Scrub Cap For Long Hair Printable Pattern and DIY Tutorial
•
16 likes•51,556 views

Custom made scrub caps for surgeons is a REALLY big deal! https://etsy.me/2XJGbTt Scrub Cap For Long Hair printable pattern comes in PDF format and prints on letter size (8.5" x 11") and A4 paper. You will get a PDF with instructions and pictures, and a link to video instructions. Make sure you check the right paper size and your printer settings (100% scale of image in particular) when you are about to send the file to printer. If you don't have these capabilities on your home printer, take the file to the nearest copy/print service location (here in US it is FedEx/Kinkos and office supplies stores) and they will help you to print them out.

Recommended
Recommended
More Related Content
Similar to Scrub Cap For Long Hair Printable Pattern and DIY Tutorial
Similar to Scrub Cap For Long Hair Printable Pattern and DIY Tutorial (20)
Recently uploaded
Recently uploaded (20)
Scrub Cap For Long Hair Printable Pattern and DIY Tutorial
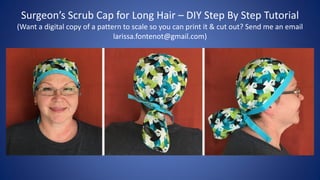
- 1. Surgeon’s Scrub Cap for Long Hair – DIY Step By Step Tutorial (Want a digital copy of a pattern to scale so you can print it & cut out? Send me an email larissa.fontenot@gmail.com)
- 4. You will need: Paper to make the pattern – all measurements are in inches 22 inches of cotton fabric – standard 44 inch width 3 inches of elastic braided tape 39 inches of ribbon or bias tape Thread of color matching one of your fabric colors Please wash, dry and iron fabric before you start cutting – it will shrink
- 5. Make Your Paper Pattern Using Measurements In Inches 1. Side of Cap: 11 & 6/8” wide 4 and 1/8” high 1” narrow end for the back at 7” tapering toward narrow end starts 2. Top of Cap: 16 & ½” wide 7 & ½” high Ponytail pouch part of top of cap is 7” wide and 5 & 3/8” high 3. Back Side of Ponytail Pouch: 7” wide and 5 & 3/8” high 4. Casing for Elastic Band: 11 & 1/2” wide and 1” high 1 3 2 4
- 6. 2. Place short side of cap (center that will cover forehead) pattern on fold in fabric 1. Fold fabric along this edge You need 2 layers of fabric ONLY for side of cap You need ONLY 1 layer of fabric for: - top of cap - back side of ponytail pouch - 1” x 10” casing for elastic tape
- 7. This is how your cut out pieces of scrub cap should look like. Note that side part of the cap is the longest piece at the top of your screen – once you unfold the fabric.
- 8. Red arrows show stress points of the scrub cap that need to be reinforced To do that you need to fold fabric using hot iron, and stitch it through using zigzag pattern using the following steps.
- 9. Here are steps to follow after you cut the fabric: On the wrong side of side part mark spots where you will fold fabric using hot iron on back ends of side part of the cap - I marked them by pins with yellow balls. The mark is about 1 and ½” from narrow edge 1.5”
- 10. Using hot iron fold about 1/4” starting from narrow edge at the back of side part of scrub cap toward a pin. At the pins fabric fold should end. 1/4”
- 11. This is how back ends of side part of scrub cap should look like after you apply zigzag stitch to secure fabric folds you created in the previous step.
- 12. On the wrong side of top part of the cap mark places where you will start fabric folds 1” to the left and to the right from the point where you will later attach ponytail pouch. I put pins with yellow balls in those spots. Now fold fabric using hot iron. 7” 1/4” 1/4”
- 13. This is how sides of top part of your scrub cap should look like after you apply zigzag stitch to secure fabric folds you created in the previous step.
- 14. The next step is folding fabric at the top of back part of ponytail pouch using hot iron. Red arrows point at the fold in the fabric. 1/4”
- 15. Place back part of ponytail pouch right side to right side of top part of your scrub cap with corners of back side of ponytail pouch overlapping top part of scrub cap about ¼”. Start straight stitch at one of pins with yellow ball 3/8” from the edge of fabric and finish at the other pin with yellow ball. 3/8” 1/4”
- 16. Use zigzag stitch to secure edges of ponytail pouch where you just applied straight stitch to give that side of pouch finished look.
- 17. The next step is folding 1/4” of fabric on all 4 sides of 1” wide 11” long piece of fabric to make a casing for elastic tape
- 18. In this step prepare a spot for elastic tape casing by ironing down the seam between top part of cap and back side of ponytail pouch, in a way that top part of cap stays flat, but back side of ponytail pouch is folded away to the other side of the seam (up in this image).
- 19. Now flip the top part of cap wrong side up. You have already prepared the future casing for elastic tap, it will go along the free edge of back side of ponytail pouch, and across top part of cap, just like you see in the next image
- 20. Long side of elastic tape casing should be flush with the edge of ponytail pouch (top side of image) and right at the mark on top part you made before enforcing stress points where you see a purple arrow on this image. Short ends of the casing should be ¼” away from edges of top side of cap and back side of ponytail pouch. 7” 1/4” 1/4”
- 21. Use pins to secure elastic tape casing in place before stitching through the edges of the casing. On this image you see that I used pins with yellow balls to secure the casing.
- 22. Use zigzag stitch to secure each long side of casing to the top part of cap and back part of ponytail pouch with two separate seams. Leave short ends of casing open, you will thread elastic tape through it at the last step of making this scrub cap.
- 23. In this step fold back side of ponytail pouch at the seam you’ve made a couple of steps prior (blue arrow), making sure that free edges of top side of cap and back side of ponytail pouch meet, while the edge with elastic tape casing is ¼”is visible from under top side of cap – I marked it by red arrow.
- 24. The next steps already done here are: 1. Finish straight stitch connecting back and front sides of ponytail pouch together (purple arrow). Very important – straight stitch should not run across short ends of elastic tape casing, they should be free (red arrow). 2. Use zigzag stitch to secure edges of front and back sides together (blue arrow).
- 25. Safety pin should easily fit from both ends of elastic tape casing like you see in the left and right images. I simply wanted you to see exactly how it would look on your scrub cap when casing is stitched to the cap properly and the straight seam connecting back and front sides of ponytail pouch does not run over the casing.
- 26. 1. Find middle of side part of scrub cap (red arrow) 2. Find middle of top part of scrub cap (red arrow) 3. Put these two parts together right sides toward one another, connecting middles and ends of side part of cap (blue arrows) ½” from ends of side part narrow ends with spots on top part of cap where casing for elastic tape is stitched to the top part of cap (purple arrows) 1/2”
- 27. In this image middles are connected by a pin with big red ball (red arrow) and ends of side part of cap are connected to the top part of cap by pins with big green balls (blue arrows). Pin the rest of side part to the top part of the cap together with ½” between the pins.
- 28. This is how two parts pinned together look on the other side
- 29. Stitch top part and side part of cap together starting at one of pins with big green ball toward the pin in the middle (with big red ball). The seam should be at ½” from the edge of fabric.
- 30. Finish stitching the two parts together at the pin with big green ball – ¼” from the zigzag stitch enforced edge.
- 31. After you stitched together top and side of cap, make zigzag seam to connect edges for clean look and cap durability.
- 32. This is the clean look your scrub cap should have after edges of connected top and side parts are stitched together by a zigzag stitch.
- 33. The next step is preparing ribbon to finish the cap. Fold ribbon in half length wise, use hot iron to iron it down, and iron both short ends down as well.
- 34. Find middle of ribbon and side part of cap, pin them together with edge of side part of cap being at the fold in the ribbon. Pins with big green balls in the image secure short ends of side part of cap to the ribbon at the edge of casing for elastic tape.
- 35. 1. Fold ribbon edge to edge and start connecting sides of ribbon together using straight stitch for one of the ends. 2. Continue your stitch making sure that it goes through both – top and bottom side of ribbon. 3. Finish stitching ribbon together at the other end of ribbon. 1 2 3
- 36. This is how your scrub cap will look like once you attach the ribbon which trims the bottom of side part of it, and free ends form ties you will use to make it fit tight on your head
- 37. Attach small safety pins to both ends of 3” long elastic tape before you thread it through the casing.
- 38. Insert one of the safety pins into the casing and thread it till it reaches the other end of the casing. The second safety pin will help you either keep the other end of elastic tape just outside of there you started the threading, or catch it if it disappears inside the casing. When the first safety pin is out of the casing at the other end of it, pull both ends of elastic tape at the same time so about 1 and ½ inch of it is out of the casing and remove safety pins.
- 39. 1. Place ends of elastic tape one over the other so they overlap about ½” 2. Use zigzag stitch to secure elastic tape ends together 3. Your elastic tape is now fixed together and you can pull the casing so your elastic tape is completely inside it. Turn ponytail pouch out to the right side. 1 2 3
- 40. Congratulations! This is your finished cap – this is how your cap looks from the front and back with ribbon ends free and tied together.
- 42. Surgeon’s Scrub Cap for Long Hair – DIY Step By Step Tutorial (Want a digital copy of a pattern to scale so you can print it & cut out? Send me an email larissa.fontenot@gmail.com)