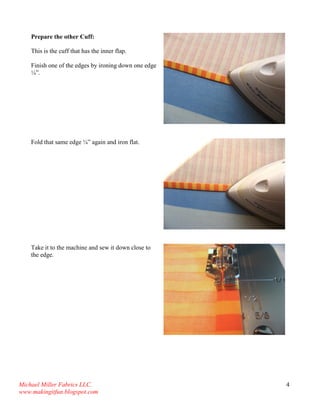
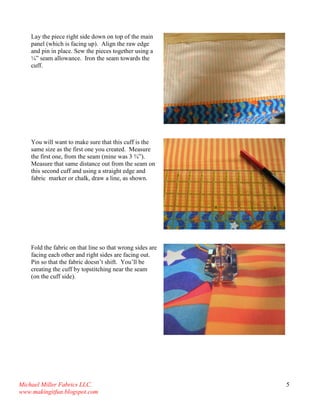
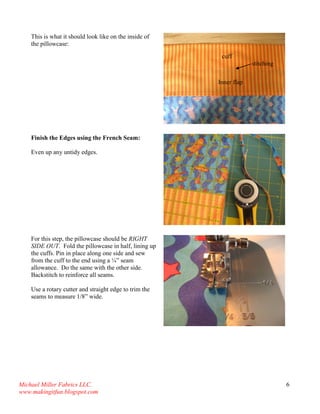
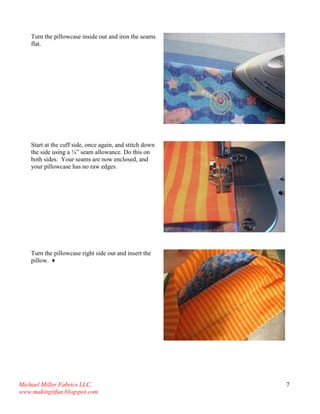
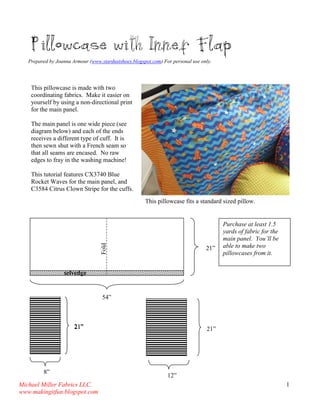
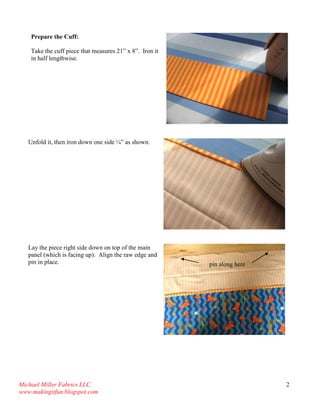
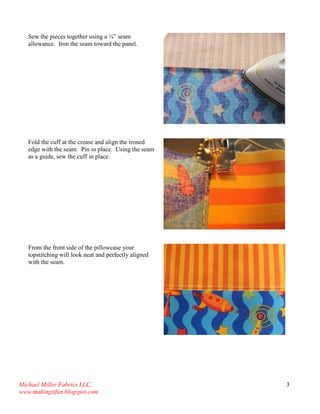
This document provides instructions for making a pillowcase with an inner flap using two coordinating fabrics. The main panel is made from a single piece of fabric that is at least 1.5 yards. It has cuffs sewn on each end, with one cuff having an inner flap. All seams are enclosed using a French seam to prevent raveling. Detailed steps are provided for cutting and sewing the pieces together to complete the pillowcase.
Scrub Cap For Long Hair Printable Pattern and DIY TutorialLarissa Fontenot
Custom made scrub caps for surgeons is a REALLY big deal! https://etsy.me/2XJGbTt
Scrub Cap For Long Hair printable pattern comes in PDF format and prints on letter size (8.5" x 11") and A4 paper. You will get a PDF with instructions and pictures, and a link to video instructions.
Make sure you check the right paper size and your printer settings (100% scale of image in particular) when you are about to send the file to printer. If you don't have these capabilities on your home printer, take the file to the nearest copy/print service location (here in US it is FedEx/Kinkos and office supplies stores) and they will help you to print them out.
Scrub Caps Printable Pattern and How To DIY Tutorial (version 2) - Learn To S...Larissa Fontenot
Want a digital copy of the pattern to scale so you can print it and cut out? Send an email - larissa.fontenot@gmail.com or get it on https://Etsy.me/2AFBiOZ
Scrub caps if they are custom made are a huge deal for surgeons. So as my daughter was about to start general surgery residency, she asked me if I could make a custom scrub cap for her - I used to sew for people for 20 years back in Russia. I still love to sew, I am creative like that. So I went searching on the internet to find a pattern to make a scrub cap she wanted: really tight fit, with elastic band in the back and, of course, I know she is going to pull on those ties, so seams might break. That's where zigzag stitch comes in handy.
I found bits and pieces online, and made up my own pattern. Decided to create a video tutorial too. Enjoy making scrub caps for your surgeon!
This tutorial is suggesting to make a mask out of medical material, which is suitable for medical workers in direct contact with Coronavirus patients. A mask made of regular cotton fabric is sufficient for general public as protection against bigger particles, like droplets when someone sneezes close to you. I made one for myself and it stays on the nose without sliding off. Very easy to sew one too.
Scrub Caps Printable Pattern and How To DIY Tutorial Teaching You How To Sew ...Larissa Fontenot
Want a digital copy of the pattern to scale so you can print it and cut out? Send me an email - larissa.fontenot@gmail.com or get it here: https://etsy.me/2UJQrHR
Watch me make this scrub cap from start to finish! https://youtu.be/gc2cxrAx1mA
Scrub caps if they are custom made are a huge deal for surgeons. So as my daughter was about to start general surgery residency, she asked me if I could make a custom scrub cap for her - I used to sew for people for 20 years back in Russia. I still love to sew, I am creative like that. So I went searching on the internet to find a pattern to make a scrub cap she wanted: really tight fit, with elastic band in the back and, of course, I know she is going to pull on those ties, so seams might break. That's where zigzag stitch comes in handy.
I found bits and pieces online, and made up my own pattern. Decided to create a video tutorial too. Enjoy making scrub caps for your surgeon!
The perfect pretty little skirt.
A subtle ruffle hem and a simple elastic waistband make this skirt a sweet and easy project.
It's multi-sized, with no pattern pieces. Just fill out the simple worksheet to measure, calculate, and cut.
Choose your favorite fabric and have fun sewing!
Got jewelry? Keep your adornments orderly and in clear view with this simple to-sew hanging coordinator. What about making one for sewing accessories, as well? A young lady can never be overly organized!
Molds and sewing instructions for the most common baby clothes, like playsuit, dress shirts, overol, tailores moldes pants, elastic waist pants, fitting bodice patterns and hooded sweatshirt sleeveless for child, hooded sweatshirt sleeveless pattern,
Để xem full tài liệu Xin vui long liên hệ page để được hỗ trợ
: https://www.facebook.com/thuvienluanvan01
HOẶC
https://www.facebook.com/garmentspace/
https://www.facebook.com/thuvienluanvan01
tai lieu tong hop, thu vien luan van, luan van tong hop, do an chuyen nganh
41 fabric manipulation tutorials
Từ khóa tìm kiếm tài liệu :
Nhận biết và phân biệt các loại vải, cotton, chiffon, silk, wool
Từ khóa tìm kiếm tài liệu :
CÁCH MAY – QUY CÁCH LẮP RÁP – QUY CÁCH ĐÁNH SỐ
TÀI LIỆU KỸ THUẬT NGÀNH MAY –TIÊU CHUẨN KỸ THUẬT – QUY CÁCH ĐÁNH SỐ - QUY CÁCH LẮP RÁP – QUY CÁCH MAY – QUY TRÌNH MAY – GẤP XẾP ĐÓNG GÓI – GIÁC SƠ ĐỒ MÃ HÀNG - Công nghệ may,kỹ thuật may dây kéo đồ án công nghệ may, công nghệ may trang phục, thiết kế trang phục, anh văn chuyên ngành may, thiết bị may công nghiệp,ngành may,báo cáo thực tập ngành may, từ điển chuyên ngành may, thiết kế trang phục 1, thiết kế trang phục thể thao, nguyên phụ liệu ngành may,vest, một số sai hỏng thường gặp ở sản phẩm may công nghiệp, quy trình may, tài liệu kỹ thuật, hình vẽ mô tả mẫu áo jacket, giác sơ đồ, giáo trình công nghệ may 3 – võ phước tấn – đại học công nghiệp tp.hcm,sách tiếng anh ngành may, sách hay ngành may,công nghệ may trang phục 1, công nghệ may tran phục 2, khoa công nghệ may và thời trang, trường đại học sư phạm kỹ thuật thành phố hồ chí minh,kỹ thuật may căn bản, quản lý đơn hàng ngành may,giáo trình thiết kế trang phục 5, thiết kế dây chuyền may, cân bằng chuyền, thiết kế đầm váy, cắt may căn bản, cắt may toàn tập, TÀI LIỆU KỸ THUẬT NGÀNH MAY, TECH PACK, QC CHUYỀN MAY, CHỨC NĂNG TỔ TRƯỞNG CHUYỀN MAY,hướng dẫn gấp xếp, đóng gói sản phẩm may,mẫu pre-production, giáo trình thiết bị trong công nghiệp may, cân bằng chuyền, mẫu trước sản xuất, ĐỒ ÁN CÔNG NGHỆ MAY, BÁO CÁO THỰC TẬP CÔNG NGHỆ MAY, may công nghiệp, quản lý sản xuất, vị trí công việc ngành may, Plat sketch, dictionary for fashion, textile, cottton, congnghemay.net ENGLISH FOR GARMENT TECHNOLOGY, Atlas.of.fashion.designers.bd, một số loại chuyền may, cơ sở sản xuất may công nghiệp,công nghệ may trang phục 1, lập kế hoạch sản xuất, giáo trình công nghệ may 2, vật liệu may trần thủy bình, công nghệ may trang phục 2, giáo trình công nghệ may 2 đại học công nghiệp tp.hcm – võ phước tấn, Fashion illustration for designers, công nghệ may 4 võ phước tấn, giáo trình thiết kế trang phục 1 võ phước tấn đại học công nghiệp,giáo trình thiết kế trang phục 2 võ phước tấn đại học công
The perfect type of quilt to practice your quilting skills:
machine quilting, appliqué and piecing – the quilting possibilities are endless! This Project Tip Sheet will help get you started on a fun quilting journey.
Explore the multifaceted world of Muntadher Saleh, an Iraqi polymath renowned for his expertise in visual art, writing, design, and pharmacy. This SlideShare delves into his innovative contributions across various disciplines, showcasing his unique ability to blend traditional themes with modern aesthetics. Learn about his impactful artworks, thought-provoking literary pieces, and his vision as a Neo-Pop artist dedicated to raising awareness about Iraq's cultural heritage. Discover why Muntadher Saleh is celebrated as "The Last Polymath" and how his multidisciplinary talents continue to inspire and influence.
2137ad - Characters that live in Merindol and are at the center of main storiesluforfor
Kurgan is a russian expatriate that is secretly in love with Sonia Contado. Henry is a british soldier that took refuge in Merindol Colony in 2137ad. He is the lover of Sonia Contado.
2137ad Merindol Colony Interiors where refugee try to build a seemengly norm...luforfor
This are the interiors of the Merindol Colony in 2137ad after the Climate Change Collapse and the Apocalipse Wars. Merindol is a small Colony in the Italian Alps where there are around 4000 humans. The Colony values mainly around meritocracy and selection by effort.
Hadj Ounis's most notable work is his sculpture titled "Metamorphosis." This piece showcases Ounis's mastery of form and texture, as he seamlessly combines metal and wood to create a dynamic and visually striking composition. The juxtaposition of the two materials creates a sense of tension and harmony, inviting viewers to contemplate the relationship between nature and industry.
1. Michael Miller Fabrics LLC.
www.makingitfun.blogspot.com
1
Pillowcase with Inner Flap
Prepared by Joanna Armour (www.stardustshoes.blogspot.com) For personal use only.
This pillowcase is made with two coordinating fabrics. Make it easier on yourself by using a non-directional print for the main panel.
The main panel is one wide piece (see diagram below) and each of the ends receives a different type of cuff. It is then sewn shut with a French seam so that all seams are encased. No raw edges to fray in the washing machine!
This tutorial features CX3740 Blue Rocket Waves for the main panel, and
C3584 Citrus Clown Stripe for the cuffs.
21”
54”
selvedge
21”
8”
21”
12”
Purchase at least 1.5 yards of fabric for the main panel. You’ll be able to make two pillowcases from it.
Fold
This pillowcase fits a standard sized pillow.
2. Michael Miller Fabrics LLC.
www.makingitfun.blogspot.com
2
Prepare the Cuff:
Take the cuff piece that measures 21” x 8”. Iron it in half lengthwise.
Unfold it, then iron down one side ¼” as shown.
Lay the piece right side down on top of the main panel (which is facing up). Align the raw edge and pin in place.
pin along here
3. Michael Miller Fabrics LLC.
www.makingitfun.blogspot.com
3
Sew the pieces together using a ¼” seam allowance. Iron the seam toward the panel.
Fold the cuff at the crease and align the ironed edge with the seam. Pin in place. Using the seam as a guide, sew the cuff in place.
From the front side of the pillowcase your topstitching will look neat and perfectly aligned with the seam.
4. Michael Miller Fabrics LLC.
www.makingitfun.blogspot.com
4
Prepare the other Cuff:
This is the cuff that has the inner flap.
Finish one of the edges by ironing down one edge ¼”.
Fold that same edge ¼” again and iron flat.
Take it to the machine and sew it down close to the edge.
5. Michael Miller Fabrics LLC.
www.makingitfun.blogspot.com
5
Lay the piece right side down on top of the main panel (which is facing up). Align the raw edge and pin in place. Sew the pieces together using a ¼” seam allowance. Iron the seam towards the cuff.
You will want to make sure that this cuff is the same size as the first one you created. Measure the first one, from the seam (mine was 3 ¾”). Measure that same distance out from the seam on this second cuff and using a straight edge and fabric marker or chalk, draw a line, as shown.
Fold the fabric on that line so that wrong sides are facing each other and right sides are facing out. Pin so that the fabric doesn’t shift. You’ll be creating the cuff by topstitching near the seam (on the cuff side).
6. Michael Miller Fabrics LLC.
www.makingitfun.blogspot.com
6
This is what it should look like on the inside of the pillowcase:
Finish the Edges using the French Seam:
Even up any untidy edges.
For this step, the pillowcase should be RIGHT SIDE OUT. Fold the pillowcase in half, lining up the cuffs. Pin in place along one side and sew from the cuff to the end using a ¼” seam allowance. Do the same with the other side. Backstitch to reinforce all seams.
Use a rotary cutter and straight edge to trim the seams to measure 1/8” wide.
Inner flap
cuff
stitching
7. Michael Miller Fabrics LLC.
www.makingitfun.blogspot.com
7
Turn the pillowcase inside out and iron the seams flat.
Start at the cuff side, once again, and stitch down the side using a ¼” seam allowance. Do this on both sides. Your seams are now enclosed, and your pillowcase has no raw edges.
Turn the pillowcase right side out and insert the pillow. ♦