This tutorial is suggesting to make a mask out of medical material, which is suitable for medical workers in direct contact with Coronavirus patients. A mask made of regular cotton fabric is sufficient for general public as protection against bigger particles, like droplets when someone sneezes close to you. I made one for myself and it stays on the nose without sliding off. Very easy to sew one too.
Scrub Cap For Long Hair Printable Pattern and DIY TutorialLarissa Fontenot
Custom made scrub caps for surgeons is a REALLY big deal! https://etsy.me/2XJGbTt
Scrub Cap For Long Hair printable pattern comes in PDF format and prints on letter size (8.5" x 11") and A4 paper. You will get a PDF with instructions and pictures, and a link to video instructions.
Make sure you check the right paper size and your printer settings (100% scale of image in particular) when you are about to send the file to printer. If you don't have these capabilities on your home printer, take the file to the nearest copy/print service location (here in US it is FedEx/Kinkos and office supplies stores) and they will help you to print them out.
Scrub Caps Printable Pattern and How To DIY Tutorial (version 2) - Learn To S...Larissa Fontenot
Want a digital copy of the pattern to scale so you can print it and cut out? Send an email - larissa.fontenot@gmail.com or get it on https://Etsy.me/2AFBiOZ
Scrub caps if they are custom made are a huge deal for surgeons. So as my daughter was about to start general surgery residency, she asked me if I could make a custom scrub cap for her - I used to sew for people for 20 years back in Russia. I still love to sew, I am creative like that. So I went searching on the internet to find a pattern to make a scrub cap she wanted: really tight fit, with elastic band in the back and, of course, I know she is going to pull on those ties, so seams might break. That's where zigzag stitch comes in handy.
I found bits and pieces online, and made up my own pattern. Decided to create a video tutorial too. Enjoy making scrub caps for your surgeon!
Scrub Caps Printable Pattern and How To DIY Tutorial Teaching You How To Sew ...Larissa Fontenot
Want a digital copy of the pattern to scale so you can print it and cut out? Send me an email - larissa.fontenot@gmail.com or get it here: https://etsy.me/2UJQrHR
Watch me make this scrub cap from start to finish! https://youtu.be/gc2cxrAx1mA
Scrub caps if they are custom made are a huge deal for surgeons. So as my daughter was about to start general surgery residency, she asked me if I could make a custom scrub cap for her - I used to sew for people for 20 years back in Russia. I still love to sew, I am creative like that. So I went searching on the internet to find a pattern to make a scrub cap she wanted: really tight fit, with elastic band in the back and, of course, I know she is going to pull on those ties, so seams might break. That's where zigzag stitch comes in handy.
I found bits and pieces online, and made up my own pattern. Decided to create a video tutorial too. Enjoy making scrub caps for your surgeon!
This slide presentation is very much useful to Apparel tech &Fashion design students studying in U.G &P.G.Degree courses.My sincere thanks&courtesy to textile apex.blogspot.com
fullness in garment ( tuck dart pleats etc)Ragu Nathan
Sewing. to make full, as by gathering or pleating. to bring (the cloth) on one side of a seam to a little greater fullness than on the other by gathering or tucking very slightly.
Guide to all the basic hand stitches for embroideries with procedure.
In this presentation all the basic hand stitches have been described for beginners.
Stitches like running stitch, chain stitch, fly stitch, blanket stitch, shadow stitch, back stitch, etc have been added which in turn can also be used in a variety of traditional hand embroideries.
I use this presentation for my lecture on basic hand stitches. With this presentation i have tried to make thing less complicated. please share your reviews.
Sharing is the new way of Learning.
WHEN FINISHING THE NECKLINE EDGE OF A GARMENT, THE DESIGNER CAN CHOOSE TO ATTACH A COLLAR. THE SLIDES HIGHLIGHTS ON THE TYPES OF COLLARS AND HOW TO ATTACH THEM.
Finger food sajian camilan untuk si kecilAdiska Putri
Untuk mencegah buah hati Ibu jajan sembarangan, sediakan saja finger food sebelum Ibu bergegas untuk pergi keluar rumah.
Sumber : http://www.blueband.co.id/
Building a relationship with your customer without trying to sell to them may seem counter intuitive. But by consistently delivering relevant, engaging, and valuable information to your target market, you're developing trust and positioning your company for when they're ready to buy.
In my experience, it does not make sense to pay advertising dollars to get customers because the cost of a customer acquisition is never lower than the price of the app. What's more, there are many ways out there to promote your app for free. Here are 25 of your most creative options:
May túi đựng máy may(English), hướng dẫn may túi rất đẹp, tiện dụng để đựng đồ, máy may.
Tham gia fanspage: http://facebook.com/maymaymininhat
Mua máy may mini gia đình tại : http://muangay123.com/may-khau
This is a tutorial that covers making moccasins. I learned this while working at Fort William Historical Park in Thunder Bay, ON. This tutorial is transcribed from the one I learned from and IS NOT of my creation. I just made it into a more shareable format.
Để xem full tài liệu Xin vui long liên hệ page để được hỗ trợ
: https://www.facebook.com/thuvienluanvan01
HOẶC
https://www.facebook.com/garmentspace/
https://www.facebook.com/thuvienluanvan01
tai lieu tong hop, thu vien luan van, luan van tong hop, do an chuyen nganh
41 fabric manipulation tutorials
Từ khóa tìm kiếm tài liệu :
Nhận biết và phân biệt các loại vải, cotton, chiffon, silk, wool
Từ khóa tìm kiếm tài liệu :
CÁCH MAY – QUY CÁCH LẮP RÁP – QUY CÁCH ĐÁNH SỐ
TÀI LIỆU KỸ THUẬT NGÀNH MAY –TIÊU CHUẨN KỸ THUẬT – QUY CÁCH ĐÁNH SỐ - QUY CÁCH LẮP RÁP – QUY CÁCH MAY – QUY TRÌNH MAY – GẤP XẾP ĐÓNG GÓI – GIÁC SƠ ĐỒ MÃ HÀNG - Công nghệ may,kỹ thuật may dây kéo đồ án công nghệ may, công nghệ may trang phục, thiết kế trang phục, anh văn chuyên ngành may, thiết bị may công nghiệp,ngành may,báo cáo thực tập ngành may, từ điển chuyên ngành may, thiết kế trang phục 1, thiết kế trang phục thể thao, nguyên phụ liệu ngành may,vest, một số sai hỏng thường gặp ở sản phẩm may công nghiệp, quy trình may, tài liệu kỹ thuật, hình vẽ mô tả mẫu áo jacket, giác sơ đồ, giáo trình công nghệ may 3 – võ phước tấn – đại học công nghiệp tp.hcm,sách tiếng anh ngành may, sách hay ngành may,công nghệ may trang phục 1, công nghệ may tran phục 2, khoa công nghệ may và thời trang, trường đại học sư phạm kỹ thuật thành phố hồ chí minh,kỹ thuật may căn bản, quản lý đơn hàng ngành may,giáo trình thiết kế trang phục 5, thiết kế dây chuyền may, cân bằng chuyền, thiết kế đầm váy, cắt may căn bản, cắt may toàn tập, TÀI LIỆU KỸ THUẬT NGÀNH MAY, TECH PACK, QC CHUYỀN MAY, CHỨC NĂNG TỔ TRƯỞNG CHUYỀN MAY,hướng dẫn gấp xếp, đóng gói sản phẩm may,mẫu pre-production, giáo trình thiết bị trong công nghiệp may, cân bằng chuyền, mẫu trước sản xuất, ĐỒ ÁN CÔNG NGHỆ MAY, BÁO CÁO THỰC TẬP CÔNG NGHỆ MAY, may công nghiệp, quản lý sản xuất, vị trí công việc ngành may, Plat sketch, dictionary for fashion, textile, cottton, congnghemay.net ENGLISH FOR GARMENT TECHNOLOGY, Atlas.of.fashion.designers.bd, một số loại chuyền may, cơ sở sản xuất may công nghiệp,công nghệ may trang phục 1, lập kế hoạch sản xuất, giáo trình công nghệ may 2, vật liệu may trần thủy bình, công nghệ may trang phục 2, giáo trình công nghệ may 2 đại học công nghiệp tp.hcm – võ phước tấn, Fashion illustration for designers, công nghệ may 4 võ phước tấn, giáo trình thiết kế trang phục 1 võ phước tấn đại học công nghiệp,giáo trình thiết kế trang phục 2 võ phước tấn đại học công
Learn how to make your own Clothing Patterns
How to make a Sewing Pattern from Existing Clothing
How to Sew by Hand
Sewing Machine Tutorial
how to make a Pleated Skirts and Dresses
How to make a Halter Dress
How to make an Elsa Dress
How to make a T-Shirt in 5 easy steps
How to make Women’s Fashion Pants
How to make a Kimono
How to make a Jumpsuit
Basic Information Steps and Youtube Tutorials
Book Formatting: Quality Control Checks for DesignersConfidence Ago
This presentation was made to help designers who work in publishing houses or format books for printing ensure quality.
Quality control is vital to every industry. This is why every department in a company need create a method they use in ensuring quality. This, perhaps, will not only improve the quality of products and bring errors to the barest minimum, but take it to a near perfect finish.
It is beyond a moot point that a good book will somewhat be judged by its cover, but the content of the book remains king. No matter how beautiful the cover, if the quality of writing or presentation is off, that will be a reason for readers not to come back to the book or recommend it.
So, this presentation points designers to some important things that may be missed by an editor that they could eventually discover and call the attention of the editor.
White wonder, Work developed by Eva TschoppMansi Shah
White Wonder by Eva Tschopp
A tale about our culture around the use of fertilizers and pesticides visiting small farms around Ahmedabad in Matar and Shilaj.
Dive into the innovative world of smart garages with our insightful presentation, "Exploring the Future of Smart Garages." This comprehensive guide covers the latest advancements in garage technology, including automated systems, smart security features, energy efficiency solutions, and seamless integration with smart home ecosystems. Learn how these technologies are transforming traditional garages into high-tech, efficient spaces that enhance convenience, safety, and sustainability.
Ideal for homeowners, tech enthusiasts, and industry professionals, this presentation provides valuable insights into the trends, benefits, and future developments in smart garage technology. Stay ahead of the curve with our expert analysis and practical tips on implementing smart garage solutions.
Transforming Brand Perception and Boosting Profitabilityaaryangarg12
In today's digital era, the dynamics of brand perception, consumer behavior, and profitability have been profoundly reshaped by the synergy of branding, social media, and website design. This research paper investigates the transformative power of these elements in influencing how individuals perceive brands and products and how this transformation can be harnessed to drive sales and profitability for businesses.
Through an exploration of brand psychology and consumer behavior, this study sheds light on the intricate ways in which effective branding strategies, strategic social media engagement, and user-centric website design contribute to altering consumers' perceptions. We delve into the principles that underlie successful brand transformations, examining how visual identity, messaging, and storytelling can captivate and resonate with target audiences.
Methodologically, this research employs a comprehensive approach, combining qualitative and quantitative analyses. Real-world case studies illustrate the impact of branding, social media campaigns, and website redesigns on consumer perception, sales figures, and profitability. We assess the various metrics, including brand awareness, customer engagement, conversion rates, and revenue growth, to measure the effectiveness of these strategies.
The results underscore the pivotal role of cohesive branding, social media influence, and website usability in shaping positive brand perceptions, influencing consumer decisions, and ultimately bolstering sales and profitability. This paper provides actionable insights and strategic recommendations for businesses seeking to leverage branding, social media, and website design as potent tools to enhance their market position and financial success.
7 Alternatives to Bullet Points in PowerPointAlvis Oh
So you tried all the ways to beautify your bullet points on your pitch deck but it just got way uglier. These points are supposed to be memorable and leave a lasting impression on your audience. With these tips, you'll no longer have to spend so much time thinking how you should present your pointers.
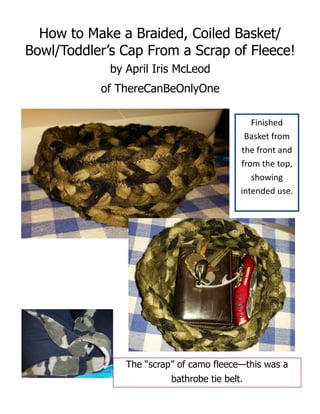
1. How to Make a Braided, Coiled Basket/
Bowl/Toddler’s Cap From a Scrap of Fleece!
by April Iris McLeod
of ThereCanBeOnlyOne
Finished
Basket from
the front and
from the top,
showing
intended use.
The “scrap” of camo fleece—this was a
bathrobe tie belt.
2. This project was inspired by the talented sewists in a FB
group about sewing! I saw some very beautiful examples
of coiled rope baskets made by the talented group
members. They used cotton clothesline and a zigzag
stitch. I needed a project to upcycle a piece of camo
fleece. This was a tie belt from a bathrobe. I got just the
belt (no robe) from a box of fabric at a yard sale. The
other fabric in the pattern is a scrap of camo from my old
Air Force BDUs. I made an ottoman for my son for
Christmas and covered it with BDU camo and have some
left over. Here is a picture of the ottoman:
Here is the scrap of camo I used
on the bottom of the basket.
NOTE: The photographs in this
tutorial were taken by me, with
my camera phone under various
lighting conditions—sorry for the
variation in colors!
3. So, I took all the stitching out of the bathrobe belt—I was left with a piece of
fabric approx. 7 feet by 4 3/4 inches. I cut it in half lengthwise, giving me
two pieces 7 feet by 2 3/8 inches. I then cut those two pieces into thirds,
lengthwise, leaving 6 pieces 7 feet by .78 inches (a little over 3/4 inch.) I
sewed the short ends of three pieces to three other pieces, giving me 3
pieces 14 feet long by .78 inches wide to braid. (The reason for the unusual
measurement is I was using an existing scrap and I wanted to use all of it—
you may use whatever measurements you like—this amount will give you a
basket approx. 4 inches across the bottom by 5 inches tall (of which I turned
2 inches down to make the decorative edge) the top diameter of the basket
is approx. 6 inches. Adjust your fabric accordingly.)
4. This picture shows one of the 14-foot long pieces – I had three
of these and the next step is to braid the three pieces together.
When braiding fabric, I find it easiest to sew the ends of the three
pieces together at the beginning and place the fabric strips under
a clamp of some sort—or , you may put a tack through the fabric,
into a table, etc., to hold it steady while you braid. Do not pull too
tight, but keep a steady pressure on the fabric. Your strips will
tangle on the long end while you are braiding—I find it helpful to
stop every 15-20 inches, put a safety pin through all layers,
untangle the ends, clip the edge (right by the safety pin,) then
begin again. Repeat this process until you get to the end. The
following pictures show these steps.
5. I ended up with approx. 11 feet of braided fleece. Your measurement
may be different, depending on your fabric and how tight your braid is.
Next, I took the fabric to my machine. I used an inexpensive Brother 21-
stitch machine. I used a number 14 universal needle and a stitch length of
3.5. The first step on the machine was to sew across both ends,
backstitching and stitching a couple of times to secure the ends. Next, I
began making the “coil” by folding about 1 1/2 inches of the braid next to
the end of the braid as shown in the first pic below, then using a wide
zigzag stitch, I began stitching the braid together. I continued coiling the
braid, keeping it flat to make the base of the basket about 4 inches across.
6. When I had the base the size I wanted, I started bending the
braid upwards and pulling a little tighter as I stitched—this
started shaping the side of the basket.
At one point, I realized I needed the bulk of the basket on the other (left)
side of my needle and I was able to simply turn the basket to the other
side! Lucky Me ;-)
After the sides were about 3 inches
tall, I started loosening the outer
braid strand to make the basket go
“outward” like a cap brim (you will
see this can actually be used for a
cap—this one would make a toddler-
sized cap.) I continued to the end of
the braid—about two inches outward.
—this part becomes the “turn-down”
on the basket.
7. The next 3 pictures show the end of the braid. I pulled the last
inch diagonally across the edge of the basket. I stitched across
the end, then trimmed it close to the stitching.
Here is the basket at this point—if you stop here you have a toddler cap! It
has just enough stretch ;-) But, I wanted to make a “catch-all” basket and
I wanted to reinforce the “bottom,” so I used two circles of leftover camo
stitched together—see pics on next page.
8. Here are 2 circles of camo fabric (from my old Air Force
uniform,) cut to about 4” across. I stitched them right sides
together, turned right-side out, then stitched close to the edge.
I decided to use the “free motion” or “darning” feature of
my machine. For this machine, that meant removing the
presser foot and putting a plate on top of the feed dogs
(some machines have a button or lever to lower the feed
dogs. I wanted to experiment with this feature to attach the
camo “base” to the basket.
9. I turned the basket inside-out for ease of stitching the
base on. I placed the base in the “bottom” of this “inside-
out” basket and, holding all the layers as tight as
possible, I stitched a very random design just to make
sure it was well attached to the braided part of the
basket. At this point, you may embroider a design or
initials on the bottom, but I just did random stitches
across the circle. (Note, my machine can be used with a
regular embroidery hoop, but, in this case, there was no
room—this is the
same setup as for
darning.
The last step in
attaching the circle
was reattaching my
presser foot,
removing the darning
plate, and zigzagging
all the way around
the base. Then, turn
the basket right-side
out.
10. Here is the bottom of the basket.
I pinned the “brim” down
evenly around the outside
of the basket, then, using a
straight stitch, sewed
straight down where each
pin was.
This pattern, design, and tutorial, including all
text and images are the intellectual property of
April Iris McLeod and ThereCanBeOnlyOne. It
is freely shared for personal use, including gift-
giving. You may not use this pattern or these
instructions for monetary or other gain.