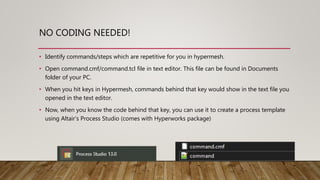
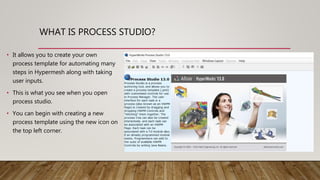
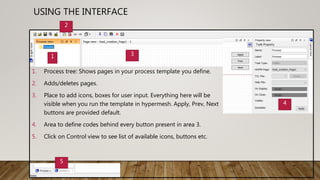
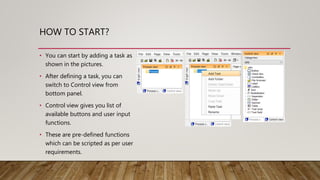
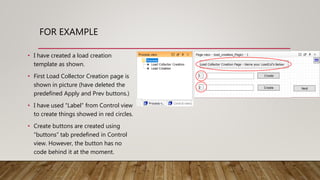
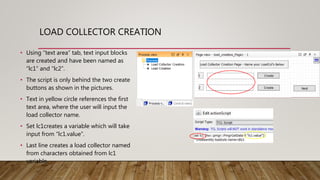
AUTOMATION IN HYPERMESH
AKSHAY MISTRI
WAYNE STATE UNIVERSITY
WHY AUTOMATE?
• Time saving.
• Minimizes chances of error.
• Intuitive process template can be created.
NO CODING NEEDED!
• Identify commands/steps which are repetitive for you in hypermesh.
• Open command.cmf/command.tcl file in text editor. This file can be found in Documents
folder of your PC.
• When you hit keys in Hypermesh, commands behind that key would show in the text file you
opened in the text editor.
• Now, when you know the code behind that key, you can use it to create a process template
using Altair’s Process Studio (comes with Hyperworks package)
WHAT IS PROCESS STUDIO?
• It allows you to create your own
process template for automating many
steps in Hypermesh along with taking
user inputs.
• This is what you see when you open
process studio.
• You can begin with creating a new
process template using the new icon on
the top left corner.
USING THE INTERFACE
1. Process tree: Shows pages in your process template you define.
2. Adds/deletes pages.
3. Place to add icons, boxes for user input. Everything here will be
visible when you run the template in hypermesh. Apply, Prev, Next
buttons are provided default.
4. Area to define codes behind every button present in area 3.
5. Click on Control view to see list of available icons, buttons etc.
1 3
4
5
2
HOW TO START?
• You can start by adding a task as
shown in the pictures.
• After defining a task, you can
switch to Control view from
bottom panel.
• Control view gives you list of
available buttons and user input
functions.
• These are pre-defined functions
which can be scripted as per user
requirements.
FOR EXAMPLE
• I have created a load creation
template as shown.
• First Load Collector Creation page is
shown in picture (have deleted the
predefined Apply and Prev buttons.)
• I have used “Label” from Control view
to create things showed in red circles.
• Create buttons are created using
“buttons” tab predefined in Control
view. However, the button has no
code behind it at the moment.
LOAD COLLECTOR CREATION
• Using “text area” tab, text input blocks
are created and have been named as
“lc1” and “lc2”.
• The script is only behind the two create
buttons as shown in the pictures.
• Text in yellow circle references the first
text area, where the user will input the
load collector name.
• Set lc1creates a variable which will take
input from “lc1.value”.
• Last line creates a load collector named
from characters obtained from lc1
variable.
LOAD CREATION
Using “Property View” enter this code
for displaying the load collector name
created on previous page.
Script behind “Set Current” button.
• “lc1.value” references the load
collector name created previously.
• Last line sets the load collector
mentioned in lc1 variable as
current.
Text area named as
“nid”.
Text areas named as “x”, “y” &
“z”.
Script behind “Create” button.
• Set command creates variables as listed above
• *createmark creates a node set with node ID being taken from “nid” text area.
• Last line creates a load on node ID “nid” with vectors mentioned in x, y and z
and magnitude “mag”.
GET THAT
TEMPLATE
HERE!

Automation in Hypermesh

  • 1.
    AUTOMATION IN HYPERMESH AKSHAYMISTRI WAYNE STATE UNIVERSITY
  • 2.
    WHY AUTOMATE? • Timesaving. • Minimizes chances of error. • Intuitive process template can be created.
  • 3.
    NO CODING NEEDED! •Identify commands/steps which are repetitive for you in hypermesh. • Open command.cmf/command.tcl file in text editor. This file can be found in Documents folder of your PC. • When you hit keys in Hypermesh, commands behind that key would show in the text file you opened in the text editor. • Now, when you know the code behind that key, you can use it to create a process template using Altair’s Process Studio (comes with Hyperworks package)
  • 4.
    WHAT IS PROCESSSTUDIO? • It allows you to create your own process template for automating many steps in Hypermesh along with taking user inputs. • This is what you see when you open process studio. • You can begin with creating a new process template using the new icon on the top left corner.
  • 5.
    USING THE INTERFACE 1.Process tree: Shows pages in your process template you define. 2. Adds/deletes pages. 3. Place to add icons, boxes for user input. Everything here will be visible when you run the template in hypermesh. Apply, Prev, Next buttons are provided default. 4. Area to define codes behind every button present in area 3. 5. Click on Control view to see list of available icons, buttons etc. 1 3 4 5 2
  • 6.
    HOW TO START? •You can start by adding a task as shown in the pictures. • After defining a task, you can switch to Control view from bottom panel. • Control view gives you list of available buttons and user input functions. • These are pre-defined functions which can be scripted as per user requirements.
  • 7.
    FOR EXAMPLE • Ihave created a load creation template as shown. • First Load Collector Creation page is shown in picture (have deleted the predefined Apply and Prev buttons.) • I have used “Label” from Control view to create things showed in red circles. • Create buttons are created using “buttons” tab predefined in Control view. However, the button has no code behind it at the moment.
  • 8.
    LOAD COLLECTOR CREATION •Using “text area” tab, text input blocks are created and have been named as “lc1” and “lc2”. • The script is only behind the two create buttons as shown in the pictures. • Text in yellow circle references the first text area, where the user will input the load collector name. • Set lc1creates a variable which will take input from “lc1.value”. • Last line creates a load collector named from characters obtained from lc1 variable.
  • 9.
    LOAD CREATION Using “PropertyView” enter this code for displaying the load collector name created on previous page. Script behind “Set Current” button. • “lc1.value” references the load collector name created previously. • Last line sets the load collector mentioned in lc1 variable as current. Text area named as “nid”. Text areas named as “x”, “y” & “z”. Script behind “Create” button. • Set command creates variables as listed above • *createmark creates a node set with node ID being taken from “nid” text area. • Last line creates a load on node ID “nid” with vectors mentioned in x, y and z and magnitude “mag”.
  • 10.