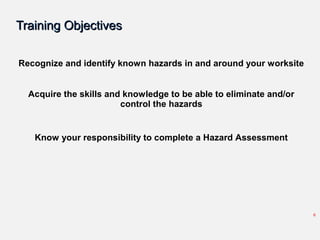
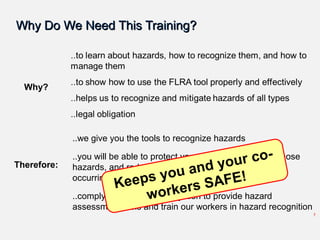
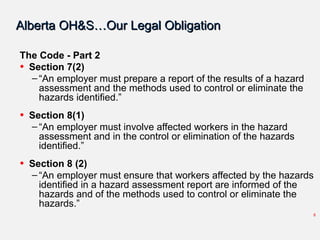
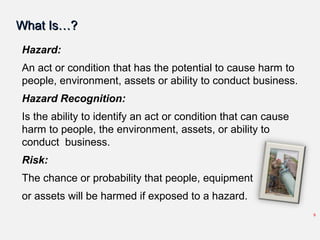
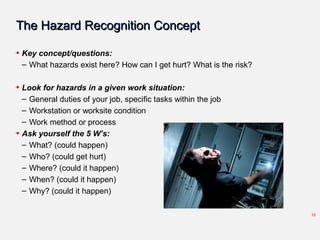
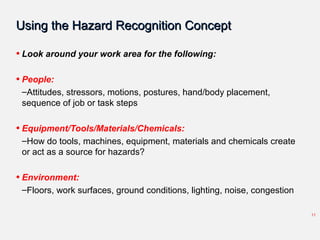
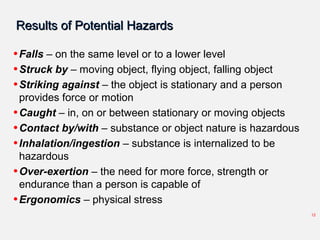
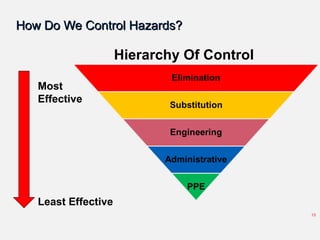
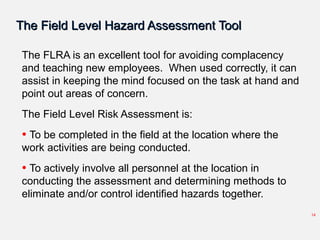
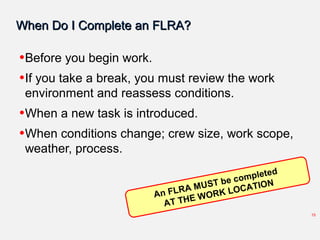
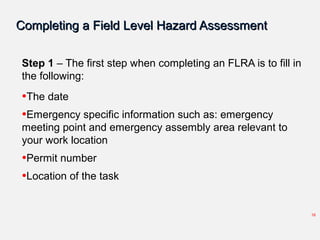
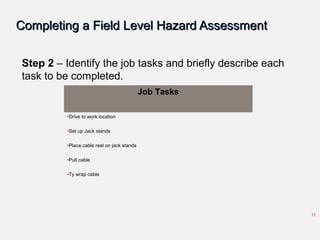
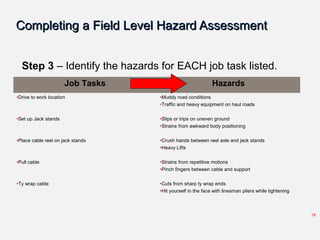
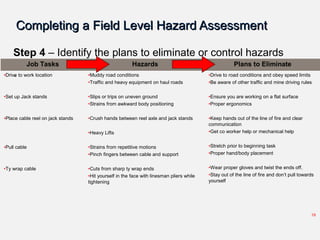
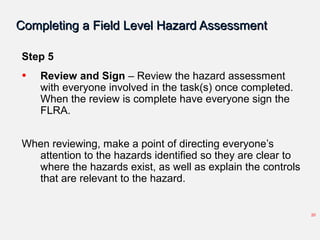
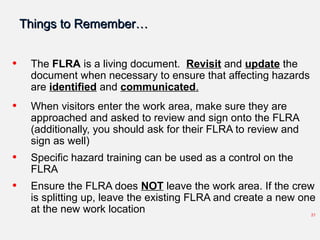
The document summarizes the safety meeting held by Archon Industries. It discusses reviewing previous safety incidents and near misses, as well as training on completing field level hazard assessments (FLHAs). The training objectives are to recognize hazards, eliminate or control risks, and understand employee responsibilities. Alberta's occupational health and safety regulations require employers to conduct hazard assessments and train workers on hazard recognition. The training teaches how to identify hazards related to people, equipment, materials and the environment. It also explains how to document hazards and control measures on an FLHA form before starting work, after breaks, or when conditions change. Employees must sign off on the FLHA to confirm they understand the identified hazards and controls.
2. Review of last shift safety meeting
Stored Energy and Line of Fire Awareness
2
3. Review Incidents, Near Miss,
Hazard ID’s (Observation)
Number of Observations: 15
Number of Hazard ID’s: 3
Number of Near Miss Reports: 0
Number of Incidents: 0
6. Training ObjectivesTraining Objectives
Recognize and identify known hazards in and around your worksite
Acquire the skills and knowledge to be able to eliminate and/or
control the hazards
Know your responsibility to complete a Hazard Assessment
6
7. Why Do We Need This Training?Why Do We Need This Training?
Why?
Therefore:
..we give you the tools to recognize hazards
..you will be able to protect yourself and others from those
hazards, and reduce the potential of an incident from
occurring
..comply with our legal obligation to provide hazard
assessment tools and train our workers in hazard recognition
Keeps you and your co-
workers SAFE!
7
8. Alberta OH&S…Our Legal ObligationAlberta OH&S…Our Legal Obligation
The Code - Part 2
• Section 7(2)
– “An employer must prepare a report of the results of a hazard
assessment and the methods used to control or eliminate the
hazards identified.”
• Section 8(1)
– “An employer must involve affected workers in the hazard
assessment and in the control or elimination of the hazards
identified.”
• Section 8 (2)
– “An employer must ensure that workers affected by the hazards
identified in a hazard assessment report are informed of the
hazards and of the methods used to control or eliminate the
hazards.”
8
9. What Is…?What Is…?
Hazard:
An act or condition that has the potential to cause harm to
people, environment, assets or ability to conduct business.
Hazard Recognition:
Is the ability to identify an act or condition that can cause
harm to people, the environment, assets, or ability to
conduct business.
Risk:
The chance or probability that people, equipment
or assets will be harmed if exposed to a hazard.
9
10. The Hazard Recognition ConceptThe Hazard Recognition Concept
• Key concept/questions:
– What hazards exist here? How can I get hurt? What is the risk?
• Look for hazards in a given work situation:
– General duties of your job, specific tasks within the job
– Workstation or worksite condition
– Work method or process
• Ask yourself the 5 W’s:
– What? (could happen)
– Who? (could get hurt)
– Where? (could it happen)
– When? (could it happen)
– Why? (could it happen)
10
11. Using the Hazard Recognition ConceptUsing the Hazard Recognition Concept
• Look around your work area for the following:
• People:
–Attitudes, stressors, motions, postures, hand/body placement,
sequence of job or task steps
• Equipment/Tools/Materials/Chemicals:
–How do tools, machines, equipment, materials and chemicals create
or act as a source for hazards?
• Environment:
–Floors, work surfaces, ground conditions, lighting, noise, congestion
11
12. Results of Potential HazardsResults of Potential Hazards
•Falls – on the same level or to a lower level
•Struck by – moving object, flying object, falling object
•Striking against – the object is stationary and a person
provides force or motion
•Caught – in, on or between stationary or moving objects
•Contact by/with – substance or object nature is hazardous
•Inhalation/ingestion – substance is internalized to be
hazardous
•Over-exertion – the need for more force, strength or
endurance than a person is capable of
•Ergonomics – physical stress
12
13. How Do We Control Hazards?How Do We Control Hazards?
13
Hierarchy Of Control
Most
Effective
Least Effective
14. The Field Level Hazard Assessment ToolThe Field Level Hazard Assessment Tool
The FLRA is an excellent tool for avoiding complacency
and teaching new employees. When used correctly, it can
assist in keeping the mind focused on the task at hand and
point out areas of concern.
The Field Level Risk Assessment is:
• To be completed in the field at the location where the
work activities are being conducted.
• To actively involve all personnel at the location in
conducting the assessment and determining methods to
eliminate and/or control identified hazards together.
14
15. When Do I Complete an FLRA?When Do I Complete an FLRA?
•Before you begin work.
•If you take a break, you must review the work
environment and reassess conditions.
•When a new task is introduced.
•When conditions change; crew size, work scope,
weather, process.
An FLRA MUST be completed
AT THE WORK LOCATION
15
16. Completing a Field Level Hazard AssessmentCompleting a Field Level Hazard Assessment
Step 1 – The first step when completing an FLRA is to fill in
the following:
•The date
•Emergency specific information such as: emergency
meeting point and emergency assembly area relevant to
your work location
•Permit number
•Location of the task
16
17. Completing a Field Level Hazard AssessmentCompleting a Field Level Hazard Assessment
Step 2 – Identify the job tasks and briefly describe each
task to be completed.
17
Job Tasks
•Drive to work location
•Set up Jack stands
•Place cable reel on jack stands
•Pull cable
•Ty wrap cable
18. Completing a Field Level Hazard AssessmentCompleting a Field Level Hazard Assessment
Step 3 – Identify the hazards for EACH job task listed.
18
Job Tasks Hazards
•Drive to work location
•Set up Jack stands
•Place cable reel on jack stands
•Pull cable
•Ty wrap cable
•Muddy road conditions
•Traffic and heavy equipment on haul roads
•Slips or trips on uneven ground
•Strains from awkward body positioning
•Crush hands between reel axle and jack stands
•Heavy Lifts
•Strains from repetitive motions
•Pinch fingers between cable and support
•Cuts from sharp ty wrap ends
•Hit yourself in the face with linesman pliers while tightening
19. Completing a Field Level Hazard AssessmentCompleting a Field Level Hazard Assessment
Step 4 – Identify the plans to eliminate or control hazards
.
19
Job Tasks Hazards Plans to Eliminate
•Drive to work location
•Set up Jack stands
•Place cable reel on jack stands
•Pull cable
•Ty wrap cable
•Muddy road conditions
•Traffic and heavy equipment on haul roads
•Slips or trips on uneven ground
•Strains from awkward body positioning
•Crush hands between reel axle and jack stands
•Heavy Lifts
•Strains from repetitive motions
•Pinch fingers between cable and support
•Cuts from sharp ty wrap ends
•Hit yourself in the face with linesman pliers while
tightening
•Drive to road conditions and obey speed limits
•Be aware of other traffic and mine driving rules
•Ensure you are working on a flat surface
•Proper ergonomics
•Keep hands out of the line of fire and clear
communication
•Get co worker help or mechanical help
•Stretch prior to beginning task
•Proper hand/body placement
•Wear proper gloves and twist the ends off.
•Stay out of the line of fire and don’t pull towards
yourself
20. Completing a Field Level Hazard AssessmentCompleting a Field Level Hazard Assessment
Step 5
• Review and Sign – Review the hazard assessment
with everyone involved in the task(s) once completed.
When the review is complete have everyone sign the
FLRA.
When reviewing, make a point of directing everyone’s
attention to the hazards identified so they are clear to
where the hazards exist, as well as explain the controls
that are relevant to the hazard.
20
21. Things to Remember…Things to Remember…
• The FLRA is a living document. Revisit and update the
document when necessary to ensure that affecting hazards
are identified and communicated.
• When visitors enter the work area, make sure they are
approached and asked to review and sign onto the FLRA
(additionally, you should ask for their FLRA to review and
sign as well)
• Specific hazard training can be used as a control on the
FLRA
• Ensure the FLRA does NOT leave the work area. If the crew
is splitting up, leave the existing FLRA and create a new one
at the new work location 21
22. Things to Remember…Things to Remember…
•Request clarification as necessary to ensure you
understand the hazard assessment and FLRA process
•Revisit your FLRA regularly throughout the day and add
additional hazards as they become apparent
–Changes in weather, ground conditions, etc.
•If the work location changes, a new FLRA must be
completed.
•FLRA’s are to be reviewed and signed by your Supervisor
22
23. This is the end of FLRA training – questions?
23
Editor's Notes
We went over the 5 main types of stored energy and line of fire;
1)Sudden release of tension
2) Hazards presented by gravity
3)Moving machinery
4) Flying debris and projectiles
5)Moving equipment
Then we discussed different ways to keep ourselves out of the line of fire and make sure we understand the differnet types of stored energy around us.
Just a reminder that April 28 is the day of mourning. We will be taking a moment of silence to remember the workers who have passed away in the last year to work related injuries/illnesses. There are 169 people who lost their lives last year alone.
Ask: why do we need this training?
Facilitator Instructions:
1. Click once to bring up “Hazard” and “Hazard Recognition”
2. Ask the class, what do you think the definition is for ‘hazard’?
3. Click to reveal actual definition
4. Ask the class, what do you think the definition is for ‘hazard recognition’?
5. Click to reveal actual definition
Facilitator Statement:
In order for anyone to have the ability to recognize hazards, we must ensure that we have an understanding of what a hazard is, as well as the various types of hazards that exist in the work environment.
Turn to next slide…
Facilitator points to speak to:
People:
Substance abuse, Violence/harassment, Shift work, Work load/work hours, Competency – do you know how to perform your assigned tasks?, Crew morale, Upcoming holidays – pre-occupied, loss of focus, Fatigue – are you getting enough rest?
Equipment:
Rotating equipment or rotating equipment parts, Pinch or crush points, Fast moving equipment, Equipment parts, Sharp objects, (line of fire)
Environment:
Aside from your work area conditions, consider the following:
Weather, lightning, snow/rain/hail, extreme temperatures, wind, wildfires, fog, dust, wildlife, insects
Facilitator Explanation of Results of Each Potential Hazard:
Falls:
Falls are one of the top reasons for injury in Canada and the US.
Falls on the same level – slips or trips due to: uneven ground, icy conditions, poor traction, etc.
Falls to a lower level – stairs, ladders, aerial work platforms, scaffolds, etc.
Struck By:
A moving object/flying object strikes the worker – misdirected hand tool, work piece that is dislodged, point of operation area in a machine, foreign body in the eye, flying debris or welding sparks
A falling object drops from above – working above or below others (i.e.: falling tools), exiting or entering buildings, overhead ice buildup
Striking Against:
Hand slips from tool, worker rounds a corner and strikes a stack of boxes, equipment to property, equipment to equipment/other vehicles
Caught:
Caught in: worker trapped in a confined space
Caught on: pant leg snagged by a loose steel cable end leading to a fall (note: the fall might be the accident TYPE but the underlying cause is the CAUGHT ON hazard)
Caught between: hand crushed between pinch rollers on a conveyor (note: many machine and equipment incidents involve CAUGHT type hazards)
Contact By/With:
Electrical – lightning , exposed/damaged cords, cables, transformers, power lines
UV radiation – Welding, sun – burns, damage to skin, cancer, raising core body temp, heat stress, X-rays
Arc Flash – Extreme heat, UV rays – burns damage to skin,
Potential Energy- stored – release of energy found anywhere on site, equipment high pressure, air hoses, etc.
Inhalation/Ingestion:
Similar to CONTACT, as the substance is inherently hazardous however, the substance must be internalized to be hazardous or toxic.
Some hazards are both CONTACT and INHALATION/INGESTION hazards – remember you can be unexpectedly exposed to these hazards (i.e.: airborne toxins settle on open beverages or food) Please refer to CHEMICALS above.
Over-Exertion:
Situations or conditions that create or cause the need for more force, strength or endurance than the person is capable of performing.
Manual Materials Handling – whole body: lifting, lowering, pushing, pulling, carrying
Underlying Causes of Manual Handling: weight or force, posture and position, frequency and duration of task, location of object handled (give examples and discuss mechanical lifting, team lifting).
Other types of over-exertion: hands (type of grasp and grip force), overhead or above-shoulder work, physically demanding work (shoveling, carrying long distances), extensive tool use.
Ergonomics:
Repetitive motions – every few seconds, every couple minutes
Poor postures (leaning, reaching, crouching, etc.)
Sustained body position
Overstress, overexertion or overload to body/joints
Vibration tools
Facilitator to explain Hierarchy of Control:
Using the control approaches in the Hierarchy of Control is the most effective way to manage hazards in the workplace:
Elimination: Elimination of the hazard is the most effective means of hazard control. It involves the physical removal of the hazard. For example, if employees are required to work above 6 feet off the ground, the hazard can be eliminated by moving the piece they are working on to "ground level" to eliminate the need to work at heights.
Substitution: The second most effective way to control hazards is substitution, which involves removing something that produces a hazard (similar to elimination) and replacing with something that does not produce a hazard. An example of substitution is replacing lead based paint with acrylic paint. In order to be an effective control, the new product must not produce another hazard.
Engineering: The third most effective means of controlling hazards is engineering controls. Engineering controls do not eliminate hazards, but rather keep people isolated from hazards. Capital costs of engineering controls tend to be higher than those the less effective controls within the hierarchy, however they may reduce future costs (i.e. building a work platform rather than purchasing, replace, and maintaining fall arrest equipment).
Administrative: Administrative controls are changes to the way people work. Examples include: employee training, written/or approved safe work practices and procedures, installation of signs and warning labels, etc.
Personal Protective Equipment: (known as PPE) is the least effective way to control hazards. PPE can include gloves, respirators, hard hats, safety glasses, high-visibility clothing, and safety footwear. PPE is the least effective means of controlling hazards because of the high potential for the PPE to become ineffective due to damage. Additionally, some PPE, such as respirators, increase physiological effort to complete a task. A better choice there would be an engineered control (such as ventilation) or substitution of another chemical so that the respirator is not required.
Facilitator:
Emphasize To be completed in the field at the location where the work activities are being conducted – e.g. this does not mean 150m away in your vehicle because it’s cold outside!
All personnel = includes subcontractors
Facilitator Notes: Further explain to the group when a new one should be done vs when new tasks can be added. Give examples like the ones below:
Examples:
Add to FLRA: additional tasks in same work location
New FLRA: new work location
Facilitator to hand out blank FLRA to each worker.
Facilitator:
Highlight that not all sites have posted “Emergency Assembly Areas”. It is important to pick a monument that will be at the work location (e.g. post, sign, etc.). Do not use objects such as trucks or equipment as they may not remain at the location at all times.
Facilitator to explain:
The job tasks will be outlined in the morning Tailgate Meeting.
Facilitator: Inform the class
Always remember to avoid being too vague and generic. The intent is to paint as clear of an image as possible to those who may enter your work location at a later time.
A helpful technique when identifying hazards is asking yourself or the crew a few questions:
What can hurt me or someone else? How and why?
What can be damaged? How and why?
The intent is to make people stop and think, rather than them writing common information from day to day.
Facilitator to Explain:
Remember, the first thing we want to do is to exercise our ability to eliminate hazards (i.e. if something can be removed from the work area, then remove it).
Think of the Hierarchy when planning to eliminate or control hazards:
Elimination
Substitution
Engineering
Administrative
PPE
Realistic and achievable – make sure you can and will do the controls you are applying.
Explain how the three columns come together during the hazard assessment process – tasks, hazards, controls
Facilitator:
Elaborate to the class what the ‘Repeat Back’ method is-
The repeat back method is to have workers repeat back what was communicated to them. This allows the communicator to be certain that the instructions that were given were effectively received.
Facilitator:
Stress the importance of revisiting and updating the FLRA as new tasks are added (mention that TapRoot incident investigations often indicate that crews are not properly completing FLRA’s and/or not adding to FLRA’s or making new ones as situations change). Explain that in some cases, a new FLRA may be required rather than just adding the information onto the existing document.
Examples of specific hazard training:
Confined Space Entry/Monitor, Respiratory Protection, Ground Disturbance, Fire/Spark Watch, Power Line Safety, Gas Detection, Fall Protection, H2S Alive, WHMIS, and TDG.
Stress the importance of leaving the FLRA with the crew and creating new FLRA’s as required.