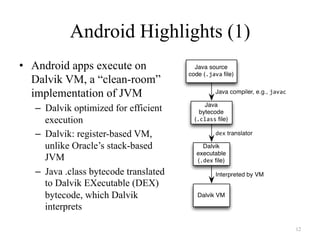
This document provides instructions for setting up an environment for Android development. It discusses downloading and installing the Java Development Kit (JDK), Android SDK, and Android Studio. It also covers configuring a real Android device or emulator for testing apps. The document demonstrates creating a basic "Hello World" Android app in Android Studio and reviewing the underlying code and manifest file. It then briefly describes a more advanced app that scans for nearby WiFi access points when a button is pressed.
![Tutorial: Setup for
Android Development
Adam C. Champion
CSE 5236: Mobile Application Development
Autumn 2014
Based on material from C. Horstmann [1], J. Bloch [2], C. Collins et al. [4],
M.L. Sichitiu (NCSU), V. Janjic (Imperial College London), CSE 2221 (OSU), and other sources
1](https://image.slidesharecdn.com/androidstudio-150429033157-conversion-gate01/85/Android-studio-1-320.jpg)


![Getting Started (4)
• Strongly recommend testing
with real Android device
– Android emulator: very slow
– Faster emulator: Genymotion
[14], [15]
– Install USB drivers for your
Android device!
• Bring up the Android SDK
Manager
– Recommended: Install
Android 2.2, 2.3.3 APIs and
4.x API
– Do not worry about Intel x86
Atom, MIPS system images
Settings
Now you’re ready for Android development!
8](https://image.slidesharecdn.com/androidstudio-150429033157-conversion-gate01/85/Android-studio-8-320.jpg)

![Introduction to Android
• Popular mobile device
OS: 52% of U.S.
smartphone market [8]
• Developed by Open
Handset Alliance, led by
Google
• Google claims 900,000
Android device
activations [9]
Source: [8]
10](https://image.slidesharecdn.com/androidstudio-150429033157-conversion-gate01/85/Android-studio-10-320.jpg)


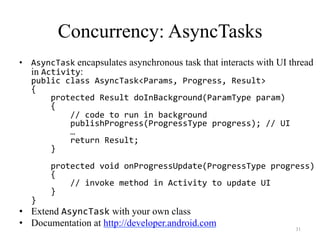
![Activity Lifecycle
• Activity: key building
block of Android apps
• Extend Activity class,
override onCreate(),
onPause(), onResume()
methods
• Dalvik VM can stop any
Activity without warning,
so saving state is important!
• Activities need to be
“responsive”, otherwise
Android shows user “App
Not Responsive” warning:
– Place lengthy operations in
Runnable Threads,
AsyncTasks
Source: [12]
15](https://image.slidesharecdn.com/androidstudio-150429033157-conversion-gate01/85/Android-studio-15-320.jpg)


![Underlying GUI Code
<RelativeLayout
xmlns:android="http://schemas.android.com/apk/res/android"
xmlns:tools="http://schemas.android.com/tools"
android:layout_width="match_parent"
android:layout_height="match_parent"
android:paddingBottom="@dimen/activity_vertical_margin"
android:paddingLeft="@dimen/activity_horizontal_margin"
android:paddingRight="@dimen/activity_horizontal_margin"
android:paddingTop="@dimen/activity_vertical_margin"
tools:context=".MainActivity"
>
<TextView
android:layout_width="wrap_content"
android:layout_height="wrap_content"
android:text="@string/hello_world"
/>
</RelativeLayout>
res/layout/activity_main.xml
– RelativeLayouts are quite complicated. See [13] for details 21](https://image.slidesharecdn.com/androidstudio-150429033157-conversion-gate01/85/Android-studio-21-320.jpg)


![Android Programming Notes
• Android apps have multiple points of entry: no main() method
– Cannot “sleep” in Android
– During each entrance, certain Objects may be null
– Defensive programming is very useful to avoid crashes, e.g.,
if
(!(myObj
==
null))
{
//
do
something
}
• Java concurrency techniques are required
– Don’t block the “main” thread in Activities
– Implement long-running tasks such as network connections
asynchronously, e.g., as AsyncTasks
– Recommendation: read [4]; chapter 20 [10]; [11]
• Logging state via android.util.Log throughout app is essential
when debugging (finding root causes)
• Better to have “too many” permissions than too few
– Otherwise, app crashes due to security exceptions!
– Remove “unnecessary” permissions before releasing app to public
• Event handling in Android GUIs entails many listener Objects
28](https://image.slidesharecdn.com/androidstudio-150429033157-conversion-gate01/85/Android-studio-28-320.jpg)