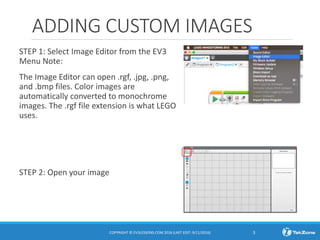
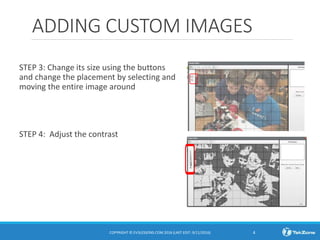
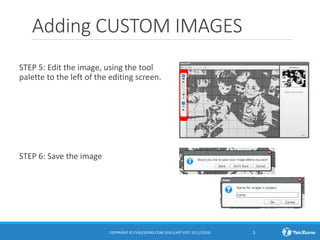
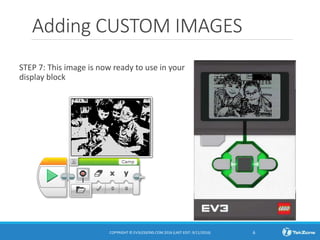
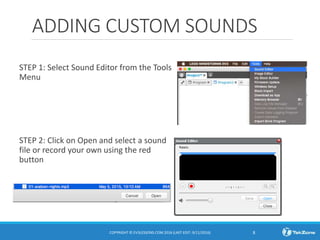
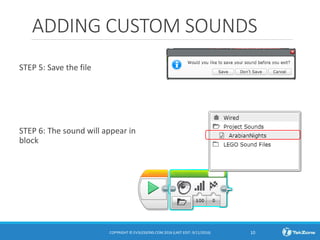
CUSTOM IMAGES AND SOUNDS
BEGINNER
PROGRAMMING
LESSON
LESSON OBJECTIVES
1. Learn to use the Display Block and Sound Block to add your custom
images and sounds to the EV3
COPYRIGHT © EV3LESSONS.COM 2016 (LAST EDIT: 9/11/2016) 2
ADDING CUSTOM IMAGES
STEP 1: Select Image Editor from the EV3
Menu Note:
The Image Editor can open .rgf, .jpg, .png,
and .bmp files. Color images are
automatically converted to monochrome
images. The .rgf file extension is what LEGO
uses.
STEP 2: Open your image
COPYRIGHT © EV3LESSONS.COM 2016 (LAST EDIT: 9/11/2016) 3
ADDING CUSTOM IMAGES
STEP 3: Change its size using the buttons
and change the placement by selecting and
moving the entire image around
STEP 4: Adjust the contrast
COPYRIGHT © EV3LESSONS.COM 2016 (LAST EDIT: 9/11/2016) 4
Adding CUSTOM IMAGES
STEP 5: Edit the image, using the tool
palette to the left of the editing screen.
STEP 6: Save the image
COPYRIGHT © EV3LESSONS.COM 2016 (LAST EDIT: 9/11/2016) 5
Adding CUSTOM IMAGES
STEP 7: This image is now ready to use in your
display block
COPYRIGHT © EV3LESSONS.COM 2016 (LAST EDIT: 9/11/2016) 6
Sharing your RGF FILE
• Click on the wrench tool
in your project
• Select the Images Tab
• Click on the .rgf file
• Click on Export and save
the file
• You can now send this file
to anyone you want to
• If you want to add a .rgf
file sent to you to your
project, simply choose
Import instead
COPYRIGHT © EV3LESSONS.COM 2016 (LAST EDIT: 9/11/2016) 7
ADDING CUSTOM SOUNDS
STEP 1: Select Sound Editor from the Tools
Menu
STEP 2: Click on Open and select a sound
file or record your own using the red
button
COPYRIGHT © EV3LESSONS.COM 2016 (LAST EDIT: 9/11/2016) 8
ADDING CUSTOM SOUNDS
STEP 3: The sound you selected will
appear in the editor
STEP 4: Move the blue bar to change the
size of the clip
COPYRIGHT © EV3LESSONS.COM 2016 (LAST EDIT: 9/11/2016) 9
ADDING CUSTOM SOUNDS
STEP 5: Save the file
STEP 6: The sound will appear in the sound
block
COPYRIGHT © EV3LESSONS.COM 2016 (LAST EDIT: 9/11/2016) 10
End of the lesson
11

Ak custom imagessounds2 - Beginner

  • 1.
    CUSTOM IMAGES ANDSOUNDS BEGINNER PROGRAMMING LESSON
  • 2.
    LESSON OBJECTIVES 1. Learnto use the Display Block and Sound Block to add your custom images and sounds to the EV3 COPYRIGHT © EV3LESSONS.COM 2016 (LAST EDIT: 9/11/2016) 2
  • 3.
    ADDING CUSTOM IMAGES STEP1: Select Image Editor from the EV3 Menu Note: The Image Editor can open .rgf, .jpg, .png, and .bmp files. Color images are automatically converted to monochrome images. The .rgf file extension is what LEGO uses. STEP 2: Open your image COPYRIGHT © EV3LESSONS.COM 2016 (LAST EDIT: 9/11/2016) 3
  • 4.
    ADDING CUSTOM IMAGES STEP3: Change its size using the buttons and change the placement by selecting and moving the entire image around STEP 4: Adjust the contrast COPYRIGHT © EV3LESSONS.COM 2016 (LAST EDIT: 9/11/2016) 4
  • 5.
    Adding CUSTOM IMAGES STEP5: Edit the image, using the tool palette to the left of the editing screen. STEP 6: Save the image COPYRIGHT © EV3LESSONS.COM 2016 (LAST EDIT: 9/11/2016) 5
  • 6.
    Adding CUSTOM IMAGES STEP7: This image is now ready to use in your display block COPYRIGHT © EV3LESSONS.COM 2016 (LAST EDIT: 9/11/2016) 6
  • 7.
    Sharing your RGFFILE • Click on the wrench tool in your project • Select the Images Tab • Click on the .rgf file • Click on Export and save the file • You can now send this file to anyone you want to • If you want to add a .rgf file sent to you to your project, simply choose Import instead COPYRIGHT © EV3LESSONS.COM 2016 (LAST EDIT: 9/11/2016) 7
  • 8.
    ADDING CUSTOM SOUNDS STEP1: Select Sound Editor from the Tools Menu STEP 2: Click on Open and select a sound file or record your own using the red button COPYRIGHT © EV3LESSONS.COM 2016 (LAST EDIT: 9/11/2016) 8
  • 9.
    ADDING CUSTOM SOUNDS STEP3: The sound you selected will appear in the editor STEP 4: Move the blue bar to change the size of the clip COPYRIGHT © EV3LESSONS.COM 2016 (LAST EDIT: 9/11/2016) 9
  • 10.
    ADDING CUSTOM SOUNDS STEP5: Save the file STEP 6: The sound will appear in the sound block COPYRIGHT © EV3LESSONS.COM 2016 (LAST EDIT: 9/11/2016) 10
  • 11.
    End of thelesson 11