3D 모델러 애드인개발 과정 Page 2 of 42
Table of Contents
1. Sketchup Addin 4
1.1 개발방법 4
1.2 RUBY 코드 예시 6
1.2.1 ADDIN MODULE 6
1.2.2 MAIN PROGRAM MODULE 7
1.2.3 Pick & Selection 7
1.3 C 코드 예시 11
1.4 참고 13
2. CloudCompare PlugIn 14
2.1 개발 방법 14
2.1.1 개요 14
2.1.2 개발환경설치 14
2.1.3 Qt5 빌드 및 설치 15
2.1.4 C++ 기반 플러그인 개발 18
2.1.5 파이썬 기반 플러그인 개발 20
2.2 참고 22
2.2.1 코딩 네미밍 컨벤션 22
2.2.2 플러그인 유형 22
2.2.3 플러그인 템플릿 사용법 23
2.2.4 파이썬 스크립트 예시 23
2.2.5 레퍼런스 24
3. Blender Addon 25
3.1 개발 방법 25
3.2 코드 예시 25
3.3 이슈 27
3.4 참고 27
4. QGIS plugin 28
4.1 개발 방법 28
4.2 코드 예시 31
4.3 참고 32
3.
3D 모델러 애드인개발 과정 Page 3 of 42
5. Autocad Plugin 33
5.1 개발 방법 33
5.2 코드 예시 34
5.3 참고 35
6. Autodesk Revit Plugin 36
6.1 개발 방법 36
6.2 코딩 36
6.3 참고 37
7. Rhino Plugin 39
7.1 개발 방법 39
7.2 코딩 39
7.3 참고 40
8. 레퍼런스 42
4.
3D 모델러 애드인개발 과정 Page 4 of 42
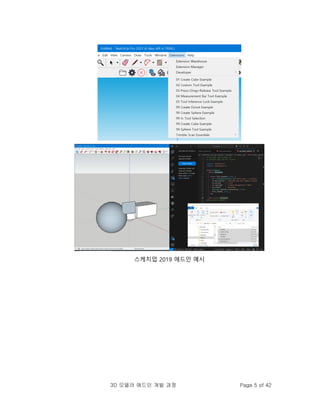
1. Sketchup Addin
1.1 개발방법
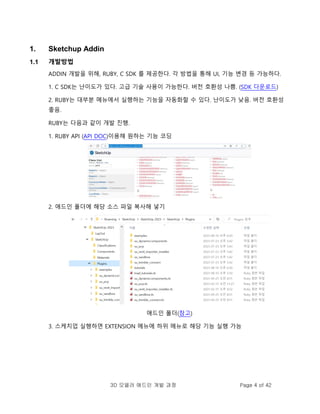
ADDIN 개발을 위해, RUBY, C SDK 를 제공한다. 각 방법을 통해 UI, 기능 변경 등 가능하다.
1. C SDK는 난이도가 있다. 고급 기술 사용이 가능한다. 버전 호환성 나쁨. (SDK 다운로드)
2. RUBY는 대부분 메뉴에서 실행하는 기능을 자동화할 수 있다. 난이도가 낮음. 버전 호환성
좋음.
RUBY는 다음과 같이 개발 진행.
1. RUBY API (API DOC)이용해 원하는 기능 코딩
2. 애드인 폴더에 해당 소스 파일 복사해 넣기
애드인 폴더(참고)
3. 스케치업 실행하면 EXTENSION 메뉴에 하위 메뉴로 해당 기능 실행 가능
3D 모델러 애드인개발 과정 Page 7 of 42
# Licensed under the MIT license
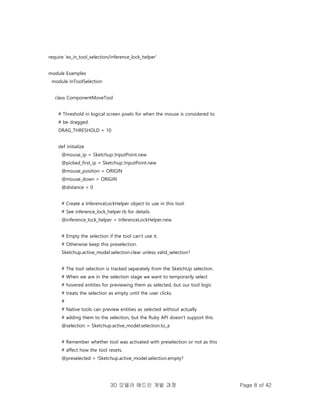
1.2.2 MAIN PROGRAM MODULE
require 'sketchup.rb'
module Examples
module HelloCube
def self.create_cube
model = Sketchup.active_model
model.start_operation('Create Cube', true)
group = model.active_entities.add_group
entities = group.entities
points = [
Geom::Point3d.new(0, 0, 0),
Geom::Point3d.new(1.m, 0, 0),
Geom::Point3d.new(1.m, 1.m, 0),
Geom::Point3d.new(0, 1.m, 0)
]
face = entities.add_face(points)
face.pushpull(-1.m)
model.commit_operation
end
unless file_loaded?(__FILE__)
menu = UI.menu('Plugins')
menu.add_item('01 Create Cube Example') {
self.create_cube
}
file_loaded(__FILE__)
end
end # module HelloCube
end # module Examples
1.2.3 Pick & Selection
# Copyright 2021 Trimble Inc
# Licensed under the MIT license
8.
3D 모델러 애드인개발 과정 Page 8 of 42
require 'ex_in_tool_selection/inference_lock_helper'
module Examples
module InToolSelection
class ComponentMoveTool
# Threshold in logical screen pixels for when the mouse is considered to
# be dragged.
DRAG_THRESHOLD = 10
def initialize
@mouse_ip = Sketchup::InputPoint.new
@picked_first_ip = Sketchup::InputPoint.new
@mouse_position = ORIGIN
@mouse_down = ORIGIN
@distance = 0
# Create a InferenceLockHelper object to use in this tool.
# See inference_lock_helper.rb for details.
@inference_lock_helper = InferenceLockHelper.new
# Empty the selection if the tool can't use it.
# Otherwise keep this preselection.
Sketchup.active_model.selection.clear unless valid_selection?
# The tool selection is tracked separately from the SketchUp selection.
# When we are in the selection stage we want to temporarily select
# hovered entities for previewing them as selected, but our tool logic
# treats the selection as empty until the user clicks.
#
# Native tools can preview entities as selected without actually
# adding them to the selection, but the Ruby API doesn't support this.
@selection = Sketchup.active_model.selection.to_a
# Remember whether tool was activated with preselection or not as this
# affect how the tool resets.
@preselected = !Sketchup.active_model.selection.empty?
9.
3D 모델러 애드인개발 과정 Page 9 of 42
# The entity being hovered when at the selection stage.
@hovered_entity = nil
# Whether the the tool is able to interact with the hovered entity.
# This affects what mouse cursor the tool uses.
@valid_hovered_entity = false
end
def activate
update_ui
end
def deactivate(view)
@inference_lock_helper.unlock
view.model.abort_operation if @in_operation
view.invalidate
end
def enableVCB?
picked_first_point?
end
def resume(view)
update_ui
view.invalidate
end
def suspend(view)
view.invalidate
end
def onCancel(reason, view)
reset_tool
view.invalidate
end
def onKeyDown(key, _repeat, _flags, view)
@inference_lock_helper.on_keydown(key, view, @mouse_ip, @picked_first_ip)
10.
3D 모델러 애드인개발 과정 Page 10 of 42
pick_mouse_position(view)
end
def onKeyUp(key, _repeat, _flags, view)
@inference_lock_helper.on_keyup(key, view)
pick_mouse_position(view)
end
def onMouseMove(flags, x, y, view)
if @selection.empty?
# If the tool selection is empty, try picking the hovered object.
try_select_entity(view, x, y)
end
@mouse_position = Geom::Point3d.new(x, y, 0)
pick_mouse_position(view)
end
def onLButtonDown(flags, x, y, view)
@mouse_down = Geom::Point3d.new(x, y)
# If tool selection is empty, select our hovered entity.
# If we already have a selection, we use it.
if @selection.empty?
@selection = view.model.selection.to_a
end
return if @selection.empty?
# For a Move or Rotate like tool, we can select a starting point in the
# same mouse click as we select an entity. For Scale or other tools
# where you need to select a handle, this logic is typically slightly
# different, and separate click is needed.
if !picked_first_point?
start_move(view)
else
end_move(view)
end
11.
3D 모델러 애드인개발 과정 Page 11 of 42
update_ui
view.invalidate
end
def onLButtonUp(flags, x, y, view)
if @mouse_down.distance([x, y]) > DRAG_THRESHOLD
end_move(view)
end
end
# Here we have hard coded a special ID for the move cursor in SketchUp.
# Normally you would use `UI.create_cursor(cursor_path, 0, 0)` instead
# with your own custom cursor bitmap:
#
# CURSOR = UI.create_cursor(cursor_path, 0, 0)
MOVE_CURSOR = 641
INVALID_CURSOR = 663
…
1.3 C 코드 예시
#include <SketchUpAPI/slapi.h>
#include <SketchUpAPI/geometry.h>
#include <SketchUpAPI/initialize.h>
#include <SketchUpAPI/unicodestring.h>
#include <SketchUpAPI/model/model.h>
#include <SketchUpAPI/model/entities.h>
#include <SketchUpAPI/model/face.h>
#include <SketchUpAPI/model/edge.h>
#include <SketchUpAPI/model/vertex.h>
#include <vector>
int main() {
// Always initialize the API before using it
SUInitialize();
// Load the model from a file
SUModelRef model = SU_INVALID;
SUModelLoadStatus status;
SUResult res = SUModelCreateFromFileWithStatus(&model, "model.skp", &status);
12.
3D 모델러 애드인개발 과정 Page 12 of 42
// It's best to always check the return code from each SU function call.
// Only showing this check once to keep this example short.
if (res != SU_ERROR_NONE) {
std::cout << "Failed creating model from a file" << std::endl;
return 1;
}
if (status == SUModelLoadStatus_Success_MoreRecent) {
std::cout
<< "This model was created in a more recent SketchUp version than that of the SDK. "
"It contains data which will not be read. Saving the model over the original file may "
"lead to permanent data loss."
<< std::endl;
}
// Get the entity container of the model.
SUEntitiesRef entities = SU_INVALID;
SUModelGetEntities(model, &entities);
// Get all the faces from the entities object
size_t faceCount = 0;
SUEntitiesGetNumFaces(entities, &faceCount);
if (faceCount > 0) {
std::vector<SUFaceRef> faces(faceCount);
SUEntitiesGetFaces(entities, faceCount, &faces[0], &faceCount);
// Get all the edges in this face
for (size_t i = 0; i < faceCount; i++) {
size_t edgeCount = 0;
SUFaceGetNumEdges(faces[i], &edgeCount);
if (edgeCount > 0) {
std::vector<SUEdgeRef> edges(edgeCount);
SUFaceGetEdges(faces[i], edgeCount, &edges[0], &edgeCount);
// Get the vertex positions for each edge
for (size_t j = 0; j < edgeCount; j++) {
SUVertexRef startVertex = SU_INVALID;
SUVertexRef endVertex = SU_INVALID;
SUEdgeGetStartVertex(edges[j], &startVertex);
SUEdgeGetEndVertex(edges[j], &endVertex);
SUPoint3D start;
SUPoint3D end;
SUVertexGetPosition(startVertex, &start);
SUVertexGetPosition(endVertex, &end);
13.
3D 모델러 애드인개발 과정 Page 13 of 42
// Now do something with the point data
}
}
}
}
// Get model name
SUStringRef name = SU_INVALID;
SUStringCreate(&name);
SUModelGetName(model, &name);
size_t name_length = 0;
SUStringGetUTF8Length(name, &name_length);
char* name_utf8 = new char[name_length + 1];
SUStringGetUTF8(name, name_length + 1, name_utf8, &name_length);
// Now we have the name in a form we can use
SUStringRelease(&name);
delete []name_utf8;
// Must release the model or there will be memory leaks
SUModelRelease(&model);
// Always terminate the API when done using it
SUTerminate();
return 0;
}
1.4 참고
스케치업 프로를 설치하면 옵션으로 설치되는 스캔 에센셜이란 상용 도구가 있다. 이를
설치하면 LAS 등 점군 파일 포맷을 로딩할 수 있다. 단 9 일 사용 제한이며, osnap과 같은
기능도 제대로 잘 사용하기 쉽지 않다(연습 필요). recap 파일 저장하는 단계가 있는 것으로
봐서, Autodesk와 협력해, 해당 기술을 라이센싱하는 듯하다.
Point Clouds to 3D Model Software - Point Cloud 3D Model - SketchUp
14.
3D 모델러 애드인개발 과정 Page 14 of 42
2. CloudCompare PlugIn
2.1 개발 방법
2.1.1 개요
클라우드 컴페어는 점군을 다루는 오픈소스 중 가장 강력한 도구이다. 간단한 명령 실행은
파이썬 방식도 지원하지만, 공식적으로 클라우드 컴페어는 C 기반으로 플러그인 개발을
지원한다. 다만, UI도구를 QT를 사용하기 때문에, QT를 먼저 다운로드하고 빌드를 시도해야
한다.
최근 개발된 파이썬 개발 방식은 두개로 cloudComPy, CloudCompare Python Plugin가
있으나(참고. 2.13 알파버전 2023.6 기준으로 파이썬 플러그인 관리자 기능 지원됨), 이
라이브러리는 명령들을 현재로서는 이벤트 형식이 아닌 배치 형식으로 동작하므로, 데이터
일괄 처리할 때만 사용된다.
참고 - 윈도우 버전 소스 빌드. CloudCompare/BUILD.md at master ·
CloudCompare/CloudCompare (github.com)
참고 - Qt for Windows - Building from Source | Qt 5.15
참고- Qt build
2.1.2 개발환경설치
개발환경 설정이 복잡한다. 다음과 같이 진행해야 한다.
1. visual studio community version 다운로드 후 설치. 다음과 같이 msvc 2015, 2017
라이브러리 설치.
15.
3D 모델러 애드인개발 과정 Page 15 of 42
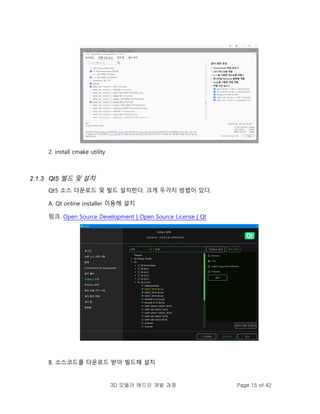
2. install cmake utility
2.1.3 Qt5 빌드 및 설치
Qt5 소스 다운로드 및 빌드 설치한다. 크게 두가지 방법이 있다.
A. Qt online installer 이용해 설치
링크. Open Source Development | Open Source License | Qt
B. 소스코드를 다운로드 받아 빌드해 설치
16.
3D 모델러 애드인개발 과정 Page 16 of 42
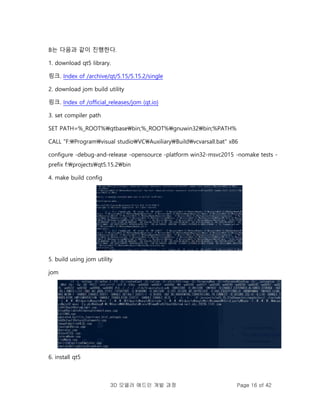
B는 다음과 같이 진행한다.
1. download qt5 library.
링크. Index of /archive/qt/5.15/5.15.2/single
2. download jom build utility
링크. Index of /official_releases/jom (qt.io)
3. set compiler path
SET PATH=%_ROOT%qtbasebin;%_ROOT%gnuwin32bin;%PATH%
CALL "F:Programvisual studioVCAuxiliaryBuildvcvarsall.bat" x86
configure -debug-and-release -opensource -platform win32-msvc2015 -nomake tests -
prefix f:projectsqt5.15.2bin
4. make build config
5. build using jom utility
jom
6. install qt5
17.
3D 모델러 애드인개발 과정 Page 17 of 42
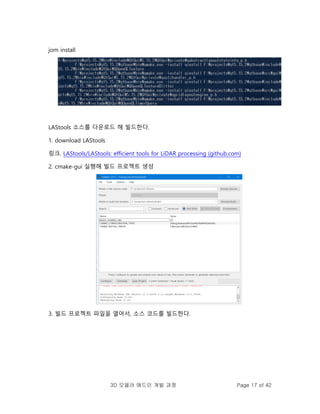
jom install
LAStools 소스를 다운로드 해 빌드한다.
1. download LAStools
링크. LAStools/LAStools: efficient tools for LiDAR processing (github.com)
2. cmake-gui 실행해 빌드 프로젝트 생성
3. 빌드 프로젝트 파일을 열어서, 소스 코드를 빌드한다.
18.
3D 모델러 애드인개발 과정 Page 18 of 42
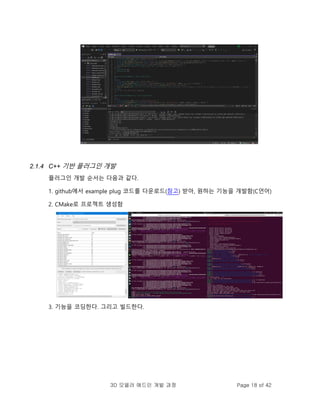
2.1.4 C++ 기반 플러그인 개발
플러그인 개발 순서는 다음과 같다.
1. github에서 example plug 코드를 다운로드(참고) 받아, 원하는 기능을 개발함(C언어)
2. CMake로 프로젝트 생성함
3. 기능을 코딩한다. 그리고 빌드한다.
19.
3D 모델러 애드인개발 과정 Page 19 of 42
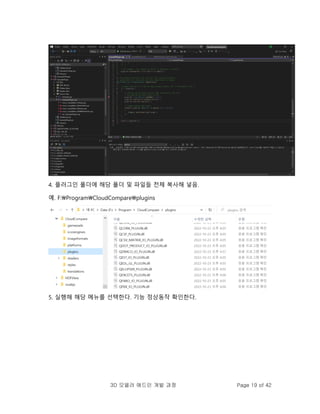
4. 플러그인 폴더에 해당 폴더 및 파일들 전체 복사해 넣음.
예. F:ProgramCloudCompareplugins
5. 실행해 해당 메뉴를 선택한다. 기능 정상동작 확인한다.
20.
3D 모델러 애드인개발 과정 Page 20 of 42
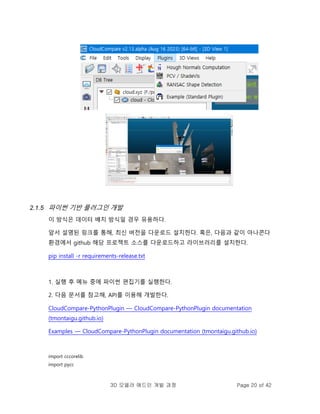
2.1.5 파이썬 기반 플러그인 개발
이 방식은 데이터 배치 방식일 경우 유용하다.
앞서 설명된 링크를 통해, 최신 버전을 다운로드 설치한다. 혹은, 다음과 같이 아나콘다
환경에서 github 해당 프로젝트 소스를 다운로드하고 라이브러리를 설치한다.
pip install -r requirements-release.txt
1. 실행 후 메뉴 중에 파이썬 편집기를 실행한다.
2. 다음 문서를 참고해, API를 이용해 개발한다.
CloudCompare-PythonPlugin — CloudCompare-PythonPlugin documentation
(tmontaigu.github.io)
Examples — CloudCompare-PythonPlugin documentation (tmontaigu.github.io)
import cccorelib
import pycc
21.
3D 모델러 애드인개발 과정 Page 21 of 42
CC = pycc.GetInstance()
def main():
entities = CC.getSelectedEntities()
if not entities:
raise RuntimeError("No entities selected")
CC.freezeUI(True)
pointCloud = entities[0]
print(pointCloud)
gravityCenter = cccorelib.GeometricalAnalysisTools.ComputeGravityCenter(pointCloud)
print("The gravity center of {} is {}".format(pointCloud.getName(), gravityCenter))
CC.freezeUI(False)
if __name__ == '__main__':
main()
3. 코딩된 파이썬을 실행해본다.
22.
3D 모델러 애드인개발 과정 Page 22 of 42
2.2 참고
2.2.1 코딩 네미밍 컨벤션
변수 등은 소문자로 시작. class는 cc로 시작. 상수 및 열거자는 대문자. 파일 이름은 공백
포함되면 안됨. QT ui는 ui_templates 폴더에 저장되어야 한다. 탭은 4 공백으로 한다.
경로는 유닉스 호환 '/'만 사용해야 한다.
2.2.2 플러그인 유형
플러그인은 3 가지 유형이 있다.
1. 표준: 작업, 처리 및 도구를 추가하는 플러그인.
2. IO: 추가 파일 형식을 읽고 쓸수 있는 플러그인
3. GL: OpenGL 렌더링 작업 수행하는 플러그인.
각 유형 플러그인은 다음 폴더에서 예시 찾을 수 있다.
plugins/example
23.
3D 모델러 애드인개발 과정 Page 23 of 42
플러그인 개발 후 다음과 같이 폴더 만들어 복사해 넣을 것.
plugins/private
2.2.3 플러그인 템플릿 사용법
1. 플러그인의 디렉토리 이름을 변경. 예. ExamplePluginSuperPlugin
2. 플러그인의 디렉토리와 동일한 이름을 갖도록 파일 이름을 변경.
예. .qrcExamplePlugin.qrc -> SuperPlugin.qrc
3. 플러그인을 빌드해야 하는지 여부를 제어하는 옵션의 이름을 변경.
"main"및 파일 (예 : 및 )에서 클래스 이름을 변경. 예. ExamplePlugin.cppExamplePlugin.h
4. 파일을 업데이트. 예. info.json
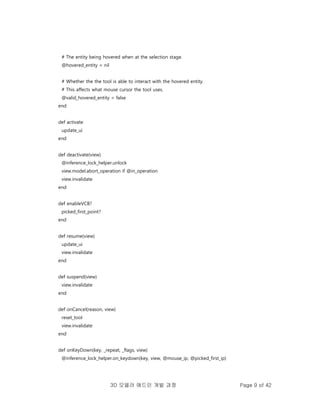
2.2.4 파이썬 스크립트 예시
파이썬은 데이터 배치 처리 수준에서만 사용 가능한다. 예시는 다음과 같음 (참고).
os.environ["_CCTRACE_"]="ON" # only if you want debug traces
from C++
import cloudComPy as cc # import the CloudComPy module
cloud = cc.loadPointCloud("myCloud.xyz") # read a point cloud from a file
print("cloud name: %s"%cloud.getName())
res=cc.computeCurvature(cc.CurvatureType.GAUSSIAN_CURV, 0.05, [cloud]) # compute curvature as a
scalar field
nsf = cloud.getNumberOfScalarFields()
sfCurv=cloud.getScalarField(nsf-1)
cloud.setCurrentOutScalarField(nsf-1)
filteredCloud=cc.filterBySFValue(0.01, sfCurv.getMax(), cloud) # keep only the points above a
given curvature
24.
3D 모델러 애드인개발 과정 Page 24 of 42
ok = filteredCloud.exportCoordToSF(False, False, True) # Z coordinate as a scalar Field
nsf = cloud.getNumberOfScalarFields()
sf1=filteredCloud.getScalarField(nsf-1)
mean, var = sf1.computeMeanAndVariance()
# using Numpy...
coordinates = filteredCloud.toNpArrayCopy() # coordinates as a numpy array
x=coordinates[:,0] # x column
y=coordinates[:,1]
z=coordinates[:,2]
f=(2*x-y)*(x+3*y) # elementwise operation on arrays
asf1=sf1.toNpArray() # scalar field as a numpy array
sf1.fromNpArrayCopy(f) # replace scalar field values by a numpy
array
res=cc.SavePointCloud(filteredCloud,"myModifiedCloud.bin") #save the point cloud to a file
2.2.5 레퍼런스
Plugins - CloudCompare forum
Steps to create a new plugin - CloudCompare forum (danielgm.net)
CloudCompare/CONTRIBUTING.md at master · CloudCompare/CloudCompare (github.com)
cloudcompare-general-tutorial_v3.docx (live.com)
25.
3D 모델러 애드인개발 과정 Page 25 of 42
3. Blender Addon
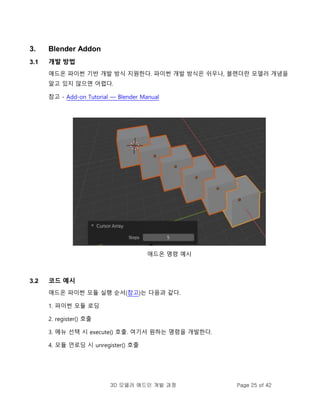
3.1 개발 방법
애드온 파이썬 기반 개발 방식 지원한다. 파이썬 개발 방식은 쉬우나, 블렌더란 모델러 개념을
알고 있지 않으면 어렵다.
참고 - Add-on Tutorial — Blender Manual
애드온 명령 예시
3.2 코드 예시
애드온 파이썬 모듈 실행 순서(참고)는 다음과 같다.
1. 파이썬 모듈 로딩
2. register() 호출
3. 메뉴 선택 시 execute() 호출. 여기서 원하는 명령을 개발한다.
4. 모듈 언로딩 시 unregister() 호출
26.
3D 모델러 애드인개발 과정 Page 26 of 42
bl_info = {
"name": "Move X Axis",
"blender": (2, 80, 0),
"category": "Object",
}
import bpy
class ObjectMoveX(bpy.types.Operator):
"""My Object Moving Script""" # Use this as a tooltip for menu items and buttons.
bl_idname = "object.move_x" # Unique identifier for buttons and menu items to reference.
bl_label = "Move X by One" # Display name in the interface.
bl_options = {'REGISTER', 'UNDO'} # Enable undo for the operator.
def execute(self, context): # execute() is called when running the operator.
# The original script
scene = context.scene
for obj in scene.objects:
obj.location.x += 1.0
return {'FINISHED'} # Lets Blender know the operator finished successfully.
def menu_func(self, context):
self.layout.operator(ObjectMoveX.bl_idname)
def register():
bpy.utils.register_class(ObjectMoveX)
bpy.types.VIEW3D_MT_object.append(menu_func) # Adds the new operator to an existing menu.
def unregister():
bpy.utils.unregister_class(ObjectMoveX)
# This allows you to run the script directly from Blender's Text editor
# to test the add-on without having to install it.
if __name__ == "__main__":
register()
27.
3D 모델러 애드인개발 과정 Page 27 of 42
3.3 이슈
블렌더는 오토데스크 마야와 같은 범용 모델러로 명령체계는 스케치업에 비해 확장성 높고
유연하나 복잡한다. 개념을 알지 못하면 사용하기 어렵다.
3.4 참고
Add-on Tutorial — Blender Manual
28.
3D 모델러 애드인개발 과정 Page 28 of 42
4. QGIS plugin
4.1 개발 방법
QGIS는 GIS 데이터를 배치 프로세스 방식으로 처리한 후 QUERY 등을 통해 원하는 정보를
얻는 ARC GIS 유사한 오픈소스 도구이다.
장점으로는 파이썬 라이브러리를 사용할 수 있다.
플러그인 개발 순서는 다음과 같다.
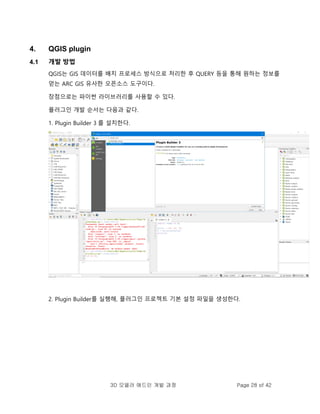
1. Plugin Builder 3 를 설치한다.
2. Plugin Builder를 실행해, 플러그인 프로젝트 기본 설정 파일을 생성한다.
29.
3D 모델러 애드인개발 과정 Page 29 of 42
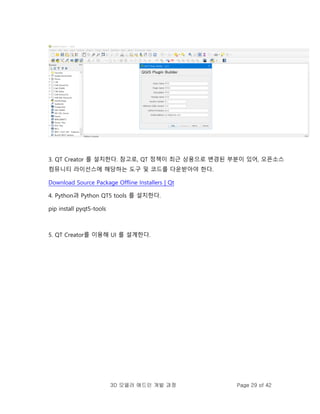
3. QT Creator 를 설치한다. 참고로, QT 정책이 최근 상용으로 변경된 부분이 있어, 오픈소스
컴뮤니티 라이선스에 해당하는 도구 및 코드를 다운받아야 한다.
Download Source Package Offline Installers | Qt
4. Python과 Python QT5 tools 를 설치한다.
pip install pyqt5-tools
5. QT Creator를 이용해 UI 를 설계한다.
30.
3D 모델러 애드인개발 과정 Page 30 of 42
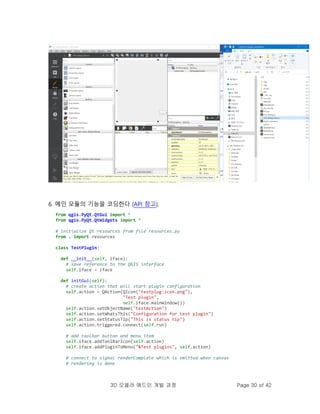
6. 메인 모듈의 기능을 코딩한다 (API 참고).
from qgis.PyQt.QtGui import *
from qgis.PyQt.QtWidgets import *
# initialize Qt resources from file resources.py
from . import resources
class TestPlugin:
def __init__(self, iface):
# save reference to the QGIS interface
self.iface = iface
def initGui(self):
# create action that will start plugin configuration
self.action = QAction(QIcon("testplug:icon.png"),
"Test plugin",
self.iface.mainWindow())
self.action.setObjectName("testAction")
self.action.setWhatsThis("Configuration for test plugin")
self.action.setStatusTip("This is status tip")
self.action.triggered.connect(self.run)
# add toolbar button and menu item
self.iface.addToolBarIcon(self.action)
self.iface.addPluginToMenu("&Test plugins", self.action)
# connect to signal renderComplete which is emitted when canvas
# rendering is done
31.
3D 모델러 애드인개발 과정 Page 31 of 42
self.iface.mapCanvas().renderComplete.connect(self.renderTest)
def unload(self):
# remove the plugin menu item and icon
self.iface.removePluginMenu("&Test plugins", self.action)
self.iface.removeToolBarIcon(self.action)
# disconnect form signal of the canvas
self.iface.mapCanvas().renderComplete.disconnect(self.renderTest)
def run(self):
# create and show a configuration dialog or something similar
print("TestPlugin: run called!")
def renderTest(self, painter):
# use painter for drawing to map canvas
print("TestPlugin: renderTest called!")
4.2 코드 예시
def getSelectedPoints(self):
selectedPoints = []
selectedTileNames = []
for loadTile in self.loadedTiles:
layers = QgsProject.instance().mapLayersByName(loadTile)
if len(layers) == 1:
layer = layers[0]
if layer.type() == QgsMapLayer.VectorLayer:
features = layer.selectedFeatures()
for feature in features:
point = []
point.append(loadTile)
point.append(feature[PC3DDefinitions.CONST_TILE_FIELD_NAME_FILE_ID])
point.append(feature[PC3DDefinitions.CONST_TILE_FIELD_NAME_POSITION])
# point.append(feature[PC3DDefinitions.CONST_TILE_FIELD_NAME_CLASS_NEW])
# point.append(feature[PC3DDefinitions.CONST_TILE_FIELD_NAME_CLASS])
selectedPoints.append(point)
if not loadTile in selectedTileNames:
selectedTileNames.append(loadTile)
return [selectedPoints,selectedTileNames]
32.
3D 모델러 애드인개발 과정 Page 32 of 42
4.3 참고
QGIS 3 플러그인 튜토리얼 - 플러그인 개발 참조 가이드 » GIS • OPS (gis-ops.com)
PyQGIS introduction — Developing QGIS Plugins (gismentors.eu)
Python QGIS Tutorial: Working with Vector Layer (geodose.com)
33.
3D 모델러 애드인개발 과정 Page 33 of 42
5. Autocad Plugin
5.1 개발 방법
오토캐드는 대중적 프로그램으로 모델링 시 편리한 기능을 지원한다. 다음 방법으로 개발
가능하다.
1. .net 프레임웍 기반 VB, C# 등을 사용해 개발한다.
2. pyautocad 라이브러리를 이용해 개발한다.
3. 고수준 기능 개발을 위해서는 ARX C++ 방식으로 개발한다.
2 번 방식 개발 순서는 다음과 같다.
1. 라이브러리 설치
참고 - pyautocad · PyPI
참고 - Welcome to pyautocad’s documentation! — pyautocad 0.2.0 documentation
2. 기능을 파이썬으로 개발함 (참고 - AutoCAD Block object in Python - SCDA
(supplychaindataanalytics.com).
from pyautocad import Autocad, APoint, aDouble
acad = Autocad(create_if_not_exists=True)
# Document > BlocksCollection > Block > BlockReference
# insertion point for block
ip = APoint(0, 0, 0)
# adding block to documents block collection
b1 = acad.doc.Blocks.Add(ip, "Test_block_1")
# adding geometries to block
pl = b1.AddPolyline(aDouble(0, 0, 0, 10000, 0, 0, 10000, 5000, 0, 0, 5000, 0, 0, 0, 0))
l = b1.AddLine(APoint(0, 250, 0), APoint(10000, 250, 0))
# adding block instance to drawing (creating a reference to the block)
block_ref1 = acad.model.InsertBlock(APoint(50, 50, 0), "Test_block_1", 1, 1, 1, 0)
34.
3D 모델러 애드인개발 과정 Page 34 of 42
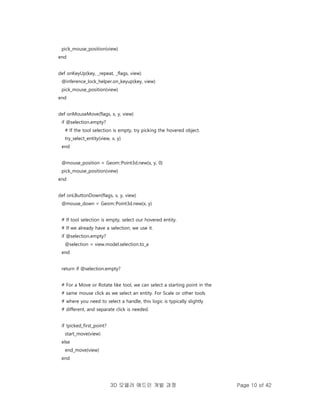
3. 해당 코드를 실행한다. 그럼 다음과 같이 캐드 화면에 엔티티가 생성됨.
5.2 코드 예시
namespace MyFirstCadPlugin
{
public class Class1
{
[CommandMethod("hello")]
public void HelloCommand()
{
// Here we connect to the active AutoCAD Document and Database
Document acDoc = Application.DocumentManager.MdiActiveDocument;
Database acCurDb = acDoc.Database;
// Here we create a Transaction in the current Database
using (Transaction acTrans = acCurDb.TransactionManager.StartTransaction())
{
// Access to the Model Blocktable for write
BlockTable acBlkTbl;
acBlkTbl = acTrans.GetObject(acCurDb.BlockTableId,
OpenMode.ForWrite) as BlockTable;
BlockTableRecord acBlkTblRec;
acBlkTblRec = acTrans.GetObject(acBlkTbl[BlockTableRecord.ModelSpace],
OpenMode.ForWrite) as BlockTableRecord;
35.
3D 모델러 애드인개발 과정 Page 35 of 42
// Create a Circle with its center in the coordinates origin and radius = 50.
Circle myCircle = new Circle();
myCircle.Center = new Point3d(0, 0, 0);
myCircle.Radius = 50;
// Create text with "Hello!" in the middle of the circle
DBText myText = new DBText();
myText.SetDatabaseDefaults();
myText.Height = 20;
myText.TextString = "Hello!";
myText.Justify = AttachmentPoint.MiddleCenter;
// Append Circle and Text to the Blocktable record and Database
acBlkTblRec.AppendEntity(myCircle);
acTrans.AddNewlyCreatedDBObject(myCircle, true);
acBlkTblRec.AppendEntity(myText);
acTrans.AddNewlyCreatedDBObject(myText, true);
// Finish Transaction
acTrans.Commit();
}
}
}
}
5.3 참고
pyautocad.Autocad Example (programtalk.com)
36.
3D 모델러 애드인개발 과정 Page 36 of 42
6. Autodesk Revit Plugin
6.1 개발 방법
Autodesk solution 플러그인 개발을 위해서는 AND 네트워크에 가입하고, SDK를 다운로드
받아 설치해야 한다.
참고 - Help | About the Revit SDK | Autodesk
참고 - Revit | Autodesk Platform Services
Autodesk 는 기본적으로 플러그인 개발시 .NET 을 사용하도록 한다.
6.2 코딩
데이터셋이 입력되면, 이를 이용해, 각 데이터를 접근할 수 있다.
private void GetPointCloudDataByIteration(PointCloudInstance pcInstance, PointCloudFilter
pointCloudFilter)
{
// read points by iteration
37.
3D 모델러 애드인개발 과정 Page 37 of 42
double averageDistance = 0.001;
PointCollection points = pcInstance.GetPoints(pointCloudFilter, averageDistance, 10000); // Get
points. Number of points is determined by the needs of the client
foreach (CloudPoint point in points)
{
// Process each point
System.Drawing.Color color = System.Drawing.ColorTranslator.FromWin32(point.Color);
String pointDescription = String.Format("({0}, {1}, {2}, {3}", point.X, point.Y, point.Z,
color.ToString());
}
}
public unsafe void GetPointCloudDataByPointer(PointCloudInstance pcInstance, PointCloudFilter
pointCloudFilter)
{
double averageDistance = 0.001;
PointCollection points = pcInstance.GetPoints(pointCloudFilter, averageDistance, 10000);
CloudPoint* pointBuffer = (CloudPoint*)points.GetPointBufferPointer().ToPointer();
int totalCount = points.Count;
for (int numberOfPoints = 0; numberOfPoints < totalCount; numberOfPoints++)
{
CloudPoint point = *(pointBuffer + numberOfPoints);
// Process each point
System.Drawing.Color color = System.Drawing.ColorTranslator.FromWin32(point.Color);
String pointDescription = String.Format("({0}, {1}, {2}, {3}", point.X, point.Y, point.Z,
color.ToString());
}
}
6.3 참고
시장이 크고, 다루는 모델러가 많다보니, 저번이 넓은 플로그인 개발이 가능한다. 다만, 상업용
소프트웨어 특성 상 메뉴에 제공하는 강력한 기능을 비즈니스를 고려해 API로 공개 제공하지
않는다. .NET을 사용해야 하며, numpy와 같은 좋은 라이브러리를 사용하는 데 제약이 있다.
38.
3D 모델러 애드인개발 과정 Page 38 of 42
참고 - Help | Point Cloud Client | Autodesk
참고 - autodesk point cloud api sdk - Google Search
39.
3D 모델러 애드인개발 과정 Page 39 of 42
7. Rhino Plugin
7.1 개발 방법
간단한 부분은 그래스호퍼나 파이썬으로 개발할 수 있으나, 좀 더 고수준 기능 개발을
위해서는 C#을 사용해야 한다. 참고로, 파이썬은 IRonPython 버전을 사용하여, 라이브러리
설치 등에 제약이 많음.
참고 - Rhino - Your First Plugin (Windows) (rhino3d.com)
참고 - mcneel/rhino-developer-samples: Rhino and Grasshopper developer sample code
(github.com)
7.2 코딩
다음과 같이 이벤트 콜백 함수를 통해, 사용자 입력을 받아 적절한 실행 로직을 코딩하면 된다.
40.
3D 모델러 애드인개발 과정 Page 40 of 42
using Rhino;
using Rhino.UI;
namespace SampleCsMouseCallback
{
public class SampleMouseCallback : MouseCallback
{
protected override void OnMouseEnter(MouseCallbackEventArgs e)
{
RhinoApp.WriteLine($"Entering view {e.View?.ActiveViewport?.Name}");
}
protected override void OnMouseHover(MouseCallbackEventArgs e)
{
RhinoApp.WriteLine($"Hovering on view {e.View?.ActiveViewport?.Name}");
base.OnMouseHover(e);
}
protected override void OnMouseLeave(MouseCallbackEventArgs e)
{
RhinoApp.WriteLine($"Leaving view {e.View?.ActiveViewport?.Name}");
base.OnMouseLeave(e);
}
protected override void OnMouseMove(MouseCallbackEventArgs e)
{
RhinoApp.WriteLine($"Moving over view {e.View?.ActiveViewport?.Name}");
base.OnMouseMove(e);
}
}
}
7.3 참고
Rhino Developer C# Level | ProArchitect (teachable.com)
41.
3D 모델러 애드인개발 과정 Page 41 of 42
[python] Where are the mouse events in the API doc? - Scripting - McNeel Forum
42.
3D 모델러 애드인개발 과정 Page 42 of 42
8. 레퍼런스
SKETCHUP SDK, TUTORIAL, SketchUp/sketchup-ruby-api-tutorials: SketchUp Ruby API
Tutorials and Examples (github.com)
Python Libraries for Mesh, Point Cloud, and Data Visualization (Part 1) | by Ivan Nikolov |
Towards Data Science


![3D 모델러 애드인 개발 과정 Page 7 of 42
# Licensed under the MIT license
1.2.2 MAIN PROGRAM MODULE
require 'sketchup.rb'
module Examples
module HelloCube
def self.create_cube
model = Sketchup.active_model
model.start_operation('Create Cube', true)
group = model.active_entities.add_group
entities = group.entities
points = [
Geom::Point3d.new(0, 0, 0),
Geom::Point3d.new(1.m, 0, 0),
Geom::Point3d.new(1.m, 1.m, 0),
Geom::Point3d.new(0, 1.m, 0)
]
face = entities.add_face(points)
face.pushpull(-1.m)
model.commit_operation
end
unless file_loaded?(__FILE__)
menu = UI.menu('Plugins')
menu.add_item('01 Create Cube Example') {
self.create_cube
}
file_loaded(__FILE__)
end
end # module HelloCube
end # module Examples
1.2.3 Pick & Selection
# Copyright 2021 Trimble Inc
# Licensed under the MIT license](https://image.slidesharecdn.com/3daddin-230920045815-40ac001b/85/3D-ADDIN-7-320.jpg)
![3D 모델러 애드인 개발 과정 Page 11 of 42
update_ui
view.invalidate
end
def onLButtonUp(flags, x, y, view)
if @mouse_down.distance([x, y]) > DRAG_THRESHOLD
end_move(view)
end
end
# Here we have hard coded a special ID for the move cursor in SketchUp.
# Normally you would use `UI.create_cursor(cursor_path, 0, 0)` instead
# with your own custom cursor bitmap:
#
# CURSOR = UI.create_cursor(cursor_path, 0, 0)
MOVE_CURSOR = 641
INVALID_CURSOR = 663
…
1.3 C 코드 예시
#include <SketchUpAPI/slapi.h>
#include <SketchUpAPI/geometry.h>
#include <SketchUpAPI/initialize.h>
#include <SketchUpAPI/unicodestring.h>
#include <SketchUpAPI/model/model.h>
#include <SketchUpAPI/model/entities.h>
#include <SketchUpAPI/model/face.h>
#include <SketchUpAPI/model/edge.h>
#include <SketchUpAPI/model/vertex.h>
#include <vector>
int main() {
// Always initialize the API before using it
SUInitialize();
// Load the model from a file
SUModelRef model = SU_INVALID;
SUModelLoadStatus status;
SUResult res = SUModelCreateFromFileWithStatus(&model, "model.skp", &status);](https://image.slidesharecdn.com/3daddin-230920045815-40ac001b/85/3D-ADDIN-11-320.jpg)
![3D 모델러 애드인 개발 과정 Page 12 of 42
// It's best to always check the return code from each SU function call.
// Only showing this check once to keep this example short.
if (res != SU_ERROR_NONE) {
std::cout << "Failed creating model from a file" << std::endl;
return 1;
}
if (status == SUModelLoadStatus_Success_MoreRecent) {
std::cout
<< "This model was created in a more recent SketchUp version than that of the SDK. "
"It contains data which will not be read. Saving the model over the original file may "
"lead to permanent data loss."
<< std::endl;
}
// Get the entity container of the model.
SUEntitiesRef entities = SU_INVALID;
SUModelGetEntities(model, &entities);
// Get all the faces from the entities object
size_t faceCount = 0;
SUEntitiesGetNumFaces(entities, &faceCount);
if (faceCount > 0) {
std::vector<SUFaceRef> faces(faceCount);
SUEntitiesGetFaces(entities, faceCount, &faces[0], &faceCount);
// Get all the edges in this face
for (size_t i = 0; i < faceCount; i++) {
size_t edgeCount = 0;
SUFaceGetNumEdges(faces[i], &edgeCount);
if (edgeCount > 0) {
std::vector<SUEdgeRef> edges(edgeCount);
SUFaceGetEdges(faces[i], edgeCount, &edges[0], &edgeCount);
// Get the vertex positions for each edge
for (size_t j = 0; j < edgeCount; j++) {
SUVertexRef startVertex = SU_INVALID;
SUVertexRef endVertex = SU_INVALID;
SUEdgeGetStartVertex(edges[j], &startVertex);
SUEdgeGetEndVertex(edges[j], &endVertex);
SUPoint3D start;
SUPoint3D end;
SUVertexGetPosition(startVertex, &start);
SUVertexGetPosition(endVertex, &end);](https://image.slidesharecdn.com/3daddin-230920045815-40ac001b/85/3D-ADDIN-12-320.jpg)
![3D 모델러 애드인 개발 과정 Page 13 of 42
// Now do something with the point data
}
}
}
}
// Get model name
SUStringRef name = SU_INVALID;
SUStringCreate(&name);
SUModelGetName(model, &name);
size_t name_length = 0;
SUStringGetUTF8Length(name, &name_length);
char* name_utf8 = new char[name_length + 1];
SUStringGetUTF8(name, name_length + 1, name_utf8, &name_length);
// Now we have the name in a form we can use
SUStringRelease(&name);
delete []name_utf8;
// Must release the model or there will be memory leaks
SUModelRelease(&model);
// Always terminate the API when done using it
SUTerminate();
return 0;
}
1.4 참고
스케치업 프로를 설치하면 옵션으로 설치되는 스캔 에센셜이란 상용 도구가 있다. 이를
설치하면 LAS 등 점군 파일 포맷을 로딩할 수 있다. 단 9 일 사용 제한이며, osnap과 같은
기능도 제대로 잘 사용하기 쉽지 않다(연습 필요). recap 파일 저장하는 단계가 있는 것으로
봐서, Autodesk와 협력해, 해당 기술을 라이센싱하는 듯하다.
Point Clouds to 3D Model Software - Point Cloud 3D Model - SketchUp](https://image.slidesharecdn.com/3daddin-230920045815-40ac001b/85/3D-ADDIN-13-320.jpg)

![3D 모델러 애드인 개발 과정 Page 21 of 42
CC = pycc.GetInstance()
def main():
entities = CC.getSelectedEntities()
if not entities:
raise RuntimeError("No entities selected")
CC.freezeUI(True)
pointCloud = entities[0]
print(pointCloud)
gravityCenter = cccorelib.GeometricalAnalysisTools.ComputeGravityCenter(pointCloud)
print("The gravity center of {} is {}".format(pointCloud.getName(), gravityCenter))
CC.freezeUI(False)
if __name__ == '__main__':
main()
3. 코딩된 파이썬을 실행해본다.](https://image.slidesharecdn.com/3daddin-230920045815-40ac001b/85/3D-ADDIN-21-320.jpg)

![3D 모델러 애드인 개발 과정 Page 23 of 42
플러그인 개발 후 다음과 같이 폴더 만들어 복사해 넣을 것.
plugins/private
2.2.3 플러그인 템플릿 사용법
1. 플러그인의 디렉토리 이름을 변경. 예. ExamplePluginSuperPlugin
2. 플러그인의 디렉토리와 동일한 이름을 갖도록 파일 이름을 변경.
예. .qrcExamplePlugin.qrc -> SuperPlugin.qrc
3. 플러그인을 빌드해야 하는지 여부를 제어하는 옵션의 이름을 변경.
"main"및 파일 (예 : 및 )에서 클래스 이름을 변경. 예. ExamplePlugin.cppExamplePlugin.h
4. 파일을 업데이트. 예. info.json
2.2.4 파이썬 스크립트 예시
파이썬은 데이터 배치 처리 수준에서만 사용 가능한다. 예시는 다음과 같음 (참고).
os.environ["_CCTRACE_"]="ON" # only if you want debug traces
from C++
import cloudComPy as cc # import the CloudComPy module
cloud = cc.loadPointCloud("myCloud.xyz") # read a point cloud from a file
print("cloud name: %s"%cloud.getName())
res=cc.computeCurvature(cc.CurvatureType.GAUSSIAN_CURV, 0.05, [cloud]) # compute curvature as a
scalar field
nsf = cloud.getNumberOfScalarFields()
sfCurv=cloud.getScalarField(nsf-1)
cloud.setCurrentOutScalarField(nsf-1)
filteredCloud=cc.filterBySFValue(0.01, sfCurv.getMax(), cloud) # keep only the points above a
given curvature](https://image.slidesharecdn.com/3daddin-230920045815-40ac001b/85/3D-ADDIN-23-320.jpg)
![3D 모델러 애드인 개발 과정 Page 24 of 42
ok = filteredCloud.exportCoordToSF(False, False, True) # Z coordinate as a scalar Field
nsf = cloud.getNumberOfScalarFields()
sf1=filteredCloud.getScalarField(nsf-1)
mean, var = sf1.computeMeanAndVariance()
# using Numpy...
coordinates = filteredCloud.toNpArrayCopy() # coordinates as a numpy array
x=coordinates[:,0] # x column
y=coordinates[:,1]
z=coordinates[:,2]
f=(2*x-y)*(x+3*y) # elementwise operation on arrays
asf1=sf1.toNpArray() # scalar field as a numpy array
sf1.fromNpArrayCopy(f) # replace scalar field values by a numpy
array
res=cc.SavePointCloud(filteredCloud,"myModifiedCloud.bin") #save the point cloud to a file
2.2.5 레퍼런스
Plugins - CloudCompare forum
Steps to create a new plugin - CloudCompare forum (danielgm.net)
CloudCompare/CONTRIBUTING.md at master · CloudCompare/CloudCompare (github.com)
cloudcompare-general-tutorial_v3.docx (live.com)](https://image.slidesharecdn.com/3daddin-230920045815-40ac001b/85/3D-ADDIN-24-320.jpg)
![3D 모델러 애드인 개발 과정 Page 31 of 42
self.iface.mapCanvas().renderComplete.connect(self.renderTest)
def unload(self):
# remove the plugin menu item and icon
self.iface.removePluginMenu("&Test plugins", self.action)
self.iface.removeToolBarIcon(self.action)
# disconnect form signal of the canvas
self.iface.mapCanvas().renderComplete.disconnect(self.renderTest)
def run(self):
# create and show a configuration dialog or something similar
print("TestPlugin: run called!")
def renderTest(self, painter):
# use painter for drawing to map canvas
print("TestPlugin: renderTest called!")
4.2 코드 예시
def getSelectedPoints(self):
selectedPoints = []
selectedTileNames = []
for loadTile in self.loadedTiles:
layers = QgsProject.instance().mapLayersByName(loadTile)
if len(layers) == 1:
layer = layers[0]
if layer.type() == QgsMapLayer.VectorLayer:
features = layer.selectedFeatures()
for feature in features:
point = []
point.append(loadTile)
point.append(feature[PC3DDefinitions.CONST_TILE_FIELD_NAME_FILE_ID])
point.append(feature[PC3DDefinitions.CONST_TILE_FIELD_NAME_POSITION])
# point.append(feature[PC3DDefinitions.CONST_TILE_FIELD_NAME_CLASS_NEW])
# point.append(feature[PC3DDefinitions.CONST_TILE_FIELD_NAME_CLASS])
selectedPoints.append(point)
if not loadTile in selectedTileNames:
selectedTileNames.append(loadTile)
return [selectedPoints,selectedTileNames]](https://image.slidesharecdn.com/3daddin-230920045815-40ac001b/85/3D-ADDIN-31-320.jpg)
![3D 모델러 애드인 개발 과정 Page 34 of 42
3. 해당 코드를 실행한다. 그럼 다음과 같이 캐드 화면에 엔티티가 생성됨.
5.2 코드 예시
namespace MyFirstCadPlugin
{
public class Class1
{
[CommandMethod("hello")]
public void HelloCommand()
{
// Here we connect to the active AutoCAD Document and Database
Document acDoc = Application.DocumentManager.MdiActiveDocument;
Database acCurDb = acDoc.Database;
// Here we create a Transaction in the current Database
using (Transaction acTrans = acCurDb.TransactionManager.StartTransaction())
{
// Access to the Model Blocktable for write
BlockTable acBlkTbl;
acBlkTbl = acTrans.GetObject(acCurDb.BlockTableId,
OpenMode.ForWrite) as BlockTable;
BlockTableRecord acBlkTblRec;
acBlkTblRec = acTrans.GetObject(acBlkTbl[BlockTableRecord.ModelSpace],
OpenMode.ForWrite) as BlockTableRecord;](https://image.slidesharecdn.com/3daddin-230920045815-40ac001b/85/3D-ADDIN-34-320.jpg)
![3D 모델러 애드인 개발 과정 Page 41 of 42
[python] Where are the mouse events in the API doc? - Scripting - McNeel Forum](https://image.slidesharecdn.com/3daddin-230920045815-40ac001b/85/3D-ADDIN-41-320.jpg)


![[180718] ML 분야 유학 및 취업 준비 설명회 @SNU](https://cdn.slidesharecdn.com/ss_thumbnails/mlpresentation180718ttf-180720005850-thumbnail.jpg?width=640&height=640&fit=bounds)


![[메조미디어] Media&Market Report_2023.02](https://cdn.slidesharecdn.com/ss_thumbnails/mediamarketreport20232-230131082633-5544b7c3-thumbnail.jpg?width=640&height=640&fit=bounds)


![[IGC2018] 오토데스크 홍상범 - 아티스트를 위한 Visual Scripting - MCG in 3dsMax, Blueprint in...](https://cdn.slidesharecdn.com/ss_thumbnails/3-181023015333-thumbnail.jpg?width=640&height=640&fit=bounds)


![[KGC2014] DX9에서DX11로의이행경험공유](https://cdn.slidesharecdn.com/ss_thumbnails/kgc2014dx9dx11-141108081701-conversion-gate01-thumbnail.jpg?width=640&height=640&fit=bounds)


