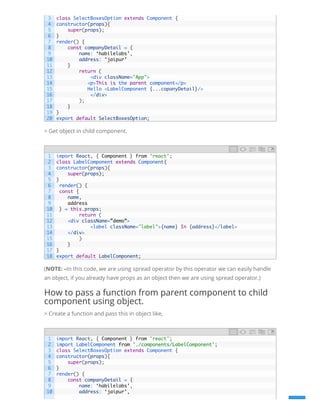
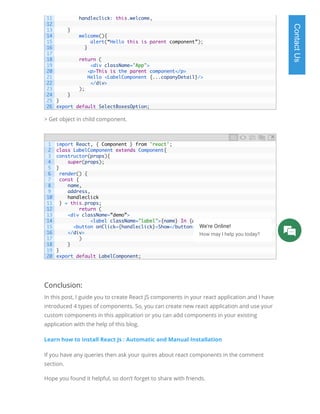
3 SIMPLE STEPS TO CREATE REACT JS
COMPONENTS
by Ashu | Jul 25, 2017 | Web Development | 0 comments
Today in this article, I will discuss how to create react js components, but before we start
to create components, let’s have an idea about what is components and why it is required.
The component is a small part of HTML tags. For example, input, label, select, etc.
It is required because after creating component we can use this component in many les.
we don’t need to create HTML tags on every page.
Before creating a component it is required to know that how you can install react-js.
Step 1: Install React.Js
> Create a folder in any drive,
> Open Command prompt.
> Enter commands and run.
• Npm install -g create-react-app
• Create-react-app my-app
• Cd my-app
U a
• Npm start
(Note: my-app is name of your application, your application run on browser)
Your Application Running Like This.
After the learning how to install react.js, it is important that where we can create our
component, so I am explaining the folder structure of react-js.
Step 2: Folder Structure
> Node_modules
> Public
• Favicon.ico
• Index.html
• Manifest.json
> Src
> Package.json
This is your folder structure. Your all packages are installed in node_modules which you
installed by command prompt for Exp: react.
In the src folder, you would include all your .js le.
The package.json le is your backup le of all your packages. When setup your application
on another system it’s not necessary to run all commands again you just run a single
command npm install then all packages are installed automatically.
Basic structure of your component
1 import React, { Component } from 'react';
selectBoxesOption is the name of your component. Your component name must start with
capital letter.
Import React, {Component} from ‘React’. It is necessary to import React in your
component. So, you should add this line in your every component.
Render()this function return a HTML.
Export default SelectBoxesOption all component are displayed on index.html so it is
compulsory to export your component.
Now we are ready to create our React JS components and how to use in another le.
Step 3: Component Creation
How to create a new component and uses in another
component:
Follow the following steps to create your another component.
> Create a folder in src ‘components’.
> Create a le in component folder ‘labelComponent.js’
> Write your code in labelComponent.js
> Import this component in your another component by,
2
3
4
5
6
7
8
9
10
11
class SelectBoxesOption extends Component {
    render() {
        return (
          <div className="App">
<p>This is the parent component</p>
             </div>
         );
         }
     }
     export default SelectBoxesOption;
1
2
3
4
5
6
7
8
9
10
11
import React, { Component } from 'react';
class LabelComponent extends Component{
    render() {
        return (
<div className=”demo”>
            <label className="label">Hello App</label>
</div>
        )
    }
}
export default LabelComponent;
1
2
3
4
import React, { Component } from 'react';
import LabelComponent from './components/LabelComponent';
class SelectBoxesOption extends Component {
render() {
Now you can reuse this (‘LabelComponent’) component. In any other component.
How to pass property from one component to another:
> Set a property in child component.
> Get this property in your child component by,
How to pass an object from one component to another.
> Create an object in your parent component and pass in child component by,
5
6
7
8
9
10
11
12
13
        return (
            <div className="App">
<p>This is the parent component</p>
<LabelComponent />
            </div>
        );
    }
}
export default SelectBoxesOption;
1
2
3
4
5
6
7
8
9
10
11
12
13
14
15
16
import React, { Component } from 'react';
import LabelComponent from './components/LabelComponent';
class SelectBoxesOption extends Component {
constructor(props){
    super(props);
}
render() {
        return (
            <div className="App">
   <p>This is the parent component</p>
   Hello <LabelComponent companyName={’Habilelabs’}/>
            </div>
        );
    }
}
export default SelectBoxesOption;
1
2
3
4
5
6
7
8
9
10
11
12
13
14
import React, { Component } from 'react';
class LabelComponent extends Component{
constructor(props){
    super(props);
}
render() {
        return (
<div className=”demo”>
            <label className="label">{this.props. companyName }</label>
</div>
        )
    }
}
export default LabelComponent;
1
2
import React, { Component } from 'react';
import LabelComponent from './components/LabelComponent';
> Get object in child component.
(NOTE: –In this code, we are using spread operator by this operator we can easily handle
an object, if you already have props as an object then we are using spread operator.)
How to pass a function from parent component to child
component using object.
> Create a function and pass this in object like,
3
4
5
6
7
8
9
10
11
12
13
14
15
16
17
18
19
20
class SelectBoxesOption extends Component {
constructor(props){
    super(props);
}
render() {
const companyDetail = {
name: ‘habilelabs’,
address: ‘jaipur’
}
        return (
            <div className="App">
   <p>This is the parent component</p>
   Hello <LabelComponent {...copanyDetail}/>
            </div>
        );
    }
}
export default SelectBoxesOption;
1
2
3
4
5
6
7
8
9
10
11
12
13
14
15
16
17
18
import React, { Component } from 'react';
class LabelComponent extends Component{
constructor(props){
    super(props);
}
render() {
const {
name,
address
} = this.props;
        return (
<div className=”demo”>
            <label className="label">{name} In {address}</label>
</div>
        )
    }
}
export default LabelComponent;
1
2
3
4
5
6
7
8
9
10
import React, { Component } from 'react';
import LabelComponent from './components/LabelComponent';
class SelectBoxesOption extends Component {
constructor(props){
    super(props);
}
render() {
const companyDetail = {
name: ‘habilelabs’,
address: ‘jaipur’,
> Get object in child component.
Conclusion:
In this post, I guide you to create React JS components in your react application and I have
introduced 4 types of components. So, you can create new react application and use your
custom components in this application or you can add components in your existing
application with the help of this blog.
Learn how to install React Js : Automatic and Manual Installation 
If you have any queries then ask your quires about react components in the comment
section.
Hope you found it helpful, so don’t forget to share with friends.
11
12
13
14
15
16
17
18
19
20
21
22
23
24
25
26
handleclick: this.welcome,
}
welcome(){
alert(“Hello this is parent component”);
          }
 
        return (
            <div className="App">
   <p>This is the parent component</p>
   Hello <LabelComponent {...copanyDetail}/>
            </div>
        );
    }
}
export default SelectBoxesOption;
1
2
3
4
5
6
7
8
9
10
11
12
13
14
15
16
17
18
19
20
import React, { Component } from 'react';
class LabelComponent extends Component{
constructor(props){
    super(props);
}
render() {
const {
name,
address,
handleclick
} = this.props;
        return (
<div className=”demo”>
            <label className="label">{name} In {address}</label>
  <button onClick={handleclick}>Show</button>
</div>
        )
    }
}
export default LabelComponent;
ContactUs
We're Online!
How may I help you today? 
Share on Facebook Share on Twitter Share on Google+
3 Simple Steps to Create React JS Components
Know 4 Types of Mistakes a Node JS Developer Makes
4 Basic Rest API Design Guidelines You should know
A Complete HTML and CSS Guidelines for Beginners
Steps to Create a Basic Application in Angular 2
What is Mini cation and It’s Bene ts
Recent Posts
Mobile development
Our Partners
Tech stack Migration
Web Development
Categories
Node Js
Angular Js
Android
Ionic
MongoDB
Salesforce
Technologies

3 Simple Steps to follow to Create React JS Components

  • 1.
    3 SIMPLE STEPSTO CREATE REACT JS COMPONENTS by Ashu | Jul 25, 2017 | Web Development | 0 comments Today in this article, I will discuss how to create react js components, but before we start to create components, let’s have an idea about what is components and why it is required. The component is a small part of HTML tags. For example, input, label, select, etc. It is required because after creating component we can use this component in many les. we don’t need to create HTML tags on every page. Before creating a component it is required to know that how you can install react-js. Step 1: Install React.Js > Create a folder in any drive, > Open Command prompt. > Enter commands and run. • Npm install -g create-react-app • Create-react-app my-app • Cd my-app U a
  • 2.
    • Npm start (Note:my-app is name of your application, your application run on browser) Your Application Running Like This. After the learning how to install react.js, it is important that where we can create our component, so I am explaining the folder structure of react-js. Step 2: Folder Structure > Node_modules > Public • Favicon.ico • Index.html • Manifest.json > Src > Package.json This is your folder structure. Your all packages are installed in node_modules which you installed by command prompt for Exp: react. In the src folder, you would include all your .js le. The package.json le is your backup le of all your packages. When setup your application on another system it’s not necessary to run all commands again you just run a single command npm install then all packages are installed automatically. Basic structure of your component 1 import React, { Component } from 'react';
  • 3.
    selectBoxesOption is thename of your component. Your component name must start with capital letter. Import React, {Component} from ‘React’. It is necessary to import React in your component. So, you should add this line in your every component. Render()this function return a HTML. Export default SelectBoxesOption all component are displayed on index.html so it is compulsory to export your component. Now we are ready to create our React JS components and how to use in another le. Step 3: Component Creation How to create a new component and uses in another component: Follow the following steps to create your another component. > Create a folder in src ‘components’. > Create a le in component folder ‘labelComponent.js’ > Write your code in labelComponent.js > Import this component in your another component by, 2 3 4 5 6 7 8 9 10 11 class SelectBoxesOption extends Component {     render() {         return (           <div className="App"> <p>This is the parent component</p>              </div>          );          }      }      export default SelectBoxesOption; 1 2 3 4 5 6 7 8 9 10 11 import React, { Component } from 'react'; class LabelComponent extends Component{     render() {         return ( <div className=”demo”>             <label className="label">Hello App</label> </div>         )     } } export default LabelComponent; 1 2 3 4 import React, { Component } from 'react'; import LabelComponent from './components/LabelComponent'; class SelectBoxesOption extends Component { render() {
  • 4.
    Now you canreuse this (‘LabelComponent’) component. In any other component. How to pass property from one component to another: > Set a property in child component. > Get this property in your child component by, How to pass an object from one component to another. > Create an object in your parent component and pass in child component by, 5 6 7 8 9 10 11 12 13         return (             <div className="App"> <p>This is the parent component</p> <LabelComponent />             </div>         );     } } export default SelectBoxesOption; 1 2 3 4 5 6 7 8 9 10 11 12 13 14 15 16 import React, { Component } from 'react'; import LabelComponent from './components/LabelComponent'; class SelectBoxesOption extends Component { constructor(props){     super(props); } render() {         return (             <div className="App">    <p>This is the parent component</p>    Hello <LabelComponent companyName={’Habilelabs’}/>             </div>         );     } } export default SelectBoxesOption; 1 2 3 4 5 6 7 8 9 10 11 12 13 14 import React, { Component } from 'react'; class LabelComponent extends Component{ constructor(props){     super(props); } render() {         return ( <div className=”demo”>             <label className="label">{this.props. companyName }</label> </div>         )     } } export default LabelComponent; 1 2 import React, { Component } from 'react'; import LabelComponent from './components/LabelComponent';
  • 5.
    > Get objectin child component. (NOTE: –In this code, we are using spread operator by this operator we can easily handle an object, if you already have props as an object then we are using spread operator.) How to pass a function from parent component to child component using object. > Create a function and pass this in object like, 3 4 5 6 7 8 9 10 11 12 13 14 15 16 17 18 19 20 class SelectBoxesOption extends Component { constructor(props){     super(props); } render() { const companyDetail = { name: ‘habilelabs’, address: ‘jaipur’ }         return (             <div className="App">    <p>This is the parent component</p>    Hello <LabelComponent {...copanyDetail}/>             </div>         );     } } export default SelectBoxesOption; 1 2 3 4 5 6 7 8 9 10 11 12 13 14 15 16 17 18 import React, { Component } from 'react'; class LabelComponent extends Component{ constructor(props){     super(props); } render() { const { name, address } = this.props;         return ( <div className=”demo”>             <label className="label">{name} In {address}</label> </div>         )     } } export default LabelComponent; 1 2 3 4 5 6 7 8 9 10 import React, { Component } from 'react'; import LabelComponent from './components/LabelComponent'; class SelectBoxesOption extends Component { constructor(props){     super(props); } render() { const companyDetail = { name: ‘habilelabs’, address: ‘jaipur’,
  • 6.
    > Get objectin child component. Conclusion: In this post, I guide you to create React JS components in your react application and I have introduced 4 types of components. So, you can create new react application and use your custom components in this application or you can add components in your existing application with the help of this blog. Learn how to install React Js : Automatic and Manual Installation  If you have any queries then ask your quires about react components in the comment section. Hope you found it helpful, so don’t forget to share with friends. 11 12 13 14 15 16 17 18 19 20 21 22 23 24 25 26 handleclick: this.welcome, } welcome(){ alert(“Hello this is parent component”);           }           return (             <div className="App">    <p>This is the parent component</p>    Hello <LabelComponent {...copanyDetail}/>             </div>         );     } } export default SelectBoxesOption; 1 2 3 4 5 6 7 8 9 10 11 12 13 14 15 16 17 18 19 20 import React, { Component } from 'react'; class LabelComponent extends Component{ constructor(props){     super(props); } render() { const { name, address, handleclick } = this.props;         return ( <div className=”demo”>             <label className="label">{name} In {address}</label>   <button onClick={handleclick}>Show</button> </div>         )     } } export default LabelComponent; ContactUs We're Online! How may I help you today? 
  • 7.
    Share on FacebookShare on Twitter Share on Google+ 3 Simple Steps to Create React JS Components Know 4 Types of Mistakes a Node JS Developer Makes 4 Basic Rest API Design Guidelines You should know A Complete HTML and CSS Guidelines for Beginners Steps to Create a Basic Application in Angular 2 What is Mini cation and It’s Bene ts Recent Posts Mobile development Our Partners Tech stack Migration Web Development Categories Node Js Angular Js Android Ionic MongoDB Salesforce Technologies