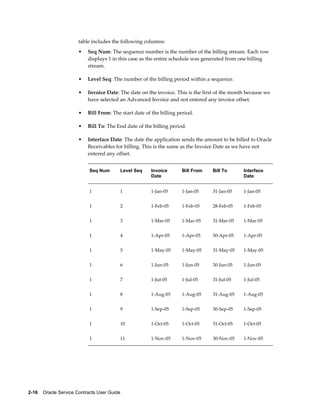
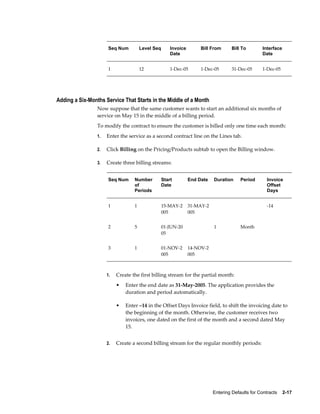
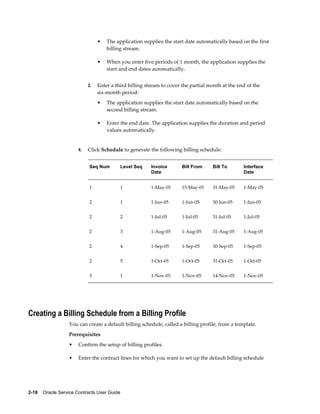
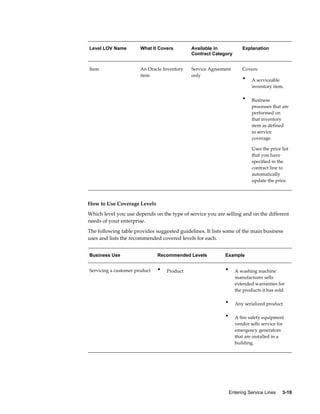
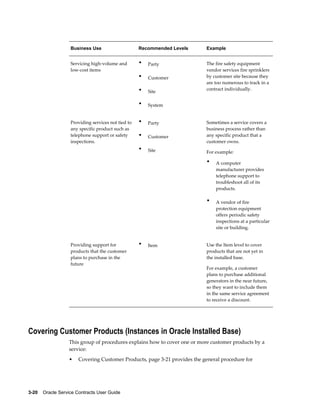
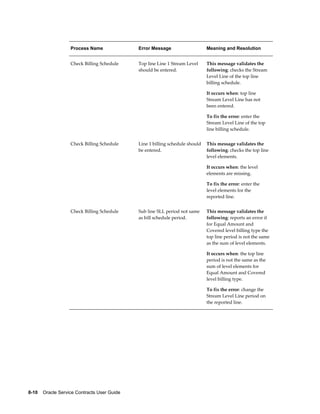
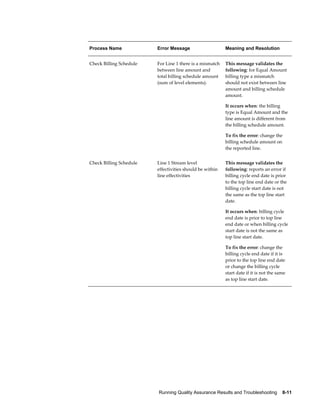
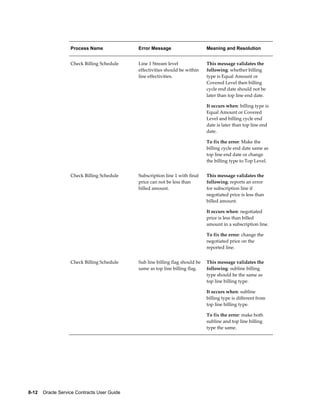
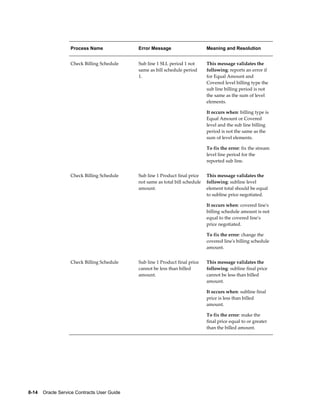
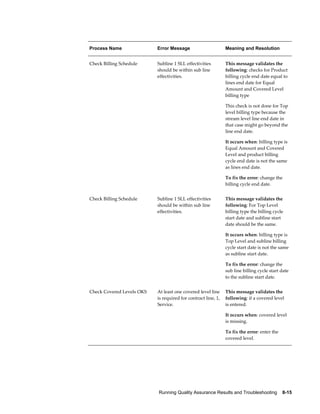
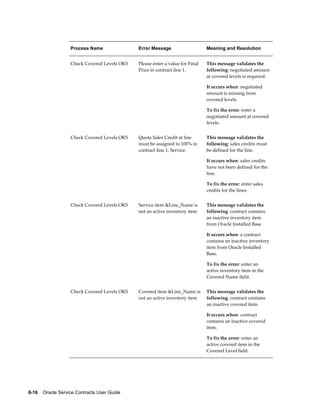
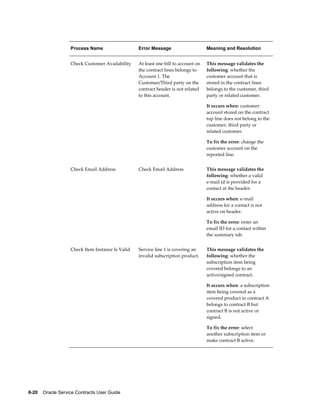
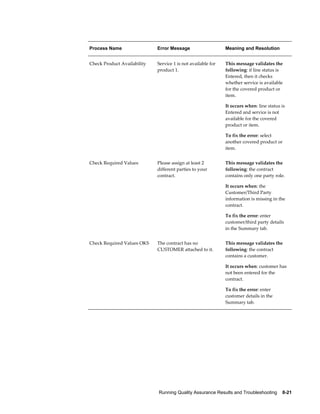
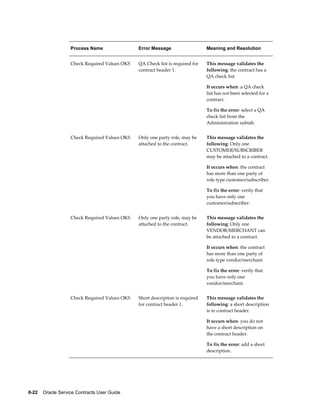
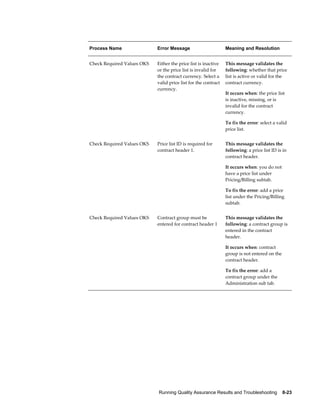
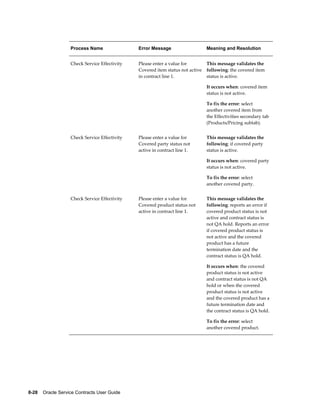
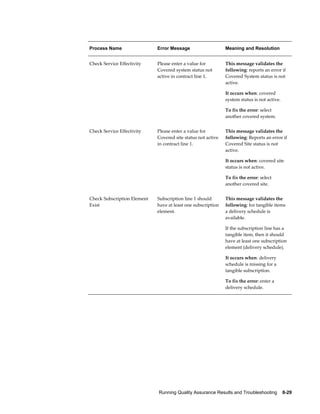
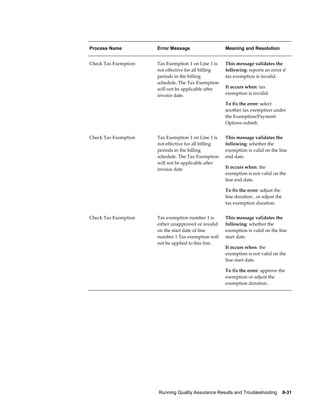
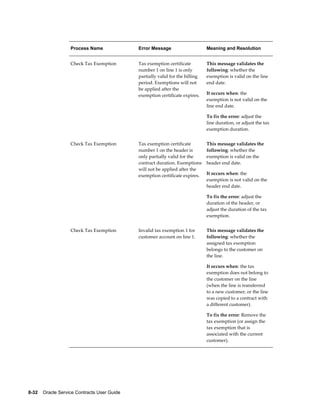
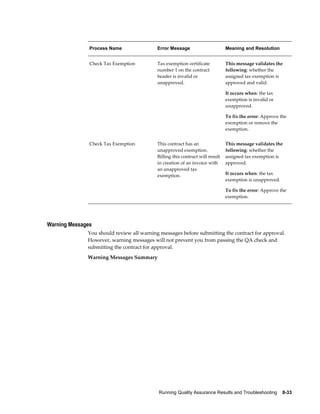
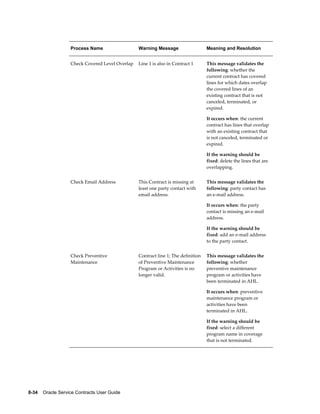
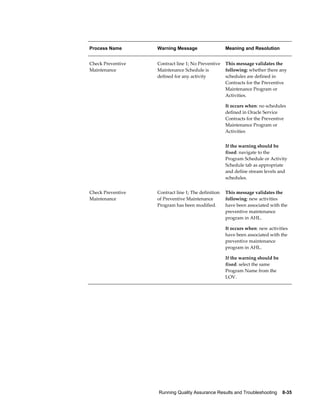
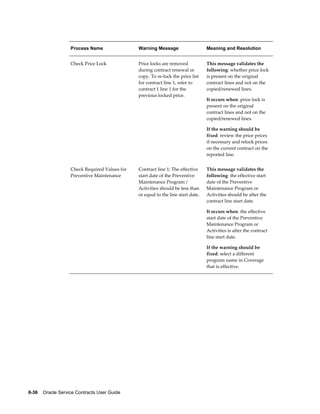
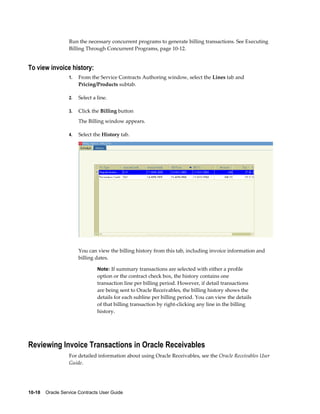
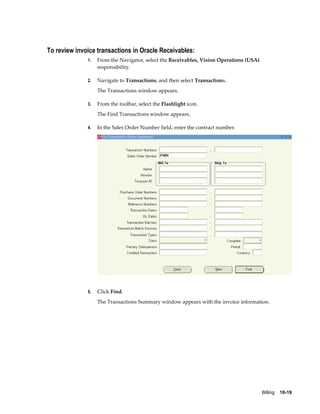
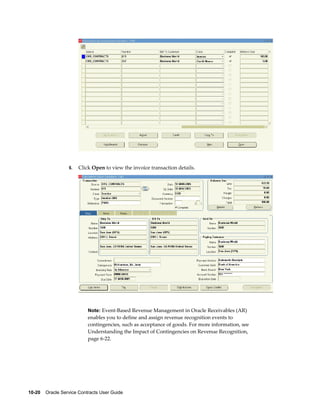
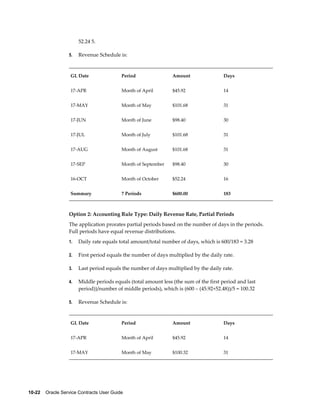
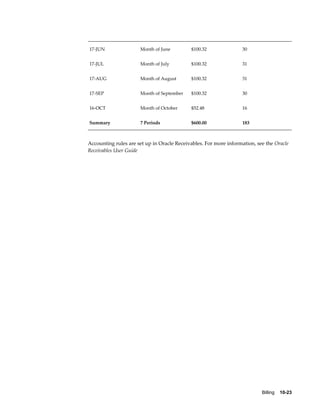
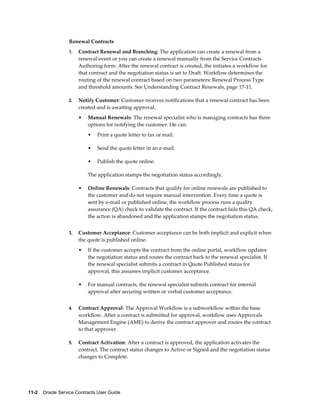
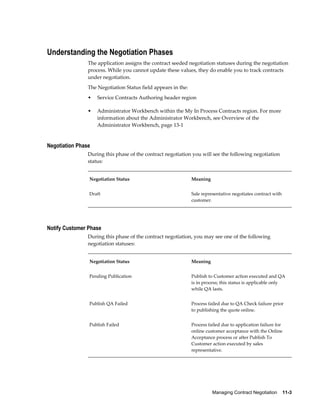
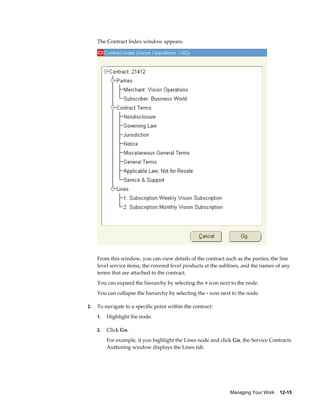
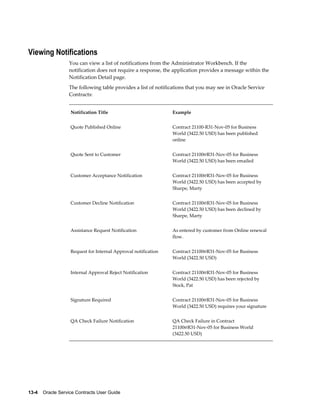
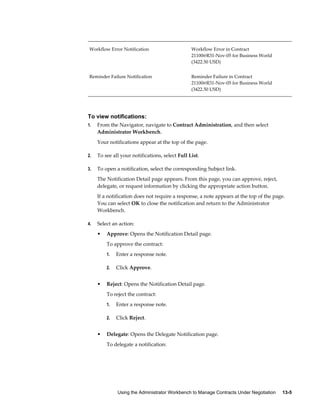
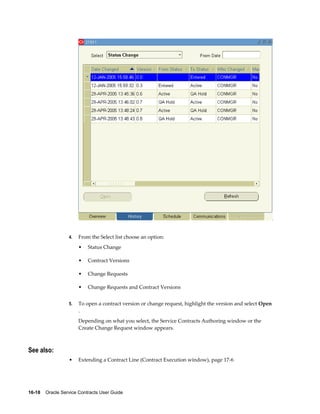
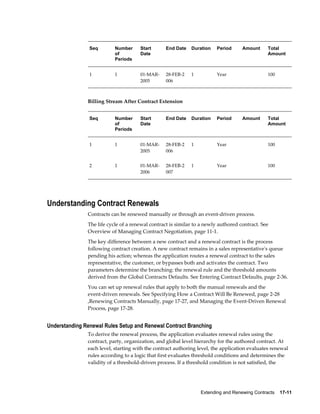
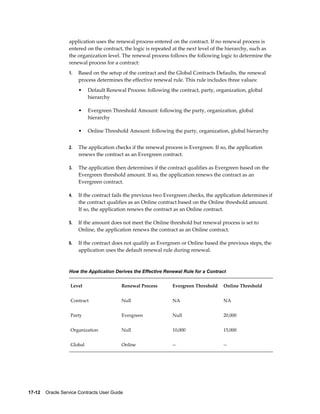
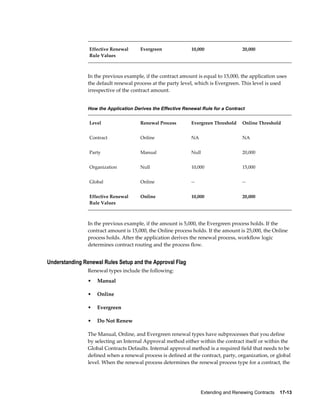
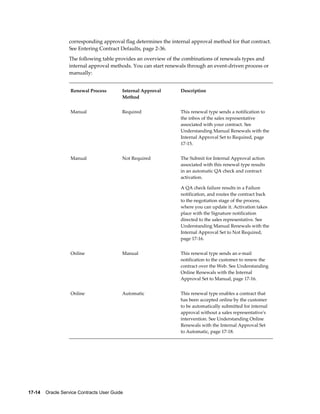
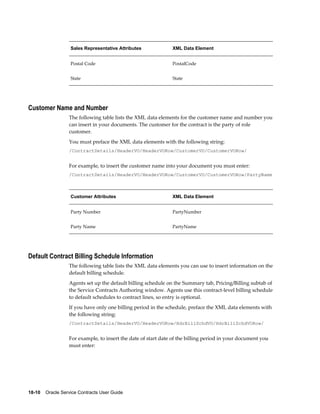
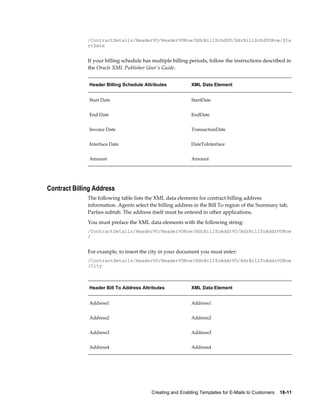
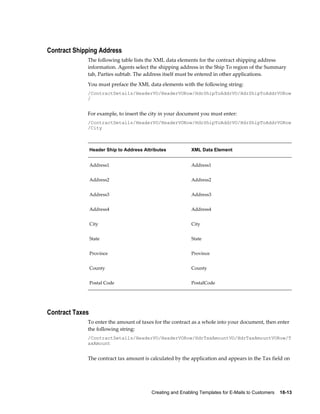
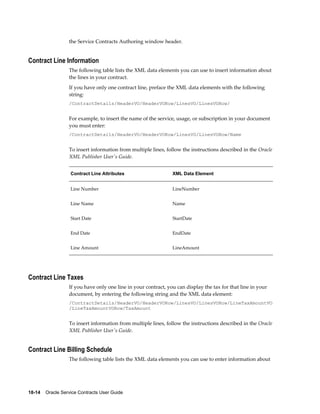
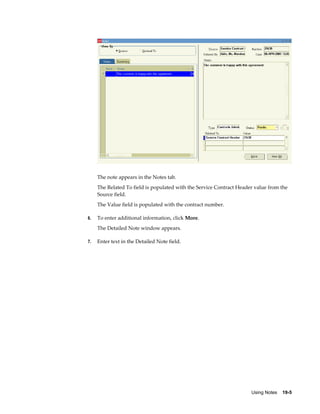
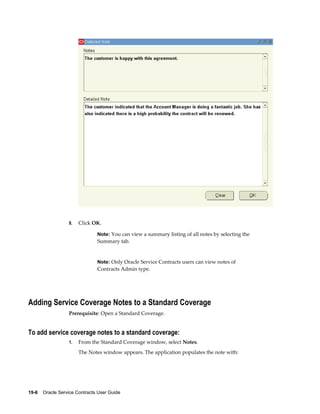
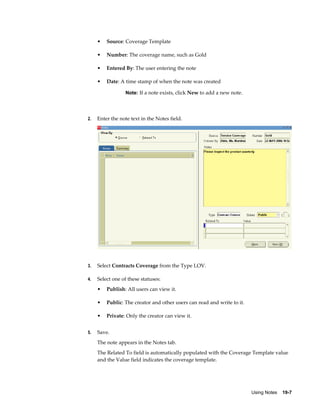
Oracle® Service Contracts
User Guide
Release 12
Part No. B25717-02
June 2007
Oracle Service Contracts User Guide, Release 12
Part No. B25717-02
Copyright © 2005, 2007, Oracle. All rights reserved.
Primary Author:     Stacey Tucker-Blosch
The Programs (which include both the software and documentation) contain proprietary information; they
are provided under a license agreement containing restrictions on use and disclosure and are also protected
by copyright, patent, and other intellectual and industrial property laws. Reverse engineering, disassembly, or
decompilation of the Programs, except to the extent required to obtain interoperability with other
independently created software or as specified by law, is prohibited.
The information contained in this document is subject to change without notice. If you find any problems in
the documentation, please report them to us in writing. This document is not warranted to be error-free.
Except as may be expressly permitted in your license agreement for these Programs, no part of these
Programs may be reproduced or transmitted in any form or by any means, electronic or mechanical, for any
purpose.
If the Programs are delivered to the United States Government or anyone licensing or using the Programs on
behalf of the United States Government, the following notice is applicable:
U.S. GOVERNMENT RIGHTS
Programs, software, databases, and related documentation and technical data delivered to U.S. Government
customers are "commercial computer software" or "commercial technical data" pursuant to the applicable
Federal Acquisition Regulation and agency-specific supplemental regulations. As such, use, duplication,
disclosure, modification, and adaptation of the Programs, including documentation and technical data, shall
be subject to the licensing restrictions set forth in the applicable Oracle license agreement, and, to the extent
applicable, the additional rights set forth in FAR 52.227-19, Commercial Computer Software--Restricted
Rights (June 1987). Oracle Corporation, 500 Oracle Parkway, Redwood City, CA 94065.
The Programs are not intended for use in any nuclear, aviation, mass transit, medical, or other inherently
dangerous applications. It shall be the licensee's responsibility to take all appropriate fail-safe, backup,
redundancy and other measures to ensure the safe use of such applications if the Programs are used for such
purposes, and we disclaim liability for any damages caused by such use of the Programs.
The Programs may provide links to Web sites and access to content, products, and services from third parties.
Oracle is not responsible for the availability of, or any content provided on, third-party Web sites. You bear all
risks associated with the use of such content. If you choose to purchase any products or services from a third
party, the relationship is directly between you and the third party. Oracle is not responsible for: (a) the quality
of third-party products or services; or (b) fulfilling any of the terms of the agreement with the third party,
including delivery of products or services and warranty obligations related to purchased products or services.
Oracle is not responsible for any loss or damage of any sort that you may incur from dealing with any third
party.
Oracle, JD Edwards, PeopleSoft, and Siebel are registered trademarks of Oracle Corporation and/or its
affiliates. Other names may be trademarks of their respective owners.
    iii
 
Contents
Send Us Your Comments
Preface
1 Creating Contracts
Overview of Oracle Service Contracts...................................................................................... 1-1
Elements of a Service Contract..................................................................................................1-2
Managing the Service Contract Life Cycle .............................................................................. 1-4
Creating a Contract.................................................................................................................... 1-4
Copying Information Between Contracts................................................................................. 1-8
Searching for a Contract or Template..................................................................................... 1-11
Creating a Template from a Contract......................................................................................1-13
2 Entering Defaults for Contracts
Overview of Entering Defaults for Contracts...........................................................................2-2
Specifying Contract Effectivity and Maximum Duration........................................................ 2-2
Entering Parties to the Contract................................................................................................ 2-3
Entering Party Contacts............................................................................................................. 2-4
Creating or Modifying a Customer Contact Record................................................................. 2-5
Entering the Billing Account and Address............................................................................... 2-7
Entering the Shipping Account and Address........................................................................... 2-8
Entering the Price List............................................................................................................... 2-9
Entering Billing Schedules......................................................................................................2-11
Billing Schedules Overview................................................................................................... 2-11
Creating a Billing Schedule Using Billing Streams............................................................... 2-12
Entering a Billing Stream........................................................................................................ 2-13
iv
Using Billing Streams to Handle Irregular Billing Periods................................................... 2-15
Creating a Billing Schedule from a Billing Profile................................................................ 2-18
Specifying How Billed Amounts Appear on Invoices .......................................................... 2-19
Suspending Billing for a Contract.......................................................................................... 2-20
Holding Credits Until the Next Billing Cycle........................................................................ 2-20
Entering Tax Exemptions........................................................................................................ 2-21
Specifying a Payment Method................................................................................................ 2-23
Specifying Payment by Credit Card or Commitment Number .............................................2-23
Requiring a Purchase Order.................................................................................................... 2-24
Specifying a Purchase Order Number for Invoices................................................................2-25
Specifying a Receivables Transaction Type for Payment...................................................... 2-25
Assigning Sales Credits.......................................................................................................... 2-26
Requiring and Specifying a Purchase Order for Service Charges......................................... 2-27
Specifying How a Contract Will Be Renewed........................................................................ 2-28
Defining Grace Periods........................................................................................................... 2-30
Specifying and Starting the Contract Approval Workflow................................................... 2-30
Organizing Contracts by Assigning Them to Contract Groups.............................................2-30
Specify a Different Quality Assurance Check List................................................................ 2-31
Entering an Estimate of Contract Revenue............................................................................. 2-31
Specifying Contract Terms......................................................................................................2-32
Granting Additional Access Privileges ..................................................................................2-33
Entering an Additional Description or Comment.................................................................. 2-34
Setting Up Defaults for Contract Renewal............................................................................. 2-34
Overview of Default Levels.................................................................................................... 2-34
Entering Contract Defaults..................................................................................................... 2-36
Setting Up System Profiles for Renewal Defaults................................................................. 2-43
Speeding Up Contract Line Entry Using Default Values.......................................................2-44
3 Entering Service Lines
Overview of Entering Service Lines......................................................................................... 3-3
About Service Lines.................................................................................................................. 3-3
Entering a Service Line (General Procedure)............................................................................3-3
Changing the Billing and Shipping Accounts and Locations..................................................3-9
Entering Billing and Shipping Contacts for a Contract Line................................................. 3-10
Creating or Modifying a Contract Line Contact .................................................................... 3-10
Specifying How a Contract Line Is to Be Renewed................................................................3-12
Renewing Service Purchased for Seasonal or Peak Periods ..................................................3-13
Specifying What a Service Covers.......................................................................................... 3-14
Levels of Coverage and Their Uses.........................................................................................3-15
Covering Customer Products (Instances in Oracle Installed Base)........................................3-20
    v
Covering Customer Products.................................................................................................. 3-21
Browsing Oracle Installed Base to Identify Item Instances for Coverage............................. 3-24
Entering a Customer Product into Oracle Installed Base....................................................... 3-26
Covering Parties...................................................................................................................... 3-27
Covering Customer Accounts................................................................................................. 3-28
Covering Party Sites................................................................................................................ 3-30
Browsing Through Party Sites ............................................................................................... 3-30
Covering Systems.................................................................................................................... 3-32
Browsing Through Oracle Installed Base Systems ................................................................3-32
Covering Inventory Items....................................................................................................... 3-34
Viewing Details About a Covered Product............................................................................ 3-34
Maintaining Pricing Attributes for Covered Products........................................................... 3-35
Specifying How the Service Prints on an Invoice.................................................................. 3-35
Omitting a Line or Subline from the Invoice......................................................................... 3-36
Specifying the Invoice Text.....................................................................................................3-37
Specifying a Billing Schedule................................................................................................. 3-38
Pricing What a Service Covers................................................................................................ 3-39
Adjusting the Price of a Service for a Covered Product or an Item....................................... 3-41
Repricing a Service by Changing the Price List..................................................................... 3-41
Manually Adjusting the Price................................................................................................. 3-42
Changing the Basis for Pricing a Service................................................................................ 3-43
Pricing Service for a Party, Customer Account, Site, or System............................................ 3-44
Specifying a Payment Method for a Contract Line................................................................ 3-45
Specifying Payment by Credit Card or Commitment Number..............................................3-45
Requiring a Purchase Order.................................................................................................... 3-46
Specifying a Purchase Order Number.................................................................................... 3-46
Modifying Coverage Provided by a Service........................................................................... 3-47
Scheduling Preventive Maintenance Activities..................................................................... 3-48
Scheduling Multiple Activities at the Same Time................................................................. 3-50
Scheduling Individual Activities............................................................................................3-51
Scheduling Activities at Regular Intervals Using Schedule Streams.................................... 3-52
Viewing Maintenance Program and Activity Details............................................................ 3-54
Updating Scheduled Service Dates for a Maintenance Program........................................... 3-55
Ending Service Lines on a Day Specified by the Customer...................................................3-56
About Cotermination.............................................................................................................. 3-56
Applying the Cotermination Date to a Service...................................................................... 3-57
Specifying Tax Status.............................................................................................................. 3-57
Applying Changes from a Service Line to the Covered Sublines..........................................3-58
Assigning Sales Credits for a Contract Line........................................................................... 3-59
Updating Service..................................................................................................................... 3-59
Applying Default Values to Existing Contract Lines............................................................. 3-60
vi
4 Entering Usage Lines
Overview of Entering Usage Lines........................................................................................... 4-1
Charging a Customer for Usage................................................................................................ 4-2
Entering a Usage Line................................................................................................................4-3
Specifying How the Customer Is Charged............................................................................... 4-6
Charging Based on a Fixed Quantity of Usage Regardless of the Actual Usage..................... 4-7
Charging a Flat Fee Regardless of the Actual Usage................................................................ 4-9
Charging for Reported or Estimated Usage Per Period.......................................................... 4-11
Charging Based on Reported Usage........................................................................................4-17
Entering a Counter.................................................................................................................. 4-21
Entering the Starting Counter Reading.................................................................................. 4-22
Creating Special Price Breaks................................................................................................. 4-23
Point and Range Price Breaks................................................................................................. 4-26
Deleting Special Price Breaks................................................................................................. 4-27
Prorating Price Breaks to Apply to Multiple Periods.............................................................4-28
How Price Breaks Are Prorated...............................................................................................4-29
Specifying a Billing Schedule for a Usage Line..................................................................... 4-31
Recording Usage by Updating a Counter Reading.................................................................4-32
5 Entering Subscription Lines
Overview of Entering Subscription Lines................................................................................ 5-1
About Subscriptions..................................................................................................................5-1
Entering a Subscription Line.................................................................................................... 5-5
Specifying a Schedule of Product Shipments.......................................................................... 5-7
Adjusting the Subscription Price............................................................................................5-10
Viewing Pricing Details.......................................................................................................... 5-11
Specifying a Billing Schedule for Subscriptions................................................................... 5-12
Viewing the Shipment Status of a Subscription Order......................................................... 5-14
6 Ordering Service in Oracle Order Management
Overview of Ordering Service in Oracle Order Management................................................. 6-1
About Ordering Service in Oracle Order Management........................................................... 6-2
Ordering Service in a Sales Order............................................................................................ 6-6
Adding Service Lines to an Existing Contract.......................................................................... 6-9
Specifying Renewal and Other Details for a New Contract Created for Your Order........... 6-11
Running Concurrent Programs to Generate Contracts Automatically.................................. 6-14
Reprocessing Orders That Did Not Create Contracts.............................................................6-15
Viewing Created Contracts by Sales Order Number............................................................. 6-16
Viewing Contracts by Sales Order Number in Oracle Service Contracts..............................6-16
    vii
Viewing Contracts by Sales Order in Oracle Installed Base..................................................6-17
Modifying the Dates That a Warranty Is Effective.................................................................6-18
Changing Only the That Dates a Warranty is Effective......................................................... 6-19
Changing Both the Warranty Dates and Installed Date.........................................................6-19
Setting Up New Contract Defaults for Oracle Order Management.......................................6-20
Understanding the Impact of Contingencies on Revenue Recognition ................................6-22
7 Adjusting Prices
Overview of Adjusting Prices................................................................................................... 7-1
Entering Price Adjustments...................................................................................................... 7-3
Getting Help in Picking Adjustments...................................................................................... 7-6
Viewing Total Adjustment Amounts....................................................................................... 7-7
Viewing Adjustments for the Whole Contract......................................................................... 7-7
Viewing the Total Adjustments for an Individual Line or Subline........................................ 7-7
Reverting to the Original Price List Price................................................................................. 7-8
Cascading Service Price ............................................................................................................ 7-9
8 Running Quality Assurance Results and Troubleshooting
About the Quality Assurance Check (QA Check).................................................................... 8-1
Running the Quality Assurance Check from the Actions Menu............................................. 8-2
Submitting the Contract for Approval from the Actions Menu.............................................. 8-3
Running the Quality Assurance Check from the (Summary) Administration Subtab........... 8-4
Running the Contracts QA Program......................................................................................... 8-6
Troubleshooting Errors............................................................................................................. 8-7
9 Approving Contracts
Approving Contracts................................................................................................................. 9-1
Submitting Contracts for Approval.......................................................................................... 9-2
Tracking Contracts During the Approval................................................................................. 9-3
Approving Contracts................................................................................................................. 9-4
Signing Contracts...................................................................................................................... 9-6
10 Billing
Overview of Billing................................................................................................................. 10-1
Understanding Billing Levels................................................................................................. 10-4
Creating Billing Profiles......................................................................................................... 10-7
Billing Customers Based on Usage......................................................................................... 10-9
Billing Using Credit Cards or Commitments....................................................................... 10-10
Specifying Multiple General Ledger Accounts for Contract Revenue Streams..................10-10
viii
Executing Billing Through Concurrent Programs................................................................ 10-12
Running the Service Contracts Main Billing Program.........................................................10-13
Running the AutoInvoice Import Program.......................................................................... 10-14
Running the Service Contracts Fetch Receivables Info for Billing Program.......................10-14
Running the Service Contracts Usage Averaging Program..................................................10-15
Running the Service Contracts Usage Settlement Program................................................. 10-15
Viewing Invoice Details........................................................................................................10-16
Viewing Invoice History....................................................................................................... 10-17
Reviewing Invoice Transactions in Oracle Receivables...................................................... 10-18
Understanding Bill Presentment Architecture..................................................................... 10-21
Using Variable Accounting and Partial Periods Revenue Recognition...............................10-21
11 Managing Contract Negotiation
Overview of Managing Contract Negotiation........................................................................ 11-1
Understanding the Negotiation Workflow.............................................................................11-1
Understanding the Negotiation Phases.................................................................................. 11-3
12 Managing Your Work
Overview of Managing Your Work........................................................................................ 12-1
Finding Contracts by Status or Notification Type................................................................. 12-2
Finding Your Most Recently Accessed Contracts...................................................................12-3
Bookmarking Contracts...........................................................................................................12-4
Finding Bookmarked Contracts.............................................................................................. 12-4
Creating Groups...................................................................................................................... 12-5
Organizing Contracts by Group and Subgroup..................................................................... 12-7
Finding Contracts Using the Contract Groups Hierarchy....................................................12-11
Removing a Contract from a Group......................................................................................12-12
Searching for Contracts Using the Entitlements Search Window....................................... 12-12
Using the Index to Navigate Through Contracts.................................................................. 12-14
13 Using the Administrator Workbench to Manage Contracts Under Negotiation
Overview of the Administrator Workbench...........................................................................13-1
Viewing Notifications............................................................................................................. 13-4
Publishing a Contract to a Customer for Acceptance............................................................. 13-6
Submitting a Contract for Approval from the Administrator Workbench............................13-7
Suppressing Reminders.......................................................................................................... 13-7
Enabling Reminders................................................................................................................ 13-8
Running the Quality Assurance Check.................................................................................. 13-8
Updating Multiple Contracts.................................................................................................. 13-9
Updating a Contract.............................................................................................................. 13-11
    ix
Opening a Contract............................................................................................................... 13-13
Sending an E-Mail to a Customer from the Administrator Workbench..............................13-13
Printing Quotes and Contracts..............................................................................................13-14
Identifying Follow-Up Actions............................................................................................. 13-14
Using Shortcuts in the Administrator Workbench...............................................................13-15
14 Viewing Contract Details in HTML
Overview of Service Contracts in HTML............................................................................... 14-1
Finding Contracts (HTML)......................................................................................................14-2
Sending an E-Mail to a Customer (HTML).............................................................................14-4
Viewing Contract Details (HTML)......................................................................................... 14-5
Viewing Service Line Details (HTML)................................................................................... 14-7
Viewing Coverage Details (HTML)........................................................................................ 14-8
Viewing Covered Level Details (HTML)................................................................................14-9
Viewing Usage Line Details (HTML)................................................................................... 14-10
Viewing Usage Counter Details............................................................................................14-11
Viewing Subscription Line Details (HTML)........................................................................ 14-11
Viewing Item Instance Details (HTML)............................................................................... 14-12
Viewing Order Information for a Service Contract (HTML)............................................... 14-13
Viewing Billing Transactions (HTML).................................................................................14-14
15 Using the Customer Acceptance Portal
Overview of the Customer Acceptance Portal........................................................................ 15-1
Opening the Customer Acceptance Portal.............................................................................. 15-3
Accepting a Contract............................................................................................................... 15-4
Adding an Attachment............................................................................................................ 15-5
Declining a Contract................................................................................................................15-6
Requesting Assistance.............................................................................................................15-7
16 Managing the Contract Life Cycle
Overview of Managing the Contract Life Cycle..................................................................... 16-1
Modifying Multiple Contracts at the Same Time (Mass Change) ........................................ 16-1
Handling Change Requests.................................................................................................... 16-8
Entering Contract Changes..................................................................................................... 16-8
Reviewing and Approving Changes.....................................................................................16-11
Updating Contracts Online................................................................................................... 16-14
Creating Different Contract Versions for Your Customer................................................... 16-15
Viewing Contract History .................................................................................................... 16-16
Handling Returns and Granting Credit................................................................................16-19
Changing Contract Status..................................................................................................... 16-19
x
17 Extending and Renewing Contracts
About Contract Extensions and Renewals..............................................................................17-2
Extending a Contract Without Repricing................................................................................17-4
Repricing an Extended Contract............................................................................................. 17-5
Extending a Contract Line....................................................................................................... 17-6
How Billing Schedules Are Updated for Extended Contracts............................................... 17-9
Understanding Contract Renewals....................................................................................... 17-11
Managing Manual Renewals................................................................................................ 17-19
Managing Online Renewals................................................................................................. 17-20
Managing Evergreen Renewals.............................................................................................17-22
Understanding Sales Credits During Contract Renewals....................................................17-22
Explaining the Pricing of Renewed Contracts......................................................................17-24
Specifying How the Renewed Contract Will Be Priced....................................................... 17-26
Renewing Contracts Manually............................................................................................. 17-27
Managing the Event-Driven Renewal Process..................................................................... 17-28
Allowing a Grace Period for Renewals.................................................................................17-28
About Grace Periods............................................................................................................. 17-29
Specifying a Grace Period for the Current Contract ............................................................17-30
Specifying a Grace Period for the Renewed Contract ......................................................... 17-30
Understanding Billing Schedules on Renewed Contracts................................................... 17-31
Consolidating Multiple Contracts for Renewal................................................................... 17-31
Sending Quote Letters by E-mail.......................................................................................... 17-36
Understanding Line Level Cancellation and Termination Reasons ................................... 17-37
Canceling a Contract Line..................................................................................................... 17-40
Canceling a Contract Subline................................................................................................17-42
18 Creating and Enabling Templates for E-Mails to Customers
About Templates for E-Mails to Customers........................................................................... 18-1
Overview of Templates for E-Mails to Customers................................................................. 18-2
Creating and Enabling Templates for E-Mail Attachments Sent by Agents......................... 18-4
Enabling Templates for Communications Generated by the Negotiation Workflow.......... 18-5
Contract-Specific Data Available for Inclusion in Template Documents............................. 18-5
Viewing the Data Definition Structure................................................................................ 18-18
Uploading and Registering a Template in Oracle XML Publisher......................................18-19
Creating the Set of Templates Used for Customer Communications..................................18-21
Specifying How the Template Sets Are to Be Used............................................................. 18-23
Viewing PDF Attachments....................................................................................................18-24
Viewing Sample Marked-Up Documents Provided with the Application......................... 18-25
    xi
19 Using Notes
Using Notes............................................................................................................................. 19-1
How Notes Are Used in Oracle Service Contracts..................................................................19-2
Adding Service Contract Notes...............................................................................................19-3
Adding Service Coverage Notes to a Standard Coverage...................................................... 19-6
Adding Service Coverage Notes to a Service Coverage (Instantiated Coverage)..................19-8
Viewing Notes....................................................................................................................... 19-10
20 Terminating Contracts
Overview of Terminating Contracts....................................................................................... 20-1
About Terminating Contracts................................................................................................. 20-1
How Termination Works........................................................................................................ 20-2
Terminating a Contract........................................................................................................... 20-3
Restrictions for Terminating a Contract................................................................................. 20-5
Terminating a Contract Line................................................................................................... 20-5
Terminating a Contract Subline..............................................................................................20-8
Terminating Multiple Contracts at the Same Time..............................................................20-10
Viewing the True Value of a Contract.................................................................................. 20-12
Understanding Termination and Credit Generation with Partial Periods.......................... 20-13
21 Running Reports and Programs
Overview of Running Reports and Concurrent Programs..................................................... 21-1
About Reports..........................................................................................................................21-1
About Concurrent Programs................................................................................................... 21-8
Running Reports and Programs............................................................................................ 21-14
22 Creating Contract Items in Oracle Inventory
About Contract Item Types..................................................................................................... 22-1
Creating Service Items............................................................................................................ 22-1
Creating Warranty Items......................................................................................................... 22-5
Creating Subscription Items................................................................................................. 22-12
Creating Usage Items............................................................................................................ 22-16
Defining Serviceable Products............................................................................................. 22-20
Restricting How Items Are Used.......................................................................................... 22-22
23 Setting Up Standard Coverage and Subscription Templates
Overview of Standard Coverage and Subscription Templates..............................................23-1
Specifying Standard Coverage................................................................................................23-3
xii
Defining Standard Coverage.................................................................................................. 23-7
Setting Up a Subscription Template.....................................................................................23-14
Copying Standard Coverage into a New Coverage.............................................................. 23-16
Modifying Standard Coverage for Existing Contracts......................................................... 23-16
Modifying Standard Coverage for New Contracts...............................................................23-17
    xiii
 
Send Us Your Comments
Oracle Service Contracts User Guide, Release 12
Part No. B25717-02
Oracle welcomes customers' comments and suggestions on the quality and usefulness of this document.
Your feedback is important, and helps us to best meet your needs as a user of our products. For example:
• Are the implementation steps correct and complete?
• Did you understand the context of the procedures?
• Did you find any errors in the information?
• Does the structure of the information help you with your tasks?
• Do you need different information or graphics? If so, where, and in what format?
• Are the examples correct? Do you need more examples?
If you find any errors or have any other suggestions for improvement, then please tell us your name, the
name of the company who has licensed our products, the title and part number of the documentation and
the chapter, section, and page number (if available).
Note: Before sending us your comments, you might like to check that you have the latest version of the
document and if any concerns are already addressed. To do this, access the new Applications Release
Online Documentation CD available on Oracle MetaLink and www.oracle.com. It contains the most
current Documentation Library plus all documents revised or released recently.
Send your comments to us using the electronic mail address: appsdoc_us@oracle.com
Please give your name, address, electronic mail address, and telephone number (optional).
If you need assistance with Oracle software, then please contact your support representative or Oracle
Support Services.
If you require training or instruction in using Oracle software, then please contact your Oracle local office
and inquire about our Oracle University offerings. A list of Oracle offices is available on our Web site at
www.oracle.com.
    xv
 
Preface
Intended Audience
Welcome to Release 12 of the Oracle Service Contracts User Guide.
See Related Information Sources on page xvi for more Oracle Applications product
information.
TTY Access to Oracle Support Services
Oracle provides dedicated Text Telephone (TTY) access to Oracle Support Services
within the United States of America 24 hours a day, seven days a week. For TTY
support, call 800.446.2398.
Documentation Accessibility
Our goal is to make Oracle products, services, and supporting documentation
accessible, with good usability, to the disabled community. To that end, our
documentation includes features that make information available to users of assistive
technology. This documentation is available in HTML format, and contains markup to
facilitate access by the disabled community. Accessibility standards will continue to
evolve over time, and Oracle is actively engaged with other market-leading technology
vendors to address technical obstacles so that our documentation can be accessible to all
of our customers. For more information, visit the Oracle Accessibility Program Web site
at http://www.oracle.com/accessibility/ .
Accessibility of Code Examples in Documentation
Screen readers may not always correctly read the code examples in this document. The
conventions for writing code require that closing braces should appear on an otherwise
empty line; however, some screen readers may not always read a line of text that
consists solely of a bracket or brace.
xvi
Accessibility of Links to External Web Sites in Documentation
This documentation may contain links to Web sites of other companies or organizations
that Oracle does not own or control. Oracle neither evaluates nor makes any
representations regarding the accessibility of these Web sites.
Structure
1  Creating Contracts
2  Entering Defaults for Contracts
3  Entering Service Lines
4  Entering Usage Lines
5  Entering Subscription Lines
6  Ordering Service in Oracle Order Management
7  Adjusting Prices
8  Running Quality Assurance Results and Troubleshooting
9  Approving Contracts
10  Billing
11  Managing Contract Negotiation
12  Managing Your Work
13  Using the Administrator Workbench to Manage Contracts Under Negotiation
14  Viewing Contract Details in HTML
15  Using the Customer Acceptance Portal
16  Managing the Contract Life Cycle
17  Extending and Renewing Contracts
18  Creating and Enabling Templates for E-Mails to Customers
19  Using Notes
20  Terminating Contracts
21  Running Reports and Programs
22  Creating Contract Items in Oracle Inventory
23  Setting Up Standard Coverage and Subscription Templates
Related Information Sources
Related Service Contracts Guides:
Oracle Contracts Implementation and Administration Guide
Other Related Guides:
Oracle Advanced Pricing User's Guide
Oracle Applications User's Guide
Oracle Bills of Material User's Guide
Oracle Common Application Components User Guide
Oracle Complex Maintenance, Repair, and Overhaul User's Guide
Oracle General Ledger User Guide
    xvii
Oracle Installed Base User Guide
Oracle Inventory User's Guide
Oracle Order Management User's Guide
Oracle Receivables User Guide
Oracle TeleService User Guide
Oracle Workflow User's Guide
Oracle XML Publisher User's Guide
Integration Repository
The Oracle Integration Repository is a compilation of information about the service
endpoints exposed by the Oracle E-Business Suite of applications. It provides a
complete catalog of Oracle E-Business Suite's business service interfaces. The tool lets
users easily discover and deploy the appropriate business service interface for
integration with any system, application, or business partner.
The Oracle Integration Repository is shipped as part of the E-Business Suite. As your
instance is patched, the repository is automatically updated with content appropriate
for the precise revisions of interfaces in your environment.
Do Not Use Database Tools to Modify Oracle Applications Data
Oracle STRONGLY RECOMMENDS that you never use SQL*Plus, Oracle Data
Browser, database triggers, or any other tool to modify Oracle Applications data unless
otherwise instructed.
Oracle provides powerful tools you can use to create, store, change, retrieve, and
maintain information in an Oracle database. But if you use Oracle tools such as
SQL*Plus to modify Oracle Applications data, you risk destroying the integrity of your
data and you lose the ability to audit changes to your data.
Because Oracle Applications tables are interrelated, any change you make using an
Oracle Applications form can update many tables at once. But when you modify Oracle
Applications data using anything other than Oracle Applications, you may change a
row in one table without making corresponding changes in related tables. If your tables
get out of synchronization with each other, you risk retrieving erroneous information
and you risk unpredictable results throughout Oracle Applications.
When you use Oracle Applications to modify your data, Oracle Applications
automatically checks that your changes are valid. Oracle Applications also keeps track
of who changes information. If you enter information into database tables using
database tools, you may store invalid information. You also lose the ability to track who
has changed your information because SQL*Plus and other database tools do not keep a
record of changes.
Creating Contracts    1-1
1
Creating Contracts
This chapter covers the following topics:
• Overview of Oracle Service Contracts
• Elements of a Service Contract
• Managing the Service Contract Life Cycle
• Creating a Contract
• Copying Information Between Contracts
• Searching for a Contract or Template
• Creating a Template from a Contract
Overview of Oracle Service Contracts
Oracle Service Contracts provides a complete contract authoring execution solution to
manage warranties, extended warranties, usage, and subscription services, as well as
complex service agreements. With Oracle Service Contracts you can:
• Sell multiple types of service
• Define pricing and billing schedules
• Ensure timely service entitlement checks
• Automate renewals for recurring revenue opportunities
• Simplify change management
• Minimize service revenue leakage
1-2    Oracle Service Contracts User Guide
Elements of a Service Contract
A contract in Oracle Service Contracts comprises:
• a header, page 1-2
• one or more lines, page 1-2
• one or more sublines, page 1-4
Header
The header is where you enter a brief description and specify the contract duration. You
can default values from the header of a contract down to the lines and, if applicable, to
sublines as well.
The header level is composed of the fields at the top of the Service Contracts Authoring
form as well as the Summary tab. The Summary tab also includes several secondary
tabs. The following list briefly describes these pages:
• Parties: Enter information about the customer, including the bill to and ship to
information for the contract.
• Pricing/Billing: Assign a price list and various accounting rules for pricing and
billing contracts. In most cases, Oracle Service Contracts retrieves the contractual
prices of services or usage from Oracle Advanced Pricing, however, pricing is done
manually in some situations.
• Renewals: Define the renewal rules that are applied during manual or automatic
renewal of the contract.
• Administration: Define administrative components that are used to process the
contract, such as the QA checklist, contract groups, and workflow.
• Security/Text: Grant contract access by the resource group or user level.
Lines
Lines list the individual service, usage, and subscription items that are included in the
contract. A single contract can have multiple lines.
Each line inherits certain information from the contract header such as effectivity dates,
bill to and ship to information, and billing rules and schedules. These can be changed as
appropriate to allow the contract to conform to the customer requirements. A contract
line may be related to one or more sublines.
Three line types are available:
Creating Contracts    1-3
• Service lines: Cover a broad category of items that can include activities such as
field service, depot repair, call center, technical support, or any other user-defined
business activities.
Each service line can cover one or more items that a customer owns.
See Entering Service Lines, page 3-3 for more information about service lines.
• Usage lines: Charge customers for usage. For example, a photo copier company
might wish to charge for the number of copies that are made within a period.
See Entering Usage Lines, page 4-3 for more information about usage lines.
• Subscription lines: Cover subscriptions for both tangible and intangible items.
Tangible items include magazines, collateral, or any other physical item that can be
shipped through Oracle Order Management. Intangible items can be collateral sent
through e-mail.
See Entering Subscription Lines, page 5-5 for more information about subscription
lines.
Note: Subscription lines do not have sublines.
The Lines tab includes several secondary tabs, which include:
• Accounts
• Effectivities
• Pricing/Products
• Exemption/Payment Options
• Counters
• Events
Note: The fields within each secondary tab are unique to the line
type that you select.
For details on entering lines, refer to the specific line type topics.
• Entering a Service Line (General Procedure), page 3-3
• Entering a Usage Line in a Contract, page 4-3
• Entering a Subscription Line, page 5-5
1-4    Oracle Service Contracts User Guide
Sublines
Sublines specify what the service covers or the counters where the usage is tracked. You
can access this information from the Pricing/Products subtab of the Lines tab.
The following list describes how each line type uses sublines:
• Service lines:Sublines for service lines specify what the service covers. A service line
can cover a party, a customer, a site, a system, a product, or an item. See Levels of
Coverage and Their Uses, page 3-15.
• Usage lines:Sublines for usage lines specify the counters where the usage is tracked.
See Entering a Counter, page 4-21.
• Subscription lines: Subscription lines do not have sublines. See About
Subscriptions, page 5-5.
Managing the Service Contract Life Cycle
Oracle Service Contracts enables you to manage the entire contract life cycle, including
contract creation, renewal, and termination. For detailed information refer to the
following procedures:
• Creating a Contract, page 1-4
• Approving Contracts, page 9-4
• Extending and Renewing Contracts, page 17-2
• Terminating Contracts, page 20-1
• Managing the Contract Life Cycle, page 16-1
Creating a Contract
You can create a contract manually. In addition, a contract can be created automatically
through Oracle Order Management or by creating a product that has a warranty in
Oracle Installed Base. See About Ordering Service in Oracle Order Management, page
6-2.
You can author service contracts in multiple operating units without changing
responsibility. You must select an operating unit for each contract.
Note: This procedure covers how to create a contract by navigating
from the Launchpad. You can also open the Service Contracts
Authoring form from the Administrator Workbench. For more
Creating Contracts    1-5
information about the Administrator Workbench, see Overview of the
Administrator Workbench, page 13-1.
To create a contract:
1. Log in under the Service Contracts Manager or Service Contracts User
responsibility.
2. Navigate to Contract Administration, and then select Launchpad.
The Oracle Contracts window appears.
3. Select New from the Tools menu.
The Create a New Contract window appears.
4. To create a contract manually:
1. Select the Create a New Contract Manually radio button.
2. Select an operating unit using the list of values (LOV).
Note: The Operating Unit LOV shows operating units that are
available to the security profile that is specified in MO: Security
Profile. If a default operating unit is specified in MO: Default
Operating Unit, the application uses the default operating unit.
3. Select a category using the LOV:
• If you are creating a contract with service agreements for individual items
(covered products) in the customer's installed base, then select Warranty
and Extended Warranty or Service Agreement. Warranty and Extended
Warranty category does not permit you to add usage lines or to sell service
to other levels of coverage (a party, site, or system).
• If you are creating a usage contract or a service agreement for levels other
than items in the customer's install base (Products), then you must select
Service Agreement.
• If your contract includes subscriptions, then select Subscription Agreement
. Subscription agreements permit you to enter subscriptions, service, and
usage lines.
5. To create a contract using a template:
1. Select the Create a Contract from a Template radio button.
1-6    Oracle Service Contracts User Guide
2. Select a template using the Template LOV. If you do not know the template
name you can search for the template by description and other criteria by
clicking Find. See Searching for a Contract or Template, page 1-11.
6. Click Create.
The Service Contracts Authoring window appears. The category that you selected
appears in the Category field at the top of the window. The start date becomes
today's date.
The application supplies a contract number for you automatically after you first
save the contract, but you can instead enter a number of your own. The contract
number can be a combination of any characters, but it must be unique.
7. Optionally, enter another short identifier in the Known As field to help you identify
the contract later.
8. Specify the dates that the contract is effective by entering:
• The start date or end date
• Duration and period
The dates that you enter here are automatically passes to each new line in the
contract. The dates that individual lines are effective cannot fall outside this
range; they cannot have a start date earlier than the contract start date or an end
date later than the contract end date. If you enter dates that are outside this
range in a contract line, then you must extend the contract dates accordingly for
your contract to pass Quality Assurance (QA).
Creating Contracts    1-7
9. To help you identify the contract later, enter a description in the Description field.
10. In the Party region, the operating unit entered in the Create a New Contract
window defaults as the Vendor Operating Unit (or the Merchant Operating Unit for
Subscription Agreements).
11. Save.
12. You are now ready to enter the rest of the contract information that is required for
your contract to become active:
Note: To speed up entry, you can copy information from an
existing contract. See Copying Information from an Existing
Contract, page 1-8.
• General contract information, including the vendor and customer, what quality
check the contract must pass to become active, and how the contract will be
renewed.
• Contract lines according to procedures described in:
• Entering a Service Line (General Procedure), page 3-3
• Entering a Usage Line in a Contract, page 4-3
• Entering a Subscription Line, page 5-5
13. You can create different versions of the contract for your customer and at different
price points and send them out for review. See Creating Different Contract Versions
for Your Customer, page 16-15.
14. Check to see whether you have entered all the required information in the contract
or whether some external reason exists why the contract cannot be implemented, by
running the QA check.
15. The QA check alerts you of any issues with your contract.
Following are examples of issues that are tracked in the QA check:
• Failure to create a billing schedule for the customer.
• Failure to include an e-mail address for the customer contact.
• Absence of sales credits for contract lines.
• Customer credit on hold.
Your contract becomes active only after it passes the QA check list and obtains the
1-8    Oracle Service Contracts User Guide
approvals that are required by the Oracle Workflow process.
Note: The application uses a common workflow for new and
renewed contracts. Each new contract, whether a renewal or new,
initiates a workflow process. See Overview of Managing Contract
Negotiation, page 11-1.
The standard contract approval workflow integrates with Oracle
Approval Management Engine (AME). Standard AME features
support rules based approval routing and definition of approval
groups. Key attributes have been seeded in AME for approval
setup, such as Contract ID, Operating Unit, Customer Party,
Contract Category, and Contract Amount.
Your administrator can define additional attributes through AME.
For more information see the Oracle Service Contracts Implementation
Guide.
See About the Quality Assurance Check (QA Check), page 8-1 and Approving
Contracts, page 9-4.
Copying Information Between Contracts
You can copy information from an existing contract into a new contract, an existing
contract, or to a new modifier of the existing contract.
Note: For existing contracts, you cannot copy the components of a
contract across categories. For example, you cannot copy the
components from a Warranty into a Service Agreement.
You can copy from Contract Navigator as well as the results table in the Search
Templates and Contracts window. In this case, you select the Source Contract and then
search for a target contract to which you can copy the information.
You can also initiate copy from within the contract itself. In this case, the selected
contract is the target contract and you search for a source contract from which you
intend to copy components. You will typically use this method to copy service lines and
covered level into the contract you have open.
To copy information from an existing contract:
1. From the Contract Navigator or Search Results region of the Search Templates and
Contracts window, right-click a contract and select Copy.
The Copy window appears and the selected contract number supplied in the upper
left region.
Creating Contracts    1-9
2. Select the information that you want to copy in the left half of the window.
You can make multiple selections by holding down the Shift and Ctrl keys on your
keyboard. You can expand the tree outlining the information by clicking any of the
nodes.
3. Use the right arrow button to copy information from the left-side of the window to
the right (the new contract).
Note: To copy the entire contract, select the Copy Entire Contract
check box. After you select this check box you can no longer use the
left and right panels to make selections.
4. From the Copy To field, select New Contract.
Note: To copy into an existing contract select Existing Contract. To
copy into a new contract that has the same contract number as the
source contract but with a new modifier select New Modifier.
5. To copy into a new contract, and make that contract a template, select the Template
check box.
When you create a new contract, you will see that template in the list of available
template contracts.
1-10    Oracle Service Contracts User Guide
6. If you are copying a large contract and you do not want to use too many system
resources, you can select the Submit as Concurrent Program check box.
7. Click Create.
The application confirms the copy with a message.
8. From the message window, select OK to view the new contract.
Note: Your administrator can set the profile OKS: Copy Notes to
control whether notes are copied. If this profile is set to yes, the
notes within the existing contract are copied into the new contract.
Within the Notes window, the Entered By field indicates
ANONYMOUS if the note was copied from an existing contract.
To copy information from within the contract:
1. Open a contract.
2. From the Action menu, select Copy from Contract/Template.
The Copy window appears and the contract number of the contract you are in
appears in the upper right region. The Copy To field is set to Existing Contract and
cannot be changed. In addition, the Copy Entire Contract check box is disabled.
3. Click Find to find a contract or template from which to copy. The Search Templates
and Contracts window appears.
You must search for a contract, highlight the contract in the results region, and
select OK.
4. Select the information to copy in the left panel.
You can make multiple selections by holding down the Shift and Ctrl keys on your
keyboard. You can expand the tree outlining the information by clicking any of the
nodes.
5. Use the right arrow button to copy information from the left-side to the right (the
new contract).
6. Click Create.
The application confirms the copy with a message.
7. From the message window, select OK to view the new contract.
Creating Contracts    1-11
Searching for a Contract or Template
To search for a contract or template:
1. From the Navigator, navigate to Contract Administration, and then select
Launchpad. The Oracle Contracts window appears.
2. From the View menu, select Find.
The Search Templates and Contracts window appears.
3. Enter your search criteria.
Narrow your search by:
• Searching for contracts within a particular operating unit by choosing a value
from the LOV.
• Selecting either a contract number or template name from the Contract Number
LOV.
1-12    Oracle Service Contracts User Guide
4. If you have selected Service Agreement, Warranty and Extended Warranty, or
Subscription Agreement for the category parameter, click the More button for
additional search criteria for finding contracts.
1. When you click the More button, the application displays the Service Module
Search window. This window enables you to search on specific attributes for
service contracts, such as agreement names, date signed, order number, bill to
address, and e-mail.
2. Click OK to return to the Search Templates and Contracts window.
Creating Contracts    1-13
5. Select Search.
A list of contracts that match your search criteria appear in the Results region.
6. Select a contract, right-click and select Open.
Creating a Template from a Contract
A template makes it possible for you to speed up the contract creation process by filling
in frequently used values.
Prerequisite
Display a contract.
To create a template from a contract:
1. From the Actions menu, select Save as Template.
The Save As Template window appears.
1-14    Oracle Service Contracts User Guide
2. Enter a template name.
3. Click OK.
The application responds with a note informing you that the template has been
created.
Note: You can save any contract as a template.
When you create a new contract from a template, the application
creates a new contract in the Entered status. The header, lines, and
sublines from the template are copied into the new contract.
See Creating a Contract, page 1-4.
Entering Defaults for Contracts    2-1
2
Entering Defaults for Contracts
This chapter covers the following topics:
• Overview of Entering Defaults for Contracts
• Specifying Contract Effectivity and Maximum Duration
• Entering Parties to the Contract
• Entering Party Contacts
• Creating or Modifying a Customer Contact Record
• Entering the Billing Account and Address
• Entering the Shipping Account and Address
• Entering the Price List
• Entering Billing Schedules
• Billing Schedules Overview
• Creating a Billing Schedule Using Billing Streams
• Entering a Billing Stream
• Using Billing Streams to Handle Irregular Billing Periods
• Creating a Billing Schedule from a Billing Profile
• Specifying How Billed Amounts Appear on Invoices
• Suspending Billing for a Contract
• Holding Credits Until the Next Billing Cycle
• Entering Tax Exemptions
• Specifying a Payment Method
• Specifying Payment by Credit Card or Commitment Number
• Requiring a Purchase Order
• Specifying a Purchase Order Number for Invoices
2-2    Oracle Service Contracts User Guide
• Specifying a Receivables Transaction Type for Payment
• Assigning Sales Credits
• Requiring and Specifying a Purchase Order for Service Charges
• Specifying How a Contract Will Be Renewed
• Defining Grace Periods
• Specifying and Starting the Contract Approval Workflow
• Organizing Contracts by Assigning Them to Contract Groups
• Specify a Different Quality Assurance Check List
• Entering an Estimate of Contract Revenue
• Specifying Contract Terms
• Granting Additional Access Privileges
• Entering an Additional Description or Comment
• Setting Up Defaults for Contract Renewal
• Overview of Default Levels
• Entering Contract Defaults
• Setting Up System Profiles for Renewal Defaults
• Speeding Up Contract Line Entry Using Default Values
Overview of Entering Defaults for Contracts
This group of topics describes how to enter the contract details. Some contract details
default to service lines.
Specifying Contract Effectivity and Maximum Duration
You can specify the dates that your contract is effective. The dates you enter become the
default dates for each new contract line and set a limit to the duration of all lines in the
contract.
A contract line cannot have a start date earlier than the contract header start date or an
end date later than the contract header end date.
Entering effectivity dates using this procedure affects new lines only. To make the new
dates also apply to existing contract lines, you must cascade the values to those lines.
See Applying Default Values to Existing Contract Lines, page 3-60 for details.
Note: If you are using this procedure to modify the dates for a contract
with existing lines and your change makes any of the lines fall outside
Entering Defaults for Contracts    2-3
the new date range, then you must cascade the values to existing lines.
If you do not, your contract will not pass the default quality assurance
check.
You can change the dates that you specify here at the individual line or subline level
provided the changes do not fall outside this range.
To specify contract effectivity and maximum duration:
1. From the Service Contracts Authoring window, select the Summary tab and Parties
subtab.
2. Specify the dates that the contract is effective by entering either:
• End date
• Duration and period
3. Save.
Entering Parties to the Contract
Usually, entering parties to the contract is limited to your organization and the
customer, but you can also enter a third party such as a distributor or a dealer. You can
bill only those accounts belonging to the parties that you enter here or to related
accounts as defined in Oracle Receivables.
Note: You cannot change a customer party or third party if dependent
data exists on the contract such as a related bill to account or ship to
account.
Prerequisites
Set up customers and third parties
Define profile MO: Security Profile
Define profile MO: Default Operating Unit (optional)
To enter the parties to the contract:
1. From the Service Contracts Authoring window, select the Summary tab and Parties
subtab.
2. In the Party region, the operating unit entered in the Create a New Contract
window defaults as the Vendor Operating Unit (or Merchant Operating Unit for
2-4    Oracle Service Contracts User Guide
Subscription Agreements).
3. Enter the customer:
1. Select Customer (or Subscriber for Subscription Agreements) from the Role
LOV.
2. Enter the customer name using the Name LOV.
4. Enter any third party, such as a dealer or distributor:
1. Select Third Party using the Role LOV.
2. Enter the third party using the Name LOV.
Note: You can enter only third parties that do not have an
account-level relationship to the customer. Such relationships
between accounts can be set up in Oracle Receivables.
5. Save.
Entering Party Contacts
You can enter contacts for the different parties to the contract. This includes the sales
people in your organization (the vendor).
Note: You must enter the sales person as a contact for the vendor to run
the Service Contracts Bookings report.
To enter party contacts:
1. From the Service Contracts Authoring window, select the Summary tab and Parties
subtab.
2. Select the party for which you want to enter the contact.
3. Select the contact's role using the Role LOV.
4. Select the contact from the Name (LOV). If the contact does not exist in the database
or the contact information needs to be modified, you can create a new record or
modify the existing one by selecting Maintain Contact from the Actions menu. See
Creating or Modifying a Customer Contact Record, page 2-5 for details.
Entering Defaults for Contracts    2-5
Important: You must enter an operating unit. From the Party region
of the Parties subtab:
1. Select a Vendor Operating Unit from the Role LOV.
2. Select an Operating Unit from the Name LOV.
5. Enter an e-mail address in the Email field or you can modify the existing e-mail
address.
6. To modify or verify phone contact information for the contact, select Maintain
Contact from the Actions menu. See Creating or Modifying a Customer Contact
Record, page 2-5 for details.
7. Save.
Creating or Modifying a Customer Contact Record
You can create or modify basic contact information such as the contact name, phone
number, and e-mail address from the Parties subtab. To create a new customer address
or enter other contact details, you must use the Customer Standard window in Oracle
Receivables or the Contact Center window, which is available under the Customer
Support responsibility. See the contact creation procedures that are described in the
Oracle TeleService User Guide and Oracle Receivables User Guide for details.
To create or modify a customer contact record:
1. From the Service Contracts Authoring window, select the Summary tab and Parties
subtab.
2. In the Party region, select the party for which you want to create the contact. You
can create a contact either for the customer or a third party.
3. In the Contacts region, place the cursor in the Role field.
4. Select Maintain Contact from the Tools menu.
The Contact window appears.
2-6    Oracle Service Contracts User Guide
5. If you are creating a new contact, then:
1. Select a role for this contact using the Contact Role LOV.
2. Enter the contact last and first name.
3. Use the following guidelines for entering other information:
• Select the titles and job descriptions from the Titles and Job LOVs. These are
preset by your application administrator.
• Do not use delimiters when entering phone, fax, and mobile numbers. Each
is composed of three fields: a country code (LOV), an area code, and the
number itself.
• Select only one of the existing party locations for the contact address. You
can add a mail stop or a mail box, however, by pressing the Tab key after
entering the address.
6. If you are modifying an existing contact, then you can:
• Change the title and job description by selecting a different one from the Title
and Job LOVs.
• Change the phone, fax, and mobile numbers.
• Change the e-mail address.
Entering Defaults for Contracts    2-7
Note: When modifying existing contact information, be aware
that you are modifying the contact record for all Oracle
E-Business Suite applications.
You cannot modify the address or mail stop number.
To select another address or enter a different mail stop, you
must:
• Navigate back to the Service Contracts Authoring window.
• Delete the contact by selecting it and clicking Delete in the
toolbar.
• Create a replacement contact with the correct address
information.
Important: Deleting the contact from the
contract does not delete it from the
database. Creating a replacement record
creates a duplicate.
7. If you are modifying an existing contact and want to revert to the existing record,
click Reset.
8. Click OK to return to the Service Contracts Authoring window.
9. Save.
Entering the Billing Account and Address
You can select the default billing account and address for new contract lines. You can
bill to an account belonging to the customer, to any third party that you have entered as
a party to the contract, as well as to any account with an established relationship to
either of the two in Oracle Receivables.
The billing account number that you select here:
• Specifies who is billed for the contract
If you enter an account belonging to a third party it will be that third party that will
receive the invoice.
• Filters the pricing information that you enter on the Pricing/Billing tab.
If you are billing a third party for the contract, then the price list and other required
2-8    Oracle Service Contracts User Guide
fields are for that third party rather than the party that is specified as Customer.
• Populates the account number field for each new contract line.
The entry that you make here affects new contract lines only. To change existing
contract lines based on your entry, you must cascade the changes to them. See Applying
Default Values to Existing Contract Lines, page 3-60 for details.
Prerequisite
Enter the parties to the contract.
To enter the billing account and address:
1. From the Service Contracts Authoring window, select the Summary tab and Parties
subtab.
2. Use the Account Party Name LOV or Account Number LOV in the Bill To region to
enter the billing account. The account that you select here becomes the bill to
account number for all lines in the contract.
Note: The LOV includes customer accounts, accounts for any third
party that you entered, as well as accounts that have an established
relationship to those accounts in Oracle Receivables.
3. Select the billing address where you want invoices to be sent using the Location
LOV.
4. Save.
Entering the Shipping Account and Address
Although entry is required only if your contract includes physical items that must be
shipped to the customer address, the application also uses the shipping address to
estimate taxes on services.
The entry that you make here affects new contract lines only. To change existing
contract lines based on your entry, you must cascade the changes to them. See Applying
Default Values to Existing Contract Lines, page 3-60 for details.
Prerequisite
Enter the parties to the contract.
To enter the shipping account and address:
1. From the Service Contracts Authoring window, select the Summary tab and Parties
Entering Defaults for Contracts    2-9
subtab.
2. Use the Account Party Name LOV or Account Number LOV in the Ship To region
to enter the account for shipping physical items. The account that you select here
becomes the ship to account number for all new lines in the contract.
Note: The LOV includes customer accounts, accounts for any third
party that you entered, as well as accounts that have an established
relationship to those accounts in Oracle Receivables.
3. Select the shipping address using the Location LOV, if physical items need to be
shipped or location based tax should be estimated.
4. Save.
Entering the Price List
You can specify the price list for the contract in the Pricing/Billing subtab. The price list
that you enter automatically passes to each new contract line.
To apply the price list to existing contract lines, you must edit each line separately.
To enter the price list:
1. From the Service Contracts Authoring window, select the Summary tab and
Pricing/Billing subtab.
2-10    Oracle Service Contracts User Guide
2. If your organization has a Pricing Agreement set up with the party you are billing,
then use the Agreement LOV to enter it. This automatically passes all of the other
required fields including the price list, the accounting rule, the payment terms, and
the invoicing rule.
Pricing Agreements, which specify prices, discounts, and billing practices for a
particular customer, are created in Oracle Order Management. See Oracle Order
Management User's Guide, "Pricing Tab: Setting Up a Blanket Sales Agreement" for
details.
Note: The values that you enter in the contract by specifying a
Blanket Sales Agreement can be changed. For example, if you use a
Billing Profile to pass billing schedules, the application overwrites
the values you enter in the Accounting Rule and Invoicing Rule
fields with the Billing Profile.
3. If no Blanket Sales Agreement is available, or to modify any passed values, then:
1. Use the LOV that is provided to enter the price list.
2. From the Billing region, use the LOVs that are provided to enter the:
• Accounting rule
• Invoicing rule. You can specify whether the customer is to be billed at the
start of the billing period (Advance Invoice) or at the end of the billing
period (Arrears Invoice).
Entering Defaults for Contracts    2-11
Note: Some usage contracts require you to specify arrears
invoicing. For example, a customer that is billed each
month based on a meter reading must be billed at the end
of the month after the counter is read. See Entering Usage
Lines, page 4-3.
3. From the Payment Details region:
1. Use the LOV that is provided to enter the price list.
2. You can enter a credit card or commitment using the Method list. See
Specifying Payment by Credit Card or Commitment Number, page 2-23.
4. Save.
Entering Billing Schedules
This group of topics explains how to create a billing schedule at the contract header
level to speed up the entry of multiple service and usage contract lines with similar
billing schedules. It covers:
• Billing Schedules Overview, page 2-11
• Creating a Billing Schedule Using Billing Streams, page 2-12
• Entering a Billing Stream, page 2-13
• Using Billing Streams to Handle Irregular Billing Periods, page 2-15
• Create a Billing Schedule from a Billing Profile, page 2-18
Note: Do not use the procedures in this section for subscription
contracts. Instead, see Specifying a Billing Schedule for
Subscriptions, page 5-12.
Billing Schedules Overview
A billing schedule determines when the customer is billed for the services they receive.
For contracts with service lines you can bill the customer either at the line level or the
subline level, but for contracts with usage lines you can bill only at line level.
For service lines, this means that you can bill at the level of the service that is sold to the
customer (called the Top Level in the application) or individually at the level of each of
2-12    Oracle Service Contracts User Guide
the items that is covered by that service (Covered Level), be it an individual item, a
system, a covered location, an account, or party.
For usage lines, you can bill only at the usage line level (Top Level).
(Subscription lines represent a special case and so are covered in Entering Subscription
Lines, page 5-5).
You can either create an individual billing schedule for each individual line or subline
in the contract, or create a billing schedule at the contract header level using either of
the two methods described in this section and then apply that schedule to existing
contract lines.
Note: Unlike the other information that you enter in the Summary tab,
the application does not automatically pass billing schedules to new
lines and sublines. To pass a schedule you create at the header, you
must first enter the contract lines and then apply the schedule to them.
You can create billing schedules for passing to contract lines by one of the two
following methods. Which method you select depends on your implementation and the
complexity of the schedule that you are creating:
• Using billing profiles, page 2-18
Build a schedule by selecting a schedule template that is set up by your application
administrator. Use this method for setting up simple periodic billing schedules, for
example, when a customer orders a year of service and wants to be billed monthly
or quarterly.
• Using billing streams, page 2-12
Using this method you can create complex billing schedules or billing schedules
with irregular periods, for example, when a customer orders additional service in
the middle of a billing period or requires service only intermittently.
Creating a Billing Schedule Using Billing Streams
To create a default billing schedule by using billing streams:
1. From the Service Contracts Authoring window, select the Summary tab and
Pricing/Billing subtab.
2. Click Billing.
The Billing Schedule window appears.
Entering Defaults for Contracts    2-13
3. From the Level LOV, select one of the two following levels:
• Top Level: To pass a schedule at the line level
• Equal Amount: To bill for equal amounts across sublines over the billing period
and have control over the amount.
Note: Equal Amount cannot be selected if Usage lines exist on
the contract.
4. Create the billing periods by entering one or more billing streams. See Entering a
Billing Stream, page 2-13.
5. Click Schedule to create the schedule.
The application displays a caution notice asking you whether you want to
overwrite all existing schedules.
6. Any contract lines that you enter in the future will not automatically have this
schedule. To apply this schedule to them, you must return to this window and click
Scheduleagain.
Entering a Billing Stream
A billing stream is designed to speed up the creation of a set of regular billing periods.
2-14    Oracle Service Contracts User Guide
You specify that you want your customer billed in 12 periods of one month each, for
example, and the application automatically specifies the invoice dates and schedules the
billing.
If the dates of the ordered service coincide with billing dates, then you can set up the
billing periods with just one billing stream. However, you may need to set up multiple
billing streams to handle irregular billing situations. See About Using Billing Streams to
Handle Irregular Billing Periods, page 2-15.
Prerequisites
Display a billing schedule in the Billing Schedule window.
To enter a billing stream:
1. If this is the first or only billing stream, then:
1. Enter 1 in the Seq Num field.
The application passes the start date from the start date of the contract.
2. Enter either the end date or the duration and period.
The application supplies the missing information.
2. If this is an additional billing stream, then:
1. In the Seq Num field, enter a number corresponding to the order in which the
billing periods are created.
The sequence numbers for billing streams must be in order of the billing period
dates. If you want to enter a billing period earlier than an existing billing
stream, then you must reorder the entire sequence.
Note: If you are reordering or otherwise editing billing stream
information, you must click Cascade Dates to recalculate and
refresh the dates in the Stream Level region.
The application passes the start date from the end date of the previous billing
stream.
2. Enter either the end date or the duration and period.
The application supplies the missing information.
3. To adjust the date that the customer sees as the invoice date, enter a positive or a
negative number of days in the Invoice field. For example, entering +2 shifts the
invoice date forward two days. Entering –2 shifts it back two days.
4. To adjust the date that the application sends billing amounts to Oracle Receivables
Entering Defaults for Contracts    2-15
for billing, enter a positive or a negative number of days in the Interface field.
5. Click Schedule to generate the schedule.
Using Billing Streams to Handle Irregular Billing Periods
You can set up multiple billing streams to handle irregular billing situations. for
example, to handle a customer who starts a contract in the middle of a month, but
wants to be billed at the beginning of each month.
This section illustrates how to use billing streams for the customer who wants to be
billed at the beginning of each month for two services with different durations and
incompatible start dates:
• General Service for January 1, 2005 through December 31, 2005
• Premium Service for May 15, 2005 through November 14, 2005
To use billing streams to handle irregular billing periods:
Here is how to set up the first service:
1. Create a contract with 01-JAN-2005 through 31-DEC- 2005 as the start and end
dates. The first line is the longest line in the contract, so you must use its dates.
2. Because the customer wants to be billed at the start of each month, select Advance
Invoice as the invoicing rule for the contract. Do this on the Summary tab and
Pricing/Billing subtab.
3. Enter the service that the customer wants to purchase as a contract line on the Lines
tab.
4. Click Billing on the Pricing/Products subtab to open the Billing window.
5. Enter one billing stream:
Seq Num Number of
Periods
Start Date End Date Duration Period
1 12 01-JAN-2005   1 Month
6. Save. The application calculates the end date automatically.
7. Click Schedule to generate a billing schedule. The following table shows the
generated schedule which bills the customer at the beginning of each month. The
2-16    Oracle Service Contracts User Guide
table includes the following columns:
• Seq Num: The sequence number is the number of the billing stream. Each row
displays 1 in this case as the entire schedule was generated from one billing
stream.
• Level Seq: The number of the billing period within a sequence.
• Invoice Date: The date on the invoice. This is the first of the month because we
have selected an Advanced Invoice and not entered any invoice offset.
• Bill From: The start date of the billing period.
• Bill To: The End date of the billing period.
• Interface Date: The date the application sends the amount to be billed to Oracle
Receivables for billing. This is the same as the Invoice Date as we have not
entered any offset.
Seq Num Level Seq Invoice
Date
Bill From Bill To Interface
Date
1 1 1-Jan-05 1-Jan-05 31-Jan-05 1-Jan-05
1 2 1-Feb-05 1-Feb-05 28-Feb-05 1-Feb-05
1 3 1-Mar-05 1-Mar-05 31-Mar-05 1-Mar-05
1 4 1-Apr-05 1-Apr-05 30-Apr-05 1-Apr-05
1 5 1-May-05 1-May-05 31-May-05 1-May-05
1 6 1-Jun-05 1-Jun-05 30-Jun-05 1-Jun-05
1 7 1-Jul-05 1-Jul-05 31-Jul-05 1-Jul-05
1 8 1-Aug-05 1-Aug-05 31-Aug-05 1-Aug-05
1 9 1-Sep-05 1-Sep-05 30-Sep-05 1-Sep-05
1 10 1-Oct-05 1-Oct-05 31-Oct-05 1-Oct-05
1 11 1-Nov-05 1-Nov-05 30-Nov-05 1-Nov-05
Entering Defaults for Contracts    2-17
Seq Num Level Seq Invoice
Date
Bill From Bill To Interface
Date
1 12 1-Dec-05 1-Dec-05 31-Dec-05 1-Dec-05
Adding a Six-Months Service That Starts in the Middle of a Month
Now suppose that the same customer wants to start an additional six months of
service on May 15 in the middle of a billing period.
To modify the contract to ensure the customer is billed only one time each month:
1. Enter the service as a second contract line on the Lines tab.
2. Click Billing on the Pricing/Products subtab to open the Billing window.
3. Create three billing streams:
Seq Num Number
of
Periods
Start
Date
End Date Duration Period Invoice
Offset
Days
1 1 15-MAY-2
005
31-MAY-2
005
    -14
2 5 01-JUN-20
05
  1 Month  
3 1 01-NOV-2
005
14-NOV-2
005
     
1. Create the first billing stream for the partial month:
• Enter the end date as 31-May-2005. The application provides the
duration and period automatically.
• Enter –14 in the Offset Days Invoice field, to shift the invoicing date to
the beginning of the month. Otherwise, the customer receives two
invoices, one dated on the first of the month and a second dated May
15.
2. Create a second billing stream for the regular monthly periods:
2-18    Oracle Service Contracts User Guide
• The application supplies the start date automatically based on the first
billing stream.
• When you enter five periods of 1 month, the application supplies the
start and end dates automatically.
3. Enter a third billing stream to cover the partial month at the end of the
six-month period:
• The application supplies the start date automatically based on the
second billing stream.
• Enter the end date. The application supplies the duration and period
values automatically.
4. Click Schedule to generate the following billing schedule:
Seq Num Level Seq Invoice
Date
Bill From Bill To Interface
Date
1 1 1-May-05 15-May-05 31-May-05 1-May-05
2 1 1-Jun-05 1-Jun-05 30-Jun-05 1-Jun-05
2 2 1-Jul-05 1-Jul-05 31-Jul-05 1-Jul-05
2 3 1-Aug-05 1-Aug-05 31-Aug-05 1-Aug-05
2 4 1-Sep-05 1-Sep-05 30-Sep-05 1-Sep-05
2 5 1-Oct-05 1-Oct-05 31-Oct-05 1-Oct-05
3 1 1-Nov-05 1-Nov-05 14-Nov-05 1-Nov-05
Creating a Billing Schedule from a Billing Profile
You can create a default billing schedule, called a billing profile, from a template.
Prerequisites
• Confirm the setup of billing profiles.
• Enter the contract lines for which you want to set up the default billing schedule
Entering Defaults for Contracts    2-19
To create a billing schedule from a billing profile:
1. From the Service Contracts Authoring window, select Cascade Attributes from the
Actions menu.
The Cascade Attributes window appears.
2. Select the Billing Profile check box.
3. Use the LOV in the field to the right to enter the billing profile template.
4. Make sure that Header to Lines is selected for the Cascade list at the top of the
window and all the lines are selected on the right of the window.
5. Click Submit.
The Transaction Log appears.
6. Click Apply.
Note: The billing schedule overwrites any existing billing schedule
at the line and subline level.
If required, you can now edit the schedule at the individual line or
subline level.
Specifying How Billed Amounts Appear on Invoices
You can have the amounts itemized for each subline or included in the contract line.
To specify how billed amounts appear on invoices:
1. From the Service Contracts Authoring window, select the Summary tab and
Pricing/Billing subtab.
2. If your organization has implemented a custom invoices solution for billing
contracts, then you can use that solution by selecting the Summary Print check box.
3. To summarize billed amounts by contract line, then select the Summary
Transaction check box.
4. To itemize charges by subline, clear the Summary check box.
Note: The contract administrator must set the system profile OKS:
Summary Transactions to No. If this profile is set to Yes, then the
2-20    Oracle Service Contracts User Guide
application sends the summarized billing details even when you
leave this check box cleared.
5. Save.
Suspending Billing for a Contract
Normally, all eligible billing records are automatically passed to Oracle Receivables for
invoicing on the invoice date that you specify in the billing schedule. An example of
when you may want to suspend billing for a contract is when the customer disputes the
invoice.
To suspend billing for a contract:
1. From the Service Contracts Authoring window, select the Summary tab and
Pricing/Billing subtab.
2. Select No from Bill Services LOV.
3. Save.
To resume billing, update Bill Services to Yes. The application then bills the
customer for all outstanding charges since the suspension started.
Note: To suspend billing for the remainder of the contract term and
resume normal billing upon renewal, set Bill Services to At
Renewal.
Holding Credits Until the Next Billing Cycle
You can place a hold on credit memos until the next billing cycle. This setting does not
hold invoices.
By default the Hold Credits check box is cleared, so the credit memo immediately picks
up the billing amount.
To hold credits until the next billing cycle:
1. From the Service Contracts Authoring window, select the Summary tab and
Pricing/Billing subtab.
2. Select the Hold Credits check box.
Entering Defaults for Contracts    2-21
3. Save.
Clear this check box to credit the customer immediately.
Entering Tax Exemptions
Oracle Service Contracts integrates with Oracle E-Business Tax to provide a preview of
estimated tax on a contract. The estimated tax amount that is provided is based on
applicable tax rates, exemptions, exceptions, and so on, as defined in Oracle E-Business
Tax setup. You can specify exemption handling for a contract by selecting the
Exemption Control attributes on a contract. These are Exemption Control, Exemption
Number, and Exemption Reason. The entry that you make here applies to new contract
lines only. To apply a change of status to existing lines you must use the Cascade
Attributes window. See Applying Default Values to Existing Contract Lines, page 3-60.
To enter tax exemptions:
1. From the Service Contracts Authoring window, select the Summary tab and
Pricing/Billing subtab.
2. In the Exemption region, set Tax Exemption Control to Exempt, Required, or
Standard to specify exemption handling for the contract.
3. If you select Exempt :
1. You are prompted to select tax exemption number from the Number LOV.
2. The list of valid exemptions is restricted as follows:
• Exemptions that are defined for the Bill To Account Party.
• Exemptions that have an Exempt Status of Primary or Manual. Exemptions
with Exempt Status Discontinued, Rejected or Unapproved are not
included in the LOV.
• Exemptions that are in effect as of the start date of the contract.
Note: The Reason field is view-only and is populated when an
exemption is selected.
Note: You can define tax exemptions with or without an end
date in Oracle E-Business Tax setup. If the application applies
an exemption with an end date to a service contract, the tax
exemption might expire prior to the end date that is specified
2-22    Oracle Service Contracts User Guide
on the contract. For a contract with recurring billing, such as
Monthly or Quarterly, this can lead to the exemption being
applied to the invoices that are generated by the contract before
the tax exemption expires, while the selected exemption is not
applied to invoices that are sent to Oracle Receivables after the
exemption has expired.
For example, a contract with a start date of 01-Nov-06 and an
end date of 31-Oct-07 is given a monthly billing schedule that
will result in an invoice being created on the first day of each
month starting on 01-Nov-06. If the exemption that is applied
to the contract expires on 31-Dec-06, then the exemption will be
applied for the invoices that are created on 01-Nov-06 and
01-Dec-06. The exemption is not applied to invoices that are
created from 01-Jan-07 onwards.
The preceding scenario can lead to a discrepancy between the
estimated tax amount previewed on the contract and the actual
tax amount that appears on invoices. Therefore, when a tax
exemption is applied to a contract or service line and is not
active for the full duration of the contract or service line, a QA
warning message is provided to inform the user.
• If Exemption applied to a contract header is not valid for
the full duration of the contract:
Tax exemption certificate number N on the
header is only partially valid for the
contract duration. Exemptions will not be
applied after the exemption certificate
expires.
• If Exemption applied to a service line is not valid for the
full duration of the service line billing period:
Tax exemption certificate number AS-Ex-10
on line 1 is only partially valid for the
billing period. Exemptions will not be
applied after the exemption certificate
expires.
4. If you select Standard, no override exemptions are entered on the contract.
Standard tax handling applies to the contract.
5. If you select Required, tax is required on the contract. You cannot apply a specific
exemption to the contract. The application also ignores any tax exemptions that are
defined in Oracle E-Business Tax that normally apply to the contract.
Entering Defaults for Contracts    2-23
6. Save.
Specifying a Payment Method
This group of procedures explains how to specify a payment method.
Note: The payment method values that you enter on the header are
used for the lines unless you manually enter a different value for a line.
• Specifying Payment by Credit Card or Commitment Number, page 2-23
• Requiring a Purchase Order, page 2-24
• Specifying a Purchase Order Number for Invoices, page 2-25
The payment method information that you enter using the procedures described in this
section applies only to new contract lines. You must cascade the entries by selecting the
Payment method check box in the Cascade Attributes window to apply them to existing
lines as well. See Applying Default Values to Existing Contract , page 3-60 for details.
Specifying Payment by Credit Card or Commitment Number
Commitments, which are set up in Oracle Receivables, represent a customer's
prepayment for goods or services (prepayments) or contractual agreements
(guarantees).
Prerequisite
• Confirm the setup of commitments in Oracle Receivables. See the Oracle Receivables
User Guide.
• Confirm that the contract has a Bill To Party and Location.
To specify payment by credit card or commitment number:
1. From the Service Contracts Authoring window, select the Summary tab and
Pricing/Billing subtab.
2. To specify payment by credit card:
1. Select Credit Card from the Method list in the Payment Details region. The
Number, Expiry, and Security fields appear.
2. Select a credit card from the Number LOV.
The credit card numbers in the LOV appear masked if your administrator
2-24    Oracle Service Contracts User Guide
defined credit card masking rules in Oracle Payments. After you select a credit
card, the application masks the card number in the Number field. Date of
Expiry appears for the card number that you select.
Note: If you do not find the card number that you need, you
can cancel out of the LOV and enter the card number,
expiration date, and security code manually. When you save,
Oracle Payments validates the credit card details. If the card
details are valid, Oracle Payments creates an account for the
new credit card and the application masks the number that you
entered on the Service Contracts Authoring form (first 12 digits
only).
3. Enter the security code in the Security field.
Security code is mandatory if your administrator set up Oracle Payments to
require a security code when accepting credit card as a payment method. After
you save and the application validates the security code, it appears masked in
the Service Contracts Authoring form.
4. Save. After you save, the security code appears masked within the Security
field.
Note: If the application administrator has set the system profile
OKS: Credit Card Validation Level to Authorize Payment, then
when QA is run for the contract, a QA check authorizes the
transaction for the amount that is specified in OKS: Credit Card
Minimum Authorized Amount.
3. To specify payment by commitment:
1. Select Commitment Number from the Method list. The Number field appears.
2. Enter the commitment number using the LOV.
4. Save.
Requiring a Purchase Order
When you require the entry of a purchase order, the contract cannot pass the QA check
and become active unless a purchase order is entered for every line.
The requirement does not affect any existing contract lines. You must use the Cascade
Attributes window and select the Payment Method check box to enforce the
requirement to all lines.
Entering Defaults for Contracts    2-25
To require a purchase order number for contract lines:
1. From the Service Contracts Authoring window, select the Summary tab and
Pricing/Billing subtab.
2. Select the Purchase Order Required check box.
3. Save.
Specifying a Purchase Order Number for Invoices
You can specify a purchase order number, which is passed to Oracle Receivables and
appears on customer invoices.
You must use the Cascade Attributes window and select the Payment Method check
box to copy the number to lines.
To specify a purchase order number for invoices:
1. From the Service Contracts Authoring window, select the Summary tab and
Pricing/Billing subtab.
2. Enter the purchase order number in the PO Number field.
3. Save.
Specifying a Receivables Transaction Type for Payment
Oracle Receivables uses transaction types to specify which accounts are credited for
customer payment.
Prerequisite
Review the Oracle Receivables transactions types that were created for your
organization.
Note: A default transaction type of Invoice-OKS is applied to invoices
that are created from Oracle Service Contracts if the Transaction Type is
not entered on the contract.
Note: Transaction Type is a mandatory field when the tax method that
is associated with the contract is Latin.
2-26    Oracle Service Contracts User Guide
To specify a Receivables transaction type for payment:
1. From the Service Contracts Authoring window, select the Summary tab and
Pricing/Billing subtab.
2. Select the transaction type from the Transaction Type LOV.
Assigning Sales Credits
You can assign the default sales credits for each new contract line in your contract. You
can assign both revenue and non revenue credits.
To apply the sales credits to existing contract lines, you must cascade the changes to
them. See Applying Default Values to Existing Contract Lines, page 3-60 for details.
To assign sales credit:
1. From the Service Contracts Authoring window, select the Summary tab.
2. Select Sales Credits from the Actions menu.
The Sales Credits window appears.
Entering Defaults for Contracts    2-27
3. Enter the sales agents and the revenue and non-revenue credit they are to receive.
Sales group entry is optional. Revenue credit must always add up to 100 percent.
4. Click OK.
Requiring and Specifying a Purchase Order for Service Charges
You can specify a purchase order or require an agent to specify a purchase order
number for charges that are not covered by the contract.
To determine which purchase order number appears in invoices, the application first
checks the service request that is associated with the service that is being performed. It
uses only the purchase order you enter here when no number is entered in the service
request.
Requiring the entry of a purchase order, prevents the contract from passing the QA
check and reaching Active status until the entry is made. It does not prevent the service
from being scheduled or performed.
To require or specify a purchase order for service charges:
1. From the Service Contracts Authoring window, select the Summary tab,
Pricing/Billing subtab, and Service Charges region.
2. To require entry of the purchase order number and prevent the contract from
becoming active until the entry is made, select the Purchase Order Required check
2-28    Oracle Service Contracts User Guide
box.
3. You can enter the purchase order number in the PO Number field.
4. Save.
Specifying How a Contract Will Be Renewed
Your application administrator can set up automatic default values for contract
renewals, see Entering Contract Defaults, page 2-36. If such defaults exist, then you
may not be required to enter renewal information. Check with your application
administrator.
To renew the contract, you must also specify how to renew each line, see Specifying
How a Contract Line is to Be Renewed, page 3-12.
For more information about contract renewals, see Understanding Contract Renewals,
page 17-11.
To specify how the contract is to be renewed:
1. From the Service Contracts Authoring window, select the Summary tab and
Renewals subtab.
2. Select the renewal process from the Process LOV.
• Evergreen: Customer acceptance will not be needed for activation.
Entering Defaults for Contracts    2-29
• Manual: All process steps will require a user action.
• Online: An automatic submission will be provided.
• Do Not Renew: Contract will not be renewed.
3. Select a value from the Approval LOV.
The Approval LOV differs based on your selection in the Process field.
• Evergreen:
• Not Required
• Required
• Manual:
• Not Required
• Required
• Online:
• Automatic
• Manual
• Not Required
Note: If the renewal process is Do Not Renew, you cannot select an
approval value.
4. To specify a billing schedule for the renewed contract, select a billing profile using
the Billing Profile LOV.
Billing profiles are templates that you can use to specify simple periodic billing
schedules and accounting and invoicing rules for the renewed contract. This
schedule overrides any billing schedule in the contract that is being renewed. See
Creating Billing Profiles, page 10-7.
5. Specify how the renewed contract is to be priced. For details, see Specifying How
the Renewed Contract will Be Priced, page 17-26.
6. Save.
2-30    Oracle Service Contracts User Guide
Defining Grace Periods
You can use grace periods to extend the service that a customer receives while a
renewed contract is being negotiated and approved. See Allowing a Grace Period for
Renewals, page 17-28.
Specifying and Starting the Contract Approval Workflow
Your administrator sets up rules in the Oracle Approval Management Engine (AME)
that determine the approver for the approval process. Oracle Service Contracts starts
the process that you specify when the contract passes the quality assurance check.
Note: The default approval process for Oracle Service Contracts is
called Approval Process.
Prerequisite
Confirm the name of the approval process to select.
To specify and start the contract approval workflow:
1. From the Service Contracts Authoring window, select the Summary tab and
Administration subtab.
2. In the Approval region, use the Name LOV to select an approval process.
3. Click Submit.
The application automatically runs the Quality Assurance check on your contract.
You must correct any errors.
The application automatically starts the Workflow process after the contract passes
the check with no errors.
Organizing Contracts by Assigning Them to Contract Groups
Contract groups organize contracts in the Contract Navigator tab of the Oracle
Contracts window.
To organize contracts by assigning them to contract groups:
1. From the Service Contracts Authoring window, select the Summary tab and
Administration subtab.
2. In the Contract Groups region, use the Group Name LOV to select each contract
Entering Defaults for Contracts    2-31
group where this contract should appear.
3. Save.
Specify a Different Quality Assurance Check List
The application uses the quality assurance check list that is specified in the system
profile OKS: Default QA Checklist to check and validate the contract for errors and
completeness before it can become active.
Prerequisite
Create a QA checklist.
To specify a different quality assurance check list:
1. From the Service Contracts Authoring window, select the Summary tab and
Administration subtab.
2. In the Approvals region, select an alternate check list from the QA Checklist LOV.
3. Save.
Entering an Estimate of Contract Revenue
The revenue that you enter appears in the Service Contracts Forecast Summary Report
and the Service Contracts Forecast Management Report.
To enter an estimate of contract revenue:
1. From the Service Contracts Authoring window, select the Summary tab and
Administration subtab.
2. In the Estimation region, enter the number representing the percentage of revenue
that you predict is going to be realized from this contract.
3. Enter the date that the estimated revenue will be realized.
4. Save.
2-32    Oracle Service Contracts User Guide
Specifying Contract Terms
To specify contract terms:
1. From the Service Contracts Authoring window, select the Summary tab and
Administration subtab.
2. Click Contract Terms.
The application displays the Contract Terms page in a separate browser window.
Refer to the following procedures in the Oracle Contracts online help:
• Applying a Contract Template
• Removing Contract Terms
• Adding Sections
• Adding and Updating Clauses
• Moving Contract Terms
• Renumbering Contract Terms
• Validating Contract Terms
• Checking for Clause Updates
• About the Contract Terms Library
• Update Contract Source
Note: You can only use this feature in Oracle Service Contracts
to change the contract template
• Updating Clauses and Creating Non-Standard Clauses in a Business Document
• Comparing Clauses
Note: The Update Variable Value function is not supported within
Oracle Service Contracts.
Entering Defaults for Contracts    2-33
Granting Additional Access Privileges
You can grant the ability to modify the contract either to an individual or a resource
group.
You cannot use this procedure to restrict access to a contract, only to grant additional
access. This is because the ability to view and modify contracts depends on a
combination of security privileges granted both by the responsibility and at the
individual contract level.
The access level that is granted by a responsibility takes precedence over the access that
you grant using this procedure. This means that if users log into the application under a
responsibility that permits modification of contracts, then you cannot restrict their right
to modify a specific contract.
You can use this procedure if your implementation has created a responsibility with
view-only access. In this case, you can grant individual users or members of a resource
group the ability to modify a specific contract as well. Your entries affect only users
logging in under that responsibility.
Note: Users logging in under a view-only responsibility, cannot create
new contracts using the Service Contracts Authoring window.
Prerequisite
Set up a responsibility with read-only access to contracts.
To grant additional access privileges:
1. From the Service Contracts Authoring window, select the Summary tab and
Security/Text subtab.
2. In the Security region use the Type list to select one of the following:
• User: to grant the right to modify this contract to a user.
• Group: to grant the right to modify the contract to a specific resource group.
Note: Your administrator can create resource groups from the
Resource Manager module. If a resource group is created with the
Contracts role type, you can select it within the Security/Text
subtab of a contract. If the resource group is granted access to a
contract, then any member of the resource group has access to the
contract. For information about Resource Manager refer to the
Oracle Common Applications Implementation Guide.
2-34    Oracle Service Contracts User Guide
3. Select the resource group or user name from the LOV.
4. Select Modify from the Level list.
5. Save.
Entering an Additional Description or Comment
To enter an additional description or comment:
1. Select the Summary tab and Security/Text subtab.
2. Enter the text in the Text region either in the Long Description or the Comments
fields.
3. Save.
Note: You can use the Query by Example method to find the
contract with the text that you entered.
Setting Up Defaults for Contract Renewal
This group of topics is intended to help application administrators set up default
renewal rules for groups of contracts. These rules, which are entered in the Global
Contracts Default window, can be overridden by agents for individual contracts.
Note: The Global Contracts Default is also used for entering defaults
required by contracts that are generated automatically from Oracle
Order Management orders. These defaults are described in Setting Up
New Contract Defaults for Oracle Order Management , page 6-20.
This group of topics covers:
• Overview of Default Levels, page 2-34
• Entering Contract Defaults, page 2-36
• Setting Up System Profiles for Renewal Defaults, page 2-43
Overview of Default Levels
You can specify how attributes of a contract pass at the time of renewal at three
different levels:
Entering Defaults for Contracts    2-35
1. Party
Enables you to specify different renewal rules for different customers.
2. Organization
Enables you to specify different renewal rules for different organizations in your
own company.
3. Global
Enables you to specify global default rules that apply to contracts that do not satisfy
any of the default rules that you specified for the previous levels.
The application looks for renewal rules in the order Party, Organization, and Global
and uses the first applicable set of rules it finds.
For example, suppose that you set up your renewal preferences for the customer
Business World and your organization Vision Enterprises.
If an agent creates a contract for Business World, the application automatically passes
the preferences that you have set up at the party level, regardless of the organization
that created the contract.
If an agent at Vision Enterprises creates a contract for ABC Corp., it is subject to the
renewal rules that you set up at the organization level. A contract for ABC Corp. that is
created by an agent at Vision Communications, another organization in your enterprise,
is subject to the global rules only.
An agent creating or editing a contract, can override the defaults you set at any level by
making an entry in the Summary tab and Renewals subtab.
Note: Agents specifying renewals in individual contracts, using the
Summary tab and Renewals subtab, do not see the default values that
you enter here.
You enter all of the different levels of default renewal rules in the same Global
Contracts Default window. Although the entries you that you make are almost identical
for each default rule level, the user interface layout is different for entering global
defaults (in the top half of the window) and for entering defaults at the party or
organization level (the tabs in the lower half).
To complete the setup of renewal defaults, you must also set the system profiles
described in Setting Up System Profiles for Renewal Defaults, page 2-43.
Note: Although the application looks at the renewal rules defined on
the contract and follows the renewal rules in the following order, Party,
Organization, and Global, the QA check and approval workflow are
always taken from the Global Contracts Default window and not the
contract itself.
2-36    Oracle Service Contracts User Guide
Entering Contract Defaults
At a minimum, you should enter renewal rules at the global level. Optionally, you can
enter renewal rules at the party and organization levels. Upon renewal the application
processes renewal rule attributes in the following order:
1. Contract
2. Parties
3. Organizations
4. Global
If renewal rules are not found at one level, the application moves to the next level.
Prerequisites
To enter rules for:
• Organizations, confirm the operating unit, such as Vision, France.
• Parties, confirm party names, such as Business World.
To enter contract defaults:
1. Navigate to Setup: Service Contracts, and then Global Contracts Defaults.
The Global Contracts Default window appears.
Entering Defaults for Contracts    2-37
2. Navigate to the appropriate region of the window, depending on which type of
renewal rule set you want to enter:
• To enter global defaults, make entries in the Global region on the top half of the
window.
• To specify rules for an organization within your business, select the
Organizations tab.
• To specify rules for a customer, select the Parties tab.
To enter Global level defaults
You can define Global defaults in the Global region on the top half of the window.
The Global defaults are divided into the following regions:
• Renewal
• Pricing/Billing
• Online Acceptance Process
• Thresholds
• Integration
The following steps provide guidelines for entering information into each of these
regions:
2-38    Oracle Service Contracts User Guide
1. Select the renewal defaults from the Renewal region.
From this region, you can:
1. Specify the contract group to which the renewed contract will belong from
the Renewal Contract Group LOV.
2. Select the renewal process from the Process LOV and the internal approval
method from the Approval LOV.
The renewal process that you select affects which internal approval
methods are available. Following is a description of the renewal processes
and corresponding internal renewal methods.
• Evergreen: Customer acceptance will not be needed for activation.
Internal Approval Methods
• Not Required
• Required
• Manual: All process steps will require a user action.
Internal Approval Methods
• Not Required
• Required
• Online: An automatic submission will be provided.
Internal Approval Methods
• Automatic
• Manual
• Not Required
• Do Not Renew: Contract will not be renewed.
Note: If the renewal process is Do Not Renew, you
cannot select an approval value.
3. Select the XML layout template set and language from the Layout Template
Set LOV and the Template Language LOV.
4. Specify a grace period beyond the expiration date of a renewed contract at
no extra charge by entering a grace duration and grace period.
Entering Defaults for Contracts    2-39
5. Require an agent to enter a purchase order number in the contract before it
can become active by selecting the PO Required check box.
6. Estimate the probability of renewal as well as the time frame by which the
revenue is realized with the Estimated Percentage, Estimated Duration, and
Estimated Period fields.
2. Select pricing and billing defaults from the Pricing/Billing region.
From this region, you can:
1. Define the pricing of the renewed contract from the Pricing Method LOV.
The pricing method that you select affects whether you must select a price
list or enter a markup percentage. Following is a description of the pricing
methods.
• Manual: The application charges the customer the same price for the
renewed contract as they paid for the original contract.
• Markup Percent: Automatically adjusts the price up or down by a
percentage that you enter. (A positive number marks up the price; a
negative number discounts it.) Optionally, you can cap the maximum
adjustment based on a price list.
• Price List: Charges the customer based on the price list that you enter
in the Price List field. The price charged is the current price listed in the
price list at the time the contract is renewed.
2. If necessary, select a price list from the Price List LOV.
3. If necessary, enter a markup percentage from the Markup Percentage LOV.
4. Specify a billing schedule for the renewed contract, by selecting a billing
profile from the Billing Profile LOV.
Billing profiles are templates that you can use to specify simple periodic
billing schedules and accounting and invoicing rules for the renewed
contract. This schedule overrides any billing schedule in the contract that is
being renewed. See Creating Billing Profiles, page 10-7.
5. Define partial period attributes.
A partial period is any billing period or service effective duration that is not
in multiples of Billing/Pricing Period unit of measure (UOM). For example,
a service may be priced and billed at a specific rate per month. If the service
duration is 01-Jan-06 to 15-Mar-06, the service amount that is priced or
billed is calculated based on the number of periods (months) in the
2-40    Oracle Service Contracts User Guide
duration; in this case, two full months for January and February and one
partial period for the 15 days in March. Partial periods define how the
application calculates pricing, billing, and termination amounts and can
occur at the beginning, the end, or both the beginning and the end of the
service duration.
Important: Partial Period Duration is equal to the Actual
Days in the Partial Period (numerator) divided by the Total
Number of Days in Pricing/Billing Period (denominator).
Number of days in the denominator is determined by
Default Pricing/Billing Period Type and Price UOM value
of subline for pricing and for Default Pricing/Billing Period
Type and Billing Steam Period Duration for billing.
Following is a description of the fields that make up the partial period
attributes:
• Period Start: Enables you to select where the partial period calculation
occurs within a pricing, billing, or termination duration when service
starts in the middle of a period.
Service start counts full periods from service start date, then a partial
period at end.
Calendar Month start counts full periods based on full calendar
months that span the duration.
• Price UOM: Enables you to define a default period for pricing and
billing. Valid values are Day, Month, Quarter, Half-year and Year. If
Month is specified as the price unit of measure, then it is used as the
basis for calculating partial periods for all pricing, billing and
termination calculations.
• Period Type: Enables you to define whether the duration is based on a
fixed definition or an actual definition. For example, for:
• Fixed, a duration of 30 days is given for a month, 90 days for a
quarter, and 360 days for a year
• Actual, a duration is based on actual days in the default period.
For example, if a service spans 11 whole months, March 1 through January 31,
plus 10 days in February, the amount for the 10 days in February can be
calculated in one of two ways:
• 10/30 of the price/month if the calculation is based on a fixed 30 day month
Entering Defaults for Contracts    2-41
• 10/28 of the price/month if the calculation is based on actual days in the
month (non-leap year)
3. Define how the processing of online acceptances from the Online Acceptance
Process region.
From this region, you can:
1. Define which payment methods can be used for online acceptances by
selecting the relevant check box. Payment method can be set up to process
or authorize payment with a purchase order, credit card, check, wire, or
commitment.
2. Enable the use of thresholds for the online acceptance process by selecting
the Enable check box.
If this field is not selected, the online acceptance is processed.
Enable is a yes or no setting at global level. At operating unit and party
level, the options are yes, no, and null. If this field is set to:
• Yes: Thresholds determine whether a contract automatically qualifies
for renewal rule Online at time of renewal based on the value of the
contract.
• No: Thresholds do not determine whether the contract qualifies for
online renewal.
• Null: The application traverses the hierarchy to the next level to
determine the renewal setting.
Example
For example, renewal rules for a party are set as follows:
• Renewal Process: Manual
• Enable: Yes
• Threshold: $2,500
• Online Threshold: $5,000
The contract renews as follows:
• If the contract amount is less than or equal to $2,500, contract renews
with renewal process Evergreen.
• If the contract amount is less than or equal to $5,000, contract renews
with renewal process Online.
2-42    Oracle Service Contracts User Guide
• If the contract amount is greater than $5,000, contract renews with
renewal process Manual.
3. Select payment terms for the renewal.
4. Identify an individual the customer should contact with questions by
selecting a name from the Help Desk LOV.
4. Define currency information, approval thresholds, and approval requirements
from the Thresholds region.
From this region, you can:
1. Select a currency, such as USD.
2. Enter the limit for processing Evergreen renewals in the Evergreen Amount
field.
3. Enter the limit for processing Online renewals in the Online Amount field.
4. Enter the limit for processing credit card payments by entering a value in
the Credit Card Amount field.
5. Define whether an internal review is required for the Evergreen renewal
based on Evergreen Amount threshold.
6. Define whether an internal review is required for the Online Acceptance
renewal process based on Online Amount threshold.
5. Change how the contract uses other functionality within Oracle Service
Contracts and how it integrates with other applications within the Oracle
E-Business Suite from the Integration region. A renewed contract inherits
defaults from the original. This region provides you with a way of changing
defaults upon renewal.
From this region, you can:
1. Specify a different contract group for the renewed contract, by choosing the
contract group from the New Contract Group LOV.
2. Select a new approval workflow from the Approval Workflow LOV.
3. For contracts that are generated from Oracle Order Management, select
Third Party from the Party Role LOV.
4. Determine whether the contract is eligible for price breaks by selecting the
Interface Price Break check box.
Entering Defaults for Contracts    2-43
5. Select a new QA checklist from the QA checklist LOV.
6. Change how return credits are processed from the Return Credit LOV.
6. Save.
Related Topics
Setting Up New Contract Defaults for Oracle Order Management (Global Contracts
Default window), page 6-20
Specifying How the Template Sets Are to Be Used (Global Contracts Default window),
page 18-23
Setting Up System Profiles for Renewal Defaults
You must also set up the following system profiles to supplement the entry of renewal
rules:
• OKS: Enable Sales Credits: This system profile determines how sales credits are
transferred to the renewed contract.
• Retain: Carries forward the sales credits from the existing contract to the
renewed contract.
• Derive: Derives a sales person for the renewal agreement according to the
setting of the OKS: Use Territories to Default Sales Person and OKS: Sales
Person.
• Drop: The application does not carry forward and default any sales credit
information to the renewed contract.
• OKS: Use Territories to Default Sales Person: If this profile is set to Yes, the
application determines the default sales person assigned to the renewed contract
based on sales territories. If this profile is set to No, then the application determines
the sales person for the contract based on the value that is entered in OKS: Sales
Person.
• OKS: Sales Person: If OKS: Use Territories to Default Sales Person is set to No, this
profile determines the sales person to receive sales credit and to be listed as the
vendor contact. You must enter a sales agent in this profile or the contract fails to
renew. An agent can manually add additional sales people to the Sales Credits
window and assign them sales credits after the renewal agreement has been
created.
• OKS: Revenue Type Distribution for Sales Credit: This system profile assigns the
2-44    Oracle Service Contracts User Guide
percentage of revenue that you specify to the sales agent who is determined from
the previous two system profiles. Agents can specify additional sales credits in the
Sales Credit window, but the total of revenue sales credits must always add up to
100 percent.
• OKS: Revenue Type for Sales Credits: The setting of this system profile specifies
whether you want to assign the sales agent revenue credit or non-revenue credit.
• OKS: Vendor Contact Role: This system profile specifies the vendor contact role to
the renewal agreement. By default this profile option is set to Salesperson.
• OKC: Contract Approver: Set this system profile to the individual in your
organization who is to approve renewed contracts. The application notifies the
agent that you specify here to approve any contracts that are renewed under the
Submit for Approval renewal type.
Speeding Up Contract Line Entry Using Default Values
You can use multiple methods to speed up the entry of values to individual contract
lines. If you are creating a new contract similar to an existing contract, for example, then
you can copy the existing contract and modify it. Or for creating multiple similar
contracts, you may instead want to save the original as a template and use that template
to create the new contracts.
You can default values from the header of a contract down to the lines and, if
applicable, to sublines as well. For example, if you select the corporate price list on the
Summary tab and then enter a service contract line, that line's price list is automatically
set to corporate as well.
With the exception of billing schedules, the defaults that you enter on the Summary tab
apply only to new contract lines. Existing contract lines are not affected. If you later
change the default price list at the header level to the good customer discount price list,
for example, that change applies only to new line entries unless you use the cascade
attributes procedure to specifically change the existing lines as well.
Default billing schedules, by contrast, apply only to existing contract lines and
automatically overwrite any schedules you have entered at the line or subline level. You
must apply the default schedule again to any new lines because they do not
automatically inherit it.
Entering Service Lines     3-1
3
Entering Service Lines
This chapter covers the following topics:
• Overview of Entering Service Lines
• About Service Lines
• Entering a Service Line (General Procedure)
• Changing the Billing and Shipping Accounts and Locations
• Entering Billing and Shipping Contacts for a Contract Line
• Creating or Modifying a Contract Line Contact
• Specifying How a Contract Line Is to Be Renewed
• Renewing Service Purchased for Seasonal or Peak Periods
• Specifying What a Service Covers
• Levels of Coverage and Their Uses
• Covering Customer Products (Instances in Oracle Installed Base)
• Covering Customer Products
• Browsing Oracle Installed Base to Identify Item Instances for Coverage
• Entering a Customer Product into Oracle Installed Base
• Covering Parties
• Covering Customer Accounts
• Covering Party Sites
• Browsing Through Party Sites
• Covering Systems
• Browsing Through Oracle Installed Base Systems
• Covering Inventory Items
• Viewing Details About a Covered Product
3-2    Oracle Service Contracts User Guide
• Maintaining Pricing Attributes for Covered Products
• Specifying How the Service Prints on an Invoice
• Omitting a Line or Subline from the Invoice
• Specifying the Invoice Text
• Specifying a Billing Schedule
• Pricing What a Service Covers
• Adjusting the Price of a Service for a Covered Product or an Item
• Repricing a Service by Changing the Price List
• Manually Adjusting the Price
• Changing the Basis for Pricing a Service
• Pricing Service for a Party, Customer Account, Site, or System
• Specifying a Payment Method for a Contract Line
• Specifying Payment by Credit Card or Commitment Number
• Requiring a Purchase Order
• Specifying a Purchase Order Number
• Modifying Coverage Provided by a Service
• Scheduling Preventive Maintenance Activities
• Scheduling Multiple Activities at the Same Time
• Scheduling Individual Activities
• Scheduling Activities at Regular Intervals Using Schedule Streams
• Viewing Maintenance Program and Activity Details
• Updating Scheduled Service Dates for a Maintenance Program
• Ending Service Lines on a Day Specified by the Customer
• About Cotermination
• Applying the Cotermination Date to a Service
• Specifying Tax Status
• Applying Changes from a Service Line to the Covered Sublines
• Assigning Sales Credits for a Contract Line
• Updating Service
• Applying Default Values to Existing Contract Lines
Entering Service Lines     3-3
Overview of Entering Service Lines
This group of topics explains how to enter service lines into your contract.
About Service Lines
A service can cover broad-category business processes such as field service, depot
repair, call center, technical support, safety inspections, and any other user-defined
business activities.
Each service is set up by the application administrator as an item in Oracle Inventory
and is associated with a coverage template. The coverage template specifies the
business processes that are covered, the times that the customer is entitled to the
coverage, amounts that are covered and applicable discounts, as well as any resources
that are to be used and their pricing.
If preventive maintenance is required as part of the service, the service is also associated
with a program of maintenance activities. These activities are scheduled automatically
when you enter the service line.
The administrator can also restrict which customers or products are permitted to use
this service.
You must be familiar with the details of the services that are created for your
organization before using them in a contract because you select a service in a service
line by its Oracle Inventory name.
A service can cover different types of entities. A safety inspection service can cover
individual customer sites or the entire enterprise. A depot repair service can cover
individual products, a group of products, all products at a specific location, or all
products that are grouped into a system.
For example, a service may cover field service for all of the computer equipment at site
A, or it may instead cover laptops L451, L359, and L863.
A service line can cover multiple entities, each of which you enter as a subline.
When you cover individual customer products (Oracle Installed Base item instances or
Items in Oracle Inventory), you can have the application price the service automatically
and take advantage of Oracle Advanced Pricing features including discounts. Your
organization can price the same service differently by setting up multiple price lists, and
it can offer different prices for the service based on service length. This means that your
organization can offer discounts if a customer purchases service for a longer period of
time.
Entering a Service Line (General Procedure)
Prerequisites
3-4    Oracle Service Contracts User Guide
Create the contract with the appropriate category:
• To cover products in a customer's installed base, you can use any of the available
contract categories: Warranty and Extended Warranty, Service Agreement, and
Subscription Agreement.
• If your contract includes usage lines, or the service covers other levels including
parties, sites, accounts, and inventory items, then you must select Service
Agreement or Subscription Agreement.
• To include subscription lines in the same contract, you must select Subscription
Agreement.
• Enter the required fields on the header of the contract.
To enter a service line:
1. From the Service Contracts Authoring window, select Lines tab and Accounts
subtab.
2. Select one of the following from the Line Type list of values (LOV) depending on
the contract category:
• For a service contract of category Service Agreement or Subscription
Agreement, select Service.
• For a service contract of category Warranty and Extended Warranty, select
Extended Warranty.
Entering Service Lines     3-5
Note: Both choices permit you to select from the same list of
service offerings.
3. Select the service from the Name LOV, which comprises all services that your
organization offers. You must select a service that is applicable to what you are
covering. Because you select the service first and what it covers later, the
application informs you of a wrong choice only after you enter the items that you
are covering.
Note: If the application displays a note that your entry is not a valid
service, then the application administrator excludes the customer
from ordering this service. See the Oracle Service Contracts
Implementation Guide for more information about defining service
availability rules.
4. Enter billing and shipping contacts that are specific to this contract line by
following the procedure described in Entering Billing and Shipping Contacts for a
Contract , page 3-10. If a contact does not exist in the database, then you can add
one following the procedure described in Creating or Modifying a Contract Line
Contact, page 3-10.
The contacts that you enter here are different from the ones that you entered in the
contract header.
5. Select the Effectivities subtab.
3-6    Oracle Service Contracts User Guide
6. You can review the status of the line. Lines on entered status contracts can be
individually canceled if you elect not to purchase the service during contract
negotiation. Leaving a line on the contract and canceling it rather than removing it
from the contract provides more visibility to lost opportunity for new and renewal
contracts. When a line is canceled, the application records the cancellation date and
reason.
7. Specify the duration of the service.
By default, the start and end dates of the service and duration are copied from the
contract header.
You can specify a different duration by:
• Clicking Coterminate to end the service line on a day that is preferred by the
customer.
This button is enabled only in contracts with a status of Entered for customers
to simplify renewals by terminating all contracts on the same day each year, for
example at the end of the calendar or fiscal years. This date is called the
cotermination date. See Ending Service Lines on a Day Specified by the
Customer, page 3-56 for more details.
• Entering either of the following:
• Start and end dates
• Duration and period
The application calculates the missing information. If you supply a
duration and period, then the start date is the start date of the contract.
Entering Service Lines     3-7
Note: If your organization prices contracts differently
based on different periods, for example offering different
prices for a service that is purchased by month, quarter,
and year, then the value in the Period field determines
which price applies in the absence of a specified price
UOM for the line.
You can change the price basis when you price the service.
You may need to do so whenever you sell a service for an
unusual service length, for example. By default, a customer
purchasing a contract for one year and five days is charged
based on a daily and not the yearly price because the line
length is not divisible by a year.
For more information, see About Changing the Basis for
Pricing a Service, page 3-43.
If the duration of the service starts earlier than the start
date or ends later than the end date of the contract, then
you must extend the start and end dates of the contract at
the header level before you can make the contract active.
8. If the contract can be renewed (you have not selected Do Not Renew on the
Summary tab and Renewals subtab), then specify how the line is to be renewed
using the Renewal Type LOV. For details, see Specifying How a Contract Line is to
Be Renewed, page 3-12.
9. Select the Pricing/Products subtab and Effectivity secondary tab.
3-8    Oracle Service Contracts User Guide
10. Specify what the service line covers. For each subline, specify one of the covered
levels and then enter what is being covered.
A service can cover:
• A specific product that the customer owns (an Oracle Installed Base item
instance)
• A party
• A customer account (party account)
• A party site
• An Oracle Installed Base system
• An Oracle Inventory item
For covered products, you can either enter each subline individually or click the
LOV indicator to open a browsing window where you can select multiple
sublines at once.
See Specifying What a Service Covers, page 3-14 for an explanation of the
covered levels and how to enter them.
11. If you are covering an inventory item or a product (instance) that the customer
owns, then the application prices the service for you. You must, however, price the
other covered levels manually. See Pricing What a Service Covers, page 3-39.
12. Much of the remaining information for a service line comes from the defaults that
you enter in the Summary tab or by the application itself from the coverage
template that is associated with the service. You can make modifications by
following these procedures:
Entering Service Lines     3-9
• Changing the Billing and Shipping Accounts and Locations, page 3-9
• Specifying a Payment Method for a Contract Line, page 3-45
• Specifying a Billing Schedule, page 3-38
• Specifying How the Service Prints on an Invoice, page 3-35
• Modifying Coverage Provided by a Service, page 3-47
• Scheduling Preventive Maintenance Activities, page 3-48
• Specifying Tax Status, page 3-57
• Assigning Sales Credits for a Contract Line, page 2-26
13. Save.
Changing the Billing and Shipping Accounts and Locations
The application uses the billing and shipping accounts and locations from the entries
that you made in the contract header. You can change the values to any account and
location that are related to the parties that are entered in the contract header.
The Bill To account and location that you select for the line is the account that receives
the invoice for this line. Your entries also restrict the contacts that you can enter for this
line.
Note: You must select the location by the application-generated
location codes. The corresponding addresses appear at the bottom of
the tab.
Prerequisite
Enter the contract line.
To change the billing and shipping accounts and locations:
1. From the Service Contracts Authoring window, select the Lines tab and Accounts
subtab.
2. Select the contract line to modify.
3. Use the LOVs to select a Bill To and Ship To account and location.
3-10    Oracle Service Contracts User Guide
Entering Billing and Shipping Contacts for a Contract Line
The contacts that you enter here are separate from those that you entered for the party
on the Summary line.
Note: The list of contacts that you can select is limited to those at that
particular account location. While you can create new contacts
according to the procedure that is described in Creating or Modifying a
Contract Line Contact, page 3-10, make sure that you do not create any
unnecessary duplicates.
Prerequisite
Select the shipping and billing accounts.
To enter billing and shipping contacts for a contract line:
1. From the Service Contracts Authoring window, select the Lines tab and Accounts
subtab.
2. Select the service line at the top of the subtab.
3. Place your cursor in an empty record in the Role field in the Customer Contacts
region.
4. To enter a contact for the billing account, select Billing Contact from the Role LOV.
This entry limits the available names to contacts for the billing account.
5. To enter a contact for the shipping account, select Shipping Contact from the Role
LOV. This entry limits the available names to contacts for the shipping account.
Note: Entering any other available role, such as Technical Contact,
makes contact at both accounts available for selection.
6. Enter the contact using the Name LOV.
7. You can specify a start date and end date for a contact using the date fields.
8. To view the phone and other contact information for a contact, select the contact
and select Maintain Contact from the Tools menu.
Creating or Modifying a Contract Line Contact
The contact that you create becomes a contact for the bill to account, the ship to account,
Entering Service Lines     3-11
or both, depending on your selection.
Prerequisite
Enter a service contract line
To create or modify a contract line contact:
1. From the Service Contracts Authoring window, select the Lines tab and Accounts
subtab.
2. Select the contract line to which you want to associate to a contact.
3. In the Customer Contacts region, place the cursor in the Role field.
4. Select Maintain Contact from the Actions menu.
The Contact window appears.
5. If you are creating a new contact, then:
1. Select a role for this contract using the Contact Role LOV. Usually this is either
Billing Contact or Shipping Contact.
2. Select the Bill To or the Ship To radio button depending on whether you want
to create a contact for the billing or shipping account in the contract line.
The role that you selected in the previous step restricts your choices: if you
selected the Billing Contact role, then you cannot select the Ship To radio button
and vice versa.
3. Enter the contact last and first name.
4. Use the following guidelines for entering other information:
• Select the titles and job descriptions from the Titles and Job LOVs. These are
preset by your application administrator.
• Phone, fax, and mobile numbers are composed of three fields: a country
code (LOV), an area code, and the number itself. Do not use any delimiters
when entering your number.
• For the contact address, you can select only one of the existing customer
locations that is associated with the account. You can add a mail stop or a
mail box, however, by pressing the Tab key after entering the address.
6. If you are modifying an existing contact, then you can:
• Change the title and job description by selecting a different one from the Title
3-12    Oracle Service Contracts User Guide
and Job LOVs.
• Change the phone, fax, and mobile numbers.
• Change the e-mail address.
Note: When modifying existing contact information, be aware
that you are modifying the contact record for all Oracle
E-Business Suite applications.
You cannot modify the address or mail stop number after you
have saved them. To select another address or enter a different
mail stop, you must:
• Navigate back to the Service Contracts Authoring window.
• Delete the contact by selecting it and clicking Delete in the
toolbar.
• Create a replacement contact with the correct address
information.
Note: Deleting the contact from the contact
does not delete it from the database.
Creating a replacement record creates a
duplicate.
7. If you are modifying an existing contact and want to revert to the existing record,
click Reset.
8. Click OK to return to the Service Contracts Authoring window.
9. Save.
Specifying How a Contract Line Is to Be Renewed
This procedure applies to lines of all types (Service, Usage, and Subscription).
Prerequisites
• Enter a contract line.
• You cannot renew a line if you have indicated that the contract is not to be renewed
at the header level. See Specifying How a Contract Will Be Renewed, page 2-28.
Entering Service Lines     3-13
To specify how a line is to be renewed:
1. From the Service Contracts Authoring window, select the Lines tab and
Effectivities subtab.
2. Select the line to set up.
3. Select one of the renewal options from the Line Renewal Type list. The choices are:
• Do Not Renew: The line will not be renewed when the contract is renewed.
• Full Duration: The line will be renewed for the whole duration of the new
contract. For example, if a customer ordered six months worth of a yearly
service in the current contract, but the renewed contract is for a period of one
year, then the service line is extended to the full year as well.
• Keep Duration: The duration of this line will remain the same in a renewed
contract. Use this setting for intermittent or seasonal service lines. For example,
a mountain resort may order special service for peak periods in winter and
summer. Using this setting, you ensure that the renewed contract retains the
same structure. See Renewing Service Purchased for Seasonal or Peak Periods,
page 3-13.
Renewing Service Purchased for Seasonal or Peak Periods
This topic explains how to set the renewal types for service lines in a contract that
includes intermittent or seasonal service.
Customer Problem
A mountain resort has installed power generators and wants to purchase two kinds of
service:
• Regular service for the whole calendar year that entitles them to repair during
regular business hours.
• Premium 24/7 service for peak winter and summer periods.
Oracle Service Contracts Solution
The following guidelines explain how to structure a contract based on the customer
requirements.
Service Line Entry
Create a contract with three service lines:
3-14    Oracle Service Contracts User Guide
• Line 1: Regular service for the whole year.
• Line 2: Premium for the winter
• Line 3: Premium for the summer
Renewal Information
To keep the same contract structure when the contract is renewed in the future specify
the following renewal information for each line:
Line Renewal Type Explanation
1. Regular Service Full Duration Renewed for the full duration
of the new contract.
2. Premium Winter Keep Duration Keeps the same duration in
the renewed contract.
3. Premium Summer Keep Duration Keeps the same duration in
the renewed contract.
Specifying What a Service Covers
A service can cover everything from individual products that a customer owns to
telephone support for a whole corporation.
Note: Contracts of category Warranty and Extended Warranty restrict
you to covering products that the customer owns (Oracle Installed Base
item instances). The other covered levels are available for service lines
that you enter in the Service Agreement and Subscription Agreement
contract categories.
This group of topics explains the different levels of coverage that are available and
provides procedures for entering them.
• Levels of Coverage and Their Uses, page 3-15
• Covering Customer Products, page 3-20
• Covering Parties, page 3-27
• Covering Customer Accounts, page 3-28
Entering Service Lines     3-15
• Covering Party Sites, page 3-30
• Covering Systems, page 3-32
• Covering Inventory Items, page 3-34
Levels of Coverage and Their Uses
Service can cover products on multiple levels. For example, you can have a service
cover the repair of an individual product that the customer owns, or you can use it to
provide telephone support for a whole enterprise.
Covered Levels
The following table lists the different levels of coverage, specifies the contract categories
for which they are available, and provides a brief explanation of each.
Level LOV Name What It Covers Available in
Contract Category
Explanation
Party A party in the
database
Service Agreement
only
Covers:
• Item instances
that are owned
by all accounts
belonging to a
party in your
database. In
Oracle Installed
Base, ownership
is defined as a
combination of
party and
account.
• Business
processes that are
performed for
the party as
defined in
service coverage.
Requires manual
pricing.
3-16    Oracle Service Contracts User Guide
Level LOV Name What It Covers Available in
Contract Category
Explanation
Customer A customer account
(an account belonging
to a party in the
database)
Service Agreement
only
Covers:
• All item
instances that are
owned by the
customer
account.
• Business
processes that are
performed for
the account as
defined in
service coverage.
Requires manual
pricing.
Site A party site Service Agreement
only
Covers:
• All items that are
installed at a
particular party
site.
• Business
processes that are
performed for
the site as
defined in
service coverage.
Requires manual
pricing.
Entering Service Lines     3-17
Level LOV Name What It Covers Available in
Contract Category
Explanation
System An Oracle Installed
Base system
Service Agreement
only
Covers:
• Item instances
belonging to a
specific system.
A system is a
grouping of item
instances that are
created in Oracle
Installed Base.
• Business
processes that are
performed for
the system as
defined in
service coverage.
Requires manual
pricing.
3-18    Oracle Service Contracts User Guide
Level LOV Name What It Covers Available in
Contract Category
Explanation
Product An item instance in
Oracle Installed Base
Warranty and
Extended Warranty
Service Agreement
Covers:
• A specific
serialized or non
serialized item
instance in
Oracle Installed
Base. For a
serialized
product such as a
computer or a
printer, the item
instance is
always an
individual
product. But an
item instance can
represent
multiple
quantities for
non-serialized
items such as
printer
cartridges, for
example.
• Business
processes that are
performed for
the item instance
as defined in
service coverage.
Uses the price list
that you have
specified in the
contract line to
automatically
update the price.
Entering Service Lines     3-19
Level LOV Name What It Covers Available in
Contract Category
Explanation
Item An Oracle Inventory
item
Service Agreement
only
Covers:
• A serviceable
inventory item.
• Business
processes that are
performed on
that inventory
item as defined
in service
coverage.
Uses the price list
that you have
specified in the
contract line to
automatically
update the price.
How to Use Coverage Levels
Which level you use depends on the type of service you are selling and on the different
needs of your enterprise.
The following table provides suggested guidelines. It lists some of the main business
uses and lists the recommended covered levels for each.
Business Use Recommended Levels Example
Servicing a customer product • Product • A washing machine
manufacturer sells
extended warranties for
the products it has sold.
• Any serialized product
• A fire safety equipment
vendor sells service for
emergency generators
that are installed in a
building.
3-20    Oracle Service Contracts User Guide
Business Use Recommended Levels Example
Servicing high-volume and
low-cost items
• Party
• Customer
• Site
• System
The fire safety equipment
vendor services fire sprinklers
by customer site because they
are too numerous to track in a
contract individually.
Providing services not tied to
any specific product such as
telephone support or safety
inspections.
• Party
• Customer
• Site
Sometimes a service covers a
business process rather than
any specific product that a
customer owns.
For example:
• A computer
manufacturer provides
telephone support to
troubleshoot all of its
products.
• A vendor of fire
protection equipment
offers periodic safety
inspections at a particular
site or building.
Providing support for
products that the customer
plans to purchase in the
future
• Item Use the Item level to cover
products that are not yet in
the installed base.
For example, a customer
plans to purchase additional
generators in the near future,
so they want to include them
in the same service agreement
to receive a discount.
Covering Customer Products (Instances in Oracle Installed Base)
This group of procedures explains how to cover one or more customer products by a
service:
• Covering Customer Products, page 3-21 provides the general procedure for
Entering Service Lines     3-21
entering a product.
• Browsing the Oracle Installed Base to Identify Item Instances for Coverage, page 3-
24 explains how to use a built-in browsing window to identify the Oracle Installed
Base item instances that you want to cover if you do not know their serial numbers
or item instance numbers. Here you also learn how the browser speeds up your
entries of multiple sublines at the same time.
• Entering a Customer Product into the Installed Base, page 3-26 explains how to
create a record in Oracle Installed Base so that you can cover products that a
customer has purchased from third parties.
Covering Customer Products
You can enter one or more products to be covered by the service.
You are not restricted to covering products that are owned by the parties in the contract.
You can cover any product belonging to any party that is an item instance in Oracle
Installed Base. However, Oracle recommends covering products that belong to the
customer party or third party on the contract, or any party that is related to the contract
customer party.
For contracts in renewal streams, service can be canceled for individual covered levels.
Prerequisites
• Enter a service line.
• If a product that you want to cover is not entered in Oracle Installed Base (for
example, if you are selling service for a product that the customer purchased from a
third party), then you must create an item instance as described in Entering a
Customer Product into the Installed Base, page 3-26.
To cover customer products:
1. From the Service Contracts Authoring window, select the Lines tab and
Pricing/Products subtab.
2. Select the service line that will cover the product.
Note: If customer products are associated with the contract line,
you can select Show All Products, which opens the Product Details
window. This window shows the details of the products covered
by the service in a spread table.
3. Select the Effectivity secondary tab.
3-22    Oracle Service Contracts User Guide
4. Enter the product or products to cover by one of the following two methods:
• If you have a small number of products to cover and you know their serial
numbers or item instance numbers, you can enter each subline individually
making entries directly into the fields on each line:
1. On a new line on the Effectivity secondary tab, select Product from the
Level LOV.
2. In the Name field, enter the Oracle Inventory name or a partial name with
the percent sign to indicate any missing characters. If the product inventory
name is AS45888, for example, then you can enter AS45888 or AS45%.
3. Press the Tab key.
The LOV search window appears:
4. You can search by complete serial number or the Oracle Installed Base item
instance number. Enter it after the % sign in the Find field. For example:
AS54888%99855.
5. Click Find.
If the search identifies a unique customer instance, the application returns
you to the authoring window. Otherwise, you have to narrow your search
criteria or select an item on the list and click OK.
• To select multiple products for coverage at the same time, or if you do not
know the serial number or the item instance number of an individual product
to cover, you can make your selection from a graphical display of the contents
of the customer's installed base by clicking the LOV indicator in the Name field.
For details see Browsing the Oracle Installed Base to Identify Item Instances for
Entering Service Lines     3-23
Coverage, page 3-24.
A product that you enter is displayed in the Name field by its inventory item
name. You can see the customer product's serial number, item instance number,
or both in the Description field.
Note: Your administrator can set the profile OKS: Item Display
Preference to display an item by name or by description. If the
profile set to Name, then you can select and view products by
the item name, such as AS54888, and the description text
following the sublines table shows the item description, such as
Sentinel Standard Desktop. If the profile is set to Description,
then you can select and view products by description and view
the name in the Description field following the sublines table.
5. Save.
The application automatically updates the price of the service line.
Note: The application calculates prices based on the quantity that is
attached to the item instance and the price list that you have
selected for the service line. Most item instances are specified for
individual items, but non-serialized items, including consumables
such as ink cartridges, can come in any quantity. If the updated
price is more than you expected, then check the quantity that is
attached to the item instance by clicking Product Details.
6. You can review the status for the covered level. If an existing covered level has a
canceled status you, can scroll to find the cancellation date and reason.
7. To create an item instance in the installed base, select New Instance. The Create
Item Instance window appears.
3-24    Oracle Service Contracts User Guide
1. Select the product to add from the Item LOV.
2. Enter a quantity.
3. Select a unit of measure(UOM) from the LOV.
4. Select a location type from the Current Location Type list, such as Party Site.
5. Select a party from the Current Location Party LOV.
6. Select an address from the Current Location Address LOV.
7. Click OK.
Note: You can create multiple item instances at one time and
then select OK. The application adds the newly created item
instances as covered products to the selected service line.
The Service Contracts Authoring window appears, and the new item instance
appears within the Effectivity secondary tab.
8. Save.
Browsing Oracle Installed Base to Identify Item Instances for Coverage
You can browse the customer's Oracle Installed Base records and select one or more
products for coverage. Each product that you select appears as a separate line in the
authoring window.
Prerequisite
Entering Service Lines     3-25
Enter a service line.
To browse Oracle Installed Base to identify item instances for coverage:
1. From the Service Contracts Authoring window, select the Lines tab and
Pricing/Products subtab.
2. Select the service line that will cover the product.
3. Select the Effectivity secondary tab.
4. Select Product from the Level LOV.
5. Click the LOV indicator in the Name field.
The Product window appears.
6. Because the size of your installed base can be too large for browsing, you can
restrict the view in a number of ways. You can:
• Select different views.
By making a selection from the Level list, you can view the item instances by:
• Item: Selecting this level displays all of the instances for a particular
inventory item.
• Model: If you have configured items in your installed base, you can view
them by model.
• System: If your Oracle Installed Based item instances are grouped in
systems, you can display the instances by system.
• Site: Use this level to display all the item instances at a particular address.
• Customer: Use this level to view item instances by a customer account.
• Party: Use this level to organize the display by customers in your database.
This view is most useful if you are selling to consumers.
• Specify which customer records display.
By selecting a customer context, you specify what customer records appear:
• Customer: Limit the display to the party that is entered as the customer on
the Summary tab of the contract.
• Related Customer: Display parties with a relationship to the customer in
the Oracle Trading Community Architecture (TCA) party model.
3-26    Oracle Service Contracts User Guide
You can display item instances for:
• Both: Both the customer and related parties.
• All: All parties in the database.
• Restrict the list that is displayed in the window.
Enter a search term in the Name field to restrict what is displayed in the list.
You can use partial entries and the percent sign % to represent omitted
characters.
For example, to view the installed base by inventory item but not view all
items, you can restrict the display to just the item that you want by entering it
in the Name field.
7. After you have entered the display criteria, click Find.
The window displays the installed base in the form of a tree.
8. View the details of any node on the tree by clicking it.
9. Select any item instance that you want to add, holding down the CTRL and Shift
keys for multiple selections.
10. Click OK to return to the Service Contracts Authoring window.
Each selection creates an individual line in the Effectivity secondary tab.
Entering a Customer Product into Oracle Installed Base
You can cover a product that does not have an item instance in Oracle Installed Base.
You may have to create an instance if you provide service for products that a customer
purchased from a third party such as a vendor or a dealer, for example.
Prerequisites
• Set up product as an item in Oracle Inventory.
• Enter a service line.
To enter a customer product into Oracle Installed Base:
1. From the Service Contracts Authoring window, select the Lines tab and
Pricing/Products subtab.
2. Select the service for the product that you are about to create.
Entering Service Lines     3-27
3. Select the Effectivity secondary tab.
4. Select New Instance. The Create Item Instance window appears.
1. Select the product to add from the Item LOV.
2. Enter a quantity.
3. Select a UOM from the LOV.
4. Select a location type from the Current Location Type list, such as Party Site.
5. Select a party from the Current Location Party LOV.
6. Select an address from the Current Location Address LOV.
7. Click OK.
The Service Contracts Authoring screen appears, and the new item instance
appears within the Effectivity secondary tab.
8. Save.
Covering Parties
You can cover one or more parties with a service. A party is a customer in your
database. This can be an individual consumer or an organization.
Prerequisite
Create a contract of category Service Agreement.
3-28    Oracle Service Contracts User Guide
To cover parties:
1. From the Service Contracts Authoring window, select the Lines tab and
Pricing/Products subtab.
2. Select the service.
3. Select the Effectivity secondary tab.
4. If you are covering a small number of parties and you know the party names or a
partial party names, then make your entries on separate sublines. For each party:
1. In a new line, select Party as the Level.
2. Enter the name or partial name in the Name field. (Use the % sign to indicate
omitted characters.)
3. Press the Tab key.
If the application does not find a unique match, it opens a search window
where you can refine your search.
5. To enter multiple parties at the same time or if you do not know the name of the
party, then you can make a selection from a list of the parties in your database
displayed in a logical tree:
1. Click on the LOV indicator in the Name field.
The Party window appears.
2. Select Related Customer from the Customer Context list.
3. Click Find.
The window displays a list of parties that are related to the customer on the
contract.
4. Select one or more parties (use the Shift and Ctrl keys for multiple selections).
5. Click OK.
6. Save.
Covering Customer Accounts
You can select one or more customer accounts (party accounts) to cover with a service.
You can cover the accounts belonging to the parties in the contract or to any parties
with a relationship to them.
Entering Service Lines     3-29
Prerequisite
Create a contract of category Service Agreement.
To cover customer accounts:
1. From the Service Contracts Authoring window, select the Lines tab and
Pricing/Products subtab.
2. Select the service.
3. Select the Effectivity secondary tab.
4. If you know the party that owns the account, you can enter each account
individually as a subline. For each subline:
1. Select Customer for your Level.
2. In the Name field, enter the name or partial name of the party.
3. Press the Tab key.
The application displays a list of accounts for the party that you specified in a
search window.
4. Select the account to cover or refine your search by adding the % sign and the
account number to the search term.
5. Click OK.
The Name field displays the name of the party. The Description field displays
the account number.
5. To enter multiple parties at the same time or if you do not know the party name or
account, then you can browse through a list of related parties and accounts:
1. In a new line, select Customer for your Level.
2. Click on the LOV indicator in the Name field.
The Party window appears.
3. Select Related Customer from the Customer Context list.
4. Click Find.
The window displays a list of parties that are related to the customer on the
contract.
You can view the accounts for the parties listed, by clicking the party node.
3-30    Oracle Service Contracts User Guide
5. Select one or more accounts (use the Shift and Ctrl keys for multiple
selections).
6. Click OK.
6. Save.
Covering Party Sites
You can cover one or more party sites with a service.
Prerequisite
Create a contract of category Service Agreement.
To cover party sites:
1. From the Service Contracts Authoring window, select the Lines tab and
Pricing/Products subtab.
2. Select the service.
3. Select the Effectivity secondary tab.
4. To enter individual sites for which you know the site numbers, enter each site on a
separate subline:
1. On a new line, select Site as the Level.
2. Enter the site number in the Name field. The site number is the unique
identifying number that is generated by the application for each party address.
5. To cover multiple sites at the same time or if you do not know the site number, then
you can find the site to cover by browsing through a list of customers and their
sites. See Browsing Through Party Sites, page 3-30.
Browsing Through Party Sites
You can select sites to cover by browsing through a list of sites organized by party.
Note: When coverage is provided for a product, the Installed At
location in Oracle Installed Base is the site that is pertinent when
coverage is provided for that product. When you create a service
request the contract will not appear as an Open Contract unless the
product is Installed At the designated site. If Party Type Is HZ
Entering Service Lines     3-31
Location, then the entitlement check does not return that contract line.
Coverage is not provided if the Party Type for the Installed At location
is not Party Site. Changing the Installed At address in the Service
Request does not mean that the product will be covered under the
designated contract.
Prerequisite
Enter a service line.
To browse through party sites:
1. From the Service Contracts Authoring window, select the Lines tab and
Pricing/Products subtab.
2. Select the service line.
3. Select the Effectivity secondary tab.
4. On a new line, select Site from the Level LOV.
5. Click the LOV indicator in the Name field.
The Site window appears.
6. Restrict which parties to display by choosing a Customer Context:
• To view only the sites for the contract customer, select Customer.
• Related Customer: Displays the parties with a relationship to the customer
in the Oracle TCA party model.
• Both: Displays both the customer and related parties.
• All: Displays all parties in the database.
7. To restrict the list that is displayed to a particular party name, enter a name or
partial name.
8. Click Find.
The window displays a list of parties that meet your criteria.
9. View the sites for any party, by clicking the party node.
10. Select the sites to cover (hold down the Shift and Ctrl keys for multiple selections).
11. Click OK to return to the Service Contracts Authoring window.
3-32    Oracle Service Contracts User Guide
Covering Systems
You can cover one or more systems with a service. A system is a grouping of item
instances that are created in Oracle Installed Base.
Prerequisite
Create a contract of category Service Agreement.
To cover systems:
1. From the Service Contracts Authoring window, select the Lines tab and
Pricing/Products subtab.
2. Select the service.
3. Select the Effectivity secondary tab.
4. To enter systems individually when you know the system names, for each system:
1. On a new line, select System from the Level LOV.
2. Enter the name or partial name in the Name field. Use the % sign to represent
missing characters.
3. Press the Tab key.
5. To enter multiple systems at the same time or if you do not know the system names,
you can browse through a list of systems by party, party account, or party site. See
Browsing Through Oracle Installed Base Systems, page 3-24.
Browsing Through Oracle Installed Base Systems
You can identify and select systems for coverage by browsing through a list of systems
organized by party, party account, or party site.
Prerequisite
Enter the service line.
To browse through Oracle Installed Base systems:
1. From the Service Contracts Authoring window, select the Lines tab and
Pricing/Products subtab.
2. Select the service line.
Entering Service Lines     3-33
3. Select the Effectivity secondary tab.
4. Select System from the Level LOV.
5. Click the LOV indicator in the Name field.
The System window appears.
6. To limit the number of customer systems to browse through at any one time, you
can:
• Select different views
By making a selection from the Level list, you can view systems by:
• Customer account, by choosing Customer.
• Party, by choosing Party.
• Party site (identified by its number), by choosing Site.
• Specify which parties to display by choosing a Customer Context. You specify
what customer records display. The choices are:
• Customer: Limit the display to the party entered as the customer in the
contract.
• Related Customer: Show parties with a relationship to the customer in the
Oracle TCA party model.
• Both: Show both the customer and related parties.
• All: Show all parties in the database.
• Restrict the list that is displayed in the window
Enter a search term in the Name field to restrict what is displayed in the list.
For example, if you have selected Party as the level, you can limit the display to
a specific party by entering its name in this field.
7. After you have entered the desired display criteria, click Find.
The window displays the systems in the desired view of the installed base systems
in the form of a logical tree.
8. View the systems in any node on the tree by clicking it.
9. Select the systems that you want to cover (use the Shift and Ctrl keys for multiple
selections).
3-34    Oracle Service Contracts User Guide
10. Click OK to return to the Service Contracts Authoring window.
Covering Inventory Items
You can cover one or more Oracle Inventory items with a service. You can cover
multiple quantities of the item on each subline.
Prerequisites
• Create a contract of category Service Agreement.
• Identify the Oracle Inventory item name of the item to cover.
To cover inventory items:
1. From the Service Contracts Authoring window, select the Lines tab and
Pricing/Products subtab.
2. Select the service.
3. Select the Effectivity secondary tab.
4. Select Item for your Level.
5. Use the Name LOV to enter the item name.
6. Save.
7. Navigate to the Pricing tab.
8. Enter the quantity of item that is being covered in the Qty field.
9. Select the unit of measure using the UOM LOV.
10. Save.
Viewing Details About a Covered Product
The products that are covered by a service line are identified in the Service Contracts
Authoring Window by their Oracle Inventory names. You can view the complete details
about a covered product (an instance in Oracle Installed Base), including the installation
address, installation date, and pricing information.
Prerequisites
• Set up the product as an item in Oracle Inventory.
Entering Service Lines     3-35
• Enter a service line.
To view details about a covered product:
1. From the Service Contracts Authoring window, select the Lines tab and
Pricing/Products subtab.
2. Select the service covering the product.
3. Select the Effectivity secondary tab.
4. Select the covered line to display. The Level must be of type Product.
5. Click Product Details.
The Product Details window appears with the information.
Note: For service contracts of category Warranty and Extended
Warranty, you can view details for all of the covered products at
the same time, by clicking the Show All Products button.
Maintaining Pricing Attributes for Covered Products
The pricing attributes can be maintained for any of the covered products.
To maintain pricing attributes for Covered Products:
1. From the Service Contracts Authoring window, select the Lines tab and the
Pricing/Products subtab, and then select the service line to update.
2. Select the Effectivity secondary tab and highlight a covered product.
3. From the Actions menu select Pricing Attributes.
4. Select the Pricing Context from the LOV. For each Pricing Context, you can enter
the pricing attributes in the corresponding descriptive flexfield.
5. Click Apply to save the pricing attributes
Specifying How the Service Prints on an Invoice
By default, Oracle Receivables prints both the line and subline on the customer invoice.
You can specify:
3-36    Oracle Service Contracts User Guide
• Whether a service line and subline is omitted from the invoice, page 3-36
• What text gets printed, page 3-37
Omitting a Line or Subline from the Invoice
You can control the printing of contract line and subline details with the Invoice Print
Flag check box. By default, the application activates this check box and prints the line
and subline. You can prevent a selected line or subline from being printed on the
invoice, by clearing the check box. Omitting the line or subline from the printed invoice
does not remove the price from the invoice subtotals.
Prerequisite
Enter a service line.
To omit a line or subline from the invoice:
1. From the Service Contracts Authoring window, select the Lines tab and
Pricing/Products subtab.
2. To omit a line from the invoice, clear the Print Flag check box on the right.
3. To omit a subline from the invoice:
1. Select the line.
2. Select the Administration secondary tab.
3. Clear the Print Flag check box.
Entering Service Lines     3-37
4. Save.
Specifying the Invoice Text
You can specify what text appears on the invoice for the service line and sublines.
The application automatically creates a description of the line and sublines for you. For
contract lines, this is the service description and the effective dates separated by colons.
For example, if the service name is Gold Service and the effective dates are 01-JAN-2005
to 31-DEC-2005, then the text invoice reads:
Gold Service:01-JAN-2005:31-DEC-2005.
For covered sublines, the description also includes the name of the item that is covered.
If you have sold Gold Service, 01-JAN-2005 to 31-DEC-2005, for washing machine
SuperWash, then the generated description reads:
Gold Service:01-JAN-2005:31-DEC-2005.
Prerequisite
Enter a service line.
To specify the invoice text:
1. From the Service Contracts Authoring window, select the Lines tab and
Effectivities subtab.
2. Select the service covering the product.
3. Modify the line descriptions in the Invoice Text field.
4. If you are billing for individual covered items, then:
1. Select the Pricing/Product subtab.
2. Select the Effectivity secondary tab and modify the text in the Invoice Text
field.
5. Save.
6. You can copy the description you have entered to the sublines by using the Cascade
Attributes option from the Actions menu. See Applying Changes from a Service
Line to the Covered Sublines, page 3-58.
3-38    Oracle Service Contracts User Guide
Specifying a Billing Schedule
You can specify how the application bills the customer for a service and when the
application sends the billing records to Oracle Receivables.
You can bill a customer for a service either at the contract line level or separately for
each of the sublines that are covered by the service. If you are billing separately for each
subline, then you can create a different billing schedule for each.
If you entered a billing schedule at the contract header level, then this schedule passes
to the line level.
Prerequisite
Enter a service line.
To specify a billing schedule:
1. From the Service Contracts Authoring window, select the Lines tab and
Pricing/Products subtab.
2. Select the service line to set up.
3. Click Billing.
The Billing window appears.
4. Select a billing level from the Level LOV:
• Equal Amount: to bill for equal amounts over the billing period and have
control over the amount as well as the billing periods.
• Top Level: to bill customers for the service as a whole.
• Covered Level: to bill customers at the level of each subline.
5. Specify the billing schedule by entering one or more billing streams. This is the
same procedure as is used for creating schedules at the header level. See Entering a
Billing Stream, page 2-13 for details.
6. If you chose Covered Level you can modify the billing schedule for any of the
sublines:
1. Select the service line on the Lines tab and Pricing/Products subtab.
2. Select the Pricing secondary tab.
3. Select the subline that you want to modify.
Entering Service Lines     3-39
4. Click Billing.
The Billing window appears for this subline.
5. Create a billing schedule for this subline using one or more billing streams.
6. Click OK.
Pricing What a Service Covers
The application automatically prices a service on an Oracle Inventory item or a product
that the customer owns (an item instance in Oracle Installed Base) based on the price
list.
Following is a summary of how pricing works for covered products, whether you are
adding an existing item instance to a contract as a covered product or creating new item
instances and adding them to the contract:
• Obtaining an Asking UOM:
If Price UOM for a covered product is NULL, Oracle Service Contracts passes the
service duration UOM on the covered product subline as the Asking UOM for the
pricing call.
Note: The UOM for service duration is always converted to the
highest possible UOM. For example, if you enter 365 days as the
service duration for the subline, at time of save the service duration
is updated to 1 year. If Price UOM is present on a covered product
subline, the Price UOM takes precedence over the service duration
UOM and the application passes it as the Asking UOM for the
pricing call.
• Pricing the Service:
If you define a service price in the same UOM as the Asking UOM, then the price is
returned at a rate/uom for the same UOM that is passed as the asking price.
Example
• Asking UOM is Month
• Price List has price defined as Month is $100 and Year is $900
• Service duration is 4 months
• Price is $400 (Quantity 4 at a monthly price of $100)
• Unit Price = $100
3-40    Oracle Service Contracts User Guide
If you do not define a service price in the same UOM as the Asking UOM, then the price
returns as follows:
1. If your Price List has a price defined for a UOM for which the Primary check box is
selected, then the price list price/UOM is converted into a price/asking UOM to
derive the service price.
Example
• Asking UOM is Month
• Price List has following prices:
• Month is $100; Precedence is 20
• Year is $900; Primary UOM; Precedence is 20
• Service duration is 4 months
• Price returned is $300 (Quantity 4 multiplied by ($900/12))
• Unit Price is $900
Note: Unit Price is based on the price list UOM the application
uses to calculate the price.
2. If your Price List has more than one price defined for a UOM for which the Primary
check box is selected, then the price list UOM with the highest precedence is used.
Example
• Asking UOM is Month
• Price List has the following prices:
• Month is $100; Precedence is 20
• Year is $900; Primary UOM; Precedence is 20
• Quarter is $270; Primary UOM; Precedence is 10
• Service duration is 4 months
• Price is $360 (Quantity 4 multiplied by (270/3))
• Unit Price is $270
Note: Unit Price is based on the Price List UOM that the
application uses to calculate the price.
Entering Service Lines     3-41
3. If Price List does not have a Price List UOM that is the same as the Asking UOM
and the price list does not have a price defined in another UOM selected as a
Primary UOM, then the application does not return a price for the Asking UOM.
The preceding logic applies for both Covered Product pricing and Covered Item
pricing.
You must price the other covered levels manually. For this reason, you must use
different procedures for entering and adjusting prices:
Adjusting the Price of a Service for a Covered Product or an Item, page 3-41, Pricing
Service for a Party, page 3-41.
Additional ways of adjusting prices for your customer are covered in Adjusting Prices,
page 7-1.
Adjusting the Price of a Service for a Covered Product or an Item
The application automatically prices a service for an inventory item or a covered
product (an item instance in Oracle Installed Base) using the price list that you entered
on the Effectivities subtab.
To reprice, you can:
• Apply preset discounts and surcharges by using the pricing Adjustments window
(a selection from the Tools menu). See Entering Price Adjustments, page 7-3.
• Adjust the price manually directly in the Authoring window when you enter the
subline. See Manually Adjusting the Price, page 3-42.
• Change the price list on the Effectivities subtab. See Repricing a Service by
Changing the Price List, page 3-41 for details.
Repricing a Service by Changing the Price List
You can reprice the service line or an individual subline by changing the price list.
Prerequisite
Enter a service line.
To reprice a service by changing the price list:
1. From the Service Contracts Authoring window, select the Lines tab and
Effectivities subtab.
2. Select a different price list from the Price List LOV.
3. Save.
3-42    Oracle Service Contracts User Guide
4. Select the Pricing/Products subtab.
5. Select the line that you want to reprice.
6. To reprice an individual subline:
1. Select the Pricing secondary tab.
2. Select the subline that you want to reprice using the new price list.
3. Click Reprice to update the price.
7. To reprice the whole line, click Reprice on the subtab itself.
8. Save.
Manually Adjusting the Price
You can manually adjust the price of a service covering an inventory item or a covered
product (Install Base item instance) in one of two ways:
• By applying discounts or surcharges that are preset by the administrator using the
Adjustment window. See Entering Price Adjustments, page 7-3.
• By modifying the price directly in the authoring window as described in this
procedure.
Note: Your application administrator must set up this item or
product with a manual modifier in Oracle Advanced Pricing for
you to be able to adjust the price using this method.
Prerequisite
Enter a service line.
To manually adjust the price:
1. From the Service Contracts Authoring window, select the Lines tab and
Pricing/Products subtab.
2. Select the service line to adjust.
3. Select the Pricing secondary tab.
4. Select the subline to reprice.
Entering Service Lines     3-43
5. Adjust the price using one of the following methods:
• Enter a different price in the Subtotal field and click Save. For example, if the
service costs $100, then you can give the customer a 10% discount by entering
90.
Note: The application applies the discount that you enter here
provided that the application administrator has set the system
profile OKS: Use Advanced Pricing for Manual Adjustment to
Yes. You can verify whether the item has been discounted by
clicking the Price Calculation button. See Viewing Adjustments
for the Whole Contract, page 7-7.
• If your organization prices a service based on different time increments, for
example charging a different price if the service is purchased by the year, by the
quarter, or by the month, then you can use the Price UOM to specify which
increment to use to calculate the price. If you do not sell by different
increments, then leave this field blank.
To reprice:
1. Select a length from the Price UOM LOV.
2. Save.
See About Changing the Basis for Pricing a Service, page 3-43 for details on
when and how to use this repricing method.
6. If you are not satisfied with the changes you have made, you can restore the
original price by clicking Reprice.
Changing the Basis for Pricing a Service
If your organization prices the same service based on different time increments, for
example offering different prices for a year contract and a monthly contract, you can
specify which increment price will be the basis for charging the customer by making an
entry in the Price UOM field.
This enables you to:
• Offer a customer any of the available prices for the service.
For example, you can offer a customer who wants to purchase a service for nine
months either the monthly, the quarterly, or the yearly price.
• Ensure that a customer purchasing a contract for an irregular time period is charged
the correct price.
3-44    Oracle Service Contracts User Guide
If you do not make any entries in the Price UOM field, then the application charges
the customer based on the value of the Period field on the Lines tab, Effectivities
subtab. The period, which is passed by the application, may not always be the one
that you want to use as the basis for charging the customer.
Suppose your organization offers a service in yearly, quarterly, and daily
increments, and a customer wants to start the service on January 1, 2005 and end it
on January 4, 2006. Because this period of one year and five days is not divisible by
one year or a quarter, the application uses a day as the period.
This means that, unless you enter a different basis in the Price UOM field, the
customer will pay 370 times the price of a daily contract rather than the price of a
yearly contract plus a prorated price for the extra five days.
Note: If you specify a UOM that is not priced on the price list, the
application charges the customer based on the price of the UOM
that the administrator has specified as primary. If the UOM is not
priced and no UOM is designated as primary, then the application
returns a price of 0.
Pricing Service for a Party, Customer Account, Site, or System
You can price a service for covered levels that are not priced automatically: party,
customer (party) account, site, and system. You must price each subline individually.
Prerequisite
Enter a service line.
To price a service for parties, customer accounts, sites, and systems:
1. From the Service Contracts Authoring window, select the Lines tab and
Pricing/Products subtab.
2. Select the service line to set up.
3. Select the Pricing secondary tab.
4. Select the subline to price.
5. Enter the price using one of the two following methods:
• Calculate the extended price for the service based on a quantity and unit price:
1. Enter the quantity in the Qty field.
2. Select the unit of measure from the UOM LOV.
Entering Service Lines     3-45
3. Enter the unit price in the Unit Price field.
4. Press the Tab key.
The application calculates the extended amount.
5. You can modify the subtotal.
Note: The entries that you make here are optional. They are
designed to aid you in making the calculation only.
• Enter the price directly into the Subtotal field.
6. Save.
Specifying a Payment Method for a Contract Line
This group of procedures explains how to specify a payment method for a specific
contract line.
• Specifying Payment by Credit Card or Commitment Number, page 3-45
• Requiring a Purchase Order, page 3-46
• Specifying a Purchase Order Number, page 3-46
To specify the same payment method for all the lines in your contract, instead create a
default payment method on the Summary tab according to the procedure that is
described in Specifying a Payment Method, page 2-23.
If you have already set up the default payment method, then payment information
automatically appears.
Specifying Payment by Credit Card or Commitment Number
Commitments represent a customer's prepayment for goods or services (prepayments)
or contractual agreements (guarantees). Commitments are set up in Oracle Receivables.
Prerequisite
Confirm the setup of commitments in Oracle Receivables. See the Oracle Receivables User
Guide.
To specify payment by credit card or commitment number:
1. From the Service Contracts Authoring window, select the Lines tab and
3-46    Oracle Service Contracts User Guide
Exemption/Payment Options subtab.
2. To specify payment by credit card:
1. Select Credit Card from the Payment Type list.
2. Enter the credit card number and expiration date.
3. To specify payment by commitment:
1. Select Commitment Number from the Payment Type list.
2. Enter the commitment number using the LOV.
4. Save.
Requiring a Purchase Order
You can require the entry of a purchase order number for the contract line. The contract
then cannot pass the QA check and become active unless a purchase order is entered for
every line.
To require a purchase order:
1. From the Service Contracts Authoring window, select the Lines tab and
Exemption/Payment Options subtab.
2. In the Payment Method region, select the Purchase Order Required check box.
3. Save.
Specifying a Purchase Order Number
You can enter a purchase order number in a contract line. This number is sent to Oracle
Receivables and appears on customer invoices.
To specify a purchase order number:
1. From the Service Contracts Authoring window, select the Lines tab and
Exemption/Payment Options subtab.
2. In the Payment Method region, enter the purchase order number in the PO Number
field.
3. Save.
Entering Service Lines     3-47
Modifying Coverage Provided by a Service
Each service that you select as a contract line item comes with a predefined list of what
that service covers (terms of coverage). This includes:
• Covered business processes (service fulfillment channels)
• Pricing and discounts
• Time zones covered, and the days and times that coverage is available
• Required reaction and resolution times
• Preferred resources to carry out the work
Your administrator defines the coverage terms that are included in a service offering,
using a coverage template at the time the service item is defined in Oracle Inventory.
You can modify any of the coverage provided for an individual service line in the
contract. For example, you can change the response time, or extend a service providing
weekday telephone support to cover weekends as well. However, the contract price is
not affected by any of the modifications that you make in an individual contract, so
your organization may prefer to make any coverage changes in the coverage template
itself.
Prerequisite
Enter a service line.
To modify coverage provided by a service:
1. From the Service Contracts Authoring window, select the Lines tab and
Effectivities subtab.
2. Select the service line to modify.
3. Click Details.
The Service Contracts Coverage window appears.
3-48    Oracle Service Contracts User Guide
4. Click Customize to create contract-specific coverage terms.
5. Modify the coverage as described in Defining Standard Coverage, page 23-7.
6. Click Reapply Standard to reapply the standard coverage terms to the service line.
Note: You can customize the coverage terms for an approved and
activated contract; however, you cannot reapply the standard
coverage template to a service line once it appears on an approved
and activated contract.
Scheduling Preventive Maintenance Activities
This procedure is for scheduling periodic activities only. For scheduling activities based
on usage, for example, maintaining a printer based on the number of copies made, you
must use Oracle Complex Maintenance, Repair, and Overhaul.
If preventive maintenance activities are required as part of the service that you have
entered in a contract line, then the application includes these along with the other
coverage details that are attached to the item.
The application administrator can set up the application to automatically schedule these
maintenance activities for you when you enter the contract line. The scheduled dates
are the planned start dates of any service requests the application generates to carry out
the work.
You can:
Entering Service Lines     3-49
• Specify new dates when each of the activities is to start.
The dates that you enter become the planned start dates in any service requests that
the application generates for these activities.
• Specify a range of dates that the maintenance activities are to start.
The start date of each activity is the planned start date in the corresponding service
request.
Note: The application can automatically generate a schedule based
on start dates only. To specify a date range, you must enter the start
and end dates into the contract manually.
Prerequisites
• Enter a service line.
• Confirm the setup of the preventive maintenance program and associated activities
in Oracle Complex Maintenance, Repair, and Overhaul.
To schedule preventive maintenance activities:
1. From the Service Contracts Authoring window, select the Lines tab and
Effectivities subtab.
2. Select the service line to modify.
3. Click Edit Coverage.
The Service Contracts Coverage window appears.
The preventive maintenance program that is associated with the service line by
your application administrator appears in the Program name field in the Preventive
Maintenance region of the window.
The preventive maintenance program encompasses the required maintenance
activities for the product. Both the program (also called a maintenance requirement)
and its activities are set up in Oracle Complex Maintenance, Repair, and Overhaul.
4. Click Schedule.
The Preventive Maintenance Schedule window appears showing the Program
Schedule tab. If the application administrator has set up a schedule for this
program, then the Schedule region is already populated with dates.
The maintenance activities that you must schedule are listed on the Activity
Schedule tab.
5. You can schedule the preventive maintenance activities in one of two ways. You
3-50    Oracle Service Contracts User Guide
can:
• Create a template schedule on the Program Schedule tab and use that schedule
to schedule multiple activities. See Scheduling Multiple Activities, page 3-50.
• Create a separate schedule for each activity. See Scheduling Individual
Activities, page 3-51.
6. Click OK.
Scheduling Multiple Activities at the Same Time
You can later modify the default schedule to create a unique schedule for each activity.
Prerequisites
• Enter a service line.
• Confirm the setup of the preventive maintenance program and associated activities
in Oracle Complex Maintenance, Repair, and Overhaul.
• Associate a preventive maintenance program with a coverage template.
To schedule multiple activities at the same time:
1. From the Service Contracts Authoring window, select the Lines tab and
Effectivities subtab.
2. Select the service line to modify.
3. Click Edit Coverage.
The Service Contracts Coverage window appears.
4. Click Schedule in the Preventive Maintenance region.
The Preventive Maintenance Schedule window appears.
5. Select the Program Schedule tab.
6. If the customer must approve scheduled tasks in the service request before they are
performed, then select the Confirmation Required check box.
7. Create a default schedule for the activities in the Stream Levels region. See
Scheduling Activities at Regular Intervals Using Schedule Streams, page 3-52.
8. To default this schedule to multiple activities:
Entering Service Lines     3-51
1. Select the Activity Schedule tab.
2. Make sure that only the Select check boxes for the activities you want to set up
are selected.
3. Click OK.
The application asks you whether you want to copy the schedule to the
activities.
4. Click Yes.
9. To pass this schedule to a single activity:
1. Save.
2. Select the Activity Schedule tab.
3. Select the activity by placing your cursor in any field on the line.
4. Click Populate from Program.
The application copies the default dates or date ranges to the selected activity.
Scheduling Individual Activities
Prerequisites
• Enter a service line.
• Confirm the setup of the preventive maintenance program and associated activities
in Oracle Complex Maintenance, Repair, and Overhaul.
• Associate a preventive maintenance program with coverage template.
To schedule an individual activity:
1. From the Service Contracts Authoring window, select the Lines tab and
Effectivities subtab.
2. Select the service line to modify.
3. Click Edit Coverage.
The Service Contracts Coverage window appears.
4. Click Schedule in the Preventive Maintenance region.
3-52    Oracle Service Contracts User Guide
The Preventive Maintenance Schedule window appears.
5. Select the Activity Schedule tab.
6. Make sure that only the activities you want to set up are selected using the Select
check box to the right of the Activity region.
7. If you have created a default schedule that you want to use to schedule this activity,
then click Populate from Program.
The application passes the schedule that you have created on the Program Schedule
tab.
8. To create a separate schedule for this activity, create the schedule in the Stream
Levels region. See Scheduling Activities at Regular Intervals Using Schedule
Streams, page 3-52.
9. If the customer must approve the tasks in the service request before work starts,
then select the Confirmation Required check box that is located to the right of the
activity.
10. Save.
Scheduling Activities at Regular Intervals Using Schedule Streams
You can schedule an inspection every month for a piece of equipment that requires 12
inspections during the year.
Each set of regular dates is called a schedule stream. You can set up any number of such
schedule streams using this procedure to handle complex requirements. For example, if
a piece of equipment requires two inspections in the first year and six for every year
thereafter, you can schedule the semiannual inspections for the first year using one
stream and use the second stream to create the schedules for the six inspections in the
second year.
You can use this procedure on both the Program Schedule and the Activity Schedule
tabs, depending on whether you are creating a default schedule for all the activities in a
program or scheduling individual activities. See Scheduling Multiple Activities at the
Same Time, page 3-50 and Scheduling Individual Activities, page 3-51.
To schedule an activity at regular intervals using a scheduling stream:
1. From the Preventive Maintenance Schedule window, navigate to the Stream Levels
region:
2. If this is the first stream, then:
Entering Service Lines     3-53
1. Enter 1 in the Seq Num field.
The application passes the start date from the start date of the contract line.
2. Enter the number of times that you want the activity to be performed in the
Periods field
3. Enter the length of each period in the UOM/Period and UOM fields. For
example, to schedule an inspection once a month, enter 1 in the UOM/Period
field and select Month from the UOM LOV.
The application supplies the end date.
3. If this is an additional stream, then:
1. In the Seq Num field, enter a number corresponding to the order in which the
periods are created.
The sequence numbers for scheduling streams must be in order of the dates in
the schedule. To schedule an activity earlier than an existing activity, reorder
the entire sequence.
The application passes the start date from the end date of the previous stream.
2. Enter the length of each period in the UOM/Period and UOM fields. For
example, to schedule an inspection once a month, enter 1 in the UOM/Period
field and select Month from the UOM LOV.
The application supplies the end date.
4. To postpone the scheduled start of the first activity in the stream, enter an offset
period by either of these two methods:
• Enter a different date in the First Date field.
• Enter the number of periods in Offset Period and the length of the offset period
in Offset UOM.
5. To create a schedule based on individual suggested dates, select the Auto Schedule
check box.
6. To create a schedule based on a date range, clear the Auto Schedule check box.
7. Click Schedule to generate the schedule.
The application displays the generated schedule in the schedule region.
8. If you left the Auto Schedule check box cleared, the application permits you to enter
a date or a date range to replace the automatically generated date.
Enter the date range for any of the scheduled dates in the From and To fields.
3-54    Oracle Service Contracts User Guide
9. Save.
Viewing Maintenance Program and Activity Details
Both the program and activities are set up and maintained in Oracle Complex
Maintenance, Repair, and Overhaul. See Oracle Complex Maintenance, Repair, and
Overhaul User's Guide for details.
Prerequisite
Enter a service line.
To view maintenance program and activity details:
1. From the Service Contracts Authoring window, select the Lines tab and
Effectivities subtab.
2. Select the service line to modify.
3. Click Edit Coverage.
The Service Contracts Coverage window appears.
• To view details about the program, click View Program on either the Program
Schedule or the Activity Schedule tabs.
The application opens a new browser window displaying the details of the
maintenance requirements.
• To view details about individual activities:
1. On the Activity Schedule tab, select the activity in the Activity region.
2. Click View Activity.
The application opens a new browser window displaying the details of the
activity. See Oracle Complex Maintenance, Repair, and Overhaul User's Guide
for details.
• To view the maintenance history of the product that the customer owns:
1. On the Program Schedule tab, click History.
The application displays the Search Unit Maintenance Plan page in a
separate browser window. Search for the maintenance history for the
product according to procedures described in Oracle Complex Maintenance,
Repair, and Overhaul User's Guide.
Entering Service Lines     3-55
Updating Scheduled Service Dates for a Maintenance Program
Companies that perform preventive maintenance sometimes need to update schedule
maintenance dates on active contracts to accommodate customer requests to reschedule
planned service. For example, the scheduled maintenance may fall on a holiday, the
equipment may not be available for service on the date scheduled, or the equipment
may not need servicing due to a low level of usage. Program schedule dates and activity
schedule dates can be updated if Auto schedule is cleared and a service request has not
been generated for the scheduled maintenance.
Prerequisites:
• Enter a service line.
• Associate a preventive maintenance program with the coverage template.
• Activate the contract.
• Confirm Open for Update allowed for Active status contracts.
To update activity schedule dates:
1. From the Service Contracts Authoring window, select the Lines tab and
Effectivities subtab.
2. Select the service line to modify.
3. Click Edit Coverage.
The Service Contracts Coverage window appears.
4. Click Schedule in the Preventive Maintenance region.
The Preventive Maintenance Schedule window appears.
5. Select the Activity Schedule tab.
6. Select an Activity on which to update scheduled maintenance dates.
Dates in activity schedules can be updated only if:
• Auto Schedule is cleared.
• A Service Request has not already been created for the scheduled maintenance.
To update program schedule dates:
1. From the Service Contracts Authoring window, select the Lines tab and
3-56    Oracle Service Contracts User Guide
Effectivities subtab.
2. Select the service line to modify.
3. Click Edit Coverage.
The Service Contracts Coverage window appears.
4. Click Schedule in the Preventive Maintenance region.
The Preventive Maintenance Schedule window appears.
5. Select dates to update in the program schedule.
Dates in the program schedule can be updated only if:
• Auto Schedule is cleared.
• The new scheduled service date is greater than the latest scheduled service date
for any activity under the program for which a service request has already been
created.
Ending Service Lines on a Day Specified by the Customer
You can define a cotermination date, which is a date that has been chosen by the
customer as the end date for all service lines:
• About Cotermination, page 3-56
• Applying the Cotermination Date to a Service, page 3-57
About Cotermination
To simplify renewals and accounting, customers sometimes request all contracts to
terminate on the same date, such as the end of the calendar or fiscal year. This date is
called the cotermination date.
Your application administrator can set up a cotermination date for a customer account.
The customer account for the service line is the bill to account that you enter on the
Lines tab, Accounts subtab.
You can tell that a cotermination date exists for the service line, when the Coterminate
and Coterminate All buttons are enabled.
Note: You cannot apply the cotermination date for contracts with a
status of Active.
If the cotermination date falls too close to the start of the service in your contract, the
Entering Service Lines     3-57
application automatically extends the service until the same cotermination date the
following year. For example, if a customer purchases six months of service in December
1 and the cotermination date on December 31 then the application extends the service
until December 31 of the following year instead of selling just one month-worth of
service. Just what minimum service length triggers the extension is determined by the
values in system profiles OKS: Minimum Duration and OKS: Minimum Period.
Applying the Cotermination Date to a Service
Prerequisites
• Enter a service line.
• Confirm that the contract is in Entered status.
To apply the cotermination date to a service:
1. From the Service Contracts Authoring window, select the Lines tab and
Effectivities subtab.
2. Select the service line to end on the cotermination date.
3. Click Coterminate.
The new end date that you have entered does not automatically apply to the items
that are already covered by the service. If you have already specified what the
service covers, then you must copy the new end date using the Cascade Attributes
window.
Specifying Tax Status
You can enter tax exemption information
If you have already set up a default tax status for all lines, then the tax status fields are
already populated for you.
Prerequisite
Enter a service line.
To specify tax status:
1. From the Service Contracts Authoring window, select the Lines tab and
Exemption/Payment Options subtab.
2. In the Tax Exemption region, select the customer's tax status from the Control LOV.
3-58    Oracle Service Contracts User Guide
3. If you entered Exempt, then select the tax exemption number from the Number
LOV.
This populates the Reason field.
4. Select the code that is used to determine the tax rate from the Tax Classification
Code LOV.
Note: If you entered Exempt, you can still select Tax classification
code.
5. Save.
Applying Changes from a Service Line to the Covered Sublines
If you change the length of a service, for example by applying a cotermination date, you
must apply them to any existing sublines. You can also use this procedure to copy the
following line attributes to the sublines:
• Invoice text
• Renewal type
• Printing preferences (the setting of the Invoice Print Flag)
Prerequisite
Identify a contract with sublines (what the service covers) and modify the dates for the
service later.
To apply changes from a service line to the covered sublines:
1. From the Service Contracts Authoring window, select Cascade Attributes from the
Actions menu.
The Cascade Attributes window appears.
2. Select Lines to Sublines from the Cascade list.
3. Select the check boxes for the line attributes that you want to apply.
4. Select the sublines that you want to copy to on the right side of the window. You
can use the check boxes to the right to select individual sublines, or the Select All
button.
5. Click Submit.
Entering Service Lines     3-59
Assigning Sales Credits for a Contract Line
You can assign both revenue and non-revenue credits.
To assign sales credits for a contract line:
1. From the Service Contracts Authoring window, select the Lines tab and select the
service to enter sales credits for on any of the subtabs.
2. Select Sales Credits from the Actions menu.
The Sales Credits window appears.
3. Enter the sales agents and the revenue and non revenue credit that they are to
receive. Sales group entry is optional. Revenue credit must always add up to 100
percent.
4. Click OK.
Updating Service
You can use the Update Service window to review existing service information and
select one or more new replacement services for the covered products on the contract
line. You can assign a percentage of the price of the former service to the new service
lines.
3-60    Oracle Service Contracts User Guide
The Update Service window is intended for use on entered status contracts, generally
during the renewal process. For example, a customer has a contract with a line that
covers 500 laptops for Bronze service, which covers Monday through Friday from 8 a.m.
to 5 p.m. After the customer restructures their service offerings, Bronze service is no
longer offered. Level II support is the comparable offering. To make contracts reflect the
new offering, rather than adding a new line and adding all the covered products to that
line, select the old service line and click Update Service, select the new service, and
indicate what percentage of the existing service's price should be applied to the new
service. This amount does not need to equal 100%. It can be more or less depending on
the appropriate value for the new service. Contract value and billing schedule amount
are adjusted accordingly. Coverages and invoice text are not changed. The renewal
relationship to the prior contract is not lost when Update Service is performed on a
service line. The Update Service function is not available for Usage and Subscription
lines.
To update service:
1. From the Service Contracts Authoring window, select the Lines tab and
Pricing/Products tab.
2. Select the service line to update.
3. From the Tools menu select Update Service.
4. Review the Contract Line region to make sure this line should be updated.
5. From Update Service region, select the new service item from the Name LOV. This
is the item replacing the item that is shown at the top of the form.
6. In the Prorate column, indicate the percentage of the price from the existing service
item that should apply to the new service item. For example, if the existing item is
$150 and the new item should cost $75, enter 50 to see a final price on the new line
that is equal to 50% of the old line.
7. Enter additional service lines as necessary. The prorate column does not need to
total 100%. You will receive a message indicating that the total is more or less. Select
OK to proceed or cancel to return to the form.
8. When all of the new lines have been entered, click Apply. The existing service item
disappears and the new service items appear. The new price is reflected for the line
item. The billing schedule reflects the new pricing as well.
Applying Default Values to Existing Contract Lines
You can apply values that you have entered in the Summary tab of the contract down to
existing lines.
Entering Service Lines     3-61
Note: For information about applying changes from a service line to a
subline, see Applying Changes from a Service Line to the Covered
Sublines, page 3-58.
To apply default values to existing contract lines:
1. From the Service Contracts Authoring window, select Cascade Attributes from the
Action menu.
The Cascade Attributes window appears. The window automatically disables
contract attributes that have not yet been entered. For example, if you have not
entered any sales credits in your contract, the Sales Credits check box is disabled
and you cannot cascade sales credits.
2. Select Header to Lines from the Cascade list.
3. Select the check boxes next to the attributes that you want to apply to the contract
lines. You can cascade the following values from the header to existing contract
lines:
• Effective dates: The dates entered in the Start Date and End Date fields.
Note: If you are changing the effective dates of an existing
warranty line, this method changes the contract dates only. It
cannot be used to change the installed date in Oracle Installed
Base. To change both the contract date and the installed date,
then use the procedure describe in Modifying the Dates a
Warranty Is Effective, page 6-18.
Extending a contract using cascading does not reprice sublines.
Extending a contract using a mass change will reprice sublines.
• Accounting Rule: Accounting rule entered on the Summary tab and
Pricing/Billing subtab.
• Bill To Account: Bill To account entered on the Summary tab and Parties
subtab.
• Bill To Address: Bill to address entered on the Summary tab and Parties
subtab.
• Bill To Contact: Bill to contact entered on the Summary tab and Parties subtab.
• Ship To Account: Ship To account entered on the Summary tab and Parties
subtab.
3-62    Oracle Service Contracts User Guide
• Ship To Address: Ship To location entered on the Summary tab and Parties
subtab.
• Invoicing Rule: Invoicing rule entered on the Summary tab and Pricing/Billing
subtab.
• Exemption Control: Tax status entered on the Summary tab and Pricing/Billing
subtab.
Note: Exemption will be cascaded from header to line only if
the header and line have same party account.
• Exemption Number: Exemption number entered on the Summary tab and
Pricing/Billing subtab.
• Tax Classification Code: This LOV uses the tax classification lookup codes that
are created for Oracle E-Business Tax. By selecting a value from this LOV, you
can cascade the tax classification code to the Lines tab and Tax/Payment
Options subtab.
• Billing Profile: Billing profile entered on the Summary tab and Pricing/Billing
subtab.
• Recalculate Tax: After applying an exemption to the contract or to a service
line, recalculate tax using Cascade Attributes. You must also use cascade
attributes to recalculate tax if you enter a tax classification code on a service
line.
• Payment Method: Payment method and details entered in the Payment Details
region of the Summary tab and Pricing/Billing subtab, such as a credit card.
• Sales Credits: Sales credits entered at the contract header level.
• Price List: Price list that you selected on the Summary tab and Pricing/Billing
subtab. (If you changed the header price list and, at the time you made the
change did not cascade the change to the lines, you can use the cascade
attributes form to select specific lines to which to cascade the new price list).
Note: When attributes cascaded from header to line, repricing
is done for all eligible sublines that:
• Are not terminated.
• Are not 100% billed.
Entering Service Lines     3-63
• Do not contain manually priced sublines.
• Price UOM: Price UOM populated on the Summary tab and Pricing/Billing
subtab from the Global Contracts Defaults form. Price UOM can be cascaded
from header to all service lines. Although other lines will appear in the Lines
block, you cannot choose the select option for usage and subscription lines.
When Price UOM is cascaded from header to line, lines are not repriced. (If you
change the header Price UOM, you can use the cascade attributes form to
cascade the new Price UOM to selected service lines and covered levels)
Important: The Price UOM value is used in the partial period
calculation for pricing, billing, and termination. For more
information, see Entering Contract Defaults, page 2-36.
4. In the Lines region, specify which lines to change by selecting the check boxes to the
right of those lines. You can use the Deselect Alland Select All buttons.
Note: By default, all of the check boxes are selected so all lines in
the contract will be changed.
5. Click Submit.
6. The Transaction Log displays the status of the changes that you are about to make.
7. Click Apply.
Note: By default when you select a header attribute to cascade on a
contract with multiple lines all lines are selected.
To control which lines inherit specific attributes, select the attribute
that you want to cascade, and then deselect the lines that should
not inherit the attribute value. You can then select the next attribute
and deselect the lines that should not inherit the attribute.
For example, suppose you have a contract with two lines, Service
Line 1 and Usage Line 2, and you want to cascade the Accounting
Rules and Bill To Address attributes to Service Line 1 but not to
Usage Line 2. You would select the Accounting Rules attribute and
deselect Usage Line 2, and then select the Bill To Address attribute
and deselect Usage Line 2.
Entering Usage Lines    4-1
4
Entering Usage Lines
This chapter covers the following topics:
• Overview of Entering Usage Lines
• Charging a Customer for Usage
• Entering a Usage Line
• Specifying How the Customer Is Charged
• Charging Based on a Fixed Quantity of Usage Regardless of the Actual Usage
• Charging a Flat Fee Regardless of the Actual Usage
• Charging for Reported or Estimated Usage Per Period
• Charging Based on Reported Usage
• Entering a Counter
• Entering the Starting Counter Reading
• Creating Special Price Breaks
• Point and Range Price Breaks
• Deleting Special Price Breaks
• Prorating Price Breaks to Apply to Multiple Periods
• How Price Breaks Are Prorated
• Specifying a Billing Schedule for a Usage Line
• Recording Usage by Updating a Counter Reading
Overview of Entering Usage Lines
This group of topics explains how to charge customers for usage.
4-2    Oracle Service Contracts User Guide
Charging a Customer for Usage
To charge a customer for usage, you must enter:
• A usage item as a contract line, page 4-2. This is where the prices for usage are
defined.
• One or more counters as sublines, page 4-2. These track usage.
About Usage Items
The usage item specifies the price list and the price breaks that are used to charge the
customer.
The application administrator sets up the usage items themselves as items in Oracle
Inventory, and prices them using price lists in Oracle Advanced Pricing.
For example, a bank may create price breaks on the corporate price list that offers
customers 10 free support calls per month and then charges $1.50 for each call. A copier
distributor may set up a price list to charge customers based on the volume of copies
made, for example, $0.05 for the first 1000 copies, charging $0.03 for the next thousand,
and then $0.02 for copies greater than 2,000.
You can modify the pricing and the price break ranges for each contract.
About Counters
The application records customer use within counters. These can represent real devices
that measure usage such as a counter in a copier, automobile odometers, and electric
meters. The counters can also be purely logical constructs that are used to record the
number of phone calls to a call center, for example.
The application creates counters automatically each time you order a service or enter a
customer product as an item instance in Oracle Installed Base.
For example, if a bank's application administrator sets up the Gold service to track
phone calls made to the call center, then each time you add the Gold service as a line in
your contract, the application automatically creates a counter where the number of calls
can be tracked. For physical objects, such as the copier, the application creates a counter
that is linked to the Oracle Installed Base instance.
Although the application creates counters automatically for you, for each usage line you
must enter the counters that you want to use to charge the customer as sublines. This
may be just one counter, to track phone calls to a call center or to charge for copies that
are made on one printer, for example, or many counters to charge for the copies that are
made in a building, for example.
You can enter actual usage into the counters manually. Service agents can enter counter
readings in Oracle Service Contracts (see Entering the Starting Counter Reading, page
4-22), Oracle TeleService (see Recording Counter Readings in the Oracle TeleService User
Entering Usage Lines    4-3
Guide), and Oracle Field Service (see Recording Counter Readings in the Oracle Field
Service User Guide). Customers can enter counter readings from a Web portal that is
created with Oracle iSupport.
How Usage Lines and Counters are Entered
The following provides an overview of how to enter usage lines and counters:
• If you are charging for usage as part of a service (for phone calls made to a call
center, for example), then you must enter the service as a line in your contract first.
• Enter the usage item as a line in the contract.
• Enter the counters as sublines.
• You identify counters that are attached to a service by the service name, the
contract number, and the line number where you entered the service.
• You identify physical counters by the inventory name of the product where the
counter is located and by that product's serial number, the Oracle Installed Base
item instance number, or both.
Note: Because of the way counters are named, you can have
only one counter per service line in a contract and one counter
per item instance in Oracle Installed Base.
You can specify various options on how to charge and bill the customer.
You can charge the customer for the actual usage that is recorded in the counter each
month and have the application estimate any missing counter readings, for example, or
you can charge a flat rate regardless of what the counter readings are.
You can also specify minimum amounts charged and the details of how customers are
credited for any overcharges.
Entering a Usage Line
Prerequisites
• Create the contract with the Service Agreement or Subscription Agreement
category.
• Enter required information in the contract header and Summary tab.
• If you are charging a customer for usage that is tied to a service that you are selling,
enter the service line first.
• Identify the prices and price breaks for the items that are set up within your
4-4    Oracle Service Contracts User Guide
organization.
To enter a usage line:
1. From the Service Contracts Authoring window, select the Lines tab and Accounts
subtab.
2. Select Usage from the Line Type LOV.
3. Select the usage item from the Name LOV.
4. The party accounts that you selected on the Summary tab and Parties subtab appear
as the Bill to and Ship to accounts. (The Account fields display the account
numbers. The Location fields display the city. The account parties and addresses for
those accounts appear at the bottom of the window.) You can select different
accounts for this contract line using the LOVs that are provided.
5. Optionally, enter billing and shipping contacts that are specific to this contract line
by following the procedure that is described in Entering Billing and Shipping
Contact for a Contract Line, page 3-10. If a contact does not exist in the database,
then you can add one by following the procedure that is described in Creating or
Modifying a Contract , page 3-10.
The contacts that you enter are different from the ones that you entered in the
contract header.
6. Select the Effectivities subtab.
Entering Usage Lines    4-5
7. The price list comes from the entry that you made on the Summary tab. Make sure
that the price list that is displayed in the Price List field matches the price list that is
used by the usage item.
8. Specify the duration of the usage line.
By default, the start date, end date, and duration are copied from the contract
header.
You can specify different values by entering either of the following:
• Start and end dates
• Duration and period
The application calculates the missing information. If you supply a duration
and period, then the start date is the start date of the contract.
Note: If the duration of the usage line starts earlier than the
start date or ends later than the end date of the contract, then
you must extend the start and end dates of the contract at the
header level before you can make the contract active.
9. If the contract can be renewed (you have not selected Do Not Renew on the
Summary tab and Renewals subtab), then specify how the line is to be renewed
using the Renewal Type LOV. The renewal options are the same for usage lines as
they are for service lines. See Specifying How a Contract Line is to Be Renewed,
page 3-12.
10. Specify how the customer is to be charged and any counters that are required to
capture the usage. Different ways of charging the customer require different
4-6    Oracle Service Contracts User Guide
combinations of entries in the Effectivities and Pricing/Products subtabs. See
Specifying How the Customer is to be Charged, page 4-6.
11. The remaining information for a line comes from the information that you entered
in the Summary tab. You can make modifications by following these procedures:
• Specifying a Billing Schedule for a Usage Line, page 4-31
• Changing the Billing and Shipping Accounts and Locations, page 3-9
• Entering Billing and Shipping Contacts for a Contract Line, page 3-10
• Specifying a Payment Method for a Contract Line, page 3-45
• Specifying Tax Status, page 3-57
• Assigning Sales Credits for a Contract Line, page 3-59
12. Save.
Specifying How the Customer Is Charged
You can charge customers in four different ways, depending on the selection that you
make in the Usage Type region of the Lines tab, Effectivities subtab.
The following table lists the different methods and the selection that you must make for
each.
Entering Usage Lines    4-7
Method for Charging the Customer Usage Type
For a fixed quantity of usage every period,
regardless of the actual usage recorded
Fixed Per Period
A flat fee regardless of the actual usage
recorded
Negotiated Price
For reported or estimated usage in each billing
period
Actual Per Period
For usage whenever usage is reported Actual by Quantity
Follow the procedure corresponding to the method that you want to use:
• Charging Based on a Fixed Quantity of Usage Regardless of the Actual Usage , page
4-7
• Charging a Flat Fee Regardless of the Actual Usage, page 4-9
• Charging for Reported or Estimated Usage Per Period, page 4-11
• Charging Based on Reported Usage, page 4-17
Charging Based on a Fixed Quantity of Usage Regardless of the Actual
Usage
You can charge a customer for making 100 phone calls to the call center, regardless of
the number of calls that were actually made. The price that the customer pays for the
100 phone calls is determined by the usage item's price list and its price breaks.
Prerequisite
Enter a usage item.
To charge a customer based on a fixed quantity of usage regardless of the actual usage:
1. From the Service Contracts Authoring window, select the Lines tab and
Effectivities subtab.
4-8    Oracle Service Contracts User Guide
2. In the Usage Type Region, select Fixed Per Period.
3. From the Period LOV, select the period to use as the basis for the entries you will
make.
4. Save.
5. Select the Pricing/Products subtab.
6. Using the Name field LOV on the Effectivity secondary tab, enter the counter that is
used to record the usage. See Entering Counters, page 4-21 for details.
7. Select the Counter Details secondary tab.
Entering Usage Lines    4-9
8. Enter the quantity on which you are going to be charging in the Fixed field. The
fixed quantity is based on the period that you selected on the Effectivity subtab. The
period acts as a unit of measure for your entry.
Suppose that you are billing the customer monthly.
If you chose a year as the period, then entering 1200 here means that the customer is
charged for the usage of 100 each month.
If you chose a month as the period and enter 1200, then the customer is charged
1200 per month.
9. Save.
10. Repeat steps 6 through 9 for each additional counter that you want to use to
calculate usage.
11. Optionally, enter the counter reading to use to start calculating usage:
• If you have already captured previous readings with this counter, then select
the start reading from the Reading LOV. This LOV includes all historical
readings for this counter.
• If no historical reading is available to select, the application assumes the initial
reading for the contract is 0. To enter another initial reading, follow the
procedure that is described in Entering the Starting Counter Reading, page 4-
22.
Charging a Flat Fee Regardless of the Actual Usage
You can charge a customer $100 for making phone calls to the call center, regardless of
the number of calls that were actually made. In this case, the customer is charged the
4-10    Oracle Service Contracts User Guide
price that you enter here rather than the price in the price list.
Prerequisite
Enter a usage item.
To charge a flat fee regardless of the actual usage:
1. From the Service Contracts Authoring window, select the Lines tab and
Effectivities subtab.
2. In the Usage Type Region, select Negotiated Price.
3. Save.
4. Select the Pricing/Products subtab.
5. Using the Name field on the Effectivity secondary tab, enter the counter that is used
to record usage. See Entering a Counter, page 4-21 for details.
6. Optionally, enter any text that you want to display in the invoice regarding this
subline. Because invoice formats are specific to each implementation, contact your
application administrator to determine whether this text is used in the invoice.
7. Select the Pricing secondary tab.
Entering Usage Lines    4-11
8. Enter the total currency amount on which you are going to be charging the
customer in the Subtotal field.
9. Save.
10. Repeat steps 5 through 9 for all counters you are using to track usage for this usage
item.
11. Optionally, enter the counter reading that you want to use to start calculating
usage:
• If you have already captured previous readings with this counter, then select
the start reading from the Reading LOV. This LOV includes all historical
readings for this counter.
• If no historical reading is available to select, the application assumes that the
initial reading for the contract is 0. To enter another initial reading, follow the
procedure that is described in Entering the Starting Counter Reading, page 4-
22.
Charging for Reported or Estimated Usage Per Period
You can charge the customer for actual or estimated usage within a period. This usage
type permits you to have the application create an estimate for any missing or partial
counter readings and bill the customer based on these estimates.
Prerequisites
• Enter a usage item.
• Confirm that billing is set to arrears.
4-12    Oracle Service Contracts User Guide
To charge for reported or estimated usage per period:
1. From the Service Contracts Authoring window, select the Lines tab and
Effectivities subtab.
2. In the Usage Type region, select Actual Per Period.
3. From the Period LOV, select the period to use as the basis for the entries that you
will make on the Counter Details secondary tab.
4. To charge customers based on an average of usage in a particular number of
periods, enter the number of periods in the Averaging Interval field.
Note: The entry that you make here is based on the period that you
selected on this tab rather than the period in the billing schedule.
Billing based on an average usage enables you to offer customers
with uneven usage a different set of price breaks from what they
would get if they were charged based on actual use.
To have usage averaged, the application administrator must
periodically run the Service Contracts Usage Averaging concurrent
program. See Running the Service Contracts Usage Averaging
Program , page 10-15.
5. Specify when the application settles any customer undercharges or overcharges
using the Settlement Interval LOV. The choices are:
• Billing Period: The application settles at the end of each period. The customer
receives a credit memo or is invoiced for the difference in the next billing
period. This action is performed automatically by Oracle Receivables.
Entering Usage Lines    4-13
• End of Usage: The application settles all undercharges and overcharges at the
end of the contract. The customer receives one credit memo or invoice for the
difference. The application administrator must regularly run the Service
Contracts Usage Settlement concurrent program which calculates the
settlement.
6. From the Termination Method LOV, select one of the two methods for charging the
customer for usage when the line is terminated:
• Amount Based Termination
Charges the customer based on the amount of usage that is recorded when the
contract is terminated. The customer is charged based on the actual usage. This
is the default method for all usage types.
See About Crediting a Customer in Terminations, page 4-17 .
• Counter Based Termination
The application credits the unused portion of the service based on the price that
the customer would pay if they continued consumption at the same rate for the
rest of the period. This means that the customer receives any price break based
on the estimated usage.
7. Save.
8. Select the Pricing/Products subtab.
9. Using the Name field on the Effectivity secondary tab, enter the counter that is used
to record the usage. See Entering a Counter, page 4-21 for details.
Entry in the Line Ref field is for your information only. It is not used in by the
application.
10. Optionally, enter any text to display in the invoice regarding this line. As invoice
formats are specific to each implementation, contact your application administrator
to determine whether this text is used in the invoice.
11. Select the Counter Details secondary tab.
4-14    Oracle Service Contracts User Guide
12. In the Default field, enter the reading that the application uses to charge a customer
if no counter reading is entered manually and no estimate is available. For example,
the application uses the default quantity to charge a customer at the beginning of a
contract when no historical data exists to calculate an estimate.
Note: The entries that you make in the Default and Minimum fields
are based on the period that you selected in the Effectivities tab.
The period acts as a unit of measure.
Suppose that you are billing the customer monthly.
If you chose year as the period, and enter 1200 as the minimum,
then the customer is billed for a minimum of 1200 in any month.
If you chose month as the period, then entering 1200 as the
minimum bills the customer for a minimum of 100 units in any
month.
13. Optionally, enter a minimum counter value in the Minimum field. A customer is
charged this minimum if a counter reading or estimate falls below this number in
any billing period.
14. You can have the application estimate usage for a billing period when no reading is
entered or the reading does not cover the whole period. To do so:
1. Select an estimation method from the Estimation Method LOV:
• Average Monthly Counter Volume
Averages historical readings to calculate any missing values within a billing
period.
Entering Usage Lines    4-15
• Counter Estimation
Your application administrator can set up additional estimation methods
using the Counters module of Oracle Installed Base.
For an explanation of the available methods see About Estimation Methods,
page 4-16.
2. If you chose Counter Estimation as your method, then enter a date that you
want to use as the start date for the estimation in the Start Date field. The
counter estimation bases the estimates on all readings since the start date.
Note: You must select an estimation method before entering
any counter readings. The estimation method will not work if
you have already made an entry.
3. Set the Fill check box:
• When this check box is cleared, the application estimates usage only when
no reading was taken during the period.
• When this check box is selected it estimates usage for any remaining days
in a billing schedule period since the reading was entered.
For example, if you are billing the customer monthly, and a reading is
entered on 15 January, then selecting the Fill check box causes the
application to estimate usage for the remaining half of January.
15. If you are billing a customer based on the usage that is recorded in multiple counter
values, to average out all of the counter readings each period, select the Level check
box.
For example, a copier manufacturer charging a customer by the number of copies
made may charge for all the copiers in a building at the same time and apply
minimums and discounts based on average volumes rather than per copier.
16. Enter the counter reading to use to start calculating usage:
• If you have already captured previous readings with this counter, then select
the start reading from the Reading LOV. This LOV includes all historical
readings for this counter.
• If no historical reading is available to select, the application assumes that the
initial reading for the contract is 0. To enter another initial reading, then follow
the procedure that is described in Entering the Starting Counter Reading, page
4-22.
4-16    Oracle Service Contracts User Guide
17. Save.
18. Repeat steps 8 through 17 to enter any additional counters.
About Estimation Methods
You can have the application estimate the missing counter values for you and bill
the customer accordingly. If the customer is overcharged, you can generate a credit
later.
You can use one of the following two methods for estimating usage for a given
billing period:
• Average Monthly Counter Volume
Oracle Service Contracts uses a simple averaging method, Average Monthly
Counter Volume (AMCV), to calculate missing readings within each scheduled
billing period.
Note: Although the name suggests otherwise, this estimation
method creates averages based on any billing schedule period
that you are using, whether it is month, quarter, week, or day.
The AMCV sums up all historical counter readings and
averages them by dividing them by the number of billing
periods.
• Counter Estimation
Your application administrator can set up additional estimation methods using
the Counters module of Oracle Installed Base. The module enables you to set up
additional methods for estimating usage, including:
• Fixed value estimation
• Estimation based on percent usage of the associated counter
Charging a Customer with No Estimation Method
The selection of an estimating method is optional. If you do not select an estimation
method and no counter reading is available for the billing period, then the
application bills the amount that is entered in the Default field.
If any counter reading is entered within the billing period, the application bills
based on the reading. If the counter reading is lower than the amount entered in the
Minimum field, then the application bills based on the minimum instead.
Charging with Estimation
The application uses the estimation methods as follows:
• If no reading is available for the billing period and you chose the Average
Entering Usage Lines    4-17
Monthly Counter Volume estimation method, then the application uses the
historical average to estimate the usage. If you chose Counter Estimation, then
the application uses the method that is set up by the application administrator
to calculate missing readings from the date that you entered in the Start Date
field.
• If no readings are available to extrapolate from, for example, at the beginning of
the contract when no historical data exists to make an estimate, then the
application uses the number that is entered in the Default field.
• If the reading covers only a part of the period and you have selected the Fill
check box, then the application estimates the rest of the period and adds this
estimate to the partial counter reading.
• If the reported and estimated amount is less than the amount that you entered
in the Minimum field, then the application bills for the minimum.
About Crediting a Customer in Terminations
You can have the application credit a customer for any disputed amount of usage
that has already been billed when a customer terminates a usage line.
Suppose, for example, that a customer is being billed based on monthly usage of a
copier. The customer calls after receiving the invoice for February to complain that
the copier has not been working properly since February 10. For this reason, the
customer does not want to pay for all the copies that were made that month and
wants to terminate the contract for the copier.
You can have the application use the previous month's reading to estimate the
amount that the customer should be charged from February 1 until February 10 and
credit him for the rest.
How the application calculates the usage and credits the customer depends on the
termination method that you select:
• Counter Based Termination
The application estimates how much the customer used based on the quantity
that the customer used in the previous billing period.
• Amount Based Termination
The application estimates how much the customer used based on the currency
amount that the customer used in the previous billing period.
Charging Based on Reported Usage
Here is an example of how this method applies to a copier customer who is being billed
monthly based on the number of copies that are made:
4-18    Oracle Service Contracts User Guide
Billing Period Counter
Reading
Reported
Minimum Default Number of
Copies
Charged that
Month
December No counter
reading in
December.
90 100 100
The customer is
charged the
default because
no recorded
usage is
available for the
month.
January 1,000 on January
10
90 100 1,000
The customer is
charged for
usage based on
the recorded
usage.
February No counter
reading in
February.
90 100 100
The customer is
charged the
default because
no usage is
recorded for the
month.
March 50 on March 1 90 100 90
Because the
recorded usage
is less then the
minimum, the
customer is
charged the
minimum. If you
do not set a
value as the
minimum, then
the customer is
charged based
on the recorded
usage.
Entering Usage Lines    4-19
Prerequisite
Enter a usage item.
To charge based on reported usage:
1. From the Service Contracts Authoring window, select the Lines tab and
Effectivities subtab.
2. In the Usage Type Region, select Actual by Quantity.
3. Save.
4. Select the Pricing/Product subtab.
5. Using the Name field on the Effectivity secondary tab, enter the counter that is used
to record usage. See Entering a Counter, page 4-21 for details.
6. Optionally, enter any text to display in the invoice regarding this subline. Because
invoice formats are specific to each implementation, contact your application
administrator to determine whether this text is used in the invoice.
7. Select the Counter Details secondary tab.
4-20    Oracle Service Contracts User Guide
8. In the Default field, enter the reading the that application uses to charge a customer
if no counter reading is entered manually or the estimated reading is 0. The entry
that you make here is based on the time period you selected in the Effectivities tab.
9. Optionally, enter a minimum counter value. A customer is charged this minimum if
a counter reading or estimate falls below this number in any billing period.
10. If you are billing a customer based on the usage recorded in multiple counter
values, to average out all of the counter readings each period, select the Level check
box.
For example, a copier manufacturer charging a customer by the number of copies
made, can charge for all the copiers that the customer owns at the same time and
apply minimums and discounts based on average volumes rather than per copier.
11. Save.
12. Repeat steps 5 through 11 to enter any additional counters for this usage item.
13. Enter the counter reading to use to start calculating usage:
• If you have already captured previous readings with this counter, then select
the start reading from the Reading LOV. This LOV includes all historical
readings for this counter.
• If no historical reading is available to select, the application assumes that the
initial reading for the contract is 0. To enter another initial reading, follow the
procedure that is described in Entering the Starting Counter Reading, page 4-
22.
Entering Usage Lines    4-21
Entering a Counter
You can enter a counter to track usage for either a physical item, such as a printer, or
the usage of a service, such as the number of telephone support calls.
Note: If you are entering multiple counters for a usage line, then each
counter must be associated with a different Oracle Installed Base item
instance number or a different service line. The application cannot
distinguish between two counters that are attached to the same item.
For example, if your organization sets up copiers with two different
counters to register the number of copies, one for color copies and the
other for black and white, you cannot distinguish between these two
counters.
Prerequisites
You must be in the process of entering a usage line.
Identify the item to which the counter will be attached.
To enter a counter:
1. From the Service Contracts Authoring window, select the Lines tab,
Pricing/Products subtab and Effectivities secondary tab, and click the LOV
indicator in the Name field in a new line.
The Counter window appears.
2. Enter a partial or complete inventory item name in the Find field. You can use the %
sign to represent missing characters.
3. Click Find.
The window displays the list of counters for the inventory item.
• For physical items, the References field includes a concatenation of the two
unique identifiers:
• Product serial number
• Oracle Installed Base item instance number
• For service items, this field displays the concatenation of the contract number
and line number of the contract for which you are specifying the usage line.
4. Enter the identifying information for the counter after the % sign and click Find
again.
4-22    Oracle Service Contracts User Guide
5. Select the counter to enter, and click OK.
The Name field displays the inventory item name of the product or service to which
the counter is attached. The Reference field shows the identifying information
including the product serial number and the counter number.
Entering the Starting Counter Reading
You must do this if the counter that you are using does not start at 0.
Prerequisite
Enter a usage line.
To enter the starting counter reading:
1. From the Service Contracts Authoring window, select the Lines tab and Counters
subtab.
2. Select the usage line to update.
3. Select the counter for the usage line in the Counters region.
4. From the Actions menu, select Counter Setup.
The Setup Counters window appears.
5. Enter the initial counter reading in the Initial Reading field.
6. Click OK.
7. Save.
Entering Usage Lines    4-23
Creating Special Price Breaks
Each usage item is associated by the application administrator with a list of default
price breaks. You can modify these default price breaks and create special price breaks
for your customer. You can offer special price breaks at the usage line level for all the
items that are covered by the usage line, or at the subline level, for individual counters.
By modifying the price breaks, you are creating a locked copy of the price list attached
to the line or subline where you create it. This means that any future changes to the
price list are not reflected in the copy.
Prerequisite
Enter a usage item.
To create special price breaks:
1. From the Service Contracts Authoring window, select the Lines tab and
Pricing/Products subtab.
2. Select the usage item to set up.
3. To set up a price break for all of the items that are covered by the usage line, click
Price Break on the Pricing/Products subtab.
4. To set up a price break for a specific counter that is covered by a usage line:
1. Select the Pricing secondary tab.
2. Select the counter.
3. Click Price Break.
4-24    Oracle Service Contracts User Guide
The Price Break window appears.
If the Locked check box is cleared, then the price breaks that are in effect are the
same as those that were set up by the application administrator.
A selected Locked check box indicates that the price breaks have already been
modified. The prices are now determined by the locked price list.
Note: The appearance of this variation of the Price Break
window is different:
• The Update button replaces the Lock button.
• The Delete button restores the original price list.
5. Click Lock or Update.
The first time you modify the price breaks, the application creates a copy of the
price list where the price breaks are defined. This action locks the prices for usage to
their values at the time the copy is made.
The Advanced Pricing - Price Lists window appears.
Note: Although the application displays a full copy of the price list,
you can modify only the price-break related information. Entries
affect only the copy. They have no effect on the price list itself.
Entering Usage Lines    4-25
6. To change the price break type from point to range or vice versa, scroll to the right
in the List Lines tab and change the type using the Price Break Type LOV. See Point
and Range Price Breaks, page 4-26 for an explanation of the two price break types.
7. To change the price break ranges themselves:
1. Click Price Breaks.
The Price Breaks window appears.
2. You can modify the ranges by:
• Entering different values in the Value From and Value to fields.
Note: With release 12, the application uses continuous price
breaks. These are price breaks where there are no gaps
between the price tiers, for example, 0–1000, 1000–2000,
2000–3000. Price breaks set up prior to release 12, will not
use continuous price breaks and will continue to behave as
in the prior release. Non-continuous price breaks do not
overlap, for example, 0–100, 101–200.
This primarily affects proration, see How Price Breaks Are
Prorated, page 4-29.
For more information about how pricing works, refer to the
Oracle Advanced Pricing User's Guide.
• Modifying the prices for each range in the Pricing field.
4-26    Oracle Service Contracts User Guide
Note: You may have to scroll to the right or maximize the
window to see the Pricing field.
3. Save and close the window.
8. Save and close the Advanced Pricing Price Lists window.
Point and Range Price Breaks
You can have the application apply price break discounts based on one of the following
methods:
• Point
• Range
The following example explains the difference between the two methods for a customer
reporting that they made 3500 copies in the billing period.
The following table lists the price breaks:
Price Breaks
Break Price
0–1000 $.05
1000–3000 $.04
3000–5000 $.03
5000–10000 $.02
Point Method
The point method gives the customer the best price based on the total number of copies
made:
Entering Usage Lines    4-27
Point Method
Point Calculation Amount
3500 Xs $.03 $105.00
Total Invoice: $105.00
Range Method
The range method charges based on all of the price break ranges up to the level
corresponding to the counter reading.
Range Method
Range Calculation Amount
1000 Xs $.05 $50.00
2000 Xs $.04 $80.00
500 Xs $.03 $15.00
Total Invoice: $145.00
Deleting Special Price Breaks
To delete the special price breaks:
1. From the Service Contracts Authoring window, select the Lines tab and
Pricing/Products subtab.
2. Select the usage item to modify.
3. To delete a special price break that was created for all of the items that are covered
by the usage line, click Price Break on the Pricing/Products subtab.
4. To revert the special price break that was created for a specific counter that is
covered by a usage line:
1. Select the Pricing secondary tab.
4-28    Oracle Service Contracts User Guide
2. Select the counter.
3. Click Price Break.
The Price Break window appears.
5. Click Delete.
Prorating Price Breaks to Apply to Multiple Periods
Price breaks are set up in each price list based on one specific period. A customer is
offered a discount if they purchase so many units in each quarter, for example.
You can turn proration on to enable the price breaks to be prorated for other periods as
well. This way, a customer receives the same price breaks for purchasing 1/3 the
amount within one month as the full amount in the quarter. When you turn proration
on using this procedure, it is available for all periods including one week and one day.
You can use this procedure to turn proration on or off. By default, proration is turned
off.
See How Price Breaks Are Prorated, page 4-29 for an explanation of how the proration
is calculated and how it takes rounding errors into account.
Prorating price breaks is independent of price list locking.
Prerequisites
• Confirm the setup of price breaks or the price list.
• Confirm that the system profile QP: Break UOM Proration Allowed is set to Yes.
To prorate price breaks to apply to multiple periods:
1. From the Service Contracts Authoring window, select the Lines tab and
Pricing/Products subtab.
2. Select the usage item to set up.
3. To turn on or off proration for all of the items that are covered by the usage line,
click Price Break on the Pricing/Products subtab.
Note: Turning price breaks on or off at the line level does not affect
any sublines where proration has been set.
Entering Usage Lines    4-29
4. To enable or disable price break proration for a specific counter that is covered by a
usage line:
1. Select the Pricing secondary tab.
2. Select the usage line.
3. Click Price Break.
The Price Break window appears.
Note: The appearance of this window is different if the price
break ranges have already been modified. In this case, the
Locked check box is selected and the Update button replaces
the Lock button.
5. To turn price break proration on, select All from the Prorate LOV.
6. To turn price break proration off, select None from the Prorate LOV.
7. Save.
8. To modify the price break ranges, click Lock or Update and follow the procedure
that is described in Creating Special Price Breaks for Your Customer, page 4-23.
How Price Breaks Are Prorated
This topic explains how the application calculates prorated price breaks. With Release
12, the application uses continuous price breaks. Continuous price breaks do not have
gaps between the price tiers, for example, 0–1000, 1000–2000, 2000–3000. It is important
to understand that there may be minor differences between how much customers are
4-30    Oracle Service Contracts User Guide
charged for prorated amounts depending on whether the application uses continuous
price breaks or non-continuous price breaks, which existed before Release 12.
Note: This section describes how proration works for continuous price
breaks.
Suppose, for example, that the price breaks that are set up in the price list are based on
quarterly usage as shown in the following table:
Price Breaks
Units/Quarter Price per Unit
0–1000 $.05
1000–3000 $.04
3000–5000 $.03
5000–999999999 $.02
Now suppose, you extend the same price breaks to a customer billed based on monthly
usage by turning proration on.
Here is how the application calculates the monthly price breaks. It divides the range by
a third.
Note: Oracle Service Contracts truncates to two decimal points.
Calculated Ranges
Quarterly Ranges/3
0–333.33
333.33–1000
1000–1666.67
1666.67–333333333
Entering Usage Lines    4-31
Prorated Price Breaks
Units/Month Price per Unit
0–333.33 $.05
333.33–1000 $.04
1000–1666.67 $.03
1666.67–33333333 $.02
Note: Price breaks set up prior to release 12, did not use continuous
price breaks. Non-continuous price breaks did not allow the use of
fractions during proration. The prorated price breaks for each tier were
set to the previous whole number, for example 0–333, rather than 0–
333.33.
For information on how price breaks were prorated before release 12,
refer to prior releases of the Oracle Service Contacts documentation,
which is available on Oracle Metalink
Specifying a Billing Schedule for a Usage Line
You can bill a customer for usage at the usage line level.
If you have entered a billing schedule at the contract header level, then this schedule
appears at the line level.
Prerequisite
Enter a usage line.
To specify a billing schedule for a usage line:
1. From the Service Contracts Authoring window, select the Lines tab and
Pricing/Products subtab.
2. Select the line to set up.
3. Click Billing.
The Billing window appears.
4-32    Oracle Service Contracts User Guide
Top Level is selected as the Level.
4. Select the appropriate accounting rule for invoicing from the Invoicing Rule LOV.
You must select Arrears Invoice for the two usage types that charge customers
based on recorded counter values in a period: Actual Per Period and Actual by
Quantity.
5. Specify the billing schedule by entering one or more billing streams. This is the
same procedure that is used for creating schedules for service lines. See Entering a
Billing Stream, page 2-13 for details.
6. Click Schedule to generate the schedule.
7. Click OK.
Recording Usage by Updating a Counter Reading
Counter values can also be captured in other Oracle E-Business Suite applications,
including Oracle Depot Repair, Oracle Field Service, and Oracle TeleService.
To record customer usage by updating a counter reading:
1. From the Service Contracts Authoring window, select the Lines tab and Counters
subtab.
2. Select the usage line to update.
Entering Usage Lines    4-33
3. From the Actions menu, select Counter Capture.
The Counter Capture Reading window appears.
4. Follow the Capturing Counter Reading procedure that is described in the Oracle
Installed Base User Guide to enter your reading.
Note: If your application administrator has set the system profile
OKS: Counter Validate to Yes, then you must select the Valid Flag
check box for the customer to be billed based on your entry. If this
system profile is set to No, the application bills for the entry that
you make regardless of whether you select this check box.
Warning: You cannot nullify a counter reading after billing occurs.
Entering Subscription Lines     5-1
5
Entering Subscription Lines
This chapter covers the following topics:
• Overview of Entering Subscription Lines
• About Subscriptions
• Entering a Subscription Line
• Specifying a Schedule of Product Shipments
• Adjusting the Subscription Price
• Viewing Pricing Details
• Specifying a Billing Schedule for Subscriptions
• Viewing the Shipment Status of a Subscription Order
Overview of Entering Subscription Lines
This group of topics explains how to enter subscriptions.
About Subscriptions
You can use Oracle Service Contracts to sell subscriptions for both tangible and
intangible items. Tangible items include magazines, collateral, or any other physical
item that can be shipped through Oracle Order Management. Intangible items can be
collateral that is sent through e-mail.
Note: While tangible items are fulfilled through Oracle Order
Management, the current release includes no fulfillment method for
intangible items. This must be set up individually by each
implementation.
Subscription lines differ from service and usage lines in the way they are entered:
5-2    Oracle Service Contracts User Guide
• Service and usage lines require you to enter sublines, subscriptions do not.
To sell a service or usage, you enter the service or usage item as a contract line and
then enter sublines to specify what the service covers or the counters where the
usage is tracked. Subscriptions require that you enter only the line.
• Subscriptions for tangible items require that you set up a subscription schedule.
A subscription schedule specifies when the application creates booked orders in
Oracle Order Management.
• The billing schedule invoices customers equal amounts in each billing period.
Just as for other contract lines, you must set up a billing schedule for invoicing the
customer, but you are restricted to billing the customer in equal amounts in each
period.
The application takes the total price and divides it equally among the invoices that
you specify. It does not matter how many billing periods you set up, however. You
can invoice customers at the beginning of the subscription for the total amount, for
example, or have them pay in equal installments over the entire length of the
subscription.
How Subscription Items Are Set Up
The item that you enter in a subscription line is an inventory item.
For tangible items, the inventory item is actually the product in inventory that is being
shipped out. For intangible subscriptions, the application administrator must set up a
new item in inventory representing the subscription itself.
What determines whether the inventory item is tangible or intangible is the attached
subscription template.
The item is tangible when fulfillment is done through Order Management. It is
intangible when fulfillment is done through a customized solution.
The subscription template also specifies the period for the subscription.
For a tangible item, the period is used for setting up the schedule for creating orders in
Oracle Order Management.
For an intangible item, the period is used as the unit of measure for the price for the
subscription. If the price of the subscription in the price list is $10 and the period in the
subscription template is a week, then the subscription is priced at $10 per week.
Pricing and Credit for Tangible Subscriptions
When you enter a subscription line for a tangible item such as a magazine, you are
actually entering the very inventory item that is shipped to the customer. (The
inventory item becomes a subscription item with extra setup from the application
administrator.)
Entering Subscription Lines     5-3
The application calculates the price for the subscription period based on the price of the
item in the price list, not on the length of the subscription. Suppose, for example, that a
publisher of a monthly magazine publishes an issue every month except for December.
A customer purchasing a year's subscription is charged not by the year but for
purchasing 11 issues. If the magazine is priced at $3 per issue, then the customer pays
11 x $3 = $33. Customers who cancel the subscription before the year is over get credited
on the basis of any items they have not yet received. This means customers who cancel
before the November issue is shipped get a credit of $3, and customers who cancel after
the issue is shipped pay the full amount because they have received all of the issues for
the year.
Your application administrator can set up price breaks based on the number of products
shipped, not on the length of the subscriptions or the quantity that you enter in the line.
For example, if the application administrator at the monthly magazine publisher sets up
price breaks at 12 and 23 issues to give discounts to subscribers who purchase two-year
and three-year subscriptions, then a customer who purchases two one-year
subscriptions gets the same discount as the customer who purchases one two-year
subscription because the number of items that are ordered by both is the same.
Pricing and Credit for Intangible Subscriptions
If the profile OKS: Intangible Subscription Pricing Method is set to Subscription Based ,
partial periods are not calculated for Intangible subscriptions. This profile setting causes
the intangible subscription lines to price, bill, and terminate in the same way as tangible
subscriptions. If profile OKS: Intangible Subscription Pricing Method is set to Effectivity
Based, partial periods are calculated for pricing amounts on intangible subscription
lines as follows:
1. The fulfillment frequency, such as weekly, monthly, or quarterly, acts as the Price
UOM in the partial period calculation
2. Regardless of the period start value on the contract, the application uses the period
start as the service start when billing subscription lines. This is due to the strong tie
between fulfillment quantity, pricing and billing on subscription offerings.
3. The application considers the period type setting.
Effectivity Based and Subscription Based Pricing Examples
The price that a customer pays for a contract line for an intangible subscription is based
on the subscription period length and quantity of subscriptions that you enter.
The price of a subscription is based on the price for a specific period. (The price comes
from the price list and the period from the subscription template).
The period of a subscription becomes important for pricing partial periods and for
assigning credit for those partial periods when the customer terminates the
subscription.
The price that customers pay and the credit they receive for partial periods depends on
the period and the setting of the system profile OKS: Intangible Subscription Pricing
5-4    Oracle Service Contracts User Guide
Method.
The application administrator can set this profile to either Effectivity Based or
Subscription Pricing:
• Effectivity Based
The application charges and credits the customer for partial periods.
Suppose, for example, that a customer subscribes to an online newsletter for a
period starting January 15, 2005 and continuing through February 1, 2006, a period
that is 16 days longer than one year.
If the service is priced at $30 per month, then the application charges the customer
$375.48: $360 for twelve months (12 x $30) and then $15.48 (16 x $30/31) for the
partial last month in the contract, January 16 through February 1, 2006.
If the customer cancels on January 3, 2006, then the application issues a credit based
on the number of unused days, in this case: 29 days x $30/31 = $28.06.
• Subscription Pricing
The application charges the full amount for the period even if the subscription ends
in the middle of that period.
The same customer purchasing the subscription for one year and 16 days, is
charged $390 for 13 months ($360+$30).
If the customer cancels on January 3, 2006, the application issues a credit for one
month.
Billing Schedule Independent of Price Paid or Credit Given
The price that the customer pays or the credit they receive is independent of the billing
schedule that you set up for either tangible or intangible items. It does not matter
whether you set up a billing schedule to invoice the customer for the full subscription
duration at the beginning of the subscription or invoice them monthly. The billing
schedule just divides the total price into however many billing periods you want.
Selling Service on Subscription Lines
When you enter a subscription line, the application automatically creates an Oracle
Installed Base item instance. This means that you can sell a service for the subscription
by entering a service line and covering the subscription at the covered product level.
(You must know its item instance number.)
Each time Oracle Order Management ships one of the physical items, the application
also automatically creates a child item instance. This enables an agent to identify a
particular item for reorder, exchange, or credit.
To create the child item instances, the application administrator must run the Service
Contracts Instance Relationship Program concurrent program after the order fulfillment
occurs.
Entering Subscription Lines     5-5
Entering a Subscription Line
Follow the references for details about any step.
Prerequisite
Create the contract with the Subscription Agreement category.
To enter a subscription line:
1. From the Service Contracts Authoring window, select the Lines tab and Accounts
subtab.
2. Select Subscription from the Line Type LOV.
3. Select the subscription item from the Name LOV.
The party accounts that you selected on the Summary tab and Parties subtab appear
as the Bill to and Ship to accounts.
4. Optionally, enter billing and shipping contacts that are specific to this contract line
by following the procedure that is described in Entering Billing and Shipping
Contacts for a Contract Line, page 3-10. If a contact does not exist in the database,
then you can add one following the procedure that is described in Creating or
Modifying a Contract, page 3-10.
The contacts that you enter are different from the ones you entered in the contract
header.
5. Select the Effectivities subtab.
5-6    Oracle Service Contracts User Guide
6. Specify the duration of the subscription.
By default, the start and end dates are copied from the start and end dates for the
contract.
You can specify different dates by entering either of the following:
• Start and end dates
• Duration and period
The application calculates the missing information. If you supply a duration
and period, then the start date is the start date of the contract.
Note: If the duration of the subscription starts earlier than the
start date or ends later than the end date of the contract, then
you must extend the start and end dates of the contract at the
header level before you can make the contract active.
7. Enter the number of subscriptions that you are ordering in the Qty field.
8. If the contract can be renewed (you have not selected Do Not Renew on the
Summary tab and Renewals subtab), then specify how the line is to be renewed
using the Renewal Type LOV. The renewal options are the same for subscription
lines as they are for service, and usage lines. See Specifying How a Contract Line is
to Be Renewed, page 3-12.
9. If the subscription is for a physical item, then specify the schedule of orders that are
placed through Oracle Order Management by clicking Edit Schedule. See
Specifying a Schedule of Product Shipments, page 5-7.
10. The price of the subscription is calculated automatically by the application based on
Entering Subscription Lines     5-7
the price list that is specified in the Price List field.
You can modify the price by choosing a different price list, by entering a new price
manually in the Pricing/Products subtab, or by using the price Adjustment window.
For details, see Adjusting the Subscription Price, page 5-10.
11. Optionally, modify the text that the customer sees on the invoice by editing the text
in the Invoice Text field.
12. Create a billing schedule. For details, see Specifying a Billing Schedule for
Subscriptions, page 5-12. Because the billing schedule for a subscription line is
based on the price of the line, you must re-create the billing schedule for a
subscription any time you modify the price.
13. The remaining information for the line comes from the information that you entered
in the Summary tab. You can make modifications by following these procedures:
• Changing the Billing and Shipping Accounts and Locations, page 3-9
• Entering Billing and Shipping Contacts for a Contract Line, page 3-10
• Specifying a Payment Method for a Contract Line, page 3-45
• Specifying Tax Status, page 3-57
• Assigning Sales Credits for a Contract Line, page 2-26
14. Save.
Specifying a Schedule of Product Shipments
You can specify a schedule of shipments for physical items in the subscription through
Oracle Order Management. The application books each order automatically on the date
that you specify here. This is called the interface date. The order must still be picked
and shipped using Oracle Order Management, however.
Prerequisite
Enter a subscription line.
To specify a schedule of product shipments:
1. From the Service Contracts Authoring window, select the Lines tab and
Effectivities subtab.
2. Select the subscription line to set up.
3. Click Edit Schedule.
5-8    Oracle Service Contracts User Guide
The subscription schedule window appears.
4. By default, the application creates the order in Oracle Order Management on the
same date as the start date of each subscription period. This is called the interface
date.
To move the interface date, enter a number in the Offset Days field. A negative
number creates the order before the start date. For example, entering -2 creates the
order two days before the start of each period.
5. Use the Schedule Pattern region to specify the shipping periods:
• To ship an item every period that is specified in the Frequency list, click OK.
The application creates a shipping schedule automatically. If the frequency is
specified for weekly, then the application schedules one item for shipment
every week, if monthly, then every month and so on.
• If the subscription schedule is not regular, then you can specify the schedule
you want by entering multiple sets of regular periods.
1. Enter each set of regular periods on a separate line. For examples, see How to
Use Schedule Sets to Enter Complex Subscriptions, page 5-9.
Entering Subscription Lines     5-9
Note: The fields that are available for entry are limited by the
period for the subscription. For example, if the period for the
subscription is a week, then you can make entries only in the
Week, Month, and Year fields.
You can use the following symbols for your entries:
Symbol Meaning Examples
* All periods Entering a * in the Month
column means that an
order is created every
month.
- Indicates a range of
periods
Entering 1-3 in the
Month column means that
an order is created only in
January, February, and
March.
, Indicates a series of
periods
Entering 1,2,4 in the
Month column means that
an order is created only in
January, February, and
April.
Note: To manipulate the daily schedule you must clear the *
from the Day field. This enables the Week and Week Day field,
which allows you to enter the day of the week for the
subscription to be fulfilled.
2. When you are done, click Refresh Schedule to generate the schedule. If you are
not satisfied with the result, you can reenter the schedule and refresh again.
6. Click OK.
How to Use Schedule Sets to Enter Complex Subscriptions
The following two examples illustrate how you can use multiple schedule pattern
lines to handle complex subscription schedules.
In both cases, the schedules are for a customer that purchases a one-year
subscription for a tangible item from February 1, 2005 through January 31, 2006.
Example 1: A periodical that publishes every week except December when it
5-10    Oracle Service Contracts User Guide
publishes only the first week
You can create this schedule by entering the following two lines:
Year Month Week
* 1-11 *
* 12 1
Example 2: A newsletter that publishes twice a month except in November and
December when it published only one issue at the beginning of the third week.
You can create this schedule by entering the following two lines:
Year Month Week
* 1-10 1,3
* 11-12 3
Note: For both of the preceding examples, the administrator must
set up the subscription template for the subscription item with a
frequency of Weekly.
Adjusting the Subscription Price
The application automatically prices a subscription based on the price list that is entered
on the Effectivities subtab.
You can modify the price either by changing the price list or entering a different price
manually on the Pricing/Products subtab.
Prerequisite
Enter a subscription line.
To adjust the subscription price:
1. From the Service Contracts Authoring window, select the subscription line.
2. Adjust the subscription price using any one of the three following methods:
Entering Subscription Lines     5-11
• Changing the price list
1. Select the Lines tab and Effectivities subtab.
2. Select the subscription line that you want to reprice.
3. Select a different price list form the Price LOV.
4. Select the Pricing/Products subtab.
5. Click Reprice.
The application recalculates the price based on the new price list.
• Entering a different price manually:
1. Select the Lines tab, Pricing/Products subtab.
2. Enter the modified price in the Subtotal field.
Note: Modifying the price manually may or may not be
permitted in your application implementation.
• Applying available discounts using the Adjustments window.
3. Save.
4. If you are repricing a line with an existing billing schedule, then you must re-create
the billing schedule for the new price. See Specifying a Billing Schedule , page 5-12.
Viewing Pricing Details
Prerequisite
Enter a subscription line for tangible items and create the subscription schedule.
To view the pricing details:
1. From the Service Contracts Authoring window, select the Lines tab and
Pricing/Products subtab.
2. Select the subscription line to view.
3. Click Price Calculation.
The Price Calculation window appears. It displays the quantity, list price, any
5-12    Oracle Service Contracts User Guide
adjustments that were made to the price, and the extended price.
4. To view any price breaks that the application administrator may have set up for this
item, click Price Breaks.
Specifying a Billing Schedule for Subscriptions
You can specify a billing schedule for an individual subscription line in a contract or for
a multiple subscription lines in a contract at the same time.
Billing schedules for subscriptions are different from those you create for service or
usage lines:
• You must select Equal Amountas the schedule level.
• You bill customers only at the line level. (There are no covered products as for
service lines and individual usage counters as for usage lines.)
• You can only bill the customer in equal amounts per period over the length of a
single billing stream.
For example, if a market research company charges $1,200 for a one-year
subscription to a newsletter, it can bill the customer the whole amount in one
invoice, invoice them $100 per month every month, invoice them $200 every other
month, or even invoice them at different intervals over the length of the
subscription.
You can use multiple billing streams to invoice the customer at different intervals
over the length of the subscription with the amounts billed proportional to the
length of the billing interval. For example, the same market research company can
invoice the customer $100 every month for the first three months, and then send
one invoice for $300 every quarter (three months) for the remainder of the
subscription period. You can set up this scenario using the following two billing
streams:
Stream Sequence
Number
Number of Periods Duration Period
1 3 1 Month
2 3 1 Quarter
Prerequisite
Enter a subscription line.
Entering Subscription Lines     5-13
To specify a billing schedule for subscriptions:
1. To create the same schedule for multiple subscription lines within the same
contract, create a schedule at the header level.
From the Service Contracts Authoring window, select the Summary tab and
Pricing/Products subtab.
2. To create a billing schedule for an individual subscription line:
1. From the Service Contracts Authoring window, select the Lines tab and
Pricing/Products subtab.
2. Select the subscription line that you want to set up.
3. Click Billing.
The Billing window appears.
4. The invoicing and accounting rules come from those that were entered in the
Summary tab, Pricing/Billing subtab. If want, you can select different rules from the
Invoicing Rule and Accounting Rule LOVs.
5. For subscriptions, select Equal Amount as the billing level.
6. Specify the billing schedule by entering one or more billing streams. This is the
same procedure that is used for creating schedules for service lines. See Entering a
Billing Stream, page 2-13 for details.
7. Click Schedule to generate the schedule.
5-14    Oracle Service Contracts User Guide
If you are creating a schedule on the Summary tab, the application displays a
message warning you that you are about to replace any existing billing schedules at
the line level. Click OK.
The application divides the total price for the line equally for each billing period
within each billing stream.
Note: You can manually enter an amount in the Amount field
before clicking Schedule and have the application charge that
amount each period instead. In this case, the application
automatically reconciles any discrepancy with the total in the last
billing period. The customer is always billed for the same total
amount.
8. Click OK to return to the authoring window.
Viewing the Shipment Status of a Subscription Order
Use this procedure to view the Oracle Order Management shipment status for tangible
items that were ordered in a subscription line.
Prerequisite
Confirm the order has been created in Oracle Order Management.
To view the shipment status of a subscription order:
1. From the Service Contracts Authoring window, select the Lines tab and
Effectivities subtab.
2. Click Edit Schedule.
The subscription schedule window appears. This window is named according to
the name of the subscription item.
The Interface Schedule region displays order numbers and status for any orders
that have been placed with Oracle Order Management.
3. To view more details about the order, including the date that any shipment
occurred, click the drill-down indicator to the left of the schedule line.
The Fulfillment History window displays details about the order.
Ordering Service in Oracle Order Management     6-1
6
Ordering Service in Oracle Order
Management
This chapter covers the following topics:
• Overview of Ordering Service in Oracle Order Management
• About Ordering Service in Oracle Order Management
• Ordering Service in a Sales Order
• Adding Service Lines to an Existing Contract
• Specifying Renewal and Other Details for a New Contract Created for Your Order
• Running Concurrent Programs to Generate Contracts Automatically
• Reprocessing Orders That Did Not Create Contracts
• Viewing Created Contracts by Sales Order Number
• Viewing Contracts by Sales Order Number in Oracle Service Contracts
• Viewing Contracts by Sales Order in Oracle Installed Base
• Modifying the Dates That a Warranty Is Effective
• Changing Only the That Dates a Warranty is Effective
• Changing Both the Warranty Dates and Installed Date
• Setting Up New Contract Defaults for Oracle Order Management
• Understanding the Impact of Contingencies on Revenue Recognition
Overview of Ordering Service in Oracle Order Management
You can order service using Oracle Order Management and have the application create
the appropriate contracts automatically.
Your administrator can define the profile OKS: Category for Order Management
Originated Contracts, which determines the contract category for Order
6-2    Oracle Service Contracts User Guide
Management-originated contracts.
This group of topics covers both sales agent and application administrator procedures
for adding service agreements to a sales order, generating contracts automatically, and
troubleshooting any errors.
This group of topics covers only steps relating to service contracts. For detailed
information about how to create and manage orders, see the Oracle Order Management
User's Guide.
About Ordering Service in Oracle Order Management
This topic explains:
• Selling services in Oracle Order Management
• What contracts are created from your Order
• When a service contract is created
• Understanding warranties
• Selling service through Oracle Order Management or Oracle Service Contracts
• Understanding what is passed from the order to the contract
Selling Services in Oracle Order Management
You can sell services in an Oracle Order Management sales order just as you do any
physical product. However, a few differences exist.
Each service line must refer to either an item that is already in a customer's installed
base or an item that is in an order (the item can be either in the same order or in a
different order altogether). For steps detailing how to add service lines, see Ordering
Service in a Sales Order, page 6-6.
For a service, you must enter the service duration. If you are ordering service for an
item in an order, then you can have the application automatically calculate the start
date of that item based on the expiration of the warranty for that item. (You supply the
duration of the service, but omit the start and end dates.)
However, the application does not supply a start date for an item a customer already
owns. If you are ordering service for an installed base item, you must enter the start
date manually, taking the length of any existing warranty into account.
What Contracts Are Created from Your Order
By default, the application automatically creates a single contract for all the service lines
in your order. You can add renewal and contact information for the new contract using
the procedure that is outlined in Specifying Renewal and Other Details for a New
Ordering Service in Oracle Order Management     6-3
Contract Created for Your Order, page 6-11.
The contract becomes effective on the earliest start date and expires on the latest end
date.
Suppose that your order has the following three lines:
• Service 1: One year contract starting January 1, 2005
• Service 2: Two year contract starting February 1, 2005
• Service 3: Two year contract starting January 15, 2005
In this case, the application creates a contract with a start date of January 1, 2005 and an
end date of January 31, 2007.
Alternatively, by using the Contract Details window, you can instead choose to merge
the service lines in your order into an existing contract. See Adding Service Lines to an
Existing Contract, page 6-9.
When a Service Contract Is Created
The application generates a new contract from the service lines in your order, or
appends the lines to an existing contract only when the item that the service covers is
entered into the installed base. For tangible items, this means that the order must be
booked, picked, and shipped.
To generate contracts from sales orders, your application administrator must also:
1. Run the Service Contracts Order Capture Integration, and Workflow Background
Process concurrent programs at regular intervals.
See Running Concurrent Programs to Generate Contracts Automatically, page 6-14
.
2. Reprocess any contracts that were generated with errors. See Reprocessing Orders
that did not Create Contracts, page 6-15.
You can view the generated contracts by sales order number from within Oracle Service
Contracts or Oracle Installed Base. See Viewing Created Contracts by Sales Order
Number, page 6-16.
Warranties
Warranties, which are offered to customers free of charge, are created by the application
automatically when the item is shipped to a customer based on an entry that the
application administrator makes in the bill of materials (BOM).
Warranties go into effect on the shipment date. The administrator can add an automatic
delay to the warranty start date to account for the shipment or installation delay and
ensure that the customer receives the full benefit of the warranty. You can specify a
different date for the warranty to become effective by following the procedure
6-4    Oracle Service Contracts User Guide
Modifying the Dates a Warranty is Effective, page 6-18.
Selling Service Through Oracle Order Management or Oracle Service Contracts
If you have the application create a new contract from your order (rather than adding
the lines to an existing order), you should be aware of some key differences between the
contract that was created for you automatically and one that you create in Oracle
Service Contracts application.
Contracts created in Oracle Order Management:
• Are restricted to service that covers products that the customer owns (Oracle
Installed Base item instances) or products that the customer is in the process of
buying (items in Oracle Inventory). You cannot use them to sell service that covers
larger sets of inventory items or to sell service at the system, site, or party levels.
• Are automatically created in the Active status.
• Do not have to pass the usual quality assurance check list and approval process as
contracts created in Oracle Service Contracts.
• Are billed through Oracle Order Management. This means that the customer is
billed in one invoice and you cannot take advantage of the flexible billing schedules
that you set up in Oracle Service Contracts. (To add flexibility, you can instead set
up Payment Terms in Oracle Receivables to set up incremental billing over time.)
• Cannot have their coverage modified. Agents can modify the coverage for only
contracts that are created in Oracle Service Contracts.
• Do not contain usage lines, because no way is available to create a usage line in the
sales order itself.
For renewals, the contracts that are generated in Oracle Order Management become just
like any contract that is created in Oracle Service Contracts.
Understanding What Is Passed from the Order to the Contract:
The following information passes from the order to the contract:
Header Level
Order Field Contract Field
Bill To Customer Bill To Party
Ship To Customer Ship To Party
Ordering Service in Oracle Order Management     6-5
Bill To Bill To Location
Ship To Ship To Location
Sales Person Vendor Contact Name
Currency Currency
Price List Price List
Accounting Rule Accounting Rule
Invoicing Rule Invoicing Rule
Payment Type Payment Type
Payment Terms Payment Terms
Tax Tax
Sales Credits Sales Credits
Order Number Order Number
Line Level
Order Field Contract Field
Service Duration Duration
Service Period Period
Ordered Item Line Item
Service Start Date Start Date
Service End Date End Date
Ordered Item Item
6-6    Oracle Service Contracts User Guide
Quantity Quantity
Unit Selling Price Price
Sales Credits Sales Credits
Currency Currency
Service Item Item Instance
Note: The application does not support non seeded contract types.
Ordering Service in a Sales Order
You can order service for an item that a customer has on order or already owns. You
can use it to order service for:
• An item in the same order
• An item in a different order
• An item in the customer's installed base
Prerequisites
• If you are ordering service for an item in a separate order, then you must know:
• That order's number.
• The line number and shipment number for the item to cover.
• The date to start the service, taking into account any other existing service
agreements and warranties.
• If you are ordering service for an item that the customer already owns, then the
item must be already entered in your customer's installed base and you must know
the item instance number (referred to in Oracle Order Management as the Reference
Number) or its serial number.
The item instance number is automatically generated by the Oracle Installed Base
application when the item is added to a customer's installed base.
If the item does not exist in the customer's installed base, then you must create it
using procedures that are described in the Oracle Installed Base User Guide.
Ordering Service in Oracle Order Management     6-7
To order service in a sales order:
1. Under the Order Management Super User responsibility, navigate to Orders,
Returns and then Sales Orders.
The Sales Orders window appears.
Note: If you are tracking sales credits, and your organization is
using Oracle Service Contracts territories to assign sales agents to
service contracts, then the application does not use the sales agent
that you enter in the Salesperson field on the Order tab, Main
subtab to the contract itself. If your organization is not using
territories for sales agent assignment, then the agent that you enter
is entered as a vendor contact in the new contract.
Note: Oracle Service Contracts carries sales credits from the order
header to the contract header and the order line to the contract line.
Because Oracle Order Management generates the invoice, the
information proceeds directly to Oracle Receivables. During credit
generation, information is sent by way of Oracle Service Contracts.
2. If you are ordering a service agreement for an item in the same order, then enter
that item first.
3. In the Sales Order window, select the Line Items tab and the Main subtab.
4. Use the Ordered Item LOV to enter the inventory item number of the service that
you are ordering.
5. Leave the Qty field blank. The application supplies the correct quantity
automatically:
• If you are ordering service for a line in an order.
The application copies the quantity from that line. For example, if you are
ordering service for an order line with three widgets, then the service quantity
is 3.
• If you are ordering service for an item in the customer's installed base.
Note: The quantity field specifies the number of services that
you are ordering. It is not related to the length of the agreement
that is specified in the UOM (Unit of Measure) field. If you
enter 5 as the quantity and the UOM field shows YR (year), you
6-8    Oracle Service Contracts User Guide
are not ordering one five-year contract.
6. Select the Services tab.
7. If the service is for an item either in this or another customer order, then:
1. Select Order from the Service Reference Type LOV.
2. Use the Service Order Type LOV to enter the order type of the sales order. If
you are ordering service for an item in this order, then enter the same type that
you entered in the Main tab of the Sales Order form.
3. In Service Ref Order Number, enter the number of the sales order. If you are
ordering service for an item in this order, then enter the sales order number that
appears in the title bar of the Sales Order window.
4. Use the Service Ref Line Number LOV to select the line number and shipment
number. (The shipment number appears in the Service Ref Shipment Number
field.)
Note: You must scroll to view all required fields.
8. If you are ordering service for an item the customer already owns, then:
1. Select Customer Product from the Service Reference Type LOV.
2. Scroll to the Service Ref Cust Product field and use the LOV to enter the
customer product instance to cover with the service. You can search either by
the Oracle Installed Base instance number (labeled Reference Number in this
LOV) or, if the item is serialized, by the item's serial number.
Note: The application automatically checks to determine
whether the service is valid for the item that you just entered. If
the application informs you that it is not, then you must go
back and enter another service.
9. To simplify renewals, a customer can end all contracts on a single day each year
(called the cotermination day). Selecting the Service Coterminate Flag check box
sets the end date to that day. If the application administrator has set up the
cotermination day for the customer, that entry overrides any end date that you
enter for this agreement. See About Cotermination, page 3-56 for more information.
10. Enter service dates and duration:
Ordering Service in Oracle Order Management     6-9
• If you are ordering service (an extended warranty) for an item in an order, you
can have the application automatically fill in the start and end dates by entering
the duration only. The application starts the service the day after any warranty
for the product expires. The application provides the dates only after the order
is fulfilled and the contracts are created.
• If you are ordering service for an installed base item, then enter either:
• The service start and end date: The application calculates the duration.
• The start date and duration: The application calculates the end date.
Note: If you selected the Service Coterminate Flag check
box, the application may override the end date that you
enter here.
11. Save.
12. To add the services in the order to an existing contract or specify renewal
information for a new contract, click Actions and select Service Contract Details
from the LOV. See Adding Service Lines to an Existing Contract, page 6-9 or
Specifying Renewal and Other Details for a New Contract Created for Your Order,
page 6-11 for details.
13. Book the order.
14. If you have created a mixed order, then you must also pick and fulfill the order for
a new contract to be created or an existing contract to be modified.
15. You can view any new contracts that were created for the customer by following
the procedure described in Viewing Created Contracts by Sales Order Number,
page 6-16.
Note: Contracts are created by concurrent processes that are set up
by the application administrator to run on a periodic basis, and so
may not be available for viewing immediately.
Adding Service Lines to an Existing Contract
By default, the application creates a new contract for the service lines in your order. You
can have an individual line, or all the lines in your order, added to an existing contract
instead. The destination contract must be:
• For the same customer.
6-10    Oracle Service Contracts User Guide
• Active or signed.
• Of the contract category that is specified by the application administrator in the
profile option OKS: Category for Order Management Originated Contracts.
Prerequisites
• Create your order first and open it in the Oracle Order Management Sales Order
window.
• Confirm the contract number.
To add service lines to an existing contract:
1. In the Sales Order window, select the service line to add to an existing contract. To
add all lines in the order to the same contract, select the first service line in the
order.
2. Click Actions.
3. Select Service Contract Details.
The Contract Details window appears.
4. To apply all the rules that are selected in the Contract Details form to all the service
lines, select the Apply All check box. Leaving this check box cleared adds only the
current line.
If it is selected for one service line, you cannot select it for other service lines.
5. Use the Line Renewal Type list to specify how to renew the contract line:
• Do Not Renew: The line will not be renewed when the contract is renewed.
• Full Duration: The line will be renewed for the duration of the whole contract.
If your order includes multiple service lines, the contract duration begins on the
earliest start date and ends on the latest end date from all the lines.
• Keep Duration: The duration of this line will remain the same in a renewed
contract. Use this setting for intermittent or seasonal service lines. For example,
a mountain resort may want to order special service for peak periods in winter
and summer. Using this setting, you ensure that the renewed contract retains
the same structure. See Seasonal or Peak Period Service.
Ordering Service in Oracle Order Management     6-11
6. Select the Existing radio button.
7. To restrict the choice of available contracts to those that are already entered in this
order, select Order from the Type list.
8. Otherwise, select Contract. This displays all active (entered) contracts in the
Contract Number LOV.
9. Use the Contract Number LOV to enter the contract number.
Note: If a contract has already been renewed, then its number
appears more than once in the Contract Number column. In this
case, pay attention to entry in the Contract Number Modifier
column to select the correct contract.
10. To have all remaining service lines in the order added to the same contract, select
the Apply All check box. This setting does not affect any service lines that already
have a contract specified for them.
Specifying Renewal and Other Details for a New Contract Created for Your
Order
You can choose to specify the information for a single service line or for all service lines
in the order. Your administrator can set up default renewal settings for different
customers or organizations within your enterprise. The entries that you make here
override those defaults.
6-12    Oracle Service Contracts User Guide
Prerequisite
Create your order and open it in the Oracle Order Management Sales Order window.
To specify renewal and other details for a new contract created for your order:
1. In the Sales Order window, select the service line for which you to create a new
contract. To have the information apply to the whole order, select the first service
line.
2. Click Actions.
3. Select Service Contract Details from the menu.
The Contract Details window appears.
4. If you plan to permit contract renewal, then use the Line Renewal Type list to
specify how to renew the current service line:
• Do Not Renew: The line will not be renewed when the contract is renewed.
• Full Duration: The line will be renewed for the whole duration of the contract.
If your order includes multiple service lines, the contract duration is as long as
the length of the longest service line.
• Keep Duration: The duration of this line will remain the same in a renewed
contract. Use this setting for intermittent or seasonal service lines. For example,
a mountain resort may order special service for peak periods in winter and
summer. Using this setting you ensure that the renewed contract retains the
same structure.
5. To add the information that you enter here to all lines in the order, select the Apply
All check box.
6. Select the New radio button.
7. Select the Renewal Type for the contract:
• Manual: Requires manual action for all process steps.
• Online: Submits contract to customer.
• Evergreen: Activates without customer acceptance.
• Do Not Renew: Does not renew upon expiry.
For information about renewals, see Understanding Contract Renewals, page 17-11
.
Ordering Service in Oracle Order Management     6-13
8. If a purchase order is required for the contract to be renewed, then select the PO
Required check box. This selection is available only for the Notify Salesrep and
Submit For Approval renewal options.
9. To specify a billing schedule for the renewed contract, then select a billing profile
using the Billing Profile LOV.
10. Specify how to price the renewed contract by making a selection from the Renewal
Pricing Type list in the Repricing Details region:
• Price List: Charges the customer based on the price list that you enter in the
Price List field. The price charged is the current price that is listed in the price
list at the time the contract is renewed.
• Manual: The application charges the customer the same price for the renewed
contract as they paid for the original contract.
• Markup Percent: Automatically adjusts the price up or down by a percentage
that you enter. Optionally, you can cap the maximum adjustment based on a
price list.
11. If you have selected Markup Percent, then:
1. Enter the percentage that you want the price to be adjusted. Entering a positive
number marks up the price. A negative number discounts the contract renewal.
2. If you are marking up the contract price and want to put a limit on the
maximum price that the customer will pay, then enter a price list in the Price
List field. The price of the renewed contract cannot go over the price that is
listed in the price list.
For example, if you enter 20% as your markup and the current list price of the
service is $100, then the renewed contract is priced at $120. If you enter a price
list that lists the service at $110, however, then this price list caps the maximum
price for the service at $110. The customer pays a maximum of $110 for the
renewal.
Note: The price cap works only for markups and not for
discounts.
12. If you have selected an electronic renewal, then in the Quote to region, enter the
contact to be notified by e-mail:
Note: The contact must have an existing e-mail address. You cannot
add new addresses here.
6-14    Oracle Service Contracts User Guide
1. Enter the contact using the Contact LOV.
2. If the contact has multiple e-mail addresses, then select the address where you
want to send the notification.
Note: The application administrator must enter a return
(From:) e-mail address in the Global Contracts Defaults
window as described in Setting Up New Contract Defaults for
Oracle Order Management, page 6-20.
13. Optionally, enter customer contacts for this contract in the Customer Contacts
region.
14. Select the Apply All check box to have all of the remaining service lines in the order
added to the same contract. This setting does not affect any service lines that
already have a contract specified.
15. Save.
Running Concurrent Programs to Generate Contracts Automatically
You must run the following two concurrent programs to generate contracts from Oracle
Order Management sales orders:
• Service Contracts Order Processing Program
• Workflow Background Process
For more information about running and troubleshooting concurrent programs see the
Oracle Applications User's Guide.
To run concurrent programs to generate contracts automatically:
1. Under the Order Management Super User responsibility, select Requests from the
View menu.
The Find Requests window appears.
2. Click Submit a New Request.
The Submit a New Request window appears.
3. Select the Single Request radio button.
4. Click OK.
The Submit Request window appears.
Ordering Service in Oracle Order Management     6-15
5. In the Name field, enter Workflow Background Process and press the tab key.
The Parameters window appears.
6. Enter the following parameters:
Prompt Entry
Item Type OM Order Line
Process Deferred Yes
Process Timeout Yes
Process Stuck No
7. Click OK.
8. Click Submit.
9. Change responsibility to Service Contract Manager.
10. Submit the Service Contracts Order Processing Program concurrent program.
No parameters are required for this program.
Reprocessing Orders That Did Not Create Contracts
Prerequisite
Run the Workflow Background Process and Service Contracts Order Capture
Integration concurrent processes as described in Running Concurrent Programs to
Generate Contracts Automatically, page 6-14.
To reprocess orders that did not create contracts:
1. From the Navigator, navigate to Workflow, and then selectReprocess Order.
The Reprocess Order window appears.
Note: The Reprocess Order form displays order details and product
history in a Multi Org Access Control (MOAC) context. The MOAC
feature allows you to access secured data in one or more operating
units from a single responsibility.
6-16    Oracle Service Contracts User Guide
Your system administrator defines the scope of access privilege
with the following profile options:
• MO: Security Profile
• MO: Default Operating Unit (Optional)
2. Use the Query By Example in the View menu to query all errors:
1. From the View menu, select Query By Example then Enter.
2. Enter Error in the Status field.
3. From the View menu, select Query By Example then Run.
The window displays all errors.
3. Click Select All.
4. Click Submit.
The application displays a note informing you of the process number.
Viewing Created Contracts by Sales Order Number
You can view the contracts that are generated by the application from your sales orders
in either Oracle Service Contracts or Oracle Installed Base.
Viewing Contracts by Sales Order Number in Oracle Service Contracts
To view contracts by sales order number in Oracle Service Contracts:
1. From the Navigator, navigate to Contract Administration, and then select
Launchpad.
2. Click Search in the toolbar.
The Search Templates and Contracts window appears.
3. From the Category LOV, select the contract category that is set in the profile OKS:
Category for Order Management Originated Contracts, for example Warranty and
Extended Warranty.
4. Click More.
The Service Module Search window appears.
Ordering Service in Oracle Order Management     6-17
5. Enter the order number using the Order Number field LOV.
6. Click OK to return to the Search Templates and Contracts window.
7. Click Search.
8. Select the warranty to display in the authoring window.
9. Right-click and select Open from the shortcut menu.
Viewing Contracts by Sales Order in Oracle Installed Base
To view contracts by sales order in Oracle Installed Base:
1. Switch responsibility to Oracle Installed Base Agent User.
2. Double-click the Oracle Installed Base Agent User to find the Install Base
Navigation Menu.
3. Select the Item Instance menu.
4. Under Item Instance main menu, double-click Item Instances to open a search
page.
The Search Item Instances page appears in a separate browser window.
5. Select Sales Order Number from the Quick Find list. Sales Order Number is one of
many search attributes that are available.
6. Enter the Sales Order number.
7. Click Go.
The application displays all of the instances that are included in the sales order.
8. Using the Select radio button, select an Instance for which you want to see the
6-18    Oracle Service Contracts User Guide
Contact details.
9. Select Contracts from the View Details list.
10. From the Actions LOV, select Contracts.
11. Click Go.
The application displays contracts that apply to that instance.
Modifying the Dates That a Warranty Is Effective
Oracle Service Contracts calculates the start date of a warranty date by adding an
optional delay to the shipment date. The same date is also used by Oracle Installed Base
as the installed date of the product.
The purpose of the delay, which the application administrator enters at the time the
item is created in Oracle Inventory, is to account for the time that the item is in transit
and being installed. This ensures that customers receive the full benefit of the warranty.
Your organization can instead specify the actual warranty start date to ensure that
customers are charged for all of the services they receive.
Note: Oracle Service Contracts does not allow a change in warranty
dates if a service request is opened during the period.
You can:
• Change the warranty start and end dates only, page 6-19
Use this procedure for products, such as toasters or cameras, that do not require
installation or for which the installed date is not important.
If a user changes the installed date in Oracle Installed Base, the warranty does not
get updated automatically.
• Change the installed date and have the application adjust the warranty accordingly,
page 6-19.
Use this method if your organization records and tracks installed dates. When you
change the installed date in Oracle Installed Base, Oracle Service Contracts
automatically adjusts the start date of the warranty for you. This method ensures
that installed date and warranty start date remain synchronized.
Note: For the installed date to automatically change the warranty
start date, the application administrator must select the
Synchronize Date Installed check box in the Warranty region of the
Coverage template. (You can check whether this check box has
Ordering Service in Oracle Order Management     6-19
been selected in any warranty by clicking the Edit Coverage button
on the Lines tab and Effectivities subtab.)
Changing Only the That Dates a Warranty is Effective
This procedure does not change the installed date for the item in Oracle Installed Base.
Prerequisites
• Confirm that the order is processed and that a warranty is created by the concurrent
processes run by the administrator.
• Confirm that the order number.
To change only the dates that a warranty is effective:
1. Find the warranty by order number using the Search Templates and Contracts
window and display it in the Service Contracts Authoring window. See Viewing
Contracts by Sales Order Number in Oracle Service Contracts, page 6-16.
2. Select Cascade Attribute from the Actions menu.
The Cascade Attributes window appears.
3. Enter the new dates for the warranty in the Effective Dates fields in the Header
Attributes region.
4. Select the Effective Dates check box.
5. Verify that Header to Lines is selected for Cascade.
6. Click Submit.
The Transaction Log appears.
7. Click Apply.
Changing Both the Warranty Dates and Installed Date
Prerequisite
• Confirm that a warranty has been created before you modify the installed date.
• Confirm the order number.
6-20    Oracle Service Contracts User Guide
To change both the warranty dates and installed date:
1. Switch responsibility to Oracle Installed Base Agent User.
2. Double-click the Oracle Installed Base Agent User to find the Install Base
Navigation Menu.
3. Click the Item Instance menu.
4. Under Item Instance main menu, double-click Item Instances to open a search
page.
The Search Item Instances page appears in a separate browser window.
5. Select Sales Order Number from the Quick Find list. Sales Order Number is one of
many search attributes that are available.
6. Enter the Sales Order number.
7. Click Go.
The application displays all of the instances created from the sales order.
8. Using the select radio button, select an instance for which you want to change the
warranty dates or installed date.
9. Click the Update icon.
An update Item Instance page appears.
10. Scroll to the Install Date and change the date.
11. Save.
Setting Up New Contract Defaults for Oracle Order Management
Application administrators must use this procedure to enter information that is
required to create new contracts from orders in Oracle Order Management. This
information is required for contracts to be created successfully and is not entered by the
agent in the order. For information about the Global Contracts Defaults, see Entering
Contract Defaults, page 2-36.
You can also default renewal information for these contracts. See Specifying How a
Contract Will Be Renewed, page 3-12.
Ordering Service in Oracle Order Management     6-21
To set up new contract defaults for Oracle Order Management:
1. Log in to the Service Contracts Manager responsibility. Navigate to Setup: Service
Contracts, and then select Global Contracts Defaults.
The Global Contracts Default window appears.
2. In the upper half of the window, make the following entries:
1. Renewal region:
• Select the contract group where new contracts will appear within the
Contracts Navigator from the Renewal Contract Group LOV.
• Select the Renewal Process from the Renewal Process LOV.
• Select the Approval method from the Approval LOV.
• Select the Layout Template from the Layout Template Set LOV.
• If the Purchase Order details need to be fetched, check the PO Required
check box.
2. Pricing /Billing region: Select the Pricing Method from the Pricing Method LOV.
3. Thresholds region: Select the Ledger Currency from the Ledger Currency LOV.
4. Integration region:
• Select a QA checklist to test contract completeness before the contract can
become active from the QA Checklist LOV .
• Select the workflow for processing contract approvals from the Approval
Worklflow LOV.
• Select Third Party from the Role LOV. This entry defines the party role
when the sold-to party is not the same as the ship to party for contracts that
are created from Oracle Order Management.
• Select the Interface Price Break check box to send price break details to
Oracle Receivables during billing. This includes quantity, unit price, and
amount.
• Select the credit that a customer receives if service is terminated from the
Return Credit LOV. The options are:
• Full: The customer receives full credit.
6-22    Oracle Service Contracts User Guide
• Calculated: The credit is prorated based on the date terminated.
• None: The customer does not receive credit.
5. Online Acceptance region:
• Select the return e-mail address for electronic renewals from the Help Desk
LOV. This address appears on the From: field of the e-mail notification that
is sent to customers.
• Select the Payment Terms from the Payment Terms LOV.
3. Save.
Understanding the Impact of Contingencies on Revenue Recognition
With the revenue management feature you can automatically time revenue recognition
in accordance with the removal of revenue deferral reasons as required by US Generally
Accepted Accounting Principles (GAAP) and International Accounting Standards (IAS).
To leverage the features of the Revenue Management module, Oracle Service Contracts
has modified the billing process to send the order line id relating to the covered goods
to Oracle Receivables (AR). The AR interface contains a new column to accept the order
line ID, which is also referred to as the parent line ID. If the application passes an order
line ID, AR uses it to check the acceptance contingencies on that order line, to determine
whether to defer revenue on the service. The application does not send an order line to
AR in the following cases:
• Goods covered in a contract, which were not sold in Oracle Order Management
• Usage lines
• Subscription lines
• Services with covered levels other than covered product
• Services with summary level billing
AR does not defer revenue without an order line ID. The application treats the service
as if no contingencies are defined for the goods that are covered by the service.
Note: Administrators can select variable accounting rules to recognize
revenue based on any duration (for example, daily, weekly or
quarterly). Accounting rules are set up in Oracle General Ledger.
1. Associate an Accounting Rule with a contract in Oracle Service
Ordering Service in Oracle Order Management     6-23
Contracts.
2. Switch the responsibility to Invoicing and Accounting Rule.
3. Use the Period field and the Number of Periods field within the
Accounting Rule form to define revenue recognition.
4. Select the Deferred Revenue check box to ensure that the
application does not use the existing accounting rule.
5. If you check the Deferred Revenue box and you want to manually
recognize revenue, navigate to Oracle Receivables, then select
Control, then select Accounting, and then select Revenue
Accounting
The Revenue Accounting and Sales Credits form appears.
• The Number is the Invoice Number.
• The Reference is the Order Number.
You can schedule or unscheduled revenue here.
Adjusting Prices    7-1
7
Adjusting Prices
This chapter covers the following topics:
• Overview of Adjusting Prices
• Entering Price Adjustments
• Getting Help in Picking Adjustments
• Viewing Total Adjustment Amounts
• Viewing Adjustments for the Whole Contract
• Viewing the Total Adjustments for an Individual Line or Subline
• Reverting to the Original Price List Price
• Cascading Service Price
Overview of Adjusting Prices
This group of topics explains how you can adjust prices of service, subscription, and
usage lines in your contract by applying adjustments that are set up by the application
administrator.
Use the procedures in this group of topics to adjust prices for service lines that are
automatically priced by the application based on a price list that you have entered. The
pricing of other lines is based on an agreement between the agent and a customer, so
the lines should already include any adjustments.
Contract lines that the application prices based on the price list include:
• Usage lines of all types except Negotiated Price.
You manually enter a price for Negotiated Price lines, so you must change that
price directly to reflect any additional discounts.
• Service lines for Item and Product levels.
Service lines covering Customers, Sites, Parties, and Systems are also priced
7-2    Oracle Service Contracts User Guide
manually.
• Subscription lines.
If your contract includes a mix of lines that are priced on the price list and that are
priced manually, and you decide to adjust the price at the contract level, then the
adjustments that you enter apply only to those lines that are priced based on the price
list.
About Price Adjustments
Using Oracle Advanced Pricing, application administrators can set up discounts or
surcharges (called price modifiers) for the services, usage contracts, and subscriptions
that you sell in Oracle Service Contracts. The price modifiers provide adjustments either
in percentages or in currency amounts.
Note: Lump Sum modifiers, which get applied to the final negotiated
price or subtotal, are not supported for service items.
The modifiers can be of two types:
• Automatic price adjustments. The application automatically applies the discount or
surcharge if the customer qualifies. For example, a company may choose to give an
automatic 15% discount to all existing customers.
• Price adjustments that you can select manually while authoring a contract. For
example, you can choose to offer a customer 10%, 15%, or 20% off the list price.
The administrator can set up either type of adjustment so that you can change the
amount of the discount manually. You can identify this type of modifier by the Y value
in the Update Allowed field. If you are applying an adjustment manually, this field
appears in the Modifier Number LOV.
If the administrator has set up such a modifier to apply to the line automatically, then
you can enter an entirely new price for the contract line. You can do so either in the line
itself or in the Price Adjustment window itself.
Different Levels of Discounts
The administrator can set up different price adjustments to apply at the contract, line,
and subline levels. For example, a copier manufacturer may offer a 10% discount on a
particular service and a 15% sale for all customers purchasing service contracts worth
$1,000 or more (contract-level discount).
Price adjustments that are applied at different levels are cumulative and are applied
against the price list price.
Suppose that a customer purchases a service contract with a list price of $1000 and
receives the following two levels of discounts:
Adjusting Prices    7-3
• An automatic 10% preferred customer discount at the contract level
• A 15% discount at the line level because of a promotion on the specific service they
are purchasing
The resulting price is $750 ($1000–$100 –$150).
The application deducts any currency adjustments after the percentage adjustments are
made. If an agent entered -$30 in the preceding example, then the final price that the
customer pays is $750–$30= $720.
Adjustment Methods
You can adjust prices in two ways:
• Change the price list and reprice the line or contract. (This method is discussed in
the chapters describing how you enter contract lines).
• Select price adjustments using the Adjustments window.
• Directly override the price.
Optionally, you can enter any information that may help a customer qualify for an
adjustment and let the application suggest valid adjustments for you.
For example, you can use this method to find out what discounts are available for a
customer who calls Support. Or perhaps the customer wants the same discounts as
a colleague from another company.
About Partial Period Computation
You can set attributes that enable the application to calculate pricing for partial periods.
A partial period duration is less than pricing period duration, such as 10 days rather
than a full month. It is a ratio of the number of days in the partial period to the number
of days in the pricing period duration (default full period or price unit of measure
(UOM)). The number of days in the pricing period duration is based on the selection
that is made in the partial period attributes Period Type and Price UOM fields.
You can select where the partial period calculation occurs within a pricing duration
when service starts in the middle of a period by setting the Period Start attribute. If you
select Calendar, the period start and end dates match the calendar start and end dates.
If you select Service, then the application uses the service start date and only the last
period can be a partial period.
You can define partial period attributes at the operating unit level within Global
Contracts Defaults. See Entering Contract Defaults, page 2-36.
Entering Price Adjustments
You can:
7-4    Oracle Service Contracts User Guide
• Enter price adjustments (discounts or surcharges). You can adjust only prices on
lines that have been priced using the price list.
• Have the application suggest appropriate adjustments for contract lines by first
entering qualifying information. See Getting Help in Picking Adjustments, page 7-
6.
Note: If you edit a modifier value, the change is not reflected on an
existing contract even after you reprice it. In this case, you must delete
the modifier and reprice the contract.
To enter price adjustments:
1. Indicate the level at which you want to apply or review adjustments:
• Header: Select the Summary tab.
• Line: Select the Lines tab, the Effectivities subtab, and the line that you want to
adjust.
• Subline: Select the Lines tab, the Pricing/Products subtab, the line, and the
subline that you want to adjust.
2. Select Pricing Adjustment from the Tools menu.
The Adjustment window appears listing any discounts that have been applied at
this level.
Note: Remember that, although adjustments are cumulative,
adjustments at one level do not show up in the windows at other
levels.
The heading at the top of the window indicates whether you are
adjusting the price at the header or line level.
Adjusting Prices    7-5
Note: The Adjustment window interface does not distinguish
between line and subline adjustments. It views them all as lines. If
you are adjusting prices at the subline level, then the Line Number
field actually refers to the subline number and the Level field lists
Line as your adjustment level although you are adjusting the
subline.
3. Select any additional price adjustments using the Modifier Number LOV. A DLT in
the Modifier Type field indicates a discount; SLT indicates a surcharge.
4. If the modifier that you selected can be updated manually (Y appears in the Manual
Override field in the LOV), then you can enter either of the following:
• Percentage adjustment in the Rate field.
• Currency amount adjustment in the Price Reduction field.
Note: You can apply a modifier that allows an override at both
the header and subline level. For contract lines, you can only
apply a modifier that does not allow an override.
Whether the modifier permits you to enter an amount or percentage adjustment
depends on the way it has been set up by the administrator.
Note: At the header level, you can enter only percentage
adjustments.
For a discount, entering a positive number reduces the price. Entering a
7-6    Oracle Service Contracts User Guide
negative number applies a surcharge.
5. Enter any reasons for the adjustment on the Reason tab.
6. To apply the adjustments that you have chosen, click Save and Reprice. Save saves
your choice but does not reprice.
The billing schedule automatically reflects the new prices.
Getting Help in Picking Adjustments
You can enter qualifying information that permits the application to suggest
appropriate adjustments for your customer. This feature is available only at the line
level.
Prerequisite
Confirm the qualifying information that is used in your application. You can contact
your application administrator for more information.
To get help in picking adjustments:
1. Select the Lines tab, the Effectivities subtab, and the line that you want to adjust.
2. Select Pricing Qualifier from the Tools menu.
The Qualifiers window appears, listing any qualifiers that were entered previously.
3. Enter the qualifying information.
For example, to see whether a customer with orders between $1000 and $2000
qualifies for discounts, you might select Volume as the context and Order Amount
Adjusting Prices    7-7
as the attribute and enter a range of 1000 through 2000 in the value fields.
4. Save and close the window.
The qualifying information that you have entered is now used by the application to:
• Apply any automatic price adjustments the customer is entitled to based on the
information that you entered. The information is sent whenever the pricing call
occurs, for example, when you save the line or reprice.
• Filter the price adjustments (modifiers) that are listed in the Modifier Number
LOV.
You are now ready to select any manual price adjustments. See Entering Price
Adjustments, page 7-3 .
Viewing Total Adjustment Amounts
You can view the total adjustment amounts for:
• The whole contract
• An individual line or subline
Viewing the totals does not tell you what specific adjustments were applied or at what
level. To view the sources of adjustments, you must open the Adjustment window at all
the different levels. See Entering Price Adjustments, page 7-3 for details.
Viewing Adjustments for the Whole Contract
To view adjustments for the contract as a whole, select the Summary tab and
Pricing/Billing subtab. The total adjustments appear in the Adjustments region.
Viewing the Total Adjustments for an Individual Line or Subline
You can view the total price adjustment for a line and subline.
To view the total adjustments for an individual line or subline:
1. Select the Lines tab and Pricing/ Products subtab.
2. Select the line (and optionally the subline) to view.
The Pricing Calculation button is active only for lines that have no sublines, such as
subscriptions.
3. Select the Pricing secondary tab.
7-8    Oracle Service Contracts User Guide
4. Click Pricing Calculation.
The total adjustments for the line and subline appear in the Pricing Calculation
window.
You can review the details that are related to the Covered Level:
• List price
• Quantity
• UOM
• Extended Amount
In addition, you can review the details that are related to the Top Line level:
• List price
• Operator: Represents how the service is priced (amount based or percentage
based).
• Quantity
• UOM
• Adjusted Price: Reflects the adjusted price if modifiers have been applied.
• Extended amount
• Status Text: Represents the status of the pricing, such as Success.
Reverting to the Original Price List Price
You can remove any adjustments that you have made and revert an adjusted price of a
line or subline to the price that is listed on the price list. This removes the adjustments
that you have added manually by calling the pricing application for the most up-to-date
price on the price list, along with any automatic modifiers.
To revert to the original list price:
1. Remove price adjustments at any of the three levels:
• For a line (this removes all subline adjustments.):
1. Select the Lines tab and Pricing/Products subtab.
2. Select the line to change.
Adjusting Prices    7-9
3. Click Reprice on the Pricing/Products subtab.
• For a single subline:
1. Select the Lines tab and Pricing/Products subtab.
2. Select the line and subline to change.
3. Click Reprice on the Pricing secondary tab.
• The entire contract:
1. Select the Summary tab and Pricing/Billing subtab
2. Click Reprice.
The reprice Decision dialog box appears.
• Select one of the two repricing methods:
• To remove the adjustments for the entire contract and return the prices to
those listed in the price list that is attached to each contract line, click
Reprice Only.
• To remove the adjustments for the entire contract and reprice the entire
contract based on the price list entered in the Price List field of the
Pricing/Billing subtab, click Cascade and Reprice.
The Repricing results window appears.
2. If all lines are repriced successfully, then click Apply to make the changes. If some
lines fail and show a severity of Error or Unexpected Error, the Apply button is
disabled. In this case, you must correct the error before attempting to reprice.
Cascading Service Price
You can access the Cascade Service Price window from the Actions menu and use it to
cascade the service line price to the covered level prices at the same proportions. For
example, in the following table, the current service line price is $2,000 and in this case,
the percentage of the service price applied to lines L1 and L2 is 75% and 25%
respectively. The same proportions are cascaded to the lines if $4,000 is applied.
Current New
S1 $2000 $4000
7-10    Oracle Service Contracts User Guide
Current New
L1 $1500 $3000
L2 $500 $1000
To cascade the service price:
1. Select the contract line to which you want to make a price change.
2. From the Service Contracts Authoring window, select the Actions menu and then
select Cascade Service Price.
3. Review the Service, Start Date, End Date, and Current Price fields. These are
display-only fields.
4. Enter the New Price that is to be allocated across the sublines.
5. Click Apply to save. The new price is cascaded in the appropriate proportions to
the final price of each covered level.
Refresh the billing schedule to reflect the new values.
Running Quality Assurance Results and Troubleshooting    8-1
8
Running Quality Assurance Results and
Troubleshooting
This chapter covers the following topics:
• About the Quality Assurance Check (QA Check)
• Running the Quality Assurance Check from the Actions Menu
• Submitting the Contract for Approval from the Actions Menu
• Running the Quality Assurance Check from the (Summary) Administration Subtab
• Running the Contracts QA Program
• Troubleshooting Errors
About the Quality Assurance Check (QA Check)
This group of topics explains how to use quality assurance results to troubleshoot issues
within your contract.
The QA Check is an automated process that verifies the validity of a contract.
A default QA checklist is seeded in the application. However, if required, the default
QA checklist can be modified to include other checks. The default is set with the profile
option OKS: Default QA Checklist. You can override the default checklist from the
Summary Administration tab of the Service Contracts Authoring form.
A QA checklist consists of one or more processes that are defined in the Process
Definitions form prior to their being selected for the QA checklist.
A process within the QA checklist can be defined with two severity levels, error and
warning. Errors must be corrected before the contract is submitted for approval.
You can start the QA checklist as follows:
• Actions menu: Starting the QA checklist from the Actions menu shows the results
for an individual contract immediately in the Quality Assurance Results window,
8-2    Oracle Service Contracts User Guide
but does not submit the contract to the Approval workflow. See Running the
Quality Assurance Check from the Actions Menu, page 8-2.
• Actions menu: Submitting the contract for approval runs the QA check, shows the
results immediately in the Quality Assurance Results window, and enables you to
submit the contract to the Approval workflow. See Submitting the for Approval
from the Actions Menu, page 8-3.
• Summary Administration subtab: Starting the QA checklist from the Summary
Administration subtab shows the results for an individual contract immediately in
the Quality Assurance Results window, and enables you to submit the contract to
the Approval workflow. See Running the Quality Assurance Check from the
(Summary) Administration Subtab, page 8-4.
• Contracts QA Report concurrent program: Starting the QA checklist from the
Contracts QA Report enables you to run a QA check on multiple contracts. The
process produces a report listing the results of each contract. This process can
optionally start the approval workflow after the QA is complete. See Running the
Contracts QA Program, page 8-6.
Note: After the QA Results appear you must fix the errors. For a
listing of errors and the corrective actions, see Troubleshooting
Errors, page 8-7.
Running the Quality Assurance Check from the Actions Menu
To run the Quality Assurance Check from the Actions menu:
1. From the Service Contracts Authoring window, select the Actions menu and select
Check QA.
The Quality Assurance Results window appears.
Note: The Continue Approval box is not active. If you want to
continue with the approval process from the QA check, then you
need to submit the contract for approval from the Summary
Administration tab.
Running Quality Assurance Results and Troubleshooting    8-3
2. Verify the following:
• Contract Number
• Default QA Checklist
• Results
For information about fixing errors, see Troubleshooting Errors, page 8-7.
Note: You can change the default QA checklist by selecting a
different checklist from the Default QA Checklist LOV within
the Summary tab and Administration subtab. After making the
change, you must select the Check QA action again.
Submitting the Contract for Approval from the Actions Menu
To submit the contract for approval from the Actions menu:
1. From the Service Contracts Authoring window, select the Actions menu and select
Submit for Approval.
The Quality Assurance Results window appears.
Note: If errors appear in the results, the Continue Approval box is
not active. If you want to continue with the approval process, you
must fix the errors and resubmit the contract.
2. Verify the following:
8-4    Oracle Service Contracts User Guide
• Contract Number
• Default QA Checklist
• Results
For information about fixing errors, see Troubleshooting Errors, page 8-7.
3. If all results indicate Success, select Continue Approval to submit the contract to
the approval workflow.
If warning messages appear, you can review the messages and determine whether
the issues should be fixed. If you determine that they do not need to be fixed, you
can ignore them.
Note: You can change the default QA checklist by selecting a
different checklist from the Default QA Checklist LOV within the
Summary Administration tab. After making the change, you must
select the Submit for Approval action again.
Running the Quality Assurance Check from the (Summary) Administration
Subtab
To run the Quality Assurance Check from the (Summary) Administration subtab:
1. From the Service Contracts Authoring window, select the Summary tab and
Administration subtab. Select Submit.
Running Quality Assurance Results and Troubleshooting    8-5
The Quality Assurance Results window appears.
Note: If errors appear in the results, the Continue Approval box is
not active. If you want to continue with the approval process, you
must fix the errors and resubmit the contract.
2. Verify the following:
• Contract Number
• Default QA Checklist
• Results
For information about fixing errors, see Troubleshooting Errors, page 8-7.
3. If all results indicate Success, select Continue Approval to submit the contract to
the approval workflow.
If warning messages appear, you can review the messages and determine if the
issues should be fixed. If you determine that they do not need to be fixed, you can
choose to ignore them.
Note: You can change the default QA checklist by selecting a
different checklist from the Default QA Checklist LOV within the
Summary Administration tab. After making the change, you must
select Submit again.
8-6    Oracle Service Contracts User Guide
Running the Contracts QA Program
This report enables you to run a QA check on multiple contracts. This is particularly
useful when the reports is run immediately before the billing process to help identify
issues on contracts before they are submitted to Accounts Receivable.
Use this option for very large contracts, when you do not want to wait for the entire QA
process to finish.
To run the contracts QA program:
1. From the View menu, select Requests.
The Find Request window appears.
2. Select Submit a New Request.
The Submit a New Request window appears.
3. Select the Single Request radio button and click OK.
The Submit Request window appears.
4. From the Name LOV, select Contracts QA Report and click OK.
The parameters window appears.
5. Set the following parameters as required:
• From Contract Number (required)
• To Contract Number
• From Start Date (required)
Note: When you run the report, the From Start Date and To
Start Date will both default to the current date. If your contracts
start prior to this date, you will not see a report. Be sure to
check your start dates.
• To Start Date
• Contract Status
• Level of Details (required)
You can select a report that details all contracts selected, all contracts that pass
the QA check, or all contracts that fail the QA check.
Running Quality Assurance Results and Troubleshooting    8-7
• Submit for Approval: If this parameter is set to Yes, the contract is
automatically submitted for approval if it passes QA.
• Ignore QA Warning: If this parameter is set to Yes, QA warnings are ignored
6. Click OK.
The Submit Request window appears with a concatenated listing of the parameters.
7. Select Submit.
A Decision window appears with the request ID. You should make a note of this ID.
8. Click No.
The Find Request window appears. You can use this window to track your request.
9. Verify that the View All My Request radio button is selected, and click Find.
The Request window appears.
10. After your request is completed, you can view the details by selecting View Output
.
Troubleshooting Errors
After you run the QA Check, you must review the Quality Assurance Results window.
The results show any errors or warnings that are associated with the contract.
Following is a list of errors and a list of warnings that may appear in the Quality
Assurance Results window.
Error Messages
You must correct all errors that are listed in the Quality Assurance Results. Error
messages will prevent you from passing the QA check and submitting the contract for
approval.
Error Messages Summary
8-8    Oracle Service Contracts User Guide
Process Name Error Message Meaning and Resolution
Check Address Bill to address is required on
top line number Line 1.
This message validates the
following: a bill to address
exists for service, usage, and
extended warranty lines.
It occurs when: the bill to
address is missing on service,
usage, or extended warranty
lines.
To fix the error: add a bill to
account that has a billing
address on the reported line.
Check Address Bill to address is invalid on
top line number 1
This message validatesthe
following: whether bill to
address is active for service,
usage, and extended warranty
lines.
It occurs when: bill to address
is not active on service, usage
or extended warranty lines.
To fix the error: change the
bill to address on the reported
line.
Check Address Bill to address is invalid at
header level
This message validatesthe
following: whether bill to
address is active at the
header.
It occurs when: bill to address
is not active on header.
To fix the error: change the
bill to address at the header
level.
Running Quality Assurance Results and Troubleshooting    8-9
Process Name Error Message Meaning and Resolution
Check Address Subscription line 1 should
have a ship to address.
This message validatesthe
following: whether ship to
address exists for subscription
line.
It occurs when: ship to
address is missing on
subscription line.
To fix the error: add a ship to
account that has a shipping
address on the reported line.
Check Address Ship to address is invalid on
top line number Line 1.
This message validatesthe
following: whether ship to
address is active for service,
usage and extended warranty
lines.
It occurs when: ship to
address is not active on
service, usage, or extended
warranty lines.
To fix the error: change the
ship to address on the
reported line.
Check Address Ship to address is invalid at
header level
This message validates the
following: whether ship to
address is active at the
header.
It occurs when: ship to
address is not active on
header.
To fix the error: change the
ship to address at the header
level.
8-10    Oracle Service Contracts User Guide
Process Name Error Message Meaning and Resolution
Check Billing Schedule Top line Line 1 Stream Level
should be entered.
This message validates the
following: checks the Stream
Level Line of the top line
billing schedule.
It occurs when: top line
Stream Level Line has not
been entered.
To fix the error: enter the
Stream Level Line of the top
line billing schedule.
Check Billing Schedule Line 1 billing schedule should
be entered.
This message validates the
following: checks the top line
level elements.
It occurs when: the level
elements are missing.
To fix the error: enter the
level elements for the
reported line.
Check Billing Schedule Sub line SLL period not same
as bill schedule period.
This message validates the
following: reports an error if
for Equal Amount and
Covered level billing type the
top line period is not the same
as the sum of level elements.
It occurs when: the top line
period is not the same as the
sum of level elements for
Equal Amount and Covered
level billing type.
To fix the error: change the
Stream Level Line period on
the reported line.
Running Quality Assurance Results and Troubleshooting    8-11
Process Name Error Message Meaning and Resolution
Check Billing Schedule For Line 1 there is a mismatch
between line amount and
total billing schedule amount
(sum of level elements).
This message validates the
following: for Equal Amount
billing type a mismatch
should not exist between line
amount and billing schedule
amount.
It occurs when: the billing
type is Equal Amount and the
line amount is different from
the billing schedule amount.
To fix the error: change the
billing schedule amount on
the reported line.
Check Billing Schedule Line 1 Stream level
effectivities should be within
line effectivities
This message validates the
following: reports an error if
billing cycle end date is prior
to the top line end date or the
billing cycle start date is not
the same as the top line start
date.
It occurs when: billing cycle
end date is prior to top line
end date or when billing cycle
start date is not the same as
top line start date.
To fix the error: change the
billing cycle end date if it is
prior to the top line end date
or change the billing cycle
start date if it is not the same
as top line start date.
8-12    Oracle Service Contracts User Guide
Process Name Error Message Meaning and Resolution
Check Billing Schedule Line 1 Stream level
effectivities should be within
line effectivities.
This message validates the
following: whether billing
type is Equal Amount or
Covered Level then billing
cycle end date should not be
later than top line end date.
It occurs when: billing type is
Equal Amount or Covered
Level and billing cycle end
date is later than top line end
date.
To fix the error: Make the
billing cycle end date same as
top line end date or change
the billing type to Top Level.
Check Billing Schedule Subscription line 1 with final
price can not be less than
billed amount.
This message validates the
following: reports an error
for subscription line if
negotiated price is less than
billed amount.
It occurs when: negotiated
price is less than billed
amount in a subscription line.
To fix the error: change the
negotiated price on the
reported line.
Check Billing Schedule Sub line billing flag should be
same as top line billing flag.
This message validates the
following: subline billing
type should be the same as
top line billing type.
It occurs when: subline
billing type is different from
top line billing type.
To fix the error: make both
subline and top line billing
type the same.
Running Quality Assurance Results and Troubleshooting    8-13
Process Name Error Message Meaning and Resolution
Check Billing Schedule Start date and end date of sub
line should be same as top
line in equal amount.
This message validates the
following: start date and end
date of sub line should be
same as top line in Equal
Amount.
It occurs when: start date or
end date of the sub line is not
the same as the top line for
Equal Amount billing type.
To fix the error: change the
start date or end date of the
reported subline or top line.
Check Billing Schedule Sub line 1 Stream Level Line
should be entered.
This message validates the
following: reports an error if
subline stream level line is not
found.
It occurs when: sub line
stream level line is not found.
To fix the error: enter the
stream level line on the
reported subline billing
schedule.
Check Billing Schedule Line 1 billing schedule should
be entered.
This message validates the
following: reports an error if
level element (billing
schedule) is not found in the
sub line.
It occurs when: level element
is not found in the subline.
To fix the error: enter the
level element on the reported
subline.
8-14    Oracle Service Contracts User Guide
Process Name Error Message Meaning and Resolution
Check Billing Schedule Sub line 1 SLL period 1 not
same as bill schedule period
1.
This message validates the
following: reports an error if
for Equal Amount and
Covered level billing type the
sub line billing period is not
the same as the sum of level
elements.
It occurs when: billing type is
Equal Amount or Covered
level and the sub line billing
period is not the same as the
sum of level elements.
To fix the error: fix the stream
level line period for the
reported sub line.
Check Billing Schedule Sub line 1 Product final price
not same as total bill schedule
amount.
This message validates the
following: subline level
element total should be equal
to subline price negotiated.
It occurs when: covered line's
billing schedule amount is not
equal to the covered line's
price negotiated.
To fix the error: change the
covered line's billing schedule
amount.
Check Billing Schedule Sub line 1 Product final price
cannot be less than billed
amount.
This message validates the
following: subline final price
cannot be less than billed
amount.
It occurs when: subline final
price is less than billed
amount.
To fix the error: make the
final price equal to or greater
than the billed amount.
Running Quality Assurance Results and Troubleshooting    8-15
Process Name Error Message Meaning and Resolution
Check Billing Schedule Subline 1 SLL effectivities
should be within sub line
effectivities.
This message validates the
following: checks for Product
billing cycle end date equal to
lines end date for Equal
Amount and Covered Level
billing type
This check is not done for Top
level billing type because the
stream level line end date in
that case might go beyond the
line end date.
It occurs when: billing type is
Equal Amount and Covered
Level and product billing
cycle end date is not the same
as lines end date.
To fix the error: change the
billing cycle end date.
Check Billing Schedule Subline 1 SLL effectivities
should be within sub line
effectivities.
This message validates the
following: For Top Level
billing type the billing cycle
start date and subline start
date should be the same.
It occurs when: billing type is
Top Level and subline billing
cycle start date is not the same
as subline start date.
To fix the error: change the
sub line billing cycle start date
to the subline start date.
Check Covered Levels OKS At least one covered level line
is required for contract line, 1,
Service.
This message validates the
following: if a covered level
is entered.
It occurs when: covered level
is missing.
To fix the error: enter the
covered level.
8-16    Oracle Service Contracts User Guide
Process Name Error Message Meaning and Resolution
Check Covered Levels OKS Please enter a value for Final
Price in contract line 1.
This message validates the
following: negotiated amount
at covered levels is required.
It occurs when: negotiated
amount is missing from
covered levels.
To fix the error: enter a
negotiated amount at covered
levels.
Check Covered Levels OKS Quota Sales Credit at line
must be assigned to 100% in
contract line 1, Service.
This message validates the
following: sales credits must
be defined for the line.
It occurs when: sales credits
have not been defined for the
line.
To fix the error: enter sales
credits for the lines.
Check Covered Levels OKS Service item &Line_Name is
not an active inventory item
This message validates the
following: contract contains
an inactive inventory item
from Oracle Installed Base
It occurs when: a contract
contains an inactive inventory
item from Oracle Installed
Base.
To fix the error: enter an
active inventory item in the
Covered Name field.
Check Covered Levels OKS Covered item &Line_Name is
not an active inventory item
This message validates the
following: contract contains
an inactive covered item.
It occurs when: contract
contains an inactive covered
item.
To fix the error: enter an
active covered item in the
Covered Level field.
Running Quality Assurance Results and Troubleshooting    8-17
Process Name Error Message Meaning and Resolution
Check Covered Levels OKS Covered Party &Line_Name
is not active
This message validates the
following: contract contains
an inactive covered party.
It occurs when: contract
contains an inactive covered
party.
To fix the error: enter an
active covered party in the
Covered Level field.
Check Covered Levels OKS Covered Product
&Line_Name is not active.
This message validates the
following: contract contains
an inactive covered product.
It occurs when: contract
contains an inactive covered
product.
To fix the error: enter an
active covered product in the
Covered Level field.
Check Covered Levels OKS Covered System &Line_Name
is not active.
This message validates the
following: contract contains
an inactive covered system.
It occurs when: contract
contains an inactive covered
system.
To fix the error: enter an
active covered system in the
Covered Level field.
Check Covered Levels OKS Covered Site &Line_Name is
not active
This message validates the
following: contract contains
an inactive covered site.
It occurs when: contract
contains an inactive covered
site.
To fix the error: enter an
active covered site in the
Covered Level field.
8-18    Oracle Service Contracts User Guide
Process Name Error Message Meaning and Resolution
Check Covered Product
Quantity
Item instance item 1 for line 1
is not found in installedbase.
This message validates the
following: whether the item
instance is in installed base.
It occurs when: the item is
not found in installed base.
To fix the error: select a new
product.
Check Covered Product
Quantity
Covered product quantity
and unit of measure on line 1
does not match the quantity
and unit of measure in
installedbase.
This message validates the
following: checks the covered
product quantity and unit of
measure against the quantity
and unit of measure in
installed base.
It occurs when: the covered
product quantity and unit of
measure is different from the
quantity and unit of measure
in installed base.
To fix the error: select a
different product from the
installed base or update the
product quantity.
Check Covered Product
Quantity
Covered product quantity on
line 1 does not match quantity
in installedbase.
This message validates the
following: checks the covered
product quantity against the
quantity in installed base.
It occurs when: the covered
product quantity is different
from the quantity in installed
base.
To fix the error: select a
different product from the
installed base or update the
product quantity.
Running Quality Assurance Results and Troubleshooting    8-19
Process Name Error Message Meaning and Resolution
Check Covered Product
Quantity
Covered product unit of
measure on line 1 does not
match the value stored in
installedbase.
This message validates the
following: checks the covered
product unit of measure
against the unit of measure in
the installed base.
It occurs when: the covered
product unit of measure is
different from the unit of
measure in installed base.
To fix the error: select a
different product from the
installed base or update the
unit of measure
Check Customer Availability Bill to customer account is
inactive on line number 1.
This message validates the
following: whether bill to
customer account is active.
It occurs when: bill to
customer account is not
active.
To fix the error: change the
bill to customer on the
reported line.
Check Customer Availability There is no customer in the
contract. Please define a party
with the role of customer for
the contract.
This message validates the
following: whether the
contract header has a
customer or third party.
It occurs when: the contract
header has no customer or
third party.
To fix the error: add a
customer or subscriber or
third party to the contract.
8-20    Oracle Service Contracts User Guide
Process Name Error Message Meaning and Resolution
Check Customer Availability At least one bill to account on
the contract lines belongs to
Account 1. The
Customer/Third party on the
contract header is not related
to this account.
This message validates the
following: whether the
customer account that is
stored in the contract lines
belongs to the customer, third
party or related customer.
It occurs when: customer
account stored on the contract
top line does not belong to the
customer, third party or
related customer.
To fix the error: change the
customer account on the
reported line.
Check Email Address Check Email Address This message validates the
following: whether a valid
e-mail id is provided for a
contact at the header.
It occurs when: e-mail
address for a contact is not
active on header.
To fix the error: enter an
email ID for a contact within
the summary tab.
Check Item Instance Is Valid Service line 1 is covering an
invalid subscription product.
This message validates the
following: whether the
subscription item being
covered belongs to an
active/signed contract.
It occurs when: a subscription
item being covered as a
covered product in contract A
belongs to contract B but
contract B is not active or
signed.
To fix the error: select
another subscription item or
make contract B active.
Running Quality Assurance Results and Troubleshooting    8-21
Process Name Error Message Meaning and Resolution
Check Product Availability Service 1 is not available for
product 1.
This message validates the
following: if line status is
Entered, then it checks
whether service is available
for the covered product or
item.
It occurs when: line status is
Entered and service is not
available for the covered
product or item.
To fix the error: select
another covered product or
item.
Check Required Values Please assign at least 2
different parties to your
contract.
This message validates the
following: the contract
contains only one party role.
It occurs when: the
Customer/Third Party
information is missing in the
contract.
To fix the error: enter
customer/third party details
in the Summary tab.
Check Required Values OKS The contract has no
CUSTOMER attached to it.
This message validates the
following: the contract
contains a customer.
It occurs when: customer has
not been entered for the
contract.
To fix the error: enter
customer details in the
Summary tab.
8-22    Oracle Service Contracts User Guide
Process Name Error Message Meaning and Resolution
Check Required Values OKS QA Check list is required for
contract header 1.
This message validates the
following: the contract has a
QA check list.
It occurs when: a QA check
list has not been selected for a
contract.
To fix the error: select a QA
check list from the
Administration subtab.
Check Required Values OKS Only one party role, may be
attached to the contract.
This message validates the
following: Only one
CUSTOMER/SUBSCRIBER
may be attached to a contract.
It occurs when: the contract
has more than one party of
role type customer/subscriber.
To fix the error: verify that
you have only one
customer/subscriber.
Check Required Values OKS Only one party role, may be
attached to the contract.
This message validates the
following: Only one
VENDOR/MERCHANT can
be attached to a contract.
It occurs when: the contract
has more than one party of
role type vendor/merchant.
To fix the error: verify that
you have only one
vendor/merchant.
Check Required Values OKS Short description is required
for contract header 1.
This message validates the
following: a short description
is in contract header.
It occurs when: you do not
have a short description on
the contract header.
To fix the error: add a short
description.
Running Quality Assurance Results and Troubleshooting    8-23
Process Name Error Message Meaning and Resolution
Check Required Values OKS Either the price list is inactive
or the price list is invalid for
the contract currency. Select a
valid price list for the contract
currency.
This message validates the
following: whether that price
list is active or valid for the
contract currency.
It occurs when: the price list
is inactive, missing, or is
invalid for the contract
currency.
To fix the error: select a valid
price list.
Check Required Values OKS Price list ID is required for
contract header 1.
This message validates the
following: a price list ID is in
contract header.
It occurs when: you do not
have a price list under
Pricing/Billing subtab.
To fix the error: add a price
list under the Pricing/Billing
subtab.
Check Required Values OKS Contract group must be
entered for contract header 1
This message validates the
following: a contract group is
entered in the contract
header.
It occurs when: contract
group is not entered on the
contract header.
To fix the error: add a
contract group under the
Administration sub tab.
8-24    Oracle Service Contracts User Guide
Process Name Error Message Meaning and Resolution
Check Required Values OKS An approval workflow must
be selected for the contract.
This message validates the
following: an approval
workflow is selected for the
contract.
It occurs when: an approval
workflow is missing.
To fix the error: add an
approval workflow under the
Administration subtab.
Check Required Values OKS Line 1 UOM code and values
should be entered.
This message validates the
following: if profile option
OKS: Use Advanced Pricing
for Manual Adjustment is set
to Yes, then a value should be
entered on the subline for unit
price or UOM.
It occurs when: profile option
OKS: Use Advanced Pricing
for Manual Adjustment is set
to Yes, and unit price or UOM
code is missing from subline.
To fix the error: add a unit
price or UOM code to the
reported subline.
Check Required Values OKS Line 1 UOM code and values
should be entered.
This message validates the
following: If profile option
OKS: Use Advanced Pricing
UOM is set, UOM becomes a
required field on the subline.
It occurs when: profile option
OKS: Use Advanced Pricing
for Manual Adjustment is set
to No and uom code is
missing from subline.
To fix the error: add a uom
code to the reported subline.
Running Quality Assurance Results and Troubleshooting    8-25
Process Name Error Message Meaning and Resolution
Check Required Values OKS Please enter the PO number
for billing.
This message validates the
following: the PO flag and
number under the billing
section. If Purchase Order
Required check box is
selected, then PO number is
required.
It occurs when: the PO check
box is checked but PO
number is missing under the
billing section under the
Pricing/Billing subtab.
To fix the error: add a PO
number under the billing
section under the
Pricing/Billing subtab or clear
the PO check box.
Check Required Values OKS Service PO number is
missing.
This message validates the
following: the PO flag and
number under the Service
Charges section. If Purchase
Order Required check box is
selected, then PO number is
required.
It occurs when: the PO flag is
checked under the Service
Charges section under the
Pricing/Billing subtab but the
PO number is not entered.
To fix the error: add the PO
number under the Service
Charges section under the
Pricing/Billing subtab or clear
the PO check box.
8-26    Oracle Service Contracts User Guide
Process Name Error Message Meaning and Resolution
Check Required Values Conversion information is
required for this contract.
This message validates the
following: the currency
conversion type is entered if
the From Currency and the To
Currency are different.
It occurs when: the to and
from currencies are different
and the currency conversion
type is missing.
To fix the error: add a
currency conversion type
under the Pricing/Billing
subtab.
Check Required Values Price list currency, does not
match header currency.
This message validates the
following: compares price list
currency with contract header
currency.
It occurs when: the price list
currency is not the same as
the header currency.
To fix the error: change the
price list under the
Pricing/Billing subtab
Check Service Effectivity Please enter a value for
Inventory item status not
active in contract line 1.
This message validates the
following: whether the
inventory item status is
active.
It occurs when: When
inventory item is no longer
valid.
To fix the error: change the
inventory item on the
reported line.
Running Quality Assurance Results and Troubleshooting    8-27
Process Name Error Message Meaning and Resolution
Check Service Effectivity Item: line 1 Not a valid
Service
This message validates the
following: whether service or
extended warranty is a valid
item in the inventory table.
It occurs when: the service or
extended warranty is not a
valid item.
To fix the error: select
another service or extended
warranty line on the Accounts
subtab, or delete the line.
Check Service Effectivity Item: line 1 Not a valid Usage This message validates the
following: if the usage item is
valid.
It occurs when: the usage is
not a valid item.
To fix the error: select
another usage on the
Accounts subtab, or delete the
line.
Check Service Effectivity The Product Item is not a
Serviceable Product.
This message validates the
following: whether covered
product is serviceable.
It occurs when: a covered
product is not serviceable.
To fix the error: select
another covered product from
the Effectivities secondary tab
(Products/Pricing subtab).
8-28    Oracle Service Contracts User Guide
Process Name Error Message Meaning and Resolution
Check Service Effectivity Please enter a value for
Covered item status not active
in contract line 1.
This message validates the
following: the covered item
status is active.
It occurs when: covered item
status is not active.
To fix the error: select
another covered item from
the Effectivities secondary tab
(Products/Pricing subtab).
Check Service Effectivity Please enter a value for
Covered party status not
active in contract line 1.
This message validates the
following: if covered party
status is active.
It occurs when: covered party
status is not active.
To fix the error: select
another covered party.
Check Service Effectivity Please enter a value for
Covered product status not
active in contract line 1.
This message validates the
following: reports an error if
covered product status is not
active and contract status is
not QA hold. Reports an error
if covered product status is
not active and the covered
product has a future
termination date and the
contract status is QA hold.
It occurs when: the covered
product status is not active
and contract status is not QA
hold or when the covered
product status is not active
and the covered product has a
future termination date and
the contract status is QA hold.
To fix the error: select
another covered product.
Running Quality Assurance Results and Troubleshooting    8-29
Process Name Error Message Meaning and Resolution
Check Service Effectivity Please enter a value for
Covered system status not
active in contract line 1.
This message validates the
following: reports an error if
Covered System status is not
active.
It occurs when: covered
system status is not active.
To fix the error: select
another covered system.
Check Service Effectivity Please enter a value for
Covered site status not active
in contract line 1.
This message validates the
following: Reports an error if
Covered Site status is not
active.
It occurs when: covered site
status is not active.
To fix the error: select
another covered site.
Check Subscription Element
Exist
Subscription line 1 should
have at least one subscription
element.
This message validates the
following: for tangible items
a delivery schedule is
available.
If the subscription line has a
tangible item, then it should
have at least one subscription
element (delivery schedule).
It occurs when: delivery
schedule is missing for a
tangible subscription.
To fix the error: enter a
delivery schedule.
8-30    Oracle Service Contracts User Guide
Process Name Error Message Meaning and Resolution
Check Subscription is
Shippable
Subscription line 1 should
have a ship to rule.
This message validates the
following: if subscription
item is shippable, then ship to
rule is required for that
subscription line.
It occurs when: subscription
item is shippable, but ship to
rule is missing from the
subscription line.
To fix the error: enter a ship
to rule for the subscription
line
Check Subscription is
Shippable
Subscription line 1 should
have a ship to address.
This message validates the
following: if subscription
item is shippable, then ship to
address is required for that
subscription line.
It occurs when: subscription
item is shippable, but ship to
address is missing from the
subscription line.
To fix the error: enter a
shipping address for the
subscription line.
Check Sum of Credit Card
Numbers
Credit Card Number is
invalid
This message validates the
following: whether the credit
card numbers are valid based
on sum calculations.
It occurs when: credit card
numbers are invalid.
To fix the error: change the
credit card number.
Running Quality Assurance Results and Troubleshooting    8-31
Process Name Error Message Meaning and Resolution
Check Tax Exemption Tax Exemption 1 on Line 1 is
not effective for all billing
periods in the billing
schedule. The Tax Exemption
will not be applicable after
invoice date.
This message validates the
following: reports an error if
tax exemption is invalid.
It occurs when: tax
exemption is invalid.
To fix the error: select
another tax exemption under
the Exemption/Payment
Options subtab.
Check Tax Exemption Tax Exemption 1 on Line 1 is
not effective for all billing
periods in the billing
schedule. The Tax Exemption
will not be applicable after
invoice date
This message validates the
following: whether the
exemption is valid on the line
end date.
It occurs when: the
exemption is not valid on the
line end date.
To fix the error: adjust the
line duration , or adjust the
tax exemption duration.
Check Tax Exemption Tax exemption number 1 is
either unapproved or invalid
on the start date of line
number 1 Tax exemption will
not be applied to this line.
This message validates the
following: whether the
exemption is valid on the line
start date.
It occurs when: the
exemption is not valid on the
line start date.
To fix the error: approve the
exemption or adjust the
exemption duration .
8-32    Oracle Service Contracts User Guide
Process Name Error Message Meaning and Resolution
Check Tax Exemption Tax exemption certificate
number 1 on line 1 is only
partially valid for the billing
period. Exemptions will not
be applied after the
exemption certificate expires.
This message validates the
following: whether the
exemption is valid on the line
end date.
It occurs when: the
exemption is not valid on the
line end date.
To fix the error: adjust the
line duration, or adjust the tax
exemption duration.
Check Tax Exemption Tax exemption certificate
number 1 on the header is
only partially valid for the
contract duration. Exemptions
will not be applied after the
exemption certificate expires.
This message validates the
following: whether the
exemption is valid on the
header end date.
It occurs when: the
exemption is not valid on the
header end date.
To fix the error: adjust the
duration of the header, or
adjust the duration of the tax
exemption.
Check Tax Exemption Invalid tax exemption 1 for
customer account on line 1.
This message validates the
following: whether the
assigned tax exemption
belongs to the customer on
the line.
It occurs when: the tax
exemption does not belong to
the customer on the line
(when the line is transferred
to a new customer, or the line
was copied to a contract with
a different customer).
To fix the error: Remove the
tax exemption (or assign the
tax exemption that is
associated with the current
customer).
Running Quality Assurance Results and Troubleshooting    8-33
Process Name Error Message Meaning and Resolution
Check Tax Exemption Tax exemption certificate
number 1 on the contract
header is invalid or
unapproved.
This message validates the
following: whether the
assigned tax exemption is
approved and valid.
It occurs when: the tax
exemption is invalid or
unapproved.
To fix the error: Approve the
exemption or remove the
exemption.
Check Tax Exemption This contract has an
unapproved exemption.
Billing this contract will result
in creation of an invoice with
an unapproved tax
exemption.
This message validates the
following: whether the
assigned tax exemption is
approved.
It occurs when: the tax
exemption is unapproved.
To fix the error: Approve the
exemption.
Warning Messages
You should review all warning messages before submitting the contract for approval.
However, warning messages will not prevent you from passing the QA check and
submitting the contract for approval.
Warning Messages Summary
8-34    Oracle Service Contracts User Guide
Process Name Warning Message Meaning and Resolution
Check Covered Level Overlap Line 1 is also in Contract 1 This message validates the
following: whether the
current contract has covered
lines for which dates overlap
the covered lines of an
existing contract that is not
canceled, terminated, or
expired.
It occurs when: the current
contract has lines that overlap
with an existing contract that
is not canceled, terminated or
expired.
If the warning should be
fixed: delete the lines that are
overlapping.
Check Email Address This Contract is missing at
least one party contact with
email address.
This message validates the
following: party contact has
an e-mail address.
It occurs when: the party
contact is missing an e-mail
address.
If the warning should be
fixed: add an e-mail address
to the party contact.
Check Preventive
Maintenance
Contract line 1; The definition
of Preventive Maintenance
Program or Activities is no
longer valid.
This message validates the
following: whether
preventive maintenance
program or activities have
been terminated in AHL.
It occurs when: preventive
maintenance program or
activities have been
terminated in AHL.
If the warning should be
fixed: select a different
program name in coverage
that is not terminated.
Running Quality Assurance Results and Troubleshooting    8-35
Process Name Warning Message Meaning and Resolution
Check Preventive
Maintenance
Contract line 1; No Preventive
Maintenance Schedule is
defined for any activity
This message validates the
following: whether there any
schedules are defined in
Contracts for the Preventive
Maintenance Program or
Activities.
It occurs when: no schedules
defined in Oracle Service
Contracts for the Preventive
Maintenance Program or
Activities
If the warning should be
fixed: navigate to the
Program Schedule or Activity
Schedule tab as appropriate
and define stream levels and
schedules.
Check Preventive
Maintenance
Contract line 1; The definition
of Preventive Maintenance
Program has been modified.
This message validates the
following: new activities
have been associated with the
preventive maintenance
program in AHL.
It occurs when: new activities
have been associated with the
preventive maintenance
program in AHL.
If the warning should be
fixed: select the same
Program Name from the
LOV.
8-36    Oracle Service Contracts User Guide
Process Name Warning Message Meaning and Resolution
Check Price Lock Price locks are removed
during contract renewal or
copy. To re-lock the price list
for contract line 1, refer to
contract 1 line 1 for the
previous locked price.
This message validates the
following: whether price lock
is present on the original
contract lines and not on the
copied/renewed lines.
It occurs when: price lock is
present on the original
contract lines and not on the
copied/renewed lines.
If the warning should be
fixed: review the prior prices
if necessary and relock prices
on the current contract on the
reported line.
Check Required Values for
Preventive Maintenance
Contract line 1; The effective
start date of the Preventive
Maintenance Program /
Activities should be less than
or equal to the line start date.
This message validates the
following: the effective start
date of the Preventive
Maintenance Program or
Activities should be after the
contract line start date.
It occurs when: the effective
start date of the Preventive
Maintenance Program or
Activities is after the contract
line start date.
If the warning should be
fixed: select a different
program name in Coverage
that is effective.
Approving Contracts    9-1
9
Approving Contracts
This chapter covers the following topics:
• Approving Contracts
• Submitting Contracts for Approval
• Tracking Contracts During the Approval
• Approving Contracts
• Signing Contracts
Approving Contracts
This group of topics explains the contract approval process.
Oracle Service Contracts leverages Oracle Workflow to automate the contract approval
process. After you author a contract you must:
• Submit the contract for approval.
• Secure approval on the contract.
• Obtain a signature on the contract.
The Submit for Approval function starts the quality assurance (QA) check. If the QA
check is successful you can continue the approval process, which submits the contract
to the approval workflow. See About the Quality Assurance Check, page 8-1.
Note: The standard contract approval workflow integrates with Oracle
Approval Management Engine (AME). Oracle Service Contracts
supports standard AME features such as rules based approval routing
and definition of approval groups. There are mandatory setups in AME
for Oracle Service Contracts. For more information, see the Oracle
Service Contracts Implementation Guide.
9-2    Oracle Service Contracts User Guide
Following the contract approval and signing, the application updates the contract status
to Signed or Active, depending on whether or not the start date has passed.
Submitting Contracts for Approval
You can submit a contract for approval from the Service Contracts Authoring window,
which is covered in the following procedure. You can also submit a contract for
approval from the Administrator Workbench, see Submitting a Contract for Approval
from the Administrator Workbench, page 13-7.
To submit contracts for approval:
1. From the Service Contracts Authoring window, select the Summary tab and
Administration subtab.
2. Click Submit.
The Quality Assurance Results window appears. You must confirm there are no
errors on the report. See About the Quality Assurance Check, page 8-1.
3. From the Quality Assurance Results window, click Continue Approval.
The Contract Authoring page returns with the Summary Administration subtab
selected. You have submitted the contract to the approval workflow that is selected
in the Approval Workflow region.
Review the following procedures:
• Tracking Contracts During the Approval, page 9-3.
• Approving Contracts, page 9-4.
Approving Contracts    9-3
• Signing Contracts, page 9-6.
Alternatively, you can submit the contract by selecting Submit for Approval from
the Actions menu.
Note: Contracts that have been submitted to the approval workflow
are locked for further authoring. However, communications and
attachments can still be added to the contract after it has been
submitted for approval.
Tracking Contracts During the Approval
To track contracts during the approval:
1. From the Service Contracts Authoring window, select the Summary tab and
Administration subtab.
2. Select Monitor.
The Monitor Diagram page appears in a new browser window.
Beneath the Current Status heading, you can view the current status and a visual
diagram of the workflow approval process.
3. Follow the green arrow within the diagram to determine where the contract is in
the approval process.
For example, if the contract requires approval the green arrow leads to the Contract
Approval Required process.
9-4    Oracle Service Contracts User Guide
4. To view details for a given process step, select the process icon within the diagram.
The tabs beneath the diagram show status information for the selected process.
Tabs include Definition, Status, Usage, and Notification.
For more information on monitoring workflows, refer to the Oracle Workflow User's
Guide.
Note: You can stop the approval process by selecting the Stop
button within the Administration subtab.
Approving Contracts
To approve a contract:
1. From the Navigator, navigate to Contract Administration, and then select
Launchpad.
2. From the Inbox region, click Find.
The Inbox Find window appears.
3. From the Select Notification Type list, select Contract Approvals.
Approving Contracts    9-5
4. Select Find.
The Inbox is refreshed with contracts that require approval.
5. Highlight the contract you would like to approve.
9-6    Oracle Service Contracts User Guide
6. Select Respond.
A worklist page appears within a new browser window. You can either approve,
reject, reassign the approval to someone else, or request information.
You may add a note to the Response region.
7. Select Approve.
The Worklist summary appears. The message indicates, Contract requires your
signature. You can select the Contract requires your signature link and sign the
contract.
Signing Contracts
To sign a contract:
1. From the Navigator, navigate to Contract Administration, and then select
Launchpad. The Launchpad appears.
2. In the Inbox region, click Find.
The Inbox Find window appears.
3. From the Select Notification Type list, select Contract Requiring Signature.
Approving Contracts    9-7
4. Select Find.
The Inbox is refreshed with contracts that require a signature.
5. Highlight the contract you would like to sign.
9-8    Oracle Service Contracts User Guide
6. Select Respond.
A worklist page appears within a new browser window. You can either sign, not
sign, reassign, or request additional information.
You may add a note to the Response region.
7. Select Yes.
The Worklist summary appears. The message indicates, Contract has been Signed.
Billing    10-1
10
Billing
This chapter covers the following topics:
• Overview of Billing
• Understanding Billing Levels
• Creating Billing Profiles
• Billing Customers Based on Usage
• Billing Using Credit Cards or Commitments
• Specifying Multiple General Ledger Accounts for Contract Revenue Streams
• Executing Billing Through Concurrent Programs
• Running the Service Contracts Main Billing Program
• Running the AutoInvoice Import Program
• Running the Service Contracts Fetch Receivables Info for Billing Program
• Running the Service Contracts Usage Averaging Program
• Running the Service Contracts Usage Settlement Program
• Viewing Invoice Details
• Viewing Invoice History
• Reviewing Invoice Transactions in Oracle Receivables
• Understanding Bill Presentment Architecture
• Using Variable Accounting and Partial Periods Revenue Recognition
Overview of Billing
This group of topics explains how billing works.
A billing schedule determines when the customer is billed for the services they receive.
You must specify billing schedules for each contract that you author in Oracle Service
10-2    Oracle Service Contracts User Guide
Contracts.
Note: Contracts can be indirectly created from Oracle Order
Management. You do not need to create billing schedules for such
contracts.
Billing schedules can be defined at the contract header, the contract line, or the subline
level.
For information about setting up billing schedules at the contract header level, see
Entering Billing Schedules, page 2-11.
For information about setting up billing schedules at the line level, see:
• Specifying a Billing Schedule, page 3-38 (for a service line)
• Specifying a Billing Schedule for a Usage Line, page 4-31
• Specifying a Billing Schedule for Subscriptions, page 5-12
About Partial Period Computation
You can set attributes that enable the application to calculate billing for partial periods.
A partial period duration is shorter than a full billing period duration, such as 10 days
rather than a full month. It is a ratio of the number of days in the partial period to the
number of days in the billing period duration (stream period unit of measure (UOM)).
The number of days in the billing period duration is based on the selection that is made
in the partial period attributes Period Type. For example for billing period duration
Month, if you select a Fixed Period Type, then number of days for any month is
considered 30, but if you select Actual, then number of days for any month is the actual
number of days as per the standard calendar. The application uses the Period Start
attributes if service effectivity starts from the middle of a billing calendar period and
ends in the middle of a billing calendar period. The Period Start attribute provides two
options, Calendar and Service.
You can define partial period attributes at the operating unit level within Global
Contracts Defaults. See Entering Contract Defaults, page 2-36
Partial Period Billing Example
Suppose your contract contains:
• Service Line Duration: 15-JAN-2006 to 14-JAN-2007
• Billing Frequency: Month
• Period Type: Actual
• Period Start: Calendar
The application generates the first billing schedule period using a partial period with
Billing    10-3
start date as service start date, which is 15-JAN-2006, and end date as first calendar
billing period's end date, which is 31-JAN-2006. The application generates the last
billing schedule period with start date of the last calendar billing period, which is
01-JAN-2007, and the end date of the service end date, 14-JAN-2007. All other billing
schedules start from the calendar month's first date and end with calendar month's end
date. For example, the application generates the second billing schedule with a start
date of 01-FEB-2006 and an end date of 28-FEB-2006. The following table lists the billing
schedules:
Sequence Start Date End Date
1
Partial Period
15-JAN-2006 31-JAN-2006
2 01-FEB-2006 28-FEB-2006
3 01-MAR-2006 31-MAR-2006
4 01-APR-2006 30-APR-2006
5 01-MAY-2006 31-MAY-2006
6 01-JUN-2006 30-JUN-2006
7 01-JUL-2006 31-JUL-2006
8 01-AUG-2006 31-AUG-2006
9 01-SEP-2006 30-SEP-2006
10 01-OCT-2006 31-OCT-2006
11 01-NOV-2006 30-NOV-2006
12 01-DEC-2006 31-DEC-2006
13
Partial Period
01-JAN-2007 14-JAN-2007
No Partial Period Billing Example
Suppose your contract contains:
• Service Line Duration: 15-JAN-2006 to 14-JAN-2007
10-4    Oracle Service Contracts User Guide
• Billing Frequency: Month
• Period Type: Actual
• Period Start: Service
The application creates 12 billing schedules, each with full billing period durations. For
example, the first billing schedule is 15-JAN-2006 to 14-FEB-2006, and the second billing
schedule is 15-FEB-2006 to 14-MAR-2006. The application follows this pattern until the
end date. The following table lists the billing schedules:
Sequence Start Date End Date
1 15-JAN-2006 14-JAN-2006
2 15-FEB-2006 14-FEB-2006
3 15-MAR-2006 14-MAR-2006
4 15-APR-2006 14-APR-2006
5 15-MAY-2006 14-MAY-2006
6 15-JUN-2006 14-JUN-2006
7 15-JUL-2006 14-JUL-2006
8 15-AUG-2006 14-AUG-2006
9 15-SEP-2006 14-SEP-2006
10 15-OCT-2006 14-OCT-2006
11 15-NOV-2006 14-NOV-2006
12 15-DEC-2006 14-DEC-2006
Understanding Billing Levels
From the Billing window, you can define a billing level for the billing schedule. Three
levels exist, but not all levels are available to each line type, nor are all levels available at
the header level.
Billing    10-5
The following provides general information about the billing levels, however; to
understand which of these levels the header and lines can use, refer to the topics that
are noted at the end of each description.
The three billing levels are:
• Equal Amount: enables you to bill for equal amounts over the billing period and
have control over the amount to be billed as well as the billing periods. You can also
use the Prorate button to spread the amount across billing periods. The start and
end dates of all top lines and their sublines must be the same. You cannot modify
the schedule form after it is generated.
Equal Amount can be set at the header, service line, or subscription line level:
• Header, see Creating a Default Billing Schedules, page 2-11
• Service lines, see Specifying a Billing Schedule, page 3-38
• Subscription lines, see Specifying a Billing Schedule for Subscriptions, page 5-12
• Top Level: enables you to define the billing periods. The billing engine calculates
the bill amounts, so the amount fields and Prorate button are disabled. With Top
Level, line level start and end dates can differ from the sublines. When you are
creating billing schedules at this level, the total stream level amounts from the
sublines roll up to the line levels. Also, once a line level billing schedule exists, all
new sublines that are added will automatically update the billing amount per
period without your needing to revisit the line level and click Schedule again.
10-6    Oracle Service Contracts User Guide
Whenever the duration of the line is increased, an additional billing stream is
created. If the contract has a later end date, the unit of measure of the billing stream
is taken from the previous stream. If the duration is reduced, billing streams can be
automatically removed, as long as those streams are entirely outside of the new
contract duration. If these changes are cascaded to the sublines, billing schedules
will be updated when the cascade is initiated. If the changes are not cascaded, only
the line level billing schedule will be automatically updated.
Top Level can be set at the header, service line, or usage line level:
• Header, see Entering Billing Schedules, page 2-11
• Service lines, see Specifying a Billing Schedule, page 3-38
• Usage lines, see Specifying a Billing Schedule for a Usage Line, page 4-31
• Covered Level: when the covered level effective dates are not the same as the
service line effective dates and you want to have different billing frequency for each
subline, you can create a covered level-specific billing schedule. As a prerequisite,
the service line billing schedule-level must first be set to the Covered Level. By
default, all the covered level lines inherit the service line billing schedule. If
required, you can modify and update the billing schedule for a given covered level.
You can enter amounts for every period and use the Prorate button.
Covered Level can be set at the service line level:
• Service lines, see Specifying a Billing Schedule, page 3-38
Note: You can select a billing level default by setting the profile
OKS: Billing Schedule Level. If the level that you select is not
available to the header or the line, the defined value will not
default.
For example, if the default is set to Top Level and you create a
subscription line, the defaulted value will not be Top Level,
despite the setting. This is because subscription lines must be
Equal Amounts, not Top Level.
Note: Although subline totals are the same for Covered Level
and Equal Amount, the calculations at the line level are
different.
• For Equal Amount, the schedule amount is the sum of
subline level element amount. However, if you navigate to
the subline billing schedule, the subline level amount and
equal amount are the same. If you view the schedule from
Billing    10-7
each of the sublines, all stream level and billing schedule
amounts and level amounts are the same.
• For Covered level billing, the schedule amount is the
subline level amount at the top line. It is not rolled up from
subline.
Example
A service line has two sublines, each with $100 for a year. The
amount in the billing stream for line is calculated as $200/12–
16.67 and is same for both Equal Amount and Covered Level.
For Equal Amount, each entry in the Billing Schedule at the line
level, equals the sum of the individual amounts for each
subline. The amount for periods 1 through 11 are $16.68 ($8.34
+ $8.34) and the amount for period 12 is $16.52 ($8.26 + $8.26).
For Covered Level, each entry in the Billing Schedule at the line
level is set to the calculated amount from the stream level
($16.67). Each of the twelve Level Amount entries is always the
same amount. The schedule amount is what is billed to AR and
not the amount in the billing stream.
Creating Billing Profiles
All customer account information is set up in Oracle Receivables, which includes a
single billing profile that is applicable when you are invoicing all customers. You can
set up multiple, ad hoc billing profiles in Oracle Service Contracts. Billing profiles
include information about accounting and invoicing rules, type of billing, and its
frequency. Invoices are generated according to the billing profile attributes. The billing
engine accesses the billing profile and bills accordingly.
For example, you could set up a billing profile, called Monthly Interval, which passes a
monthly billing schedule with specific accounting and invoicing rules. You could use
this profile to default information and also when renewing contracts if the billing
durations are not the same between the original and renewed contracts.
You can use the billing profile to overwrite any existing line level billing schedule on
the contract authoring form by selecting it in the Cascade Attributes form.
You can also default billing profile information onto the contract by associate a billing
profile template to a customer with the Global Contract Defaults form.
Prerequisites
Define the following options:
• Accounting Rules
10-8    Oracle Service Contracts User Guide
• Invoicing Rules
• Billing Levels
• Recurring Intervals
To create billing profiles:
1. From the Navigator, select Setup: Service Contracts, and then select Billing
Profiles.
The Billing Profile window appears.
2. Enter an alphanumeric profile number.
3. Enter the profile description.
4. Optionally, select a party, such as Business World.
When a billing schedule is assigned to a party, the profile is limited to that party. If
you are creating a contract for another party, you do not see this billing profile in
the LOV when you cascade attributes.
5. Select an Accounting Rule from the LOV.
6. Select an Invoicing Rule from the LOV.
7. Select a Billing Level from the LOV.
Billing    10-9
8. Select One Time or Recurring as the Billing Type option.
For the Recurring billing, select a billing Interval from the LOV, for example,
Month.
9. In the Invoice Offset field, enter the number of days to move forward or push back
the invoice date.
10. In the Interface Offset field, enter the number of days to move forward or push back
the date on which the billing period passes to Oracle Receivables.
11. Save.
Note: A billing profile should be defined according to the billing
requirements. If multiple customer accounts have different billing
requirements, the number of billing profiles should be defined
accordingly.
No restrictions exist for the number of billing profiles.
Billing Customers Based on Usage
For usage lines, you can bill customers using different methods. Some of these methods
are fixed; others are based on counter readings or estimation values.
To understand how a customer can be charged for usage lines, see Specifying How
Customer is Charged, page 4-6.
10-10    Oracle Service Contracts User Guide
Billing Using Credit Cards or Commitments
Oracle Service Contracts integrates with Oracle Receivables to support multiple billing
methods.
When you enter billing terms for a contract, you can select a method of payment from a
LOV. These methods include Credit Card and Commitment (prepayment). You select a
method from the Pricing/Billing subtab of the Summary tab.
If you select the Credit Card method, then you must select a credit card from the LOV.
The application displays the credit card number and credit card expiration date.
If you select the Commitment method, then the Authoring process requires the entry of
a commitment number. Customer commitments must be set up in Oracle Receivables
prior to use as a method of payment in Oracle Service Contracts. See:
• (header) Specifying Payment by Credit Card or Commitment Number, page 2-23.
• (lines) Specifying Payment by Credit Card or Commitment Number, page 3-45.
Specifying Multiple General Ledger Accounts for Contract Revenue
Streams
Situations may occur in which you want to distribute revenue for a contract line to one
or more general ledger accounts other than the default account that was specified
during the implementation.
You can change the default revenue distribution for an Entered contract. You can also
open an Active contract for update, or create a change request. If you are changing the
revenue distribution for a contract after a line has been billed, you will change only the
revenue distribution for future billing.
If the contract is copied, renewed, or used as a template, these distributions will also be
copied to the new agreement.
To specify multiple general ledger accounts for contract revenue streams:
1. From the Service Contract Authoring window, select a line to specify multiple
general ledger accounts.
2. From the Tools menu, select Revenue Distribution.
The Revenue Distribution window appears for the line.
Billing    10-11
3. Review the account in the GL Account field.
4. Select the LOV for the Override Account field.
The Operations Accounting Flex window appears.
5. Select the LOV for the Account Alias field.
The Account Alias window appears.
6. Select an account alias.
The account number for the account alias appears in the Override Account field.
Note: For some accounts, the Operations Accounting Flex window
appears. You can select the overriding account by selecting the
10-12    Oracle Service Contracts User Guide
segment values, or by selecting from the list of combinations.
For more information, refer to the Oracle General Ledger User Guide.
7. Enter the percentage to be allocated to the account in the Percent field.
After you have entered all the override accounts, the Total % field must equal 100%.
8. To add additional override accounts, repeat steps 3 through 7.
9. Click OK.
Executing Billing Through Concurrent Programs
To initiate and complete the billing process, you must run the following concurrent
programs:
• Service Contracts Main Billing
• AutoInvoice Import Program
Billing    10-13
• Service Contracts Fetch Receivables Info for Billing
Note: You should run contracts through the quality assurance
check prior to submitting them for billing. This helps to ensure that
the billing process is successful.
Note: As part of the Multi Org Access Control (MOAC), all billing
programs process only those contracts that belong to the operating
units that are listed by the security profile associated with the
current responsibility
Running the Service Contracts Main Billing Program
This program is owned by Oracle Service Contracts. It generates a log file of the total
value processed, total value successful, and total value rejected for billing. For a
description, see About Concurrent Programs, page 21-8.
For usage lines, the Service Contracts Main Billing program calculates billing amounts
based upon the usage type. See Specifying How the Customer is Charged, page 4-6.
To run the Service Contracts Main Billing program:
1. From the Navigator, navigate to Requests, and then select Run.
The Submit New Request window appears.
2. Select Single Request and click OK. The Submit Request window appears.
3. In the Request region, select Service Contracts Main Billing.
4. In the Parameters window, specify one or more of the following:
• Contract Number: Enter the numbers of the contracts to be billed.
• Default Date: Enter the date that you want as the default. (The default is the
system date on your computer.)
• Operating Unit: Enter the operating unit for which all the contracts are to be
billed.
• Customer Name: Enter the name of the customer for which all the contracts are
to be billed.
• Category: Enter the category for which all the contracts are to be billed.
10-14    Oracle Service Contracts User Guide
• Group: Enter the name of the group for which all the contracts are to be billed.
• Preview: Change this option to yes to send these transactions to special preview
tables to enable you to review the invoice details before you submit them to
Oracle Receivables. Leave it at no if you want the transactions passed to Oracle
Receivables.
5. Click OK.
6. In the Submit Request window, click Submit Request.
The billing program sends the invoice amount to Oracle Receivables, which then
generates the invoice. The process also populates some billing transaction history
information in the History tab of the Billing Schedule. Because the invoice number
is assigned and tax is calculated by Oracle Receivables, neither of these pieces of
information can be populated until after the Service Contracts Fetch Receivables
Info for Billing program is run. The tax amount will be omitted and the invoice
number of –99 will be supplied.
Running the AutoInvoice Import Program
This program is owned by Oracle Receivables. It imports the billing transactions from
the Service Contracts Main Billing Program into Oracle Receivables and generates the
invoice details.
To run the AutoInvoice Import Program:
After you run the Service Contracts Main Billing Program, you must run the
Autoinvoice Import Program to import the billing transactions into Oracle Receivables
for processing.
For more information about how to run this program, see the Oracle Receivables User
Guide.
Running the Service Contracts Fetch Receivables Info for Billing Program
This program is owned by Oracle Service Contracts. For a description, see About
Concurrent Programs, page 21-8.
To run the Service Contracts Fetch Receivables Info for Billing program
1. From the Navigator, navigate to Requests, and then select Run.
The Submit a New Request window appears.
2. Select Single Request, and click OK.
Billing    10-15
The Submit Request window appears.
3. In the Name field, select Service Contracts Fetch Receivables Info for Billing.
4. Click OK.
5. In the Submit Request window, click Submit Request.
This updates the invoicing information in the customer's contract. The invoice
number and tax appear in the billing details.
Running the Service Contracts Usage Averaging Program
Usage averaging is used to give price benefits to the user for higher consumption in a
period. This feature enables he user to distribute consumption evenly in multiple billing
periods. After the application distributes the consumptions evenly, price breaks are
applied to these consumptions to get new billing amounts for the period.
This program is owned by Oracle Service Contracts. For a description, see About
Concurrent Programs, page 21-8.
For information about usage lines, see Entering Usage Lines, page 4-3.
To run the Service Contracts Usage Averaging program:
1. In the Navigator, navigate to Requests, and then select Run.
The Submit New Request window appears.
2. Select Single Request, and click OK.
The Submit Request window appears.
3. In the Name field, select Service Contracts Usage Averaging.
4. In the Parameters window, enter the number of the contract.
If you leave this field blank, all contracts will be used.
5. Click OK. In the Submit Request window, click Submit Request.
Running the Service Contracts Usage Settlement Program
Usage billing supports settlement features for Actual Per Period. This program is used
to settle the discrepancies between actual consumption and actual billed amount. This
type of situation may arise when consumption for billing period is captured after you
run the main billing for that billing period. Currently a separate settlement program
exists to do settlements of usage lines.
10-16    Oracle Service Contracts User Guide
Settlement can also be done by billing program at the time of invoice generation.
The Service Contracts Usage Settlement program is owned by Oracle Service Contracts.
For a description, see About Concurrent Programs, page 21-8.
For information about usage lines, see Entering Usage Lines, page 4-3.
To run the Service Contracts Usage Settlement program:
1. In the Navigator, navigate to Requests, and then select Run.
The Submit New Request window appears.
2. Select Single Request, and click OK.
The Submit Request window appears.
3. In the Name field, select Service Contracts Usage Settlement.
4. In the Parameters window, enter the number of the contract.
If you leave this field blank, all contracts will be used.
5. Click OK. In the Submit Request window, click Submit Request.
Viewing Invoice Details
You can use the Invoice Details function to review payment, credit, and adjustment
information that is applicable to the contract, lines, and sublines.
Prerequisite
Run the necessary concurrent programs to generate billing transactions. See Executing
Billing Through Concurrent Programs, page 10-12.
To view invoice details:
1. From the Service Contracts Authoring window, select the Tools menu and Invoice
Details.
The Invoice Details window appears with the invoice number, date, source,
transaction type, and amount.
Billing    10-17
2. Click the Payment Details button.
The Payment Details window appears with the payment amount and payment
date.
Click OK when finished viewing payment details.
3. From the Invoice Details window, click the Line Details button.
The Line Details window appears with item names and descriptions, unit of
measure, unit price, billed amount, and tax rate for the lines.
Click OK when you are finished viewing the Line Details.
4. Click OK to return to the Service Contract Authoring window.
Viewing Invoice History
You can use the History tab of the Billing window to review billing history. This tab is
populated after you run the billing execution programs. See Executing Billing Through
Concurrent Programs, page 10-12.
You should understand the following about the details that are associated with the
History tab of the Billing window:
• Line-level billing schedule histories are populated with the actuals.
• Header-level billing schedules do not show any billing history.
Prerequisite
10-18    Oracle Service Contracts User Guide
Run the necessary concurrent programs to generate billing transactions. See Executing
Billing Through Concurrent Programs, page 10-12.
To view invoice history:
1. From the Service Contracts Authoring window, select the Lines tab and
Pricing/Products subtab.
2. Select a line.
3. Click the Billing button
The Billing window appears.
4. Select the History tab.
You can view the billing history from this tab, including invoice information and
billing dates.
Note: If summary transactions are selected with either a profile
option or the contract check box, the history contains one
transaction line per billing period. However, if detail transactions
are being sent to Oracle Receivables, the billing history shows the
details for each subline per billing period. You can view the details
of that billing transaction by right-clicking any line in the billing
history.
Reviewing Invoice Transactions in Oracle Receivables
For detailed information about using Oracle Receivables, see the Oracle Receivables User
Guide.
Billing    10-19
To review invoice transactions in Oracle Receivables:
1. From the Navigator, select the Receivables, Vision Operations (USA)
responsibility.
2. Navigate to Transactions, and then select Transactions.
The Transactions window appears.
3. From the toolbar, select the Flashlight icon.
The Find Transactions window appears.
4. In the Sales Order Number field, enter the contract number.
5. Click Find.
The Transactions Summary window appears with the invoice information.
10-20    Oracle Service Contracts User Guide
6. Click Open to view the invoice transaction details.
Note: Event-Based Revenue Management in Oracle Receivables (AR)
enables you to define and assign revenue recognition events to
contingencies, such as acceptance of goods. For more information, see
Understanding the Impact of Contingencies on Revenue Recognition,
page 6-22.
Billing    10-21
Understanding Bill Presentment Architecture
Bill Presentment Architecture (BPA) enables you to customize the content and
formatting of billing data that your customers view online or print. Oracle Service
Contracts is one of the data sources that can be used by the BPA framework.
A number of setups are required to enable this functionality. For more information, see
the Oracle Receivables User Guide.
Using Variable Accounting and Partial Periods Revenue Recognition
Oracle Service Contracts carries sales credits from the order header to contract header
and onto Oracle Receivables. Your administrator can select a variable accounting rule to
recognize revenue based on any duration, such as daily, weekly or quarterly.
In addition, Oracle Service Contracts integrates with Oracle Receivables to enable
partial period revenue recognition for services that are billed from service contracts.
Your administrator can define accounting rules that recognize revenue evenly across all
full periods in a schedule, and prorate recognition for partial periods that fall at the
beginning or end of a schedule.
The following examples explain the two options that are available for partial revenue
recognition. The first option is with daily rate applied to all periods including partial
periods, and the second option is with revenue rate applied only to the first and last
periods.
Example
Example: Your customer signs a contract on April 17, 2005 for a six-month service and
the total price for six months is $600 (with $100 per month rate). The application bills
one time in the amount of $600 and recognizes revenue over the contract period.
Accounting rule detail is:
• Type: Variable
• Period: Month
Option 1 Accounting Rule Type: Daily Revenue Rate, All Periods.
The application bases partial periods and full periods on the number of days in the
periods.
1. Calculate daily rate based on the total number of days in the contract. The daily rate
is 600/183, which equals 3.28
2. First period equals number of days multiplied by the daily rate.
3. Middle period equals the number of days multiplied by the daily rate.
4. Last period equals the remainder. 600 – (45.92+101.68+98.40+101.68+101.68+98.40) =
10-22    Oracle Service Contracts User Guide
52.24 5.
5. Revenue Schedule is:
GL Date Period Amount Days
17-APR Month of April $45.92 14
17-MAY Month of May $101.68 31
17-JUN Month of June $98.40 30
17-JUL Month of July $101.68 31
17-AUG Month of August $101.68 31
17-SEP Month of September $98.40 30
16-OCT Month of October $52.24 16
Summary 7 Periods $600.00 183
Option 2: Accounting Rule Type: Daily Revenue Rate, Partial Periods
The application prorates partial periods based on the number of days in the periods.
Full periods have equal revenue distributions.
1. Daily rate equals total amount/total number of days, which is 600/183 = 3.28
2. First period equals the number of days multiplied by the daily rate.
3. Last period equals the number of days multiplied by the daily rate.
4. Middle periods equals (total amount less (the sum of the first period and last
period))/number of middle periods), which is (600 – (45.92+52.48))/5 = 100.32
5. Revenue Schedule is:
GL Date Period Amount Days
17-APR Month of April $45.92 14
17-MAY Month of May $100.32 31
Billing    10-23
17-JUN Month of June $100.32 30
17-JUL Month of July $100.32 31
17-AUG Month of August $100.32 31
17-SEP Month of September $100.32 30
16-OCT Month of October $52.48 16
Summary 7 Periods $600.00 183
Accounting rules are set up in Oracle Receivables. For more information, see the Oracle
Receivables User Guide
Managing Contract Negotiation    11-1
11
Managing Contract Negotiation
Overview of Managing Contract Negotiation
This group of topics explains the contract negotiation process. Topics include:
• Understanding the Negotiation Workflow, page 11-1
• Understanding the Negotiation Phases, page 11-3
Understanding the Negotiation Workflow
Most contracts go through several stages after you author or renew them. The
negotiation workflow manages each of the stages of the negotiation cycle. The process is
essentially the same for both new and renewed contracts with a few differences.
New Contracts
1. Contract Creation and Negotiation: Sales representative authors a new contract
and negotiates the contract terms with customer.
2. Notify Customer: Sales representative notifies customer that the contract is waiting
acceptance.
The sales representative can use the application e-mail or publish the contract
online or use another means to notify the customer.
3. Customer Acceptance: Customer accepts, declines, or requests additional
information either through the Online Acceptance Portal or verbally.
4. Internal Approval: After the customer or sales representative accepts the contracts
the Internal Approval action is available from the Administrator Workbench .
5. Activation: Application activates the contract following acceptance and approval.
11-2    Oracle Service Contracts User Guide
Renewal Contracts
1. Contract Renewal and Branching: The application can create a renewal from a
renewal event or you can create a renewal manually from the Service Contracts
Authoring form. After the renewal contract is created, the initiates a workflow for
that contract and the negotiation status is set to Draft. Workflow determines the
routing of the renewal contract based on two parameters: Renewal Process Type
and threshold amounts. See Understanding Contract Renewals, page 17-11.
2. Notify Customer: Customer receives notifications that a renewal contract has been
created and is awaiting approval.
• Manual Renewals: The renewal specialist who is managing contracts has three
options for notifying the customer. He can:
• Print a quote letter to fax or mail.
• Send the quote letter in an e-mail.
• Publish the quote online.
The application stamps the negotiation status accordingly.
• Online Renewals: Contracts that qualify for online renewals are published to
the customer and do not require manual intervention. Every time a quote is
sent by e-mail or published online, the workflow process runs a quality
assurance (QA) check to validate the contract. If the contract fails this QA check,
the action is abandoned and the application stamps the negotiation status.
3. Customer Acceptance: Customer acceptance can be both implicit and explicit when
the quote is published online.
• If the customer accepts the contract from the online portal, workflow updates
the negotiation status and routes the contract back to the renewal specialist. If
the renewal specialist submits a contract in Quote Published status for
approval, this assumes implicit customer acceptance.
• For manual contracts, the renewal specialist submits contract for internal
approval after securing written or verbal customer acceptance.
4. Contract Approval: The Approval Workflow is a subworkflow within the base
workflow. After a contract is submitted for approval, workflow uses Approvals
Management Engine (AME) to derive the contract approver and routes the contract
to that approver.
5. Contract Activation: After a contract is approved, the application activates the
contract. The contract status changes to Active or Signed and the negotiation status
changes to Complete.
Managing Contract Negotiation    11-3
Understanding the Negotiation Phases
The application assigns the contract seeded negotiation statuses during the negotiation
process. While you cannot update these values, they do enable you to track contracts
under negotiation.
The Negotiation Status field appears in the:
• Service Contracts Authoring header region
• Administrator Workbench within the My In Process Contracts region. For more
information about the Administrator Workbench, see Overview of the
Administrator Workbench, page 13-1
Negotiation Phase
During this phase of the contract negotiation you will see the following negotiation
status:
Negotiation Status Meaning
Draft Sale representative negotiates contract with
customer.
Notify Customer Phase
During this phase of the contract negotiation, you may see one of the following
negotiation statuses:
Negotiation Status Meaning
Pending Publication Publish to Customer action executed and QA
is in process; this status is applicable only
while QA lasts.
Publish QA Failed Process failed due to QA Check failure prior
to publishing the quote online.
Publish Failed Process failed due to application failure for
online customer acceptance with the Online
Acceptance process or after Publish To
Customer action executed by sales
representative.
11-4    Oracle Service Contracts User Guide
Quote Published Contract quote published for online customer
acceptance through Online Acceptance
process or through Publish To Customer
action by sales representative.
Customer Acceptance Phase
During this phase of the contract renewal, you may see one of the following negotiation
statuses:
Negotiation Status Meaning
Quote Accepted Customer accepts the contract quote through
Online Acceptance, or the sales representative
has captured customer acceptance.
Quote Canceled Sales representative cancels the contract
quote. The Contract Status changes to
Canceled.
Quote Declined Customer declines a contract quote through
Online Acceptance process. The Contract
Status changes to Canceled.
Assistance Required Customer requests assistance through Online
Acceptance process
Internal Approval Phase
During this phase of the contract renewal, you may see one of the following negotiation
statuses:
Negotiation Status Meaning
Internal Approval QA Failed Process failed due to QA Check failure prior
to submitting the quote for Internal Approval.
Internal Approval Failed Process failed due to application failure after
Submit for Internal Approval executed by
sales representative.
Managing Contract Negotiation    11-5
Pending Activation Contract submitted for Activation because
Approval is not required.
Pending Internal Approval Contract is submitted for Internal Approval,
from the manual, online, or evergreen
processes.
Rejected Contract is rejected by approver.
Activation Phase
During this phase of the contract renewal, you will see the following negotiation
statuses:
Negotiation Status Meaning
Complete Application activates contract or sales
representative signs contract. The Contract
Status changes to Signed or Active.
Status Transitions
The following diagrams provide an overview of status transitions during contract
negotiation.
Note: For new contracts, the status transitions are the same as those of a
manual renewal process, except for the Determine Renewal Process
step, which does not apply to new contracts. Refer to Manual Renewal
Process Status Transition State Diagram.
11-6    Oracle Service Contracts User Guide
Manual Renewal Process Status Transition State Diagram
The preceding diagram shows negotiation status transitions during a manual renewal.
The following describes the process:
• Determine Renewal Process: System changes negotiation status to Draft.
• Draft: Salesperson publishes contract and negotiation status changes to Pending
Publish, or salesperson cancels the contract and the negotiation status changes to
Quote Canceled.
• Pending Publish: System changes negotiation status to Publish QA Failed, Publish
Failed, or Quote Published.
• Pending Approval: Salesperson submits the contract for approval and one the
following occurs.
Managing Contract Negotiation    11-7
• System changes negotiation status to Approval QA Failed.
• System changes negotiation status to Approval Failed.
• Approver approves contract, which changes negotiation status to Complete.
• Approver rejects contract, which changes negotiation status to Rejected.
• Quote Published: If the system updates the negotiation status to Quote Published,
one of the following occurs:
• Customer accepts the quote and the negotiation status changes to Quote
Accepted.
• Customer requests assistance and the negotiation status changes to Assistance
Requested.
• Customer declines the quote and the negotiation status changes to Quote
Declined.
• Quote Accepted: Either the system updates the negotiation status to Pending
Activation, or the salesperson or system updates the negotiation status to Pending
Approval.
• Assistance Requested: After the customer receives assistance, he can choose to
either accept or decline the quote.
• Quote Declined: Customer declines quote.
• Pending Activation: System changes status to Complete.
11-8    Oracle Service Contracts User Guide
Online Renewal Process Status Transition State Diagram
The preceding diagram shows negotiation status transitions during an online renewal.
The following describes the process:
• Determine Renewal Process: System changes negotiation status to Pending Publish.
• Pending Publish: System changes negotiation status to Publish QA Failed, Publish
Failed, or Quote Published.
• Quote Published: If the system updates the negotiation status to Quote Published,
one of the following occurs:
• Customer accepts the quote and the negotiation status changes to Quote
Accepted.
Managing Contract Negotiation    11-9
• Customer requests assistance and the negotiation status changes to Assistance
Requested.
• Customer declines the quote and the negotiation status changes to Quote
Declined.
• Salesperson accepts the quote and the negotiation status changes to Pending
Approval.
• Salesperson cancels the quote and the negotiation status changes to Quote
Canceled.
• Quote Accepted: Either the system changes the negotiation status to Pending
Activation or the salesperson or system changes the negotiation status to Pending
Approval.
• Assistance Requested: After he receives assistance, the customer chooses to accept
or decline the quote.
• Pending Approval: Salesperson submits the contract for approval and one the
following occurs.
• System changes negotiation status to Approval QA Failed.
• System changes negotiation status to Approval Failed.
• Approver approves contract, which changes negotiation status to Complete.
• Approver rejects contract, which changes negotiation status to Rejected.
• Pending Activation: System changes status to Complete.
11-10    Oracle Service Contracts User Guide
Evergreen Renewal Process Status Transition State Diagram
The preceding diagram shows negotiation status transitions during an evergreen
renewal. The following describes the process:
• Determine Renewal Process: System changes negotiation status to Complete or
Pending Approval.
• Pending Approval: One the following occurs.
• System changes negotiation status to Approval QA Failed.
• System changes negotiation status to Approval Failed.
• Approver approves contract, which changes negotiation status to Complete.
Managing Contract Negotiation    11-11
• Approver rejects contract, which changes negotiation status to Rejected.
Managing Your Work    12-1
12
Managing Your Work
This chapter covers the following topics:
• Overview of Managing Your Work
• Finding Contracts by Status or Notification Type
• Finding Your Most Recently Accessed Contracts
• Bookmarking Contracts
• Finding Bookmarked Contracts
• Creating Groups
• Organizing Contracts by Group and Subgroup
• Finding Contracts Using the Contract Groups Hierarchy
• Removing a Contract from a Group
• Searching for Contracts Using the Entitlements Search Window
• Using the Index to Navigate Through Contracts
Overview of Managing Your Work
This group of topics explains how to manage your work in Oracle Service Contracts.
You can access contracts from multiple points within the application. Oracle Service
Contracts enables you to find contracts by status or notification type, and to open
recently accessed or bookmarked contracts.
You can also organize your contracts into a hierarchy of groups, which can be viewed
from the Contract Navigator. Contract groups provide a convenient way to organize
contracts using any criteria. They are similar to folders and can be created for private or
public use.
You will generally access contracts from either the Launchpad or the Contract
Navigator.
12-2    Oracle Service Contracts User Guide
Finding Contracts by Status or Notification Type
To find a contract by status or notification type:
1. From the Navigator, navigate to Contract Administration, and then select
Launchpad. The Launchpad appears.
2. In the Inbox region, click Find.
The Inbox Find window appears.
3. Select your search criteria:
1. To find a contract with a particular status, select a status from the Select Status
list.
2. To find a contract with a particular notification type, select a notification type
from the Select Notification Type list.
For example, you could perform a search for contracts with an open status that
require contract approvals or you could simply search for contracts that require
contract approval.
4. Select Find.
The application refreshes the Inbox with contracts that meet your criteria.
Managing Your Work    12-3
5. To sort the results, click the column heading by which you want the results sorted.
You can sort columns in ascending or descending order.
6. Highlight the contract to review.
7. From the Inbox region, select Open.
The contract appears in the Service Contracts Authoring window.
Note: For information about responding to notifications, see
Approving Contracts, page 9-4.
Finding Your Most Recently Accessed Contracts
To find your most recently accessed contracts:
1. From the Navigator, navigate to Contract Administration, and then select
Launchpad. The Launchpad appears.
2. In the Recent Documents region, scroll through the list of contracts.
These are the contracts that you have most recently accessed.
3. To sort the list, click the column heading by which you want the list sorted.
You can sort columns in ascending or descending order.
12-4    Oracle Service Contracts User Guide
4. Highlight the contract to review.
5. From the Recent Documents region, select Open.
The contract appears in the Service Contracts Authoring window.
Note: You can also double-click the contract number to open the
Service Contracts Authoring window.
Bookmarking Contracts
To bookmark contracts:
1. From the Service Contracts Authoring window, select the Actions menu and select
Bookmark.
A note appears, indicating that the contract has been successfully bookmarked. This
adds the bookmark to the Bookmarked Documents region in the Launchpad. The
Bookmarked Documents region is a personal listing of contracts that you can access
quickly.
2. To review bookmarked contracts, see Finding Bookmarked Contracts, page 12-4.
Note: You can also bookmark a contract from the Contract
Navigator by:
1. Highlighting a contract in the right panel
2. Selecting Add Bookmark from the Tools menu.
Finding Bookmarked Contracts
To find bookmarked contracts:
1. From the Navigator, navigate to Contract Administration, and then select
Launchpad. The Launchpad appears.
Managing Your Work    12-5
2. In the Bookmarked Documents region, scroll through the listing of contracts.
Creating Groups
Groups help you to organize and find contracts more efficiently. A contract can be in
more than one group at a time. For example, a contract can be in your personal group
My Contracts and also be in the public group Business World Contracts. You can also
use groups to help you identify contracts that can be processed through actions such as
mass change, or reports.
To create a group:
1. From the Navigator, navigate to Contract Groups, and then select Contract Groups
.
The Contracts Groups window appears.
12-6    Oracle Service Contracts User Guide
2. In the Name field enter the group name, for example, Service Agreements.
3. In the Description field, provide a description of the group.
4. If you want this folder to be public, select the Public check box.
Note: If you do not select the Public check box, you will create a
private folder that only you will see.
For you to be able to create public folders, your administrator must
set the profile OKC: Public Group Creator to Yes.
5. Save.
Note: If you want to see a listing of all groups, you can use the
query function to display the groups in the Contracts Groups
window.
1. From the View menu, select Query by Example and Enter. The
form changes to query mode.
2. Enter % in the Name field.
3. From the View menu, select Query by Example and Run. A
complete listing of the Contract Groups appears.
Managing Your Work    12-7
Organizing Contracts by Group and Subgroup
To organize contracts by group and subgroup:
1. From the Navigator, select Contract Groups, and then select Assign Contract
Groups.
The Contracts Groupings window appears. The Groupings region on the left
provides a hierarchy that you can use to navigate the contract groups.
You can click the + icon to expand a node
You can click the - icon to collapse a node.
2. Select a node from the Global region, for example, Service.
The contracts that are currently a part of the group appear under the Currently
Assigned Contracts heading.
3. Click Find.
The Search templates and Contracts window appears. You can use this window to
search for contracts that you want to add to the criteria.
4. Enter your search criteria, and click Search.
The results appear in the Available Contracts region of the Contract Groupings
window.
12-8    Oracle Service Contracts User Guide
5. To add a contract to the group, highlight the contract in Available Contracts and
select the left arrow.
The contract is moved to Currently Assigned Contracts, which indicates that it is a
part of the group.
6. To remove a contract from the group, highlight a contract in the Currently Assigned
Contracts region and select the right arrow.
The contract is moved to Available Contracts, which indicates that it is not a part of
the group.
Managing Your Work    12-9
7. To add a subnode to the Group, select the Groups tab.
The Currently Assigned Groups and Available Subgroups regions are populated
with a listing of subgroups.
You can change the view of the Available Subgroups region by selecting either
Unassigned or All Groups from the View list.
8. To add a subgroup to the group, highlight the subgroup in the Available Subgroups
region and select the left arrow.
12-10    Oracle Service Contracts User Guide
The subgroup is moved to Currently Assigned Groups, which indicates that it is a
subgroup of the group.
9. To remove a subgroup from the group, highlight a subgroup in the Currently
Assigned Groups region and select the right arrow.
The contract is moved to Available Subgroups, which indicates that it is not a part
of the group.
10. Save.
Managing Your Work    12-11
Finding Contracts Using the Contract Groups Hierarchy
To find a contract using the contract groups hierarchy:
1. From the Navigator, navigate to Contract Administration, and then select
Launchpad. The Launchpad appears. Select the Contract Navigator tab.
2. In the left panel, review the group hierarchy.
You can expand a node by selecting the + icon. You can collapse a node by selecting
the - icon.
3. Select a node to view the contracts that are in contract group node.
For example, you could select the Global node to view all contracts within that
node.
The contracts that are included in this group appear in the right-hand panel.
4. To sort the results, click the column heading by which you would like the results
sorted.
You can sort columns in ascending or descending order.
5. Highlight the contract that you want to review.
6. Right-click and select Open.
12-12    Oracle Service Contracts User Guide
The contract appears in the Service Contracts Authoring window.
Note: Double-click the contract number to open the Contract
Execution window.
Removing a Contract from a Group
To remove a contract from a group:
1. From the Navigator, navigate to Contract Administration, and then select
Launchpad. The Launchpad appears. Select the Contract Navigator tab.
2. In the left panel, select a group such as Service.
A listing of contracts appears.
3. Highlight the contract to remove from the group.
4. You can do one of the following:
1. Right-click the contract and select Remove from Group.
2. From the Tools menu, select Remove from Group.
A decision box appears, asking whether you are sure that you want to remove
the contract from the group.
5. Click Yes.
The contract is removed from the group.
Note: You can also add or remove a contract from a group by
updating the Contracts Group region within the Administration
subtab of the contract.
Searching for Contracts Using the Entitlements Search Window
To search for contracts using the Entitlements Search window:
1. From the Navigator, navigate to Contract Administration, and then select
Entitlements Search.
The Entitlements Search window appears.
Managing Your Work    12-13
You can use this window to search for all contracts that match your search criteria,
or limit the search to Entitled contracts.
You can search for contracts based on their covered levels attributes, header
attributes, or line attributes, or a combination of these.
2. From the Search Option region, select whether to search all contracts or entitled
contracts.
Entitled contracts are those that are within their start and end dates as of the time of
the search, and are in a status that has the operation Eligible for Entitlement set to
Yes.
3. From the Contract Covered Levels region, specify the contract covered levels to use
in your search.
You can search by the following covered levels: product, item, site, system, account,
and party.
This region has specific attributes associated with each covered level, which are
separated by rows. For example, if you select a product, the row with the Product
Name field also contains a Serial Number field and Reference Number field. These
additional attributes are used to narrow your search.
4. From the Lines region, specify lines attributes.
For example, you could add a service name, a status, and a duration to the search
criteria.
5. From the Header region, specify header attributes.
For example, you could add a contract status, party, and duration.
12-14    Oracle Service Contracts User Guide
Note: To clear the form and enter your search criteria again, select
Clear.
6. Select Search.
The Results window appears, which shows contract line details that match the
search criteria. You can also determine the operating unit for the contract.
7. To view the coverage for a specific contract and line, select the line and click View
Coverage.
The Coverage Template appears in read-only form.
8. To open the contract, select the contract line and click Open.
The Service Contracts Authoring window appears. From this window, you can
manually adjust Warranty Start and End dates on installed products.
Note: If the entitlements search is used for any application other
than Oracle Service Contracts, the Line Detail window appears in
read-only mode. For example, a service agent could use entitlement
search from Oracle TeleService.
Using the Index to Navigate Through Contracts
The index helps you find parts of the contract and allows you to navigate to them
directly, for example, to a particular line number.
To use the index to navigate through contracts:
1. From the Service Contracts Authoring window, select the Actions menu and Show
Index.
Managing Your Work    12-15
The Contract Index window appears.
From this window, you can view details of the contract such as the parties, the line
level service items, the covered level products at the sublines, and the names of any
terms that are attached to the contract.
You can expand the hierarchy by selecting the + icon next to the node.
You can collapse the hierarchy by selecting the - icon next to the node.
2. To navigate to a specific point within the contract:
1. Highlight the node.
2. Click Go.
For example, if you highlight the Lines node and click Go, the Service Contracts
Authoring window displays the Lines tab.
12-16    Oracle Service Contracts User Guide
3. Optionally, you can close the Contract Index window by selecting Cancel.
Using the Administrator Workbench to Manage Contracts Under Negotiation     13-1
13
Using the Administrator Workbench to
Manage Contracts Under Negotiation
Overview of the Administrator Workbench
The Administrator Workbench enables sales representatives, managers, and contract
administrators to track progress of workloads and initiate follow up actions on
contracts under negotiation. Sales representatives may have several open quotes in
various stages of negotiation. These open quotes may be undergoing revisions, awaiting
approvals for special terms, or with customers for review. The Administrator
Workbench informs users of what is currently in their queue.
As a sales representative, you can perform multiple actions during the negotiation
process from the Administrator Workbench. It enables you to track new contract and
renewal opportunities by providing information in bins and portlets that you can
personalize:
• Quick Search: Enables you to perform a search using a search intent and search
criteria. You can also navigate to an advanced search page for an expanded criteria
list.
• Notifications: Provides a list of open notifications that require your attention. From
this region, you can view notification details and submit responses.
• My In Process Contracts: Provides a list of views for open service contracts that are
assigned to you. The following views for open service contracts are seeded in the
application:
• All In Process Contracts: A list of all open contracts under negotiation or
pending approval and activation.
• Follow Up Actions: A list of open contracts with assigned follow-up actions
and due dates.
13-2    Oracle Service Contracts User Guide
• Online Quotes : A list of all open contracts that are routed for automatic online
customer acceptance.
• Pending Internal Approval : A list of all contracts that are accepted by
customers and pending internal review and approval
• Pending Quotes: A list of all open contracts for which quotes have been sent to
the customer. This view does not include contracts that have been accepted by
the customer and are pending approval.
• Pending Salesrep Assistance: A list of online acceptance contracts for which
customers requested assistance in clarifying terms or want to make corrections.
This is the default view for the bin.
• Reminder Sent: A list of open contracts for which reminder notices have been
sent to the customer.
• Renewals: A list of all open renewals under negotiation.
When you select a view and click the Go button, the My In Process Contracts bin
refreshes. The following options are available:
• Personalize: In addition to the seeded views, you can define personalized
views to manage your contracts by using the OA Framework personalization
features.
Note: For information about personalization of the HTML
pages, refer to the Oracle Applications Personalization Guide.
• Full List: This option shows your full list of tracked contracts.
Note: All actions that are available from the renewal tracking
bin are also available from the full list page.
From the My In Process Contract bin, you can:
• Identify follow-up actions on contracts.
• Publish contract online to customers.
• Submit contract for internal review.
• Manage reminders and notifications.
• Run quality check to validate contract information.
Using the Administrator Workbench to Manage Contracts Under Negotiation     13-3
• Open the contract in the Service Contracts Authoring window for editing.
• Initiate communication with customers through e-mail.
Note: The My In Process bin actions are separated based on
whether they can be performed on a single contract or multiple
contracts.
• Actions performed on multiple contracts: Publish to Customer,
Submit for Approval, Disable Reminders, Enable Reminders,
Run QA Check
• Actions performed on single contracts: Open Contract, Email
Customer, Print Quote
• Shortcuts: Provides a list of links that provide shortcuts to other functions within
Oracle Service Contracts.
This group of procedures covers the following:
• Viewing Notifications, page 13-4
• Publishing a Contract to a Customer for Acceptance, page 13-6
• Submitting a Contract for Approval from the Administrator Workbench, page 13-
7
• Suppressing Reminders, page 13-7
• Enabling Reminders, page 13-8
• Running the Quality Assurance Check, page 13-8
• Updating Multiple Contracts, page 13-9
• Updating a Contract, page 13-11
• Opening a Contract, page 13-13
• Sending an E-mail to a Customer from the Administrator Workbench, page 13-13
• Printing Quotes and Contracts, page 13-14
• Identifying Follow-Up Actions, page 13-14
• Using Shortcuts in the Administrator Workbench, page 13-15
13-4    Oracle Service Contracts User Guide
Viewing Notifications
You can view a list of notifications from the Administrator Workbench. If the
notification does not require a response, the application provides a message within the
Notification Detail page.
The following table provides a list of notifications that you may see in Oracle Service
Contracts:
Notification Title Example
Quote Published Online Contract 21100-R31-Nov-05 for Business
World (3422.50 USD) has been published
online
Quote Sent to Customer Contract 21100@R31-Nov-05 for Business
World (3422.50 USD) has been emailed
Customer Acceptance Notification Contract 21100@R31-Nov-05 for Business
World (3422.50 USD) has been accepted by
Sharpe, Marty
Customer Decline Notification Contract 21100@R31-Nov-05 for Business
World (3422.50 USD) has been declined by
Sharpe, Marty
Assistance Request Notification As entered by customer from Online renewal
flow.
Request for Internal Approval notification Contract 21100@R31-Nov-05 for Business
World (3422.50 USD)
Internal Approval Reject Notification Contract 21100@R31-Nov-05 for Business
World (3422.50 USD) has been rejected by
Stock, Pat
Signature Required Contract 21100@R31-Nov-05 for Business
World (3422.50 USD) requires your signature
QA Check Failure Notification QA Check Failure in Contract
21100@R31-Nov-05 for Business World
(3422.50 USD)
Using the Administrator Workbench to Manage Contracts Under Negotiation     13-5
Workflow Error Notification Workflow Error in Contract
21100@R31-Nov-05 for Business World
(3422.50 USD)
Reminder Failure Notification Reminder Failure in Contract
21100@R31-Nov-05 for Business World
(3422.50 USD)
To view notifications:
1. From the Navigator, navigate to Contract Administration, and then select
Administrator Workbench.
Your notifications appear at the top of the page.
2. To see all your notifications, select Full List.
3. To open a notification, select the corresponding Subject link.
The Notification Detail page appears. From this page, you can approve, reject,
delegate, or request information by clicking the appropriate action button.
If a notification does not require a response, a note appears at the top of the page.
You can select OK to close the notification and return to the Administrator
Workbench.
4. Select an action:
• Approve: Opens the Notification Detail page.
To approve the contract:
1. Enter a response note.
2. Click Approve.
• Reject: Opens the Notification Detail page.
To reject the contract:
1. Enter a response note.
2. Click Reject.
• Delegate: Opens the Delegate Notification page.
To delegate a notification:
13-6    Oracle Service Contracts User Guide
1. Select an assignee.
2. Enter comments.
3. Click Submit.
• Request Information: Opens the Request Information page.
• To request information:
1. Select the individual from whom you want to request more information.
2. Enter the information requested.
3. Click Submit.
• OK: Returns to the Administrator Workbench.
Note: You can return to the Administrator Workbench, by selecting
the Service Contracts link preceding the notification title.
Publishing a Contract to a Customer for Acceptance
You can publish a manual renewal contract or a new contract online for customer
acceptance. Contracts that are marked for online renewal get published online upon
renewal. However, you may decide to publish additional contracts that are currently
being manually managed by using this action. This action publishes selected contracts
on the online acceptance portal. You can publish one or multiple contracts online.
To publish a contract to a customer for acceptance:
1. From the Navigator, navigate to Contract Administration, and then select
Administrator Workbench.
A list of contracts appears in the My In Process Contracts region.
2. Choose the Select check box next to the contract that you want to publish to a
customer for approval.
3. From the Select Contracts list, select Publish to Customer.
4. Click Go.
A confirmation appears, which indicates the contracts that have been submitted for
online acceptance. If the contract is already published online, a message appears
indicating that the contract is already published.
Using the Administrator Workbench to Manage Contracts Under Negotiation     13-7
Submitting a Contract for Approval from the Administrator Workbench
You can submit contracts for internal business approval . The Submit for Approval
action puts the contract in the approver's worklist. You can submit contracts for
approval for one or multiple contracts.
To submit a contract for approval from the Administrator Workbench:
1. From the Navigator, navigate to Contract Administration, and then select
Administrator Workbench.
A list of contracts appears in the My In Process Contracts region.
2. Choose the Select check box next to the contract that you want to publish for
internal approval.
3. From the Select Contracts list, select Submit for Approval.
4. Click Go.
A confirmation appears indicating the contracts that have been submitted for
approval. If the contract is already submitted for approval, a message appears
indicating that the contract is already in the approval queue.
Suppressing Reminders
You can suppress reminders for contracts using the suppress reminders actions.
Customers do not get reminder notifications for contracts from the auto reminder
program for contracts that require customer acceptance. You can suppress reminders
for one or multiple contracts.
To suppress reminders:
1. From the Navigator, navigate to Contract Administration, and then select
Administrator Workbench.
A list of contracts appears in the My In Process Contracts region.
2. Choose the Select check box next to the contract that you want to disable
reminders.
3. From the Select Contracts list, select Disable Reminders.
4. Click Go.
A confirmation appears, which indicates that reminders have been disabled for the
selected contracts. All contracts for which reminders have been suppressed are
13-8    Oracle Service Contracts User Guide
marked with an icon next to the contract number.
Enabling Reminders
You can enable reminders for those contracts for which reminders were suppressed.
You can enable reminders for one or multiple contracts.
To enable reminders:
1. From the Navigator, navigate to Contract Administration, and then select
Administrator Workbench.
A list of contracts appears in the My In Process Contracts region.
2. Choose the Select check box next to the contract that you want to enable reminders.
3. From the Select Contracts list, select Enable Reminders.
4. Click Go.
A confirmation appears, which indicates that reminders have been enabled for the
selected contracts.
Running the Quality Assurance Check
You can run the quality assurance (QA) check on selected contracts. You can run the
QA check for one or multiple contracts.
To run the quality assurance check:
1. From the Navigator, navigate to Contract Administration, and then select
Administrator Workbench.
A list of contracts appears in the My In Process Contracts region.
2. Choose the Select check box next to the contract that you want to publish to a
customer for approval.
3. From the Select Contracts list, select Run QA Check.
4. Click Go.
A confirmation appears, which indicates the QA Check concurrent request has been
submitted and provides a concurrent request id.
Note: For more information about the QA check, see About the
Quality Assurance Check (QA Check), page 8-1.
Using the Administrator Workbench to Manage Contracts Under Negotiation     13-9
Updating Multiple Contracts
You can update one or more attributes on multiple contracts from the Mass Update
Contracts page.
Prerequisites: .
Identify one or more contracts with a status of Entered or Canceled. The negotiation
status must not be Pending Approval or Pending Activation.
Note: This procedure shows the navigation from the Administrator
Workbench page.
You can also access the Mass Update Contracts page when the Mass
Update action is selected from the following pages:
• Search
• Advanced Search
To update multiple contracts:
1. From the Navigator, navigate to Contract Administration, and then select
Administrator Workbench.
A list of contracts appears in the My In Process Contracts region.
2. Mark the Select check box next to the contracts that you want to update.
3. From the Select Contracts list, select Mass Update.
4. Click Go.
The Mass Update Contracts page appears.
A read-only table at the top of the page shows the following attributes for the
contracts that you selected:
• Contract Number
• Customer
• Description
• Status
• Start Date
• End Date
13-10    Oracle Service Contracts User Guide
• Follow-Up Due Date
• Follow-Up Action
• Amount
You can also add the following columns using the personalization feature:
• Forecast Close Date
• Forecast Percent
• Negotiation Status
• Known As
• Category
5. To update the contract status information, scroll to the Contract Status region. You
can update the following:
• Status: Select a new status from the drop down list.
• Reason: Select a reason from the drop down list.
• Comments: Enter comments to explain the status update.
6. To create a follow up action, scroll to the Follow-Up region. You can create the
following:
• Action: Select an action from the drop down list, such as Call Customer.
• Due Date: Select the date that you expect the action to be completed.
7. To update forecast details, scroll to the Forecast region. You can update the
following:
• Close Date: Select a new close date for the forecast.
• Close Percent: Enter a new close percent for the forecast.
8. To enter notes, scroll to the Notes region and enter any notes relating to the contract
within the Notes Text field.
9. Click Apply.
A confirmation message appears indicating that the contracts were successfully
updated.
Using the Administrator Workbench to Manage Contracts Under Negotiation     13-11
Updating a Contract
You can update one or more attributes on a single contract from the Update Contracts
page.
Prerequisite: .
Identify a contract with a status of Entered or Canceled. The negotiation status must not
be Pending Approval or Pending Activation.
Note: This procedure shows the navigation from the Administrator
Workbench page.
You can also access the Update Contracts page when the Update
Contract action is selected from the following pages:
• Search
• Advanced Search
To update a contract:
1. From the Navigator, navigate to Contract Administration, and then select
Administrator Workbench.
A list of contracts appears in the My In Process Contracts region.
2. Mark the Select check box next to the contract that you want to update.
3. From the Select Contracts list, select Update Contract.
4. Click Go.
The Update Contracts page appears.
A read-only table at the top of the page shows the following attributes for the
contract that you selected:
• Contract Number
• Customer
• Description
• Status
• Start Date
• End Date
13-12    Oracle Service Contracts User Guide
• Follow-Up Due Date
• Follow-Up Action
• Amount
• Forecast Close Date
• Forecast Percent
• Negotiation Status
• Known As
• Category
You can change the display of the page by using the personalization feature.
5. To update the contract status information, scroll to the Contract Status region. You
can update the following:
• Status: Select a new status from the drop down list.
• Reason: Select a reason from the drop down list.
• Comments: Enter comments to explain the status update.
6. To create a follow up action, scroll to the Follow-Up region. You can create the
following:
• Action: Select an action from the drop down list, such as Call Customer.
• Due Date: Select the date that you expect the action to be completed.
7. To update forecast details, scroll to the Forecast region. You can update the
following:
• Close Date: Select a new close date for the forecast.
• Close Percent: Enter a new close percent for the forecast.
8. To enter notes, scroll to the Notes region and enter any notes relating to the contract
within the Notes Text field.
9. To add a note to the interaction history of the contract, scroll to the Interaction
History region.
1. Filter the interactions by selecting a value from the View list, such as In Person.
Using the Administrator Workbench to Manage Contracts Under Negotiation     13-13
2. Click Go.
This filters the interactions.
3. Select the Interaction to which you would like to add a note.
4. Enter a text in the Note field.
10. Click Apply.
A confirmation message appears indicating that the contract was successfully
updated.
Opening a Contract
You can open the Service Contracts Authoring window from the Administrator
Workbench, where you can make updates to the contract, save those changes and
return to the workbench. You are limited to opening one contract at a time.
To open a contract:
1. From the Navigator, navigate to Contract Administration, and then select
Administrator Workbench.
A list of contracts appears in the My In Process Contracts region.
2. Choose the Select check box next to the contract that you want to open.
3. From the Select Contracts list, select Open Contract.
4. Click Go.
The Service Contracts Authoring window appears. You can make updates to the
contract in this form.
For information about the Service Contracts Authoring window, see Creating a
Contract, page 1-4.
Sending an E-Mail to a Customer from the Administrator Workbench
You can send an e-mail to a customer from the Administrator Workbench. This opens
the Email Customer page, where you can select the communication template and
specify a description. You are limited to sending an e-mail for one contract at a time.
The procedure for sending an e-mail from the Administrator Workbench mirrors the
procedure for sending an e-mail from the Service Contract Search page. See Sending an
E-Mail to a Customer (HTML), page 14-4 for details.
13-14    Oracle Service Contracts User Guide
Printing Quotes and Contracts
You can select a contract and the Print Quote action to view the quote in the PDF
format. You are limited to creating a quote document for one contract at a time.
To print quotes and contracts:
1. From the Navigator, navigate to Contract Administration, and then select
Administrator Workbench.
A list of contracts appears in the My In Process Contracts region.
2. Choose the Select check box next to the contract for which you want to create a
Quote Document.
3. From the Select Contracts list, select Print Quote.
4. Click Go.
The File Download window appears.
5. Select Open to open the file, or Save to save to the file to your computer.
If you chose to open the file, the Quote Document opens in a new window.
6. Review the details on the Quote Document, such as:
• Contract number
• Short description
• Contract term (start and end dates)
• Amount
• Line details
7. You can print the Quote Document for your computer.
Identifying Follow-Up Actions
You can view contracts that require follow-up actions from the My In Process Contracts
bin.
To identify follow-up actions:
1. From the Navigator, navigate to Contract Administration, and then select
Using the Administrator Workbench to Manage Contracts Under Negotiation     13-15
Administrator Workbench.
2. From the View list, select Follow Up Actions .
3. Select Go. A list of contracts appears.
You can view contracts that require follow-up actions. The due date is the date on
which you must complete the action. All follow-up actions that are past due are
marked with an icon next to the due date.
Using Shortcuts in the Administrator Workbench
The Shortcuts bin provides links to other functions within Oracle Service Contracts. You
can use the Shortcuts bin to search for contracts or create contracts:
• Advanced Search: Opens the Advanced Search page.
• Create Service Agreement: Opens the Service Contracts Authoring window with a
Status of Entered and a Category of Service Agreement.
• Create Extended Warranty: Opens the Service Contracts Authoring window with a
Status of Entered and a Category of Warranty and Extended Warranty.
• Create Subscription: Opens the Service Contracts Authoring window with a Status
of Entered and a Category of Subscription Agreement.
To use shortcuts:
1. From the Navigator, navigate to Contract Administration, and then select
Administrator Workbench.
2. Click the link for the function that you want to start, such as Create Service
Agreement.
Viewing Contract Details in HTML    14-1
14
Viewing Contract Details in HTML
Overview of Service Contracts in HTML
HTML pages are accessible from the Service Contract Administrator workbench, the
Oracle Installed Base Mass Update workbench, the Oracle Installed Base Instance
Details page, the Oracle Sales Online Customer Details page, and the Daily Business
Intelligence (DBI) portal for service contracts. From the HTML pages, you can view the
following:
• Service lines and covered product level information for all line types
• Billing schedules
• Billing history
• Notes
• Attachments
• Interactions
• Contract terms
Use the following procedures to navigate the HTML pages:
• Finding Contracts (HTML), page 14-2
• Sending an E-Mail to a Customer (HTML), page 14-4
• Viewing Contract Details (HTML), page 14-5
• Viewing Service Line Details (HTML), page 14-7
• Viewing Coverage Details (HTML), page 14-8
14-2    Oracle Service Contracts User Guide
• Viewing Covered Level Details (HTML), page 14-9
• Viewing Usage Line Details (HTML), page 14-10
• Viewing Usage Counter Details (HTML), page 14-11
• Viewing Subscription Line Details (HTML), page 14-11
• Viewing Item Instance Details (HTML), page 14-12
• Viewing Order Information for a Service Contract (HTML), page 14-13
• Viewing Billing Transactions (HTML), page 14-14
You can also use the following procedures to update one or more contracts:
• Updating a Contract (HTML), page 13-11
• Updating Multiple Contracts (HTML), page 13-9
Note: You can personalize the view within the HTML pages. For
information about personalization of the HTML pages, refer to the
Oracle Applications Personalization Guide.
Finding Contracts (HTML)
This procedure describes how to find a contract from the Search page. You can also find
contracts from the Service Contracts Administrator Workbench.
To find contracts:
1. From the Navigator, navigate to Contract Administration, and then select Contract
Search.
The Service Contracts Search page appears.
2. From the Display LOV, select the view to display for your search results.
For example, select All Contracts.
3. To narrow the search results, enter your search criteria.
For example, enter Business World in the Customer field and Entered in the Status
field.
• The flashlight icon to the right of a field opens a Search and Select page, which
you can use to find an item.
Viewing Contract Details in HTML    14-3
• The calendar icon to the right of a field opens a calendar, which you can use to
select a date.
Note: To specify additional search criteria that is not available in
the Search region, click the Advanced Search button. The Advanced
Search page appears. This page provides additional search criteria
from which to select.
4. Select Go.
The search results appear at the bottom of the page.
5. To revise your search, select Clear and enter new criteria. Then repeat the previous
steps.
6. To view the contract details for a specific contract click the corresponding Contract
Number link.
7. To export the search results to a spreadsheet, select Export.
You will be prompted to open or save the file to your computer.
8. To take action on a contract or multiple contracts:
1. Choose the corresponding Select check box.
To select all contracts, click the Select All link.
2. From the Select Contracts list, select an action.
The following actions are available:
• Publish to Customer
• Submit for Approval
• Disable Reminders
• Enable Reminders
• Run QA Check
• Open Contract
• Email Customer
• Print Quote
14-4    Oracle Service Contracts User Guide
• Mass Update
• Update Contract
For example, you can open the contract in the Service Contracts Authoring
window by selecting a single contract and choosing Open Contract.
Note: You can select only a single contract for the following
actions: Open Contract, Email Customer, and Print Quote
3. Click Go.
For most actions, a confirmation message appears at the top of the page.
See also Overview of Service Contracts in HTML, page 14-1.
Sending an E-Mail to a Customer (HTML)
Prerequisite:Navigate to Find Contracts and review your search results. See Finding
Contracts (HTML), page 14-2.
To send an e-mail to a customer:
1. From the Search results, choose the Select check box for the contract.
2. From the Select Contracts list, select Email Customer.
3. Click Go.
The Email Customer: Service Contract page appears.
4. Specify details for the e-mail.
• At a minimum, you must complete the fields that contain an asterisk, such as
To and From.
• To select a message layout template, select the flashlight icon to the right of the
Message Layout Template field.
This opens the Search and Select page. From here you can search for and select
a template.
Note: After you select a template, you can preview the template
by clicking the Preview button to the right of the Message
Layout Template field.
Viewing Contract Details in HTML    14-5
• To select an attachment layout template, select the flashlight icon to the right of
the Attachment Layout Template field.
This opens the Search and Select page. From here you can search for and select
a template.
5. Click Send.
6. A confirmation message appears at the top of the page, which indicates that the
e-mail has been sent successfully to the customer contact.
Viewing Contract Details (HTML)
Prerequisite: Navigate to Find Contracts and review your search results. See Finding
Contracts (HTML), page 14-2.
To view contract details:
1. From the Search results click the corresponding Contract Number link for a
contract.
The Service Contract page appears. You can view the contract header or select any
of the following subtabs to view contract details that are defined at the header level:
• Lines
Note: To export lines into a spreadsheet, select Export
• Contacts
• Billing
Note: Amounts in the Terminated and Billed regions are rolled
up from lines and sublines.
• Sales Credits
• Renewals
• Related Documents
Note: If an order exists, you can view order details by clicking
the order number link in the Document Reference column. The
Sales Order page appears.
14-6    Oracle Service Contracts User Guide
• History
Note: The application provides navigation that enables you to
return to previous pages. After you select a subtab, you can return
to the previous page by clicking the navigation link preceding the
page title. For example, if the following navigation appears ,
Service Contract Search > Service Contract: 23248, click the Service
Contract: 23248 link to return to the contract header.
You can also view additional detail pages by clicking the links within the
Additional Details block:
• Interaction History
• Billing History
Note: To export billing transactions into a spreadsheet, select
Export. The Transaction number link navigates to Oracle Bill
Presentment view of Invoice and Credit Memo.
• Contract Terms
• Notes and Attachments
• Contract Groups
2. Review customer and contract information in the contract header. For example, you
identify the customer, status, term, and contract amount.
3. To view line details, select the Lines tab. See:
• Viewing Service Line Details (HTML), page 14-7
• Viewing Usage Line Details (HTML), page 14-10
• Viewing Subscription Line Details (HTML), page 14-11
4. To open the Service Contracts Authoring window click the Open button. This
opens the form where you can modify the contract.
Note: The Open button is not visible if you navigate from pages of
applications other than Oracle Service Contracts.
Viewing Contract Details in HTML    14-7
Viewing Service Line Details (HTML)
Prerequisite: Open a contract containing service lines.
To view service line details:
1. To drill down into the service line details, select the Lines tab and the service line
link that is associated with the service.
The secondary tabs for the selected line appear, with the Covered Levels secondary
tab selected:
• Covered Levels
1. Select Show from the Details column to expand the display.
2. To open the details for the service contract line, select the link
corresponding line.
The Service Contract Line Covered Level page appears. View the Covered
Level details for the selected line.
To view billing transactions for the line, select the Billing Transactions link
from the Additional Covered Level Details block.
3. If an associated item instance is entered in Oracle Installed Base, you can
click that link to view the Item Instance page. See Viewing Item Instance
Details, page 14-12.
• Contacts
• Billing
Note: Amounts in the Terminated and Billed regions are rolled
up from sublines.
• Sales Credits
• Related Documents
• History
You can also view additional pages by clicking the links within the Additional Line
Details block:
• Billing Transactions
14-8    Oracle Service Contracts User Guide
Note: You can view accounts receivables invoices and credit
memos for the line as Billing History and also future Billing
Schedules.
• Coverage Details
Note: Select Coverage Details to view the service level
agreements, such as coverage and response times.
• Notes
2. To return to the Contract, click the Service Contract link preceding the page title.
Related Topics
Viewing Usage Line Details (HTML), page 14-10
Viewing Subscription Line Details (HTML), page 14-11
Viewing Coverage Details (HTML)
Prerequisite: Open a contract containing service lines and select a service line.
To view coverage details:
1. From the Additional Line Details region, select Coverage Details. The Coverage
Details page appears.
2. Review the coverage entitlements associated with the service line:
• Review the Coverage Header.
• Select a business process, such as Customer Support. The following regions are
updated to correspond to the business process that you select.
• Coverage Times: You can change the view of the coverage times by
selecting one of the Display radio buttons, either By Interval or By Day.
• Response Times: You can change the response time view by selecting a
value from the View list, either Reaction Times or Resolution Times.
• Preferred Resources
• Billing Types
Viewing Contract Details in HTML    14-9
Related Topics
For a description of defining coverage templates, see Defining a Coverage Template,
page 23-7
Viewing Covered Level Details (HTML)
Prerequisite: Open a contract containing service lines and select a service line.
To view covered level details:
1. Click the Line link for the covered level details that you want to view. The Line
Details page appears.
2. Review the Covered Level Details that are associated with the line:
• Covered Level Header
• Covered Level Details:
• Instance details: Appears only if the covered level is Product.
• Item details: Appears only if the covered level is Item.
• System details: Appears only if the covered level is System.
• Site details: Appears only if the covered level is Site.
• Account details: Appears only if the covered level is Account.
• Party details: Appears only if the covered level is Party.
• Pricing Calculation: Appears only if the covered level is Product or Item.
Note: You can drill down further into detail pages if a link
exists. For example, clicking the Item Instance link opens a
detail page for the item instance.
• Related Documents
3. Navigate to other pages with additional subline details, by clicking a link within the
Additional Covered Level details bin, for example, Billing Transactions.
14-10    Oracle Service Contracts User Guide
Related Topics
For a description of the various covered levels, see Levels of Coverage and Their Uses,
page 3-15.
Viewing Usage Line Details (HTML)
Prerequisite: Open a contract containing usage lines.
To view usage line details:
1. To drill down into the usage line details, select the Lines tab and the usage line link
that is associated with the service.
The secondary tabs for the selected line appear, with the Counters secondary tab
selected:
• Counters
• Contacts
• Billing
Note: Amounts in the Terminated and Billed regions are rolled
up from sublines for Negotiated Usage lines, or come from the
line itself for all other types of Usage lines.
• Sales Credits
• Renewals
• Related Documents
• History
You can also view additional pages by clicking the links within the Additional Line
Details block:
• Billing Transactions
• Notes
2. To return to the Contract, click the Service Contract link preceding the page title.
Viewing Contract Details in HTML    14-11
Related Topics
Viewing Service Line Details (HTML), page 14-10
Viewing Subscription Line Details (HTML), page 14-11
Viewing Usage Counter Details
Prerequisite: Open a contract containing usage lines with a counter.
To view usage counter details:
1. From the Lines tab, click the Service link, such as QP-LPTR-U. The Usage Line page
appears with the Counters tab selected.
2. Click the Line Number link, such as 1.1. The Usage Counter page appears.
You can view the counter read history within the Counter Readings region and
Billing History in the Billing Transactions region. You can use the Transaction
Number link in the Billing Transactions region to drill down to the Oracle Bill
Presentment view of the invoice or credit memo.
You can reconcile quantity billed for a particular billing transaction with the default
or minimum, actual, estimate, or actual and estimate that is shown in the Usage
Pricing Details region. This depends on the usage type. You can also reconcile
amount billed for a particular billing transaction with the applied price breaks that
are shown in the child Usage Pricing Details region.
Viewing Subscription Line Details (HTML)
Prerequisite:Open a contract containing subscription lines.
To view subscription line details:
1. To drill down into the subscription line details, select the Lines tab and the
subscription line link that is associated with the service.
The secondary tabs for the selected line appear, with the Fulfillment Details
secondary tab selected:
• Fulfillment Details: Shows the subscription fulfillment schedules for a tangible
subscription.
Note: You can click the Order Number link to navigate to the
sales order view page and view the shipment dates and
delivery numbers.
14-12    Oracle Service Contracts User Guide
• Contacts
• Billing
Note: Amounts in the Terminated region and Billed regions
come from the line itself for Subscription lines.
• Sales Credits
• Related Documents
• History
You can also view additional pages by clicking the links within the Additional Line
Details block:
• Billing Transactions
• Notes
2. To return to the contract, click the Service Contract link preceding the page title.
Related Topics
Viewing Service Line Details (HTML), page 14-10
Viewing Usage Counter Details (HTML), page 14-11
Viewing Item Instance Details (HTML)
Prerequisite: Open a contract containing service lines.
To view item instance details:
1. Select the Lines tab and the service line link that is associated with the Service.
Drill down into the service line by clicking the associated Service link. The
secondary tabs for the selected line appear, with the Covered Levels secondary tab
selected.
2. Select the instance number link in the Item Instance column.
The Item Instance Page appears with the General subtab selected. You can view the
installed base details by selecting the other subtabs.
• Location
Viewing Contract Details in HTML    14-13
• Associations
• Configuration
• Counters
• Notes
Note: For more information, see the Oracle Installed Base User Guide.
3. To return to the line, click the Service Contract: Line link preceding the page title.
Viewing Order Information for a Service Contract (HTML)
Prerequisite: Open a contract that is associated with an order.
To view order information for a service contract:
1. Select the Related Documents subtab.
2. From the Document Reference column, click the Order Number link.
The Sales Order page appears with the Lines tab selected. You can view the sales
order details by selecting the other subtabs.
• Contract Terms
• Contract Documents
• Invoices
• Deliveries
• Notes
Note: For more information, see the Oracle Order Management User's
Guide.
3. To return to the line, click the Service Contract: Line link preceding the page title.
4. Optionally, click the View Contract button to open the terms and conditions that
are attached to the sales order in a PDF format.
14-14    Oracle Service Contracts User Guide
Viewing Billing Transactions (HTML)
Prerequisite: Open a contract containing lines.
To view billing transactions:
1. Select the Lines tab and click the Service link. You can click this link for service
lines, usage lines, and subscription lines and covered level details. For more
information, refer to the following procedures:
• Viewing Service Line Details (HTML), page 14-7
• Viewing Usage Line Details (HTML), page 14-10
• Viewing Subscription Line Details (HTML), page 14-11
• Viewing Covered Level Details (HTML), page 14-9
2. From the Additional Details bin, click the Billing Transactions link. The Billing
Transactions Detail page appears. Use the following regions to view billing
transaction details:
• Billing Rules
• Billed (Amounts)
• Billed Amount equals rolled up invoice amounts.
• Unbilled Amount equals the contract amount not yet invoiced.
• Terminated (Amounts)
• Billing History
• Displays all invoices and credit memos that are linked to this contract.
• Click the Transaction Number link to view invoice or credit memo in
Oracle Bill Presentment.
• Billing Schedule
Note: For more information about how billing works, see Overview
of Billing, page 10-1.
Using the Customer Acceptance Portal    15-1
15
Using the Customer Acceptance Portal
Overview of the Customer Acceptance Portal
The Customer Acceptance Portal lists newly authored contracts and renewal contracts
that require customer acceptance. Contracts appearing within the portal can be
manually submitted by the sales representative as well as generated with the Online
renewal process. After logging into the Customer Acceptance Portal, a customer can
accept, decline, or request additional information for each contract.
Customers can:
• Specify payment methods that comply with regional requirements for their
international contracts. Acceptable payment methods are defined within Global
Contracts Defaults and include credit card, commitment, purchase order, check, or
wire. See Entering Contract Defaults, page 2-36.
• Upload a payment document, such as the image of a PO or check.
• Either log in directly to the Customer Acceptance Portal or access the page through
a link embedded within an e-mail notification.
• Capture cancellation reasons and comments.
After a customer accepts or declines a contract, it is no longer available in the pending
contracts region. Contracts for which customers request assistance remain available for
acceptance or declination.
Additionally, sales representatives can:
• Review request assistance messages and cancellation notes within the customer
interactions of the contract.
• Maintain customer account and password information.
The following table lists notifications that customers receive during the authoring and
15-2    Oracle Service Contracts User Guide
renewal process that may require acceptance within the Customer Acceptance Portal:
Note: For each of these customer e-mails, the application provides a
link to the Customer Acceptance Portal if the cover letter template
includes a link. The seeded cover letter template has a link.
Check with your administrator to determine whether the seeded letter
has been modified.
E-Mail Template Method that customer receives e-mail
Quote Letter The application sends an e-mail notification at
renewal in the Online process or using the
Publish to Customer action.
You can also send this notification to a
customer using the Email Customer action
and selecting the Quote Letter notification for
the e-mail message body. See Sending an
E-Mail to a Customer (HTML), page 14-4.
Reminder Letter The application sends an e-mail notification
when a Reminder program identifies a target
contract
You can also send this notification to a
customer using the Email Customer action
and selecting the Reminder Letter notification
for the e-mail message body. See Sending an
E-Mail to a Customer (HTML), page 14-4.
Acceptance Confirmation If a customer accepts a renewal, an acceptance
confirmation e-mail is generated.
If the sales representative accepts on behalf of
the customer, an activation confirmation is
sent at contract activation.
You can also send this notification to a
customer using the Email Customer action
and selecting the Acceptance Confirmation
notification for the e-mail message body. See
Sending an E-Mail to a Customer (HTML),
page 14-4.
Using the Customer Acceptance Portal    15-3
Cancellation Letter If a customer declines a renewal, a
cancellation e-mail is sent.
This may also generate a cancellation letter if a
sales representative declines on behalf of the
customer by changing the contract status to
Canceled.
You can also send this notification to a
customer using the Email Customer action
and selecting the Cancellation Letter
notification for the e-mail message body. See
Sending an E-Mail to a Customer (HTML),
page 14-4.
Activation Confirmation If a customer accepts a renewal, an e-mail
notification is generated at the start date of the
contract.
You can also send this notification to a
customer using the Email Customer action
and selecting the Activation Confirmation
notification for the e-mail message body. See
Sending an E-Mail to a Customer (HTML),
page 14-4.
Related Topics
Opening the Customer Acceptance Portal, page 15-3
Accepting a Contract, page 15-4
Declining a Contract, page 15-6
Requesting Assistance, page 15-7
Opening the Customer Acceptance Portal
Prerequisite: Your administrator must create a login. The application sends login
information in the initial quote letter.
To open the Customer Acceptance Portal:
1. Log in to the Customer Acceptance Portal with your user name and password, such
as marsha.able@vision.com/welcome. The Pending Service Contracts page
appears.
You can accept the contract, decline the contract, or request assistance. You can also
15-4    Oracle Service Contracts User Guide
view a PDF version of the contract quote.
2. Review the list of contracts and identify the contract that you will work with.
3. Choose the Select radio button.
4. To view a contract quote, select the Quote icon for the contract. This opens a PDF
version of the quote in a separate window.
Related Topics
Accepting a Contract, page 15-4
Declining a Contract, page 15-6
Requesting Assistance, page 15-7
Accepting a Contract
Prerequisite: Access the Customer Acceptance Portal. You must have contracts that
require your action.
To accept a contract:
1. Choose the Select radio button for the contract that you want to accept.
2. Click Accept.
The Accept contract detail page appears with an html view with key information of
the contract, such as contract amount and bill to information. Additional details will
be available in the quote letter pdf file. You can cancel the acceptance process,
request assistance, or continue to acceptance process.
3. Review the contract details.
Note: You can open a PDF view of the Quote by selecting the Quote
link.
4. Select a Payment Type in the Payment Details region. Depending on the type that
you select, you may need to enter additional information.
5. If you select Credit Card on File:
1. Select a credit card from the LOV.
2. Enter a security code.
Using the Customer Acceptance Portal    15-5
6. If you select Check, enter the check number.
7. If you select Commitment, select a commitment number from the LOV.
8. If you select New Credit Card:
1. Enter a credit card.
2. Select an expiration date.
3. Enter a security code. This field may be required if the vendor requires a
security code for credit card transactions.
9. If you select Purchase Order, enter the PO number covering the contract.
10. If you select Wire Transfer, enter the account number from which the fund will be
wired.
11. To add a supporting payment document or other attachment, select Add
Attachment within the Attach Documents region. The Add Attachment page
appears. See Adding an Attachment, page 15-5.
12. Select Continue. The Accept Service Contract: Review and Confirm page appears.
13. Review the contract details.
14. In the Acceptance Clause region, select the check box indicating that you agree to
the contract terms and conditions.
15. Select Accept. A confirmation appears indicating that your acceptance has been
received.
16. To print a copy of your acceptance terms, select Printable Page
17. Select Done.
Related Topics
Opening the Customer Acceptance Portal, page 15-3
Declining a Contract, page 15-6
Requesting Assistance, page 15-7
Adding an Attachment
Prerequisite: Open the Customer Acceptance Portal and accept a contract. From the
Accept detail page select Add Attachment.
15-6    Oracle Service Contracts User Guide
To add an attachment:
1. Name your attachment in the Title field.
2. Provide a summary of the attachment in the Description field.
3. Select a File Type radio button. You can choose File, URL, or Test.
4. If you select File, select Browse to select a file from your computer to attach. This
starts the File Upload box for your computer and enables you to navigate and select
a file.
5. If you select URL, enter a url to reference, such as http://www.oracle.com.
6. If you select Text, enter or paste the text that you want to reference within the Text
box.
7. Click Apply. The attachment appears in the Attach Documents region.
Note: After you apply your attachment, you can select Add
Another to add an additional attachment. If you select Add
Attachment, you will receive a message that the attachment has
been added successfully but not saved. You must select Apply to
continue.
After you add an attachment, you can update it by selecting the
Update icon. You can also delete it by selecting the Delete icon.
Declining a Contract
Prerequisite: Access the Customer Acceptance Portal. You must have contracts that
require your action.
To decline a contract:
1. Select the Select radio button for the contract that you want to decline.
2. Click Decline.
3. The Decline contract detail page appears with an html view with key information
about the contract. You can cancel the declination process, request assistance, or
decline the contract.
4. Select a reason from the LOV.
5. Select the check box that indicates that you agree to the terms of the Decline Clause.
Using the Customer Acceptance Portal    15-7
6. Optionally, enter your comments.
7. Click Decline. A confirmation message appears indicating that your decline
instruction has been received.
Related Topics
Opening the Customer Acceptance Portal, page 15-3
Accepting a Contract, page 15-4
Requesting Assistance, page 15-7
Requesting Assistance
Prerequisite: Access the Customer Acceptance Portal. You must have contracts that
require your action.
To request assistance:
1. Choose the Select radio button for the contract for which you need help.
2. Click Request Assistance.
3. The Request Assistance page appears with an e-mail form for you to complete. The
sales representative for the contract appears in the To field. Your e-mail ID appears
in the CC field. The Subject field is populated with the contract number, such as
Salesrep Assistance for Contract : 23126. You can send an e-mail or
cancel your request.
4. Enter a description of your issue in the Description block.
5. Select Send.
6. A confirmation appears indicating that your request for assistance has been
forwarded to the sales representative who is responsible for your contract.
Related Topics
Opening the Customer Acceptance Portal, page 15-3
Accepting a Contract, page 15-4
Declining a Contract, page 15-6
Managing the Contract Life Cycle    16-1
16
Managing the Contract Life Cycle
This chapter covers the following topics:
• Overview of Managing the Contract Life Cycle
• Modifying Multiple Contracts at the Same Time (Mass Change)
• Handling Change Requests
• Entering Contract Changes
• Reviewing and Approving Changes
• Updating Contracts Online
• Creating Different Contract Versions for Your Customer
• Viewing Contract History
• Handling Returns and Granting Credit
• Changing Contract Status
Overview of Managing the Contract Life Cycle
This group of topics explains how you can manage the contract life cycle.
After the contract authoring process is complete, you must manage your contracts on an
ongoing basis. You may need to change coverages, durations, versions, and other
aspects your contracts.
You can streamline and control administrative processes, by leveraging functionality
that manages updates and changes.
For information on contract extensions and renewals, see Approving Contracts, page 9-
4.
Modifying Multiple Contracts at the Same Time (Mass Change)
You can change one attribute of multiple contracts with a single request using mass
16-2    Oracle Service Contracts User Guide
change functionality. Mass change is allowed for contracts that are in appropriate
status, where the operation update online is permitted.
Note: Canceled contracts and Entered contracts that contain no lines do
not appear in the Mass Change form. This form is designed for contract
administrators to centrally manage contracts, which are generally in the
Active status. Entered contracts, which may have lines and no sublines
are essentially acted upon by assigned sales representatives who do not
typically need to perform mass changes. Sales representatives are
usually managing a limited number of contracts with specific
requirements, rather than a large number of contracts that may require
mass changes.
Mass Change supports changes to a particular instance selected in the update level. For
example, if changes are to be made at the operating unit, it will update records
pertaining to that operating unit.
The Mass change window allows you to enter the scope of the mass change request and
selection criteria. It determines which contracts are to undergo a mass change. The
update level is seeded, but may also be restricted by use of the OKS: Mass Change
Security Level profile option. If the security of the profile option is turned on, the list
may contain only the Contract and Contract Group levels; otherwise, the following is
the list of update levels available:
• Category
• Contract Group
• Operating Unit
• Party
• Contract
Mass change permits the following attributes to be changed. Making change on a
contract has a subsequent cascading effect and therefore needs to be carefully
considered before allowing such a change. Following attributes are permitted for mass
change that can be selected from the Attribute's LOV in the Mass Change header:
• Accounting Rule
• Agreement
• Business Process Price List
• Contract End Date
• Contract Group
Managing the Contract Life Cycle    16-3
• Contract Line Ref
• Contract Start Date
• Contract Renewal Type
• Coverage End Time
• Coverage Start Time
• Coverage Timezone
• Coverage Type
• Header Bill to Address
• Header Ship to Address
• Invoicing Rules
• Known As
• Party Billing Contact
• Party Shipping Contact
• Payment Term
• PO Numbering for Billing
• PO Required for Renewal
• Preferred Engineer
• Preferred Resource Group
• Price List
• Product Line Ref
• Reaction Time
• Resolution Time
• Revenue Account
• Salesperson
16-4    Oracle Service Contracts User Guide
• Summary Print
Note: if the billing schedule is defined with Equal Amount or
Covered Level, you cannot use Mass Change to modify either the
contract start date or the contract end date, as the billing schedule
must be adjusted for each individual contract.
To modify multiple contracts at the same time:
1. From the Navigator, navigate Contract Administration, and then select Mass
Change.
The Mass Change Operation window appears.
2. Enter the name of mass change.
3. From Mass Change Details select the value Update Level from the LOV, such as
Party.
4. Select Value from the LOV, such as Business World.
5. Select an appropriate attribute from the LOV, such as Price List
Attributes supported by mass change are listed in this list.
6. Select an old value, such as Corporate.
Managing the Contract Life Cycle    16-5
7. Select a new value, such as Business World.
8. Click Search or click Cancel and start over.
If you click the Search button, all the contracts that meet the criteria appear in the
Result region. By default, all the records are selected.
16-6    Oracle Service Contracts User Guide
9. To deselect a contract, check the Select check box.
Note: You can deselect all contracts by clicking Deselect All or you
can select all contracts by clicking Select All.
10. To run the quality assurance (QA) check first, select the Check QA check box.
11. To preview the request without submitting it, click Preview.
The Mass Change Submission window appears.
Because the Mass Change is a powerful process, you may preview a report. This
ensures that you do not unintentionally update any contracts. To do so, you can run
a preview, review the report, then submit it when you are confident the changes are
correct.
Managing the Contract Life Cycle    16-7
12. To submit the request, click Submit the Request.
The Mass Change Submission window appears.
1. Select either As soon as possible or On Specific day.
2. Click OK.
A note appears, indicating that the Mass Change request was successfully
submitted.
You are returned to the Mass Change window. The Operation Status field
provides the status for the mass change.
The Request region is populated with details of the request.
Note: While submitting the mass change request, if one of the
requests has an error it will display an error message. In this
case, you can resubmit the request after making the changes to
that request. This can be done until all the contracts in the mass
change request are successfully processed.
13. To view the details for the request, select View Request.
The Requests window appears.
16-8    Oracle Service Contracts User Guide
14. After the request is completed, requery the Mass Change request window to view
the updated operation status and request information in the Mass Change
Operation window.
Handling Change Requests
Your administrator can set a contract to a status that does not allow changes to be made
online through the authoring form, but does allow changes through a change request.
This provides more control over tracking the changes made to a contract through its life
cycle.
If the Active status does not allow online updates, then any changes to the contract
would have to go through the change request process. After a change request has been
approved, a notification is sent to the Contract Administrator. From the Inbox, you can
open the contract for update. In this situation the Open for Update button is not visible
in the contract itself.
After you complete the contract updates, you can run the contract through the QA
Check and if everything passes, the contract status is set back to Active.
Entering Contract Changes
Prerequisite
Confirm the status and operations setup allows changes for the category and status.
Managing the Contract Life Cycle    16-9
To enter contract changes:
1. From the Navigator, navigate to Contract Administration, and then select
Launchpad.
2. Select the Contract Navigator tab.
3. Highlight the contract you want to change.
4. Right-click the contract and select the Create Change Request option.
The Create Change Requests window appears.
5. Enter the request name and a description.
6. Confirm the requester's name in the Request By field.
This person receives a workflow notification when changes are approved and can
be applied to the contract.
7. Enter the request date.
8. Enter the effective dates.
9. To version the changed contract, select the Version check box.
10. To require signature, select the Signature Required check box.
16-10    Oracle Service Contracts User Guide
11. Record the lines for which you are requesting a change and the exact nature of the
change. For example, apply an extra 10% discount.
12. Select the Admin tab.
13. In the Workflow Name field, select the approval workflow.
14. Select an administrator.
15. Select party approvals (optional).
16. Save.
Managing the Contract Life Cycle    16-11
17. Click Submit for Approval.
A note message appears, indicating that the change request has been Submitted for
approval
18. Click OK.
Reviewing and Approving Changes
The change request must first be approved before you can change the contract. After the
change request has been approved, you can open the contract and apply the changes as
described in the change request notification. After you start editing the contract, you
automatically lock the contract for other users with an approved change request.
Prerequisite
Open the change request notification in your Inbox and confirm no other change
requests are in process.
To review and approve changes:
1. From the Navigator, navigate to Contract Administration, and then select
Launchpad.
2. From the Launchpad, click Find.
16-12    Oracle Service Contracts User Guide
The Inbox Find window appears.
3. From Select Notification Type, select Change Request Approvals.
4. Click Find.
The contracts that have open change requests appear.
Managing the Contract Life Cycle    16-13
5. Highlight a contract from the Inbox and click Respond.
The Notification Details window appears.
6. Click Approve.
The worklist window shows the change request has been approved.
Close the worklist.
7. From the Launchpad Inbox select Find:
• From the Select Notification Type list, select Change Requests Approved.
• Click Find.
The approved change requests appear.
• Highlight the change request and select Open.
The contract opens in status of QA Hold (or Open for Update).
After you make changes to the contract, you must submit the contract for a QA
check.
8. From the Actions menu, select Check QA.
The Quality Assurance Results window appears. If the contract passes QA, select
OK.
A new version of the contract will be created if that option was selected in the
16-14    Oracle Service Contracts User Guide
change request.
Note: To change a contract that has been submitted through the
change request process to Active status, you can open the change
request and click Check Contract on the Admin tab.
Updating Contracts Online
After the contract has gone through the approval process, you can update a contract
through the Update Online operation, as long as the status and operations definition
allows it.
Prerequisites
• Set the OKC: Global Update Privileges profile option to Yes.
• Grant the Update Online function to the user responsibility
• Confirm other users do not have the change request lock on the contract.
To update contracts online:
1. From the Service Contracts Authoring window, select the Summary tab and select
Open for Update .
The Contract Status should change from Active to QA Hold. This locks the contract.
2. Make changes to the contract.
3. Save.
4. From the Actions menu, select QA Check.
5. Review the QA results.
6. If the QA results are clean, click OK.
7. The Contract Status changes from QA Hold to Active.
Managing the Contract Life Cycle    16-15
Creating Different Contract Versions for Your Customer
The contract version consists of a major version and a minor version. The major and
minor versions are separated by a period. When a contract is created, the version is set
to 0.0. The minor version increases incrementally each time that the contract is changed.
When you create a new version, the major version number of a contract is changed from
its most recent value to the next increment. The minor version changes each time that
the contract is changed, but the major version will not change again unless you create
another contract version.
For example:
Contract Changes Version
Initial creation 0.0
First save with changes 0.1
Second save with changes 0.2
Create new version 1.0
First save after new version 1.1
Second save after new version 1.2
To create different contract versions for your customer:
1. From the Service Contracts Authoring window, select the Tools menu and select
Create New Version.
A caution window appears indicating that the application will create a new version.
2. Click OK.
16-16    Oracle Service Contracts User Guide
A note appears, indicating that a new version has been created successfully.
3. Click OK.
In the Version field, the digit that is in front of the period, or the major version
number, increases by one. The minor version is reset to zero.
Viewing Contract History
To view contract history:
1. In the Contract Navigator tab of the Oracle Contracts window, select a contract.
2. Double-click the contract.
The Contract Execution window appears.
Managing the Contract Life Cycle    16-17
3. Select the History tab.
16-18    Oracle Service Contracts User Guide
4. From the Select list choose an option:
• Status Change
• Contract Versions
• Change Requests
• Change Requests and Contract Versions
5. To open a contract version or change request, highlight the version and select Open
.
Depending on what you select, the Service Contracts Authoring window or the
Create Change Request window appears.
See also:
• Extending a Contract Line (Contract Execution window), page 17-6
Managing the Contract Life Cycle    16-19
• Terminating a Contract Line (Contract Execution window), page 20-5
Handling Returns and Granting Credit
Credits are determined by the RMA line type in Oracle Order Management. When a
product is returned from Oracle Order Management, Oracle Installed Base makes a call
to Oracle Service Contracts with the parameter raise_credit, which determines if a full, a
partial, or no credit is to be issued.
• Full: Product line in Oracle Service Contracts is terminated as of the start date of the
product line and a full credit is issued.
• Calculated (Partial): Product line in Oracle Service Contracts is terminated as of the
return date of the product. A partial prorated credit is issued based on the return
date.
• None: Product line in Oracle Service Contracts is terminated as of return date and
no credit is issued.
If there is a null value and nothing is passed in the parameter raise_credit, then Oracle
Service Contracts uses the credit option rule set in the Credit Amount field of the Global
Contracts Defaults window. You can set the credit option to Full, Calculated, or None.
For more information on the Global Contracts Defaults window, see Entering Contract
Defaults, page 2-36.
If you define the credit option rule in Global Contracts Defaults, and your administrator
sets the OKS: Raise Credit Memo for IB Instance Termination option to Yes, the
application uses the values defined in the Global Contracts Defaults. If your
administrator sets the profile option to No, the application does not generate credits.
Changing Contract Status
To change a contract status:
1. In the Contract Navigator, right-click a contract and select Change Status.
The Contract Status window appears.
16-20    Oracle Service Contracts User Guide
2. Select the new status from the LOV.
Note: The New Status LOV is dependent on the Current Status. For
example, the New Status LOV values for Terminated contract are
different from that of an Entered or Active Contract.
3. Select a reason from the LOV.
If you need to add more reasons for the status change, your system administrator
can add more options in the Lookup Codes.
4. Use the Comments field to enter any additional information.
5. Click OK.
6. A Status window appears indicating that the status change was successful.
7. Click OK.
Note: The Termination Reason field populates only for Terminated
Contracts. This feature allows you to know the termination reason
and segregate contracts with similar reasons under New Status.
8. In the Contract Navigator tab, right-click the contract and select Refresh.
The contract shows the new status.
Managing the Contract Life Cycle    16-21
Note: Certain status transitions are made based upon the start date
or end date on a contract or on a contract line. There are two
concurrent programs used to automatically change the status of a
contract:
• Contract Status Change by Range
• Contract Status Change by Contract
These programs are used when the status transitions are not
manual.
For example, a contract:
• expires when an end date is reached.
• becomes active from the signed status at the start date.
Extending and Renewing Contracts    17-1
17
Extending and Renewing Contracts
This chapter covers the following topics:
• About Contract Extensions and Renewals
• Extending a Contract Without Repricing
• Repricing an Extended Contract
• Extending a Contract Line
• How Billing Schedules Are Updated for Extended Contracts
• Understanding Contract Renewals
• Managing Manual Renewals
• Managing Online Renewals
• Managing Evergreen Renewals
• Understanding Sales Credits During Contract Renewals
• Explaining the Pricing of Renewed Contracts
• Specifying How the Renewed Contract Will Be Priced
• Renewing Contracts Manually
• Managing the Event-Driven Renewal Process
• Allowing a Grace Period for Renewals
• About Grace Periods
• Specifying a Grace Period for the Current Contract
• Specifying a Grace Period for the Renewed Contract
• Understanding Billing Schedules on Renewed Contracts
• Consolidating Multiple Contracts for Renewal
• Sending Quote Letters by E-mail
• Understanding Line Level Cancellation and Termination Reasons
17-2    Oracle Service Contracts User Guide
• Canceling a Contract Line
• Canceling a Contract Subline
About Contract Extensions and Renewals
This group of topics explains how you can extend and renew contracts.
Contract Extensions
Oracle Service Contracts allows you to extend the duration of a contract or a contract
line without having to submit the contract to the approval workflow.
A contract must be in a status of Active, Signed, or Expired to be extended. Contracts in
a status of Entered, Canceled, or Terminated are examples of contracts that cannot be
extended.
When you extend the duration of a contract, the contract lines are automatically
extended, as long as the end date of the line is the same as the end date of the contract.
If the end date for the line is different from the end date for the contract, the line will
not change if the contract is extended. This functionality ensures that a service with a
duration that, is deliberately different from the contract duration, retains its intended
duration.
Either you can extend the contract without repricing it, or you can choose to reprice it.
For example, you may:
• Provide a customer with six months of additional coverage, because he is a good
customer and you want to show your appreciation. In this scenario, you choose not
to reprice the contract. See Extending a Contract without Repricing, page 17-4.
• Extend a contract by three months because of a customer request. Although you
agree to extend the contract, you advise the customer that he will be charged for the
extension. In this scenario, you choose to reprice the contract. See Repricing an
Extended Contract, page 17-5.
You can also extend the duration of a contract line manually. See Extending a Contract
Line, page 17-6.
After you have extended a contract, you should review any changes to the billing
schedules. See How Billing Schedules Are Updated for Extended Contracts, page 17-9
Note: You cannot extend the original contract if it has already been
renewed. However, you can extend the renewed contract, as long as
another contract does not follow it.
Contract Renewals
The process of renewing a contract involves making a copy of an existing, active
Extending and Renewing Contracts    17-3
contract at a point in time. The dates are changed to reflect a period similar to that of the
existing contract, beginning on the first day after the existing contract expires. Other
attributes of the new contract may also be changed, such as pricing.
Contracts can be renewed either manually or automatically. You can manually renew a
contract from the Contract Navigator, or your administrator can set up the application
to automatically submit a contract for renewal. Regardless of whether you plan to
renew contracts manually or automatically, you can:
• Define renewal rules within a contract. See Specifying How a Contract Will Be
Renewed, page 2-28.
• Create global defaults. See Setting Up Defaults for Contract Renewal, page 2-34.
After a contract has been renewed, changes to the existing contract will not update the
renewal contract. For example, if a contract is renewed 90 days before expiration and
the customer requests changes to their existing contract 15 days after the renewal
process has begun, the changes made to the existing contract will not be reflected on the
renewed agreement. If changes have not been made on the renewal contracts and it is
still in an Entered state, you can:
• Delete the renewal contract.
• Change to the original contract.
• Renew the contract again, so that the latest changes are incorporated on the renewal
contract.
Note: When renewing a Subscription contract:
• A new instance is not created in Oracle Installed Base and the new
contract continues to reference the same parent item. However, if
you use the Copy function to create a new Subscription contract, a
new instance is created in Oracle Installed Base.
• The Fulfillment schedule is copied to the new contract.
To upsell a contract by adding additional services or covered goods, you may do so at
renewal. To upsell a contract, you must work with a sales representative when an
opportunity to open and update the contract occurs.
You can cancel service lines or covered products during a renewal if you no longer
want to renew them. See Understanding Line Level Cancellation and Termination
Reasons, page 17-37.
For information about creating and enabling templates for e-mails to customers, see
About Templates for E-Mails to Customers, page 18-1.
17-4    Oracle Service Contracts User Guide
Extending a Contract Without Repricing
To extend a contract without repricing:
1. From the Contract Navigator, highlight a contract and right-click.
2. Select Extend.
The Extend Contracts window appears.
3. Select a Duration and Period.
The End Date field is populated based on the duration and period.
4. Select Extend.
5. A decision message indicating that the contract was successfully extended appears.
Click Yes to save changes.
6. To verify if that the contract was extended, highlight the contract and right click.
7. Select Open.
The contract authoring window appears.
8. Check the duration of the header to verify whether the contract was extended.
Extending and Renewing Contracts    17-5
9. Select the Lines tab and Effectivities subtab to verify whether the lines were
extended.
Note: For the procedure about extending a contract line, see Extending
a Contract Line, page 17-6.
Repricing an Extended Contract
To reprice an extended contract:
1. From the Service Contracts Authoring window, select the Summary tab and Parties
subtab, and then select Open for Update.
Note: If you do not see the Open for Update button, your
administrator may not have set the status and operations to allow
online updates.
The status of the contract changes to QA hold.
2. To reprice the contract line by line, navigate to the Lines tab and Pricing/Products
subtab.
3. Select Reprice.
The Repricing Results window appears.
4. Click Apply.
Verify that the pricing was updated. You may also want to review the billing
streams. The application adds an additional stream level sequence to cover the
extended duration.
Note: Anytime the dates of a contract header, line, or subline are
changed, remember to verify that amounts and billing schedules
are updated or retained as appropriate for the situation.
5. From the Actions menu, select Check QA to run the QA check.
The Quality Assurance Results window appears.
6. Click Continue.
7. The contract status updates to the original status.
17-6    Oracle Service Contracts User Guide
Note: You can reprice the entire contract, by navigating to the
Summary tab and Pricing/Billing subtab and selecting Reprice.
Extending a Contract Line
To extend a contract line:
1. From the Contract Navigator, select the contract that contains the line to extend.
2. Double-click the contract to open the Contract Execution window.
Extending and Renewing Contracts    17-7
3. Select the Overview tab. The lines of the contract appear in the lower portion of this
tab.
4. Highlight the line you want to extend, right-click and select Extend Line.
The Extend Contracts Line window appears.
5. Enter a duration and period.
17-8    Oracle Service Contracts User Guide
6. Click Extend.
7. A decision box appears, indicating that the line was successfully extended.
8. Select Yes from the decision box.
9. Close the Contract Execution window and return to the Contract Navigator.
10. To verify that the contract line was extended, return to the Contract Execution
window.
11. Select the line, right-click, and select Refresh.
Extending and Renewing Contracts    17-9
How Billing Schedules Are Updated for Extended Contracts
After the contract is extended, an additional billing stream sequence appears in the
billing schedule. This sequence covers the extended duration. Depending on the billing
schedule, the total amounts for any unbilled periods are updated to reflect the
remaining duration of the contract.
Billing Schedules for Extended Contracts Without Repricing
If you do not reprice the contract, the total amount of the contract remains unchanged.
However, for each line, a new billing stream sequence is added with the same billing
period as the preceding stream sequence. The number of periods for the new billing
stream sequence reflects the duration of the extension.
Although the total amount of the contract has not changed, the billing stream sequences
for any unbilled total amounts are also updated to reflect the remaining duration of the
contract. The billing schedule is also updated.
For example, if you have a one-year contract with a service line that is priced at 100
17-10    Oracle Service Contracts User Guide
USD and is scheduled to be billed one time during the one-year duration, and you
extend that contract without repricing it; a second billing stream sequence is added
with the same billing period as the previous billing stream sequence. Because the
contract has not been billed, the amount for each billing stream sequence is now 50
USD. However, the total amount of the service line remains 100 USD.
Billing Stream Before Contract Extension
Seq Number
of
Periods
Start
Date
End Date Duration Period Amount Total
Amount
1 1 01-MAR-
2005
28-FEB-2
006
1 Year   100
Billing Stream After Contract Extension
Seq Number
of
Periods
Start
Date
End Date Duration Period Amount Total
Amount
1 1 01-MAR-
2005
28-FEB-2
006
1 Year   50
2 1 01-MAR-
2006
28-FEB-2
007
1 Year   50
Billing Schedules for Extended Contracts with Repricing
If you reprice the contract, the total amount of the contract is updated to reflect the new
pricing. For each line, a new billing stream sequence is added with the same billing
period as the previous stream. The number of periods for the new billing stream reflects
the duration of the extension. Because the total amount of the contract has changed, the
billing streams for any unbilled amounts are updated to reflect the new amount and the
new billing stream. The billing schedule is also updated.
For example, you have a one-year contract with a service line that is priced at 100 USD,
and is scheduled to be billed one time during the one-year duration, and you then
extend the contract and reprice the service line to 200 USD, a second billing stream
sequence is added with the same billing period as the previous billing stream sequence.
Because the contract has not been billed, the amount for each billing stream is now 100
USD and the total amount of the service line is 200 USD.
Billing Stream Before Contract Extension
Extending and Renewing Contracts    17-11
Seq Number
of
Periods
Start
Date
End Date Duration Period Amount Total
Amount
1 1 01-MAR-
2005
28-FEB-2
006
1 Year   100
Billing Stream After Contract Extension
Seq Number
of
Periods
Start
Date
End Date Duration Period Amount Total
Amount
1 1 01-MAR-
2005
28-FEB-2
006
1 Year   100
2 1 01-MAR-
2006
28-FEB-2
007
1 Year   100
Understanding Contract Renewals
Contracts can be renewed manually or through an event-driven process.
The life cycle of a renewal contract is similar to a newly authored contract. See
Overview of Managing Contract Negotiation, page 11-1.
The key difference between a new contract and a renewal contract is the process
following contract creation. A new contract remains in a sales representative's queue
pending his action; whereas the application routes a renewal contract to the sales
representative, the customer, or bypasses both and activates the contract. Two
parameters determine the branching: the renewal rule and the threshold amounts
derived from the Global Contracts Defaults. See Entering Contract Defaults, page 2-36.
You can set up renewal rules that apply to both the manual renewals and the
event-driven renewals. See Specifying How a Contract Will Be Renewed, page 2-28
,Renewing Contracts Manually, page 17-27, and Managing the Event-Driven Renewal
Process, page 17-28.
Understanding Renewal Rules Setup and Renewal Contract Branching
To derive the renewal process, the application evaluates renewal rules using the
contract, party, organization, and global level hierarchy for the authored contract. At
each level, starting with the contract authoring level, the application evaluates renewal
rules according to a logic that first evaluates threshold conditions and determines the
validity of a threshold-driven process. If a threshold condition is not satisfied, the
17-12    Oracle Service Contracts User Guide
application uses the renewal process entered on the contract. If no renewal process is
entered on the contract, the logic is repeated at the next level of the hierarchy, such as
the organization level. The renewal process follows the following logic to determine the
renewal process for a contract:
1. Based on the setup of the contract and the Global Contracts Defaults, the renewal
process determines the effective renewal rule. This rule includes three values:
• Default Renewal Process: following the contract, party, organization, global
hierarchy
• Evergreen Threshold Amount: following the party, organization, global
hierarchy
• Online Threshold Amount: following the party, organization, global hierarchy
2. The application checks if the renewal process is Evergreen. If so, the application
renews the contract as an Evergreen contract.
3. The application then determines if the contract qualifies as Evergreen based on the
Evergreen threshold amount. If so, the application renews the contract as an
Evergreen contract.
4. If the contract fails the previous two Evergreen checks, the application determines if
the contract qualifies as an Online contract based on the Online threshold amount.
If so, the application renews the contract as an Online contract.
5. If the amount does not meet the Online threshold but renewal process is set to
Online, the application renews the contract as an Online contract.
6. If the contract does not qualify as Evergreen or Online based the previous steps, the
application uses the default renewal rule during renewal.
How the Application Derives the Effective Renewal Rule for a Contract
Level Renewal Process Evergreen Threshold Online Threshold
Contract Null NA NA
Party Evergreen Null 20,000
Organization Null 10,000 15,000
Global Online -- --
Extending and Renewing Contracts    17-13
Effective Renewal
Rule Values
Evergreen 10,000 20,000
In the previous example, if the contract amount is equal to 15,000, the application uses
the default renewal process at the party level, which is Evergreen. This level is used
irrespective of the contract amount.
How the Application Derives the Effective Renewal Rule for a Contract
Level Renewal Process Evergreen Threshold Online Threshold
Contract Online NA NA
Party Manual Null 20,000
Organization Null 10,000 15,000
Global Online -- --
Effective Renewal
Rule Values
Online 10,000 20,000
In the previous example, if the amount is 5,000, the Evergreen process holds. If the
contract amount is 15,000, the Online process holds. If the amount is 25,000, the Online
process holds. After the application derives the renewal process, workflow logic
determines contract routing and the process flow.
Understanding Renewal Rules Setup and the Approval Flag
Renewal types include the following:
• Manual
• Online
• Evergreen
• Do Not Renew
The Manual, Online, and Evergreen renewal types have subprocesses that you define
by selecting an Internal Approval method either within the contract itself or within the
Global Contracts Defaults. Internal approval method is a required field that needs to be
defined when a renewal process is defined at the contract, party, organization, or global
level. When the renewal process determines the renewal process type for a contract, the
17-14    Oracle Service Contracts User Guide
corresponding approval flag determines the internal approval method for that contract.
See Entering Contract Defaults, page 2-36.
The following table provides an overview of the combinations of renewals types and
internal approval methods. You can start renewals through an event-driven process or
manually:
Renewal Process Internal Approval
Method
Description
Manual Required This renewal type sends a notification to
the inbox of the sales representative
associated with your contract. See
Understanding Manual Renewals with the
Internal Approval Set to Required, page
17-15.
Manual Not Required The Submit for Internal Approval action
associated with this renewal type results
in an automatic QA check and contract
activation.
A QA check failure results in a Failure
notification, and routes the contract back
to the negotiation stage of the process,
where you can update it. Activation takes
place with the Signature notification
directed to the sales representative. See
Understanding Manual Renewals with the
Internal Approval Set to Not Required,
page 17-16.
Online Manual This renewal type sends an e-mail
notification to the customer to renew the
contract over the Web. See Understanding
Online Renewals with the Internal
Approval Set to Manual, page 17-16.
Online Automatic This renewal type enables a contract that
has been accepted online by the customer
to be automatically submitted for internal
approval without a sales representative's
intervention. See Understanding Online
Renewals with the Internal Approval Set
to Automatic, page 17-18.
Extending and Renewing Contracts    17-15
Online Not Required This renewal type skips the internal
approval allowing a contract to be directly
submitted for activation as a result of
online customer acceptance. See
Understanding Online Renewals with the
Internal Approval Set to Not Required,
page 17-18.
Evergreen Required This renewal type enables you to have the
application create a renewed contract and
submit it for approval to the sales
representative specified on the contract or
the help desk contact specified in the
Global Contracts Defaults. See
Understanding Evergreen Renewals with
Internal Approval Set to Required, page
17-18.
Evergreen Not Required This renewal type enables the application
to renew the contract in Active status.
No approval or human intervention is
required. See Understanding Evergreen
Renewals with the Internal Approval Set
to Not Required, page 17-19.
Do Not Renew NA This renewal type enables you to prevent
a contract from being renewed. See
Understanding How Do Not Renew
Works, page 17-19.
Understanding Manual Renewals with the Internal Approval Set to Required
By setting the renewal type of a contract to a Manual renewal with the Internal
Approval set to Required, the application sends a notification to the Inbox of the sales
representative associated with your contract.
The process works as follows:
• The application renews the contract in Entered status with a negotiation status of
Draft.
• The application sends a notification to the inbox of the sales representative.
• The sales representative reviews the contract and makes any necessary changes.
The application sets the negotiation status to Pending Approval.
17-16    Oracle Service Contracts User Guide
• The sales representative submits the contract for approval.
• After the contract is approved, the application changes the status to Active or
Signed and sets the negotiation status to Complete.
See Managing Manual Renewals, page 17-19.
Understanding Manual Renewals with the Internal Approval Set to Not Required
By setting the renewal type of a contract to Manual with the Internal Approval set to
Not Required, you can author a contract and have it activate after customer acceptance.
The following describes how the process works:
• The Submit for Internal Approval action results in an automatic QA Check and then
activation.
• A QA Check failure results in a Failure notification, and routes the contract back to
Negotiation stage of process where it may be updated and then activated.
• The application activates the contract by the Signature notification directed to the
sales representative.
See Managing Manual Renewals, page 17-19.
Understanding Online Renewals with the Internal Approval Set to Manual
By setting the renewal type of a contract to Online with the Internal Approval Set to
Manual, the application sends an e-mail notification to the customer to renew the
contract over the Web.
The following describes how the process works:
• The application renews the contract with a status of Entered.
• The application runs a QA Check against the contract.
• If the QA Check fails, the application sends a notification. The hierarchy for the
notification is:
• Sales representative, if defined on contract
• Helpdesk, set up in Global Contracts Defaults
• After the contract has been corrected, the contracts administrator can resubmit it, so
it will be picked up by the Autorenew workflow.
• The application sends an e-mail notification to the customer. This is the Quote To
contact on the contract. The e-mail contains the following:
Extending and Renewing Contracts    17-17
• A cover letter, which is defined in OKC Print Contracts Setup
• A URL for customer to view Quote Letter, which is defined in OKC Print
Contracts setup.
• An account and password that are required to log into the web page and view
quote. Account and Password are stored in FND USERS and associated with
the Quote To contact.
Note: The first e-mail sent to the Quote To user, contains a
password in a readable format. For security, the password will
be encrypted in the subsequent e-mails sent to the same user.
• Upon receipt of the e-mail, the customer may log into the web page to review the
quote and accept, reject, or request changes to the contract renewal. See Overview
of the Customer Acceptance Portal, page 15-1.
If the customer accepts the contract renewal, the following occurs:
• The application updates renewal status to Quote Accepted.
• The application updates contract with the payment details.
• The application sends notification depending on hierarchy.
• The application logs an interaction.
• The contract administrator must initiate the approval process by manually
submitting the contract for approval.
• The application sends a notification to the contract approver. If the QA Check fails,
the application sends a notification to the help desk e-mail account.
• If the customer rejects the quote, the application sends a notification and places the
contract in the Rejection negotiation status. The hierarchy for the notification is as
follows:
• Sales representative, if defined on contract
• Helpdesk setup in Global Contract Defaults
• The sales representative must resubmit rejected quotes for approval after making
required modifications. After the approval, the application updates the status to
Active or Signed.
See Managing Online Renewals, page 17-20.
17-18    Oracle Service Contracts User Guide
Understanding Online Renewals with the Internal Approval Set to Automatic
By setting the renewal type of a contract to Online with the Internal Approval Set to
Automatic, the application submits contracts accepted Online by the customer for
internal approval without sales representative intervention.
See Managing Online Renewals, page 17-20.
Understanding Online Renewals with the Internal Approval Set to Not Required
By setting the renewal type of a contract to Online with the Internal Approval Set to Not
Required, you are allowing the internal approval to be skipped during the Online
process. This allows the application to directly submit a contract for activation after
online customer acceptance.
The following describes how the process works:
• Online customer acceptance results in an automated QA check and automatic
submission for contract activation.
• A QA Check failure after customer acceptance prompts a failure notification, and
routes the contract back to Negotiation stage of process, where it may be updated
and submitted for activation.
• Activation takes place by the Signature notification directed to the sales
representative.
See Managing Online Renewals, page 17-20.
Understanding Evergreen Renewals with Internal Approval Set to Required
By setting the renewal type of a contract to Evergreen with Internal Approval set to
Required, the application creates a renewed contract and submits it for approval.
The following describes how the process works:
• The application renews the contract in Entered status.
• The application automatically submits the contract for approval.
• The application sends a notification as follows:
• Sales representative, if defined on contract
• Helpdesk setup in Global Contract Defaults
Note: If you do not see the Submit button, your administrator may not
have set the status and operations to allow online updates.
Extending and Renewing Contracts    17-19
See Managing Evergreen Renewals, page 17-22.
Understanding Evergreen Renewals with the Internal Approval Set to Not Required
By setting the renewal type of a contract to Evergreen Renewals with the Internal
Approval set to Not Required, the application renews the contract in a status of Active.
Following is a description of how the process works:
• The application renews contract in Active status.
This renewal type does not require approval or human intervention.
See Managing Evergreen Renewals, page 17-22.
Understanding How Do Not Renew Works
By setting the renewal type of a contract to Do Not Renew, you can prevent a contract
from being renewed.
Managing Manual Renewals
Note: Setting the renewal type within does not necessarily mean the
contract will be renewed accordingly. The application may override
this option based on the Evergreen and Online renewal types as well as
thresholds specified in the Global Contracts Defaults.
To specify the contract should be renewed manually with the internal approval set to
required:
You can specify whether a contract should renewal manually on the contract. Upon
renewal, whether it is an event-driven or manual renewal, the application sends a
notification to the sales representative associated with the renewal. See Understanding
Sales Credits During Renewals, page 17-22.
Prerequisites
Confirm the setup of sales territories, or set OKS: Use Territories to Default Sales Person
to No and specify the sales representative who handles renewal requests in the profile
option OKS: Default Sales Person for Renewal.
1. From the Service Contracts Authoring window, select the Summary tab and the
Renewals subtab.
2. Select Manual from the Type LOV in the Renewal region.
3. Select Required from the Approval list.
17-20    Oracle Service Contracts User Guide
4. To require the sales representative to enter a purchase order before the contract can
be renewed, select Yes from the PO Required list.
To specify the contract should be renewed manually with the internal approval set to not
required:
You can allow a contract to automatically activate after customer acceptance.
1. From the Service Contracts Authoring window, select the Summary tab and
Renewals subtab.
2. Select Manual from the Type LOV in the Renewal region.
3. Select Not Required from the Approval list.
4. To require the contract author to enter a purchase order before the contract can be
renewed, select Yes from the PO Required list.
Managing Online Renewals
Prerequisite
Confirm the setup of online renewal.
To specify the contract should be renewed online with the internal approval set to
manual:
Online renewal is available for Warranty and Extended Warranty, Service Agreement,
and Subscription categories of contracts.
The e-mail the application sends includes a hyperlink the customer can use to access
your organization's web site and renew the contract. See Overview of the Customer
Acceptance Portal, page 15-1.
1. From the Service Contracts Authoring window, select the Summary tab and the
Renewals subtab.
2. Select Online from the Process LOV in the Renewal region.
3. Select Manual from the Approval list.
4. In the Quote to region, use the LOV to enter the contact, e-mail address, and phone.
Note: The contact must have an existing e-mail address. You cannot
add new addresses here.
Extending and Renewing Contracts    17-21
5. Save.
To specify the contract should be renewed online with the internal approval set to
automatic:
You can allow a contract to be automatically submitted for internal approval without
intervention by the sales representative after it is accepted online by a customer.
1. From the Service Contracts Authoring window, select the Summary tab and the
Renewals subtab.
2. Select Online from the Process LOV in the Renewal region.
3. Select Automatic from the Approval list.
4. In the Quote to region, use the LOV to enter the contact, e-mail address, and phone.
Note: The contact must have an existing e-mail address. You cannot
add new addresses here.
5. Save.
To specify the contract should be renewed online with the internal approval set to not
required:
You can have online customer acceptance result in an automated QA check and
submission for contract activation.
1. From the Service Contracts Authoring window, select the Summary tab and
Renewals subtab.
2. Select Online from the Process LOV in the Renewal region.
3. Select Not Required from the Approval list.
4. In the Quote to region, use the LOV to enter the contact, e-mail address, and phone.
Note: The contact must have an existing e-mail address. You cannot
add new addresses here.
5. Save.
17-22    Oracle Service Contracts User Guide
Managing Evergreen Renewals
To specify an evergreen renewal with the internal approval set to required:
You can have the application create a renewed contract and submit it for approval to
the sales representative specified on the contract or the help desk contact specified in
the Global Contracts Defaults.
1. From the Service Contracts Authoring window, select the Summary tab and
Renewals subtab.
2. Select Evergreen from the Type LOV in the Renewal region.
3. Select Required from the Approval list.
4. To require the entry of a purchase order before the contract can be approved, select
Yes from the PO Required list.
To specify an evergreen renewal with the internal approval set to not required:
You can have the application renew a contract upon expiration.
1. From the Service Contracts Authoring window, select the Summary tab and the
Renewals subtab.
2. Select Evergreen from the Process LOV in the Renewal region.
3. Select Not Required from the Approval list.
4. Specify a date in the Renew Up To field. The contract keeps renewing automatically
until this date.
5. Save.
Understanding Sales Credits During Contract Renewals
The following provides an overview of how Oracle Service Contracts determines which
sales representative receives sales credit for the renewal. The application uses OKS:
Enable Sales Credit profile to make this determination. This profile option has four
values:
OKS: Enable Sales Credit Profile Option
Setup
Business Rule
Extending and Renewing Contracts    17-23
Derive for Revenue Type Drops both types of sales credits and derives
only the sales credit specified under the
OKS:Revenue Type profile option.
Derive for Revenue Type and Retain Other Drops and derives only the sales credit
specified under the OKS:Revenue Type profile
option; Retains the other sales credit.
Drop All Drops both sales credits; no derivation of
either.
Retain All Retains both sales credits; no derivation of
either.
Rules to Derive Sales Representative When the Profile Option OKS: Enable Sales
Credits is set to Derive:
The application uses the following profile options to derive a sales representative for
the renewal agreement:
• OKS: Use Territories to Default Sales Person
• If set to Yes, the sales representative uses Territory Setup.
• If set to No, then Service Contracts uses the value entered in OKS: Sales person
to derive the vendor contact and or sales representative.
• OKS: Sales Person
• If OKS: Use Territories to Default Sales Person is set to No, this profile
determines the sales representative for the Sales Credit form and for the vendor
contact on the contract summary.
• If OKS: Use Territories to Default Sales Person is set to No, and you do not set a
value for OKS: Sales Person, the contract fails to renew and produces an error
message. You may manually add additional sales representative to the Sales
Credits form after the application creates the renewal agreement
Other Profile Options Used for Sales Credits:
• OKS: Revenue Type Distribution for Sales Credit: Assigns the percentage of
revenue to the sales person whose name was determined by the OKS: Sales Person
or OKS: Use Territories to Default Sales Person profile options. Sales Credits must
total 100% in order to pass the QA check.
17-24    Oracle Service Contracts User Guide
Note: If you add additional sales people to the Sales Credits form,
remember to distribute revenue to them until the total is 100%.
• OKS: Revenue Type for Sales Credits: Indicates whether the revenue is quota or
non-quota for the default sales representative.
Explaining the Pricing of Renewed Contracts
You can set up renewal rules that apply to both manual renewals and automatic
renewals. Pricing methods specify how the contract will be priced at renewal. There are
three pricing methods:
• Price List: Charges the customer based on the price list you enter in the Price List
field. The price charged is the current price listed in the price list at the time the
contract is renewed.
• Manual: The application retains the price of the original contract for the renewed
contract.
• Markup Percent: Automatically adjusts the price up or down by a percentage you
enter. (A positive number marks up the price; a negative number discounts it.)
Optionally, you can cap the maximum adjustment based on a price list.
For more information on defining pricing methods for renewals, see:
• Specifying How the Renewed Contract will Be Priced, page 17-26.
• Setting Up Defaults for Contract Renewal, page 2-34.
Understanding the Price List Pricing Method
The following is intended to help you understand how the Price List pricing method
works.
A contract using the Price List pricing method has the Corporate price list assigned. For
the original contract the list price of item X is $150. Before the contract is renewed, item
X on the corporate price list is changed to $200. Item X on the renewed contract will be
$200.
Understanding the Manual Pricing Method
The following is intended to help you understand how the Manual pricing method
works.
A contract using the Manual pricing method contains item X. For the original contract
the list price of item X is $150. Before the contract is renewed, item X on the price list is
changed to $200. When the contract is renewed, item X will be $150, not the increased
Extending and Renewing Contracts    17-25
price of $200.
Understanding Renewal Markup Pricing
The following is intended to provide some scenarios to help you understand how
renewal markup pricing works.
In calculating the amount of a contract for a renewal agreement using Renewal Markup
Pricing, begin with the original year contract Con03. This agreement has a final price
that is comprised of the year 2003 price list plus any discounts or surcharges that are
applied (modifiers).
The contract contains a renewal markup that indicates that the final price of the contract
should be increased or decreased by a certain percentage when that contract is renewed.
Also identified is a renewal price list Cap04. This price list is generally used to assure
that renewal customers are not being asked to pay more for their renewal agreements
after markups than new customers are paying for their original service contracts.
When renewing the contract, any modifiers carried over from Con03 to the renewal
agreement are applied to the Cap04 list price to calculate the final price. Service
Contracts compares this amount to value of Con03 plus the renewal markup
percentage. The renewal markup value is used unless it exceeds the cap pricing value.
The application, effectively, selects the lower of the two values and that amount
becomes the new contract final price for the renewal agreement.
Example 1: Markup pricing does not exceed cap (using surcharges)
Con03
List price of item X $1,000
Modifier: 10% surcharge
Contract Final price: $1,100
Renewal markup: 5%
Con03R04
Cap List price of item X $1,500
Modifier: 10% surcharge
• Comparison:
Markup Pricing: $1,155
Cap Pricing: $1,650
New Contract Final Price $1,155
Example 2: Markup up pricing exceeds cap (using surcharges)
Con03
List price of item X $1,000
17-26    Oracle Service Contracts User Guide
Modifier: 10% surcharge
Contract Final price: $1,100
Renewal markup: 5%
Con03R04
Cap List price of item X $1,000
Modifier: 10% surcharge
• Comparison:
Markup Pricing: $1,155
Cap Pricing: $1,100
New Contract Final Price $1,100
Example 3: Markup pricing does not exceed cap (using discounts)
Con03
List price of item X $1,000
Modifier: 10% discount
Contract Final price: $900
Renewal markup: 5%
Con03R04
Cap List price of item X $1,200
Modifier: 10% discount
• Comparison:
Markup Pricing: $945
Cap Pricing: $1,080
New Contract Final Price $945
Specifying How the Renewed Contract Will Be Priced
To specify how the renewed contract will be priced:
1. From the Service Contracts Authoring window, select the Summary tab and
Renewals subtab.
2. From the Pricing Method LOV, select a pricing method.
3. If you have selected Price List, then enter the price list to be used for the renewal in
Extending and Renewing Contracts    17-27
the Price List field.
4. If you have selected Markup Percent, then:
1. Enter the percentage, which adjusts the price accordingly. Entering a positive
number marks up the price. A negative number discounts the contract renewal.
2. If you are marking up the contract price and wish to put a limit on the
maximum price the customer will pay, then enter a price list in the Price List
field. The price of the renewed contract cannot go over the price listed in the
price list.
For example, if you enter 20% as your markup and the current list price of the
service is $100, then the renewed contract is priced at $120. If you enter a price
list that lists the service at $110, however, then this price list caps the maximum
price for the service at $110. The customer pays a maximum of $110 for the
renewal.
Note: The price cap works only for (positive) markups and not
for discounts.
Renewing Contracts Manually
To renew contracts manually:
1. From the Contract Navigator, highlight an active contract.
2. Right mouse click to select Renew.
The Renew Contract window appears with the following fields populated:
• New Number: new contract number.
• New Modifier: a modifier to differentiate the old and renewed contract.
• New Start date: new start date.
17-28    Oracle Service Contracts User Guide
3. Enter the Duration and Period.
The New End date field populates after you enter the duration and period.
Note: If your contract is a large contract, you may wish to process
the contract in the background. You can do this by selecting the
Submit Request check box.
4. Click Renew.
5. A decision message appears indicating that the contract successfully renewed. Click
Yes to save changes.
The Contract Navigator appears.
6. On the right hand side of the form, right mouse click to select Refresh.
You should be able to identify the contract with the new modifier.
7. On the right hand side of the form, highlight the contract with the New Modifier
and right mouse click to select Open.
Managing the Event-Driven Renewal Process
There are a number of implementation setups that are required to define and trigger the
renewal process. For more information, see the Oracle Service Contracts Implementation
Guide.
Allowing a Grace Period for Renewals
By entering a grace period, you can extend the service a customer receives while a
renewed contract is in the process of being negotiated and approved. This group of
topics explains how grace periods work and how to set them up:
• About Grace Periods, page 17-29
Extending and Renewing Contracts    17-29
• Specifying a Grace Period for the Current Contract, page 17-30
• Specifying a Grace Period for the Renewed Contract, page 17-30
About Grace Periods
By specifying a grace period you grant the customer the services of a contract beyond
the expiration date at no extra charge. Grace periods ensure the customer does not
experience an interruption of service while a contract is being renegotiated, for
example.
The actual start and end dates of the contract and the billing schedule are unaffected by
the grace period.
If the renewal happens within the grace period, the new contract takes effect the day
after the original contract expired and the customer is billed accordingly.
Suppose, for example, that a customer calls on January 15 to renew a service contract
that expired on December 31. Because the contract had a one month grace period, the
customer did not experience any interruption of service, but the new contract goes into
effect and is billed from January 1 rather than from the date of the call or the end date of
the grace period.
You can specify a grace period both for the current contract and for the renewed
contract.
You can use the Global Contracts Defaults form to set up a standard grace period for
the contracts that are renewed.
The grace period affects only lines and sublines that expire on the same day as the
contract.
For example:
• Contract start date: 01-JAN-2003 end date: 31-DEC-2003
• Service 1 start date 01-JAN-2003 end date 31-JAN-2003
• Service 2 start date 01-JAN-2003 end date 31-DEC-2003
• Service 3 start date 01-OCT-2003 end date 31-DEC-2003
If you add a 30 day grace period to this contract, services 2 and 3 are eligible for
entitlement until 30-JAN-2004. Service 1 is not.
The same logic applies to sublines and coverage terms. Only those items that end on the
same day as the contract end date are considered for coverage during the grace period.
As long as the business processes are eligible for entitlement, the original terms
associated with the business process (preferred engineer, coverage times, reaction times,
resolution times, and billing types) will continue through the extended period.
17-30    Oracle Service Contracts User Guide
You can delete the grace period from the contract at any time, either before the contract
expires, when the grace period goes into effect, or when the renewed contract becomes
active.
Specifying a Grace Period for the Current Contract
You can grant, modify, or deny a grace period for the current contract. During a grace
period, the customer continues the same level of service as under the old contract, at no
extra charge, if the contract expires.
Prerequisite
Set the profile option OKS: Enable Grace Period to Yes at the Site Level.
To specify a grace period for the current contract:
1. From the Service Contracts Authoring window, select the Summary tab and
Administration subtab.
2. To grant a grace period:
1. Enter a number in the Grace Duration field. (For example: 30)
2. Select the unit of measure from the Grace Period LOV. (For example: Days)
3. To adjust the grace period, make changes in these same fields.
4. To deny an existing grace period, delete the entry in the Grace Duration field.
5. Save.
Specifying a Grace Period for the Renewed Contract
A grace period becomes effective upon the expiration of the renewed contract.
Prerequisite
Set the profile option OKS: Enable Grace Period to Yes at the Site Level.
To specify a grace period for the renewed contract:
1. From the Service Contracts Authoring window, select the Summary tab and
Renewals subtab.
2. To grant a grace period, then:
1. Enter a number in the Grace Duration field. (For example: 30)
Extending and Renewing Contracts    17-31
2. Select the unit of measure from the Grace Period LOV. (For example: Days)
3. To adjust the grace period, then make changes in these same fields.
4. To deny an existing grace period, then delete the entry in the Grace Duration field.
5. Save.
Understanding Billing Schedules on Renewed Contracts
If the renewed contract has the same duration as the original contract, a copy is made of
the original contract, which also includes a copy of the billing schedule.
If the renewed contract has a duration that is different than the original contract, then
the billing schedule does not appear on the renewed contract. The renewed contract
fails the QA check because the billing schedule does not adjust itself to the new
duration. This also happens when you renew a one year contract for six months. Even if
the renewal type is Evergreen (Internal Approval is Not Required), the renewed
contract stays in Entered status because it fails the QA check.
If you are considering using the Evergreen (Internal Approval is Not Required) renewal
type, you should also consider using billing profiles. When a billing profile is defined in
the global defaults, the billing schedule for the renewed contract is created according to
that billing profile.
Consolidating Multiple Contracts for Renewal
Renewing service contracts can be complicated because some organizations will always
sell a full duration service contract the first time, resulting in a single customer having
numerous contracts expiring at different times over the course of a year. This requires
the customer be contacted multiple times per year for renewal confirmation and
perhaps renegotiation, which increases the workload for renewal.
Renewal Consolidation addresses the problem of multiple contracts expiring during a
year (or other given period) causing multiple renewals. With Renewal Consolidation,
all the contracts to be renewed over a given period are consolidated into a single
renewal contract.
Renewal Consolidation has several benefits:
• Decreases the number of renewal contracts, reducing workload and the difficulties
imposed by large numbers of contracts.
• Improves the customer relationship. All the customer's services may be included in
a single contract or several consolidated contracts based on how the contracts are to
be billed.
17-32    Oracle Service Contracts User Guide
• Reduces the number of customer invoices.
The renewal consolidation process is initiated after a contract has been renewed, which
may have been the result of the renewal event where contracts are renewed in mass or
manually renewed from the Contract Navigator using the right mouse click. In both
cases the contract is in the Entered status and is considered the Target contract.
If a contract is not valid for consolidation, you will see the error message Target contract
is invalid. If the target contract is eligible for renewal consolidation, the Renewal
Consolidation window is displayed and is used to facilitate the selection of all the
source contracts for consolidation. The upper half of the window displays all the details
of the target contract. The lower half displays all the eligible source contracts in a tree
structure.
The following lines are displayed:
• Service lines
• Sublines or covered levels, for example, Party, Customer, Site, Product, Item, and
System
A contract is eligible as a source contract if the following are true:
• Customer account is the same as the target
• Source contract end date +1 is within the effectivity of the target contract.
• Potential source contract must be in Active or Expired status
When submitting the renewal consolidation, a concurrent request consolidates all of the
selected source lines into the target contract. If the services are the same on the source
and target contracts, the covered levels of those services can be merged into one
contract line on the target contract.
Merging occurs if the following conditions are met:
• Target and source lines have the same:
• Service Item
• Organization ID
• Renewal Type
• Bill-To site
• Start and End Dates
In addition, setting the profile option OKS: Check Coverage Match to Yes, forces the
renewal consolidation process to preserve differences in coverage.
Extending and Renewing Contracts    17-33
The Check Coverage API compares each attribute of the coverage and stops as soon as
one difference is found. It returns the result to the renewal consolidation process. If the
coverage is the same, the sublines of the source contract are merged under the service of
the same name on the target contract. If the coverages are different, a new contract line
is created on the target contract for the service on the source contract.
The Check Coverage API checks the following attributes:
• Coverage Name
• Coverage Type
• Business Processes
• Preferred Resources
The start dates of the consolidated lines begin one day after the expiration of the
original source line and all the end dates coterminate with the target contract. When the
operation instance is reviewed at a later date, that is, after the concurrent request has
processed normally, all the consolidated source lines are identified with ##.
When the renewal consolidation or operation instance is created, a source line is eligible
for consolidation at that point in time. However, between the time it is created and the
time it is submitted, a given source line may have been renewed, whether it be by
consolidation in another operation instance or renewed manually. Therefore, at the time
of submission, the application verifies that the source is still eligible for consolidation. If
not eligible, Oracle Service Contracts excludes the source line from the consolidation.
After consolidation has taken place, the target may be opened to verify that all the
source contracts have been consolidated successfully. The new terms and conditions
may then be reviewed with the customer. Once the customer agrees with its terms and
conditions, the contract may be submitted for approval and billed at the intervals
designated in the contract.
Note: An Extended Warranty line can be consolidated into a Service
line. However, a Service line cannot be consolidated into an Extended
Warranty line. This is because an Extended Warranty line supports
only a product while a Service line supports party, customer, site,
product, item, and system.
To consolidate multiple contracts for renewals:
1. From the Contract Navigator, select a target contract, right-click and select Renewal
Consolidation.
The Renewal Consolidation window appears.
17-34    Oracle Service Contracts User Guide
Note: The Renewal Rules region references the rules that will be
applied to all lines, which are consolidated into the target contract.
2. Click Query Source.
If there are no contracts eligible as source contracts for the target contract, the lower
half of the window will remain empty.
Extending and Renewing Contracts    17-35
3. To select a line, highlight the branch and click Select Line.
If selected the source line is identified with **.
4. To deselect a line, highlight the branch and click Deselect Line.
If a branch with child branches is cleared, all the child branches are also cleared.
A single child branch may be deselected, as required. If deselected, the source
line(s) are no longer identified with a **.
You can reselect the Source lines by highlighting the line and clicking the Select
Line button.
Note: If a source contract is deselected and the operation instance is
submitted for renewal consolidation, it may be selected at a later
time for consolidation in the same target contract as long as the
target is still in Entered status. If the target contract has already
been approved and activated, the contract may be consolidated as a
source in another target contract.
5. Verify source lines are valid for consolidation.
6. To save and retrieve the consolidation at a later review, click Save. You can leave
this window and when your changes are reflected in the Renewal Consolidation
17-36    Oracle Service Contracts User Guide
window.
7. To submit the Renewal Consolidation, click Submit.
A Note window with a concurrent request id appears.
8. Save.
You can refresh the window by clicking Refresh Source to monitor the processing.
After the line has been consolidated the ## appears next to the line, which indicates
Processed.
9. Open the target contract and verify all source contracts have been consolidated
successfully.
10. Submit contract for approval.
Sending Quote Letters by E-mail
You can generate quote letters and e-mail them to a customer as part of the renewal
process. The person who receives this e-mail quote is specifically identified on the
Summary Renewals tab.
Prerequisites
The following profile options must be set up in order to use the e-mail Quote
functionality:
• OKS SMTP Host
• OKS: SMTP Port
To send quote letters by e-mail:
1. From the Service Contracts Authoring window, select the Tools menu and then
select Email Quote.
The Email Quote window appears.
The To field comes from the Quote To field in the Summary Renewals tab. Enter a
Reply To/Copy e-mail address of the sales representative or other individual who
should be copied or replied to about this e-mail. This field is free-format text.
You can use different From and Reply To e-mail addresses depending on which
address the e-mail should come from, and which address you wish to route the
e-mail replies.
Extending and Renewing Contracts    17-37
2. In the addresses region, add additional recipients as desired.
3. In the message region, enter any text that you wish to appear in the body of the
e-mail.
4. In the Attachments region, select the quote printing report.
The reports are specific to the environment.
This report summarizes the contents of the renewal contracts.
5. Click Send.
A Note window indicating a concurrent request has been submitted appears.
See also Creating and Enabling Templates for E-Mails to Customers, page 18-4.
Understanding Line Level Cancellation and Termination Reasons
You may elect not to maintain one or more services on the contract at the time of
renewal. Alternately, you may choose to discontinue service only for specific service
lines or covered products on a service contract at time of renewal.
You can:
17-38    Oracle Service Contracts User Guide
• Cancel individual services or covered lines on a contract.
• Flag service lines and covered products on renewed contracts as canceled.
• Provide a cancellation reason at both service lines and covered products. If a service
line is canceled, all child sublines are canceled as well. Similarly, canceling a
contract should result in all lines and sublines being canceled.
Note: Your administrator can define status and operations to prevent
canceled status lines from being deleted from contracts. Entered lines
can similarly be controlled.
You can terminate lines and sublines in contracts due to service transfer, product
return, product replacement, updates to instance quantity in installed base, instance
expiration/termination in installed base and manual service termination. When you
terminate lines and sublines, the termination reason and source appears in the
authoring form along with termination date and status.
Note: When services are transferred from Entered contracts, the
transferred service lines and sublines are automatically placed in
Canceled status with a cancellation reason of Service Transferred. Lines
canceled due to service transfer are not eligible for status change back
to Entered.
You cancel both lines and sublines for contracts with the Entered status; whether these
contracts were created as new contracts through authoring, or as renewal contracts
through the renewal event or the manual renewal process. You can also cancel both
lines and sublines for Manual and Online renewal contracts, provided they pass QA
successfully at time of renewal, Evergreen contracts go straight to Active status and are
not typically eligible for line level cancellations.
If you cancel a line or subline, the cancellation date stamp is today's date. You must also
enter a cancellation reason.
If you attempt to delete an Entered contract with lines that are canceled due to Transfer,
all canceled status lines are deleted on the contract except for the lines that are canceled
with a cancellation source of Service Transfer.
You cannot delete service lines or covered levels that were canceled as a result of a
service transfer:
Canceled lines are excluded from quotes, QA checks, and are not eligible for billing or
termination. Amounts for canceled lines are not rolled up to contract line/header.
Canceled lines are included in reports.
After you activate a contract, the canceled lines and sublines remain on the active
contract as Canceled. In subsequent renewals, the canceled lines drop from the renewed
contract. If all lines in Signed, Active, Expired status are terminated during the life of
Extending and Renewing Contracts    17-39
the contract and the only remaining lines on the contract are in Terminated or Canceled
status, the contract should not be selected for renewal by an automated renewal event.
Canceled lines or sublines cannot be made active on Active contracts.
You cannot perform the following actions on a canceled service line:
• Enter revenue distribution.
• Enter pricing adjustment.
• Enter pricing qualifier.
• Use as a target for copy
• Use as a target for renewal consolidation.
• Use as a source for renewal consolidation.
• Revert update.
• Cascade attributes as either a source or target.
• Cascade service price.
• Update service.
• Use for pricing calls, such as reprice or currency change.
You cannot perform the following on a canceled service subline:
• Enter pricing adjustment
• Enter pricing qualifier
• Use as a source for renewal consolidation
• Revert update
• Use as a source for cascade attributes
• Cascade service price
• Update service
• Use for pricing calls, such as reprice or currency change.
Cancellation and Termination Reasons
When you cancel or terminate services and sublines, the reasons and source appears in
17-40    Oracle Service Contracts User Guide
the authoring form along with a date and status.
The following cancellation sources appear in the authoring form:
Cancellation Source Cancellation Reason
Manual you determine
Service Transfer Service Transferred
The following termination sources appear in the authoring form:
Termination Source Termination Reason
Manual you determine
Service Transfer you determine
Item Instance Return Covered Product Returned
Item Instance Replacement Covered Product Replaced
Item Instance Expiration Covered Product Expired
Item Instance Quantity Update Covered Product Quantity Updated
Canceling a Contract Line
Prerequisite: Open a contract with contract lines in Entered status.
To cancel a contract line:
1. Select Lines tab and Effectivities subtab.
2. Select the line to cancel.
3. From the Tools menu, select Change Status. The Service Line Status window
appears.
Extending and Renewing Contracts    17-41
4. From the New Status LOV, select Canceled.
5. Select a reason from the LOV.
6. Select OK. A confirmation message appears. Click OK to continue.
The Status field within the service line is Canceled.
7. Scroll right to view the Cancellation fields, Amount, Date, and Reason.
17-42    Oracle Service Contracts User Guide
8. Select the Pricing/Products subtab and Effectivities secondary tab. Cancelling the
line cancels the subline.
Canceling a Contract Subline
Prerequisite: Open a contract with contract lines in Entered status.
To cancel a contract subline:
1. Select Lines tab and Pricing subtab.
2. From the Effectivity secondary tab select the subline to cancel.
3. From the Tools menu, select Change Status. The Covered Level Status window
appears.
Extending and Renewing Contracts    17-43
4. From the New Status LOV, select Canceled.
5. Select a reason from the LOV.
6. Select OK. A confirmation message appears. Click OK to continue.
The Status field within the service subline is Canceled.
7. Scroll right to view the Cancellation fields, Date and Reason.
17-44    Oracle Service Contracts User Guide
8. Select the Effectivities secondary tab. Cancelling the subline does not cancel the
line.
Creating and Enabling Templates for E-Mails to Customers    18-1
18
Creating and Enabling Templates for E-Mails
to Customers
This chapter covers the following topics:
• About Templates for E-Mails to Customers
• Overview of Templates for E-Mails to Customers
• Creating and Enabling Templates for E-Mail Attachments Sent by Agents
• Enabling Templates for Communications Generated by the Negotiation Workflow
• Contract-Specific Data Available for Inclusion in Template Documents
• Viewing the Data Definition Structure
• Uploading and Registering a Template in Oracle XML Publisher
• Creating the Set of Templates Used for Customer Communications
• Specifying How the Template Sets Are to Be Used
• Viewing PDF Attachments
• Viewing Sample Marked-Up Documents Provided with the Application
About Templates for E-Mails to Customers
This group of topics explains how application administrators can take advantage of the
Oracle Service Contracts integration with Oracle XML Publisher to create and enable
templates for personalized e-mail communications with customers.
Overview of Templates for E-Mails to Customers, page 18-2 describes the two types of
e-mail communications you can create. The topics that follow provide the general steps
for creating each:
• Creating and Enabling Templates for E-Mail Attachments Sent by Agents, page 18-
4
18-2    Oracle Service Contracts User Guide
• Creating and Enabling Templates for Communications Generated by the
Negotiation Workflow , page 18-5
Overview of Templates for E-Mails to Customers
You can create templates for communications with customers that can be used by:
• Agents to send quotes and other communications as e-mail attachments for manual
renewal or initial contract negotiation.
• The negotiation workflow to send customer communications during the online
process for both new and renewal contracts.
About E-Mail Attachments Sent by Agents to Customers
Agents can send e-mails to contacts from different places within the application. From
the:
1. Service Contracts Authoring form: Select E-Mail Quote from the Tools menu. This
opens up the HTML e-mail page. You enter an e-mail address, the subject, and the
body, and can attach a cover letter and attachment PDF communication generated
from the template you create using the procedures in this section. This PDF can be
either a report about the current contract, or any other communication such as a
general announcement. See Sending Quote Letters by E-Mail, page 17-36.
2. Administrator Workbench: Select the Email Quote action of the My In Process bin.
See Sending an E-Mail to a Customer from the Administrator Workbench, page 13-
13.
About E-Mails Generated by Electronic Renewals
The negotiation workflow sends e-mail notifications to customers at various points
during the negotiation cycle. You can also have the negotiation workflow use the
template for one or more of the e-mail communications generated by the process. These
communications can be generated for renewal contracts or new contracts.
You can define document types. Available document types are extensible, allowing
user-defined document types to be added within the FND setup. The following
document types are seeded:
• Quote Document
• Cover Letter (Application attaches the Quote Document)
• Reminder Letter (Application attaches the Quote Document)
• Acceptance Confirmation
Creating and Enabling Templates for E-Mails to Customers    18-3
• Activation Confirmation
• Cancellation Letter
For each e-mail communication, the application generates an HTML e-mail body from
the template and attaches the PDF attachment.
The subject line for each e-mail type is preset and cannot be modified. The following
table lists the subject lines for the three types of e-mail communications:
E-Mail Communication Type Automatically-generated Subject Line Text
Cover letters Contract <contract number and modifier>
requires your approval.
Reminder notices Reminder notice for contract <contract
number and modifier>.
Cancellation notices Cancellation notice for contract <contract
number and modifier>.
The application sends all communications to the e-mail address the agent enters into the
contract authoring window (the Quote To region of the Summary tab, Renewals
subtab).
You can create multiple sets of templates for use on different dates, by different internal
organizations, or targeted to different customers.
Process Overview
You must complete the following two steps to create both e-mail attachments and
electronic renewal communications:
1. Create the template documents, using Microsoft Word (or another application
capable of saving files in the RTF format), following the procedures described in the
Oracle XML Publisher User's Guide.
In the document you can embed codes (XML data elements) which the application
uses to supply contract-specific information including:
• Details about the contract
• The URL the customer can use to log into an application-generated Web page.
There they can review the quote, indicate their acceptance, or request changes.
• The user name and password for the login.
For a complete list of contract data you can include see Contract-Specific Data
18-4    Oracle Service Contracts User Guide
Available for Inclusion in Template Documents, page 18-5. You can view
sample documents provided with this application by following the instructions
described in Viewing Sample Marked-Up Documents Provided with the
Application, page 18-25.
2. Upload the document and register it as a template in Oracle XML Publisher. See
Uploading and Registering a Template in Oracle XML Publisher, page 18-19 for
details.
To create templates for e-mails sent automatically by the electronic renewals feature of
this application you must also complete these two additional steps:
1. Specify the set of templates that are going to be used for a specific renewal flow. See
Creating the Set of Templates Used for Customer Communications, page 18-21.
2. Specify how the template set is to be used. See Specifying How the Template Sets
Are to Be Used, page 18-23.
Creating and Enabling Templates for E-Mail Attachments Sent by Agents
Prerequisite
Confirm system profile OKS: Layout Template Source is set to XML Publisher at the
Site level.
To create and enable templates for e-mail attachments sent by agents:
1. Create the RTF document according to the procedures in the Oracle XML Publisher
User's Guide.
2. Change responsibility to XML Publisher Administrator.
3. Upload and register the document as a template in Oracle XML Publisher. See
Uploading and Registering a Template in Oracle XML Publisher, page 18-19.
4. Change the responsibility back to Service Contracts Manger.
5. Group the templates into sets and specify when to send the notices. Creating the Set
of Templates Used for Customer Communications, page 18-21.
All templates defined in a template set are available for agents to send as a PDF
attachment when they send out an e-mail from the Oracle Service Contracts
Authoring window or Administrator Workbench. The application resolves the
correct template set for the selected contract based on party, organization, and
global hierarchy and displays all templates available for that contract.
Creating and Enabling Templates for E-Mails to Customers    18-5
Enabling Templates for Communications Generated by the Negotiation
Workflow
You can create and enable the templates the electronic renewal process uses to generate
e-mail communications with the customer.
Note: Electronic renewals are available only for contracts of categories
Service and Warranty and Extended Warranty.
To create and enable templates for communications generated by the Negotiation
Workflow:
1. Create the RTF document according to the procedures in the Oracle XML Publisher
User's Guide.
2. Change responsibility to XML Publisher Administrator.
3. Upload and register the document as a template in Oracle XML Publisher. See
Uploading and Registering a Template in Oracle XML Publisher, page 18-19.
4. Change responsibility back to Service Contracts Manger.
5. Group the templates into sets and specify when to send these notices.Creating the
Set of Templates Used Customer Communications, page 18-21.
6. Specify how you wish to use the template sets. See Specifying How the Template
Sets Are to Be Used, page 18-23.
7. Optionally, you can preview the communications generated by the template set for
a specific contract, for a party, or for an entire internal organization by running the
Generate Quotes concurrent program. See Viewing PDF Attachments, page 18-24.
Contract-Specific Data Available for Inclusion in Template Documents
The data definition supplied by Oracle, OKSCONDATA, makes it possible for you to
include information about the following aspects of the contract in the e-mail body or
PDF quote attachment:
• Basic contract information from the contract header
• Recipient of e-mails generated by the electronic renewal process
• Sales agent on the contract
18-6    Oracle Service Contracts User Guide
• Customer name and number
• Default contract billing schedule
• Contract billing address
• Contract shipping address
• Contract taxes
• Contract line information
• Contract line taxes
• Contract line billing schedule
• Contract line billing contact
• Contract sublines (what the line covers)
• Login information for the URL for customer renewals
• Current date
• Contract payment terms
Note: For this release, you are restricted to the data definition
provided by Oracle. You can view the structure of the data
definition by following the procedure described in Viewing the
Data Definition Structure, page 18-18.
Contract Header
The following table lists XML data elements you can use to insert information from the
contract header (basic information about the contract the agent enters at the top of the
Service Contract Authoring window).
You must preface any of the XML data elements with the following string:
/ContractDetails/HeaderVO/HeaderVORow/
For example, to insert the contract number into your document you must enter:
/ContractDetails/HeaderVO/HeaderVORow/ContractNumber
Creating and Enabling Templates for E-Mails to Customers    18-7
Contract Header Field XML Data Element
Contract Number ContractNumber
Contract Modifier ContractModifier
Start Date StartDate
End Date EndDate
Status Status
Short Description ShortDescription
Currency Currency
Contract Amount ContractAmount
Electronic Renewal Recipient Information
The following table lists the XML data elements for inserting information about the
recipient of electronic renewals communications.
Agents enter this information in the Quote To region of the contract. This region is
found either on the Summary tab, Renewals subtab of the Service Contracts Authoring
window or, if you are generating contracts automatically from Oracle Order
Management, in the Contract Details window.
Note: Some of the XML data elements are derived from information
entered by agents in applications other than Oracle Service Contracts.
For example, address details are entered in Oracle TeleService, Oracle
Receivables, Oracle TeleSales and other applications.
You must preface the XML data elements with the following string:
/ContractDetails/HeaderVO/HeaderVORow/QuoteToContDtlsVO/QuoteToContDtlsV
ORow/
For example, to insert the full name of the recipient into your document you must enter:
/ContractDetails/HeaderVO/HeaderVORow/QuoteToContDtlsVO/QuoteToContDtlsV
ORow/FirstLast
18-8    Oracle Service Contracts User Guide
Quote to Contact Attributes XML Data Element
First Name FirstName
Middle Name MiddleName
Last Name LastName
Full Name FirstLast
Job Title JobTitle
Phone Area Code PhoneAreaCode
Phone Number PhoneNumber
Email EmailAddress
Address1 Address1
Address2 Address2
Address3 Address3
Address4 Address4
City City
Postal Code PostalCode
State State
Sales Agent Information
The following table lists the XML data elements for information you can insert in your
documents regarding the sales agent on the contract.
This sales agent can be:
• The vendor contact of role Salesperson entered on the Summary tab, Parties subtab
of the Service Contracts Authoring window.
• If you are using Oracle Order Management to create contracts, the sales agent in the
Creating and Enabling Templates for E-Mails to Customers    18-9
Sales Order window.
• Assigned by the application automatically if your organization has implemented
territories.
You must preface the XML data elements with the following string:
/ContractDetails/HeaderVO/HeaderVORow/SalesRepVO/SalesRepVORow/
For example, to insert the full name of the sales agent into your document you must
enter:
/ContractDetails/HeaderVO/HeaderVORow/SalesRepVO/SalesRepVORow/FullName
Sales Representative Attributes XML Data Element
First Name FirstName
Middle Name MiddleName
Last Name LastName
Full Name FullName
Phone Area Code PhoneAreaCode
Phone Number PhoneNumber
Email EmailAddress
Job Title JobTitle
Manager Name ManagerName
Address1 Address1
Address2 Address2
Address3 Address3
Address4 Address4
City City
18-10    Oracle Service Contracts User Guide
Sales Representative Attributes XML Data Element
Postal Code PostalCode
State State
Customer Name and Number
The following table lists the XML data elements for the customer name and number you
can insert in your documents. The customer for the contract is the party of role
customer.
You must preface the XML data elements with the following string:
/ContractDetails/HeaderVO/HeaderVORow/CustomerVO/CustomerVORow/
For example, to insert the customer name into your document you must enter:
/ContractDetails/HeaderVO/HeaderVORow/CustomerVO/CustomerVORow/PartyName
Customer Attributes XML Data Element
Party Number PartyNumber
Party Name PartyName
Default Contract Billing Schedule Information
The following table lists the XML data elements you can use to insert information on the
default billing schedule.
Agents set up the default billing schedule on the Summary tab, Pricing/Billing subtab of
the Service Contracts Authoring window. Agents use this contract-level billing schedule
to default schedules to contract lines, so entry is optional.
If you have only one billing period in the schedule, preface the XML data elements with
the following string:
/ContractDetails/HeaderVO/HeaderVORow/HdrBillSchdVO/HdrBillSchdVORow/
For example, to insert the date of start date of the billing period in your document you
must enter:
Creating and Enabling Templates for E-Mails to Customers    18-11
/ContractDetails/HeaderVO/HeaderVORow/HdrBillSchdVO/HdrBillSchdVORow/Sta
rtDate
If your billing schedule has multiple billing periods, follow the instructions described in
the Oracle XML Publisher User's Guide.
Header Billing Schedule Attributes XML Data Element
Start Date StartDate
End Date EndDate
Invoice Date TransactionDate
Interface Date DateToInterface
Amount Amount
Contract Billing Address
The following table lists the XML data elements for contract billing address
information. Agents select the billing address in the Bill To region of the Summary tab,
Parties subtab. The address itself must be entered in other applications.
You must preface the XML data elements with the following string:
/ContractDetails/HeaderVO/HeaderVORow/HdrBillToAddrVO/HdrBillToAddrVORow
/
For example, to insert the city in your document you must enter:
/ContractDetails/HeaderVO/HeaderVORow/HdrBillToAddrVO/HdrBillToAddrVORow
/City
Header Bill To Address Attributes XML Data Element
Address1 Address1
Address2 Address2
Address3 Address3
Address4 Address4
18-12    Oracle Service Contracts User Guide
Header Bill To Address Attributes XML Data Element
City City
Postal Code PostalCode
State State
Province Province
County County
Contract Billing Contact Information
The following table lists the XML data elements you can use to insert information about
the contract's billing contact. Agents enter the billing contact by entering a customer or
a third party contact with the role of Billing in the Contact region of the Summary tab,
Parties subtab.
You must preface the XML data elements with the following string:
/ContractDetails/HeaderVO/HeaderVORow/HdrBillToContDtlsVO/HdrBillToContD
tlsVORow/
For example, to insert the last name of the contact in your document you must enter:
/ContractDetails/HeaderVO/HeaderVORow/HdrBillToContDtlsVO/HdrBillToContD
tlsVORow/LastName
Header Billing Contact Attributes XML Data Element
First Name FirstName
Last Name LastName
Phone BillToPhone
Fax BillToFax
Email BillToEmail
Creating and Enabling Templates for E-Mails to Customers    18-13
Contract Shipping Address
The following table lists the XML data elements for the contract shipping address
information. Agents select the shipping address in the Ship To region of the Summary
tab, Parties subtab. The address itself must be entered in other applications.
You must preface the XML data elements with the following string:
/ContractDetails/HeaderVO/HeaderVORow/HdrShipToAddrVO/HdrShipToAddrVORow
/
For example, to insert the city in your document you must enter:
/ContractDetails/HeaderVO/HeaderVORow/HdrShipToAddrVO/HdrShipToAddrVORow
/City
Header Ship to Address Attributes XML Data Element
Address1 Address1
Address2 Address2
Address3 Address3
Address4 Address4
City City
State State
Province Province
County County
Postal Code PostalCode
Contract Taxes
To enter the amount of taxes for the contract as a whole into your document, then enter
the following string:
/ContractDetails/HeaderVO/HeaderVORow/HdrTaxAmountVO/HdrTaxAmountVORow/T
axAmount
The contract tax amount is calculated by the application and appears in the Tax field on
18-14    Oracle Service Contracts User Guide
the Service Contracts Authoring window header.
Contract Line Information
The following table lists the XML data elements you can use to insert information about
the lines in your contract.
If you have only one contract line, preface the XML data elements with the following
string:
/ContractDetails/HeaderVO/HeaderVORow/LinesVO/LinesVORow/
For example, to insert the name of the service, usage, or subscription in your document
you must enter:
/ContractDetails/HeaderVO/HeaderVORow/LinesVO/LinesVORow/Name
To insert information from multiple lines, follow the instructions described in the Oracle
XML Publisher User's Guide.
Contract Line Attributes XML Data Element
Line Number LineNumber
Line Name Name
Start Date StartDate
End Date EndDate
Line Amount LineAmount
Contract Line Taxes
If you have only one line in your contract, you can display the tax for that line in your
document, by entering the following string and the XML data element:
/ContractDetails/HeaderVO/HeaderVORow/LinesVO/LinesVORow/LineTaxAmountVO
/LineTaxAmountVORow/TaxAmount
To insert information from multiple lines, follow the instructions described in the Oracle
XML Publisher User's Guide.
Contract Line Billing Schedule
The following table lists the XML data elements you can use to enter information about
Creating and Enabling Templates for E-Mails to Customers    18-15
billing schedules for individual contract lines into your document.
If you have only one line in your contract, preface the XML data elements with the
following string:
/ContractDetails/HeaderVO/HeaderVORow/LinesVO/LinesVORow/LineBillSchdVO/
LineBillSchdVORow/
For example, to insert the date of the invoice in your document you must enter:
/ContractDetails/HeaderVO/HeaderVORow/LinesVO/LinesVORow/LineBillSchdVO/
LineBillSchdVORow/TransactionDate
To insert information from multiple lines, follow the instructions described in the Oracle
XML Publisher User's Guide.
Line Billing Schedule Attributes XML Data Element
Start Date StartDate
End Date EndDate
Invoice Date TransactionDate
Date To Interface DateToInterface
Amount Amount
Line Billing Contact
The following table lists the XML data elements you can use to enter into your
document billing contact information for individual contract lines. Agents enter the
billing contact by entering a customer contact of role Billing Contact on the Lines Tab,
Accounts subtab of the Service Contracts Authoring window.
If you have only one contract line, then preface the XML data elements with the
following string:
/ContractDetails/HeaderVO/HeaderVORow/LinesVO/LinesVORow/LineBillToContD
tlsVO/LineBillToContDtlsVORow/
For example, to insert the name of the contact in your document you must enter:
/ContractDetails/HeaderVO/HeaderVORow/LinesVO/LinesVORow/LineBillToContD
tlsVO/LineBillToContDtlsVORow/Name
To insert information from multiple lines, follow the instructions described in the Oracle
XML Publisher User's Guide.
18-16    Oracle Service Contracts User Guide
Line Billing Contact Attributes XML Data Element
Name (first and last name) Name
Email Email
Address1 Address1
Address2 Address2
Address3 Address3
Address4 Address4
City City
State State
Province Province
County County
Postal Code PostalCode
Sublines
The following table lists the XML data elements you can use to enter information about
sublines. For service lines, this is what the service covers (for example, a product, or a
customer site). For usage lines, this is the individual counter used to track usage.
If you have only one subline in your contract, then preface the XML data elements with
the following string:
/ContractDetails/HeaderVO/HeaderVORow/LinesVO/LinesVORow/SubLinesVO/SubL
inesVORow/
For example, to insert the level of coverage for a service line in your document you
must enter:
/ContractDetails/HeaderVO/HeaderVORow/LinesVO/LinesVORow/SubLinesVO/SubL
inesVORow/CoveredLevel
To insert information from multiple sublines, follow the instructions described in the
Oracle XML Publisher User's Guide.
Creating and Enabling Templates for E-Mails to Customers    18-17
SubLine Attributes XML Data Element
SubLine Number SubLineNumber
Name Name
Covered Level CoveredLevel
Start Date StartDate
End Date EndDate
Quantity Quantity
UOM Uom
SubLine Amount SubLineAmount
Login Information for Electronic Renewals
The following table lists the XML data elements you can use to include in your
document information users can use to log into an automatically generated HTML page
where they can review and renew their contract.
The URL for that page must be entered by the application administrator in the system
profile OKS: Electronic Renewals URL.
The application automatically creates a user name and password which you can insert
in the renewal e-mail by including the XML names tags listed in the following tables. If
you include the password tag name, the application sends the automatically generated
password with the first communication to the customer and encrypts the password as a
series of stars in all subsequent e-mails.
You must preface the XML data elements with the following string:
/ContractDetails/
For example, to insert the user name into your document you must enter:
/ContractDetails/UserName
18-18    Oracle Service Contracts User Guide
Web UI Login Attributes XML Data Element
User Name UserName
Password Password
Web UI Login URL WebUILoginURL
Current Date
To insert the current date (sysdate) into your document, then enter the following string
as the XML tag name:
/ContractDetails/HeaderVO/HeaderVORow/ReportGeneratedDate
Contract Payment Terms
To insert the contract payment terms into your document, then enter the following
string as the XML tag name:
/ContractDetails/HeaderVO/HeaderVORow/PayTermVO/PayTermVORow/PaymentTerm
s
Viewing the Data Definition Structure
You can display a sample document with all of the available data elements.
To view the data definition structure:
1. Log into Oracle Applications under the XML Publisher Administrator
responsibility.
2. Click Data Definitions in the Navigator.
The Data Definitions search page appears in a new browser window.
Creating and Enabling Templates for E-Mails to Customers    18-19
3. Enter Service Contracts in the Application field.
4. Click Go.
5. Select the Service Contract Data link.
The View Data Definition page appears.
6. Click the OKSCONDATA.xml link in the Preview Data field to view or save the
file.
Uploading and Registering a Template in Oracle XML Publisher
This step is required to use your document for electronic renewals.
Prerequisite
Create the template as an RTF document.
18-20    Oracle Service Contracts User Guide
To upload and register a template in Oracle XML Publisher:
1. Log into Oracle Applications under the XML Publisher Administrator
responsibility.
2. Click Templates in the Navigator.
The Templates search page appears in a new browser window.
3. Click Create Template.
The Create Template page appears.
4. In the Name field, enter a user-friendly name for your template.
5. In the Code field, enter a code (no longer than 10 characters) for the template. start
with this product's short code (OKS) and a descriptive ending. For example:
OKS_cover.
6. Select Service Contracts from the Application LOV.
7. Select OKSCONDATA from the Data Definition LOV. This is the data definition
supplied by Oracle. In this release, you are restricted to using this data definition
only.
8. Select RTF from the Type LOV.
9. In Start Date, enter the date from which the template will be active.
10. In the End Date, enter the date when this template becomes inactive. This is
optional.
11. Sub-templates are not supported in this release.
Creating and Enabling Templates for E-Mails to Customers    18-21
12. Optionally, enter a description in the Description field.
13. Click Browse and select the RTF template file.
14. Select the language of the template you have uploaded from the Language LOV.
15. Language territories are not supported in this release, so you can leave the Territory
field blank.
16. Click Apply.
17. You can preview a PDF of your template to validate your work by navigating to the
View Template page and selecting the Preview icon. See the Viewing and Updating
section of the Oracle XML Publisher User's Guide for details.
Creating the Set of Templates Used for Customer Communications
In the template set, you specify which RTF template is used for which communication.
For reminder and cancellation notices, you also specify when they will be sent. For
example, send one renewal reminder 30 days before the contract expires and, if the
customer does not respond, send out another 15 days before expiration. If the customer
has not responded two weeks after the expiration date, you may send a reminder that
the contract is being canceled.
You can set up just one template set to be used for communications for all renewals. Or
you can set up different sets to go to different customers or to be used by different
organizations within your company.
This step is required to use your document for electronic renewals.
Prerequisites
Create and upload into Oracle XML Publisher RTF templates for communications you
wish to send the customer:
Note: Reminder and cancellation notices are optional.
To create the set of templates used for customer communications:
1. Navigate to Setup: Contract, then select Define Layout Template Set.
The Template Set window appears.
2. Enter a name for the template set in the Name field.
3. Optionally, enter a start and end date to restrict the availability of this template set.
18-22    Oracle Service Contracts User Guide
4. Optionally, enter a description.
5. From the Templates region:
1. Select the renewal process to associate with the template from the Process LOV:
• Manual: Identifies Print templates for the Print Document action during the
Manual process, and for attachments available with the Email Customer
action.
• Online: Identifies e-mail templates used in the Online process, including
e-mails used by the Reminder process, and e-mail body templates available
with the Email Customer action.
• Both online and manual: Identifies template for both manual and online
negotiation processes.
2. Select a Document Type from the LOV. The seeded document types are:
• Acceptance Confirmation
• Activation Confirmation
• Cancellation Confirmation
• Quote
• Reminder Notice
You can also created user defined documents types. See About E-mails
Generated by Electronic Renewals, page 18-2.
3. From the Applies to LOV select whether the template applies to new contracts,
renewals, or both.
4. Select a Message Template from the LOV.
5. Select an Attachment Template from the LOV.
6. Optionally, enter an Attachment Name.
7. To restrict the use of this reminder to a specific time period, then enter a start
date, an end date, or both.
8. Specify when you wish the reminder to be sent in relationship to the start date
of the renewed contract. This is done by entering a negative number in the
Duration field and choosing the time unit of measure from the Period LOV. For
example, to send the reminder two weeks before the start date of the renewed
Creating and Enabling Templates for E-Mails to Customers    18-23
contract, then enter -2 as the duration and select Week as the period.
9. You can have the application reset the status of the contract after the notice is
sent. To do so, select a status from the Status LOV.
6. Save.
Specifying How the Template Sets Are to Be Used
You can:
• Specify a single template set for all negotiation workflow processes, the global level.
• Specify different template sets for use by different organizations within your
company.
• Specify different template sets to be used for different individual customers.
The application looks for an appropriate template set from the most specific to the
global. If the application does not find a template set specified at the customer level, it
looks at the organization level, if none is found at the organization level either, it uses
the template specified at the global level.
For example, if you specify Set 1 of renewal e-mail communications to be used at the
global level, and specify Set 2 to be used for customers A and B. Then any contract for
customers A and B will use Set 2, and contracts for all other customers will use Set 1.
Note: For electronic renewals to work, you must at least associate a
template set at the global level.
Prerequisite
Create the template sets used to generate the negotiation communications.
To specify how the template sets are to be used:
1. Navigate to Setup: Contract and then select Global Contracts Defaults.
The Global Contracts Defaults window appears.
2. Select a template for electronic renewals at the global level using the Template Set
LOV in the Global region at the top of the window.
3. Select a template set language. This attribute determines the language passed to the
XML publisher while looking up templates. XML Publisher returns the appropriate
template for the specified language.
18-24    Oracle Service Contracts User Guide
4. To specify different template sets for individual customers, then for each customer:
1. Select the Parties Tab and Electronic Renewal subtab.
2. Select the customer from the Party Name LOV.
3. Select the template set from the Template Set LOV.
5. To specify different template sets for organizations in your own company, then for
each organization:
1. Select the Organizations tab and Electronic Renewal subtab.
2. Select the organization from the Organization Name LOV.
3. Select the template set from the Template Set LOV.
6. Save.
Viewing PDF Attachments
The application automatically generates and e-mails the PDF attachment with every
electronic renewal communication. You can view the PDF to be sent for a single
contract, all the PDFs being sent to a customer, or all the PDFs generated for an internal
organization.
To view PDF attachments:
1. Navigate to Control: Requests, then select Run.
The Submit a New Request window appears.
2. Select the Single Request radio button.
3. Click OK.
The Submit Request window appears.
4. Enter Generate Quote in the Name field using the LOV.
The Parameters window appears.
5. Select the template set name from the Quote Template LOV.
6. Enter any of the following to limit the number of contracts to be generated:
Note: If you do not enter any values, the application generates the
Creating and Enabling Templates for E-Mails to Customers    18-25
communications for the entire database of contracts.
• To generate communications for an internal organization, then enter the
organization name using the Org LOV.
• For a single customer, select the customer from the Party LOV.
• For a single contract, select the contract number from the Contract Number
LOV.
7. Click OK to exit the Parameters window.
8. Click Submit.
The Decision window appears with the identification number of the request you
have submitted. Use this number to monitor the progress of your request.
9. Click No if you do not wish to submit another request.
10. Select Requests from the View menu.
The Find Requests window opens.
11. Click Find to find the requests you have submitted.
The Requests window appears showing the status of your concurrent requests.
The Generate Quotes process you have submitted automatically starts the Service
Contracts Quote request. Both have to complete successfully for the
communications to be generated successfully.
12. Place your cursor in the line displaying the Service Contracts Quote process status.
13. Click View Output to display the generated communications in a separate browser
window.
Viewing Sample Marked-Up Documents Provided with the Application
Oracle supplies sample templates in Oracle XML Publisher with XML name tags
already embedded.
To view the sample documents provided with the application:
1. Log into Oracle Applications under the XML Publisher Administrator
responsibility.
2. Click Templates in the Navigator.
18-26    Oracle Service Contracts User Guide
The Templates search page appears in a new browser window.
3. Enter %sample% in the Name field.
4. Select Service Contracts from the Application LOV.
5. Click OK.
6. The window displays the sample documents.
7. To download a document:
1. Select a link in the Name column.
The View Template page opens.
2. Click Download.
Using Notes    19-1
19
Using Notes
This chapter covers the following topics:
• Using Notes
• How Notes Are Used in Oracle Service Contracts
• Adding Service Contract Notes
• Adding Service Coverage Notes to a Standard Coverage
• Adding Service Coverage Notes to a Service Coverage (Instantiated Coverage)
• Viewing Notes
Using Notes
This group of topics explains how you can use notes to add additional information to a
contract.
For detailed information about using notes, refer to the Oracle Common Application
Components User Guide.
You can use notes to communicate with other contract administrators, service agents,
and sales representatives regarding the details of a contract. For example, you can
include notes for contract administrators regarding the management of the contract, or
to service agents regarding the services provided under the contract.
A note can contain any free format text and can be attached to either a:
• Service contract, see Adding Service Contract Notes, page 19-3.
• Coverage template, see Adding Service Coverage Notes to a Standard Coverage,
page 19-6.
• Service coverage (which is the instantiated coverage of a particular service line), see
Adding Service Coverage Notes to a Service Coverage (Instantiated Coverage),
page 19-8.
19-2    Oracle Service Contracts User Guide
Note: Because Notes is a context based menu, Service Contract
notes or Service Coverage notes are invoked based on where you
place your cursor within the application.
You can define a note status so that:
• All users can view it.
• You and other users can read and write to it.
• Only you can view it.
Note Types Used in Oracle Service Contracts
Oracle Service Contracts uses two types of seeded notes:
Note: Although there are two seeded note types, note types are user
extensible. You can add your own note type to the contract note source.
For detailed information about using notes, refer to the Oracle Common
Application Components User Guide.
1. Contracts Admin: allows you to add further information to the contract at the
contract header level, to the coverage template, or at the service level.
Contracts Admin notes indicate how to manage the contract itself and are useful for
the sales representative or contract administrator.
You can view Contracts Admin notes at the header level and at the line level
2. Contract Coverage: allows you to add further information to the coverage template
or the service coverage.
Contract Coverage notes generally relate to a specific service and explain any
relevant details of how the service is to be carried out. These notes are most useful
to the users who review entitlements.
You can also add Contract Coverage notes to a coverage template, which will be
copied over to the actual instantiated coverage that is tied to the contract line. These
notes can be viewed from the service coverage on the contract.
You can see Contract Coverage notes only at the line level.
How Notes Are Used in Oracle Service Contracts
The following examples show how notes are used within Oracle Service Contracts.
Contracts Admin Notes Added to a Service Contract
Using Notes    19-3
Include Jane Smith in renewal discussions on this contract, as well as other designated resources.
Spoke to Harry Jones 24 June 2006, confirmed that products A, B and C require upgraded
coverage next year.
See Adding Service Contract Notes, page 19-3.
Contracts Coverage Note Added to a Coverage Template
Perform inspection 3 times per month for this particular service on these products.
See Adding Service Coverage Notes to a Standard Coverage, page 19-6.
Contracts Coverage Notes Added to a Service Coverage
Every time service is performed at site A, the engineer must contact the Security Patrol to obtain
a key.
Ensure that John Doe signs the work orders when performing any work against under this
service.
See Adding Service Coverage Notes to a Service Coverage (Instantiated Coverage),
page 19-8.
Note: Notes are part of the Oracle Common Application Components
that are leveraged by applications across the Oracle E-Business Suite.
For more information on Notes, refer to the Oracle Common Application
Components User Guide.
Adding Service Contract Notes
To add a service contract note:
1. From the Service Contracts Authoring window, select the Summary tab. From the
Tools menu select Notes.
19-4    Oracle Service Contracts User Guide
The Notes window appears. The application populates the note with:
• Source: Service Contract Header
• Number: The contract number
• Entered By: The user entering the note
• Date: A time stamp of when the note was created
Note: If a note exists, click New to add a new note.
2. Enter the note text in the Notes field.
3. Select Contracts Admin from the Type LOV.
4. Select one of these statuses:
• Publish: All users can view it.
• Public: The creator and other users can read and write to it.
• Private: Only the creator can view it.
5. Save.
Using Notes    19-5
The note appears in the Notes tab.
The Related To field is populated with the Service Contract Header value from the
Source field.
The Value field is populated with the contract number.
6. To enter additional information, click More.
The Detailed Note window appears.
7. Enter text in the Detailed Note field.
19-6    Oracle Service Contracts User Guide
8. Click OK.
Note: You can view a summary listing of all notes by selecting the
Summary tab.
Note: Only Oracle Service Contracts users can view notes of
Contracts Admin type.
Adding Service Coverage Notes to a Standard Coverage
Prerequisite: Open a Standard Coverage.
To add service coverage notes to a standard coverage:
1. From the Standard Coverage window, select Notes.
The Notes window appears. The application populates the note with:
Using Notes    19-7
• Source: Coverage Template
• Number: The coverage name, such as Gold
• Entered By: The user entering the note
• Date: A time stamp of when the note was created
Note: If a note exists, click New to add a new note.
2. Enter the note text in the Notes field.
3. Select Contracts Coverage from the Type LOV.
4. Select one of these statuses:
• Publish: All users can view it.
• Public: The creator and other users can read and write to it.
• Private: Only the creator can view it.
5. Save.
The note appears in the Notes tab.
The Related To field is automatically populated with the Coverage Template value
and the Value field indicates the coverage template.
19-8    Oracle Service Contracts User Guide
6. To enter additional information, click More.
The Detailed Note window appears.
7. Enter text in the Detailed Note field.
8. Click OK.
Note: With the exception of Private notes, if you add a service
coverage note to the coverage template, the note appears whenever
the coverage template is instantiated to a service line.
Note: Service coverage notes added to a service coverage template
can be viewed by Service Contracts application users as well as
Service application users
Adding Service Coverage Notes to a Service Coverage (Instantiated
Coverage)
To add a service coverage note to a service coverage:
1. From the Service Contracts Authoring window, select the Lines tab. From the Tools
menu, select Notes.
Using Notes    19-9
The Notes window appears. The application populates the note with:
• Source: Service Coverage
• Number: The coverage name, such as Gold
• Entered By: The user entering the note
• Date: A time stamp of when the note was created
Note: If a note exists, click New to add a new note.
2. Enter the note text in the Notes field.
3. Select Contracts Coverage from the Type LOV.
4. Select one of these statuses:
• Publish: All users can view it.
• Public: The creator and other users can read and write to it.
• Private: Only the creator can view it.
5. Save.
The note appears in the Notes tab.
19-10    Oracle Service Contracts User Guide
The Related To field is automatically populated with the Service Coverage value
and the Value field indicates the coverage template.
6. To enter additional information, click More.
The Detailed Note window appears.
7. Enter text in the Detailed Note field.
8. Click OK.
Note: If you enter a service coverage note for an instantiated
coverage of a service line, the note is attached to that specific
coverage.
If your contract has more than one service line, then the note is
added only to the instantiated coverage for the selected service line,
not to all service lines.
Note: Service coverage notes added to a service line can be viewed
by Service Contracts application users as well as Service application
users
Viewing Notes
Prerequisites
Notes for the contract and coverage notes for a service line are managed and viewed
separately. You access these notes from different points within the application.
• To view notes for a contract, select the Summary tab.
• To view notes for a service coverage, select the Lines tab, and then select a service
line.
To view notes:
1. From the Service Contracts Authoring window, select the Tools menu, and then
select Notes.
The Notes window appears. On the Notes tab, you will see a listing of the available
notes.
2. Highlight the note you wish to view.
The note details appear in the right-hand side of the window.
Using Notes    19-11
3. To verify if additional details are included on the note, select More.
Note: To view the notes that are attached to a coverage template,
navigate to the Service Contracts Coverage Template form, and
click the Notes button.
Terminating Contracts    20-1
20
Terminating Contracts
This chapter covers the following topics:
• Overview of Terminating Contracts
• About Terminating Contracts
• How Termination Works
• Terminating a Contract
• Restrictions for Terminating a Contract
• Terminating a Contract Line
• Terminating a Contract Subline
• Terminating Multiple Contracts at the Same Time
• Viewing the True Value of a Contract
• Understanding Termination and Credit Generation with Partial Periods
Overview of Terminating Contracts
This group of topics explains how you can terminate contracts, contract lines, and
contract sublines.
About Terminating Contracts
You can terminate a contract, a contract line, or a contract subline. The termination date
must fall between the start date and end date of the service or services being
terminated. You cannot terminate a service or contract that has already been
terminated. For example, if you have a future date terminated, you cannot change it to
an earlier date.
You can terminate multiple contracts and contract lines at one time.
During the termination process the application calculates a credit amount. You can:
20-2    Oracle Service Contracts User Guide
• Override the credit
• Provide a full credit
• Suppress the credit
How Termination Works
The following describes various termination scenarios. These scenarios will help you
understand the termination methods that you can use and their impact on the true
value of the contract. See Viewing the True Value of a Contract, page 20-12.
Assumptions for all examples: Your customer has a one-year contract that is valued at
$1,200. The contract start date is December 1 and the termination date is March 1. The
contract has two billing periods, which bill in advance. Billing period 1 has been billed;
billing period 2 has not.
Override the credit example: The customer is due a credit of $300, which is for the
unused portion of the billed amount. However, you and the customer have mutually
agreed to deduct $100 from the credit.
An override amount of $200 is entered during the termination. The customer is issued a
credit of $200.
The contract total is updated to $400 and the terminated amount is updated to $800. The
terminated amount is equal to the override amount plus the unbilled amount in billing
period 2.
Provide a full credit example: The customer is due a credit of $300, which is for the
unused portion of the billed amount. Because this is a very good customer, you allow a
credit for the full amount, not just the unused portion.
The full amount is $600 for the billed amount. The customer is issued a credit of $600.
The contract total is updated to $0 and the terminated amount is updated to $1,200. The
terminated amount is equal to the full credit amount plus the unbilled amount in billing
period 2.
Suppress the credit example: The customer is due a credit of $300. However, the
contract is being terminated for a breach and your company policy is that credit is not
issued when a contract is breached.
You can suppress the credit so that the customer receives no credit, which ensures that
the credit is not processed by Accounts Receivable. The contract total is updated to $300
and the terminated amount is updated to $900. The terminated amount is equal to the
amount suppressed plus the unbilled amount in billing period 2.
Terminating Contracts    20-3
Terminating a Contract
To terminate a contract:
1. From the Contract Navigator, highlight the contract that you want to terminate.
2. From the Tools menu, select Terminate.
The Terminate Contracts window appears.
3. Select the following:
• Date: The termination date, which must be within the contract start and end
dates.
• Reason: The reason for terminating the contract.
Your administrator can define reasons by navigating to Setup: Contract and
then Termination Reasons.
20-4    Oracle Service Contracts User Guide
4. Select Review.
If the customer is due a credit for amounts that were paid prior to the termination
date, then the credit amount, which is prorated based on the date terminated and
the amount billed, appears in the Amount field.
5. Optionally, you can use the Override Amount field to override the calculated
amount.
The amount that is entered for override cannot be negative or more than the
original credit. Entering zero in the Override field will not prevent a credit memo
from being generated; it will generate a credit memo for zero dollars.
6. To issue a full credit during termination, select the Full Credit check box.
The Amount field displays the total amount that was billed for the contract at the
time of termination.
Note: The Full Credit check box gives you greater flexibility to
control the credit amount. You can also use this check box in
situations where you wish to credit more than the prorated amount
but not the full credit amount, by selecting the Full Credit check
box and then entering a value in the Override Amount field.
For example, if the prorated amount is $500 and the Full Amount is
$1,000 and you want to credit $800, you can select the Full Credit
check box and enter $800 in the Override Amount field.
7. If you do not want to generate a credit memo, select the Suppress Credit check box.
Note: If credits are suppressed in error, you can run the Service
Contracts Program to Process Suppress Credits. This program
enables users to generate credits for contract terminations for which
credits have been suppressed. See About Concurrent Programs,
page 21-8.
8. Click Terminate.
9. A Decision window appears, indicating that the contract was successfully
terminated. Click Yes to save your changes.
Terminating Contracts    20-5
Note: After you terminate the contract, you can run the Main
Billing program to generate the necessary billing transactions as a
result of the termination.
Restrictions for Terminating a Contract
Be aware of the following restrictions relating to the contract status. If the contract
status is:
• QA Hold: You cannot perform a termination.
• Hold: You can perform a termination irrespective of the status and operation
setting, Eligible for Invoicing.
• All Other Statuses: You cannot perform a termination if the status and operation
setting, Eligible for Invoicing, is not enabled.
Terminating a Contract Line
To terminate a contract line:
1. From the Contract Navigator, double-click the contract.
The Contract Execution window appears.
20-6    Oracle Service Contracts User Guide
2. From the Overview tab, highlight the contract line you want to terminate. You can
select multiple lines.
3. Right-click the mouse, and select Terminate Line.
The Terminate Contract Lines window appears
4. Select the following:
• Date: The termination date, which must be within the contract start and end
dates.
• Reason: The reason for terminating the contract line.
Terminating Contracts    20-7
5. Select Review.
If the customer is due a credit for amounts that were paid prior to the termination
date, the credit amount appears in the Amount field.
6. Optionally, you can use the Override Amount field to override the calculated
amount.
7. To issue a full credit during termination, select the Full Credit check box.
The Amount field displays the total amount that was billed for the line at the time
of termination.
8. If you do not want to generate a credit memo, select the Suppress Credit check box.
Note: If credits are suppressed in error, you can run the Service
Contracts Program to Process Suppress Credits. This program
enables users to generate credits for contract terminations for which
credits have been suppressed.
9. Click Terminate.
A Decision window appears, indicating that the contract line was successfully
terminated. Click Yes to save your changes.
The Status Meaning for the line shows as Terminated.
20-8    Oracle Service Contracts User Guide
Note: After you terminate the contract line, you can run the Main
Billing program to generate the necessary billing transactions as a
result of the termination.
Terminating a Contract Subline
To terminate a contract subline:
1. From the Service Contracts Authoring window, select the Line tab,
Pricing/Products subtab, and the Effectivity secondary tab, and then select the
subline to terminate.
Terminating Contracts    20-9
2. From the Tools menu, select Terminate Subline.
The Terminate Sublines window appears.
3. Select the following:
• Date: The termination date, which must be within the contract start and end
dates.
• Reason: The reason for terminating the contract subline.
4. Select Review.
If the customer is due a credit for amounts that were paid prior to the termination
date, the credit amount appears in the Amount field.
5. Optionally, you can use the Override Amount field to override the calculated
amount.
The amount that is entered for override cannot be negative or more than the
original credit. Entering zero in the Override field will not prevent a credit memo
from being generated; it will generate a credit memo for zero dollars.
6. To issue a full credit during termination, select the Full Credit check box.
The Amount field displays the total amount that was billed for the covered level or
20-10    Oracle Service Contracts User Guide
usage at the time of termination.
7. If you do not want to generate a credit memo, select the Suppress Credit check box.
8. Click Terminate.
Terminating Multiple Contracts at the Same Time
To terminate multiple contracts at the same time:
1. From the Contracts Navigator, highlight the contracts to terminate.
To select multiple contracts, hold down the Control key and select the contracts that
you want to delete. To select a block of rows, select the first contract row, hold
down the Shift key, and then select the last contract row.
2. From the Tools menu, select Terminate.
The Terminate Contracts window appears.
3. Select the following:
• Date: The termination date, which must be within the contract start and end
dates.
• Reason: The reason for terminating the contract.
Terminating Contracts    20-11
4. Select Preview.
The Selected Contracts for Termination region appears with a listing of the
contracts that you have selected to be terminated.
5. Confirm whether the customer is due a credit for amounts that were paid prior to
the termination dates. The amount is indicated in the Amount field for each
associated contract number.
6. Optionally, you can use the Override Amount field to override the calculated
amount.
The amount that is entered for override cannot be negative or more than the
original credit. Entering zero in the Override field will not prevent a credit memo
from being generated; it will generate a credit memo for zero dollars.
7. For each contract, you can enter a different:
• Termination Date
• Reason
8. To issue a full credit during termination, select the Full Credit check box for the
associated contract number.
The Amount fields display the total amount that was billed for the associated
contract number at the time of termination.
9. If you do not want to generate a credit memo, select the Suppress Credit check box
for the associated contract number.
Note: If credits are suppressed in error, you can run the Service
Contracts Program to Process Suppress Credits. This program
enables users to generate credits for contract terminations for which
credits have been suppressed. See About Concurrent Programs,
page 21-8.
10. Click Terminate.
20-12    Oracle Service Contracts User Guide
A Decision window appears, indicating that the contracts were successfully
terminated. Click Yes to save your changes.
Note: After you terminate the contracts, you can run the Main
Billing program to generate the necessary billing transactions as a
result of the terminations.
Viewing the True Value of a Contract
When you terminate a contract, a contract line, or a subline, the contract total in the
header is automatically adjusted to reflect the terminated amount.
To view the true value of a contract:
1. From the Service Contracts Authoring window, review the following in the header:
• Total: Reflects the true value of the contract incorporating any price
adjustments or credits that have been applied to the contract.
• Terminated: Reflects a sum of the following after a termination is submitted:
• The unbilled amount for the original contract
• The termination credit that was issued
• Any termination amounts that were suppressed
2. Alternatively, navigate to the Summary tab and Pricing/Billing subtab.
Terminating Contracts    20-13
3. Select Billing.
The Billing window appears.
4. Review the following:
• Amount: Reflects the true value of the contract.
• Total field in the terminated region: Reflects the amount that was credited
after the termination was submitted.
• Billed: Reflects the amount that was originally billed.
Understanding Termination and Credit Generation with Partial Periods
If a contract is terminated during a billing period, credits are prorated by the
application. The calculation of the prorated amount varies among line types. Following
are descriptions of how the prorated amount is handled for each line type.
Service Lines
You can request service line termination at different levels, such as contract level, line
level, and subline level. Regardless of the termination level, the new extended price,
termination amount, credit, or unbilled amounts are calculated at sub line level and
then rolled up to the higher levels.
The following list describes how the application calculates terminations and generates
credits using partial periods for service lines:
Note: You define Partial Period attributes in the Global Contracts
Defaults window. See Entering Contract Defaults, page 2-36.
• Determines a start date and an end date of termination period.
• Termination Period Start Date: Termination date
• Termination Period End Date: Original Service End of sub line
• Calculates Termination period duration in terms of price unit of measure (UOM)
20-14    Oracle Service Contracts User Guide
using Partial Period Method as described in pricing section.
• Calculates termination amount by multiplying termination period duration with
unit price.
• Calculates new extended price of subline by subtracting termination amount from
original extended price.
• Compares new extended price and already billed amount.
• Calculates unbilled amount, credit amount, suppressed credit amount and
overridden amount based on suppressed credit flag, full credit flag, and override
amount (as is).
• If termination action is requested at service line level or contract level, then repeats
the preceding for all sublines that are affected and rolls up amounts to higher levels.
The application processes partial periods differently for contracts that are generated
from Oracle Order Management. The following table describes some of the variations
within the termination logic.
Type Partial Period Impact on Termination Logic
Oracle Service Contracts Generated Contracts As described in the preceding list.
Oracle Order Management originated contract
with dates and Partial Periods attributes
defined.
Fixed logic
As described in the preceding list.
Period Start: Period Start
Period Type passes from Global Contracts
Defaults
Oracle Order Management originated contract
with dates and Partial Periods attributes
defined.
Actual logic
As described in the preceding list.
Period Start: Period Start
Period Type passes from Global Contracts
Defaults
Oracle Order Management originated contract
with dates and no Partial Periods attributes
defined.
Application bases termination on Daily Rates.
Application does not stamp contract with
Partial Period values.
Terminating Contracts    20-15
Oracle Order Management originated contract
with no dates defined on the contract and
Partial Periods attributes defined.
Fixed logic
As described in the preceding list.
Application does not calculate Partial Period.
Fixed Rate UOM conversion as follows: 1
Month equals 30 days.
Oracle Order Management originated contract
with no dates defined on the contract and
Partial Periods attributes defined.
Actual logic
As described in the preceding list.
Application does not calculate Partial Period.
Fixed Rate UOM conversion as follows: 1
Month equals 30 days.
Oracle Order Management originated contract
with no dates defined on the contract and no
Partial Periods attributes defined.
As described in the preceding list.
Application does not calculate Partial Period.
Fixed Rate UOM conversion as follows: 1
Month equals 30 days.
For information about service lines, see About Service Lines, page 3-3.
Usage Lines
For usage lines, you must define the termination method that the application will use to
calculate the usage and to credit the customer upon termination. You can choose
between the Amount Based Termination and Counter Based Termination method.
Amount Based Termination
Charges the customer based on the amount of usage that is recorded when the contract
is terminated. The customer is charged based on the actual usage. This is the default
method for all usage types.
Counter Based Termination
The application credits the unused portion of the service based on the price that the
customer would pay if they continued consumption at the same rate for the rest of the
period. This means that the customer receives any price break based on the estimated
usage.
For information about usage lines, see About Crediting a Customer in Terminations,
page 4-17.
Partial Periods Effect on Usage Line Terminations
Partial periods affects only estimation and termination of usage. Price UOM and Period
Start (Service or Calendar) do not drive pricing or billing of usage lines. The period that
you define for the Usage Type in the Lines tab and Effectivities subtab drives usage
pricing. The billing schedule is manually entered.
20-16    Oracle Service Contracts User Guide
When the application is calculating estimated fill for partially billed periods or
termination amounts, usage lines use the Period Type setting for partial period
calculations. Estimated fill involves calculating a partial period amount for the rest of
the billing period. Termination amounts can be calculated by determining the amount
per day in a billing period to determine the termination amount (Amount Based) or can
be calculated by determining the consumption per day to determine the estimated
consumption as of the termination date (Counter Based). Whether determining amount
per day or consumption per day within a billing period, the application bases the
calculation on actual days or fixed days according to the Period Type setting.
The following table summarizes the how Partial Period setup impacts different usage
types:
Usage Types Partial Period Impact on Termination
Negotiated Price Partial Period termination calculation uses the
Period Type settings.
Fixed per Period Partial Period termination calculation uses the
Period Type settings.
Actual per Period Partial Period termination calculation uses the
Period Type setting. Volume based
terminations call Oracle Installed Base for
estimated consumption.
Actual by Quantity Partial Period termination calculation uses the
Period Type setting.
Subscription Lines
For subscription lines, how the terminated contract is prorated depends on whether it is
for a tangible or an intangible subscription.
Tangible Subscription Termination
Termination for tangible subscriptions can be done only for quantities (or fulfillment
periods), that have not been passed to Oracle Order Management. The termination
amount correlates to the quantity that is terminated. For example, if 12 fulfillment
periods exist for the subscription line, then the line can be terminated only in 1/12th
increments of the total line value. If the end date of the latest fulfilled period is greater
than the termination date, the termination date for the subscription line will be moved
forward to be equal to the end date of the latest fulfilled period.
Suppose that you have a 12-month subscription with a start date of January 1. The
billing amount for each month is $10. The months of January, February, and March
have passed to Oracle Order Management. If a termination date of February 15 is
Terminating Contracts    20-17
entered, the termination date is moved to March 31 because this is the end date of the
latest fulfilled period. The months of April through December are included in the
terminated amount, which is $90.
Intangible Subscription Termination
Termination for intangible subscriptions can be either fulfillment based or effectivity
based, depending on whether the system profile, OKS: Intangible Subscription Pricing
Method is set to Effectivity Based or Subscription Based. Effectivity Based is the same as
the termination functionality for terminations that are performed against Service Lines.
Subscription Based, is the same as the termination of tangible subscriptions.
For information about subscription lines, see About Subscriptions, page 5-1.
Partial Periods Effect on Subscription Line Terminations
The application does not calculate partial periods for tangible subscription lines because
pricing, billing, and termination amounts are strictly tied to whole-number fulfillment
quantities for the subscription line.
If profile OKS: Intangible Subscription Pricing Method is set to Subscription Base, the
application does not calculate partial periods for Intangible. This profile setting causes
the intangible subscription lines to price, bill, and terminate in the same fashion as
tangible subscriptions.
If profile OKS: Intangible Subscription Pricing Method is set to Effectivity Based, the
application calculates partial periods for pricing, billing, and termination amounts on
intangible subscription lines as follows:
• Because Price UOM is not available for subscription lines, the fulfillment frequency
(weekly, monthly, quarterly, and so on) acts as the Price UOM in the partial period
calculation
• Regardless of Period Start value on the contract, the application always uses Period
Start as Service Start when billing subscription lines. This is due to the relationship
between fulfillment quantity, pricing, and billing on subscription offerings.
• The application uses the Period Type setting.
Running Reports and Programs    21-1
21
Running Reports and Programs
This chapter covers the following topics:
• Overview of Running Reports and Concurrent Programs
• About Reports
• About Concurrent Programs
• Running Reports and Programs
Overview of Running Reports and Concurrent Programs
This group of topics explains the reports available in Oracle Service Contracts.
Oracle Service Contracts provides several reports and concurrent programs designed to
help you analyze information and manage the application.
About Reports
This section provides a high-level description of various reports that are available in
Oracle Service Contracts and describes the parameters that are available for each. Some
parameters are required, while other parameters are optional and can be used to
narrow the scope of the information that is included in the report.
Reports also create output information, that can be used to analyze your contracts.
The following reports are listed in the order in which they appear in the Reports list of
values (LOV) for the Service Contracts Manager responsibility. The Reports LOV
includes reports and concurrent programs. For information on how to submit a report,
see Running Reports and Programs, page 21-14.
Contracts QA Report
This report enables you to run a quality assurance (QA) check on multiple contracts. A
QA check is particularly useful when run immediately before the billing process to help
identify contract issues on before the contracts are submitted to Accounts Receivable.
21-2    Oracle Service Contracts User Guide
You can define the following parameters for this report:
• From Contract Number (required)
• To Contract Number
• From Start Date (required)
Note: When running this report, the defaults From Start Date and
To Start Date are the current date. If your contracts start before this
date, you will not see a report. Be sure to check your start dates.
• To Start Date
• Contract Status
• Level of Details (required)
You can choose a report that details all contracts selected, all contracts that pass the
QA check, or all contracts that fail the QA check.
• Submit for Approval: If this parameter is set to Yes, the contract is automatically
submitted for approval if it passes QA.
• Ignore QA Warning: If this parameter is set to Yes, QA warnings are ignored
The report output includes details of the data checked including whether the checked
data had warnings and errors and if so, what results were found.
List of Contracts By Contract Group
This report provides a list of contracts by contract group. You can define the following
parameters:
• Group
• Role (required)
• Category
• Start Date From
• Start Date To
• Status
• Currency
Running Reports and Programs    21-3
• Order By Amount
The report output lists the contract number, modifier, short description, date signed
currency code, estimated amount and the status. The output is sorted by the contract
group and the role, such as customer.
Contracts QA Report for List of Contracts
This report allows you to run a QA check for multiple contracts.
You can enter multiple contract numbers within the Contract IDs separated by comma
parameter.
The report output includes details of the data checked including whether the checked
data had warnings and errors and, if so, what results were found.
Generate Quote
This report integrates with XML Publisher, to generate a PDF file using the quote
template that you specify in the parameters.
You can define the following parameters:
• Quote Template (required)
• Acceptance Confirmation - Sample
• Activation Confirmation - Sample
• Cancellation Confirmation - Sample
• Cancellation Notice - Sample
• Cover Letter - Sample
• Quote Letter - Sample
• Reminder Notice - Sample
• Contract Number
The report output provides a PDF file based on the quote template that you select.
OKS Products Not Renewed Report
This report helps the sales representative identify customer products that have
extended warranties in an Expired or Terminated status. The extended warranty must
have a valid customer and vendor, and must include a vendor contact role of sales
person or support sales. In addition, the product must not have been renewed to any
other extended warranty with in a Signed or Active status.
21-4    Oracle Service Contracts User Guide
You can define the following parameters:
• Contract Group
• Operating Unit
• Sales Rep
• Customer
• From End Date
• To End Date
The report output includes a listing the part number, product description and serial
number, along with details of the line amount and the installed base start and end
dates.
Service Contract Forecast Management Report
This report allows the sales representative and management to track the anticipated
close of contract renewals. It checks service agreements, warranties, or extended
warranties in an Entered status with a valid and customer role specified. To be
included, contracts must also have a valid vendor contact role of sales person or
support sales.
Note: To get results for Booking Forecast, Revenue Recognition Value,
and Forecast Value, you must enter values for Revenue Estimation Date
and Percentage.
You can define the following parameters:
• Contract Group
• Operating Unit
• Sales Rep
• Status Code
• Currency Code
• Minimum Contract Value
• Maximum Contract Value
• Forecast Start Period
Running Reports and Programs    21-5
• Forecast End Period
• Revenue Recognized Date
The report output provides a listing of forecast information by sales representative. This
includes customer, contract number, modifier, status, start and end date, forecast
percentage, forecast date, last update date, contract value, contract forecast, revenue to
be recognized, and currency code.
Service Contracts Bookings Report
This report lists the value of all service agreements, warranties and extended
warranties, in an Active, Approved, or Signed status with a valid customer or vendor
role specified. To be included, contracts must also have a valid vendor contact role of
sales person or support sales.
Contracts are grouped by the sales representative assigned to the contract.
You can define the following parameters:
• Contract Group
• Operating Unit
• Sales Rep
• Start Date From (required)
• Start Date To (required)
• Approved Date From
• Approved Date To
• Value Exceeding
• Sort By
You can sort the report output by any of the preceding parameters or by contract
number, contract value, currency, customer name, date approved, invoice date,
invoice number, invoice value, modifier, sales representative, or start date.
Service Contracts Detail Report
This report displays key details of the contract headers, contract lines, and covered
products for contracts in the warranty and extended warranty categories. The report
does not extract all Service Agreement information. The report focuses on covered
products.
You can define the following parameters:
21-6    Oracle Service Contracts User Guide
• Contract Group
• Contract #
• Customer
• Status Type
• Status Code
• Start Date From
• End Date From
• Start Date To
• End Date To
• Operating Unit
The report output provides a listing of:
• Header level details, such as the contract number, modifier, vendor, start and end
dates, customer, status, total value, currency code.
• Service level details for each line, such as the line number, the service, start and end
dates, and total value.
• Product level details for each line, such as line number, product name, start and end
dates, installed base number, serial number, reference number, quantity, pricing
attributes, and final price.
Service Contracts Forecast Summary Report
This report lists the contracts eligible for renewal for a given period as well as the
recognized revenue date. It checks service agreements, warranties and extended
warranties in an Entered status with a valid customer and vendor role specified. To be
included, contracts must also have a valid vendor contact role of sales person or
support sales.
You can define the following parameters:
• Contract Group
• Operating Unit
• Currency Code
• Start Date
Running Reports and Programs    21-7
• End date
• Minimum Contract Value
• Maximum Contract Value
• Recognized Revenue Date
The report output provides a listing of the following information by status type and
status code; currency code, number of contracts, contract value, booking forecast,
revenue recognized value, and forecast value.
Note: To get results for Booking Forecast, Revenue Recognition Value,
and Forecast Value, you must enter values for Revenue Estimation Date
and Percentage.
Service Contracts Summary Report
This report allows the sales representative to track all contracts by customer. It includes
service agreements, warranties and extended warranties with a valid customer and
vendor role specified. To be included, contracts must also have a valid vendor contact
role of sales person or support sales.
You can define the following parameters:
• Contract Group
• Operating Unit
• Rep Name
• Customer Number
• Customer Name
• Form Date
• To Date
• Currency Code
The report output provides a summary listing of contracts for each customer, sorted by
sales representative. The report includes customer number, customer name, contract
number, modifier, status type, start and end dates, total value, currency code, and when
the contract was last updated.
21-8    Oracle Service Contracts User Guide
Service Contracts by Status Report
This report allows sales representatives to track contracts by status. It includes service
agreements, warranties and extended warranties with a valid customer and vendor role
specified. To be included, contracts must also have a valid vendor contact role of sales
person or support sales.
You can define the following parameters:
• Contract Group
• Operating Unit
• Sales Rep Name
• Customer Number
• Customer Name
• From Start Date (required)
• To Start Date (required)
• From End Date
• To End Date
• Status Code
• Status Type
• Currency Code
• Detail Report
The report output provides a listing of service contracts by status. It is sorted by sales
representative and provides status, customer, and start and end dates as well as the
contract value, selected status product value, and the annual rate.
About Concurrent Programs
The section provides a high-level description of concurrent programs that are available
in Oracle Service Contracts and describes the parameters that are available for each.
Some parameters are required, while other parameters can be used to narrow the scope
of the information processed. These programs are used to initiate processes that enable
particular functionality in the application.
The following programs are listed in the order in which they appear in the Reports LOV
for the Service Contracts Manager responsibility. The Reports LOV includes reports and
Running Reports and Programs    21-9
concurrent programs. For information on how to submit a report, see Running Reports
and Programs, page 21-14.
Contracts Status Change by Contract
This program enables you to execute contract status change programs for a given
contract. This process changes the contract status if the selected contract qualifies for a
status change.
You can define the following parameters:
• Contract Number (required)
• Contract Number Modifier
Contracts Status Change by Range
This program enables you to execute contract status change programs for a range of
contracts. This process changes the contract status if the selected contracts qualify for a
status change.
You can define the following parameters:
• Category
• From Number
• To Number
• From modifier
• To modifier
• Last Run Date
AutoInvoice Import Program
This program is owned by Oracle Receivables. It imports the billing transactions from
the Service Contracts Main Billing Program into Oracle Receivables.
You can define the following parameters:
• Transaction Source (required)
• Default Date (required)
• Transaction Type
• (Low) Bill To Customer Number
21-10    Oracle Service Contracts User Guide
• (High) Bill to Customer Number
• (Low) Bill to Customer Name
• (High) Bill to Customer Name
• (Low) GL Date
• (High) GL Date
• (Low) Ship Date
• (High) Ship Date
• (Low) Transaction Number
• (High) Transaction Number
• (Low) Sales Order Number
• (High) Sales Order Number
• (Low) Invoice Date
• (High) Invoice Date
• (Low) Ship To Customer Number
• (High) Ship To Customer Number
• (Low) Ship To Customer Name
• (High) Ship To Customer Name
• Base Due Date on Trx Date
• Due Date Adjustment Days
For more information about this program, refer to the Oracle Receivables User Guide.
OKS Update Sales Group
This program updates a sales group for a particular contract. You run this program
before any updates to the sales group can be performed.
You can define the following parameters:
• Contract Number
Running Reports and Programs    21-11
• Contract Group
Service Contracts AutoReminder Program
This program automates the process of reminding customers to renew their contracts by
sending a notification for both manual and online renewals.
For online renewals the program sends reminders for all contracts for which a quote has
been published online.
For manual renewals the program sends reminders for all contracts that have the
contract status specified in the parameters when you run the program. After the
reminder is sent, the program marks the contract with a flag indicating that a reminder
has been sent. Subsequent runs of the program will look at this flag to determine
whether to send a reminder.
Example
The following scenario helps describe which contracts are selected when you run the
Service Contracts AutoReminder Program.
Contract Type Contract Status Negotiation Status
Contract X Manual Quote Sent Draft
Contract Y Manual Entered Draft
Contract Z Online Entered Quote Published
Based on the preceding table, if you set the Service Contracts AutoReminder Program to
select all contracts where the contract status is to Quote Sent, then reminders are sent
for Contracts X and Z.
The following prerequisite steps must be performed before scheduling auto reminder
notices:
• Create templates for a quote letter and cover letter in the Template Set. Navigate to
Service Contracts, select Setup, select Service Contracts, and select Communication
Templates.
• Define a Template Set using the Define Electronic Renewal Template.
You can define the Contract Status parameter.
Note: You can set up statuses from the Duration field of the Template
Set form. When you add reminder notices to a template set, you can
indicate how many days lead time the application uses for reminder
notices. For example, if you have a reminder notice set at -90, the
21-12    Oracle Service Contracts User Guide
concurrent program finds eligible contracts and sends out a 90 day
notice reminder for any contract with a start date 90 days in the future.
Service Contracts Concurrent Program for Reassigning Resources
This program ensures that contract assignments are correct and that no contract is
assigned to an inactive contact.
Service contracts are generally assigned to a resource who is responsible for following
through on inquiries from the customer through the life of the contract, from the initial
sale through the renewal process. If that person moves to another department or leaves
the company, the contract may not receive appropriate level of attention.
This concurrent process can be scheduled to run as often as necessary, for example,
nightly. The process will check all contracts in an Entered status type. It will compare
the Vendor Contact resource who is assigned to the contract with the resource assigned
to the territory that the contract maps to in JTF territory management. If the resources
are different, the resource associated to the territory will overwrite the resource who
was assigned to the contract. The resource to which the contract is being assigned will
receive a workflow notification.
The following prerequisites are required to run this program:
• JTF Territory assignments must be set up.
• Profile option OKS: Use Territories to Default Sales Person should be set to Yes to
use this process.
• Profile option OKS: Enable Sales Credits should be set to Derive.
• Resource must be assigned to the contract on the Summary Parties tab in the
Contacts region for the vendor.
You can define the following parameters:
• Contract Number
• Contract Status
• Operating Unit
• Sales Person
Service Contracts Fetch Receivables Info for Billing
This program fetches the invoice number and tax from Oracle Receivables and updates
the contract billing history. There are no parameters to define for this report.
Running Reports and Programs    21-13
Service Contracts Instance Relationship Program
This program associates the parent instance created for a subscription line with any
child instances that are created when a tangible subscription ships.
You can define the Contract Number parameter.
Service Contracts Main Billing
This program generates a log file of the total value processed, total value successful, and
total value rejected for billing. For all unsuccessful transactions, further contract
information appears and you can pinpoint the contract, the line, or the contract and line,
that caused the issue.
You can define the following parameters:
• Contract Number
• Default Date
• Operating Unit
• Customer Name
• Category
• Group
• Preview
Service Contracts Order Processing Program
This program processes order lines from Oracle Order Management and creates
contracts in Oracle Service Contracts.
When ordering a serviceable product in Oracle Order Management, if an application
has an associated warranty, the application automatically creates a contract when the
product ships. When a serviceable product is placed on a sales order, associated
services may also be sold; these pass to Oracle Service Contracts as extended
warranties.
You can define the followings parameters:
• Status
• Source
Service Contracts Program to Process Suppress Credits
This program sends credits to Oracle Receivables if the suppress credit check box was
21-14    Oracle Service Contracts User Guide
selected during termination.
You can define the following parameters:
• Contract Number
• Operating Unit
• Category
Service Contracts Usage Averaging
This program calculates usage averaging based upon the averaging interval defined for
each usage line in a contract.
Usage averaging allows you to give price benefits to customers for higher consumption,
by allowing you to average invoices over multiple periods. Usage averaging ensures
that consumption is evenly distributed, which allows customers to take advantage of
price breaks.
See Charging for Reported or Estimated Usage Per Period, page 4-11.
You can define the Contract Number parameter.
Service Contracts Usage Settlement
This program calculates usage settlement based upon the settlement frequency defined
for each usage line in a contract. It calculates the settlement of any customer
undercharges or overcharges using the value defined in the Settlement Interval LOV.
Usage settlement reconciles discrepancies between actual consumption and estimated
billed quantity. Discrepancies may arise if consumption is not captured before you run
the Service Contracts Main Billing program. When the consumption is not captured
before the billing program runs, the billing program estimates the consumption for the
period. Because the consumption captured for the billing period after running the
billing program may be greater than or less than the actual billed quantity, you can use
this program to settle the discrepancies.
Your administrator should determine how frequently to run this program: monthly,
quarterly, or at the end of the contract.
See Charging for Reported or Estimated Usage Per Period, page 4-11.
You can define the Contract Number parameter.
Running Reports and Programs
To run reports and programs
1. From the View menu, select Requests.
Running Reports and Programs    21-15
The Find Request window appears.
2. Select Submit a New Request.
The Submit a New Request window appears.
3. Select the Single Request option and click OK.
The Submit Request window appears.
4. From the Name LOV, select the report you want to submit, for example (Contracts
QA Report) and click OK.
The parameters window appears.
5. Define all mandatory parameters.
21-16    Oracle Service Contracts User Guide
6. Click OK.
The Submit Request window appears with a concatenated listing of the parameters.
7. Select Submit.
A Decision window appears with the request id. You should make a note of this id.
The application asks if you want to submit another request.
8. Click No.
The Find Request window appears. You can use this window to track your request.
9. Verify that the View All My Request option is selected, and click Find.
The Request window appears.
Creating Contract Items in Oracle Inventory    22-1
22
Creating Contract Items in Oracle Inventory
This chapter covers the following topics:
• About Contract Item Types
• Creating Service Items
• Creating Warranty Items
• Creating Subscription Items
• Creating Usage Items
• Defining Serviceable Products
• Restricting How Items Are Used
About Contract Item Types
This group of topics explains how setup items in Oracle Inventory for use in contracts.
Whether a contract is authored in Oracle Service Contracts or created automatically
from Oracle Order Management or Oracle Installed Base, a contract must include lines.
The line types used in a contract are items that are created in Oracle Inventory. For
example, a computer manufacturer could set up an service item WR23763, to cover the
Extended Notebook PC Service Plan.
Items are classified into four contract item types: service, subscription, usage, and
warranty. How you classify these items restricts which contract categories can use
them. See Restricting How Items Can be Used, page 22-22.
Because an item must be defined as a serviceable item to be covered on a contract, you
must also ensure that the Item Master contains serviceable items. See Defining
Serviceable Products, page 22-20.
Creating Service Items
Services are items that you define in the item master. They include the coverage terms
22-2    Oracle Service Contracts User Guide
that are given or sold to a customer.
You must define service items in the item master.
This procedure highlights an example of how a service item can be set up. For
additional information about setting up product items in Oracle Inventory, refer to the
Oracle Inventory User's Guide.
For information about entering service lines, see About Service Lines, page 3-3.
Prerequisite
Confirm that a Coverage Template is defined. See Defining a Coverage Template, page
23-7.
To create a service item:
1. Open Oracle Inventory and navigate to Inventory. Select Items, and then select
Master Items.
2. If prompted, enter an Organization.
The Master Items window appears.
3. Enter an item.
4. Enter a description.
5. From the Main tab:
1. Select the User Item Type, Service Pgm / Warranty.
2. Select a unit of measure (UOM), from the Primary LOV.
Note: You set up a service using a time UOM, such as Year, not
a quantity UOM, such as Each.
Creating Contract Items in Oracle Inventory    22-3
6. Select the Order Management tab:
1. Select the Customer Ordered check box.
The Customer Orders Enabled check box is automatically selected.
2. Select the OE Transactable check box.
22-4    Oracle Service Contracts User Guide
3. Select the Internal Ordered check box.
The Internal Ordered Enabled check box is selected automatically.
7. Select the Invoicing tab:
• Select the Invoiceable Item and Invoice Enabled check boxes
8. Select the Service tab.
Creating Contract Items in Oracle Inventory    22-5
1. In the Contract Item Type, select Service from the LOV.
2. Select a Duration and Duration Period.
The duration and duration period are used for passing the service duration for
the service item, when it is selected in the Oracle Quoting application.
3. From the Template LOV, select a coverage template.
9. Save.
Creating Warranty Items
Warranties are services that are given to the customer free of charge. The price is
assumed to be included in the price of the associated product.
You must define warranty items in the item master.
This procedure highlights an example of how a warranty item can be set up, for
additional information on setting up product items in Oracle Inventory refer to the
Oracle Inventory User's Guide.
For information about warranties, see About Ordering Service in Oracle Order
Management, page 6-2.
This table distinguishes between warranties and services. Extended warranties are
considered services:
22-6    Oracle Service Contracts User Guide
Warranties Services
Non-orderable and managed automatically Can be sold on a quote, order, or service
contract.
Cannot be authored, can only be created when
products under warranty are sold from Oracle
Order Management or are manually created in
the Install Base
Can be authored or created through the Order
Management interface.
Do not have a price Has unit or percentage based pricing.
Associated with serviceable items in Bill of
Materials (BOM)
Not included in a bills of material (BOM).
Have warranty inheritance rules Do not have warranty inheritance rules.
Cannot be renewed, can be extended or
terminated
Can be renewed, extended, or terminated.
Prerequisite
Confirm that a Coverage Template is defined. See Defining a Service Coverage, page 23-
7.
To create a warranty item:
1. Open Oracle Inventory and navigate to Inventory. Select Items, and then select
Master Items.
2. If prompted, enter an organization.
The Master Items window appears.
3. Enter an item.
4. Enter a description.
5. On the Main tab, select the User Item Type, Service Pgm/Warranty.
Creating Contract Items in Oracle Inventory    22-7
6. Select the Order Management tab:
• Select the OE Transactable check box.
22-8    Oracle Service Contracts User Guide
7. Select the Invoicing tab:
Creating Contract Items in Oracle Inventory    22-9
• Select the Invoiceable Item and Invoice Enabled check boxes.
8. Select the Service tab.
22-10    Oracle Service Contracts User Guide
1. In the Contract Item Type, select Warranty from the LOV.
2. Select a Duration and Duration Period.
3. From the Template LOV, select a coverage template.
4. You may enter Starting Delay (Days).
For Warranty items, you can enter Starting Delay (Days), which will affect the
start date for the contract. The start date for the contract is equal to the ship date
plus the value entered in the Starting Delay (Days) field. The same date is also
used by Oracle Installed Base as the installed date of the product.
For information on modifying warranty dates, see Modifying the Dates a
Warranty Is Effective, page 6-18.
Creating Contract Items in Oracle Inventory    22-11
9. Save.
Note: After a warranty is defined, it must be associated with a
serviceable product in the Bill of Materials for a warranty contract
to be automatically created. Refer to the Oracle Bills of Material
User's Guide for further information.
When a product is shipped or manually created in the installed
base, the warranty is automatically created in Oracle Service
Contracts. Warranties allow a support service to be associated with
a product automatically. The warranty is automatically associated
with the customer product in the installed base upon ordering and
fulfillment of the product to the customer.
Each serviceable product can be fulfilled with one or more base
warranties defined as components in the BOM for the product.
10. Select the Enable Contract Coverage check box.
This makes the product serviceable. The Track in Installed Base check box is
automatically selected.
11. If defects for this item are to be tracked, then select the Enable Defect Tracking
check box.
12. Select the Enable Service Billing check box.
22-12    Oracle Service Contracts User Guide
13. Select the Billing Type field. For example, Material, Labor, or Expense.
14. Select the Recovered Part Disposition speed.
This indicates if replaced parts are to be recovered and how quickly.
15. Save.
Creating Subscription Items
For subscription items to be priced and sold on a contract, they must be defined in the
item master.
A Subscription Item Type can either be selected as a contract line item on subscription
agreement, or as a subline to a service line.
• When a subscription is on a line, you are selling that subscription. An example is a
magazine subscription, delivered once per month for a year.
• If you want to sell service that provides coverage on a subscription, an example is a
subscription used to track the duration that a user has access to a web based service.
The service coverage on that subscription would be used to provide support if the
customer has problems with the service, such as a login issue.
This procedure highlights an example of how a subscription item can be set up, for
additional information on setting up product items in Oracle Inventory refer to the
Oracle Inventory User's Guide.
For information on entering subscription lines, see About Subscriptions, page 5-1.
Prerequisite
Confirm that a Subscription Template is defined. See Setting Up a Subscription
Template, page 23-14.
To create a subscription item:
1. Open Oracle Inventory and navigate to Inventory. Select Items, and then select
Master Items.
2. If prompted, enter an Organization.
The Master Items window appears.
3. Enter an Item.
4. Enter a Description.
5. From the Main tab, select the User Item Type.
Creating Contract Items in Oracle Inventory    22-13
6. Select the Order Management tab:
1. Select the Customer Ordered check box.
22-14    Oracle Service Contracts User Guide
The Customer Orders Enabled check box is automatically selected.
2. For tangible subscriptions, select the Shippable check box.
3. Select the OE Transactable check box.
4. From the Contract Item Type LOV, select Subscription.
5. Select the Subscription Template that should be associated with this item.
This defines the fulfillment schedule defaults.
Note: You must select a Subscription template. If you do not
select a template, the subscription cannot be used on the
authoring form, it will display an error.
7. Select the Invoicing tab.
Creating Contract Items in Oracle Inventory    22-15
• Select the Invoiceable Item and Invoice Enabled check boxes.
8. Select the Service tab:
1. To enable the ability to file service requests against this item, select Enabled
from the Service Request list.
2. Select the Enable Contract Coverage check box to identify this product as being
serviceable.
The Track in Installed Base check box is automatically selected.
22-16    Oracle Service Contracts User Guide
3. From the Contract Item Type LOV, select Subscription.
4. Select the Subscription Template that should be associated with this item.
This value defines the fulfillment schedule defaults.
Note: You must select a Subscription template. If you do not
select a template, the subscription cannot be used on the
authoring form, and an error appears.
9. Save.
The subscription item is now an inventory part as well as a serviceable product.
Creating Usage Items
For usage items to be priced and sold on a contract, they must be defined in the item
master. Usage includes things such as the number of copies made on a printer or the
number of calls made to Support.
This procedure highlights an example of how a usage item can be set up, for additional
information on setting up product items in Oracle Inventory refer to the Oracle Inventory
User's Guide.
For information about entering usage lines, see About Charging a Customer for Usage,
page 4-2.
Creating Contract Items in Oracle Inventory    22-17
To create a usage item:
1. Open Oracle Inventory and navigate to Inventory. Select Items, and then select
Master Items.
2. If prompted, enter an Organization.
The Master Items window appears.
3. Enter an Item.
4. Enter a Description.
5. From the Main tab, select a User Item Type.
6. Select the Order Management tab.
1. Select the Customer Ordered check box.
The Customer Orders Enabled check box is automatically selected.
2. Select the Internal Ordered check box.
3. The Internal Orders Enabled check box is automatically selected.
22-18    Oracle Service Contracts User Guide
7. Select the Invoicing tab.
Creating Contract Items in Oracle Inventory    22-19
• Select the Invoiceable Item and Invoice Enabled check boxes.
8. Select the Service tab.
22-20    Oracle Service Contracts User Guide
1. In the Contract Item Type, select Usage from the LOV.
9. Save.
Defining Serviceable Products
To be covered by a service item, subscription item, warranty item, or extended
warranty item, a product item must be classified as a serviceable product.
Prerequisites
Confirm that the product items exist in Oracle Inventory.
For additional information on setting up product items in Oracle Inventory, refer to the
Oracle Inventory User's Guide.
To define a serviceable product:
1. Open Oracle Inventory and navigate to Inventory. Select Items, and then select
Master Items.
The Master Items window appears.
2. Query an item.
1. From the View menu, select Query By Example and then Enter.
Creating Contract Items in Oracle Inventory    22-21
2. Enter a value in the Item field, for example %AS5%.
3. From the View menu, select Query By Example and thenRun.
The queried item appears in the form. Click the arrow to see additional items
that match your query.
3. Select the Service tab.
4. To enable the ability to file service requests against this item, select Enabled from
the Service Request list.
5. Select the Enable Contract Coverage check box.
This selection makes the product serviceable. The Track in Installed Base check box
is automatically selected.
6. If defects for this item are to be tracked, then select the Enable Defect Tracking
check box.
7. Select the Enable Service Billing check box.
8. Select the Billing Type field. For example, Material, Labor, or Expense.
9. Select the Recovered Part Disposition speed.
This value indicates if replaced parts are to be recovered and how quickly.
22-22    Oracle Service Contracts User Guide
10. Save.
The product item is now a serviceable product.
Restricting How Items Are Used
Contract categories restrict the line types that can be added to a contract. Accordingly,
how you classify an item in Oracle Inventory impacts which contract categories can use
the item.
This table shows the contract line items that can be used by each of the contract
categories.
Contract Line
Item
Service
Agreement
Subscription
Agreement
Warranty and
Extend
Warranty
Warranty
(automatically
generated from
Oracle Order
Management)
Service contract
item type
Yes Yes Yes.
Line Type
indicates
Extended
Warranty rather
than Service.
No
Subscription
contract item
type
Cannot be used
as a contract line,
but can be used
as a subline
Yes Cannot be used
as a contract line,
but can be used
as a subline
No
Usage contract
item type
Yes Yes No No
Warranty
contract item
type
No No No Yes
Setting Up Standard Coverage and Subscription Templates    23-1
23
Setting Up Standard Coverage and
Subscription Templates
This chapter covers the following topics:
• Overview of Standard Coverage and Subscription Templates
• Specifying Standard Coverage
• Defining Standard Coverage
• Setting Up a Subscription Template
• Copying Standard Coverage into a New Coverage
• Modifying Standard Coverage for Existing Contracts
• Modifying Standard Coverage for New Contracts
Overview of Standard Coverage and Subscription Templates
This group of topics explains how can set up coverage and subscription templates.
Oracle Service Contracts enables you to define a standard set of templates, to create
offerings for a common set of agreements used by your organization, and modify them
to meet your customers' requirements.
In order to create a:
• Service item in Oracle Inventory, you must first define a Standard Coverage.
• Subscription item in Oracle Inventory, you must first define a Subscription
Template.
Standard Coverage
A Standard Coverage contains attributes that are associated to a Service Item in Oracle
Inventory. It provides key information on how service should be carried out on
products covered under the contract. For each business process covered, it defines the
23-2    Oracle Service Contracts User Guide
times of coverage, days of coverage, reaction and resolution times for a service request,
preferred resources, and the discounted rates that would be applied when work is
performed on covered products, see Specifying Standard Coverage, page 23-3.
You can use Standard Coverage to define warranty inheritance rules and transfer rules.
You can also link a Preventive Maintenance (PM) program to standard coverage, which
includes the schedule to perform a particular set of activities, such as changing toner in
a copy machine.
Note: The preventive maintenance schedule is created in a manner
similar to the billing schedule. Multiple maintenance streams can be
defined for a preventive maintenance program. Preventive
Maintenance programs are defined in Oracle Complex Maintenance,
Repair, and Overhaul. For more information, see the Oracle Complex
Maintenance, Repair, and Overhaul User's Guide.
The following topics and procedures define and describe how to set up standard
coverage:
• Specifying Standard Coverage, page 23-3
• Defining Standard Coverage, page 23-7
• Copying Standard Coverage into a New Coverage, page 23-16
• Modifying Standard Coverage for Existing Contracts, page 23-16
• Modifying Standard Coverage for New Contracts, page 23-17
Subscription Template
A subscription template contains attributes, that are associated to a subscription item in
Oracle Inventory. The attributes include Subscription type, Media and Property type,
Fulfillment Channel, and Frequency.
A subscription item can be a tangible item like a magazine, or an intangible item like a
membership.
Currently Oracle Order Management is supported as the fulfillment channel. If no
fulfillment channel is specified, it is considered an intangible item, and no delivery
schedule is created for that item. Subscription Frequency such as Yearly, Monthly,
Weekly, and Daily identifies how often an item should be delivered.
The following procedure describes setting up a subscription template, Setting Up a
Subscription Template, page 23-14.
Setting Up Standard Coverage and Subscription Templates    23-3
Specifying Standard Coverage
Service coverage describes the situations under which the customer is covered for
service. Services are broken down into business processes, which are related the service,
such as Depot Repair. Coverage Terms are then defined for these business processes.
Creating a Standard Coverage
The preceding diagram shows the steps necessary to complete standard coverage. A
description of the steps and an example follow:
• Define Coverage: Specify coverage name, type, importance level, effective dates,
warranty inheritance, transfer rules, or attach a preventative maintenance program.
• Define Business Process: Specify the business processes that the Standard
Coverage will use.
For example, select the Field Service business process. You will need to define
coverage times, reaction times, resources, and billing types for each business
process that you add.
• Define Coverage Times: Specify the days of the week and hours used to calculate
reaction and resolution times. A customer can request service anytime. If they call
up support, the service agent will not turn down the call if the call is beyond the
coverage times. The coverage times simply determine the starting point from where
you start counting reaction and resolution times. For example, if coverage ends at 5
p.m. on a Monday and starts again at 9 a.m. on a Tuesday, with a two-hour
response time, then a call received at 4 p.m. on Monday, will have a respond time of
10 a.m. Tuesday (assuming that work through is not selected). If the coverage is 24
hours per day, seven days a week, then the respond by time would be 6 p.m.
Coverage times are defined for each business process as part of coverage terms, and
they are applicable to one time zone.
23-4    Oracle Service Contracts User Guide
• Define Reaction Times: Specify the allowed amount of time by which action must
be initiated for a requested process.
For example, set up reaction times of two hours on Monday through Sunday,
Therefore, you must respond within two hours of being notified by the customer.
Reaction times are tied to severity.
• Define Resolution Times: Specify a fixed time per contract by which a normal
operation should be restored. The Resolution Times will be made available to other
functions, such as Service Request.
For example, you could set up resolution times of eight hours Monday through
Friday, which means if the customer calls Monday through Friday you must resolve
the issue within eight hours.
Resolution times are tied to severity.
Note: When checking entitlements in Oracle TeleService, the
application uses the best customer time zone to calculate reaction
and resolution times. For example, in the preceding scenario, if the
best customer time zone is EST.
Service request determines the best customer time zone for service
entitlement in the following order:
• Incident time zone: The time zone of the incident. It can be
derived from the incident address on a service request.
• Primary contact time zone: The time zone of the primary
contact
• Customer time zone: The time zone derived from the Service
Request Customer's identifying address or phone number.
• Server time zone: The time zone of the server. By convention,
all date and time information in the E-Business Suite is stored
according to this time zone. In many cases, this time zone is
also referred to as the corporate time zone.
Other rules that help determine the best customer time zone,
include:
• If the best customer time zone matches a coverage time zone,
the application converts the service request reported time to the
best customer time zone and uses the coverage times setup for
the best customer time zone. The application returns respond
by and resolve by times by adding the applicable response time
and resolution time to the passed service request reported time
Setting Up Standard Coverage and Subscription Templates    23-5
in server time zone.
• If the best customer time zone does not match any coverage
time zone but the default coverage is defined applicable to all
time zones, the application converts the service request
reported time to the best customer time zone and uses the
coverage times setup for the default coverage time zone. The
application returns respond by and resolve by times by adding
the applicable response time and resolution time to the passed
service request reported time in server time zone.
• If the best customer time zone does not match any coverage
time zone and default coverage is not applicable to all time
zones, the application converts the service request reported
time to the default coverage time zone and compares it with the
coverage time defined for the default coverage time zone. The
application returns respond by and resolve by times by adding
the applicable response time and resolution time to the passed
service request reported time in server time zone.
Example
Scenario Result
Best customer time zone: EST
Reported Time: 9AM, EST
Coverage (not default) defined for
time zone EST:
• Coverage Time: 9AM to 6PM,
Monday through Friday
• Response Time: 1 Hour
• Resolution Time: 5 Hour
Respond By: 10AM, EST
Resolve By: 2PM, EST
23-6    Oracle Service Contracts User Guide
Best customer time zone: EST
Reported Time: 9AM, EST
Coverage defined for time zone
EST:
• Coverage Time: 9AM to 6PM,
Monday through Friday
• Response Time: 1 Hour
• Resolution Time: 5 Hour
Respond By: 10AM, EST
Resolve By: 2PM, EST
Best customer time zone: EST
Reported Time: 9AM, EST
No Coverage defined for time zone
EST
Default Coverage and applicable to
all time zones:
• Coverage Time: 9AM to 6PM,
Monday through Friday
• Response Time: 1 Hour
• Resolution Time: 5 Hour
Respond By: 10AM, EST
Resolve By: 2PM, EST
Best customer time zone: EST
Reported Time: 9AM, EST
No Coverage defined for time zone
EST
Default Coverage but not
applicable to all time zones:
• Coverage Time: 9AM to 6PM,
Monday through Friday
• Response Time: 1 Hour
• Resolution Time: 5 Hour
Respond By: 1PM, EST
Resolve By: 5PM, EST
Setting Up Standard Coverage and Subscription Templates    23-7
• Define Resources: Specify the list of resources that are eligible to work on a specific
task when a service request is created. Resources can be classified as Primary,
Preferred, or Excluded.
For example, identify a primary service engineer that responds to service calls.
This information is used by Assignment Manager to assign a service engineer.
• Define Billing Types: Specify for each Business Process, what type of work is
covered, to what limit, and at what rate. The billing types and rates are used when
calculating the amount to charge a customer when work has been performed.
For example, define a replacement transaction type where the customer is charged
for material and labor.
Defining Standard Coverage
Prerequisites
The following must be defined as part of your implementation:
• Coverage Type Lookup Code (Oracle Service Contracts)
• Business Processes (Oracle TeleService)
• Price List (Oracle Order Management)
• Time Zone
• Service Request Severity (Oracle TeleService)
• Resource Types (Oracle TeleService)
• Resources (Oracle TeleService)
• Billing Types (Oracle TeleService)
• Billing Rates (Oracle TeleService)
• Preventive Maintenance Program (Oracle Complex Maintenance, Repair and
Overhaul)
To define standard coverage:
1. From the Navigator, navigate to Service Offerings, and then select Standard
Coverage.
The Standard Coverage window appears.
23-8    Oracle Service Contracts User Guide
2. In the Coverage region, enter the following:
Name: Enter the name of the coverage.
Type: Select the type of coverage such as Gold, Silver, or Bronze from the LOV.
After you select a coverage type, the Importance Level field and start dates for the
Effective Dates fields are populated with values.
The effective Start Date is required and the End date is optional.
Note: When reviewing a service request, a service agent can click
the Line Details button to open the Line Details form, which
enables the service agent to view the covered level details and
compare the products covered under the contract with those that
are related to the service call.
The Line Details button is active only when the contract coverage is
viewed from the Service Request form. It is disabled when you
create or update standard coverage.
Access to the Line Details option is controlled by application
function security so that only authorized users are able to see the
contract line details. You must ensure that your administrator has
added the Service Contracts function named Covered Level Details
to the appropriate user menus.
Description: Enter a brief description for the coverage.
Exception: Optionally, enter an exception coverage for the standard coverage
Setting Up Standard Coverage and Subscription Templates    23-9
definition.
Note: Although there is no support for exception coverage during
entitlement calls, the ability to define exception coverage does
facilitate extensions to the entitlement process.
For example, you may wish to extend exception coverage to all
customers with the Gold coverage plan in order to ensure a
minimum level of support for these customers even if their
contracts expire; or an exception coverage may be referenced for
entitlement calls to a contract under a grace period.
Suitable as Exception check box: Select this check box if you want to use this
standard coverage as an exception coverage for other standard coverages.
Note: You can add a note the standard coverage by clicking the
Notes button. This opens the Notes window.
For information on notes, see Communicating Using Notes, page
19-1.
1. Define warranty inheritance rules as follows:
Warranty check box: Select this check box to define warranty inheritance, which
allows the warranty to continue if the product is replaced. This check box controls
whether or not this coverage can be selected against a warranty item in the item
master.
Inheritance: Select value if the warranty should continue when the product is
replaced.
Remaining Duration: Replacement product's warranty is the remaining duration of
the original warranty.
Full New Duration: Replacement product's warranty is a new warranty duration.
Note: The Warranty check box can be updated. However, if an
Inheritance has been entered in conjunction with the Warranty
check box, the Inheritance must be set to NULL before the
Warranty check box can be unchecked.
Billing Types may be set up for warranties as for any other type of
coverage.
Synchronize date installed check box: Select this check box, if you
want to set the warranty start date to be the same as the installation
date.
When a product installation date is changed, Service Contracts
23-10    Oracle Service Contracts User Guide
checks for contracts that cover that product. For every service that
covers the product, the coverage definition is checked for warranty
coverage that has the attribute set to allow the installation date
synchronization.
If this option is selected, Service Contracts checks whether any
service request has been logged on dates that would be outside the
warranty period if it were changed to start on the new installation
date. If no service request exists, the warranty start date is changed
to the installation date. To preserve the original duration of the
warranty, the end date is also changed. The effect of the change is
automatically cascaded to the coverage definition.
In order for this feature to work you must confirm that within the
Status and Operation setup, the Active status is checked for Update
Online within the Warranties/Extended Warranties category.
Define other standard coverage rules as follows:
Free upgrade check box: Select this check box if you want to track this coverage as
having a free upgrade.
This flag does not provide any automated functionality at this time.
Transfer: Determine the status of the contract in case a customer product is
transferred from one owner to another. This is a required field.
No Change: There would not be any changes in the existing owners contract. No
new contract is created for the new owner.
Terminate: The current contract subline is terminated. The termination date would
be the transfer date. No new contract is created for the new owner.
Terminate ifNot Related: If the new owner is related to the current owner, no
changes are made to the contract. If the parties are not related, the current contract
is terminated. The termination date would be the Transfer date.
Transfer: The current contract subline is terminated with the Termination date set
to Transfer date. If the Contract Transferred is a Warranty Contract, then a Contract
for the new Owner is created in Active Status. If the Contract transferred is an
Extended Warranty or Service Contract, a contract is created for the new owner in
the status defined by the profile option OKS: Transfer Status. The contract will have
a one-time billing schedule and advance billing.
Transfer if Not Related: If the new owner is related to the current owner, this
option keeps the current owners contract in force. If the owners are not related, the
current contract is terminated and a contract for the new owner is created. If the
contract transferred is a Warranty contract, then the new contract is created in the
Active status. If the contract transferred is an Extended Warranty or Service type
contract, the contract will have an advance one-time billing schedule and the status
Setting Up Standard Coverage and Subscription Templates    23-11
of the contract would be defined by the profile option OKS: Transfer Status.
Define Preventive Maintenance programs as follows:
Program Name: Select a Preventive Maintenance Program.
The program description displays after you select a program name.
Preventive Maintenance programs are set up in Oracle Complex Maintenance,
Repair, and Overhaul.
Note: You can open the Preventive Maintenance Schedule form and
view or modify the information related to the selected Preventive
Maintenance program, by clicking the Schedule button.
For more information on setting up Preventive Maintenance
programs, see the Oracle Complex Maintenance, Repair, and Overhaul
User's Guide.
3. In the Business Process region, enter the following:
Business Process: Select a Business Process from the LOV, such as Depot Repair.
Offset Duration: Enter the offset duration or amount of time you would like the
service to be offset from the authored contract's start date.
For example, set onsite support to start one month after the contract comes into
effect and set hotline support to be available immediately.
Offset Period: Specify the unit of measure for the offset duration, such as hour or
day.
If the Offset Duration is modified, the Start and End dates are automatically
adjusted as long as they're within the range of the service coverage dates, and
conversely, if the Start and End dates are modified, the Offset Duration is
automatically adjusted.
Price List: Select the default price list that should be used when billing service
charges.
Discount: Select the percentage of discount allowed for the transaction group, for
example 10%, from the LOV.
4. From the Coverage Times tab, enter the following:
Timezone: Select a Time zone from the LOV.
You can define more than one time zone for each business line. However, you must
define at least one time zone for every business process line.
Default check box: Select a time zone as the default for the selected business
process.
Apply Default to Other Time Zones check box: To have the Default coverage
23-12    Oracle Service Contracts User Guide
times applied to any other time zone for which you have not entered any coverage
times, select the Apply Default to Other Time Zones check box
In the Covered Times region: Enter a Start Time, End Time, and select the check
boxes for the applicable days for each time zone.
For a given business process, the coverage time for at least one day must be entered.
You can enter multiple coverage times for a specific time zone.
You can also define multiple coverage times for the same day, as long as the
coverage time records do not overlap.
Note: You can click the Always Covered button, to set to set the
Start Time and End Time for all days to 00:00 and 23:59
respectively.
5. From the Reaction Times tab, enter the following:
Severity Name: Enter a name for the severity definition, for example, Level 1 or
Important.
Severity: Select the level of severity, for example High, from a LOV.
Workthrough check box: If selected, this check box overrides the normal coverage
times for that transaction.
For example, suppose you have support between 9 a.m. and 5 p.m. from Monday
through Friday with a two-hour reaction time. If a customer calls at 4:45 p.m. in the
middle of the week and Work Through is selected, then the customer is entitled to
receive support by 6:45 p.m. that evening. If the Work Through option is not
selected, then the support representative has until 10:45 a.m. the next morning to
respond to the call.
Active check box: If selected, this check box indicates this severity level is active
and makes the reaction times available through an entitlements call.
Reaction Times for days of the week: Enter specific reaction times, in hours, for
each applicable day.
For example, if 2:00 is entered in the Monday field, then a service call must be made
within two hours if the call occurs on Monday.
Setting Up Standard Coverage and Subscription Templates    23-13
Workflow: Select the applicable workflow for each reaction time name specified.
6. From the Resolution Times tab, enter the following:
Severity Name: Comes from the Severity Name on the Reaction Times tab.
Severity: Comes from the Severity on the Reaction Times tab.
Workthrough check box: If selected, this check box overrides the normal coverage
times for that transaction.
Active check box: If selected, this check box indicates this severity level is active
and makes the resolution times available through an entitlements call.
Resolution Times for days of the week: Enter specific resolution times, in hours,
for each applicable day.
For example, if 4:00 is entered in the Monday field, then the issue must be resolved
within four hours if a call occurs on Monday.
7. From the Resources tab, enter the following:
Type: Select a resource type from the LOV. For example, Engineer.
Name: Select the resource by name.
Classification: Select the proper classification for the resource from the LOV.
You can classify a resource as Preferred, Primary or Excluded.
If you classify a resource as Excluded, the Assignment Manager removes the
resource from the list of available resources.
8. From the Billing Types tab, enter the following:
23-14    Oracle Service Contracts User Guide
Service Activity Billing Type: Select the billing type from the LOV.
Duplicates are not allowed.
If the billing type is Labor, then the Billing Rates button is enabled.
Up To Amount: Enter the maximum allowed amount.
If you leave this field blank, the upper limit is restricted by the percentage covered
or discount you enter in the % Covered field.
% Covered: Enter the percentage covered or discount.
For example, if new parts have been installed to fix a problem at a customer site, the
bill for the work needs to be calculated, taking the coverage on the service contract
into account. If parts are covered 50% up to a maximum of $300, and the charge for
parts was $800, after applying the rates agreed on the contract, the charge would be
calculated as $500, after the maximum discount of $300 has been applied. For the
same contract rates, if the charge for parts came to $500, the customer would receive
the full 50% discount ($250) because the discount is below the $300 maximum.
Allow Full Discount check box: If selected, this check box provides 100% coverage
for warranties without requiring setup of billing types. If unchecked on the
template, the box will be grayed out on the contract. Any bill types data populated
on the template will override the use of this check box.
Billing Rates: Check this button to open the Billing Rates form.
9. Save.
Setting Up a Subscription Template
To set up a subscription template:
1. From the Navigator, navigate to Service Offerings, and then select Subscription
Template.
The Subscription Template window appears.
Setting Up Standard Coverage and Subscription Templates    23-15
2. In the Name field, enter a name for the template.
Examples of names include Monthly or Yearly.
3. In the Description field, enter a description for the template.
Examples of descriptions include Monthly Subscription and Yearly Subscription.
4. In the Subscription Type field, select the type of subscription from the LOV.
Examples of subscription types include journals, magazines, and newsletters.
5. In the Media Type field, select the type of medium from the LOV.
Examples of medium include document, image, and audio.
6. In the Fulfillment Channel field, select of one the following options:
• Order Management: for tangible items that need to shipped
• None: for intangible items
7. In the Frequency field, select a subscription frequency:
• Daily
• Weekly
• Monthly
• Yearly
8. Enter any additional information in the Comments field.
9. Verify that the Active check box is selected to ensure that the subscription template
is active.
23-16    Oracle Service Contracts User Guide
10. Select OK.
Copying Standard Coverage into a New Coverage
You can provide a new service offering by making copy of the existing standard
coverage and incorporating required changes to it. For example, you can copy a
coverage and add additional business processes and change response times.
To copy standard coverage into a new coverage:
1. From the Navigator, navigate to Service Offerings, and then select Standard
Coverage.
The Standard Coverage window appears.
2. Click the flashlight icon in the toolbar. The Coverage Template window appears
with a list of the standard coverages. Select a standard coverage.
3. From the Tools menu, select Copy Coverage. The Copy Coverage window appears.
4. Enter a name for the new coverage.
5. Click OK.
Modifying Standard Coverage for Existing Contracts
To modify standard coverage for existing contracts:
1. From the Navigator, navigate to Service Offerings, and then select Standard
Coverage.
The Standard Coverage window appears.
2. Search for the coverage name that to modify.
3. Make updates as desired.
Setting Up Standard Coverage and Subscription Templates    23-17
4. Save.
Modifying Standard Coverage for New Contracts
Prerequisite: Create a copy of the coverage name you wish to modify. See Copying
Standard Coverage into a New Coverage, page 23-16.
To modify standard coverage for new contracts:
1. Make updates as desired.
2. Save.
3. Assign the new coverage to the service item in the Item Master. See Creating
Service Items, page 22-1.
Moving forward, the application applies the new coverage when the service is
ordered in a contract or order.
120oksug

120oksug

  • 1.
    Oracle® Service Contracts UserGuide Release 12 Part No. B25717-02 June 2007
  • 2.
    Oracle Service ContractsUser Guide, Release 12 Part No. B25717-02 Copyright © 2005, 2007, Oracle. All rights reserved. Primary Author:     Stacey Tucker-Blosch The Programs (which include both the software and documentation) contain proprietary information; they are provided under a license agreement containing restrictions on use and disclosure and are also protected by copyright, patent, and other intellectual and industrial property laws. Reverse engineering, disassembly, or decompilation of the Programs, except to the extent required to obtain interoperability with other independently created software or as specified by law, is prohibited. The information contained in this document is subject to change without notice. If you find any problems in the documentation, please report them to us in writing. This document is not warranted to be error-free. Except as may be expressly permitted in your license agreement for these Programs, no part of these Programs may be reproduced or transmitted in any form or by any means, electronic or mechanical, for any purpose. If the Programs are delivered to the United States Government or anyone licensing or using the Programs on behalf of the United States Government, the following notice is applicable: U.S. GOVERNMENT RIGHTS Programs, software, databases, and related documentation and technical data delivered to U.S. Government customers are "commercial computer software" or "commercial technical data" pursuant to the applicable Federal Acquisition Regulation and agency-specific supplemental regulations. As such, use, duplication, disclosure, modification, and adaptation of the Programs, including documentation and technical data, shall be subject to the licensing restrictions set forth in the applicable Oracle license agreement, and, to the extent applicable, the additional rights set forth in FAR 52.227-19, Commercial Computer Software--Restricted Rights (June 1987). Oracle Corporation, 500 Oracle Parkway, Redwood City, CA 94065. The Programs are not intended for use in any nuclear, aviation, mass transit, medical, or other inherently dangerous applications. It shall be the licensee's responsibility to take all appropriate fail-safe, backup, redundancy and other measures to ensure the safe use of such applications if the Programs are used for such purposes, and we disclaim liability for any damages caused by such use of the Programs. The Programs may provide links to Web sites and access to content, products, and services from third parties. Oracle is not responsible for the availability of, or any content provided on, third-party Web sites. You bear all risks associated with the use of such content. If you choose to purchase any products or services from a third party, the relationship is directly between you and the third party. Oracle is not responsible for: (a) the quality of third-party products or services; or (b) fulfilling any of the terms of the agreement with the third party, including delivery of products or services and warranty obligations related to purchased products or services. Oracle is not responsible for any loss or damage of any sort that you may incur from dealing with any third party. Oracle, JD Edwards, PeopleSoft, and Siebel are registered trademarks of Oracle Corporation and/or its affiliates. Other names may be trademarks of their respective owners.
  • 3.
        iii   Contents Send UsYour Comments Preface 1 Creating Contracts Overview of Oracle Service Contracts...................................................................................... 1-1 Elements of a Service Contract..................................................................................................1-2 Managing the Service Contract Life Cycle .............................................................................. 1-4 Creating a Contract.................................................................................................................... 1-4 Copying Information Between Contracts................................................................................. 1-8 Searching for a Contract or Template..................................................................................... 1-11 Creating a Template from a Contract......................................................................................1-13 2 Entering Defaults for Contracts Overview of Entering Defaults for Contracts...........................................................................2-2 Specifying Contract Effectivity and Maximum Duration........................................................ 2-2 Entering Parties to the Contract................................................................................................ 2-3 Entering Party Contacts............................................................................................................. 2-4 Creating or Modifying a Customer Contact Record................................................................. 2-5 Entering the Billing Account and Address............................................................................... 2-7 Entering the Shipping Account and Address........................................................................... 2-8 Entering the Price List............................................................................................................... 2-9 Entering Billing Schedules......................................................................................................2-11 Billing Schedules Overview................................................................................................... 2-11 Creating a Billing Schedule Using Billing Streams............................................................... 2-12 Entering a Billing Stream........................................................................................................ 2-13
  • 4.
    iv Using Billing Streamsto Handle Irregular Billing Periods................................................... 2-15 Creating a Billing Schedule from a Billing Profile................................................................ 2-18 Specifying How Billed Amounts Appear on Invoices .......................................................... 2-19 Suspending Billing for a Contract.......................................................................................... 2-20 Holding Credits Until the Next Billing Cycle........................................................................ 2-20 Entering Tax Exemptions........................................................................................................ 2-21 Specifying a Payment Method................................................................................................ 2-23 Specifying Payment by Credit Card or Commitment Number .............................................2-23 Requiring a Purchase Order.................................................................................................... 2-24 Specifying a Purchase Order Number for Invoices................................................................2-25 Specifying a Receivables Transaction Type for Payment...................................................... 2-25 Assigning Sales Credits.......................................................................................................... 2-26 Requiring and Specifying a Purchase Order for Service Charges......................................... 2-27 Specifying How a Contract Will Be Renewed........................................................................ 2-28 Defining Grace Periods........................................................................................................... 2-30 Specifying and Starting the Contract Approval Workflow................................................... 2-30 Organizing Contracts by Assigning Them to Contract Groups.............................................2-30 Specify a Different Quality Assurance Check List................................................................ 2-31 Entering an Estimate of Contract Revenue............................................................................. 2-31 Specifying Contract Terms......................................................................................................2-32 Granting Additional Access Privileges ..................................................................................2-33 Entering an Additional Description or Comment.................................................................. 2-34 Setting Up Defaults for Contract Renewal............................................................................. 2-34 Overview of Default Levels.................................................................................................... 2-34 Entering Contract Defaults..................................................................................................... 2-36 Setting Up System Profiles for Renewal Defaults................................................................. 2-43 Speeding Up Contract Line Entry Using Default Values.......................................................2-44 3 Entering Service Lines Overview of Entering Service Lines......................................................................................... 3-3 About Service Lines.................................................................................................................. 3-3 Entering a Service Line (General Procedure)............................................................................3-3 Changing the Billing and Shipping Accounts and Locations..................................................3-9 Entering Billing and Shipping Contacts for a Contract Line................................................. 3-10 Creating or Modifying a Contract Line Contact .................................................................... 3-10 Specifying How a Contract Line Is to Be Renewed................................................................3-12 Renewing Service Purchased for Seasonal or Peak Periods ..................................................3-13 Specifying What a Service Covers.......................................................................................... 3-14 Levels of Coverage and Their Uses.........................................................................................3-15 Covering Customer Products (Instances in Oracle Installed Base)........................................3-20
  • 5.
        v Covering CustomerProducts.................................................................................................. 3-21 Browsing Oracle Installed Base to Identify Item Instances for Coverage............................. 3-24 Entering a Customer Product into Oracle Installed Base....................................................... 3-26 Covering Parties...................................................................................................................... 3-27 Covering Customer Accounts................................................................................................. 3-28 Covering Party Sites................................................................................................................ 3-30 Browsing Through Party Sites ............................................................................................... 3-30 Covering Systems.................................................................................................................... 3-32 Browsing Through Oracle Installed Base Systems ................................................................3-32 Covering Inventory Items....................................................................................................... 3-34 Viewing Details About a Covered Product............................................................................ 3-34 Maintaining Pricing Attributes for Covered Products........................................................... 3-35 Specifying How the Service Prints on an Invoice.................................................................. 3-35 Omitting a Line or Subline from the Invoice......................................................................... 3-36 Specifying the Invoice Text.....................................................................................................3-37 Specifying a Billing Schedule................................................................................................. 3-38 Pricing What a Service Covers................................................................................................ 3-39 Adjusting the Price of a Service for a Covered Product or an Item....................................... 3-41 Repricing a Service by Changing the Price List..................................................................... 3-41 Manually Adjusting the Price................................................................................................. 3-42 Changing the Basis for Pricing a Service................................................................................ 3-43 Pricing Service for a Party, Customer Account, Site, or System............................................ 3-44 Specifying a Payment Method for a Contract Line................................................................ 3-45 Specifying Payment by Credit Card or Commitment Number..............................................3-45 Requiring a Purchase Order.................................................................................................... 3-46 Specifying a Purchase Order Number.................................................................................... 3-46 Modifying Coverage Provided by a Service........................................................................... 3-47 Scheduling Preventive Maintenance Activities..................................................................... 3-48 Scheduling Multiple Activities at the Same Time................................................................. 3-50 Scheduling Individual Activities............................................................................................3-51 Scheduling Activities at Regular Intervals Using Schedule Streams.................................... 3-52 Viewing Maintenance Program and Activity Details............................................................ 3-54 Updating Scheduled Service Dates for a Maintenance Program........................................... 3-55 Ending Service Lines on a Day Specified by the Customer...................................................3-56 About Cotermination.............................................................................................................. 3-56 Applying the Cotermination Date to a Service...................................................................... 3-57 Specifying Tax Status.............................................................................................................. 3-57 Applying Changes from a Service Line to the Covered Sublines..........................................3-58 Assigning Sales Credits for a Contract Line........................................................................... 3-59 Updating Service..................................................................................................................... 3-59 Applying Default Values to Existing Contract Lines............................................................. 3-60
  • 6.
    vi 4 Entering UsageLines Overview of Entering Usage Lines........................................................................................... 4-1 Charging a Customer for Usage................................................................................................ 4-2 Entering a Usage Line................................................................................................................4-3 Specifying How the Customer Is Charged............................................................................... 4-6 Charging Based on a Fixed Quantity of Usage Regardless of the Actual Usage..................... 4-7 Charging a Flat Fee Regardless of the Actual Usage................................................................ 4-9 Charging for Reported or Estimated Usage Per Period.......................................................... 4-11 Charging Based on Reported Usage........................................................................................4-17 Entering a Counter.................................................................................................................. 4-21 Entering the Starting Counter Reading.................................................................................. 4-22 Creating Special Price Breaks................................................................................................. 4-23 Point and Range Price Breaks................................................................................................. 4-26 Deleting Special Price Breaks................................................................................................. 4-27 Prorating Price Breaks to Apply to Multiple Periods.............................................................4-28 How Price Breaks Are Prorated...............................................................................................4-29 Specifying a Billing Schedule for a Usage Line..................................................................... 4-31 Recording Usage by Updating a Counter Reading.................................................................4-32 5 Entering Subscription Lines Overview of Entering Subscription Lines................................................................................ 5-1 About Subscriptions..................................................................................................................5-1 Entering a Subscription Line.................................................................................................... 5-5 Specifying a Schedule of Product Shipments.......................................................................... 5-7 Adjusting the Subscription Price............................................................................................5-10 Viewing Pricing Details.......................................................................................................... 5-11 Specifying a Billing Schedule for Subscriptions................................................................... 5-12 Viewing the Shipment Status of a Subscription Order......................................................... 5-14 6 Ordering Service in Oracle Order Management Overview of Ordering Service in Oracle Order Management................................................. 6-1 About Ordering Service in Oracle Order Management........................................................... 6-2 Ordering Service in a Sales Order............................................................................................ 6-6 Adding Service Lines to an Existing Contract.......................................................................... 6-9 Specifying Renewal and Other Details for a New Contract Created for Your Order........... 6-11 Running Concurrent Programs to Generate Contracts Automatically.................................. 6-14 Reprocessing Orders That Did Not Create Contracts.............................................................6-15 Viewing Created Contracts by Sales Order Number............................................................. 6-16 Viewing Contracts by Sales Order Number in Oracle Service Contracts..............................6-16
  • 7.
        vii Viewing Contractsby Sales Order in Oracle Installed Base..................................................6-17 Modifying the Dates That a Warranty Is Effective.................................................................6-18 Changing Only the That Dates a Warranty is Effective......................................................... 6-19 Changing Both the Warranty Dates and Installed Date.........................................................6-19 Setting Up New Contract Defaults for Oracle Order Management.......................................6-20 Understanding the Impact of Contingencies on Revenue Recognition ................................6-22 7 Adjusting Prices Overview of Adjusting Prices................................................................................................... 7-1 Entering Price Adjustments...................................................................................................... 7-3 Getting Help in Picking Adjustments...................................................................................... 7-6 Viewing Total Adjustment Amounts....................................................................................... 7-7 Viewing Adjustments for the Whole Contract......................................................................... 7-7 Viewing the Total Adjustments for an Individual Line or Subline........................................ 7-7 Reverting to the Original Price List Price................................................................................. 7-8 Cascading Service Price ............................................................................................................ 7-9 8 Running Quality Assurance Results and Troubleshooting About the Quality Assurance Check (QA Check).................................................................... 8-1 Running the Quality Assurance Check from the Actions Menu............................................. 8-2 Submitting the Contract for Approval from the Actions Menu.............................................. 8-3 Running the Quality Assurance Check from the (Summary) Administration Subtab........... 8-4 Running the Contracts QA Program......................................................................................... 8-6 Troubleshooting Errors............................................................................................................. 8-7 9 Approving Contracts Approving Contracts................................................................................................................. 9-1 Submitting Contracts for Approval.......................................................................................... 9-2 Tracking Contracts During the Approval................................................................................. 9-3 Approving Contracts................................................................................................................. 9-4 Signing Contracts...................................................................................................................... 9-6 10 Billing Overview of Billing................................................................................................................. 10-1 Understanding Billing Levels................................................................................................. 10-4 Creating Billing Profiles......................................................................................................... 10-7 Billing Customers Based on Usage......................................................................................... 10-9 Billing Using Credit Cards or Commitments....................................................................... 10-10 Specifying Multiple General Ledger Accounts for Contract Revenue Streams..................10-10
  • 8.
    viii Executing Billing ThroughConcurrent Programs................................................................ 10-12 Running the Service Contracts Main Billing Program.........................................................10-13 Running the AutoInvoice Import Program.......................................................................... 10-14 Running the Service Contracts Fetch Receivables Info for Billing Program.......................10-14 Running the Service Contracts Usage Averaging Program..................................................10-15 Running the Service Contracts Usage Settlement Program................................................. 10-15 Viewing Invoice Details........................................................................................................10-16 Viewing Invoice History....................................................................................................... 10-17 Reviewing Invoice Transactions in Oracle Receivables...................................................... 10-18 Understanding Bill Presentment Architecture..................................................................... 10-21 Using Variable Accounting and Partial Periods Revenue Recognition...............................10-21 11 Managing Contract Negotiation Overview of Managing Contract Negotiation........................................................................ 11-1 Understanding the Negotiation Workflow.............................................................................11-1 Understanding the Negotiation Phases.................................................................................. 11-3 12 Managing Your Work Overview of Managing Your Work........................................................................................ 12-1 Finding Contracts by Status or Notification Type................................................................. 12-2 Finding Your Most Recently Accessed Contracts...................................................................12-3 Bookmarking Contracts...........................................................................................................12-4 Finding Bookmarked Contracts.............................................................................................. 12-4 Creating Groups...................................................................................................................... 12-5 Organizing Contracts by Group and Subgroup..................................................................... 12-7 Finding Contracts Using the Contract Groups Hierarchy....................................................12-11 Removing a Contract from a Group......................................................................................12-12 Searching for Contracts Using the Entitlements Search Window....................................... 12-12 Using the Index to Navigate Through Contracts.................................................................. 12-14 13 Using the Administrator Workbench to Manage Contracts Under Negotiation Overview of the Administrator Workbench...........................................................................13-1 Viewing Notifications............................................................................................................. 13-4 Publishing a Contract to a Customer for Acceptance............................................................. 13-6 Submitting a Contract for Approval from the Administrator Workbench............................13-7 Suppressing Reminders.......................................................................................................... 13-7 Enabling Reminders................................................................................................................ 13-8 Running the Quality Assurance Check.................................................................................. 13-8 Updating Multiple Contracts.................................................................................................. 13-9 Updating a Contract.............................................................................................................. 13-11
  • 9.
        ix Opening aContract............................................................................................................... 13-13 Sending an E-Mail to a Customer from the Administrator Workbench..............................13-13 Printing Quotes and Contracts..............................................................................................13-14 Identifying Follow-Up Actions............................................................................................. 13-14 Using Shortcuts in the Administrator Workbench...............................................................13-15 14 Viewing Contract Details in HTML Overview of Service Contracts in HTML............................................................................... 14-1 Finding Contracts (HTML)......................................................................................................14-2 Sending an E-Mail to a Customer (HTML).............................................................................14-4 Viewing Contract Details (HTML)......................................................................................... 14-5 Viewing Service Line Details (HTML)................................................................................... 14-7 Viewing Coverage Details (HTML)........................................................................................ 14-8 Viewing Covered Level Details (HTML)................................................................................14-9 Viewing Usage Line Details (HTML)................................................................................... 14-10 Viewing Usage Counter Details............................................................................................14-11 Viewing Subscription Line Details (HTML)........................................................................ 14-11 Viewing Item Instance Details (HTML)............................................................................... 14-12 Viewing Order Information for a Service Contract (HTML)............................................... 14-13 Viewing Billing Transactions (HTML).................................................................................14-14 15 Using the Customer Acceptance Portal Overview of the Customer Acceptance Portal........................................................................ 15-1 Opening the Customer Acceptance Portal.............................................................................. 15-3 Accepting a Contract............................................................................................................... 15-4 Adding an Attachment............................................................................................................ 15-5 Declining a Contract................................................................................................................15-6 Requesting Assistance.............................................................................................................15-7 16 Managing the Contract Life Cycle Overview of Managing the Contract Life Cycle..................................................................... 16-1 Modifying Multiple Contracts at the Same Time (Mass Change) ........................................ 16-1 Handling Change Requests.................................................................................................... 16-8 Entering Contract Changes..................................................................................................... 16-8 Reviewing and Approving Changes.....................................................................................16-11 Updating Contracts Online................................................................................................... 16-14 Creating Different Contract Versions for Your Customer................................................... 16-15 Viewing Contract History .................................................................................................... 16-16 Handling Returns and Granting Credit................................................................................16-19 Changing Contract Status..................................................................................................... 16-19
  • 10.
    x 17 Extending andRenewing Contracts About Contract Extensions and Renewals..............................................................................17-2 Extending a Contract Without Repricing................................................................................17-4 Repricing an Extended Contract............................................................................................. 17-5 Extending a Contract Line....................................................................................................... 17-6 How Billing Schedules Are Updated for Extended Contracts............................................... 17-9 Understanding Contract Renewals....................................................................................... 17-11 Managing Manual Renewals................................................................................................ 17-19 Managing Online Renewals................................................................................................. 17-20 Managing Evergreen Renewals.............................................................................................17-22 Understanding Sales Credits During Contract Renewals....................................................17-22 Explaining the Pricing of Renewed Contracts......................................................................17-24 Specifying How the Renewed Contract Will Be Priced....................................................... 17-26 Renewing Contracts Manually............................................................................................. 17-27 Managing the Event-Driven Renewal Process..................................................................... 17-28 Allowing a Grace Period for Renewals.................................................................................17-28 About Grace Periods............................................................................................................. 17-29 Specifying a Grace Period for the Current Contract ............................................................17-30 Specifying a Grace Period for the Renewed Contract ......................................................... 17-30 Understanding Billing Schedules on Renewed Contracts................................................... 17-31 Consolidating Multiple Contracts for Renewal................................................................... 17-31 Sending Quote Letters by E-mail.......................................................................................... 17-36 Understanding Line Level Cancellation and Termination Reasons ................................... 17-37 Canceling a Contract Line..................................................................................................... 17-40 Canceling a Contract Subline................................................................................................17-42 18 Creating and Enabling Templates for E-Mails to Customers About Templates for E-Mails to Customers........................................................................... 18-1 Overview of Templates for E-Mails to Customers................................................................. 18-2 Creating and Enabling Templates for E-Mail Attachments Sent by Agents......................... 18-4 Enabling Templates for Communications Generated by the Negotiation Workflow.......... 18-5 Contract-Specific Data Available for Inclusion in Template Documents............................. 18-5 Viewing the Data Definition Structure................................................................................ 18-18 Uploading and Registering a Template in Oracle XML Publisher......................................18-19 Creating the Set of Templates Used for Customer Communications..................................18-21 Specifying How the Template Sets Are to Be Used............................................................. 18-23 Viewing PDF Attachments....................................................................................................18-24 Viewing Sample Marked-Up Documents Provided with the Application......................... 18-25
  • 11.
        xi 19 UsingNotes Using Notes............................................................................................................................. 19-1 How Notes Are Used in Oracle Service Contracts..................................................................19-2 Adding Service Contract Notes...............................................................................................19-3 Adding Service Coverage Notes to a Standard Coverage...................................................... 19-6 Adding Service Coverage Notes to a Service Coverage (Instantiated Coverage)..................19-8 Viewing Notes....................................................................................................................... 19-10 20 Terminating Contracts Overview of Terminating Contracts....................................................................................... 20-1 About Terminating Contracts................................................................................................. 20-1 How Termination Works........................................................................................................ 20-2 Terminating a Contract........................................................................................................... 20-3 Restrictions for Terminating a Contract................................................................................. 20-5 Terminating a Contract Line................................................................................................... 20-5 Terminating a Contract Subline..............................................................................................20-8 Terminating Multiple Contracts at the Same Time..............................................................20-10 Viewing the True Value of a Contract.................................................................................. 20-12 Understanding Termination and Credit Generation with Partial Periods.......................... 20-13 21 Running Reports and Programs Overview of Running Reports and Concurrent Programs..................................................... 21-1 About Reports..........................................................................................................................21-1 About Concurrent Programs................................................................................................... 21-8 Running Reports and Programs............................................................................................ 21-14 22 Creating Contract Items in Oracle Inventory About Contract Item Types..................................................................................................... 22-1 Creating Service Items............................................................................................................ 22-1 Creating Warranty Items......................................................................................................... 22-5 Creating Subscription Items................................................................................................. 22-12 Creating Usage Items............................................................................................................ 22-16 Defining Serviceable Products............................................................................................. 22-20 Restricting How Items Are Used.......................................................................................... 22-22 23 Setting Up Standard Coverage and Subscription Templates Overview of Standard Coverage and Subscription Templates..............................................23-1 Specifying Standard Coverage................................................................................................23-3
  • 12.
    xii Defining Standard Coverage..................................................................................................23-7 Setting Up a Subscription Template.....................................................................................23-14 Copying Standard Coverage into a New Coverage.............................................................. 23-16 Modifying Standard Coverage for Existing Contracts......................................................... 23-16 Modifying Standard Coverage for New Contracts...............................................................23-17
  • 13.
        xiii   Send UsYour Comments Oracle Service Contracts User Guide, Release 12 Part No. B25717-02 Oracle welcomes customers' comments and suggestions on the quality and usefulness of this document. Your feedback is important, and helps us to best meet your needs as a user of our products. For example: • Are the implementation steps correct and complete? • Did you understand the context of the procedures? • Did you find any errors in the information? • Does the structure of the information help you with your tasks? • Do you need different information or graphics? If so, where, and in what format? • Are the examples correct? Do you need more examples? If you find any errors or have any other suggestions for improvement, then please tell us your name, the name of the company who has licensed our products, the title and part number of the documentation and the chapter, section, and page number (if available). Note: Before sending us your comments, you might like to check that you have the latest version of the document and if any concerns are already addressed. To do this, access the new Applications Release Online Documentation CD available on Oracle MetaLink and www.oracle.com. It contains the most current Documentation Library plus all documents revised or released recently. Send your comments to us using the electronic mail address: appsdoc_us@oracle.com Please give your name, address, electronic mail address, and telephone number (optional). If you need assistance with Oracle software, then please contact your support representative or Oracle Support Services. If you require training or instruction in using Oracle software, then please contact your Oracle local office and inquire about our Oracle University offerings. A list of Oracle offices is available on our Web site at www.oracle.com.
  • 15.
        xv   Preface Intended Audience Welcometo Release 12 of the Oracle Service Contracts User Guide. See Related Information Sources on page xvi for more Oracle Applications product information. TTY Access to Oracle Support Services Oracle provides dedicated Text Telephone (TTY) access to Oracle Support Services within the United States of America 24 hours a day, seven days a week. For TTY support, call 800.446.2398. Documentation Accessibility Our goal is to make Oracle products, services, and supporting documentation accessible, with good usability, to the disabled community. To that end, our documentation includes features that make information available to users of assistive technology. This documentation is available in HTML format, and contains markup to facilitate access by the disabled community. Accessibility standards will continue to evolve over time, and Oracle is actively engaged with other market-leading technology vendors to address technical obstacles so that our documentation can be accessible to all of our customers. For more information, visit the Oracle Accessibility Program Web site at http://www.oracle.com/accessibility/ . Accessibility of Code Examples in Documentation Screen readers may not always correctly read the code examples in this document. The conventions for writing code require that closing braces should appear on an otherwise empty line; however, some screen readers may not always read a line of text that consists solely of a bracket or brace.
  • 16.
    xvi Accessibility of Linksto External Web Sites in Documentation This documentation may contain links to Web sites of other companies or organizations that Oracle does not own or control. Oracle neither evaluates nor makes any representations regarding the accessibility of these Web sites. Structure 1  Creating Contracts 2  Entering Defaults for Contracts 3  Entering Service Lines 4  Entering Usage Lines 5  Entering Subscription Lines 6  Ordering Service in Oracle Order Management 7  Adjusting Prices 8  Running Quality Assurance Results and Troubleshooting 9  Approving Contracts 10  Billing 11  Managing Contract Negotiation 12  Managing Your Work 13  Using the Administrator Workbench to Manage Contracts Under Negotiation 14  Viewing Contract Details in HTML 15  Using the Customer Acceptance Portal 16  Managing the Contract Life Cycle 17  Extending and Renewing Contracts 18  Creating and Enabling Templates for E-Mails to Customers 19  Using Notes 20  Terminating Contracts 21  Running Reports and Programs 22  Creating Contract Items in Oracle Inventory 23  Setting Up Standard Coverage and Subscription Templates Related Information Sources Related Service Contracts Guides: Oracle Contracts Implementation and Administration Guide Other Related Guides: Oracle Advanced Pricing User's Guide Oracle Applications User's Guide Oracle Bills of Material User's Guide Oracle Common Application Components User Guide Oracle Complex Maintenance, Repair, and Overhaul User's Guide Oracle General Ledger User Guide
  • 17.
        xvii Oracle InstalledBase User Guide Oracle Inventory User's Guide Oracle Order Management User's Guide Oracle Receivables User Guide Oracle TeleService User Guide Oracle Workflow User's Guide Oracle XML Publisher User's Guide Integration Repository The Oracle Integration Repository is a compilation of information about the service endpoints exposed by the Oracle E-Business Suite of applications. It provides a complete catalog of Oracle E-Business Suite's business service interfaces. The tool lets users easily discover and deploy the appropriate business service interface for integration with any system, application, or business partner. The Oracle Integration Repository is shipped as part of the E-Business Suite. As your instance is patched, the repository is automatically updated with content appropriate for the precise revisions of interfaces in your environment. Do Not Use Database Tools to Modify Oracle Applications Data Oracle STRONGLY RECOMMENDS that you never use SQL*Plus, Oracle Data Browser, database triggers, or any other tool to modify Oracle Applications data unless otherwise instructed. Oracle provides powerful tools you can use to create, store, change, retrieve, and maintain information in an Oracle database. But if you use Oracle tools such as SQL*Plus to modify Oracle Applications data, you risk destroying the integrity of your data and you lose the ability to audit changes to your data. Because Oracle Applications tables are interrelated, any change you make using an Oracle Applications form can update many tables at once. But when you modify Oracle Applications data using anything other than Oracle Applications, you may change a row in one table without making corresponding changes in related tables. If your tables get out of synchronization with each other, you risk retrieving erroneous information and you risk unpredictable results throughout Oracle Applications. When you use Oracle Applications to modify your data, Oracle Applications automatically checks that your changes are valid. Oracle Applications also keeps track of who changes information. If you enter information into database tables using database tools, you may store invalid information. You also lose the ability to track who has changed your information because SQL*Plus and other database tools do not keep a record of changes.
  • 19.
    Creating Contracts    1-1 1 CreatingContracts This chapter covers the following topics: • Overview of Oracle Service Contracts • Elements of a Service Contract • Managing the Service Contract Life Cycle • Creating a Contract • Copying Information Between Contracts • Searching for a Contract or Template • Creating a Template from a Contract Overview of Oracle Service Contracts Oracle Service Contracts provides a complete contract authoring execution solution to manage warranties, extended warranties, usage, and subscription services, as well as complex service agreements. With Oracle Service Contracts you can: • Sell multiple types of service • Define pricing and billing schedules • Ensure timely service entitlement checks • Automate renewals for recurring revenue opportunities • Simplify change management • Minimize service revenue leakage
  • 20.
    1-2    Oracle ServiceContracts User Guide Elements of a Service Contract A contract in Oracle Service Contracts comprises: • a header, page 1-2 • one or more lines, page 1-2 • one or more sublines, page 1-4 Header The header is where you enter a brief description and specify the contract duration. You can default values from the header of a contract down to the lines and, if applicable, to sublines as well. The header level is composed of the fields at the top of the Service Contracts Authoring form as well as the Summary tab. The Summary tab also includes several secondary tabs. The following list briefly describes these pages: • Parties: Enter information about the customer, including the bill to and ship to information for the contract. • Pricing/Billing: Assign a price list and various accounting rules for pricing and billing contracts. In most cases, Oracle Service Contracts retrieves the contractual prices of services or usage from Oracle Advanced Pricing, however, pricing is done manually in some situations. • Renewals: Define the renewal rules that are applied during manual or automatic renewal of the contract. • Administration: Define administrative components that are used to process the contract, such as the QA checklist, contract groups, and workflow. • Security/Text: Grant contract access by the resource group or user level. Lines Lines list the individual service, usage, and subscription items that are included in the contract. A single contract can have multiple lines. Each line inherits certain information from the contract header such as effectivity dates, bill to and ship to information, and billing rules and schedules. These can be changed as appropriate to allow the contract to conform to the customer requirements. A contract line may be related to one or more sublines. Three line types are available:
  • 21.
    Creating Contracts    1-3 •Service lines: Cover a broad category of items that can include activities such as field service, depot repair, call center, technical support, or any other user-defined business activities. Each service line can cover one or more items that a customer owns. See Entering Service Lines, page 3-3 for more information about service lines. • Usage lines: Charge customers for usage. For example, a photo copier company might wish to charge for the number of copies that are made within a period. See Entering Usage Lines, page 4-3 for more information about usage lines. • Subscription lines: Cover subscriptions for both tangible and intangible items. Tangible items include magazines, collateral, or any other physical item that can be shipped through Oracle Order Management. Intangible items can be collateral sent through e-mail. See Entering Subscription Lines, page 5-5 for more information about subscription lines. Note: Subscription lines do not have sublines. The Lines tab includes several secondary tabs, which include: • Accounts • Effectivities • Pricing/Products • Exemption/Payment Options • Counters • Events Note: The fields within each secondary tab are unique to the line type that you select. For details on entering lines, refer to the specific line type topics. • Entering a Service Line (General Procedure), page 3-3 • Entering a Usage Line in a Contract, page 4-3 • Entering a Subscription Line, page 5-5
  • 22.
    1-4    Oracle ServiceContracts User Guide Sublines Sublines specify what the service covers or the counters where the usage is tracked. You can access this information from the Pricing/Products subtab of the Lines tab. The following list describes how each line type uses sublines: • Service lines:Sublines for service lines specify what the service covers. A service line can cover a party, a customer, a site, a system, a product, or an item. See Levels of Coverage and Their Uses, page 3-15. • Usage lines:Sublines for usage lines specify the counters where the usage is tracked. See Entering a Counter, page 4-21. • Subscription lines: Subscription lines do not have sublines. See About Subscriptions, page 5-5. Managing the Service Contract Life Cycle Oracle Service Contracts enables you to manage the entire contract life cycle, including contract creation, renewal, and termination. For detailed information refer to the following procedures: • Creating a Contract, page 1-4 • Approving Contracts, page 9-4 • Extending and Renewing Contracts, page 17-2 • Terminating Contracts, page 20-1 • Managing the Contract Life Cycle, page 16-1 Creating a Contract You can create a contract manually. In addition, a contract can be created automatically through Oracle Order Management or by creating a product that has a warranty in Oracle Installed Base. See About Ordering Service in Oracle Order Management, page 6-2. You can author service contracts in multiple operating units without changing responsibility. You must select an operating unit for each contract. Note: This procedure covers how to create a contract by navigating from the Launchpad. You can also open the Service Contracts Authoring form from the Administrator Workbench. For more
  • 23.
    Creating Contracts    1-5 informationabout the Administrator Workbench, see Overview of the Administrator Workbench, page 13-1. To create a contract: 1. Log in under the Service Contracts Manager or Service Contracts User responsibility. 2. Navigate to Contract Administration, and then select Launchpad. The Oracle Contracts window appears. 3. Select New from the Tools menu. The Create a New Contract window appears. 4. To create a contract manually: 1. Select the Create a New Contract Manually radio button. 2. Select an operating unit using the list of values (LOV). Note: The Operating Unit LOV shows operating units that are available to the security profile that is specified in MO: Security Profile. If a default operating unit is specified in MO: Default Operating Unit, the application uses the default operating unit. 3. Select a category using the LOV: • If you are creating a contract with service agreements for individual items (covered products) in the customer's installed base, then select Warranty and Extended Warranty or Service Agreement. Warranty and Extended Warranty category does not permit you to add usage lines or to sell service to other levels of coverage (a party, site, or system). • If you are creating a usage contract or a service agreement for levels other than items in the customer's install base (Products), then you must select Service Agreement. • If your contract includes subscriptions, then select Subscription Agreement . Subscription agreements permit you to enter subscriptions, service, and usage lines. 5. To create a contract using a template: 1. Select the Create a Contract from a Template radio button.
  • 24.
    1-6    Oracle ServiceContracts User Guide 2. Select a template using the Template LOV. If you do not know the template name you can search for the template by description and other criteria by clicking Find. See Searching for a Contract or Template, page 1-11. 6. Click Create. The Service Contracts Authoring window appears. The category that you selected appears in the Category field at the top of the window. The start date becomes today's date. The application supplies a contract number for you automatically after you first save the contract, but you can instead enter a number of your own. The contract number can be a combination of any characters, but it must be unique. 7. Optionally, enter another short identifier in the Known As field to help you identify the contract later. 8. Specify the dates that the contract is effective by entering: • The start date or end date • Duration and period The dates that you enter here are automatically passes to each new line in the contract. The dates that individual lines are effective cannot fall outside this range; they cannot have a start date earlier than the contract start date or an end date later than the contract end date. If you enter dates that are outside this range in a contract line, then you must extend the contract dates accordingly for your contract to pass Quality Assurance (QA).
  • 25.
    Creating Contracts    1-7 9.To help you identify the contract later, enter a description in the Description field. 10. In the Party region, the operating unit entered in the Create a New Contract window defaults as the Vendor Operating Unit (or the Merchant Operating Unit for Subscription Agreements). 11. Save. 12. You are now ready to enter the rest of the contract information that is required for your contract to become active: Note: To speed up entry, you can copy information from an existing contract. See Copying Information from an Existing Contract, page 1-8. • General contract information, including the vendor and customer, what quality check the contract must pass to become active, and how the contract will be renewed. • Contract lines according to procedures described in: • Entering a Service Line (General Procedure), page 3-3 • Entering a Usage Line in a Contract, page 4-3 • Entering a Subscription Line, page 5-5 13. You can create different versions of the contract for your customer and at different price points and send them out for review. See Creating Different Contract Versions for Your Customer, page 16-15. 14. Check to see whether you have entered all the required information in the contract or whether some external reason exists why the contract cannot be implemented, by running the QA check. 15. The QA check alerts you of any issues with your contract. Following are examples of issues that are tracked in the QA check: • Failure to create a billing schedule for the customer. • Failure to include an e-mail address for the customer contact. • Absence of sales credits for contract lines. • Customer credit on hold. Your contract becomes active only after it passes the QA check list and obtains the
  • 26.
    1-8    Oracle ServiceContracts User Guide approvals that are required by the Oracle Workflow process. Note: The application uses a common workflow for new and renewed contracts. Each new contract, whether a renewal or new, initiates a workflow process. See Overview of Managing Contract Negotiation, page 11-1. The standard contract approval workflow integrates with Oracle Approval Management Engine (AME). Standard AME features support rules based approval routing and definition of approval groups. Key attributes have been seeded in AME for approval setup, such as Contract ID, Operating Unit, Customer Party, Contract Category, and Contract Amount. Your administrator can define additional attributes through AME. For more information see the Oracle Service Contracts Implementation Guide. See About the Quality Assurance Check (QA Check), page 8-1 and Approving Contracts, page 9-4. Copying Information Between Contracts You can copy information from an existing contract into a new contract, an existing contract, or to a new modifier of the existing contract. Note: For existing contracts, you cannot copy the components of a contract across categories. For example, you cannot copy the components from a Warranty into a Service Agreement. You can copy from Contract Navigator as well as the results table in the Search Templates and Contracts window. In this case, you select the Source Contract and then search for a target contract to which you can copy the information. You can also initiate copy from within the contract itself. In this case, the selected contract is the target contract and you search for a source contract from which you intend to copy components. You will typically use this method to copy service lines and covered level into the contract you have open. To copy information from an existing contract: 1. From the Contract Navigator or Search Results region of the Search Templates and Contracts window, right-click a contract and select Copy. The Copy window appears and the selected contract number supplied in the upper left region.
  • 27.
    Creating Contracts    1-9 2.Select the information that you want to copy in the left half of the window. You can make multiple selections by holding down the Shift and Ctrl keys on your keyboard. You can expand the tree outlining the information by clicking any of the nodes. 3. Use the right arrow button to copy information from the left-side of the window to the right (the new contract). Note: To copy the entire contract, select the Copy Entire Contract check box. After you select this check box you can no longer use the left and right panels to make selections. 4. From the Copy To field, select New Contract. Note: To copy into an existing contract select Existing Contract. To copy into a new contract that has the same contract number as the source contract but with a new modifier select New Modifier. 5. To copy into a new contract, and make that contract a template, select the Template check box. When you create a new contract, you will see that template in the list of available template contracts.
  • 28.
    1-10    Oracle ServiceContracts User Guide 6. If you are copying a large contract and you do not want to use too many system resources, you can select the Submit as Concurrent Program check box. 7. Click Create. The application confirms the copy with a message. 8. From the message window, select OK to view the new contract. Note: Your administrator can set the profile OKS: Copy Notes to control whether notes are copied. If this profile is set to yes, the notes within the existing contract are copied into the new contract. Within the Notes window, the Entered By field indicates ANONYMOUS if the note was copied from an existing contract. To copy information from within the contract: 1. Open a contract. 2. From the Action menu, select Copy from Contract/Template. The Copy window appears and the contract number of the contract you are in appears in the upper right region. The Copy To field is set to Existing Contract and cannot be changed. In addition, the Copy Entire Contract check box is disabled. 3. Click Find to find a contract or template from which to copy. The Search Templates and Contracts window appears. You must search for a contract, highlight the contract in the results region, and select OK. 4. Select the information to copy in the left panel. You can make multiple selections by holding down the Shift and Ctrl keys on your keyboard. You can expand the tree outlining the information by clicking any of the nodes. 5. Use the right arrow button to copy information from the left-side to the right (the new contract). 6. Click Create. The application confirms the copy with a message. 7. From the message window, select OK to view the new contract.
  • 29.
    Creating Contracts    1-11 Searchingfor a Contract or Template To search for a contract or template: 1. From the Navigator, navigate to Contract Administration, and then select Launchpad. The Oracle Contracts window appears. 2. From the View menu, select Find. The Search Templates and Contracts window appears. 3. Enter your search criteria. Narrow your search by: • Searching for contracts within a particular operating unit by choosing a value from the LOV. • Selecting either a contract number or template name from the Contract Number LOV.
  • 30.
    1-12    Oracle ServiceContracts User Guide 4. If you have selected Service Agreement, Warranty and Extended Warranty, or Subscription Agreement for the category parameter, click the More button for additional search criteria for finding contracts. 1. When you click the More button, the application displays the Service Module Search window. This window enables you to search on specific attributes for service contracts, such as agreement names, date signed, order number, bill to address, and e-mail. 2. Click OK to return to the Search Templates and Contracts window.
  • 31.
    Creating Contracts    1-13 5.Select Search. A list of contracts that match your search criteria appear in the Results region. 6. Select a contract, right-click and select Open. Creating a Template from a Contract A template makes it possible for you to speed up the contract creation process by filling in frequently used values. Prerequisite Display a contract. To create a template from a contract: 1. From the Actions menu, select Save as Template. The Save As Template window appears.
  • 32.
    1-14    Oracle ServiceContracts User Guide 2. Enter a template name. 3. Click OK. The application responds with a note informing you that the template has been created. Note: You can save any contract as a template. When you create a new contract from a template, the application creates a new contract in the Entered status. The header, lines, and sublines from the template are copied into the new contract. See Creating a Contract, page 1-4.
  • 33.
    Entering Defaults forContracts    2-1 2 Entering Defaults for Contracts This chapter covers the following topics: • Overview of Entering Defaults for Contracts • Specifying Contract Effectivity and Maximum Duration • Entering Parties to the Contract • Entering Party Contacts • Creating or Modifying a Customer Contact Record • Entering the Billing Account and Address • Entering the Shipping Account and Address • Entering the Price List • Entering Billing Schedules • Billing Schedules Overview • Creating a Billing Schedule Using Billing Streams • Entering a Billing Stream • Using Billing Streams to Handle Irregular Billing Periods • Creating a Billing Schedule from a Billing Profile • Specifying How Billed Amounts Appear on Invoices • Suspending Billing for a Contract • Holding Credits Until the Next Billing Cycle • Entering Tax Exemptions • Specifying a Payment Method • Specifying Payment by Credit Card or Commitment Number • Requiring a Purchase Order • Specifying a Purchase Order Number for Invoices
  • 34.
    2-2    Oracle ServiceContracts User Guide • Specifying a Receivables Transaction Type for Payment • Assigning Sales Credits • Requiring and Specifying a Purchase Order for Service Charges • Specifying How a Contract Will Be Renewed • Defining Grace Periods • Specifying and Starting the Contract Approval Workflow • Organizing Contracts by Assigning Them to Contract Groups • Specify a Different Quality Assurance Check List • Entering an Estimate of Contract Revenue • Specifying Contract Terms • Granting Additional Access Privileges • Entering an Additional Description or Comment • Setting Up Defaults for Contract Renewal • Overview of Default Levels • Entering Contract Defaults • Setting Up System Profiles for Renewal Defaults • Speeding Up Contract Line Entry Using Default Values Overview of Entering Defaults for Contracts This group of topics describes how to enter the contract details. Some contract details default to service lines. Specifying Contract Effectivity and Maximum Duration You can specify the dates that your contract is effective. The dates you enter become the default dates for each new contract line and set a limit to the duration of all lines in the contract. A contract line cannot have a start date earlier than the contract header start date or an end date later than the contract header end date. Entering effectivity dates using this procedure affects new lines only. To make the new dates also apply to existing contract lines, you must cascade the values to those lines. See Applying Default Values to Existing Contract Lines, page 3-60 for details. Note: If you are using this procedure to modify the dates for a contract with existing lines and your change makes any of the lines fall outside
  • 35.
    Entering Defaults forContracts    2-3 the new date range, then you must cascade the values to existing lines. If you do not, your contract will not pass the default quality assurance check. You can change the dates that you specify here at the individual line or subline level provided the changes do not fall outside this range. To specify contract effectivity and maximum duration: 1. From the Service Contracts Authoring window, select the Summary tab and Parties subtab. 2. Specify the dates that the contract is effective by entering either: • End date • Duration and period 3. Save. Entering Parties to the Contract Usually, entering parties to the contract is limited to your organization and the customer, but you can also enter a third party such as a distributor or a dealer. You can bill only those accounts belonging to the parties that you enter here or to related accounts as defined in Oracle Receivables. Note: You cannot change a customer party or third party if dependent data exists on the contract such as a related bill to account or ship to account. Prerequisites Set up customers and third parties Define profile MO: Security Profile Define profile MO: Default Operating Unit (optional) To enter the parties to the contract: 1. From the Service Contracts Authoring window, select the Summary tab and Parties subtab. 2. In the Party region, the operating unit entered in the Create a New Contract window defaults as the Vendor Operating Unit (or Merchant Operating Unit for
  • 36.
    2-4    Oracle ServiceContracts User Guide Subscription Agreements). 3. Enter the customer: 1. Select Customer (or Subscriber for Subscription Agreements) from the Role LOV. 2. Enter the customer name using the Name LOV. 4. Enter any third party, such as a dealer or distributor: 1. Select Third Party using the Role LOV. 2. Enter the third party using the Name LOV. Note: You can enter only third parties that do not have an account-level relationship to the customer. Such relationships between accounts can be set up in Oracle Receivables. 5. Save. Entering Party Contacts You can enter contacts for the different parties to the contract. This includes the sales people in your organization (the vendor). Note: You must enter the sales person as a contact for the vendor to run the Service Contracts Bookings report. To enter party contacts: 1. From the Service Contracts Authoring window, select the Summary tab and Parties subtab. 2. Select the party for which you want to enter the contact. 3. Select the contact's role using the Role LOV. 4. Select the contact from the Name (LOV). If the contact does not exist in the database or the contact information needs to be modified, you can create a new record or modify the existing one by selecting Maintain Contact from the Actions menu. See Creating or Modifying a Customer Contact Record, page 2-5 for details.
  • 37.
    Entering Defaults forContracts    2-5 Important: You must enter an operating unit. From the Party region of the Parties subtab: 1. Select a Vendor Operating Unit from the Role LOV. 2. Select an Operating Unit from the Name LOV. 5. Enter an e-mail address in the Email field or you can modify the existing e-mail address. 6. To modify or verify phone contact information for the contact, select Maintain Contact from the Actions menu. See Creating or Modifying a Customer Contact Record, page 2-5 for details. 7. Save. Creating or Modifying a Customer Contact Record You can create or modify basic contact information such as the contact name, phone number, and e-mail address from the Parties subtab. To create a new customer address or enter other contact details, you must use the Customer Standard window in Oracle Receivables or the Contact Center window, which is available under the Customer Support responsibility. See the contact creation procedures that are described in the Oracle TeleService User Guide and Oracle Receivables User Guide for details. To create or modify a customer contact record: 1. From the Service Contracts Authoring window, select the Summary tab and Parties subtab. 2. In the Party region, select the party for which you want to create the contact. You can create a contact either for the customer or a third party. 3. In the Contacts region, place the cursor in the Role field. 4. Select Maintain Contact from the Tools menu. The Contact window appears.
  • 38.
    2-6    Oracle ServiceContracts User Guide 5. If you are creating a new contact, then: 1. Select a role for this contact using the Contact Role LOV. 2. Enter the contact last and first name. 3. Use the following guidelines for entering other information: • Select the titles and job descriptions from the Titles and Job LOVs. These are preset by your application administrator. • Do not use delimiters when entering phone, fax, and mobile numbers. Each is composed of three fields: a country code (LOV), an area code, and the number itself. • Select only one of the existing party locations for the contact address. You can add a mail stop or a mail box, however, by pressing the Tab key after entering the address. 6. If you are modifying an existing contact, then you can: • Change the title and job description by selecting a different one from the Title and Job LOVs. • Change the phone, fax, and mobile numbers. • Change the e-mail address.
  • 39.
    Entering Defaults forContracts    2-7 Note: When modifying existing contact information, be aware that you are modifying the contact record for all Oracle E-Business Suite applications. You cannot modify the address or mail stop number. To select another address or enter a different mail stop, you must: • Navigate back to the Service Contracts Authoring window. • Delete the contact by selecting it and clicking Delete in the toolbar. • Create a replacement contact with the correct address information. Important: Deleting the contact from the contract does not delete it from the database. Creating a replacement record creates a duplicate. 7. If you are modifying an existing contact and want to revert to the existing record, click Reset. 8. Click OK to return to the Service Contracts Authoring window. 9. Save. Entering the Billing Account and Address You can select the default billing account and address for new contract lines. You can bill to an account belonging to the customer, to any third party that you have entered as a party to the contract, as well as to any account with an established relationship to either of the two in Oracle Receivables. The billing account number that you select here: • Specifies who is billed for the contract If you enter an account belonging to a third party it will be that third party that will receive the invoice. • Filters the pricing information that you enter on the Pricing/Billing tab. If you are billing a third party for the contract, then the price list and other required
  • 40.
    2-8    Oracle ServiceContracts User Guide fields are for that third party rather than the party that is specified as Customer. • Populates the account number field for each new contract line. The entry that you make here affects new contract lines only. To change existing contract lines based on your entry, you must cascade the changes to them. See Applying Default Values to Existing Contract Lines, page 3-60 for details. Prerequisite Enter the parties to the contract. To enter the billing account and address: 1. From the Service Contracts Authoring window, select the Summary tab and Parties subtab. 2. Use the Account Party Name LOV or Account Number LOV in the Bill To region to enter the billing account. The account that you select here becomes the bill to account number for all lines in the contract. Note: The LOV includes customer accounts, accounts for any third party that you entered, as well as accounts that have an established relationship to those accounts in Oracle Receivables. 3. Select the billing address where you want invoices to be sent using the Location LOV. 4. Save. Entering the Shipping Account and Address Although entry is required only if your contract includes physical items that must be shipped to the customer address, the application also uses the shipping address to estimate taxes on services. The entry that you make here affects new contract lines only. To change existing contract lines based on your entry, you must cascade the changes to them. See Applying Default Values to Existing Contract Lines, page 3-60 for details. Prerequisite Enter the parties to the contract. To enter the shipping account and address: 1. From the Service Contracts Authoring window, select the Summary tab and Parties
  • 41.
    Entering Defaults forContracts    2-9 subtab. 2. Use the Account Party Name LOV or Account Number LOV in the Ship To region to enter the account for shipping physical items. The account that you select here becomes the ship to account number for all new lines in the contract. Note: The LOV includes customer accounts, accounts for any third party that you entered, as well as accounts that have an established relationship to those accounts in Oracle Receivables. 3. Select the shipping address using the Location LOV, if physical items need to be shipped or location based tax should be estimated. 4. Save. Entering the Price List You can specify the price list for the contract in the Pricing/Billing subtab. The price list that you enter automatically passes to each new contract line. To apply the price list to existing contract lines, you must edit each line separately. To enter the price list: 1. From the Service Contracts Authoring window, select the Summary tab and Pricing/Billing subtab.
  • 42.
    2-10    Oracle ServiceContracts User Guide 2. If your organization has a Pricing Agreement set up with the party you are billing, then use the Agreement LOV to enter it. This automatically passes all of the other required fields including the price list, the accounting rule, the payment terms, and the invoicing rule. Pricing Agreements, which specify prices, discounts, and billing practices for a particular customer, are created in Oracle Order Management. See Oracle Order Management User's Guide, "Pricing Tab: Setting Up a Blanket Sales Agreement" for details. Note: The values that you enter in the contract by specifying a Blanket Sales Agreement can be changed. For example, if you use a Billing Profile to pass billing schedules, the application overwrites the values you enter in the Accounting Rule and Invoicing Rule fields with the Billing Profile. 3. If no Blanket Sales Agreement is available, or to modify any passed values, then: 1. Use the LOV that is provided to enter the price list. 2. From the Billing region, use the LOVs that are provided to enter the: • Accounting rule • Invoicing rule. You can specify whether the customer is to be billed at the start of the billing period (Advance Invoice) or at the end of the billing period (Arrears Invoice).
  • 43.
    Entering Defaults forContracts    2-11 Note: Some usage contracts require you to specify arrears invoicing. For example, a customer that is billed each month based on a meter reading must be billed at the end of the month after the counter is read. See Entering Usage Lines, page 4-3. 3. From the Payment Details region: 1. Use the LOV that is provided to enter the price list. 2. You can enter a credit card or commitment using the Method list. See Specifying Payment by Credit Card or Commitment Number, page 2-23. 4. Save. Entering Billing Schedules This group of topics explains how to create a billing schedule at the contract header level to speed up the entry of multiple service and usage contract lines with similar billing schedules. It covers: • Billing Schedules Overview, page 2-11 • Creating a Billing Schedule Using Billing Streams, page 2-12 • Entering a Billing Stream, page 2-13 • Using Billing Streams to Handle Irregular Billing Periods, page 2-15 • Create a Billing Schedule from a Billing Profile, page 2-18 Note: Do not use the procedures in this section for subscription contracts. Instead, see Specifying a Billing Schedule for Subscriptions, page 5-12. Billing Schedules Overview A billing schedule determines when the customer is billed for the services they receive. For contracts with service lines you can bill the customer either at the line level or the subline level, but for contracts with usage lines you can bill only at line level. For service lines, this means that you can bill at the level of the service that is sold to the customer (called the Top Level in the application) or individually at the level of each of
  • 44.
    2-12    Oracle ServiceContracts User Guide the items that is covered by that service (Covered Level), be it an individual item, a system, a covered location, an account, or party. For usage lines, you can bill only at the usage line level (Top Level). (Subscription lines represent a special case and so are covered in Entering Subscription Lines, page 5-5). You can either create an individual billing schedule for each individual line or subline in the contract, or create a billing schedule at the contract header level using either of the two methods described in this section and then apply that schedule to existing contract lines. Note: Unlike the other information that you enter in the Summary tab, the application does not automatically pass billing schedules to new lines and sublines. To pass a schedule you create at the header, you must first enter the contract lines and then apply the schedule to them. You can create billing schedules for passing to contract lines by one of the two following methods. Which method you select depends on your implementation and the complexity of the schedule that you are creating: • Using billing profiles, page 2-18 Build a schedule by selecting a schedule template that is set up by your application administrator. Use this method for setting up simple periodic billing schedules, for example, when a customer orders a year of service and wants to be billed monthly or quarterly. • Using billing streams, page 2-12 Using this method you can create complex billing schedules or billing schedules with irregular periods, for example, when a customer orders additional service in the middle of a billing period or requires service only intermittently. Creating a Billing Schedule Using Billing Streams To create a default billing schedule by using billing streams: 1. From the Service Contracts Authoring window, select the Summary tab and Pricing/Billing subtab. 2. Click Billing. The Billing Schedule window appears.
  • 45.
    Entering Defaults forContracts    2-13 3. From the Level LOV, select one of the two following levels: • Top Level: To pass a schedule at the line level • Equal Amount: To bill for equal amounts across sublines over the billing period and have control over the amount. Note: Equal Amount cannot be selected if Usage lines exist on the contract. 4. Create the billing periods by entering one or more billing streams. See Entering a Billing Stream, page 2-13. 5. Click Schedule to create the schedule. The application displays a caution notice asking you whether you want to overwrite all existing schedules. 6. Any contract lines that you enter in the future will not automatically have this schedule. To apply this schedule to them, you must return to this window and click Scheduleagain. Entering a Billing Stream A billing stream is designed to speed up the creation of a set of regular billing periods.
  • 46.
    2-14    Oracle ServiceContracts User Guide You specify that you want your customer billed in 12 periods of one month each, for example, and the application automatically specifies the invoice dates and schedules the billing. If the dates of the ordered service coincide with billing dates, then you can set up the billing periods with just one billing stream. However, you may need to set up multiple billing streams to handle irregular billing situations. See About Using Billing Streams to Handle Irregular Billing Periods, page 2-15. Prerequisites Display a billing schedule in the Billing Schedule window. To enter a billing stream: 1. If this is the first or only billing stream, then: 1. Enter 1 in the Seq Num field. The application passes the start date from the start date of the contract. 2. Enter either the end date or the duration and period. The application supplies the missing information. 2. If this is an additional billing stream, then: 1. In the Seq Num field, enter a number corresponding to the order in which the billing periods are created. The sequence numbers for billing streams must be in order of the billing period dates. If you want to enter a billing period earlier than an existing billing stream, then you must reorder the entire sequence. Note: If you are reordering or otherwise editing billing stream information, you must click Cascade Dates to recalculate and refresh the dates in the Stream Level region. The application passes the start date from the end date of the previous billing stream. 2. Enter either the end date or the duration and period. The application supplies the missing information. 3. To adjust the date that the customer sees as the invoice date, enter a positive or a negative number of days in the Invoice field. For example, entering +2 shifts the invoice date forward two days. Entering –2 shifts it back two days. 4. To adjust the date that the application sends billing amounts to Oracle Receivables
  • 47.
    Entering Defaults forContracts    2-15 for billing, enter a positive or a negative number of days in the Interface field. 5. Click Schedule to generate the schedule. Using Billing Streams to Handle Irregular Billing Periods You can set up multiple billing streams to handle irregular billing situations. for example, to handle a customer who starts a contract in the middle of a month, but wants to be billed at the beginning of each month. This section illustrates how to use billing streams for the customer who wants to be billed at the beginning of each month for two services with different durations and incompatible start dates: • General Service for January 1, 2005 through December 31, 2005 • Premium Service for May 15, 2005 through November 14, 2005 To use billing streams to handle irregular billing periods: Here is how to set up the first service: 1. Create a contract with 01-JAN-2005 through 31-DEC- 2005 as the start and end dates. The first line is the longest line in the contract, so you must use its dates. 2. Because the customer wants to be billed at the start of each month, select Advance Invoice as the invoicing rule for the contract. Do this on the Summary tab and Pricing/Billing subtab. 3. Enter the service that the customer wants to purchase as a contract line on the Lines tab. 4. Click Billing on the Pricing/Products subtab to open the Billing window. 5. Enter one billing stream: Seq Num Number of Periods Start Date End Date Duration Period 1 12 01-JAN-2005   1 Month 6. Save. The application calculates the end date automatically. 7. Click Schedule to generate a billing schedule. The following table shows the generated schedule which bills the customer at the beginning of each month. The
  • 48.
    2-16    Oracle ServiceContracts User Guide table includes the following columns: • Seq Num: The sequence number is the number of the billing stream. Each row displays 1 in this case as the entire schedule was generated from one billing stream. • Level Seq: The number of the billing period within a sequence. • Invoice Date: The date on the invoice. This is the first of the month because we have selected an Advanced Invoice and not entered any invoice offset. • Bill From: The start date of the billing period. • Bill To: The End date of the billing period. • Interface Date: The date the application sends the amount to be billed to Oracle Receivables for billing. This is the same as the Invoice Date as we have not entered any offset. Seq Num Level Seq Invoice Date Bill From Bill To Interface Date 1 1 1-Jan-05 1-Jan-05 31-Jan-05 1-Jan-05 1 2 1-Feb-05 1-Feb-05 28-Feb-05 1-Feb-05 1 3 1-Mar-05 1-Mar-05 31-Mar-05 1-Mar-05 1 4 1-Apr-05 1-Apr-05 30-Apr-05 1-Apr-05 1 5 1-May-05 1-May-05 31-May-05 1-May-05 1 6 1-Jun-05 1-Jun-05 30-Jun-05 1-Jun-05 1 7 1-Jul-05 1-Jul-05 31-Jul-05 1-Jul-05 1 8 1-Aug-05 1-Aug-05 31-Aug-05 1-Aug-05 1 9 1-Sep-05 1-Sep-05 30-Sep-05 1-Sep-05 1 10 1-Oct-05 1-Oct-05 31-Oct-05 1-Oct-05 1 11 1-Nov-05 1-Nov-05 30-Nov-05 1-Nov-05
  • 49.
    Entering Defaults forContracts    2-17 Seq Num Level Seq Invoice Date Bill From Bill To Interface Date 1 12 1-Dec-05 1-Dec-05 31-Dec-05 1-Dec-05 Adding a Six-Months Service That Starts in the Middle of a Month Now suppose that the same customer wants to start an additional six months of service on May 15 in the middle of a billing period. To modify the contract to ensure the customer is billed only one time each month: 1. Enter the service as a second contract line on the Lines tab. 2. Click Billing on the Pricing/Products subtab to open the Billing window. 3. Create three billing streams: Seq Num Number of Periods Start Date End Date Duration Period Invoice Offset Days 1 1 15-MAY-2 005 31-MAY-2 005     -14 2 5 01-JUN-20 05   1 Month   3 1 01-NOV-2 005 14-NOV-2 005       1. Create the first billing stream for the partial month: • Enter the end date as 31-May-2005. The application provides the duration and period automatically. • Enter –14 in the Offset Days Invoice field, to shift the invoicing date to the beginning of the month. Otherwise, the customer receives two invoices, one dated on the first of the month and a second dated May 15. 2. Create a second billing stream for the regular monthly periods:
  • 50.
    2-18    Oracle ServiceContracts User Guide • The application supplies the start date automatically based on the first billing stream. • When you enter five periods of 1 month, the application supplies the start and end dates automatically. 3. Enter a third billing stream to cover the partial month at the end of the six-month period: • The application supplies the start date automatically based on the second billing stream. • Enter the end date. The application supplies the duration and period values automatically. 4. Click Schedule to generate the following billing schedule: Seq Num Level Seq Invoice Date Bill From Bill To Interface Date 1 1 1-May-05 15-May-05 31-May-05 1-May-05 2 1 1-Jun-05 1-Jun-05 30-Jun-05 1-Jun-05 2 2 1-Jul-05 1-Jul-05 31-Jul-05 1-Jul-05 2 3 1-Aug-05 1-Aug-05 31-Aug-05 1-Aug-05 2 4 1-Sep-05 1-Sep-05 30-Sep-05 1-Sep-05 2 5 1-Oct-05 1-Oct-05 31-Oct-05 1-Oct-05 3 1 1-Nov-05 1-Nov-05 14-Nov-05 1-Nov-05 Creating a Billing Schedule from a Billing Profile You can create a default billing schedule, called a billing profile, from a template. Prerequisites • Confirm the setup of billing profiles. • Enter the contract lines for which you want to set up the default billing schedule
  • 51.
    Entering Defaults forContracts    2-19 To create a billing schedule from a billing profile: 1. From the Service Contracts Authoring window, select Cascade Attributes from the Actions menu. The Cascade Attributes window appears. 2. Select the Billing Profile check box. 3. Use the LOV in the field to the right to enter the billing profile template. 4. Make sure that Header to Lines is selected for the Cascade list at the top of the window and all the lines are selected on the right of the window. 5. Click Submit. The Transaction Log appears. 6. Click Apply. Note: The billing schedule overwrites any existing billing schedule at the line and subline level. If required, you can now edit the schedule at the individual line or subline level. Specifying How Billed Amounts Appear on Invoices You can have the amounts itemized for each subline or included in the contract line. To specify how billed amounts appear on invoices: 1. From the Service Contracts Authoring window, select the Summary tab and Pricing/Billing subtab. 2. If your organization has implemented a custom invoices solution for billing contracts, then you can use that solution by selecting the Summary Print check box. 3. To summarize billed amounts by contract line, then select the Summary Transaction check box. 4. To itemize charges by subline, clear the Summary check box. Note: The contract administrator must set the system profile OKS: Summary Transactions to No. If this profile is set to Yes, then the
  • 52.
    2-20    Oracle ServiceContracts User Guide application sends the summarized billing details even when you leave this check box cleared. 5. Save. Suspending Billing for a Contract Normally, all eligible billing records are automatically passed to Oracle Receivables for invoicing on the invoice date that you specify in the billing schedule. An example of when you may want to suspend billing for a contract is when the customer disputes the invoice. To suspend billing for a contract: 1. From the Service Contracts Authoring window, select the Summary tab and Pricing/Billing subtab. 2. Select No from Bill Services LOV. 3. Save. To resume billing, update Bill Services to Yes. The application then bills the customer for all outstanding charges since the suspension started. Note: To suspend billing for the remainder of the contract term and resume normal billing upon renewal, set Bill Services to At Renewal. Holding Credits Until the Next Billing Cycle You can place a hold on credit memos until the next billing cycle. This setting does not hold invoices. By default the Hold Credits check box is cleared, so the credit memo immediately picks up the billing amount. To hold credits until the next billing cycle: 1. From the Service Contracts Authoring window, select the Summary tab and Pricing/Billing subtab. 2. Select the Hold Credits check box.
  • 53.
    Entering Defaults forContracts    2-21 3. Save. Clear this check box to credit the customer immediately. Entering Tax Exemptions Oracle Service Contracts integrates with Oracle E-Business Tax to provide a preview of estimated tax on a contract. The estimated tax amount that is provided is based on applicable tax rates, exemptions, exceptions, and so on, as defined in Oracle E-Business Tax setup. You can specify exemption handling for a contract by selecting the Exemption Control attributes on a contract. These are Exemption Control, Exemption Number, and Exemption Reason. The entry that you make here applies to new contract lines only. To apply a change of status to existing lines you must use the Cascade Attributes window. See Applying Default Values to Existing Contract Lines, page 3-60. To enter tax exemptions: 1. From the Service Contracts Authoring window, select the Summary tab and Pricing/Billing subtab. 2. In the Exemption region, set Tax Exemption Control to Exempt, Required, or Standard to specify exemption handling for the contract. 3. If you select Exempt : 1. You are prompted to select tax exemption number from the Number LOV. 2. The list of valid exemptions is restricted as follows: • Exemptions that are defined for the Bill To Account Party. • Exemptions that have an Exempt Status of Primary or Manual. Exemptions with Exempt Status Discontinued, Rejected or Unapproved are not included in the LOV. • Exemptions that are in effect as of the start date of the contract. Note: The Reason field is view-only and is populated when an exemption is selected. Note: You can define tax exemptions with or without an end date in Oracle E-Business Tax setup. If the application applies an exemption with an end date to a service contract, the tax exemption might expire prior to the end date that is specified
  • 54.
    2-22    Oracle ServiceContracts User Guide on the contract. For a contract with recurring billing, such as Monthly or Quarterly, this can lead to the exemption being applied to the invoices that are generated by the contract before the tax exemption expires, while the selected exemption is not applied to invoices that are sent to Oracle Receivables after the exemption has expired. For example, a contract with a start date of 01-Nov-06 and an end date of 31-Oct-07 is given a monthly billing schedule that will result in an invoice being created on the first day of each month starting on 01-Nov-06. If the exemption that is applied to the contract expires on 31-Dec-06, then the exemption will be applied for the invoices that are created on 01-Nov-06 and 01-Dec-06. The exemption is not applied to invoices that are created from 01-Jan-07 onwards. The preceding scenario can lead to a discrepancy between the estimated tax amount previewed on the contract and the actual tax amount that appears on invoices. Therefore, when a tax exemption is applied to a contract or service line and is not active for the full duration of the contract or service line, a QA warning message is provided to inform the user. • If Exemption applied to a contract header is not valid for the full duration of the contract: Tax exemption certificate number N on the header is only partially valid for the contract duration. Exemptions will not be applied after the exemption certificate expires. • If Exemption applied to a service line is not valid for the full duration of the service line billing period: Tax exemption certificate number AS-Ex-10 on line 1 is only partially valid for the billing period. Exemptions will not be applied after the exemption certificate expires. 4. If you select Standard, no override exemptions are entered on the contract. Standard tax handling applies to the contract. 5. If you select Required, tax is required on the contract. You cannot apply a specific exemption to the contract. The application also ignores any tax exemptions that are defined in Oracle E-Business Tax that normally apply to the contract.
  • 55.
    Entering Defaults forContracts    2-23 6. Save. Specifying a Payment Method This group of procedures explains how to specify a payment method. Note: The payment method values that you enter on the header are used for the lines unless you manually enter a different value for a line. • Specifying Payment by Credit Card or Commitment Number, page 2-23 • Requiring a Purchase Order, page 2-24 • Specifying a Purchase Order Number for Invoices, page 2-25 The payment method information that you enter using the procedures described in this section applies only to new contract lines. You must cascade the entries by selecting the Payment method check box in the Cascade Attributes window to apply them to existing lines as well. See Applying Default Values to Existing Contract , page 3-60 for details. Specifying Payment by Credit Card or Commitment Number Commitments, which are set up in Oracle Receivables, represent a customer's prepayment for goods or services (prepayments) or contractual agreements (guarantees). Prerequisite • Confirm the setup of commitments in Oracle Receivables. See the Oracle Receivables User Guide. • Confirm that the contract has a Bill To Party and Location. To specify payment by credit card or commitment number: 1. From the Service Contracts Authoring window, select the Summary tab and Pricing/Billing subtab. 2. To specify payment by credit card: 1. Select Credit Card from the Method list in the Payment Details region. The Number, Expiry, and Security fields appear. 2. Select a credit card from the Number LOV. The credit card numbers in the LOV appear masked if your administrator
  • 56.
    2-24    Oracle ServiceContracts User Guide defined credit card masking rules in Oracle Payments. After you select a credit card, the application masks the card number in the Number field. Date of Expiry appears for the card number that you select. Note: If you do not find the card number that you need, you can cancel out of the LOV and enter the card number, expiration date, and security code manually. When you save, Oracle Payments validates the credit card details. If the card details are valid, Oracle Payments creates an account for the new credit card and the application masks the number that you entered on the Service Contracts Authoring form (first 12 digits only). 3. Enter the security code in the Security field. Security code is mandatory if your administrator set up Oracle Payments to require a security code when accepting credit card as a payment method. After you save and the application validates the security code, it appears masked in the Service Contracts Authoring form. 4. Save. After you save, the security code appears masked within the Security field. Note: If the application administrator has set the system profile OKS: Credit Card Validation Level to Authorize Payment, then when QA is run for the contract, a QA check authorizes the transaction for the amount that is specified in OKS: Credit Card Minimum Authorized Amount. 3. To specify payment by commitment: 1. Select Commitment Number from the Method list. The Number field appears. 2. Enter the commitment number using the LOV. 4. Save. Requiring a Purchase Order When you require the entry of a purchase order, the contract cannot pass the QA check and become active unless a purchase order is entered for every line. The requirement does not affect any existing contract lines. You must use the Cascade Attributes window and select the Payment Method check box to enforce the requirement to all lines.
  • 57.
    Entering Defaults forContracts    2-25 To require a purchase order number for contract lines: 1. From the Service Contracts Authoring window, select the Summary tab and Pricing/Billing subtab. 2. Select the Purchase Order Required check box. 3. Save. Specifying a Purchase Order Number for Invoices You can specify a purchase order number, which is passed to Oracle Receivables and appears on customer invoices. You must use the Cascade Attributes window and select the Payment Method check box to copy the number to lines. To specify a purchase order number for invoices: 1. From the Service Contracts Authoring window, select the Summary tab and Pricing/Billing subtab. 2. Enter the purchase order number in the PO Number field. 3. Save. Specifying a Receivables Transaction Type for Payment Oracle Receivables uses transaction types to specify which accounts are credited for customer payment. Prerequisite Review the Oracle Receivables transactions types that were created for your organization. Note: A default transaction type of Invoice-OKS is applied to invoices that are created from Oracle Service Contracts if the Transaction Type is not entered on the contract. Note: Transaction Type is a mandatory field when the tax method that is associated with the contract is Latin.
  • 58.
    2-26    Oracle ServiceContracts User Guide To specify a Receivables transaction type for payment: 1. From the Service Contracts Authoring window, select the Summary tab and Pricing/Billing subtab. 2. Select the transaction type from the Transaction Type LOV. Assigning Sales Credits You can assign the default sales credits for each new contract line in your contract. You can assign both revenue and non revenue credits. To apply the sales credits to existing contract lines, you must cascade the changes to them. See Applying Default Values to Existing Contract Lines, page 3-60 for details. To assign sales credit: 1. From the Service Contracts Authoring window, select the Summary tab. 2. Select Sales Credits from the Actions menu. The Sales Credits window appears.
  • 59.
    Entering Defaults forContracts    2-27 3. Enter the sales agents and the revenue and non-revenue credit they are to receive. Sales group entry is optional. Revenue credit must always add up to 100 percent. 4. Click OK. Requiring and Specifying a Purchase Order for Service Charges You can specify a purchase order or require an agent to specify a purchase order number for charges that are not covered by the contract. To determine which purchase order number appears in invoices, the application first checks the service request that is associated with the service that is being performed. It uses only the purchase order you enter here when no number is entered in the service request. Requiring the entry of a purchase order, prevents the contract from passing the QA check and reaching Active status until the entry is made. It does not prevent the service from being scheduled or performed. To require or specify a purchase order for service charges: 1. From the Service Contracts Authoring window, select the Summary tab, Pricing/Billing subtab, and Service Charges region. 2. To require entry of the purchase order number and prevent the contract from becoming active until the entry is made, select the Purchase Order Required check
  • 60.
    2-28    Oracle ServiceContracts User Guide box. 3. You can enter the purchase order number in the PO Number field. 4. Save. Specifying How a Contract Will Be Renewed Your application administrator can set up automatic default values for contract renewals, see Entering Contract Defaults, page 2-36. If such defaults exist, then you may not be required to enter renewal information. Check with your application administrator. To renew the contract, you must also specify how to renew each line, see Specifying How a Contract Line is to Be Renewed, page 3-12. For more information about contract renewals, see Understanding Contract Renewals, page 17-11. To specify how the contract is to be renewed: 1. From the Service Contracts Authoring window, select the Summary tab and Renewals subtab. 2. Select the renewal process from the Process LOV. • Evergreen: Customer acceptance will not be needed for activation.
  • 61.
    Entering Defaults forContracts    2-29 • Manual: All process steps will require a user action. • Online: An automatic submission will be provided. • Do Not Renew: Contract will not be renewed. 3. Select a value from the Approval LOV. The Approval LOV differs based on your selection in the Process field. • Evergreen: • Not Required • Required • Manual: • Not Required • Required • Online: • Automatic • Manual • Not Required Note: If the renewal process is Do Not Renew, you cannot select an approval value. 4. To specify a billing schedule for the renewed contract, select a billing profile using the Billing Profile LOV. Billing profiles are templates that you can use to specify simple periodic billing schedules and accounting and invoicing rules for the renewed contract. This schedule overrides any billing schedule in the contract that is being renewed. See Creating Billing Profiles, page 10-7. 5. Specify how the renewed contract is to be priced. For details, see Specifying How the Renewed Contract will Be Priced, page 17-26. 6. Save.
  • 62.
    2-30    Oracle ServiceContracts User Guide Defining Grace Periods You can use grace periods to extend the service that a customer receives while a renewed contract is being negotiated and approved. See Allowing a Grace Period for Renewals, page 17-28. Specifying and Starting the Contract Approval Workflow Your administrator sets up rules in the Oracle Approval Management Engine (AME) that determine the approver for the approval process. Oracle Service Contracts starts the process that you specify when the contract passes the quality assurance check. Note: The default approval process for Oracle Service Contracts is called Approval Process. Prerequisite Confirm the name of the approval process to select. To specify and start the contract approval workflow: 1. From the Service Contracts Authoring window, select the Summary tab and Administration subtab. 2. In the Approval region, use the Name LOV to select an approval process. 3. Click Submit. The application automatically runs the Quality Assurance check on your contract. You must correct any errors. The application automatically starts the Workflow process after the contract passes the check with no errors. Organizing Contracts by Assigning Them to Contract Groups Contract groups organize contracts in the Contract Navigator tab of the Oracle Contracts window. To organize contracts by assigning them to contract groups: 1. From the Service Contracts Authoring window, select the Summary tab and Administration subtab. 2. In the Contract Groups region, use the Group Name LOV to select each contract
  • 63.
    Entering Defaults forContracts    2-31 group where this contract should appear. 3. Save. Specify a Different Quality Assurance Check List The application uses the quality assurance check list that is specified in the system profile OKS: Default QA Checklist to check and validate the contract for errors and completeness before it can become active. Prerequisite Create a QA checklist. To specify a different quality assurance check list: 1. From the Service Contracts Authoring window, select the Summary tab and Administration subtab. 2. In the Approvals region, select an alternate check list from the QA Checklist LOV. 3. Save. Entering an Estimate of Contract Revenue The revenue that you enter appears in the Service Contracts Forecast Summary Report and the Service Contracts Forecast Management Report. To enter an estimate of contract revenue: 1. From the Service Contracts Authoring window, select the Summary tab and Administration subtab. 2. In the Estimation region, enter the number representing the percentage of revenue that you predict is going to be realized from this contract. 3. Enter the date that the estimated revenue will be realized. 4. Save.
  • 64.
    2-32    Oracle ServiceContracts User Guide Specifying Contract Terms To specify contract terms: 1. From the Service Contracts Authoring window, select the Summary tab and Administration subtab. 2. Click Contract Terms. The application displays the Contract Terms page in a separate browser window. Refer to the following procedures in the Oracle Contracts online help: • Applying a Contract Template • Removing Contract Terms • Adding Sections • Adding and Updating Clauses • Moving Contract Terms • Renumbering Contract Terms • Validating Contract Terms • Checking for Clause Updates • About the Contract Terms Library • Update Contract Source Note: You can only use this feature in Oracle Service Contracts to change the contract template • Updating Clauses and Creating Non-Standard Clauses in a Business Document • Comparing Clauses Note: The Update Variable Value function is not supported within Oracle Service Contracts.
  • 65.
    Entering Defaults forContracts    2-33 Granting Additional Access Privileges You can grant the ability to modify the contract either to an individual or a resource group. You cannot use this procedure to restrict access to a contract, only to grant additional access. This is because the ability to view and modify contracts depends on a combination of security privileges granted both by the responsibility and at the individual contract level. The access level that is granted by a responsibility takes precedence over the access that you grant using this procedure. This means that if users log into the application under a responsibility that permits modification of contracts, then you cannot restrict their right to modify a specific contract. You can use this procedure if your implementation has created a responsibility with view-only access. In this case, you can grant individual users or members of a resource group the ability to modify a specific contract as well. Your entries affect only users logging in under that responsibility. Note: Users logging in under a view-only responsibility, cannot create new contracts using the Service Contracts Authoring window. Prerequisite Set up a responsibility with read-only access to contracts. To grant additional access privileges: 1. From the Service Contracts Authoring window, select the Summary tab and Security/Text subtab. 2. In the Security region use the Type list to select one of the following: • User: to grant the right to modify this contract to a user. • Group: to grant the right to modify the contract to a specific resource group. Note: Your administrator can create resource groups from the Resource Manager module. If a resource group is created with the Contracts role type, you can select it within the Security/Text subtab of a contract. If the resource group is granted access to a contract, then any member of the resource group has access to the contract. For information about Resource Manager refer to the Oracle Common Applications Implementation Guide.
  • 66.
    2-34    Oracle ServiceContracts User Guide 3. Select the resource group or user name from the LOV. 4. Select Modify from the Level list. 5. Save. Entering an Additional Description or Comment To enter an additional description or comment: 1. Select the Summary tab and Security/Text subtab. 2. Enter the text in the Text region either in the Long Description or the Comments fields. 3. Save. Note: You can use the Query by Example method to find the contract with the text that you entered. Setting Up Defaults for Contract Renewal This group of topics is intended to help application administrators set up default renewal rules for groups of contracts. These rules, which are entered in the Global Contracts Default window, can be overridden by agents for individual contracts. Note: The Global Contracts Default is also used for entering defaults required by contracts that are generated automatically from Oracle Order Management orders. These defaults are described in Setting Up New Contract Defaults for Oracle Order Management , page 6-20. This group of topics covers: • Overview of Default Levels, page 2-34 • Entering Contract Defaults, page 2-36 • Setting Up System Profiles for Renewal Defaults, page 2-43 Overview of Default Levels You can specify how attributes of a contract pass at the time of renewal at three different levels:
  • 67.
    Entering Defaults forContracts    2-35 1. Party Enables you to specify different renewal rules for different customers. 2. Organization Enables you to specify different renewal rules for different organizations in your own company. 3. Global Enables you to specify global default rules that apply to contracts that do not satisfy any of the default rules that you specified for the previous levels. The application looks for renewal rules in the order Party, Organization, and Global and uses the first applicable set of rules it finds. For example, suppose that you set up your renewal preferences for the customer Business World and your organization Vision Enterprises. If an agent creates a contract for Business World, the application automatically passes the preferences that you have set up at the party level, regardless of the organization that created the contract. If an agent at Vision Enterprises creates a contract for ABC Corp., it is subject to the renewal rules that you set up at the organization level. A contract for ABC Corp. that is created by an agent at Vision Communications, another organization in your enterprise, is subject to the global rules only. An agent creating or editing a contract, can override the defaults you set at any level by making an entry in the Summary tab and Renewals subtab. Note: Agents specifying renewals in individual contracts, using the Summary tab and Renewals subtab, do not see the default values that you enter here. You enter all of the different levels of default renewal rules in the same Global Contracts Default window. Although the entries you that you make are almost identical for each default rule level, the user interface layout is different for entering global defaults (in the top half of the window) and for entering defaults at the party or organization level (the tabs in the lower half). To complete the setup of renewal defaults, you must also set the system profiles described in Setting Up System Profiles for Renewal Defaults, page 2-43. Note: Although the application looks at the renewal rules defined on the contract and follows the renewal rules in the following order, Party, Organization, and Global, the QA check and approval workflow are always taken from the Global Contracts Default window and not the contract itself.
  • 68.
    2-36    Oracle ServiceContracts User Guide Entering Contract Defaults At a minimum, you should enter renewal rules at the global level. Optionally, you can enter renewal rules at the party and organization levels. Upon renewal the application processes renewal rule attributes in the following order: 1. Contract 2. Parties 3. Organizations 4. Global If renewal rules are not found at one level, the application moves to the next level. Prerequisites To enter rules for: • Organizations, confirm the operating unit, such as Vision, France. • Parties, confirm party names, such as Business World. To enter contract defaults: 1. Navigate to Setup: Service Contracts, and then Global Contracts Defaults. The Global Contracts Default window appears.
  • 69.
    Entering Defaults forContracts    2-37 2. Navigate to the appropriate region of the window, depending on which type of renewal rule set you want to enter: • To enter global defaults, make entries in the Global region on the top half of the window. • To specify rules for an organization within your business, select the Organizations tab. • To specify rules for a customer, select the Parties tab. To enter Global level defaults You can define Global defaults in the Global region on the top half of the window. The Global defaults are divided into the following regions: • Renewal • Pricing/Billing • Online Acceptance Process • Thresholds • Integration The following steps provide guidelines for entering information into each of these regions:
  • 70.
    2-38    Oracle ServiceContracts User Guide 1. Select the renewal defaults from the Renewal region. From this region, you can: 1. Specify the contract group to which the renewed contract will belong from the Renewal Contract Group LOV. 2. Select the renewal process from the Process LOV and the internal approval method from the Approval LOV. The renewal process that you select affects which internal approval methods are available. Following is a description of the renewal processes and corresponding internal renewal methods. • Evergreen: Customer acceptance will not be needed for activation. Internal Approval Methods • Not Required • Required • Manual: All process steps will require a user action. Internal Approval Methods • Not Required • Required • Online: An automatic submission will be provided. Internal Approval Methods • Automatic • Manual • Not Required • Do Not Renew: Contract will not be renewed. Note: If the renewal process is Do Not Renew, you cannot select an approval value. 3. Select the XML layout template set and language from the Layout Template Set LOV and the Template Language LOV. 4. Specify a grace period beyond the expiration date of a renewed contract at no extra charge by entering a grace duration and grace period.
  • 71.
    Entering Defaults forContracts    2-39 5. Require an agent to enter a purchase order number in the contract before it can become active by selecting the PO Required check box. 6. Estimate the probability of renewal as well as the time frame by which the revenue is realized with the Estimated Percentage, Estimated Duration, and Estimated Period fields. 2. Select pricing and billing defaults from the Pricing/Billing region. From this region, you can: 1. Define the pricing of the renewed contract from the Pricing Method LOV. The pricing method that you select affects whether you must select a price list or enter a markup percentage. Following is a description of the pricing methods. • Manual: The application charges the customer the same price for the renewed contract as they paid for the original contract. • Markup Percent: Automatically adjusts the price up or down by a percentage that you enter. (A positive number marks up the price; a negative number discounts it.) Optionally, you can cap the maximum adjustment based on a price list. • Price List: Charges the customer based on the price list that you enter in the Price List field. The price charged is the current price listed in the price list at the time the contract is renewed. 2. If necessary, select a price list from the Price List LOV. 3. If necessary, enter a markup percentage from the Markup Percentage LOV. 4. Specify a billing schedule for the renewed contract, by selecting a billing profile from the Billing Profile LOV. Billing profiles are templates that you can use to specify simple periodic billing schedules and accounting and invoicing rules for the renewed contract. This schedule overrides any billing schedule in the contract that is being renewed. See Creating Billing Profiles, page 10-7. 5. Define partial period attributes. A partial period is any billing period or service effective duration that is not in multiples of Billing/Pricing Period unit of measure (UOM). For example, a service may be priced and billed at a specific rate per month. If the service duration is 01-Jan-06 to 15-Mar-06, the service amount that is priced or billed is calculated based on the number of periods (months) in the
  • 72.
    2-40    Oracle ServiceContracts User Guide duration; in this case, two full months for January and February and one partial period for the 15 days in March. Partial periods define how the application calculates pricing, billing, and termination amounts and can occur at the beginning, the end, or both the beginning and the end of the service duration. Important: Partial Period Duration is equal to the Actual Days in the Partial Period (numerator) divided by the Total Number of Days in Pricing/Billing Period (denominator). Number of days in the denominator is determined by Default Pricing/Billing Period Type and Price UOM value of subline for pricing and for Default Pricing/Billing Period Type and Billing Steam Period Duration for billing. Following is a description of the fields that make up the partial period attributes: • Period Start: Enables you to select where the partial period calculation occurs within a pricing, billing, or termination duration when service starts in the middle of a period. Service start counts full periods from service start date, then a partial period at end. Calendar Month start counts full periods based on full calendar months that span the duration. • Price UOM: Enables you to define a default period for pricing and billing. Valid values are Day, Month, Quarter, Half-year and Year. If Month is specified as the price unit of measure, then it is used as the basis for calculating partial periods for all pricing, billing and termination calculations. • Period Type: Enables you to define whether the duration is based on a fixed definition or an actual definition. For example, for: • Fixed, a duration of 30 days is given for a month, 90 days for a quarter, and 360 days for a year • Actual, a duration is based on actual days in the default period. For example, if a service spans 11 whole months, March 1 through January 31, plus 10 days in February, the amount for the 10 days in February can be calculated in one of two ways: • 10/30 of the price/month if the calculation is based on a fixed 30 day month
  • 73.
    Entering Defaults forContracts    2-41 • 10/28 of the price/month if the calculation is based on actual days in the month (non-leap year) 3. Define how the processing of online acceptances from the Online Acceptance Process region. From this region, you can: 1. Define which payment methods can be used for online acceptances by selecting the relevant check box. Payment method can be set up to process or authorize payment with a purchase order, credit card, check, wire, or commitment. 2. Enable the use of thresholds for the online acceptance process by selecting the Enable check box. If this field is not selected, the online acceptance is processed. Enable is a yes or no setting at global level. At operating unit and party level, the options are yes, no, and null. If this field is set to: • Yes: Thresholds determine whether a contract automatically qualifies for renewal rule Online at time of renewal based on the value of the contract. • No: Thresholds do not determine whether the contract qualifies for online renewal. • Null: The application traverses the hierarchy to the next level to determine the renewal setting. Example For example, renewal rules for a party are set as follows: • Renewal Process: Manual • Enable: Yes • Threshold: $2,500 • Online Threshold: $5,000 The contract renews as follows: • If the contract amount is less than or equal to $2,500, contract renews with renewal process Evergreen. • If the contract amount is less than or equal to $5,000, contract renews with renewal process Online.
  • 74.
    2-42    Oracle ServiceContracts User Guide • If the contract amount is greater than $5,000, contract renews with renewal process Manual. 3. Select payment terms for the renewal. 4. Identify an individual the customer should contact with questions by selecting a name from the Help Desk LOV. 4. Define currency information, approval thresholds, and approval requirements from the Thresholds region. From this region, you can: 1. Select a currency, such as USD. 2. Enter the limit for processing Evergreen renewals in the Evergreen Amount field. 3. Enter the limit for processing Online renewals in the Online Amount field. 4. Enter the limit for processing credit card payments by entering a value in the Credit Card Amount field. 5. Define whether an internal review is required for the Evergreen renewal based on Evergreen Amount threshold. 6. Define whether an internal review is required for the Online Acceptance renewal process based on Online Amount threshold. 5. Change how the contract uses other functionality within Oracle Service Contracts and how it integrates with other applications within the Oracle E-Business Suite from the Integration region. A renewed contract inherits defaults from the original. This region provides you with a way of changing defaults upon renewal. From this region, you can: 1. Specify a different contract group for the renewed contract, by choosing the contract group from the New Contract Group LOV. 2. Select a new approval workflow from the Approval Workflow LOV. 3. For contracts that are generated from Oracle Order Management, select Third Party from the Party Role LOV. 4. Determine whether the contract is eligible for price breaks by selecting the Interface Price Break check box.
  • 75.
    Entering Defaults forContracts    2-43 5. Select a new QA checklist from the QA checklist LOV. 6. Change how return credits are processed from the Return Credit LOV. 6. Save. Related Topics Setting Up New Contract Defaults for Oracle Order Management (Global Contracts Default window), page 6-20 Specifying How the Template Sets Are to Be Used (Global Contracts Default window), page 18-23 Setting Up System Profiles for Renewal Defaults You must also set up the following system profiles to supplement the entry of renewal rules: • OKS: Enable Sales Credits: This system profile determines how sales credits are transferred to the renewed contract. • Retain: Carries forward the sales credits from the existing contract to the renewed contract. • Derive: Derives a sales person for the renewal agreement according to the setting of the OKS: Use Territories to Default Sales Person and OKS: Sales Person. • Drop: The application does not carry forward and default any sales credit information to the renewed contract. • OKS: Use Territories to Default Sales Person: If this profile is set to Yes, the application determines the default sales person assigned to the renewed contract based on sales territories. If this profile is set to No, then the application determines the sales person for the contract based on the value that is entered in OKS: Sales Person. • OKS: Sales Person: If OKS: Use Territories to Default Sales Person is set to No, this profile determines the sales person to receive sales credit and to be listed as the vendor contact. You must enter a sales agent in this profile or the contract fails to renew. An agent can manually add additional sales people to the Sales Credits window and assign them sales credits after the renewal agreement has been created. • OKS: Revenue Type Distribution for Sales Credit: This system profile assigns the
  • 76.
    2-44    Oracle ServiceContracts User Guide percentage of revenue that you specify to the sales agent who is determined from the previous two system profiles. Agents can specify additional sales credits in the Sales Credit window, but the total of revenue sales credits must always add up to 100 percent. • OKS: Revenue Type for Sales Credits: The setting of this system profile specifies whether you want to assign the sales agent revenue credit or non-revenue credit. • OKS: Vendor Contact Role: This system profile specifies the vendor contact role to the renewal agreement. By default this profile option is set to Salesperson. • OKC: Contract Approver: Set this system profile to the individual in your organization who is to approve renewed contracts. The application notifies the agent that you specify here to approve any contracts that are renewed under the Submit for Approval renewal type. Speeding Up Contract Line Entry Using Default Values You can use multiple methods to speed up the entry of values to individual contract lines. If you are creating a new contract similar to an existing contract, for example, then you can copy the existing contract and modify it. Or for creating multiple similar contracts, you may instead want to save the original as a template and use that template to create the new contracts. You can default values from the header of a contract down to the lines and, if applicable, to sublines as well. For example, if you select the corporate price list on the Summary tab and then enter a service contract line, that line's price list is automatically set to corporate as well. With the exception of billing schedules, the defaults that you enter on the Summary tab apply only to new contract lines. Existing contract lines are not affected. If you later change the default price list at the header level to the good customer discount price list, for example, that change applies only to new line entries unless you use the cascade attributes procedure to specifically change the existing lines as well. Default billing schedules, by contrast, apply only to existing contract lines and automatically overwrite any schedules you have entered at the line or subline level. You must apply the default schedule again to any new lines because they do not automatically inherit it.
  • 77.
    Entering Service Lines    3-1 3 Entering Service Lines This chapter covers the following topics: • Overview of Entering Service Lines • About Service Lines • Entering a Service Line (General Procedure) • Changing the Billing and Shipping Accounts and Locations • Entering Billing and Shipping Contacts for a Contract Line • Creating or Modifying a Contract Line Contact • Specifying How a Contract Line Is to Be Renewed • Renewing Service Purchased for Seasonal or Peak Periods • Specifying What a Service Covers • Levels of Coverage and Their Uses • Covering Customer Products (Instances in Oracle Installed Base) • Covering Customer Products • Browsing Oracle Installed Base to Identify Item Instances for Coverage • Entering a Customer Product into Oracle Installed Base • Covering Parties • Covering Customer Accounts • Covering Party Sites • Browsing Through Party Sites • Covering Systems • Browsing Through Oracle Installed Base Systems • Covering Inventory Items • Viewing Details About a Covered Product
  • 78.
    3-2    Oracle ServiceContracts User Guide • Maintaining Pricing Attributes for Covered Products • Specifying How the Service Prints on an Invoice • Omitting a Line or Subline from the Invoice • Specifying the Invoice Text • Specifying a Billing Schedule • Pricing What a Service Covers • Adjusting the Price of a Service for a Covered Product or an Item • Repricing a Service by Changing the Price List • Manually Adjusting the Price • Changing the Basis for Pricing a Service • Pricing Service for a Party, Customer Account, Site, or System • Specifying a Payment Method for a Contract Line • Specifying Payment by Credit Card or Commitment Number • Requiring a Purchase Order • Specifying a Purchase Order Number • Modifying Coverage Provided by a Service • Scheduling Preventive Maintenance Activities • Scheduling Multiple Activities at the Same Time • Scheduling Individual Activities • Scheduling Activities at Regular Intervals Using Schedule Streams • Viewing Maintenance Program and Activity Details • Updating Scheduled Service Dates for a Maintenance Program • Ending Service Lines on a Day Specified by the Customer • About Cotermination • Applying the Cotermination Date to a Service • Specifying Tax Status • Applying Changes from a Service Line to the Covered Sublines • Assigning Sales Credits for a Contract Line • Updating Service • Applying Default Values to Existing Contract Lines
  • 79.
    Entering Service Lines    3-3 Overview of Entering Service Lines This group of topics explains how to enter service lines into your contract. About Service Lines A service can cover broad-category business processes such as field service, depot repair, call center, technical support, safety inspections, and any other user-defined business activities. Each service is set up by the application administrator as an item in Oracle Inventory and is associated with a coverage template. The coverage template specifies the business processes that are covered, the times that the customer is entitled to the coverage, amounts that are covered and applicable discounts, as well as any resources that are to be used and their pricing. If preventive maintenance is required as part of the service, the service is also associated with a program of maintenance activities. These activities are scheduled automatically when you enter the service line. The administrator can also restrict which customers or products are permitted to use this service. You must be familiar with the details of the services that are created for your organization before using them in a contract because you select a service in a service line by its Oracle Inventory name. A service can cover different types of entities. A safety inspection service can cover individual customer sites or the entire enterprise. A depot repair service can cover individual products, a group of products, all products at a specific location, or all products that are grouped into a system. For example, a service may cover field service for all of the computer equipment at site A, or it may instead cover laptops L451, L359, and L863. A service line can cover multiple entities, each of which you enter as a subline. When you cover individual customer products (Oracle Installed Base item instances or Items in Oracle Inventory), you can have the application price the service automatically and take advantage of Oracle Advanced Pricing features including discounts. Your organization can price the same service differently by setting up multiple price lists, and it can offer different prices for the service based on service length. This means that your organization can offer discounts if a customer purchases service for a longer period of time. Entering a Service Line (General Procedure) Prerequisites
  • 80.
    3-4    Oracle ServiceContracts User Guide Create the contract with the appropriate category: • To cover products in a customer's installed base, you can use any of the available contract categories: Warranty and Extended Warranty, Service Agreement, and Subscription Agreement. • If your contract includes usage lines, or the service covers other levels including parties, sites, accounts, and inventory items, then you must select Service Agreement or Subscription Agreement. • To include subscription lines in the same contract, you must select Subscription Agreement. • Enter the required fields on the header of the contract. To enter a service line: 1. From the Service Contracts Authoring window, select Lines tab and Accounts subtab. 2. Select one of the following from the Line Type list of values (LOV) depending on the contract category: • For a service contract of category Service Agreement or Subscription Agreement, select Service. • For a service contract of category Warranty and Extended Warranty, select Extended Warranty.
  • 81.
    Entering Service Lines    3-5 Note: Both choices permit you to select from the same list of service offerings. 3. Select the service from the Name LOV, which comprises all services that your organization offers. You must select a service that is applicable to what you are covering. Because you select the service first and what it covers later, the application informs you of a wrong choice only after you enter the items that you are covering. Note: If the application displays a note that your entry is not a valid service, then the application administrator excludes the customer from ordering this service. See the Oracle Service Contracts Implementation Guide for more information about defining service availability rules. 4. Enter billing and shipping contacts that are specific to this contract line by following the procedure described in Entering Billing and Shipping Contacts for a Contract , page 3-10. If a contact does not exist in the database, then you can add one following the procedure described in Creating or Modifying a Contract Line Contact, page 3-10. The contacts that you enter here are different from the ones that you entered in the contract header. 5. Select the Effectivities subtab.
  • 82.
    3-6    Oracle ServiceContracts User Guide 6. You can review the status of the line. Lines on entered status contracts can be individually canceled if you elect not to purchase the service during contract negotiation. Leaving a line on the contract and canceling it rather than removing it from the contract provides more visibility to lost opportunity for new and renewal contracts. When a line is canceled, the application records the cancellation date and reason. 7. Specify the duration of the service. By default, the start and end dates of the service and duration are copied from the contract header. You can specify a different duration by: • Clicking Coterminate to end the service line on a day that is preferred by the customer. This button is enabled only in contracts with a status of Entered for customers to simplify renewals by terminating all contracts on the same day each year, for example at the end of the calendar or fiscal years. This date is called the cotermination date. See Ending Service Lines on a Day Specified by the Customer, page 3-56 for more details. • Entering either of the following: • Start and end dates • Duration and period The application calculates the missing information. If you supply a duration and period, then the start date is the start date of the contract.
  • 83.
    Entering Service Lines    3-7 Note: If your organization prices contracts differently based on different periods, for example offering different prices for a service that is purchased by month, quarter, and year, then the value in the Period field determines which price applies in the absence of a specified price UOM for the line. You can change the price basis when you price the service. You may need to do so whenever you sell a service for an unusual service length, for example. By default, a customer purchasing a contract for one year and five days is charged based on a daily and not the yearly price because the line length is not divisible by a year. For more information, see About Changing the Basis for Pricing a Service, page 3-43. If the duration of the service starts earlier than the start date or ends later than the end date of the contract, then you must extend the start and end dates of the contract at the header level before you can make the contract active. 8. If the contract can be renewed (you have not selected Do Not Renew on the Summary tab and Renewals subtab), then specify how the line is to be renewed using the Renewal Type LOV. For details, see Specifying How a Contract Line is to Be Renewed, page 3-12. 9. Select the Pricing/Products subtab and Effectivity secondary tab.
  • 84.
    3-8    Oracle ServiceContracts User Guide 10. Specify what the service line covers. For each subline, specify one of the covered levels and then enter what is being covered. A service can cover: • A specific product that the customer owns (an Oracle Installed Base item instance) • A party • A customer account (party account) • A party site • An Oracle Installed Base system • An Oracle Inventory item For covered products, you can either enter each subline individually or click the LOV indicator to open a browsing window where you can select multiple sublines at once. See Specifying What a Service Covers, page 3-14 for an explanation of the covered levels and how to enter them. 11. If you are covering an inventory item or a product (instance) that the customer owns, then the application prices the service for you. You must, however, price the other covered levels manually. See Pricing What a Service Covers, page 3-39. 12. Much of the remaining information for a service line comes from the defaults that you enter in the Summary tab or by the application itself from the coverage template that is associated with the service. You can make modifications by following these procedures:
  • 85.
    Entering Service Lines    3-9 • Changing the Billing and Shipping Accounts and Locations, page 3-9 • Specifying a Payment Method for a Contract Line, page 3-45 • Specifying a Billing Schedule, page 3-38 • Specifying How the Service Prints on an Invoice, page 3-35 • Modifying Coverage Provided by a Service, page 3-47 • Scheduling Preventive Maintenance Activities, page 3-48 • Specifying Tax Status, page 3-57 • Assigning Sales Credits for a Contract Line, page 2-26 13. Save. Changing the Billing and Shipping Accounts and Locations The application uses the billing and shipping accounts and locations from the entries that you made in the contract header. You can change the values to any account and location that are related to the parties that are entered in the contract header. The Bill To account and location that you select for the line is the account that receives the invoice for this line. Your entries also restrict the contacts that you can enter for this line. Note: You must select the location by the application-generated location codes. The corresponding addresses appear at the bottom of the tab. Prerequisite Enter the contract line. To change the billing and shipping accounts and locations: 1. From the Service Contracts Authoring window, select the Lines tab and Accounts subtab. 2. Select the contract line to modify. 3. Use the LOVs to select a Bill To and Ship To account and location.
  • 86.
    3-10    Oracle ServiceContracts User Guide Entering Billing and Shipping Contacts for a Contract Line The contacts that you enter here are separate from those that you entered for the party on the Summary line. Note: The list of contacts that you can select is limited to those at that particular account location. While you can create new contacts according to the procedure that is described in Creating or Modifying a Contract Line Contact, page 3-10, make sure that you do not create any unnecessary duplicates. Prerequisite Select the shipping and billing accounts. To enter billing and shipping contacts for a contract line: 1. From the Service Contracts Authoring window, select the Lines tab and Accounts subtab. 2. Select the service line at the top of the subtab. 3. Place your cursor in an empty record in the Role field in the Customer Contacts region. 4. To enter a contact for the billing account, select Billing Contact from the Role LOV. This entry limits the available names to contacts for the billing account. 5. To enter a contact for the shipping account, select Shipping Contact from the Role LOV. This entry limits the available names to contacts for the shipping account. Note: Entering any other available role, such as Technical Contact, makes contact at both accounts available for selection. 6. Enter the contact using the Name LOV. 7. You can specify a start date and end date for a contact using the date fields. 8. To view the phone and other contact information for a contact, select the contact and select Maintain Contact from the Tools menu. Creating or Modifying a Contract Line Contact The contact that you create becomes a contact for the bill to account, the ship to account,
  • 87.
    Entering Service Lines    3-11 or both, depending on your selection. Prerequisite Enter a service contract line To create or modify a contract line contact: 1. From the Service Contracts Authoring window, select the Lines tab and Accounts subtab. 2. Select the contract line to which you want to associate to a contact. 3. In the Customer Contacts region, place the cursor in the Role field. 4. Select Maintain Contact from the Actions menu. The Contact window appears. 5. If you are creating a new contact, then: 1. Select a role for this contract using the Contact Role LOV. Usually this is either Billing Contact or Shipping Contact. 2. Select the Bill To or the Ship To radio button depending on whether you want to create a contact for the billing or shipping account in the contract line. The role that you selected in the previous step restricts your choices: if you selected the Billing Contact role, then you cannot select the Ship To radio button and vice versa. 3. Enter the contact last and first name. 4. Use the following guidelines for entering other information: • Select the titles and job descriptions from the Titles and Job LOVs. These are preset by your application administrator. • Phone, fax, and mobile numbers are composed of three fields: a country code (LOV), an area code, and the number itself. Do not use any delimiters when entering your number. • For the contact address, you can select only one of the existing customer locations that is associated with the account. You can add a mail stop or a mail box, however, by pressing the Tab key after entering the address. 6. If you are modifying an existing contact, then you can: • Change the title and job description by selecting a different one from the Title
  • 88.
    3-12    Oracle ServiceContracts User Guide and Job LOVs. • Change the phone, fax, and mobile numbers. • Change the e-mail address. Note: When modifying existing contact information, be aware that you are modifying the contact record for all Oracle E-Business Suite applications. You cannot modify the address or mail stop number after you have saved them. To select another address or enter a different mail stop, you must: • Navigate back to the Service Contracts Authoring window. • Delete the contact by selecting it and clicking Delete in the toolbar. • Create a replacement contact with the correct address information. Note: Deleting the contact from the contact does not delete it from the database. Creating a replacement record creates a duplicate. 7. If you are modifying an existing contact and want to revert to the existing record, click Reset. 8. Click OK to return to the Service Contracts Authoring window. 9. Save. Specifying How a Contract Line Is to Be Renewed This procedure applies to lines of all types (Service, Usage, and Subscription). Prerequisites • Enter a contract line. • You cannot renew a line if you have indicated that the contract is not to be renewed at the header level. See Specifying How a Contract Will Be Renewed, page 2-28.
  • 89.
    Entering Service Lines    3-13 To specify how a line is to be renewed: 1. From the Service Contracts Authoring window, select the Lines tab and Effectivities subtab. 2. Select the line to set up. 3. Select one of the renewal options from the Line Renewal Type list. The choices are: • Do Not Renew: The line will not be renewed when the contract is renewed. • Full Duration: The line will be renewed for the whole duration of the new contract. For example, if a customer ordered six months worth of a yearly service in the current contract, but the renewed contract is for a period of one year, then the service line is extended to the full year as well. • Keep Duration: The duration of this line will remain the same in a renewed contract. Use this setting for intermittent or seasonal service lines. For example, a mountain resort may order special service for peak periods in winter and summer. Using this setting, you ensure that the renewed contract retains the same structure. See Renewing Service Purchased for Seasonal or Peak Periods, page 3-13. Renewing Service Purchased for Seasonal or Peak Periods This topic explains how to set the renewal types for service lines in a contract that includes intermittent or seasonal service. Customer Problem A mountain resort has installed power generators and wants to purchase two kinds of service: • Regular service for the whole calendar year that entitles them to repair during regular business hours. • Premium 24/7 service for peak winter and summer periods. Oracle Service Contracts Solution The following guidelines explain how to structure a contract based on the customer requirements. Service Line Entry Create a contract with three service lines:
  • 90.
    3-14    Oracle ServiceContracts User Guide • Line 1: Regular service for the whole year. • Line 2: Premium for the winter • Line 3: Premium for the summer Renewal Information To keep the same contract structure when the contract is renewed in the future specify the following renewal information for each line: Line Renewal Type Explanation 1. Regular Service Full Duration Renewed for the full duration of the new contract. 2. Premium Winter Keep Duration Keeps the same duration in the renewed contract. 3. Premium Summer Keep Duration Keeps the same duration in the renewed contract. Specifying What a Service Covers A service can cover everything from individual products that a customer owns to telephone support for a whole corporation. Note: Contracts of category Warranty and Extended Warranty restrict you to covering products that the customer owns (Oracle Installed Base item instances). The other covered levels are available for service lines that you enter in the Service Agreement and Subscription Agreement contract categories. This group of topics explains the different levels of coverage that are available and provides procedures for entering them. • Levels of Coverage and Their Uses, page 3-15 • Covering Customer Products, page 3-20 • Covering Parties, page 3-27 • Covering Customer Accounts, page 3-28
  • 91.
    Entering Service Lines    3-15 • Covering Party Sites, page 3-30 • Covering Systems, page 3-32 • Covering Inventory Items, page 3-34 Levels of Coverage and Their Uses Service can cover products on multiple levels. For example, you can have a service cover the repair of an individual product that the customer owns, or you can use it to provide telephone support for a whole enterprise. Covered Levels The following table lists the different levels of coverage, specifies the contract categories for which they are available, and provides a brief explanation of each. Level LOV Name What It Covers Available in Contract Category Explanation Party A party in the database Service Agreement only Covers: • Item instances that are owned by all accounts belonging to a party in your database. In Oracle Installed Base, ownership is defined as a combination of party and account. • Business processes that are performed for the party as defined in service coverage. Requires manual pricing.
  • 92.
    3-16    Oracle ServiceContracts User Guide Level LOV Name What It Covers Available in Contract Category Explanation Customer A customer account (an account belonging to a party in the database) Service Agreement only Covers: • All item instances that are owned by the customer account. • Business processes that are performed for the account as defined in service coverage. Requires manual pricing. Site A party site Service Agreement only Covers: • All items that are installed at a particular party site. • Business processes that are performed for the site as defined in service coverage. Requires manual pricing.
  • 93.
    Entering Service Lines    3-17 Level LOV Name What It Covers Available in Contract Category Explanation System An Oracle Installed Base system Service Agreement only Covers: • Item instances belonging to a specific system. A system is a grouping of item instances that are created in Oracle Installed Base. • Business processes that are performed for the system as defined in service coverage. Requires manual pricing.
  • 94.
    3-18    Oracle ServiceContracts User Guide Level LOV Name What It Covers Available in Contract Category Explanation Product An item instance in Oracle Installed Base Warranty and Extended Warranty Service Agreement Covers: • A specific serialized or non serialized item instance in Oracle Installed Base. For a serialized product such as a computer or a printer, the item instance is always an individual product. But an item instance can represent multiple quantities for non-serialized items such as printer cartridges, for example. • Business processes that are performed for the item instance as defined in service coverage. Uses the price list that you have specified in the contract line to automatically update the price.
  • 95.
    Entering Service Lines    3-19 Level LOV Name What It Covers Available in Contract Category Explanation Item An Oracle Inventory item Service Agreement only Covers: • A serviceable inventory item. • Business processes that are performed on that inventory item as defined in service coverage. Uses the price list that you have specified in the contract line to automatically update the price. How to Use Coverage Levels Which level you use depends on the type of service you are selling and on the different needs of your enterprise. The following table provides suggested guidelines. It lists some of the main business uses and lists the recommended covered levels for each. Business Use Recommended Levels Example Servicing a customer product • Product • A washing machine manufacturer sells extended warranties for the products it has sold. • Any serialized product • A fire safety equipment vendor sells service for emergency generators that are installed in a building.
  • 96.
    3-20    Oracle ServiceContracts User Guide Business Use Recommended Levels Example Servicing high-volume and low-cost items • Party • Customer • Site • System The fire safety equipment vendor services fire sprinklers by customer site because they are too numerous to track in a contract individually. Providing services not tied to any specific product such as telephone support or safety inspections. • Party • Customer • Site Sometimes a service covers a business process rather than any specific product that a customer owns. For example: • A computer manufacturer provides telephone support to troubleshoot all of its products. • A vendor of fire protection equipment offers periodic safety inspections at a particular site or building. Providing support for products that the customer plans to purchase in the future • Item Use the Item level to cover products that are not yet in the installed base. For example, a customer plans to purchase additional generators in the near future, so they want to include them in the same service agreement to receive a discount. Covering Customer Products (Instances in Oracle Installed Base) This group of procedures explains how to cover one or more customer products by a service: • Covering Customer Products, page 3-21 provides the general procedure for
  • 97.
    Entering Service Lines    3-21 entering a product. • Browsing the Oracle Installed Base to Identify Item Instances for Coverage, page 3- 24 explains how to use a built-in browsing window to identify the Oracle Installed Base item instances that you want to cover if you do not know their serial numbers or item instance numbers. Here you also learn how the browser speeds up your entries of multiple sublines at the same time. • Entering a Customer Product into the Installed Base, page 3-26 explains how to create a record in Oracle Installed Base so that you can cover products that a customer has purchased from third parties. Covering Customer Products You can enter one or more products to be covered by the service. You are not restricted to covering products that are owned by the parties in the contract. You can cover any product belonging to any party that is an item instance in Oracle Installed Base. However, Oracle recommends covering products that belong to the customer party or third party on the contract, or any party that is related to the contract customer party. For contracts in renewal streams, service can be canceled for individual covered levels. Prerequisites • Enter a service line. • If a product that you want to cover is not entered in Oracle Installed Base (for example, if you are selling service for a product that the customer purchased from a third party), then you must create an item instance as described in Entering a Customer Product into the Installed Base, page 3-26. To cover customer products: 1. From the Service Contracts Authoring window, select the Lines tab and Pricing/Products subtab. 2. Select the service line that will cover the product. Note: If customer products are associated with the contract line, you can select Show All Products, which opens the Product Details window. This window shows the details of the products covered by the service in a spread table. 3. Select the Effectivity secondary tab.
  • 98.
    3-22    Oracle ServiceContracts User Guide 4. Enter the product or products to cover by one of the following two methods: • If you have a small number of products to cover and you know their serial numbers or item instance numbers, you can enter each subline individually making entries directly into the fields on each line: 1. On a new line on the Effectivity secondary tab, select Product from the Level LOV. 2. In the Name field, enter the Oracle Inventory name or a partial name with the percent sign to indicate any missing characters. If the product inventory name is AS45888, for example, then you can enter AS45888 or AS45%. 3. Press the Tab key. The LOV search window appears: 4. You can search by complete serial number or the Oracle Installed Base item instance number. Enter it after the % sign in the Find field. For example: AS54888%99855. 5. Click Find. If the search identifies a unique customer instance, the application returns you to the authoring window. Otherwise, you have to narrow your search criteria or select an item on the list and click OK. • To select multiple products for coverage at the same time, or if you do not know the serial number or the item instance number of an individual product to cover, you can make your selection from a graphical display of the contents of the customer's installed base by clicking the LOV indicator in the Name field. For details see Browsing the Oracle Installed Base to Identify Item Instances for
  • 99.
    Entering Service Lines    3-23 Coverage, page 3-24. A product that you enter is displayed in the Name field by its inventory item name. You can see the customer product's serial number, item instance number, or both in the Description field. Note: Your administrator can set the profile OKS: Item Display Preference to display an item by name or by description. If the profile set to Name, then you can select and view products by the item name, such as AS54888, and the description text following the sublines table shows the item description, such as Sentinel Standard Desktop. If the profile is set to Description, then you can select and view products by description and view the name in the Description field following the sublines table. 5. Save. The application automatically updates the price of the service line. Note: The application calculates prices based on the quantity that is attached to the item instance and the price list that you have selected for the service line. Most item instances are specified for individual items, but non-serialized items, including consumables such as ink cartridges, can come in any quantity. If the updated price is more than you expected, then check the quantity that is attached to the item instance by clicking Product Details. 6. You can review the status for the covered level. If an existing covered level has a canceled status you, can scroll to find the cancellation date and reason. 7. To create an item instance in the installed base, select New Instance. The Create Item Instance window appears.
  • 100.
    3-24    Oracle ServiceContracts User Guide 1. Select the product to add from the Item LOV. 2. Enter a quantity. 3. Select a unit of measure(UOM) from the LOV. 4. Select a location type from the Current Location Type list, such as Party Site. 5. Select a party from the Current Location Party LOV. 6. Select an address from the Current Location Address LOV. 7. Click OK. Note: You can create multiple item instances at one time and then select OK. The application adds the newly created item instances as covered products to the selected service line. The Service Contracts Authoring window appears, and the new item instance appears within the Effectivity secondary tab. 8. Save. Browsing Oracle Installed Base to Identify Item Instances for Coverage You can browse the customer's Oracle Installed Base records and select one or more products for coverage. Each product that you select appears as a separate line in the authoring window. Prerequisite
  • 101.
    Entering Service Lines    3-25 Enter a service line. To browse Oracle Installed Base to identify item instances for coverage: 1. From the Service Contracts Authoring window, select the Lines tab and Pricing/Products subtab. 2. Select the service line that will cover the product. 3. Select the Effectivity secondary tab. 4. Select Product from the Level LOV. 5. Click the LOV indicator in the Name field. The Product window appears. 6. Because the size of your installed base can be too large for browsing, you can restrict the view in a number of ways. You can: • Select different views. By making a selection from the Level list, you can view the item instances by: • Item: Selecting this level displays all of the instances for a particular inventory item. • Model: If you have configured items in your installed base, you can view them by model. • System: If your Oracle Installed Based item instances are grouped in systems, you can display the instances by system. • Site: Use this level to display all the item instances at a particular address. • Customer: Use this level to view item instances by a customer account. • Party: Use this level to organize the display by customers in your database. This view is most useful if you are selling to consumers. • Specify which customer records display. By selecting a customer context, you specify what customer records appear: • Customer: Limit the display to the party that is entered as the customer on the Summary tab of the contract. • Related Customer: Display parties with a relationship to the customer in the Oracle Trading Community Architecture (TCA) party model.
  • 102.
    3-26    Oracle ServiceContracts User Guide You can display item instances for: • Both: Both the customer and related parties. • All: All parties in the database. • Restrict the list that is displayed in the window. Enter a search term in the Name field to restrict what is displayed in the list. You can use partial entries and the percent sign % to represent omitted characters. For example, to view the installed base by inventory item but not view all items, you can restrict the display to just the item that you want by entering it in the Name field. 7. After you have entered the display criteria, click Find. The window displays the installed base in the form of a tree. 8. View the details of any node on the tree by clicking it. 9. Select any item instance that you want to add, holding down the CTRL and Shift keys for multiple selections. 10. Click OK to return to the Service Contracts Authoring window. Each selection creates an individual line in the Effectivity secondary tab. Entering a Customer Product into Oracle Installed Base You can cover a product that does not have an item instance in Oracle Installed Base. You may have to create an instance if you provide service for products that a customer purchased from a third party such as a vendor or a dealer, for example. Prerequisites • Set up product as an item in Oracle Inventory. • Enter a service line. To enter a customer product into Oracle Installed Base: 1. From the Service Contracts Authoring window, select the Lines tab and Pricing/Products subtab. 2. Select the service for the product that you are about to create.
  • 103.
    Entering Service Lines    3-27 3. Select the Effectivity secondary tab. 4. Select New Instance. The Create Item Instance window appears. 1. Select the product to add from the Item LOV. 2. Enter a quantity. 3. Select a UOM from the LOV. 4. Select a location type from the Current Location Type list, such as Party Site. 5. Select a party from the Current Location Party LOV. 6. Select an address from the Current Location Address LOV. 7. Click OK. The Service Contracts Authoring screen appears, and the new item instance appears within the Effectivity secondary tab. 8. Save. Covering Parties You can cover one or more parties with a service. A party is a customer in your database. This can be an individual consumer or an organization. Prerequisite Create a contract of category Service Agreement.
  • 104.
    3-28    Oracle ServiceContracts User Guide To cover parties: 1. From the Service Contracts Authoring window, select the Lines tab and Pricing/Products subtab. 2. Select the service. 3. Select the Effectivity secondary tab. 4. If you are covering a small number of parties and you know the party names or a partial party names, then make your entries on separate sublines. For each party: 1. In a new line, select Party as the Level. 2. Enter the name or partial name in the Name field. (Use the % sign to indicate omitted characters.) 3. Press the Tab key. If the application does not find a unique match, it opens a search window where you can refine your search. 5. To enter multiple parties at the same time or if you do not know the name of the party, then you can make a selection from a list of the parties in your database displayed in a logical tree: 1. Click on the LOV indicator in the Name field. The Party window appears. 2. Select Related Customer from the Customer Context list. 3. Click Find. The window displays a list of parties that are related to the customer on the contract. 4. Select one or more parties (use the Shift and Ctrl keys for multiple selections). 5. Click OK. 6. Save. Covering Customer Accounts You can select one or more customer accounts (party accounts) to cover with a service. You can cover the accounts belonging to the parties in the contract or to any parties with a relationship to them.
  • 105.
    Entering Service Lines    3-29 Prerequisite Create a contract of category Service Agreement. To cover customer accounts: 1. From the Service Contracts Authoring window, select the Lines tab and Pricing/Products subtab. 2. Select the service. 3. Select the Effectivity secondary tab. 4. If you know the party that owns the account, you can enter each account individually as a subline. For each subline: 1. Select Customer for your Level. 2. In the Name field, enter the name or partial name of the party. 3. Press the Tab key. The application displays a list of accounts for the party that you specified in a search window. 4. Select the account to cover or refine your search by adding the % sign and the account number to the search term. 5. Click OK. The Name field displays the name of the party. The Description field displays the account number. 5. To enter multiple parties at the same time or if you do not know the party name or account, then you can browse through a list of related parties and accounts: 1. In a new line, select Customer for your Level. 2. Click on the LOV indicator in the Name field. The Party window appears. 3. Select Related Customer from the Customer Context list. 4. Click Find. The window displays a list of parties that are related to the customer on the contract. You can view the accounts for the parties listed, by clicking the party node.
  • 106.
    3-30    Oracle ServiceContracts User Guide 5. Select one or more accounts (use the Shift and Ctrl keys for multiple selections). 6. Click OK. 6. Save. Covering Party Sites You can cover one or more party sites with a service. Prerequisite Create a contract of category Service Agreement. To cover party sites: 1. From the Service Contracts Authoring window, select the Lines tab and Pricing/Products subtab. 2. Select the service. 3. Select the Effectivity secondary tab. 4. To enter individual sites for which you know the site numbers, enter each site on a separate subline: 1. On a new line, select Site as the Level. 2. Enter the site number in the Name field. The site number is the unique identifying number that is generated by the application for each party address. 5. To cover multiple sites at the same time or if you do not know the site number, then you can find the site to cover by browsing through a list of customers and their sites. See Browsing Through Party Sites, page 3-30. Browsing Through Party Sites You can select sites to cover by browsing through a list of sites organized by party. Note: When coverage is provided for a product, the Installed At location in Oracle Installed Base is the site that is pertinent when coverage is provided for that product. When you create a service request the contract will not appear as an Open Contract unless the product is Installed At the designated site. If Party Type Is HZ
  • 107.
    Entering Service Lines    3-31 Location, then the entitlement check does not return that contract line. Coverage is not provided if the Party Type for the Installed At location is not Party Site. Changing the Installed At address in the Service Request does not mean that the product will be covered under the designated contract. Prerequisite Enter a service line. To browse through party sites: 1. From the Service Contracts Authoring window, select the Lines tab and Pricing/Products subtab. 2. Select the service line. 3. Select the Effectivity secondary tab. 4. On a new line, select Site from the Level LOV. 5. Click the LOV indicator in the Name field. The Site window appears. 6. Restrict which parties to display by choosing a Customer Context: • To view only the sites for the contract customer, select Customer. • Related Customer: Displays the parties with a relationship to the customer in the Oracle TCA party model. • Both: Displays both the customer and related parties. • All: Displays all parties in the database. 7. To restrict the list that is displayed to a particular party name, enter a name or partial name. 8. Click Find. The window displays a list of parties that meet your criteria. 9. View the sites for any party, by clicking the party node. 10. Select the sites to cover (hold down the Shift and Ctrl keys for multiple selections). 11. Click OK to return to the Service Contracts Authoring window.
  • 108.
    3-32    Oracle ServiceContracts User Guide Covering Systems You can cover one or more systems with a service. A system is a grouping of item instances that are created in Oracle Installed Base. Prerequisite Create a contract of category Service Agreement. To cover systems: 1. From the Service Contracts Authoring window, select the Lines tab and Pricing/Products subtab. 2. Select the service. 3. Select the Effectivity secondary tab. 4. To enter systems individually when you know the system names, for each system: 1. On a new line, select System from the Level LOV. 2. Enter the name or partial name in the Name field. Use the % sign to represent missing characters. 3. Press the Tab key. 5. To enter multiple systems at the same time or if you do not know the system names, you can browse through a list of systems by party, party account, or party site. See Browsing Through Oracle Installed Base Systems, page 3-24. Browsing Through Oracle Installed Base Systems You can identify and select systems for coverage by browsing through a list of systems organized by party, party account, or party site. Prerequisite Enter the service line. To browse through Oracle Installed Base systems: 1. From the Service Contracts Authoring window, select the Lines tab and Pricing/Products subtab. 2. Select the service line.
  • 109.
    Entering Service Lines    3-33 3. Select the Effectivity secondary tab. 4. Select System from the Level LOV. 5. Click the LOV indicator in the Name field. The System window appears. 6. To limit the number of customer systems to browse through at any one time, you can: • Select different views By making a selection from the Level list, you can view systems by: • Customer account, by choosing Customer. • Party, by choosing Party. • Party site (identified by its number), by choosing Site. • Specify which parties to display by choosing a Customer Context. You specify what customer records display. The choices are: • Customer: Limit the display to the party entered as the customer in the contract. • Related Customer: Show parties with a relationship to the customer in the Oracle TCA party model. • Both: Show both the customer and related parties. • All: Show all parties in the database. • Restrict the list that is displayed in the window Enter a search term in the Name field to restrict what is displayed in the list. For example, if you have selected Party as the level, you can limit the display to a specific party by entering its name in this field. 7. After you have entered the desired display criteria, click Find. The window displays the systems in the desired view of the installed base systems in the form of a logical tree. 8. View the systems in any node on the tree by clicking it. 9. Select the systems that you want to cover (use the Shift and Ctrl keys for multiple selections).
  • 110.
    3-34    Oracle ServiceContracts User Guide 10. Click OK to return to the Service Contracts Authoring window. Covering Inventory Items You can cover one or more Oracle Inventory items with a service. You can cover multiple quantities of the item on each subline. Prerequisites • Create a contract of category Service Agreement. • Identify the Oracle Inventory item name of the item to cover. To cover inventory items: 1. From the Service Contracts Authoring window, select the Lines tab and Pricing/Products subtab. 2. Select the service. 3. Select the Effectivity secondary tab. 4. Select Item for your Level. 5. Use the Name LOV to enter the item name. 6. Save. 7. Navigate to the Pricing tab. 8. Enter the quantity of item that is being covered in the Qty field. 9. Select the unit of measure using the UOM LOV. 10. Save. Viewing Details About a Covered Product The products that are covered by a service line are identified in the Service Contracts Authoring Window by their Oracle Inventory names. You can view the complete details about a covered product (an instance in Oracle Installed Base), including the installation address, installation date, and pricing information. Prerequisites • Set up the product as an item in Oracle Inventory.
  • 111.
    Entering Service Lines    3-35 • Enter a service line. To view details about a covered product: 1. From the Service Contracts Authoring window, select the Lines tab and Pricing/Products subtab. 2. Select the service covering the product. 3. Select the Effectivity secondary tab. 4. Select the covered line to display. The Level must be of type Product. 5. Click Product Details. The Product Details window appears with the information. Note: For service contracts of category Warranty and Extended Warranty, you can view details for all of the covered products at the same time, by clicking the Show All Products button. Maintaining Pricing Attributes for Covered Products The pricing attributes can be maintained for any of the covered products. To maintain pricing attributes for Covered Products: 1. From the Service Contracts Authoring window, select the Lines tab and the Pricing/Products subtab, and then select the service line to update. 2. Select the Effectivity secondary tab and highlight a covered product. 3. From the Actions menu select Pricing Attributes. 4. Select the Pricing Context from the LOV. For each Pricing Context, you can enter the pricing attributes in the corresponding descriptive flexfield. 5. Click Apply to save the pricing attributes Specifying How the Service Prints on an Invoice By default, Oracle Receivables prints both the line and subline on the customer invoice. You can specify:
  • 112.
    3-36    Oracle ServiceContracts User Guide • Whether a service line and subline is omitted from the invoice, page 3-36 • What text gets printed, page 3-37 Omitting a Line or Subline from the Invoice You can control the printing of contract line and subline details with the Invoice Print Flag check box. By default, the application activates this check box and prints the line and subline. You can prevent a selected line or subline from being printed on the invoice, by clearing the check box. Omitting the line or subline from the printed invoice does not remove the price from the invoice subtotals. Prerequisite Enter a service line. To omit a line or subline from the invoice: 1. From the Service Contracts Authoring window, select the Lines tab and Pricing/Products subtab. 2. To omit a line from the invoice, clear the Print Flag check box on the right. 3. To omit a subline from the invoice: 1. Select the line. 2. Select the Administration secondary tab. 3. Clear the Print Flag check box.
  • 113.
    Entering Service Lines    3-37 4. Save. Specifying the Invoice Text You can specify what text appears on the invoice for the service line and sublines. The application automatically creates a description of the line and sublines for you. For contract lines, this is the service description and the effective dates separated by colons. For example, if the service name is Gold Service and the effective dates are 01-JAN-2005 to 31-DEC-2005, then the text invoice reads: Gold Service:01-JAN-2005:31-DEC-2005. For covered sublines, the description also includes the name of the item that is covered. If you have sold Gold Service, 01-JAN-2005 to 31-DEC-2005, for washing machine SuperWash, then the generated description reads: Gold Service:01-JAN-2005:31-DEC-2005. Prerequisite Enter a service line. To specify the invoice text: 1. From the Service Contracts Authoring window, select the Lines tab and Effectivities subtab. 2. Select the service covering the product. 3. Modify the line descriptions in the Invoice Text field. 4. If you are billing for individual covered items, then: 1. Select the Pricing/Product subtab. 2. Select the Effectivity secondary tab and modify the text in the Invoice Text field. 5. Save. 6. You can copy the description you have entered to the sublines by using the Cascade Attributes option from the Actions menu. See Applying Changes from a Service Line to the Covered Sublines, page 3-58.
  • 114.
    3-38    Oracle ServiceContracts User Guide Specifying a Billing Schedule You can specify how the application bills the customer for a service and when the application sends the billing records to Oracle Receivables. You can bill a customer for a service either at the contract line level or separately for each of the sublines that are covered by the service. If you are billing separately for each subline, then you can create a different billing schedule for each. If you entered a billing schedule at the contract header level, then this schedule passes to the line level. Prerequisite Enter a service line. To specify a billing schedule: 1. From the Service Contracts Authoring window, select the Lines tab and Pricing/Products subtab. 2. Select the service line to set up. 3. Click Billing. The Billing window appears. 4. Select a billing level from the Level LOV: • Equal Amount: to bill for equal amounts over the billing period and have control over the amount as well as the billing periods. • Top Level: to bill customers for the service as a whole. • Covered Level: to bill customers at the level of each subline. 5. Specify the billing schedule by entering one or more billing streams. This is the same procedure as is used for creating schedules at the header level. See Entering a Billing Stream, page 2-13 for details. 6. If you chose Covered Level you can modify the billing schedule for any of the sublines: 1. Select the service line on the Lines tab and Pricing/Products subtab. 2. Select the Pricing secondary tab. 3. Select the subline that you want to modify.
  • 115.
    Entering Service Lines    3-39 4. Click Billing. The Billing window appears for this subline. 5. Create a billing schedule for this subline using one or more billing streams. 6. Click OK. Pricing What a Service Covers The application automatically prices a service on an Oracle Inventory item or a product that the customer owns (an item instance in Oracle Installed Base) based on the price list. Following is a summary of how pricing works for covered products, whether you are adding an existing item instance to a contract as a covered product or creating new item instances and adding them to the contract: • Obtaining an Asking UOM: If Price UOM for a covered product is NULL, Oracle Service Contracts passes the service duration UOM on the covered product subline as the Asking UOM for the pricing call. Note: The UOM for service duration is always converted to the highest possible UOM. For example, if you enter 365 days as the service duration for the subline, at time of save the service duration is updated to 1 year. If Price UOM is present on a covered product subline, the Price UOM takes precedence over the service duration UOM and the application passes it as the Asking UOM for the pricing call. • Pricing the Service: If you define a service price in the same UOM as the Asking UOM, then the price is returned at a rate/uom for the same UOM that is passed as the asking price. Example • Asking UOM is Month • Price List has price defined as Month is $100 and Year is $900 • Service duration is 4 months • Price is $400 (Quantity 4 at a monthly price of $100) • Unit Price = $100
  • 116.
    3-40    Oracle ServiceContracts User Guide If you do not define a service price in the same UOM as the Asking UOM, then the price returns as follows: 1. If your Price List has a price defined for a UOM for which the Primary check box is selected, then the price list price/UOM is converted into a price/asking UOM to derive the service price. Example • Asking UOM is Month • Price List has following prices: • Month is $100; Precedence is 20 • Year is $900; Primary UOM; Precedence is 20 • Service duration is 4 months • Price returned is $300 (Quantity 4 multiplied by ($900/12)) • Unit Price is $900 Note: Unit Price is based on the price list UOM the application uses to calculate the price. 2. If your Price List has more than one price defined for a UOM for which the Primary check box is selected, then the price list UOM with the highest precedence is used. Example • Asking UOM is Month • Price List has the following prices: • Month is $100; Precedence is 20 • Year is $900; Primary UOM; Precedence is 20 • Quarter is $270; Primary UOM; Precedence is 10 • Service duration is 4 months • Price is $360 (Quantity 4 multiplied by (270/3)) • Unit Price is $270 Note: Unit Price is based on the Price List UOM that the application uses to calculate the price.
  • 117.
    Entering Service Lines    3-41 3. If Price List does not have a Price List UOM that is the same as the Asking UOM and the price list does not have a price defined in another UOM selected as a Primary UOM, then the application does not return a price for the Asking UOM. The preceding logic applies for both Covered Product pricing and Covered Item pricing. You must price the other covered levels manually. For this reason, you must use different procedures for entering and adjusting prices: Adjusting the Price of a Service for a Covered Product or an Item, page 3-41, Pricing Service for a Party, page 3-41. Additional ways of adjusting prices for your customer are covered in Adjusting Prices, page 7-1. Adjusting the Price of a Service for a Covered Product or an Item The application automatically prices a service for an inventory item or a covered product (an item instance in Oracle Installed Base) using the price list that you entered on the Effectivities subtab. To reprice, you can: • Apply preset discounts and surcharges by using the pricing Adjustments window (a selection from the Tools menu). See Entering Price Adjustments, page 7-3. • Adjust the price manually directly in the Authoring window when you enter the subline. See Manually Adjusting the Price, page 3-42. • Change the price list on the Effectivities subtab. See Repricing a Service by Changing the Price List, page 3-41 for details. Repricing a Service by Changing the Price List You can reprice the service line or an individual subline by changing the price list. Prerequisite Enter a service line. To reprice a service by changing the price list: 1. From the Service Contracts Authoring window, select the Lines tab and Effectivities subtab. 2. Select a different price list from the Price List LOV. 3. Save.
  • 118.
    3-42    Oracle ServiceContracts User Guide 4. Select the Pricing/Products subtab. 5. Select the line that you want to reprice. 6. To reprice an individual subline: 1. Select the Pricing secondary tab. 2. Select the subline that you want to reprice using the new price list. 3. Click Reprice to update the price. 7. To reprice the whole line, click Reprice on the subtab itself. 8. Save. Manually Adjusting the Price You can manually adjust the price of a service covering an inventory item or a covered product (Install Base item instance) in one of two ways: • By applying discounts or surcharges that are preset by the administrator using the Adjustment window. See Entering Price Adjustments, page 7-3. • By modifying the price directly in the authoring window as described in this procedure. Note: Your application administrator must set up this item or product with a manual modifier in Oracle Advanced Pricing for you to be able to adjust the price using this method. Prerequisite Enter a service line. To manually adjust the price: 1. From the Service Contracts Authoring window, select the Lines tab and Pricing/Products subtab. 2. Select the service line to adjust. 3. Select the Pricing secondary tab. 4. Select the subline to reprice.
  • 119.
    Entering Service Lines    3-43 5. Adjust the price using one of the following methods: • Enter a different price in the Subtotal field and click Save. For example, if the service costs $100, then you can give the customer a 10% discount by entering 90. Note: The application applies the discount that you enter here provided that the application administrator has set the system profile OKS: Use Advanced Pricing for Manual Adjustment to Yes. You can verify whether the item has been discounted by clicking the Price Calculation button. See Viewing Adjustments for the Whole Contract, page 7-7. • If your organization prices a service based on different time increments, for example charging a different price if the service is purchased by the year, by the quarter, or by the month, then you can use the Price UOM to specify which increment to use to calculate the price. If you do not sell by different increments, then leave this field blank. To reprice: 1. Select a length from the Price UOM LOV. 2. Save. See About Changing the Basis for Pricing a Service, page 3-43 for details on when and how to use this repricing method. 6. If you are not satisfied with the changes you have made, you can restore the original price by clicking Reprice. Changing the Basis for Pricing a Service If your organization prices the same service based on different time increments, for example offering different prices for a year contract and a monthly contract, you can specify which increment price will be the basis for charging the customer by making an entry in the Price UOM field. This enables you to: • Offer a customer any of the available prices for the service. For example, you can offer a customer who wants to purchase a service for nine months either the monthly, the quarterly, or the yearly price. • Ensure that a customer purchasing a contract for an irregular time period is charged the correct price.
  • 120.
    3-44    Oracle ServiceContracts User Guide If you do not make any entries in the Price UOM field, then the application charges the customer based on the value of the Period field on the Lines tab, Effectivities subtab. The period, which is passed by the application, may not always be the one that you want to use as the basis for charging the customer. Suppose your organization offers a service in yearly, quarterly, and daily increments, and a customer wants to start the service on January 1, 2005 and end it on January 4, 2006. Because this period of one year and five days is not divisible by one year or a quarter, the application uses a day as the period. This means that, unless you enter a different basis in the Price UOM field, the customer will pay 370 times the price of a daily contract rather than the price of a yearly contract plus a prorated price for the extra five days. Note: If you specify a UOM that is not priced on the price list, the application charges the customer based on the price of the UOM that the administrator has specified as primary. If the UOM is not priced and no UOM is designated as primary, then the application returns a price of 0. Pricing Service for a Party, Customer Account, Site, or System You can price a service for covered levels that are not priced automatically: party, customer (party) account, site, and system. You must price each subline individually. Prerequisite Enter a service line. To price a service for parties, customer accounts, sites, and systems: 1. From the Service Contracts Authoring window, select the Lines tab and Pricing/Products subtab. 2. Select the service line to set up. 3. Select the Pricing secondary tab. 4. Select the subline to price. 5. Enter the price using one of the two following methods: • Calculate the extended price for the service based on a quantity and unit price: 1. Enter the quantity in the Qty field. 2. Select the unit of measure from the UOM LOV.
  • 121.
    Entering Service Lines    3-45 3. Enter the unit price in the Unit Price field. 4. Press the Tab key. The application calculates the extended amount. 5. You can modify the subtotal. Note: The entries that you make here are optional. They are designed to aid you in making the calculation only. • Enter the price directly into the Subtotal field. 6. Save. Specifying a Payment Method for a Contract Line This group of procedures explains how to specify a payment method for a specific contract line. • Specifying Payment by Credit Card or Commitment Number, page 3-45 • Requiring a Purchase Order, page 3-46 • Specifying a Purchase Order Number, page 3-46 To specify the same payment method for all the lines in your contract, instead create a default payment method on the Summary tab according to the procedure that is described in Specifying a Payment Method, page 2-23. If you have already set up the default payment method, then payment information automatically appears. Specifying Payment by Credit Card or Commitment Number Commitments represent a customer's prepayment for goods or services (prepayments) or contractual agreements (guarantees). Commitments are set up in Oracle Receivables. Prerequisite Confirm the setup of commitments in Oracle Receivables. See the Oracle Receivables User Guide. To specify payment by credit card or commitment number: 1. From the Service Contracts Authoring window, select the Lines tab and
  • 122.
    3-46    Oracle ServiceContracts User Guide Exemption/Payment Options subtab. 2. To specify payment by credit card: 1. Select Credit Card from the Payment Type list. 2. Enter the credit card number and expiration date. 3. To specify payment by commitment: 1. Select Commitment Number from the Payment Type list. 2. Enter the commitment number using the LOV. 4. Save. Requiring a Purchase Order You can require the entry of a purchase order number for the contract line. The contract then cannot pass the QA check and become active unless a purchase order is entered for every line. To require a purchase order: 1. From the Service Contracts Authoring window, select the Lines tab and Exemption/Payment Options subtab. 2. In the Payment Method region, select the Purchase Order Required check box. 3. Save. Specifying a Purchase Order Number You can enter a purchase order number in a contract line. This number is sent to Oracle Receivables and appears on customer invoices. To specify a purchase order number: 1. From the Service Contracts Authoring window, select the Lines tab and Exemption/Payment Options subtab. 2. In the Payment Method region, enter the purchase order number in the PO Number field. 3. Save.
  • 123.
    Entering Service Lines    3-47 Modifying Coverage Provided by a Service Each service that you select as a contract line item comes with a predefined list of what that service covers (terms of coverage). This includes: • Covered business processes (service fulfillment channels) • Pricing and discounts • Time zones covered, and the days and times that coverage is available • Required reaction and resolution times • Preferred resources to carry out the work Your administrator defines the coverage terms that are included in a service offering, using a coverage template at the time the service item is defined in Oracle Inventory. You can modify any of the coverage provided for an individual service line in the contract. For example, you can change the response time, or extend a service providing weekday telephone support to cover weekends as well. However, the contract price is not affected by any of the modifications that you make in an individual contract, so your organization may prefer to make any coverage changes in the coverage template itself. Prerequisite Enter a service line. To modify coverage provided by a service: 1. From the Service Contracts Authoring window, select the Lines tab and Effectivities subtab. 2. Select the service line to modify. 3. Click Details. The Service Contracts Coverage window appears.
  • 124.
    3-48    Oracle ServiceContracts User Guide 4. Click Customize to create contract-specific coverage terms. 5. Modify the coverage as described in Defining Standard Coverage, page 23-7. 6. Click Reapply Standard to reapply the standard coverage terms to the service line. Note: You can customize the coverage terms for an approved and activated contract; however, you cannot reapply the standard coverage template to a service line once it appears on an approved and activated contract. Scheduling Preventive Maintenance Activities This procedure is for scheduling periodic activities only. For scheduling activities based on usage, for example, maintaining a printer based on the number of copies made, you must use Oracle Complex Maintenance, Repair, and Overhaul. If preventive maintenance activities are required as part of the service that you have entered in a contract line, then the application includes these along with the other coverage details that are attached to the item. The application administrator can set up the application to automatically schedule these maintenance activities for you when you enter the contract line. The scheduled dates are the planned start dates of any service requests the application generates to carry out the work. You can:
  • 125.
    Entering Service Lines    3-49 • Specify new dates when each of the activities is to start. The dates that you enter become the planned start dates in any service requests that the application generates for these activities. • Specify a range of dates that the maintenance activities are to start. The start date of each activity is the planned start date in the corresponding service request. Note: The application can automatically generate a schedule based on start dates only. To specify a date range, you must enter the start and end dates into the contract manually. Prerequisites • Enter a service line. • Confirm the setup of the preventive maintenance program and associated activities in Oracle Complex Maintenance, Repair, and Overhaul. To schedule preventive maintenance activities: 1. From the Service Contracts Authoring window, select the Lines tab and Effectivities subtab. 2. Select the service line to modify. 3. Click Edit Coverage. The Service Contracts Coverage window appears. The preventive maintenance program that is associated with the service line by your application administrator appears in the Program name field in the Preventive Maintenance region of the window. The preventive maintenance program encompasses the required maintenance activities for the product. Both the program (also called a maintenance requirement) and its activities are set up in Oracle Complex Maintenance, Repair, and Overhaul. 4. Click Schedule. The Preventive Maintenance Schedule window appears showing the Program Schedule tab. If the application administrator has set up a schedule for this program, then the Schedule region is already populated with dates. The maintenance activities that you must schedule are listed on the Activity Schedule tab. 5. You can schedule the preventive maintenance activities in one of two ways. You
  • 126.
    3-50    Oracle ServiceContracts User Guide can: • Create a template schedule on the Program Schedule tab and use that schedule to schedule multiple activities. See Scheduling Multiple Activities, page 3-50. • Create a separate schedule for each activity. See Scheduling Individual Activities, page 3-51. 6. Click OK. Scheduling Multiple Activities at the Same Time You can later modify the default schedule to create a unique schedule for each activity. Prerequisites • Enter a service line. • Confirm the setup of the preventive maintenance program and associated activities in Oracle Complex Maintenance, Repair, and Overhaul. • Associate a preventive maintenance program with a coverage template. To schedule multiple activities at the same time: 1. From the Service Contracts Authoring window, select the Lines tab and Effectivities subtab. 2. Select the service line to modify. 3. Click Edit Coverage. The Service Contracts Coverage window appears. 4. Click Schedule in the Preventive Maintenance region. The Preventive Maintenance Schedule window appears. 5. Select the Program Schedule tab. 6. If the customer must approve scheduled tasks in the service request before they are performed, then select the Confirmation Required check box. 7. Create a default schedule for the activities in the Stream Levels region. See Scheduling Activities at Regular Intervals Using Schedule Streams, page 3-52. 8. To default this schedule to multiple activities:
  • 127.
    Entering Service Lines    3-51 1. Select the Activity Schedule tab. 2. Make sure that only the Select check boxes for the activities you want to set up are selected. 3. Click OK. The application asks you whether you want to copy the schedule to the activities. 4. Click Yes. 9. To pass this schedule to a single activity: 1. Save. 2. Select the Activity Schedule tab. 3. Select the activity by placing your cursor in any field on the line. 4. Click Populate from Program. The application copies the default dates or date ranges to the selected activity. Scheduling Individual Activities Prerequisites • Enter a service line. • Confirm the setup of the preventive maintenance program and associated activities in Oracle Complex Maintenance, Repair, and Overhaul. • Associate a preventive maintenance program with coverage template. To schedule an individual activity: 1. From the Service Contracts Authoring window, select the Lines tab and Effectivities subtab. 2. Select the service line to modify. 3. Click Edit Coverage. The Service Contracts Coverage window appears. 4. Click Schedule in the Preventive Maintenance region.
  • 128.
    3-52    Oracle ServiceContracts User Guide The Preventive Maintenance Schedule window appears. 5. Select the Activity Schedule tab. 6. Make sure that only the activities you want to set up are selected using the Select check box to the right of the Activity region. 7. If you have created a default schedule that you want to use to schedule this activity, then click Populate from Program. The application passes the schedule that you have created on the Program Schedule tab. 8. To create a separate schedule for this activity, create the schedule in the Stream Levels region. See Scheduling Activities at Regular Intervals Using Schedule Streams, page 3-52. 9. If the customer must approve the tasks in the service request before work starts, then select the Confirmation Required check box that is located to the right of the activity. 10. Save. Scheduling Activities at Regular Intervals Using Schedule Streams You can schedule an inspection every month for a piece of equipment that requires 12 inspections during the year. Each set of regular dates is called a schedule stream. You can set up any number of such schedule streams using this procedure to handle complex requirements. For example, if a piece of equipment requires two inspections in the first year and six for every year thereafter, you can schedule the semiannual inspections for the first year using one stream and use the second stream to create the schedules for the six inspections in the second year. You can use this procedure on both the Program Schedule and the Activity Schedule tabs, depending on whether you are creating a default schedule for all the activities in a program or scheduling individual activities. See Scheduling Multiple Activities at the Same Time, page 3-50 and Scheduling Individual Activities, page 3-51. To schedule an activity at regular intervals using a scheduling stream: 1. From the Preventive Maintenance Schedule window, navigate to the Stream Levels region: 2. If this is the first stream, then:
  • 129.
    Entering Service Lines    3-53 1. Enter 1 in the Seq Num field. The application passes the start date from the start date of the contract line. 2. Enter the number of times that you want the activity to be performed in the Periods field 3. Enter the length of each period in the UOM/Period and UOM fields. For example, to schedule an inspection once a month, enter 1 in the UOM/Period field and select Month from the UOM LOV. The application supplies the end date. 3. If this is an additional stream, then: 1. In the Seq Num field, enter a number corresponding to the order in which the periods are created. The sequence numbers for scheduling streams must be in order of the dates in the schedule. To schedule an activity earlier than an existing activity, reorder the entire sequence. The application passes the start date from the end date of the previous stream. 2. Enter the length of each period in the UOM/Period and UOM fields. For example, to schedule an inspection once a month, enter 1 in the UOM/Period field and select Month from the UOM LOV. The application supplies the end date. 4. To postpone the scheduled start of the first activity in the stream, enter an offset period by either of these two methods: • Enter a different date in the First Date field. • Enter the number of periods in Offset Period and the length of the offset period in Offset UOM. 5. To create a schedule based on individual suggested dates, select the Auto Schedule check box. 6. To create a schedule based on a date range, clear the Auto Schedule check box. 7. Click Schedule to generate the schedule. The application displays the generated schedule in the schedule region. 8. If you left the Auto Schedule check box cleared, the application permits you to enter a date or a date range to replace the automatically generated date. Enter the date range for any of the scheduled dates in the From and To fields.
  • 130.
    3-54    Oracle ServiceContracts User Guide 9. Save. Viewing Maintenance Program and Activity Details Both the program and activities are set up and maintained in Oracle Complex Maintenance, Repair, and Overhaul. See Oracle Complex Maintenance, Repair, and Overhaul User's Guide for details. Prerequisite Enter a service line. To view maintenance program and activity details: 1. From the Service Contracts Authoring window, select the Lines tab and Effectivities subtab. 2. Select the service line to modify. 3. Click Edit Coverage. The Service Contracts Coverage window appears. • To view details about the program, click View Program on either the Program Schedule or the Activity Schedule tabs. The application opens a new browser window displaying the details of the maintenance requirements. • To view details about individual activities: 1. On the Activity Schedule tab, select the activity in the Activity region. 2. Click View Activity. The application opens a new browser window displaying the details of the activity. See Oracle Complex Maintenance, Repair, and Overhaul User's Guide for details. • To view the maintenance history of the product that the customer owns: 1. On the Program Schedule tab, click History. The application displays the Search Unit Maintenance Plan page in a separate browser window. Search for the maintenance history for the product according to procedures described in Oracle Complex Maintenance, Repair, and Overhaul User's Guide.
  • 131.
    Entering Service Lines    3-55 Updating Scheduled Service Dates for a Maintenance Program Companies that perform preventive maintenance sometimes need to update schedule maintenance dates on active contracts to accommodate customer requests to reschedule planned service. For example, the scheduled maintenance may fall on a holiday, the equipment may not be available for service on the date scheduled, or the equipment may not need servicing due to a low level of usage. Program schedule dates and activity schedule dates can be updated if Auto schedule is cleared and a service request has not been generated for the scheduled maintenance. Prerequisites: • Enter a service line. • Associate a preventive maintenance program with the coverage template. • Activate the contract. • Confirm Open for Update allowed for Active status contracts. To update activity schedule dates: 1. From the Service Contracts Authoring window, select the Lines tab and Effectivities subtab. 2. Select the service line to modify. 3. Click Edit Coverage. The Service Contracts Coverage window appears. 4. Click Schedule in the Preventive Maintenance region. The Preventive Maintenance Schedule window appears. 5. Select the Activity Schedule tab. 6. Select an Activity on which to update scheduled maintenance dates. Dates in activity schedules can be updated only if: • Auto Schedule is cleared. • A Service Request has not already been created for the scheduled maintenance. To update program schedule dates: 1. From the Service Contracts Authoring window, select the Lines tab and
  • 132.
    3-56    Oracle ServiceContracts User Guide Effectivities subtab. 2. Select the service line to modify. 3. Click Edit Coverage. The Service Contracts Coverage window appears. 4. Click Schedule in the Preventive Maintenance region. The Preventive Maintenance Schedule window appears. 5. Select dates to update in the program schedule. Dates in the program schedule can be updated only if: • Auto Schedule is cleared. • The new scheduled service date is greater than the latest scheduled service date for any activity under the program for which a service request has already been created. Ending Service Lines on a Day Specified by the Customer You can define a cotermination date, which is a date that has been chosen by the customer as the end date for all service lines: • About Cotermination, page 3-56 • Applying the Cotermination Date to a Service, page 3-57 About Cotermination To simplify renewals and accounting, customers sometimes request all contracts to terminate on the same date, such as the end of the calendar or fiscal year. This date is called the cotermination date. Your application administrator can set up a cotermination date for a customer account. The customer account for the service line is the bill to account that you enter on the Lines tab, Accounts subtab. You can tell that a cotermination date exists for the service line, when the Coterminate and Coterminate All buttons are enabled. Note: You cannot apply the cotermination date for contracts with a status of Active. If the cotermination date falls too close to the start of the service in your contract, the
  • 133.
    Entering Service Lines    3-57 application automatically extends the service until the same cotermination date the following year. For example, if a customer purchases six months of service in December 1 and the cotermination date on December 31 then the application extends the service until December 31 of the following year instead of selling just one month-worth of service. Just what minimum service length triggers the extension is determined by the values in system profiles OKS: Minimum Duration and OKS: Minimum Period. Applying the Cotermination Date to a Service Prerequisites • Enter a service line. • Confirm that the contract is in Entered status. To apply the cotermination date to a service: 1. From the Service Contracts Authoring window, select the Lines tab and Effectivities subtab. 2. Select the service line to end on the cotermination date. 3. Click Coterminate. The new end date that you have entered does not automatically apply to the items that are already covered by the service. If you have already specified what the service covers, then you must copy the new end date using the Cascade Attributes window. Specifying Tax Status You can enter tax exemption information If you have already set up a default tax status for all lines, then the tax status fields are already populated for you. Prerequisite Enter a service line. To specify tax status: 1. From the Service Contracts Authoring window, select the Lines tab and Exemption/Payment Options subtab. 2. In the Tax Exemption region, select the customer's tax status from the Control LOV.
  • 134.
    3-58    Oracle ServiceContracts User Guide 3. If you entered Exempt, then select the tax exemption number from the Number LOV. This populates the Reason field. 4. Select the code that is used to determine the tax rate from the Tax Classification Code LOV. Note: If you entered Exempt, you can still select Tax classification code. 5. Save. Applying Changes from a Service Line to the Covered Sublines If you change the length of a service, for example by applying a cotermination date, you must apply them to any existing sublines. You can also use this procedure to copy the following line attributes to the sublines: • Invoice text • Renewal type • Printing preferences (the setting of the Invoice Print Flag) Prerequisite Identify a contract with sublines (what the service covers) and modify the dates for the service later. To apply changes from a service line to the covered sublines: 1. From the Service Contracts Authoring window, select Cascade Attributes from the Actions menu. The Cascade Attributes window appears. 2. Select Lines to Sublines from the Cascade list. 3. Select the check boxes for the line attributes that you want to apply. 4. Select the sublines that you want to copy to on the right side of the window. You can use the check boxes to the right to select individual sublines, or the Select All button. 5. Click Submit.
  • 135.
    Entering Service Lines    3-59 Assigning Sales Credits for a Contract Line You can assign both revenue and non-revenue credits. To assign sales credits for a contract line: 1. From the Service Contracts Authoring window, select the Lines tab and select the service to enter sales credits for on any of the subtabs. 2. Select Sales Credits from the Actions menu. The Sales Credits window appears. 3. Enter the sales agents and the revenue and non revenue credit that they are to receive. Sales group entry is optional. Revenue credit must always add up to 100 percent. 4. Click OK. Updating Service You can use the Update Service window to review existing service information and select one or more new replacement services for the covered products on the contract line. You can assign a percentage of the price of the former service to the new service lines.
  • 136.
    3-60    Oracle ServiceContracts User Guide The Update Service window is intended for use on entered status contracts, generally during the renewal process. For example, a customer has a contract with a line that covers 500 laptops for Bronze service, which covers Monday through Friday from 8 a.m. to 5 p.m. After the customer restructures their service offerings, Bronze service is no longer offered. Level II support is the comparable offering. To make contracts reflect the new offering, rather than adding a new line and adding all the covered products to that line, select the old service line and click Update Service, select the new service, and indicate what percentage of the existing service's price should be applied to the new service. This amount does not need to equal 100%. It can be more or less depending on the appropriate value for the new service. Contract value and billing schedule amount are adjusted accordingly. Coverages and invoice text are not changed. The renewal relationship to the prior contract is not lost when Update Service is performed on a service line. The Update Service function is not available for Usage and Subscription lines. To update service: 1. From the Service Contracts Authoring window, select the Lines tab and Pricing/Products tab. 2. Select the service line to update. 3. From the Tools menu select Update Service. 4. Review the Contract Line region to make sure this line should be updated. 5. From Update Service region, select the new service item from the Name LOV. This is the item replacing the item that is shown at the top of the form. 6. In the Prorate column, indicate the percentage of the price from the existing service item that should apply to the new service item. For example, if the existing item is $150 and the new item should cost $75, enter 50 to see a final price on the new line that is equal to 50% of the old line. 7. Enter additional service lines as necessary. The prorate column does not need to total 100%. You will receive a message indicating that the total is more or less. Select OK to proceed or cancel to return to the form. 8. When all of the new lines have been entered, click Apply. The existing service item disappears and the new service items appear. The new price is reflected for the line item. The billing schedule reflects the new pricing as well. Applying Default Values to Existing Contract Lines You can apply values that you have entered in the Summary tab of the contract down to existing lines.
  • 137.
    Entering Service Lines    3-61 Note: For information about applying changes from a service line to a subline, see Applying Changes from a Service Line to the Covered Sublines, page 3-58. To apply default values to existing contract lines: 1. From the Service Contracts Authoring window, select Cascade Attributes from the Action menu. The Cascade Attributes window appears. The window automatically disables contract attributes that have not yet been entered. For example, if you have not entered any sales credits in your contract, the Sales Credits check box is disabled and you cannot cascade sales credits. 2. Select Header to Lines from the Cascade list. 3. Select the check boxes next to the attributes that you want to apply to the contract lines. You can cascade the following values from the header to existing contract lines: • Effective dates: The dates entered in the Start Date and End Date fields. Note: If you are changing the effective dates of an existing warranty line, this method changes the contract dates only. It cannot be used to change the installed date in Oracle Installed Base. To change both the contract date and the installed date, then use the procedure describe in Modifying the Dates a Warranty Is Effective, page 6-18. Extending a contract using cascading does not reprice sublines. Extending a contract using a mass change will reprice sublines. • Accounting Rule: Accounting rule entered on the Summary tab and Pricing/Billing subtab. • Bill To Account: Bill To account entered on the Summary tab and Parties subtab. • Bill To Address: Bill to address entered on the Summary tab and Parties subtab. • Bill To Contact: Bill to contact entered on the Summary tab and Parties subtab. • Ship To Account: Ship To account entered on the Summary tab and Parties subtab.
  • 138.
    3-62    Oracle ServiceContracts User Guide • Ship To Address: Ship To location entered on the Summary tab and Parties subtab. • Invoicing Rule: Invoicing rule entered on the Summary tab and Pricing/Billing subtab. • Exemption Control: Tax status entered on the Summary tab and Pricing/Billing subtab. Note: Exemption will be cascaded from header to line only if the header and line have same party account. • Exemption Number: Exemption number entered on the Summary tab and Pricing/Billing subtab. • Tax Classification Code: This LOV uses the tax classification lookup codes that are created for Oracle E-Business Tax. By selecting a value from this LOV, you can cascade the tax classification code to the Lines tab and Tax/Payment Options subtab. • Billing Profile: Billing profile entered on the Summary tab and Pricing/Billing subtab. • Recalculate Tax: After applying an exemption to the contract or to a service line, recalculate tax using Cascade Attributes. You must also use cascade attributes to recalculate tax if you enter a tax classification code on a service line. • Payment Method: Payment method and details entered in the Payment Details region of the Summary tab and Pricing/Billing subtab, such as a credit card. • Sales Credits: Sales credits entered at the contract header level. • Price List: Price list that you selected on the Summary tab and Pricing/Billing subtab. (If you changed the header price list and, at the time you made the change did not cascade the change to the lines, you can use the cascade attributes form to select specific lines to which to cascade the new price list). Note: When attributes cascaded from header to line, repricing is done for all eligible sublines that: • Are not terminated. • Are not 100% billed.
  • 139.
    Entering Service Lines    3-63 • Do not contain manually priced sublines. • Price UOM: Price UOM populated on the Summary tab and Pricing/Billing subtab from the Global Contracts Defaults form. Price UOM can be cascaded from header to all service lines. Although other lines will appear in the Lines block, you cannot choose the select option for usage and subscription lines. When Price UOM is cascaded from header to line, lines are not repriced. (If you change the header Price UOM, you can use the cascade attributes form to cascade the new Price UOM to selected service lines and covered levels) Important: The Price UOM value is used in the partial period calculation for pricing, billing, and termination. For more information, see Entering Contract Defaults, page 2-36. 4. In the Lines region, specify which lines to change by selecting the check boxes to the right of those lines. You can use the Deselect Alland Select All buttons. Note: By default, all of the check boxes are selected so all lines in the contract will be changed. 5. Click Submit. 6. The Transaction Log displays the status of the changes that you are about to make. 7. Click Apply. Note: By default when you select a header attribute to cascade on a contract with multiple lines all lines are selected. To control which lines inherit specific attributes, select the attribute that you want to cascade, and then deselect the lines that should not inherit the attribute value. You can then select the next attribute and deselect the lines that should not inherit the attribute. For example, suppose you have a contract with two lines, Service Line 1 and Usage Line 2, and you want to cascade the Accounting Rules and Bill To Address attributes to Service Line 1 but not to Usage Line 2. You would select the Accounting Rules attribute and deselect Usage Line 2, and then select the Bill To Address attribute and deselect Usage Line 2.
  • 141.
    Entering Usage Lines   4-1 4 Entering Usage Lines This chapter covers the following topics: • Overview of Entering Usage Lines • Charging a Customer for Usage • Entering a Usage Line • Specifying How the Customer Is Charged • Charging Based on a Fixed Quantity of Usage Regardless of the Actual Usage • Charging a Flat Fee Regardless of the Actual Usage • Charging for Reported or Estimated Usage Per Period • Charging Based on Reported Usage • Entering a Counter • Entering the Starting Counter Reading • Creating Special Price Breaks • Point and Range Price Breaks • Deleting Special Price Breaks • Prorating Price Breaks to Apply to Multiple Periods • How Price Breaks Are Prorated • Specifying a Billing Schedule for a Usage Line • Recording Usage by Updating a Counter Reading Overview of Entering Usage Lines This group of topics explains how to charge customers for usage.
  • 142.
    4-2    Oracle ServiceContracts User Guide Charging a Customer for Usage To charge a customer for usage, you must enter: • A usage item as a contract line, page 4-2. This is where the prices for usage are defined. • One or more counters as sublines, page 4-2. These track usage. About Usage Items The usage item specifies the price list and the price breaks that are used to charge the customer. The application administrator sets up the usage items themselves as items in Oracle Inventory, and prices them using price lists in Oracle Advanced Pricing. For example, a bank may create price breaks on the corporate price list that offers customers 10 free support calls per month and then charges $1.50 for each call. A copier distributor may set up a price list to charge customers based on the volume of copies made, for example, $0.05 for the first 1000 copies, charging $0.03 for the next thousand, and then $0.02 for copies greater than 2,000. You can modify the pricing and the price break ranges for each contract. About Counters The application records customer use within counters. These can represent real devices that measure usage such as a counter in a copier, automobile odometers, and electric meters. The counters can also be purely logical constructs that are used to record the number of phone calls to a call center, for example. The application creates counters automatically each time you order a service or enter a customer product as an item instance in Oracle Installed Base. For example, if a bank's application administrator sets up the Gold service to track phone calls made to the call center, then each time you add the Gold service as a line in your contract, the application automatically creates a counter where the number of calls can be tracked. For physical objects, such as the copier, the application creates a counter that is linked to the Oracle Installed Base instance. Although the application creates counters automatically for you, for each usage line you must enter the counters that you want to use to charge the customer as sublines. This may be just one counter, to track phone calls to a call center or to charge for copies that are made on one printer, for example, or many counters to charge for the copies that are made in a building, for example. You can enter actual usage into the counters manually. Service agents can enter counter readings in Oracle Service Contracts (see Entering the Starting Counter Reading, page 4-22), Oracle TeleService (see Recording Counter Readings in the Oracle TeleService User
  • 143.
    Entering Usage Lines   4-3 Guide), and Oracle Field Service (see Recording Counter Readings in the Oracle Field Service User Guide). Customers can enter counter readings from a Web portal that is created with Oracle iSupport. How Usage Lines and Counters are Entered The following provides an overview of how to enter usage lines and counters: • If you are charging for usage as part of a service (for phone calls made to a call center, for example), then you must enter the service as a line in your contract first. • Enter the usage item as a line in the contract. • Enter the counters as sublines. • You identify counters that are attached to a service by the service name, the contract number, and the line number where you entered the service. • You identify physical counters by the inventory name of the product where the counter is located and by that product's serial number, the Oracle Installed Base item instance number, or both. Note: Because of the way counters are named, you can have only one counter per service line in a contract and one counter per item instance in Oracle Installed Base. You can specify various options on how to charge and bill the customer. You can charge the customer for the actual usage that is recorded in the counter each month and have the application estimate any missing counter readings, for example, or you can charge a flat rate regardless of what the counter readings are. You can also specify minimum amounts charged and the details of how customers are credited for any overcharges. Entering a Usage Line Prerequisites • Create the contract with the Service Agreement or Subscription Agreement category. • Enter required information in the contract header and Summary tab. • If you are charging a customer for usage that is tied to a service that you are selling, enter the service line first. • Identify the prices and price breaks for the items that are set up within your
  • 144.
    4-4    Oracle ServiceContracts User Guide organization. To enter a usage line: 1. From the Service Contracts Authoring window, select the Lines tab and Accounts subtab. 2. Select Usage from the Line Type LOV. 3. Select the usage item from the Name LOV. 4. The party accounts that you selected on the Summary tab and Parties subtab appear as the Bill to and Ship to accounts. (The Account fields display the account numbers. The Location fields display the city. The account parties and addresses for those accounts appear at the bottom of the window.) You can select different accounts for this contract line using the LOVs that are provided. 5. Optionally, enter billing and shipping contacts that are specific to this contract line by following the procedure that is described in Entering Billing and Shipping Contact for a Contract Line, page 3-10. If a contact does not exist in the database, then you can add one by following the procedure that is described in Creating or Modifying a Contract , page 3-10. The contacts that you enter are different from the ones that you entered in the contract header. 6. Select the Effectivities subtab.
  • 145.
    Entering Usage Lines   4-5 7. The price list comes from the entry that you made on the Summary tab. Make sure that the price list that is displayed in the Price List field matches the price list that is used by the usage item. 8. Specify the duration of the usage line. By default, the start date, end date, and duration are copied from the contract header. You can specify different values by entering either of the following: • Start and end dates • Duration and period The application calculates the missing information. If you supply a duration and period, then the start date is the start date of the contract. Note: If the duration of the usage line starts earlier than the start date or ends later than the end date of the contract, then you must extend the start and end dates of the contract at the header level before you can make the contract active. 9. If the contract can be renewed (you have not selected Do Not Renew on the Summary tab and Renewals subtab), then specify how the line is to be renewed using the Renewal Type LOV. The renewal options are the same for usage lines as they are for service lines. See Specifying How a Contract Line is to Be Renewed, page 3-12. 10. Specify how the customer is to be charged and any counters that are required to capture the usage. Different ways of charging the customer require different
  • 146.
    4-6    Oracle ServiceContracts User Guide combinations of entries in the Effectivities and Pricing/Products subtabs. See Specifying How the Customer is to be Charged, page 4-6. 11. The remaining information for a line comes from the information that you entered in the Summary tab. You can make modifications by following these procedures: • Specifying a Billing Schedule for a Usage Line, page 4-31 • Changing the Billing and Shipping Accounts and Locations, page 3-9 • Entering Billing and Shipping Contacts for a Contract Line, page 3-10 • Specifying a Payment Method for a Contract Line, page 3-45 • Specifying Tax Status, page 3-57 • Assigning Sales Credits for a Contract Line, page 3-59 12. Save. Specifying How the Customer Is Charged You can charge customers in four different ways, depending on the selection that you make in the Usage Type region of the Lines tab, Effectivities subtab. The following table lists the different methods and the selection that you must make for each.
  • 147.
    Entering Usage Lines   4-7 Method for Charging the Customer Usage Type For a fixed quantity of usage every period, regardless of the actual usage recorded Fixed Per Period A flat fee regardless of the actual usage recorded Negotiated Price For reported or estimated usage in each billing period Actual Per Period For usage whenever usage is reported Actual by Quantity Follow the procedure corresponding to the method that you want to use: • Charging Based on a Fixed Quantity of Usage Regardless of the Actual Usage , page 4-7 • Charging a Flat Fee Regardless of the Actual Usage, page 4-9 • Charging for Reported or Estimated Usage Per Period, page 4-11 • Charging Based on Reported Usage, page 4-17 Charging Based on a Fixed Quantity of Usage Regardless of the Actual Usage You can charge a customer for making 100 phone calls to the call center, regardless of the number of calls that were actually made. The price that the customer pays for the 100 phone calls is determined by the usage item's price list and its price breaks. Prerequisite Enter a usage item. To charge a customer based on a fixed quantity of usage regardless of the actual usage: 1. From the Service Contracts Authoring window, select the Lines tab and Effectivities subtab.
  • 148.
    4-8    Oracle ServiceContracts User Guide 2. In the Usage Type Region, select Fixed Per Period. 3. From the Period LOV, select the period to use as the basis for the entries you will make. 4. Save. 5. Select the Pricing/Products subtab. 6. Using the Name field LOV on the Effectivity secondary tab, enter the counter that is used to record the usage. See Entering Counters, page 4-21 for details. 7. Select the Counter Details secondary tab.
  • 149.
    Entering Usage Lines   4-9 8. Enter the quantity on which you are going to be charging in the Fixed field. The fixed quantity is based on the period that you selected on the Effectivity subtab. The period acts as a unit of measure for your entry. Suppose that you are billing the customer monthly. If you chose a year as the period, then entering 1200 here means that the customer is charged for the usage of 100 each month. If you chose a month as the period and enter 1200, then the customer is charged 1200 per month. 9. Save. 10. Repeat steps 6 through 9 for each additional counter that you want to use to calculate usage. 11. Optionally, enter the counter reading to use to start calculating usage: • If you have already captured previous readings with this counter, then select the start reading from the Reading LOV. This LOV includes all historical readings for this counter. • If no historical reading is available to select, the application assumes the initial reading for the contract is 0. To enter another initial reading, follow the procedure that is described in Entering the Starting Counter Reading, page 4- 22. Charging a Flat Fee Regardless of the Actual Usage You can charge a customer $100 for making phone calls to the call center, regardless of the number of calls that were actually made. In this case, the customer is charged the
  • 150.
    4-10    Oracle ServiceContracts User Guide price that you enter here rather than the price in the price list. Prerequisite Enter a usage item. To charge a flat fee regardless of the actual usage: 1. From the Service Contracts Authoring window, select the Lines tab and Effectivities subtab. 2. In the Usage Type Region, select Negotiated Price. 3. Save. 4. Select the Pricing/Products subtab. 5. Using the Name field on the Effectivity secondary tab, enter the counter that is used to record usage. See Entering a Counter, page 4-21 for details. 6. Optionally, enter any text that you want to display in the invoice regarding this subline. Because invoice formats are specific to each implementation, contact your application administrator to determine whether this text is used in the invoice. 7. Select the Pricing secondary tab.
  • 151.
    Entering Usage Lines   4-11 8. Enter the total currency amount on which you are going to be charging the customer in the Subtotal field. 9. Save. 10. Repeat steps 5 through 9 for all counters you are using to track usage for this usage item. 11. Optionally, enter the counter reading that you want to use to start calculating usage: • If you have already captured previous readings with this counter, then select the start reading from the Reading LOV. This LOV includes all historical readings for this counter. • If no historical reading is available to select, the application assumes that the initial reading for the contract is 0. To enter another initial reading, follow the procedure that is described in Entering the Starting Counter Reading, page 4- 22. Charging for Reported or Estimated Usage Per Period You can charge the customer for actual or estimated usage within a period. This usage type permits you to have the application create an estimate for any missing or partial counter readings and bill the customer based on these estimates. Prerequisites • Enter a usage item. • Confirm that billing is set to arrears.
  • 152.
    4-12    Oracle ServiceContracts User Guide To charge for reported or estimated usage per period: 1. From the Service Contracts Authoring window, select the Lines tab and Effectivities subtab. 2. In the Usage Type region, select Actual Per Period. 3. From the Period LOV, select the period to use as the basis for the entries that you will make on the Counter Details secondary tab. 4. To charge customers based on an average of usage in a particular number of periods, enter the number of periods in the Averaging Interval field. Note: The entry that you make here is based on the period that you selected on this tab rather than the period in the billing schedule. Billing based on an average usage enables you to offer customers with uneven usage a different set of price breaks from what they would get if they were charged based on actual use. To have usage averaged, the application administrator must periodically run the Service Contracts Usage Averaging concurrent program. See Running the Service Contracts Usage Averaging Program , page 10-15. 5. Specify when the application settles any customer undercharges or overcharges using the Settlement Interval LOV. The choices are: • Billing Period: The application settles at the end of each period. The customer receives a credit memo or is invoiced for the difference in the next billing period. This action is performed automatically by Oracle Receivables.
  • 153.
    Entering Usage Lines   4-13 • End of Usage: The application settles all undercharges and overcharges at the end of the contract. The customer receives one credit memo or invoice for the difference. The application administrator must regularly run the Service Contracts Usage Settlement concurrent program which calculates the settlement. 6. From the Termination Method LOV, select one of the two methods for charging the customer for usage when the line is terminated: • Amount Based Termination Charges the customer based on the amount of usage that is recorded when the contract is terminated. The customer is charged based on the actual usage. This is the default method for all usage types. See About Crediting a Customer in Terminations, page 4-17 . • Counter Based Termination The application credits the unused portion of the service based on the price that the customer would pay if they continued consumption at the same rate for the rest of the period. This means that the customer receives any price break based on the estimated usage. 7. Save. 8. Select the Pricing/Products subtab. 9. Using the Name field on the Effectivity secondary tab, enter the counter that is used to record the usage. See Entering a Counter, page 4-21 for details. Entry in the Line Ref field is for your information only. It is not used in by the application. 10. Optionally, enter any text to display in the invoice regarding this line. As invoice formats are specific to each implementation, contact your application administrator to determine whether this text is used in the invoice. 11. Select the Counter Details secondary tab.
  • 154.
    4-14    Oracle ServiceContracts User Guide 12. In the Default field, enter the reading that the application uses to charge a customer if no counter reading is entered manually and no estimate is available. For example, the application uses the default quantity to charge a customer at the beginning of a contract when no historical data exists to calculate an estimate. Note: The entries that you make in the Default and Minimum fields are based on the period that you selected in the Effectivities tab. The period acts as a unit of measure. Suppose that you are billing the customer monthly. If you chose year as the period, and enter 1200 as the minimum, then the customer is billed for a minimum of 1200 in any month. If you chose month as the period, then entering 1200 as the minimum bills the customer for a minimum of 100 units in any month. 13. Optionally, enter a minimum counter value in the Minimum field. A customer is charged this minimum if a counter reading or estimate falls below this number in any billing period. 14. You can have the application estimate usage for a billing period when no reading is entered or the reading does not cover the whole period. To do so: 1. Select an estimation method from the Estimation Method LOV: • Average Monthly Counter Volume Averages historical readings to calculate any missing values within a billing period.
  • 155.
    Entering Usage Lines   4-15 • Counter Estimation Your application administrator can set up additional estimation methods using the Counters module of Oracle Installed Base. For an explanation of the available methods see About Estimation Methods, page 4-16. 2. If you chose Counter Estimation as your method, then enter a date that you want to use as the start date for the estimation in the Start Date field. The counter estimation bases the estimates on all readings since the start date. Note: You must select an estimation method before entering any counter readings. The estimation method will not work if you have already made an entry. 3. Set the Fill check box: • When this check box is cleared, the application estimates usage only when no reading was taken during the period. • When this check box is selected it estimates usage for any remaining days in a billing schedule period since the reading was entered. For example, if you are billing the customer monthly, and a reading is entered on 15 January, then selecting the Fill check box causes the application to estimate usage for the remaining half of January. 15. If you are billing a customer based on the usage that is recorded in multiple counter values, to average out all of the counter readings each period, select the Level check box. For example, a copier manufacturer charging a customer by the number of copies made may charge for all the copiers in a building at the same time and apply minimums and discounts based on average volumes rather than per copier. 16. Enter the counter reading to use to start calculating usage: • If you have already captured previous readings with this counter, then select the start reading from the Reading LOV. This LOV includes all historical readings for this counter. • If no historical reading is available to select, the application assumes that the initial reading for the contract is 0. To enter another initial reading, then follow the procedure that is described in Entering the Starting Counter Reading, page 4-22.
  • 156.
    4-16    Oracle ServiceContracts User Guide 17. Save. 18. Repeat steps 8 through 17 to enter any additional counters. About Estimation Methods You can have the application estimate the missing counter values for you and bill the customer accordingly. If the customer is overcharged, you can generate a credit later. You can use one of the following two methods for estimating usage for a given billing period: • Average Monthly Counter Volume Oracle Service Contracts uses a simple averaging method, Average Monthly Counter Volume (AMCV), to calculate missing readings within each scheduled billing period. Note: Although the name suggests otherwise, this estimation method creates averages based on any billing schedule period that you are using, whether it is month, quarter, week, or day. The AMCV sums up all historical counter readings and averages them by dividing them by the number of billing periods. • Counter Estimation Your application administrator can set up additional estimation methods using the Counters module of Oracle Installed Base. The module enables you to set up additional methods for estimating usage, including: • Fixed value estimation • Estimation based on percent usage of the associated counter Charging a Customer with No Estimation Method The selection of an estimating method is optional. If you do not select an estimation method and no counter reading is available for the billing period, then the application bills the amount that is entered in the Default field. If any counter reading is entered within the billing period, the application bills based on the reading. If the counter reading is lower than the amount entered in the Minimum field, then the application bills based on the minimum instead. Charging with Estimation The application uses the estimation methods as follows: • If no reading is available for the billing period and you chose the Average
  • 157.
    Entering Usage Lines   4-17 Monthly Counter Volume estimation method, then the application uses the historical average to estimate the usage. If you chose Counter Estimation, then the application uses the method that is set up by the application administrator to calculate missing readings from the date that you entered in the Start Date field. • If no readings are available to extrapolate from, for example, at the beginning of the contract when no historical data exists to make an estimate, then the application uses the number that is entered in the Default field. • If the reading covers only a part of the period and you have selected the Fill check box, then the application estimates the rest of the period and adds this estimate to the partial counter reading. • If the reported and estimated amount is less than the amount that you entered in the Minimum field, then the application bills for the minimum. About Crediting a Customer in Terminations You can have the application credit a customer for any disputed amount of usage that has already been billed when a customer terminates a usage line. Suppose, for example, that a customer is being billed based on monthly usage of a copier. The customer calls after receiving the invoice for February to complain that the copier has not been working properly since February 10. For this reason, the customer does not want to pay for all the copies that were made that month and wants to terminate the contract for the copier. You can have the application use the previous month's reading to estimate the amount that the customer should be charged from February 1 until February 10 and credit him for the rest. How the application calculates the usage and credits the customer depends on the termination method that you select: • Counter Based Termination The application estimates how much the customer used based on the quantity that the customer used in the previous billing period. • Amount Based Termination The application estimates how much the customer used based on the currency amount that the customer used in the previous billing period. Charging Based on Reported Usage Here is an example of how this method applies to a copier customer who is being billed monthly based on the number of copies that are made:
  • 158.
    4-18    Oracle ServiceContracts User Guide Billing Period Counter Reading Reported Minimum Default Number of Copies Charged that Month December No counter reading in December. 90 100 100 The customer is charged the default because no recorded usage is available for the month. January 1,000 on January 10 90 100 1,000 The customer is charged for usage based on the recorded usage. February No counter reading in February. 90 100 100 The customer is charged the default because no usage is recorded for the month. March 50 on March 1 90 100 90 Because the recorded usage is less then the minimum, the customer is charged the minimum. If you do not set a value as the minimum, then the customer is charged based on the recorded usage.
  • 159.
    Entering Usage Lines   4-19 Prerequisite Enter a usage item. To charge based on reported usage: 1. From the Service Contracts Authoring window, select the Lines tab and Effectivities subtab. 2. In the Usage Type Region, select Actual by Quantity. 3. Save. 4. Select the Pricing/Product subtab. 5. Using the Name field on the Effectivity secondary tab, enter the counter that is used to record usage. See Entering a Counter, page 4-21 for details. 6. Optionally, enter any text to display in the invoice regarding this subline. Because invoice formats are specific to each implementation, contact your application administrator to determine whether this text is used in the invoice. 7. Select the Counter Details secondary tab.
  • 160.
    4-20    Oracle ServiceContracts User Guide 8. In the Default field, enter the reading the that application uses to charge a customer if no counter reading is entered manually or the estimated reading is 0. The entry that you make here is based on the time period you selected in the Effectivities tab. 9. Optionally, enter a minimum counter value. A customer is charged this minimum if a counter reading or estimate falls below this number in any billing period. 10. If you are billing a customer based on the usage recorded in multiple counter values, to average out all of the counter readings each period, select the Level check box. For example, a copier manufacturer charging a customer by the number of copies made, can charge for all the copiers that the customer owns at the same time and apply minimums and discounts based on average volumes rather than per copier. 11. Save. 12. Repeat steps 5 through 11 to enter any additional counters for this usage item. 13. Enter the counter reading to use to start calculating usage: • If you have already captured previous readings with this counter, then select the start reading from the Reading LOV. This LOV includes all historical readings for this counter. • If no historical reading is available to select, the application assumes that the initial reading for the contract is 0. To enter another initial reading, follow the procedure that is described in Entering the Starting Counter Reading, page 4- 22.
  • 161.
    Entering Usage Lines   4-21 Entering a Counter You can enter a counter to track usage for either a physical item, such as a printer, or the usage of a service, such as the number of telephone support calls. Note: If you are entering multiple counters for a usage line, then each counter must be associated with a different Oracle Installed Base item instance number or a different service line. The application cannot distinguish between two counters that are attached to the same item. For example, if your organization sets up copiers with two different counters to register the number of copies, one for color copies and the other for black and white, you cannot distinguish between these two counters. Prerequisites You must be in the process of entering a usage line. Identify the item to which the counter will be attached. To enter a counter: 1. From the Service Contracts Authoring window, select the Lines tab, Pricing/Products subtab and Effectivities secondary tab, and click the LOV indicator in the Name field in a new line. The Counter window appears. 2. Enter a partial or complete inventory item name in the Find field. You can use the % sign to represent missing characters. 3. Click Find. The window displays the list of counters for the inventory item. • For physical items, the References field includes a concatenation of the two unique identifiers: • Product serial number • Oracle Installed Base item instance number • For service items, this field displays the concatenation of the contract number and line number of the contract for which you are specifying the usage line. 4. Enter the identifying information for the counter after the % sign and click Find again.
  • 162.
    4-22    Oracle ServiceContracts User Guide 5. Select the counter to enter, and click OK. The Name field displays the inventory item name of the product or service to which the counter is attached. The Reference field shows the identifying information including the product serial number and the counter number. Entering the Starting Counter Reading You must do this if the counter that you are using does not start at 0. Prerequisite Enter a usage line. To enter the starting counter reading: 1. From the Service Contracts Authoring window, select the Lines tab and Counters subtab. 2. Select the usage line to update. 3. Select the counter for the usage line in the Counters region. 4. From the Actions menu, select Counter Setup. The Setup Counters window appears. 5. Enter the initial counter reading in the Initial Reading field. 6. Click OK. 7. Save.
  • 163.
    Entering Usage Lines   4-23 Creating Special Price Breaks Each usage item is associated by the application administrator with a list of default price breaks. You can modify these default price breaks and create special price breaks for your customer. You can offer special price breaks at the usage line level for all the items that are covered by the usage line, or at the subline level, for individual counters. By modifying the price breaks, you are creating a locked copy of the price list attached to the line or subline where you create it. This means that any future changes to the price list are not reflected in the copy. Prerequisite Enter a usage item. To create special price breaks: 1. From the Service Contracts Authoring window, select the Lines tab and Pricing/Products subtab. 2. Select the usage item to set up. 3. To set up a price break for all of the items that are covered by the usage line, click Price Break on the Pricing/Products subtab. 4. To set up a price break for a specific counter that is covered by a usage line: 1. Select the Pricing secondary tab. 2. Select the counter. 3. Click Price Break.
  • 164.
    4-24    Oracle ServiceContracts User Guide The Price Break window appears. If the Locked check box is cleared, then the price breaks that are in effect are the same as those that were set up by the application administrator. A selected Locked check box indicates that the price breaks have already been modified. The prices are now determined by the locked price list. Note: The appearance of this variation of the Price Break window is different: • The Update button replaces the Lock button. • The Delete button restores the original price list. 5. Click Lock or Update. The first time you modify the price breaks, the application creates a copy of the price list where the price breaks are defined. This action locks the prices for usage to their values at the time the copy is made. The Advanced Pricing - Price Lists window appears. Note: Although the application displays a full copy of the price list, you can modify only the price-break related information. Entries affect only the copy. They have no effect on the price list itself.
  • 165.
    Entering Usage Lines   4-25 6. To change the price break type from point to range or vice versa, scroll to the right in the List Lines tab and change the type using the Price Break Type LOV. See Point and Range Price Breaks, page 4-26 for an explanation of the two price break types. 7. To change the price break ranges themselves: 1. Click Price Breaks. The Price Breaks window appears. 2. You can modify the ranges by: • Entering different values in the Value From and Value to fields. Note: With release 12, the application uses continuous price breaks. These are price breaks where there are no gaps between the price tiers, for example, 0–1000, 1000–2000, 2000–3000. Price breaks set up prior to release 12, will not use continuous price breaks and will continue to behave as in the prior release. Non-continuous price breaks do not overlap, for example, 0–100, 101–200. This primarily affects proration, see How Price Breaks Are Prorated, page 4-29. For more information about how pricing works, refer to the Oracle Advanced Pricing User's Guide. • Modifying the prices for each range in the Pricing field.
  • 166.
    4-26    Oracle ServiceContracts User Guide Note: You may have to scroll to the right or maximize the window to see the Pricing field. 3. Save and close the window. 8. Save and close the Advanced Pricing Price Lists window. Point and Range Price Breaks You can have the application apply price break discounts based on one of the following methods: • Point • Range The following example explains the difference between the two methods for a customer reporting that they made 3500 copies in the billing period. The following table lists the price breaks: Price Breaks Break Price 0–1000 $.05 1000–3000 $.04 3000–5000 $.03 5000–10000 $.02 Point Method The point method gives the customer the best price based on the total number of copies made:
  • 167.
    Entering Usage Lines   4-27 Point Method Point Calculation Amount 3500 Xs $.03 $105.00 Total Invoice: $105.00 Range Method The range method charges based on all of the price break ranges up to the level corresponding to the counter reading. Range Method Range Calculation Amount 1000 Xs $.05 $50.00 2000 Xs $.04 $80.00 500 Xs $.03 $15.00 Total Invoice: $145.00 Deleting Special Price Breaks To delete the special price breaks: 1. From the Service Contracts Authoring window, select the Lines tab and Pricing/Products subtab. 2. Select the usage item to modify. 3. To delete a special price break that was created for all of the items that are covered by the usage line, click Price Break on the Pricing/Products subtab. 4. To revert the special price break that was created for a specific counter that is covered by a usage line: 1. Select the Pricing secondary tab.
  • 168.
    4-28    Oracle ServiceContracts User Guide 2. Select the counter. 3. Click Price Break. The Price Break window appears. 5. Click Delete. Prorating Price Breaks to Apply to Multiple Periods Price breaks are set up in each price list based on one specific period. A customer is offered a discount if they purchase so many units in each quarter, for example. You can turn proration on to enable the price breaks to be prorated for other periods as well. This way, a customer receives the same price breaks for purchasing 1/3 the amount within one month as the full amount in the quarter. When you turn proration on using this procedure, it is available for all periods including one week and one day. You can use this procedure to turn proration on or off. By default, proration is turned off. See How Price Breaks Are Prorated, page 4-29 for an explanation of how the proration is calculated and how it takes rounding errors into account. Prorating price breaks is independent of price list locking. Prerequisites • Confirm the setup of price breaks or the price list. • Confirm that the system profile QP: Break UOM Proration Allowed is set to Yes. To prorate price breaks to apply to multiple periods: 1. From the Service Contracts Authoring window, select the Lines tab and Pricing/Products subtab. 2. Select the usage item to set up. 3. To turn on or off proration for all of the items that are covered by the usage line, click Price Break on the Pricing/Products subtab. Note: Turning price breaks on or off at the line level does not affect any sublines where proration has been set.
  • 169.
    Entering Usage Lines   4-29 4. To enable or disable price break proration for a specific counter that is covered by a usage line: 1. Select the Pricing secondary tab. 2. Select the usage line. 3. Click Price Break. The Price Break window appears. Note: The appearance of this window is different if the price break ranges have already been modified. In this case, the Locked check box is selected and the Update button replaces the Lock button. 5. To turn price break proration on, select All from the Prorate LOV. 6. To turn price break proration off, select None from the Prorate LOV. 7. Save. 8. To modify the price break ranges, click Lock or Update and follow the procedure that is described in Creating Special Price Breaks for Your Customer, page 4-23. How Price Breaks Are Prorated This topic explains how the application calculates prorated price breaks. With Release 12, the application uses continuous price breaks. Continuous price breaks do not have gaps between the price tiers, for example, 0–1000, 1000–2000, 2000–3000. It is important to understand that there may be minor differences between how much customers are
  • 170.
    4-30    Oracle ServiceContracts User Guide charged for prorated amounts depending on whether the application uses continuous price breaks or non-continuous price breaks, which existed before Release 12. Note: This section describes how proration works for continuous price breaks. Suppose, for example, that the price breaks that are set up in the price list are based on quarterly usage as shown in the following table: Price Breaks Units/Quarter Price per Unit 0–1000 $.05 1000–3000 $.04 3000–5000 $.03 5000–999999999 $.02 Now suppose, you extend the same price breaks to a customer billed based on monthly usage by turning proration on. Here is how the application calculates the monthly price breaks. It divides the range by a third. Note: Oracle Service Contracts truncates to two decimal points. Calculated Ranges Quarterly Ranges/3 0–333.33 333.33–1000 1000–1666.67 1666.67–333333333
  • 171.
    Entering Usage Lines   4-31 Prorated Price Breaks Units/Month Price per Unit 0–333.33 $.05 333.33–1000 $.04 1000–1666.67 $.03 1666.67–33333333 $.02 Note: Price breaks set up prior to release 12, did not use continuous price breaks. Non-continuous price breaks did not allow the use of fractions during proration. The prorated price breaks for each tier were set to the previous whole number, for example 0–333, rather than 0– 333.33. For information on how price breaks were prorated before release 12, refer to prior releases of the Oracle Service Contacts documentation, which is available on Oracle Metalink Specifying a Billing Schedule for a Usage Line You can bill a customer for usage at the usage line level. If you have entered a billing schedule at the contract header level, then this schedule appears at the line level. Prerequisite Enter a usage line. To specify a billing schedule for a usage line: 1. From the Service Contracts Authoring window, select the Lines tab and Pricing/Products subtab. 2. Select the line to set up. 3. Click Billing. The Billing window appears.
  • 172.
    4-32    Oracle ServiceContracts User Guide Top Level is selected as the Level. 4. Select the appropriate accounting rule for invoicing from the Invoicing Rule LOV. You must select Arrears Invoice for the two usage types that charge customers based on recorded counter values in a period: Actual Per Period and Actual by Quantity. 5. Specify the billing schedule by entering one or more billing streams. This is the same procedure that is used for creating schedules for service lines. See Entering a Billing Stream, page 2-13 for details. 6. Click Schedule to generate the schedule. 7. Click OK. Recording Usage by Updating a Counter Reading Counter values can also be captured in other Oracle E-Business Suite applications, including Oracle Depot Repair, Oracle Field Service, and Oracle TeleService. To record customer usage by updating a counter reading: 1. From the Service Contracts Authoring window, select the Lines tab and Counters subtab. 2. Select the usage line to update.
  • 173.
    Entering Usage Lines   4-33 3. From the Actions menu, select Counter Capture. The Counter Capture Reading window appears. 4. Follow the Capturing Counter Reading procedure that is described in the Oracle Installed Base User Guide to enter your reading. Note: If your application administrator has set the system profile OKS: Counter Validate to Yes, then you must select the Valid Flag check box for the customer to be billed based on your entry. If this system profile is set to No, the application bills for the entry that you make regardless of whether you select this check box. Warning: You cannot nullify a counter reading after billing occurs.
  • 175.
    Entering Subscription Lines    5-1 5 Entering Subscription Lines This chapter covers the following topics: • Overview of Entering Subscription Lines • About Subscriptions • Entering a Subscription Line • Specifying a Schedule of Product Shipments • Adjusting the Subscription Price • Viewing Pricing Details • Specifying a Billing Schedule for Subscriptions • Viewing the Shipment Status of a Subscription Order Overview of Entering Subscription Lines This group of topics explains how to enter subscriptions. About Subscriptions You can use Oracle Service Contracts to sell subscriptions for both tangible and intangible items. Tangible items include magazines, collateral, or any other physical item that can be shipped through Oracle Order Management. Intangible items can be collateral that is sent through e-mail. Note: While tangible items are fulfilled through Oracle Order Management, the current release includes no fulfillment method for intangible items. This must be set up individually by each implementation. Subscription lines differ from service and usage lines in the way they are entered:
  • 176.
    5-2    Oracle ServiceContracts User Guide • Service and usage lines require you to enter sublines, subscriptions do not. To sell a service or usage, you enter the service or usage item as a contract line and then enter sublines to specify what the service covers or the counters where the usage is tracked. Subscriptions require that you enter only the line. • Subscriptions for tangible items require that you set up a subscription schedule. A subscription schedule specifies when the application creates booked orders in Oracle Order Management. • The billing schedule invoices customers equal amounts in each billing period. Just as for other contract lines, you must set up a billing schedule for invoicing the customer, but you are restricted to billing the customer in equal amounts in each period. The application takes the total price and divides it equally among the invoices that you specify. It does not matter how many billing periods you set up, however. You can invoice customers at the beginning of the subscription for the total amount, for example, or have them pay in equal installments over the entire length of the subscription. How Subscription Items Are Set Up The item that you enter in a subscription line is an inventory item. For tangible items, the inventory item is actually the product in inventory that is being shipped out. For intangible subscriptions, the application administrator must set up a new item in inventory representing the subscription itself. What determines whether the inventory item is tangible or intangible is the attached subscription template. The item is tangible when fulfillment is done through Order Management. It is intangible when fulfillment is done through a customized solution. The subscription template also specifies the period for the subscription. For a tangible item, the period is used for setting up the schedule for creating orders in Oracle Order Management. For an intangible item, the period is used as the unit of measure for the price for the subscription. If the price of the subscription in the price list is $10 and the period in the subscription template is a week, then the subscription is priced at $10 per week. Pricing and Credit for Tangible Subscriptions When you enter a subscription line for a tangible item such as a magazine, you are actually entering the very inventory item that is shipped to the customer. (The inventory item becomes a subscription item with extra setup from the application administrator.)
  • 177.
    Entering Subscription Lines    5-3 The application calculates the price for the subscription period based on the price of the item in the price list, not on the length of the subscription. Suppose, for example, that a publisher of a monthly magazine publishes an issue every month except for December. A customer purchasing a year's subscription is charged not by the year but for purchasing 11 issues. If the magazine is priced at $3 per issue, then the customer pays 11 x $3 = $33. Customers who cancel the subscription before the year is over get credited on the basis of any items they have not yet received. This means customers who cancel before the November issue is shipped get a credit of $3, and customers who cancel after the issue is shipped pay the full amount because they have received all of the issues for the year. Your application administrator can set up price breaks based on the number of products shipped, not on the length of the subscriptions or the quantity that you enter in the line. For example, if the application administrator at the monthly magazine publisher sets up price breaks at 12 and 23 issues to give discounts to subscribers who purchase two-year and three-year subscriptions, then a customer who purchases two one-year subscriptions gets the same discount as the customer who purchases one two-year subscription because the number of items that are ordered by both is the same. Pricing and Credit for Intangible Subscriptions If the profile OKS: Intangible Subscription Pricing Method is set to Subscription Based , partial periods are not calculated for Intangible subscriptions. This profile setting causes the intangible subscription lines to price, bill, and terminate in the same way as tangible subscriptions. If profile OKS: Intangible Subscription Pricing Method is set to Effectivity Based, partial periods are calculated for pricing amounts on intangible subscription lines as follows: 1. The fulfillment frequency, such as weekly, monthly, or quarterly, acts as the Price UOM in the partial period calculation 2. Regardless of the period start value on the contract, the application uses the period start as the service start when billing subscription lines. This is due to the strong tie between fulfillment quantity, pricing and billing on subscription offerings. 3. The application considers the period type setting. Effectivity Based and Subscription Based Pricing Examples The price that a customer pays for a contract line for an intangible subscription is based on the subscription period length and quantity of subscriptions that you enter. The price of a subscription is based on the price for a specific period. (The price comes from the price list and the period from the subscription template). The period of a subscription becomes important for pricing partial periods and for assigning credit for those partial periods when the customer terminates the subscription. The price that customers pay and the credit they receive for partial periods depends on the period and the setting of the system profile OKS: Intangible Subscription Pricing
  • 178.
    5-4    Oracle ServiceContracts User Guide Method. The application administrator can set this profile to either Effectivity Based or Subscription Pricing: • Effectivity Based The application charges and credits the customer for partial periods. Suppose, for example, that a customer subscribes to an online newsletter for a period starting January 15, 2005 and continuing through February 1, 2006, a period that is 16 days longer than one year. If the service is priced at $30 per month, then the application charges the customer $375.48: $360 for twelve months (12 x $30) and then $15.48 (16 x $30/31) for the partial last month in the contract, January 16 through February 1, 2006. If the customer cancels on January 3, 2006, then the application issues a credit based on the number of unused days, in this case: 29 days x $30/31 = $28.06. • Subscription Pricing The application charges the full amount for the period even if the subscription ends in the middle of that period. The same customer purchasing the subscription for one year and 16 days, is charged $390 for 13 months ($360+$30). If the customer cancels on January 3, 2006, the application issues a credit for one month. Billing Schedule Independent of Price Paid or Credit Given The price that the customer pays or the credit they receive is independent of the billing schedule that you set up for either tangible or intangible items. It does not matter whether you set up a billing schedule to invoice the customer for the full subscription duration at the beginning of the subscription or invoice them monthly. The billing schedule just divides the total price into however many billing periods you want. Selling Service on Subscription Lines When you enter a subscription line, the application automatically creates an Oracle Installed Base item instance. This means that you can sell a service for the subscription by entering a service line and covering the subscription at the covered product level. (You must know its item instance number.) Each time Oracle Order Management ships one of the physical items, the application also automatically creates a child item instance. This enables an agent to identify a particular item for reorder, exchange, or credit. To create the child item instances, the application administrator must run the Service Contracts Instance Relationship Program concurrent program after the order fulfillment occurs.
  • 179.
    Entering Subscription Lines    5-5 Entering a Subscription Line Follow the references for details about any step. Prerequisite Create the contract with the Subscription Agreement category. To enter a subscription line: 1. From the Service Contracts Authoring window, select the Lines tab and Accounts subtab. 2. Select Subscription from the Line Type LOV. 3. Select the subscription item from the Name LOV. The party accounts that you selected on the Summary tab and Parties subtab appear as the Bill to and Ship to accounts. 4. Optionally, enter billing and shipping contacts that are specific to this contract line by following the procedure that is described in Entering Billing and Shipping Contacts for a Contract Line, page 3-10. If a contact does not exist in the database, then you can add one following the procedure that is described in Creating or Modifying a Contract, page 3-10. The contacts that you enter are different from the ones you entered in the contract header. 5. Select the Effectivities subtab.
  • 180.
    5-6    Oracle ServiceContracts User Guide 6. Specify the duration of the subscription. By default, the start and end dates are copied from the start and end dates for the contract. You can specify different dates by entering either of the following: • Start and end dates • Duration and period The application calculates the missing information. If you supply a duration and period, then the start date is the start date of the contract. Note: If the duration of the subscription starts earlier than the start date or ends later than the end date of the contract, then you must extend the start and end dates of the contract at the header level before you can make the contract active. 7. Enter the number of subscriptions that you are ordering in the Qty field. 8. If the contract can be renewed (you have not selected Do Not Renew on the Summary tab and Renewals subtab), then specify how the line is to be renewed using the Renewal Type LOV. The renewal options are the same for subscription lines as they are for service, and usage lines. See Specifying How a Contract Line is to Be Renewed, page 3-12. 9. If the subscription is for a physical item, then specify the schedule of orders that are placed through Oracle Order Management by clicking Edit Schedule. See Specifying a Schedule of Product Shipments, page 5-7. 10. The price of the subscription is calculated automatically by the application based on
  • 181.
    Entering Subscription Lines    5-7 the price list that is specified in the Price List field. You can modify the price by choosing a different price list, by entering a new price manually in the Pricing/Products subtab, or by using the price Adjustment window. For details, see Adjusting the Subscription Price, page 5-10. 11. Optionally, modify the text that the customer sees on the invoice by editing the text in the Invoice Text field. 12. Create a billing schedule. For details, see Specifying a Billing Schedule for Subscriptions, page 5-12. Because the billing schedule for a subscription line is based on the price of the line, you must re-create the billing schedule for a subscription any time you modify the price. 13. The remaining information for the line comes from the information that you entered in the Summary tab. You can make modifications by following these procedures: • Changing the Billing and Shipping Accounts and Locations, page 3-9 • Entering Billing and Shipping Contacts for a Contract Line, page 3-10 • Specifying a Payment Method for a Contract Line, page 3-45 • Specifying Tax Status, page 3-57 • Assigning Sales Credits for a Contract Line, page 2-26 14. Save. Specifying a Schedule of Product Shipments You can specify a schedule of shipments for physical items in the subscription through Oracle Order Management. The application books each order automatically on the date that you specify here. This is called the interface date. The order must still be picked and shipped using Oracle Order Management, however. Prerequisite Enter a subscription line. To specify a schedule of product shipments: 1. From the Service Contracts Authoring window, select the Lines tab and Effectivities subtab. 2. Select the subscription line to set up. 3. Click Edit Schedule.
  • 182.
    5-8    Oracle ServiceContracts User Guide The subscription schedule window appears. 4. By default, the application creates the order in Oracle Order Management on the same date as the start date of each subscription period. This is called the interface date. To move the interface date, enter a number in the Offset Days field. A negative number creates the order before the start date. For example, entering -2 creates the order two days before the start of each period. 5. Use the Schedule Pattern region to specify the shipping periods: • To ship an item every period that is specified in the Frequency list, click OK. The application creates a shipping schedule automatically. If the frequency is specified for weekly, then the application schedules one item for shipment every week, if monthly, then every month and so on. • If the subscription schedule is not regular, then you can specify the schedule you want by entering multiple sets of regular periods. 1. Enter each set of regular periods on a separate line. For examples, see How to Use Schedule Sets to Enter Complex Subscriptions, page 5-9.
  • 183.
    Entering Subscription Lines    5-9 Note: The fields that are available for entry are limited by the period for the subscription. For example, if the period for the subscription is a week, then you can make entries only in the Week, Month, and Year fields. You can use the following symbols for your entries: Symbol Meaning Examples * All periods Entering a * in the Month column means that an order is created every month. - Indicates a range of periods Entering 1-3 in the Month column means that an order is created only in January, February, and March. , Indicates a series of periods Entering 1,2,4 in the Month column means that an order is created only in January, February, and April. Note: To manipulate the daily schedule you must clear the * from the Day field. This enables the Week and Week Day field, which allows you to enter the day of the week for the subscription to be fulfilled. 2. When you are done, click Refresh Schedule to generate the schedule. If you are not satisfied with the result, you can reenter the schedule and refresh again. 6. Click OK. How to Use Schedule Sets to Enter Complex Subscriptions The following two examples illustrate how you can use multiple schedule pattern lines to handle complex subscription schedules. In both cases, the schedules are for a customer that purchases a one-year subscription for a tangible item from February 1, 2005 through January 31, 2006. Example 1: A periodical that publishes every week except December when it
  • 184.
    5-10    Oracle ServiceContracts User Guide publishes only the first week You can create this schedule by entering the following two lines: Year Month Week * 1-11 * * 12 1 Example 2: A newsletter that publishes twice a month except in November and December when it published only one issue at the beginning of the third week. You can create this schedule by entering the following two lines: Year Month Week * 1-10 1,3 * 11-12 3 Note: For both of the preceding examples, the administrator must set up the subscription template for the subscription item with a frequency of Weekly. Adjusting the Subscription Price The application automatically prices a subscription based on the price list that is entered on the Effectivities subtab. You can modify the price either by changing the price list or entering a different price manually on the Pricing/Products subtab. Prerequisite Enter a subscription line. To adjust the subscription price: 1. From the Service Contracts Authoring window, select the subscription line. 2. Adjust the subscription price using any one of the three following methods:
  • 185.
    Entering Subscription Lines    5-11 • Changing the price list 1. Select the Lines tab and Effectivities subtab. 2. Select the subscription line that you want to reprice. 3. Select a different price list form the Price LOV. 4. Select the Pricing/Products subtab. 5. Click Reprice. The application recalculates the price based on the new price list. • Entering a different price manually: 1. Select the Lines tab, Pricing/Products subtab. 2. Enter the modified price in the Subtotal field. Note: Modifying the price manually may or may not be permitted in your application implementation. • Applying available discounts using the Adjustments window. 3. Save. 4. If you are repricing a line with an existing billing schedule, then you must re-create the billing schedule for the new price. See Specifying a Billing Schedule , page 5-12. Viewing Pricing Details Prerequisite Enter a subscription line for tangible items and create the subscription schedule. To view the pricing details: 1. From the Service Contracts Authoring window, select the Lines tab and Pricing/Products subtab. 2. Select the subscription line to view. 3. Click Price Calculation. The Price Calculation window appears. It displays the quantity, list price, any
  • 186.
    5-12    Oracle ServiceContracts User Guide adjustments that were made to the price, and the extended price. 4. To view any price breaks that the application administrator may have set up for this item, click Price Breaks. Specifying a Billing Schedule for Subscriptions You can specify a billing schedule for an individual subscription line in a contract or for a multiple subscription lines in a contract at the same time. Billing schedules for subscriptions are different from those you create for service or usage lines: • You must select Equal Amountas the schedule level. • You bill customers only at the line level. (There are no covered products as for service lines and individual usage counters as for usage lines.) • You can only bill the customer in equal amounts per period over the length of a single billing stream. For example, if a market research company charges $1,200 for a one-year subscription to a newsletter, it can bill the customer the whole amount in one invoice, invoice them $100 per month every month, invoice them $200 every other month, or even invoice them at different intervals over the length of the subscription. You can use multiple billing streams to invoice the customer at different intervals over the length of the subscription with the amounts billed proportional to the length of the billing interval. For example, the same market research company can invoice the customer $100 every month for the first three months, and then send one invoice for $300 every quarter (three months) for the remainder of the subscription period. You can set up this scenario using the following two billing streams: Stream Sequence Number Number of Periods Duration Period 1 3 1 Month 2 3 1 Quarter Prerequisite Enter a subscription line.
  • 187.
    Entering Subscription Lines    5-13 To specify a billing schedule for subscriptions: 1. To create the same schedule for multiple subscription lines within the same contract, create a schedule at the header level. From the Service Contracts Authoring window, select the Summary tab and Pricing/Products subtab. 2. To create a billing schedule for an individual subscription line: 1. From the Service Contracts Authoring window, select the Lines tab and Pricing/Products subtab. 2. Select the subscription line that you want to set up. 3. Click Billing. The Billing window appears. 4. The invoicing and accounting rules come from those that were entered in the Summary tab, Pricing/Billing subtab. If want, you can select different rules from the Invoicing Rule and Accounting Rule LOVs. 5. For subscriptions, select Equal Amount as the billing level. 6. Specify the billing schedule by entering one or more billing streams. This is the same procedure that is used for creating schedules for service lines. See Entering a Billing Stream, page 2-13 for details. 7. Click Schedule to generate the schedule.
  • 188.
    5-14    Oracle ServiceContracts User Guide If you are creating a schedule on the Summary tab, the application displays a message warning you that you are about to replace any existing billing schedules at the line level. Click OK. The application divides the total price for the line equally for each billing period within each billing stream. Note: You can manually enter an amount in the Amount field before clicking Schedule and have the application charge that amount each period instead. In this case, the application automatically reconciles any discrepancy with the total in the last billing period. The customer is always billed for the same total amount. 8. Click OK to return to the authoring window. Viewing the Shipment Status of a Subscription Order Use this procedure to view the Oracle Order Management shipment status for tangible items that were ordered in a subscription line. Prerequisite Confirm the order has been created in Oracle Order Management. To view the shipment status of a subscription order: 1. From the Service Contracts Authoring window, select the Lines tab and Effectivities subtab. 2. Click Edit Schedule. The subscription schedule window appears. This window is named according to the name of the subscription item. The Interface Schedule region displays order numbers and status for any orders that have been placed with Oracle Order Management. 3. To view more details about the order, including the date that any shipment occurred, click the drill-down indicator to the left of the schedule line. The Fulfillment History window displays details about the order.
  • 189.
    Ordering Service inOracle Order Management     6-1 6 Ordering Service in Oracle Order Management This chapter covers the following topics: • Overview of Ordering Service in Oracle Order Management • About Ordering Service in Oracle Order Management • Ordering Service in a Sales Order • Adding Service Lines to an Existing Contract • Specifying Renewal and Other Details for a New Contract Created for Your Order • Running Concurrent Programs to Generate Contracts Automatically • Reprocessing Orders That Did Not Create Contracts • Viewing Created Contracts by Sales Order Number • Viewing Contracts by Sales Order Number in Oracle Service Contracts • Viewing Contracts by Sales Order in Oracle Installed Base • Modifying the Dates That a Warranty Is Effective • Changing Only the That Dates a Warranty is Effective • Changing Both the Warranty Dates and Installed Date • Setting Up New Contract Defaults for Oracle Order Management • Understanding the Impact of Contingencies on Revenue Recognition Overview of Ordering Service in Oracle Order Management You can order service using Oracle Order Management and have the application create the appropriate contracts automatically. Your administrator can define the profile OKS: Category for Order Management Originated Contracts, which determines the contract category for Order
  • 190.
    6-2    Oracle ServiceContracts User Guide Management-originated contracts. This group of topics covers both sales agent and application administrator procedures for adding service agreements to a sales order, generating contracts automatically, and troubleshooting any errors. This group of topics covers only steps relating to service contracts. For detailed information about how to create and manage orders, see the Oracle Order Management User's Guide. About Ordering Service in Oracle Order Management This topic explains: • Selling services in Oracle Order Management • What contracts are created from your Order • When a service contract is created • Understanding warranties • Selling service through Oracle Order Management or Oracle Service Contracts • Understanding what is passed from the order to the contract Selling Services in Oracle Order Management You can sell services in an Oracle Order Management sales order just as you do any physical product. However, a few differences exist. Each service line must refer to either an item that is already in a customer's installed base or an item that is in an order (the item can be either in the same order or in a different order altogether). For steps detailing how to add service lines, see Ordering Service in a Sales Order, page 6-6. For a service, you must enter the service duration. If you are ordering service for an item in an order, then you can have the application automatically calculate the start date of that item based on the expiration of the warranty for that item. (You supply the duration of the service, but omit the start and end dates.) However, the application does not supply a start date for an item a customer already owns. If you are ordering service for an installed base item, you must enter the start date manually, taking the length of any existing warranty into account. What Contracts Are Created from Your Order By default, the application automatically creates a single contract for all the service lines in your order. You can add renewal and contact information for the new contract using the procedure that is outlined in Specifying Renewal and Other Details for a New
  • 191.
    Ordering Service inOracle Order Management     6-3 Contract Created for Your Order, page 6-11. The contract becomes effective on the earliest start date and expires on the latest end date. Suppose that your order has the following three lines: • Service 1: One year contract starting January 1, 2005 • Service 2: Two year contract starting February 1, 2005 • Service 3: Two year contract starting January 15, 2005 In this case, the application creates a contract with a start date of January 1, 2005 and an end date of January 31, 2007. Alternatively, by using the Contract Details window, you can instead choose to merge the service lines in your order into an existing contract. See Adding Service Lines to an Existing Contract, page 6-9. When a Service Contract Is Created The application generates a new contract from the service lines in your order, or appends the lines to an existing contract only when the item that the service covers is entered into the installed base. For tangible items, this means that the order must be booked, picked, and shipped. To generate contracts from sales orders, your application administrator must also: 1. Run the Service Contracts Order Capture Integration, and Workflow Background Process concurrent programs at regular intervals. See Running Concurrent Programs to Generate Contracts Automatically, page 6-14 . 2. Reprocess any contracts that were generated with errors. See Reprocessing Orders that did not Create Contracts, page 6-15. You can view the generated contracts by sales order number from within Oracle Service Contracts or Oracle Installed Base. See Viewing Created Contracts by Sales Order Number, page 6-16. Warranties Warranties, which are offered to customers free of charge, are created by the application automatically when the item is shipped to a customer based on an entry that the application administrator makes in the bill of materials (BOM). Warranties go into effect on the shipment date. The administrator can add an automatic delay to the warranty start date to account for the shipment or installation delay and ensure that the customer receives the full benefit of the warranty. You can specify a different date for the warranty to become effective by following the procedure
  • 192.
    6-4    Oracle ServiceContracts User Guide Modifying the Dates a Warranty is Effective, page 6-18. Selling Service Through Oracle Order Management or Oracle Service Contracts If you have the application create a new contract from your order (rather than adding the lines to an existing order), you should be aware of some key differences between the contract that was created for you automatically and one that you create in Oracle Service Contracts application. Contracts created in Oracle Order Management: • Are restricted to service that covers products that the customer owns (Oracle Installed Base item instances) or products that the customer is in the process of buying (items in Oracle Inventory). You cannot use them to sell service that covers larger sets of inventory items or to sell service at the system, site, or party levels. • Are automatically created in the Active status. • Do not have to pass the usual quality assurance check list and approval process as contracts created in Oracle Service Contracts. • Are billed through Oracle Order Management. This means that the customer is billed in one invoice and you cannot take advantage of the flexible billing schedules that you set up in Oracle Service Contracts. (To add flexibility, you can instead set up Payment Terms in Oracle Receivables to set up incremental billing over time.) • Cannot have their coverage modified. Agents can modify the coverage for only contracts that are created in Oracle Service Contracts. • Do not contain usage lines, because no way is available to create a usage line in the sales order itself. For renewals, the contracts that are generated in Oracle Order Management become just like any contract that is created in Oracle Service Contracts. Understanding What Is Passed from the Order to the Contract: The following information passes from the order to the contract: Header Level Order Field Contract Field Bill To Customer Bill To Party Ship To Customer Ship To Party
  • 193.
    Ordering Service inOracle Order Management     6-5 Bill To Bill To Location Ship To Ship To Location Sales Person Vendor Contact Name Currency Currency Price List Price List Accounting Rule Accounting Rule Invoicing Rule Invoicing Rule Payment Type Payment Type Payment Terms Payment Terms Tax Tax Sales Credits Sales Credits Order Number Order Number Line Level Order Field Contract Field Service Duration Duration Service Period Period Ordered Item Line Item Service Start Date Start Date Service End Date End Date Ordered Item Item
  • 194.
    6-6    Oracle ServiceContracts User Guide Quantity Quantity Unit Selling Price Price Sales Credits Sales Credits Currency Currency Service Item Item Instance Note: The application does not support non seeded contract types. Ordering Service in a Sales Order You can order service for an item that a customer has on order or already owns. You can use it to order service for: • An item in the same order • An item in a different order • An item in the customer's installed base Prerequisites • If you are ordering service for an item in a separate order, then you must know: • That order's number. • The line number and shipment number for the item to cover. • The date to start the service, taking into account any other existing service agreements and warranties. • If you are ordering service for an item that the customer already owns, then the item must be already entered in your customer's installed base and you must know the item instance number (referred to in Oracle Order Management as the Reference Number) or its serial number. The item instance number is automatically generated by the Oracle Installed Base application when the item is added to a customer's installed base. If the item does not exist in the customer's installed base, then you must create it using procedures that are described in the Oracle Installed Base User Guide.
  • 195.
    Ordering Service inOracle Order Management     6-7 To order service in a sales order: 1. Under the Order Management Super User responsibility, navigate to Orders, Returns and then Sales Orders. The Sales Orders window appears. Note: If you are tracking sales credits, and your organization is using Oracle Service Contracts territories to assign sales agents to service contracts, then the application does not use the sales agent that you enter in the Salesperson field on the Order tab, Main subtab to the contract itself. If your organization is not using territories for sales agent assignment, then the agent that you enter is entered as a vendor contact in the new contract. Note: Oracle Service Contracts carries sales credits from the order header to the contract header and the order line to the contract line. Because Oracle Order Management generates the invoice, the information proceeds directly to Oracle Receivables. During credit generation, information is sent by way of Oracle Service Contracts. 2. If you are ordering a service agreement for an item in the same order, then enter that item first. 3. In the Sales Order window, select the Line Items tab and the Main subtab. 4. Use the Ordered Item LOV to enter the inventory item number of the service that you are ordering. 5. Leave the Qty field blank. The application supplies the correct quantity automatically: • If you are ordering service for a line in an order. The application copies the quantity from that line. For example, if you are ordering service for an order line with three widgets, then the service quantity is 3. • If you are ordering service for an item in the customer's installed base. Note: The quantity field specifies the number of services that you are ordering. It is not related to the length of the agreement that is specified in the UOM (Unit of Measure) field. If you enter 5 as the quantity and the UOM field shows YR (year), you
  • 196.
    6-8    Oracle ServiceContracts User Guide are not ordering one five-year contract. 6. Select the Services tab. 7. If the service is for an item either in this or another customer order, then: 1. Select Order from the Service Reference Type LOV. 2. Use the Service Order Type LOV to enter the order type of the sales order. If you are ordering service for an item in this order, then enter the same type that you entered in the Main tab of the Sales Order form. 3. In Service Ref Order Number, enter the number of the sales order. If you are ordering service for an item in this order, then enter the sales order number that appears in the title bar of the Sales Order window. 4. Use the Service Ref Line Number LOV to select the line number and shipment number. (The shipment number appears in the Service Ref Shipment Number field.) Note: You must scroll to view all required fields. 8. If you are ordering service for an item the customer already owns, then: 1. Select Customer Product from the Service Reference Type LOV. 2. Scroll to the Service Ref Cust Product field and use the LOV to enter the customer product instance to cover with the service. You can search either by the Oracle Installed Base instance number (labeled Reference Number in this LOV) or, if the item is serialized, by the item's serial number. Note: The application automatically checks to determine whether the service is valid for the item that you just entered. If the application informs you that it is not, then you must go back and enter another service. 9. To simplify renewals, a customer can end all contracts on a single day each year (called the cotermination day). Selecting the Service Coterminate Flag check box sets the end date to that day. If the application administrator has set up the cotermination day for the customer, that entry overrides any end date that you enter for this agreement. See About Cotermination, page 3-56 for more information. 10. Enter service dates and duration:
  • 197.
    Ordering Service inOracle Order Management     6-9 • If you are ordering service (an extended warranty) for an item in an order, you can have the application automatically fill in the start and end dates by entering the duration only. The application starts the service the day after any warranty for the product expires. The application provides the dates only after the order is fulfilled and the contracts are created. • If you are ordering service for an installed base item, then enter either: • The service start and end date: The application calculates the duration. • The start date and duration: The application calculates the end date. Note: If you selected the Service Coterminate Flag check box, the application may override the end date that you enter here. 11. Save. 12. To add the services in the order to an existing contract or specify renewal information for a new contract, click Actions and select Service Contract Details from the LOV. See Adding Service Lines to an Existing Contract, page 6-9 or Specifying Renewal and Other Details for a New Contract Created for Your Order, page 6-11 for details. 13. Book the order. 14. If you have created a mixed order, then you must also pick and fulfill the order for a new contract to be created or an existing contract to be modified. 15. You can view any new contracts that were created for the customer by following the procedure described in Viewing Created Contracts by Sales Order Number, page 6-16. Note: Contracts are created by concurrent processes that are set up by the application administrator to run on a periodic basis, and so may not be available for viewing immediately. Adding Service Lines to an Existing Contract By default, the application creates a new contract for the service lines in your order. You can have an individual line, or all the lines in your order, added to an existing contract instead. The destination contract must be: • For the same customer.
  • 198.
    6-10    Oracle ServiceContracts User Guide • Active or signed. • Of the contract category that is specified by the application administrator in the profile option OKS: Category for Order Management Originated Contracts. Prerequisites • Create your order first and open it in the Oracle Order Management Sales Order window. • Confirm the contract number. To add service lines to an existing contract: 1. In the Sales Order window, select the service line to add to an existing contract. To add all lines in the order to the same contract, select the first service line in the order. 2. Click Actions. 3. Select Service Contract Details. The Contract Details window appears. 4. To apply all the rules that are selected in the Contract Details form to all the service lines, select the Apply All check box. Leaving this check box cleared adds only the current line. If it is selected for one service line, you cannot select it for other service lines. 5. Use the Line Renewal Type list to specify how to renew the contract line: • Do Not Renew: The line will not be renewed when the contract is renewed. • Full Duration: The line will be renewed for the duration of the whole contract. If your order includes multiple service lines, the contract duration begins on the earliest start date and ends on the latest end date from all the lines. • Keep Duration: The duration of this line will remain the same in a renewed contract. Use this setting for intermittent or seasonal service lines. For example, a mountain resort may want to order special service for peak periods in winter and summer. Using this setting, you ensure that the renewed contract retains the same structure. See Seasonal or Peak Period Service.
  • 199.
    Ordering Service inOracle Order Management     6-11 6. Select the Existing radio button. 7. To restrict the choice of available contracts to those that are already entered in this order, select Order from the Type list. 8. Otherwise, select Contract. This displays all active (entered) contracts in the Contract Number LOV. 9. Use the Contract Number LOV to enter the contract number. Note: If a contract has already been renewed, then its number appears more than once in the Contract Number column. In this case, pay attention to entry in the Contract Number Modifier column to select the correct contract. 10. To have all remaining service lines in the order added to the same contract, select the Apply All check box. This setting does not affect any service lines that already have a contract specified for them. Specifying Renewal and Other Details for a New Contract Created for Your Order You can choose to specify the information for a single service line or for all service lines in the order. Your administrator can set up default renewal settings for different customers or organizations within your enterprise. The entries that you make here override those defaults.
  • 200.
    6-12    Oracle ServiceContracts User Guide Prerequisite Create your order and open it in the Oracle Order Management Sales Order window. To specify renewal and other details for a new contract created for your order: 1. In the Sales Order window, select the service line for which you to create a new contract. To have the information apply to the whole order, select the first service line. 2. Click Actions. 3. Select Service Contract Details from the menu. The Contract Details window appears. 4. If you plan to permit contract renewal, then use the Line Renewal Type list to specify how to renew the current service line: • Do Not Renew: The line will not be renewed when the contract is renewed. • Full Duration: The line will be renewed for the whole duration of the contract. If your order includes multiple service lines, the contract duration is as long as the length of the longest service line. • Keep Duration: The duration of this line will remain the same in a renewed contract. Use this setting for intermittent or seasonal service lines. For example, a mountain resort may order special service for peak periods in winter and summer. Using this setting you ensure that the renewed contract retains the same structure. 5. To add the information that you enter here to all lines in the order, select the Apply All check box. 6. Select the New radio button. 7. Select the Renewal Type for the contract: • Manual: Requires manual action for all process steps. • Online: Submits contract to customer. • Evergreen: Activates without customer acceptance. • Do Not Renew: Does not renew upon expiry. For information about renewals, see Understanding Contract Renewals, page 17-11 .
  • 201.
    Ordering Service inOracle Order Management     6-13 8. If a purchase order is required for the contract to be renewed, then select the PO Required check box. This selection is available only for the Notify Salesrep and Submit For Approval renewal options. 9. To specify a billing schedule for the renewed contract, then select a billing profile using the Billing Profile LOV. 10. Specify how to price the renewed contract by making a selection from the Renewal Pricing Type list in the Repricing Details region: • Price List: Charges the customer based on the price list that you enter in the Price List field. The price charged is the current price that is listed in the price list at the time the contract is renewed. • Manual: The application charges the customer the same price for the renewed contract as they paid for the original contract. • Markup Percent: Automatically adjusts the price up or down by a percentage that you enter. Optionally, you can cap the maximum adjustment based on a price list. 11. If you have selected Markup Percent, then: 1. Enter the percentage that you want the price to be adjusted. Entering a positive number marks up the price. A negative number discounts the contract renewal. 2. If you are marking up the contract price and want to put a limit on the maximum price that the customer will pay, then enter a price list in the Price List field. The price of the renewed contract cannot go over the price that is listed in the price list. For example, if you enter 20% as your markup and the current list price of the service is $100, then the renewed contract is priced at $120. If you enter a price list that lists the service at $110, however, then this price list caps the maximum price for the service at $110. The customer pays a maximum of $110 for the renewal. Note: The price cap works only for markups and not for discounts. 12. If you have selected an electronic renewal, then in the Quote to region, enter the contact to be notified by e-mail: Note: The contact must have an existing e-mail address. You cannot add new addresses here.
  • 202.
    6-14    Oracle ServiceContracts User Guide 1. Enter the contact using the Contact LOV. 2. If the contact has multiple e-mail addresses, then select the address where you want to send the notification. Note: The application administrator must enter a return (From:) e-mail address in the Global Contracts Defaults window as described in Setting Up New Contract Defaults for Oracle Order Management, page 6-20. 13. Optionally, enter customer contacts for this contract in the Customer Contacts region. 14. Select the Apply All check box to have all of the remaining service lines in the order added to the same contract. This setting does not affect any service lines that already have a contract specified. 15. Save. Running Concurrent Programs to Generate Contracts Automatically You must run the following two concurrent programs to generate contracts from Oracle Order Management sales orders: • Service Contracts Order Processing Program • Workflow Background Process For more information about running and troubleshooting concurrent programs see the Oracle Applications User's Guide. To run concurrent programs to generate contracts automatically: 1. Under the Order Management Super User responsibility, select Requests from the View menu. The Find Requests window appears. 2. Click Submit a New Request. The Submit a New Request window appears. 3. Select the Single Request radio button. 4. Click OK. The Submit Request window appears.
  • 203.
    Ordering Service inOracle Order Management     6-15 5. In the Name field, enter Workflow Background Process and press the tab key. The Parameters window appears. 6. Enter the following parameters: Prompt Entry Item Type OM Order Line Process Deferred Yes Process Timeout Yes Process Stuck No 7. Click OK. 8. Click Submit. 9. Change responsibility to Service Contract Manager. 10. Submit the Service Contracts Order Processing Program concurrent program. No parameters are required for this program. Reprocessing Orders That Did Not Create Contracts Prerequisite Run the Workflow Background Process and Service Contracts Order Capture Integration concurrent processes as described in Running Concurrent Programs to Generate Contracts Automatically, page 6-14. To reprocess orders that did not create contracts: 1. From the Navigator, navigate to Workflow, and then selectReprocess Order. The Reprocess Order window appears. Note: The Reprocess Order form displays order details and product history in a Multi Org Access Control (MOAC) context. The MOAC feature allows you to access secured data in one or more operating units from a single responsibility.
  • 204.
    6-16    Oracle ServiceContracts User Guide Your system administrator defines the scope of access privilege with the following profile options: • MO: Security Profile • MO: Default Operating Unit (Optional) 2. Use the Query By Example in the View menu to query all errors: 1. From the View menu, select Query By Example then Enter. 2. Enter Error in the Status field. 3. From the View menu, select Query By Example then Run. The window displays all errors. 3. Click Select All. 4. Click Submit. The application displays a note informing you of the process number. Viewing Created Contracts by Sales Order Number You can view the contracts that are generated by the application from your sales orders in either Oracle Service Contracts or Oracle Installed Base. Viewing Contracts by Sales Order Number in Oracle Service Contracts To view contracts by sales order number in Oracle Service Contracts: 1. From the Navigator, navigate to Contract Administration, and then select Launchpad. 2. Click Search in the toolbar. The Search Templates and Contracts window appears. 3. From the Category LOV, select the contract category that is set in the profile OKS: Category for Order Management Originated Contracts, for example Warranty and Extended Warranty. 4. Click More. The Service Module Search window appears.
  • 205.
    Ordering Service inOracle Order Management     6-17 5. Enter the order number using the Order Number field LOV. 6. Click OK to return to the Search Templates and Contracts window. 7. Click Search. 8. Select the warranty to display in the authoring window. 9. Right-click and select Open from the shortcut menu. Viewing Contracts by Sales Order in Oracle Installed Base To view contracts by sales order in Oracle Installed Base: 1. Switch responsibility to Oracle Installed Base Agent User. 2. Double-click the Oracle Installed Base Agent User to find the Install Base Navigation Menu. 3. Select the Item Instance menu. 4. Under Item Instance main menu, double-click Item Instances to open a search page. The Search Item Instances page appears in a separate browser window. 5. Select Sales Order Number from the Quick Find list. Sales Order Number is one of many search attributes that are available. 6. Enter the Sales Order number. 7. Click Go. The application displays all of the instances that are included in the sales order. 8. Using the Select radio button, select an Instance for which you want to see the
  • 206.
    6-18    Oracle ServiceContracts User Guide Contact details. 9. Select Contracts from the View Details list. 10. From the Actions LOV, select Contracts. 11. Click Go. The application displays contracts that apply to that instance. Modifying the Dates That a Warranty Is Effective Oracle Service Contracts calculates the start date of a warranty date by adding an optional delay to the shipment date. The same date is also used by Oracle Installed Base as the installed date of the product. The purpose of the delay, which the application administrator enters at the time the item is created in Oracle Inventory, is to account for the time that the item is in transit and being installed. This ensures that customers receive the full benefit of the warranty. Your organization can instead specify the actual warranty start date to ensure that customers are charged for all of the services they receive. Note: Oracle Service Contracts does not allow a change in warranty dates if a service request is opened during the period. You can: • Change the warranty start and end dates only, page 6-19 Use this procedure for products, such as toasters or cameras, that do not require installation or for which the installed date is not important. If a user changes the installed date in Oracle Installed Base, the warranty does not get updated automatically. • Change the installed date and have the application adjust the warranty accordingly, page 6-19. Use this method if your organization records and tracks installed dates. When you change the installed date in Oracle Installed Base, Oracle Service Contracts automatically adjusts the start date of the warranty for you. This method ensures that installed date and warranty start date remain synchronized. Note: For the installed date to automatically change the warranty start date, the application administrator must select the Synchronize Date Installed check box in the Warranty region of the Coverage template. (You can check whether this check box has
  • 207.
    Ordering Service inOracle Order Management     6-19 been selected in any warranty by clicking the Edit Coverage button on the Lines tab and Effectivities subtab.) Changing Only the That Dates a Warranty is Effective This procedure does not change the installed date for the item in Oracle Installed Base. Prerequisites • Confirm that the order is processed and that a warranty is created by the concurrent processes run by the administrator. • Confirm that the order number. To change only the dates that a warranty is effective: 1. Find the warranty by order number using the Search Templates and Contracts window and display it in the Service Contracts Authoring window. See Viewing Contracts by Sales Order Number in Oracle Service Contracts, page 6-16. 2. Select Cascade Attribute from the Actions menu. The Cascade Attributes window appears. 3. Enter the new dates for the warranty in the Effective Dates fields in the Header Attributes region. 4. Select the Effective Dates check box. 5. Verify that Header to Lines is selected for Cascade. 6. Click Submit. The Transaction Log appears. 7. Click Apply. Changing Both the Warranty Dates and Installed Date Prerequisite • Confirm that a warranty has been created before you modify the installed date. • Confirm the order number.
  • 208.
    6-20    Oracle ServiceContracts User Guide To change both the warranty dates and installed date: 1. Switch responsibility to Oracle Installed Base Agent User. 2. Double-click the Oracle Installed Base Agent User to find the Install Base Navigation Menu. 3. Click the Item Instance menu. 4. Under Item Instance main menu, double-click Item Instances to open a search page. The Search Item Instances page appears in a separate browser window. 5. Select Sales Order Number from the Quick Find list. Sales Order Number is one of many search attributes that are available. 6. Enter the Sales Order number. 7. Click Go. The application displays all of the instances created from the sales order. 8. Using the select radio button, select an instance for which you want to change the warranty dates or installed date. 9. Click the Update icon. An update Item Instance page appears. 10. Scroll to the Install Date and change the date. 11. Save. Setting Up New Contract Defaults for Oracle Order Management Application administrators must use this procedure to enter information that is required to create new contracts from orders in Oracle Order Management. This information is required for contracts to be created successfully and is not entered by the agent in the order. For information about the Global Contracts Defaults, see Entering Contract Defaults, page 2-36. You can also default renewal information for these contracts. See Specifying How a Contract Will Be Renewed, page 3-12.
  • 209.
    Ordering Service inOracle Order Management     6-21 To set up new contract defaults for Oracle Order Management: 1. Log in to the Service Contracts Manager responsibility. Navigate to Setup: Service Contracts, and then select Global Contracts Defaults. The Global Contracts Default window appears. 2. In the upper half of the window, make the following entries: 1. Renewal region: • Select the contract group where new contracts will appear within the Contracts Navigator from the Renewal Contract Group LOV. • Select the Renewal Process from the Renewal Process LOV. • Select the Approval method from the Approval LOV. • Select the Layout Template from the Layout Template Set LOV. • If the Purchase Order details need to be fetched, check the PO Required check box. 2. Pricing /Billing region: Select the Pricing Method from the Pricing Method LOV. 3. Thresholds region: Select the Ledger Currency from the Ledger Currency LOV. 4. Integration region: • Select a QA checklist to test contract completeness before the contract can become active from the QA Checklist LOV . • Select the workflow for processing contract approvals from the Approval Worklflow LOV. • Select Third Party from the Role LOV. This entry defines the party role when the sold-to party is not the same as the ship to party for contracts that are created from Oracle Order Management. • Select the Interface Price Break check box to send price break details to Oracle Receivables during billing. This includes quantity, unit price, and amount. • Select the credit that a customer receives if service is terminated from the Return Credit LOV. The options are: • Full: The customer receives full credit.
  • 210.
    6-22    Oracle ServiceContracts User Guide • Calculated: The credit is prorated based on the date terminated. • None: The customer does not receive credit. 5. Online Acceptance region: • Select the return e-mail address for electronic renewals from the Help Desk LOV. This address appears on the From: field of the e-mail notification that is sent to customers. • Select the Payment Terms from the Payment Terms LOV. 3. Save. Understanding the Impact of Contingencies on Revenue Recognition With the revenue management feature you can automatically time revenue recognition in accordance with the removal of revenue deferral reasons as required by US Generally Accepted Accounting Principles (GAAP) and International Accounting Standards (IAS). To leverage the features of the Revenue Management module, Oracle Service Contracts has modified the billing process to send the order line id relating to the covered goods to Oracle Receivables (AR). The AR interface contains a new column to accept the order line ID, which is also referred to as the parent line ID. If the application passes an order line ID, AR uses it to check the acceptance contingencies on that order line, to determine whether to defer revenue on the service. The application does not send an order line to AR in the following cases: • Goods covered in a contract, which were not sold in Oracle Order Management • Usage lines • Subscription lines • Services with covered levels other than covered product • Services with summary level billing AR does not defer revenue without an order line ID. The application treats the service as if no contingencies are defined for the goods that are covered by the service. Note: Administrators can select variable accounting rules to recognize revenue based on any duration (for example, daily, weekly or quarterly). Accounting rules are set up in Oracle General Ledger. 1. Associate an Accounting Rule with a contract in Oracle Service
  • 211.
    Ordering Service inOracle Order Management     6-23 Contracts. 2. Switch the responsibility to Invoicing and Accounting Rule. 3. Use the Period field and the Number of Periods field within the Accounting Rule form to define revenue recognition. 4. Select the Deferred Revenue check box to ensure that the application does not use the existing accounting rule. 5. If you check the Deferred Revenue box and you want to manually recognize revenue, navigate to Oracle Receivables, then select Control, then select Accounting, and then select Revenue Accounting The Revenue Accounting and Sales Credits form appears. • The Number is the Invoice Number. • The Reference is the Order Number. You can schedule or unscheduled revenue here.
  • 213.
    Adjusting Prices    7-1 7 AdjustingPrices This chapter covers the following topics: • Overview of Adjusting Prices • Entering Price Adjustments • Getting Help in Picking Adjustments • Viewing Total Adjustment Amounts • Viewing Adjustments for the Whole Contract • Viewing the Total Adjustments for an Individual Line or Subline • Reverting to the Original Price List Price • Cascading Service Price Overview of Adjusting Prices This group of topics explains how you can adjust prices of service, subscription, and usage lines in your contract by applying adjustments that are set up by the application administrator. Use the procedures in this group of topics to adjust prices for service lines that are automatically priced by the application based on a price list that you have entered. The pricing of other lines is based on an agreement between the agent and a customer, so the lines should already include any adjustments. Contract lines that the application prices based on the price list include: • Usage lines of all types except Negotiated Price. You manually enter a price for Negotiated Price lines, so you must change that price directly to reflect any additional discounts. • Service lines for Item and Product levels. Service lines covering Customers, Sites, Parties, and Systems are also priced
  • 214.
    7-2    Oracle ServiceContracts User Guide manually. • Subscription lines. If your contract includes a mix of lines that are priced on the price list and that are priced manually, and you decide to adjust the price at the contract level, then the adjustments that you enter apply only to those lines that are priced based on the price list. About Price Adjustments Using Oracle Advanced Pricing, application administrators can set up discounts or surcharges (called price modifiers) for the services, usage contracts, and subscriptions that you sell in Oracle Service Contracts. The price modifiers provide adjustments either in percentages or in currency amounts. Note: Lump Sum modifiers, which get applied to the final negotiated price or subtotal, are not supported for service items. The modifiers can be of two types: • Automatic price adjustments. The application automatically applies the discount or surcharge if the customer qualifies. For example, a company may choose to give an automatic 15% discount to all existing customers. • Price adjustments that you can select manually while authoring a contract. For example, you can choose to offer a customer 10%, 15%, or 20% off the list price. The administrator can set up either type of adjustment so that you can change the amount of the discount manually. You can identify this type of modifier by the Y value in the Update Allowed field. If you are applying an adjustment manually, this field appears in the Modifier Number LOV. If the administrator has set up such a modifier to apply to the line automatically, then you can enter an entirely new price for the contract line. You can do so either in the line itself or in the Price Adjustment window itself. Different Levels of Discounts The administrator can set up different price adjustments to apply at the contract, line, and subline levels. For example, a copier manufacturer may offer a 10% discount on a particular service and a 15% sale for all customers purchasing service contracts worth $1,000 or more (contract-level discount). Price adjustments that are applied at different levels are cumulative and are applied against the price list price. Suppose that a customer purchases a service contract with a list price of $1000 and receives the following two levels of discounts:
  • 215.
    Adjusting Prices    7-3 •An automatic 10% preferred customer discount at the contract level • A 15% discount at the line level because of a promotion on the specific service they are purchasing The resulting price is $750 ($1000–$100 –$150). The application deducts any currency adjustments after the percentage adjustments are made. If an agent entered -$30 in the preceding example, then the final price that the customer pays is $750–$30= $720. Adjustment Methods You can adjust prices in two ways: • Change the price list and reprice the line or contract. (This method is discussed in the chapters describing how you enter contract lines). • Select price adjustments using the Adjustments window. • Directly override the price. Optionally, you can enter any information that may help a customer qualify for an adjustment and let the application suggest valid adjustments for you. For example, you can use this method to find out what discounts are available for a customer who calls Support. Or perhaps the customer wants the same discounts as a colleague from another company. About Partial Period Computation You can set attributes that enable the application to calculate pricing for partial periods. A partial period duration is less than pricing period duration, such as 10 days rather than a full month. It is a ratio of the number of days in the partial period to the number of days in the pricing period duration (default full period or price unit of measure (UOM)). The number of days in the pricing period duration is based on the selection that is made in the partial period attributes Period Type and Price UOM fields. You can select where the partial period calculation occurs within a pricing duration when service starts in the middle of a period by setting the Period Start attribute. If you select Calendar, the period start and end dates match the calendar start and end dates. If you select Service, then the application uses the service start date and only the last period can be a partial period. You can define partial period attributes at the operating unit level within Global Contracts Defaults. See Entering Contract Defaults, page 2-36. Entering Price Adjustments You can:
  • 216.
    7-4    Oracle ServiceContracts User Guide • Enter price adjustments (discounts or surcharges). You can adjust only prices on lines that have been priced using the price list. • Have the application suggest appropriate adjustments for contract lines by first entering qualifying information. See Getting Help in Picking Adjustments, page 7- 6. Note: If you edit a modifier value, the change is not reflected on an existing contract even after you reprice it. In this case, you must delete the modifier and reprice the contract. To enter price adjustments: 1. Indicate the level at which you want to apply or review adjustments: • Header: Select the Summary tab. • Line: Select the Lines tab, the Effectivities subtab, and the line that you want to adjust. • Subline: Select the Lines tab, the Pricing/Products subtab, the line, and the subline that you want to adjust. 2. Select Pricing Adjustment from the Tools menu. The Adjustment window appears listing any discounts that have been applied at this level. Note: Remember that, although adjustments are cumulative, adjustments at one level do not show up in the windows at other levels. The heading at the top of the window indicates whether you are adjusting the price at the header or line level.
  • 217.
    Adjusting Prices    7-5 Note:The Adjustment window interface does not distinguish between line and subline adjustments. It views them all as lines. If you are adjusting prices at the subline level, then the Line Number field actually refers to the subline number and the Level field lists Line as your adjustment level although you are adjusting the subline. 3. Select any additional price adjustments using the Modifier Number LOV. A DLT in the Modifier Type field indicates a discount; SLT indicates a surcharge. 4. If the modifier that you selected can be updated manually (Y appears in the Manual Override field in the LOV), then you can enter either of the following: • Percentage adjustment in the Rate field. • Currency amount adjustment in the Price Reduction field. Note: You can apply a modifier that allows an override at both the header and subline level. For contract lines, you can only apply a modifier that does not allow an override. Whether the modifier permits you to enter an amount or percentage adjustment depends on the way it has been set up by the administrator. Note: At the header level, you can enter only percentage adjustments. For a discount, entering a positive number reduces the price. Entering a
  • 218.
    7-6    Oracle ServiceContracts User Guide negative number applies a surcharge. 5. Enter any reasons for the adjustment on the Reason tab. 6. To apply the adjustments that you have chosen, click Save and Reprice. Save saves your choice but does not reprice. The billing schedule automatically reflects the new prices. Getting Help in Picking Adjustments You can enter qualifying information that permits the application to suggest appropriate adjustments for your customer. This feature is available only at the line level. Prerequisite Confirm the qualifying information that is used in your application. You can contact your application administrator for more information. To get help in picking adjustments: 1. Select the Lines tab, the Effectivities subtab, and the line that you want to adjust. 2. Select Pricing Qualifier from the Tools menu. The Qualifiers window appears, listing any qualifiers that were entered previously. 3. Enter the qualifying information. For example, to see whether a customer with orders between $1000 and $2000 qualifies for discounts, you might select Volume as the context and Order Amount
  • 219.
    Adjusting Prices    7-7 asthe attribute and enter a range of 1000 through 2000 in the value fields. 4. Save and close the window. The qualifying information that you have entered is now used by the application to: • Apply any automatic price adjustments the customer is entitled to based on the information that you entered. The information is sent whenever the pricing call occurs, for example, when you save the line or reprice. • Filter the price adjustments (modifiers) that are listed in the Modifier Number LOV. You are now ready to select any manual price adjustments. See Entering Price Adjustments, page 7-3 . Viewing Total Adjustment Amounts You can view the total adjustment amounts for: • The whole contract • An individual line or subline Viewing the totals does not tell you what specific adjustments were applied or at what level. To view the sources of adjustments, you must open the Adjustment window at all the different levels. See Entering Price Adjustments, page 7-3 for details. Viewing Adjustments for the Whole Contract To view adjustments for the contract as a whole, select the Summary tab and Pricing/Billing subtab. The total adjustments appear in the Adjustments region. Viewing the Total Adjustments for an Individual Line or Subline You can view the total price adjustment for a line and subline. To view the total adjustments for an individual line or subline: 1. Select the Lines tab and Pricing/ Products subtab. 2. Select the line (and optionally the subline) to view. The Pricing Calculation button is active only for lines that have no sublines, such as subscriptions. 3. Select the Pricing secondary tab.
  • 220.
    7-8    Oracle ServiceContracts User Guide 4. Click Pricing Calculation. The total adjustments for the line and subline appear in the Pricing Calculation window. You can review the details that are related to the Covered Level: • List price • Quantity • UOM • Extended Amount In addition, you can review the details that are related to the Top Line level: • List price • Operator: Represents how the service is priced (amount based or percentage based). • Quantity • UOM • Adjusted Price: Reflects the adjusted price if modifiers have been applied. • Extended amount • Status Text: Represents the status of the pricing, such as Success. Reverting to the Original Price List Price You can remove any adjustments that you have made and revert an adjusted price of a line or subline to the price that is listed on the price list. This removes the adjustments that you have added manually by calling the pricing application for the most up-to-date price on the price list, along with any automatic modifiers. To revert to the original list price: 1. Remove price adjustments at any of the three levels: • For a line (this removes all subline adjustments.): 1. Select the Lines tab and Pricing/Products subtab. 2. Select the line to change.
  • 221.
    Adjusting Prices    7-9 3.Click Reprice on the Pricing/Products subtab. • For a single subline: 1. Select the Lines tab and Pricing/Products subtab. 2. Select the line and subline to change. 3. Click Reprice on the Pricing secondary tab. • The entire contract: 1. Select the Summary tab and Pricing/Billing subtab 2. Click Reprice. The reprice Decision dialog box appears. • Select one of the two repricing methods: • To remove the adjustments for the entire contract and return the prices to those listed in the price list that is attached to each contract line, click Reprice Only. • To remove the adjustments for the entire contract and reprice the entire contract based on the price list entered in the Price List field of the Pricing/Billing subtab, click Cascade and Reprice. The Repricing results window appears. 2. If all lines are repriced successfully, then click Apply to make the changes. If some lines fail and show a severity of Error or Unexpected Error, the Apply button is disabled. In this case, you must correct the error before attempting to reprice. Cascading Service Price You can access the Cascade Service Price window from the Actions menu and use it to cascade the service line price to the covered level prices at the same proportions. For example, in the following table, the current service line price is $2,000 and in this case, the percentage of the service price applied to lines L1 and L2 is 75% and 25% respectively. The same proportions are cascaded to the lines if $4,000 is applied. Current New S1 $2000 $4000
  • 222.
    7-10    Oracle ServiceContracts User Guide Current New L1 $1500 $3000 L2 $500 $1000 To cascade the service price: 1. Select the contract line to which you want to make a price change. 2. From the Service Contracts Authoring window, select the Actions menu and then select Cascade Service Price. 3. Review the Service, Start Date, End Date, and Current Price fields. These are display-only fields. 4. Enter the New Price that is to be allocated across the sublines. 5. Click Apply to save. The new price is cascaded in the appropriate proportions to the final price of each covered level. Refresh the billing schedule to reflect the new values.
  • 223.
    Running Quality AssuranceResults and Troubleshooting    8-1 8 Running Quality Assurance Results and Troubleshooting This chapter covers the following topics: • About the Quality Assurance Check (QA Check) • Running the Quality Assurance Check from the Actions Menu • Submitting the Contract for Approval from the Actions Menu • Running the Quality Assurance Check from the (Summary) Administration Subtab • Running the Contracts QA Program • Troubleshooting Errors About the Quality Assurance Check (QA Check) This group of topics explains how to use quality assurance results to troubleshoot issues within your contract. The QA Check is an automated process that verifies the validity of a contract. A default QA checklist is seeded in the application. However, if required, the default QA checklist can be modified to include other checks. The default is set with the profile option OKS: Default QA Checklist. You can override the default checklist from the Summary Administration tab of the Service Contracts Authoring form. A QA checklist consists of one or more processes that are defined in the Process Definitions form prior to their being selected for the QA checklist. A process within the QA checklist can be defined with two severity levels, error and warning. Errors must be corrected before the contract is submitted for approval. You can start the QA checklist as follows: • Actions menu: Starting the QA checklist from the Actions menu shows the results for an individual contract immediately in the Quality Assurance Results window,
  • 224.
    8-2    Oracle ServiceContracts User Guide but does not submit the contract to the Approval workflow. See Running the Quality Assurance Check from the Actions Menu, page 8-2. • Actions menu: Submitting the contract for approval runs the QA check, shows the results immediately in the Quality Assurance Results window, and enables you to submit the contract to the Approval workflow. See Submitting the for Approval from the Actions Menu, page 8-3. • Summary Administration subtab: Starting the QA checklist from the Summary Administration subtab shows the results for an individual contract immediately in the Quality Assurance Results window, and enables you to submit the contract to the Approval workflow. See Running the Quality Assurance Check from the (Summary) Administration Subtab, page 8-4. • Contracts QA Report concurrent program: Starting the QA checklist from the Contracts QA Report enables you to run a QA check on multiple contracts. The process produces a report listing the results of each contract. This process can optionally start the approval workflow after the QA is complete. See Running the Contracts QA Program, page 8-6. Note: After the QA Results appear you must fix the errors. For a listing of errors and the corrective actions, see Troubleshooting Errors, page 8-7. Running the Quality Assurance Check from the Actions Menu To run the Quality Assurance Check from the Actions menu: 1. From the Service Contracts Authoring window, select the Actions menu and select Check QA. The Quality Assurance Results window appears. Note: The Continue Approval box is not active. If you want to continue with the approval process from the QA check, then you need to submit the contract for approval from the Summary Administration tab.
  • 225.
    Running Quality AssuranceResults and Troubleshooting    8-3 2. Verify the following: • Contract Number • Default QA Checklist • Results For information about fixing errors, see Troubleshooting Errors, page 8-7. Note: You can change the default QA checklist by selecting a different checklist from the Default QA Checklist LOV within the Summary tab and Administration subtab. After making the change, you must select the Check QA action again. Submitting the Contract for Approval from the Actions Menu To submit the contract for approval from the Actions menu: 1. From the Service Contracts Authoring window, select the Actions menu and select Submit for Approval. The Quality Assurance Results window appears. Note: If errors appear in the results, the Continue Approval box is not active. If you want to continue with the approval process, you must fix the errors and resubmit the contract. 2. Verify the following:
  • 226.
    8-4    Oracle ServiceContracts User Guide • Contract Number • Default QA Checklist • Results For information about fixing errors, see Troubleshooting Errors, page 8-7. 3. If all results indicate Success, select Continue Approval to submit the contract to the approval workflow. If warning messages appear, you can review the messages and determine whether the issues should be fixed. If you determine that they do not need to be fixed, you can ignore them. Note: You can change the default QA checklist by selecting a different checklist from the Default QA Checklist LOV within the Summary Administration tab. After making the change, you must select the Submit for Approval action again. Running the Quality Assurance Check from the (Summary) Administration Subtab To run the Quality Assurance Check from the (Summary) Administration subtab: 1. From the Service Contracts Authoring window, select the Summary tab and Administration subtab. Select Submit.
  • 227.
    Running Quality AssuranceResults and Troubleshooting    8-5 The Quality Assurance Results window appears. Note: If errors appear in the results, the Continue Approval box is not active. If you want to continue with the approval process, you must fix the errors and resubmit the contract. 2. Verify the following: • Contract Number • Default QA Checklist • Results For information about fixing errors, see Troubleshooting Errors, page 8-7. 3. If all results indicate Success, select Continue Approval to submit the contract to the approval workflow. If warning messages appear, you can review the messages and determine if the issues should be fixed. If you determine that they do not need to be fixed, you can choose to ignore them. Note: You can change the default QA checklist by selecting a different checklist from the Default QA Checklist LOV within the Summary Administration tab. After making the change, you must select Submit again.
  • 228.
    8-6    Oracle ServiceContracts User Guide Running the Contracts QA Program This report enables you to run a QA check on multiple contracts. This is particularly useful when the reports is run immediately before the billing process to help identify issues on contracts before they are submitted to Accounts Receivable. Use this option for very large contracts, when you do not want to wait for the entire QA process to finish. To run the contracts QA program: 1. From the View menu, select Requests. The Find Request window appears. 2. Select Submit a New Request. The Submit a New Request window appears. 3. Select the Single Request radio button and click OK. The Submit Request window appears. 4. From the Name LOV, select Contracts QA Report and click OK. The parameters window appears. 5. Set the following parameters as required: • From Contract Number (required) • To Contract Number • From Start Date (required) Note: When you run the report, the From Start Date and To Start Date will both default to the current date. If your contracts start prior to this date, you will not see a report. Be sure to check your start dates. • To Start Date • Contract Status • Level of Details (required) You can select a report that details all contracts selected, all contracts that pass the QA check, or all contracts that fail the QA check.
  • 229.
    Running Quality AssuranceResults and Troubleshooting    8-7 • Submit for Approval: If this parameter is set to Yes, the contract is automatically submitted for approval if it passes QA. • Ignore QA Warning: If this parameter is set to Yes, QA warnings are ignored 6. Click OK. The Submit Request window appears with a concatenated listing of the parameters. 7. Select Submit. A Decision window appears with the request ID. You should make a note of this ID. 8. Click No. The Find Request window appears. You can use this window to track your request. 9. Verify that the View All My Request radio button is selected, and click Find. The Request window appears. 10. After your request is completed, you can view the details by selecting View Output . Troubleshooting Errors After you run the QA Check, you must review the Quality Assurance Results window. The results show any errors or warnings that are associated with the contract. Following is a list of errors and a list of warnings that may appear in the Quality Assurance Results window. Error Messages You must correct all errors that are listed in the Quality Assurance Results. Error messages will prevent you from passing the QA check and submitting the contract for approval. Error Messages Summary
  • 230.
    8-8    Oracle ServiceContracts User Guide Process Name Error Message Meaning and Resolution Check Address Bill to address is required on top line number Line 1. This message validates the following: a bill to address exists for service, usage, and extended warranty lines. It occurs when: the bill to address is missing on service, usage, or extended warranty lines. To fix the error: add a bill to account that has a billing address on the reported line. Check Address Bill to address is invalid on top line number 1 This message validatesthe following: whether bill to address is active for service, usage, and extended warranty lines. It occurs when: bill to address is not active on service, usage or extended warranty lines. To fix the error: change the bill to address on the reported line. Check Address Bill to address is invalid at header level This message validatesthe following: whether bill to address is active at the header. It occurs when: bill to address is not active on header. To fix the error: change the bill to address at the header level.
  • 231.
    Running Quality AssuranceResults and Troubleshooting    8-9 Process Name Error Message Meaning and Resolution Check Address Subscription line 1 should have a ship to address. This message validatesthe following: whether ship to address exists for subscription line. It occurs when: ship to address is missing on subscription line. To fix the error: add a ship to account that has a shipping address on the reported line. Check Address Ship to address is invalid on top line number Line 1. This message validatesthe following: whether ship to address is active for service, usage and extended warranty lines. It occurs when: ship to address is not active on service, usage, or extended warranty lines. To fix the error: change the ship to address on the reported line. Check Address Ship to address is invalid at header level This message validates the following: whether ship to address is active at the header. It occurs when: ship to address is not active on header. To fix the error: change the ship to address at the header level.
  • 232.
    8-10    Oracle ServiceContracts User Guide Process Name Error Message Meaning and Resolution Check Billing Schedule Top line Line 1 Stream Level should be entered. This message validates the following: checks the Stream Level Line of the top line billing schedule. It occurs when: top line Stream Level Line has not been entered. To fix the error: enter the Stream Level Line of the top line billing schedule. Check Billing Schedule Line 1 billing schedule should be entered. This message validates the following: checks the top line level elements. It occurs when: the level elements are missing. To fix the error: enter the level elements for the reported line. Check Billing Schedule Sub line SLL period not same as bill schedule period. This message validates the following: reports an error if for Equal Amount and Covered level billing type the top line period is not the same as the sum of level elements. It occurs when: the top line period is not the same as the sum of level elements for Equal Amount and Covered level billing type. To fix the error: change the Stream Level Line period on the reported line.
  • 233.
    Running Quality AssuranceResults and Troubleshooting    8-11 Process Name Error Message Meaning and Resolution Check Billing Schedule For Line 1 there is a mismatch between line amount and total billing schedule amount (sum of level elements). This message validates the following: for Equal Amount billing type a mismatch should not exist between line amount and billing schedule amount. It occurs when: the billing type is Equal Amount and the line amount is different from the billing schedule amount. To fix the error: change the billing schedule amount on the reported line. Check Billing Schedule Line 1 Stream level effectivities should be within line effectivities This message validates the following: reports an error if billing cycle end date is prior to the top line end date or the billing cycle start date is not the same as the top line start date. It occurs when: billing cycle end date is prior to top line end date or when billing cycle start date is not the same as top line start date. To fix the error: change the billing cycle end date if it is prior to the top line end date or change the billing cycle start date if it is not the same as top line start date.
  • 234.
    8-12    Oracle ServiceContracts User Guide Process Name Error Message Meaning and Resolution Check Billing Schedule Line 1 Stream level effectivities should be within line effectivities. This message validates the following: whether billing type is Equal Amount or Covered Level then billing cycle end date should not be later than top line end date. It occurs when: billing type is Equal Amount or Covered Level and billing cycle end date is later than top line end date. To fix the error: Make the billing cycle end date same as top line end date or change the billing type to Top Level. Check Billing Schedule Subscription line 1 with final price can not be less than billed amount. This message validates the following: reports an error for subscription line if negotiated price is less than billed amount. It occurs when: negotiated price is less than billed amount in a subscription line. To fix the error: change the negotiated price on the reported line. Check Billing Schedule Sub line billing flag should be same as top line billing flag. This message validates the following: subline billing type should be the same as top line billing type. It occurs when: subline billing type is different from top line billing type. To fix the error: make both subline and top line billing type the same.
  • 235.
    Running Quality AssuranceResults and Troubleshooting    8-13 Process Name Error Message Meaning and Resolution Check Billing Schedule Start date and end date of sub line should be same as top line in equal amount. This message validates the following: start date and end date of sub line should be same as top line in Equal Amount. It occurs when: start date or end date of the sub line is not the same as the top line for Equal Amount billing type. To fix the error: change the start date or end date of the reported subline or top line. Check Billing Schedule Sub line 1 Stream Level Line should be entered. This message validates the following: reports an error if subline stream level line is not found. It occurs when: sub line stream level line is not found. To fix the error: enter the stream level line on the reported subline billing schedule. Check Billing Schedule Line 1 billing schedule should be entered. This message validates the following: reports an error if level element (billing schedule) is not found in the sub line. It occurs when: level element is not found in the subline. To fix the error: enter the level element on the reported subline.
  • 236.
    8-14    Oracle ServiceContracts User Guide Process Name Error Message Meaning and Resolution Check Billing Schedule Sub line 1 SLL period 1 not same as bill schedule period 1. This message validates the following: reports an error if for Equal Amount and Covered level billing type the sub line billing period is not the same as the sum of level elements. It occurs when: billing type is Equal Amount or Covered level and the sub line billing period is not the same as the sum of level elements. To fix the error: fix the stream level line period for the reported sub line. Check Billing Schedule Sub line 1 Product final price not same as total bill schedule amount. This message validates the following: subline level element total should be equal to subline price negotiated. It occurs when: covered line's billing schedule amount is not equal to the covered line's price negotiated. To fix the error: change the covered line's billing schedule amount. Check Billing Schedule Sub line 1 Product final price cannot be less than billed amount. This message validates the following: subline final price cannot be less than billed amount. It occurs when: subline final price is less than billed amount. To fix the error: make the final price equal to or greater than the billed amount.
  • 237.
    Running Quality AssuranceResults and Troubleshooting    8-15 Process Name Error Message Meaning and Resolution Check Billing Schedule Subline 1 SLL effectivities should be within sub line effectivities. This message validates the following: checks for Product billing cycle end date equal to lines end date for Equal Amount and Covered Level billing type This check is not done for Top level billing type because the stream level line end date in that case might go beyond the line end date. It occurs when: billing type is Equal Amount and Covered Level and product billing cycle end date is not the same as lines end date. To fix the error: change the billing cycle end date. Check Billing Schedule Subline 1 SLL effectivities should be within sub line effectivities. This message validates the following: For Top Level billing type the billing cycle start date and subline start date should be the same. It occurs when: billing type is Top Level and subline billing cycle start date is not the same as subline start date. To fix the error: change the sub line billing cycle start date to the subline start date. Check Covered Levels OKS At least one covered level line is required for contract line, 1, Service. This message validates the following: if a covered level is entered. It occurs when: covered level is missing. To fix the error: enter the covered level.
  • 238.
    8-16    Oracle ServiceContracts User Guide Process Name Error Message Meaning and Resolution Check Covered Levels OKS Please enter a value for Final Price in contract line 1. This message validates the following: negotiated amount at covered levels is required. It occurs when: negotiated amount is missing from covered levels. To fix the error: enter a negotiated amount at covered levels. Check Covered Levels OKS Quota Sales Credit at line must be assigned to 100% in contract line 1, Service. This message validates the following: sales credits must be defined for the line. It occurs when: sales credits have not been defined for the line. To fix the error: enter sales credits for the lines. Check Covered Levels OKS Service item &Line_Name is not an active inventory item This message validates the following: contract contains an inactive inventory item from Oracle Installed Base It occurs when: a contract contains an inactive inventory item from Oracle Installed Base. To fix the error: enter an active inventory item in the Covered Name field. Check Covered Levels OKS Covered item &Line_Name is not an active inventory item This message validates the following: contract contains an inactive covered item. It occurs when: contract contains an inactive covered item. To fix the error: enter an active covered item in the Covered Level field.
  • 239.
    Running Quality AssuranceResults and Troubleshooting    8-17 Process Name Error Message Meaning and Resolution Check Covered Levels OKS Covered Party &Line_Name is not active This message validates the following: contract contains an inactive covered party. It occurs when: contract contains an inactive covered party. To fix the error: enter an active covered party in the Covered Level field. Check Covered Levels OKS Covered Product &Line_Name is not active. This message validates the following: contract contains an inactive covered product. It occurs when: contract contains an inactive covered product. To fix the error: enter an active covered product in the Covered Level field. Check Covered Levels OKS Covered System &Line_Name is not active. This message validates the following: contract contains an inactive covered system. It occurs when: contract contains an inactive covered system. To fix the error: enter an active covered system in the Covered Level field. Check Covered Levels OKS Covered Site &Line_Name is not active This message validates the following: contract contains an inactive covered site. It occurs when: contract contains an inactive covered site. To fix the error: enter an active covered site in the Covered Level field.
  • 240.
    8-18    Oracle ServiceContracts User Guide Process Name Error Message Meaning and Resolution Check Covered Product Quantity Item instance item 1 for line 1 is not found in installedbase. This message validates the following: whether the item instance is in installed base. It occurs when: the item is not found in installed base. To fix the error: select a new product. Check Covered Product Quantity Covered product quantity and unit of measure on line 1 does not match the quantity and unit of measure in installedbase. This message validates the following: checks the covered product quantity and unit of measure against the quantity and unit of measure in installed base. It occurs when: the covered product quantity and unit of measure is different from the quantity and unit of measure in installed base. To fix the error: select a different product from the installed base or update the product quantity. Check Covered Product Quantity Covered product quantity on line 1 does not match quantity in installedbase. This message validates the following: checks the covered product quantity against the quantity in installed base. It occurs when: the covered product quantity is different from the quantity in installed base. To fix the error: select a different product from the installed base or update the product quantity.
  • 241.
    Running Quality AssuranceResults and Troubleshooting    8-19 Process Name Error Message Meaning and Resolution Check Covered Product Quantity Covered product unit of measure on line 1 does not match the value stored in installedbase. This message validates the following: checks the covered product unit of measure against the unit of measure in the installed base. It occurs when: the covered product unit of measure is different from the unit of measure in installed base. To fix the error: select a different product from the installed base or update the unit of measure Check Customer Availability Bill to customer account is inactive on line number 1. This message validates the following: whether bill to customer account is active. It occurs when: bill to customer account is not active. To fix the error: change the bill to customer on the reported line. Check Customer Availability There is no customer in the contract. Please define a party with the role of customer for the contract. This message validates the following: whether the contract header has a customer or third party. It occurs when: the contract header has no customer or third party. To fix the error: add a customer or subscriber or third party to the contract.
  • 242.
    8-20    Oracle ServiceContracts User Guide Process Name Error Message Meaning and Resolution Check Customer Availability At least one bill to account on the contract lines belongs to Account 1. The Customer/Third party on the contract header is not related to this account. This message validates the following: whether the customer account that is stored in the contract lines belongs to the customer, third party or related customer. It occurs when: customer account stored on the contract top line does not belong to the customer, third party or related customer. To fix the error: change the customer account on the reported line. Check Email Address Check Email Address This message validates the following: whether a valid e-mail id is provided for a contact at the header. It occurs when: e-mail address for a contact is not active on header. To fix the error: enter an email ID for a contact within the summary tab. Check Item Instance Is Valid Service line 1 is covering an invalid subscription product. This message validates the following: whether the subscription item being covered belongs to an active/signed contract. It occurs when: a subscription item being covered as a covered product in contract A belongs to contract B but contract B is not active or signed. To fix the error: select another subscription item or make contract B active.
  • 243.
    Running Quality AssuranceResults and Troubleshooting    8-21 Process Name Error Message Meaning and Resolution Check Product Availability Service 1 is not available for product 1. This message validates the following: if line status is Entered, then it checks whether service is available for the covered product or item. It occurs when: line status is Entered and service is not available for the covered product or item. To fix the error: select another covered product or item. Check Required Values Please assign at least 2 different parties to your contract. This message validates the following: the contract contains only one party role. It occurs when: the Customer/Third Party information is missing in the contract. To fix the error: enter customer/third party details in the Summary tab. Check Required Values OKS The contract has no CUSTOMER attached to it. This message validates the following: the contract contains a customer. It occurs when: customer has not been entered for the contract. To fix the error: enter customer details in the Summary tab.
  • 244.
    8-22    Oracle ServiceContracts User Guide Process Name Error Message Meaning and Resolution Check Required Values OKS QA Check list is required for contract header 1. This message validates the following: the contract has a QA check list. It occurs when: a QA check list has not been selected for a contract. To fix the error: select a QA check list from the Administration subtab. Check Required Values OKS Only one party role, may be attached to the contract. This message validates the following: Only one CUSTOMER/SUBSCRIBER may be attached to a contract. It occurs when: the contract has more than one party of role type customer/subscriber. To fix the error: verify that you have only one customer/subscriber. Check Required Values OKS Only one party role, may be attached to the contract. This message validates the following: Only one VENDOR/MERCHANT can be attached to a contract. It occurs when: the contract has more than one party of role type vendor/merchant. To fix the error: verify that you have only one vendor/merchant. Check Required Values OKS Short description is required for contract header 1. This message validates the following: a short description is in contract header. It occurs when: you do not have a short description on the contract header. To fix the error: add a short description.
  • 245.
    Running Quality AssuranceResults and Troubleshooting    8-23 Process Name Error Message Meaning and Resolution Check Required Values OKS Either the price list is inactive or the price list is invalid for the contract currency. Select a valid price list for the contract currency. This message validates the following: whether that price list is active or valid for the contract currency. It occurs when: the price list is inactive, missing, or is invalid for the contract currency. To fix the error: select a valid price list. Check Required Values OKS Price list ID is required for contract header 1. This message validates the following: a price list ID is in contract header. It occurs when: you do not have a price list under Pricing/Billing subtab. To fix the error: add a price list under the Pricing/Billing subtab. Check Required Values OKS Contract group must be entered for contract header 1 This message validates the following: a contract group is entered in the contract header. It occurs when: contract group is not entered on the contract header. To fix the error: add a contract group under the Administration sub tab.
  • 246.
    8-24    Oracle ServiceContracts User Guide Process Name Error Message Meaning and Resolution Check Required Values OKS An approval workflow must be selected for the contract. This message validates the following: an approval workflow is selected for the contract. It occurs when: an approval workflow is missing. To fix the error: add an approval workflow under the Administration subtab. Check Required Values OKS Line 1 UOM code and values should be entered. This message validates the following: if profile option OKS: Use Advanced Pricing for Manual Adjustment is set to Yes, then a value should be entered on the subline for unit price or UOM. It occurs when: profile option OKS: Use Advanced Pricing for Manual Adjustment is set to Yes, and unit price or UOM code is missing from subline. To fix the error: add a unit price or UOM code to the reported subline. Check Required Values OKS Line 1 UOM code and values should be entered. This message validates the following: If profile option OKS: Use Advanced Pricing UOM is set, UOM becomes a required field on the subline. It occurs when: profile option OKS: Use Advanced Pricing for Manual Adjustment is set to No and uom code is missing from subline. To fix the error: add a uom code to the reported subline.
  • 247.
    Running Quality AssuranceResults and Troubleshooting    8-25 Process Name Error Message Meaning and Resolution Check Required Values OKS Please enter the PO number for billing. This message validates the following: the PO flag and number under the billing section. If Purchase Order Required check box is selected, then PO number is required. It occurs when: the PO check box is checked but PO number is missing under the billing section under the Pricing/Billing subtab. To fix the error: add a PO number under the billing section under the Pricing/Billing subtab or clear the PO check box. Check Required Values OKS Service PO number is missing. This message validates the following: the PO flag and number under the Service Charges section. If Purchase Order Required check box is selected, then PO number is required. It occurs when: the PO flag is checked under the Service Charges section under the Pricing/Billing subtab but the PO number is not entered. To fix the error: add the PO number under the Service Charges section under the Pricing/Billing subtab or clear the PO check box.
  • 248.
    8-26    Oracle ServiceContracts User Guide Process Name Error Message Meaning and Resolution Check Required Values Conversion information is required for this contract. This message validates the following: the currency conversion type is entered if the From Currency and the To Currency are different. It occurs when: the to and from currencies are different and the currency conversion type is missing. To fix the error: add a currency conversion type under the Pricing/Billing subtab. Check Required Values Price list currency, does not match header currency. This message validates the following: compares price list currency with contract header currency. It occurs when: the price list currency is not the same as the header currency. To fix the error: change the price list under the Pricing/Billing subtab Check Service Effectivity Please enter a value for Inventory item status not active in contract line 1. This message validates the following: whether the inventory item status is active. It occurs when: When inventory item is no longer valid. To fix the error: change the inventory item on the reported line.
  • 249.
    Running Quality AssuranceResults and Troubleshooting    8-27 Process Name Error Message Meaning and Resolution Check Service Effectivity Item: line 1 Not a valid Service This message validates the following: whether service or extended warranty is a valid item in the inventory table. It occurs when: the service or extended warranty is not a valid item. To fix the error: select another service or extended warranty line on the Accounts subtab, or delete the line. Check Service Effectivity Item: line 1 Not a valid Usage This message validates the following: if the usage item is valid. It occurs when: the usage is not a valid item. To fix the error: select another usage on the Accounts subtab, or delete the line. Check Service Effectivity The Product Item is not a Serviceable Product. This message validates the following: whether covered product is serviceable. It occurs when: a covered product is not serviceable. To fix the error: select another covered product from the Effectivities secondary tab (Products/Pricing subtab).
  • 250.
    8-28    Oracle ServiceContracts User Guide Process Name Error Message Meaning and Resolution Check Service Effectivity Please enter a value for Covered item status not active in contract line 1. This message validates the following: the covered item status is active. It occurs when: covered item status is not active. To fix the error: select another covered item from the Effectivities secondary tab (Products/Pricing subtab). Check Service Effectivity Please enter a value for Covered party status not active in contract line 1. This message validates the following: if covered party status is active. It occurs when: covered party status is not active. To fix the error: select another covered party. Check Service Effectivity Please enter a value for Covered product status not active in contract line 1. This message validates the following: reports an error if covered product status is not active and contract status is not QA hold. Reports an error if covered product status is not active and the covered product has a future termination date and the contract status is QA hold. It occurs when: the covered product status is not active and contract status is not QA hold or when the covered product status is not active and the covered product has a future termination date and the contract status is QA hold. To fix the error: select another covered product.
  • 251.
    Running Quality AssuranceResults and Troubleshooting    8-29 Process Name Error Message Meaning and Resolution Check Service Effectivity Please enter a value for Covered system status not active in contract line 1. This message validates the following: reports an error if Covered System status is not active. It occurs when: covered system status is not active. To fix the error: select another covered system. Check Service Effectivity Please enter a value for Covered site status not active in contract line 1. This message validates the following: Reports an error if Covered Site status is not active. It occurs when: covered site status is not active. To fix the error: select another covered site. Check Subscription Element Exist Subscription line 1 should have at least one subscription element. This message validates the following: for tangible items a delivery schedule is available. If the subscription line has a tangible item, then it should have at least one subscription element (delivery schedule). It occurs when: delivery schedule is missing for a tangible subscription. To fix the error: enter a delivery schedule.
  • 252.
    8-30    Oracle ServiceContracts User Guide Process Name Error Message Meaning and Resolution Check Subscription is Shippable Subscription line 1 should have a ship to rule. This message validates the following: if subscription item is shippable, then ship to rule is required for that subscription line. It occurs when: subscription item is shippable, but ship to rule is missing from the subscription line. To fix the error: enter a ship to rule for the subscription line Check Subscription is Shippable Subscription line 1 should have a ship to address. This message validates the following: if subscription item is shippable, then ship to address is required for that subscription line. It occurs when: subscription item is shippable, but ship to address is missing from the subscription line. To fix the error: enter a shipping address for the subscription line. Check Sum of Credit Card Numbers Credit Card Number is invalid This message validates the following: whether the credit card numbers are valid based on sum calculations. It occurs when: credit card numbers are invalid. To fix the error: change the credit card number.
  • 253.
    Running Quality AssuranceResults and Troubleshooting    8-31 Process Name Error Message Meaning and Resolution Check Tax Exemption Tax Exemption 1 on Line 1 is not effective for all billing periods in the billing schedule. The Tax Exemption will not be applicable after invoice date. This message validates the following: reports an error if tax exemption is invalid. It occurs when: tax exemption is invalid. To fix the error: select another tax exemption under the Exemption/Payment Options subtab. Check Tax Exemption Tax Exemption 1 on Line 1 is not effective for all billing periods in the billing schedule. The Tax Exemption will not be applicable after invoice date This message validates the following: whether the exemption is valid on the line end date. It occurs when: the exemption is not valid on the line end date. To fix the error: adjust the line duration , or adjust the tax exemption duration. Check Tax Exemption Tax exemption number 1 is either unapproved or invalid on the start date of line number 1 Tax exemption will not be applied to this line. This message validates the following: whether the exemption is valid on the line start date. It occurs when: the exemption is not valid on the line start date. To fix the error: approve the exemption or adjust the exemption duration .
  • 254.
    8-32    Oracle ServiceContracts User Guide Process Name Error Message Meaning and Resolution Check Tax Exemption Tax exemption certificate number 1 on line 1 is only partially valid for the billing period. Exemptions will not be applied after the exemption certificate expires. This message validates the following: whether the exemption is valid on the line end date. It occurs when: the exemption is not valid on the line end date. To fix the error: adjust the line duration, or adjust the tax exemption duration. Check Tax Exemption Tax exemption certificate number 1 on the header is only partially valid for the contract duration. Exemptions will not be applied after the exemption certificate expires. This message validates the following: whether the exemption is valid on the header end date. It occurs when: the exemption is not valid on the header end date. To fix the error: adjust the duration of the header, or adjust the duration of the tax exemption. Check Tax Exemption Invalid tax exemption 1 for customer account on line 1. This message validates the following: whether the assigned tax exemption belongs to the customer on the line. It occurs when: the tax exemption does not belong to the customer on the line (when the line is transferred to a new customer, or the line was copied to a contract with a different customer). To fix the error: Remove the tax exemption (or assign the tax exemption that is associated with the current customer).
  • 255.
    Running Quality AssuranceResults and Troubleshooting    8-33 Process Name Error Message Meaning and Resolution Check Tax Exemption Tax exemption certificate number 1 on the contract header is invalid or unapproved. This message validates the following: whether the assigned tax exemption is approved and valid. It occurs when: the tax exemption is invalid or unapproved. To fix the error: Approve the exemption or remove the exemption. Check Tax Exemption This contract has an unapproved exemption. Billing this contract will result in creation of an invoice with an unapproved tax exemption. This message validates the following: whether the assigned tax exemption is approved. It occurs when: the tax exemption is unapproved. To fix the error: Approve the exemption. Warning Messages You should review all warning messages before submitting the contract for approval. However, warning messages will not prevent you from passing the QA check and submitting the contract for approval. Warning Messages Summary
  • 256.
    8-34    Oracle ServiceContracts User Guide Process Name Warning Message Meaning and Resolution Check Covered Level Overlap Line 1 is also in Contract 1 This message validates the following: whether the current contract has covered lines for which dates overlap the covered lines of an existing contract that is not canceled, terminated, or expired. It occurs when: the current contract has lines that overlap with an existing contract that is not canceled, terminated or expired. If the warning should be fixed: delete the lines that are overlapping. Check Email Address This Contract is missing at least one party contact with email address. This message validates the following: party contact has an e-mail address. It occurs when: the party contact is missing an e-mail address. If the warning should be fixed: add an e-mail address to the party contact. Check Preventive Maintenance Contract line 1; The definition of Preventive Maintenance Program or Activities is no longer valid. This message validates the following: whether preventive maintenance program or activities have been terminated in AHL. It occurs when: preventive maintenance program or activities have been terminated in AHL. If the warning should be fixed: select a different program name in coverage that is not terminated.
  • 257.
    Running Quality AssuranceResults and Troubleshooting    8-35 Process Name Warning Message Meaning and Resolution Check Preventive Maintenance Contract line 1; No Preventive Maintenance Schedule is defined for any activity This message validates the following: whether there any schedules are defined in Contracts for the Preventive Maintenance Program or Activities. It occurs when: no schedules defined in Oracle Service Contracts for the Preventive Maintenance Program or Activities If the warning should be fixed: navigate to the Program Schedule or Activity Schedule tab as appropriate and define stream levels and schedules. Check Preventive Maintenance Contract line 1; The definition of Preventive Maintenance Program has been modified. This message validates the following: new activities have been associated with the preventive maintenance program in AHL. It occurs when: new activities have been associated with the preventive maintenance program in AHL. If the warning should be fixed: select the same Program Name from the LOV.
  • 258.
    8-36    Oracle ServiceContracts User Guide Process Name Warning Message Meaning and Resolution Check Price Lock Price locks are removed during contract renewal or copy. To re-lock the price list for contract line 1, refer to contract 1 line 1 for the previous locked price. This message validates the following: whether price lock is present on the original contract lines and not on the copied/renewed lines. It occurs when: price lock is present on the original contract lines and not on the copied/renewed lines. If the warning should be fixed: review the prior prices if necessary and relock prices on the current contract on the reported line. Check Required Values for Preventive Maintenance Contract line 1; The effective start date of the Preventive Maintenance Program / Activities should be less than or equal to the line start date. This message validates the following: the effective start date of the Preventive Maintenance Program or Activities should be after the contract line start date. It occurs when: the effective start date of the Preventive Maintenance Program or Activities is after the contract line start date. If the warning should be fixed: select a different program name in Coverage that is effective.
  • 259.
    Approving Contracts    9-1 9 ApprovingContracts This chapter covers the following topics: • Approving Contracts • Submitting Contracts for Approval • Tracking Contracts During the Approval • Approving Contracts • Signing Contracts Approving Contracts This group of topics explains the contract approval process. Oracle Service Contracts leverages Oracle Workflow to automate the contract approval process. After you author a contract you must: • Submit the contract for approval. • Secure approval on the contract. • Obtain a signature on the contract. The Submit for Approval function starts the quality assurance (QA) check. If the QA check is successful you can continue the approval process, which submits the contract to the approval workflow. See About the Quality Assurance Check, page 8-1. Note: The standard contract approval workflow integrates with Oracle Approval Management Engine (AME). Oracle Service Contracts supports standard AME features such as rules based approval routing and definition of approval groups. There are mandatory setups in AME for Oracle Service Contracts. For more information, see the Oracle Service Contracts Implementation Guide.
  • 260.
    9-2    Oracle ServiceContracts User Guide Following the contract approval and signing, the application updates the contract status to Signed or Active, depending on whether or not the start date has passed. Submitting Contracts for Approval You can submit a contract for approval from the Service Contracts Authoring window, which is covered in the following procedure. You can also submit a contract for approval from the Administrator Workbench, see Submitting a Contract for Approval from the Administrator Workbench, page 13-7. To submit contracts for approval: 1. From the Service Contracts Authoring window, select the Summary tab and Administration subtab. 2. Click Submit. The Quality Assurance Results window appears. You must confirm there are no errors on the report. See About the Quality Assurance Check, page 8-1. 3. From the Quality Assurance Results window, click Continue Approval. The Contract Authoring page returns with the Summary Administration subtab selected. You have submitted the contract to the approval workflow that is selected in the Approval Workflow region. Review the following procedures: • Tracking Contracts During the Approval, page 9-3. • Approving Contracts, page 9-4.
  • 261.
    Approving Contracts    9-3 •Signing Contracts, page 9-6. Alternatively, you can submit the contract by selecting Submit for Approval from the Actions menu. Note: Contracts that have been submitted to the approval workflow are locked for further authoring. However, communications and attachments can still be added to the contract after it has been submitted for approval. Tracking Contracts During the Approval To track contracts during the approval: 1. From the Service Contracts Authoring window, select the Summary tab and Administration subtab. 2. Select Monitor. The Monitor Diagram page appears in a new browser window. Beneath the Current Status heading, you can view the current status and a visual diagram of the workflow approval process. 3. Follow the green arrow within the diagram to determine where the contract is in the approval process. For example, if the contract requires approval the green arrow leads to the Contract Approval Required process.
  • 262.
    9-4    Oracle ServiceContracts User Guide 4. To view details for a given process step, select the process icon within the diagram. The tabs beneath the diagram show status information for the selected process. Tabs include Definition, Status, Usage, and Notification. For more information on monitoring workflows, refer to the Oracle Workflow User's Guide. Note: You can stop the approval process by selecting the Stop button within the Administration subtab. Approving Contracts To approve a contract: 1. From the Navigator, navigate to Contract Administration, and then select Launchpad. 2. From the Inbox region, click Find. The Inbox Find window appears. 3. From the Select Notification Type list, select Contract Approvals.
  • 263.
    Approving Contracts    9-5 4.Select Find. The Inbox is refreshed with contracts that require approval. 5. Highlight the contract you would like to approve.
  • 264.
    9-6    Oracle ServiceContracts User Guide 6. Select Respond. A worklist page appears within a new browser window. You can either approve, reject, reassign the approval to someone else, or request information. You may add a note to the Response region. 7. Select Approve. The Worklist summary appears. The message indicates, Contract requires your signature. You can select the Contract requires your signature link and sign the contract. Signing Contracts To sign a contract: 1. From the Navigator, navigate to Contract Administration, and then select Launchpad. The Launchpad appears. 2. In the Inbox region, click Find. The Inbox Find window appears. 3. From the Select Notification Type list, select Contract Requiring Signature.
  • 265.
    Approving Contracts    9-7 4.Select Find. The Inbox is refreshed with contracts that require a signature. 5. Highlight the contract you would like to sign.
  • 266.
    9-8    Oracle ServiceContracts User Guide 6. Select Respond. A worklist page appears within a new browser window. You can either sign, not sign, reassign, or request additional information. You may add a note to the Response region. 7. Select Yes. The Worklist summary appears. The message indicates, Contract has been Signed.
  • 267.
    Billing    10-1 10 Billing This chaptercovers the following topics: • Overview of Billing • Understanding Billing Levels • Creating Billing Profiles • Billing Customers Based on Usage • Billing Using Credit Cards or Commitments • Specifying Multiple General Ledger Accounts for Contract Revenue Streams • Executing Billing Through Concurrent Programs • Running the Service Contracts Main Billing Program • Running the AutoInvoice Import Program • Running the Service Contracts Fetch Receivables Info for Billing Program • Running the Service Contracts Usage Averaging Program • Running the Service Contracts Usage Settlement Program • Viewing Invoice Details • Viewing Invoice History • Reviewing Invoice Transactions in Oracle Receivables • Understanding Bill Presentment Architecture • Using Variable Accounting and Partial Periods Revenue Recognition Overview of Billing This group of topics explains how billing works. A billing schedule determines when the customer is billed for the services they receive. You must specify billing schedules for each contract that you author in Oracle Service
  • 268.
    10-2    Oracle ServiceContracts User Guide Contracts. Note: Contracts can be indirectly created from Oracle Order Management. You do not need to create billing schedules for such contracts. Billing schedules can be defined at the contract header, the contract line, or the subline level. For information about setting up billing schedules at the contract header level, see Entering Billing Schedules, page 2-11. For information about setting up billing schedules at the line level, see: • Specifying a Billing Schedule, page 3-38 (for a service line) • Specifying a Billing Schedule for a Usage Line, page 4-31 • Specifying a Billing Schedule for Subscriptions, page 5-12 About Partial Period Computation You can set attributes that enable the application to calculate billing for partial periods. A partial period duration is shorter than a full billing period duration, such as 10 days rather than a full month. It is a ratio of the number of days in the partial period to the number of days in the billing period duration (stream period unit of measure (UOM)). The number of days in the billing period duration is based on the selection that is made in the partial period attributes Period Type. For example for billing period duration Month, if you select a Fixed Period Type, then number of days for any month is considered 30, but if you select Actual, then number of days for any month is the actual number of days as per the standard calendar. The application uses the Period Start attributes if service effectivity starts from the middle of a billing calendar period and ends in the middle of a billing calendar period. The Period Start attribute provides two options, Calendar and Service. You can define partial period attributes at the operating unit level within Global Contracts Defaults. See Entering Contract Defaults, page 2-36 Partial Period Billing Example Suppose your contract contains: • Service Line Duration: 15-JAN-2006 to 14-JAN-2007 • Billing Frequency: Month • Period Type: Actual • Period Start: Calendar The application generates the first billing schedule period using a partial period with
  • 269.
    Billing    10-3 start dateas service start date, which is 15-JAN-2006, and end date as first calendar billing period's end date, which is 31-JAN-2006. The application generates the last billing schedule period with start date of the last calendar billing period, which is 01-JAN-2007, and the end date of the service end date, 14-JAN-2007. All other billing schedules start from the calendar month's first date and end with calendar month's end date. For example, the application generates the second billing schedule with a start date of 01-FEB-2006 and an end date of 28-FEB-2006. The following table lists the billing schedules: Sequence Start Date End Date 1 Partial Period 15-JAN-2006 31-JAN-2006 2 01-FEB-2006 28-FEB-2006 3 01-MAR-2006 31-MAR-2006 4 01-APR-2006 30-APR-2006 5 01-MAY-2006 31-MAY-2006 6 01-JUN-2006 30-JUN-2006 7 01-JUL-2006 31-JUL-2006 8 01-AUG-2006 31-AUG-2006 9 01-SEP-2006 30-SEP-2006 10 01-OCT-2006 31-OCT-2006 11 01-NOV-2006 30-NOV-2006 12 01-DEC-2006 31-DEC-2006 13 Partial Period 01-JAN-2007 14-JAN-2007 No Partial Period Billing Example Suppose your contract contains: • Service Line Duration: 15-JAN-2006 to 14-JAN-2007
  • 270.
    10-4    Oracle ServiceContracts User Guide • Billing Frequency: Month • Period Type: Actual • Period Start: Service The application creates 12 billing schedules, each with full billing period durations. For example, the first billing schedule is 15-JAN-2006 to 14-FEB-2006, and the second billing schedule is 15-FEB-2006 to 14-MAR-2006. The application follows this pattern until the end date. The following table lists the billing schedules: Sequence Start Date End Date 1 15-JAN-2006 14-JAN-2006 2 15-FEB-2006 14-FEB-2006 3 15-MAR-2006 14-MAR-2006 4 15-APR-2006 14-APR-2006 5 15-MAY-2006 14-MAY-2006 6 15-JUN-2006 14-JUN-2006 7 15-JUL-2006 14-JUL-2006 8 15-AUG-2006 14-AUG-2006 9 15-SEP-2006 14-SEP-2006 10 15-OCT-2006 14-OCT-2006 11 15-NOV-2006 14-NOV-2006 12 15-DEC-2006 14-DEC-2006 Understanding Billing Levels From the Billing window, you can define a billing level for the billing schedule. Three levels exist, but not all levels are available to each line type, nor are all levels available at the header level.
  • 271.
    Billing    10-5 The followingprovides general information about the billing levels, however; to understand which of these levels the header and lines can use, refer to the topics that are noted at the end of each description. The three billing levels are: • Equal Amount: enables you to bill for equal amounts over the billing period and have control over the amount to be billed as well as the billing periods. You can also use the Prorate button to spread the amount across billing periods. The start and end dates of all top lines and their sublines must be the same. You cannot modify the schedule form after it is generated. Equal Amount can be set at the header, service line, or subscription line level: • Header, see Creating a Default Billing Schedules, page 2-11 • Service lines, see Specifying a Billing Schedule, page 3-38 • Subscription lines, see Specifying a Billing Schedule for Subscriptions, page 5-12 • Top Level: enables you to define the billing periods. The billing engine calculates the bill amounts, so the amount fields and Prorate button are disabled. With Top Level, line level start and end dates can differ from the sublines. When you are creating billing schedules at this level, the total stream level amounts from the sublines roll up to the line levels. Also, once a line level billing schedule exists, all new sublines that are added will automatically update the billing amount per period without your needing to revisit the line level and click Schedule again.
  • 272.
    10-6    Oracle ServiceContracts User Guide Whenever the duration of the line is increased, an additional billing stream is created. If the contract has a later end date, the unit of measure of the billing stream is taken from the previous stream. If the duration is reduced, billing streams can be automatically removed, as long as those streams are entirely outside of the new contract duration. If these changes are cascaded to the sublines, billing schedules will be updated when the cascade is initiated. If the changes are not cascaded, only the line level billing schedule will be automatically updated. Top Level can be set at the header, service line, or usage line level: • Header, see Entering Billing Schedules, page 2-11 • Service lines, see Specifying a Billing Schedule, page 3-38 • Usage lines, see Specifying a Billing Schedule for a Usage Line, page 4-31 • Covered Level: when the covered level effective dates are not the same as the service line effective dates and you want to have different billing frequency for each subline, you can create a covered level-specific billing schedule. As a prerequisite, the service line billing schedule-level must first be set to the Covered Level. By default, all the covered level lines inherit the service line billing schedule. If required, you can modify and update the billing schedule for a given covered level. You can enter amounts for every period and use the Prorate button. Covered Level can be set at the service line level: • Service lines, see Specifying a Billing Schedule, page 3-38 Note: You can select a billing level default by setting the profile OKS: Billing Schedule Level. If the level that you select is not available to the header or the line, the defined value will not default. For example, if the default is set to Top Level and you create a subscription line, the defaulted value will not be Top Level, despite the setting. This is because subscription lines must be Equal Amounts, not Top Level. Note: Although subline totals are the same for Covered Level and Equal Amount, the calculations at the line level are different. • For Equal Amount, the schedule amount is the sum of subline level element amount. However, if you navigate to the subline billing schedule, the subline level amount and equal amount are the same. If you view the schedule from
  • 273.
    Billing    10-7 each ofthe sublines, all stream level and billing schedule amounts and level amounts are the same. • For Covered level billing, the schedule amount is the subline level amount at the top line. It is not rolled up from subline. Example A service line has two sublines, each with $100 for a year. The amount in the billing stream for line is calculated as $200/12– 16.67 and is same for both Equal Amount and Covered Level. For Equal Amount, each entry in the Billing Schedule at the line level, equals the sum of the individual amounts for each subline. The amount for periods 1 through 11 are $16.68 ($8.34 + $8.34) and the amount for period 12 is $16.52 ($8.26 + $8.26). For Covered Level, each entry in the Billing Schedule at the line level is set to the calculated amount from the stream level ($16.67). Each of the twelve Level Amount entries is always the same amount. The schedule amount is what is billed to AR and not the amount in the billing stream. Creating Billing Profiles All customer account information is set up in Oracle Receivables, which includes a single billing profile that is applicable when you are invoicing all customers. You can set up multiple, ad hoc billing profiles in Oracle Service Contracts. Billing profiles include information about accounting and invoicing rules, type of billing, and its frequency. Invoices are generated according to the billing profile attributes. The billing engine accesses the billing profile and bills accordingly. For example, you could set up a billing profile, called Monthly Interval, which passes a monthly billing schedule with specific accounting and invoicing rules. You could use this profile to default information and also when renewing contracts if the billing durations are not the same between the original and renewed contracts. You can use the billing profile to overwrite any existing line level billing schedule on the contract authoring form by selecting it in the Cascade Attributes form. You can also default billing profile information onto the contract by associate a billing profile template to a customer with the Global Contract Defaults form. Prerequisites Define the following options: • Accounting Rules
  • 274.
    10-8    Oracle ServiceContracts User Guide • Invoicing Rules • Billing Levels • Recurring Intervals To create billing profiles: 1. From the Navigator, select Setup: Service Contracts, and then select Billing Profiles. The Billing Profile window appears. 2. Enter an alphanumeric profile number. 3. Enter the profile description. 4. Optionally, select a party, such as Business World. When a billing schedule is assigned to a party, the profile is limited to that party. If you are creating a contract for another party, you do not see this billing profile in the LOV when you cascade attributes. 5. Select an Accounting Rule from the LOV. 6. Select an Invoicing Rule from the LOV. 7. Select a Billing Level from the LOV.
  • 275.
    Billing    10-9 8. SelectOne Time or Recurring as the Billing Type option. For the Recurring billing, select a billing Interval from the LOV, for example, Month. 9. In the Invoice Offset field, enter the number of days to move forward or push back the invoice date. 10. In the Interface Offset field, enter the number of days to move forward or push back the date on which the billing period passes to Oracle Receivables. 11. Save. Note: A billing profile should be defined according to the billing requirements. If multiple customer accounts have different billing requirements, the number of billing profiles should be defined accordingly. No restrictions exist for the number of billing profiles. Billing Customers Based on Usage For usage lines, you can bill customers using different methods. Some of these methods are fixed; others are based on counter readings or estimation values. To understand how a customer can be charged for usage lines, see Specifying How Customer is Charged, page 4-6.
  • 276.
    10-10    Oracle ServiceContracts User Guide Billing Using Credit Cards or Commitments Oracle Service Contracts integrates with Oracle Receivables to support multiple billing methods. When you enter billing terms for a contract, you can select a method of payment from a LOV. These methods include Credit Card and Commitment (prepayment). You select a method from the Pricing/Billing subtab of the Summary tab. If you select the Credit Card method, then you must select a credit card from the LOV. The application displays the credit card number and credit card expiration date. If you select the Commitment method, then the Authoring process requires the entry of a commitment number. Customer commitments must be set up in Oracle Receivables prior to use as a method of payment in Oracle Service Contracts. See: • (header) Specifying Payment by Credit Card or Commitment Number, page 2-23. • (lines) Specifying Payment by Credit Card or Commitment Number, page 3-45. Specifying Multiple General Ledger Accounts for Contract Revenue Streams Situations may occur in which you want to distribute revenue for a contract line to one or more general ledger accounts other than the default account that was specified during the implementation. You can change the default revenue distribution for an Entered contract. You can also open an Active contract for update, or create a change request. If you are changing the revenue distribution for a contract after a line has been billed, you will change only the revenue distribution for future billing. If the contract is copied, renewed, or used as a template, these distributions will also be copied to the new agreement. To specify multiple general ledger accounts for contract revenue streams: 1. From the Service Contract Authoring window, select a line to specify multiple general ledger accounts. 2. From the Tools menu, select Revenue Distribution. The Revenue Distribution window appears for the line.
  • 277.
    Billing    10-11 3. Reviewthe account in the GL Account field. 4. Select the LOV for the Override Account field. The Operations Accounting Flex window appears. 5. Select the LOV for the Account Alias field. The Account Alias window appears. 6. Select an account alias. The account number for the account alias appears in the Override Account field. Note: For some accounts, the Operations Accounting Flex window appears. You can select the overriding account by selecting the
  • 278.
    10-12    Oracle ServiceContracts User Guide segment values, or by selecting from the list of combinations. For more information, refer to the Oracle General Ledger User Guide. 7. Enter the percentage to be allocated to the account in the Percent field. After you have entered all the override accounts, the Total % field must equal 100%. 8. To add additional override accounts, repeat steps 3 through 7. 9. Click OK. Executing Billing Through Concurrent Programs To initiate and complete the billing process, you must run the following concurrent programs: • Service Contracts Main Billing • AutoInvoice Import Program
  • 279.
    Billing    10-13 • ServiceContracts Fetch Receivables Info for Billing Note: You should run contracts through the quality assurance check prior to submitting them for billing. This helps to ensure that the billing process is successful. Note: As part of the Multi Org Access Control (MOAC), all billing programs process only those contracts that belong to the operating units that are listed by the security profile associated with the current responsibility Running the Service Contracts Main Billing Program This program is owned by Oracle Service Contracts. It generates a log file of the total value processed, total value successful, and total value rejected for billing. For a description, see About Concurrent Programs, page 21-8. For usage lines, the Service Contracts Main Billing program calculates billing amounts based upon the usage type. See Specifying How the Customer is Charged, page 4-6. To run the Service Contracts Main Billing program: 1. From the Navigator, navigate to Requests, and then select Run. The Submit New Request window appears. 2. Select Single Request and click OK. The Submit Request window appears. 3. In the Request region, select Service Contracts Main Billing. 4. In the Parameters window, specify one or more of the following: • Contract Number: Enter the numbers of the contracts to be billed. • Default Date: Enter the date that you want as the default. (The default is the system date on your computer.) • Operating Unit: Enter the operating unit for which all the contracts are to be billed. • Customer Name: Enter the name of the customer for which all the contracts are to be billed. • Category: Enter the category for which all the contracts are to be billed.
  • 280.
    10-14    Oracle ServiceContracts User Guide • Group: Enter the name of the group for which all the contracts are to be billed. • Preview: Change this option to yes to send these transactions to special preview tables to enable you to review the invoice details before you submit them to Oracle Receivables. Leave it at no if you want the transactions passed to Oracle Receivables. 5. Click OK. 6. In the Submit Request window, click Submit Request. The billing program sends the invoice amount to Oracle Receivables, which then generates the invoice. The process also populates some billing transaction history information in the History tab of the Billing Schedule. Because the invoice number is assigned and tax is calculated by Oracle Receivables, neither of these pieces of information can be populated until after the Service Contracts Fetch Receivables Info for Billing program is run. The tax amount will be omitted and the invoice number of –99 will be supplied. Running the AutoInvoice Import Program This program is owned by Oracle Receivables. It imports the billing transactions from the Service Contracts Main Billing Program into Oracle Receivables and generates the invoice details. To run the AutoInvoice Import Program: After you run the Service Contracts Main Billing Program, you must run the Autoinvoice Import Program to import the billing transactions into Oracle Receivables for processing. For more information about how to run this program, see the Oracle Receivables User Guide. Running the Service Contracts Fetch Receivables Info for Billing Program This program is owned by Oracle Service Contracts. For a description, see About Concurrent Programs, page 21-8. To run the Service Contracts Fetch Receivables Info for Billing program 1. From the Navigator, navigate to Requests, and then select Run. The Submit a New Request window appears. 2. Select Single Request, and click OK.
  • 281.
    Billing    10-15 The SubmitRequest window appears. 3. In the Name field, select Service Contracts Fetch Receivables Info for Billing. 4. Click OK. 5. In the Submit Request window, click Submit Request. This updates the invoicing information in the customer's contract. The invoice number and tax appear in the billing details. Running the Service Contracts Usage Averaging Program Usage averaging is used to give price benefits to the user for higher consumption in a period. This feature enables he user to distribute consumption evenly in multiple billing periods. After the application distributes the consumptions evenly, price breaks are applied to these consumptions to get new billing amounts for the period. This program is owned by Oracle Service Contracts. For a description, see About Concurrent Programs, page 21-8. For information about usage lines, see Entering Usage Lines, page 4-3. To run the Service Contracts Usage Averaging program: 1. In the Navigator, navigate to Requests, and then select Run. The Submit New Request window appears. 2. Select Single Request, and click OK. The Submit Request window appears. 3. In the Name field, select Service Contracts Usage Averaging. 4. In the Parameters window, enter the number of the contract. If you leave this field blank, all contracts will be used. 5. Click OK. In the Submit Request window, click Submit Request. Running the Service Contracts Usage Settlement Program Usage billing supports settlement features for Actual Per Period. This program is used to settle the discrepancies between actual consumption and actual billed amount. This type of situation may arise when consumption for billing period is captured after you run the main billing for that billing period. Currently a separate settlement program exists to do settlements of usage lines.
  • 282.
    10-16    Oracle ServiceContracts User Guide Settlement can also be done by billing program at the time of invoice generation. The Service Contracts Usage Settlement program is owned by Oracle Service Contracts. For a description, see About Concurrent Programs, page 21-8. For information about usage lines, see Entering Usage Lines, page 4-3. To run the Service Contracts Usage Settlement program: 1. In the Navigator, navigate to Requests, and then select Run. The Submit New Request window appears. 2. Select Single Request, and click OK. The Submit Request window appears. 3. In the Name field, select Service Contracts Usage Settlement. 4. In the Parameters window, enter the number of the contract. If you leave this field blank, all contracts will be used. 5. Click OK. In the Submit Request window, click Submit Request. Viewing Invoice Details You can use the Invoice Details function to review payment, credit, and adjustment information that is applicable to the contract, lines, and sublines. Prerequisite Run the necessary concurrent programs to generate billing transactions. See Executing Billing Through Concurrent Programs, page 10-12. To view invoice details: 1. From the Service Contracts Authoring window, select the Tools menu and Invoice Details. The Invoice Details window appears with the invoice number, date, source, transaction type, and amount.
  • 283.
    Billing    10-17 2. Clickthe Payment Details button. The Payment Details window appears with the payment amount and payment date. Click OK when finished viewing payment details. 3. From the Invoice Details window, click the Line Details button. The Line Details window appears with item names and descriptions, unit of measure, unit price, billed amount, and tax rate for the lines. Click OK when you are finished viewing the Line Details. 4. Click OK to return to the Service Contract Authoring window. Viewing Invoice History You can use the History tab of the Billing window to review billing history. This tab is populated after you run the billing execution programs. See Executing Billing Through Concurrent Programs, page 10-12. You should understand the following about the details that are associated with the History tab of the Billing window: • Line-level billing schedule histories are populated with the actuals. • Header-level billing schedules do not show any billing history. Prerequisite
  • 284.
    10-18    Oracle ServiceContracts User Guide Run the necessary concurrent programs to generate billing transactions. See Executing Billing Through Concurrent Programs, page 10-12. To view invoice history: 1. From the Service Contracts Authoring window, select the Lines tab and Pricing/Products subtab. 2. Select a line. 3. Click the Billing button The Billing window appears. 4. Select the History tab. You can view the billing history from this tab, including invoice information and billing dates. Note: If summary transactions are selected with either a profile option or the contract check box, the history contains one transaction line per billing period. However, if detail transactions are being sent to Oracle Receivables, the billing history shows the details for each subline per billing period. You can view the details of that billing transaction by right-clicking any line in the billing history. Reviewing Invoice Transactions in Oracle Receivables For detailed information about using Oracle Receivables, see the Oracle Receivables User Guide.
  • 285.
    Billing    10-19 To reviewinvoice transactions in Oracle Receivables: 1. From the Navigator, select the Receivables, Vision Operations (USA) responsibility. 2. Navigate to Transactions, and then select Transactions. The Transactions window appears. 3. From the toolbar, select the Flashlight icon. The Find Transactions window appears. 4. In the Sales Order Number field, enter the contract number. 5. Click Find. The Transactions Summary window appears with the invoice information.
  • 286.
    10-20    Oracle ServiceContracts User Guide 6. Click Open to view the invoice transaction details. Note: Event-Based Revenue Management in Oracle Receivables (AR) enables you to define and assign revenue recognition events to contingencies, such as acceptance of goods. For more information, see Understanding the Impact of Contingencies on Revenue Recognition, page 6-22.
  • 287.
    Billing    10-21 Understanding BillPresentment Architecture Bill Presentment Architecture (BPA) enables you to customize the content and formatting of billing data that your customers view online or print. Oracle Service Contracts is one of the data sources that can be used by the BPA framework. A number of setups are required to enable this functionality. For more information, see the Oracle Receivables User Guide. Using Variable Accounting and Partial Periods Revenue Recognition Oracle Service Contracts carries sales credits from the order header to contract header and onto Oracle Receivables. Your administrator can select a variable accounting rule to recognize revenue based on any duration, such as daily, weekly or quarterly. In addition, Oracle Service Contracts integrates with Oracle Receivables to enable partial period revenue recognition for services that are billed from service contracts. Your administrator can define accounting rules that recognize revenue evenly across all full periods in a schedule, and prorate recognition for partial periods that fall at the beginning or end of a schedule. The following examples explain the two options that are available for partial revenue recognition. The first option is with daily rate applied to all periods including partial periods, and the second option is with revenue rate applied only to the first and last periods. Example Example: Your customer signs a contract on April 17, 2005 for a six-month service and the total price for six months is $600 (with $100 per month rate). The application bills one time in the amount of $600 and recognizes revenue over the contract period. Accounting rule detail is: • Type: Variable • Period: Month Option 1 Accounting Rule Type: Daily Revenue Rate, All Periods. The application bases partial periods and full periods on the number of days in the periods. 1. Calculate daily rate based on the total number of days in the contract. The daily rate is 600/183, which equals 3.28 2. First period equals number of days multiplied by the daily rate. 3. Middle period equals the number of days multiplied by the daily rate. 4. Last period equals the remainder. 600 – (45.92+101.68+98.40+101.68+101.68+98.40) =
  • 288.
    10-22    Oracle ServiceContracts User Guide 52.24 5. 5. Revenue Schedule is: GL Date Period Amount Days 17-APR Month of April $45.92 14 17-MAY Month of May $101.68 31 17-JUN Month of June $98.40 30 17-JUL Month of July $101.68 31 17-AUG Month of August $101.68 31 17-SEP Month of September $98.40 30 16-OCT Month of October $52.24 16 Summary 7 Periods $600.00 183 Option 2: Accounting Rule Type: Daily Revenue Rate, Partial Periods The application prorates partial periods based on the number of days in the periods. Full periods have equal revenue distributions. 1. Daily rate equals total amount/total number of days, which is 600/183 = 3.28 2. First period equals the number of days multiplied by the daily rate. 3. Last period equals the number of days multiplied by the daily rate. 4. Middle periods equals (total amount less (the sum of the first period and last period))/number of middle periods), which is (600 – (45.92+52.48))/5 = 100.32 5. Revenue Schedule is: GL Date Period Amount Days 17-APR Month of April $45.92 14 17-MAY Month of May $100.32 31
  • 289.
    Billing    10-23 17-JUN Monthof June $100.32 30 17-JUL Month of July $100.32 31 17-AUG Month of August $100.32 31 17-SEP Month of September $100.32 30 16-OCT Month of October $52.48 16 Summary 7 Periods $600.00 183 Accounting rules are set up in Oracle Receivables. For more information, see the Oracle Receivables User Guide
  • 291.
    Managing Contract Negotiation   11-1 11 Managing Contract Negotiation Overview of Managing Contract Negotiation This group of topics explains the contract negotiation process. Topics include: • Understanding the Negotiation Workflow, page 11-1 • Understanding the Negotiation Phases, page 11-3 Understanding the Negotiation Workflow Most contracts go through several stages after you author or renew them. The negotiation workflow manages each of the stages of the negotiation cycle. The process is essentially the same for both new and renewed contracts with a few differences. New Contracts 1. Contract Creation and Negotiation: Sales representative authors a new contract and negotiates the contract terms with customer. 2. Notify Customer: Sales representative notifies customer that the contract is waiting acceptance. The sales representative can use the application e-mail or publish the contract online or use another means to notify the customer. 3. Customer Acceptance: Customer accepts, declines, or requests additional information either through the Online Acceptance Portal or verbally. 4. Internal Approval: After the customer or sales representative accepts the contracts the Internal Approval action is available from the Administrator Workbench . 5. Activation: Application activates the contract following acceptance and approval.
  • 292.
    11-2    Oracle ServiceContracts User Guide Renewal Contracts 1. Contract Renewal and Branching: The application can create a renewal from a renewal event or you can create a renewal manually from the Service Contracts Authoring form. After the renewal contract is created, the initiates a workflow for that contract and the negotiation status is set to Draft. Workflow determines the routing of the renewal contract based on two parameters: Renewal Process Type and threshold amounts. See Understanding Contract Renewals, page 17-11. 2. Notify Customer: Customer receives notifications that a renewal contract has been created and is awaiting approval. • Manual Renewals: The renewal specialist who is managing contracts has three options for notifying the customer. He can: • Print a quote letter to fax or mail. • Send the quote letter in an e-mail. • Publish the quote online. The application stamps the negotiation status accordingly. • Online Renewals: Contracts that qualify for online renewals are published to the customer and do not require manual intervention. Every time a quote is sent by e-mail or published online, the workflow process runs a quality assurance (QA) check to validate the contract. If the contract fails this QA check, the action is abandoned and the application stamps the negotiation status. 3. Customer Acceptance: Customer acceptance can be both implicit and explicit when the quote is published online. • If the customer accepts the contract from the online portal, workflow updates the negotiation status and routes the contract back to the renewal specialist. If the renewal specialist submits a contract in Quote Published status for approval, this assumes implicit customer acceptance. • For manual contracts, the renewal specialist submits contract for internal approval after securing written or verbal customer acceptance. 4. Contract Approval: The Approval Workflow is a subworkflow within the base workflow. After a contract is submitted for approval, workflow uses Approvals Management Engine (AME) to derive the contract approver and routes the contract to that approver. 5. Contract Activation: After a contract is approved, the application activates the contract. The contract status changes to Active or Signed and the negotiation status changes to Complete.
  • 293.
    Managing Contract Negotiation   11-3 Understanding the Negotiation Phases The application assigns the contract seeded negotiation statuses during the negotiation process. While you cannot update these values, they do enable you to track contracts under negotiation. The Negotiation Status field appears in the: • Service Contracts Authoring header region • Administrator Workbench within the My In Process Contracts region. For more information about the Administrator Workbench, see Overview of the Administrator Workbench, page 13-1 Negotiation Phase During this phase of the contract negotiation you will see the following negotiation status: Negotiation Status Meaning Draft Sale representative negotiates contract with customer. Notify Customer Phase During this phase of the contract negotiation, you may see one of the following negotiation statuses: Negotiation Status Meaning Pending Publication Publish to Customer action executed and QA is in process; this status is applicable only while QA lasts. Publish QA Failed Process failed due to QA Check failure prior to publishing the quote online. Publish Failed Process failed due to application failure for online customer acceptance with the Online Acceptance process or after Publish To Customer action executed by sales representative.
  • 294.
    11-4    Oracle ServiceContracts User Guide Quote Published Contract quote published for online customer acceptance through Online Acceptance process or through Publish To Customer action by sales representative. Customer Acceptance Phase During this phase of the contract renewal, you may see one of the following negotiation statuses: Negotiation Status Meaning Quote Accepted Customer accepts the contract quote through Online Acceptance, or the sales representative has captured customer acceptance. Quote Canceled Sales representative cancels the contract quote. The Contract Status changes to Canceled. Quote Declined Customer declines a contract quote through Online Acceptance process. The Contract Status changes to Canceled. Assistance Required Customer requests assistance through Online Acceptance process Internal Approval Phase During this phase of the contract renewal, you may see one of the following negotiation statuses: Negotiation Status Meaning Internal Approval QA Failed Process failed due to QA Check failure prior to submitting the quote for Internal Approval. Internal Approval Failed Process failed due to application failure after Submit for Internal Approval executed by sales representative.
  • 295.
    Managing Contract Negotiation   11-5 Pending Activation Contract submitted for Activation because Approval is not required. Pending Internal Approval Contract is submitted for Internal Approval, from the manual, online, or evergreen processes. Rejected Contract is rejected by approver. Activation Phase During this phase of the contract renewal, you will see the following negotiation statuses: Negotiation Status Meaning Complete Application activates contract or sales representative signs contract. The Contract Status changes to Signed or Active. Status Transitions The following diagrams provide an overview of status transitions during contract negotiation. Note: For new contracts, the status transitions are the same as those of a manual renewal process, except for the Determine Renewal Process step, which does not apply to new contracts. Refer to Manual Renewal Process Status Transition State Diagram.
  • 296.
    11-6    Oracle ServiceContracts User Guide Manual Renewal Process Status Transition State Diagram The preceding diagram shows negotiation status transitions during a manual renewal. The following describes the process: • Determine Renewal Process: System changes negotiation status to Draft. • Draft: Salesperson publishes contract and negotiation status changes to Pending Publish, or salesperson cancels the contract and the negotiation status changes to Quote Canceled. • Pending Publish: System changes negotiation status to Publish QA Failed, Publish Failed, or Quote Published. • Pending Approval: Salesperson submits the contract for approval and one the following occurs.
  • 297.
    Managing Contract Negotiation   11-7 • System changes negotiation status to Approval QA Failed. • System changes negotiation status to Approval Failed. • Approver approves contract, which changes negotiation status to Complete. • Approver rejects contract, which changes negotiation status to Rejected. • Quote Published: If the system updates the negotiation status to Quote Published, one of the following occurs: • Customer accepts the quote and the negotiation status changes to Quote Accepted. • Customer requests assistance and the negotiation status changes to Assistance Requested. • Customer declines the quote and the negotiation status changes to Quote Declined. • Quote Accepted: Either the system updates the negotiation status to Pending Activation, or the salesperson or system updates the negotiation status to Pending Approval. • Assistance Requested: After the customer receives assistance, he can choose to either accept or decline the quote. • Quote Declined: Customer declines quote. • Pending Activation: System changes status to Complete.
  • 298.
    11-8    Oracle ServiceContracts User Guide Online Renewal Process Status Transition State Diagram The preceding diagram shows negotiation status transitions during an online renewal. The following describes the process: • Determine Renewal Process: System changes negotiation status to Pending Publish. • Pending Publish: System changes negotiation status to Publish QA Failed, Publish Failed, or Quote Published. • Quote Published: If the system updates the negotiation status to Quote Published, one of the following occurs: • Customer accepts the quote and the negotiation status changes to Quote Accepted.
  • 299.
    Managing Contract Negotiation   11-9 • Customer requests assistance and the negotiation status changes to Assistance Requested. • Customer declines the quote and the negotiation status changes to Quote Declined. • Salesperson accepts the quote and the negotiation status changes to Pending Approval. • Salesperson cancels the quote and the negotiation status changes to Quote Canceled. • Quote Accepted: Either the system changes the negotiation status to Pending Activation or the salesperson or system changes the negotiation status to Pending Approval. • Assistance Requested: After he receives assistance, the customer chooses to accept or decline the quote. • Pending Approval: Salesperson submits the contract for approval and one the following occurs. • System changes negotiation status to Approval QA Failed. • System changes negotiation status to Approval Failed. • Approver approves contract, which changes negotiation status to Complete. • Approver rejects contract, which changes negotiation status to Rejected. • Pending Activation: System changes status to Complete.
  • 300.
    11-10    Oracle ServiceContracts User Guide Evergreen Renewal Process Status Transition State Diagram The preceding diagram shows negotiation status transitions during an evergreen renewal. The following describes the process: • Determine Renewal Process: System changes negotiation status to Complete or Pending Approval. • Pending Approval: One the following occurs. • System changes negotiation status to Approval QA Failed. • System changes negotiation status to Approval Failed. • Approver approves contract, which changes negotiation status to Complete.
  • 301.
    Managing Contract Negotiation   11-11 • Approver rejects contract, which changes negotiation status to Rejected.
  • 303.
    Managing Your Work   12-1 12 Managing Your Work This chapter covers the following topics: • Overview of Managing Your Work • Finding Contracts by Status or Notification Type • Finding Your Most Recently Accessed Contracts • Bookmarking Contracts • Finding Bookmarked Contracts • Creating Groups • Organizing Contracts by Group and Subgroup • Finding Contracts Using the Contract Groups Hierarchy • Removing a Contract from a Group • Searching for Contracts Using the Entitlements Search Window • Using the Index to Navigate Through Contracts Overview of Managing Your Work This group of topics explains how to manage your work in Oracle Service Contracts. You can access contracts from multiple points within the application. Oracle Service Contracts enables you to find contracts by status or notification type, and to open recently accessed or bookmarked contracts. You can also organize your contracts into a hierarchy of groups, which can be viewed from the Contract Navigator. Contract groups provide a convenient way to organize contracts using any criteria. They are similar to folders and can be created for private or public use. You will generally access contracts from either the Launchpad or the Contract Navigator.
  • 304.
    12-2    Oracle ServiceContracts User Guide Finding Contracts by Status or Notification Type To find a contract by status or notification type: 1. From the Navigator, navigate to Contract Administration, and then select Launchpad. The Launchpad appears. 2. In the Inbox region, click Find. The Inbox Find window appears. 3. Select your search criteria: 1. To find a contract with a particular status, select a status from the Select Status list. 2. To find a contract with a particular notification type, select a notification type from the Select Notification Type list. For example, you could perform a search for contracts with an open status that require contract approvals or you could simply search for contracts that require contract approval. 4. Select Find. The application refreshes the Inbox with contracts that meet your criteria.
  • 305.
    Managing Your Work   12-3 5. To sort the results, click the column heading by which you want the results sorted. You can sort columns in ascending or descending order. 6. Highlight the contract to review. 7. From the Inbox region, select Open. The contract appears in the Service Contracts Authoring window. Note: For information about responding to notifications, see Approving Contracts, page 9-4. Finding Your Most Recently Accessed Contracts To find your most recently accessed contracts: 1. From the Navigator, navigate to Contract Administration, and then select Launchpad. The Launchpad appears. 2. In the Recent Documents region, scroll through the list of contracts. These are the contracts that you have most recently accessed. 3. To sort the list, click the column heading by which you want the list sorted. You can sort columns in ascending or descending order.
  • 306.
    12-4    Oracle ServiceContracts User Guide 4. Highlight the contract to review. 5. From the Recent Documents region, select Open. The contract appears in the Service Contracts Authoring window. Note: You can also double-click the contract number to open the Service Contracts Authoring window. Bookmarking Contracts To bookmark contracts: 1. From the Service Contracts Authoring window, select the Actions menu and select Bookmark. A note appears, indicating that the contract has been successfully bookmarked. This adds the bookmark to the Bookmarked Documents region in the Launchpad. The Bookmarked Documents region is a personal listing of contracts that you can access quickly. 2. To review bookmarked contracts, see Finding Bookmarked Contracts, page 12-4. Note: You can also bookmark a contract from the Contract Navigator by: 1. Highlighting a contract in the right panel 2. Selecting Add Bookmark from the Tools menu. Finding Bookmarked Contracts To find bookmarked contracts: 1. From the Navigator, navigate to Contract Administration, and then select Launchpad. The Launchpad appears.
  • 307.
    Managing Your Work   12-5 2. In the Bookmarked Documents region, scroll through the listing of contracts. Creating Groups Groups help you to organize and find contracts more efficiently. A contract can be in more than one group at a time. For example, a contract can be in your personal group My Contracts and also be in the public group Business World Contracts. You can also use groups to help you identify contracts that can be processed through actions such as mass change, or reports. To create a group: 1. From the Navigator, navigate to Contract Groups, and then select Contract Groups . The Contracts Groups window appears.
  • 308.
    12-6    Oracle ServiceContracts User Guide 2. In the Name field enter the group name, for example, Service Agreements. 3. In the Description field, provide a description of the group. 4. If you want this folder to be public, select the Public check box. Note: If you do not select the Public check box, you will create a private folder that only you will see. For you to be able to create public folders, your administrator must set the profile OKC: Public Group Creator to Yes. 5. Save. Note: If you want to see a listing of all groups, you can use the query function to display the groups in the Contracts Groups window. 1. From the View menu, select Query by Example and Enter. The form changes to query mode. 2. Enter % in the Name field. 3. From the View menu, select Query by Example and Run. A complete listing of the Contract Groups appears.
  • 309.
    Managing Your Work   12-7 Organizing Contracts by Group and Subgroup To organize contracts by group and subgroup: 1. From the Navigator, select Contract Groups, and then select Assign Contract Groups. The Contracts Groupings window appears. The Groupings region on the left provides a hierarchy that you can use to navigate the contract groups. You can click the + icon to expand a node You can click the - icon to collapse a node. 2. Select a node from the Global region, for example, Service. The contracts that are currently a part of the group appear under the Currently Assigned Contracts heading. 3. Click Find. The Search templates and Contracts window appears. You can use this window to search for contracts that you want to add to the criteria. 4. Enter your search criteria, and click Search. The results appear in the Available Contracts region of the Contract Groupings window.
  • 310.
    12-8    Oracle ServiceContracts User Guide 5. To add a contract to the group, highlight the contract in Available Contracts and select the left arrow. The contract is moved to Currently Assigned Contracts, which indicates that it is a part of the group. 6. To remove a contract from the group, highlight a contract in the Currently Assigned Contracts region and select the right arrow. The contract is moved to Available Contracts, which indicates that it is not a part of the group.
  • 311.
    Managing Your Work   12-9 7. To add a subnode to the Group, select the Groups tab. The Currently Assigned Groups and Available Subgroups regions are populated with a listing of subgroups. You can change the view of the Available Subgroups region by selecting either Unassigned or All Groups from the View list. 8. To add a subgroup to the group, highlight the subgroup in the Available Subgroups region and select the left arrow.
  • 312.
    12-10    Oracle ServiceContracts User Guide The subgroup is moved to Currently Assigned Groups, which indicates that it is a subgroup of the group. 9. To remove a subgroup from the group, highlight a subgroup in the Currently Assigned Groups region and select the right arrow. The contract is moved to Available Subgroups, which indicates that it is not a part of the group. 10. Save.
  • 313.
    Managing Your Work   12-11 Finding Contracts Using the Contract Groups Hierarchy To find a contract using the contract groups hierarchy: 1. From the Navigator, navigate to Contract Administration, and then select Launchpad. The Launchpad appears. Select the Contract Navigator tab. 2. In the left panel, review the group hierarchy. You can expand a node by selecting the + icon. You can collapse a node by selecting the - icon. 3. Select a node to view the contracts that are in contract group node. For example, you could select the Global node to view all contracts within that node. The contracts that are included in this group appear in the right-hand panel. 4. To sort the results, click the column heading by which you would like the results sorted. You can sort columns in ascending or descending order. 5. Highlight the contract that you want to review. 6. Right-click and select Open.
  • 314.
    12-12    Oracle ServiceContracts User Guide The contract appears in the Service Contracts Authoring window. Note: Double-click the contract number to open the Contract Execution window. Removing a Contract from a Group To remove a contract from a group: 1. From the Navigator, navigate to Contract Administration, and then select Launchpad. The Launchpad appears. Select the Contract Navigator tab. 2. In the left panel, select a group such as Service. A listing of contracts appears. 3. Highlight the contract to remove from the group. 4. You can do one of the following: 1. Right-click the contract and select Remove from Group. 2. From the Tools menu, select Remove from Group. A decision box appears, asking whether you are sure that you want to remove the contract from the group. 5. Click Yes. The contract is removed from the group. Note: You can also add or remove a contract from a group by updating the Contracts Group region within the Administration subtab of the contract. Searching for Contracts Using the Entitlements Search Window To search for contracts using the Entitlements Search window: 1. From the Navigator, navigate to Contract Administration, and then select Entitlements Search. The Entitlements Search window appears.
  • 315.
    Managing Your Work   12-13 You can use this window to search for all contracts that match your search criteria, or limit the search to Entitled contracts. You can search for contracts based on their covered levels attributes, header attributes, or line attributes, or a combination of these. 2. From the Search Option region, select whether to search all contracts or entitled contracts. Entitled contracts are those that are within their start and end dates as of the time of the search, and are in a status that has the operation Eligible for Entitlement set to Yes. 3. From the Contract Covered Levels region, specify the contract covered levels to use in your search. You can search by the following covered levels: product, item, site, system, account, and party. This region has specific attributes associated with each covered level, which are separated by rows. For example, if you select a product, the row with the Product Name field also contains a Serial Number field and Reference Number field. These additional attributes are used to narrow your search. 4. From the Lines region, specify lines attributes. For example, you could add a service name, a status, and a duration to the search criteria. 5. From the Header region, specify header attributes. For example, you could add a contract status, party, and duration.
  • 316.
    12-14    Oracle ServiceContracts User Guide Note: To clear the form and enter your search criteria again, select Clear. 6. Select Search. The Results window appears, which shows contract line details that match the search criteria. You can also determine the operating unit for the contract. 7. To view the coverage for a specific contract and line, select the line and click View Coverage. The Coverage Template appears in read-only form. 8. To open the contract, select the contract line and click Open. The Service Contracts Authoring window appears. From this window, you can manually adjust Warranty Start and End dates on installed products. Note: If the entitlements search is used for any application other than Oracle Service Contracts, the Line Detail window appears in read-only mode. For example, a service agent could use entitlement search from Oracle TeleService. Using the Index to Navigate Through Contracts The index helps you find parts of the contract and allows you to navigate to them directly, for example, to a particular line number. To use the index to navigate through contracts: 1. From the Service Contracts Authoring window, select the Actions menu and Show Index.
  • 317.
    Managing Your Work   12-15 The Contract Index window appears. From this window, you can view details of the contract such as the parties, the line level service items, the covered level products at the sublines, and the names of any terms that are attached to the contract. You can expand the hierarchy by selecting the + icon next to the node. You can collapse the hierarchy by selecting the - icon next to the node. 2. To navigate to a specific point within the contract: 1. Highlight the node. 2. Click Go. For example, if you highlight the Lines node and click Go, the Service Contracts Authoring window displays the Lines tab.
  • 318.
    12-16    Oracle ServiceContracts User Guide 3. Optionally, you can close the Contract Index window by selecting Cancel.
  • 319.
    Using the AdministratorWorkbench to Manage Contracts Under Negotiation     13-1 13 Using the Administrator Workbench to Manage Contracts Under Negotiation Overview of the Administrator Workbench The Administrator Workbench enables sales representatives, managers, and contract administrators to track progress of workloads and initiate follow up actions on contracts under negotiation. Sales representatives may have several open quotes in various stages of negotiation. These open quotes may be undergoing revisions, awaiting approvals for special terms, or with customers for review. The Administrator Workbench informs users of what is currently in their queue. As a sales representative, you can perform multiple actions during the negotiation process from the Administrator Workbench. It enables you to track new contract and renewal opportunities by providing information in bins and portlets that you can personalize: • Quick Search: Enables you to perform a search using a search intent and search criteria. You can also navigate to an advanced search page for an expanded criteria list. • Notifications: Provides a list of open notifications that require your attention. From this region, you can view notification details and submit responses. • My In Process Contracts: Provides a list of views for open service contracts that are assigned to you. The following views for open service contracts are seeded in the application: • All In Process Contracts: A list of all open contracts under negotiation or pending approval and activation. • Follow Up Actions: A list of open contracts with assigned follow-up actions and due dates.
  • 320.
    13-2    Oracle ServiceContracts User Guide • Online Quotes : A list of all open contracts that are routed for automatic online customer acceptance. • Pending Internal Approval : A list of all contracts that are accepted by customers and pending internal review and approval • Pending Quotes: A list of all open contracts for which quotes have been sent to the customer. This view does not include contracts that have been accepted by the customer and are pending approval. • Pending Salesrep Assistance: A list of online acceptance contracts for which customers requested assistance in clarifying terms or want to make corrections. This is the default view for the bin. • Reminder Sent: A list of open contracts for which reminder notices have been sent to the customer. • Renewals: A list of all open renewals under negotiation. When you select a view and click the Go button, the My In Process Contracts bin refreshes. The following options are available: • Personalize: In addition to the seeded views, you can define personalized views to manage your contracts by using the OA Framework personalization features. Note: For information about personalization of the HTML pages, refer to the Oracle Applications Personalization Guide. • Full List: This option shows your full list of tracked contracts. Note: All actions that are available from the renewal tracking bin are also available from the full list page. From the My In Process Contract bin, you can: • Identify follow-up actions on contracts. • Publish contract online to customers. • Submit contract for internal review. • Manage reminders and notifications. • Run quality check to validate contract information.
  • 321.
    Using the AdministratorWorkbench to Manage Contracts Under Negotiation     13-3 • Open the contract in the Service Contracts Authoring window for editing. • Initiate communication with customers through e-mail. Note: The My In Process bin actions are separated based on whether they can be performed on a single contract or multiple contracts. • Actions performed on multiple contracts: Publish to Customer, Submit for Approval, Disable Reminders, Enable Reminders, Run QA Check • Actions performed on single contracts: Open Contract, Email Customer, Print Quote • Shortcuts: Provides a list of links that provide shortcuts to other functions within Oracle Service Contracts. This group of procedures covers the following: • Viewing Notifications, page 13-4 • Publishing a Contract to a Customer for Acceptance, page 13-6 • Submitting a Contract for Approval from the Administrator Workbench, page 13- 7 • Suppressing Reminders, page 13-7 • Enabling Reminders, page 13-8 • Running the Quality Assurance Check, page 13-8 • Updating Multiple Contracts, page 13-9 • Updating a Contract, page 13-11 • Opening a Contract, page 13-13 • Sending an E-mail to a Customer from the Administrator Workbench, page 13-13 • Printing Quotes and Contracts, page 13-14 • Identifying Follow-Up Actions, page 13-14 • Using Shortcuts in the Administrator Workbench, page 13-15
  • 322.
    13-4    Oracle ServiceContracts User Guide Viewing Notifications You can view a list of notifications from the Administrator Workbench. If the notification does not require a response, the application provides a message within the Notification Detail page. The following table provides a list of notifications that you may see in Oracle Service Contracts: Notification Title Example Quote Published Online Contract 21100-R31-Nov-05 for Business World (3422.50 USD) has been published online Quote Sent to Customer Contract 21100@R31-Nov-05 for Business World (3422.50 USD) has been emailed Customer Acceptance Notification Contract 21100@R31-Nov-05 for Business World (3422.50 USD) has been accepted by Sharpe, Marty Customer Decline Notification Contract 21100@R31-Nov-05 for Business World (3422.50 USD) has been declined by Sharpe, Marty Assistance Request Notification As entered by customer from Online renewal flow. Request for Internal Approval notification Contract 21100@R31-Nov-05 for Business World (3422.50 USD) Internal Approval Reject Notification Contract 21100@R31-Nov-05 for Business World (3422.50 USD) has been rejected by Stock, Pat Signature Required Contract 21100@R31-Nov-05 for Business World (3422.50 USD) requires your signature QA Check Failure Notification QA Check Failure in Contract 21100@R31-Nov-05 for Business World (3422.50 USD)
  • 323.
    Using the AdministratorWorkbench to Manage Contracts Under Negotiation     13-5 Workflow Error Notification Workflow Error in Contract 21100@R31-Nov-05 for Business World (3422.50 USD) Reminder Failure Notification Reminder Failure in Contract 21100@R31-Nov-05 for Business World (3422.50 USD) To view notifications: 1. From the Navigator, navigate to Contract Administration, and then select Administrator Workbench. Your notifications appear at the top of the page. 2. To see all your notifications, select Full List. 3. To open a notification, select the corresponding Subject link. The Notification Detail page appears. From this page, you can approve, reject, delegate, or request information by clicking the appropriate action button. If a notification does not require a response, a note appears at the top of the page. You can select OK to close the notification and return to the Administrator Workbench. 4. Select an action: • Approve: Opens the Notification Detail page. To approve the contract: 1. Enter a response note. 2. Click Approve. • Reject: Opens the Notification Detail page. To reject the contract: 1. Enter a response note. 2. Click Reject. • Delegate: Opens the Delegate Notification page. To delegate a notification:
  • 324.
    13-6    Oracle ServiceContracts User Guide 1. Select an assignee. 2. Enter comments. 3. Click Submit. • Request Information: Opens the Request Information page. • To request information: 1. Select the individual from whom you want to request more information. 2. Enter the information requested. 3. Click Submit. • OK: Returns to the Administrator Workbench. Note: You can return to the Administrator Workbench, by selecting the Service Contracts link preceding the notification title. Publishing a Contract to a Customer for Acceptance You can publish a manual renewal contract or a new contract online for customer acceptance. Contracts that are marked for online renewal get published online upon renewal. However, you may decide to publish additional contracts that are currently being manually managed by using this action. This action publishes selected contracts on the online acceptance portal. You can publish one or multiple contracts online. To publish a contract to a customer for acceptance: 1. From the Navigator, navigate to Contract Administration, and then select Administrator Workbench. A list of contracts appears in the My In Process Contracts region. 2. Choose the Select check box next to the contract that you want to publish to a customer for approval. 3. From the Select Contracts list, select Publish to Customer. 4. Click Go. A confirmation appears, which indicates the contracts that have been submitted for online acceptance. If the contract is already published online, a message appears indicating that the contract is already published.
  • 325.
    Using the AdministratorWorkbench to Manage Contracts Under Negotiation     13-7 Submitting a Contract for Approval from the Administrator Workbench You can submit contracts for internal business approval . The Submit for Approval action puts the contract in the approver's worklist. You can submit contracts for approval for one or multiple contracts. To submit a contract for approval from the Administrator Workbench: 1. From the Navigator, navigate to Contract Administration, and then select Administrator Workbench. A list of contracts appears in the My In Process Contracts region. 2. Choose the Select check box next to the contract that you want to publish for internal approval. 3. From the Select Contracts list, select Submit for Approval. 4. Click Go. A confirmation appears indicating the contracts that have been submitted for approval. If the contract is already submitted for approval, a message appears indicating that the contract is already in the approval queue. Suppressing Reminders You can suppress reminders for contracts using the suppress reminders actions. Customers do not get reminder notifications for contracts from the auto reminder program for contracts that require customer acceptance. You can suppress reminders for one or multiple contracts. To suppress reminders: 1. From the Navigator, navigate to Contract Administration, and then select Administrator Workbench. A list of contracts appears in the My In Process Contracts region. 2. Choose the Select check box next to the contract that you want to disable reminders. 3. From the Select Contracts list, select Disable Reminders. 4. Click Go. A confirmation appears, which indicates that reminders have been disabled for the selected contracts. All contracts for which reminders have been suppressed are
  • 326.
    13-8    Oracle ServiceContracts User Guide marked with an icon next to the contract number. Enabling Reminders You can enable reminders for those contracts for which reminders were suppressed. You can enable reminders for one or multiple contracts. To enable reminders: 1. From the Navigator, navigate to Contract Administration, and then select Administrator Workbench. A list of contracts appears in the My In Process Contracts region. 2. Choose the Select check box next to the contract that you want to enable reminders. 3. From the Select Contracts list, select Enable Reminders. 4. Click Go. A confirmation appears, which indicates that reminders have been enabled for the selected contracts. Running the Quality Assurance Check You can run the quality assurance (QA) check on selected contracts. You can run the QA check for one or multiple contracts. To run the quality assurance check: 1. From the Navigator, navigate to Contract Administration, and then select Administrator Workbench. A list of contracts appears in the My In Process Contracts region. 2. Choose the Select check box next to the contract that you want to publish to a customer for approval. 3. From the Select Contracts list, select Run QA Check. 4. Click Go. A confirmation appears, which indicates the QA Check concurrent request has been submitted and provides a concurrent request id. Note: For more information about the QA check, see About the Quality Assurance Check (QA Check), page 8-1.
  • 327.
    Using the AdministratorWorkbench to Manage Contracts Under Negotiation     13-9 Updating Multiple Contracts You can update one or more attributes on multiple contracts from the Mass Update Contracts page. Prerequisites: . Identify one or more contracts with a status of Entered or Canceled. The negotiation status must not be Pending Approval or Pending Activation. Note: This procedure shows the navigation from the Administrator Workbench page. You can also access the Mass Update Contracts page when the Mass Update action is selected from the following pages: • Search • Advanced Search To update multiple contracts: 1. From the Navigator, navigate to Contract Administration, and then select Administrator Workbench. A list of contracts appears in the My In Process Contracts region. 2. Mark the Select check box next to the contracts that you want to update. 3. From the Select Contracts list, select Mass Update. 4. Click Go. The Mass Update Contracts page appears. A read-only table at the top of the page shows the following attributes for the contracts that you selected: • Contract Number • Customer • Description • Status • Start Date • End Date
  • 328.
    13-10    Oracle ServiceContracts User Guide • Follow-Up Due Date • Follow-Up Action • Amount You can also add the following columns using the personalization feature: • Forecast Close Date • Forecast Percent • Negotiation Status • Known As • Category 5. To update the contract status information, scroll to the Contract Status region. You can update the following: • Status: Select a new status from the drop down list. • Reason: Select a reason from the drop down list. • Comments: Enter comments to explain the status update. 6. To create a follow up action, scroll to the Follow-Up region. You can create the following: • Action: Select an action from the drop down list, such as Call Customer. • Due Date: Select the date that you expect the action to be completed. 7. To update forecast details, scroll to the Forecast region. You can update the following: • Close Date: Select a new close date for the forecast. • Close Percent: Enter a new close percent for the forecast. 8. To enter notes, scroll to the Notes region and enter any notes relating to the contract within the Notes Text field. 9. Click Apply. A confirmation message appears indicating that the contracts were successfully updated.
  • 329.
    Using the AdministratorWorkbench to Manage Contracts Under Negotiation     13-11 Updating a Contract You can update one or more attributes on a single contract from the Update Contracts page. Prerequisite: . Identify a contract with a status of Entered or Canceled. The negotiation status must not be Pending Approval or Pending Activation. Note: This procedure shows the navigation from the Administrator Workbench page. You can also access the Update Contracts page when the Update Contract action is selected from the following pages: • Search • Advanced Search To update a contract: 1. From the Navigator, navigate to Contract Administration, and then select Administrator Workbench. A list of contracts appears in the My In Process Contracts region. 2. Mark the Select check box next to the contract that you want to update. 3. From the Select Contracts list, select Update Contract. 4. Click Go. The Update Contracts page appears. A read-only table at the top of the page shows the following attributes for the contract that you selected: • Contract Number • Customer • Description • Status • Start Date • End Date
  • 330.
    13-12    Oracle ServiceContracts User Guide • Follow-Up Due Date • Follow-Up Action • Amount • Forecast Close Date • Forecast Percent • Negotiation Status • Known As • Category You can change the display of the page by using the personalization feature. 5. To update the contract status information, scroll to the Contract Status region. You can update the following: • Status: Select a new status from the drop down list. • Reason: Select a reason from the drop down list. • Comments: Enter comments to explain the status update. 6. To create a follow up action, scroll to the Follow-Up region. You can create the following: • Action: Select an action from the drop down list, such as Call Customer. • Due Date: Select the date that you expect the action to be completed. 7. To update forecast details, scroll to the Forecast region. You can update the following: • Close Date: Select a new close date for the forecast. • Close Percent: Enter a new close percent for the forecast. 8. To enter notes, scroll to the Notes region and enter any notes relating to the contract within the Notes Text field. 9. To add a note to the interaction history of the contract, scroll to the Interaction History region. 1. Filter the interactions by selecting a value from the View list, such as In Person.
  • 331.
    Using the AdministratorWorkbench to Manage Contracts Under Negotiation     13-13 2. Click Go. This filters the interactions. 3. Select the Interaction to which you would like to add a note. 4. Enter a text in the Note field. 10. Click Apply. A confirmation message appears indicating that the contract was successfully updated. Opening a Contract You can open the Service Contracts Authoring window from the Administrator Workbench, where you can make updates to the contract, save those changes and return to the workbench. You are limited to opening one contract at a time. To open a contract: 1. From the Navigator, navigate to Contract Administration, and then select Administrator Workbench. A list of contracts appears in the My In Process Contracts region. 2. Choose the Select check box next to the contract that you want to open. 3. From the Select Contracts list, select Open Contract. 4. Click Go. The Service Contracts Authoring window appears. You can make updates to the contract in this form. For information about the Service Contracts Authoring window, see Creating a Contract, page 1-4. Sending an E-Mail to a Customer from the Administrator Workbench You can send an e-mail to a customer from the Administrator Workbench. This opens the Email Customer page, where you can select the communication template and specify a description. You are limited to sending an e-mail for one contract at a time. The procedure for sending an e-mail from the Administrator Workbench mirrors the procedure for sending an e-mail from the Service Contract Search page. See Sending an E-Mail to a Customer (HTML), page 14-4 for details.
  • 332.
    13-14    Oracle ServiceContracts User Guide Printing Quotes and Contracts You can select a contract and the Print Quote action to view the quote in the PDF format. You are limited to creating a quote document for one contract at a time. To print quotes and contracts: 1. From the Navigator, navigate to Contract Administration, and then select Administrator Workbench. A list of contracts appears in the My In Process Contracts region. 2. Choose the Select check box next to the contract for which you want to create a Quote Document. 3. From the Select Contracts list, select Print Quote. 4. Click Go. The File Download window appears. 5. Select Open to open the file, or Save to save to the file to your computer. If you chose to open the file, the Quote Document opens in a new window. 6. Review the details on the Quote Document, such as: • Contract number • Short description • Contract term (start and end dates) • Amount • Line details 7. You can print the Quote Document for your computer. Identifying Follow-Up Actions You can view contracts that require follow-up actions from the My In Process Contracts bin. To identify follow-up actions: 1. From the Navigator, navigate to Contract Administration, and then select
  • 333.
    Using the AdministratorWorkbench to Manage Contracts Under Negotiation     13-15 Administrator Workbench. 2. From the View list, select Follow Up Actions . 3. Select Go. A list of contracts appears. You can view contracts that require follow-up actions. The due date is the date on which you must complete the action. All follow-up actions that are past due are marked with an icon next to the due date. Using Shortcuts in the Administrator Workbench The Shortcuts bin provides links to other functions within Oracle Service Contracts. You can use the Shortcuts bin to search for contracts or create contracts: • Advanced Search: Opens the Advanced Search page. • Create Service Agreement: Opens the Service Contracts Authoring window with a Status of Entered and a Category of Service Agreement. • Create Extended Warranty: Opens the Service Contracts Authoring window with a Status of Entered and a Category of Warranty and Extended Warranty. • Create Subscription: Opens the Service Contracts Authoring window with a Status of Entered and a Category of Subscription Agreement. To use shortcuts: 1. From the Navigator, navigate to Contract Administration, and then select Administrator Workbench. 2. Click the link for the function that you want to start, such as Create Service Agreement.
  • 335.
    Viewing Contract Detailsin HTML    14-1 14 Viewing Contract Details in HTML Overview of Service Contracts in HTML HTML pages are accessible from the Service Contract Administrator workbench, the Oracle Installed Base Mass Update workbench, the Oracle Installed Base Instance Details page, the Oracle Sales Online Customer Details page, and the Daily Business Intelligence (DBI) portal for service contracts. From the HTML pages, you can view the following: • Service lines and covered product level information for all line types • Billing schedules • Billing history • Notes • Attachments • Interactions • Contract terms Use the following procedures to navigate the HTML pages: • Finding Contracts (HTML), page 14-2 • Sending an E-Mail to a Customer (HTML), page 14-4 • Viewing Contract Details (HTML), page 14-5 • Viewing Service Line Details (HTML), page 14-7 • Viewing Coverage Details (HTML), page 14-8
  • 336.
    14-2    Oracle ServiceContracts User Guide • Viewing Covered Level Details (HTML), page 14-9 • Viewing Usage Line Details (HTML), page 14-10 • Viewing Usage Counter Details (HTML), page 14-11 • Viewing Subscription Line Details (HTML), page 14-11 • Viewing Item Instance Details (HTML), page 14-12 • Viewing Order Information for a Service Contract (HTML), page 14-13 • Viewing Billing Transactions (HTML), page 14-14 You can also use the following procedures to update one or more contracts: • Updating a Contract (HTML), page 13-11 • Updating Multiple Contracts (HTML), page 13-9 Note: You can personalize the view within the HTML pages. For information about personalization of the HTML pages, refer to the Oracle Applications Personalization Guide. Finding Contracts (HTML) This procedure describes how to find a contract from the Search page. You can also find contracts from the Service Contracts Administrator Workbench. To find contracts: 1. From the Navigator, navigate to Contract Administration, and then select Contract Search. The Service Contracts Search page appears. 2. From the Display LOV, select the view to display for your search results. For example, select All Contracts. 3. To narrow the search results, enter your search criteria. For example, enter Business World in the Customer field and Entered in the Status field. • The flashlight icon to the right of a field opens a Search and Select page, which you can use to find an item.
  • 337.
    Viewing Contract Detailsin HTML    14-3 • The calendar icon to the right of a field opens a calendar, which you can use to select a date. Note: To specify additional search criteria that is not available in the Search region, click the Advanced Search button. The Advanced Search page appears. This page provides additional search criteria from which to select. 4. Select Go. The search results appear at the bottom of the page. 5. To revise your search, select Clear and enter new criteria. Then repeat the previous steps. 6. To view the contract details for a specific contract click the corresponding Contract Number link. 7. To export the search results to a spreadsheet, select Export. You will be prompted to open or save the file to your computer. 8. To take action on a contract or multiple contracts: 1. Choose the corresponding Select check box. To select all contracts, click the Select All link. 2. From the Select Contracts list, select an action. The following actions are available: • Publish to Customer • Submit for Approval • Disable Reminders • Enable Reminders • Run QA Check • Open Contract • Email Customer • Print Quote
  • 338.
    14-4    Oracle ServiceContracts User Guide • Mass Update • Update Contract For example, you can open the contract in the Service Contracts Authoring window by selecting a single contract and choosing Open Contract. Note: You can select only a single contract for the following actions: Open Contract, Email Customer, and Print Quote 3. Click Go. For most actions, a confirmation message appears at the top of the page. See also Overview of Service Contracts in HTML, page 14-1. Sending an E-Mail to a Customer (HTML) Prerequisite:Navigate to Find Contracts and review your search results. See Finding Contracts (HTML), page 14-2. To send an e-mail to a customer: 1. From the Search results, choose the Select check box for the contract. 2. From the Select Contracts list, select Email Customer. 3. Click Go. The Email Customer: Service Contract page appears. 4. Specify details for the e-mail. • At a minimum, you must complete the fields that contain an asterisk, such as To and From. • To select a message layout template, select the flashlight icon to the right of the Message Layout Template field. This opens the Search and Select page. From here you can search for and select a template. Note: After you select a template, you can preview the template by clicking the Preview button to the right of the Message Layout Template field.
  • 339.
    Viewing Contract Detailsin HTML    14-5 • To select an attachment layout template, select the flashlight icon to the right of the Attachment Layout Template field. This opens the Search and Select page. From here you can search for and select a template. 5. Click Send. 6. A confirmation message appears at the top of the page, which indicates that the e-mail has been sent successfully to the customer contact. Viewing Contract Details (HTML) Prerequisite: Navigate to Find Contracts and review your search results. See Finding Contracts (HTML), page 14-2. To view contract details: 1. From the Search results click the corresponding Contract Number link for a contract. The Service Contract page appears. You can view the contract header or select any of the following subtabs to view contract details that are defined at the header level: • Lines Note: To export lines into a spreadsheet, select Export • Contacts • Billing Note: Amounts in the Terminated and Billed regions are rolled up from lines and sublines. • Sales Credits • Renewals • Related Documents Note: If an order exists, you can view order details by clicking the order number link in the Document Reference column. The Sales Order page appears.
  • 340.
    14-6    Oracle ServiceContracts User Guide • History Note: The application provides navigation that enables you to return to previous pages. After you select a subtab, you can return to the previous page by clicking the navigation link preceding the page title. For example, if the following navigation appears , Service Contract Search > Service Contract: 23248, click the Service Contract: 23248 link to return to the contract header. You can also view additional detail pages by clicking the links within the Additional Details block: • Interaction History • Billing History Note: To export billing transactions into a spreadsheet, select Export. The Transaction number link navigates to Oracle Bill Presentment view of Invoice and Credit Memo. • Contract Terms • Notes and Attachments • Contract Groups 2. Review customer and contract information in the contract header. For example, you identify the customer, status, term, and contract amount. 3. To view line details, select the Lines tab. See: • Viewing Service Line Details (HTML), page 14-7 • Viewing Usage Line Details (HTML), page 14-10 • Viewing Subscription Line Details (HTML), page 14-11 4. To open the Service Contracts Authoring window click the Open button. This opens the form where you can modify the contract. Note: The Open button is not visible if you navigate from pages of applications other than Oracle Service Contracts.
  • 341.
    Viewing Contract Detailsin HTML    14-7 Viewing Service Line Details (HTML) Prerequisite: Open a contract containing service lines. To view service line details: 1. To drill down into the service line details, select the Lines tab and the service line link that is associated with the service. The secondary tabs for the selected line appear, with the Covered Levels secondary tab selected: • Covered Levels 1. Select Show from the Details column to expand the display. 2. To open the details for the service contract line, select the link corresponding line. The Service Contract Line Covered Level page appears. View the Covered Level details for the selected line. To view billing transactions for the line, select the Billing Transactions link from the Additional Covered Level Details block. 3. If an associated item instance is entered in Oracle Installed Base, you can click that link to view the Item Instance page. See Viewing Item Instance Details, page 14-12. • Contacts • Billing Note: Amounts in the Terminated and Billed regions are rolled up from sublines. • Sales Credits • Related Documents • History You can also view additional pages by clicking the links within the Additional Line Details block: • Billing Transactions
  • 342.
    14-8    Oracle ServiceContracts User Guide Note: You can view accounts receivables invoices and credit memos for the line as Billing History and also future Billing Schedules. • Coverage Details Note: Select Coverage Details to view the service level agreements, such as coverage and response times. • Notes 2. To return to the Contract, click the Service Contract link preceding the page title. Related Topics Viewing Usage Line Details (HTML), page 14-10 Viewing Subscription Line Details (HTML), page 14-11 Viewing Coverage Details (HTML) Prerequisite: Open a contract containing service lines and select a service line. To view coverage details: 1. From the Additional Line Details region, select Coverage Details. The Coverage Details page appears. 2. Review the coverage entitlements associated with the service line: • Review the Coverage Header. • Select a business process, such as Customer Support. The following regions are updated to correspond to the business process that you select. • Coverage Times: You can change the view of the coverage times by selecting one of the Display radio buttons, either By Interval or By Day. • Response Times: You can change the response time view by selecting a value from the View list, either Reaction Times or Resolution Times. • Preferred Resources • Billing Types
  • 343.
    Viewing Contract Detailsin HTML    14-9 Related Topics For a description of defining coverage templates, see Defining a Coverage Template, page 23-7 Viewing Covered Level Details (HTML) Prerequisite: Open a contract containing service lines and select a service line. To view covered level details: 1. Click the Line link for the covered level details that you want to view. The Line Details page appears. 2. Review the Covered Level Details that are associated with the line: • Covered Level Header • Covered Level Details: • Instance details: Appears only if the covered level is Product. • Item details: Appears only if the covered level is Item. • System details: Appears only if the covered level is System. • Site details: Appears only if the covered level is Site. • Account details: Appears only if the covered level is Account. • Party details: Appears only if the covered level is Party. • Pricing Calculation: Appears only if the covered level is Product or Item. Note: You can drill down further into detail pages if a link exists. For example, clicking the Item Instance link opens a detail page for the item instance. • Related Documents 3. Navigate to other pages with additional subline details, by clicking a link within the Additional Covered Level details bin, for example, Billing Transactions.
  • 344.
    14-10    Oracle ServiceContracts User Guide Related Topics For a description of the various covered levels, see Levels of Coverage and Their Uses, page 3-15. Viewing Usage Line Details (HTML) Prerequisite: Open a contract containing usage lines. To view usage line details: 1. To drill down into the usage line details, select the Lines tab and the usage line link that is associated with the service. The secondary tabs for the selected line appear, with the Counters secondary tab selected: • Counters • Contacts • Billing Note: Amounts in the Terminated and Billed regions are rolled up from sublines for Negotiated Usage lines, or come from the line itself for all other types of Usage lines. • Sales Credits • Renewals • Related Documents • History You can also view additional pages by clicking the links within the Additional Line Details block: • Billing Transactions • Notes 2. To return to the Contract, click the Service Contract link preceding the page title.
  • 345.
    Viewing Contract Detailsin HTML    14-11 Related Topics Viewing Service Line Details (HTML), page 14-10 Viewing Subscription Line Details (HTML), page 14-11 Viewing Usage Counter Details Prerequisite: Open a contract containing usage lines with a counter. To view usage counter details: 1. From the Lines tab, click the Service link, such as QP-LPTR-U. The Usage Line page appears with the Counters tab selected. 2. Click the Line Number link, such as 1.1. The Usage Counter page appears. You can view the counter read history within the Counter Readings region and Billing History in the Billing Transactions region. You can use the Transaction Number link in the Billing Transactions region to drill down to the Oracle Bill Presentment view of the invoice or credit memo. You can reconcile quantity billed for a particular billing transaction with the default or minimum, actual, estimate, or actual and estimate that is shown in the Usage Pricing Details region. This depends on the usage type. You can also reconcile amount billed for a particular billing transaction with the applied price breaks that are shown in the child Usage Pricing Details region. Viewing Subscription Line Details (HTML) Prerequisite:Open a contract containing subscription lines. To view subscription line details: 1. To drill down into the subscription line details, select the Lines tab and the subscription line link that is associated with the service. The secondary tabs for the selected line appear, with the Fulfillment Details secondary tab selected: • Fulfillment Details: Shows the subscription fulfillment schedules for a tangible subscription. Note: You can click the Order Number link to navigate to the sales order view page and view the shipment dates and delivery numbers.
  • 346.
    14-12    Oracle ServiceContracts User Guide • Contacts • Billing Note: Amounts in the Terminated region and Billed regions come from the line itself for Subscription lines. • Sales Credits • Related Documents • History You can also view additional pages by clicking the links within the Additional Line Details block: • Billing Transactions • Notes 2. To return to the contract, click the Service Contract link preceding the page title. Related Topics Viewing Service Line Details (HTML), page 14-10 Viewing Usage Counter Details (HTML), page 14-11 Viewing Item Instance Details (HTML) Prerequisite: Open a contract containing service lines. To view item instance details: 1. Select the Lines tab and the service line link that is associated with the Service. Drill down into the service line by clicking the associated Service link. The secondary tabs for the selected line appear, with the Covered Levels secondary tab selected. 2. Select the instance number link in the Item Instance column. The Item Instance Page appears with the General subtab selected. You can view the installed base details by selecting the other subtabs. • Location
  • 347.
    Viewing Contract Detailsin HTML    14-13 • Associations • Configuration • Counters • Notes Note: For more information, see the Oracle Installed Base User Guide. 3. To return to the line, click the Service Contract: Line link preceding the page title. Viewing Order Information for a Service Contract (HTML) Prerequisite: Open a contract that is associated with an order. To view order information for a service contract: 1. Select the Related Documents subtab. 2. From the Document Reference column, click the Order Number link. The Sales Order page appears with the Lines tab selected. You can view the sales order details by selecting the other subtabs. • Contract Terms • Contract Documents • Invoices • Deliveries • Notes Note: For more information, see the Oracle Order Management User's Guide. 3. To return to the line, click the Service Contract: Line link preceding the page title. 4. Optionally, click the View Contract button to open the terms and conditions that are attached to the sales order in a PDF format.
  • 348.
    14-14    Oracle ServiceContracts User Guide Viewing Billing Transactions (HTML) Prerequisite: Open a contract containing lines. To view billing transactions: 1. Select the Lines tab and click the Service link. You can click this link for service lines, usage lines, and subscription lines and covered level details. For more information, refer to the following procedures: • Viewing Service Line Details (HTML), page 14-7 • Viewing Usage Line Details (HTML), page 14-10 • Viewing Subscription Line Details (HTML), page 14-11 • Viewing Covered Level Details (HTML), page 14-9 2. From the Additional Details bin, click the Billing Transactions link. The Billing Transactions Detail page appears. Use the following regions to view billing transaction details: • Billing Rules • Billed (Amounts) • Billed Amount equals rolled up invoice amounts. • Unbilled Amount equals the contract amount not yet invoiced. • Terminated (Amounts) • Billing History • Displays all invoices and credit memos that are linked to this contract. • Click the Transaction Number link to view invoice or credit memo in Oracle Bill Presentment. • Billing Schedule Note: For more information about how billing works, see Overview of Billing, page 10-1.
  • 349.
    Using the CustomerAcceptance Portal    15-1 15 Using the Customer Acceptance Portal Overview of the Customer Acceptance Portal The Customer Acceptance Portal lists newly authored contracts and renewal contracts that require customer acceptance. Contracts appearing within the portal can be manually submitted by the sales representative as well as generated with the Online renewal process. After logging into the Customer Acceptance Portal, a customer can accept, decline, or request additional information for each contract. Customers can: • Specify payment methods that comply with regional requirements for their international contracts. Acceptable payment methods are defined within Global Contracts Defaults and include credit card, commitment, purchase order, check, or wire. See Entering Contract Defaults, page 2-36. • Upload a payment document, such as the image of a PO or check. • Either log in directly to the Customer Acceptance Portal or access the page through a link embedded within an e-mail notification. • Capture cancellation reasons and comments. After a customer accepts or declines a contract, it is no longer available in the pending contracts region. Contracts for which customers request assistance remain available for acceptance or declination. Additionally, sales representatives can: • Review request assistance messages and cancellation notes within the customer interactions of the contract. • Maintain customer account and password information. The following table lists notifications that customers receive during the authoring and
  • 350.
    15-2    Oracle ServiceContracts User Guide renewal process that may require acceptance within the Customer Acceptance Portal: Note: For each of these customer e-mails, the application provides a link to the Customer Acceptance Portal if the cover letter template includes a link. The seeded cover letter template has a link. Check with your administrator to determine whether the seeded letter has been modified. E-Mail Template Method that customer receives e-mail Quote Letter The application sends an e-mail notification at renewal in the Online process or using the Publish to Customer action. You can also send this notification to a customer using the Email Customer action and selecting the Quote Letter notification for the e-mail message body. See Sending an E-Mail to a Customer (HTML), page 14-4. Reminder Letter The application sends an e-mail notification when a Reminder program identifies a target contract You can also send this notification to a customer using the Email Customer action and selecting the Reminder Letter notification for the e-mail message body. See Sending an E-Mail to a Customer (HTML), page 14-4. Acceptance Confirmation If a customer accepts a renewal, an acceptance confirmation e-mail is generated. If the sales representative accepts on behalf of the customer, an activation confirmation is sent at contract activation. You can also send this notification to a customer using the Email Customer action and selecting the Acceptance Confirmation notification for the e-mail message body. See Sending an E-Mail to a Customer (HTML), page 14-4.
  • 351.
    Using the CustomerAcceptance Portal    15-3 Cancellation Letter If a customer declines a renewal, a cancellation e-mail is sent. This may also generate a cancellation letter if a sales representative declines on behalf of the customer by changing the contract status to Canceled. You can also send this notification to a customer using the Email Customer action and selecting the Cancellation Letter notification for the e-mail message body. See Sending an E-Mail to a Customer (HTML), page 14-4. Activation Confirmation If a customer accepts a renewal, an e-mail notification is generated at the start date of the contract. You can also send this notification to a customer using the Email Customer action and selecting the Activation Confirmation notification for the e-mail message body. See Sending an E-Mail to a Customer (HTML), page 14-4. Related Topics Opening the Customer Acceptance Portal, page 15-3 Accepting a Contract, page 15-4 Declining a Contract, page 15-6 Requesting Assistance, page 15-7 Opening the Customer Acceptance Portal Prerequisite: Your administrator must create a login. The application sends login information in the initial quote letter. To open the Customer Acceptance Portal: 1. Log in to the Customer Acceptance Portal with your user name and password, such as marsha.able@vision.com/welcome. The Pending Service Contracts page appears. You can accept the contract, decline the contract, or request assistance. You can also
  • 352.
    15-4    Oracle ServiceContracts User Guide view a PDF version of the contract quote. 2. Review the list of contracts and identify the contract that you will work with. 3. Choose the Select radio button. 4. To view a contract quote, select the Quote icon for the contract. This opens a PDF version of the quote in a separate window. Related Topics Accepting a Contract, page 15-4 Declining a Contract, page 15-6 Requesting Assistance, page 15-7 Accepting a Contract Prerequisite: Access the Customer Acceptance Portal. You must have contracts that require your action. To accept a contract: 1. Choose the Select radio button for the contract that you want to accept. 2. Click Accept. The Accept contract detail page appears with an html view with key information of the contract, such as contract amount and bill to information. Additional details will be available in the quote letter pdf file. You can cancel the acceptance process, request assistance, or continue to acceptance process. 3. Review the contract details. Note: You can open a PDF view of the Quote by selecting the Quote link. 4. Select a Payment Type in the Payment Details region. Depending on the type that you select, you may need to enter additional information. 5. If you select Credit Card on File: 1. Select a credit card from the LOV. 2. Enter a security code.
  • 353.
    Using the CustomerAcceptance Portal    15-5 6. If you select Check, enter the check number. 7. If you select Commitment, select a commitment number from the LOV. 8. If you select New Credit Card: 1. Enter a credit card. 2. Select an expiration date. 3. Enter a security code. This field may be required if the vendor requires a security code for credit card transactions. 9. If you select Purchase Order, enter the PO number covering the contract. 10. If you select Wire Transfer, enter the account number from which the fund will be wired. 11. To add a supporting payment document or other attachment, select Add Attachment within the Attach Documents region. The Add Attachment page appears. See Adding an Attachment, page 15-5. 12. Select Continue. The Accept Service Contract: Review and Confirm page appears. 13. Review the contract details. 14. In the Acceptance Clause region, select the check box indicating that you agree to the contract terms and conditions. 15. Select Accept. A confirmation appears indicating that your acceptance has been received. 16. To print a copy of your acceptance terms, select Printable Page 17. Select Done. Related Topics Opening the Customer Acceptance Portal, page 15-3 Declining a Contract, page 15-6 Requesting Assistance, page 15-7 Adding an Attachment Prerequisite: Open the Customer Acceptance Portal and accept a contract. From the Accept detail page select Add Attachment.
  • 354.
    15-6    Oracle ServiceContracts User Guide To add an attachment: 1. Name your attachment in the Title field. 2. Provide a summary of the attachment in the Description field. 3. Select a File Type radio button. You can choose File, URL, or Test. 4. If you select File, select Browse to select a file from your computer to attach. This starts the File Upload box for your computer and enables you to navigate and select a file. 5. If you select URL, enter a url to reference, such as http://www.oracle.com. 6. If you select Text, enter or paste the text that you want to reference within the Text box. 7. Click Apply. The attachment appears in the Attach Documents region. Note: After you apply your attachment, you can select Add Another to add an additional attachment. If you select Add Attachment, you will receive a message that the attachment has been added successfully but not saved. You must select Apply to continue. After you add an attachment, you can update it by selecting the Update icon. You can also delete it by selecting the Delete icon. Declining a Contract Prerequisite: Access the Customer Acceptance Portal. You must have contracts that require your action. To decline a contract: 1. Select the Select radio button for the contract that you want to decline. 2. Click Decline. 3. The Decline contract detail page appears with an html view with key information about the contract. You can cancel the declination process, request assistance, or decline the contract. 4. Select a reason from the LOV. 5. Select the check box that indicates that you agree to the terms of the Decline Clause.
  • 355.
    Using the CustomerAcceptance Portal    15-7 6. Optionally, enter your comments. 7. Click Decline. A confirmation message appears indicating that your decline instruction has been received. Related Topics Opening the Customer Acceptance Portal, page 15-3 Accepting a Contract, page 15-4 Requesting Assistance, page 15-7 Requesting Assistance Prerequisite: Access the Customer Acceptance Portal. You must have contracts that require your action. To request assistance: 1. Choose the Select radio button for the contract for which you need help. 2. Click Request Assistance. 3. The Request Assistance page appears with an e-mail form for you to complete. The sales representative for the contract appears in the To field. Your e-mail ID appears in the CC field. The Subject field is populated with the contract number, such as Salesrep Assistance for Contract : 23126. You can send an e-mail or cancel your request. 4. Enter a description of your issue in the Description block. 5. Select Send. 6. A confirmation appears indicating that your request for assistance has been forwarded to the sales representative who is responsible for your contract. Related Topics Opening the Customer Acceptance Portal, page 15-3 Accepting a Contract, page 15-4 Declining a Contract, page 15-6
  • 357.
    Managing the ContractLife Cycle    16-1 16 Managing the Contract Life Cycle This chapter covers the following topics: • Overview of Managing the Contract Life Cycle • Modifying Multiple Contracts at the Same Time (Mass Change) • Handling Change Requests • Entering Contract Changes • Reviewing and Approving Changes • Updating Contracts Online • Creating Different Contract Versions for Your Customer • Viewing Contract History • Handling Returns and Granting Credit • Changing Contract Status Overview of Managing the Contract Life Cycle This group of topics explains how you can manage the contract life cycle. After the contract authoring process is complete, you must manage your contracts on an ongoing basis. You may need to change coverages, durations, versions, and other aspects your contracts. You can streamline and control administrative processes, by leveraging functionality that manages updates and changes. For information on contract extensions and renewals, see Approving Contracts, page 9- 4. Modifying Multiple Contracts at the Same Time (Mass Change) You can change one attribute of multiple contracts with a single request using mass
  • 358.
    16-2    Oracle ServiceContracts User Guide change functionality. Mass change is allowed for contracts that are in appropriate status, where the operation update online is permitted. Note: Canceled contracts and Entered contracts that contain no lines do not appear in the Mass Change form. This form is designed for contract administrators to centrally manage contracts, which are generally in the Active status. Entered contracts, which may have lines and no sublines are essentially acted upon by assigned sales representatives who do not typically need to perform mass changes. Sales representatives are usually managing a limited number of contracts with specific requirements, rather than a large number of contracts that may require mass changes. Mass Change supports changes to a particular instance selected in the update level. For example, if changes are to be made at the operating unit, it will update records pertaining to that operating unit. The Mass change window allows you to enter the scope of the mass change request and selection criteria. It determines which contracts are to undergo a mass change. The update level is seeded, but may also be restricted by use of the OKS: Mass Change Security Level profile option. If the security of the profile option is turned on, the list may contain only the Contract and Contract Group levels; otherwise, the following is the list of update levels available: • Category • Contract Group • Operating Unit • Party • Contract Mass change permits the following attributes to be changed. Making change on a contract has a subsequent cascading effect and therefore needs to be carefully considered before allowing such a change. Following attributes are permitted for mass change that can be selected from the Attribute's LOV in the Mass Change header: • Accounting Rule • Agreement • Business Process Price List • Contract End Date • Contract Group
  • 359.
    Managing the ContractLife Cycle    16-3 • Contract Line Ref • Contract Start Date • Contract Renewal Type • Coverage End Time • Coverage Start Time • Coverage Timezone • Coverage Type • Header Bill to Address • Header Ship to Address • Invoicing Rules • Known As • Party Billing Contact • Party Shipping Contact • Payment Term • PO Numbering for Billing • PO Required for Renewal • Preferred Engineer • Preferred Resource Group • Price List • Product Line Ref • Reaction Time • Resolution Time • Revenue Account • Salesperson
  • 360.
    16-4    Oracle ServiceContracts User Guide • Summary Print Note: if the billing schedule is defined with Equal Amount or Covered Level, you cannot use Mass Change to modify either the contract start date or the contract end date, as the billing schedule must be adjusted for each individual contract. To modify multiple contracts at the same time: 1. From the Navigator, navigate Contract Administration, and then select Mass Change. The Mass Change Operation window appears. 2. Enter the name of mass change. 3. From Mass Change Details select the value Update Level from the LOV, such as Party. 4. Select Value from the LOV, such as Business World. 5. Select an appropriate attribute from the LOV, such as Price List Attributes supported by mass change are listed in this list. 6. Select an old value, such as Corporate.
  • 361.
    Managing the ContractLife Cycle    16-5 7. Select a new value, such as Business World. 8. Click Search or click Cancel and start over. If you click the Search button, all the contracts that meet the criteria appear in the Result region. By default, all the records are selected.
  • 362.
    16-6    Oracle ServiceContracts User Guide 9. To deselect a contract, check the Select check box. Note: You can deselect all contracts by clicking Deselect All or you can select all contracts by clicking Select All. 10. To run the quality assurance (QA) check first, select the Check QA check box. 11. To preview the request without submitting it, click Preview. The Mass Change Submission window appears. Because the Mass Change is a powerful process, you may preview a report. This ensures that you do not unintentionally update any contracts. To do so, you can run a preview, review the report, then submit it when you are confident the changes are correct.
  • 363.
    Managing the ContractLife Cycle    16-7 12. To submit the request, click Submit the Request. The Mass Change Submission window appears. 1. Select either As soon as possible or On Specific day. 2. Click OK. A note appears, indicating that the Mass Change request was successfully submitted. You are returned to the Mass Change window. The Operation Status field provides the status for the mass change. The Request region is populated with details of the request. Note: While submitting the mass change request, if one of the requests has an error it will display an error message. In this case, you can resubmit the request after making the changes to that request. This can be done until all the contracts in the mass change request are successfully processed. 13. To view the details for the request, select View Request. The Requests window appears.
  • 364.
    16-8    Oracle ServiceContracts User Guide 14. After the request is completed, requery the Mass Change request window to view the updated operation status and request information in the Mass Change Operation window. Handling Change Requests Your administrator can set a contract to a status that does not allow changes to be made online through the authoring form, but does allow changes through a change request. This provides more control over tracking the changes made to a contract through its life cycle. If the Active status does not allow online updates, then any changes to the contract would have to go through the change request process. After a change request has been approved, a notification is sent to the Contract Administrator. From the Inbox, you can open the contract for update. In this situation the Open for Update button is not visible in the contract itself. After you complete the contract updates, you can run the contract through the QA Check and if everything passes, the contract status is set back to Active. Entering Contract Changes Prerequisite Confirm the status and operations setup allows changes for the category and status.
  • 365.
    Managing the ContractLife Cycle    16-9 To enter contract changes: 1. From the Navigator, navigate to Contract Administration, and then select Launchpad. 2. Select the Contract Navigator tab. 3. Highlight the contract you want to change. 4. Right-click the contract and select the Create Change Request option. The Create Change Requests window appears. 5. Enter the request name and a description. 6. Confirm the requester's name in the Request By field. This person receives a workflow notification when changes are approved and can be applied to the contract. 7. Enter the request date. 8. Enter the effective dates. 9. To version the changed contract, select the Version check box. 10. To require signature, select the Signature Required check box.
  • 366.
    16-10    Oracle ServiceContracts User Guide 11. Record the lines for which you are requesting a change and the exact nature of the change. For example, apply an extra 10% discount. 12. Select the Admin tab. 13. In the Workflow Name field, select the approval workflow. 14. Select an administrator. 15. Select party approvals (optional). 16. Save.
  • 367.
    Managing the ContractLife Cycle    16-11 17. Click Submit for Approval. A note message appears, indicating that the change request has been Submitted for approval 18. Click OK. Reviewing and Approving Changes The change request must first be approved before you can change the contract. After the change request has been approved, you can open the contract and apply the changes as described in the change request notification. After you start editing the contract, you automatically lock the contract for other users with an approved change request. Prerequisite Open the change request notification in your Inbox and confirm no other change requests are in process. To review and approve changes: 1. From the Navigator, navigate to Contract Administration, and then select Launchpad. 2. From the Launchpad, click Find.
  • 368.
    16-12    Oracle ServiceContracts User Guide The Inbox Find window appears. 3. From Select Notification Type, select Change Request Approvals. 4. Click Find. The contracts that have open change requests appear.
  • 369.
    Managing the ContractLife Cycle    16-13 5. Highlight a contract from the Inbox and click Respond. The Notification Details window appears. 6. Click Approve. The worklist window shows the change request has been approved. Close the worklist. 7. From the Launchpad Inbox select Find: • From the Select Notification Type list, select Change Requests Approved. • Click Find. The approved change requests appear. • Highlight the change request and select Open. The contract opens in status of QA Hold (or Open for Update). After you make changes to the contract, you must submit the contract for a QA check. 8. From the Actions menu, select Check QA. The Quality Assurance Results window appears. If the contract passes QA, select OK. A new version of the contract will be created if that option was selected in the
  • 370.
    16-14    Oracle ServiceContracts User Guide change request. Note: To change a contract that has been submitted through the change request process to Active status, you can open the change request and click Check Contract on the Admin tab. Updating Contracts Online After the contract has gone through the approval process, you can update a contract through the Update Online operation, as long as the status and operations definition allows it. Prerequisites • Set the OKC: Global Update Privileges profile option to Yes. • Grant the Update Online function to the user responsibility • Confirm other users do not have the change request lock on the contract. To update contracts online: 1. From the Service Contracts Authoring window, select the Summary tab and select Open for Update . The Contract Status should change from Active to QA Hold. This locks the contract. 2. Make changes to the contract. 3. Save. 4. From the Actions menu, select QA Check. 5. Review the QA results. 6. If the QA results are clean, click OK. 7. The Contract Status changes from QA Hold to Active.
  • 371.
    Managing the ContractLife Cycle    16-15 Creating Different Contract Versions for Your Customer The contract version consists of a major version and a minor version. The major and minor versions are separated by a period. When a contract is created, the version is set to 0.0. The minor version increases incrementally each time that the contract is changed. When you create a new version, the major version number of a contract is changed from its most recent value to the next increment. The minor version changes each time that the contract is changed, but the major version will not change again unless you create another contract version. For example: Contract Changes Version Initial creation 0.0 First save with changes 0.1 Second save with changes 0.2 Create new version 1.0 First save after new version 1.1 Second save after new version 1.2 To create different contract versions for your customer: 1. From the Service Contracts Authoring window, select the Tools menu and select Create New Version. A caution window appears indicating that the application will create a new version. 2. Click OK.
  • 372.
    16-16    Oracle ServiceContracts User Guide A note appears, indicating that a new version has been created successfully. 3. Click OK. In the Version field, the digit that is in front of the period, or the major version number, increases by one. The minor version is reset to zero. Viewing Contract History To view contract history: 1. In the Contract Navigator tab of the Oracle Contracts window, select a contract. 2. Double-click the contract. The Contract Execution window appears.
  • 373.
    Managing the ContractLife Cycle    16-17 3. Select the History tab.
  • 374.
    16-18    Oracle ServiceContracts User Guide 4. From the Select list choose an option: • Status Change • Contract Versions • Change Requests • Change Requests and Contract Versions 5. To open a contract version or change request, highlight the version and select Open . Depending on what you select, the Service Contracts Authoring window or the Create Change Request window appears. See also: • Extending a Contract Line (Contract Execution window), page 17-6
  • 375.
    Managing the ContractLife Cycle    16-19 • Terminating a Contract Line (Contract Execution window), page 20-5 Handling Returns and Granting Credit Credits are determined by the RMA line type in Oracle Order Management. When a product is returned from Oracle Order Management, Oracle Installed Base makes a call to Oracle Service Contracts with the parameter raise_credit, which determines if a full, a partial, or no credit is to be issued. • Full: Product line in Oracle Service Contracts is terminated as of the start date of the product line and a full credit is issued. • Calculated (Partial): Product line in Oracle Service Contracts is terminated as of the return date of the product. A partial prorated credit is issued based on the return date. • None: Product line in Oracle Service Contracts is terminated as of return date and no credit is issued. If there is a null value and nothing is passed in the parameter raise_credit, then Oracle Service Contracts uses the credit option rule set in the Credit Amount field of the Global Contracts Defaults window. You can set the credit option to Full, Calculated, or None. For more information on the Global Contracts Defaults window, see Entering Contract Defaults, page 2-36. If you define the credit option rule in Global Contracts Defaults, and your administrator sets the OKS: Raise Credit Memo for IB Instance Termination option to Yes, the application uses the values defined in the Global Contracts Defaults. If your administrator sets the profile option to No, the application does not generate credits. Changing Contract Status To change a contract status: 1. In the Contract Navigator, right-click a contract and select Change Status. The Contract Status window appears.
  • 376.
    16-20    Oracle ServiceContracts User Guide 2. Select the new status from the LOV. Note: The New Status LOV is dependent on the Current Status. For example, the New Status LOV values for Terminated contract are different from that of an Entered or Active Contract. 3. Select a reason from the LOV. If you need to add more reasons for the status change, your system administrator can add more options in the Lookup Codes. 4. Use the Comments field to enter any additional information. 5. Click OK. 6. A Status window appears indicating that the status change was successful. 7. Click OK. Note: The Termination Reason field populates only for Terminated Contracts. This feature allows you to know the termination reason and segregate contracts with similar reasons under New Status. 8. In the Contract Navigator tab, right-click the contract and select Refresh. The contract shows the new status.
  • 377.
    Managing the ContractLife Cycle    16-21 Note: Certain status transitions are made based upon the start date or end date on a contract or on a contract line. There are two concurrent programs used to automatically change the status of a contract: • Contract Status Change by Range • Contract Status Change by Contract These programs are used when the status transitions are not manual. For example, a contract: • expires when an end date is reached. • becomes active from the signed status at the start date.
  • 379.
    Extending and RenewingContracts    17-1 17 Extending and Renewing Contracts This chapter covers the following topics: • About Contract Extensions and Renewals • Extending a Contract Without Repricing • Repricing an Extended Contract • Extending a Contract Line • How Billing Schedules Are Updated for Extended Contracts • Understanding Contract Renewals • Managing Manual Renewals • Managing Online Renewals • Managing Evergreen Renewals • Understanding Sales Credits During Contract Renewals • Explaining the Pricing of Renewed Contracts • Specifying How the Renewed Contract Will Be Priced • Renewing Contracts Manually • Managing the Event-Driven Renewal Process • Allowing a Grace Period for Renewals • About Grace Periods • Specifying a Grace Period for the Current Contract • Specifying a Grace Period for the Renewed Contract • Understanding Billing Schedules on Renewed Contracts • Consolidating Multiple Contracts for Renewal • Sending Quote Letters by E-mail • Understanding Line Level Cancellation and Termination Reasons
  • 380.
    17-2    Oracle ServiceContracts User Guide • Canceling a Contract Line • Canceling a Contract Subline About Contract Extensions and Renewals This group of topics explains how you can extend and renew contracts. Contract Extensions Oracle Service Contracts allows you to extend the duration of a contract or a contract line without having to submit the contract to the approval workflow. A contract must be in a status of Active, Signed, or Expired to be extended. Contracts in a status of Entered, Canceled, or Terminated are examples of contracts that cannot be extended. When you extend the duration of a contract, the contract lines are automatically extended, as long as the end date of the line is the same as the end date of the contract. If the end date for the line is different from the end date for the contract, the line will not change if the contract is extended. This functionality ensures that a service with a duration that, is deliberately different from the contract duration, retains its intended duration. Either you can extend the contract without repricing it, or you can choose to reprice it. For example, you may: • Provide a customer with six months of additional coverage, because he is a good customer and you want to show your appreciation. In this scenario, you choose not to reprice the contract. See Extending a Contract without Repricing, page 17-4. • Extend a contract by three months because of a customer request. Although you agree to extend the contract, you advise the customer that he will be charged for the extension. In this scenario, you choose to reprice the contract. See Repricing an Extended Contract, page 17-5. You can also extend the duration of a contract line manually. See Extending a Contract Line, page 17-6. After you have extended a contract, you should review any changes to the billing schedules. See How Billing Schedules Are Updated for Extended Contracts, page 17-9 Note: You cannot extend the original contract if it has already been renewed. However, you can extend the renewed contract, as long as another contract does not follow it. Contract Renewals The process of renewing a contract involves making a copy of an existing, active
  • 381.
    Extending and RenewingContracts    17-3 contract at a point in time. The dates are changed to reflect a period similar to that of the existing contract, beginning on the first day after the existing contract expires. Other attributes of the new contract may also be changed, such as pricing. Contracts can be renewed either manually or automatically. You can manually renew a contract from the Contract Navigator, or your administrator can set up the application to automatically submit a contract for renewal. Regardless of whether you plan to renew contracts manually or automatically, you can: • Define renewal rules within a contract. See Specifying How a Contract Will Be Renewed, page 2-28. • Create global defaults. See Setting Up Defaults for Contract Renewal, page 2-34. After a contract has been renewed, changes to the existing contract will not update the renewal contract. For example, if a contract is renewed 90 days before expiration and the customer requests changes to their existing contract 15 days after the renewal process has begun, the changes made to the existing contract will not be reflected on the renewed agreement. If changes have not been made on the renewal contracts and it is still in an Entered state, you can: • Delete the renewal contract. • Change to the original contract. • Renew the contract again, so that the latest changes are incorporated on the renewal contract. Note: When renewing a Subscription contract: • A new instance is not created in Oracle Installed Base and the new contract continues to reference the same parent item. However, if you use the Copy function to create a new Subscription contract, a new instance is created in Oracle Installed Base. • The Fulfillment schedule is copied to the new contract. To upsell a contract by adding additional services or covered goods, you may do so at renewal. To upsell a contract, you must work with a sales representative when an opportunity to open and update the contract occurs. You can cancel service lines or covered products during a renewal if you no longer want to renew them. See Understanding Line Level Cancellation and Termination Reasons, page 17-37. For information about creating and enabling templates for e-mails to customers, see About Templates for E-Mails to Customers, page 18-1.
  • 382.
    17-4    Oracle ServiceContracts User Guide Extending a Contract Without Repricing To extend a contract without repricing: 1. From the Contract Navigator, highlight a contract and right-click. 2. Select Extend. The Extend Contracts window appears. 3. Select a Duration and Period. The End Date field is populated based on the duration and period. 4. Select Extend. 5. A decision message indicating that the contract was successfully extended appears. Click Yes to save changes. 6. To verify if that the contract was extended, highlight the contract and right click. 7. Select Open. The contract authoring window appears. 8. Check the duration of the header to verify whether the contract was extended.
  • 383.
    Extending and RenewingContracts    17-5 9. Select the Lines tab and Effectivities subtab to verify whether the lines were extended. Note: For the procedure about extending a contract line, see Extending a Contract Line, page 17-6. Repricing an Extended Contract To reprice an extended contract: 1. From the Service Contracts Authoring window, select the Summary tab and Parties subtab, and then select Open for Update. Note: If you do not see the Open for Update button, your administrator may not have set the status and operations to allow online updates. The status of the contract changes to QA hold. 2. To reprice the contract line by line, navigate to the Lines tab and Pricing/Products subtab. 3. Select Reprice. The Repricing Results window appears. 4. Click Apply. Verify that the pricing was updated. You may also want to review the billing streams. The application adds an additional stream level sequence to cover the extended duration. Note: Anytime the dates of a contract header, line, or subline are changed, remember to verify that amounts and billing schedules are updated or retained as appropriate for the situation. 5. From the Actions menu, select Check QA to run the QA check. The Quality Assurance Results window appears. 6. Click Continue. 7. The contract status updates to the original status.
  • 384.
    17-6    Oracle ServiceContracts User Guide Note: You can reprice the entire contract, by navigating to the Summary tab and Pricing/Billing subtab and selecting Reprice. Extending a Contract Line To extend a contract line: 1. From the Contract Navigator, select the contract that contains the line to extend. 2. Double-click the contract to open the Contract Execution window.
  • 385.
    Extending and RenewingContracts    17-7 3. Select the Overview tab. The lines of the contract appear in the lower portion of this tab. 4. Highlight the line you want to extend, right-click and select Extend Line. The Extend Contracts Line window appears. 5. Enter a duration and period.
  • 386.
    17-8    Oracle ServiceContracts User Guide 6. Click Extend. 7. A decision box appears, indicating that the line was successfully extended. 8. Select Yes from the decision box. 9. Close the Contract Execution window and return to the Contract Navigator. 10. To verify that the contract line was extended, return to the Contract Execution window. 11. Select the line, right-click, and select Refresh.
  • 387.
    Extending and RenewingContracts    17-9 How Billing Schedules Are Updated for Extended Contracts After the contract is extended, an additional billing stream sequence appears in the billing schedule. This sequence covers the extended duration. Depending on the billing schedule, the total amounts for any unbilled periods are updated to reflect the remaining duration of the contract. Billing Schedules for Extended Contracts Without Repricing If you do not reprice the contract, the total amount of the contract remains unchanged. However, for each line, a new billing stream sequence is added with the same billing period as the preceding stream sequence. The number of periods for the new billing stream sequence reflects the duration of the extension. Although the total amount of the contract has not changed, the billing stream sequences for any unbilled total amounts are also updated to reflect the remaining duration of the contract. The billing schedule is also updated. For example, if you have a one-year contract with a service line that is priced at 100
  • 388.
    17-10    Oracle ServiceContracts User Guide USD and is scheduled to be billed one time during the one-year duration, and you extend that contract without repricing it; a second billing stream sequence is added with the same billing period as the previous billing stream sequence. Because the contract has not been billed, the amount for each billing stream sequence is now 50 USD. However, the total amount of the service line remains 100 USD. Billing Stream Before Contract Extension Seq Number of Periods Start Date End Date Duration Period Amount Total Amount 1 1 01-MAR- 2005 28-FEB-2 006 1 Year   100 Billing Stream After Contract Extension Seq Number of Periods Start Date End Date Duration Period Amount Total Amount 1 1 01-MAR- 2005 28-FEB-2 006 1 Year   50 2 1 01-MAR- 2006 28-FEB-2 007 1 Year   50 Billing Schedules for Extended Contracts with Repricing If you reprice the contract, the total amount of the contract is updated to reflect the new pricing. For each line, a new billing stream sequence is added with the same billing period as the previous stream. The number of periods for the new billing stream reflects the duration of the extension. Because the total amount of the contract has changed, the billing streams for any unbilled amounts are updated to reflect the new amount and the new billing stream. The billing schedule is also updated. For example, you have a one-year contract with a service line that is priced at 100 USD, and is scheduled to be billed one time during the one-year duration, and you then extend the contract and reprice the service line to 200 USD, a second billing stream sequence is added with the same billing period as the previous billing stream sequence. Because the contract has not been billed, the amount for each billing stream is now 100 USD and the total amount of the service line is 200 USD. Billing Stream Before Contract Extension
  • 389.
    Extending and RenewingContracts    17-11 Seq Number of Periods Start Date End Date Duration Period Amount Total Amount 1 1 01-MAR- 2005 28-FEB-2 006 1 Year   100 Billing Stream After Contract Extension Seq Number of Periods Start Date End Date Duration Period Amount Total Amount 1 1 01-MAR- 2005 28-FEB-2 006 1 Year   100 2 1 01-MAR- 2006 28-FEB-2 007 1 Year   100 Understanding Contract Renewals Contracts can be renewed manually or through an event-driven process. The life cycle of a renewal contract is similar to a newly authored contract. See Overview of Managing Contract Negotiation, page 11-1. The key difference between a new contract and a renewal contract is the process following contract creation. A new contract remains in a sales representative's queue pending his action; whereas the application routes a renewal contract to the sales representative, the customer, or bypasses both and activates the contract. Two parameters determine the branching: the renewal rule and the threshold amounts derived from the Global Contracts Defaults. See Entering Contract Defaults, page 2-36. You can set up renewal rules that apply to both the manual renewals and the event-driven renewals. See Specifying How a Contract Will Be Renewed, page 2-28 ,Renewing Contracts Manually, page 17-27, and Managing the Event-Driven Renewal Process, page 17-28. Understanding Renewal Rules Setup and Renewal Contract Branching To derive the renewal process, the application evaluates renewal rules using the contract, party, organization, and global level hierarchy for the authored contract. At each level, starting with the contract authoring level, the application evaluates renewal rules according to a logic that first evaluates threshold conditions and determines the validity of a threshold-driven process. If a threshold condition is not satisfied, the
  • 390.
    17-12    Oracle ServiceContracts User Guide application uses the renewal process entered on the contract. If no renewal process is entered on the contract, the logic is repeated at the next level of the hierarchy, such as the organization level. The renewal process follows the following logic to determine the renewal process for a contract: 1. Based on the setup of the contract and the Global Contracts Defaults, the renewal process determines the effective renewal rule. This rule includes three values: • Default Renewal Process: following the contract, party, organization, global hierarchy • Evergreen Threshold Amount: following the party, organization, global hierarchy • Online Threshold Amount: following the party, organization, global hierarchy 2. The application checks if the renewal process is Evergreen. If so, the application renews the contract as an Evergreen contract. 3. The application then determines if the contract qualifies as Evergreen based on the Evergreen threshold amount. If so, the application renews the contract as an Evergreen contract. 4. If the contract fails the previous two Evergreen checks, the application determines if the contract qualifies as an Online contract based on the Online threshold amount. If so, the application renews the contract as an Online contract. 5. If the amount does not meet the Online threshold but renewal process is set to Online, the application renews the contract as an Online contract. 6. If the contract does not qualify as Evergreen or Online based the previous steps, the application uses the default renewal rule during renewal. How the Application Derives the Effective Renewal Rule for a Contract Level Renewal Process Evergreen Threshold Online Threshold Contract Null NA NA Party Evergreen Null 20,000 Organization Null 10,000 15,000 Global Online -- --
  • 391.
    Extending and RenewingContracts    17-13 Effective Renewal Rule Values Evergreen 10,000 20,000 In the previous example, if the contract amount is equal to 15,000, the application uses the default renewal process at the party level, which is Evergreen. This level is used irrespective of the contract amount. How the Application Derives the Effective Renewal Rule for a Contract Level Renewal Process Evergreen Threshold Online Threshold Contract Online NA NA Party Manual Null 20,000 Organization Null 10,000 15,000 Global Online -- -- Effective Renewal Rule Values Online 10,000 20,000 In the previous example, if the amount is 5,000, the Evergreen process holds. If the contract amount is 15,000, the Online process holds. If the amount is 25,000, the Online process holds. After the application derives the renewal process, workflow logic determines contract routing and the process flow. Understanding Renewal Rules Setup and the Approval Flag Renewal types include the following: • Manual • Online • Evergreen • Do Not Renew The Manual, Online, and Evergreen renewal types have subprocesses that you define by selecting an Internal Approval method either within the contract itself or within the Global Contracts Defaults. Internal approval method is a required field that needs to be defined when a renewal process is defined at the contract, party, organization, or global level. When the renewal process determines the renewal process type for a contract, the
  • 392.
    17-14    Oracle ServiceContracts User Guide corresponding approval flag determines the internal approval method for that contract. See Entering Contract Defaults, page 2-36. The following table provides an overview of the combinations of renewals types and internal approval methods. You can start renewals through an event-driven process or manually: Renewal Process Internal Approval Method Description Manual Required This renewal type sends a notification to the inbox of the sales representative associated with your contract. See Understanding Manual Renewals with the Internal Approval Set to Required, page 17-15. Manual Not Required The Submit for Internal Approval action associated with this renewal type results in an automatic QA check and contract activation. A QA check failure results in a Failure notification, and routes the contract back to the negotiation stage of the process, where you can update it. Activation takes place with the Signature notification directed to the sales representative. See Understanding Manual Renewals with the Internal Approval Set to Not Required, page 17-16. Online Manual This renewal type sends an e-mail notification to the customer to renew the contract over the Web. See Understanding Online Renewals with the Internal Approval Set to Manual, page 17-16. Online Automatic This renewal type enables a contract that has been accepted online by the customer to be automatically submitted for internal approval without a sales representative's intervention. See Understanding Online Renewals with the Internal Approval Set to Automatic, page 17-18.
  • 393.
    Extending and RenewingContracts    17-15 Online Not Required This renewal type skips the internal approval allowing a contract to be directly submitted for activation as a result of online customer acceptance. See Understanding Online Renewals with the Internal Approval Set to Not Required, page 17-18. Evergreen Required This renewal type enables you to have the application create a renewed contract and submit it for approval to the sales representative specified on the contract or the help desk contact specified in the Global Contracts Defaults. See Understanding Evergreen Renewals with Internal Approval Set to Required, page 17-18. Evergreen Not Required This renewal type enables the application to renew the contract in Active status. No approval or human intervention is required. See Understanding Evergreen Renewals with the Internal Approval Set to Not Required, page 17-19. Do Not Renew NA This renewal type enables you to prevent a contract from being renewed. See Understanding How Do Not Renew Works, page 17-19. Understanding Manual Renewals with the Internal Approval Set to Required By setting the renewal type of a contract to a Manual renewal with the Internal Approval set to Required, the application sends a notification to the Inbox of the sales representative associated with your contract. The process works as follows: • The application renews the contract in Entered status with a negotiation status of Draft. • The application sends a notification to the inbox of the sales representative. • The sales representative reviews the contract and makes any necessary changes. The application sets the negotiation status to Pending Approval.
  • 394.
    17-16    Oracle ServiceContracts User Guide • The sales representative submits the contract for approval. • After the contract is approved, the application changes the status to Active or Signed and sets the negotiation status to Complete. See Managing Manual Renewals, page 17-19. Understanding Manual Renewals with the Internal Approval Set to Not Required By setting the renewal type of a contract to Manual with the Internal Approval set to Not Required, you can author a contract and have it activate after customer acceptance. The following describes how the process works: • The Submit for Internal Approval action results in an automatic QA Check and then activation. • A QA Check failure results in a Failure notification, and routes the contract back to Negotiation stage of process where it may be updated and then activated. • The application activates the contract by the Signature notification directed to the sales representative. See Managing Manual Renewals, page 17-19. Understanding Online Renewals with the Internal Approval Set to Manual By setting the renewal type of a contract to Online with the Internal Approval Set to Manual, the application sends an e-mail notification to the customer to renew the contract over the Web. The following describes how the process works: • The application renews the contract with a status of Entered. • The application runs a QA Check against the contract. • If the QA Check fails, the application sends a notification. The hierarchy for the notification is: • Sales representative, if defined on contract • Helpdesk, set up in Global Contracts Defaults • After the contract has been corrected, the contracts administrator can resubmit it, so it will be picked up by the Autorenew workflow. • The application sends an e-mail notification to the customer. This is the Quote To contact on the contract. The e-mail contains the following:
  • 395.
    Extending and RenewingContracts    17-17 • A cover letter, which is defined in OKC Print Contracts Setup • A URL for customer to view Quote Letter, which is defined in OKC Print Contracts setup. • An account and password that are required to log into the web page and view quote. Account and Password are stored in FND USERS and associated with the Quote To contact. Note: The first e-mail sent to the Quote To user, contains a password in a readable format. For security, the password will be encrypted in the subsequent e-mails sent to the same user. • Upon receipt of the e-mail, the customer may log into the web page to review the quote and accept, reject, or request changes to the contract renewal. See Overview of the Customer Acceptance Portal, page 15-1. If the customer accepts the contract renewal, the following occurs: • The application updates renewal status to Quote Accepted. • The application updates contract with the payment details. • The application sends notification depending on hierarchy. • The application logs an interaction. • The contract administrator must initiate the approval process by manually submitting the contract for approval. • The application sends a notification to the contract approver. If the QA Check fails, the application sends a notification to the help desk e-mail account. • If the customer rejects the quote, the application sends a notification and places the contract in the Rejection negotiation status. The hierarchy for the notification is as follows: • Sales representative, if defined on contract • Helpdesk setup in Global Contract Defaults • The sales representative must resubmit rejected quotes for approval after making required modifications. After the approval, the application updates the status to Active or Signed. See Managing Online Renewals, page 17-20.
  • 396.
    17-18    Oracle ServiceContracts User Guide Understanding Online Renewals with the Internal Approval Set to Automatic By setting the renewal type of a contract to Online with the Internal Approval Set to Automatic, the application submits contracts accepted Online by the customer for internal approval without sales representative intervention. See Managing Online Renewals, page 17-20. Understanding Online Renewals with the Internal Approval Set to Not Required By setting the renewal type of a contract to Online with the Internal Approval Set to Not Required, you are allowing the internal approval to be skipped during the Online process. This allows the application to directly submit a contract for activation after online customer acceptance. The following describes how the process works: • Online customer acceptance results in an automated QA check and automatic submission for contract activation. • A QA Check failure after customer acceptance prompts a failure notification, and routes the contract back to Negotiation stage of process, where it may be updated and submitted for activation. • Activation takes place by the Signature notification directed to the sales representative. See Managing Online Renewals, page 17-20. Understanding Evergreen Renewals with Internal Approval Set to Required By setting the renewal type of a contract to Evergreen with Internal Approval set to Required, the application creates a renewed contract and submits it for approval. The following describes how the process works: • The application renews the contract in Entered status. • The application automatically submits the contract for approval. • The application sends a notification as follows: • Sales representative, if defined on contract • Helpdesk setup in Global Contract Defaults Note: If you do not see the Submit button, your administrator may not have set the status and operations to allow online updates.
  • 397.
    Extending and RenewingContracts    17-19 See Managing Evergreen Renewals, page 17-22. Understanding Evergreen Renewals with the Internal Approval Set to Not Required By setting the renewal type of a contract to Evergreen Renewals with the Internal Approval set to Not Required, the application renews the contract in a status of Active. Following is a description of how the process works: • The application renews contract in Active status. This renewal type does not require approval or human intervention. See Managing Evergreen Renewals, page 17-22. Understanding How Do Not Renew Works By setting the renewal type of a contract to Do Not Renew, you can prevent a contract from being renewed. Managing Manual Renewals Note: Setting the renewal type within does not necessarily mean the contract will be renewed accordingly. The application may override this option based on the Evergreen and Online renewal types as well as thresholds specified in the Global Contracts Defaults. To specify the contract should be renewed manually with the internal approval set to required: You can specify whether a contract should renewal manually on the contract. Upon renewal, whether it is an event-driven or manual renewal, the application sends a notification to the sales representative associated with the renewal. See Understanding Sales Credits During Renewals, page 17-22. Prerequisites Confirm the setup of sales territories, or set OKS: Use Territories to Default Sales Person to No and specify the sales representative who handles renewal requests in the profile option OKS: Default Sales Person for Renewal. 1. From the Service Contracts Authoring window, select the Summary tab and the Renewals subtab. 2. Select Manual from the Type LOV in the Renewal region. 3. Select Required from the Approval list.
  • 398.
    17-20    Oracle ServiceContracts User Guide 4. To require the sales representative to enter a purchase order before the contract can be renewed, select Yes from the PO Required list. To specify the contract should be renewed manually with the internal approval set to not required: You can allow a contract to automatically activate after customer acceptance. 1. From the Service Contracts Authoring window, select the Summary tab and Renewals subtab. 2. Select Manual from the Type LOV in the Renewal region. 3. Select Not Required from the Approval list. 4. To require the contract author to enter a purchase order before the contract can be renewed, select Yes from the PO Required list. Managing Online Renewals Prerequisite Confirm the setup of online renewal. To specify the contract should be renewed online with the internal approval set to manual: Online renewal is available for Warranty and Extended Warranty, Service Agreement, and Subscription categories of contracts. The e-mail the application sends includes a hyperlink the customer can use to access your organization's web site and renew the contract. See Overview of the Customer Acceptance Portal, page 15-1. 1. From the Service Contracts Authoring window, select the Summary tab and the Renewals subtab. 2. Select Online from the Process LOV in the Renewal region. 3. Select Manual from the Approval list. 4. In the Quote to region, use the LOV to enter the contact, e-mail address, and phone. Note: The contact must have an existing e-mail address. You cannot add new addresses here.
  • 399.
    Extending and RenewingContracts    17-21 5. Save. To specify the contract should be renewed online with the internal approval set to automatic: You can allow a contract to be automatically submitted for internal approval without intervention by the sales representative after it is accepted online by a customer. 1. From the Service Contracts Authoring window, select the Summary tab and the Renewals subtab. 2. Select Online from the Process LOV in the Renewal region. 3. Select Automatic from the Approval list. 4. In the Quote to region, use the LOV to enter the contact, e-mail address, and phone. Note: The contact must have an existing e-mail address. You cannot add new addresses here. 5. Save. To specify the contract should be renewed online with the internal approval set to not required: You can have online customer acceptance result in an automated QA check and submission for contract activation. 1. From the Service Contracts Authoring window, select the Summary tab and Renewals subtab. 2. Select Online from the Process LOV in the Renewal region. 3. Select Not Required from the Approval list. 4. In the Quote to region, use the LOV to enter the contact, e-mail address, and phone. Note: The contact must have an existing e-mail address. You cannot add new addresses here. 5. Save.
  • 400.
    17-22    Oracle ServiceContracts User Guide Managing Evergreen Renewals To specify an evergreen renewal with the internal approval set to required: You can have the application create a renewed contract and submit it for approval to the sales representative specified on the contract or the help desk contact specified in the Global Contracts Defaults. 1. From the Service Contracts Authoring window, select the Summary tab and Renewals subtab. 2. Select Evergreen from the Type LOV in the Renewal region. 3. Select Required from the Approval list. 4. To require the entry of a purchase order before the contract can be approved, select Yes from the PO Required list. To specify an evergreen renewal with the internal approval set to not required: You can have the application renew a contract upon expiration. 1. From the Service Contracts Authoring window, select the Summary tab and the Renewals subtab. 2. Select Evergreen from the Process LOV in the Renewal region. 3. Select Not Required from the Approval list. 4. Specify a date in the Renew Up To field. The contract keeps renewing automatically until this date. 5. Save. Understanding Sales Credits During Contract Renewals The following provides an overview of how Oracle Service Contracts determines which sales representative receives sales credit for the renewal. The application uses OKS: Enable Sales Credit profile to make this determination. This profile option has four values: OKS: Enable Sales Credit Profile Option Setup Business Rule
  • 401.
    Extending and RenewingContracts    17-23 Derive for Revenue Type Drops both types of sales credits and derives only the sales credit specified under the OKS:Revenue Type profile option. Derive for Revenue Type and Retain Other Drops and derives only the sales credit specified under the OKS:Revenue Type profile option; Retains the other sales credit. Drop All Drops both sales credits; no derivation of either. Retain All Retains both sales credits; no derivation of either. Rules to Derive Sales Representative When the Profile Option OKS: Enable Sales Credits is set to Derive: The application uses the following profile options to derive a sales representative for the renewal agreement: • OKS: Use Territories to Default Sales Person • If set to Yes, the sales representative uses Territory Setup. • If set to No, then Service Contracts uses the value entered in OKS: Sales person to derive the vendor contact and or sales representative. • OKS: Sales Person • If OKS: Use Territories to Default Sales Person is set to No, this profile determines the sales representative for the Sales Credit form and for the vendor contact on the contract summary. • If OKS: Use Territories to Default Sales Person is set to No, and you do not set a value for OKS: Sales Person, the contract fails to renew and produces an error message. You may manually add additional sales representative to the Sales Credits form after the application creates the renewal agreement Other Profile Options Used for Sales Credits: • OKS: Revenue Type Distribution for Sales Credit: Assigns the percentage of revenue to the sales person whose name was determined by the OKS: Sales Person or OKS: Use Territories to Default Sales Person profile options. Sales Credits must total 100% in order to pass the QA check.
  • 402.
    17-24    Oracle ServiceContracts User Guide Note: If you add additional sales people to the Sales Credits form, remember to distribute revenue to them until the total is 100%. • OKS: Revenue Type for Sales Credits: Indicates whether the revenue is quota or non-quota for the default sales representative. Explaining the Pricing of Renewed Contracts You can set up renewal rules that apply to both manual renewals and automatic renewals. Pricing methods specify how the contract will be priced at renewal. There are three pricing methods: • Price List: Charges the customer based on the price list you enter in the Price List field. The price charged is the current price listed in the price list at the time the contract is renewed. • Manual: The application retains the price of the original contract for the renewed contract. • Markup Percent: Automatically adjusts the price up or down by a percentage you enter. (A positive number marks up the price; a negative number discounts it.) Optionally, you can cap the maximum adjustment based on a price list. For more information on defining pricing methods for renewals, see: • Specifying How the Renewed Contract will Be Priced, page 17-26. • Setting Up Defaults for Contract Renewal, page 2-34. Understanding the Price List Pricing Method The following is intended to help you understand how the Price List pricing method works. A contract using the Price List pricing method has the Corporate price list assigned. For the original contract the list price of item X is $150. Before the contract is renewed, item X on the corporate price list is changed to $200. Item X on the renewed contract will be $200. Understanding the Manual Pricing Method The following is intended to help you understand how the Manual pricing method works. A contract using the Manual pricing method contains item X. For the original contract the list price of item X is $150. Before the contract is renewed, item X on the price list is changed to $200. When the contract is renewed, item X will be $150, not the increased
  • 403.
    Extending and RenewingContracts    17-25 price of $200. Understanding Renewal Markup Pricing The following is intended to provide some scenarios to help you understand how renewal markup pricing works. In calculating the amount of a contract for a renewal agreement using Renewal Markup Pricing, begin with the original year contract Con03. This agreement has a final price that is comprised of the year 2003 price list plus any discounts or surcharges that are applied (modifiers). The contract contains a renewal markup that indicates that the final price of the contract should be increased or decreased by a certain percentage when that contract is renewed. Also identified is a renewal price list Cap04. This price list is generally used to assure that renewal customers are not being asked to pay more for their renewal agreements after markups than new customers are paying for their original service contracts. When renewing the contract, any modifiers carried over from Con03 to the renewal agreement are applied to the Cap04 list price to calculate the final price. Service Contracts compares this amount to value of Con03 plus the renewal markup percentage. The renewal markup value is used unless it exceeds the cap pricing value. The application, effectively, selects the lower of the two values and that amount becomes the new contract final price for the renewal agreement. Example 1: Markup pricing does not exceed cap (using surcharges) Con03 List price of item X $1,000 Modifier: 10% surcharge Contract Final price: $1,100 Renewal markup: 5% Con03R04 Cap List price of item X $1,500 Modifier: 10% surcharge • Comparison: Markup Pricing: $1,155 Cap Pricing: $1,650 New Contract Final Price $1,155 Example 2: Markup up pricing exceeds cap (using surcharges) Con03 List price of item X $1,000
  • 404.
    17-26    Oracle ServiceContracts User Guide Modifier: 10% surcharge Contract Final price: $1,100 Renewal markup: 5% Con03R04 Cap List price of item X $1,000 Modifier: 10% surcharge • Comparison: Markup Pricing: $1,155 Cap Pricing: $1,100 New Contract Final Price $1,100 Example 3: Markup pricing does not exceed cap (using discounts) Con03 List price of item X $1,000 Modifier: 10% discount Contract Final price: $900 Renewal markup: 5% Con03R04 Cap List price of item X $1,200 Modifier: 10% discount • Comparison: Markup Pricing: $945 Cap Pricing: $1,080 New Contract Final Price $945 Specifying How the Renewed Contract Will Be Priced To specify how the renewed contract will be priced: 1. From the Service Contracts Authoring window, select the Summary tab and Renewals subtab. 2. From the Pricing Method LOV, select a pricing method. 3. If you have selected Price List, then enter the price list to be used for the renewal in
  • 405.
    Extending and RenewingContracts    17-27 the Price List field. 4. If you have selected Markup Percent, then: 1. Enter the percentage, which adjusts the price accordingly. Entering a positive number marks up the price. A negative number discounts the contract renewal. 2. If you are marking up the contract price and wish to put a limit on the maximum price the customer will pay, then enter a price list in the Price List field. The price of the renewed contract cannot go over the price listed in the price list. For example, if you enter 20% as your markup and the current list price of the service is $100, then the renewed contract is priced at $120. If you enter a price list that lists the service at $110, however, then this price list caps the maximum price for the service at $110. The customer pays a maximum of $110 for the renewal. Note: The price cap works only for (positive) markups and not for discounts. Renewing Contracts Manually To renew contracts manually: 1. From the Contract Navigator, highlight an active contract. 2. Right mouse click to select Renew. The Renew Contract window appears with the following fields populated: • New Number: new contract number. • New Modifier: a modifier to differentiate the old and renewed contract. • New Start date: new start date.
  • 406.
    17-28    Oracle ServiceContracts User Guide 3. Enter the Duration and Period. The New End date field populates after you enter the duration and period. Note: If your contract is a large contract, you may wish to process the contract in the background. You can do this by selecting the Submit Request check box. 4. Click Renew. 5. A decision message appears indicating that the contract successfully renewed. Click Yes to save changes. The Contract Navigator appears. 6. On the right hand side of the form, right mouse click to select Refresh. You should be able to identify the contract with the new modifier. 7. On the right hand side of the form, highlight the contract with the New Modifier and right mouse click to select Open. Managing the Event-Driven Renewal Process There are a number of implementation setups that are required to define and trigger the renewal process. For more information, see the Oracle Service Contracts Implementation Guide. Allowing a Grace Period for Renewals By entering a grace period, you can extend the service a customer receives while a renewed contract is in the process of being negotiated and approved. This group of topics explains how grace periods work and how to set them up: • About Grace Periods, page 17-29
  • 407.
    Extending and RenewingContracts    17-29 • Specifying a Grace Period for the Current Contract, page 17-30 • Specifying a Grace Period for the Renewed Contract, page 17-30 About Grace Periods By specifying a grace period you grant the customer the services of a contract beyond the expiration date at no extra charge. Grace periods ensure the customer does not experience an interruption of service while a contract is being renegotiated, for example. The actual start and end dates of the contract and the billing schedule are unaffected by the grace period. If the renewal happens within the grace period, the new contract takes effect the day after the original contract expired and the customer is billed accordingly. Suppose, for example, that a customer calls on January 15 to renew a service contract that expired on December 31. Because the contract had a one month grace period, the customer did not experience any interruption of service, but the new contract goes into effect and is billed from January 1 rather than from the date of the call or the end date of the grace period. You can specify a grace period both for the current contract and for the renewed contract. You can use the Global Contracts Defaults form to set up a standard grace period for the contracts that are renewed. The grace period affects only lines and sublines that expire on the same day as the contract. For example: • Contract start date: 01-JAN-2003 end date: 31-DEC-2003 • Service 1 start date 01-JAN-2003 end date 31-JAN-2003 • Service 2 start date 01-JAN-2003 end date 31-DEC-2003 • Service 3 start date 01-OCT-2003 end date 31-DEC-2003 If you add a 30 day grace period to this contract, services 2 and 3 are eligible for entitlement until 30-JAN-2004. Service 1 is not. The same logic applies to sublines and coverage terms. Only those items that end on the same day as the contract end date are considered for coverage during the grace period. As long as the business processes are eligible for entitlement, the original terms associated with the business process (preferred engineer, coverage times, reaction times, resolution times, and billing types) will continue through the extended period.
  • 408.
    17-30    Oracle ServiceContracts User Guide You can delete the grace period from the contract at any time, either before the contract expires, when the grace period goes into effect, or when the renewed contract becomes active. Specifying a Grace Period for the Current Contract You can grant, modify, or deny a grace period for the current contract. During a grace period, the customer continues the same level of service as under the old contract, at no extra charge, if the contract expires. Prerequisite Set the profile option OKS: Enable Grace Period to Yes at the Site Level. To specify a grace period for the current contract: 1. From the Service Contracts Authoring window, select the Summary tab and Administration subtab. 2. To grant a grace period: 1. Enter a number in the Grace Duration field. (For example: 30) 2. Select the unit of measure from the Grace Period LOV. (For example: Days) 3. To adjust the grace period, make changes in these same fields. 4. To deny an existing grace period, delete the entry in the Grace Duration field. 5. Save. Specifying a Grace Period for the Renewed Contract A grace period becomes effective upon the expiration of the renewed contract. Prerequisite Set the profile option OKS: Enable Grace Period to Yes at the Site Level. To specify a grace period for the renewed contract: 1. From the Service Contracts Authoring window, select the Summary tab and Renewals subtab. 2. To grant a grace period, then: 1. Enter a number in the Grace Duration field. (For example: 30)
  • 409.
    Extending and RenewingContracts    17-31 2. Select the unit of measure from the Grace Period LOV. (For example: Days) 3. To adjust the grace period, then make changes in these same fields. 4. To deny an existing grace period, then delete the entry in the Grace Duration field. 5. Save. Understanding Billing Schedules on Renewed Contracts If the renewed contract has the same duration as the original contract, a copy is made of the original contract, which also includes a copy of the billing schedule. If the renewed contract has a duration that is different than the original contract, then the billing schedule does not appear on the renewed contract. The renewed contract fails the QA check because the billing schedule does not adjust itself to the new duration. This also happens when you renew a one year contract for six months. Even if the renewal type is Evergreen (Internal Approval is Not Required), the renewed contract stays in Entered status because it fails the QA check. If you are considering using the Evergreen (Internal Approval is Not Required) renewal type, you should also consider using billing profiles. When a billing profile is defined in the global defaults, the billing schedule for the renewed contract is created according to that billing profile. Consolidating Multiple Contracts for Renewal Renewing service contracts can be complicated because some organizations will always sell a full duration service contract the first time, resulting in a single customer having numerous contracts expiring at different times over the course of a year. This requires the customer be contacted multiple times per year for renewal confirmation and perhaps renegotiation, which increases the workload for renewal. Renewal Consolidation addresses the problem of multiple contracts expiring during a year (or other given period) causing multiple renewals. With Renewal Consolidation, all the contracts to be renewed over a given period are consolidated into a single renewal contract. Renewal Consolidation has several benefits: • Decreases the number of renewal contracts, reducing workload and the difficulties imposed by large numbers of contracts. • Improves the customer relationship. All the customer's services may be included in a single contract or several consolidated contracts based on how the contracts are to be billed.
  • 410.
    17-32    Oracle ServiceContracts User Guide • Reduces the number of customer invoices. The renewal consolidation process is initiated after a contract has been renewed, which may have been the result of the renewal event where contracts are renewed in mass or manually renewed from the Contract Navigator using the right mouse click. In both cases the contract is in the Entered status and is considered the Target contract. If a contract is not valid for consolidation, you will see the error message Target contract is invalid. If the target contract is eligible for renewal consolidation, the Renewal Consolidation window is displayed and is used to facilitate the selection of all the source contracts for consolidation. The upper half of the window displays all the details of the target contract. The lower half displays all the eligible source contracts in a tree structure. The following lines are displayed: • Service lines • Sublines or covered levels, for example, Party, Customer, Site, Product, Item, and System A contract is eligible as a source contract if the following are true: • Customer account is the same as the target • Source contract end date +1 is within the effectivity of the target contract. • Potential source contract must be in Active or Expired status When submitting the renewal consolidation, a concurrent request consolidates all of the selected source lines into the target contract. If the services are the same on the source and target contracts, the covered levels of those services can be merged into one contract line on the target contract. Merging occurs if the following conditions are met: • Target and source lines have the same: • Service Item • Organization ID • Renewal Type • Bill-To site • Start and End Dates In addition, setting the profile option OKS: Check Coverage Match to Yes, forces the renewal consolidation process to preserve differences in coverage.
  • 411.
    Extending and RenewingContracts    17-33 The Check Coverage API compares each attribute of the coverage and stops as soon as one difference is found. It returns the result to the renewal consolidation process. If the coverage is the same, the sublines of the source contract are merged under the service of the same name on the target contract. If the coverages are different, a new contract line is created on the target contract for the service on the source contract. The Check Coverage API checks the following attributes: • Coverage Name • Coverage Type • Business Processes • Preferred Resources The start dates of the consolidated lines begin one day after the expiration of the original source line and all the end dates coterminate with the target contract. When the operation instance is reviewed at a later date, that is, after the concurrent request has processed normally, all the consolidated source lines are identified with ##. When the renewal consolidation or operation instance is created, a source line is eligible for consolidation at that point in time. However, between the time it is created and the time it is submitted, a given source line may have been renewed, whether it be by consolidation in another operation instance or renewed manually. Therefore, at the time of submission, the application verifies that the source is still eligible for consolidation. If not eligible, Oracle Service Contracts excludes the source line from the consolidation. After consolidation has taken place, the target may be opened to verify that all the source contracts have been consolidated successfully. The new terms and conditions may then be reviewed with the customer. Once the customer agrees with its terms and conditions, the contract may be submitted for approval and billed at the intervals designated in the contract. Note: An Extended Warranty line can be consolidated into a Service line. However, a Service line cannot be consolidated into an Extended Warranty line. This is because an Extended Warranty line supports only a product while a Service line supports party, customer, site, product, item, and system. To consolidate multiple contracts for renewals: 1. From the Contract Navigator, select a target contract, right-click and select Renewal Consolidation. The Renewal Consolidation window appears.
  • 412.
    17-34    Oracle ServiceContracts User Guide Note: The Renewal Rules region references the rules that will be applied to all lines, which are consolidated into the target contract. 2. Click Query Source. If there are no contracts eligible as source contracts for the target contract, the lower half of the window will remain empty.
  • 413.
    Extending and RenewingContracts    17-35 3. To select a line, highlight the branch and click Select Line. If selected the source line is identified with **. 4. To deselect a line, highlight the branch and click Deselect Line. If a branch with child branches is cleared, all the child branches are also cleared. A single child branch may be deselected, as required. If deselected, the source line(s) are no longer identified with a **. You can reselect the Source lines by highlighting the line and clicking the Select Line button. Note: If a source contract is deselected and the operation instance is submitted for renewal consolidation, it may be selected at a later time for consolidation in the same target contract as long as the target is still in Entered status. If the target contract has already been approved and activated, the contract may be consolidated as a source in another target contract. 5. Verify source lines are valid for consolidation. 6. To save and retrieve the consolidation at a later review, click Save. You can leave this window and when your changes are reflected in the Renewal Consolidation
  • 414.
    17-36    Oracle ServiceContracts User Guide window. 7. To submit the Renewal Consolidation, click Submit. A Note window with a concurrent request id appears. 8. Save. You can refresh the window by clicking Refresh Source to monitor the processing. After the line has been consolidated the ## appears next to the line, which indicates Processed. 9. Open the target contract and verify all source contracts have been consolidated successfully. 10. Submit contract for approval. Sending Quote Letters by E-mail You can generate quote letters and e-mail them to a customer as part of the renewal process. The person who receives this e-mail quote is specifically identified on the Summary Renewals tab. Prerequisites The following profile options must be set up in order to use the e-mail Quote functionality: • OKS SMTP Host • OKS: SMTP Port To send quote letters by e-mail: 1. From the Service Contracts Authoring window, select the Tools menu and then select Email Quote. The Email Quote window appears. The To field comes from the Quote To field in the Summary Renewals tab. Enter a Reply To/Copy e-mail address of the sales representative or other individual who should be copied or replied to about this e-mail. This field is free-format text. You can use different From and Reply To e-mail addresses depending on which address the e-mail should come from, and which address you wish to route the e-mail replies.
  • 415.
    Extending and RenewingContracts    17-37 2. In the addresses region, add additional recipients as desired. 3. In the message region, enter any text that you wish to appear in the body of the e-mail. 4. In the Attachments region, select the quote printing report. The reports are specific to the environment. This report summarizes the contents of the renewal contracts. 5. Click Send. A Note window indicating a concurrent request has been submitted appears. See also Creating and Enabling Templates for E-Mails to Customers, page 18-4. Understanding Line Level Cancellation and Termination Reasons You may elect not to maintain one or more services on the contract at the time of renewal. Alternately, you may choose to discontinue service only for specific service lines or covered products on a service contract at time of renewal. You can:
  • 416.
    17-38    Oracle ServiceContracts User Guide • Cancel individual services or covered lines on a contract. • Flag service lines and covered products on renewed contracts as canceled. • Provide a cancellation reason at both service lines and covered products. If a service line is canceled, all child sublines are canceled as well. Similarly, canceling a contract should result in all lines and sublines being canceled. Note: Your administrator can define status and operations to prevent canceled status lines from being deleted from contracts. Entered lines can similarly be controlled. You can terminate lines and sublines in contracts due to service transfer, product return, product replacement, updates to instance quantity in installed base, instance expiration/termination in installed base and manual service termination. When you terminate lines and sublines, the termination reason and source appears in the authoring form along with termination date and status. Note: When services are transferred from Entered contracts, the transferred service lines and sublines are automatically placed in Canceled status with a cancellation reason of Service Transferred. Lines canceled due to service transfer are not eligible for status change back to Entered. You cancel both lines and sublines for contracts with the Entered status; whether these contracts were created as new contracts through authoring, or as renewal contracts through the renewal event or the manual renewal process. You can also cancel both lines and sublines for Manual and Online renewal contracts, provided they pass QA successfully at time of renewal, Evergreen contracts go straight to Active status and are not typically eligible for line level cancellations. If you cancel a line or subline, the cancellation date stamp is today's date. You must also enter a cancellation reason. If you attempt to delete an Entered contract with lines that are canceled due to Transfer, all canceled status lines are deleted on the contract except for the lines that are canceled with a cancellation source of Service Transfer. You cannot delete service lines or covered levels that were canceled as a result of a service transfer: Canceled lines are excluded from quotes, QA checks, and are not eligible for billing or termination. Amounts for canceled lines are not rolled up to contract line/header. Canceled lines are included in reports. After you activate a contract, the canceled lines and sublines remain on the active contract as Canceled. In subsequent renewals, the canceled lines drop from the renewed contract. If all lines in Signed, Active, Expired status are terminated during the life of
  • 417.
    Extending and RenewingContracts    17-39 the contract and the only remaining lines on the contract are in Terminated or Canceled status, the contract should not be selected for renewal by an automated renewal event. Canceled lines or sublines cannot be made active on Active contracts. You cannot perform the following actions on a canceled service line: • Enter revenue distribution. • Enter pricing adjustment. • Enter pricing qualifier. • Use as a target for copy • Use as a target for renewal consolidation. • Use as a source for renewal consolidation. • Revert update. • Cascade attributes as either a source or target. • Cascade service price. • Update service. • Use for pricing calls, such as reprice or currency change. You cannot perform the following on a canceled service subline: • Enter pricing adjustment • Enter pricing qualifier • Use as a source for renewal consolidation • Revert update • Use as a source for cascade attributes • Cascade service price • Update service • Use for pricing calls, such as reprice or currency change. Cancellation and Termination Reasons When you cancel or terminate services and sublines, the reasons and source appears in
  • 418.
    17-40    Oracle ServiceContracts User Guide the authoring form along with a date and status. The following cancellation sources appear in the authoring form: Cancellation Source Cancellation Reason Manual you determine Service Transfer Service Transferred The following termination sources appear in the authoring form: Termination Source Termination Reason Manual you determine Service Transfer you determine Item Instance Return Covered Product Returned Item Instance Replacement Covered Product Replaced Item Instance Expiration Covered Product Expired Item Instance Quantity Update Covered Product Quantity Updated Canceling a Contract Line Prerequisite: Open a contract with contract lines in Entered status. To cancel a contract line: 1. Select Lines tab and Effectivities subtab. 2. Select the line to cancel. 3. From the Tools menu, select Change Status. The Service Line Status window appears.
  • 419.
    Extending and RenewingContracts    17-41 4. From the New Status LOV, select Canceled. 5. Select a reason from the LOV. 6. Select OK. A confirmation message appears. Click OK to continue. The Status field within the service line is Canceled. 7. Scroll right to view the Cancellation fields, Amount, Date, and Reason.
  • 420.
    17-42    Oracle ServiceContracts User Guide 8. Select the Pricing/Products subtab and Effectivities secondary tab. Cancelling the line cancels the subline. Canceling a Contract Subline Prerequisite: Open a contract with contract lines in Entered status. To cancel a contract subline: 1. Select Lines tab and Pricing subtab. 2. From the Effectivity secondary tab select the subline to cancel. 3. From the Tools menu, select Change Status. The Covered Level Status window appears.
  • 421.
    Extending and RenewingContracts    17-43 4. From the New Status LOV, select Canceled. 5. Select a reason from the LOV. 6. Select OK. A confirmation message appears. Click OK to continue. The Status field within the service subline is Canceled. 7. Scroll right to view the Cancellation fields, Date and Reason.
  • 422.
    17-44    Oracle ServiceContracts User Guide 8. Select the Effectivities secondary tab. Cancelling the subline does not cancel the line.
  • 423.
    Creating and EnablingTemplates for E-Mails to Customers    18-1 18 Creating and Enabling Templates for E-Mails to Customers This chapter covers the following topics: • About Templates for E-Mails to Customers • Overview of Templates for E-Mails to Customers • Creating and Enabling Templates for E-Mail Attachments Sent by Agents • Enabling Templates for Communications Generated by the Negotiation Workflow • Contract-Specific Data Available for Inclusion in Template Documents • Viewing the Data Definition Structure • Uploading and Registering a Template in Oracle XML Publisher • Creating the Set of Templates Used for Customer Communications • Specifying How the Template Sets Are to Be Used • Viewing PDF Attachments • Viewing Sample Marked-Up Documents Provided with the Application About Templates for E-Mails to Customers This group of topics explains how application administrators can take advantage of the Oracle Service Contracts integration with Oracle XML Publisher to create and enable templates for personalized e-mail communications with customers. Overview of Templates for E-Mails to Customers, page 18-2 describes the two types of e-mail communications you can create. The topics that follow provide the general steps for creating each: • Creating and Enabling Templates for E-Mail Attachments Sent by Agents, page 18- 4
  • 424.
    18-2    Oracle ServiceContracts User Guide • Creating and Enabling Templates for Communications Generated by the Negotiation Workflow , page 18-5 Overview of Templates for E-Mails to Customers You can create templates for communications with customers that can be used by: • Agents to send quotes and other communications as e-mail attachments for manual renewal or initial contract negotiation. • The negotiation workflow to send customer communications during the online process for both new and renewal contracts. About E-Mail Attachments Sent by Agents to Customers Agents can send e-mails to contacts from different places within the application. From the: 1. Service Contracts Authoring form: Select E-Mail Quote from the Tools menu. This opens up the HTML e-mail page. You enter an e-mail address, the subject, and the body, and can attach a cover letter and attachment PDF communication generated from the template you create using the procedures in this section. This PDF can be either a report about the current contract, or any other communication such as a general announcement. See Sending Quote Letters by E-Mail, page 17-36. 2. Administrator Workbench: Select the Email Quote action of the My In Process bin. See Sending an E-Mail to a Customer from the Administrator Workbench, page 13- 13. About E-Mails Generated by Electronic Renewals The negotiation workflow sends e-mail notifications to customers at various points during the negotiation cycle. You can also have the negotiation workflow use the template for one or more of the e-mail communications generated by the process. These communications can be generated for renewal contracts or new contracts. You can define document types. Available document types are extensible, allowing user-defined document types to be added within the FND setup. The following document types are seeded: • Quote Document • Cover Letter (Application attaches the Quote Document) • Reminder Letter (Application attaches the Quote Document) • Acceptance Confirmation
  • 425.
    Creating and EnablingTemplates for E-Mails to Customers    18-3 • Activation Confirmation • Cancellation Letter For each e-mail communication, the application generates an HTML e-mail body from the template and attaches the PDF attachment. The subject line for each e-mail type is preset and cannot be modified. The following table lists the subject lines for the three types of e-mail communications: E-Mail Communication Type Automatically-generated Subject Line Text Cover letters Contract <contract number and modifier> requires your approval. Reminder notices Reminder notice for contract <contract number and modifier>. Cancellation notices Cancellation notice for contract <contract number and modifier>. The application sends all communications to the e-mail address the agent enters into the contract authoring window (the Quote To region of the Summary tab, Renewals subtab). You can create multiple sets of templates for use on different dates, by different internal organizations, or targeted to different customers. Process Overview You must complete the following two steps to create both e-mail attachments and electronic renewal communications: 1. Create the template documents, using Microsoft Word (or another application capable of saving files in the RTF format), following the procedures described in the Oracle XML Publisher User's Guide. In the document you can embed codes (XML data elements) which the application uses to supply contract-specific information including: • Details about the contract • The URL the customer can use to log into an application-generated Web page. There they can review the quote, indicate their acceptance, or request changes. • The user name and password for the login. For a complete list of contract data you can include see Contract-Specific Data
  • 426.
    18-4    Oracle ServiceContracts User Guide Available for Inclusion in Template Documents, page 18-5. You can view sample documents provided with this application by following the instructions described in Viewing Sample Marked-Up Documents Provided with the Application, page 18-25. 2. Upload the document and register it as a template in Oracle XML Publisher. See Uploading and Registering a Template in Oracle XML Publisher, page 18-19 for details. To create templates for e-mails sent automatically by the electronic renewals feature of this application you must also complete these two additional steps: 1. Specify the set of templates that are going to be used for a specific renewal flow. See Creating the Set of Templates Used for Customer Communications, page 18-21. 2. Specify how the template set is to be used. See Specifying How the Template Sets Are to Be Used, page 18-23. Creating and Enabling Templates for E-Mail Attachments Sent by Agents Prerequisite Confirm system profile OKS: Layout Template Source is set to XML Publisher at the Site level. To create and enable templates for e-mail attachments sent by agents: 1. Create the RTF document according to the procedures in the Oracle XML Publisher User's Guide. 2. Change responsibility to XML Publisher Administrator. 3. Upload and register the document as a template in Oracle XML Publisher. See Uploading and Registering a Template in Oracle XML Publisher, page 18-19. 4. Change the responsibility back to Service Contracts Manger. 5. Group the templates into sets and specify when to send the notices. Creating the Set of Templates Used for Customer Communications, page 18-21. All templates defined in a template set are available for agents to send as a PDF attachment when they send out an e-mail from the Oracle Service Contracts Authoring window or Administrator Workbench. The application resolves the correct template set for the selected contract based on party, organization, and global hierarchy and displays all templates available for that contract.
  • 427.
    Creating and EnablingTemplates for E-Mails to Customers    18-5 Enabling Templates for Communications Generated by the Negotiation Workflow You can create and enable the templates the electronic renewal process uses to generate e-mail communications with the customer. Note: Electronic renewals are available only for contracts of categories Service and Warranty and Extended Warranty. To create and enable templates for communications generated by the Negotiation Workflow: 1. Create the RTF document according to the procedures in the Oracle XML Publisher User's Guide. 2. Change responsibility to XML Publisher Administrator. 3. Upload and register the document as a template in Oracle XML Publisher. See Uploading and Registering a Template in Oracle XML Publisher, page 18-19. 4. Change responsibility back to Service Contracts Manger. 5. Group the templates into sets and specify when to send these notices.Creating the Set of Templates Used Customer Communications, page 18-21. 6. Specify how you wish to use the template sets. See Specifying How the Template Sets Are to Be Used, page 18-23. 7. Optionally, you can preview the communications generated by the template set for a specific contract, for a party, or for an entire internal organization by running the Generate Quotes concurrent program. See Viewing PDF Attachments, page 18-24. Contract-Specific Data Available for Inclusion in Template Documents The data definition supplied by Oracle, OKSCONDATA, makes it possible for you to include information about the following aspects of the contract in the e-mail body or PDF quote attachment: • Basic contract information from the contract header • Recipient of e-mails generated by the electronic renewal process • Sales agent on the contract
  • 428.
    18-6    Oracle ServiceContracts User Guide • Customer name and number • Default contract billing schedule • Contract billing address • Contract shipping address • Contract taxes • Contract line information • Contract line taxes • Contract line billing schedule • Contract line billing contact • Contract sublines (what the line covers) • Login information for the URL for customer renewals • Current date • Contract payment terms Note: For this release, you are restricted to the data definition provided by Oracle. You can view the structure of the data definition by following the procedure described in Viewing the Data Definition Structure, page 18-18. Contract Header The following table lists XML data elements you can use to insert information from the contract header (basic information about the contract the agent enters at the top of the Service Contract Authoring window). You must preface any of the XML data elements with the following string: /ContractDetails/HeaderVO/HeaderVORow/ For example, to insert the contract number into your document you must enter: /ContractDetails/HeaderVO/HeaderVORow/ContractNumber
  • 429.
    Creating and EnablingTemplates for E-Mails to Customers    18-7 Contract Header Field XML Data Element Contract Number ContractNumber Contract Modifier ContractModifier Start Date StartDate End Date EndDate Status Status Short Description ShortDescription Currency Currency Contract Amount ContractAmount Electronic Renewal Recipient Information The following table lists the XML data elements for inserting information about the recipient of electronic renewals communications. Agents enter this information in the Quote To region of the contract. This region is found either on the Summary tab, Renewals subtab of the Service Contracts Authoring window or, if you are generating contracts automatically from Oracle Order Management, in the Contract Details window. Note: Some of the XML data elements are derived from information entered by agents in applications other than Oracle Service Contracts. For example, address details are entered in Oracle TeleService, Oracle Receivables, Oracle TeleSales and other applications. You must preface the XML data elements with the following string: /ContractDetails/HeaderVO/HeaderVORow/QuoteToContDtlsVO/QuoteToContDtlsV ORow/ For example, to insert the full name of the recipient into your document you must enter: /ContractDetails/HeaderVO/HeaderVORow/QuoteToContDtlsVO/QuoteToContDtlsV ORow/FirstLast
  • 430.
    18-8    Oracle ServiceContracts User Guide Quote to Contact Attributes XML Data Element First Name FirstName Middle Name MiddleName Last Name LastName Full Name FirstLast Job Title JobTitle Phone Area Code PhoneAreaCode Phone Number PhoneNumber Email EmailAddress Address1 Address1 Address2 Address2 Address3 Address3 Address4 Address4 City City Postal Code PostalCode State State Sales Agent Information The following table lists the XML data elements for information you can insert in your documents regarding the sales agent on the contract. This sales agent can be: • The vendor contact of role Salesperson entered on the Summary tab, Parties subtab of the Service Contracts Authoring window. • If you are using Oracle Order Management to create contracts, the sales agent in the
  • 431.
    Creating and EnablingTemplates for E-Mails to Customers    18-9 Sales Order window. • Assigned by the application automatically if your organization has implemented territories. You must preface the XML data elements with the following string: /ContractDetails/HeaderVO/HeaderVORow/SalesRepVO/SalesRepVORow/ For example, to insert the full name of the sales agent into your document you must enter: /ContractDetails/HeaderVO/HeaderVORow/SalesRepVO/SalesRepVORow/FullName Sales Representative Attributes XML Data Element First Name FirstName Middle Name MiddleName Last Name LastName Full Name FullName Phone Area Code PhoneAreaCode Phone Number PhoneNumber Email EmailAddress Job Title JobTitle Manager Name ManagerName Address1 Address1 Address2 Address2 Address3 Address3 Address4 Address4 City City
  • 432.
    18-10    Oracle ServiceContracts User Guide Sales Representative Attributes XML Data Element Postal Code PostalCode State State Customer Name and Number The following table lists the XML data elements for the customer name and number you can insert in your documents. The customer for the contract is the party of role customer. You must preface the XML data elements with the following string: /ContractDetails/HeaderVO/HeaderVORow/CustomerVO/CustomerVORow/ For example, to insert the customer name into your document you must enter: /ContractDetails/HeaderVO/HeaderVORow/CustomerVO/CustomerVORow/PartyName Customer Attributes XML Data Element Party Number PartyNumber Party Name PartyName Default Contract Billing Schedule Information The following table lists the XML data elements you can use to insert information on the default billing schedule. Agents set up the default billing schedule on the Summary tab, Pricing/Billing subtab of the Service Contracts Authoring window. Agents use this contract-level billing schedule to default schedules to contract lines, so entry is optional. If you have only one billing period in the schedule, preface the XML data elements with the following string: /ContractDetails/HeaderVO/HeaderVORow/HdrBillSchdVO/HdrBillSchdVORow/ For example, to insert the date of start date of the billing period in your document you must enter:
  • 433.
    Creating and EnablingTemplates for E-Mails to Customers    18-11 /ContractDetails/HeaderVO/HeaderVORow/HdrBillSchdVO/HdrBillSchdVORow/Sta rtDate If your billing schedule has multiple billing periods, follow the instructions described in the Oracle XML Publisher User's Guide. Header Billing Schedule Attributes XML Data Element Start Date StartDate End Date EndDate Invoice Date TransactionDate Interface Date DateToInterface Amount Amount Contract Billing Address The following table lists the XML data elements for contract billing address information. Agents select the billing address in the Bill To region of the Summary tab, Parties subtab. The address itself must be entered in other applications. You must preface the XML data elements with the following string: /ContractDetails/HeaderVO/HeaderVORow/HdrBillToAddrVO/HdrBillToAddrVORow / For example, to insert the city in your document you must enter: /ContractDetails/HeaderVO/HeaderVORow/HdrBillToAddrVO/HdrBillToAddrVORow /City Header Bill To Address Attributes XML Data Element Address1 Address1 Address2 Address2 Address3 Address3 Address4 Address4
  • 434.
    18-12    Oracle ServiceContracts User Guide Header Bill To Address Attributes XML Data Element City City Postal Code PostalCode State State Province Province County County Contract Billing Contact Information The following table lists the XML data elements you can use to insert information about the contract's billing contact. Agents enter the billing contact by entering a customer or a third party contact with the role of Billing in the Contact region of the Summary tab, Parties subtab. You must preface the XML data elements with the following string: /ContractDetails/HeaderVO/HeaderVORow/HdrBillToContDtlsVO/HdrBillToContD tlsVORow/ For example, to insert the last name of the contact in your document you must enter: /ContractDetails/HeaderVO/HeaderVORow/HdrBillToContDtlsVO/HdrBillToContD tlsVORow/LastName Header Billing Contact Attributes XML Data Element First Name FirstName Last Name LastName Phone BillToPhone Fax BillToFax Email BillToEmail
  • 435.
    Creating and EnablingTemplates for E-Mails to Customers    18-13 Contract Shipping Address The following table lists the XML data elements for the contract shipping address information. Agents select the shipping address in the Ship To region of the Summary tab, Parties subtab. The address itself must be entered in other applications. You must preface the XML data elements with the following string: /ContractDetails/HeaderVO/HeaderVORow/HdrShipToAddrVO/HdrShipToAddrVORow / For example, to insert the city in your document you must enter: /ContractDetails/HeaderVO/HeaderVORow/HdrShipToAddrVO/HdrShipToAddrVORow /City Header Ship to Address Attributes XML Data Element Address1 Address1 Address2 Address2 Address3 Address3 Address4 Address4 City City State State Province Province County County Postal Code PostalCode Contract Taxes To enter the amount of taxes for the contract as a whole into your document, then enter the following string: /ContractDetails/HeaderVO/HeaderVORow/HdrTaxAmountVO/HdrTaxAmountVORow/T axAmount The contract tax amount is calculated by the application and appears in the Tax field on
  • 436.
    18-14    Oracle ServiceContracts User Guide the Service Contracts Authoring window header. Contract Line Information The following table lists the XML data elements you can use to insert information about the lines in your contract. If you have only one contract line, preface the XML data elements with the following string: /ContractDetails/HeaderVO/HeaderVORow/LinesVO/LinesVORow/ For example, to insert the name of the service, usage, or subscription in your document you must enter: /ContractDetails/HeaderVO/HeaderVORow/LinesVO/LinesVORow/Name To insert information from multiple lines, follow the instructions described in the Oracle XML Publisher User's Guide. Contract Line Attributes XML Data Element Line Number LineNumber Line Name Name Start Date StartDate End Date EndDate Line Amount LineAmount Contract Line Taxes If you have only one line in your contract, you can display the tax for that line in your document, by entering the following string and the XML data element: /ContractDetails/HeaderVO/HeaderVORow/LinesVO/LinesVORow/LineTaxAmountVO /LineTaxAmountVORow/TaxAmount To insert information from multiple lines, follow the instructions described in the Oracle XML Publisher User's Guide. Contract Line Billing Schedule The following table lists the XML data elements you can use to enter information about
  • 437.
    Creating and EnablingTemplates for E-Mails to Customers    18-15 billing schedules for individual contract lines into your document. If you have only one line in your contract, preface the XML data elements with the following string: /ContractDetails/HeaderVO/HeaderVORow/LinesVO/LinesVORow/LineBillSchdVO/ LineBillSchdVORow/ For example, to insert the date of the invoice in your document you must enter: /ContractDetails/HeaderVO/HeaderVORow/LinesVO/LinesVORow/LineBillSchdVO/ LineBillSchdVORow/TransactionDate To insert information from multiple lines, follow the instructions described in the Oracle XML Publisher User's Guide. Line Billing Schedule Attributes XML Data Element Start Date StartDate End Date EndDate Invoice Date TransactionDate Date To Interface DateToInterface Amount Amount Line Billing Contact The following table lists the XML data elements you can use to enter into your document billing contact information for individual contract lines. Agents enter the billing contact by entering a customer contact of role Billing Contact on the Lines Tab, Accounts subtab of the Service Contracts Authoring window. If you have only one contract line, then preface the XML data elements with the following string: /ContractDetails/HeaderVO/HeaderVORow/LinesVO/LinesVORow/LineBillToContD tlsVO/LineBillToContDtlsVORow/ For example, to insert the name of the contact in your document you must enter: /ContractDetails/HeaderVO/HeaderVORow/LinesVO/LinesVORow/LineBillToContD tlsVO/LineBillToContDtlsVORow/Name To insert information from multiple lines, follow the instructions described in the Oracle XML Publisher User's Guide.
  • 438.
    18-16    Oracle ServiceContracts User Guide Line Billing Contact Attributes XML Data Element Name (first and last name) Name Email Email Address1 Address1 Address2 Address2 Address3 Address3 Address4 Address4 City City State State Province Province County County Postal Code PostalCode Sublines The following table lists the XML data elements you can use to enter information about sublines. For service lines, this is what the service covers (for example, a product, or a customer site). For usage lines, this is the individual counter used to track usage. If you have only one subline in your contract, then preface the XML data elements with the following string: /ContractDetails/HeaderVO/HeaderVORow/LinesVO/LinesVORow/SubLinesVO/SubL inesVORow/ For example, to insert the level of coverage for a service line in your document you must enter: /ContractDetails/HeaderVO/HeaderVORow/LinesVO/LinesVORow/SubLinesVO/SubL inesVORow/CoveredLevel To insert information from multiple sublines, follow the instructions described in the Oracle XML Publisher User's Guide.
  • 439.
    Creating and EnablingTemplates for E-Mails to Customers    18-17 SubLine Attributes XML Data Element SubLine Number SubLineNumber Name Name Covered Level CoveredLevel Start Date StartDate End Date EndDate Quantity Quantity UOM Uom SubLine Amount SubLineAmount Login Information for Electronic Renewals The following table lists the XML data elements you can use to include in your document information users can use to log into an automatically generated HTML page where they can review and renew their contract. The URL for that page must be entered by the application administrator in the system profile OKS: Electronic Renewals URL. The application automatically creates a user name and password which you can insert in the renewal e-mail by including the XML names tags listed in the following tables. If you include the password tag name, the application sends the automatically generated password with the first communication to the customer and encrypts the password as a series of stars in all subsequent e-mails. You must preface the XML data elements with the following string: /ContractDetails/ For example, to insert the user name into your document you must enter: /ContractDetails/UserName
  • 440.
    18-18    Oracle ServiceContracts User Guide Web UI Login Attributes XML Data Element User Name UserName Password Password Web UI Login URL WebUILoginURL Current Date To insert the current date (sysdate) into your document, then enter the following string as the XML tag name: /ContractDetails/HeaderVO/HeaderVORow/ReportGeneratedDate Contract Payment Terms To insert the contract payment terms into your document, then enter the following string as the XML tag name: /ContractDetails/HeaderVO/HeaderVORow/PayTermVO/PayTermVORow/PaymentTerm s Viewing the Data Definition Structure You can display a sample document with all of the available data elements. To view the data definition structure: 1. Log into Oracle Applications under the XML Publisher Administrator responsibility. 2. Click Data Definitions in the Navigator. The Data Definitions search page appears in a new browser window.
  • 441.
    Creating and EnablingTemplates for E-Mails to Customers    18-19 3. Enter Service Contracts in the Application field. 4. Click Go. 5. Select the Service Contract Data link. The View Data Definition page appears. 6. Click the OKSCONDATA.xml link in the Preview Data field to view or save the file. Uploading and Registering a Template in Oracle XML Publisher This step is required to use your document for electronic renewals. Prerequisite Create the template as an RTF document.
  • 442.
    18-20    Oracle ServiceContracts User Guide To upload and register a template in Oracle XML Publisher: 1. Log into Oracle Applications under the XML Publisher Administrator responsibility. 2. Click Templates in the Navigator. The Templates search page appears in a new browser window. 3. Click Create Template. The Create Template page appears. 4. In the Name field, enter a user-friendly name for your template. 5. In the Code field, enter a code (no longer than 10 characters) for the template. start with this product's short code (OKS) and a descriptive ending. For example: OKS_cover. 6. Select Service Contracts from the Application LOV. 7. Select OKSCONDATA from the Data Definition LOV. This is the data definition supplied by Oracle. In this release, you are restricted to using this data definition only. 8. Select RTF from the Type LOV. 9. In Start Date, enter the date from which the template will be active. 10. In the End Date, enter the date when this template becomes inactive. This is optional. 11. Sub-templates are not supported in this release.
  • 443.
    Creating and EnablingTemplates for E-Mails to Customers    18-21 12. Optionally, enter a description in the Description field. 13. Click Browse and select the RTF template file. 14. Select the language of the template you have uploaded from the Language LOV. 15. Language territories are not supported in this release, so you can leave the Territory field blank. 16. Click Apply. 17. You can preview a PDF of your template to validate your work by navigating to the View Template page and selecting the Preview icon. See the Viewing and Updating section of the Oracle XML Publisher User's Guide for details. Creating the Set of Templates Used for Customer Communications In the template set, you specify which RTF template is used for which communication. For reminder and cancellation notices, you also specify when they will be sent. For example, send one renewal reminder 30 days before the contract expires and, if the customer does not respond, send out another 15 days before expiration. If the customer has not responded two weeks after the expiration date, you may send a reminder that the contract is being canceled. You can set up just one template set to be used for communications for all renewals. Or you can set up different sets to go to different customers or to be used by different organizations within your company. This step is required to use your document for electronic renewals. Prerequisites Create and upload into Oracle XML Publisher RTF templates for communications you wish to send the customer: Note: Reminder and cancellation notices are optional. To create the set of templates used for customer communications: 1. Navigate to Setup: Contract, then select Define Layout Template Set. The Template Set window appears. 2. Enter a name for the template set in the Name field. 3. Optionally, enter a start and end date to restrict the availability of this template set.
  • 444.
    18-22    Oracle ServiceContracts User Guide 4. Optionally, enter a description. 5. From the Templates region: 1. Select the renewal process to associate with the template from the Process LOV: • Manual: Identifies Print templates for the Print Document action during the Manual process, and for attachments available with the Email Customer action. • Online: Identifies e-mail templates used in the Online process, including e-mails used by the Reminder process, and e-mail body templates available with the Email Customer action. • Both online and manual: Identifies template for both manual and online negotiation processes. 2. Select a Document Type from the LOV. The seeded document types are: • Acceptance Confirmation • Activation Confirmation • Cancellation Confirmation • Quote • Reminder Notice You can also created user defined documents types. See About E-mails Generated by Electronic Renewals, page 18-2. 3. From the Applies to LOV select whether the template applies to new contracts, renewals, or both. 4. Select a Message Template from the LOV. 5. Select an Attachment Template from the LOV. 6. Optionally, enter an Attachment Name. 7. To restrict the use of this reminder to a specific time period, then enter a start date, an end date, or both. 8. Specify when you wish the reminder to be sent in relationship to the start date of the renewed contract. This is done by entering a negative number in the Duration field and choosing the time unit of measure from the Period LOV. For example, to send the reminder two weeks before the start date of the renewed
  • 445.
    Creating and EnablingTemplates for E-Mails to Customers    18-23 contract, then enter -2 as the duration and select Week as the period. 9. You can have the application reset the status of the contract after the notice is sent. To do so, select a status from the Status LOV. 6. Save. Specifying How the Template Sets Are to Be Used You can: • Specify a single template set for all negotiation workflow processes, the global level. • Specify different template sets for use by different organizations within your company. • Specify different template sets to be used for different individual customers. The application looks for an appropriate template set from the most specific to the global. If the application does not find a template set specified at the customer level, it looks at the organization level, if none is found at the organization level either, it uses the template specified at the global level. For example, if you specify Set 1 of renewal e-mail communications to be used at the global level, and specify Set 2 to be used for customers A and B. Then any contract for customers A and B will use Set 2, and contracts for all other customers will use Set 1. Note: For electronic renewals to work, you must at least associate a template set at the global level. Prerequisite Create the template sets used to generate the negotiation communications. To specify how the template sets are to be used: 1. Navigate to Setup: Contract and then select Global Contracts Defaults. The Global Contracts Defaults window appears. 2. Select a template for electronic renewals at the global level using the Template Set LOV in the Global region at the top of the window. 3. Select a template set language. This attribute determines the language passed to the XML publisher while looking up templates. XML Publisher returns the appropriate template for the specified language.
  • 446.
    18-24    Oracle ServiceContracts User Guide 4. To specify different template sets for individual customers, then for each customer: 1. Select the Parties Tab and Electronic Renewal subtab. 2. Select the customer from the Party Name LOV. 3. Select the template set from the Template Set LOV. 5. To specify different template sets for organizations in your own company, then for each organization: 1. Select the Organizations tab and Electronic Renewal subtab. 2. Select the organization from the Organization Name LOV. 3. Select the template set from the Template Set LOV. 6. Save. Viewing PDF Attachments The application automatically generates and e-mails the PDF attachment with every electronic renewal communication. You can view the PDF to be sent for a single contract, all the PDFs being sent to a customer, or all the PDFs generated for an internal organization. To view PDF attachments: 1. Navigate to Control: Requests, then select Run. The Submit a New Request window appears. 2. Select the Single Request radio button. 3. Click OK. The Submit Request window appears. 4. Enter Generate Quote in the Name field using the LOV. The Parameters window appears. 5. Select the template set name from the Quote Template LOV. 6. Enter any of the following to limit the number of contracts to be generated: Note: If you do not enter any values, the application generates the
  • 447.
    Creating and EnablingTemplates for E-Mails to Customers    18-25 communications for the entire database of contracts. • To generate communications for an internal organization, then enter the organization name using the Org LOV. • For a single customer, select the customer from the Party LOV. • For a single contract, select the contract number from the Contract Number LOV. 7. Click OK to exit the Parameters window. 8. Click Submit. The Decision window appears with the identification number of the request you have submitted. Use this number to monitor the progress of your request. 9. Click No if you do not wish to submit another request. 10. Select Requests from the View menu. The Find Requests window opens. 11. Click Find to find the requests you have submitted. The Requests window appears showing the status of your concurrent requests. The Generate Quotes process you have submitted automatically starts the Service Contracts Quote request. Both have to complete successfully for the communications to be generated successfully. 12. Place your cursor in the line displaying the Service Contracts Quote process status. 13. Click View Output to display the generated communications in a separate browser window. Viewing Sample Marked-Up Documents Provided with the Application Oracle supplies sample templates in Oracle XML Publisher with XML name tags already embedded. To view the sample documents provided with the application: 1. Log into Oracle Applications under the XML Publisher Administrator responsibility. 2. Click Templates in the Navigator.
  • 448.
    18-26    Oracle ServiceContracts User Guide The Templates search page appears in a new browser window. 3. Enter %sample% in the Name field. 4. Select Service Contracts from the Application LOV. 5. Click OK. 6. The window displays the sample documents. 7. To download a document: 1. Select a link in the Name column. The View Template page opens. 2. Click Download.
  • 449.
    Using Notes    19-1 19 UsingNotes This chapter covers the following topics: • Using Notes • How Notes Are Used in Oracle Service Contracts • Adding Service Contract Notes • Adding Service Coverage Notes to a Standard Coverage • Adding Service Coverage Notes to a Service Coverage (Instantiated Coverage) • Viewing Notes Using Notes This group of topics explains how you can use notes to add additional information to a contract. For detailed information about using notes, refer to the Oracle Common Application Components User Guide. You can use notes to communicate with other contract administrators, service agents, and sales representatives regarding the details of a contract. For example, you can include notes for contract administrators regarding the management of the contract, or to service agents regarding the services provided under the contract. A note can contain any free format text and can be attached to either a: • Service contract, see Adding Service Contract Notes, page 19-3. • Coverage template, see Adding Service Coverage Notes to a Standard Coverage, page 19-6. • Service coverage (which is the instantiated coverage of a particular service line), see Adding Service Coverage Notes to a Service Coverage (Instantiated Coverage), page 19-8.
  • 450.
    19-2    Oracle ServiceContracts User Guide Note: Because Notes is a context based menu, Service Contract notes or Service Coverage notes are invoked based on where you place your cursor within the application. You can define a note status so that: • All users can view it. • You and other users can read and write to it. • Only you can view it. Note Types Used in Oracle Service Contracts Oracle Service Contracts uses two types of seeded notes: Note: Although there are two seeded note types, note types are user extensible. You can add your own note type to the contract note source. For detailed information about using notes, refer to the Oracle Common Application Components User Guide. 1. Contracts Admin: allows you to add further information to the contract at the contract header level, to the coverage template, or at the service level. Contracts Admin notes indicate how to manage the contract itself and are useful for the sales representative or contract administrator. You can view Contracts Admin notes at the header level and at the line level 2. Contract Coverage: allows you to add further information to the coverage template or the service coverage. Contract Coverage notes generally relate to a specific service and explain any relevant details of how the service is to be carried out. These notes are most useful to the users who review entitlements. You can also add Contract Coverage notes to a coverage template, which will be copied over to the actual instantiated coverage that is tied to the contract line. These notes can be viewed from the service coverage on the contract. You can see Contract Coverage notes only at the line level. How Notes Are Used in Oracle Service Contracts The following examples show how notes are used within Oracle Service Contracts. Contracts Admin Notes Added to a Service Contract
  • 451.
    Using Notes    19-3 IncludeJane Smith in renewal discussions on this contract, as well as other designated resources. Spoke to Harry Jones 24 June 2006, confirmed that products A, B and C require upgraded coverage next year. See Adding Service Contract Notes, page 19-3. Contracts Coverage Note Added to a Coverage Template Perform inspection 3 times per month for this particular service on these products. See Adding Service Coverage Notes to a Standard Coverage, page 19-6. Contracts Coverage Notes Added to a Service Coverage Every time service is performed at site A, the engineer must contact the Security Patrol to obtain a key. Ensure that John Doe signs the work orders when performing any work against under this service. See Adding Service Coverage Notes to a Service Coverage (Instantiated Coverage), page 19-8. Note: Notes are part of the Oracle Common Application Components that are leveraged by applications across the Oracle E-Business Suite. For more information on Notes, refer to the Oracle Common Application Components User Guide. Adding Service Contract Notes To add a service contract note: 1. From the Service Contracts Authoring window, select the Summary tab. From the Tools menu select Notes.
  • 452.
    19-4    Oracle ServiceContracts User Guide The Notes window appears. The application populates the note with: • Source: Service Contract Header • Number: The contract number • Entered By: The user entering the note • Date: A time stamp of when the note was created Note: If a note exists, click New to add a new note. 2. Enter the note text in the Notes field. 3. Select Contracts Admin from the Type LOV. 4. Select one of these statuses: • Publish: All users can view it. • Public: The creator and other users can read and write to it. • Private: Only the creator can view it. 5. Save.
  • 453.
    Using Notes    19-5 Thenote appears in the Notes tab. The Related To field is populated with the Service Contract Header value from the Source field. The Value field is populated with the contract number. 6. To enter additional information, click More. The Detailed Note window appears. 7. Enter text in the Detailed Note field.
  • 454.
    19-6    Oracle ServiceContracts User Guide 8. Click OK. Note: You can view a summary listing of all notes by selecting the Summary tab. Note: Only Oracle Service Contracts users can view notes of Contracts Admin type. Adding Service Coverage Notes to a Standard Coverage Prerequisite: Open a Standard Coverage. To add service coverage notes to a standard coverage: 1. From the Standard Coverage window, select Notes. The Notes window appears. The application populates the note with:
  • 455.
    Using Notes    19-7 •Source: Coverage Template • Number: The coverage name, such as Gold • Entered By: The user entering the note • Date: A time stamp of when the note was created Note: If a note exists, click New to add a new note. 2. Enter the note text in the Notes field. 3. Select Contracts Coverage from the Type LOV. 4. Select one of these statuses: • Publish: All users can view it. • Public: The creator and other users can read and write to it. • Private: Only the creator can view it. 5. Save. The note appears in the Notes tab. The Related To field is automatically populated with the Coverage Template value and the Value field indicates the coverage template.
  • 456.
    19-8    Oracle ServiceContracts User Guide 6. To enter additional information, click More. The Detailed Note window appears. 7. Enter text in the Detailed Note field. 8. Click OK. Note: With the exception of Private notes, if you add a service coverage note to the coverage template, the note appears whenever the coverage template is instantiated to a service line. Note: Service coverage notes added to a service coverage template can be viewed by Service Contracts application users as well as Service application users Adding Service Coverage Notes to a Service Coverage (Instantiated Coverage) To add a service coverage note to a service coverage: 1. From the Service Contracts Authoring window, select the Lines tab. From the Tools menu, select Notes.
  • 457.
    Using Notes    19-9 TheNotes window appears. The application populates the note with: • Source: Service Coverage • Number: The coverage name, such as Gold • Entered By: The user entering the note • Date: A time stamp of when the note was created Note: If a note exists, click New to add a new note. 2. Enter the note text in the Notes field. 3. Select Contracts Coverage from the Type LOV. 4. Select one of these statuses: • Publish: All users can view it. • Public: The creator and other users can read and write to it. • Private: Only the creator can view it. 5. Save. The note appears in the Notes tab.
  • 458.
    19-10    Oracle ServiceContracts User Guide The Related To field is automatically populated with the Service Coverage value and the Value field indicates the coverage template. 6. To enter additional information, click More. The Detailed Note window appears. 7. Enter text in the Detailed Note field. 8. Click OK. Note: If you enter a service coverage note for an instantiated coverage of a service line, the note is attached to that specific coverage. If your contract has more than one service line, then the note is added only to the instantiated coverage for the selected service line, not to all service lines. Note: Service coverage notes added to a service line can be viewed by Service Contracts application users as well as Service application users Viewing Notes Prerequisites Notes for the contract and coverage notes for a service line are managed and viewed separately. You access these notes from different points within the application. • To view notes for a contract, select the Summary tab. • To view notes for a service coverage, select the Lines tab, and then select a service line. To view notes: 1. From the Service Contracts Authoring window, select the Tools menu, and then select Notes. The Notes window appears. On the Notes tab, you will see a listing of the available notes. 2. Highlight the note you wish to view. The note details appear in the right-hand side of the window.
  • 459.
    Using Notes    19-11 3.To verify if additional details are included on the note, select More. Note: To view the notes that are attached to a coverage template, navigate to the Service Contracts Coverage Template form, and click the Notes button.
  • 461.
    Terminating Contracts    20-1 20 TerminatingContracts This chapter covers the following topics: • Overview of Terminating Contracts • About Terminating Contracts • How Termination Works • Terminating a Contract • Restrictions for Terminating a Contract • Terminating a Contract Line • Terminating a Contract Subline • Terminating Multiple Contracts at the Same Time • Viewing the True Value of a Contract • Understanding Termination and Credit Generation with Partial Periods Overview of Terminating Contracts This group of topics explains how you can terminate contracts, contract lines, and contract sublines. About Terminating Contracts You can terminate a contract, a contract line, or a contract subline. The termination date must fall between the start date and end date of the service or services being terminated. You cannot terminate a service or contract that has already been terminated. For example, if you have a future date terminated, you cannot change it to an earlier date. You can terminate multiple contracts and contract lines at one time. During the termination process the application calculates a credit amount. You can:
  • 462.
    20-2    Oracle ServiceContracts User Guide • Override the credit • Provide a full credit • Suppress the credit How Termination Works The following describes various termination scenarios. These scenarios will help you understand the termination methods that you can use and their impact on the true value of the contract. See Viewing the True Value of a Contract, page 20-12. Assumptions for all examples: Your customer has a one-year contract that is valued at $1,200. The contract start date is December 1 and the termination date is March 1. The contract has two billing periods, which bill in advance. Billing period 1 has been billed; billing period 2 has not. Override the credit example: The customer is due a credit of $300, which is for the unused portion of the billed amount. However, you and the customer have mutually agreed to deduct $100 from the credit. An override amount of $200 is entered during the termination. The customer is issued a credit of $200. The contract total is updated to $400 and the terminated amount is updated to $800. The terminated amount is equal to the override amount plus the unbilled amount in billing period 2. Provide a full credit example: The customer is due a credit of $300, which is for the unused portion of the billed amount. Because this is a very good customer, you allow a credit for the full amount, not just the unused portion. The full amount is $600 for the billed amount. The customer is issued a credit of $600. The contract total is updated to $0 and the terminated amount is updated to $1,200. The terminated amount is equal to the full credit amount plus the unbilled amount in billing period 2. Suppress the credit example: The customer is due a credit of $300. However, the contract is being terminated for a breach and your company policy is that credit is not issued when a contract is breached. You can suppress the credit so that the customer receives no credit, which ensures that the credit is not processed by Accounts Receivable. The contract total is updated to $300 and the terminated amount is updated to $900. The terminated amount is equal to the amount suppressed plus the unbilled amount in billing period 2.
  • 463.
    Terminating Contracts    20-3 Terminatinga Contract To terminate a contract: 1. From the Contract Navigator, highlight the contract that you want to terminate. 2. From the Tools menu, select Terminate. The Terminate Contracts window appears. 3. Select the following: • Date: The termination date, which must be within the contract start and end dates. • Reason: The reason for terminating the contract. Your administrator can define reasons by navigating to Setup: Contract and then Termination Reasons.
  • 464.
    20-4    Oracle ServiceContracts User Guide 4. Select Review. If the customer is due a credit for amounts that were paid prior to the termination date, then the credit amount, which is prorated based on the date terminated and the amount billed, appears in the Amount field. 5. Optionally, you can use the Override Amount field to override the calculated amount. The amount that is entered for override cannot be negative or more than the original credit. Entering zero in the Override field will not prevent a credit memo from being generated; it will generate a credit memo for zero dollars. 6. To issue a full credit during termination, select the Full Credit check box. The Amount field displays the total amount that was billed for the contract at the time of termination. Note: The Full Credit check box gives you greater flexibility to control the credit amount. You can also use this check box in situations where you wish to credit more than the prorated amount but not the full credit amount, by selecting the Full Credit check box and then entering a value in the Override Amount field. For example, if the prorated amount is $500 and the Full Amount is $1,000 and you want to credit $800, you can select the Full Credit check box and enter $800 in the Override Amount field. 7. If you do not want to generate a credit memo, select the Suppress Credit check box. Note: If credits are suppressed in error, you can run the Service Contracts Program to Process Suppress Credits. This program enables users to generate credits for contract terminations for which credits have been suppressed. See About Concurrent Programs, page 21-8. 8. Click Terminate. 9. A Decision window appears, indicating that the contract was successfully terminated. Click Yes to save your changes.
  • 465.
    Terminating Contracts    20-5 Note:After you terminate the contract, you can run the Main Billing program to generate the necessary billing transactions as a result of the termination. Restrictions for Terminating a Contract Be aware of the following restrictions relating to the contract status. If the contract status is: • QA Hold: You cannot perform a termination. • Hold: You can perform a termination irrespective of the status and operation setting, Eligible for Invoicing. • All Other Statuses: You cannot perform a termination if the status and operation setting, Eligible for Invoicing, is not enabled. Terminating a Contract Line To terminate a contract line: 1. From the Contract Navigator, double-click the contract. The Contract Execution window appears.
  • 466.
    20-6    Oracle ServiceContracts User Guide 2. From the Overview tab, highlight the contract line you want to terminate. You can select multiple lines. 3. Right-click the mouse, and select Terminate Line. The Terminate Contract Lines window appears 4. Select the following: • Date: The termination date, which must be within the contract start and end dates. • Reason: The reason for terminating the contract line.
  • 467.
    Terminating Contracts    20-7 5.Select Review. If the customer is due a credit for amounts that were paid prior to the termination date, the credit amount appears in the Amount field. 6. Optionally, you can use the Override Amount field to override the calculated amount. 7. To issue a full credit during termination, select the Full Credit check box. The Amount field displays the total amount that was billed for the line at the time of termination. 8. If you do not want to generate a credit memo, select the Suppress Credit check box. Note: If credits are suppressed in error, you can run the Service Contracts Program to Process Suppress Credits. This program enables users to generate credits for contract terminations for which credits have been suppressed. 9. Click Terminate. A Decision window appears, indicating that the contract line was successfully terminated. Click Yes to save your changes. The Status Meaning for the line shows as Terminated.
  • 468.
    20-8    Oracle ServiceContracts User Guide Note: After you terminate the contract line, you can run the Main Billing program to generate the necessary billing transactions as a result of the termination. Terminating a Contract Subline To terminate a contract subline: 1. From the Service Contracts Authoring window, select the Line tab, Pricing/Products subtab, and the Effectivity secondary tab, and then select the subline to terminate.
  • 469.
    Terminating Contracts    20-9 2.From the Tools menu, select Terminate Subline. The Terminate Sublines window appears. 3. Select the following: • Date: The termination date, which must be within the contract start and end dates. • Reason: The reason for terminating the contract subline. 4. Select Review. If the customer is due a credit for amounts that were paid prior to the termination date, the credit amount appears in the Amount field. 5. Optionally, you can use the Override Amount field to override the calculated amount. The amount that is entered for override cannot be negative or more than the original credit. Entering zero in the Override field will not prevent a credit memo from being generated; it will generate a credit memo for zero dollars. 6. To issue a full credit during termination, select the Full Credit check box. The Amount field displays the total amount that was billed for the covered level or
  • 470.
    20-10    Oracle ServiceContracts User Guide usage at the time of termination. 7. If you do not want to generate a credit memo, select the Suppress Credit check box. 8. Click Terminate. Terminating Multiple Contracts at the Same Time To terminate multiple contracts at the same time: 1. From the Contracts Navigator, highlight the contracts to terminate. To select multiple contracts, hold down the Control key and select the contracts that you want to delete. To select a block of rows, select the first contract row, hold down the Shift key, and then select the last contract row. 2. From the Tools menu, select Terminate. The Terminate Contracts window appears. 3. Select the following: • Date: The termination date, which must be within the contract start and end dates. • Reason: The reason for terminating the contract.
  • 471.
    Terminating Contracts    20-11 4.Select Preview. The Selected Contracts for Termination region appears with a listing of the contracts that you have selected to be terminated. 5. Confirm whether the customer is due a credit for amounts that were paid prior to the termination dates. The amount is indicated in the Amount field for each associated contract number. 6. Optionally, you can use the Override Amount field to override the calculated amount. The amount that is entered for override cannot be negative or more than the original credit. Entering zero in the Override field will not prevent a credit memo from being generated; it will generate a credit memo for zero dollars. 7. For each contract, you can enter a different: • Termination Date • Reason 8. To issue a full credit during termination, select the Full Credit check box for the associated contract number. The Amount fields display the total amount that was billed for the associated contract number at the time of termination. 9. If you do not want to generate a credit memo, select the Suppress Credit check box for the associated contract number. Note: If credits are suppressed in error, you can run the Service Contracts Program to Process Suppress Credits. This program enables users to generate credits for contract terminations for which credits have been suppressed. See About Concurrent Programs, page 21-8. 10. Click Terminate.
  • 472.
    20-12    Oracle ServiceContracts User Guide A Decision window appears, indicating that the contracts were successfully terminated. Click Yes to save your changes. Note: After you terminate the contracts, you can run the Main Billing program to generate the necessary billing transactions as a result of the terminations. Viewing the True Value of a Contract When you terminate a contract, a contract line, or a subline, the contract total in the header is automatically adjusted to reflect the terminated amount. To view the true value of a contract: 1. From the Service Contracts Authoring window, review the following in the header: • Total: Reflects the true value of the contract incorporating any price adjustments or credits that have been applied to the contract. • Terminated: Reflects a sum of the following after a termination is submitted: • The unbilled amount for the original contract • The termination credit that was issued • Any termination amounts that were suppressed 2. Alternatively, navigate to the Summary tab and Pricing/Billing subtab.
  • 473.
    Terminating Contracts    20-13 3.Select Billing. The Billing window appears. 4. Review the following: • Amount: Reflects the true value of the contract. • Total field in the terminated region: Reflects the amount that was credited after the termination was submitted. • Billed: Reflects the amount that was originally billed. Understanding Termination and Credit Generation with Partial Periods If a contract is terminated during a billing period, credits are prorated by the application. The calculation of the prorated amount varies among line types. Following are descriptions of how the prorated amount is handled for each line type. Service Lines You can request service line termination at different levels, such as contract level, line level, and subline level. Regardless of the termination level, the new extended price, termination amount, credit, or unbilled amounts are calculated at sub line level and then rolled up to the higher levels. The following list describes how the application calculates terminations and generates credits using partial periods for service lines: Note: You define Partial Period attributes in the Global Contracts Defaults window. See Entering Contract Defaults, page 2-36. • Determines a start date and an end date of termination period. • Termination Period Start Date: Termination date • Termination Period End Date: Original Service End of sub line • Calculates Termination period duration in terms of price unit of measure (UOM)
  • 474.
    20-14    Oracle ServiceContracts User Guide using Partial Period Method as described in pricing section. • Calculates termination amount by multiplying termination period duration with unit price. • Calculates new extended price of subline by subtracting termination amount from original extended price. • Compares new extended price and already billed amount. • Calculates unbilled amount, credit amount, suppressed credit amount and overridden amount based on suppressed credit flag, full credit flag, and override amount (as is). • If termination action is requested at service line level or contract level, then repeats the preceding for all sublines that are affected and rolls up amounts to higher levels. The application processes partial periods differently for contracts that are generated from Oracle Order Management. The following table describes some of the variations within the termination logic. Type Partial Period Impact on Termination Logic Oracle Service Contracts Generated Contracts As described in the preceding list. Oracle Order Management originated contract with dates and Partial Periods attributes defined. Fixed logic As described in the preceding list. Period Start: Period Start Period Type passes from Global Contracts Defaults Oracle Order Management originated contract with dates and Partial Periods attributes defined. Actual logic As described in the preceding list. Period Start: Period Start Period Type passes from Global Contracts Defaults Oracle Order Management originated contract with dates and no Partial Periods attributes defined. Application bases termination on Daily Rates. Application does not stamp contract with Partial Period values.
  • 475.
    Terminating Contracts    20-15 OracleOrder Management originated contract with no dates defined on the contract and Partial Periods attributes defined. Fixed logic As described in the preceding list. Application does not calculate Partial Period. Fixed Rate UOM conversion as follows: 1 Month equals 30 days. Oracle Order Management originated contract with no dates defined on the contract and Partial Periods attributes defined. Actual logic As described in the preceding list. Application does not calculate Partial Period. Fixed Rate UOM conversion as follows: 1 Month equals 30 days. Oracle Order Management originated contract with no dates defined on the contract and no Partial Periods attributes defined. As described in the preceding list. Application does not calculate Partial Period. Fixed Rate UOM conversion as follows: 1 Month equals 30 days. For information about service lines, see About Service Lines, page 3-3. Usage Lines For usage lines, you must define the termination method that the application will use to calculate the usage and to credit the customer upon termination. You can choose between the Amount Based Termination and Counter Based Termination method. Amount Based Termination Charges the customer based on the amount of usage that is recorded when the contract is terminated. The customer is charged based on the actual usage. This is the default method for all usage types. Counter Based Termination The application credits the unused portion of the service based on the price that the customer would pay if they continued consumption at the same rate for the rest of the period. This means that the customer receives any price break based on the estimated usage. For information about usage lines, see About Crediting a Customer in Terminations, page 4-17. Partial Periods Effect on Usage Line Terminations Partial periods affects only estimation and termination of usage. Price UOM and Period Start (Service or Calendar) do not drive pricing or billing of usage lines. The period that you define for the Usage Type in the Lines tab and Effectivities subtab drives usage pricing. The billing schedule is manually entered.
  • 476.
    20-16    Oracle ServiceContracts User Guide When the application is calculating estimated fill for partially billed periods or termination amounts, usage lines use the Period Type setting for partial period calculations. Estimated fill involves calculating a partial period amount for the rest of the billing period. Termination amounts can be calculated by determining the amount per day in a billing period to determine the termination amount (Amount Based) or can be calculated by determining the consumption per day to determine the estimated consumption as of the termination date (Counter Based). Whether determining amount per day or consumption per day within a billing period, the application bases the calculation on actual days or fixed days according to the Period Type setting. The following table summarizes the how Partial Period setup impacts different usage types: Usage Types Partial Period Impact on Termination Negotiated Price Partial Period termination calculation uses the Period Type settings. Fixed per Period Partial Period termination calculation uses the Period Type settings. Actual per Period Partial Period termination calculation uses the Period Type setting. Volume based terminations call Oracle Installed Base for estimated consumption. Actual by Quantity Partial Period termination calculation uses the Period Type setting. Subscription Lines For subscription lines, how the terminated contract is prorated depends on whether it is for a tangible or an intangible subscription. Tangible Subscription Termination Termination for tangible subscriptions can be done only for quantities (or fulfillment periods), that have not been passed to Oracle Order Management. The termination amount correlates to the quantity that is terminated. For example, if 12 fulfillment periods exist for the subscription line, then the line can be terminated only in 1/12th increments of the total line value. If the end date of the latest fulfilled period is greater than the termination date, the termination date for the subscription line will be moved forward to be equal to the end date of the latest fulfilled period. Suppose that you have a 12-month subscription with a start date of January 1. The billing amount for each month is $10. The months of January, February, and March have passed to Oracle Order Management. If a termination date of February 15 is
  • 477.
    Terminating Contracts    20-17 entered,the termination date is moved to March 31 because this is the end date of the latest fulfilled period. The months of April through December are included in the terminated amount, which is $90. Intangible Subscription Termination Termination for intangible subscriptions can be either fulfillment based or effectivity based, depending on whether the system profile, OKS: Intangible Subscription Pricing Method is set to Effectivity Based or Subscription Based. Effectivity Based is the same as the termination functionality for terminations that are performed against Service Lines. Subscription Based, is the same as the termination of tangible subscriptions. For information about subscription lines, see About Subscriptions, page 5-1. Partial Periods Effect on Subscription Line Terminations The application does not calculate partial periods for tangible subscription lines because pricing, billing, and termination amounts are strictly tied to whole-number fulfillment quantities for the subscription line. If profile OKS: Intangible Subscription Pricing Method is set to Subscription Base, the application does not calculate partial periods for Intangible. This profile setting causes the intangible subscription lines to price, bill, and terminate in the same fashion as tangible subscriptions. If profile OKS: Intangible Subscription Pricing Method is set to Effectivity Based, the application calculates partial periods for pricing, billing, and termination amounts on intangible subscription lines as follows: • Because Price UOM is not available for subscription lines, the fulfillment frequency (weekly, monthly, quarterly, and so on) acts as the Price UOM in the partial period calculation • Regardless of Period Start value on the contract, the application always uses Period Start as Service Start when billing subscription lines. This is due to the relationship between fulfillment quantity, pricing, and billing on subscription offerings. • The application uses the Period Type setting.
  • 479.
    Running Reports andPrograms    21-1 21 Running Reports and Programs This chapter covers the following topics: • Overview of Running Reports and Concurrent Programs • About Reports • About Concurrent Programs • Running Reports and Programs Overview of Running Reports and Concurrent Programs This group of topics explains the reports available in Oracle Service Contracts. Oracle Service Contracts provides several reports and concurrent programs designed to help you analyze information and manage the application. About Reports This section provides a high-level description of various reports that are available in Oracle Service Contracts and describes the parameters that are available for each. Some parameters are required, while other parameters are optional and can be used to narrow the scope of the information that is included in the report. Reports also create output information, that can be used to analyze your contracts. The following reports are listed in the order in which they appear in the Reports list of values (LOV) for the Service Contracts Manager responsibility. The Reports LOV includes reports and concurrent programs. For information on how to submit a report, see Running Reports and Programs, page 21-14. Contracts QA Report This report enables you to run a quality assurance (QA) check on multiple contracts. A QA check is particularly useful when run immediately before the billing process to help identify contract issues on before the contracts are submitted to Accounts Receivable.
  • 480.
    21-2    Oracle ServiceContracts User Guide You can define the following parameters for this report: • From Contract Number (required) • To Contract Number • From Start Date (required) Note: When running this report, the defaults From Start Date and To Start Date are the current date. If your contracts start before this date, you will not see a report. Be sure to check your start dates. • To Start Date • Contract Status • Level of Details (required) You can choose a report that details all contracts selected, all contracts that pass the QA check, or all contracts that fail the QA check. • Submit for Approval: If this parameter is set to Yes, the contract is automatically submitted for approval if it passes QA. • Ignore QA Warning: If this parameter is set to Yes, QA warnings are ignored The report output includes details of the data checked including whether the checked data had warnings and errors and if so, what results were found. List of Contracts By Contract Group This report provides a list of contracts by contract group. You can define the following parameters: • Group • Role (required) • Category • Start Date From • Start Date To • Status • Currency
  • 481.
    Running Reports andPrograms    21-3 • Order By Amount The report output lists the contract number, modifier, short description, date signed currency code, estimated amount and the status. The output is sorted by the contract group and the role, such as customer. Contracts QA Report for List of Contracts This report allows you to run a QA check for multiple contracts. You can enter multiple contract numbers within the Contract IDs separated by comma parameter. The report output includes details of the data checked including whether the checked data had warnings and errors and, if so, what results were found. Generate Quote This report integrates with XML Publisher, to generate a PDF file using the quote template that you specify in the parameters. You can define the following parameters: • Quote Template (required) • Acceptance Confirmation - Sample • Activation Confirmation - Sample • Cancellation Confirmation - Sample • Cancellation Notice - Sample • Cover Letter - Sample • Quote Letter - Sample • Reminder Notice - Sample • Contract Number The report output provides a PDF file based on the quote template that you select. OKS Products Not Renewed Report This report helps the sales representative identify customer products that have extended warranties in an Expired or Terminated status. The extended warranty must have a valid customer and vendor, and must include a vendor contact role of sales person or support sales. In addition, the product must not have been renewed to any other extended warranty with in a Signed or Active status.
  • 482.
    21-4    Oracle ServiceContracts User Guide You can define the following parameters: • Contract Group • Operating Unit • Sales Rep • Customer • From End Date • To End Date The report output includes a listing the part number, product description and serial number, along with details of the line amount and the installed base start and end dates. Service Contract Forecast Management Report This report allows the sales representative and management to track the anticipated close of contract renewals. It checks service agreements, warranties, or extended warranties in an Entered status with a valid and customer role specified. To be included, contracts must also have a valid vendor contact role of sales person or support sales. Note: To get results for Booking Forecast, Revenue Recognition Value, and Forecast Value, you must enter values for Revenue Estimation Date and Percentage. You can define the following parameters: • Contract Group • Operating Unit • Sales Rep • Status Code • Currency Code • Minimum Contract Value • Maximum Contract Value • Forecast Start Period
  • 483.
    Running Reports andPrograms    21-5 • Forecast End Period • Revenue Recognized Date The report output provides a listing of forecast information by sales representative. This includes customer, contract number, modifier, status, start and end date, forecast percentage, forecast date, last update date, contract value, contract forecast, revenue to be recognized, and currency code. Service Contracts Bookings Report This report lists the value of all service agreements, warranties and extended warranties, in an Active, Approved, or Signed status with a valid customer or vendor role specified. To be included, contracts must also have a valid vendor contact role of sales person or support sales. Contracts are grouped by the sales representative assigned to the contract. You can define the following parameters: • Contract Group • Operating Unit • Sales Rep • Start Date From (required) • Start Date To (required) • Approved Date From • Approved Date To • Value Exceeding • Sort By You can sort the report output by any of the preceding parameters or by contract number, contract value, currency, customer name, date approved, invoice date, invoice number, invoice value, modifier, sales representative, or start date. Service Contracts Detail Report This report displays key details of the contract headers, contract lines, and covered products for contracts in the warranty and extended warranty categories. The report does not extract all Service Agreement information. The report focuses on covered products. You can define the following parameters:
  • 484.
    21-6    Oracle ServiceContracts User Guide • Contract Group • Contract # • Customer • Status Type • Status Code • Start Date From • End Date From • Start Date To • End Date To • Operating Unit The report output provides a listing of: • Header level details, such as the contract number, modifier, vendor, start and end dates, customer, status, total value, currency code. • Service level details for each line, such as the line number, the service, start and end dates, and total value. • Product level details for each line, such as line number, product name, start and end dates, installed base number, serial number, reference number, quantity, pricing attributes, and final price. Service Contracts Forecast Summary Report This report lists the contracts eligible for renewal for a given period as well as the recognized revenue date. It checks service agreements, warranties and extended warranties in an Entered status with a valid customer and vendor role specified. To be included, contracts must also have a valid vendor contact role of sales person or support sales. You can define the following parameters: • Contract Group • Operating Unit • Currency Code • Start Date
  • 485.
    Running Reports andPrograms    21-7 • End date • Minimum Contract Value • Maximum Contract Value • Recognized Revenue Date The report output provides a listing of the following information by status type and status code; currency code, number of contracts, contract value, booking forecast, revenue recognized value, and forecast value. Note: To get results for Booking Forecast, Revenue Recognition Value, and Forecast Value, you must enter values for Revenue Estimation Date and Percentage. Service Contracts Summary Report This report allows the sales representative to track all contracts by customer. It includes service agreements, warranties and extended warranties with a valid customer and vendor role specified. To be included, contracts must also have a valid vendor contact role of sales person or support sales. You can define the following parameters: • Contract Group • Operating Unit • Rep Name • Customer Number • Customer Name • Form Date • To Date • Currency Code The report output provides a summary listing of contracts for each customer, sorted by sales representative. The report includes customer number, customer name, contract number, modifier, status type, start and end dates, total value, currency code, and when the contract was last updated.
  • 486.
    21-8    Oracle ServiceContracts User Guide Service Contracts by Status Report This report allows sales representatives to track contracts by status. It includes service agreements, warranties and extended warranties with a valid customer and vendor role specified. To be included, contracts must also have a valid vendor contact role of sales person or support sales. You can define the following parameters: • Contract Group • Operating Unit • Sales Rep Name • Customer Number • Customer Name • From Start Date (required) • To Start Date (required) • From End Date • To End Date • Status Code • Status Type • Currency Code • Detail Report The report output provides a listing of service contracts by status. It is sorted by sales representative and provides status, customer, and start and end dates as well as the contract value, selected status product value, and the annual rate. About Concurrent Programs The section provides a high-level description of concurrent programs that are available in Oracle Service Contracts and describes the parameters that are available for each. Some parameters are required, while other parameters can be used to narrow the scope of the information processed. These programs are used to initiate processes that enable particular functionality in the application. The following programs are listed in the order in which they appear in the Reports LOV for the Service Contracts Manager responsibility. The Reports LOV includes reports and
  • 487.
    Running Reports andPrograms    21-9 concurrent programs. For information on how to submit a report, see Running Reports and Programs, page 21-14. Contracts Status Change by Contract This program enables you to execute contract status change programs for a given contract. This process changes the contract status if the selected contract qualifies for a status change. You can define the following parameters: • Contract Number (required) • Contract Number Modifier Contracts Status Change by Range This program enables you to execute contract status change programs for a range of contracts. This process changes the contract status if the selected contracts qualify for a status change. You can define the following parameters: • Category • From Number • To Number • From modifier • To modifier • Last Run Date AutoInvoice Import Program This program is owned by Oracle Receivables. It imports the billing transactions from the Service Contracts Main Billing Program into Oracle Receivables. You can define the following parameters: • Transaction Source (required) • Default Date (required) • Transaction Type • (Low) Bill To Customer Number
  • 488.
    21-10    Oracle ServiceContracts User Guide • (High) Bill to Customer Number • (Low) Bill to Customer Name • (High) Bill to Customer Name • (Low) GL Date • (High) GL Date • (Low) Ship Date • (High) Ship Date • (Low) Transaction Number • (High) Transaction Number • (Low) Sales Order Number • (High) Sales Order Number • (Low) Invoice Date • (High) Invoice Date • (Low) Ship To Customer Number • (High) Ship To Customer Number • (Low) Ship To Customer Name • (High) Ship To Customer Name • Base Due Date on Trx Date • Due Date Adjustment Days For more information about this program, refer to the Oracle Receivables User Guide. OKS Update Sales Group This program updates a sales group for a particular contract. You run this program before any updates to the sales group can be performed. You can define the following parameters: • Contract Number
  • 489.
    Running Reports andPrograms    21-11 • Contract Group Service Contracts AutoReminder Program This program automates the process of reminding customers to renew their contracts by sending a notification for both manual and online renewals. For online renewals the program sends reminders for all contracts for which a quote has been published online. For manual renewals the program sends reminders for all contracts that have the contract status specified in the parameters when you run the program. After the reminder is sent, the program marks the contract with a flag indicating that a reminder has been sent. Subsequent runs of the program will look at this flag to determine whether to send a reminder. Example The following scenario helps describe which contracts are selected when you run the Service Contracts AutoReminder Program. Contract Type Contract Status Negotiation Status Contract X Manual Quote Sent Draft Contract Y Manual Entered Draft Contract Z Online Entered Quote Published Based on the preceding table, if you set the Service Contracts AutoReminder Program to select all contracts where the contract status is to Quote Sent, then reminders are sent for Contracts X and Z. The following prerequisite steps must be performed before scheduling auto reminder notices: • Create templates for a quote letter and cover letter in the Template Set. Navigate to Service Contracts, select Setup, select Service Contracts, and select Communication Templates. • Define a Template Set using the Define Electronic Renewal Template. You can define the Contract Status parameter. Note: You can set up statuses from the Duration field of the Template Set form. When you add reminder notices to a template set, you can indicate how many days lead time the application uses for reminder notices. For example, if you have a reminder notice set at -90, the
  • 490.
    21-12    Oracle ServiceContracts User Guide concurrent program finds eligible contracts and sends out a 90 day notice reminder for any contract with a start date 90 days in the future. Service Contracts Concurrent Program for Reassigning Resources This program ensures that contract assignments are correct and that no contract is assigned to an inactive contact. Service contracts are generally assigned to a resource who is responsible for following through on inquiries from the customer through the life of the contract, from the initial sale through the renewal process. If that person moves to another department or leaves the company, the contract may not receive appropriate level of attention. This concurrent process can be scheduled to run as often as necessary, for example, nightly. The process will check all contracts in an Entered status type. It will compare the Vendor Contact resource who is assigned to the contract with the resource assigned to the territory that the contract maps to in JTF territory management. If the resources are different, the resource associated to the territory will overwrite the resource who was assigned to the contract. The resource to which the contract is being assigned will receive a workflow notification. The following prerequisites are required to run this program: • JTF Territory assignments must be set up. • Profile option OKS: Use Territories to Default Sales Person should be set to Yes to use this process. • Profile option OKS: Enable Sales Credits should be set to Derive. • Resource must be assigned to the contract on the Summary Parties tab in the Contacts region for the vendor. You can define the following parameters: • Contract Number • Contract Status • Operating Unit • Sales Person Service Contracts Fetch Receivables Info for Billing This program fetches the invoice number and tax from Oracle Receivables and updates the contract billing history. There are no parameters to define for this report.
  • 491.
    Running Reports andPrograms    21-13 Service Contracts Instance Relationship Program This program associates the parent instance created for a subscription line with any child instances that are created when a tangible subscription ships. You can define the Contract Number parameter. Service Contracts Main Billing This program generates a log file of the total value processed, total value successful, and total value rejected for billing. For all unsuccessful transactions, further contract information appears and you can pinpoint the contract, the line, or the contract and line, that caused the issue. You can define the following parameters: • Contract Number • Default Date • Operating Unit • Customer Name • Category • Group • Preview Service Contracts Order Processing Program This program processes order lines from Oracle Order Management and creates contracts in Oracle Service Contracts. When ordering a serviceable product in Oracle Order Management, if an application has an associated warranty, the application automatically creates a contract when the product ships. When a serviceable product is placed on a sales order, associated services may also be sold; these pass to Oracle Service Contracts as extended warranties. You can define the followings parameters: • Status • Source Service Contracts Program to Process Suppress Credits This program sends credits to Oracle Receivables if the suppress credit check box was
  • 492.
    21-14    Oracle ServiceContracts User Guide selected during termination. You can define the following parameters: • Contract Number • Operating Unit • Category Service Contracts Usage Averaging This program calculates usage averaging based upon the averaging interval defined for each usage line in a contract. Usage averaging allows you to give price benefits to customers for higher consumption, by allowing you to average invoices over multiple periods. Usage averaging ensures that consumption is evenly distributed, which allows customers to take advantage of price breaks. See Charging for Reported or Estimated Usage Per Period, page 4-11. You can define the Contract Number parameter. Service Contracts Usage Settlement This program calculates usage settlement based upon the settlement frequency defined for each usage line in a contract. It calculates the settlement of any customer undercharges or overcharges using the value defined in the Settlement Interval LOV. Usage settlement reconciles discrepancies between actual consumption and estimated billed quantity. Discrepancies may arise if consumption is not captured before you run the Service Contracts Main Billing program. When the consumption is not captured before the billing program runs, the billing program estimates the consumption for the period. Because the consumption captured for the billing period after running the billing program may be greater than or less than the actual billed quantity, you can use this program to settle the discrepancies. Your administrator should determine how frequently to run this program: monthly, quarterly, or at the end of the contract. See Charging for Reported or Estimated Usage Per Period, page 4-11. You can define the Contract Number parameter. Running Reports and Programs To run reports and programs 1. From the View menu, select Requests.
  • 493.
    Running Reports andPrograms    21-15 The Find Request window appears. 2. Select Submit a New Request. The Submit a New Request window appears. 3. Select the Single Request option and click OK. The Submit Request window appears. 4. From the Name LOV, select the report you want to submit, for example (Contracts QA Report) and click OK. The parameters window appears. 5. Define all mandatory parameters.
  • 494.
    21-16    Oracle ServiceContracts User Guide 6. Click OK. The Submit Request window appears with a concatenated listing of the parameters. 7. Select Submit. A Decision window appears with the request id. You should make a note of this id. The application asks if you want to submit another request. 8. Click No. The Find Request window appears. You can use this window to track your request. 9. Verify that the View All My Request option is selected, and click Find. The Request window appears.
  • 495.
    Creating Contract Itemsin Oracle Inventory    22-1 22 Creating Contract Items in Oracle Inventory This chapter covers the following topics: • About Contract Item Types • Creating Service Items • Creating Warranty Items • Creating Subscription Items • Creating Usage Items • Defining Serviceable Products • Restricting How Items Are Used About Contract Item Types This group of topics explains how setup items in Oracle Inventory for use in contracts. Whether a contract is authored in Oracle Service Contracts or created automatically from Oracle Order Management or Oracle Installed Base, a contract must include lines. The line types used in a contract are items that are created in Oracle Inventory. For example, a computer manufacturer could set up an service item WR23763, to cover the Extended Notebook PC Service Plan. Items are classified into four contract item types: service, subscription, usage, and warranty. How you classify these items restricts which contract categories can use them. See Restricting How Items Can be Used, page 22-22. Because an item must be defined as a serviceable item to be covered on a contract, you must also ensure that the Item Master contains serviceable items. See Defining Serviceable Products, page 22-20. Creating Service Items Services are items that you define in the item master. They include the coverage terms
  • 496.
    22-2    Oracle ServiceContracts User Guide that are given or sold to a customer. You must define service items in the item master. This procedure highlights an example of how a service item can be set up. For additional information about setting up product items in Oracle Inventory, refer to the Oracle Inventory User's Guide. For information about entering service lines, see About Service Lines, page 3-3. Prerequisite Confirm that a Coverage Template is defined. See Defining a Coverage Template, page 23-7. To create a service item: 1. Open Oracle Inventory and navigate to Inventory. Select Items, and then select Master Items. 2. If prompted, enter an Organization. The Master Items window appears. 3. Enter an item. 4. Enter a description. 5. From the Main tab: 1. Select the User Item Type, Service Pgm / Warranty. 2. Select a unit of measure (UOM), from the Primary LOV. Note: You set up a service using a time UOM, such as Year, not a quantity UOM, such as Each.
  • 497.
    Creating Contract Itemsin Oracle Inventory    22-3 6. Select the Order Management tab: 1. Select the Customer Ordered check box. The Customer Orders Enabled check box is automatically selected. 2. Select the OE Transactable check box.
  • 498.
    22-4    Oracle ServiceContracts User Guide 3. Select the Internal Ordered check box. The Internal Ordered Enabled check box is selected automatically. 7. Select the Invoicing tab: • Select the Invoiceable Item and Invoice Enabled check boxes 8. Select the Service tab.
  • 499.
    Creating Contract Itemsin Oracle Inventory    22-5 1. In the Contract Item Type, select Service from the LOV. 2. Select a Duration and Duration Period. The duration and duration period are used for passing the service duration for the service item, when it is selected in the Oracle Quoting application. 3. From the Template LOV, select a coverage template. 9. Save. Creating Warranty Items Warranties are services that are given to the customer free of charge. The price is assumed to be included in the price of the associated product. You must define warranty items in the item master. This procedure highlights an example of how a warranty item can be set up, for additional information on setting up product items in Oracle Inventory refer to the Oracle Inventory User's Guide. For information about warranties, see About Ordering Service in Oracle Order Management, page 6-2. This table distinguishes between warranties and services. Extended warranties are considered services:
  • 500.
    22-6    Oracle ServiceContracts User Guide Warranties Services Non-orderable and managed automatically Can be sold on a quote, order, or service contract. Cannot be authored, can only be created when products under warranty are sold from Oracle Order Management or are manually created in the Install Base Can be authored or created through the Order Management interface. Do not have a price Has unit or percentage based pricing. Associated with serviceable items in Bill of Materials (BOM) Not included in a bills of material (BOM). Have warranty inheritance rules Do not have warranty inheritance rules. Cannot be renewed, can be extended or terminated Can be renewed, extended, or terminated. Prerequisite Confirm that a Coverage Template is defined. See Defining a Service Coverage, page 23- 7. To create a warranty item: 1. Open Oracle Inventory and navigate to Inventory. Select Items, and then select Master Items. 2. If prompted, enter an organization. The Master Items window appears. 3. Enter an item. 4. Enter a description. 5. On the Main tab, select the User Item Type, Service Pgm/Warranty.
  • 501.
    Creating Contract Itemsin Oracle Inventory    22-7 6. Select the Order Management tab: • Select the OE Transactable check box.
  • 502.
    22-8    Oracle ServiceContracts User Guide 7. Select the Invoicing tab:
  • 503.
    Creating Contract Itemsin Oracle Inventory    22-9 • Select the Invoiceable Item and Invoice Enabled check boxes. 8. Select the Service tab.
  • 504.
    22-10    Oracle ServiceContracts User Guide 1. In the Contract Item Type, select Warranty from the LOV. 2. Select a Duration and Duration Period. 3. From the Template LOV, select a coverage template. 4. You may enter Starting Delay (Days). For Warranty items, you can enter Starting Delay (Days), which will affect the start date for the contract. The start date for the contract is equal to the ship date plus the value entered in the Starting Delay (Days) field. The same date is also used by Oracle Installed Base as the installed date of the product. For information on modifying warranty dates, see Modifying the Dates a Warranty Is Effective, page 6-18.
  • 505.
    Creating Contract Itemsin Oracle Inventory    22-11 9. Save. Note: After a warranty is defined, it must be associated with a serviceable product in the Bill of Materials for a warranty contract to be automatically created. Refer to the Oracle Bills of Material User's Guide for further information. When a product is shipped or manually created in the installed base, the warranty is automatically created in Oracle Service Contracts. Warranties allow a support service to be associated with a product automatically. The warranty is automatically associated with the customer product in the installed base upon ordering and fulfillment of the product to the customer. Each serviceable product can be fulfilled with one or more base warranties defined as components in the BOM for the product. 10. Select the Enable Contract Coverage check box. This makes the product serviceable. The Track in Installed Base check box is automatically selected. 11. If defects for this item are to be tracked, then select the Enable Defect Tracking check box. 12. Select the Enable Service Billing check box.
  • 506.
    22-12    Oracle ServiceContracts User Guide 13. Select the Billing Type field. For example, Material, Labor, or Expense. 14. Select the Recovered Part Disposition speed. This indicates if replaced parts are to be recovered and how quickly. 15. Save. Creating Subscription Items For subscription items to be priced and sold on a contract, they must be defined in the item master. A Subscription Item Type can either be selected as a contract line item on subscription agreement, or as a subline to a service line. • When a subscription is on a line, you are selling that subscription. An example is a magazine subscription, delivered once per month for a year. • If you want to sell service that provides coverage on a subscription, an example is a subscription used to track the duration that a user has access to a web based service. The service coverage on that subscription would be used to provide support if the customer has problems with the service, such as a login issue. This procedure highlights an example of how a subscription item can be set up, for additional information on setting up product items in Oracle Inventory refer to the Oracle Inventory User's Guide. For information on entering subscription lines, see About Subscriptions, page 5-1. Prerequisite Confirm that a Subscription Template is defined. See Setting Up a Subscription Template, page 23-14. To create a subscription item: 1. Open Oracle Inventory and navigate to Inventory. Select Items, and then select Master Items. 2. If prompted, enter an Organization. The Master Items window appears. 3. Enter an Item. 4. Enter a Description. 5. From the Main tab, select the User Item Type.
  • 507.
    Creating Contract Itemsin Oracle Inventory    22-13 6. Select the Order Management tab: 1. Select the Customer Ordered check box.
  • 508.
    22-14    Oracle ServiceContracts User Guide The Customer Orders Enabled check box is automatically selected. 2. For tangible subscriptions, select the Shippable check box. 3. Select the OE Transactable check box. 4. From the Contract Item Type LOV, select Subscription. 5. Select the Subscription Template that should be associated with this item. This defines the fulfillment schedule defaults. Note: You must select a Subscription template. If you do not select a template, the subscription cannot be used on the authoring form, it will display an error. 7. Select the Invoicing tab.
  • 509.
    Creating Contract Itemsin Oracle Inventory    22-15 • Select the Invoiceable Item and Invoice Enabled check boxes. 8. Select the Service tab: 1. To enable the ability to file service requests against this item, select Enabled from the Service Request list. 2. Select the Enable Contract Coverage check box to identify this product as being serviceable. The Track in Installed Base check box is automatically selected.
  • 510.
    22-16    Oracle ServiceContracts User Guide 3. From the Contract Item Type LOV, select Subscription. 4. Select the Subscription Template that should be associated with this item. This value defines the fulfillment schedule defaults. Note: You must select a Subscription template. If you do not select a template, the subscription cannot be used on the authoring form, and an error appears. 9. Save. The subscription item is now an inventory part as well as a serviceable product. Creating Usage Items For usage items to be priced and sold on a contract, they must be defined in the item master. Usage includes things such as the number of copies made on a printer or the number of calls made to Support. This procedure highlights an example of how a usage item can be set up, for additional information on setting up product items in Oracle Inventory refer to the Oracle Inventory User's Guide. For information about entering usage lines, see About Charging a Customer for Usage, page 4-2.
  • 511.
    Creating Contract Itemsin Oracle Inventory    22-17 To create a usage item: 1. Open Oracle Inventory and navigate to Inventory. Select Items, and then select Master Items. 2. If prompted, enter an Organization. The Master Items window appears. 3. Enter an Item. 4. Enter a Description. 5. From the Main tab, select a User Item Type. 6. Select the Order Management tab. 1. Select the Customer Ordered check box. The Customer Orders Enabled check box is automatically selected. 2. Select the Internal Ordered check box. 3. The Internal Orders Enabled check box is automatically selected.
  • 512.
    22-18    Oracle ServiceContracts User Guide 7. Select the Invoicing tab.
  • 513.
    Creating Contract Itemsin Oracle Inventory    22-19 • Select the Invoiceable Item and Invoice Enabled check boxes. 8. Select the Service tab.
  • 514.
    22-20    Oracle ServiceContracts User Guide 1. In the Contract Item Type, select Usage from the LOV. 9. Save. Defining Serviceable Products To be covered by a service item, subscription item, warranty item, or extended warranty item, a product item must be classified as a serviceable product. Prerequisites Confirm that the product items exist in Oracle Inventory. For additional information on setting up product items in Oracle Inventory, refer to the Oracle Inventory User's Guide. To define a serviceable product: 1. Open Oracle Inventory and navigate to Inventory. Select Items, and then select Master Items. The Master Items window appears. 2. Query an item. 1. From the View menu, select Query By Example and then Enter.
  • 515.
    Creating Contract Itemsin Oracle Inventory    22-21 2. Enter a value in the Item field, for example %AS5%. 3. From the View menu, select Query By Example and thenRun. The queried item appears in the form. Click the arrow to see additional items that match your query. 3. Select the Service tab. 4. To enable the ability to file service requests against this item, select Enabled from the Service Request list. 5. Select the Enable Contract Coverage check box. This selection makes the product serviceable. The Track in Installed Base check box is automatically selected. 6. If defects for this item are to be tracked, then select the Enable Defect Tracking check box. 7. Select the Enable Service Billing check box. 8. Select the Billing Type field. For example, Material, Labor, or Expense. 9. Select the Recovered Part Disposition speed. This value indicates if replaced parts are to be recovered and how quickly.
  • 516.
    22-22    Oracle ServiceContracts User Guide 10. Save. The product item is now a serviceable product. Restricting How Items Are Used Contract categories restrict the line types that can be added to a contract. Accordingly, how you classify an item in Oracle Inventory impacts which contract categories can use the item. This table shows the contract line items that can be used by each of the contract categories. Contract Line Item Service Agreement Subscription Agreement Warranty and Extend Warranty Warranty (automatically generated from Oracle Order Management) Service contract item type Yes Yes Yes. Line Type indicates Extended Warranty rather than Service. No Subscription contract item type Cannot be used as a contract line, but can be used as a subline Yes Cannot be used as a contract line, but can be used as a subline No Usage contract item type Yes Yes No No Warranty contract item type No No No Yes
  • 517.
    Setting Up StandardCoverage and Subscription Templates    23-1 23 Setting Up Standard Coverage and Subscription Templates This chapter covers the following topics: • Overview of Standard Coverage and Subscription Templates • Specifying Standard Coverage • Defining Standard Coverage • Setting Up a Subscription Template • Copying Standard Coverage into a New Coverage • Modifying Standard Coverage for Existing Contracts • Modifying Standard Coverage for New Contracts Overview of Standard Coverage and Subscription Templates This group of topics explains how can set up coverage and subscription templates. Oracle Service Contracts enables you to define a standard set of templates, to create offerings for a common set of agreements used by your organization, and modify them to meet your customers' requirements. In order to create a: • Service item in Oracle Inventory, you must first define a Standard Coverage. • Subscription item in Oracle Inventory, you must first define a Subscription Template. Standard Coverage A Standard Coverage contains attributes that are associated to a Service Item in Oracle Inventory. It provides key information on how service should be carried out on products covered under the contract. For each business process covered, it defines the
  • 518.
    23-2    Oracle ServiceContracts User Guide times of coverage, days of coverage, reaction and resolution times for a service request, preferred resources, and the discounted rates that would be applied when work is performed on covered products, see Specifying Standard Coverage, page 23-3. You can use Standard Coverage to define warranty inheritance rules and transfer rules. You can also link a Preventive Maintenance (PM) program to standard coverage, which includes the schedule to perform a particular set of activities, such as changing toner in a copy machine. Note: The preventive maintenance schedule is created in a manner similar to the billing schedule. Multiple maintenance streams can be defined for a preventive maintenance program. Preventive Maintenance programs are defined in Oracle Complex Maintenance, Repair, and Overhaul. For more information, see the Oracle Complex Maintenance, Repair, and Overhaul User's Guide. The following topics and procedures define and describe how to set up standard coverage: • Specifying Standard Coverage, page 23-3 • Defining Standard Coverage, page 23-7 • Copying Standard Coverage into a New Coverage, page 23-16 • Modifying Standard Coverage for Existing Contracts, page 23-16 • Modifying Standard Coverage for New Contracts, page 23-17 Subscription Template A subscription template contains attributes, that are associated to a subscription item in Oracle Inventory. The attributes include Subscription type, Media and Property type, Fulfillment Channel, and Frequency. A subscription item can be a tangible item like a magazine, or an intangible item like a membership. Currently Oracle Order Management is supported as the fulfillment channel. If no fulfillment channel is specified, it is considered an intangible item, and no delivery schedule is created for that item. Subscription Frequency such as Yearly, Monthly, Weekly, and Daily identifies how often an item should be delivered. The following procedure describes setting up a subscription template, Setting Up a Subscription Template, page 23-14.
  • 519.
    Setting Up StandardCoverage and Subscription Templates    23-3 Specifying Standard Coverage Service coverage describes the situations under which the customer is covered for service. Services are broken down into business processes, which are related the service, such as Depot Repair. Coverage Terms are then defined for these business processes. Creating a Standard Coverage The preceding diagram shows the steps necessary to complete standard coverage. A description of the steps and an example follow: • Define Coverage: Specify coverage name, type, importance level, effective dates, warranty inheritance, transfer rules, or attach a preventative maintenance program. • Define Business Process: Specify the business processes that the Standard Coverage will use. For example, select the Field Service business process. You will need to define coverage times, reaction times, resources, and billing types for each business process that you add. • Define Coverage Times: Specify the days of the week and hours used to calculate reaction and resolution times. A customer can request service anytime. If they call up support, the service agent will not turn down the call if the call is beyond the coverage times. The coverage times simply determine the starting point from where you start counting reaction and resolution times. For example, if coverage ends at 5 p.m. on a Monday and starts again at 9 a.m. on a Tuesday, with a two-hour response time, then a call received at 4 p.m. on Monday, will have a respond time of 10 a.m. Tuesday (assuming that work through is not selected). If the coverage is 24 hours per day, seven days a week, then the respond by time would be 6 p.m. Coverage times are defined for each business process as part of coverage terms, and they are applicable to one time zone.
  • 520.
    23-4    Oracle ServiceContracts User Guide • Define Reaction Times: Specify the allowed amount of time by which action must be initiated for a requested process. For example, set up reaction times of two hours on Monday through Sunday, Therefore, you must respond within two hours of being notified by the customer. Reaction times are tied to severity. • Define Resolution Times: Specify a fixed time per contract by which a normal operation should be restored. The Resolution Times will be made available to other functions, such as Service Request. For example, you could set up resolution times of eight hours Monday through Friday, which means if the customer calls Monday through Friday you must resolve the issue within eight hours. Resolution times are tied to severity. Note: When checking entitlements in Oracle TeleService, the application uses the best customer time zone to calculate reaction and resolution times. For example, in the preceding scenario, if the best customer time zone is EST. Service request determines the best customer time zone for service entitlement in the following order: • Incident time zone: The time zone of the incident. It can be derived from the incident address on a service request. • Primary contact time zone: The time zone of the primary contact • Customer time zone: The time zone derived from the Service Request Customer's identifying address or phone number. • Server time zone: The time zone of the server. By convention, all date and time information in the E-Business Suite is stored according to this time zone. In many cases, this time zone is also referred to as the corporate time zone. Other rules that help determine the best customer time zone, include: • If the best customer time zone matches a coverage time zone, the application converts the service request reported time to the best customer time zone and uses the coverage times setup for the best customer time zone. The application returns respond by and resolve by times by adding the applicable response time and resolution time to the passed service request reported time
  • 521.
    Setting Up StandardCoverage and Subscription Templates    23-5 in server time zone. • If the best customer time zone does not match any coverage time zone but the default coverage is defined applicable to all time zones, the application converts the service request reported time to the best customer time zone and uses the coverage times setup for the default coverage time zone. The application returns respond by and resolve by times by adding the applicable response time and resolution time to the passed service request reported time in server time zone. • If the best customer time zone does not match any coverage time zone and default coverage is not applicable to all time zones, the application converts the service request reported time to the default coverage time zone and compares it with the coverage time defined for the default coverage time zone. The application returns respond by and resolve by times by adding the applicable response time and resolution time to the passed service request reported time in server time zone. Example Scenario Result Best customer time zone: EST Reported Time: 9AM, EST Coverage (not default) defined for time zone EST: • Coverage Time: 9AM to 6PM, Monday through Friday • Response Time: 1 Hour • Resolution Time: 5 Hour Respond By: 10AM, EST Resolve By: 2PM, EST
  • 522.
    23-6    Oracle ServiceContracts User Guide Best customer time zone: EST Reported Time: 9AM, EST Coverage defined for time zone EST: • Coverage Time: 9AM to 6PM, Monday through Friday • Response Time: 1 Hour • Resolution Time: 5 Hour Respond By: 10AM, EST Resolve By: 2PM, EST Best customer time zone: EST Reported Time: 9AM, EST No Coverage defined for time zone EST Default Coverage and applicable to all time zones: • Coverage Time: 9AM to 6PM, Monday through Friday • Response Time: 1 Hour • Resolution Time: 5 Hour Respond By: 10AM, EST Resolve By: 2PM, EST Best customer time zone: EST Reported Time: 9AM, EST No Coverage defined for time zone EST Default Coverage but not applicable to all time zones: • Coverage Time: 9AM to 6PM, Monday through Friday • Response Time: 1 Hour • Resolution Time: 5 Hour Respond By: 1PM, EST Resolve By: 5PM, EST
  • 523.
    Setting Up StandardCoverage and Subscription Templates    23-7 • Define Resources: Specify the list of resources that are eligible to work on a specific task when a service request is created. Resources can be classified as Primary, Preferred, or Excluded. For example, identify a primary service engineer that responds to service calls. This information is used by Assignment Manager to assign a service engineer. • Define Billing Types: Specify for each Business Process, what type of work is covered, to what limit, and at what rate. The billing types and rates are used when calculating the amount to charge a customer when work has been performed. For example, define a replacement transaction type where the customer is charged for material and labor. Defining Standard Coverage Prerequisites The following must be defined as part of your implementation: • Coverage Type Lookup Code (Oracle Service Contracts) • Business Processes (Oracle TeleService) • Price List (Oracle Order Management) • Time Zone • Service Request Severity (Oracle TeleService) • Resource Types (Oracle TeleService) • Resources (Oracle TeleService) • Billing Types (Oracle TeleService) • Billing Rates (Oracle TeleService) • Preventive Maintenance Program (Oracle Complex Maintenance, Repair and Overhaul) To define standard coverage: 1. From the Navigator, navigate to Service Offerings, and then select Standard Coverage. The Standard Coverage window appears.
  • 524.
    23-8    Oracle ServiceContracts User Guide 2. In the Coverage region, enter the following: Name: Enter the name of the coverage. Type: Select the type of coverage such as Gold, Silver, or Bronze from the LOV. After you select a coverage type, the Importance Level field and start dates for the Effective Dates fields are populated with values. The effective Start Date is required and the End date is optional. Note: When reviewing a service request, a service agent can click the Line Details button to open the Line Details form, which enables the service agent to view the covered level details and compare the products covered under the contract with those that are related to the service call. The Line Details button is active only when the contract coverage is viewed from the Service Request form. It is disabled when you create or update standard coverage. Access to the Line Details option is controlled by application function security so that only authorized users are able to see the contract line details. You must ensure that your administrator has added the Service Contracts function named Covered Level Details to the appropriate user menus. Description: Enter a brief description for the coverage. Exception: Optionally, enter an exception coverage for the standard coverage
  • 525.
    Setting Up StandardCoverage and Subscription Templates    23-9 definition. Note: Although there is no support for exception coverage during entitlement calls, the ability to define exception coverage does facilitate extensions to the entitlement process. For example, you may wish to extend exception coverage to all customers with the Gold coverage plan in order to ensure a minimum level of support for these customers even if their contracts expire; or an exception coverage may be referenced for entitlement calls to a contract under a grace period. Suitable as Exception check box: Select this check box if you want to use this standard coverage as an exception coverage for other standard coverages. Note: You can add a note the standard coverage by clicking the Notes button. This opens the Notes window. For information on notes, see Communicating Using Notes, page 19-1. 1. Define warranty inheritance rules as follows: Warranty check box: Select this check box to define warranty inheritance, which allows the warranty to continue if the product is replaced. This check box controls whether or not this coverage can be selected against a warranty item in the item master. Inheritance: Select value if the warranty should continue when the product is replaced. Remaining Duration: Replacement product's warranty is the remaining duration of the original warranty. Full New Duration: Replacement product's warranty is a new warranty duration. Note: The Warranty check box can be updated. However, if an Inheritance has been entered in conjunction with the Warranty check box, the Inheritance must be set to NULL before the Warranty check box can be unchecked. Billing Types may be set up for warranties as for any other type of coverage. Synchronize date installed check box: Select this check box, if you want to set the warranty start date to be the same as the installation date. When a product installation date is changed, Service Contracts
  • 526.
    23-10    Oracle ServiceContracts User Guide checks for contracts that cover that product. For every service that covers the product, the coverage definition is checked for warranty coverage that has the attribute set to allow the installation date synchronization. If this option is selected, Service Contracts checks whether any service request has been logged on dates that would be outside the warranty period if it were changed to start on the new installation date. If no service request exists, the warranty start date is changed to the installation date. To preserve the original duration of the warranty, the end date is also changed. The effect of the change is automatically cascaded to the coverage definition. In order for this feature to work you must confirm that within the Status and Operation setup, the Active status is checked for Update Online within the Warranties/Extended Warranties category. Define other standard coverage rules as follows: Free upgrade check box: Select this check box if you want to track this coverage as having a free upgrade. This flag does not provide any automated functionality at this time. Transfer: Determine the status of the contract in case a customer product is transferred from one owner to another. This is a required field. No Change: There would not be any changes in the existing owners contract. No new contract is created for the new owner. Terminate: The current contract subline is terminated. The termination date would be the transfer date. No new contract is created for the new owner. Terminate ifNot Related: If the new owner is related to the current owner, no changes are made to the contract. If the parties are not related, the current contract is terminated. The termination date would be the Transfer date. Transfer: The current contract subline is terminated with the Termination date set to Transfer date. If the Contract Transferred is a Warranty Contract, then a Contract for the new Owner is created in Active Status. If the Contract transferred is an Extended Warranty or Service Contract, a contract is created for the new owner in the status defined by the profile option OKS: Transfer Status. The contract will have a one-time billing schedule and advance billing. Transfer if Not Related: If the new owner is related to the current owner, this option keeps the current owners contract in force. If the owners are not related, the current contract is terminated and a contract for the new owner is created. If the contract transferred is a Warranty contract, then the new contract is created in the Active status. If the contract transferred is an Extended Warranty or Service type contract, the contract will have an advance one-time billing schedule and the status
  • 527.
    Setting Up StandardCoverage and Subscription Templates    23-11 of the contract would be defined by the profile option OKS: Transfer Status. Define Preventive Maintenance programs as follows: Program Name: Select a Preventive Maintenance Program. The program description displays after you select a program name. Preventive Maintenance programs are set up in Oracle Complex Maintenance, Repair, and Overhaul. Note: You can open the Preventive Maintenance Schedule form and view or modify the information related to the selected Preventive Maintenance program, by clicking the Schedule button. For more information on setting up Preventive Maintenance programs, see the Oracle Complex Maintenance, Repair, and Overhaul User's Guide. 3. In the Business Process region, enter the following: Business Process: Select a Business Process from the LOV, such as Depot Repair. Offset Duration: Enter the offset duration or amount of time you would like the service to be offset from the authored contract's start date. For example, set onsite support to start one month after the contract comes into effect and set hotline support to be available immediately. Offset Period: Specify the unit of measure for the offset duration, such as hour or day. If the Offset Duration is modified, the Start and End dates are automatically adjusted as long as they're within the range of the service coverage dates, and conversely, if the Start and End dates are modified, the Offset Duration is automatically adjusted. Price List: Select the default price list that should be used when billing service charges. Discount: Select the percentage of discount allowed for the transaction group, for example 10%, from the LOV. 4. From the Coverage Times tab, enter the following: Timezone: Select a Time zone from the LOV. You can define more than one time zone for each business line. However, you must define at least one time zone for every business process line. Default check box: Select a time zone as the default for the selected business process. Apply Default to Other Time Zones check box: To have the Default coverage
  • 528.
    23-12    Oracle ServiceContracts User Guide times applied to any other time zone for which you have not entered any coverage times, select the Apply Default to Other Time Zones check box In the Covered Times region: Enter a Start Time, End Time, and select the check boxes for the applicable days for each time zone. For a given business process, the coverage time for at least one day must be entered. You can enter multiple coverage times for a specific time zone. You can also define multiple coverage times for the same day, as long as the coverage time records do not overlap. Note: You can click the Always Covered button, to set to set the Start Time and End Time for all days to 00:00 and 23:59 respectively. 5. From the Reaction Times tab, enter the following: Severity Name: Enter a name for the severity definition, for example, Level 1 or Important. Severity: Select the level of severity, for example High, from a LOV. Workthrough check box: If selected, this check box overrides the normal coverage times for that transaction. For example, suppose you have support between 9 a.m. and 5 p.m. from Monday through Friday with a two-hour reaction time. If a customer calls at 4:45 p.m. in the middle of the week and Work Through is selected, then the customer is entitled to receive support by 6:45 p.m. that evening. If the Work Through option is not selected, then the support representative has until 10:45 a.m. the next morning to respond to the call. Active check box: If selected, this check box indicates this severity level is active and makes the reaction times available through an entitlements call. Reaction Times for days of the week: Enter specific reaction times, in hours, for each applicable day. For example, if 2:00 is entered in the Monday field, then a service call must be made within two hours if the call occurs on Monday.
  • 529.
    Setting Up StandardCoverage and Subscription Templates    23-13 Workflow: Select the applicable workflow for each reaction time name specified. 6. From the Resolution Times tab, enter the following: Severity Name: Comes from the Severity Name on the Reaction Times tab. Severity: Comes from the Severity on the Reaction Times tab. Workthrough check box: If selected, this check box overrides the normal coverage times for that transaction. Active check box: If selected, this check box indicates this severity level is active and makes the resolution times available through an entitlements call. Resolution Times for days of the week: Enter specific resolution times, in hours, for each applicable day. For example, if 4:00 is entered in the Monday field, then the issue must be resolved within four hours if a call occurs on Monday. 7. From the Resources tab, enter the following: Type: Select a resource type from the LOV. For example, Engineer. Name: Select the resource by name. Classification: Select the proper classification for the resource from the LOV. You can classify a resource as Preferred, Primary or Excluded. If you classify a resource as Excluded, the Assignment Manager removes the resource from the list of available resources. 8. From the Billing Types tab, enter the following:
  • 530.
    23-14    Oracle ServiceContracts User Guide Service Activity Billing Type: Select the billing type from the LOV. Duplicates are not allowed. If the billing type is Labor, then the Billing Rates button is enabled. Up To Amount: Enter the maximum allowed amount. If you leave this field blank, the upper limit is restricted by the percentage covered or discount you enter in the % Covered field. % Covered: Enter the percentage covered or discount. For example, if new parts have been installed to fix a problem at a customer site, the bill for the work needs to be calculated, taking the coverage on the service contract into account. If parts are covered 50% up to a maximum of $300, and the charge for parts was $800, after applying the rates agreed on the contract, the charge would be calculated as $500, after the maximum discount of $300 has been applied. For the same contract rates, if the charge for parts came to $500, the customer would receive the full 50% discount ($250) because the discount is below the $300 maximum. Allow Full Discount check box: If selected, this check box provides 100% coverage for warranties without requiring setup of billing types. If unchecked on the template, the box will be grayed out on the contract. Any bill types data populated on the template will override the use of this check box. Billing Rates: Check this button to open the Billing Rates form. 9. Save. Setting Up a Subscription Template To set up a subscription template: 1. From the Navigator, navigate to Service Offerings, and then select Subscription Template. The Subscription Template window appears.
  • 531.
    Setting Up StandardCoverage and Subscription Templates    23-15 2. In the Name field, enter a name for the template. Examples of names include Monthly or Yearly. 3. In the Description field, enter a description for the template. Examples of descriptions include Monthly Subscription and Yearly Subscription. 4. In the Subscription Type field, select the type of subscription from the LOV. Examples of subscription types include journals, magazines, and newsletters. 5. In the Media Type field, select the type of medium from the LOV. Examples of medium include document, image, and audio. 6. In the Fulfillment Channel field, select of one the following options: • Order Management: for tangible items that need to shipped • None: for intangible items 7. In the Frequency field, select a subscription frequency: • Daily • Weekly • Monthly • Yearly 8. Enter any additional information in the Comments field. 9. Verify that the Active check box is selected to ensure that the subscription template is active.
  • 532.
    23-16    Oracle ServiceContracts User Guide 10. Select OK. Copying Standard Coverage into a New Coverage You can provide a new service offering by making copy of the existing standard coverage and incorporating required changes to it. For example, you can copy a coverage and add additional business processes and change response times. To copy standard coverage into a new coverage: 1. From the Navigator, navigate to Service Offerings, and then select Standard Coverage. The Standard Coverage window appears. 2. Click the flashlight icon in the toolbar. The Coverage Template window appears with a list of the standard coverages. Select a standard coverage. 3. From the Tools menu, select Copy Coverage. The Copy Coverage window appears. 4. Enter a name for the new coverage. 5. Click OK. Modifying Standard Coverage for Existing Contracts To modify standard coverage for existing contracts: 1. From the Navigator, navigate to Service Offerings, and then select Standard Coverage. The Standard Coverage window appears. 2. Search for the coverage name that to modify. 3. Make updates as desired.
  • 533.
    Setting Up StandardCoverage and Subscription Templates    23-17 4. Save. Modifying Standard Coverage for New Contracts Prerequisite: Create a copy of the coverage name you wish to modify. See Copying Standard Coverage into a New Coverage, page 23-16. To modify standard coverage for new contracts: 1. Make updates as desired. 2. Save. 3. Assign the new coverage to the service item in the Item Master. See Creating Service Items, page 22-1. Moving forward, the application applies the new coverage when the service is ordered in a contract or order.