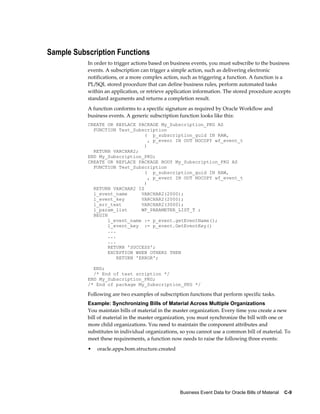
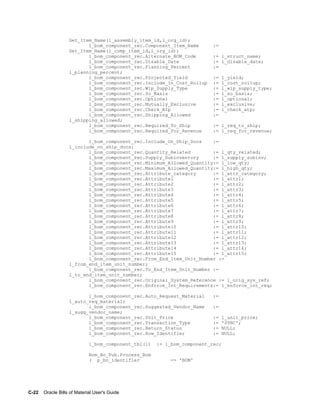
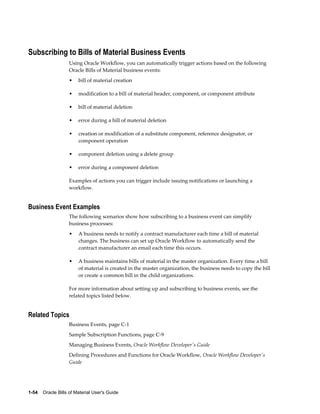
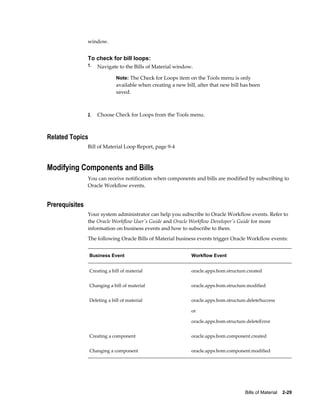
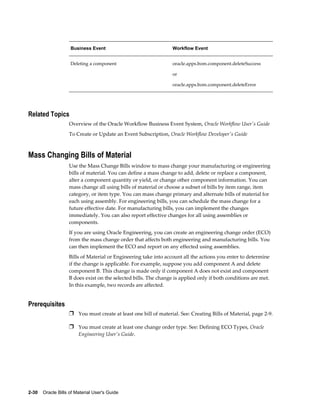
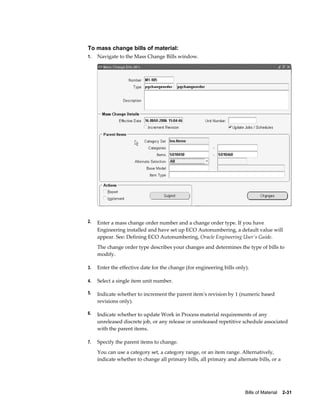
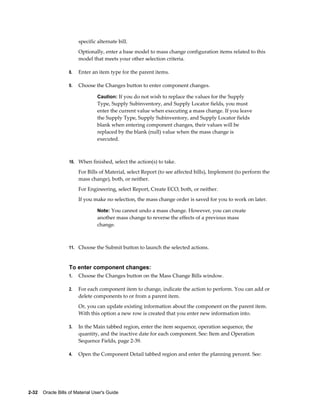
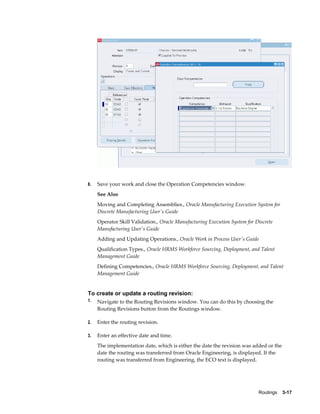
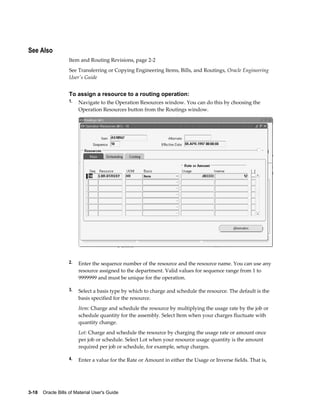
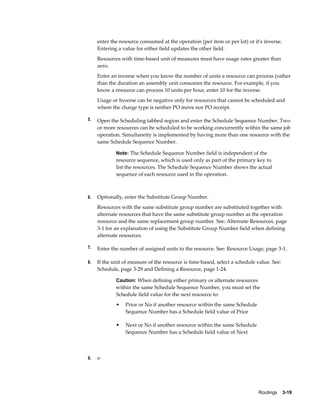
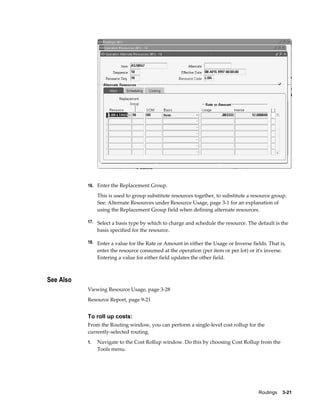
This document provides instructions for setting up Oracle Bills of Material. It describes defining bills of material parameters, creating departments and resources, setting profile options, and subscribing to business events. Setup steps include creating alternates, deletion statements, department classes, and lookups. The document also covers using the Workday calendar and assigning view privileges to forms.


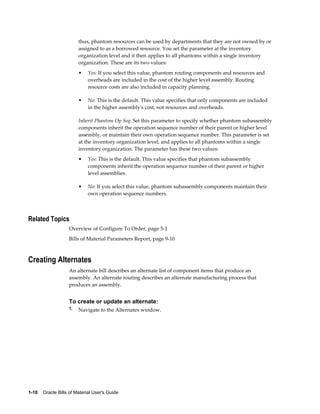

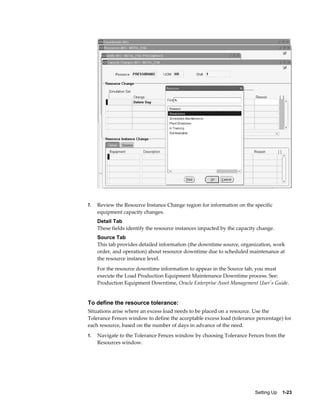
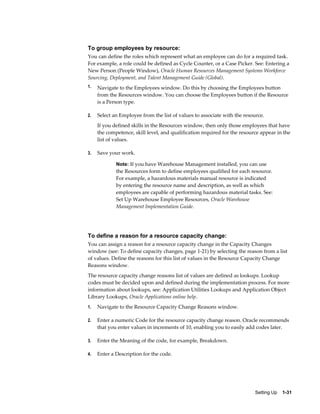


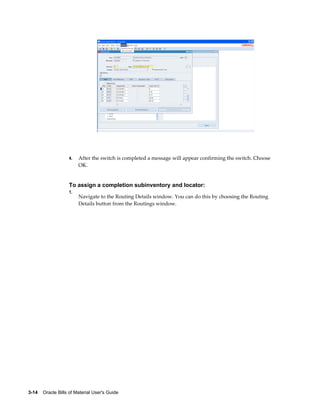
![Bills of Material 2-43
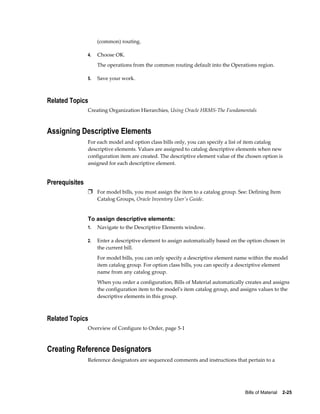
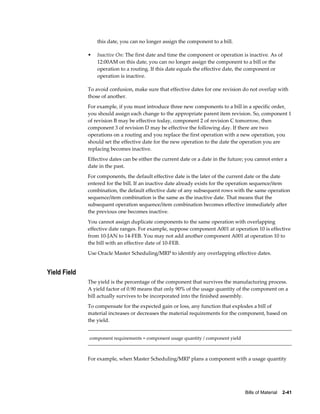
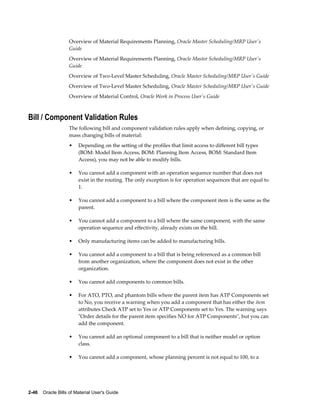
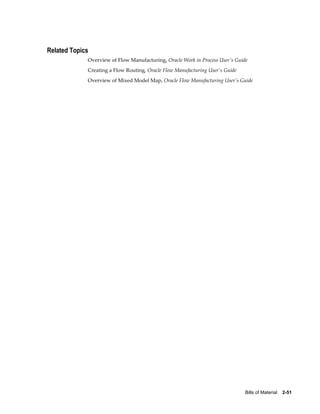
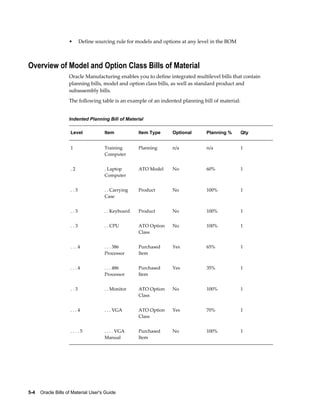
Extended Quantity Field
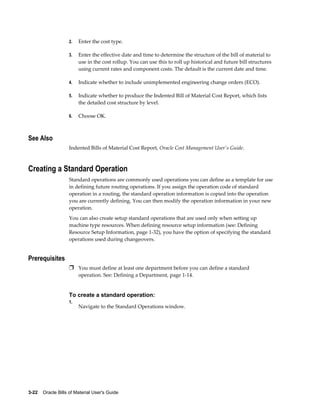
The extended quantity of the component used in the parent item is calculated as
follows:
((explosion quantity of parent item x component usage quantity) / component yield) / (1 -
shrinkage rate for parent)
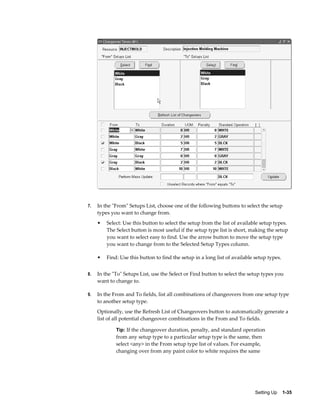
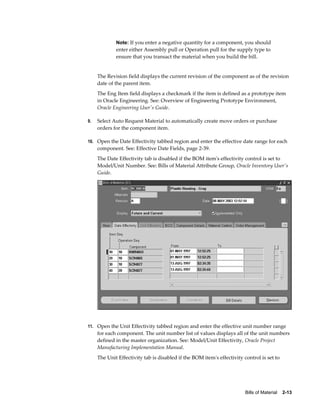
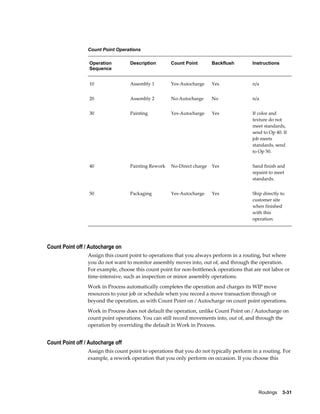
Supply Subinventory and Locator Fields
Work in Process pulls components from the supply subinventory and the locator within
the subinventory during backflushing.
Assign a supply subinventory and locator, if applicable, to components that have a
supply type of Assembly pull or Operation pull. You must specify a supply locator if
you have mandatory locator control for the supply subinventory. The system validates
any item subinventory and locator restrictions you defined during your Oracle
Inventory setup.
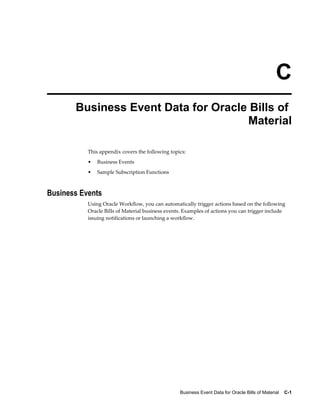
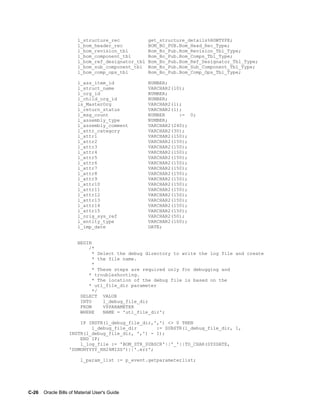
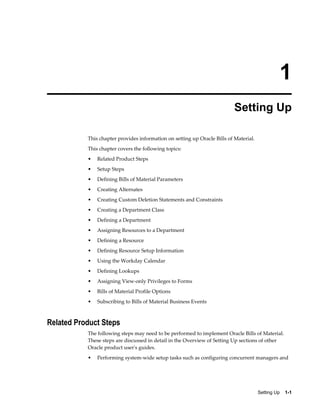
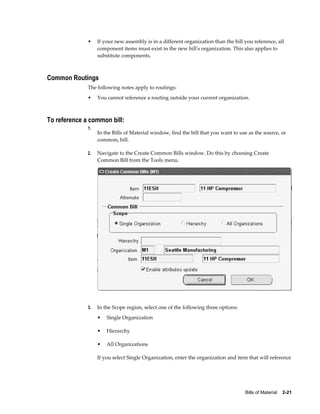
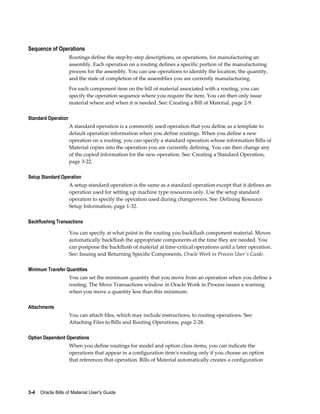
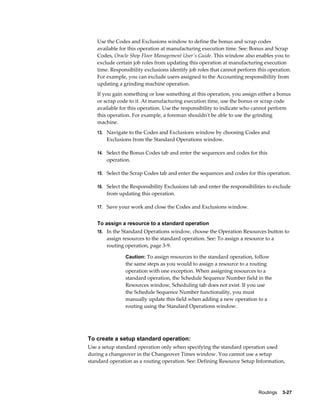
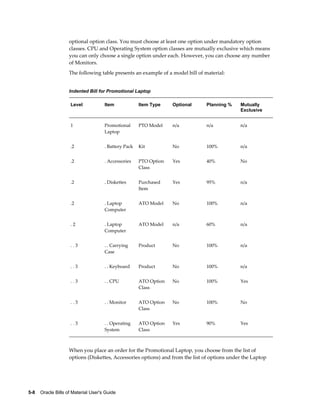
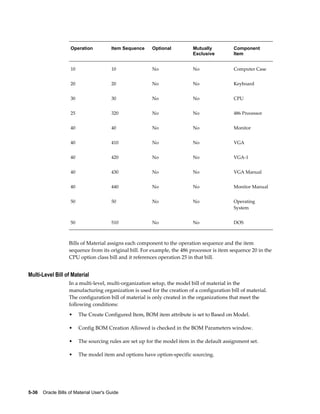
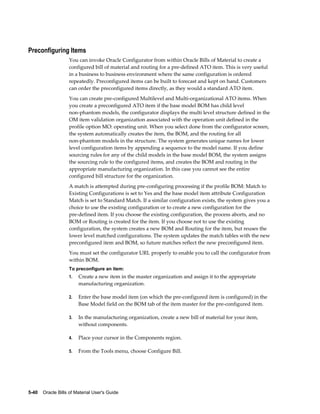
Mutually Exclusive and Optional Fields
The following pertains to options for model and option class bills. All components are
mandatory on standard and planning bills. Model and option class bills can have both
mandatory and optional components.
The Optional field indicates whether the component is mandatory or optional. The
Mutually Exclusive field applies only to option class bills and indicates whether you
can choose one or many options within an option class.
Oracle Order Management uses the Mutually Exclusive check box in combination with
the Optional check box to determine the number of option items you can or must
choose to order the components of the option class bill. Refer to the table below for
details on how the Optional check box and the Mutually Exclusive check box work
together.
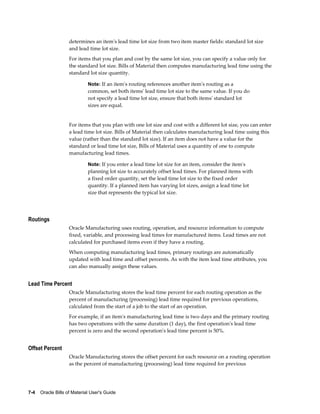
Description [ ] Mutually Exclusive
(default)
[X] Mutually Exclusive
[X] Optional Choose any number or no
options on the option class
bill
Choose one or no options on
the option class bill
[ ] Optional (default) Choose at least one option on
the option class bill
Choose one, and only one,
option on the option class bill](https://image.slidesharecdn.com/121bomug-160624063500/85/BOM-WIP-111-320.jpg)

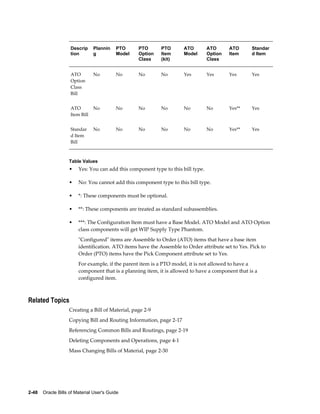

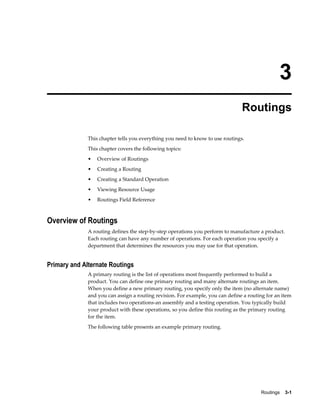


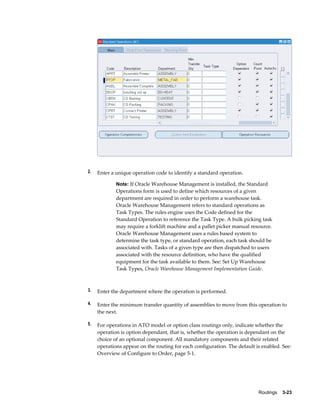


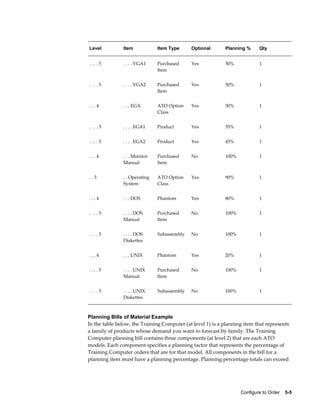


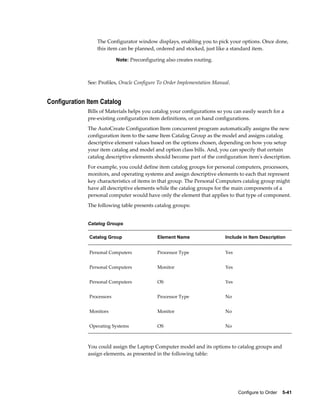


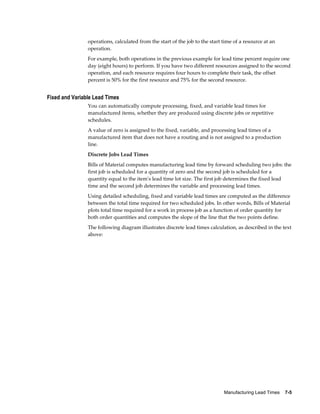
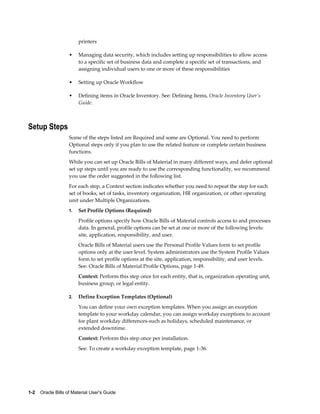
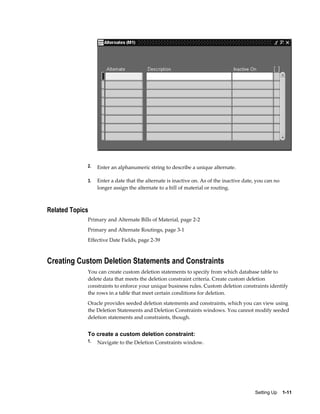
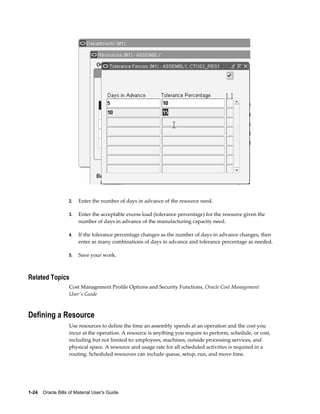
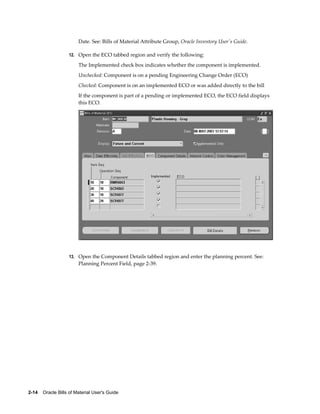
![7-8 Oracle Bills of Material User's Guide
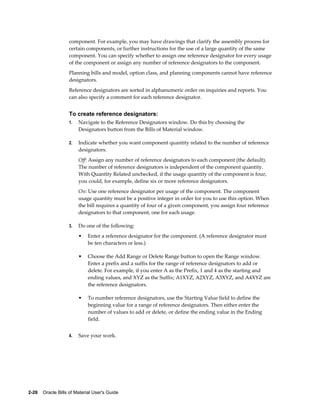
completion date (of one item) - system date
Schedule a job for the lead time lot size beginning on the system date and compute
variable lead time (rate) as follows:
[(completion date (of all items) - system date) - fixed lead time] / lead time lot size
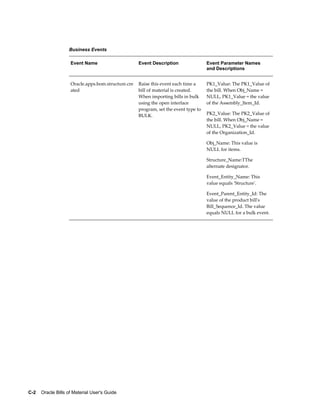
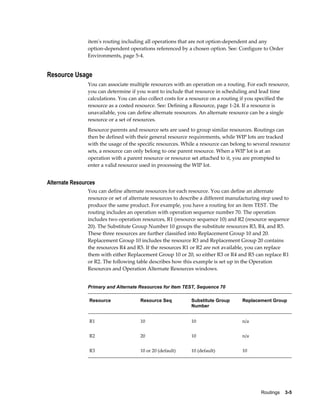
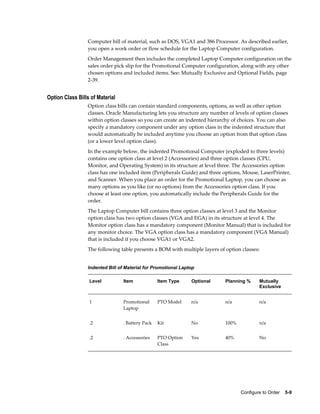
Repetitive Schedule Lead Times
A lead time lot size of 1 is always used to compute lead times for items produced on
routing-based schedules.
The following terms apply to repetitive schedules:
• Day: A day is equal to the number of hours the production line is active. If the line is
active from 8:00 to 16:00, the day is 8 hours long.
• Production Rate (Line Speed): The number of assemblies built per line, per hour.
• Line Fixed Lead Time: The fixed lead time of the production line, that is, the amount
of time for one assembly to travel down a production line.
• Production Interval: The time between two assemblies on a production line. If the
production rate (line speed) is 10 assemblies per hour, then the production interval
is .1 hours or once every .0125 days, or 1/(10*8), for a line that runs 8 hours per day.
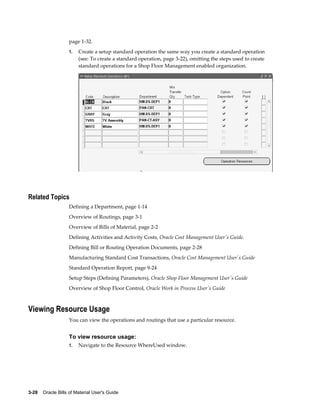
1 / (production rate * day)
The Calculate Manufacturing Lead Times program calls the scheduler twice, first using
a quantity of 1, then using a quantity of 0. For each case, the scheduling lead time
(expressed in days) is returned. This is the total time taken to build the assemblies. The
program then converts the two values into the fixed lead time and the variable lead
time item attributes, respectively.
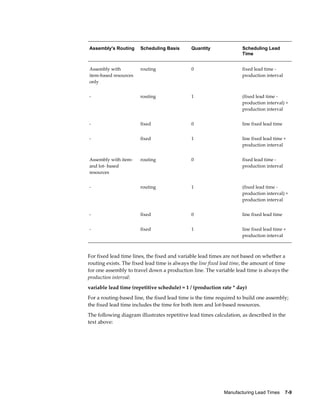
The following table illustrates how scheduling lead times are calculated:
Assembly's Routing Scheduling Basis Quantity Scheduling Lead
Time
No routing routing 0 0
No routing routing 1 production interval
No routing fixed 0 line fixed lead time
No routing fixed 1 line fixed lead time +
production interval](https://image.slidesharecdn.com/121bomug-160624063500/85/BOM-WIP-224-320.jpg)

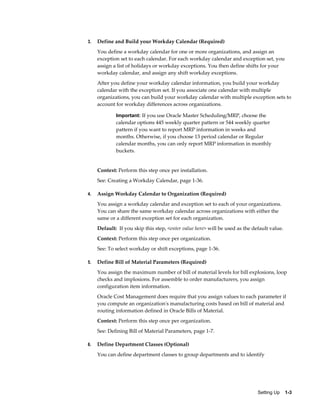
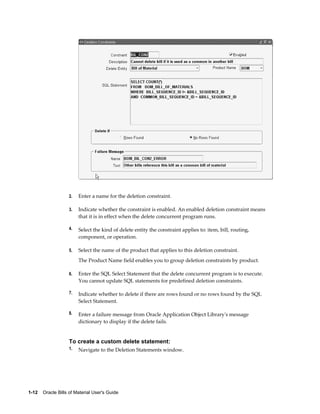
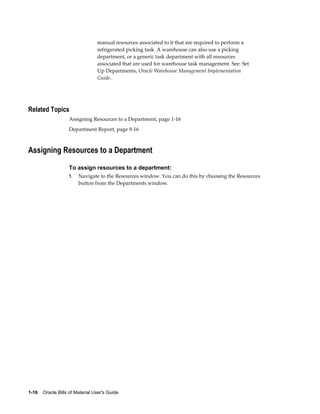
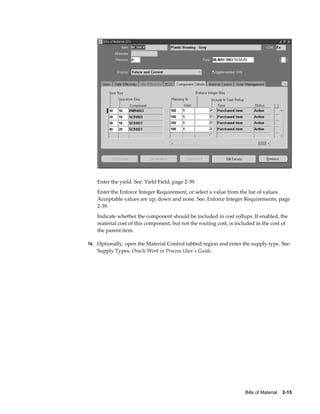
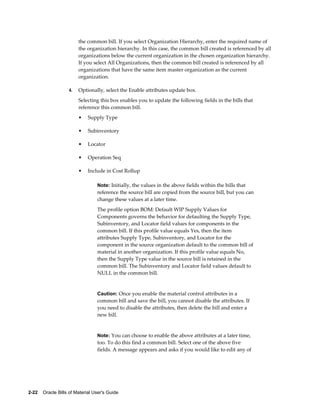
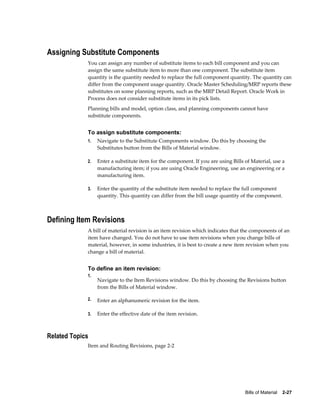
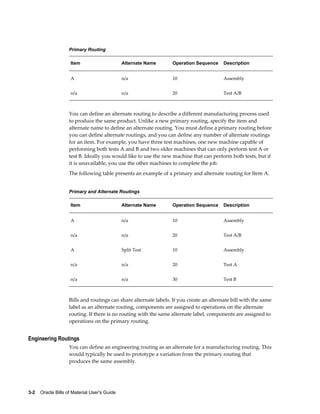
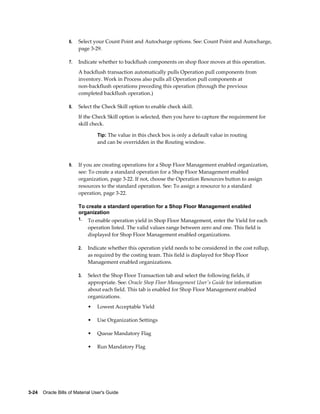
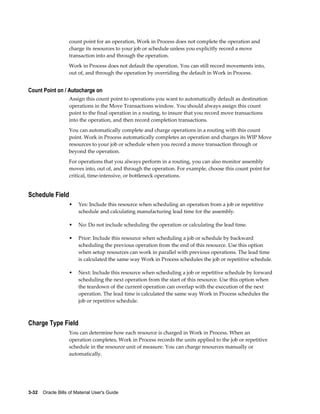
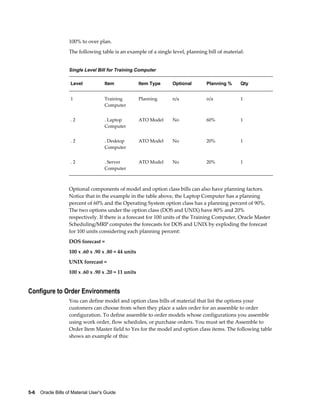
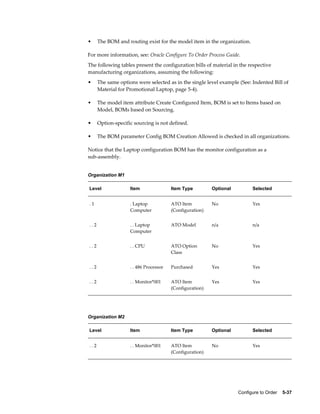
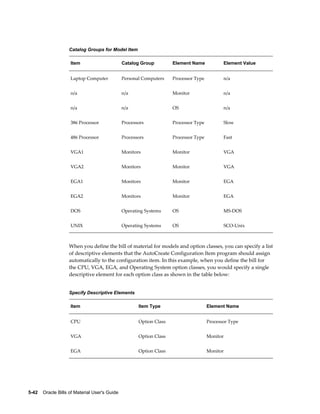
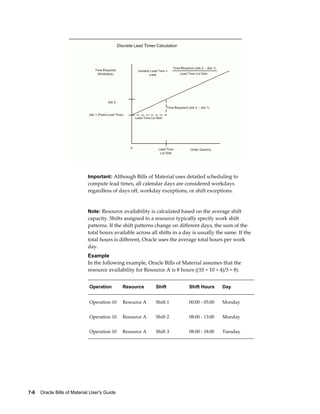
![Manufacturing Lead Times 7-11
Variable lead time = [(completion date - system date) (rate) - fixed
lead time] / lead time lot size
Variable lead time = [(13-JAN - 01-JAN) - 10] / 10
Variable lead time = [13 - 10] / 10
Variable lead time = 0.3 days/unit
Processing lead time = completion date - system date
Processing lead time = 13-JAN - 01-JAN
Processing lead time = 13 days
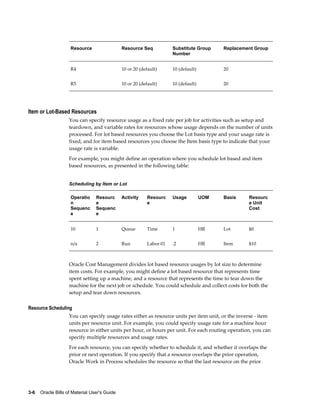
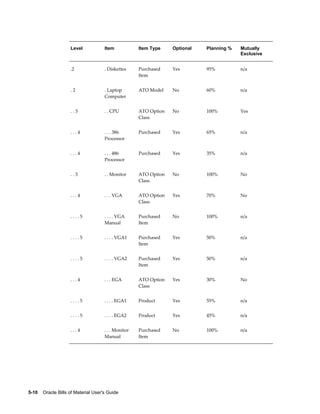
Offset Computations
The corresponding operation lead time percent for operations in the primary routing is
updated automatically.
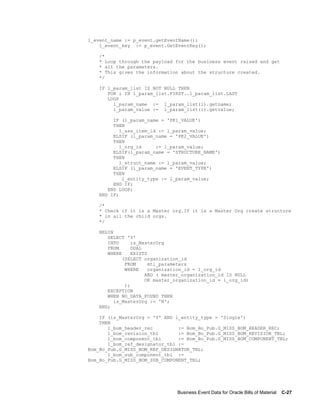
For example, if the routing operations for item A had the following start dates (on a job
for 10 assemblies), Bills of Material would compute and update the following operation
lead time percentages, as shown in the table below:
Operation Lead Time Percent
Op Seq Start Date
and Time
End Date
and Time
Time
Required
Previous Op
Time
Required
Lead Time
Percent
10 01-JAN -
00:00
02-JAN -
24:00
2 0 0/10 = 0%
20 03-JAN -
00:00
04-JAN -
24:00
2 2 2/10 = 20%
30 05-JAN -
00:00
09-JAN -
24:00
4 4 4/10 = 40%
40 09-JAN -
00:00
10-JAN -
24:00
2 8 8/10= 80%](https://image.slidesharecdn.com/121bomug-160624063500/85/BOM-WIP-227-320.jpg)
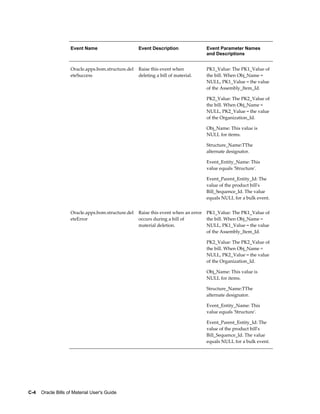
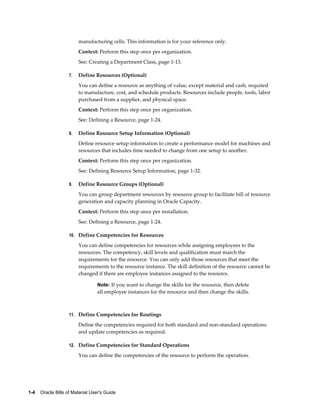
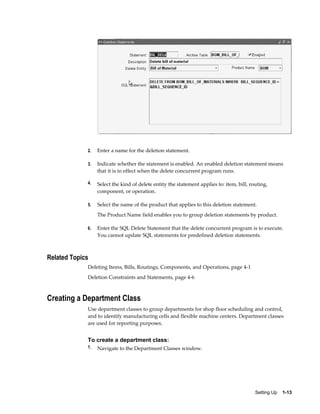
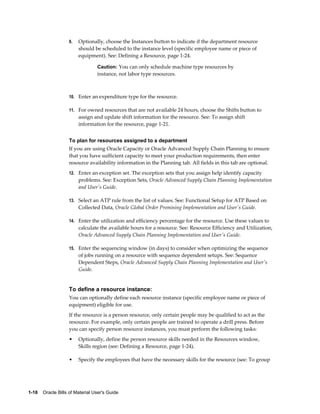
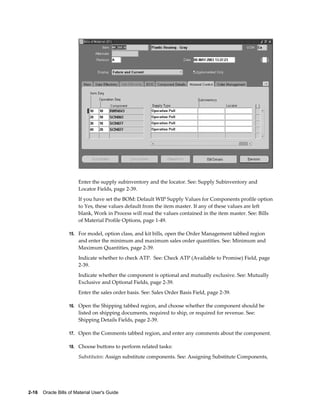
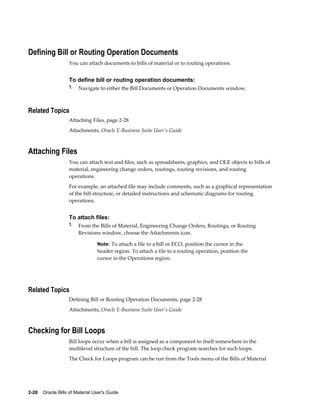
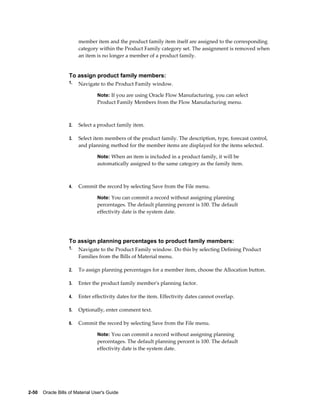
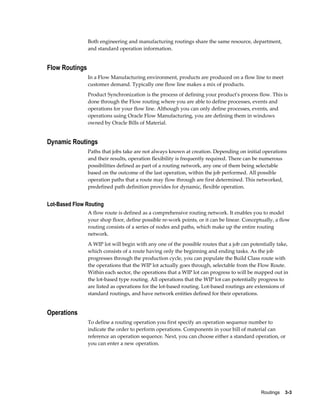
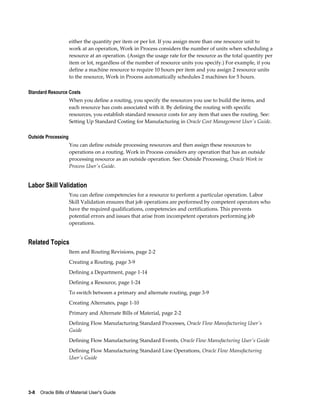
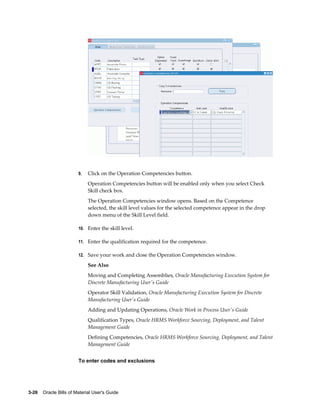
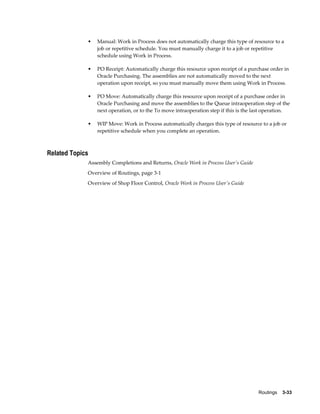
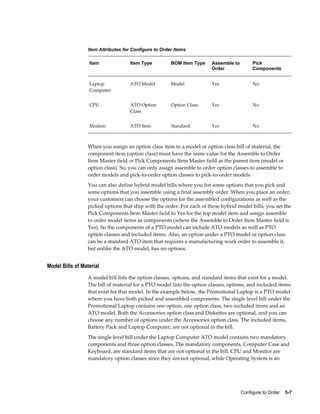
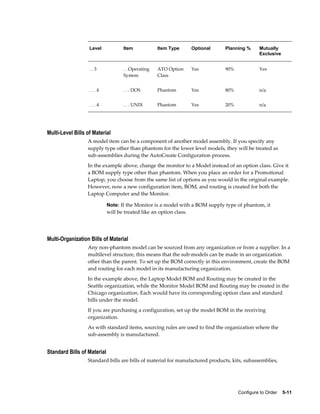
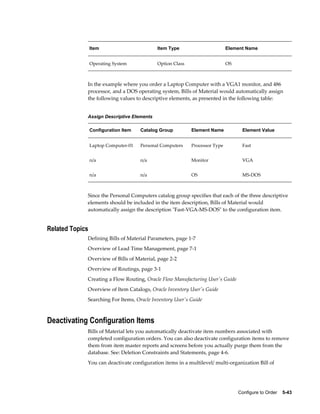
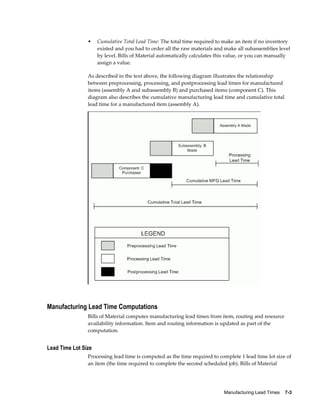
![Manufacturing Lead Times 7-13
manufacturing lead time for item + Maximum [(cumulative manufacturing lead time
- offset days) for any component]
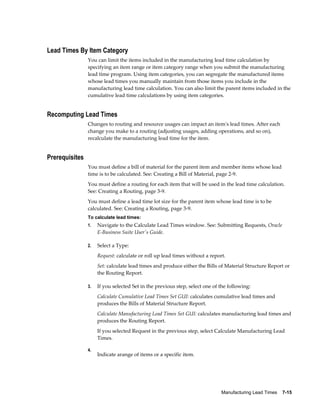
Cumulative Total Lead Time
Bills of Material sets an item's cumulative total lead time to its own total lead time plus
the maximum value of cumulative total lead time less operation offset for any
component. Operation offset for a component is the lead time percent for the operation
where the component is used times the item's manufacturing lead time (based on one
lead time lot size).
Bills of Material calculates cumulative total lead time using the following equation:
total lead time for item + Maximum [(cumulative total lead time - offset days) for any
component]
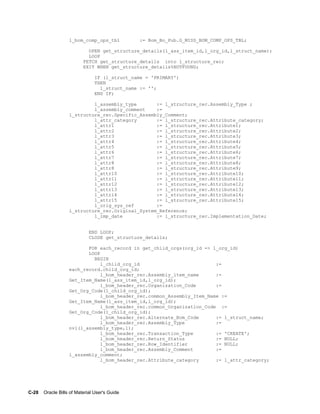
For example, suppose Item A is made up of B, C, and D. B, C, and D are used at
operations 20, 30, and 40 respectively and the manufacturing (processing) lead time for
A (for the lead time lot size) equals 10. The following table illustrates the component,
offset days, and lead time percent for each component:
Cumulative Manufacturing Lead Time
Component Cum. Mfg.
Lead Time.
Op Seq. Lead Time
Percent
Offset Days Cum Mfg.
Lead Time -
Offset Days
B 15 20 20 2 13
C 20 30 40 4 16
D 22 40 80 8 14
Bills of Material calculates cumulative manufacturing lead time as follows:
manufacturing lead time for A + Maximum [(cumulative manufacturing lead time -
offset days)for component B, C, or D]
Cumulative manufacturing lead time = 10 + 16 = 26 days
The following table illustrates the cumulative total lead times assigned to components
B, C, and D:](https://image.slidesharecdn.com/121bomug-160624063500/85/BOM-WIP-229-320.jpg)
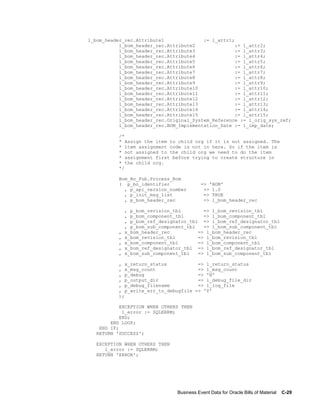
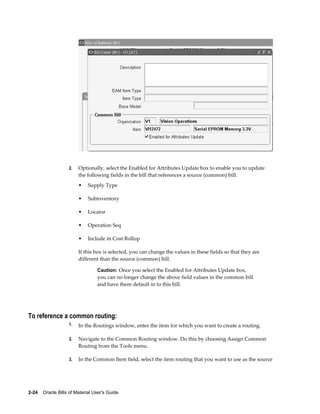
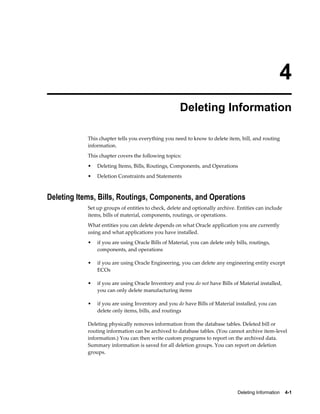
![7-14 Oracle Bills of Material User's Guide
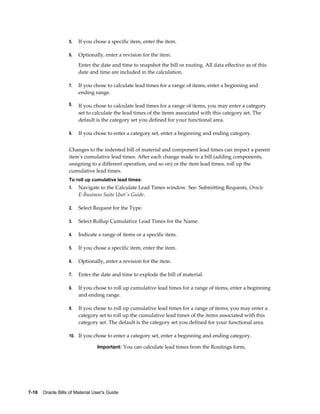
Cumulative Total Lead Time
Component Cum. Total
Lead Time.
Op Seq. Lead Time
Percent
Offset Days Cum Total
Lead Time -
Offset Days
B 19 20 20 2 17
C 20 30 40 4 16
D 23 40 80 8 15
Bills of Material calculates cumulative total lead time for A as follows:
total lead time for A + Maximum [(cumulative total lead time - offset days) for
component B, C, or D]
Cumulative total lead time = 10 + 17 = 27 days
Related Topics
Creating a Routing, page 3-9
Calculating Lead Times, page 7-14
Overview of Work in Process Scheduling, Oracle Work in Process User's Guide
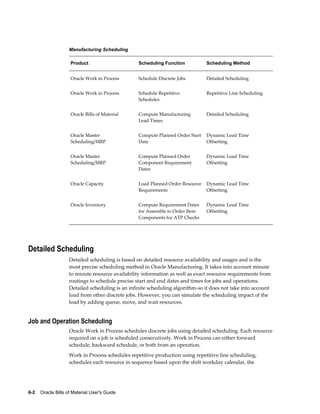
Overview of Manufacturing Scheduling, page 6-1
Overview of Material Requirements Planning, Oracle Master Scheduling/MRP User's
Guide
Defining Items, Oracle Inventory User's Guide
Calculating Lead Times
You can calculate manufacturing lead times for one item, a range of items, or a category
of items. The calculation updates the lead time attributes of all manufacturing items that
you include, regardless of whether you manually maintain an item's lead times.
Note: Leadtime for items with network routings is calculated using
only resources on the primary path. For more information about
network routings, see: Creating a Routing Network, Oracle Flow
Manufacturing User's Guide and Creating a Network Routing, Oracle
Shopfloor Management User's Guide.](https://image.slidesharecdn.com/121bomug-160624063500/85/BOM-WIP-230-320.jpg)


![Oracle Bills of Material Windows and Navigator Paths A-1
A
Oracle Bills of Material Windows and
Navigator Paths
This appendix shows you the default navigator path for each Oracle Bills of Material
window. Refer to this appendix when you do not already know the navigator path for a
window you want to use.
This appendix covers the following topics:
• Bills of Material Windows and Navigator Paths
Bills of Material Windows and Navigator Paths
Although your system administrator may have customized your navigator, typical
navigational paths are presented in the following table:
Note: Text in brackets ([ ]) indicates a button. [M] indicates a menu selection.
Bill of Material Responsibility
Window Name Navigation Path
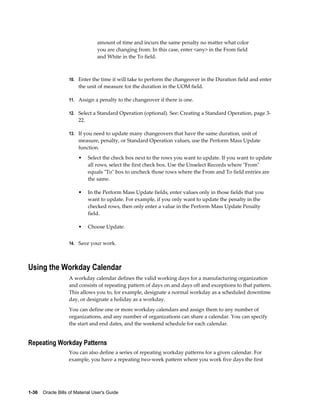
Add Range, page 2-25 Bills > Bills > [Designators] > [Add Range]
Alternates, page 1-10 Setup > Alternates
Bill Components Comparison, page 2-36 Bills > Comparison
Bill Details, page 2-19 Bills > Bills > [Bill Details]
Bill Documents, page 2-28 Bills > Documents](https://image.slidesharecdn.com/121bomug-160624063500/85/BOM-WIP-265-320.jpg)
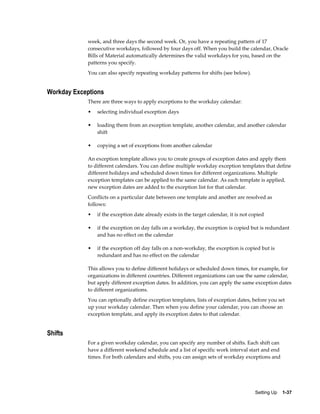
![A-2 Oracle Bills of Material User's Guide
Window Name Navigation Path
Bills of Material, page 2-9 Bills > Bills
Calculate Lead Times, page 7-14 Routings > Lead Times
Calendar Dates, page 1-36 Setup > Calendars > [Dates] or Setup >
Calendars > [Shifts] > [Dates]
Change Types, Oracle Engineering User's Guide Setup > Change Types
Changeover Times, page 1-32 Routings > Resources [Setups] >
[Changeovers]
Component Changes, page 2-30 Bills > Mass Changes > [Changes]
Delete Range, page 2-25 Bills > Bills > [Designators] > [Delete Range]
Deletion Constraints, page 1-11 Setup > Delete Constraints
Deletion Groups, page 4-1 Delete Groups
Deletion Statements, page 1-11 Setup > Delete Statements
Department Classes, page 1-13 Setup > Department Classes
Departments, page 1-14 Routings > Departments
Descriptive Elements, page 2-25 Bills > Bills > [M] Bills > Elements
Employees, page 1-24 Routings > Resources [Employees]
Exceptions, page 1-36 Setup > Calendars > [Dates] > [Exceptions]
Exception Templates, page 1-36 Setup > Exception Templates
Import Bills and Routings, page 1-36 Bills > Import or Routings > Import
Indented Bill of Material, page 2-34 Bills > Indented Bills
Instances, page 1-18 Routings > Departments [Resources] >
[Instances]](https://image.slidesharecdn.com/121bomug-160624063500/85/BOM-WIP-266-320.jpg)
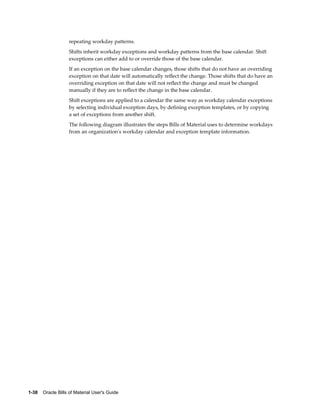
![Oracle Bills of Material Windows and Navigator Paths A-3
Window Name Navigation Path
Item Revisions, page 2-27 Bills > Bills > [Revision]
Item Where Used, page 2-38 Bills > Item WhereUsed
Locations (See: Setting Up Locations, Oracle
Human Resources Management Systems
Enterprise and Workforce Management Guide
(US))
Setup > Locations
Mass Change Bills, page 2-30 Bills > Mass Changes
Operation Competencies
Creating a Routing, page 3-9
Creating a Standard Operation, page 3-22
Routings > Routings > Operation
Competencies
Routings > Standard Operations > Operation
Competencies
Operation Resources, page 1-24 Routings > Resources
Parameters, page 1-7 Setup > Parameters
Product Families, page 2-49 Flow Manufacturing: Products and Parts >
Product Family Members
Reference Designators, page 2-25 Bills > Bills > [Designators]
Resource Capacity Change Reasons , page 1-
31
Setup > Resource Capacity Change Reasons
Resource Groups (See: Resource Groups,
Oracle Capacity User's Guide)
Setup > Resource Groups
Resources To define a resource, page 1-24: Routings >
Resources
To assign resources to a department, page 1-16
: Routings > Departments [Resources]
Resource WhereUsed, page 3-28 Routings > Resource WhereUsed
Responsibilities, page 1-47 System Administrator: Security >
Responsibility](https://image.slidesharecdn.com/121bomug-160624063500/85/BOM-WIP-267-320.jpg)
![A-4 Oracle Bills of Material User's Guide
Window Name Navigation Path
Routing Details, page 3-9 Routings > Routings > [Routing Details]
Routing Documents, page 2-28 Routings > Documents
Routing Revisions, page 3-9 Routings > Routings > [Routing Revisions]
Routings, page 3-9 Routings > Routings
Run Assemble to Order Processes, page 5-24 Routings > ATO
Setup Types, page 1-32 Routings > Setup Types
or
Setup > Setup Type
Setups, page 1-32 Routings > Resources > [Setups]
Simulation Sets (See: Creating Simulation Sets,
Oracle Capacity User's Guide)
Setup > Simulation Sets
Shifts, page 1-36 Setup > Calendars > [Shifts]
Shift Times, page 1-36 Setup > Calendars > [Shifts] > [Times]
Standard Operations, page 3-22 Routings > Standard Operations
Substitute Components, page 2-27 Bills > Bills > [Substitutes]
Workday Calendar, page 1-36 Setup > Calendars
Workday Patterns, page 1-36 Setup > Calendars > [Workday Pattern]](https://image.slidesharecdn.com/121bomug-160624063500/85/BOM-WIP-268-320.jpg)
![B-2 Oracle Bills of Material User's Guide
Related Topics
Rolling Up Cumulative Lead Times, page 7-14
Checking for Bill Loops, page 2-28
Copying Bill and Routing Information, page 2-17
Referencing Common Bills and Routings, page 2-19
Rolling Up Assembly Costs, Oracle Cost Management User's Guide
Transferring or Copying Engineering Items, Bills, and Routings, Oracle Engineering
User's Guide
Oracle Bills Of Material Character Mode Forms and Corresponding GUI
Windows
The following table matches character mode forms with their corresponding GUI
windows or processes. This information supplements Windows and Navigator Paths in
the product online documentation. Text in brackets ([ ]) indicates a button.
The GUI Navigator paths are based on the BOM Supervisor responsibility.
The following table presents more information on any window; navigate to the window
and choose the help icon.
Character Mode Form and Menu Path GUI Window or Process, and Navigation
Path
Assemble to Order Reports and Processes
Navigate ATO
Run Assemble to Order Processes
Navigator: Routings > ATO
Assign Descriptive Security Rules
Navigate Setup Flexfields Descriptive
Security Define
Assign Security Rules
Navigator: Setup > Flexfields > Descriptive >
Security > Assign
Assign Key Flexfield Security Rules
Navigate Setup Flexfields Key Security
Assign
Assign Security Rules
Navigator: Setup > Flexfields
Assign Security Rules
Navigate Setup Flexfields Key Security
Assign
Assign Security Rules
Navigator: Setup > Flexfields > Key > Security
> Assign](https://image.slidesharecdn.com/121bomug-160624063500/85/BOM-WIP-270-320.jpg)
![Oracle Bills of Material Tools Menu B-3
Character Mode Form and Menu Path GUI Window or Process, and Navigation
Path
Bill of Material Comparison Report
Navigate Report Bill Compare
Bill Components Comparison
Navigator: Bills > Comparison
Bill of Material Loop Report
Navigate Report Bill LoopCheck
Bill of Material Reports
Navigator: Reports > Bills
Bill of Material Structure Report
Navigate Report Bill Structure
Bill of Material Reports
Navigator: Reports > Bills
Bills of Material Setup Reports
Navigate Report Setup Bills of Material
BOM Setup Reports
Navigator: Reports > Setup
Calculate Lead Times
Navigate Leadtimes
Calculate Lead Times
Navigator: Routings > Lead Times
Change Organization
Navigate Other ChangeOrg
Change Organization
Navigator: Other > Change Organization
Define Alternates
Navigate Setup BOM Alternates
Alternates
Navigator: Setup > Alternates
Define Bill of Material
Navigate Bill Define
Delete Range
Navigator: Bills > Bills > [Designators] >
[Delete Range]
or
Add Range
Navigator: Bills > Bills > [Designators] > [Add
Range]
Define Bills of Material Parameters
Navigate Setup BOM Parameters
Parameters
Navigator: Setup > Parameters
Define Change Order types
Navigate Setup BOM Types
Change Types
Navigator: Setup > Change Types](https://image.slidesharecdn.com/121bomug-160624063500/85/BOM-WIP-271-320.jpg)

![Oracle Bills of Material Tools Menu B-5
Character Mode Form and Menu Path GUI Window or Process, and Navigation
Path
Define Routing
Navigate Routing Define
Routing Details
Navigator: Routings > Routings > [Routing
Details]
or
Routing Revisions
Navigator: Routings > Routings > [Routing
Revisions]
or
Routings
Navigator: Routings > Routings
Define Security Rule
Navigate Setup Flexfields Validation
Security Define
Define Security Rules
Navigator: Setup > Flexfields > Validation >
Security > Define
Define Segment Values
Navigate Setup Flexfields Validation Values
Segment Values
Navigator: Setup > Flexfields > Validation >
Values
Define Shorthand Aliases
Navigate Setup Flexfields Key Aliases
Shorthand Aliases
Navigator: Setup > Flexfields > Key > Aliases
Define Simulation Sets
Navigate Setup Organization SimulationSets
Simulation Sets
Navigator: Setup > Simulation Sets
Define Standard Comments
Navigate Setup BOM Comments
Bill Documents
Navigator: Bills > Documents
Define Standard Instructions
Navigate Setup BOM Instructions
Operation Documents
Navigator: Routing > Documents
Define Standard Operation
Navigate Routing Define
Standard Operations
Navigator: Routings > Standard Operations](https://image.slidesharecdn.com/121bomug-160624063500/85/BOM-WIP-273-320.jpg)
![B-6 Oracle Bills of Material User's Guide
Character Mode Form and Menu Path GUI Window or Process, and Navigation
Path
Define Value Set
Navigate Setup Flexfields Validation Sets
Value Sets
Navigator: Setup > Flexfields > Validation >
Sets
Define Workday Calendar
Navigate Setup Calendar Define
Calendar Dates
Navigator: Setup > Calendars > [Dates]
or
Navigator: Setup > Calendars > [Shifts] >
[Dates]
or
Shifts
Navigator: Setup > Calendars > [Shifts]
or
Shift Times
Navigator: Setup > Calendars > [Shifts] >
[Times]
or
Workday Calendar
Navigator: Setup > Calendars
or
Workday Patterns
Navigator: Setup > Calendars > [Workday
Pattern]
or
Exceptions
Navigator: Setup > Calendars > [Dates] >
[Exceptions]
Define Workday Exception Sets
Navigate Setup Calendar ExceptionSets
Exception Templates
Navigator: Setup > Exception Templates](https://image.slidesharecdn.com/121bomug-160624063500/85/BOM-WIP-274-320.jpg)
![Oracle Bills of Material Tools Menu B-7
Character Mode Form and Menu Path GUI Window or Process, and Navigation
Path
Delete Item Information
Navigate Delete
Deletion Groups
Navigator: Delete Groups
or
Navigator: Routings > Delete Groups
Delete Items Report
Navigate Report Setup Item
Delete History Report
Navigator: Reports > Delete Groups
Indented Bill of Material Cost Report
Navigate Report Setup Cost Indented
Use the Cost Management responsibility and
See: Oracle Cost Management User's Guide or
online documentation.
Item Cost Information Report
Navigate Report Setup Item Cost CostItem
Use the Cost Management responsibility and
See: Oracle Cost Management User's Guide or
online documentation.
Item Usage Report
Navigate Report WhereUsed
Item WhereUsed Report
Navigator: Reports > Bills
Manufacturing Setup Reports
Navigate Report Setup Organization
BOM Setup Reports
Navigator: Reports > Setup
Mass Change Bills of Material
Navigate Bill MassChange
Mass Change Bills
Navigator: Bills > Mass Changes
Mass Change Bills of Material
Navigate Bill MassChange
Component Changes
Navigator: Bills > Mass Changes > Changes >
[Changes]
Resource Usage Report
Navigate Report WhereUsed
Resource Usage Report
Navigator: Reports > Routings
Routing Reports
Navigate Report Routing
Routing Reports
Navigator: Reports > Routings](https://image.slidesharecdn.com/121bomug-160624063500/85/BOM-WIP-275-320.jpg)
![B-8 Oracle Bills of Material User's Guide
Character Mode Form and Menu Path GUI Window or Process, and Navigation
Path
Run Reports
Navigate Report Routing
GUI Obsolete
Substitute Components
Navigate Bill Define
Substitute Components
Navigator: Bills > Bills > [Substitutes]
Update Personal Profile Options
Navigate Other Profile
Personal Profile Values
Navigator: Setup > Profiles
View Bill of Material Comparison
Navigate Inquiry Bill Compare
Bill Components Comparison
Navigator: Bills > Comparison
View Bill of Material Details
Navigate Inquiry Bill Detail
Bill Details
Navigator: Bills > Bills > [Bill Details]
View Concurrent Requests
Navigate Other Requests
GUI Obsolete
View Delete History
Navigate Inquiry DeleteHistory
Deletion Groups
Navigator: Routings > Delete Groups
View Department
Navigate Inquiry Organization Department
Departments
Navigator: Routings > Departments
View Indented Bill of Material
Navigate Inquiry Bill Indented
Indented Bills of Material
Navigator: Bills > Indented Bills
View Item Cost Information
Navigate Inquiry Item Cost
Use the Cost Management responsibility and
See: Oracle Cost Management User's Guide or
online help
View Item Revisions
Navigate Inquiry Item Revision
Item Revisions
Navigator: Bills > Bills > [Revision]](https://image.slidesharecdn.com/121bomug-160624063500/85/BOM-WIP-276-320.jpg)
![Oracle Bills of Material Tools Menu B-9
Character Mode Form and Menu Path GUI Window or Process, and Navigation
Path
View Item Usage
Navigate Inquiry WhereUsed Item
Item WhereUsed
Navigator: Bills > Item WhereUsed
View Resource Usage
Navigate Inquiry WhereUsed Resource
Resource WhereUsed
Navigator: Routings > Resource WhereUsed
View Routing Details
Navigate Inquiry Routing
Routing Details
Navigator: Routings > Routings > [Routing
Details]](https://image.slidesharecdn.com/121bomug-160624063500/85/BOM-WIP-277-320.jpg)