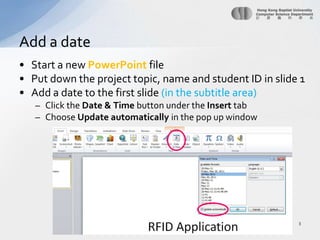
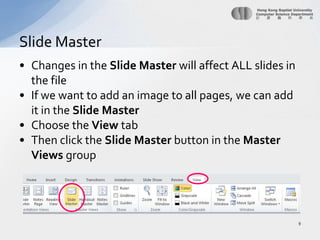
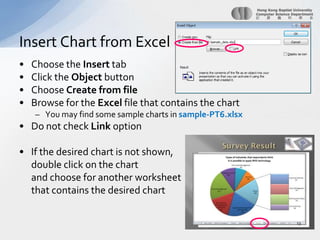
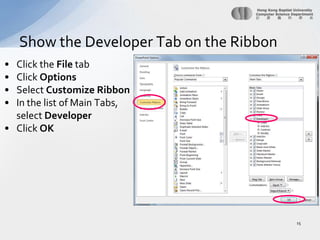
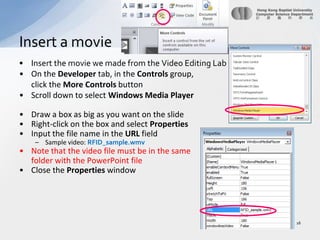
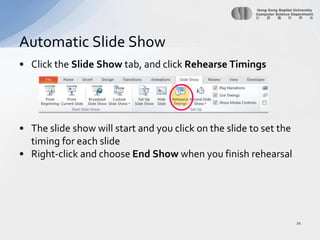
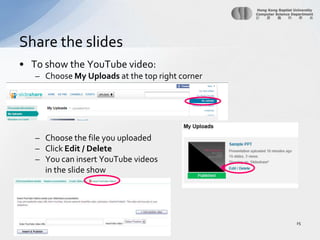
IT1710IT Innovations Shaping Our WorldProject-based Tutorial 8 Presentation Tool MS PowerPoint 2010
Try out MS PowerPoint 2010 to create a draft presentation for your projectShare your ppt on slideshare.netToday’s tasks2
Start a newPowerPoint filePut down the project topic, name and student ID in slide 1Add a date to the first slide (in the subtitle area)Click the Date & Time buttonunder the Insert tabChoose Update automatically in the pop up windowAdd a date3
Use the New Slide button under the Home tab to create new slidesYou can also use the Layout button to change	the layout of the slideCreate a new slide4
Use SmartArtto create a flow chart to introduce the content of the presentationClick the SmartArtbuttonunder the Insert tabUse the Continuous Block Process layout in the Process groupSmartArt5
Fill in the appropriate content text into the SmartArt box as followYou can press Enter to add more bulletsSmartArt6
You may copy the sample PowerPoint slides from PT8_source_ppt.pptxand paste them to your PowerPoint fileSample contents7
Change the Slide Design and Color Scheme under the Design tabSlide Design8Select a designChange the color scheme
Changes in the Slide Master will affect ALL slides in the fileIf we want to add an image to all pages, we can add it in the Slide MasterChoose the View tabThen click the Slide Master button in the Master Views groupSlide Master9
Insert a picture10Choose the Insert tabClick the Picture buttonChoose a pictureMove the picture to where you wantYou may dim the picture by right-clicking on the picture and choose Format Picture.Select Picture Color group, and choose Washout effect under Recolor You may also adjust the brightness and contrast if you want.Close the Master View under the Slide Master group
Add another SmartArt object to slide 6Use the layout Horizontal Bullet List under List groupThe data can be found from the file PT8_source_table.docxComplete the sample slides contents11
Copy the tables from the file PT8_source_table.docx and paste them to slides 7 and 8 You can change the Table Styles under the Design tabComplete the sample slides contents12Change the Table Styles
Choose the Insert tabClick the Object buttonChoose Create from fileBrowse for the Excel file that contains the chartYou may find some sample charts in sample-PT6.xlsxDo not check Link optionIf the desired chart is not shown,	double click on the chart 	and choose for another worksheet	that contains the desired chartInsert Chart from Excel13
Embed a YouTubeVideo ClipOpen the video link http://www.youtube.com/watch?v=eob532iEpqkClick the SharebuttonThen click the Embed buttonCheck the boxes for Enable privacy-enhanced mode and Use old embed codeCopy the codeThen, go to the slideChoose the Insert tabClick the Video button and choose Video from Web SitePaste the code into the box  of the pop-up window and then click Insert
Click the FiletabClick OptionsSelect Customize RibbonIn the list of Main Tabs, select DeveloperClick OKShow the Developer Tab on the Ribbon15
Insert the movie we made from the Video Editing LabOn the Developer tab, in the Controls group, click the More Controls buttonScroll down to select Windows Media PlayerDraw a box as big as you want on the slideRight-click on the box and select PropertiesInput the file name in the URL fieldSample video: RFID_sample.wmvNote that the video file must be in the same 	folder with the PowerPoint fileClose the Properties windowInsert a movie 16
Apply transition effect to all slides under the Transitions tabTransition Effects17Change the speedSelect a transition effectApply the effect to all slides
Select any objects which you want to add animationClick the Add Animation button under the Animationstab, and choose the effect from the list, you can preview the effect as wellClick the Animation Pane button in the AdvancedAnimations groupThe Animationpane will be shownAdjust the timing, direction and speed by     right-clicking the object on the paneAdd Animation18
We would like to create an automatic slide show that the PowerPoint slides can be run automaticallyYou can also insert sound tracks to every slides for the automatic slide show Choose the Insert tabClick the Audio button and choose Audio from FileGo to slide 1Select the sound fileSample file: s1.mp3Repeat the steps to insert audio track for other slides by choosing corresponding mp3 files Insert audio tracks to the slide19
Move the sound icon to the bottom right cornerClick the icon and click the Playback tabunder Audio ToolsCheck the Hide During Show box to hide the icon when the slide show runsChoose Play across slides in the Start optionMove the sound object to the top in the      Animation PaneInsert audio tracks to the slide20
Click the Slide Show tab, and click Rehearse TimingsThe slide show will start and you click on the slide to set the timing for each slideRight-click and choose End Show when you finish rehearsalAutomatic Slide Show21
Click the File tabChoose Save As andSave your file as xxxxxxxx-PT8.pptxSave your file22
We may use website http://www.slideshare.netto share our PowerPoint slides Click the Upload buttonThen click Create one to register for a free accountClick the Upload button againAnd choose UPLOAD publiclyUpload the .pptxfileShare the slides23
After finishing upload and conversion, your slides will be publishedYou can share it on Facebook, by email or embed it to your webpageHowever, the sound and video embedded in the PowerPoint cannot be played as these functions are not supported Share the slides & Submission24Right-click on this link, choose Copy Link Locationand paste the link to BU eLearning
To show the YouTube video:Choose My Uploads at the top right cornerChoose the file you uploadedClick Edit / DeleteYou can insert YouTube videosin the slide showShare the slides25
We can use PowerPoint to make a photo slide show easilyClick the Insert tabClick the Photo Album buttonClick File/Disk… to select photosSelect Theme for the photo albumYou can make some changes to the photos 	(e.g. Rotation, brightness, contrast)Supplementary - Photo Album 26
Add a dateCreate a new slideSmartArtSlide DesignSlide MasterInsert a pictureInsert Chart from ExcelEmbed a YouTube video clipInsert a movieTransition EffectsCustom AnimationInsert sound tracks to the slideAutomatic Slide ShowShare the slides Summary27

11015101pt8

  • 1.
    IT1710IT Innovations ShapingOur WorldProject-based Tutorial 8 Presentation Tool MS PowerPoint 2010
  • 2.
    Try out MSPowerPoint 2010 to create a draft presentation for your projectShare your ppt on slideshare.netToday’s tasks2
  • 3.
    Start a newPowerPointfilePut down the project topic, name and student ID in slide 1Add a date to the first slide (in the subtitle area)Click the Date & Time buttonunder the Insert tabChoose Update automatically in the pop up windowAdd a date3
  • 4.
    Use the NewSlide button under the Home tab to create new slidesYou can also use the Layout button to change the layout of the slideCreate a new slide4
  • 5.
    Use SmartArtto createa flow chart to introduce the content of the presentationClick the SmartArtbuttonunder the Insert tabUse the Continuous Block Process layout in the Process groupSmartArt5
  • 6.
    Fill in theappropriate content text into the SmartArt box as followYou can press Enter to add more bulletsSmartArt6
  • 7.
    You may copythe sample PowerPoint slides from PT8_source_ppt.pptxand paste them to your PowerPoint fileSample contents7
  • 8.
    Change the SlideDesign and Color Scheme under the Design tabSlide Design8Select a designChange the color scheme
  • 9.
    Changes in theSlide Master will affect ALL slides in the fileIf we want to add an image to all pages, we can add it in the Slide MasterChoose the View tabThen click the Slide Master button in the Master Views groupSlide Master9
  • 10.
    Insert a picture10Choosethe Insert tabClick the Picture buttonChoose a pictureMove the picture to where you wantYou may dim the picture by right-clicking on the picture and choose Format Picture.Select Picture Color group, and choose Washout effect under Recolor You may also adjust the brightness and contrast if you want.Close the Master View under the Slide Master group
  • 11.
    Add another SmartArtobject to slide 6Use the layout Horizontal Bullet List under List groupThe data can be found from the file PT8_source_table.docxComplete the sample slides contents11
  • 12.
    Copy the tablesfrom the file PT8_source_table.docx and paste them to slides 7 and 8 You can change the Table Styles under the Design tabComplete the sample slides contents12Change the Table Styles
  • 13.
    Choose the InserttabClick the Object buttonChoose Create from fileBrowse for the Excel file that contains the chartYou may find some sample charts in sample-PT6.xlsxDo not check Link optionIf the desired chart is not shown, double click on the chart and choose for another worksheet that contains the desired chartInsert Chart from Excel13
  • 14.
    Embed a YouTubeVideoClipOpen the video link http://www.youtube.com/watch?v=eob532iEpqkClick the SharebuttonThen click the Embed buttonCheck the boxes for Enable privacy-enhanced mode and Use old embed codeCopy the codeThen, go to the slideChoose the Insert tabClick the Video button and choose Video from Web SitePaste the code into the box of the pop-up window and then click Insert
  • 15.
    Click the FiletabClickOptionsSelect Customize RibbonIn the list of Main Tabs, select DeveloperClick OKShow the Developer Tab on the Ribbon15
  • 16.
    Insert the moviewe made from the Video Editing LabOn the Developer tab, in the Controls group, click the More Controls buttonScroll down to select Windows Media PlayerDraw a box as big as you want on the slideRight-click on the box and select PropertiesInput the file name in the URL fieldSample video: RFID_sample.wmvNote that the video file must be in the same folder with the PowerPoint fileClose the Properties windowInsert a movie 16
  • 17.
    Apply transition effectto all slides under the Transitions tabTransition Effects17Change the speedSelect a transition effectApply the effect to all slides
  • 18.
    Select any objectswhich you want to add animationClick the Add Animation button under the Animationstab, and choose the effect from the list, you can preview the effect as wellClick the Animation Pane button in the AdvancedAnimations groupThe Animationpane will be shownAdjust the timing, direction and speed by right-clicking the object on the paneAdd Animation18
  • 19.
    We would liketo create an automatic slide show that the PowerPoint slides can be run automaticallyYou can also insert sound tracks to every slides for the automatic slide show Choose the Insert tabClick the Audio button and choose Audio from FileGo to slide 1Select the sound fileSample file: s1.mp3Repeat the steps to insert audio track for other slides by choosing corresponding mp3 files Insert audio tracks to the slide19
  • 20.
    Move the soundicon to the bottom right cornerClick the icon and click the Playback tabunder Audio ToolsCheck the Hide During Show box to hide the icon when the slide show runsChoose Play across slides in the Start optionMove the sound object to the top in the Animation PaneInsert audio tracks to the slide20
  • 21.
    Click the SlideShow tab, and click Rehearse TimingsThe slide show will start and you click on the slide to set the timing for each slideRight-click and choose End Show when you finish rehearsalAutomatic Slide Show21
  • 22.
    Click the FiletabChoose Save As andSave your file as xxxxxxxx-PT8.pptxSave your file22
  • 23.
    We may usewebsite http://www.slideshare.netto share our PowerPoint slides Click the Upload buttonThen click Create one to register for a free accountClick the Upload button againAnd choose UPLOAD publiclyUpload the .pptxfileShare the slides23
  • 24.
    After finishing uploadand conversion, your slides will be publishedYou can share it on Facebook, by email or embed it to your webpageHowever, the sound and video embedded in the PowerPoint cannot be played as these functions are not supported Share the slides & Submission24Right-click on this link, choose Copy Link Locationand paste the link to BU eLearning
  • 25.
    To show theYouTube video:Choose My Uploads at the top right cornerChoose the file you uploadedClick Edit / DeleteYou can insert YouTube videosin the slide showShare the slides25
  • 26.
    We can usePowerPoint to make a photo slide show easilyClick the Insert tabClick the Photo Album buttonClick File/Disk… to select photosSelect Theme for the photo albumYou can make some changes to the photos (e.g. Rotation, brightness, contrast)Supplementary - Photo Album 26
  • 27.
    Add a dateCreatea new slideSmartArtSlide DesignSlide MasterInsert a pictureInsert Chart from ExcelEmbed a YouTube video clipInsert a movieTransition EffectsCustom AnimationInsert sound tracks to the slideAutomatic Slide ShowShare the slides Summary27

Editor's Notes

  • #25 BU eLearning: http://buelearning.hkbu.edu.hk/