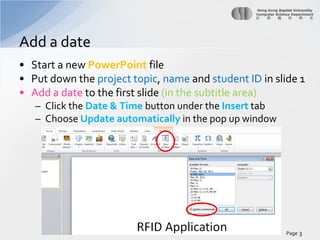
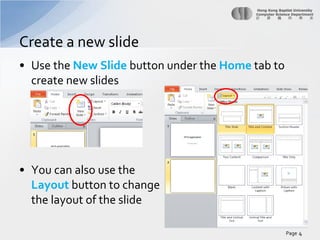
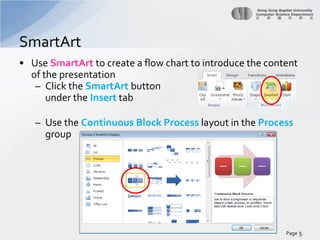
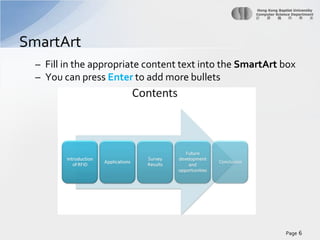
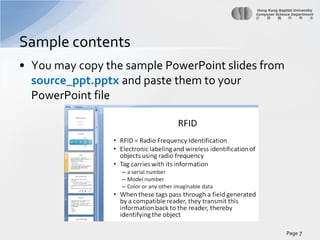
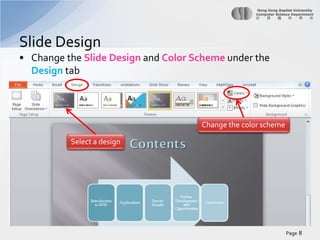
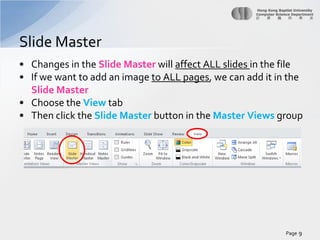
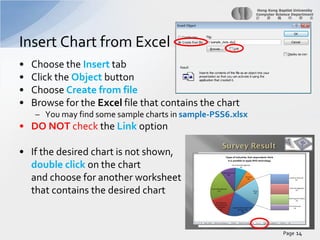
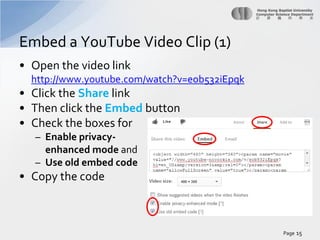
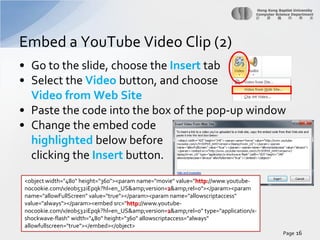
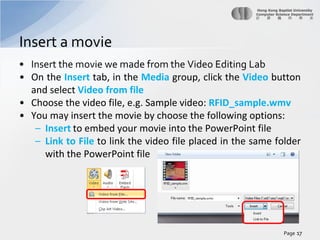
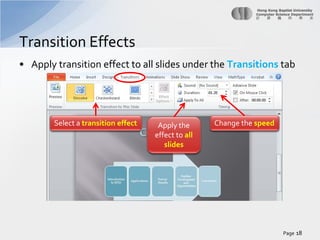
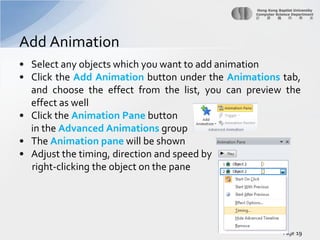
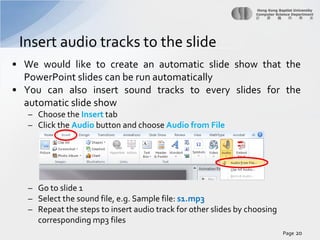
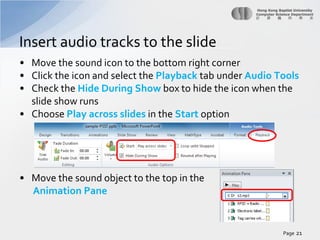
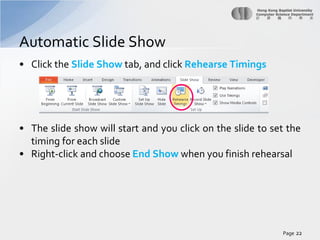
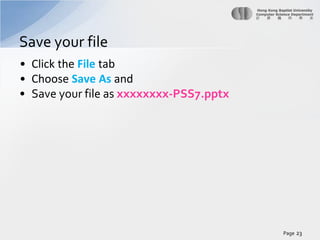
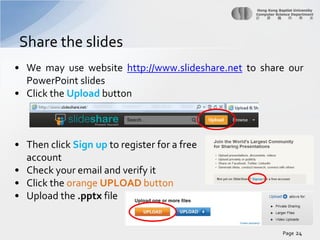
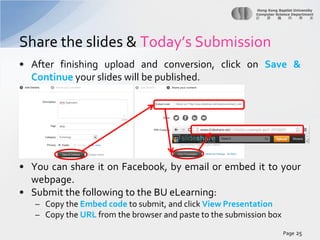
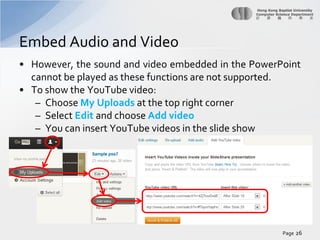
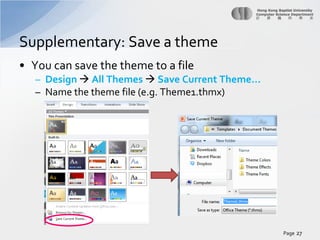
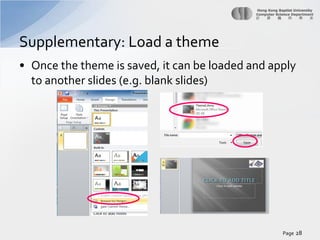
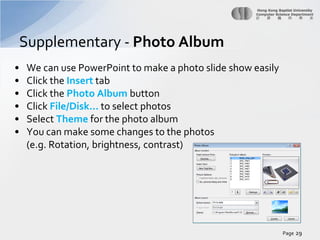
Problem Solving Session 7

Presentation Tool
MS PowerPoint 2010
Page 1
Today’s tasks
• Try out MS PowerPoint 2010 to create a draft
presentation for your project
• Share your ppt on slideshare.net

Page 2
Add a date
• Start a new PowerPoint file
• Put down the project topic, name and student ID in slide 1
• Add a date to the first slide (in the subtitle area)
– Click the Date & Time button under the Insert tab
– Choose Update automatically in the pop up window

Page 3
Create a new slide
• Use the New Slide button under the Home tab to
create new slides

• You can also use the
Layout button to change
the layout of the slide
Page 4
SmartArt
• Use SmartArt to create a flow chart to introduce the content
of the presentation
– Click the SmartArt button
under the Insert tab
– Use the Continuous Block Process layout in the Process
group

Page 5
SmartArt
– Fill in the appropriate content text into the SmartArt box
– You can press Enter to add more bullets

Page 6
Sample contents
• You may copy the sample PowerPoint slides from
source_ppt.pptx and paste them to your
PowerPoint file

Page 7
Slide Design
• Change the Slide Design and Color Scheme under the
Design tab

Change the color scheme
Select a design

Page 8
Slide Master
• Changes in the Slide Master will affect ALL slides in the file
• If we want to add an image to ALL pages, we can add it in the
Slide Master
• Choose the View tab
• Then click the Slide Master button in the Master Views group

Page 9
Insert a picture on a master slide
• Don’t close the Slide Master
Group
• Choose the Insert tab
• Click the Picture button
• Choose a picture and move it
to where you want
• You may dim the picture by
right-clicking on the picture
and choose Format Picture.

Page 10
Insert a picture on a master slide
• Select Picture Color group, and
choose Washout effect under Recolor
• You may also adjust the brightness
and contrast if you want
• Close the Master View under the
Slide Master group when you finish
editing the master slide

Page 11
Complete the sample slides contents
• Add another SmartArt object to slide 6
• Use the layout Horizontal Bullet List under List group
• The data can be found from the file source_table.docx

Page 12
Complete the sample slides contents
• Copy the tables from the file source_table.docx and
paste them to slides 7 and 8
• You can change the Table Styles under the Design tab

Change the Table Styles on
specific rows/columns

Change the Table Styles

Page 13
Insert Chart from Excel
•
•
•
•

Choose the Insert tab
Click the Object button
Choose Create from file
Browse for the Excel file that contains the chart
– You may find some sample charts in sample-PSS6.xlsx

• DO NOT check the Link option
• If the desired chart is not shown,
double click on the chart
and choose for another worksheet
that contains the desired chart

Page 14
Embed a YouTube Video Clip (1)
• Open the video link
http://www.youtube.com/watch?v=eob532iEpqk

• Click the Share link
• Then click the Embed button
• Check the boxes for
– Enable privacyenhanced mode and
– Use old embed code

• Copy the code

Page 15
Embed a YouTube Video Clip (2)
• Go to the slide, choose the Insert tab
• Select the Video button, and choose
Video from Web Site
• Paste the code into the box of the pop-up window
• Change the embed code
highlighted below before
clicking the Insert button.
<object width="480" height="360"><param name="movie" value="http://www.youtubenocookie.com/v/eob532iEpqk?hl=en_US&amp;version=2&amp;rel=0"></param><param
name="allowFullScreen" value="true"></param><param name="allowscriptaccess"
value="always"></param><embed src="http://www.youtubenocookie.com/v/eob532iEpqk?hl=en_US&amp;version=2&amp;rel=0" type="application/xshockwave-flash" width="480" height="360" allowscriptaccess="always"
allowfullscreen="true"></embed></object>

Page 16
Insert a movie
• Insert the movie we made from the Video Editing Lab
• On the Insert tab, in the Media group, click the Video button
and select Video from file
• Choose the video file, e.g. Sample video: RFID_sample.wmv
• You may insert the movie by choose the following options:
– Insert to embed your movie into the PowerPoint file
– Link to File to link the video file placed in the same folder
with the PowerPoint file

Page 17
Transition Effects
• Apply transition effect to all slides under the Transitions tab

Select a transition effect

Apply the
effect to all
slides

Change the speed

Page 18
Add Animation
• Select any objects which you want to add animation
• Click the Add Animation button under the Animations tab,
and choose the effect from the list, you can preview the
effect as well
• Click the Animation Pane button
in the Advanced Animations group
• The Animation pane will be shown
• Adjust the timing, direction and speed by
right-clicking the object on the pane

Page 19
Insert audio tracks to the slide
• We would like to create an automatic slide show that the
PowerPoint slides can be run automatically
• You can also insert sound tracks to every slides for the
automatic slide show
– Choose the Insert tab
– Click the Audio button and choose Audio from File

– Go to slide 1
– Select the sound file, e.g. Sample file: s1.mp3
– Repeat the steps to insert audio track for other slides by choosing
corresponding mp3 files
Page 20
Insert audio tracks to the slide
• Move the sound icon to the bottom right corner
• Click the icon and select the Playback tab under Audio Tools
• Check the Hide During Show box to hide the icon when the
slide show runs
• Choose Play across slides in the Start option

• Move the sound object to the top in the
Animation Pane

Page 21
Automatic Slide Show
• Click the Slide Show tab, and click Rehearse Timings

• The slide show will start and you click on the slide to set the
timing for each slide
• Right-click and choose End Show when you finish rehearsal

Page 22
Save your file
• Click the File tab
• Choose Save As and
• Save your file as xxxxxxxx-PSS7.pptx

Page 23
Share the slides
• We may use website http://www.slideshare.net to share our
PowerPoint slides
• Click the Upload button

• Then click Sign up to register for a free
account
• Check your email and verify it
• Click the orange UPLOAD button
• Upload the .pptx file

Page 24
Share the slides & Today’s Submission
• After finishing upload and conversion, click on Save &
Continue your slides will be published.

• You can share it on Facebook, by email or embed it to your
webpage.
• Submit the following to the BU eLearning:
– Copy the Embed code to submit, and click View Presentation
– Copy the URL from the browser and paste to the submission box
Page 25
Embed Audio and Video
• However, the sound and video embedded in the PowerPoint
cannot be played as these functions are not supported.
• To show the YouTube video:
– Choose My Uploads at the top right corner
– Select Edit and choose Add video
– You can insert YouTube videos in the slide show

Page 26
Supplementary: Save a theme
• You can save the theme to a file
– Design  All Themes  Save Current Theme…
– Name the theme file (e.g. Theme1.thmx)

Page 27
Supplementary: Load a theme
• Once the theme is saved, it can be loaded and apply
to another slides (e.g. blank slides)

Page 28
Supplementary - Photo Album
•
•
•
•
•
•

We can use PowerPoint to make a photo slide show easily
Click the Insert tab
Click the Photo Album button
Click File/Disk… to select photos
Select Theme for the photo album
You can make some changes to the photos
(e.g. Rotation, brightness, contrast)

Page 29
Summary
•
•
•
•
•
•
•
•
•
•
•
•
•
•

Add a date
Create a new slide
SmartArt
Slide Design
Slide Master
Insert a picture
Insert Chart from Excel
Embed a YouTube video clip
Insert a movie
Transition Effects
Custom Animation
Insert sound tracks to the slide
Automatic Slide Show
Share the slides

Page 30

Pss 7 power_point

  • 1.
    Problem Solving Session7 Presentation Tool MS PowerPoint 2010 Page 1
  • 2.
    Today’s tasks • Tryout MS PowerPoint 2010 to create a draft presentation for your project • Share your ppt on slideshare.net Page 2
  • 3.
    Add a date •Start a new PowerPoint file • Put down the project topic, name and student ID in slide 1 • Add a date to the first slide (in the subtitle area) – Click the Date & Time button under the Insert tab – Choose Update automatically in the pop up window Page 3
  • 4.
    Create a newslide • Use the New Slide button under the Home tab to create new slides • You can also use the Layout button to change the layout of the slide Page 4
  • 5.
    SmartArt • Use SmartArtto create a flow chart to introduce the content of the presentation – Click the SmartArt button under the Insert tab – Use the Continuous Block Process layout in the Process group Page 5
  • 6.
    SmartArt – Fill inthe appropriate content text into the SmartArt box – You can press Enter to add more bullets Page 6
  • 7.
    Sample contents • Youmay copy the sample PowerPoint slides from source_ppt.pptx and paste them to your PowerPoint file Page 7
  • 8.
    Slide Design • Changethe Slide Design and Color Scheme under the Design tab Change the color scheme Select a design Page 8
  • 9.
    Slide Master • Changesin the Slide Master will affect ALL slides in the file • If we want to add an image to ALL pages, we can add it in the Slide Master • Choose the View tab • Then click the Slide Master button in the Master Views group Page 9
  • 10.
    Insert a pictureon a master slide • Don’t close the Slide Master Group • Choose the Insert tab • Click the Picture button • Choose a picture and move it to where you want • You may dim the picture by right-clicking on the picture and choose Format Picture. Page 10
  • 11.
    Insert a pictureon a master slide • Select Picture Color group, and choose Washout effect under Recolor • You may also adjust the brightness and contrast if you want • Close the Master View under the Slide Master group when you finish editing the master slide Page 11
  • 12.
    Complete the sampleslides contents • Add another SmartArt object to slide 6 • Use the layout Horizontal Bullet List under List group • The data can be found from the file source_table.docx Page 12
  • 13.
    Complete the sampleslides contents • Copy the tables from the file source_table.docx and paste them to slides 7 and 8 • You can change the Table Styles under the Design tab Change the Table Styles on specific rows/columns Change the Table Styles Page 13
  • 14.
    Insert Chart fromExcel • • • • Choose the Insert tab Click the Object button Choose Create from file Browse for the Excel file that contains the chart – You may find some sample charts in sample-PSS6.xlsx • DO NOT check the Link option • If the desired chart is not shown, double click on the chart and choose for another worksheet that contains the desired chart Page 14
  • 15.
    Embed a YouTubeVideo Clip (1) • Open the video link http://www.youtube.com/watch?v=eob532iEpqk • Click the Share link • Then click the Embed button • Check the boxes for – Enable privacyenhanced mode and – Use old embed code • Copy the code Page 15
  • 16.
    Embed a YouTubeVideo Clip (2) • Go to the slide, choose the Insert tab • Select the Video button, and choose Video from Web Site • Paste the code into the box of the pop-up window • Change the embed code highlighted below before clicking the Insert button. <object width="480" height="360"><param name="movie" value="http://www.youtubenocookie.com/v/eob532iEpqk?hl=en_US&amp;version=2&amp;rel=0"></param><param name="allowFullScreen" value="true"></param><param name="allowscriptaccess" value="always"></param><embed src="http://www.youtubenocookie.com/v/eob532iEpqk?hl=en_US&amp;version=2&amp;rel=0" type="application/xshockwave-flash" width="480" height="360" allowscriptaccess="always" allowfullscreen="true"></embed></object> Page 16
  • 17.
    Insert a movie •Insert the movie we made from the Video Editing Lab • On the Insert tab, in the Media group, click the Video button and select Video from file • Choose the video file, e.g. Sample video: RFID_sample.wmv • You may insert the movie by choose the following options: – Insert to embed your movie into the PowerPoint file – Link to File to link the video file placed in the same folder with the PowerPoint file Page 17
  • 18.
    Transition Effects • Applytransition effect to all slides under the Transitions tab Select a transition effect Apply the effect to all slides Change the speed Page 18
  • 19.
    Add Animation • Selectany objects which you want to add animation • Click the Add Animation button under the Animations tab, and choose the effect from the list, you can preview the effect as well • Click the Animation Pane button in the Advanced Animations group • The Animation pane will be shown • Adjust the timing, direction and speed by right-clicking the object on the pane Page 19
  • 20.
    Insert audio tracksto the slide • We would like to create an automatic slide show that the PowerPoint slides can be run automatically • You can also insert sound tracks to every slides for the automatic slide show – Choose the Insert tab – Click the Audio button and choose Audio from File – Go to slide 1 – Select the sound file, e.g. Sample file: s1.mp3 – Repeat the steps to insert audio track for other slides by choosing corresponding mp3 files Page 20
  • 21.
    Insert audio tracksto the slide • Move the sound icon to the bottom right corner • Click the icon and select the Playback tab under Audio Tools • Check the Hide During Show box to hide the icon when the slide show runs • Choose Play across slides in the Start option • Move the sound object to the top in the Animation Pane Page 21
  • 22.
    Automatic Slide Show •Click the Slide Show tab, and click Rehearse Timings • The slide show will start and you click on the slide to set the timing for each slide • Right-click and choose End Show when you finish rehearsal Page 22
  • 23.
    Save your file •Click the File tab • Choose Save As and • Save your file as xxxxxxxx-PSS7.pptx Page 23
  • 24.
    Share the slides •We may use website http://www.slideshare.net to share our PowerPoint slides • Click the Upload button • Then click Sign up to register for a free account • Check your email and verify it • Click the orange UPLOAD button • Upload the .pptx file Page 24
  • 25.
    Share the slides& Today’s Submission • After finishing upload and conversion, click on Save & Continue your slides will be published. • You can share it on Facebook, by email or embed it to your webpage. • Submit the following to the BU eLearning: – Copy the Embed code to submit, and click View Presentation – Copy the URL from the browser and paste to the submission box Page 25
  • 26.
    Embed Audio andVideo • However, the sound and video embedded in the PowerPoint cannot be played as these functions are not supported. • To show the YouTube video: – Choose My Uploads at the top right corner – Select Edit and choose Add video – You can insert YouTube videos in the slide show Page 26
  • 27.
    Supplementary: Save atheme • You can save the theme to a file – Design  All Themes  Save Current Theme… – Name the theme file (e.g. Theme1.thmx) Page 27
  • 28.
    Supplementary: Load atheme • Once the theme is saved, it can be loaded and apply to another slides (e.g. blank slides) Page 28
  • 29.
    Supplementary - PhotoAlbum • • • • • • We can use PowerPoint to make a photo slide show easily Click the Insert tab Click the Photo Album button Click File/Disk… to select photos Select Theme for the photo album You can make some changes to the photos (e.g. Rotation, brightness, contrast) Page 29
  • 30.
    Summary • • • • • • • • • • • • • • Add a date Createa new slide SmartArt Slide Design Slide Master Insert a picture Insert Chart from Excel Embed a YouTube video clip Insert a movie Transition Effects Custom Animation Insert sound tracks to the slide Automatic Slide Show Share the slides Page 30