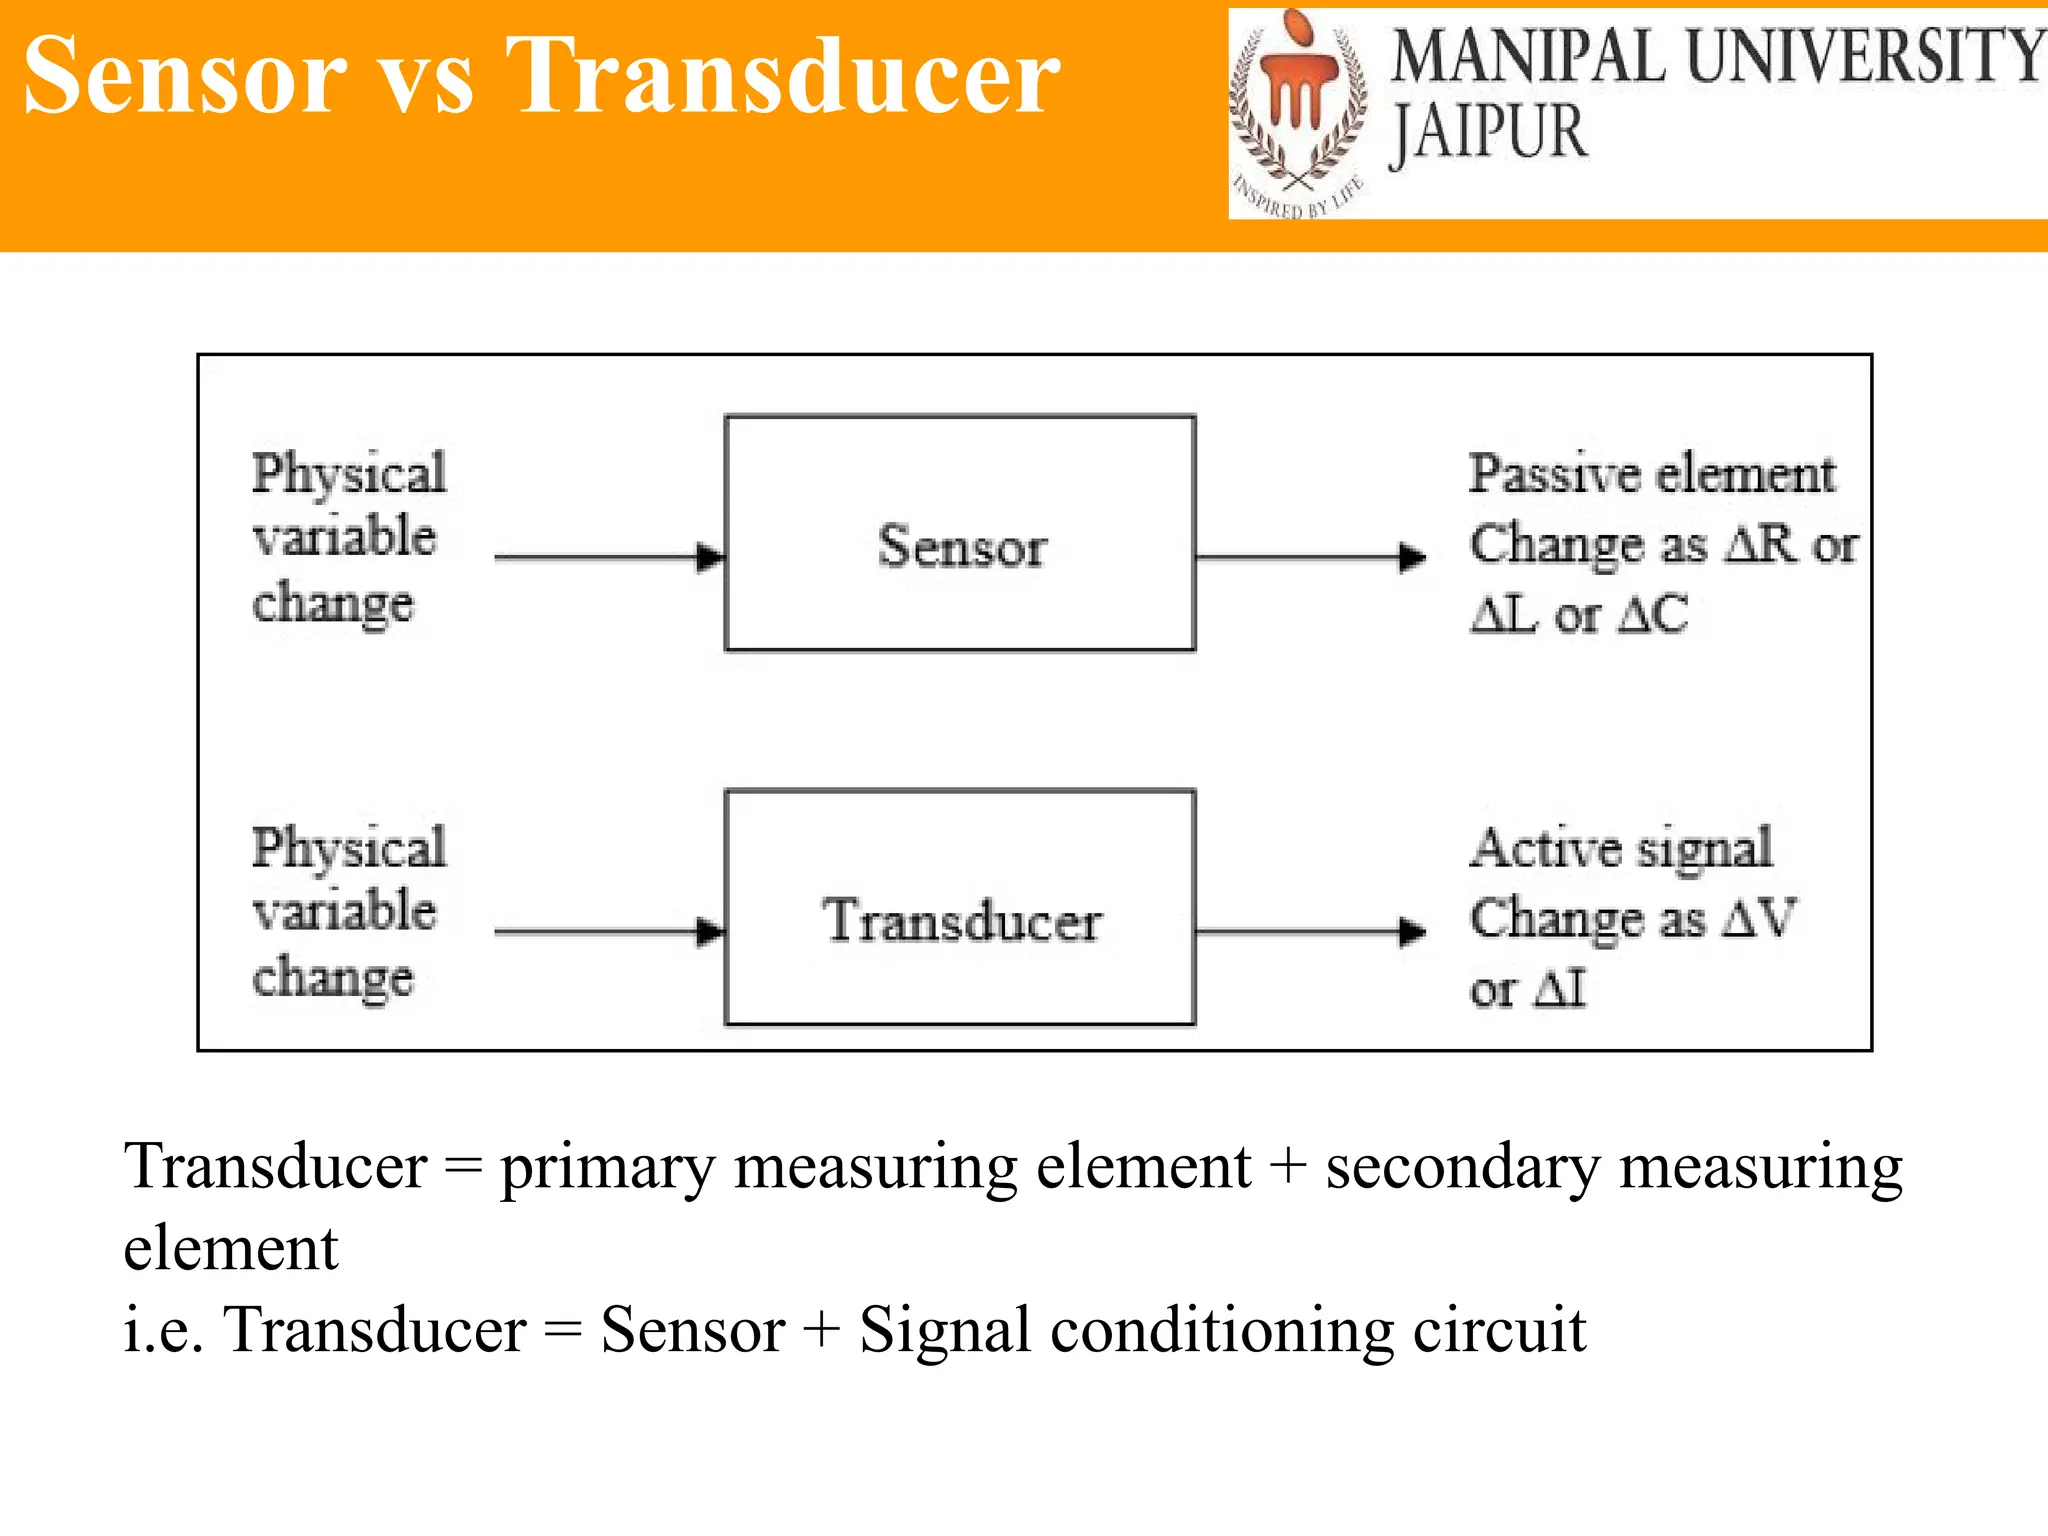
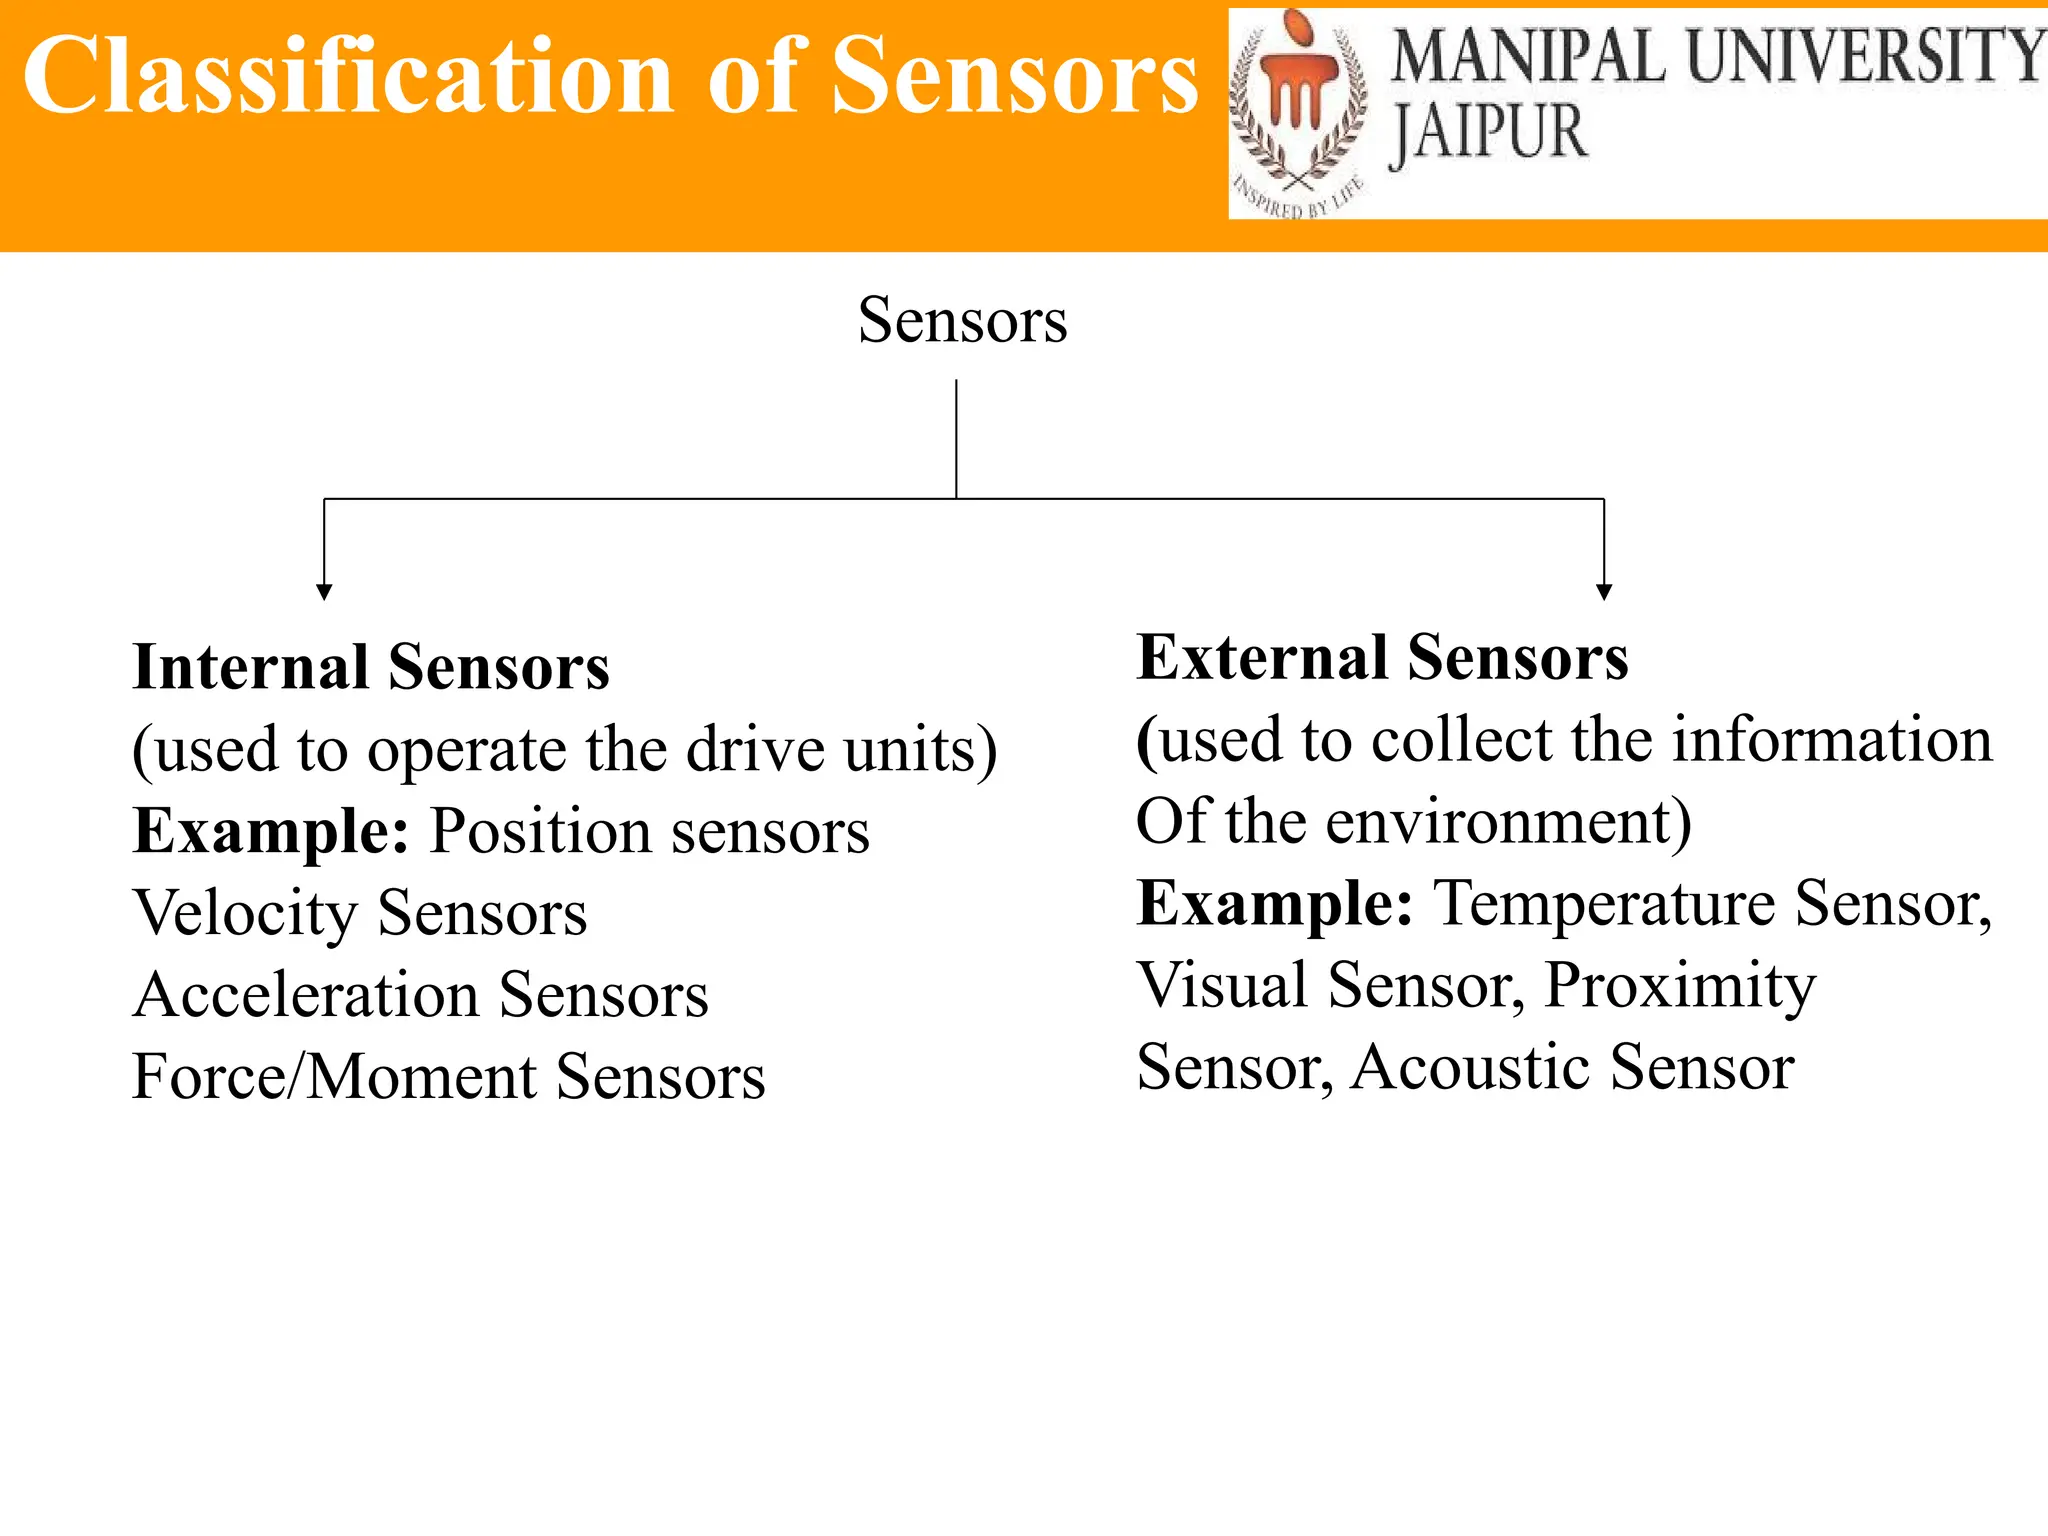
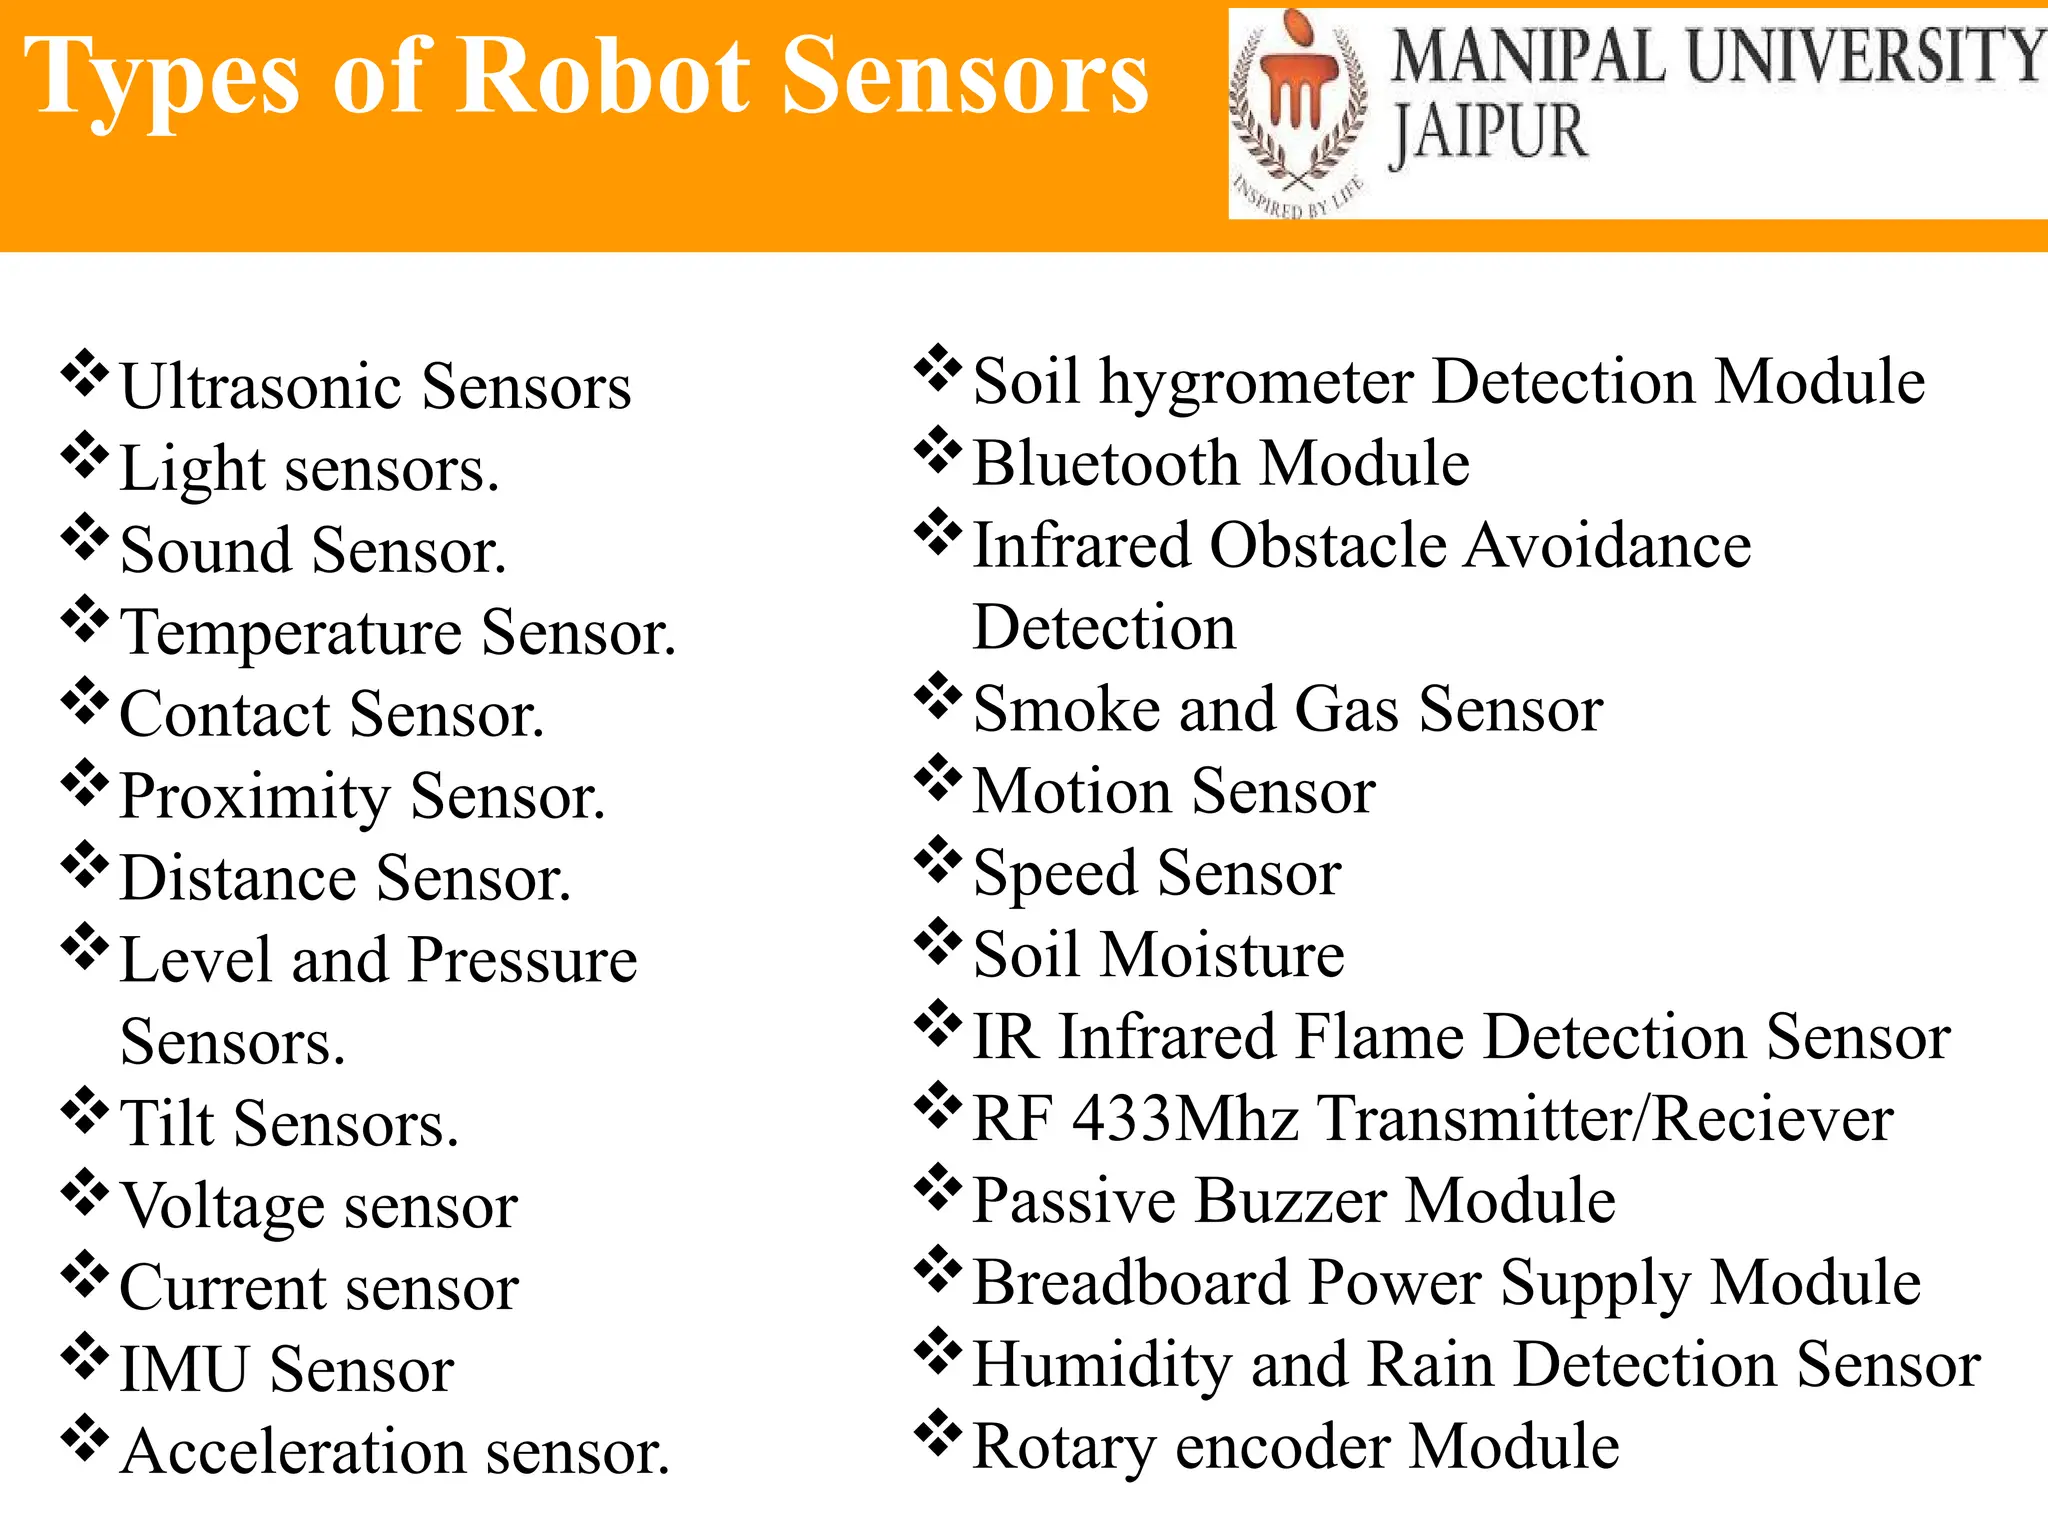
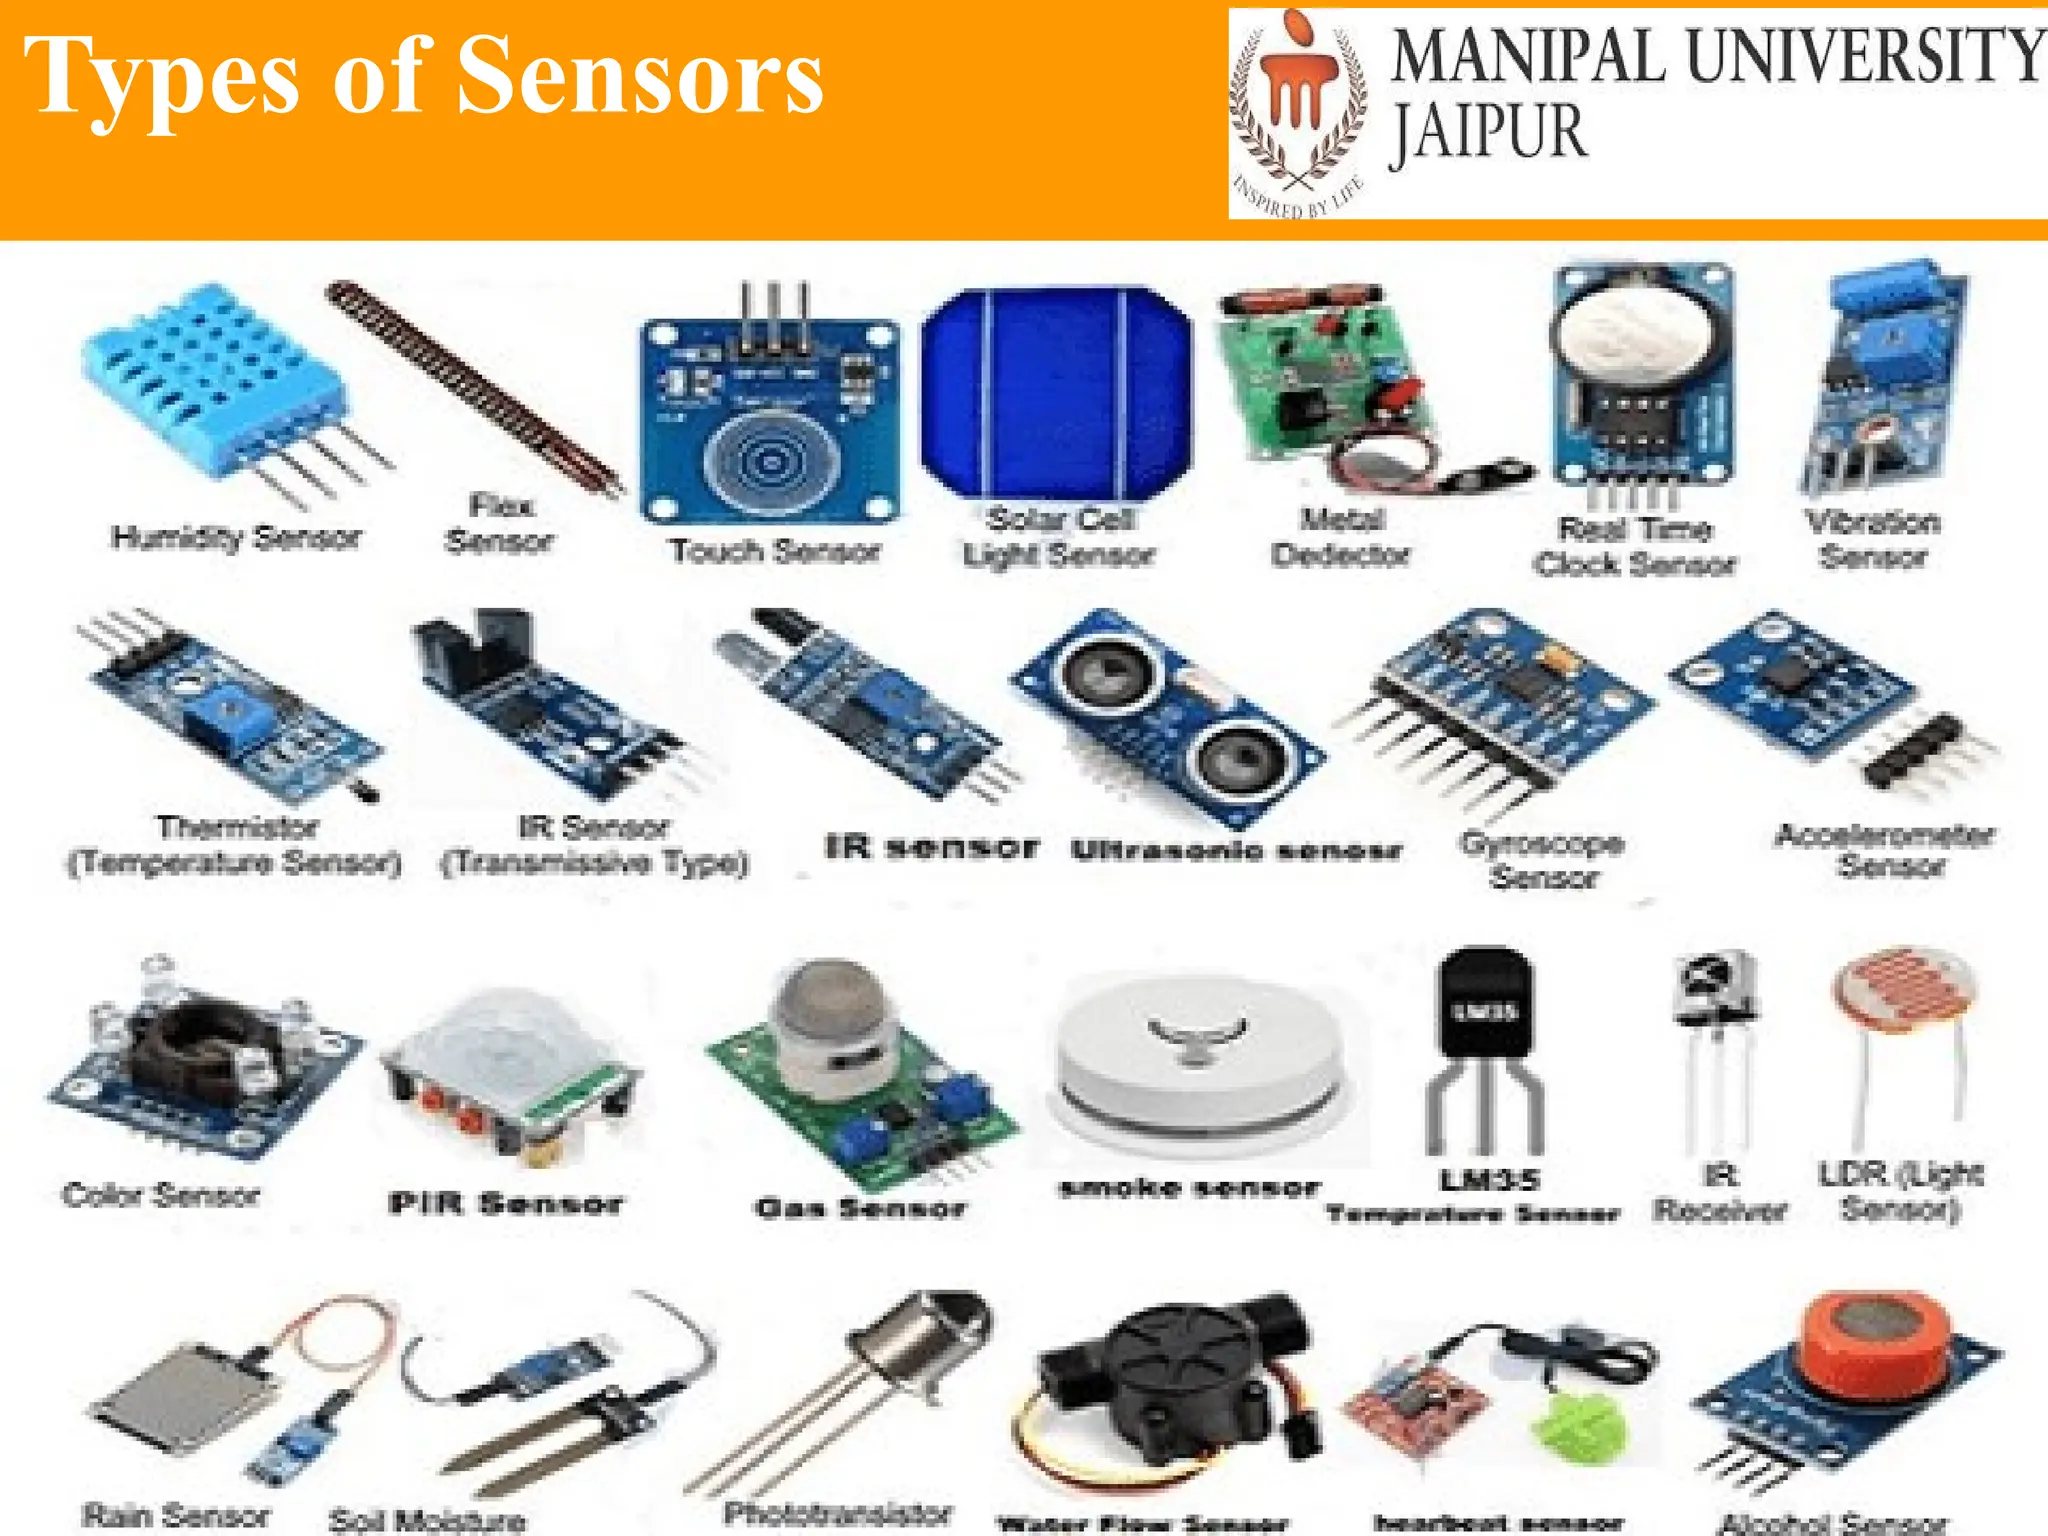
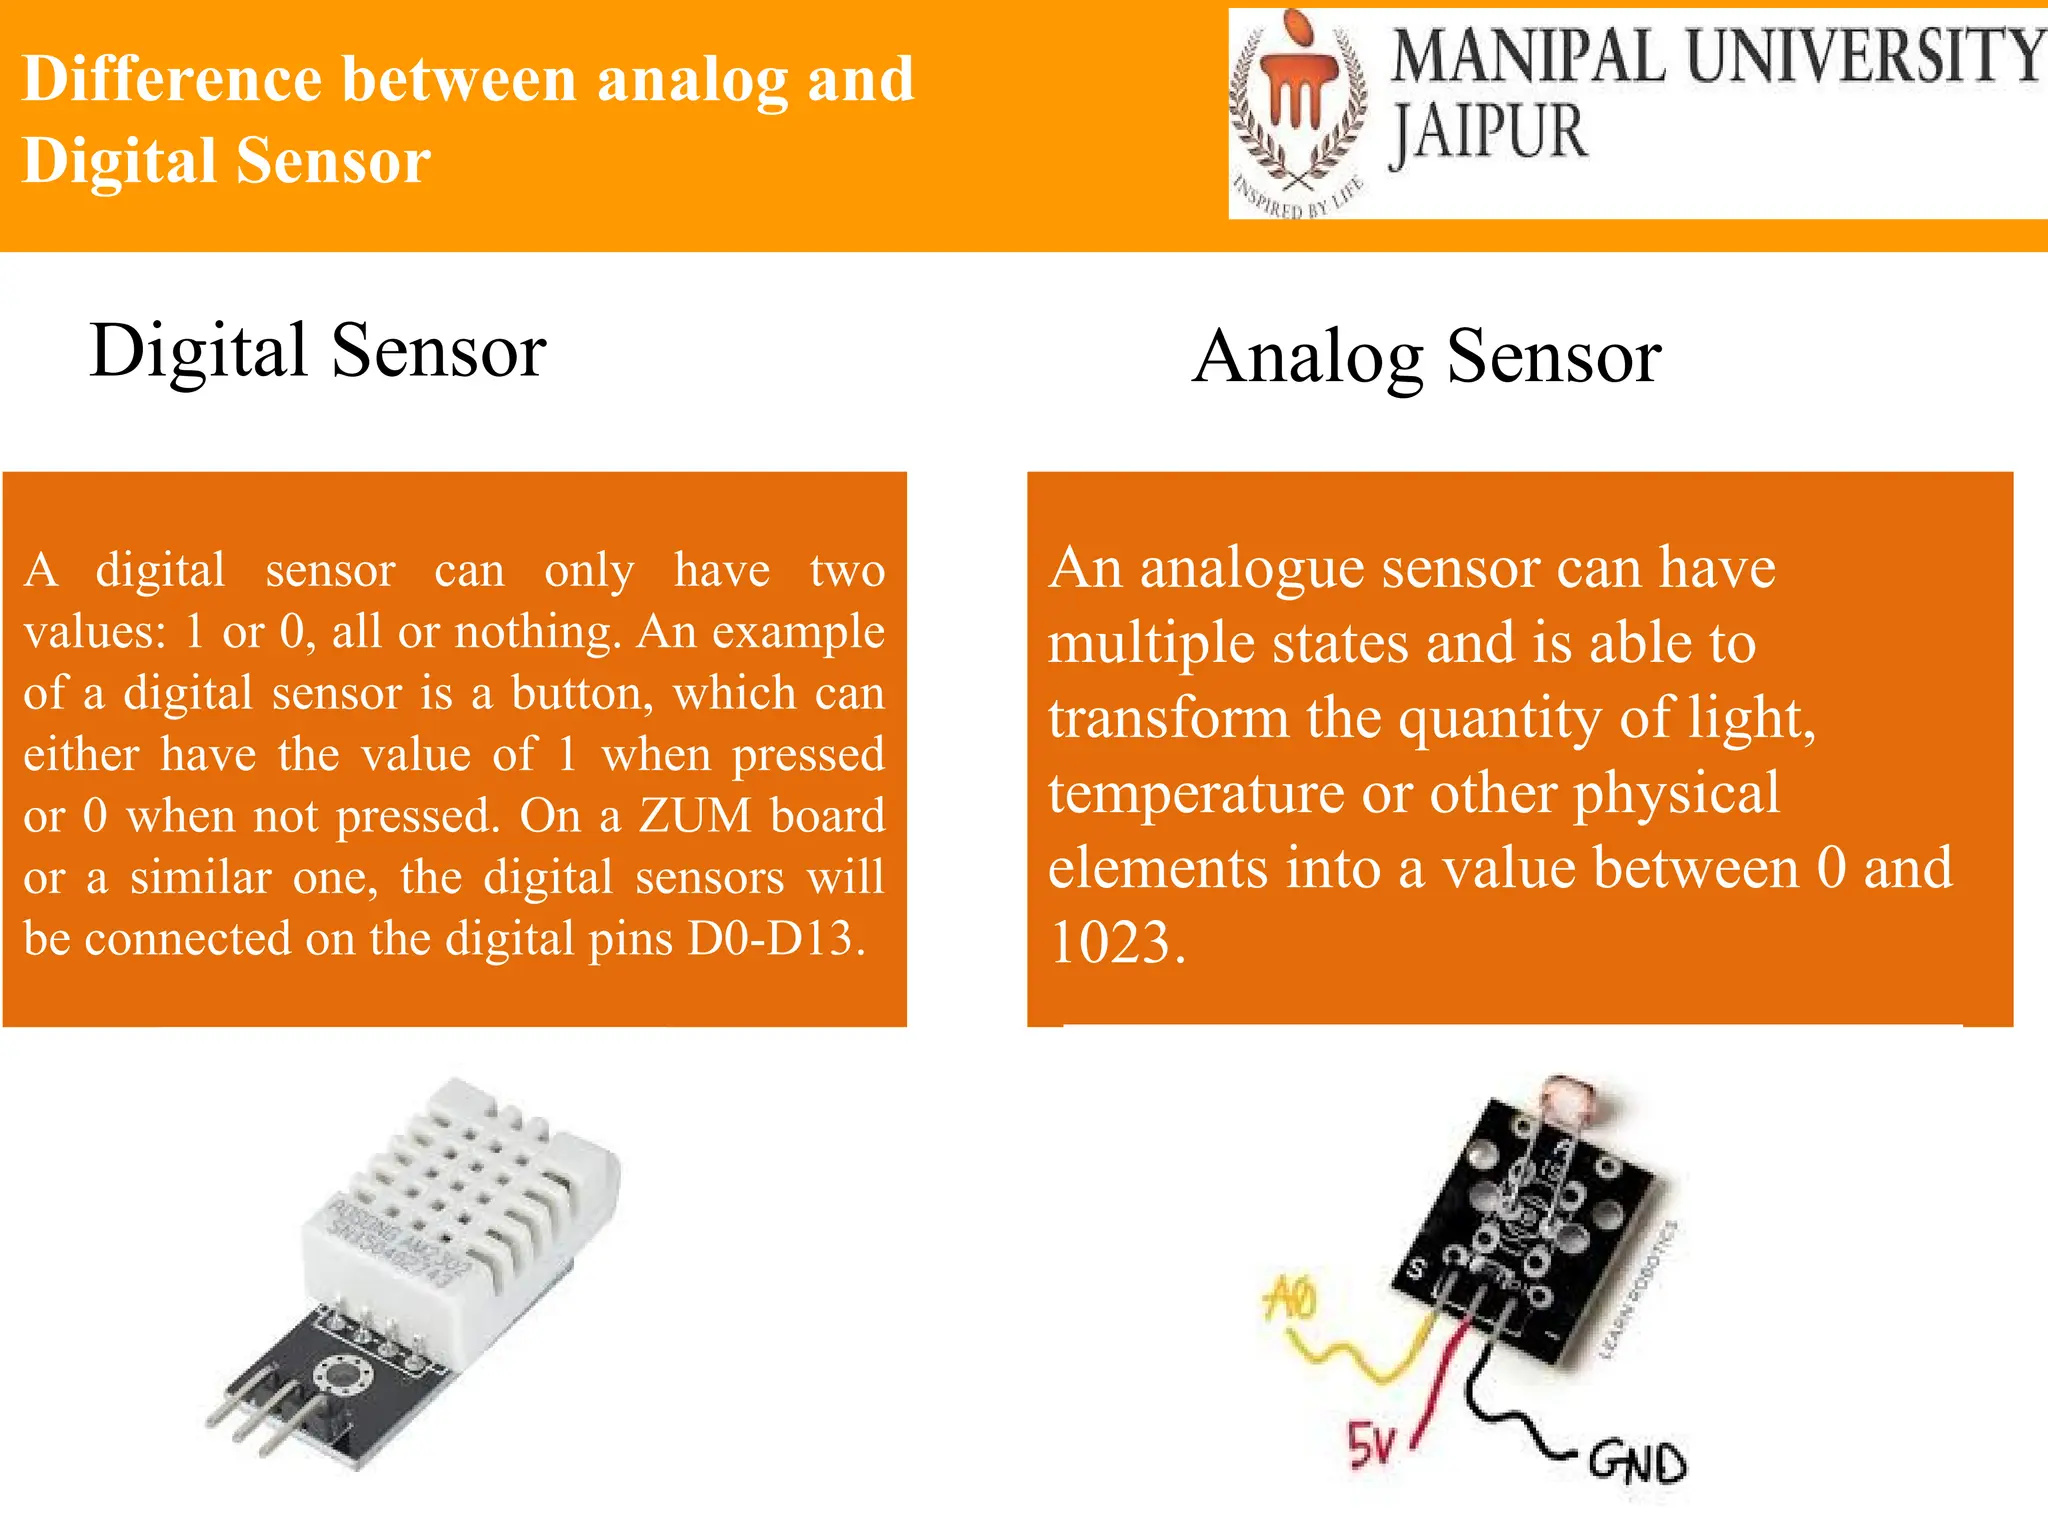
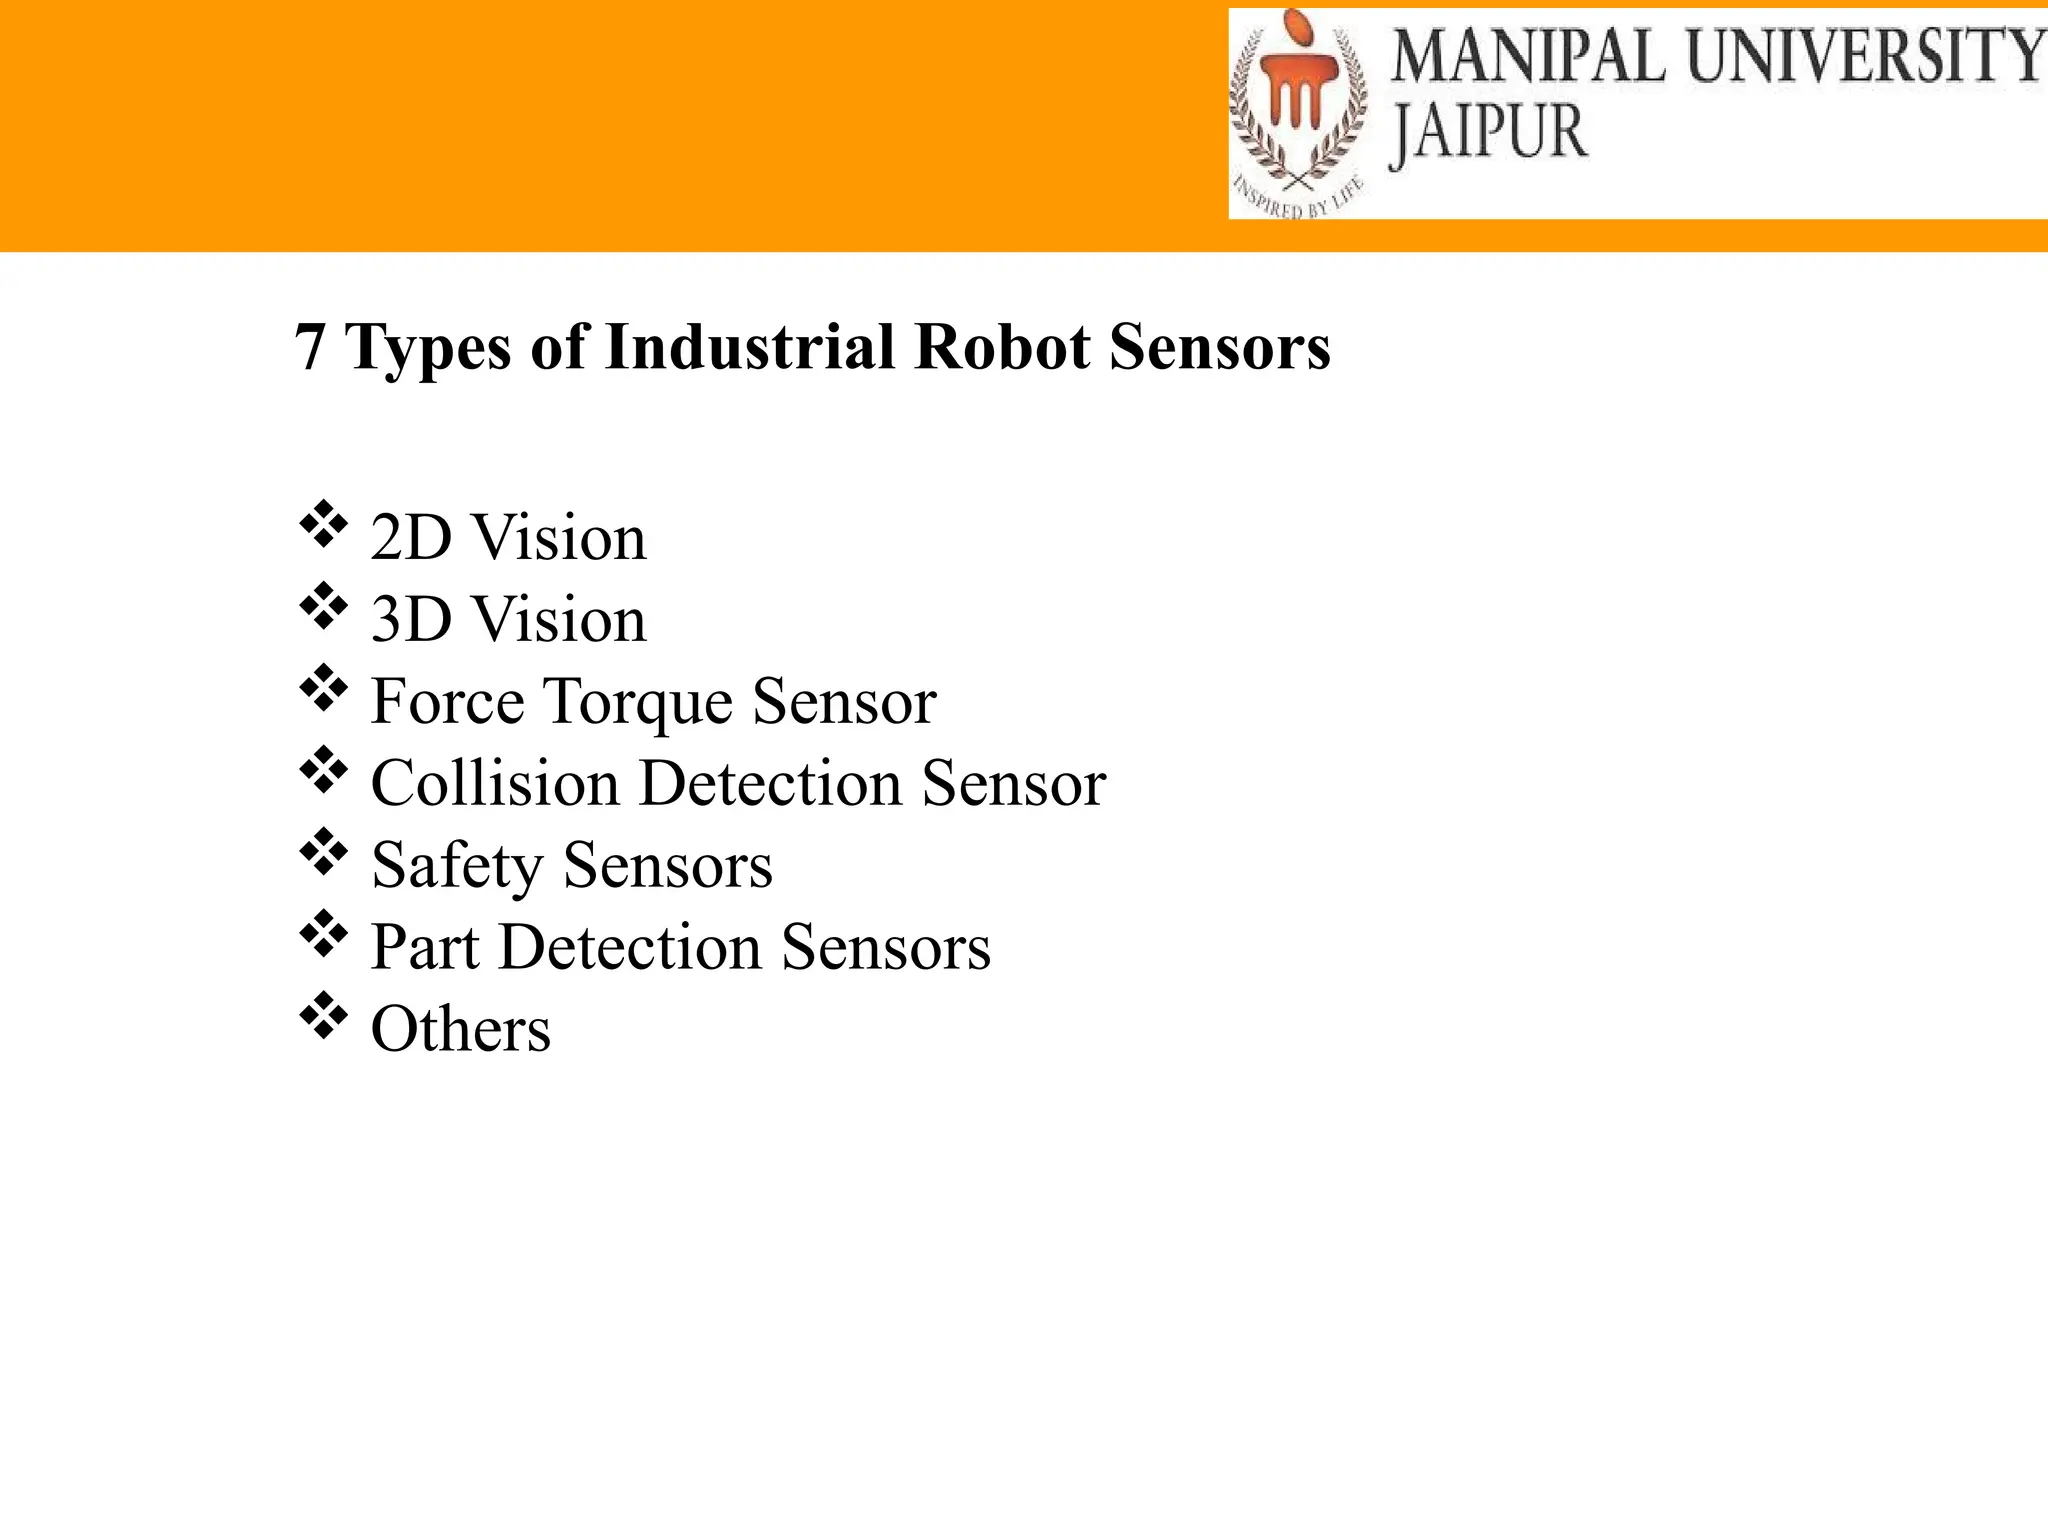
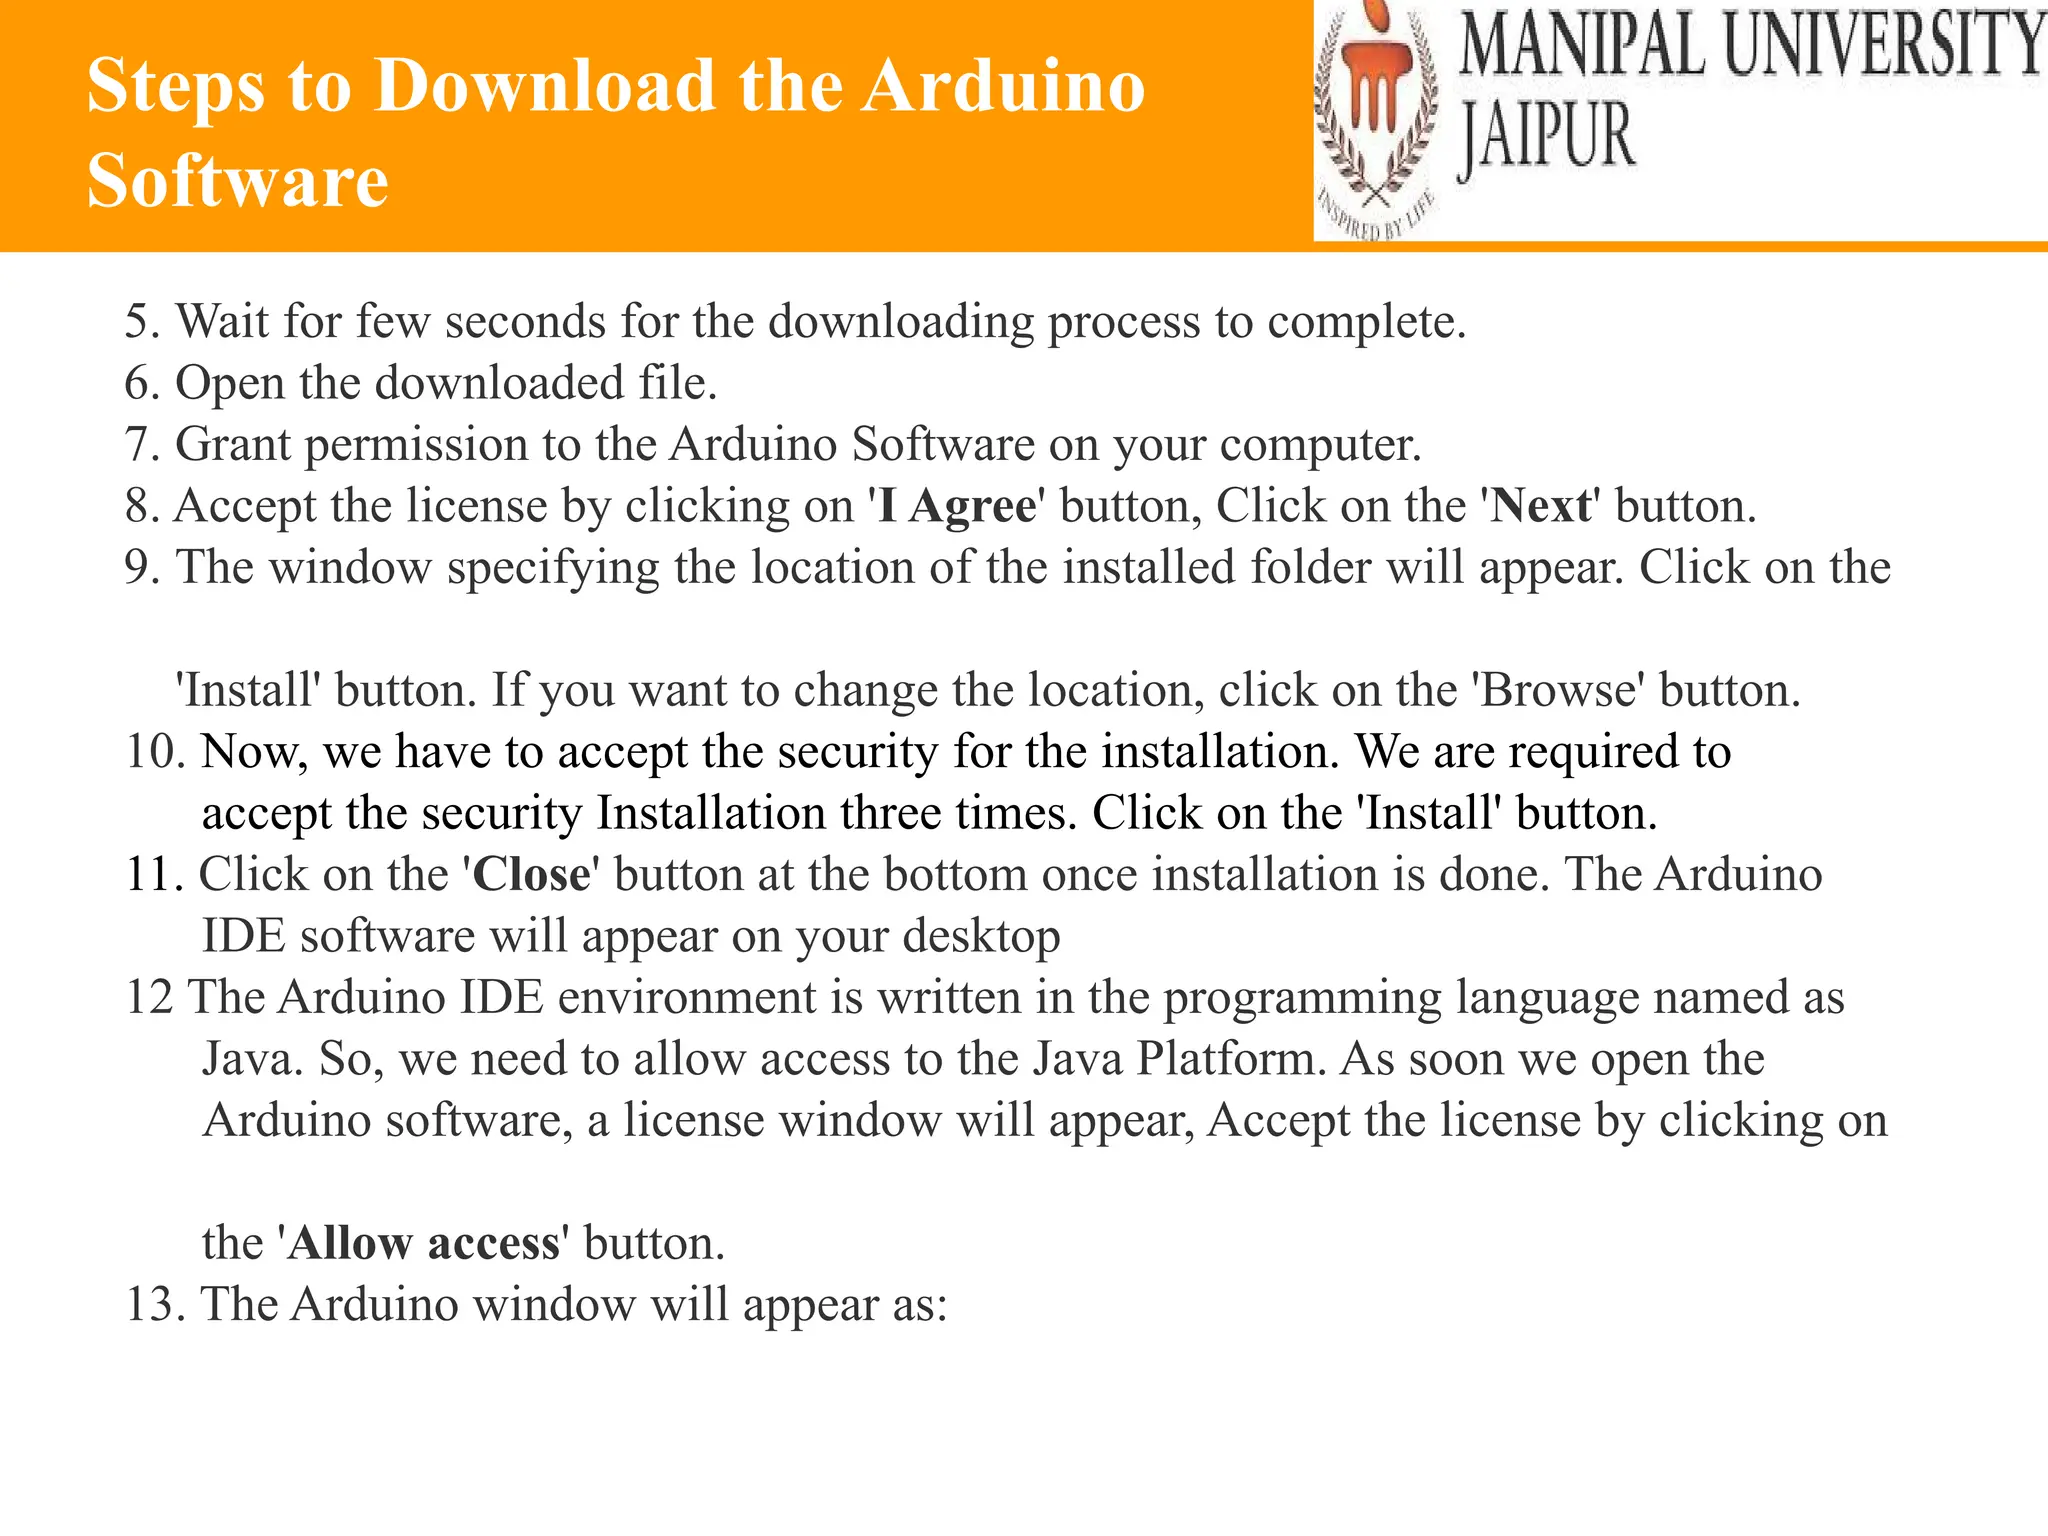
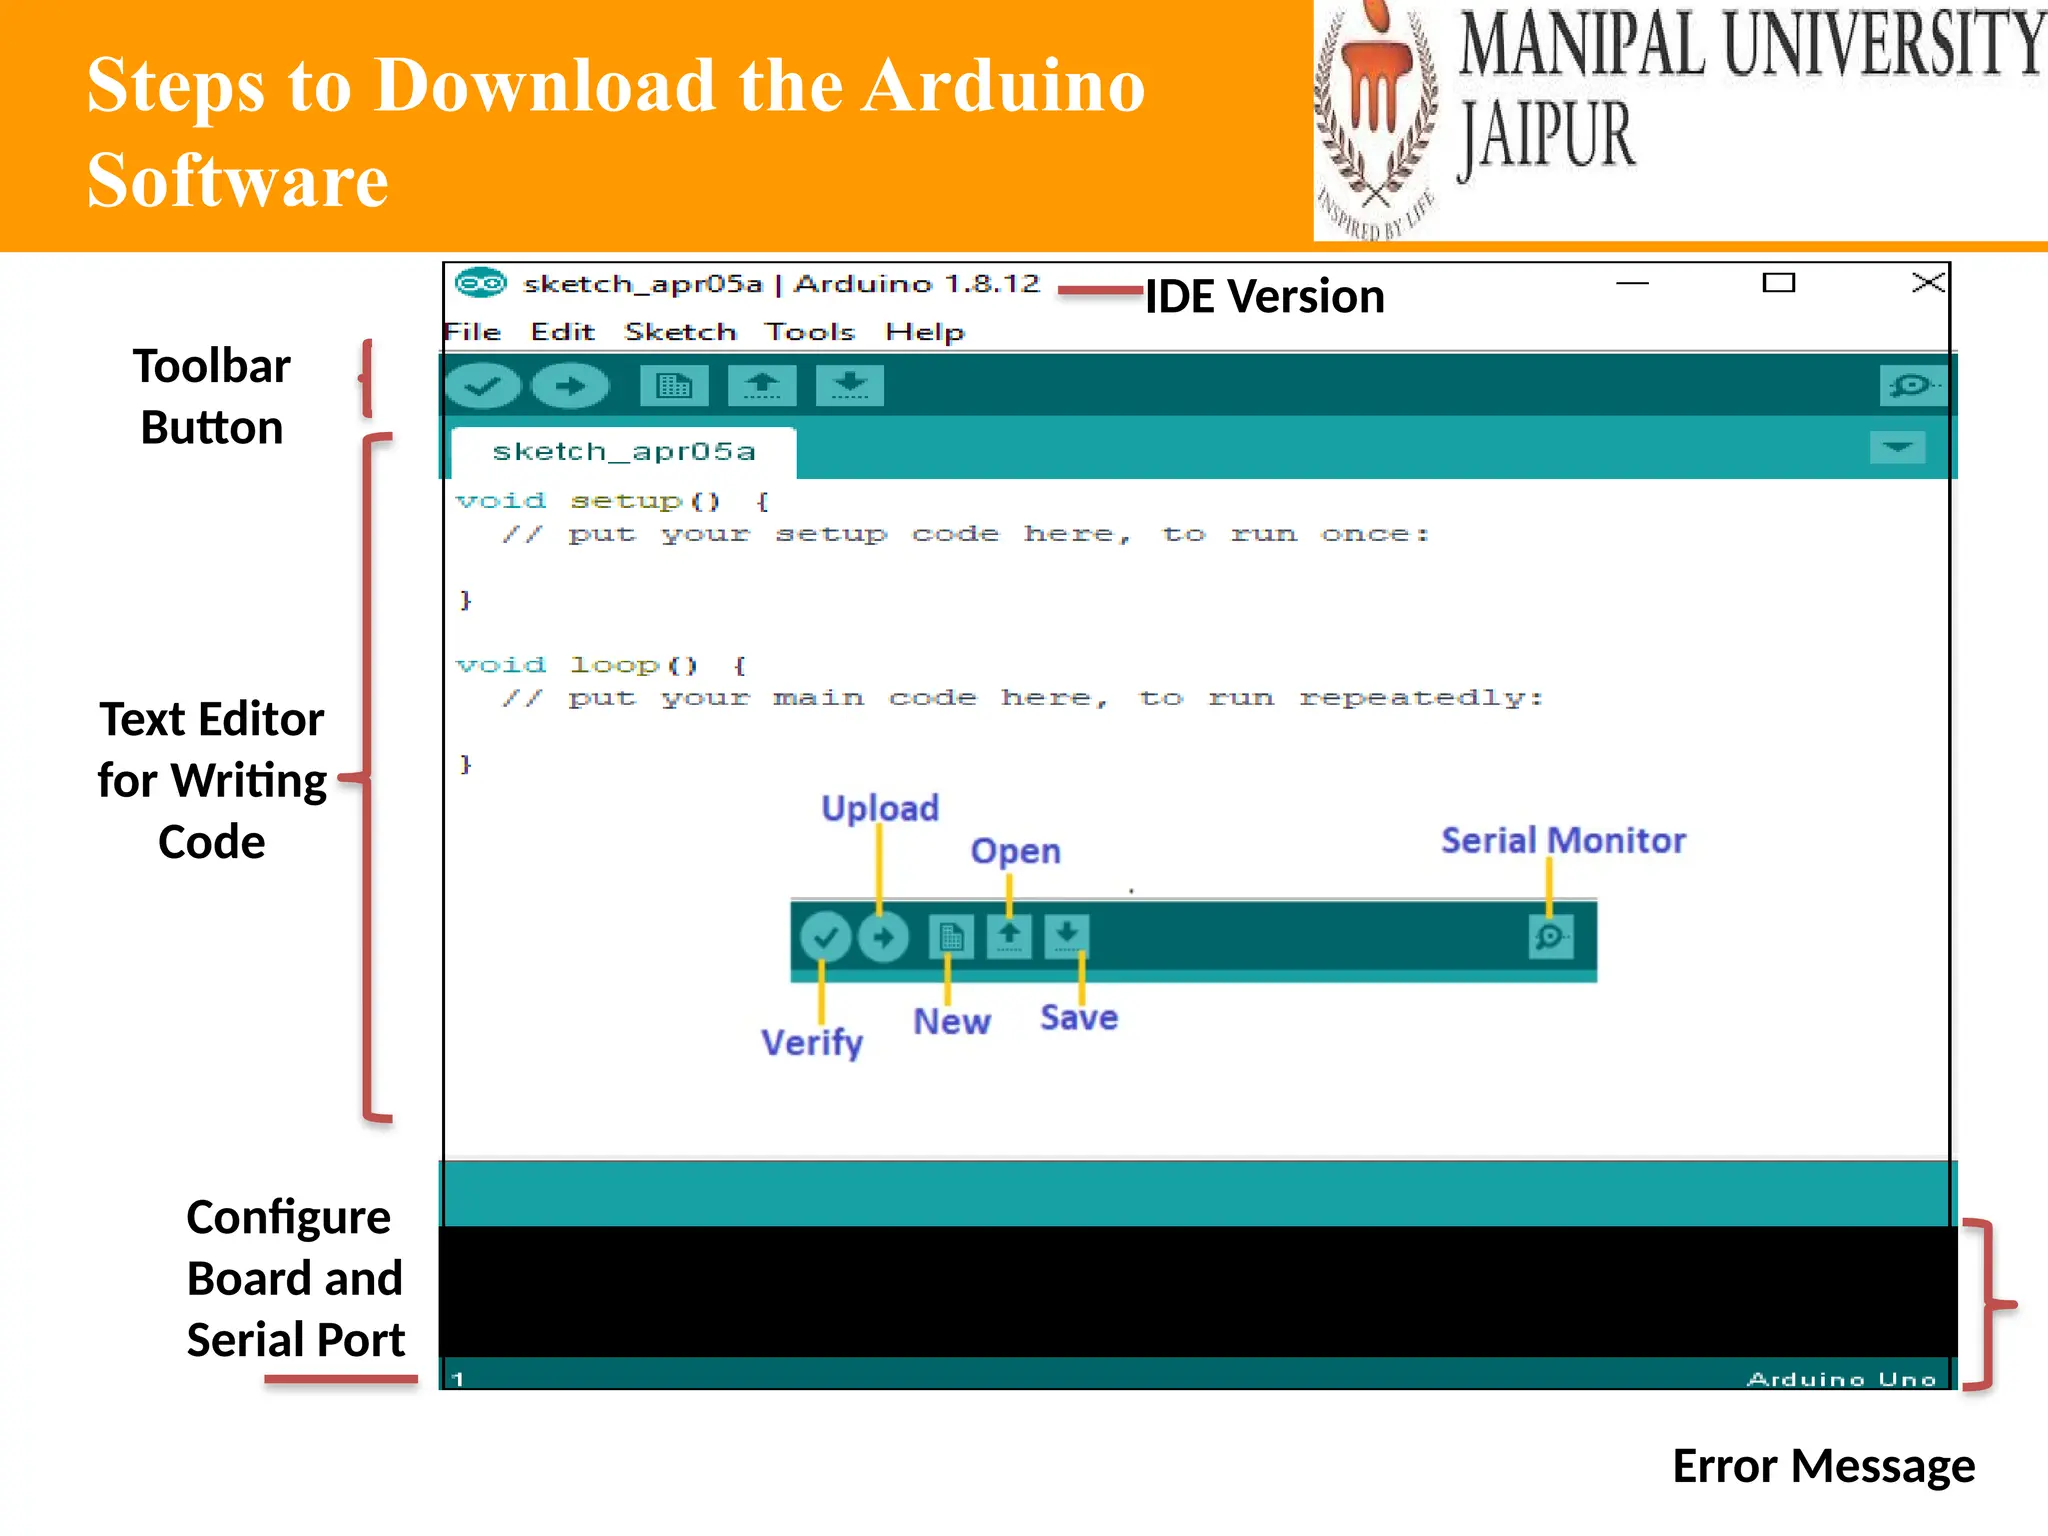
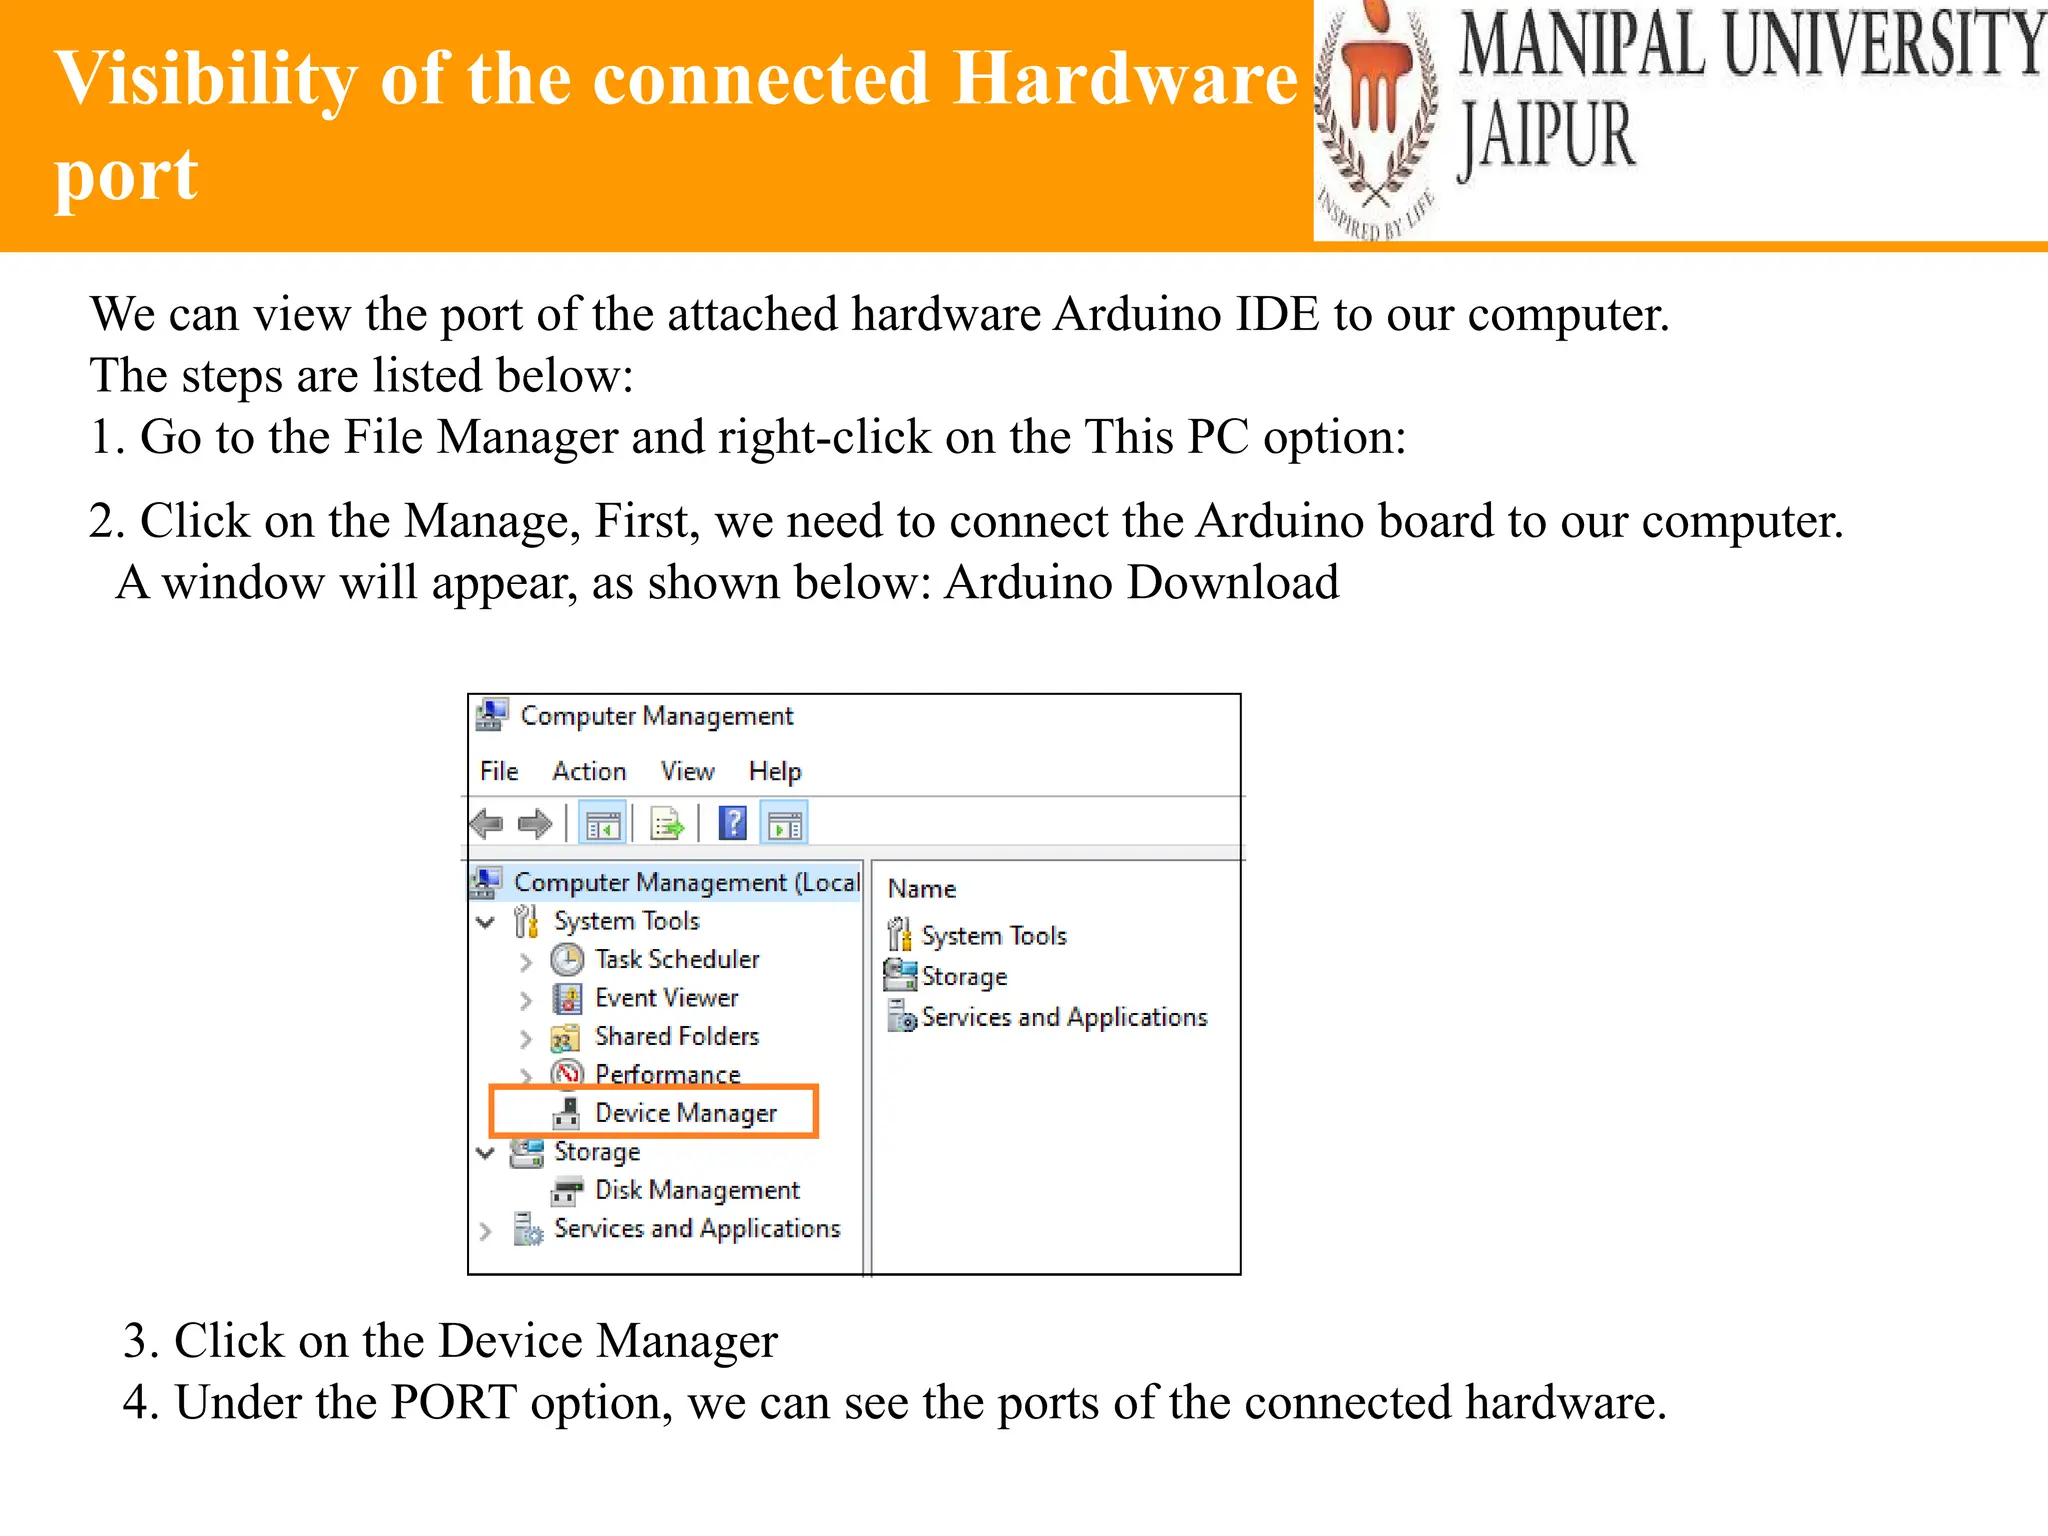
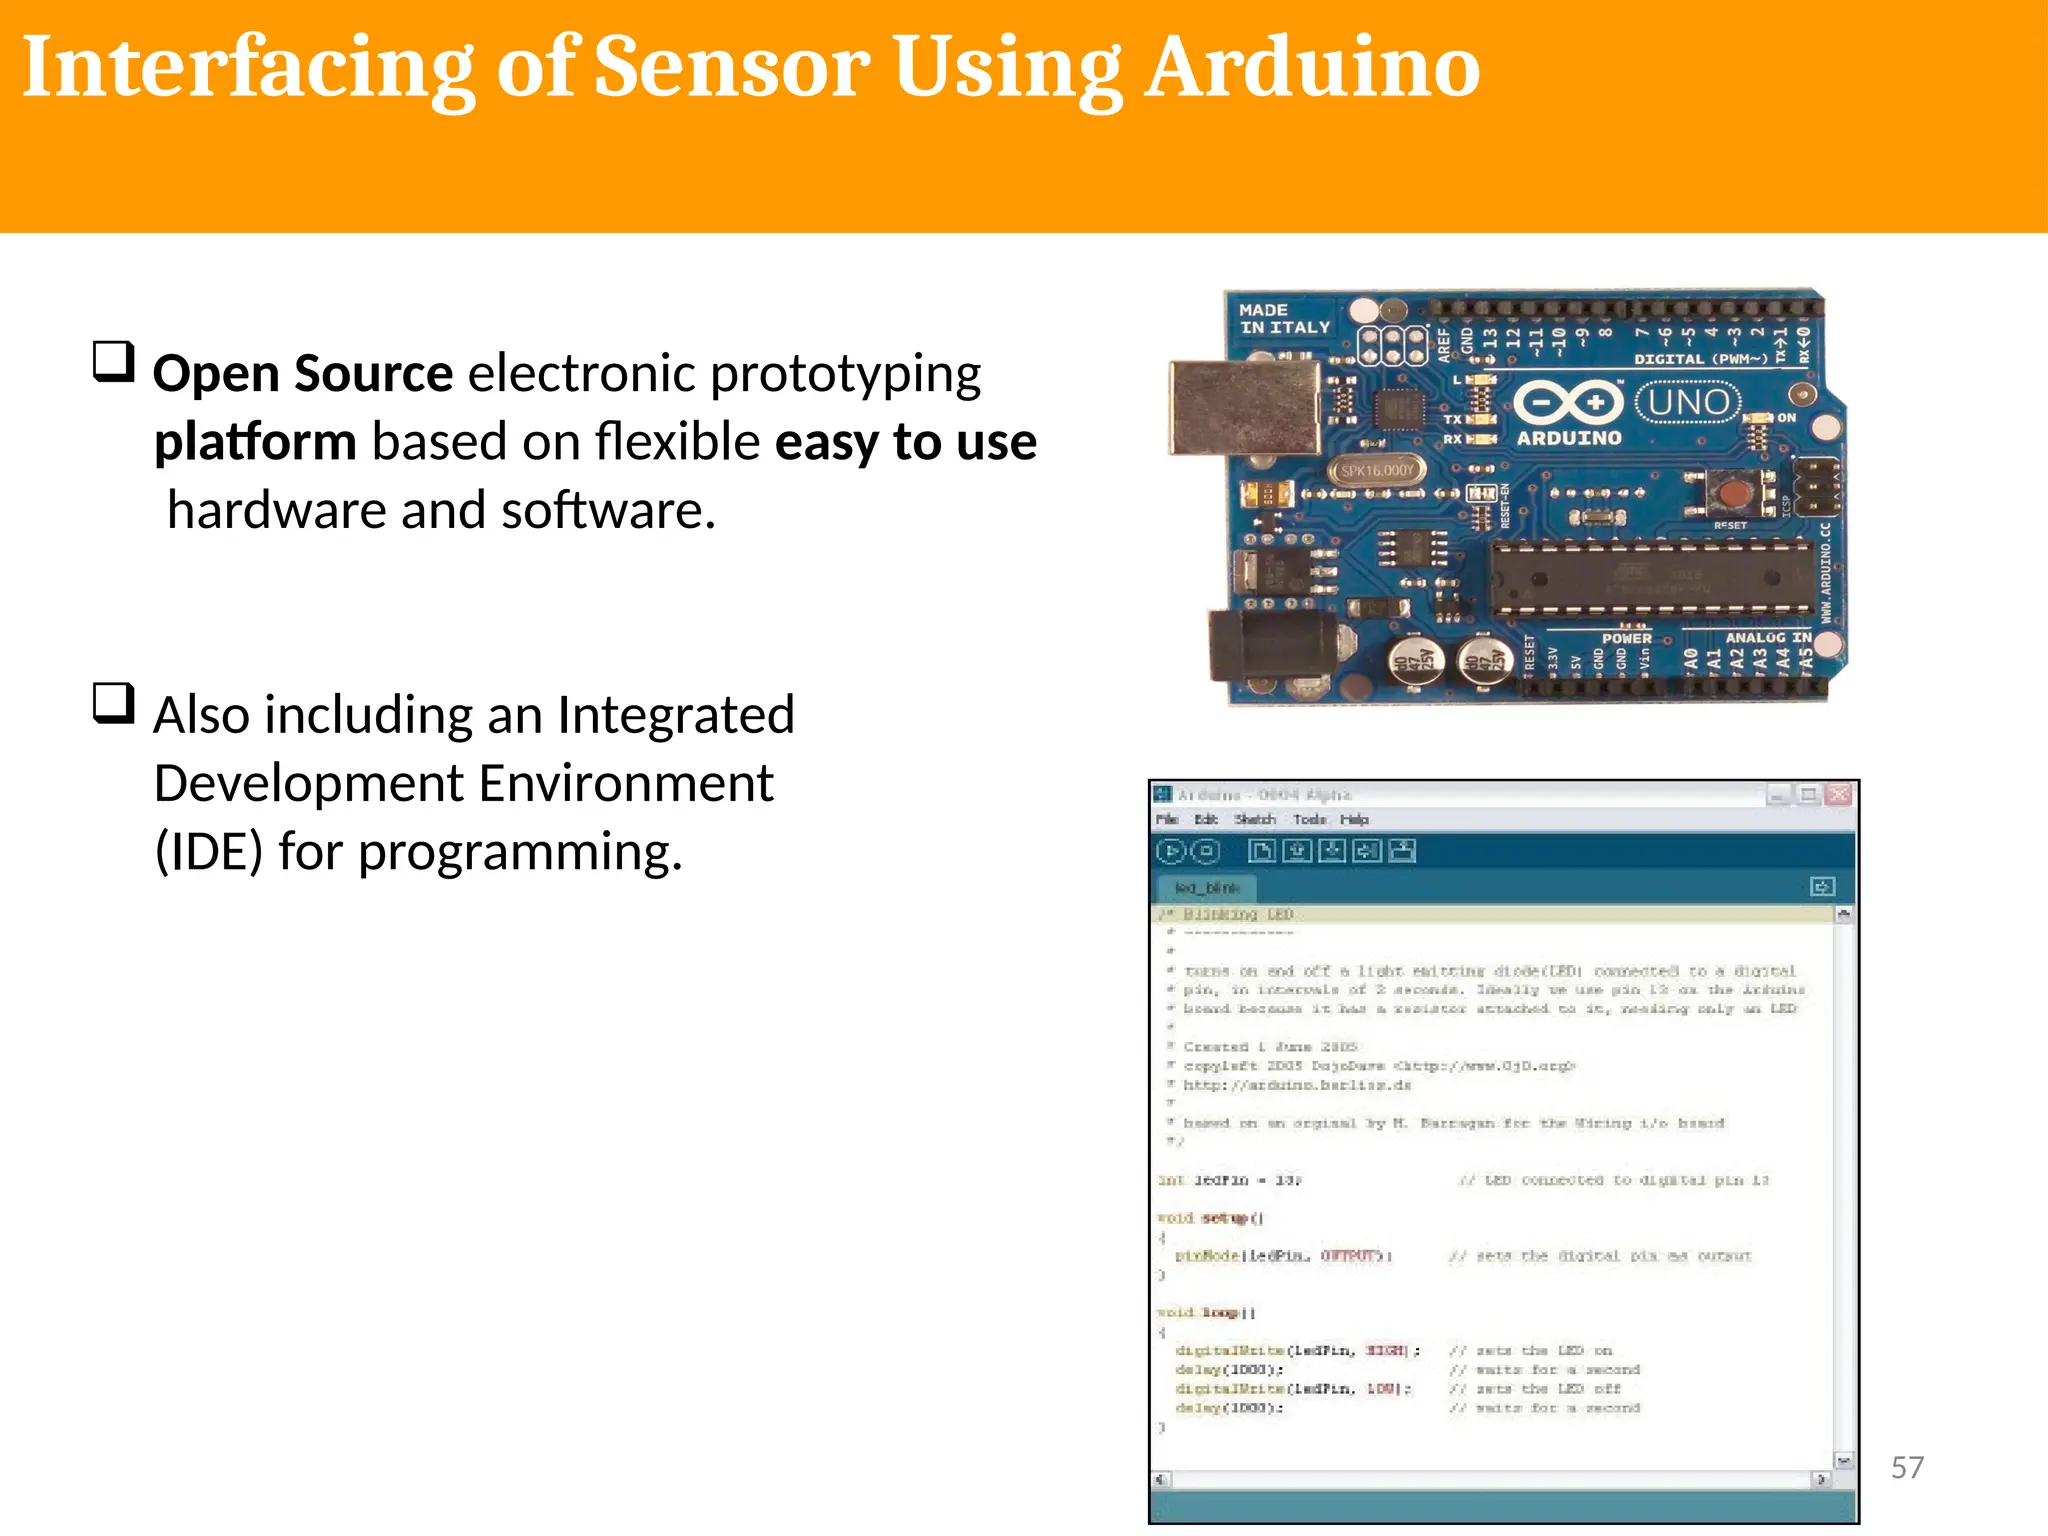
Course Name: Fab Lab
Course Code: MC 1030
Department of Mechatronics Engg.
Manipal University Jaipur
Sensors
Human beings collect information of the surroundings
using their sensors namely, eyes, ears, nose, skin, etc. in
order to perform various tasks.
A sensor is used to take measurement of physical variable.
A sensor requires calibration
Sensors are used to build intelligent robots.
Sensor vs Transducer
Transducer = primary measuring element + secondary measuring
element
i.e. Transducer = Sensor + Signal conditioning circuit
Classification of Sensors
Sensors
Internal Sensors
(used to operate the drive units)
Example: Position sensors
Velocity Sensors
Acceleration Sensors
Force/Moment Sensors
External Sensors
(used to collect the information
Of the environment)
Example: Temperature Sensor,
Visual Sensor, Proximity
Sensor, Acoustic Sensor
Classification of Sensors
Sensors
Contact Sensors
(Physical contact between
sensor mounted on robot and
object)
Non Contact Sensors
(No Physical Contact)
Example: Visual Sensor,
Proximity Sensor, Acoustic Sensor,
Range Sensor
Touch Sensor/ Tactile
Sensor/Binary Sensor
(indicate presence or
absence of an object)
Example: Micro switch,
Limit Switch
Force Sensor/ Analog Sensor
(not only the contact is made but also the force is
measured)
Sensors using strain gauges
Types of Robot Sensors
Ultrasonic Sensors
Light sensors.
Sound Sensor.
Temperature Sensor.
Contact Sensor.
Proximity Sensor.
Distance Sensor.
Level and Pressure
Sensors.
Tilt Sensors.
Voltage sensor
Current sensor
IMU Sensor
Acceleration sensor.
Soil hygrometer Detection Module
Bluetooth Module
Infrared Obstacle Avoidance
Detection
Smoke and Gas Sensor
Motion Sensor
Speed Sensor
Soil Moisture
IR Infrared Flame Detection Sensor
RF 433Mhz Transmitter/Reciever
Passive Buzzer Module
Breadboard Power Supply Module
Humidity and Rain Detection Sensor
Rotary encoder Module
Types of Sensors
Joystick Sensor Module
Joystick is an input device
Analog Joystick sometimes
called as Control Stick
It is also used to control the
pointer movement in 2
dimension axis
Bluetooth Module
It manages the communication
channel of the wireless part
It can transmit and Receive the
data wirelessly by using two
devices
It can transmit and receive the
data from host system with the
help of Host controller
Interface (HCI)
Vibration/Knock Sensor
It detects vibrations or shocks
from knocking or tapping it
It is an electronic switch which is
normally open
When it detects any vibrations, it
closes
Motion Sensor
It can work from 3.3-5 V
The sensor used
LM393comparator to detect
vibrations over threshold point
It provide digital data, Logic
Low, Logic High, 0 or 1
Pyroelectric Infrared Sensor
The PIR Sensor Module allows
you to sense motion
It is used to detect the motion of
a human body within the sensor
range
Pulse Sensor Module
It has a light which helps in
measuring the pulse rate
When we place the finger on the
pulse sensor, the light reflected
will change based on the volume
of blood inside the capillary
blood vessels during the heart
beat.
Hall Sensor Module
Based on the Hall effect, it is a
one that varies its output voltage
in response to magnetic field
Hall sensors are used for
proximity switching, positioning,
speed detection and current
sensing applications
Photoresistor Photoelectric
sensor Module
LDR sensor module is used to
detect the intensity of light
It is associated with both analog
output pin and digital output
labelled as AO and DO on the
board.
When there is light , the
resistance of LDR became low
according to intensity of light
Photodiode Light sensor
Module
It is most sensitive to ambient
light, generally used to detect the
brightness of the ambient light
intensity
The difference between PRM and
PDM is that PDM is directional,
can be perceived the fixed
direction of light source
IR sensor Module
It consist mainly of IR transmitter
and Receiver, Opamp, Variable
Resistor, output LED
IR LED emits the light in the
range of infrared frequency
IR light is invisible to us as its
wavelength (700 nm-1mm) is
much higher than the visible light
range.
Ultrasonic Sensor Module
An Ultrasonic Sensor works
based on the properties of the
sound waves with frequency
greater than that of the human
audible range.
It can detect movement of targets
and measure the distance to them
in many automated factories and
process plants
Sound Sensor Module
It is used to detect the intensity of
sound
Applications: switch, security as
well as monitoring. The accuracy
of this sensor can be changed for
the ease of usage
Soil Moisture Sensor
It is used to detect the moisture
When the soil is dry, the module
outputs a high level, otherwise
output low.
This sensor can be used to make
Automatic watering system so that
the garden plants can be watered
without people to manage.
Digital Barometric Pressure
Sensor
It is also known as Barometric Air
pressure (BAP)
It is a type of engine management
sensor commonly found on many
vehicles
It is responsible for measuring the
atmospheric pressure of the
environmental that vehicle is
driving in
Digital Thermal Sensor
Temperature sensor measures the
amount of heat energy or even
coldness that is generated by the
object or system allowing us to
sense or detect any physical
change to that temperature
producing either an analogue or
digital output.
Rotary Encoder Module
It is used in wide range of
applications that require
monitoring or control or both of
mechanical systems
It includes industrial controls,
robotics, photoelectric devices,
computer input devices such as opt
mechanical device , track balls
controlled stress rheometers and
rotating radar platforms
MQ2 Gas Sensor
It is an electronic sensor used for
sensing the concentration of gases
in the air such as LPG, propane,
methane, hydrogen, alcohol,
smoke and carbon monoxide
Humidity and Rain Detection
Sensor
It can be used as a switch when
rain drops falls through the raining
board and also measuring rainfall
intensity
Speed Sensor Module
To check the rate of an electric
motor
It can used in Association with
microcontroller for motor speed
detection, pulse count, position
limit, etc.
In principle, any rate meter simply
measures the rate at which some
event occurs.
IR infrared Flame Detection
Sensor
It can detect low frequency
flickering IR radiation ranging
from 1 to 15 Hz during
combustion.
It uses the IR flame flicker
techniques, which enables the
sensor to operate through layer of
oil , water, vapour dust or ice.
Accelerometer Module
It can be used for tilt sensing
applications as well as dynamic
acceleration resulting from motion,
shock or vibration.
 The ADXL335 gives complete 3
axis acceleration movement.
RF433 MHz Transmitter
Receiver
It receives serial data and transmit
it wirelessly through RF through
its antenna connected at pin 4
 The transmission occurs at the
rate of 1 kbps-10 kbps.
The transmitted data is received
by an RF receiver operating at the
same frequency as that of
transmitter.
GPRS GSM Module
It is used to enable communication
between microcontroller and the
GSM network.
GSM stands for Global system for
mobile communication and GPRS
for General Packet radio service.
Temperature and Humidity
Sensor Module
It uses an internal thermistor and a
capacitive humidity sensor to
determine environment conditions,
an internal chip is responsible for
converting readings to a serial
digital signal.
Colour Sensor Module
It is based on TCS3200, RG
Sensor chip and 4 White LED’s
It can detect and measure a nearly
limitless range of visible colours
Applications include test strip
reading, sorting by colour, ambient
light sensing and calibration, and
colour matching.
Metal Sensor with LM393 Detection
Touch Sensor Module Metal Detector
It is an electronic device that
detects the presence of metal
nearby
It is useful for finding metal
inclusions hidden within objects,
or metal objects buried
underground.
They often consist of handheld
unit with a sensor probe which can
be swept over the ground or other
objects.
Alcohol Sensor
It can detect the presence of
alcohol gases at concentration
from 0.05 mg/L to 10 mg/L
The sensitive material used for
this sensor is SnO2 whose
conductivity is lower in clean air.
Its conductivity increases as the
concentration of the alcohol gases
increases.
Finger Print Sensor Module
These modules comes with Flash
memory to store the fingerprints
and work with any microcontroller
or system with TTL serial.
These modules can be added to
security systems, door locks, time
attendance system and much more.
Light Sensor
A Light sensor is used to detect light and create a voltage difference. The two main light
sensors generally used in robots are photo resistor and Photovoltaic cells.
Types of Light Sensor
 VEX light sensor
 LEGO light sensor
 Light Sensor 1000 lux
 SCI-BOX Light Detector
 TAOS TSL235R Light to Frequency Converter
 Parallax QTI Sensor
 DFRobot Ambient Light Sensor
 Arduino LilyPad light sensor
 DFRobot BH1750 light sensor
 CdS photoconductive cell
Light Sensor
Types of Light Sensor
 DFRobot Ambient Light Sensor
 Arduino LilyPad light sensor
 DFRobot BH1750 light sensor
 CdS photoconductive cell
Sound Sensor
This sensor (generally a microphone) detects sound and returns a voltage proportional
to the sound level. A simple robot can be designed to navigate based on the sound it
receives. Imagine a robot which turns right for one clap and turns left for two claps.
Complex robots can use the same microphone for speech and voice recognition.
Temperature Sensor
What if your robot has to work in a desert and transmit ambient temperature?
Simple solution is to use a temperature sensor. Tiny temperature sensor ICs
provide voltage difference for a change in temperature. Few generally used
temperature sensor IC’s are LM34, LM35, TMP35, TMP36, and TMP37.
Contact Sensor
Contact sensors are those which require physical contact against other objects
to trigger. A push button switch, limit switch or tactile bumper switch
are all examples of contact sensors.
Pressure Sensor
Pressure sensor measures pressure. Tactile pressure sensors are useful in robotics as
they are sensitive to touch, force and pressure. If you design a robot hand and need
to measure the amount of grip and pressure required to hold an object, then this is
what you would want to use.
Tilt Sensor
Tilt sensors measure tilt of an object. In a typical analog tilt sensor, a small amount of
mercury is suspended in a glass bulb. When mercury flows towards one end, it closes
a switch which suggests a tilt.
Distance (Proximity) Sensor
Most proximity sensors can also be used as distance sensors.
Type of distance sensor:
Ultrasonic Distance Sensors
Infrared Distance sensor
Laser range Sensor
Encoders
Stereo Camera
Distance (Proximity) Sensor
Most proximity sensors can also be used as distance sensors.
Type of distance sensor:
Ultrasonic Distance Sensors
Infrared Distance sensor
Laser range Sensor
Encoders
Stereo Camera
Voltage Sensor
Voltage sensors typically convert lower voltages to higher voltages,
or vice versa. One example is a general Operational- Amplifier (Op-
Amp) which accepts a low voltage, amplifies it, and generates a
higher voltage output.
Current Sensor
Current sensors are electronic circuits which monitor the current
flow in a circuit and output either a proportional voltage or a current.
IMU Sensor
Inertial Measurement Units combine properties of two or more sensors such as
Accelerometer, Gyro, Magnetometer, etc., to measure orientation, velocity and
gravitational forces.
Difference between analog and Digital Sensor
An accelerometer is a device which measures acceleration and tilt.
There are two kinds of forces which can affect an accelerometer: Static
force and Dynamic Force.
Difference between analog and
Digital Sensor
A digital sensor can only have two
values: 1 or 0, all or nothing. An example
of a digital sensor is a button, which can
either have the value of 1 when pressed
or 0 when not pressed. On a ZUM board
or a similar one, the digital sensors will
be connected on the digital pins D0-D13.
An analogue sensor can have
multiple states and is able to
transform the quantity of light,
temperature or other physical
elements into a value between 0 and
1023.
Digital Sensor Analog Sensor
7 Types of Industrial Robot Sensors
 2D Vision
 3D Vision
 Force Torque Sensor
 Collision Detection Sensor
 Safety Sensors
 Part Detection Sensors
 Others
Arduino
Steps to Download the Arduino
Software
1. Go to the official website of Arduino (https://www.arduino.cc/) > Click on
SOFTWARE < click on DOWNLOADS, Or
Open the URL https://www.arduino.cc/en/Main/Software
2. A page will appear, as shown below:
3. Scroll the screen a little, Click on the 'Windows Installer' as we are
operating with the Windows. We can select the Linux or Mac OS X,
accordingly.
4. A contribution window will appear. We can contribute according to our
choice and click on the 'CONTRIBUTE &DOWNLOAD' option. Otherwise, click
on the 'JUST DOWNLOAD' option
Steps to Download the Arduino
Software
5. Wait for few seconds for the downloading process to complete.
6. Open the downloaded file.
7. Grant permission to the Arduino Software on your computer.
8. Accept the license by clicking on 'I Agree' button, Click on the 'Next' button.
9. The window specifying the location of the installed folder will appear. Click on the
'Install' button. If you want to change the location, click on the 'Browse' button.
10. Now, we have to accept the security for the installation. We are required to
accept the security Installation three times. Click on the 'Install' button.
11. Click on the 'Close' button at the bottom once installation is done. The Arduino
IDE software will appear on your desktop
12 The Arduino IDE environment is written in the programming language named as
Java. So, we need to allow access to the Java Platform. As soon we open the
Arduino software, a license window will appear, Accept the license by clicking on
the 'Allow access' button.
13. The Arduino window will appear as:
Steps to Download the Arduino
Software
Configure
Board and
Serial Port
Error Message
Text Editor
for Writing
Code
Toolbar
Button
IDE Version
Visibility of the connected Hardware
port
We can view the port of the attached hardware Arduino IDE to our computer.
The steps are listed below:
1. Go to the File Manager and right-click on the This PC option:
2. Click on the Manage, First, we need to connect the Arduino board to our computer.
A window will appear, as shown below: Arduino Download
3. Click on the Device Manager
4. Under the PORT option, we can see the ports of the connected hardware.
57
Interfacing of Sensor Using Arduino
 Open Source electronic prototyping
platform based on flexible easy to use
hardware and software.
 Also including an Integrated
Development Environment
(IDE) for programming.
58
What it is used for?
• Physical Computing projects / research
• Interactive Installations
• Rapid prototyping
• Sensors ( to sense stuff )
– Push buttons, touch pads, tilt switches.
– Variable resistors (.eg. volume knob / sliders)
– Photoresistors (sensing light levels)
– Thermistors (temperature)
– Ultrasound (proximity range finder)
• Actuators ( to do stuff )
– Lights, LED’s
– Motors
– Speakers
– Displays (LCD)
59
Why Arduino?
• It is Open Source, both in terms of Hardware and Software.
• It is cheap(1300र), the hardware can be built from components or a
prefab board can be purchased for approx 900र.
• It can communicate with a computer via serial connection over
USB.
• It can be powered from USB or standalone DC power.
• It can run standalone from a computer (chip is programmable) and
it has memory (a small amount).
• It can work with both Digital and Analog electronic signals. Sensors
and Actuators.
• You can make cool stuff! Some people are even making
simple robots, and we all know robots are just cool.
60
Different Applications
61
Different Applications
62
Different Applications
63
Different Applications
64
Different Applications
65
Different Applications
66
Different Applications
67
Arduino Kit
68
Arduino Kit
Arduino UNO board, Breadboard, LED (Bright White, Green, Red, Yellow, Blue, and
RGB), LCD Alphanumeric, Wooden base that can be easily assembled, Solid core
jump wires, Stranded Jump wires of RED and BLACK color, 9V Battery, Resistors of
220 Ohms, 560 Ohms, 1kOhms, 4.7kOhms, 10kOhms, 1MOhms, and 10MOhms,
Small DC Motor of 6/9V, (40 x 1) Male Strip pins, Red, Blue, and Green Transparent
Gels, Diodes, The Capacitors of 100uF, Optocouplers, Small servo meter, Piezo
Capsule, Push Buttons, Tilt Sensor, Potentiometer, Phototransistor, Temperature Sensor,
MOSFET Transistors, H-bridge Motor Driver, USB Cable
69
Arduino Shields
 Arduino shields are the boards, which are plugged over the Arduino board to expand its
functionalities. There are different varieties of shields used for various tasks, such as
Arduino motor shields, Arduino communication shields, etc.
 Shield is defined as the hardware device that can be mounted over the board to increase
the capabilities of the projects. It also makes our work easy. For example, Ethernet
shields are used to connect the Arduino board to the Internet.
Type of Shields
• Ethernet shield
• Xbee Shield
• Proto shield
• Relay shield
• Motor shield
• LCD shield
• Bluetooth shield
• Capacitive Touchpad Shield
70
Hardware Details
71
Arduino Uno Pinout
72
Types of Arduino Boards
 Arduino Nano
 Arduino Mega
 Arduino Micro
 Arduino Leonardo
 Arduino Due
 Arduino Shields
 Arduino Lilypad
 Arduino Bluetooth
 Arduino Diecimila
 Arduino Robot
 Arduino Ethernet
 Arduino Zero
 Arduino Esplora
 Arduino Pro Micro
73
Arduino Uno Specifications
74
Arduino Boards
75
Arduino IDE Interface
76
Arduino IDE Interface
77
Commonly used Arduino Functions
78
Demonstration
Start up the Arduino software and
open up the Blink sketch.
For the most basic kind of program you’ll need a simple actuator, an
LED with the long leg (+) pushed into pin 13 and the short leg (-) in the
adjacent ground pin (GND). Pin 13 is special, in the sense that it has a
built in resistor to correctly control the voltage going into a testing LED
just like this.
79
Demonstration
80
Demonstration
81
Demonstration
82
Demonstration
83
Demonstration
84
Demonstration
85
Demonstration
86
Connections
• At this stage we just programmed the LED to blink on and off at a set time
interval.
• Press the reset button on the board and then click ‘Upload to I/O board’ in the
IDE.
If all goes well lights should flicker on the board and the IDE will confirm
87
Sensor Interfacing
Sensors use the following methods to provide information:
Digital on/off
Some devices, such as the tilt sensor simply switch a voltage on and off. These can be treated
like the switch.
Analog
Other sensors provide an analog signal (a voltage that is proportional to what is being
sensed, such as temperature or light level). The recipes for detecting light motion vibration
sound, and acceleration demonstrate how analog sensors can be used. All of them use the
analogRead command.
Pulse width
Distance sensors, provide data using pulse duration proportional to the distance value.
Applications using these sensors measure the duration of a pulse using the pulseIn
command.
Serial
Some sensors provide values using a serial protocol. for an example of how you can add
additional software serial ports if you have multiple serial sensors or the hardware serial port
is occupied for some other task.
88
Sensor Interfacing
Pulse Width Modulation
89
Sensor Interfacing
90
REFERNCES
Useful Links
1. https://www.tinkercad.com/ (Arduino)
2. https://www.arduino.cc/
3. https://www.scratch.mit.edu/
4. https://azure-samples.github.io/raspberry-pi-web-simulator/ (Raspberry-Pi)
5. https://trinket.io/sense-hat (Raspberry-Pi)

1. For Knowledge of Arduino Introduction.pptx

  • 1.
    Course Name: FabLab Course Code: MC 1030 Department of Mechatronics Engg. Manipal University Jaipur
  • 2.
    Sensors Human beings collectinformation of the surroundings using their sensors namely, eyes, ears, nose, skin, etc. in order to perform various tasks. A sensor is used to take measurement of physical variable. A sensor requires calibration Sensors are used to build intelligent robots.
  • 3.
    Sensor vs Transducer Transducer= primary measuring element + secondary measuring element i.e. Transducer = Sensor + Signal conditioning circuit
  • 4.
    Classification of Sensors Sensors InternalSensors (used to operate the drive units) Example: Position sensors Velocity Sensors Acceleration Sensors Force/Moment Sensors External Sensors (used to collect the information Of the environment) Example: Temperature Sensor, Visual Sensor, Proximity Sensor, Acoustic Sensor
  • 5.
    Classification of Sensors Sensors ContactSensors (Physical contact between sensor mounted on robot and object) Non Contact Sensors (No Physical Contact) Example: Visual Sensor, Proximity Sensor, Acoustic Sensor, Range Sensor Touch Sensor/ Tactile Sensor/Binary Sensor (indicate presence or absence of an object) Example: Micro switch, Limit Switch Force Sensor/ Analog Sensor (not only the contact is made but also the force is measured) Sensors using strain gauges
  • 6.
    Types of RobotSensors Ultrasonic Sensors Light sensors. Sound Sensor. Temperature Sensor. Contact Sensor. Proximity Sensor. Distance Sensor. Level and Pressure Sensors. Tilt Sensors. Voltage sensor Current sensor IMU Sensor Acceleration sensor. Soil hygrometer Detection Module Bluetooth Module Infrared Obstacle Avoidance Detection Smoke and Gas Sensor Motion Sensor Speed Sensor Soil Moisture IR Infrared Flame Detection Sensor RF 433Mhz Transmitter/Reciever Passive Buzzer Module Breadboard Power Supply Module Humidity and Rain Detection Sensor Rotary encoder Module
  • 7.
  • 8.
    Joystick Sensor Module Joystickis an input device Analog Joystick sometimes called as Control Stick It is also used to control the pointer movement in 2 dimension axis
  • 9.
    Bluetooth Module It managesthe communication channel of the wireless part It can transmit and Receive the data wirelessly by using two devices It can transmit and receive the data from host system with the help of Host controller Interface (HCI)
  • 10.
    Vibration/Knock Sensor It detectsvibrations or shocks from knocking or tapping it It is an electronic switch which is normally open When it detects any vibrations, it closes
  • 11.
    Motion Sensor It canwork from 3.3-5 V The sensor used LM393comparator to detect vibrations over threshold point It provide digital data, Logic Low, Logic High, 0 or 1
  • 12.
    Pyroelectric Infrared Sensor ThePIR Sensor Module allows you to sense motion It is used to detect the motion of a human body within the sensor range
  • 13.
    Pulse Sensor Module Ithas a light which helps in measuring the pulse rate When we place the finger on the pulse sensor, the light reflected will change based on the volume of blood inside the capillary blood vessels during the heart beat.
  • 14.
    Hall Sensor Module Basedon the Hall effect, it is a one that varies its output voltage in response to magnetic field Hall sensors are used for proximity switching, positioning, speed detection and current sensing applications
  • 15.
    Photoresistor Photoelectric sensor Module LDRsensor module is used to detect the intensity of light It is associated with both analog output pin and digital output labelled as AO and DO on the board. When there is light , the resistance of LDR became low according to intensity of light
  • 16.
    Photodiode Light sensor Module Itis most sensitive to ambient light, generally used to detect the brightness of the ambient light intensity The difference between PRM and PDM is that PDM is directional, can be perceived the fixed direction of light source
  • 17.
    IR sensor Module Itconsist mainly of IR transmitter and Receiver, Opamp, Variable Resistor, output LED IR LED emits the light in the range of infrared frequency IR light is invisible to us as its wavelength (700 nm-1mm) is much higher than the visible light range.
  • 18.
    Ultrasonic Sensor Module AnUltrasonic Sensor works based on the properties of the sound waves with frequency greater than that of the human audible range. It can detect movement of targets and measure the distance to them in many automated factories and process plants
  • 19.
    Sound Sensor Module Itis used to detect the intensity of sound Applications: switch, security as well as monitoring. The accuracy of this sensor can be changed for the ease of usage
  • 20.
    Soil Moisture Sensor Itis used to detect the moisture When the soil is dry, the module outputs a high level, otherwise output low. This sensor can be used to make Automatic watering system so that the garden plants can be watered without people to manage.
  • 21.
    Digital Barometric Pressure Sensor Itis also known as Barometric Air pressure (BAP) It is a type of engine management sensor commonly found on many vehicles It is responsible for measuring the atmospheric pressure of the environmental that vehicle is driving in
  • 22.
    Digital Thermal Sensor Temperaturesensor measures the amount of heat energy or even coldness that is generated by the object or system allowing us to sense or detect any physical change to that temperature producing either an analogue or digital output.
  • 23.
    Rotary Encoder Module Itis used in wide range of applications that require monitoring or control or both of mechanical systems It includes industrial controls, robotics, photoelectric devices, computer input devices such as opt mechanical device , track balls controlled stress rheometers and rotating radar platforms
  • 24.
    MQ2 Gas Sensor Itis an electronic sensor used for sensing the concentration of gases in the air such as LPG, propane, methane, hydrogen, alcohol, smoke and carbon monoxide
  • 25.
    Humidity and RainDetection Sensor It can be used as a switch when rain drops falls through the raining board and also measuring rainfall intensity
  • 26.
    Speed Sensor Module Tocheck the rate of an electric motor It can used in Association with microcontroller for motor speed detection, pulse count, position limit, etc. In principle, any rate meter simply measures the rate at which some event occurs.
  • 27.
    IR infrared FlameDetection Sensor It can detect low frequency flickering IR radiation ranging from 1 to 15 Hz during combustion. It uses the IR flame flicker techniques, which enables the sensor to operate through layer of oil , water, vapour dust or ice.
  • 28.
    Accelerometer Module It canbe used for tilt sensing applications as well as dynamic acceleration resulting from motion, shock or vibration.  The ADXL335 gives complete 3 axis acceleration movement.
  • 29.
    RF433 MHz Transmitter Receiver Itreceives serial data and transmit it wirelessly through RF through its antenna connected at pin 4  The transmission occurs at the rate of 1 kbps-10 kbps. The transmitted data is received by an RF receiver operating at the same frequency as that of transmitter.
  • 30.
    GPRS GSM Module Itis used to enable communication between microcontroller and the GSM network. GSM stands for Global system for mobile communication and GPRS for General Packet radio service.
  • 31.
    Temperature and Humidity SensorModule It uses an internal thermistor and a capacitive humidity sensor to determine environment conditions, an internal chip is responsible for converting readings to a serial digital signal.
  • 32.
    Colour Sensor Module Itis based on TCS3200, RG Sensor chip and 4 White LED’s It can detect and measure a nearly limitless range of visible colours Applications include test strip reading, sorting by colour, ambient light sensing and calibration, and colour matching.
  • 33.
    Metal Sensor withLM393 Detection Touch Sensor Module Metal Detector It is an electronic device that detects the presence of metal nearby It is useful for finding metal inclusions hidden within objects, or metal objects buried underground. They often consist of handheld unit with a sensor probe which can be swept over the ground or other objects.
  • 34.
    Alcohol Sensor It candetect the presence of alcohol gases at concentration from 0.05 mg/L to 10 mg/L The sensitive material used for this sensor is SnO2 whose conductivity is lower in clean air. Its conductivity increases as the concentration of the alcohol gases increases.
  • 35.
    Finger Print SensorModule These modules comes with Flash memory to store the fingerprints and work with any microcontroller or system with TTL serial. These modules can be added to security systems, door locks, time attendance system and much more.
  • 36.
    Light Sensor A Lightsensor is used to detect light and create a voltage difference. The two main light sensors generally used in robots are photo resistor and Photovoltaic cells. Types of Light Sensor  VEX light sensor  LEGO light sensor  Light Sensor 1000 lux  SCI-BOX Light Detector  TAOS TSL235R Light to Frequency Converter  Parallax QTI Sensor  DFRobot Ambient Light Sensor  Arduino LilyPad light sensor  DFRobot BH1750 light sensor  CdS photoconductive cell
  • 37.
    Light Sensor A Lightsensor is used to detect light and create a voltage difference. The two main light sensors generally used in robots are photo resistor and Photovoltaic cells. Types of Light Sensor  VEX light sensor  LEGO light sensor  Light Sensor 1000 lux  SCI-BOX Light Detector  TAOS TSL235R Light to Frequency Converter  Parallax QTI Sensor  DFRobot Ambient Light Sensor  Arduino LilyPad light sensor  DFRobot BH1750 light sensor  CdS photoconductive cell
  • 38.
    Light Sensor Types ofLight Sensor  DFRobot Ambient Light Sensor  Arduino LilyPad light sensor  DFRobot BH1750 light sensor  CdS photoconductive cell
  • 39.
    Sound Sensor This sensor(generally a microphone) detects sound and returns a voltage proportional to the sound level. A simple robot can be designed to navigate based on the sound it receives. Imagine a robot which turns right for one clap and turns left for two claps. Complex robots can use the same microphone for speech and voice recognition.
  • 40.
    Temperature Sensor What ifyour robot has to work in a desert and transmit ambient temperature? Simple solution is to use a temperature sensor. Tiny temperature sensor ICs provide voltage difference for a change in temperature. Few generally used temperature sensor IC’s are LM34, LM35, TMP35, TMP36, and TMP37.
  • 41.
    Contact Sensor Contact sensorsare those which require physical contact against other objects to trigger. A push button switch, limit switch or tactile bumper switch are all examples of contact sensors.
  • 42.
    Pressure Sensor Pressure sensormeasures pressure. Tactile pressure sensors are useful in robotics as they are sensitive to touch, force and pressure. If you design a robot hand and need to measure the amount of grip and pressure required to hold an object, then this is what you would want to use.
  • 43.
    Tilt Sensor Tilt sensorsmeasure tilt of an object. In a typical analog tilt sensor, a small amount of mercury is suspended in a glass bulb. When mercury flows towards one end, it closes a switch which suggests a tilt.
  • 44.
    Distance (Proximity) Sensor Mostproximity sensors can also be used as distance sensors. Type of distance sensor: Ultrasonic Distance Sensors Infrared Distance sensor Laser range Sensor Encoders Stereo Camera
  • 45.
    Distance (Proximity) Sensor Mostproximity sensors can also be used as distance sensors. Type of distance sensor: Ultrasonic Distance Sensors Infrared Distance sensor Laser range Sensor Encoders Stereo Camera
  • 46.
    Voltage Sensor Voltage sensorstypically convert lower voltages to higher voltages, or vice versa. One example is a general Operational- Amplifier (Op- Amp) which accepts a low voltage, amplifies it, and generates a higher voltage output.
  • 47.
    Current Sensor Current sensorsare electronic circuits which monitor the current flow in a circuit and output either a proportional voltage or a current.
  • 48.
    IMU Sensor Inertial MeasurementUnits combine properties of two or more sensors such as Accelerometer, Gyro, Magnetometer, etc., to measure orientation, velocity and gravitational forces.
  • 49.
    Difference between analogand Digital Sensor An accelerometer is a device which measures acceleration and tilt. There are two kinds of forces which can affect an accelerometer: Static force and Dynamic Force.
  • 50.
    Difference between analogand Digital Sensor A digital sensor can only have two values: 1 or 0, all or nothing. An example of a digital sensor is a button, which can either have the value of 1 when pressed or 0 when not pressed. On a ZUM board or a similar one, the digital sensors will be connected on the digital pins D0-D13. An analogue sensor can have multiple states and is able to transform the quantity of light, temperature or other physical elements into a value between 0 and 1023. Digital Sensor Analog Sensor
  • 51.
    7 Types ofIndustrial Robot Sensors  2D Vision  3D Vision  Force Torque Sensor  Collision Detection Sensor  Safety Sensors  Part Detection Sensors  Others
  • 52.
  • 53.
    Steps to Downloadthe Arduino Software 1. Go to the official website of Arduino (https://www.arduino.cc/) > Click on SOFTWARE < click on DOWNLOADS, Or Open the URL https://www.arduino.cc/en/Main/Software 2. A page will appear, as shown below: 3. Scroll the screen a little, Click on the 'Windows Installer' as we are operating with the Windows. We can select the Linux or Mac OS X, accordingly. 4. A contribution window will appear. We can contribute according to our choice and click on the 'CONTRIBUTE &DOWNLOAD' option. Otherwise, click on the 'JUST DOWNLOAD' option
  • 54.
    Steps to Downloadthe Arduino Software 5. Wait for few seconds for the downloading process to complete. 6. Open the downloaded file. 7. Grant permission to the Arduino Software on your computer. 8. Accept the license by clicking on 'I Agree' button, Click on the 'Next' button. 9. The window specifying the location of the installed folder will appear. Click on the 'Install' button. If you want to change the location, click on the 'Browse' button. 10. Now, we have to accept the security for the installation. We are required to accept the security Installation three times. Click on the 'Install' button. 11. Click on the 'Close' button at the bottom once installation is done. The Arduino IDE software will appear on your desktop 12 The Arduino IDE environment is written in the programming language named as Java. So, we need to allow access to the Java Platform. As soon we open the Arduino software, a license window will appear, Accept the license by clicking on the 'Allow access' button. 13. The Arduino window will appear as:
  • 55.
    Steps to Downloadthe Arduino Software Configure Board and Serial Port Error Message Text Editor for Writing Code Toolbar Button IDE Version
  • 56.
    Visibility of theconnected Hardware port We can view the port of the attached hardware Arduino IDE to our computer. The steps are listed below: 1. Go to the File Manager and right-click on the This PC option: 2. Click on the Manage, First, we need to connect the Arduino board to our computer. A window will appear, as shown below: Arduino Download 3. Click on the Device Manager 4. Under the PORT option, we can see the ports of the connected hardware.
  • 57.
    57 Interfacing of SensorUsing Arduino  Open Source electronic prototyping platform based on flexible easy to use hardware and software.  Also including an Integrated Development Environment (IDE) for programming.
  • 58.
    58 What it isused for? • Physical Computing projects / research • Interactive Installations • Rapid prototyping • Sensors ( to sense stuff ) – Push buttons, touch pads, tilt switches. – Variable resistors (.eg. volume knob / sliders) – Photoresistors (sensing light levels) – Thermistors (temperature) – Ultrasound (proximity range finder) • Actuators ( to do stuff ) – Lights, LED’s – Motors – Speakers – Displays (LCD)
  • 59.
    59 Why Arduino? • Itis Open Source, both in terms of Hardware and Software. • It is cheap(1300र), the hardware can be built from components or a prefab board can be purchased for approx 900र. • It can communicate with a computer via serial connection over USB. • It can be powered from USB or standalone DC power. • It can run standalone from a computer (chip is programmable) and it has memory (a small amount). • It can work with both Digital and Analog electronic signals. Sensors and Actuators. • You can make cool stuff! Some people are even making simple robots, and we all know robots are just cool.
  • 60.
  • 61.
  • 62.
  • 63.
  • 64.
  • 65.
  • 66.
  • 67.
  • 68.
    68 Arduino Kit Arduino UNOboard, Breadboard, LED (Bright White, Green, Red, Yellow, Blue, and RGB), LCD Alphanumeric, Wooden base that can be easily assembled, Solid core jump wires, Stranded Jump wires of RED and BLACK color, 9V Battery, Resistors of 220 Ohms, 560 Ohms, 1kOhms, 4.7kOhms, 10kOhms, 1MOhms, and 10MOhms, Small DC Motor of 6/9V, (40 x 1) Male Strip pins, Red, Blue, and Green Transparent Gels, Diodes, The Capacitors of 100uF, Optocouplers, Small servo meter, Piezo Capsule, Push Buttons, Tilt Sensor, Potentiometer, Phototransistor, Temperature Sensor, MOSFET Transistors, H-bridge Motor Driver, USB Cable
  • 69.
    69 Arduino Shields  Arduinoshields are the boards, which are plugged over the Arduino board to expand its functionalities. There are different varieties of shields used for various tasks, such as Arduino motor shields, Arduino communication shields, etc.  Shield is defined as the hardware device that can be mounted over the board to increase the capabilities of the projects. It also makes our work easy. For example, Ethernet shields are used to connect the Arduino board to the Internet. Type of Shields • Ethernet shield • Xbee Shield • Proto shield • Relay shield • Motor shield • LCD shield • Bluetooth shield • Capacitive Touchpad Shield
  • 70.
  • 71.
  • 72.
    72 Types of ArduinoBoards  Arduino Nano  Arduino Mega  Arduino Micro  Arduino Leonardo  Arduino Due  Arduino Shields  Arduino Lilypad  Arduino Bluetooth  Arduino Diecimila  Arduino Robot  Arduino Ethernet  Arduino Zero  Arduino Esplora  Arduino Pro Micro
  • 73.
  • 74.
  • 75.
  • 76.
  • 77.
  • 78.
    78 Demonstration Start up theArduino software and open up the Blink sketch. For the most basic kind of program you’ll need a simple actuator, an LED with the long leg (+) pushed into pin 13 and the short leg (-) in the adjacent ground pin (GND). Pin 13 is special, in the sense that it has a built in resistor to correctly control the voltage going into a testing LED just like this.
  • 79.
  • 80.
  • 81.
  • 82.
  • 83.
  • 84.
  • 85.
  • 86.
    86 Connections • At thisstage we just programmed the LED to blink on and off at a set time interval. • Press the reset button on the board and then click ‘Upload to I/O board’ in the IDE. If all goes well lights should flicker on the board and the IDE will confirm
  • 87.
    87 Sensor Interfacing Sensors usethe following methods to provide information: Digital on/off Some devices, such as the tilt sensor simply switch a voltage on and off. These can be treated like the switch. Analog Other sensors provide an analog signal (a voltage that is proportional to what is being sensed, such as temperature or light level). The recipes for detecting light motion vibration sound, and acceleration demonstrate how analog sensors can be used. All of them use the analogRead command. Pulse width Distance sensors, provide data using pulse duration proportional to the distance value. Applications using these sensors measure the duration of a pulse using the pulseIn command. Serial Some sensors provide values using a serial protocol. for an example of how you can add additional software serial ports if you have multiple serial sensors or the hardware serial port is occupied for some other task.
  • 88.
  • 89.
  • 90.
    90 REFERNCES Useful Links 1. https://www.tinkercad.com/(Arduino) 2. https://www.arduino.cc/ 3. https://www.scratch.mit.edu/ 4. https://azure-samples.github.io/raspberry-pi-web-simulator/ (Raspberry-Pi) 5. https://trinket.io/sense-hat (Raspberry-Pi)

Editor's Notes

  • #4 What are the types of sensors in Arduino? Some of the types of sensors in Arduino are listed below: Light sensor The light sensor is used to control the light. It is used with LDR (Light Dependent Resistor) in Arduino. Ultrasonic sensor The ultrasonic sensor is used to determine the distance of the object using SONAR. Temperature sensor The temperature sensor is used to detect the temperature around it. Knock Sensor The knock sensor is used to pick the vibrations of the knocking. It is a common category of a vibration sensor. Object Detection Sensor It is used to detect the object by emitting infrared radiations, which are reflected or bounced back by that object. Tracking Sensor It allows the robots to follow a particular path specified by sensing the marking or lines on the surface. Metal Touch Sensor It is suitable for detecting the human touch. Water Level Sensor It is used to measure the water or the depth of the water level. It is also used to detect leaks in containers. Vibration Sensor The vibration sensor is used to measure the vibrations. Air Pressure sensor It is commonly related to meteorology, biomedical fields. It looks like the below image: Pulse Sensor The pulse sensor is used to measure the pulse rate. It looks like the below image: Capacitive soil moisture sensor It is used to measure the moisture level of the soil. Microphone sensor The microphone sensor in Arduino is used to detect the sound. The analog and digital are the two outputs of this module. The digital output sends the high signal when the intensity of sound reaches a certain threshold. We can adjust the sensitivity of a module with the help of a potentiometer. humidity sensor The humidity sensor is used to monitor weather conditions. Motion sensor The motion sensor detects the movement and occupancy from the human body with the help of Infrared radiation. Vibration sensor The vibration sensor is used to detect the vibrations. Sound sensor The sound sensor is suitable to detect the sound of the environment. Pressure Sensor The pressure sensor is used to measure the pressure. The sensor in Arduino measures the pressure and displays it on the small LCD screen. Magnetic field sensor The magnetic field sensor measures the magnetic field strength and produces a varying voltage as the output in Arduino.
  • #8 It is used in video games Quadcopter, helicopter in remote. It is a 2 dimension and use 2 potentiometer on both the axis
  • #51 A simple obstacle avoider robot can be built using a couple of photo resistor, or an infrared sensor. The more complex your robot gets, the more number of sensors you tend to use. A single task may require a combination of different sensors, or different tasks can be achieved using a single sensor. Sometimes, a task can be performed from any of the many available sensors.
  • #65 ABS System
  • #67 The noise from the electrical signals is removed by the Optocouplers. It is also used to separate the low power circuits from the high-power circuits and transfers the electrical signals between these separated circuits. The servo motor is used to control the position, liner speed, and rotational speed. The advantageous features of servo motor are high efficiency, high precision, low heat generation, etc. The tilt sensor is used to measure the tilt with respect to the reference plain. It is also used to detect the inclination of the plane. The potentiometer acts as a knob, which is used to provide variable resistance. It can also be used to alter its resistance. The amount of resistance is measured as an analog value. We can control the high voltage Arduino projects using the Mosfet Transistors. One terminal is used as a power source, and the other two terminals are used onboard. These motors are capable of driving the DC motors. We can turn the motor in both directions with the help of an H-bridge motor driver.
  • #69 Ethernet shield The Ethernet shields are used to connect the Arduino board to the Internet. We need to mount the shield on the top of the specified Arduino board. Xbee Shield We can communicate wirelessly with the Arduino board by using the Xbee Shield with Zigbee. It reduces the hassle of the cable, which makes Xbee a wireless communication model. The Xbee wireless module allows us to communicate outdoor upto 300 feet and indoor upto 100 feet. Proto shield Proto shields are designed for custom circuits. We can solder electronic circuits directly on the shield. The shield consists of two LED pads, two power lines, and SPI signal pads. The IOREF (Input Output voltage REFerence) and GND (Ground) are the two power lines on the board. Relay shield The Arduino digital I/O pins cannot bear the high current due to its voltage and current limits. The relay shield is used to overcome such situation. It provides a solution for controlling the devices carrying high current and voltage. The shield consists of four relays and four LED indicators. It also provides NO/NC interfaces and a shield form factor for the simple connection to the Arduino board. The LED indicators depicts the ON/OFF condition of each relay. Motor shield The motor shield helps us to control the motor using the Arduino board. It controls the direction and working speed of the motor. We can power the motor shield either by the external power supply through the input terminal or directly by the Arduino. We can also measure the absorption current of each motor with the help of the motor shield. The motor shield is based on the L298 chip that can drive a step motor or two DC motors. L298 chip is a full bridge IC. It also consists of the heat sinker, which increases the performance of the motor shield. It can drive inductive loads, such as solenoids, etc. The operating voltage is from 5V to 12V. LCD shield The keypad of LCD (Liquid Crystal Display) shield includes five buttons called as up, down, left, right, and select. There are 6 push buttons present on the shield that can be used as a custom menu control panel. It consists of the 1602 white characters, which are displayed on the blue backlight LCD. Bluetooth shield The Bluetooth shield can be used as a wireless module for transparent serial communication. It includes a serial Bluetooth module. D0 and D1 are the serial hardware ports in the Bluetooth shield, which can be used to communicate with the two serial ports (from D0 to D7) of the Arduino board. Capacitive Touchpad shield It has a touchpad interface that allows to integrate the Arduino board with the touch shield. The Capacitive touchpad shield consists of 12 sensitive touch buttons, which includes 3 electrode connections and 9 capacitive touch pads.
  • #70 The Arduino UNO is a standard board of Arduino. Arduino UNO is based on an ATmega328P Microcontroller. It is easy to use compared to other boards, such as the Arduino Mega board, etc. The components on the Arduino board are ATmega328P Microcontroller, ICSP pin, power LED indicator, Digital I/O pins, Analog pins, AREF pin, 16 MHz crystal oscillator, GND pins, Vin pin, voltage regulator, Tx and Rx LED, USB, and a reset button. ATmega328 Microcontroller- It is a single chip Microcontroller of the ATmel family. The processor code inside it is of 8-bit. It combines Memory (SRAM, EEPROM, and Flash), Analog to Digital Converter, SPI serial ports, I/O lines, registers, timer, external and internal interrupts, and oscillator. ICSP pin - The In-Circuit Serial Programming pin allows the user to program using the firmware of the Arduino board. Power LED Indicator- The ON status of LED shows the power is activated. When the power is OFF, the LED will not light up. Digital I/O pins- The digital pins have the value HIGH or LOW. The pins numbered from D0 to D13 are digital pins. TX and RX LED's- The successful flow of data is represented by the lighting of these LED's. AREF- The Analog Reference (AREF) pin is used to feed a reference voltage to the Arduino UNO board from the external power supply. Reset button- It is used to add a Reset button to the connection. USB- It allows the board to connect to the computer. It is essential for the programming of the Arduino UNO board. Crystal Oscillator- The Crystal oscillator has a frequency of 16MHz, which makes the Arduino UNO a powerful board. Voltage Regulator- The voltage regulator converts the input voltage to 5V. GND- Ground pins. The ground pin acts as a pin with zero voltage. Vin- It is the input voltage. Analog Pins- The pins numbered from A0 to A5 are analog pins. The function of Analog pins is to read the analog sensor used in the connection. It can also act as GPIO (General Purpose Input Output) pins.
  • #71 ATmega328 Microcontroller- It is a single chip Microcontroller of the ATmel family. The processor core inside it is of 8-bit. It is a low-cost, low powered, and a simple microcontroller. The Arduino UNO and Nano models are based on the ATmega328 Microcontroller. Voltage Regulator The voltage regulator converts the input voltage to 5V. The primary function of voltage regulator is to regulate the voltage level in the Arduino board. For any changes in the input voltage of the regulator, the output voltage is constant and steady. GND - Ground pins. The ground pins are used to ground the circuit. TXD and RXD TXD and RXD pins are used for serial communication. The TXD is used for transmitting the data, and RXD is used for receiving the data. It also represents the successful flow of data. USB Interface The USB Interface is used to plug-in the USB cable. It allows the board to connect to the computer. It is essential for the programming of the Arduino UNO board. RESET It is used to add a Reset button to the connection. SCK It stands for Serial Clock. These are the clock pulses, which are used to synchronize the transmission of data. MISO It stands for Master Input/ Slave Output. The save line in the MISO pin is used to send the data to the master. VCC It is the modulated DC supply voltage, which is used to regulate the IC's used in the connection. It is also called as the primary voltage for IC's present on the Arduino board. The Vcc voltage value can be negative or positive with respect to the GND pin. Crystal Oscillator- The Crystal oscillator has a frequency of 16MHz, which makes the Arduino UNO a powerful board. ICSP It stands for In-Circuit Serial Programming. The users can program the Arduino board's firmware using the ICSP pins. The program or firmware with the advanced functionalities is received by microcontroller with the help of the ICSP header. The ICSP header consists of 6 pins. The structure of the ICSP header is shown below: It is the top view of the ICSP header. SDA It stands for Serial Data. It is a line used by the slave and master to send and receive data. It is called as a data line, while SCL is called as a clock line. SCL It stands for Serial Clock. It is defined as the line that carries the clock data. It is used to synchronize the transfer of data between the two devices. The Serial Clock is generated by the device and it is called as master. SPI It stands for Serial Peripheral Interface. It is popularly used by the microcontrollers to communicate with one or more peripheral devices quickly. It uses conductors for data receiving, data sending, synchronization, and device selection (for communication). MOSI It stands for Master Output/ Slave Input. The MOSI and SCK are driven by the Master. SS It stands for Slave Select. It is the Slave Select line, which is used by the master. It acts as the enable line. I2C It is the two-wire serial communication protocol. It stands for Inter Integrated Circuits. The I2C is a serial communication protocol that uses SCL (Serial Clock) and SDA (Serial Data) to receive and send data between two devices. 3.3V and 5V are the operating voltages of the board.
  • #72 Arduino UNO Arduino UNO is based on an ATmega328P microcontroller. It is easy to use compared to other boards, such as the Arduino Mega board, etc. The Arduino UNO includes 6 analog pin inputs, 14 digital pins, a USB connector, a power jack, and an ICSP (In-Circuit Serial Programming) header. It is the most used and of standard form from the list of all available Arduino Boards. It is also recommended for beginners as it is easy to use. Arduino Nano The Arduino Nano is a small Arduino board based on ATmega328P or ATmega628 Microcontroller. The connectivity is the same as the Arduino UNO board. The Nano board is defined as a sustainable, small, consistent, and flexible microcontroller board. It is small in size compared to the UNO board. The devices required to start our projects using the Arduino Nano board are Arduino IDE and mini USB. The Arduino Nano includes an I/O pin set of 14 digital pins and 8 analog pins. It also includes 6 Power pins and 2 Reset pins. Arduino Mega The Arduino Mega is based on ATmega2560 Microcontroller. The ATmega2560 is an 8-bit microcontroller. We need a simple USB cable to connect to the computer and the AC to DC adapter or battery to get started with it. It has the advantage of working with more memory space. The Arduino Mega includes 54 I/O digital pins and 16 Analog Input/Output (I/O), ICSP header, a reset button, 4 UART (Universal Asynchronous Reciever/Transmitter) ports, USB connection, and a power jack. Arduino Micro The Arduino Micro is based on the ATmega32U4 Microcontroller. It consists of 20 sets of pins. The 7 pins from the set are PWM (Pulse Width Modulation) pins, while 12 pins are analog input pins. The other components on board are reset button, 16MHz crystal oscillator, ICSP header, and a micro USB connection. The USB is inbuilt in the Arduino Micro board. The Arduino Micro is also called as the shrunk version of Arduino Leonardo. Arduino Leonardo The basic specification of the Arduino Leonardo is the same as the Arduino Micro. It is also based on ATmega32U4 Microcontroller. The components present on the board are 20 analog and digital pins, reset button, 16MHz crystal oscillator, ICSP header, and a micro USB connection. Arduino Due The Arduino Due is based on the 32- bit ARM core. It is the first Arduino board that has developed based on the ARM Microcontroller. It consists of 54 Digital Input/Output pins and 12 Analog pins. The Microcontroller present on the board is the Atmel SAM3X8E ARM Cortex-M3 CPU. It has two ports, namely, native USB port and Programming port. The micro side of the USB cable should be attached to the programming port. Arduino Shields The Arduino shields are the boards, which can be plugged on the top of the PCB. The shields further extend the potential of the PCB's. The production of shields is cheap. It is also easy to use. There are various types of Arduino shields that can be used for different purposes. For example, the Xbee shield. The Xbee shield can be used for wireless communication between multiple Arduino boards over distances upto 300 feet using the Zigbee Module. Arduino Lilypad The Arduino LilyPad was initially created for wearable projects and e-textiles. It is based on the ATmega168 Microcontroller. The functionality of Lilypad is the same as other Arduino Boards. It is a round, light-weight board with a minimal number of components to keep the size of board small. The Arduino Lilypad board was designed by Sparkfun and Leah. It was developed by Leah Buechley. It has 9 digital I/O pins. Arduino Bluetooth The Arduino Bluetooth board is based on ATmega168 Microcontroller. It is also named as Arduino BT board. The components present on the board are 16 digital pins, 6 analog pins, reset button, 16MHz crystal oscillator, ICSP header, and screw terminals. The screw terminals are used for power. The Arduino Bluetooth Microcontroller board can be programmed over the Bluetooth as a wireless connection. Arduino Diecimila The Arduino Diecimila is also based on ATmeg628 Microcontroller. The board consists of 6 analog pin inputs, 14 digital Input/Output pins, a USB connector, a power jack, an ICSP (In-Circuit Serial Programming) header, and a reset button. We can connect the board to the computer using the USB, and can power-on the board with the help of AC to DC adapter. The Diecimila was initially developed to mark the 10000 delivered boards of Arduino. Here, Diecimila means 10,000 in Italian. Arduino Robot The Arduino Robot is called as the tiny computer. It is widely used in robotics. The board comprises of the speaker, five-button, color screen, two motors, an SD card reader, a digital compass, two potentiometers, and five floor sensors. The Robot Library can be used to control the actuators and the sensors. Arduino Ethernet The Arduino Ethernet is based on the ATmega328 Microcontroller. The board consists of 6 analog pins, 14 digital I/O pins, crystal oscillator, reset button, ICSP header, a power jack, and an RJ45 connection. With the help of the Ethernet shield, we can connect our Arduino board to the internet. Arduino Zero The Arduino Zero is generally called as the 32-bit extension of the Arduino UNO. It is based on ATmel's SAM21 MCU. The board consists of 6 analog pin inputs, 14 digital Input/Output pins, a USB connector, a power jack, and an ICSP (In-Circuit Serial Programming) header, UART port pins, a power header, and AREF button. The Embedded debugger of Atmel is also supported by the Arduino Zero. The function of Debugger is to provide a full debug interface, which does not require additional hardware. Arduino Esplora The Arduino Esplora boards allow easy interfacing of sensors and actuators. The outputs and inputs connected on the Esplora board make it unique from other types of Arduino boards. The board includes outputs, inputs, a small microcontroller, a microphone, a sensor, a joystick, an accelerometer, a temperature sensor, four buttons, and a slider. Arduino Pro Micro The structure of Arduino Pro Micro is similar to the Arduino Mini board, except the Microcontroller ATmega32U4. The board consists of 12 digital Input/output pins, 5 PWM (Pulse Width Modulation) pins, Tx and Rx serial connections, and 10-bit ADC (Analog to Digital Converter).