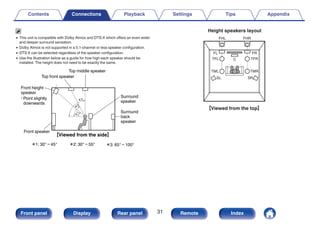
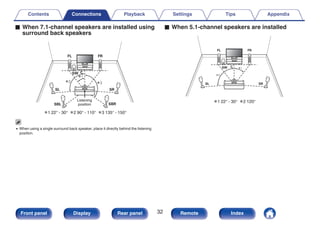
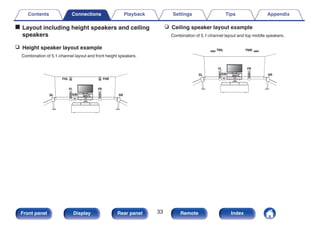
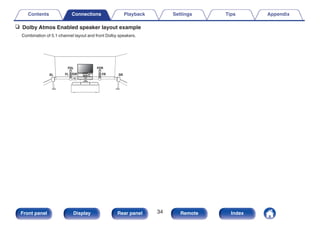
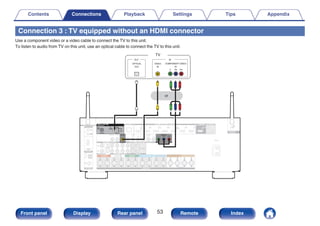
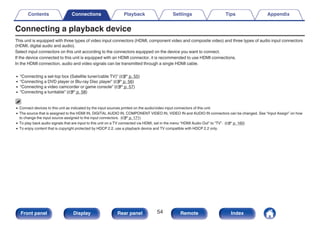
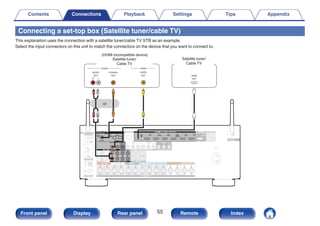
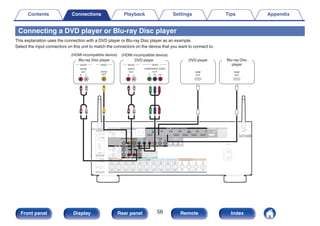
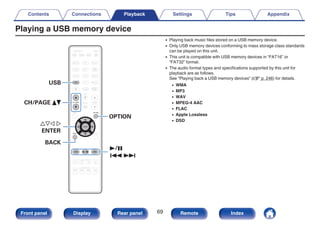
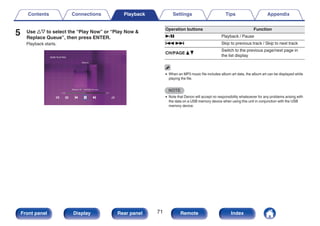
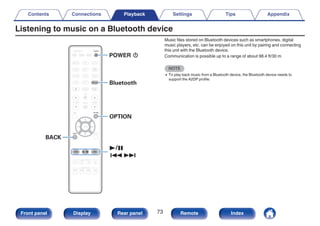
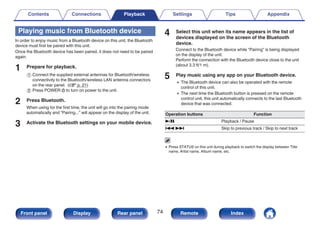
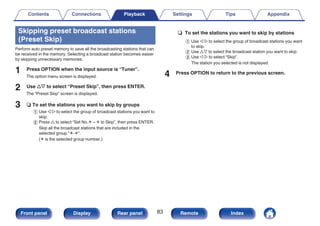
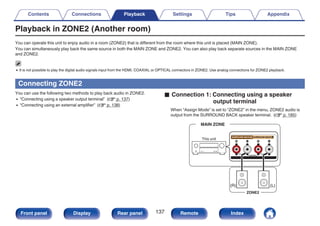
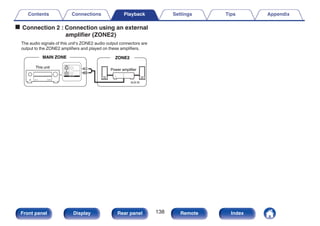
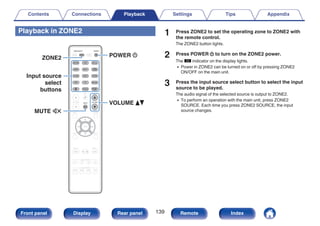
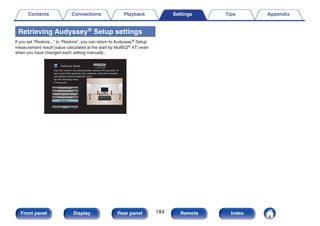
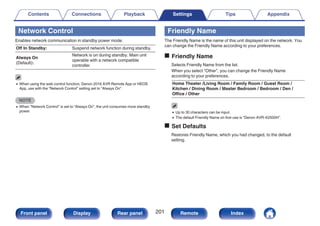
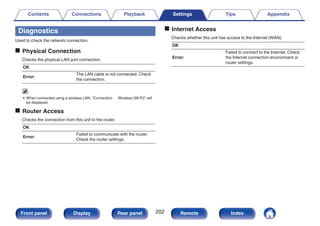
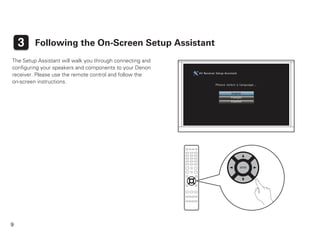
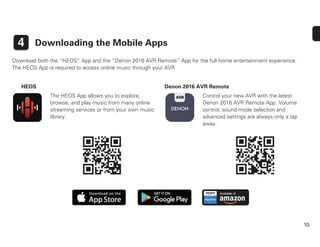
This document provides an overview of the features and specifications of the Denon AVR-X2500H integrated network AV receiver. Key features highlighted include high quality discrete 7-channel amplification capable of 125 watts per channel, support for Dolby Atmos and DTS:X object-based audio formats, easy operation, and connections for speakers, TVs, playback devices, antennas, and networked devices. The document also covers parts names and functions, connection diagrams, playback operation instructions, and setup menu options.


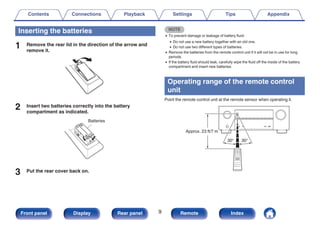
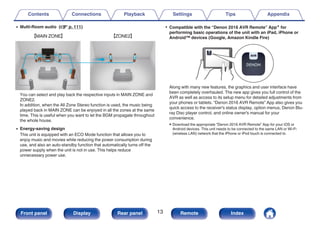


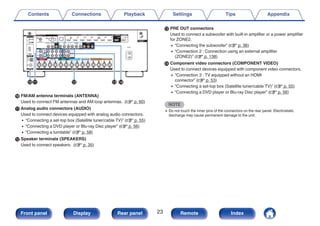
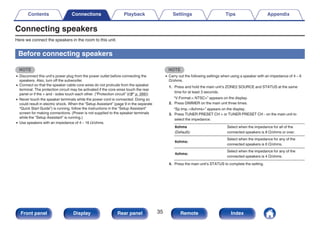


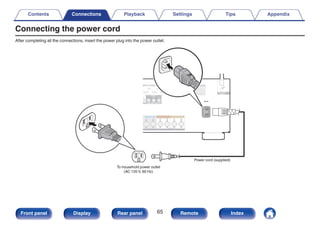


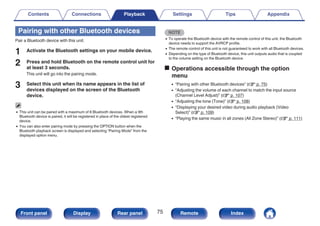
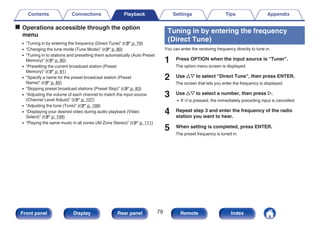
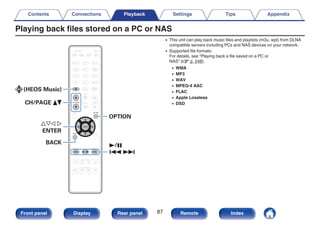
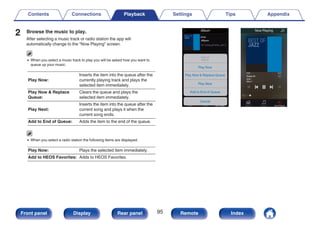

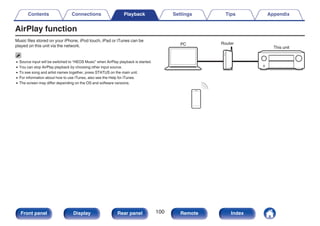
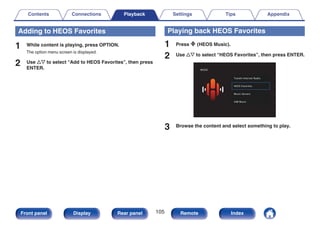
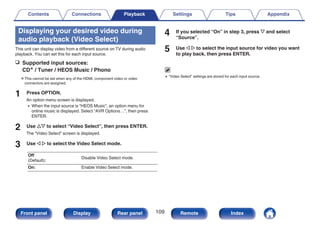
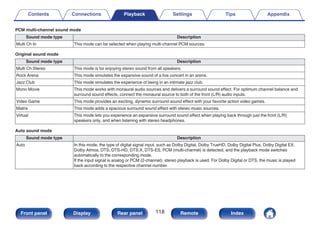
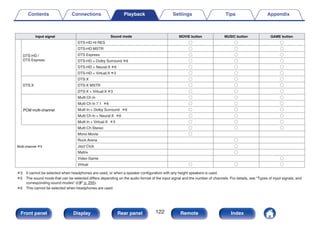
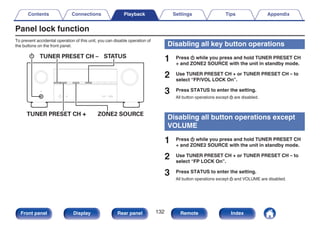
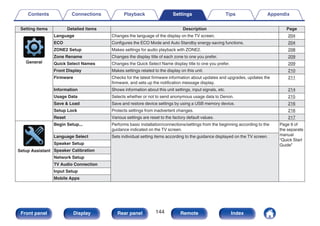
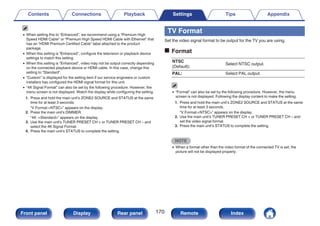
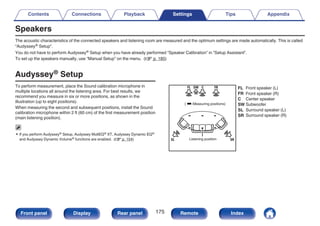
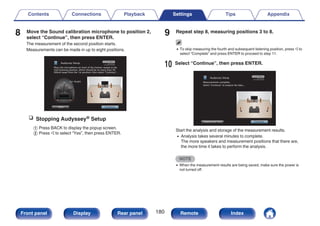
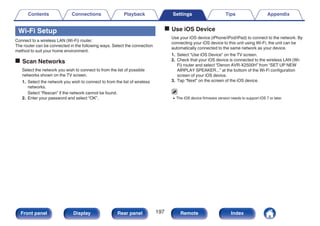
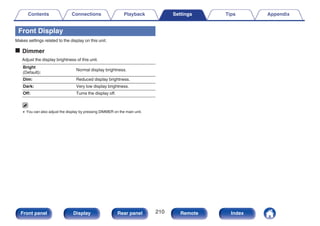
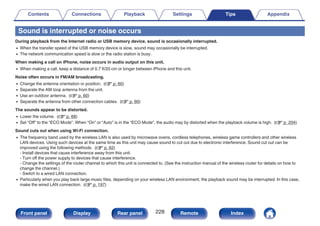
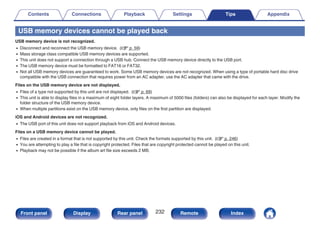
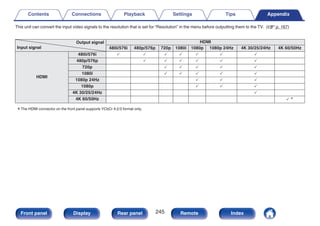
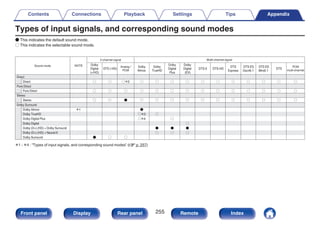
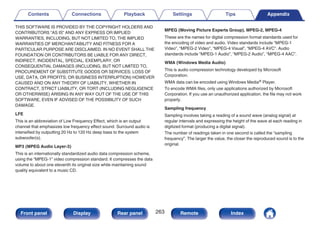
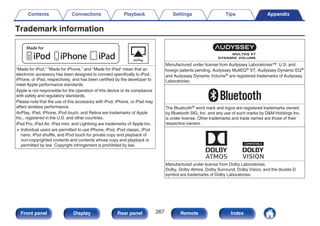
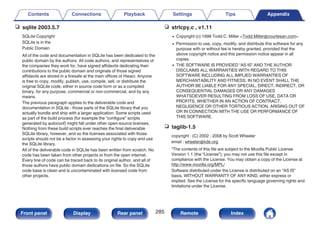
![Playing songs from your iPhone, iPod
touch or iPad
If you update your “iPhone/iPod touch/iPad” to iOS 4.2.1 or later, you can
stream music stored in your “iPhone/iPod touch/iPad” directly to this unit.
1 Connect your iPhone, iPod touch or iPad Wi-Fi to the
same network as this unit.
0 For details, see your device’s manual.
2 Play the song on your iPhone, iPod touch or iPad.
AirPlay icon is displayed on the iPhone, iPod touch or iPad screen.
3 Tap the AirPlay icon.
.
AirPlay
AirPlay
Drop:
AirDrop:
ryone
ryone
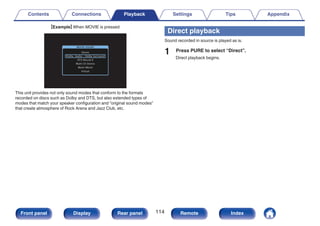
[Example] iOS 10 [Example] iOS 9
4 Select the speaker (devices) you want to use.
Playing iTunes music with this unit
1 Install iTunes 10, or later, on a Mac or Windows PC that
is connected to the same network as this unit.
2 Turn this unit ON.
Set “Network Control” to “Always On” for this unit. (v p. 201)
NOTE
0 When “Network Control” is set to “Always On”, the unit consumes more
standby power.
3 Start iTunes and click the AirPlay icon to select the
main unit.
.
[Example] iTunes
4 Choose a song and click play in iTunes.
The music will stream to this unit.
Contents Connections Playback Settings Tips Appendix
101
Front panel Display Rear panel Remote Index](https://image.slidesharecdn.com/033avx2500-230215041525-d88d0687/85/033AVX2500-pdf-101-320.jpg)
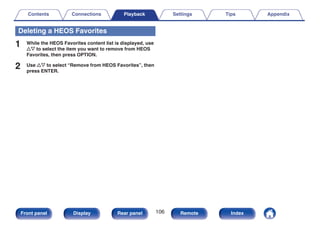
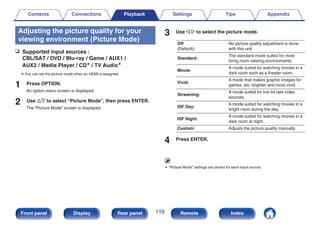

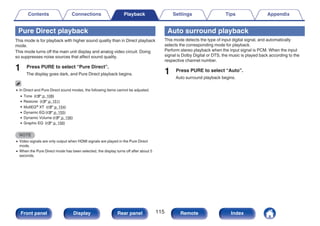
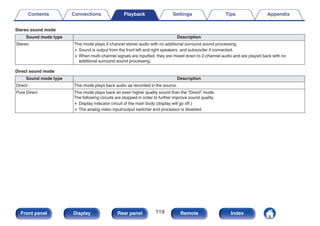

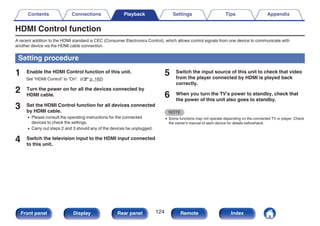

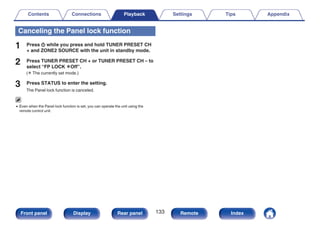
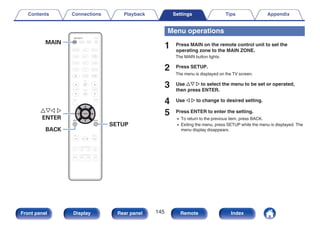


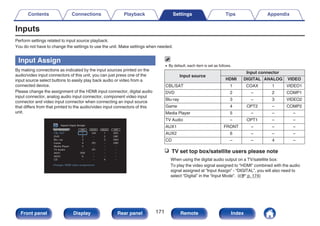

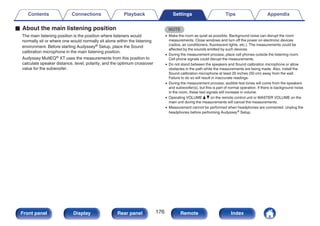

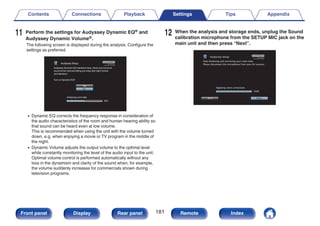


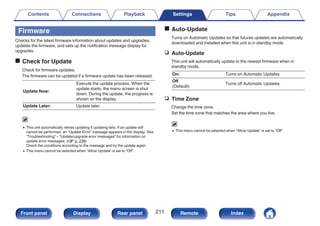

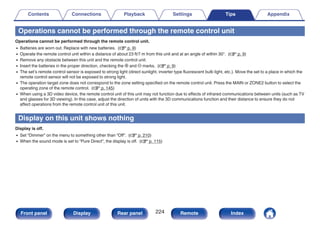

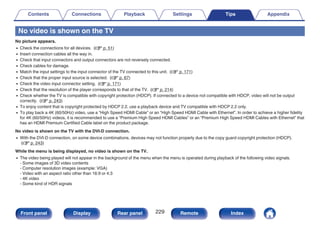
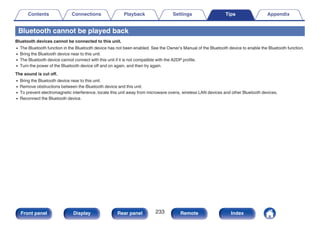


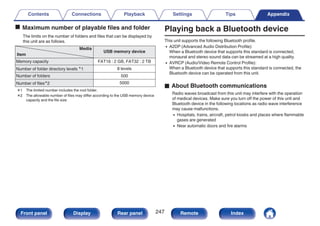

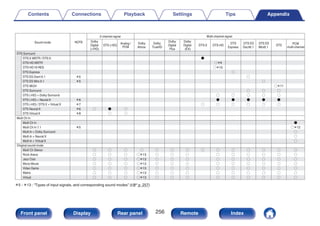
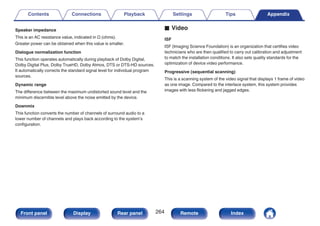
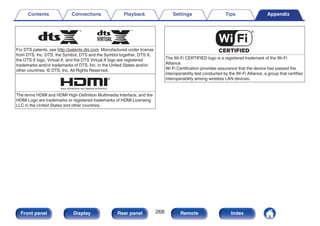
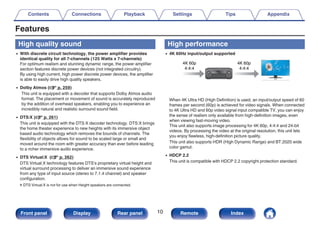
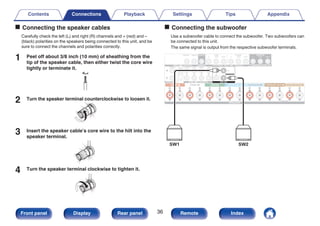
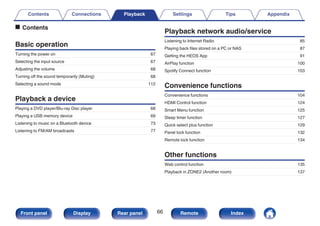
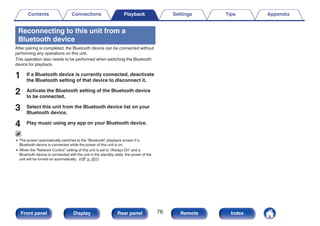
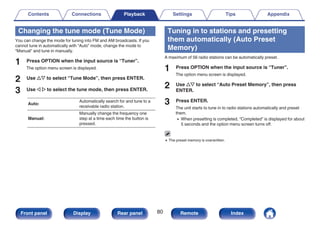
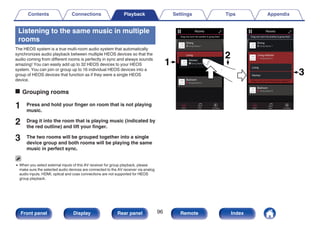
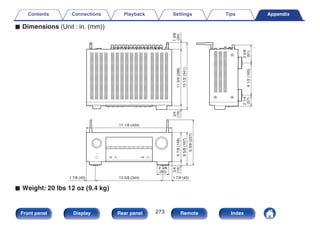
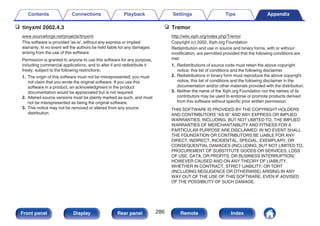
![o Tuner section [FM] [AM]
(Note: μV at 75 Ω/ohms, 0 dBf = 1 x 10 –15 W)
Reception frequency range: 87.5 MHz – 107.9 MHz 520 kHz – 1710 kHz
Effective sensitivity: 1.2 μV (12.8 dBf) 18 μV
50 dB sensitivity: MONO ― 2.8 μV (20.2 dBf)
S/N ratio: MONO ― 70 dB (IHF–A weighted, Direct mode)
STEREO ― 67 dB (IHF–A weighted, Direct mode)
Distortion: MONO ― 0.7 % (1 kHz)
STEREO ― 1.0 % (1 kHz)
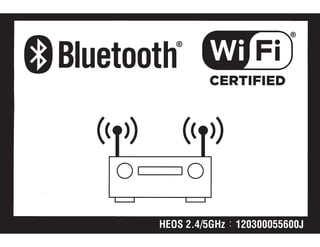
o Wireless LAN section
Network type (wireless LAN standard): Conforming to IEEE 802.11a/b/g/n
(Wi-Fi® compliant) z1
Security: WEP 64 bit, WEP 128 bit
WPA/WPA2-PSK (AES)
WPA/WPA2-PSK (TKIP)
Used frequency range: 2.4 GHz, 5 GHz
z1 The Wi-Fi® CERTIFIED Logo and the Wi-Fi CERTIFIED On-Product Logo are registered trademarks of the Wi-Fi Alliance.
Contents Connections Playback Settings Tips Appendix
271
Front panel Display Rear panel Remote Index](https://image.slidesharecdn.com/033avx2500-230215041525-d88d0687/85/033AVX2500-pdf-271-320.jpg)


![Notes on radio DENON
FCC Information (For US customers)
1. COMPLIANCE INFORMATION
• Product Name: Integrated Network AV Receiver
• Model Number: AVR-S640H I AVR-S740H I AVR-S940H I AVR-X1500H I
AVR-X2500H I AVR-X3500H I AVR-X4500H I AVR·X6500H
• CONTAINS TRANSMITIER MODULE FCC 10: RAX·AIOS4-0S
This product complies w 1
th Part 15 of the FCC Rules. Operation is subJect to the following two
conditions· (1) this product may not cause harmfulmterference. and (2) this product must accept
any interference received. including mterference that may cause undesired operation
Denon Electronics iUSAI, LLC
(a D M Holdings Company)
100 Corporate Drive
Mahwah. NJ 07430-2041
Tel. 1201 ) 762-6665
2. IMPORTANT NOTICE: DO NOT MODIFY THIS PRODUCT
This product, when installed as indicated in the instructions contamed in this manual. meets FCC
requirements. Modification not expressly approved by Denon may void your authority, granted by
the FCC, to use the product.
3. IMPORTANT (For Network)
When connecting this product to network hub or router, use only a shielded STP or ScTP LAN cable
which is available at retailer. Follow all installation instructions. Failure to follow instructions could
void your authority, granted by the FCC. to use the product
4. CAUTION (For BluetoothiWi-Fi)
• To comply with FCC RF exposure compliance requirement, separation distance of at least 20 em
must be maintained between this product and all persons
• Thrs product and its antenna m ust not be co-located or operating m conjunction with any other
antenna or transmitter
5. NOTE
This product has been tested and found to comply with the limits for a Class B drgital device.
pursuant to Part 15 of the FCC Rules. These limits are designed to provide reasonable protection
againstharmful interferenceinaresidentialinstallation .
This product generates, uses and can radiate radio frequency energy and. if not installed and used
in accordance w ith the instructions, may cause harmful interference to radio communications
However, there is no guarantee that interference will not occur in a particular installation. If this
product does cause harmful interference to radio or television reception. which can be determined
by turning the product Off and ON, the user is encouraged to try to correct the rnterference by one
or more of the following measures
• Reorientor relocatethereceivingantenna
• Increase the separation between the equipment and receiver
• Connect the product into an outlet on a circuit different from that to whrch the receiver is
connected
• Consult the local retailer authorized to distribute this type of product or an experienced radio I
TV technician for help
INFORMATION FCC (Pour Ia clientele 8tasunienne)
1. INFORMATIONS DE CONFORMITE
• Nom du produit: Ampli-Tuner Audio/Video Reseau
• Numl!ro de modele: AVR-S640H I AVR-S740H I AVR-S940H I AVR-X1500H I
AVR-X2500H I AVR-X3500H I AVR-X4500H I AVR-X6500H
• CONTIENT MODULE EMETIEUR FCC ID: RAX-AIOS4-0S
Ce produit est conforme tr Ia section 15 du reglement FCC. Lutilisation est sujette aux deux
conditions suivantes: (1) ce produit ne provoque pas d'interterences nocives et (2) ce produit doit
accepter toute interference. y compris las interferences pouvant entralner un fonctionnement non
souhaitable
Denon Electron ics IUSAJ, LLC
Ia D M Holdings Company)
100Corporate Drive
Mahwah. NJ 07430-2041
Tel. 1201)762-6665
2. REMARQUE IMPORTANTE: NE PAS MODIFIER CE PRODUIT
Ce produit, lorsqu'il est installe comme indique dans les instructions de ce manuel, est conforme
aux normes FCC. Les modifications qui ne sont pas expressement approuvees par Denon peuvent
annuler lautorisation FCC a utiliser le produit
3. IMPORTANT (Pour teseau)
Lars du branchement de ce produita un routeur oua un concentrateur reseau, n'utihsez qu'un cable
STP ou ScTP LAN blinde ldisponible chez un detaillant).
Survre toutes instructions d'installation. Dans le cas contraire. cela pourrait annuler l'autorisation
fCCautilisercetappareil
4. PRECAUT10N (Pour BluetoothiWi-Fi)
• Afin de repondre aux exigences de conformite FCC sur I'exposition aux RF, une distance dau
mains 20 em doit etre maintenue entre cet appareil et toutes les personnes.
• Cet appareil ainsi que son antenna ne doivent pas se trouver a proximite immediate, ni eue
utilises en association avec une autre antenne ou un autre emetteur.
5. NOTE
Ce produit a ete teste et il est confer me aux limitations des disposrt1fs numEniques de Class B. en
vertu de Ia se:tion 15 du r9glement fCC. Ces limitations sontconcues pour fournir une protection
raisonnable contra les interferences nocives sur una installation r8sidentielle
Ce produit genere, utilise et emet de renergie de radiofrequence et s'il n'est pas installe et
utilise conformement aux instructions, il peut entrainer des interferences netastes avec les
communications radio. Toutefois. nous ne pouvons pas garantir !'absence d'interterence avec
certaines installations. En cas d'interferences nefastes sur Ia receptron de Ia radio ou de Ia television
provoquees par cat appareil, survenant au moment de I'activation ON ou de Ia desactivation OFF,
nous conseillons a l'utilisateur d'essayer de corriger !'interference comme suit:
• Reorienter ou deplacer l'antenne
• Augmenter Ia distance entre !'equipement et le recepteur
• Connecter l'apparerl a Ia pnse murale d'un circuit different de celui du recepteur.
• Consulter un revendeur local agree pour Ia distribution de ce type de produit ou un te:hnicien
radio/TV experimente
IC Information (For Canadian customers)
! . PRODUCT
CONTAINS TRANSMITIER MODULE IC: 4711A-AIOS40S
Thrs product complies with RSS-247 of Industry Canada. Operation is subJ
ect to the following two
conditiOns: (1) this product may not cause harmful interference. and (2) this product must accept
any interference received. including interference that may cause undesired operation. This Class 8
digital apparatus complies w ith Canadian ICE-003
2. CAUTION
To reduce potential radio interference to other users. the antenna type and its gain should be so
chosen that the equivalent isotropically radiated power (e.i.r.p.) is not more t han that permitted for
successful communication
li) the device for operation in the band 5.150- 5,250 MHz is only for indoor use to reduce the
potential for harmful interference to co-channel mobile satellite systems
Iii) high-power radars are allocated as primary users (i.e. priority usersl of the bands 5.250- 5,350
MHz and 5,650 - 5.850 MHz and that these radars could cause interference and/or damage to
LE-LAN devices
Informations sur IC (pour les clients canadiens)
1. APPAREIL
CONTIENT MODULE EMETIEUR IC: 4711A·AIOS40S
Cet appareil est conforme a Ia norme CNR-247 du Canada. L'utilisaiiOn de ce dispositif est autorisee
seulement aux deux conditrons suivantes: (1) rl nedoit pas produire de brouillage. et (2) l'utilisateur
du drsposit1f doit etre pret aaccepter tout brouillage radio€1
ectrique reyu, meme si ce brouillage est
susceptible de compromettre le fonctionnement du dispositif. Cet appareil numerique de Ia classe
B est conforme a Ia norme NMB-003 du Canada
2. ATIENTION
Afin de reduire le risque d'interference aux autres utilisateurs, il !aut choisir le type d'antenne et son
gain de fayon ace que Ia puissance isotrope rayonnee equivalente lp.i.r.e.) ne soit pas superieure
au niveau requrs pour !obtention d'une communication satislaisante
{i) les dispositifs fonctionnant dans Ia bande 5 150-5 250 MHz sont reserves uniquement pour
une utilisation al'interieur afin de reduire les risques de brouillage prejudiciable aux systemes
de satellites mobiles utilisant les memes canaux.
(ii) De plus, les utilisateurs devraient aussi etre avises que les utilisateurs de radars de haute
puissance sent designes utilisateurs principaux (c.-a-cl.. qu'ils ant Ia priorit8) pour les bandes 5
250 - 5 350 MHz et 5 650 - 5 850 MHz et que ces radars pourraient causer du brouillage et/ou
des dommages aux dispositifs LAN-EL.
For Canadran custom ers I Pour les clients canadklns:
CAN ICES-3 (B) / NMB-3 {B)
w
for indoor use only
D RF Exposure Information
This equipment complies with FCC I IC radiation exposure limits set forth for an uncontrolled
environment and meets the FCC radio frequency (RF) Exposure Guidelines in Supplement C to
OET65 and RSS-102 of the IC radio frequency IRF) Exposure rules. This equipment has very low
levels of RF energy that are deemed to comply without testing of specific absorption ratio (SARJ
Cet equipement est conforme aux normes d'exposition aux radiations FCC /IC definies pour un
environnement non contr618 et satisfait les directives d'exposition a Ia radiofrequence (RF) dans
le supplement C des OET65 et RSS-102 des r9gles d'exposition a Ia fr6quence radio (RF) IC. Cet
equipement a de tres faibles niveaux d'8nergie RF qui sent juges conformes sans test de taux
dabsorption sp8cifique SARL
-#•- CE:
[ENGLISH)
1. DECLARATION OF CONFORMITY
Our products following the provisions of ECIEU directives, that as follows;
RE Directive 2014/53/EU
2. IMPORTANT NOTICE: DO NOT MODIFY THIS PRODUCT
This product, when rnstalled as indicated in the instructions contained in this manual. meets RE
directive requirements. Modification of the product could result in hazardous Radio and EMC
radiation
3. CAUTION
Separation distance of at least 20 em must be maintained between this product and all persons
This product and its antenna must not be co-located or operating in conjunction with any other
antenna or transmitter
(DEUTSCH(
1. 0BEREINSTIMMUNGSERKI.ARUNG
Unsere Produkte unterliegen den Bestimmungen der folgenden EG/EU-Richtlinien:
RE Directive 2014/53/EU
2. WICHTIGER HINWEIS: NEHMEN SIE KEINE VERANDERUNGEN AN DIESEM
PRODUKTVOR
Wenn dreses Produkt entsprechend dieser Bedienungsanlertung aufgebaut wird, entspricht es den
Anforderungen der RE-Richtlinie. Veriinderungen am Produkt k.Onnen zu gefiihrlicher Funk- und
EMV-Strahlung fUhren
3. VORSICHT
Zwischen dieses Produkts und Personen muss ein Schutzabstand von 20 em eingehalten werden
Dieses Produkt und seine Antenna dUrfen nicht neben anderen Antennen oder Sendern aufgestellt
oder zusammen mit ihnen verwendet warden.
(FRAN~AISI
1. DECLARATION DE CONFORMITE
Nos produits sent conformes aux dispositions des direct ives CENE comme suit :
RE Directive 2014/53/EU
2. MISE EN GARDE IMPORTANTE : NE JAMAIS MODIFIER CE PRODUrT
Si toutes les consignes indiquees dans ce mode ont ete respectees pendant son installation, ce
produit est conforme aux directives RE . Toute modification du produit nsquerait alors de generer
des radiations radio et EMC dangereuses
3. ATTENTION
lappareil devra ~tre situee tr une distance de 20 em au mains des personnes
Ce produit ainsi que son antenna ne devront en aucun cas eue utilises aproxrmite d'une autre
antenneou transmetteur.
(ITALIANO)
1. DICHIARAZIONE Dl CONFORMrTA
I nostn prodotti sono conformi a quanta previsto dalle direttive EC/EU. come specificate di seguito
RE Direct1
ve 2014/53/EU
2. AWERTENZA IMPORTANTE: NON MODIFICARE QUESTO PRODOTIO
Se installato come indicate nelle istruzion i del presente manuale, questa prodotto soddrsfa i
requisiti della direttiva RE. Eventuali modifiche apportate al prodotto potrebbero causare pericolose
radiazioniradioedEMC
3. ATIENZIONE
Enecessaria mantenere una distanza minima di 20 c'm tra questa prodotto e le persone
Questa prodotto e Ia relativa antenna non devono essere posizionati in prossimita di altre antenne
o trasmettitori e non devono essere utilizzati congruntamente a questi ultimi.
IESPANOL)
1. DECLARACI6N DE CONFORMIDAD
Nuestros productos cumplen las disposiciones de las directivas de Ia CE/U E siguientes:
RE Directive 2014/53/EU
2. NOTA IMPORTANTE: NO MODIFIQUE ESTE PRODUCTO
Este producto. si es instalado de acuerdo con las insuucciones contenidas en este manual, cumple
los requisrtos de Ia directive RE. La modificaci6n del producto puede producir radiaci6n de Radio
yEMC peligrosa
3. PRECAUCI6N
Se debe mantener una separaci6n de al manes 20 em del producto y las personas.
Este producto y su antena no debe instalarse ni utilizarse conjuntamente con otra antena o
transmisor
(NEDERLANDS)
1. EENVORMIGHEIDSVERKLARING
Onze producten volgen de voorwaarden van de EGIEU-richtli]nen zeals volgt;
RE Directive2014/53/EU
2. BELANGRIJKE MEDEDEUNG:
BRENG AAN DIT PRODUCT GEEN AANPASSINGEN AAN
Dit product, indian geinstalleerd volgens de aanwijzingen in deze gebruiksaanwijzing. voldoet aan
de vereisten van de RE-richtlijn. Aanpassing van dit product kan gevaarlijke radio- en EMC-straling
tot gevolghebben
3. LETOP
Houd tussen en personen altijd een al stand van tenminste 20 em aan
Dit product en zijn antenne mogen niet in de buurt van een andere antenne of zender worden
geplaatst of in combinatie daarmee worden gebruikt
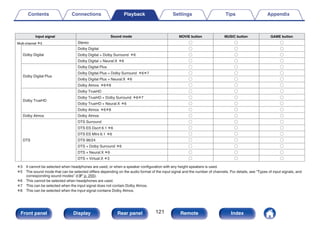
Radio Specification (for Europe model)
Type Frequency Range Max. RF Power
Bluetooth 2,402 2,480 MHz 20 dBm
WLAN (2.4 GHz) 2,400 2,483.5 MHz 20 dBm
5,150-5,250 MHz 23 dBm
5 GHz Radio 5,250- 5,350 MHz 23 dBm
5,470 - 5,725 MHz 30 dBm
*Note: The above specifications is based on the RE Directive.
There is a possibility to varies by countries.
(SVENSKAI
1. OVERENSSTAMMELSESINTYG
Vtlra produkter uppfyller fOijande fOreskrilter i ECIEU-direktiv
RE Directive 2014/53/EU
2. VIKTIGT: APPARATEN FAR INTE MODIFIERAS
Under fOrutsiittning att apparaten installeras enligt anvisningarna i denna bruksanvisning.
uppfyller denna kraven i RE-direktivet. Ev. modifiering av apparaten kan resultera i farlig radio- och
elektromagnetiskstralning.
3. F0RSIKTIGT
Se till att de! !inns ett avst~nd ptl minst 20 em mellan apparatens och personer i omgivningen
Apparaten och dess antenn f~r inte placeras eller anviindas 1 niirheten av andra antenner eller
siindare.
IPYCCKIU1)
1. CEPTHDHKAT COOTBETCTBHR
HaWH npo,D,yKTbl COOTBeTCTByiOT cne,QyiOlUI-Ii1 fiOJlO)I(eHHAMH .QHpeKTHBbl E3CIEC
RE Directive 2014/53/EU
2. BAKHOI HE H3MEHRI1TE AAHHbll1 OPOAYKT
npo,QyKT, yCTaHOBneHHbiH cornaCHO IIIHCTpyn.]HAM B HaCTOAlUeM pyKOBO,Il,CTBe, O
TBe'laer
rpe6oeaHHAM ,D,IIrpeKTHBbl RE. liiJMeHeHHe npo,11,yna Moxer npHseCTH K nOHsneHHIO onacHoro
3neKTpOMarHITHOrO H3Tly'leHHA
3. OPEAYOPEKAEHHE
He np1-16nHxaHrecb r .D,aHHOro 113J1en1-1A 6n11xe. 'leM Ha 20 eM
3anpewaeTCA I-ICf10Jlb30BaTb .D,aHHbiH npo.QyKT 1-1 aHTeHHY C,apyroH 8HTeHHOH 1-1111-1 nepe.D,aT'-lHKOM
(POLSKI)
1. DEKLARACJA ZGODNO$CI
Nasze produkty zgodnie z postanowieniamr KE/UE, tj.
RE Directive2014/53/EU
2. UWAGA: MODYFIKACJA TEGO UR21DZENIA JEST ZABRONIONA
Po zainstalowaniu zgodnie z instrukcjami zawartymi w nrniejszej instrukcj i obslugi urzqdzenie
to ~dz i e spetniaC IIIIYfTlOQi dyrektywy RE. Wprowadzanie modyfikacji do tego urzqdzenia moie
skutkowaC powstaniem niebezpiecznego promieniowania elektromagnetycznego oraz radiowego
3. OSTR2EiENIE
M r ~dzy tego produktu i wszelkimi osobami musi byC zachowana odlegtoSC przynajmniej 20 em
Urzqdzenia wraz z antenq nie moina instalowaC w polijczeniu z innq antenq lub nadajnikiem.
DM Europe B.V
Beemdstraat 11, 5653 MA Eindhoven, The Netherlands
EU declaration of conformity URL:
bttp-!frnaO!Jals denon com{Cfdeclaration
(ENGLISH)
5,150- 5.350 MHz is restricted to indoor use only
(DEUTSCH(
5.150 - 5.350 M Hz dar! nur in geschlossenen Riumen verwendet werden
IFRAN~AIS)
5 150 • 5 350 MHz est limite a une utilisation en interieur uniquement
(ITALIANO)
La frequenza 5.150- 5.350 MHz elimitata al solo usc interne
IESPANOL)
5.150 - 5.350 MHz esta restringido al uso en interiores solamente
(NEDERLANDS)
5.150 - 5.350 MHz is beperkt tot aileen binnenshuis gebruik
(SVENSKA(
5 150- 5 350 MHz ar begriinsat till inomhusbruk
(PYCCKHH)
5150 - 5350 M r u. orpaHH41-1BaeTCfiHCnonb30BaHHeM TOObKO e noMetu,eHHH
(POLSKI)
5 150- 5 350 MHz to cz~stotl iwoSC ograniczona do uZytkowania jedynie w pomieszczeniach
UK DE FR
ES NL SE
IT
PL
DM Holdings Inc.
5431 10583 OOAD](https://image.slidesharecdn.com/033avx2500-230215041525-d88d0687/85/033AVX2500-pdf-308-320.jpg)
![-
0 l!ljSff;:IIJg~i:~·
;;Ml!li~:'l:'!if-:iI~~i':tMlruE':!fll i'!G!::Ijl~:i:J
7-?I:.Hii§::::~; 7.AO)Ji~Foi~ilii~l*iio!Gn '*~o
• ott!!':~I'll~ ;/:: ~I:Ji~Foi0)9ci':fli!b'l!130'J ;ttl,,
0 LITO)::/::':ill::tJ-51:5n~HlttGtl;::/:: IJ'ilOlJ
*~0
· P'Jll~ ;lji~:IJ7-?I:.HI~:Y 7 7 LO)Ji~Foi~ilii':i
~ ~ G';(~~;::c
• i*ir.!~ ;1j1~ :!J 7-?I:.HI~Y 7 7 .AO)JilC~Foi ~001:
l!iJc®;ruEEJJ5-Jll':IJ:IJ'~=I::
• ::O)til!i®O)~fll!lil:;il!l (2.4GHz/5GHz) 11:. LITO)
J, ?U~!lil5il!;i~!Ji'Jfll':nn '*~0
· ~f~YY~O)£~·~~·~mflltil!i®
• I l!iJO)~~ 7 -1' Y~c~fll ':tln';!$!11JPIIilillUJ'llO)
Wii*IJI~Foi (9c,'F':'l!i~;Ji~Foi)
• '!li:iEIJI~:tJJIl!liFoi (9cHH~VJL1Ji~Foi)
• 1'77~?Ji~Foi C9c,H'l!i~;Ji~Foi)
· liJ;;gJilC~Mnfll~
• ll~ ~-?1--1 GPS i11Jllt 'i''¥t':]l'il!i1~0)'f''ll!l
~I'll~
·~Lli!C~Mnfll~C0000~-?1-~)
1. ::O)til!i®':~fll~ ;iJiit:. iii -rLi':cO)Ji~FoiiJ'iillfll
':tlTL1fJL1::/::Hi:MlGTt;C':C'o
2. lJ!J'-. ::O)til!i®IJ'6LI:CO)Ji%~Foii:11G T'll~t
J~
5il!T'51J'O)'!i'i?lJIJ'1li:'EGtc!Jllgi:IJ:. Jm-!J'I:~fll!lii5Jli
;!i':;lli'!!~;IJ ;tcli~5JliO)~t-J':ll'.ll:GtcL. T
i':C~~:JtC:~~l 1!::1'::~. ilE~IQJi!!!O)i::II.JO)lU~~
I:-::Jl1cC:::lll!:GTt;C;':L1o
3. 'fO)ft!l. ::O)ti!lliliJ'GJ:ci':cO)Ji~Foil:11 Gc'!l~t~
5JliT'i!JiO)li'1?1Jmt:'EUcJl!g'd:l::'. f6JIJ'illl'!llJO);::c
m.~tcl: ~1:11:. ;)iO)~ ~lt-illlllll,gt:Jtt t;C':
l )0
)1;li:Jt:
ttzt,g.tl 71' - PYri.A;J;- Jl!7.,- /::t7
7 J Yill'il'11H§O!:t/?l-
05?0 (666) 112
http:/I denon.jp/jp/ html/contact.htmI
C:N~i?lJ) I~~0~ I
© ~5815ni:J,l.J. 5.150-5.350MHz O)Jlii5Jli;)~ffili.
lli!i*IO)i'!:ili~'N':tlTL 1;j;~o
© :$:tilciJ:. 2.4GHz/5GHz O)Jlil581;!ilil0)~5JliHIJ fll G
n ';ll!l!*-r. T::Cti!~/::T')JffiG. 'oW~tlltltclJlil.
g;IJ'i]t:'f.UclJ '9';OJ1ft:!i!J'®l.J ;J;~o
[2.4GHz/5GHzOJil!l51l!;!I~':~FllGTl19±'d:tilllll
· !IH~YY
· li!C~LAN HIJJ'llGtcti~ (/-1-l'iC/:::JY, !!U~
J~ -?1-, !!~ LAN 111G AV till~§~)
· 77-c7~Y I :::J-r~77~Y
• Bluetooth ncr~lll
• 'J-i''l'~/1ilGAVti~
•'J-i'''~7:::JYcD - 5 -
0 liW'tlltltclJlil.lifiJ'~:'EUc lJ~;tli81:11:. T'c
0)1J5ncolF!!l~;OJ!lt!i!J'®'J ;~;-g-0
1. T'51JiGn '9ti!llil/::O)~§IIIU!t'9' o
2. T'~~GTl1;ti!~O)~Jli': t!J ;o
© «-7x -:iJ- 1!J'O)~Ii!fll~illti!lll': C~J'llO)~g l :
1
1:. ~~fll~llt!llllx-:iJ-Ucli~'ffik51:~5Jlil:
J,;!!;l!II':Cit~O)_tC~Fll t::':l1o
© }._CdJ.O)cjJc~FllUc'). :$:ti!O)fllll:~i!'1i :::J Y-? 1)
c0Jl!!-l!li..'d:I:O)~~~WIJ'®;/::, illli§t!i!ib'!!!i
tr'J'l1fb''Wtltc l.J. J41.'giJ'~:'EGtclJ'9' ;::c!J'ao
l);~o g!J'~WtltclJ. !litiW~:'EUcl.JJ;lJ!g
1:11:. ~:.HIGO)fi!l 1lJpfil:~iiil'Gil!!GT t;CN'o
© 'l!~O)flli!lli-~~~amwc )J~g-rt. ~5JliO)!l1l't:
J:lJ~iM'?;L'IJ''d:l1l!i]giJ'f5lJ;i;'9'o 'tO)~g
I:IJ::$:jtj!O)ioJ~-Illiii!!':;lli;ii.91:G';(5~9;::1::b%'J
;1;lo
© 5V:t-17~ t:. BS/CS 7 ~ -:t--'d:/::'0)~5JliHIJffi
Ucti!~O)'f lfc~fllJ 91:. J 4 7':~:'£9 ;;::: C:
b'®l) ;i;To 'fO)IJ]Igi:IJ:ti!i®b'6JIC'Itli':l!ii!!GT
t;CN1o
© :ttill:iii'i!Will!.i.tl:ti~HliiOIGTIO'J ;i;JIJ'. ~:=:'IJ'
IN!lll:*fclii/ll?.ill:~i§9 9 OJilt!iiJ'® l) ;9o
© :t.fliiI:Oill!i*icO)g'!ii:, B:I:~~O)l'l:'f.':§8()1:Uc
;Ji-hiY?I-7-i'XYI-:Y77.Al'9'oft!lO)~
§8(JcO)~fllliill-lll.l t;C':L'0
2.4 FH 1
2.4 2.4GHz;o;':~fll~;Ji~~1lil'::NG;~o
DS/OF/FH ;l'iil'JJ'Jit'::NG;~o
4/1 !$t!JPIOIll~li!'il!iO)II!i*IJI~Foii:11G TJ1!:5':':tl;-3-T'51Jiii!;iii'::NG;~C*'l: :N~filix 10 m)o
- - - 2.4GHz ;o;O)~;o;lll!':~fllG. IJ'::!$0JJPIOIllUli!'~O);o;li!':IQJl!!!OJ1ft:c30;::c':li!WVr~o
2.4GHz ;o;O)~!lli!':~FllG. IJ'-::J!$t!JPIOiillUl'il!!O)!lll!f.fiQJl!!!'fOJc30;::c':~WG;~ o
IEEE802.1 1b/g/n/a/ac 111GGTl1gJi%~ LAN l!III':J.G;~o
~ 1i!GGTl19 5GHz!1l!li LANJlii5Jli;l;m':J.G;~o
l!m )l;IIGGn )tJL' 5GHz !ltl~ LAN J'l51l!;llil':J.G;9o
tH
g -9-~~ tli .C ~ :u:~~ ~ 7 ~-5~0 1 5.'1.9.££ ~ ~~~:rr~ ~~E A-J I::I I~~ ~? rug yq .
B ii 71
71( 7f~~ '~h1~-tl7 1 Xf:H )
O
l 71
71 -E 7 f~* (8 i'} ) ~Xflif~ g{7171 £Ai ?£7f~OII Ai Af*'O'f-E ';!~ ~2.£ 'O'foj , 2.-§XI'21 011 Ai Af*~ 9 7./Ei'-l ef.
tHg- .!f-{j~ I::II .C ~~% ~II~g~ 7~~~ 01 91.££ £ 89:'12.!-B TI~ -E)-~.§ A-j t:1 j ~~ ~ 9 '8;!_-g LJ c~ .
-
§f;+=ll
~~i':~~S't§;Lif.I;J.J~~j!ffi~l!ll • ml'~DJ · ::illl , il'lil!!lt§IZiiEI!l~t3l'i®~El!!!:i!i:!ffi~, JJOAJ.l~§IZ~:i!i:~~ilt;L1M't:JJ.Jiill o
§f;+e!lll
iMJ~~~~~~;LiiEI!l l'i®ilJllffi~i'L~~:'fllil'Jt®~ ; ~,!i'~llHH!tm®:ll¥ · l!!:rr§PI¥1!l · Micll~~!!Hitii¥J'Jj!¥1l!llfliiEI!l o
iliJJ.Il'@r)tjj~ · ll:lit1ll:~)tffl.)Ei'F¥;LJ!M~~®~ o
if.I;JJ.J~~~i'i~~!.lli'J~'@r)t@0§1ZI¥ ''fll~:~rn!l!l~)~~~tt~~~i/ii;L'flf o
-
0 lj:l!i~!il@~lltli!~ (SRRC)
§f;+=~
I. • @I!J~jjj$ : 2.4 - 2.4835GHz
• ;;!¥lll('E~~~JJ.J~ (EIRP) :
70~ijl~ 1OdBi IIi : 1OOmW §IZ 20dBm CD
70~11!~ I OdBi IIi : 500mW §IZ 27dBm ~
· ~AJ.IJ~~!tl/.ll:
70~1!l~ 1OdBi IIi : 20dBm I MHz (EIRP) CD
70~11!~ 1OdBi IIi : 27dBm I MHz (EIRP) ~
• llt~'g~ : 20ppm
• 9f.'!;tt,IJJ]$ Itt 2.4 - 2.4835GHz ~l! LJ9f)
-SOdBm I Hz IEIRP)
· ~~at,~ 1~t,~ J JJ.J$ 1x11ill.iltJ~ ± 2.5 i§ig~m
MIJ.9fl :
-36dBm I 1OOkHz 130 - I OOOMHz)
- 33dBm I 1OOkHz 12.4 - 2.4835GHz)
-40dBm I 1MHz (3.4 - 3.53GHz)
-40dBm 11 MHz 15.725- 5.85GHz)
- 30dBm 11 MHz I #l:'8 1 - 12.75GHz)
1. • Ii'F:Jili~J'BI'lli: 5150- 5350MHz
• ;;!jlll('E~~t,IJJ]~ IEtRP) : 200mW
• ~AJJ.J'!fl~!tlf.ll : 1OdBm I MHz
• llt:Jili'g~ : 20ppm
• 'l'9f.'!;tt,IJ.]$ IEIRP) : -SOdBm I Hz
· ~~at,~l~t,~)J.J$:
-36dBm I 1OOkHz (30 - 1OOOMHz)
- 54dBm 11OOkHz (48.5 - 72.5MHz,
76- 118MHz, 167 - 223MHz, 470- 798MHz)
-40dBm I I MHz (2400 - 2483.5MHz)
-33dBm I I OOKHz (5150 - 5350MHz)
-40dBm I 1MHz (5470 - 5850MHz)
-30dBm I 1MHz I :11;'8 1 - 40GHz)
'* Jt~Filfii~Pii!rtt~llfil!.l!l . IJ.I!iiEf~ 5150 ~
5350MHz ~$~~'f!;to
2. l'i®liiiE!:i!i:cllat,l~$, JJDAaMJJ.J~ I E!!i5!ili9fJJD~t,i:JiliJJ.J$J)l(Ag§ l , l'i®I!!!E!9fli70~§1Z2lll!l:ll:'8a~if70~;
I. • Ii'F~jij$J'BI'lli : 5725 - 5850MHz
• a~JJ.J~ : 500mW :fO 27dBm
• ;;!¥l'E~!iiiit,IJ.l$ (EIRP) : 2W :fO 33dBm
·~AJJJ$l~!tl/.ll :
13dBm I MHz:fO 19dBm I MHz (EIRP)
• ilt:Jili'g~ : 20ppm
• ffl9fa~JJ.J$ IEIRP) :
-SOdBm I Hz I 5725MHz §IZ 5850MHz)
• ~~.'!;!:~ I 'fl,l~j ) J.IJ$ :
-36dBm I 1OOkHz (30 - 1OOOMHz)
- 40dBm I IMHz (2400 - 2483.5MHz)
- 40dBm I IMHz (3400 - 3530MHz)
-33dBm I I OOkHz (5725 - 5850MHz)
I )1 : Jj@~j~ 2.5 i§1B~'Il'MLJ9f)
-30dBm I I MHz ( :11;'8 1 - 40GHz)
3. iiEI!lllil'i®x1§~1S'Jtffii:EMeg@fE51H~F'±~~'flt; - §aiR~'f!tiR!RBi. lill.:rr§P!;!J..tiiEI!l, 'lf*llllnl!i!iJ~':f-'fltFoJ'JDJ!It~iiEI!l :
4. iiEI!lilWJJ.J'!f:E~egiJl~' !iDJ»'ii'J~§~ot;~egill_~ffil'flt§IZiill., 'lll'l'.~f:flill.l!lill~ffii~t,J'fj;t;
5. l'i®1£t,~/l,:fDt/L:t1JIIJ.tiQiiEI!l ,
DENON
www.denon.com](https://image.slidesharecdn.com/033avx2500-230215041525-d88d0687/85/033AVX2500-pdf-309-320.jpg)