The writing process a writing resource guide final
•
6 likes•9,640 views

This document provides guidance for teachers on writing instruction and the writing process. It begins by explaining that the writing process involves forward and backward steps as writers think, reflect, revise, and repeat earlier steps. The job of teachers is to guide students through this process to help them become better writers. It also emphasizes that writing must be explicitly taught and given sufficient time. The rest of the document outlines the writing process and provides examples of instructional routines and activities teachers can use to teach each step of the process. It aims to be a comprehensive resource for both new and experienced teachers.

Recommended
More Related Content
What's hot
What's hot (20)
Viewers also liked
Similar to The writing process a writing resource guide final
Similar to The writing process a writing resource guide final (20)
Recently uploaded
Recently uploaded (20)
The writing process a writing resource guide final
- 1. 0 A Writing Resource Guide
- 2. 1 The Writing Process and Teachers This Writing Process guide is a resource for new and experienced teachers who are looking for ways to improve and enhance their current writing instruction. The activities, examples, and instructional routines are designed so that teachers may select a specific resource or they may use the entire document to provide guidance for their instruction. Writing is much more than just putting words on paper. By its very nature, writing is a series of forward and backward steps as writers think, reflect, revise, detour, start over, and repeat earlier steps. The job of educators is to guide students through the process in order to help them become the best writers they can be. In order to give students the necessary skills, writing must be explicitly taught and given time. It cannot be just a few minutes here and there! Students may write quickly and freely in a quickwrite; but they also need to be deliberate and thoughtful as they produce an effective finished product. Utilizing this guide will help teachers lead their students in the “write” direction! To be a teacher of a process such as this takes qualities too few of us have, but which most of us can develop. We have to be quiet, to listen, and to respond. We are not the initiator or the motivator; we are the reader, the recipient. We have to be patient and wait, and wait, and wait. By Donald Murray
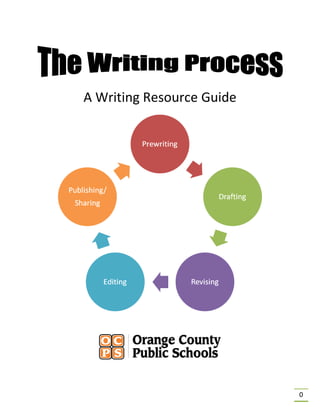
- 3. 2 Table of Contents Section Title Page 3 9 14 21 24 26 31 38 Building a Community of Writers1 Prewriting Revising Editing Publishing/Sharing Resources and Instructional Routines The Writing Process 2 3 Drafting 4 5 6 7 8 37
- 4. 3 School begins with a sea of shining, eager faces for teachers. This is the time to start building community within classrooms. Students who feel safe and respected will grow into confident writers, willing to take risks as they express themselves. BUILDING A COMMUNITY ACTIVITY ONE Building a Community of Writers Teachers can establish a positive atmosphere by: 1. Creating an inviting classroom and attractive surroundings o a literacy rich environment o computer centers that promote writing o student work displayed o have chairs arranged in a warm group setting o Include an author’s chair o Use 3 compliments and a wish when students share 2. Modeling respect 3. Sharing teachers’ own writing 4. Establishing routines and expectations 5. Using a writer’s notebook From “Proven Instructional Practices for High-Quality Writing,” FLDOE
- 5. 4 Day 1: • Partners brainstorm unusual questions and write them down. • Partners review questions, select two and circle them. • Call on a pair to read one of their circled questions. • Partners discuss the question that was just read aloud. • Discuss as a class: o What did you find out about your partner? o Did both partners have a chance to share? o If not, what can you do to make sure that you both get a chance to share? • Repeat the procedure for several more questions as time allows. • Tell students you will continue the activity tomorrow and that all of them will have a chance to read their question to the class. • Ask: o What do we want to do the same or differently tomorrow? Day 2: • Remind students they are building a caring community by getting to know one another. • Ask: o How can you show that you are interested in finding out about each other? o You are responsible for listening to what others say. If you can’t hear, what can you do? o What did you do to listen responsively to your partner during the activity? • Have students share what they learned about their partner. Examples of Unusual Questions: 1. How many teeth do you have? 2. When is a time you couldn’t stop laughing? 3. Who is the most interesting person in your family? Community Building Asking Unusual Questions Based upon a lesson in Being a Writer Instructional Routine Overview • Summary of Routine: Students will build community by finding out things they did not already know about one another by asking and answering unusual questions. • Student Outcomes: Students will be encouraged to speak clearly and listen to one another as they build community • Estimated Time: 30 minutes each day for 2 days
- 6. 5 Procedure: • Tell students to think about the phrase, “If I were.” • Students can think about animals, heroes, or objects. • Have students brainstorm ideas of what kind of animal they could be. • Model filling out the template (see next page, with example). • Have students write their own If I Were poem. • Allow students to read poem to their partners. • Choose several students to share what they have written with the whole class. • Model how to give “3 Compliments and a Wish.” See pages 32-33 in this guide. Extension: If you wish to extend this activity, you may take another day for conferencing and allow students to write a corrected copy and/or finish their poem from yesterday. Once you have a conference with individual students, give them a good sheet of paper to recopy their poem and add illustrations. Display on a bulletin board. If I Were a Giraffe If I were a giraffe, I would look into the windows of skyscrapers. If I were a giraffe, I would lift kindergarteners up to the monkey bars. If I were a giraffe, I would buy a really long turtle neck. Community Building Writing Poetry • Based upon a lesson in For the Love of Language: Poetry for Every Learner by Nancy Cecil Instructional Routine Overview • Summary of Routine: Students will build community by writing and sharing poems they have written with a student friendly scaffold. • Student Outcomes: Students will be encouraged to speak clearly and listen to one another. • Estimated Time: 45 minutes
- 7. 6 If I Were If I were_______________________________________________________________________ I would________________________________________________________________________ ______________________________________________________________________________ If I were_______________________________________________________________________ I would________________________________________________________________________ ______________________________________________________________________________ If I were_______________________________________________________________________ I would________________________________________________________________________ ______________________________________________________________________________ STUDENT SAMPLE If I Were a Frisbee If I were a frisbee, I would fly so I could touch the sky. If I were a frisbee, I would hang out at the park all day long. If I were a frisbee, I would hate to lie on the garage floor.
- 8. 7 Day 1: • Ask students if they know what an autobiography is. Discuss how an autobiography differs from a biography. • Read and discuss the book Best Wishes by Cynthia Rylant. Any other autobiography that is readily available can be replaced in this lesson. Explain that this is a book Cynthia Rylant wrote about her life. Tell students to listen carefully as they will be writing their own autobiography. • Discuss what questions students will want to ask their families in order to write their own autobiographies. Allow students to brainstorm these questions. Write them on chart paper. • Have students copy some of the questions they will want to ask their families for homework. Day 2: • Have students sit with their partners. Allow them time to share what they learned about their own life when they spoke with their families. • In the whole class setting, allow students to share their autobiography if they are comfortable. Only a few may want to share, but allow as many as time allows. • For discussion, ask students what they liked about this activity/what they didn’t like. Why is it helpful to know about yourself and others? Why do you think authors write biographies? Extension: This activity may be extended over several days and students may write a final copy – going through the steps of revision, editing, and publishing. Community Building Writing an Autobiography Based upon a the book Best Wishes by Cynthia Rylant Instructional Routine Overview • Summary of Routine: Students will write and share their autobiographies using the following scaffold. • Student Outcomes: Students will be encouraged to speak clearly and listen to one another. By writing and sharing their autobiographies, students will build community by making connections to one another. They will develop their own unique sense of place within the community. • Estimated Time: 30 to 45 minutes each day for 2 days.
- 9. 8 First, middle, last name_____________________________________________ My parents named me this because___________________________________ Birthday/Place of birth______________________________________________ My favorite book___________________________________________________ My favorite food(s) _________________________________________________ My least favorite food(s) _____________________________________________ When other people think about me, they think I am (happy, silly, grouchy, etc.) _________________________________________________________________ Something unique about me__________________________________________ When I grow up I hope to____________________________________________ _________________________________________________________________ The best gift I ever received___________________________________________ Write 15 or more words that describe you! Then, draw a picture of yourself.
- 10. 9 Modeling Respect Prewriting • Ideas • Audience • Purpose • Form Drafting Conferencing Revising • Ideas • Organization • Voice • Word choice • Sentence Editing • Conventions Publishing/Sharing • Presentation • Author’s Chair • 3 compliments and a wish Establish Routines and Expectations Positive Atmosphere Sharing Teacher’s Own Writing Writing Process The writing process is framed by a community of writers
- 11. 10 The writing process should be an ongoing cycle in every writing classroom. Students should be engaged in prewriting, drafting, revising, editing, and publishing. The process is not a linear step-by- step sequence, but rather a recursive process that students pass through at different rates, sometimes moving on and at other times revisiting earlier steps in the cycle. Students who experience the process will learn skills which enable them to produce polished pieces of writing. Introducing the Writing Process to Students Lori Jamison, 2009 The writing process is how we translate ideas into written text. It starts with an idea and the need to develop it, communicate it to an audience, and preserve it. Every writer at every age and at every stage of development and proficiency goes through this process. Marcia S. Freeman Teaching the Youngest Writers Prewriting Getting started Drafting Getting it down Revising Getting it good Editing Getting it right Publishing Getting it out
- 12. 11 Modeled Writing is an effective instructional practice that provides a foundation for understanding the complexities of writing. Research contrasts the effectiveness of telling students how to write versus modeling for them. High levels of telling are negatively related to writing growth whereas high levels of modeling are positively related, especially for children in high-poverty classrooms (Taylor, Pearson, Peterson, & Rodriguez, 2003). During Modeled Writing, the teacher: • plans and prewrite a piece so that the differentiated needs of students are addressed, and • rewrites the prepared text while “thinking aloud,” so that students hear the rational for all decisions about craft and conventions, and • writes legibly and visibly on a chart tablet, overhead, doc camera, or smartboard, and • produces an error-free text that allows for continued use. If the teacher is modeling editing procedures, a text with errors is used to expose the thinking required for the editing process, and • engages students by requiring them to record specific elements or “look-fors” (over- used words, transitions, spelling or punctuation errors), and • upon completion, invites students to share and discuss their “look-fors”, ask questions, or make comments. Additionally, Modeled Writing: • is data driven so that specific skills are addressed, and • is used in large or small group settings, and • helps students become aware of the structures and patterns of written language, and demonstrates the conventions of written language Modeled Writing is not: • writing silently as students observe, nor • used without careful planning of specific skills and strategies based on student needs, nor • a worksheet. Modeled Writing is a time for the teacher to demonstrate the writing process through his/her own writing. The students may ask questions about the topic, but the teacher is doing all of the composing. Modeled Writing should take place often and is most effective right before an independent writing session. As students become more proficient writers, modeling does not need to occur before every session, but it should definitely occur each time students are introduced to a new genre of writing (journal, letter, list, narrative, paragraph, report, etc.). Students will need to see more than one modeled lesson in each new genre. From TEACHER2TEACHERhelp The Writing Process and Modeled Writing Thinking Out Loud to Demonstrate Metacognitive Processes
- 13. 12 “I Write, We Write, You Write” strategy is an extremely powerful tool for writing instruction. All steps of the writing process are demonstrated, reinforced, and practiced. The model scaffolds support, with the teacher initially assuming total responsibility, and then gradually releasing it to students. “I Write, We Write, You Write” can be used for all aspects of instruction: introducing a new genre, adding details, using precise vocabulary, sentence construction, applying conventions, etc. The length and complexity of the piece vary depending upon the age of the students and purpose of the assignment. There are three distinct, yet equally important steps in “I Write, We Write, You Write”: teacher modeled writing, collaborative (shared) writing, and independent writing. Throughout the process, the same genre and a similar topic are used. Preceding instruction students may have participated in a common experience: a book was read aloud, a science experiment or math investigation was completed, or students participated in a class event. Or if the teacher selects a topic based on personal experience or interest, it should be one to which students can easily relate: family, friends, pets or animals, school events, etc. During “I Write” (teacher modeling), the teacher: • has thoroughly planned the “I Write” so that students are engaged by a lively demonstration • “thinks aloud,” sharing her rational for decisions while brainstorming, drafting, revising, editing, and publishing • writes on a chart tablet, overhead, or smartboard • upon completion, invites students to share their compliments or ask questions During “We Write” (shared writing), the teacher: • engages students in every step of the process, from brainstorming to publication • honors, discusses, and considers all suggestions • encourages students to springboard off one another to develop, elaborate, and correct the piece During “You Write” (independent writing) students: • select an individual topic, similar to the “I Write” and “We Write” and in the same genre • apply the skills that have been modeled and collaborated upon • confer with the teacher as she circulates • celebrate by sharing the completed piece with a partner, a small group, or the whole class The “I Write, We Write, You Write” process has been used successfully by teachers of all grades and with students of all ability levels. The model also is effective in all content areas. It provides a dynamic platform and a safe environment for students to stretch their wings. The Writing Process I Write, We Write, You Write
- 14. 13 The Purpose • To provide a simple illustration of how the writing process works • To help students improve the variety and complexity of their sentences Day 1: Prewriting and Brainstorming • In groups, brainstorm what you know about writing (e.g. writing takes times, writing is a process). • Then brainstorm about 50 things you could write about. The number of things students generate will depend on the grade level. For K-2 this activity could be done whole group with a list of 10-20 things written down on chart paper. Day 2: Drafting • Pick ONE or your topics. • Write one sentence about the topic. • Underline the verb. • Model for your students using your own example or a sample from a book. Day 3: Conferencing and Revising • Share your draft sentence with a partner. • Revise by adding two details and making the verb stronger. • Share your revised draft with a partner. • Revise by starting the sentence a different way. Day 4: Final Revision and Editing • Read the sentence aloud to two people in the class. • Ask each person to initial the sentence if it makes sense. • Next confer with a partner or teacher. • Edit for spelling, grammar, or punctuation. Day 5: Publishing and Sharing • Write the final version on a sentence strip. • Put a copyright symbol © and your initials under the sentence. • Post the sentences around the room. • Circulate around the room and read the sentences. • Write a compliment for 2-3 sentences on Post-it notes and attach the compliments to the sentences. Writing Process Speed Week Based upon Great Source “Speed Week” Repeat Speed Week at least once every 9 weeks.
- 15. 14 Just think of prewriting as a practice for the “real thing”. Prewriting is the getting ready to write stage in the writing process. This step is crucial to the writing process as a rehearsal is to a performer. Prewriting sets the stage for what the writer wants to write about, Talking with a colleague and sharing ideas are key elements to the prewriting stage. Following are some prewriting instructional routines: 1. Talking is the most important prewriting activity for all writers. Everyone loves to talk about things that interest them! Talking can be informal or formal. Have students turn and talk to a partner, conference with a peer, or conduct an interview. Talking with other classmates and adults helps students gather alternate views about a topic. 2. Brainstorming helps students record their thoughts and ideas by compiling a list on a topic. This can be done in small groups, whole class or individually. If done individually, they need to share their ideas with the class. 3. Graphic organizers may also be used to link words with the main topic (i.e. cats – and words associated with cats). Students enjoy creating graphic organizers and find them most helpful in the writing process. 4. Drawing as a prewriting activity enhances writing because sometimes, without a visual image, students find it hard to write about an event. Having students draw first will give them many ideas and enrich the details. 5. Reading and gathering ideas by using literature will open up discussion and provide a wealth of ideas for writing. The students may relate to the characters, events, problems or style of the book or poem. 6. Quick writes of 5 or 10 minutes enables students to generate ideas very quickly. The students are allowed to write whatever comes to their mind (or the teacher may provide a topic.) Quick writes do not need to be well organized nor elaborated. After the allotted time, students reread their writing and may decide to expand upon it or save it in a notebook for consideration at a later date. 7. Making lists of possible topics or listing as much as they can about a given topic is a helpful strategy and is one type of brainstorming. 8. Conducting research and finding out as much as they can about their subject is important for producing a fully elaborated, polished piece of writing. Prewriting Getting Started
- 16. 15 9. Formal and informal reading of books, newspapers, flyers, magazines or anything else that has information related to their topic enables students to write with the voice of an expert. 10. Outlining is a type of graphic organizer and gives students a visual aid for organization. 11. Remembering personal experiences with a topic, both the positive and the negative, helps students write with voice and conviction. 12. Notebooks and journal writing several time a week allows students to write about topics of their own choosing, which often are the seeds of extended pieces. They also provide an ongoing record of a writer’s growth. 13. Observing nature or people is an excellent prewriting activity. Taking students outdoors to a nature park or even to a quiet corner of the playground provides many items of interest to observe and describe. Or, if going outdoors isn’t an option, students may watch a movie or video on the internet. 14. Anticipation guides are frames for writing and they assess a class’ knowledge before they start writing or reading (if you have a particular topic in mind). See next page for an example.
- 17. 16 Example Anticipation/Reaction Guide Based upon the book African Critters by Robert Haas Instructions: Respond to each statement twice: once before the lesson and again after reading it: • Write A if you agree with the statement • Write B if you disagree with the statement Response Before Lesson Topic: African Animals Response After Lesson Leopards can leap into tall trees. Elephants can be very aggressive. Human beings are not allowed to camp near the African animals. There are wild dogs living in South Africa. Lions are considered the king of beasts. Hyenas won’t chase their prey very far. A hippo and a rhino are exactly the same. Prewriting Anticipation/Reaction Guide Instructional Routine Overview • Summary of Routine: Students will access prior knowledge by responding to questions before a lesson. • Student Outcomes: Students will build interest and become engaged with the topic before and after a lesson. • Estimated Time: 10 minutes
- 18. 17 Teacher Template Anticipation/Reaction Guide Instructions: Respond to each statement twice: once before the lesson and again after reading it. • Write A if you agree with the statement • Write B if you disagree with the statement Response Before Lesson Topic: Response After Lesson
- 19. 18 A quickwrite is a powerful instructional strategy that yields multiple benefits and is easily managed. It is a short, first draft of a piece of writing that helps students generate ideas and get words onto paper. Quickwrites are short bursts of writing that take 3 minutes initially and increase to no more than 5-7 minutes, several times a week. They can begin with a generic topic, a selected picture, a compelling poem or a short passage from literature. Quickwrites “demystify” writing so that students will see that all writing is a process of thinking, recording, reflecting and sharing, and revising. A bank of quickwrites gives students the opportunity to select their ideas to expand and publish. They are very successful with students of all ability levels in grades 2-8. The process can easily be adapted for students in grades K-2. The benefits of quickwrites include: • making writing accessible to all students, even those who struggle the most • focusing students’ attention and activating prior knowledge at the beginning of a class • helping students make connections to important ideas • building fluency and stamina for longer, more complex pieces • introducing students to a variety of genres and literary devices they might try in their writing • providing students with examples of fine, compelling writing from their peers, teacher, and professional writers Quickwrites build student confidence because they: • are quick and non-threatening • help students find their voices and their passion as they make choices about what they write, how they write, and what works and does not work • offer surprise as students discover what they knew or what they were thinking Prewriting Quickwrite Explanation
- 20. 19 Quickwrites are beneficial to teachers because they: • can formatively assess student growth throughout the year • help teachers find their own ideas and voices as writers • clarify their understanding of the difficulty of the task they are asking students to complete, because they’re doing what students must do The following procedures for quickwrites are based on the work of Patricia Cunningham, author of What Really Matters in Writing. Introducing and modeling quickwrites for students in grades 3-12: 1. Tell students that you are going to model a quickwrite, a short (3 minutes) first draft on a topic you’ve chosen. 2. The essential rule is that the writer can’t stop writing during the quickwrite. 3. Model for students by thinking aloud about the topic, making sure students understand that writers must think about what they are going to write. 4. Set a timer (3 minutes for initial lessons and gradually increase it to 5-7 minutes as students’ stamina grows.) Turn the timer so that students can see it as you model. 5. Begin writing but do not tell students what you are writing. They will stay engaged if they read what you write as you write. 6. Give intermediate and middle schools students, “look-fors,” such as over-used words, transitions, vivid verbs, spelling, or punctuation errors. 7. At least once, write I can’t think of anything else to write, I can’t think of anything else . . . Then continue with your quickwrite. 8. When the timer goes off, tell your students that you are allowed to finish the sentence you are writing. Finish the sentence. 9. Read your quickwrite aloud to students, crossing out and omitting I can’t think of anything else to write. 10. Ask for comments or questions and allow a brief discussion. Joel, an eighth grader, told me one day, “The quickwrites help me write down some things I didn’t remember I knew. When I see them it makes me want to write, so I do write.” I can’t work in a void, and neither can students. Quickwrites help them find words for their ideas in a concrete way. Once students have words on paper, I can help them develop those thoughts into effective, compelling pieces of writing. Quickwrites help all of us get out of the void. - Linda Reif, 100 Quickwrites
- 21. 20 Facilitating quickwrites for students in grades 3-12: 1. Remind students that they can’t stop writing until the timer goes off and when it does, they may finish only their last sentence. 2. Give students exactly 1 minute to think and start everyone together. 3. Turn the timer away from students so they will not watch the clock. 4. Circulate, encourage, and praise. 5. Ask volunteers to share their quickwrites and allow questions and positive comments. Quickwrites in 5 steps for students in grades K-2: Model and rehearse with students the following 5 steps: 1. Think. (They repeat as you raise one finger.) 2. Draw a picture. (They repeat as you raise another finger.) 3. Write something. (They repeat as you raise one finger.) 4. Write your name. (They repeat as you raise one finger.) 5. Write the date. (They repeat as you raise one finger.)
- 22. 21 Write your first draft with your heart. Re-write with your head. ~From the movie Finding Forrester Drafting is a series of stages during which the student concentrates on getting ideas on paper. Emphasis is on content rather than mechanics, especially during the first draft. Not all drafts will be published. The majority are rehearsals for final, polished pieces. Some teachers use a standardized format during the first draft stage of writing. The “hamburger” strategy utilizes a template that resembles a hamburger. The top bun is for the topic sentence (or opening sentence), the middle sections, the meat, cheese, pickle, and condiments, are for the supporting details, and the bottom bun is what holds everything together, so it is the strong conclusion. Not all students need structural support techniques in order to write. Students who can successfully write without using structures should never be required to conform to a standardized structure. Forcing a student to use a strict format such as a hamburger paragraph or a five-paragraph essay will stifle their voice and creativity. However, all students benefit from teacher modeling, the process of observing as the teacher thinks aloud as a piece of writing is composed. Most writing teachers know which students need a structural guideline and which students don't. It is up to the teacher to determine how and when to give each individual the instruction and support he/she needs. Once students are ready to begin their first drafts, they should use one of their pre-writes to guide them. Students may need to be shown that much of their work is already accomplished in their pre-write. This will encourage them as they proceed through the writing process. Students will then view pre-writes as a beneficial and not just “one more thing to do”. By using a pre-writing tool, students’ minds are open to look at the more technical aspects of their writing. They may need instruction to help transition from idea to idea or event to event, to add supporting details, dialogue, and to express themselves with their own voice. Each draft will develop differently as students revise, edit and publish their pieces. Drafting Getting It Down
- 23. 22 Tips for Drafting Students need to write, write, and write some more! Students write only on the front of their paper, skipping lines as they go. This allows them to revise more easily. Some students may actually want to cut out whole sections and paste them elsewhere – or remove them altogether! A first draft should never be called a “sloppy copy”. Doing so does not honor the process of writing. Whenever writing, students should write legibly and neatly and employ all the conventions they have mastered. Students should talk to one another to see how their process is coming. When students are critiquing each other they should: • Be polite and honest! • Listen to the entire piece before commenting on any section. • Give praise for what works in a specific section. • Give comments on the big issues: Is the draft interesting? Is it organized? Is the main point clearly understood? • Be specific in suggestions for revision. • Ask questions, which may allow the writer to see what is missing in their piece. The drafting stage is a time when a writer needs to be able to write freely and know that whatever is put down on paper can be adjusted and changed. Drafting should be a comfortable, safe time for writing, conferencing and writing some more.
- 24. 23 Revising is making changes based on feedback from the teacher or other students during conferences. Students also make revisions by rereading each draft. During the revision stage students add details, add and substitute words and phrases, and delete and rearrange material in the piece. An easy and very effective activity for students is to reread their pieces aloud to themselves, a partner, or even a stuffed animal. Revision is NOT Editing Revising Getting It Good "Writing is rewriting. A writer must learn to deepen characters, trim writing, and intensify scenes. To fall in love with the first draft to the point where one cannot change it is to greatly enhance the prospects of never publishing." Richard North Patterson
- 25. 24 The Purpose • To provide a simple illustration of how the revision process works • To help students focus on the area/skill being taught during revision Directions 1. Read aloud a picture book to the whole class that will inspire a piece of writing or give the class a prompt on a topic which allows all students to participate. 2. Write the paragraph story on chart paper. 3. Read the first draft back with your students. Discuss the following revision questions as a class: Is this paper organized? Does it have an introduction, middle, and end? Does this story make sense? Are there details I need to add or delete? Is it on topic? Who is my audience? Are all of my sentences the same? How do my sentences begin and end? Can I combine sentences to make them longer? Do I use boring words? Are there strong verbs, interesting adjectives, or figurative language? 4. As the class answers the questions, make changes on the story by crossing out, rearranging words, adding arrows, and inserting new words. Discuss that revision is a messy process. 5. Make a new copy of the revised story on chart paper and read aloud to the class. Discuss the changes made to the story. Adaptations: Students can do this on their own paper using markers, glue, tape, scissors, and white out to make the revisions to the story. Revision Revising a Paragraph Story Together
- 26. 25 Revision Example Directions: Use the following example with an overhead, media projector, or document camera to demonstrate the revision process. Remove the draft numbers and have students cut apart each section of the story and put them in order from the first draft to the third draft. After putting the drafts in order, discuss with students, requiring them students to defend their sequence. First Draft: Turtle A turtle is a small, slow reptile. The turtle has a shell that is green. One type of turtle is a snapping turtle. A snapping turtle lives in water and can swim. They can walk on land too. Snapping turtles eat plants and some animals. Second Draft: The Snapping Turtle A snapping turtle is a green shelled reptile that can weigh up to 85 pounds. The snapping turtle spends most of its time in the water. Most turtles live in North America. Snapping turtles eat plants, small fish, insects, and other stuff. Third Draft: Snapping Turtles The snapping turtle is a green shelled reptile that can weigh up to 85 pounds. It is called a snapping turtle because it has powerful jaws, no teeth, and a sharp beak. Snapping turtles spend most of their time in the waters of North America. Most snapping turtles are omnivores or plant eaters. They can also eat small fish, insects, snakes, and even dead animals. Yuck!
- 27. 26 Editing is the stage of the writing process that gives a piece of writing its polish and correctness. Students correct spelling, punctuation, and grammar in preparation for publication. Editing can be done by the individual writer or with the help of peers or teacher to achieve correctness. Teachers should employ wait time of 24 to 48 hours before asking students to edit a piece. A student should, “write hot and edit cold” so that students are truly reading the words on the page and not from their memories. Teachers should target specific skills in the editing stage such as capitalization of the first letter or commas in a series. Working on just one (or a couple) skill(s) prevents students from becoming overwhelmed. Editing Getting It Right Editing Ideas Capitalization Handwriting Sentence Fluency Punctuation Main Idea Word Choice Verb/Noun Tense Quotations Commas Spelling Organization Paragraphing
- 28. 27 Editing Symbols Introduce symbols to students individually in the beginning. The Editing Mark Meaning Example Delete a word or phrase I had a fun fun day. sp Spelling error My sister is having a burthday. Use a capital letter During summer vacation I drove to seattle, Washington. Insert (letter, word, phrase, or punctuation) I love to ride my to the park. ¶ Start a new paragraph This was the best day of my life. We went swimming, ate pizza, and played Twister. ¶ It all started when I woke up at dad’s house. → Indent →Our summer vacation was going to be the best one ever. I love to swim at my grandmother’s house. ~ Transpose letters or words Johnny loves to raed adventure books from the Media Center. bike ~
- 29. 28 Peer Editing Checklists Once students have been trained to use editing symbols, they can use checklists to edit their papers or their classmates. When students use a checklist they need to have been taught how to recognize all the areas on the page. All or part of the following self or peer checklist can be changed to address the areas you teach in your classroom. Primary Editing Checklist Writer’s Name______________________ Editor’s Name___________________________ Directions: Color the smiley face or frown face for each editing target. Does each sentence begin with a capital letter? Does each sentence end with a punctuation mark? Are the words spelled correctly? Is the handwriting neat and easy to read? Are all paragraphs indented? Are all proper names capitalized?
- 30. 29 Around the World Editing Checklist Writer’s Name: _______________________________________ Directions: After editing your own paper, prepare your draft by numbering each line of your writing piece. Find one other person in your classroom to read your draft and edit it for one specific area. You may not ask the same person to do more than one area. Trip One Editor’s Name: _________________________________________ 1. Read the paper 2. What words are misspelled? List the word(s) and what line number it can be found. Trip Two Editor’s Name: ________________________________________ 1. Read the paper 2. Check for punctuation errors. Point out to the writer any errors in using commas, questions marks, periods, quotation marks, or capital letters. List the line number of where the error(s) can be found. Trip Three Editor’s Name: ________________________________________ 1. Read the paper. 2. Is each paragraph indented? List any line number where a change needs to be made. 3. Does the paper have appropriate margins? 4. Is the handwriting neat? Adaptations: Teachers can add or delete the number of editors along with what skills the editors are looking for in each paper.
- 31. 30 Intermediate Peer Editing Checklist Author: ________________________________________ Date____________________ Peer Editor: ____________________________________ Directions: Read your classmate’s paper. Next, check the box by each question and write a constructive comment to improve the writing piece. Yes No Comment 1. Did a prewriting activity happen? (graphic organizer, list, brainstorm) 2. Are the paragraphs organized and indented? 3. Is the introduction attention grabbing? 4. Are there enough supporting details? 5. Does the writer stay on topic? 6. Is this writing piece interesting? 7. Are there any spelling errors? (circle misspelled words in the paper) 8. Does each sentence begin with a capital letter? 9. Does each sentence end with punctuation?
- 32. 31 Student who take a piece of writing through the writing process to the publishing stage think of themselves as authors. Students should always receive a positive comment whenever a piece is shared publicly. Publishing can take on many forms: reading a piece aloud, making a book, typing the paper, and using digital tools. Publishing Getting It Out Ways to Publish • Read Aloud with 3 Compliments and A Wish • Author’s Chair • Word Process • Display on Bulletin Board • OCPS Showcase of Writers on the National Gallery of Writing: http://galleryofwriting.org/galleries/145087 • Lintor Publishing: www.lintorpublishing.com
- 33. 32 Steps: 1. Call on a student to read aloud a writing piece. 2. After reading, either the teacher or student author calsl on 3 classmates for a compliment on their writing piece. Encourage the audience to be specific in their compliments. A compliment is praise for a specific detail. Examples of effective compliments Examples of ineffective compliments “I love that you told me the detail of how fast a cheetah can run.” “I like your story.” “I enjoyed the idea of you racing the cheetah in a sports car.” “I love the details about cheetahs.” Publishing 3 Compliments and a Wish Instructional Routine Overview • Summary of Routine: Students will read their pieces aloud the classroom audience. The audience will respond to the writing with 3 compliments and a wish. • Student Outcomes: Students will be encouraged to speak clearly and listen to one another. They will be validated as a writer by receiving compliments and encouraged to make revisions based on the wish. • Estimated Time: 10 to 15 minutes The world is filled with countless animals. How can a person pick just one as their favorite? After much thought I have decided that the cheetah is my favorite animal. Cheetahs have great fur with spots that help them blend in with their surroundings. They don’t need too much camouflage because they are the fastest mammals in the world. These mammals can run up to 100 miles per hour. The only way I could beat a cheetah in a race is to be in a fast sports car. I have only seen a cheetah in the zoo but someday I would love to see one in real life. I think I will have to travel to Africa to see one in the wild. What is your favorite animal? -Quick write by a fourth grade student
- 34. 33 “I could understand your story because it started talking about picking a favorite animal but then you told me details about the cheetah.” “The cheetah is my favorite animal too.” 3. Next, the reader calls on one classmate for a wish. The wish could be a question about the writing or something they want the reader to add, delete, or clarify. A wish is only a request for more information never a criticism. Examples of effective wishes Examples of ineffective wishes “I wish you would have told me where cheetahs live.” “I wish you would have picked an elephant.” “I don’t understand what the word mammal means. Is a cheetah a mammal?” “Why didn’t you add more details?” “I wish you would have told me when you are going to go to Africa.” “I wish you have read louder.” 4. The process is done for each student during the publishing phase. Some shy students may want the teacher to read their writing but still enjoy taking part in hearing the compliments and a wish regarding their piece.
- 35. 34 What is Author’s Chair? The Author’s Chair is a strategy for authors to share their writing and receive feedback from classmates. Author’s Chair is used in the publishing stage of the writing process How do I use the author’s chair? The chair can be decorated or it can be just be a normal seat placed in a position of honor in front of the audience. The class should understand that they are required to listen and respond to the author’s writing in a respectful manner. Initially, the teacher will need to model both the role of an author and an audience member. Author’s Chair is not meant to be used with every student every day. You may have one author a week share an entire piece or several authors sharing a short piece or a selection from their piece. A sample schedule is below. Example of an Author’s Chair Schedule: Days of the Week Authors Monday Sean, Armani, Noah Tuesday Abigail, Marcus, Micheal Wednesday Carlos, Shaira, Grace Thursday Amarilis, Noel, Alex Friday Abraham, Bella, Jose Publishing Author’s Chair Instructional Routine Overview • Summary of Routine: Students will read their pieces aloud to the classroom audience while sitting in a special Author’s Chair. • Student Outcomes: Students will be encouraged to speak clearly and listen to one another. Students will be encouraged to read aloud their piece, receive feedback, and then respond to their classmates. They will be validated as a writer. • Estimated Time: 10 to 15 minutes
- 36. 35 What adaptations can I make? • Younger students may start the Author’s Chair sharing their drawings, limited writing, or teacher captions. • Use the Author’s Chair for the student of the week to share a piece they have finished. • Allow students to be in the Author’s Chair for different subjects. Students can share their writing from other content such as a math word problem or a reaction to a reading story.
- 37. 36 RUBRIC FOR AUTHOR’S CHAIR Skills student shows: Outstanding Good Fair Poor Work was complete and ready to be shared with the class Words were read easily and without hesitation Words were read at a speed that was understandable Words were read clearly Words were read so that everyone could hear Paper was held quietly Paper was held down so as not to cover speaker’s face Good eye contact with audience Topic was interesting Writing made sense Illustrations colorful ,neat, and easy to see
- 38. 37 The following documents are suggestions to help you organize classrooms and writer’s workshop by explaining how to implement instructional routines. 1. Guidelines for Writing Workshop 2. Primary Writing Workshop Schedule 3. Intermediate Writing Workshop Schedule 5. Writing Workshop Status of the Class Form 7. Compliments for Writers 8. Questions for Writers 9. Conference Record Form . Resources and Instructional Routines
- 39. 38 1. You must always be writing or sketching in your writer’s notebook or working on a piece of writing. 2. Work silently so that everyone can do their best thinking. 3. Use a soft voice when conferring with the teacher or your writing partner. 4. Put the date in the margin each day as you start writing. 5. When writing a draft, write on every other line and cross out when you make mistakes. 6. Request a teacher conference when you are ready for your final draft. 7. When writing the final draft, use your best handwriting and write on every line. 8. When you finish the final draft, reread it and: • highlight all the interesting details • use the editing checklist and a dictionary to check your work • put your drafts in numerical order • staple them together with the final draft on top 9. Place your final draft in the editor’s basket when you want your teacher to edit your project for publication. Guidelines for Writing Workshop
- 40. 39 Primary Grades 5 minutes Introductory (Focus) Activity The teacher reads from a mentor text that exemplifies a writing craft, literary device, convention, genre, or models (writes aloud) demonstrating any of the above. She may also teach a mini-lesson on a specific skill such as: • pencil grip and posture • letter formation and spacing • beginning, middle, and end • ideas for writing • adding details • word choice • spelling, punctuation, or capitalization • rereading to revise • writing workshop procedures 5 - 10 minutes Shared Writing The teacher and students collaborate together on a skill that was modeled by the teacher. All students are invited to participate and all suggestions are honored, discussed and considered for inclusion. 15 - 20 minutes Writing Time Students brainstorm, write, revise, or edit their draft, or confer with their partner(s) or the teacher. The teacher may: • circulate and write with individuals • confer or teach individuals or a small focus group 1. observe and take notes on instructional needs 10 minutes Sharing Time Students may share: • excerpts from their writing • revisions made based on feedback from conference group or peer editors • information from their folders • any newly published pieces of writing • knowledge of their “expert” areas NOTE: The schedule and focus-lessons listed above are recommendations within a literacy framework that includes reading and writing, to, with, and by students; the essentials for a writing workshop are a focus-lesson, a time to write, and a time to share. Writing Workshop
- 41. 40 Intermediate Grades 5 - 10 minutes Introductory (Focus) Activity The teacher reads from a mentor text that exemplifies a writing craft, literary device, convention, genre, or models (writes aloud) demonstrating any of the above. She may also teach a mini-lesson on a specific skill such as: • ideas for writing • organization (leads, transitions, endings) • supporting details • word choice (specific nouns, descriptive adjectives, vivid verbs) • literary devices (similes, onomatopoeia, hyperbole) • verb tense, noun-pronoun agreement, subject-verb agreement • spelling, punctuation, or capitalization • troublesome words (to, too, two) • rereading to revise • writing workshop procedures 5 - 10 minutes Shared Writing The teacher and students collaborate together on a skill that was modeled by the teacher. All students are invited to participate and all suggestions are honored, discussed and considered for inclusion. 20 – 25 minutes Writing Time Students brainstorm, write, revise, or edit their draft, or confer with their partner(s) or the teacher. The teacher may: • circulate and write with individuals • confer or teach individuals or a small focus group • observe and take notes on instructional needs 10 minutes Sharing Time Students may share: • excerpts from their writing • revisions made based on feedback from conference group or peer editors • information from their folders • any newly published pieces of writing • knowledge of their “expert” areas NOTE: The schedule and focus-lessons listed above are recommendations within a literacy framework that includes reading and writing, to, with, and by students; the essentials for a writing workshop are a focus-lesson, a time to write, and a time to share. Writing Workshop
- 42. 41 The “Status of the Class” form is a very useful tool in the writing process. It helps teachers and students alike get a quick picture of where each individual is in the process. Here is a code for completing the chart: PW – Prewriting D – Drafting R – Revising E – Editing P – Publishing At the start of every writing workshop, the teacher calls upon each student to determine where they are in the process and if they need a conference. Some students may not be able to move beyond prewriting without advice about how to begin. Others may skip revising and editing and move directly to publishing. Look at the example chart below. Mary spent the entire week prewriting, and she needs help to progress beyond it. Devon completed one step a day; he probably is moving too quickly. Student Monday Tuesday Wednesday Thursday Friday Mary PW PW PW PW PW Devon PW D R E P Writing Workshop Status of the Class Form
- 43. 42 Student Monday Tuesday Wednesday Thursday Friday
- 44. 43 You write like a pro! May I share this with another class? Teachers? This should be published for everyone to read! You are a gifted and talented writer. Someday you could make a living by writing. When I read your story, I laughed out loud! You described your mother’s cooking so well, I felt hungry. You used great transition words. I especially liked _______________. Your characters are very real. I felt as if I knew them. The beginning really got my attention because___________________. Your story sounds so real! Your story paints a picture in my mind of____________________. The ending surprised everyone! Your story made me think about__________________. The dialogue added much interest. I can’t wait to hear what will happen next! Writing Workshop Compliments for Writers
- 45. 44 Where did you get your idea? Is your story fiction or non-fiction? What is the main idea? What is the problem? How was it solved? What is the beginning? Middle? End? What is your favorite part of your story? Tell me more about it. Who is your favorite character? Tell me more about the character. Read me the places where you’re pleased with your description. What makes these sections work? Are there places you could describe more? Is there any part that you are not happy with? Let’s talk about it. Is there anything that doesn’t seem to fit? Do you think that you have more than one piece (paragraph) here? Are you going to publish this? Were you trying to write this in the style of a certain author? Why did you choose this topic? What is important about it to you? What is the most important thing you are saying? What questions do you think others will have for you? Writing Workshop Conference Questions for Writers
- 46. 45 Conference Record Form Directions: Use the Conference Record Form to document which students you are meeting with during writer’s workshop and to record details you may need to remember from the conferences. Student Name M T W Th F Comments
- 47. 46