
Recommended
More Related Content
Viewers also liked
Viewers also liked (18)
Similar to MIT OPTIONAL ESSAY
Similar to MIT OPTIONAL ESSAY (15)
Recently uploaded
Recently uploaded (20)
MIT OPTIONAL ESSAY
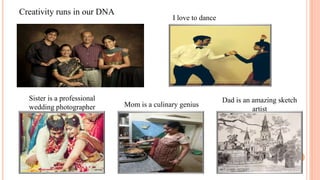
- 1. Creativity runs in our DNA Sister is a professional wedding photographer I love to dance Mom is a culinary genius Dad is an amazing sketch artist
- 2. Passion for Chess Passion for Chess Ideal Sunday afternoon, playing chess in the park When I defeated the reigning Under 10 Champion • Chess has always been close to my heart • As a member of United States Chess Federation, I participate in local tournaments • I volunteer to teach chess to young kids
- 3. Bay Area, 2009 Global Citizen Grew up in India and Singapore Travelled extensively throughout Asia and North America Lived in the mid west, the west coast and the east coast. Excited to begin the next phase of my life in Boston India, 2007 New York, 2012 Ohio, 2008
- 4. What Can I bring to the MIT Sloan Community? Play an active role in the Sloan Follies which will also give me an opportunity to showcase my dance skills Start a MIT Sloan Chess Club as it will foster a healthy competition among my classmates Chess has helped me to think strategically and foresee consequences This has piqued my interest in Game Theory. I look forward to discussing more about it with Prof. Andreas Schulz This will enable me to analyze risk and reward and forecast all possible scenarios for startups as part of the Entrepreneurship Lab Offer a global and diverse perspective. Learn more about other cultures and further bond with my classmates during Spring Trips and Action Learning Labs An innovative and intellectually curios mindset which will help me ask questions, challenge assumptions and delve deep into solving problems Bring strong quantitative skills which I will use to help my classmates develop their analytical abilities
Editor's Notes
- Picture trio with mat and frame (Intermediate)To reproduce one of the framed pictures on this slide, do the following:On the Home tab, in the Slides group, click Layout, and then click Blank.On the Home tab, in the Drawing group, click Shapes, and then under Rectangles, click Rectangle (first option from the left). On the slide, drag to draw a rectangle.Select the rectangle. Under DrawingTools, on the Format tab, in the Size group, do the following:In the Shape Height box, enter 2.5”.In the Shape Width box, enter 2.6”.On the Home tab, in the bottom right corner of the Drawing group, click the Format Shape dialog box launcher. In the Format Shape dialog box, click Fill in the left pane, selectGradient fill in the Fill pane, and then do the following:In the Type list, select Linear.Click the button next to Direction, and then click Linear Down (first row, second option from the left).Under Gradient stops, click Add gradient stops or Remove gradient stops until two stops appear in the slider.Also under Gradient stops, customize the gradient stops that you added as follows:Select the first stop in the slider, and then do the following:In the Position box, enter 0%.Click the button next to Color, and then under Theme Colors click White, Background 1 (first row, first option from the left). Select the second stop in the slider, and then do the following: In the Position box, enter 100%.Click the button next to Color, and then under Theme Colors click White, Background 1, Darker 15% (third row, first option from the left). Also in the Format Shape dialog box, click Line Color in the left pane, select Gradient line in the Line Color pane, and then do the following:In the Type list, select Linear.Click the button next to Direction, and then click Linear Right (first row, fourth option from the left).Under Gradient stops, click Add gradient stops or Remove gradient stops until two stops appear in the slider.Also under Gradient stops, customize the gradient stops that you added as follows:Select the first stop in the slider, and then do the following:In the Position box, enter 0%.Click the button next to Color, and then under Theme Colors click White, Background 1, Darker 35% (fifth row, first option from the left). Select the second stop in the slider, and then do the following: In the Position box, enter 100%.Click the button next to Color, and then under Theme Colors click White, Background 1, Darker 25% (fourth row, first option from the left). Also in the Format Shape dialog box, click Line Style in the left pane, and then in the Line Style pane, in the Width box, enter 8 pt. Also in the Format Shape dialog box, click 3-D Formatin the left pane, and then do the following in the 3-D Format pane:Under Bevel, click the button next to Top, and then under Bevel click Relaxed Inset (first row, second option from the left). Next to Top, in the Width box, enter 6 pt, and in the Height box, enter 6 pt. Under Surface, click the button next to Material, and then under Standard click Warm Matte (second option from the left). Click the button next to Lighting, and then under Neutral, click Three Point (first row, first option from the left). On the Home tab, in the Drawing group, click Shape Effects, point to Glow, and then do the following:Under Glow Variations, click Blue, 5 pt glow, Accent color 1 (first row, first option from the left). Point to More Glow Colors, and then under Theme Colors click White, Background 1 (first row, first option from the left).On the Insert tab, in the Images group, click Picture. In the Insert Picture dialog box, select a picture and then click Insert.Under Picture Tools, on the Format tab, in the bottom right corner of the Size group, click the Size and Position dialog box launcher. In the Format Picture dialog box, resize or crop the image so that the height is set to 1.8” and the widthis set to 2”.To crop the picture, click Crop in the left pane, and in the Crop pane, under Crop position, enter values into the Height, Width, Left, and Top boxes. To resize the picture, click Size in the left pane, and in the right pane, under Size and rotate, enter values into the Height and Width boxes.Under Picture Tools, on the Format tab, in the bottom right corner of the Picture Styles group, click the Format Picture dialog box launcher. In the Format Picture dialog box, click Line Color in the left pane, click Solid line in the Line Color pane, click the button next to Color, and then under Theme Colors, click White, Background 1, Darker 15% (third row, first option from the left). Also in the Format Picturedialog box, click Line Style in the left pane, and then in the Line Style pane, in the Width box, enter 1 pt. Also in the Format Picturedialog box, click Shadow in the left pane, and then do the following:Click the button next to Presets, and then under Inner, click Inside Diagonal Top Right (first row, third option from the left). In the Transparency box, enter 21%.In the Blur box, enter 3 pt. In the Distance box, enter 1 pt. Press and hold SHIFT and select both the picture and the rectangle on the slide. On the Home tab, in the Drawing group, click Arrange, point to Align, and then do the following:Click Align to Slide.Click Align Center.Click Align Middle. To reproduce the other framed pictures on this slide, do the following:Press and hold SHIFT and select both the picture and rectangle. On the Home tab, in the Drawing group, click Arrange, and then click Group.On the Home tab, in the Clipboard group, click the arrow to the right of Copy and then click Duplicate. Repeat this process for a total of three framed picture groups. Drag the framed picture groups away from the center of the slide.Select one of the duplicate framed picture groups. On the Home tab, in the Drawing group, click Arrange, and then click Ungroup.Right-click the ungrouped duplicate picture and select Change Picture.In the Insert Picture dialog box, select a picture and then click Insert.Under Picture Tools, on the Format tab, in the bottom right corner of the Size group, click the Size and Position dialog box launcher. In the Format Picture dialog box, resize or crop the image so that the height is set to 1.8” and the widthis set to 2”. To crop the picture, click Crop in the left pane, and in the Crop pane, under Crop position, enter values into the Height, Width, Left, and Top boxes. To resize the picture, click Size in the left pane, and in the right pane, under Size and rotate, enter values into the Height and Width boxes.Select the ungrouped duplicate picture and its frame. On the Home tab, in the Drawing group, click Arrange, and then do the following:Point to Align, and then click Align to Slide.Point to Align, and then click Align Center.Point to Align, and then click Align Middle.Click Group. Drag this group away from the center of the slide. Repeat steps 4-9 with the other duplicate framed picture group. Drag the three groups into a row across the slide.Press and hold SHIFT and select all three groups on the slide. On the Home tab, in the Drawing group, click Arrange, point to Align, and then do the following:Click Align Middle. Click Distribute Horizontally. To reproduce the background effects on this slide, do the following:Right-click the slide background area, and then click Format Background. In the Format Background dialog box, click Fill in the left pane, select Gradient fill in the right pane, and then do the following:In the Type list, select Radial.Click the button next to Direction, and then click From Center (third option from the left).Under Gradient stops, click Add gradient stops or Remove gradient stops until two stops appear in the slider.Also under Gradient stops, customize the gradient stops that you added as follows:Select the first stop in the slider, and then do the following:In the Position box, enter 0%.Click the button next to Color, and then under Theme Colors click White, Background 1 (first row, first option from the left).Select the second stop in the slider, and then do the following: In the Position box, enter 100%.Click the button next to Color, click More Colors, and then in the Colors dialog box, on the Custom tab, enter values for Red: 169, Green: 169, Blue: 161.