
Recommended
More Related Content
What's hot
What's hot (20)
Viewers also liked
Viewers also liked (16)
Similar to Level Design Workflow: From Concept to Completion in 40 Characters
Similar to Level Design Workflow: From Concept to Completion in 40 Characters (20)
More from nazaryth98
More from nazaryth98 (18)
Recently uploaded
Recently uploaded (20)
Level Design Workflow: From Concept to Completion in 40 Characters
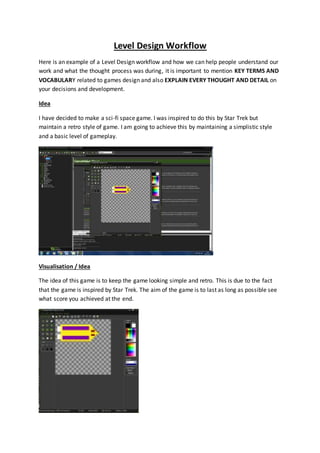
- 1. Level Design Workflow Here is an example of a Level Design workflow and how we can help people understand our work and what the thought process was during, it is important to mention KEY TERMS AND VOCABULARY related to games design and also EXPLAIN EVERY THOUGHT AND DETAIL on your decisions and development. Idea I have decided to make a sci-fi space game. I was inspired to do this by Star Trek but maintain a retro style of game. I am going to achieve this by maintaining a simplistic style and a basic level of gameplay. Visualisation / Idea The idea of this game is to keep the game looking simple and retro. This is due to the fact that the game is inspired by Star Trek. The aim of the game is to last as long as possible see what score you achieved at the end.
- 2. Planning and Execution The level was created to implicate the retro style “space game”. To do this the background for obvious reasons is space however I have added a faster moving layer above the background which gives the impression of depth in the game. Blocking To ensure that the game functions properly the code must be written perfectly otherwise the game will crash; fail to load or fail to perform some primary functions. The code doesn’t make a large amount of sense when looking at it but it is vital that the code for every aspect of the game is complete with no missed parts.
- 3. Detail This is the complete asset menu for the game. In here every part of the game is separately compiled into a list. The sprites section of the list is where the character’s “skin” is made at any particular size. The character must then be drawn using multiple tools for every pixel. The sounds are put into the game as a file such as mp3 e.c.t. The objects are the complex part of the creation process as the coding must be done in this section of the program otherwise the game will not function at all. As you can see by the large list of objects I have created every individual piece of my game to fit together with the other part of the game it is supposed to go with for example, the player_1 obj (object) is supposed to go with the player_1lazer. Final Testing The final testing to the game showed me that every component that I created works to perfection and fits well to my first design. When others played the game they found it enjoyable to play even though there is not a large amount to do. My layout only changed via the size of the level and the size of the characters in the game needed to be changed as the game was too much of a challenge. All in all the game is a good fit to my initial idea as it maintains the design and simplicity of a retro space game. Whilst creating the game the
- 4. tests showed that there multiple bugs but I was able to either remove them or make them much less present.