SlideShare a Scribd company logo
1 of 5
Download to read offline
Department of Chemistry
Teaching Laboratories
Page 1 of 5 Fluorimeter Last updated: 21/06/2017
Shimadzu RF-5301 Fluorimeter operation guide for
students
General directions
Detailed instructions for use of the fluorimeter may be given in the lab script, consult
a demonstrator for assistance where necessary.
The fluorimeter cell holder has two positions; ‘Right angle’ and ‘Front surface’, see
photographs;
Right Angle Cell holder positions Front surface
Handle the fluorimeter cells with care;
 Always handle on the corners, or at the top and bottom
 Ensure that the cell is washed thoroughly after each solution and then rinsed
out with the new solution before taking its spectrum
 Ensure that the same cell face is used for each solution
 Ensure that the cell windows are clean, dry and not contaminated
Page 2 of 5 Fluorimeter Last updated: 21/06/2017
How to record fluorescence emission spectra
1. Ensure the sampling geometry is right-angle illumination by carefully rotating
the cell holder (if necessary). Please check with a demonstrator if you are
unsure.
2. In the software click on Configure and select Parameters; the Spectrum
parameters dialogue box will be displayed.
3. To run an emission spectrum, click on Spectrum type: Emission.
4. Use the UV absorption maximum, λmax, of your sample as the excitation
wavelength; click on the EX wavelength box and type in this value.
5. Click on the EM wavelength boxes and type in (for e.g.) Start 300 nm, end
600 nm. This selects the range of wavelength over which the emission
spectrum will be scanned. Details may be in your script.
6. Click on sensitivity: select Low.
7. Click Scan speed: Medium, and Slit width: EX 5 nm, EM 5 nm; dots will
appear against the selected parameters.
8. Click on the Recording range boxes, adjust the spectrum y-axis to a size
which fills the screen by typing values in, e.g. Low: 0 and High: 400. You can
change the range later if necessary if the spectrum goes off scale.
9. Click on Ok to return to the main application window.
10.Click on Start at the bottom of the window; the spectrum will be scanned and
displayed on the screen.
11.Save the spectrum obtained, type a filename into the box in the filename entry
window (e.g. abcd1) when it appears at the end of the scan, and choose the
Save option. Record this filename.
12.The main application window should now be displayed. Click on Manipulate
and select Peakpick. A window showing the channels containing the
emission spectrum will appear. Click on the channel you wish to analyze and
then select Ok. The spectrum will be redrawn with the peaks labelled
13.Click on the cross in the top right hand corner to close the peak window. The
main application window should now be displayed.
Page 3 of 5 Fluorimeter Last updated: 21/06/2017
How to record fluorescence excitation spectra
1. Click on Configure and select Parameters. The Spectrum parameters
dialogue box will be displayed.
2. To run an excitation spectrum, click on Spectrum type: Excitation.
3. Take the λem from the emission spectrum and use this value as the excitation
wavelength. Click on the EM wavelength box and type in this value. This
selects the wavelength of the light used to observe emission from the sample.
4. Click on the EX wavelength boxes and type in (for e.g.) Start 300 nm, End
600 nm. This selects the range of wavelength over which the excitation
spectrum will be scanned.
5. All the other spectrum parameters should be the same as those used for
obtaining the emission spectrum.
6. Click on OK to return to the main application window.
7. Click on Start at the bottom of the window; the spectrum will be scanned and
displayed on the screen.
8. Save the spectrum using a different filename, use Manipulate and Peakpick
as for the emission spectrum. Record the wavelength of excitation (λex) and
intensity
9. Click on the cross in the top right hand corner to close the peak window. The
main application window should now be displayed with both the emission and
excitation spectrum shown.
How to print out spectra
1. To print out the spectra it is useful to present both scans on the same plot. To
select the files you wish to display, go to the main application window, click on
Presentation and select Channel status.
2. The display option for each channel can be toggled between Y and N. Select
Y for both of your emission and excitation spectra, N for other files. Click on
OK
3. If you wish to change the x- and y-ranges for your graph on the screen, click
on Presentation and select Set limit. The Set limits dialogue box will
appear. Change any values by clicking on the appropriate box and entering
new values. Click on OK to return to the main applications window. The graph
will now be displayed with your new ranges.
Page 4 of 5 Fluorimeter Last updated: 21/06/2017
4. To plot this data, click on Presentation and select Plot. The Plot layout
dialogue box will be displayed. In row A double click on graph; a cross will be
shown in the box and the Plot data dialogue box will appear. Type a title, if
you wish, in the Graph title box. The y-axis range may be altered, if you
wish. Click on OK.
5. Ensure that Screen is now selected in the Channel/f.name area of the Plot
layout dialogue box; this will allow a plot of the contents of the graph as they
appear on the screen. Click on the Quadrant boxes to ensure that only 1 and
2 are active (showing crosses); clicking on the boxes toggles between active
and inactive. Click on Print to obtain the plot.
How to record spectra of donor-acceptor mixtures
1. Set the sampling geometry to front-surface angle illumination by rotating the
cell holder clockwise until it clicks (see page 1)
2. In the energy transfer study you need only obtain emission spectra; therefore
Spectrum type = Emission.
3. Select the absorption maximum λmax of the donor as the excitation wavelength
and type this into the EX wavelength box.
4. Run the fluorescence emission spectra of all solutions between (for e.g.) 300
nm and 600 nm; type Start 300 nm, End 600 nm in the EM wavelength
boxes.
5. Click on sensitivity: select Low. Click Scan speed: Medium, Slit width: EX
5nm, EM 5 nm. A Recording range of 300 – 600nm is likely to be
appropriate.
6. Commence with the donor only solution and ensure that the peak is on scale,
then repeat the measurement for the remaining solutions and do not adjust
any instrument settings or the filter in the excitation beam for the D – A
mixtures.
7. Ensure that the cell is washed thoroughly after each solution and then rinsed
out with the new solution before taking its spectrum.
8. Obtain the emission intensity, i, at the peak of the donor emission for each of
the solutions
9. When you have obtained all the spectra, make a plot with all of these overlaid
on one chart.
Page 5 of 5 Fluorimeter Last updated: 21/06/2017
Instrument set-up guide for technicians / demonstrators
Turn the instrument on: see photo
Turn on the pc and start the software
 Open the RFPC software
 Select ’Configure’ from the header menu and then ‘PC configuration’. In the
dialogue box choose the ‘Serial port’ setting box and connect to the number
which is suggested, then click ‘Ok’. Note that the PC sometimes connects to the
correct com port automatically
 Select ’Configure’ from the header menu and then ‘Instrument’. In the dialogue
box select the ‘On’ button against the spectrometer. A new dialogue box will open
with the progress of the instrument ready checks displayed
 Once all checks are complete (each box will go green against the tested
parameters) click ‘Ok’
The instrument is now ready for use and the PC communications established.
Power switch
Turning on: XE Lamp switch to ON and Main switch
to I listen to lamp striking; ticking noise should stop
after a few seconds
Turning off: XE Lamp switch to OFF, wait 5-10 min to
cool, turn main switch to O

More Related Content

Similar to Shimazdu rf 5301 instructions

Similar to Shimazdu rf 5301 instructions (20)

Sampling with the ESX24
Sampling with the ESX24Sampling with the ESX24
Sampling with the ESX24
 
Stratagene mx3000e
Stratagene mx3000eStratagene mx3000e
Stratagene mx3000e
 
Coaxial feed microstrip patch antenna using HFSS
 Coaxial feed microstrip patch antenna using  HFSS Coaxial feed microstrip patch antenna using  HFSS
Coaxial feed microstrip patch antenna using HFSS
 
Power Systems Fundamentals - EE3500 - Lab 1.pptx
Power Systems Fundamentals - EE3500 - Lab 1.pptxPower Systems Fundamentals - EE3500 - Lab 1.pptx
Power Systems Fundamentals - EE3500 - Lab 1.pptx
 
Tutorial ads
Tutorial adsTutorial ads
Tutorial ads
 
Cadence tutorial lab_2_f16
Cadence tutorial lab_2_f16Cadence tutorial lab_2_f16
Cadence tutorial lab_2_f16
 
Cadence tutorial lab_2_f16
Cadence tutorial lab_2_f16Cadence tutorial lab_2_f16
Cadence tutorial lab_2_f16
 
Phoenics tutorial
Phoenics tutorialPhoenics tutorial
Phoenics tutorial
 
Tutorial ic design
Tutorial ic designTutorial ic design
Tutorial ic design
 
Mi script mirna_mx3000p_technical_note_setup-e
Mi script mirna_mx3000p_technical_note_setup-eMi script mirna_mx3000p_technical_note_setup-e
Mi script mirna_mx3000p_technical_note_setup-e
 
GNSS Observation Using U-BLOX (5)
GNSS Observation Using U-BLOX (5)GNSS Observation Using U-BLOX (5)
GNSS Observation Using U-BLOX (5)
 
Advanced scopes-lab
Advanced scopes-labAdvanced scopes-lab
Advanced scopes-lab
 
Models.mph.tuning fork
Models.mph.tuning forkModels.mph.tuning fork
Models.mph.tuning fork
 
Magazine awr-ims-3
Magazine awr-ims-3Magazine awr-ims-3
Magazine awr-ims-3
 
Ads
AdsAds
Ads
 
Jeol 2010 basic_easyusing
Jeol 2010 basic_easyusingJeol 2010 basic_easyusing
Jeol 2010 basic_easyusing
 
Create a spectrum analysis ap group
Create a spectrum analysis ap groupCreate a spectrum analysis ap group
Create a spectrum analysis ap group
 
Automating pKa Curve Fitting Using Origin
Automating pKa Curve Fitting Using OriginAutomating pKa Curve Fitting Using Origin
Automating pKa Curve Fitting Using Origin
 
Tutorial 2
Tutorial 2Tutorial 2
Tutorial 2
 
Ac lab final_report
Ac lab final_reportAc lab final_report
Ac lab final_report
 

Recently uploaded

Forest laws, Indian forest laws, why they are important
Forest laws, Indian forest laws, why they are importantForest laws, Indian forest laws, why they are important
Forest laws, Indian forest laws, why they are importantadityabhardwaj282
 
THE ROLE OF PHARMACOGNOSY IN TRADITIONAL AND MODERN SYSTEM OF MEDICINE.pptx
THE ROLE OF PHARMACOGNOSY IN TRADITIONAL AND MODERN SYSTEM OF MEDICINE.pptxTHE ROLE OF PHARMACOGNOSY IN TRADITIONAL AND MODERN SYSTEM OF MEDICINE.pptx
THE ROLE OF PHARMACOGNOSY IN TRADITIONAL AND MODERN SYSTEM OF MEDICINE.pptxNandakishor Bhaurao Deshmukh
 
Recombinant DNA technology( Transgenic plant and animal)
Recombinant DNA technology( Transgenic plant and animal)Recombinant DNA technology( Transgenic plant and animal)
Recombinant DNA technology( Transgenic plant and animal)DHURKADEVIBASKAR
 
BIOETHICS IN RECOMBINANT DNA TECHNOLOGY.
BIOETHICS IN RECOMBINANT DNA TECHNOLOGY.BIOETHICS IN RECOMBINANT DNA TECHNOLOGY.
BIOETHICS IN RECOMBINANT DNA TECHNOLOGY.PraveenaKalaiselvan1
 
Cytokinin, mechanism and its application.pptx
Cytokinin, mechanism and its application.pptxCytokinin, mechanism and its application.pptx
Cytokinin, mechanism and its application.pptxVarshiniMK
 
Call Girls in Mayapuri Delhi 💯Call Us 🔝9953322196🔝 💯Escort.
Call Girls in Mayapuri Delhi 💯Call Us 🔝9953322196🔝 💯Escort.Call Girls in Mayapuri Delhi 💯Call Us 🔝9953322196🔝 💯Escort.
Call Girls in Mayapuri Delhi 💯Call Us 🔝9953322196🔝 💯Escort.aasikanpl
 
Call Girls in Munirka Delhi 💯Call Us 🔝8264348440🔝
Call Girls in Munirka Delhi 💯Call Us 🔝8264348440🔝Call Girls in Munirka Delhi 💯Call Us 🔝8264348440🔝
Call Girls in Munirka Delhi 💯Call Us 🔝8264348440🔝soniya singh
 
Evidences of Evolution General Biology 2
Evidences of Evolution General Biology 2Evidences of Evolution General Biology 2
Evidences of Evolution General Biology 2John Carlo Rollon
 
zoogeography of pakistan.pptx fauna of Pakistan
zoogeography of pakistan.pptx fauna of Pakistanzoogeography of pakistan.pptx fauna of Pakistan
zoogeography of pakistan.pptx fauna of Pakistanzohaibmir069
 
Module 4: Mendelian Genetics and Punnett Square
Module 4:  Mendelian Genetics and Punnett SquareModule 4:  Mendelian Genetics and Punnett Square
Module 4: Mendelian Genetics and Punnett SquareIsiahStephanRadaza
 
Call Girls In Nihal Vihar Delhi ❤️8860477959 Looking Escorts In 24/7 Delhi NCR
Call Girls In Nihal Vihar Delhi ❤️8860477959 Looking Escorts In 24/7 Delhi NCRCall Girls In Nihal Vihar Delhi ❤️8860477959 Looking Escorts In 24/7 Delhi NCR
Call Girls In Nihal Vihar Delhi ❤️8860477959 Looking Escorts In 24/7 Delhi NCRlizamodels9
 
Artificial Intelligence In Microbiology by Dr. Prince C P
Artificial Intelligence In Microbiology by Dr. Prince C PArtificial Intelligence In Microbiology by Dr. Prince C P
Artificial Intelligence In Microbiology by Dr. Prince C PPRINCE C P
 
Call Us ≽ 9953322196 ≼ Call Girls In Mukherjee Nagar(Delhi) |
Call Us ≽ 9953322196 ≼ Call Girls In Mukherjee Nagar(Delhi) |Call Us ≽ 9953322196 ≼ Call Girls In Mukherjee Nagar(Delhi) |
Call Us ≽ 9953322196 ≼ Call Girls In Mukherjee Nagar(Delhi) |aasikanpl
 
Is RISC-V ready for HPC workload? Maybe?
Is RISC-V ready for HPC workload? Maybe?Is RISC-V ready for HPC workload? Maybe?
Is RISC-V ready for HPC workload? Maybe?Patrick Diehl
 
SOLUBLE PATTERN RECOGNITION RECEPTORS.pptx
SOLUBLE PATTERN RECOGNITION RECEPTORS.pptxSOLUBLE PATTERN RECOGNITION RECEPTORS.pptx
SOLUBLE PATTERN RECOGNITION RECEPTORS.pptxkessiyaTpeter
 
Microphone- characteristics,carbon microphone, dynamic microphone.pptx
Microphone- characteristics,carbon microphone, dynamic microphone.pptxMicrophone- characteristics,carbon microphone, dynamic microphone.pptx
Microphone- characteristics,carbon microphone, dynamic microphone.pptxpriyankatabhane
 
Dashanga agada a formulation of Agada tantra dealt in 3 Rd year bams agada tanta
Dashanga agada a formulation of Agada tantra dealt in 3 Rd year bams agada tantaDashanga agada a formulation of Agada tantra dealt in 3 Rd year bams agada tanta
Dashanga agada a formulation of Agada tantra dealt in 3 Rd year bams agada tantaPraksha3
 
Neurodevelopmental disorders according to the dsm 5 tr
Neurodevelopmental disorders according to the dsm 5 trNeurodevelopmental disorders according to the dsm 5 tr
Neurodevelopmental disorders according to the dsm 5 trssuser06f238
 

Recently uploaded (20)

Forest laws, Indian forest laws, why they are important
Forest laws, Indian forest laws, why they are importantForest laws, Indian forest laws, why they are important
Forest laws, Indian forest laws, why they are important
 
THE ROLE OF PHARMACOGNOSY IN TRADITIONAL AND MODERN SYSTEM OF MEDICINE.pptx
THE ROLE OF PHARMACOGNOSY IN TRADITIONAL AND MODERN SYSTEM OF MEDICINE.pptxTHE ROLE OF PHARMACOGNOSY IN TRADITIONAL AND MODERN SYSTEM OF MEDICINE.pptx
THE ROLE OF PHARMACOGNOSY IN TRADITIONAL AND MODERN SYSTEM OF MEDICINE.pptx
 
Recombinant DNA technology( Transgenic plant and animal)
Recombinant DNA technology( Transgenic plant and animal)Recombinant DNA technology( Transgenic plant and animal)
Recombinant DNA technology( Transgenic plant and animal)
 
BIOETHICS IN RECOMBINANT DNA TECHNOLOGY.
BIOETHICS IN RECOMBINANT DNA TECHNOLOGY.BIOETHICS IN RECOMBINANT DNA TECHNOLOGY.
BIOETHICS IN RECOMBINANT DNA TECHNOLOGY.
 
Cytokinin, mechanism and its application.pptx
Cytokinin, mechanism and its application.pptxCytokinin, mechanism and its application.pptx
Cytokinin, mechanism and its application.pptx
 
Call Girls in Mayapuri Delhi 💯Call Us 🔝9953322196🔝 💯Escort.
Call Girls in Mayapuri Delhi 💯Call Us 🔝9953322196🔝 💯Escort.Call Girls in Mayapuri Delhi 💯Call Us 🔝9953322196🔝 💯Escort.
Call Girls in Mayapuri Delhi 💯Call Us 🔝9953322196🔝 💯Escort.
 
Call Girls in Munirka Delhi 💯Call Us 🔝8264348440🔝
Call Girls in Munirka Delhi 💯Call Us 🔝8264348440🔝Call Girls in Munirka Delhi 💯Call Us 🔝8264348440🔝
Call Girls in Munirka Delhi 💯Call Us 🔝8264348440🔝
 
Evidences of Evolution General Biology 2
Evidences of Evolution General Biology 2Evidences of Evolution General Biology 2
Evidences of Evolution General Biology 2
 
zoogeography of pakistan.pptx fauna of Pakistan
zoogeography of pakistan.pptx fauna of Pakistanzoogeography of pakistan.pptx fauna of Pakistan
zoogeography of pakistan.pptx fauna of Pakistan
 
Module 4: Mendelian Genetics and Punnett Square
Module 4:  Mendelian Genetics and Punnett SquareModule 4:  Mendelian Genetics and Punnett Square
Module 4: Mendelian Genetics and Punnett Square
 
Call Girls In Nihal Vihar Delhi ❤️8860477959 Looking Escorts In 24/7 Delhi NCR
Call Girls In Nihal Vihar Delhi ❤️8860477959 Looking Escorts In 24/7 Delhi NCRCall Girls In Nihal Vihar Delhi ❤️8860477959 Looking Escorts In 24/7 Delhi NCR
Call Girls In Nihal Vihar Delhi ❤️8860477959 Looking Escorts In 24/7 Delhi NCR
 
Artificial Intelligence In Microbiology by Dr. Prince C P
Artificial Intelligence In Microbiology by Dr. Prince C PArtificial Intelligence In Microbiology by Dr. Prince C P
Artificial Intelligence In Microbiology by Dr. Prince C P
 
Call Us ≽ 9953322196 ≼ Call Girls In Mukherjee Nagar(Delhi) |
Call Us ≽ 9953322196 ≼ Call Girls In Mukherjee Nagar(Delhi) |Call Us ≽ 9953322196 ≼ Call Girls In Mukherjee Nagar(Delhi) |
Call Us ≽ 9953322196 ≼ Call Girls In Mukherjee Nagar(Delhi) |
 
Is RISC-V ready for HPC workload? Maybe?
Is RISC-V ready for HPC workload? Maybe?Is RISC-V ready for HPC workload? Maybe?
Is RISC-V ready for HPC workload? Maybe?
 
SOLUBLE PATTERN RECOGNITION RECEPTORS.pptx
SOLUBLE PATTERN RECOGNITION RECEPTORS.pptxSOLUBLE PATTERN RECOGNITION RECEPTORS.pptx
SOLUBLE PATTERN RECOGNITION RECEPTORS.pptx
 
Microphone- characteristics,carbon microphone, dynamic microphone.pptx
Microphone- characteristics,carbon microphone, dynamic microphone.pptxMicrophone- characteristics,carbon microphone, dynamic microphone.pptx
Microphone- characteristics,carbon microphone, dynamic microphone.pptx
 
Dashanga agada a formulation of Agada tantra dealt in 3 Rd year bams agada tanta
Dashanga agada a formulation of Agada tantra dealt in 3 Rd year bams agada tantaDashanga agada a formulation of Agada tantra dealt in 3 Rd year bams agada tanta
Dashanga agada a formulation of Agada tantra dealt in 3 Rd year bams agada tanta
 
Hot Sexy call girls in Moti Nagar,🔝 9953056974 🔝 escort Service
Hot Sexy call girls in  Moti Nagar,🔝 9953056974 🔝 escort ServiceHot Sexy call girls in  Moti Nagar,🔝 9953056974 🔝 escort Service
Hot Sexy call girls in Moti Nagar,🔝 9953056974 🔝 escort Service
 
Volatile Oils Pharmacognosy And Phytochemistry -I
Volatile Oils Pharmacognosy And Phytochemistry -IVolatile Oils Pharmacognosy And Phytochemistry -I
Volatile Oils Pharmacognosy And Phytochemistry -I
 
Neurodevelopmental disorders according to the dsm 5 tr
Neurodevelopmental disorders according to the dsm 5 trNeurodevelopmental disorders according to the dsm 5 tr
Neurodevelopmental disorders according to the dsm 5 tr
 

Shimazdu rf 5301 instructions

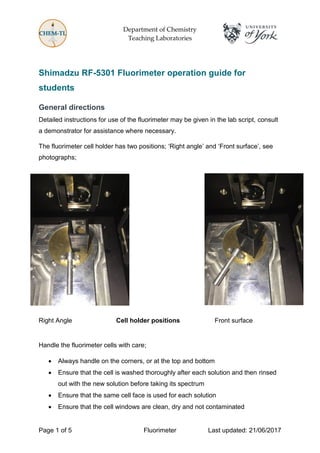
  • 1. Department of Chemistry Teaching Laboratories Page 1 of 5 Fluorimeter Last updated: 21/06/2017 Shimadzu RF-5301 Fluorimeter operation guide for students General directions Detailed instructions for use of the fluorimeter may be given in the lab script, consult a demonstrator for assistance where necessary. The fluorimeter cell holder has two positions; ‘Right angle’ and ‘Front surface’, see photographs; Right Angle Cell holder positions Front surface Handle the fluorimeter cells with care;  Always handle on the corners, or at the top and bottom  Ensure that the cell is washed thoroughly after each solution and then rinsed out with the new solution before taking its spectrum  Ensure that the same cell face is used for each solution  Ensure that the cell windows are clean, dry and not contaminated
  • 2. Page 2 of 5 Fluorimeter Last updated: 21/06/2017 How to record fluorescence emission spectra 1. Ensure the sampling geometry is right-angle illumination by carefully rotating the cell holder (if necessary). Please check with a demonstrator if you are unsure. 2. In the software click on Configure and select Parameters; the Spectrum parameters dialogue box will be displayed. 3. To run an emission spectrum, click on Spectrum type: Emission. 4. Use the UV absorption maximum, λmax, of your sample as the excitation wavelength; click on the EX wavelength box and type in this value. 5. Click on the EM wavelength boxes and type in (for e.g.) Start 300 nm, end 600 nm. This selects the range of wavelength over which the emission spectrum will be scanned. Details may be in your script. 6. Click on sensitivity: select Low. 7. Click Scan speed: Medium, and Slit width: EX 5 nm, EM 5 nm; dots will appear against the selected parameters. 8. Click on the Recording range boxes, adjust the spectrum y-axis to a size which fills the screen by typing values in, e.g. Low: 0 and High: 400. You can change the range later if necessary if the spectrum goes off scale. 9. Click on Ok to return to the main application window. 10.Click on Start at the bottom of the window; the spectrum will be scanned and displayed on the screen. 11.Save the spectrum obtained, type a filename into the box in the filename entry window (e.g. abcd1) when it appears at the end of the scan, and choose the Save option. Record this filename. 12.The main application window should now be displayed. Click on Manipulate and select Peakpick. A window showing the channels containing the emission spectrum will appear. Click on the channel you wish to analyze and then select Ok. The spectrum will be redrawn with the peaks labelled 13.Click on the cross in the top right hand corner to close the peak window. The main application window should now be displayed.
  • 3. Page 3 of 5 Fluorimeter Last updated: 21/06/2017 How to record fluorescence excitation spectra 1. Click on Configure and select Parameters. The Spectrum parameters dialogue box will be displayed. 2. To run an excitation spectrum, click on Spectrum type: Excitation. 3. Take the λem from the emission spectrum and use this value as the excitation wavelength. Click on the EM wavelength box and type in this value. This selects the wavelength of the light used to observe emission from the sample. 4. Click on the EX wavelength boxes and type in (for e.g.) Start 300 nm, End 600 nm. This selects the range of wavelength over which the excitation spectrum will be scanned. 5. All the other spectrum parameters should be the same as those used for obtaining the emission spectrum. 6. Click on OK to return to the main application window. 7. Click on Start at the bottom of the window; the spectrum will be scanned and displayed on the screen. 8. Save the spectrum using a different filename, use Manipulate and Peakpick as for the emission spectrum. Record the wavelength of excitation (λex) and intensity 9. Click on the cross in the top right hand corner to close the peak window. The main application window should now be displayed with both the emission and excitation spectrum shown. How to print out spectra 1. To print out the spectra it is useful to present both scans on the same plot. To select the files you wish to display, go to the main application window, click on Presentation and select Channel status. 2. The display option for each channel can be toggled between Y and N. Select Y for both of your emission and excitation spectra, N for other files. Click on OK 3. If you wish to change the x- and y-ranges for your graph on the screen, click on Presentation and select Set limit. The Set limits dialogue box will appear. Change any values by clicking on the appropriate box and entering new values. Click on OK to return to the main applications window. The graph will now be displayed with your new ranges.
  • 4. Page 4 of 5 Fluorimeter Last updated: 21/06/2017 4. To plot this data, click on Presentation and select Plot. The Plot layout dialogue box will be displayed. In row A double click on graph; a cross will be shown in the box and the Plot data dialogue box will appear. Type a title, if you wish, in the Graph title box. The y-axis range may be altered, if you wish. Click on OK. 5. Ensure that Screen is now selected in the Channel/f.name area of the Plot layout dialogue box; this will allow a plot of the contents of the graph as they appear on the screen. Click on the Quadrant boxes to ensure that only 1 and 2 are active (showing crosses); clicking on the boxes toggles between active and inactive. Click on Print to obtain the plot. How to record spectra of donor-acceptor mixtures 1. Set the sampling geometry to front-surface angle illumination by rotating the cell holder clockwise until it clicks (see page 1) 2. In the energy transfer study you need only obtain emission spectra; therefore Spectrum type = Emission. 3. Select the absorption maximum λmax of the donor as the excitation wavelength and type this into the EX wavelength box. 4. Run the fluorescence emission spectra of all solutions between (for e.g.) 300 nm and 600 nm; type Start 300 nm, End 600 nm in the EM wavelength boxes. 5. Click on sensitivity: select Low. Click Scan speed: Medium, Slit width: EX 5nm, EM 5 nm. A Recording range of 300 – 600nm is likely to be appropriate. 6. Commence with the donor only solution and ensure that the peak is on scale, then repeat the measurement for the remaining solutions and do not adjust any instrument settings or the filter in the excitation beam for the D – A mixtures. 7. Ensure that the cell is washed thoroughly after each solution and then rinsed out with the new solution before taking its spectrum. 8. Obtain the emission intensity, i, at the peak of the donor emission for each of the solutions 9. When you have obtained all the spectra, make a plot with all of these overlaid on one chart.
  • 5. Page 5 of 5 Fluorimeter Last updated: 21/06/2017 Instrument set-up guide for technicians / demonstrators Turn the instrument on: see photo Turn on the pc and start the software  Open the RFPC software  Select ’Configure’ from the header menu and then ‘PC configuration’. In the dialogue box choose the ‘Serial port’ setting box and connect to the number which is suggested, then click ‘Ok’. Note that the PC sometimes connects to the correct com port automatically  Select ’Configure’ from the header menu and then ‘Instrument’. In the dialogue box select the ‘On’ button against the spectrometer. A new dialogue box will open with the progress of the instrument ready checks displayed  Once all checks are complete (each box will go green against the tested parameters) click ‘Ok’ The instrument is now ready for use and the PC communications established. Power switch Turning on: XE Lamp switch to ON and Main switch to I listen to lamp striking; ticking noise should stop after a few seconds Turning off: XE Lamp switch to OFF, wait 5-10 min to cool, turn main switch to O