SlideShare a Scribd company logo
1 of 9
Ultrasonic B-Scan - Remote Access Experimental Lab

Requirements

To capture and analyse an Ultrasonic B-Scan Image of a corroded pipe sample. The laboratory
exercise will be completed via remote access using a student dedicated remote desktop link from
the on-line learning environment. An additional web cam link to the laboratory for communication
with a supervising technician is also necessary.

Equipment

Remotely Accessed Ultrasonic B-Scan System.

Method

Start Procedure

   1. VPN into the University Network.

   2. Establish Communication with the Supervising technician.

   3. Launch the relevant Remote Desktop Link from the on-line distance learning website. Use
      your university user name and password to log onto the remote access computer.

   4. Check that all cables have been connected and that the UT and controller interfaces are
      switched on. Also ensure that the UT scanner is over a defect free region on the sample.

   5. Launch the Sector B-Scan Software application using the start menu as shown below.


   6. The application window will then be displayed. To enable the UT interface, select the
      Control, Initialise Interface menu option.
7. You should see a real-time A-Scan similar to that shown below.


8.   Use the gain control to adjust the gain so that the first received signal is approx. Full screen
     height.


9. Enable Gate 1 control, and adjust its position, length and level as indicated below:
10. Notice that the thickness readout is displaying approx. 32mm. To calibrate for the correct
    wall thickness, we need to alter the Delay control. The pipe sample wall thickness is approx.
    10mm.


11. To improve the resolution of the A-Scan presentation, select a more suitable Range value.


    You can use the up down control itself, or select from a predefined range              .
    In the figure below a time-base range of 20mm has been selected. The Gate 1 has also been
    extended slightly.
12. Specify the scan distance resolution required for the B-Scan image. This control


                       is located towards the top right of the application window.


   13. Select the Start button           , and inform the technician to drive the scanner forward.
       The image will start being collected and displayed in real-time. If there are gaps in the B-
       Scan image this may be because of the added overhead involved in the network access being
       used. Don’t worry about this since it is the principle of setting up and driving the system
       that we are concerned about.


   14. After travelling a few 100mm inform the technician to stop the scanner. You will then need


       to tell the software to End the scan           . You can use the file-save menu options to
       save the data file.


   15. To stop the real-time A-Scan, select the Hold button. This will allow you to analyse the
       acquired image. When in Hold mode and by moving the cursor over the image you will
       notice that for every section along the length of the image there is a relevant A-Scan
       displayed. Also the thickness is displayed in the thickness meter.


   16. To display cursor and measurement options, right click over the B-Scan image. The following


       pop-up menu will appear,                   .


   17. You can use these options to perform measurements and switch cross hairs and parabolic
       cursors on/off.


Data Aanalysis.
Experimental Data for the pipe sample has already been acquired and stored on drive C: of the host
PC.

   1. To open the file use the File.. Open menu option. The following dialogue window will be
      displayed. The directory where the files are stored is also indicated.


   2. Select the 12 inch pipe sample file.


   3. The application window will then look like the following.
4. Use the pop-up menu to enable cursors, and perform measurements. Try and locate the
   minimum wall thickness.


5.
6. You can use the Profile menu option,                            to obtain a thickness profile
   of the sample. The following dialogue window is first displayed.


7. Use the default settings, and select OK. The following profile window will then be displayed.


8. Note that the default range is the same as the time base. To improve the profile display you
   can adjust the range up or down. Note also that the maximum, minimum and mean wall
   thickness values are also given in this window.
Compile an experimental report, describing the process of setting up and collecting a B-Scan image.
By analysing the data file for the 12 inch pipe sample, produce a typical inspection report,
remembering to highlight the minimum, maximum and mean wall thickness values.
Structure of an Experimental Report

The convention, when writing a scientific report, is to adopt a rather formalised structure. The table below
describes what sections a typical report should have and a brief description of what each section should
contain. Whether the experiment is largely theoretical or more biased towards data analysis, you should still
comply as closely as possible with the structure set out in the following table. The table also gives a typical
breakdown of the marks allocated to each section (if the experiment is for assessment). Since no two
experiments or investigations are the same, the relative weights of each section might well vary from one
experiment to another. As with any open-ended piece of work, some flexibility in the marking scheme is
usually required, to take account of each student’s approach. Remember, there is no hard and fast rule about
the relative importance of different sections for different experiments, so the marks in the table below are just
a typical breakdown for a typical experiment.

A typical length would be 7 to 10 pages for the main body of the report.

Section of Report                                                                                        Typical mark

Date, title and general presentation and organisation of the report.                                     ~5 marks

Abstract - This should be three or four sentences, summarising what you did, how you did it, what
the results (and uncertainties) were and what your conclusions were. In practice, you will write this    ~5 marks
last, so leave about half a page at the beginning of your write-up in which to put an abstract later.
Apparatus - List the apparatus with a diagram where necessary. Describe in particular anything           ~10 marks
different or additional to that in the script.
Introduction/Method/Procedure - Explain very briefly what the experiment is about. Record what           ~10 marks
you did - particularly if it differs from the script. Include problems and disasters.
Measurements and Graphs of Raw measurements - Record all raw measurements (good, bad or
indifferent) as and when you obtained them. If the raw data or calculations are voluminous, they         ~20 mark
could be summarised here and included in their entirety in an appendix. It is often worthwhile to
plot a graph of your measurements as you go. This can save time since it indicates quickly if you need
to repeat readings or if you need more.
Calculations and error estimates - Describe the calculations or other processing of your results.
Explain what equations you used and include a sample calculation, even if you use a spreadsheet          ~10 marks
programme to carry out the calculations. Discuss the sources of error in your measurements and use
these to estimate the uncertainties (or experimental error) on your final results. Include any graphs
used in your analysis.
Results and Discussion - Discuss the interpretation of your results. The questions in the experimental
script usually lead you through what is required, so you should record your responses to these           ~25 marks
questions as you come to them. Clearly state your results with estimated errors and units. This is
where you should compare your results with accepted values from reference books or other sources.
Conclusion and bibliography - Write a conclusion drawing the results together, discussing their
physical implications, the validity of the theory and the methods, and scope for improvement of the      ~15 marks
experiment. Remember to list the books, articles or web pages that you used for reference in a
bibliography at the end.
Appendix - Most reports will not require appendix as tables of data, calculations and graphs of
results should normally be included in the main body of the report to create a coherent whole. Only
relegate large volumes of data to the appendix if absolutely necessary.                                  N/A

Don’t forget to go back and write the abstract.

More Related Content

Similar to Remote Ultrasonic B-Scan Lab

Lab report templante for 10th and 9th grade
Lab report templante for 10th and 9th gradeLab report templante for 10th and 9th grade
Lab report templante for 10th and 9th gradeSofia Paz
 
Lab report templete
Lab report templeteLab report templete
Lab report templeteSofia Paz
 
VictorMohmmadjaludM._Revision-Matrix.docx
VictorMohmmadjaludM._Revision-Matrix.docxVictorMohmmadjaludM._Revision-Matrix.docx
VictorMohmmadjaludM._Revision-Matrix.docxEugene Embalzado
 
Six_Sigma_Spurious_12_15_09
Six_Sigma_Spurious_12_15_09Six_Sigma_Spurious_12_15_09
Six_Sigma_Spurious_12_15_09Dr. Ali Nassib
 
Testing and Benchmarking (Martyn)
Testing and Benchmarking (Martyn)Testing and Benchmarking (Martyn)
Testing and Benchmarking (Martyn)iteclearners
 
Synchrotron applications
Synchrotron applicationsSynchrotron applications
Synchrotron applicationsAcung Acia
 
Lecture16_Process Analyzer and OPTQUEST.ppt
Lecture16_Process Analyzer and OPTQUEST.pptLecture16_Process Analyzer and OPTQUEST.ppt
Lecture16_Process Analyzer and OPTQUEST.pptAbdAbd72
 
Advanced mechanical design and materials material selection and finite elemen...
Advanced mechanical design and materials material selection and finite elemen...Advanced mechanical design and materials material selection and finite elemen...
Advanced mechanical design and materials material selection and finite elemen...TOPENGINEERINGSOLUTIONS
 
A Better Way to Capture and Manage Cement Lab Data
A Better Way to Capture and Manage Cement Lab DataA Better Way to Capture and Manage Cement Lab Data
A Better Way to Capture and Manage Cement Lab Datapvisoftware
 
A PRESENTATION ON INSTALLATION OF RAPID MINER & CHARTA PRESENTATION ON INSTAL...
A PRESENTATION ON INSTALLATION OF RAPID MINER &CHARTA PRESENTATION ON INSTAL...A PRESENTATION ON INSTALLATION OF RAPID MINER &CHARTA PRESENTATION ON INSTAL...
A PRESENTATION ON INSTALLATION OF RAPID MINER & CHARTA PRESENTATION ON INSTAL...Ahtesham Ullah khan
 
Simulation pitfalls p302023
Simulation pitfalls p302023Simulation pitfalls p302023
Simulation pitfalls p302023vijaykale1981
 
Statistical Process Control (SPC) - QMS.pptx
Statistical Process Control (SPC) - QMS.pptxStatistical Process Control (SPC) - QMS.pptx
Statistical Process Control (SPC) - QMS.pptxARUN KUMAR
 
Filter designandanalysisusingmicrowaveoffice
Filter designandanalysisusingmicrowaveofficeFilter designandanalysisusingmicrowaveoffice
Filter designandanalysisusingmicrowaveofficeEmad S. Ahmed
 
A study on the efficiency of a test analysis method utilizing test-categories...
A study on the efficiency of a test analysis method utilizing test-categories...A study on the efficiency of a test analysis method utilizing test-categories...
A study on the efficiency of a test analysis method utilizing test-categories...Tsuyoshi Yumoto
 
Magazine awr-ims-3
Magazine awr-ims-3Magazine awr-ims-3
Magazine awr-ims-3Sam Sambala
 

Similar to Remote Ultrasonic B-Scan Lab (20)

What's new in Design-Expert version 9?
 What's new in  Design-Expert version 9? What's new in  Design-Expert version 9?
What's new in Design-Expert version 9?
 
Lab report templante for 10th and 9th grade
Lab report templante for 10th and 9th gradeLab report templante for 10th and 9th grade
Lab report templante for 10th and 9th grade
 
Lab report templete
Lab report templeteLab report templete
Lab report templete
 
Design expert 9 tutorials 2015
Design expert 9 tutorials 2015Design expert 9 tutorials 2015
Design expert 9 tutorials 2015
 
VictorMohmmadjaludM._Revision-Matrix.docx
VictorMohmmadjaludM._Revision-Matrix.docxVictorMohmmadjaludM._Revision-Matrix.docx
VictorMohmmadjaludM._Revision-Matrix.docx
 
Six_Sigma_Spurious_12_15_09
Six_Sigma_Spurious_12_15_09Six_Sigma_Spurious_12_15_09
Six_Sigma_Spurious_12_15_09
 
CHAPTER 7.pptx
CHAPTER 7.pptxCHAPTER 7.pptx
CHAPTER 7.pptx
 
Testing and Benchmarking (Martyn)
Testing and Benchmarking (Martyn)Testing and Benchmarking (Martyn)
Testing and Benchmarking (Martyn)
 
Synchrotron applications
Synchrotron applicationsSynchrotron applications
Synchrotron applications
 
Lecture16_Process Analyzer and OPTQUEST.ppt
Lecture16_Process Analyzer and OPTQUEST.pptLecture16_Process Analyzer and OPTQUEST.ppt
Lecture16_Process Analyzer and OPTQUEST.ppt
 
Advanced mechanical design and materials material selection and finite elemen...
Advanced mechanical design and materials material selection and finite elemen...Advanced mechanical design and materials material selection and finite elemen...
Advanced mechanical design and materials material selection and finite elemen...
 
A Better Way to Capture and Manage Cement Lab Data
A Better Way to Capture and Manage Cement Lab DataA Better Way to Capture and Manage Cement Lab Data
A Better Way to Capture and Manage Cement Lab Data
 
A PRESENTATION ON INSTALLATION OF RAPID MINER & CHARTA PRESENTATION ON INSTAL...
A PRESENTATION ON INSTALLATION OF RAPID MINER &CHARTA PRESENTATION ON INSTAL...A PRESENTATION ON INSTALLATION OF RAPID MINER &CHARTA PRESENTATION ON INSTAL...
A PRESENTATION ON INSTALLATION OF RAPID MINER & CHARTA PRESENTATION ON INSTAL...
 
Science fair
Science fairScience fair
Science fair
 
ADI_Newsletter_Issue31
ADI_Newsletter_Issue31ADI_Newsletter_Issue31
ADI_Newsletter_Issue31
 
Simulation pitfalls p302023
Simulation pitfalls p302023Simulation pitfalls p302023
Simulation pitfalls p302023
 
Statistical Process Control (SPC) - QMS.pptx
Statistical Process Control (SPC) - QMS.pptxStatistical Process Control (SPC) - QMS.pptx
Statistical Process Control (SPC) - QMS.pptx
 
Filter designandanalysisusingmicrowaveoffice
Filter designandanalysisusingmicrowaveofficeFilter designandanalysisusingmicrowaveoffice
Filter designandanalysisusingmicrowaveoffice
 
A study on the efficiency of a test analysis method utilizing test-categories...
A study on the efficiency of a test analysis method utilizing test-categories...A study on the efficiency of a test analysis method utilizing test-categories...
A study on the efficiency of a test analysis method utilizing test-categories...
 
Magazine awr-ims-3
Magazine awr-ims-3Magazine awr-ims-3
Magazine awr-ims-3
 

More from Tony Toole

Health and safety
Health and safetyHealth and safety
Health and safetyTony Toole
 
5 s techniques
5 s techniques5 s techniques
5 s techniquesTony Toole
 
5 s techniques
5 s techniques5 s techniques
5 s techniquesTony Toole
 
Tony Toole CV 2014
Tony Toole CV 2014Tony Toole CV 2014
Tony Toole CV 2014Tony Toole
 
Automotive supply chain management
Automotive supply chain managementAutomotive supply chain management
Automotive supply chain managementTony Toole
 
Automotive supply chain management
Automotive supply chain managementAutomotive supply chain management
Automotive supply chain managementTony Toole
 
Jisc fe and skills project (csg briefing paper 1)
Jisc fe and skills project (csg briefing paper 1)Jisc fe and skills project (csg briefing paper 1)
Jisc fe and skills project (csg briefing paper 1)Tony Toole
 
Jisc fe and skills development and resource programme proposal
Jisc fe and skills development and resource programme proposalJisc fe and skills development and resource programme proposal
Jisc fe and skills development and resource programme proposalTony Toole
 
Tel survey report
Tel survey reportTel survey report
Tel survey reportTony Toole
 
Tel survey, csg (final)
Tel survey, csg (final)Tel survey, csg (final)
Tel survey, csg (final)Tony Toole
 
Tel survey, carmarthen lampeter (final)
Tel survey, carmarthen lampeter (final)Tel survey, carmarthen lampeter (final)
Tel survey, carmarthen lampeter (final)Tony Toole
 
Tel survey, swansea (final)
Tel survey, swansea (final)Tel survey, swansea (final)
Tel survey, swansea (final)Tony Toole
 
E learning Good Practice Guide
E learning Good Practice GuideE learning Good Practice Guide
E learning Good Practice GuideTony Toole
 
E learning Good Practice Guide
E learning Good Practice GuideE learning Good Practice Guide
E learning Good Practice GuideTony Toole
 
Alt c 2013 presentation
Alt c 2013 presentationAlt c 2013 presentation
Alt c 2013 presentationTony Toole
 
Tony toole cv 2013
Tony toole cv 2013Tony toole cv 2013
Tony toole cv 2013Tony Toole
 
Sip tel innovation report 3
Sip tel innovation report 3Sip tel innovation report 3
Sip tel innovation report 3Tony Toole
 
Sip tel innovation report 2
Sip tel innovation report 2Sip tel innovation report 2
Sip tel innovation report 2Tony Toole
 
Moocs and Open Education
Moocs and Open EducationMoocs and Open Education
Moocs and Open EducationTony Toole
 

More from Tony Toole (20)

Health and safety
Health and safetyHealth and safety
Health and safety
 
Kaizen
KaizenKaizen
Kaizen
 
5 s techniques
5 s techniques5 s techniques
5 s techniques
 
5 s techniques
5 s techniques5 s techniques
5 s techniques
 
Tony Toole CV 2014
Tony Toole CV 2014Tony Toole CV 2014
Tony Toole CV 2014
 
Automotive supply chain management
Automotive supply chain managementAutomotive supply chain management
Automotive supply chain management
 
Automotive supply chain management
Automotive supply chain managementAutomotive supply chain management
Automotive supply chain management
 
Jisc fe and skills project (csg briefing paper 1)
Jisc fe and skills project (csg briefing paper 1)Jisc fe and skills project (csg briefing paper 1)
Jisc fe and skills project (csg briefing paper 1)
 
Jisc fe and skills development and resource programme proposal
Jisc fe and skills development and resource programme proposalJisc fe and skills development and resource programme proposal
Jisc fe and skills development and resource programme proposal
 
Tel survey report
Tel survey reportTel survey report
Tel survey report
 
Tel survey, csg (final)
Tel survey, csg (final)Tel survey, csg (final)
Tel survey, csg (final)
 
Tel survey, carmarthen lampeter (final)
Tel survey, carmarthen lampeter (final)Tel survey, carmarthen lampeter (final)
Tel survey, carmarthen lampeter (final)
 
Tel survey, swansea (final)
Tel survey, swansea (final)Tel survey, swansea (final)
Tel survey, swansea (final)
 
E learning Good Practice Guide
E learning Good Practice GuideE learning Good Practice Guide
E learning Good Practice Guide
 
E learning Good Practice Guide
E learning Good Practice GuideE learning Good Practice Guide
E learning Good Practice Guide
 
Alt c 2013 presentation
Alt c 2013 presentationAlt c 2013 presentation
Alt c 2013 presentation
 
Tony toole cv 2013
Tony toole cv 2013Tony toole cv 2013
Tony toole cv 2013
 
Sip tel innovation report 3
Sip tel innovation report 3Sip tel innovation report 3
Sip tel innovation report 3
 
Sip tel innovation report 2
Sip tel innovation report 2Sip tel innovation report 2
Sip tel innovation report 2
 
Moocs and Open Education
Moocs and Open EducationMoocs and Open Education
Moocs and Open Education
 

Remote Ultrasonic B-Scan Lab

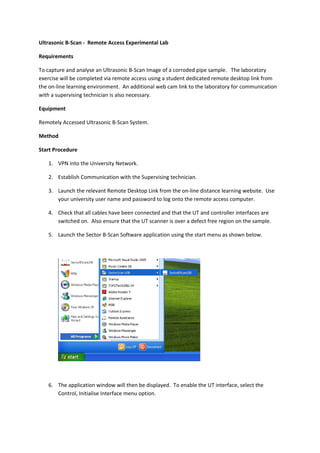
  • 1. Ultrasonic B-Scan - Remote Access Experimental Lab Requirements To capture and analyse an Ultrasonic B-Scan Image of a corroded pipe sample. The laboratory exercise will be completed via remote access using a student dedicated remote desktop link from the on-line learning environment. An additional web cam link to the laboratory for communication with a supervising technician is also necessary. Equipment Remotely Accessed Ultrasonic B-Scan System. Method Start Procedure 1. VPN into the University Network. 2. Establish Communication with the Supervising technician. 3. Launch the relevant Remote Desktop Link from the on-line distance learning website. Use your university user name and password to log onto the remote access computer. 4. Check that all cables have been connected and that the UT and controller interfaces are switched on. Also ensure that the UT scanner is over a defect free region on the sample. 5. Launch the Sector B-Scan Software application using the start menu as shown below. 6. The application window will then be displayed. To enable the UT interface, select the Control, Initialise Interface menu option.
  • 2. 7. You should see a real-time A-Scan similar to that shown below. 8. Use the gain control to adjust the gain so that the first received signal is approx. Full screen height. 9. Enable Gate 1 control, and adjust its position, length and level as indicated below:
  • 3. 10. Notice that the thickness readout is displaying approx. 32mm. To calibrate for the correct wall thickness, we need to alter the Delay control. The pipe sample wall thickness is approx. 10mm. 11. To improve the resolution of the A-Scan presentation, select a more suitable Range value. You can use the up down control itself, or select from a predefined range . In the figure below a time-base range of 20mm has been selected. The Gate 1 has also been extended slightly.
  • 4. 12. Specify the scan distance resolution required for the B-Scan image. This control is located towards the top right of the application window. 13. Select the Start button , and inform the technician to drive the scanner forward. The image will start being collected and displayed in real-time. If there are gaps in the B- Scan image this may be because of the added overhead involved in the network access being used. Don’t worry about this since it is the principle of setting up and driving the system that we are concerned about. 14. After travelling a few 100mm inform the technician to stop the scanner. You will then need to tell the software to End the scan . You can use the file-save menu options to save the data file. 15. To stop the real-time A-Scan, select the Hold button. This will allow you to analyse the acquired image. When in Hold mode and by moving the cursor over the image you will notice that for every section along the length of the image there is a relevant A-Scan displayed. Also the thickness is displayed in the thickness meter. 16. To display cursor and measurement options, right click over the B-Scan image. The following pop-up menu will appear, . 17. You can use these options to perform measurements and switch cross hairs and parabolic cursors on/off. Data Aanalysis.
  • 5. Experimental Data for the pipe sample has already been acquired and stored on drive C: of the host PC. 1. To open the file use the File.. Open menu option. The following dialogue window will be displayed. The directory where the files are stored is also indicated. 2. Select the 12 inch pipe sample file. 3. The application window will then look like the following.
  • 6. 4. Use the pop-up menu to enable cursors, and perform measurements. Try and locate the minimum wall thickness. 5.
  • 7. 6. You can use the Profile menu option, to obtain a thickness profile of the sample. The following dialogue window is first displayed. 7. Use the default settings, and select OK. The following profile window will then be displayed. 8. Note that the default range is the same as the time base. To improve the profile display you can adjust the range up or down. Note also that the maximum, minimum and mean wall thickness values are also given in this window.
  • 8. Compile an experimental report, describing the process of setting up and collecting a B-Scan image. By analysing the data file for the 12 inch pipe sample, produce a typical inspection report, remembering to highlight the minimum, maximum and mean wall thickness values.
  • 9. Structure of an Experimental Report The convention, when writing a scientific report, is to adopt a rather formalised structure. The table below describes what sections a typical report should have and a brief description of what each section should contain. Whether the experiment is largely theoretical or more biased towards data analysis, you should still comply as closely as possible with the structure set out in the following table. The table also gives a typical breakdown of the marks allocated to each section (if the experiment is for assessment). Since no two experiments or investigations are the same, the relative weights of each section might well vary from one experiment to another. As with any open-ended piece of work, some flexibility in the marking scheme is usually required, to take account of each student’s approach. Remember, there is no hard and fast rule about the relative importance of different sections for different experiments, so the marks in the table below are just a typical breakdown for a typical experiment. A typical length would be 7 to 10 pages for the main body of the report. Section of Report Typical mark Date, title and general presentation and organisation of the report. ~5 marks Abstract - This should be three or four sentences, summarising what you did, how you did it, what the results (and uncertainties) were and what your conclusions were. In practice, you will write this ~5 marks last, so leave about half a page at the beginning of your write-up in which to put an abstract later. Apparatus - List the apparatus with a diagram where necessary. Describe in particular anything ~10 marks different or additional to that in the script. Introduction/Method/Procedure - Explain very briefly what the experiment is about. Record what ~10 marks you did - particularly if it differs from the script. Include problems and disasters. Measurements and Graphs of Raw measurements - Record all raw measurements (good, bad or indifferent) as and when you obtained them. If the raw data or calculations are voluminous, they ~20 mark could be summarised here and included in their entirety in an appendix. It is often worthwhile to plot a graph of your measurements as you go. This can save time since it indicates quickly if you need to repeat readings or if you need more. Calculations and error estimates - Describe the calculations or other processing of your results. Explain what equations you used and include a sample calculation, even if you use a spreadsheet ~10 marks programme to carry out the calculations. Discuss the sources of error in your measurements and use these to estimate the uncertainties (or experimental error) on your final results. Include any graphs used in your analysis. Results and Discussion - Discuss the interpretation of your results. The questions in the experimental script usually lead you through what is required, so you should record your responses to these ~25 marks questions as you come to them. Clearly state your results with estimated errors and units. This is where you should compare your results with accepted values from reference books or other sources. Conclusion and bibliography - Write a conclusion drawing the results together, discussing their physical implications, the validity of the theory and the methods, and scope for improvement of the ~15 marks experiment. Remember to list the books, articles or web pages that you used for reference in a bibliography at the end. Appendix - Most reports will not require appendix as tables of data, calculations and graphs of results should normally be included in the main body of the report to create a coherent whole. Only relegate large volumes of data to the appendix if absolutely necessary. N/A Don’t forget to go back and write the abstract.