1. Technical Note
®
Eppendorf Mastercycler ep realplex
Instrument Setup Instructions for RT2Profiler™ PCR Arrays
Preparation
Before the Experiment (Presetting the Run Template will save time for your run):
1.
Make sure the correct thermal block cycler (silver or aluminum) is in place.
2.
Turn on the Mastercycler instrument; the main switch is located at the back of the instrument. Turn on the
computer linked to the instrument and log on to Window XP.
3.
Start realplex software version 2.2.
4.
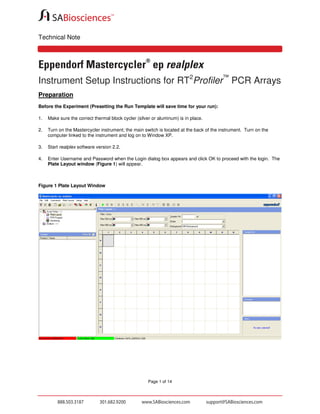
Enter Username and Password when the Login dialog box appears and click OK to proceed with the login. The
Plate Layout window (Figure 1) will appear.
Figure 1 Plate Layout Window
Page 1 of 14
2. Technical Note
Background Calibration
5.
Before setting up an experiment, it is necessary to perform background calibration using an empty, capped A
plate. Click on Setup, then Background Calibration. A list of previously performed calibrations will appear.
Click New… to open the following dialog box (Figure 2):
Figure 2 New Background Calibration Dialog Box
6.
Enter SABiosciences A Plate as the name of the background plate. The default block and lid temperatures
(60.0 and 105° respectively) do not need to be changed. Insert the background plate into the Mastercycler
C,
with well A1 at the upper left corner; slide the heated lid closed, pull the sealing clamp into the closed position
and click Calibrate. Click OK to begin calibration.
7.
After the first reading, the software will prompt you to turn the plate. Open the realplex instrument and turn the
background plate so that well A1 is in the lower right corner. Then close the instrument and click OK to continue
the calibration.
8.
If background calibration was successful, the plate layout will be highlighted in green and a dialog box will
appear with the message Calibration successfully finished. Click OK to continue with the experiment setup.
**If background calibration fails in some positions, those wells will be highlighted in orange. Failure may be
a result of fluorescence contamination on the plate or in some wells of the thermoblock. Retry calibration with a new
A Plate; if this also fails, clean the thermoblock as instructed in the instrument manual.
Page 2 of 14
3. Technical Note
RT2 Profiler PCR Array Template Setup
9.
In the Plate Layout window, specify the following setup parameters:
Filter 520 nm: SYBR
Sample Vol: 25 µl
Probe: SYBR Green
Background: SABiosciences A plate
10. Select all wells, then right-click in the blue area and select “Unknown” to complete plate layout (Figure 3).
Figure 3 Complete Plate Layout Window
Page 3 of 14
4. Technical Note
11. Select PCR Program in the navigator window at the upper left corner of the screen. The default PCR program
will appear (Figure 4).
Figure 4 PCR Program Window
2
12. Edit the default program to create an RT Profiler PCR Array template.
Right-click in segment 2, 3, or 4, then click Delete. All three segments will be deleted.
Page 4 of 14
5. Technical Note
13. Right click on END. Select “Add Step”, then select “2 Step Cycle” and click OK (Figure 5).
Figure 5 Adding 2-Step Cycle
Page 5 of 14
6. Technical Note
14. Right click on END. Select “Add Step”, then select “Melting Curve” and click OK (Figure 6).
Figure 6 Adding the Melting Curve
15. Change the length of the heat activation step to 10 minutes. To do so, click on 02:00 in segment 1 and enter
10:00.
The final parameters for the PCR program should be as below:
Program
Heat Activation
PCR cycle
Melt Curve
Segment
1
2
3
4
5
6
7
Temperature (°C)
95.0
95.0
60.0
95.0
60.0
95.0
Page 6 of 14
Hold (mm:ss)
10:00
00:15
01:00
00:15
00:15
20:00
00:15
Cycles
1
40
1
7. Technical Note
Temperature Step Parameters
16.
Double-click on the
icon in segment 3. The Temp Step window will appear. Uncheck “Gradient” and
change the Ramp [%] to 26**. The final Temp Step parameters should appear as in Figure 7. Click OK.
**Note: 26% is the recommended ramp rate for the silver block. The recommended ramp rate for the aluminum
block is 35%.
Figure 7 Temp Step Parameters
Page 7 of 14
8. Technical Note
17. When the PCR Program setup is complete, the window should appear as in Figure 8.
Figure 8: Final PCR Program Screen
18. Click File and select Save As. In the Assay Name field enter the filename RT2ProfilerPCRArraySilver or
RT2ProfilerPCRArrayAluminum depending on which sample block is being used. From the drop-down list for
Assay Type, select Template. Click OK.
Page 8 of 14
9. Technical Note
Performing Real-Time PCR Detection
To load the PCR Array plate and start the run:
1.
When the PCR Array is prepared and centrifuged, bring the plate to the realplex instrument to load.
2.
Make sure the correct thermal block cycler (silver or aluminum) is in place.
3.
If the realplex instrument is not on, turn it on using the main switch at the back of the instrument. Turn on the
computer linked to the instrument and log on to Windows XP.
4.
Start realplex software version 2.2.
5.
Enter Username and Password when the Login dialog box appears and click OK to proceed with the login. The
Plate Layout window will appear.
6.
Wait for the LED on the top of the instrument to turn green. Make sure the instrument has been warmed up for
at least 15 minutes before starting an assay.
7.
Push the sealing clamp back into the open position, then slide the heated lid back. Place the PCR Array plate
on the thermoblock with well A1 in the upper left corner.
8.
Slide the heated lid forward and pull the clamp down.
9.
In the Plate Layout window, click File then Open. Select the previously saved RT2ProfilerPCRArraySilver or
RT2ProfilerPCRArrayAluminum run template as appropriate, then click OK.
10. Click File, then Save as. Save the file under a new filename as an Assay.
11. Click the
button to start the PCR program.
12. The dialog box Start PCR will appear. Ensure that SABiosciences A Plate is selected as the background
plate, then click OK. Realtime data acquisition can be viewed in the Monitoring window.
Page 9 of 14
10. Technical Note
Data Analysis
1.
Click File, then Open Assay (Figure 9) and find the run file to be analyzed. Alternatively, upon completion of a
PCR experiment, a dialog box will appear prompting you to start analysis. Click Yes.
Figure 9 Opening the Run File
Note: It is possible to open a data file for analysis during an ongoing assay. A message will appear alerting you that
the file will be opened for data analysis only. Click OK to view the assay in the analysis window. You will not be
able to view plate layout or PCR program information for the completed assay in this mode.
Figure 10: Analysis only
Page 10 of 14
11. Technical Note
2.
In the navigator window at the upper left corner, click on Analysis. The top panel (Figure 11) features a Type
of Application combo box. Click on the
button to select an analysis module.
Figure 11: Analysis panel
3.
Select Quantification (Figure 12) from as the type of application to obtain Ct values. Numerical values are
listed in the Sample/Analysis window to the left of the screen while amplification curves are shown in the main
work area as a function of fluorescence and cycle number. As a default, the curves are shown in linear scale; to
view the curves in log scale, check the Log Scale box in the top panel. Click on the
with results.
button to save the file
To view a selection of samples, you can highlight the desired wells in the Sample/Analysis window or in the
MiniPlate Layout at the lower left part of the screen.
Figure 12: Quantification Analysis window
Page 11 of 14
12. Technical Note
Setting Threshold and Baseline:
4.
The Threshold should be set at the same level for all of the PCR arrays in your experiment. The threshold
should be set using the log view of your amplification data and set somewhere in the lower 1/3 of your
amplification curves. A good indication that the threshold is set in the proper location is that the values of the
PPC assays on catalogued arrays should be between 18 Ct and 22 Ct.
5.
To set the Baseline, use the Automatic Baseline setting.
FIGURE 13: LOG VIEW of Raw Data
Threshold
Exporting the Ct Results:
6.
To export Ct values, right click in the Sample/Analysis window and select Save Results As. Export results in
text format to view results as a spreadsheet. Click OK. When prompted, choose the file destination, filename,
and type. Click Save to export.
To export results from a selection of wells, highlight the desired wells in the Sample/Analysis window before
right-clicking to save results. Under Include, click the radio button for Selected Samples before proceeding
with the export.
Figure 14: Exporting the Ct Results
Page 12 of 14
13. Technical Note
Note: You can also export the entire run file containing all setup information, raw data, and analyses as a *.asy file.
This will allow you to open the file using the realplex software on another computer. To do so, go to File and
Export. The dialog box Export assay to file will appear. Select the destination for the file and enter a
filename. The file type should be realplex-Exchange (*.asy). Click Save to finish.
button (or go to
To import a file, open the realplex software and create a new document by clicking on the
File and New Assay). You will not be able to import a file if an assay is currently in progress. Go to File, then
Import. In the Import Assay from file dialog box, find the file you wish to import. Click Open.
Melting Curve Analysis
7. To proceed with the melt curve analysis, select Melting Curve as the type of application in the top panel. The
Sample/Analysis window will show the wells and corresponding melting point values. Peak curves are shown in
the main working window and below that is a plot of fluorescence vs. temperature. Again, a selection of curves
may be viewed by selecting the desired wells in either the Sample/Analysis or MiniPlate Layout windows.
Melting points will be analyzed only for those peaks that are above the threshold. The default threshold is 33%,
but this can be changed by editing the value at the right of the screen. Alternatively, the threshold can be
manually adjusted by moving the horizontal red line. Below the default value, the temperature that is displayed
represents the temperature at the vertical green line. This line can be moved to any peak maximum to
determine the melting point.
8.
To export Tm values, right click in the Sample/Analysis window and select Save Results As. Export results in
text format to view results as a spreadsheet. Click OK. When prompted, choose the file destination, filename,
and type. Click Save to export.
Figure 15: Melting Curve Analysis
Page 13 of 14