
Recommended
More Related Content
What's hot
What's hot (20)
Similar to Extrusion insights-06 2018-eng-0119
Similar to Extrusion insights-06 2018-eng-0119 (20)
More from arpado
More from arpado (8)
Recently uploaded
Recently uploaded (20)
Extrusion insights-06 2018-eng-0119
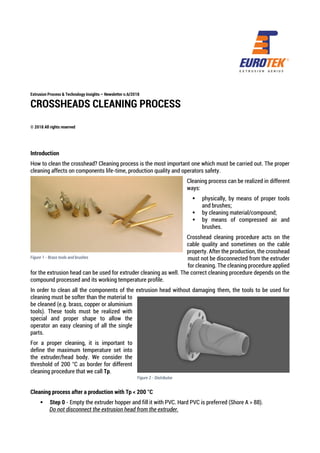
- 1. Extrusion Process & Technology Insights – Newsletter n.6/2018 CROSSHEADS CLEANING PROCESS © 2018 All rights reserved Introduction How to clean the crosshead? Cleaning process is the most important one which must be carried out. The proper cleaning affects on components life-time, production quality and operators safety. Cleaning process can be realized in different ways: ▪ physically, by means of proper tools and brushes; ▪ by cleaning material/compound; ▪ by means of compressed air and brushes. Crosshead cleaning procedure acts on the cable quality and sometimes on the cable property. After the production, the crosshead must not be disconnected from the extruder for cleaning. The cleaning procedure applied for the extrusion head can be used for extruder cleaning as well. The correct cleaning procedure depends on the compound processed and its working temperature profile. In order to clean all the components of the extrusion head without damaging them, the tools to be used for cleaning must be softer than the material to be cleaned (e.g. brass, copper or aluminium tools). These tools must be realized with special and proper shape to allow the operator an easy cleaning of all the single parts. For a proper cleaning, it is important to define the maximum temperature set into the extruder/head body. We consider the threshold of 200 °C as border for different cleaning procedure that we call Tp. Cleaning process after a production with Tp < 200 °C ▪ Step 0 - Empty the extruder hopper and fill it with PVC. Hard PVC is preferred (Shore A > 88). Do not disconnect the extrusion head from the extruder. Figure 1 - Brass tools and brushes Figure 2 - Distributor
- 2. ▪ Step 1 - Keep the working temperature profile and turn on the extruder at 10-30 rpm (according to extruder size: the bigger is the extruder, the lower can be the purging rpm) till the PVC is getting out from the tip and the die. It means that the extruder and the crosshead are full of cleaning PVC. ▪ Step 2 - Set the new temperature profile that we can call “Cleaning Profile 1” and reduce a bit the purging speed. The temperature profile must be the one to process standard insulation PVC (PVC that we used for cleaning). ▪ ▪ Step 3 - As the extruder temperature is approaching the cleaning profile, reduce the purging speed up to 3-10 rpm. The compound has to get out from the tools (tip and die). Keep this purging speed for 3-5 minutes. ▪ ▪ Step 4 - Reduce the temperature profile of the extruder barrel and the crosshead as described below: the extruder temperature should be set at 100-110 °C (all the zones) and the crosshead one at 130-140 °C. As the temperature is approaching the cleaning profile, the extruder back pressure will increase. Pay attention to keep it in the recommended safety range. ▪ Step 5 - Before the extruder reaches the cleaning temperature profile, the extruder feeding must be closed (stop the extruder feeding) and the hopper can be empty. Before the barrel get empty, the extruder can be stopped. ▪ Step 6 - The die nut can be unscrewed. The extruder can be switched on again at low rpm, in order to let the die get out from its place. As soon as the die is out, the extruder must be stopped. Clean the die when it is still hot. Put silicon spray on it after cleaning. ▪ Step 7 - Extract the tip by the supplied tools and clean it until is hot. ▪ Step 8 - Extract the flow distributor and clean it till it is hot. Use only brass. ▪ Step 9 - Disconnect the head from the extruder by opening the connecting clamp. ▪ Step 10 - Turn on again the extruder and remove the breaker plate. Keep the extruder on until is totally empty. ▪ Step 11 - Dis-assembly the flow distributor and clean it if it has not been done on step 8. ▪ Step 12 - Clean the connection through the crosshead with brass brushes and tools and compressed air. ▪ Step 13 - When the extruder is empty, extract the screw and clean it by copper or brass brushes (even if it should be already cleaned). Figure 3 - PVC for cleaning
- 3. ▪ Step 14 – Clean the barrel by brass brushes or by homemade copper wire brush. Cleaning process after production with Tp > 210 °C (No Fluoropolymer/Technopolymer) The compounds that belong to this category are: Polyethylene, Polypropylene, Polyamides, Polycarbonate, TPE, Polyesters, etc. After production, it is not advised to feed the extruder with PVC due to the high temperature of the extruder and the crosshead. If XLPE production is carried out, stop the catalyst dosing (liquid or dry silane if monosil process is carried out) and feed the extruder with PE only until it is getting out from the head. As the production is stopped, it is necessary to empty the hopper and feed the extruder with PE or HDPE. Turn the extruder on and purge through the extrusion head. As from the extrusion tools/distributor is getting out the PE and all previous compound disappear, then is possible to reduce the temperature profile, setting the PVC profile or another one not higher than 180 °C. Then start from Step 1. Cleaning process after production with Tp range 210-285 °C (Fluoropolymers) It is important to remember that all components of the head to process fluoropolymers are in Hastelloy® and consequently they are easily damageable. Copper or brass tools only must be used for cleaning. The cleaning can be made in 2 different ways: 1. processing cleaning material through the extruder; 2. without cleaning material. In case of production of fluoropolymers with max temperature into the head/barrel of 285 °C (ETFE, PVDF, etc.), the HDPE or PP can be used as cleaning material and go on as described on paragraph 3. Anyway, after the Fluoropolymer production the most useful method to clean the extrusion head is by using compressed air gun and copper brushes. The thermoregulation of the extruder and extrusion head must be kept on. Compressed air must be available close to the extrusion head. High temperature glow and glasses must be dressed. Mask must be used: fluoro-vapour are dangerous and cab block the breathing. Figure 4 - Compressed air gun
- 4. ▪ Step 1 - Unscrew the die nut and turn on the extruder. The plastic will push out the die. ▪ Step 2 - As the die is out from its place, take it and clean immediately using compressed air. Point the air gun on the plastic around the die metal surface and push air. The fep will stick out from the die. Clean the rest with brass tools or brush. ▪ Step 2’ - In case the fluoropolymer is solified before the end of the cleaning process, warm up the die again or place it back into the head and start again. ▪ Step 3 - Keep the extruder on until the barrel is empty, then stop the extruder. ▪ Step 4 - Remove the tip from the tip holder and clean it by compressed air and brass brushes. ▪ Step 5 - Remove the flow distributor carefully. Start cleaning it untili t is hot. Use compressed gun to shut air into the channel and wherever there is plastic. ▪ Step 6 - Clean the inner head body as well as the front head by compressed air and brass brushes. ▪ Step 7 - Disconnect the crosshead from the extruder. ▪ Step 8 - Clean by air the collar connected with head and by round brush. Clean immediately the screw end tip as well before it is cool down. ▪ Step 9 - Extract slowly the screw from the barrel (by extractor) and as soon as the screw is coming out from the barrel, clean it removing the film of FEP by compressed air and brass brushes (DO NOT USE STEEL BRUSHES). ▪ Step 10 - Pull out the cleaned screw. ▪ Step 11 - Clean manually the barrel using copper or brass brushes shaving the inner barrel.