Auto cad for fashion design by v.s. bhati
•
4 likes•717 views

AutoCAD for Fashion Design Students

Recommended
Recommended
More Related Content
What's hot
What's hot (20)
Similar to Auto cad for fashion design by v.s. bhati
Similar to Auto cad for fashion design by v.s. bhati (20)
More from CIPETIAN EDUCATIONAL ZONE
More from CIPETIAN EDUCATIONAL ZONE (20)
Recently uploaded
Recently uploaded (20)
Auto cad for fashion design by v.s. bhati
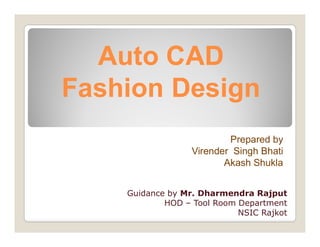
- 1. Auto CADAuto CAD Fashion DesignFashion Design Prepared by Virender Singh Bhati Akash Shukla Guidance by Mr. Dharmendra Rajput HOD – Tool Room Department NSIC Rajkot
- 2. Auto Cad • CAD means Computer Aided Design or Drafting. Auto cad is most widely used software developed by Auto desk. • Auto cad is one of the most popular cad packages. • Auto cad is a drafting package in almost all engineering branches. • It is a general purpose computer aided design Software. PreparedbyV.S.Bhati&AkashShukla 2
- 3. Life before Auto CAD PreparedbyV.S.Bhati&AkashShukla 3
- 4. Computer Aided Design’s Impact on the Fashion Industry • Overall CAD saves the designer time during the design process. • Many designers sketch by hand but large numbers of designers are now utilizing cad. • Today computer aided design is a part of the qualifications for a fashion designer. • Gives designer more flexibility in the area of color and change on a product. • Allows designers to develop even newer design ideas. Shows the components in every design. PreparedbyV.S.Bhati&AkashShukla 4
- 5. How to open Auto CAD • First double click on auto cad icon • Select no template metric • Auto cad will ready for use• Auto cad will ready for use PreparedbyV.S.Bhati&AkashShukla 5
- 6. How to Limit Set • Type Limit • Select Lower Limit (0,0) • Set Upper Limit (as Per Drawing)• Set Upper Limit (as Per Drawing) • Then Z Entre • A Entre PreparedbyV.S.Bhati&AkashShukla 6
- 7. How to Change Unit • Type UN • Select Unit as Per Requirement • Set Other Parameter as Per Requirement• Set Other Parameter as Per Requirement • Then OK PreparedbyV.S.Bhati&AkashShukla 7
- 8. How to open Auto Cad old File • File • Open • Select documents• Select documents Open PreparedbyV.S.Bhati&AkashShukla 8
- 9. How to Save Auto CAD File • Click on file • Open save tab • Select file• Select file • Provide file name PreparedbyV.S.Bhati&AkashShukla 9
- 10. How to Change the color scheme • Right Click • Select Option • Display • Colour Scheme• Colour Scheme • Chose Colour (Light or Dark) PreparedbyV.S.Bhati&AkashShukla 10
- 11. Status bar • Drawing Coordinates (Show curser coordinates) • Grid Display (start back side graph) • Snap Mode (select only grid points) • Ortho Mode (only horizontal or vertical draw)• Ortho Mode (only horizontal or vertical draw) • Polar Tracking (draw line at a specific angles) • Object Snap Tracking (for on tracking line) • Object Snap (easy to select key points-end, Edge) • Show / Hide Line weight PreparedbyV.S.Bhati&AkashShukla 11
- 12. Object Snap • End Point • Mid Point • Nearest • Centre• Centre • Tangent • Quadrant • Intersection • Perpendicular • Parallel PreparedbyV.S.Bhati&AkashShukla 12
- 13. How to Change Curser Colour • Right Click • Options • Display • Colours• Colours • 2D Model space • Crosshairs • Select Colour • Apply & Close PreparedbyV.S.Bhati&AkashShukla 13
- 14. Selection type There are two methods for select drawings • Regular shape • Irregular shape• Irregular shape PreparedbyV.S.Bhati&AkashShukla 14
- 16. Toggle General Features • Ctrl+D :- Toggle coordinate display • Ctrl+G :- Toggle Grid • Ctrl+E :- Cycle isometric planes • Ctrl+F :- Toggle running object snaps• Ctrl+F :- Toggle running object snaps • Ctrl+H :- Toggle Pick Style • Ctrl+Shift+H :- Toggle Hide pallets • Ctrl+I :- Toggle Coords • Ctrl+Shift+I :- Toggle Infer Constraints PreparedbyV.S.Bhati&AkashShukla 16
- 17. Manage Screen • Ctrl+0 :- Clean Screen • Ctrl+1 :- Property Palette • Ctrl+2 :- Design Center Palette • Ctrl+3 :- Tool Palette PreparedbyV.S.Bhati&AkashShukla • Ctrl+3 :- Tool Palette • Ctrl+4 :- Sheet Set Palette • Ctrl+6 :- DB Connect Manager • Ctrl+7 :- Markup Set Manager Palette • Ctrl+8 :- Quick Calc • Ctrl+9 :- Command Line PreparedbyV.S.Bhati&AkashShukla 17
- 18. Manage Drawings • Ctrl+N :- New Drawing • Ctrl+S :- Save drawing • Ctrl+O :- Open drawing • Ctrl+P :- Plot dialog box • Ctrl+Tab :- Switch to next• Ctrl+Tab :- Switch to next • Ctrl+Shift+Tab :- Switch to previous drawing • Ctrl+Page Up :- Switch to previous tab in current drawing • Ctrl+Page :- Down Switch to next tab in current drawing • Ctrl+Q :- Exit • Ctrl+A :- Select all objects PreparedbyV.S.Bhati&AkashShukla 18
- 19. Toggle Drawing Modes • F1 :- Display Help • F2 :- Text screen • F3 :- Object snap mode (For Select Key Points) • F4 :- 3DOsnap (For Select 3D Object Points) • F5 :- Iso plane (For Select iso Planes)• F5 :- Iso plane (For Select iso Planes) • F6 :- Dynamic UCS (It is 3D Objects) • F7 :- Grid mode (It show background grid) • F8 :- Ortho mode (Horizontal or Vertical line can ) • F9 :- Snap mode (on curse point on grid points) • F10 :- Polar mode (For Draw line in angle) • F11 :- Object snap tracking (For Tracking Object) • F12 :- Dynamic input mode (Easy to input Dimension Value) PreparedbyV.S.Bhati&AkashShukla 19
- 20. Manage Workflow • Ctrl+C :- Copy object • Ctrl+X :- Cut object • Ctrl+V :- Paste object • Ctrl+Shift+C :- Copy to clipboard with base point• Ctrl+Shift+C :- Copy to clipboard with base point • Ctrl+Shift+V :- Paste data as block • Ctrl+Z :- Undo last action • Ctrl+Y :- Redo last action • Ctrl+[:- Cancel current command (or ctrl+) • ESC :- Cancel current command PreparedbyV.S.Bhati&AkashShukla 20
- 22. Draw Commands: - Line Poly line Construction line Ray Polygon Rectangle Rectangle Arc Circle Ellipse Ellipse arc Hatch Multi Point Prepared by V.S. Bhati & Akash Shukla 22
- 23. Auto Cad • Commands: - • Line: The LINE command is used to draw a line between two specified points. First enter the LINE command or shortcut L in the command area. Mouse Cross hair displays to specify the first point of the line and next point of the line or enter the distance of the line. Press ESC key at the end of the line.the line. Press ESC key at the end of the line. PreparedbyV.S.Bhati&AkashShukla 23
- 24. Auto Cad • Practice Drawing PreparedbyV.S.Bhati&AkashShukla 24
- 25. Auto Cad • Commands: - • Polyline: POLYLINE command is used to draw a series of lines continuously at a time. PL or PLINE is the keyboard shortcut for polyline. PreparedbyV.S.Bhati&AkashShukla 25
- 26. Auto Cad • Commands: - •Rectangle: RECTANGLE command is used to draw a rectangular geometry in the drawings. REC is the keyboard shortcut for rectangle. First enter the REC command in the command area. A cross hair will be displays to specify the first corner point of the rectangle and input the dimensions of the rectangle as other corner point. PreparedbyV.S.Bhati&AkashShukla 26
- 27. Auto Cad • Practice Drawing PreparedbyV.S.Bhati&AkashShukla 27
- 28. Auto Cad • Circle: Circles are created with the CIRCLE command. There are several different ways you can define a circle. Those are defining center point and radius or diameter of the circle. In the 2Point method Define the circle with points on either endmethod Define the circle with points on either end of the circle diameter. In the 3Point method Define the circle with 3 non- collinear points. In the Tangent, Tangent and Radius method define the circle by specifying two other objects that are tangent to the circle and the radius of the circle. PreparedbyV.S.Bhati&AkashShukla 28
- 29. Auto Cad • Arc: ARC command is used draw partial circles in the Auto CAD drawings. There are seven methods available to draw an arc in the Auto CAD. • Those are i. Specifying 3 points on the arc Specifying starting point, center and end pointii. Specifying starting point, center and end point iii. Specifying starting point, center and included angle iv. Specifying starting point, center and length of the cord v. Specifying starting point, end point and radius vi. Specifying starting point, end point and included angle and vii. Specifying starting point, end point and direction of start PreparedbyV.S.Bhati&AkashShukla 29
- 30. Auto Cad • Practice Drawing PreparedbyV.S.Bhati&AkashShukla 30
- 31. Auto Cad • Polygon: The POLYGONE command is used to draw a polygon with 3 to 1024 sides by specifying a circle inscribed or circumscribed with definite radius or by entering side length of the polygon.the polygon. PreparedbyV.S.Bhati&AkashShukla 31
- 32. Auto Cad • Ellipse: This ELLIPSE command is used to draw ellipses by giving starting and ending angles PreparedbyV.S.Bhati&AkashShukla 32
- 33. Auto Cad • Practice Drawing PreparedbyV.S.Bhati&AkashShukla 33
- 34. How to Import Picture in AutoCAD • Insert • Reference • Attach • Select Picture• Select Picture • Ok • Select area where want to make Picture PreparedbyV.S.Bhati&AkashShukla 34
- 35. Modify Commands: - • Copy • Move • Rotate Erase Mirror Polar Array • Rotate • Scale • Trim • Extend • Fillet • Chamfer PreparedbyV.S.Bhati&AkashShukla 35 Offset Path Array Rectangular Array
- 36. Dimensions : - • Linear (DLI) Used to create horizontal or vertical Dimension • Aligned (DAL) used to create a linear dimension parallel to the used to create a linear dimension parallel to the object • Angular (DAN) used to create angular a dimension Prepared by V.S. Bhati & Akash Shukla 36
- 37. Dimensions : - • Arc Length (DAR) used to dimension the total or partial length of an arc • Radius (DRA) used to create a radial dimension of a circle or an arcarc • Diameter (DIA) (used to create a diameter dimension of a circle or an arc) • Centre Mark (DCE) (used to create a Centre Mark in a circle or an arc) Prepared by V.S. Bhati & Akash Shukla 37
- 38. How to change Dimension text size : - • D Entre • Modify • Text • Text Height (Define text height)• Text Height (Define text height) • close Prepared by V.S. Bhati & Akash Shukla 38
- 40. Text : - Text Command is used for input text in Auto CAD • We can edit all parameter at text editor page PreparedbyV.S.Bhati&AkashShukla We can edit all parameter at text editor page Text Style Bold Underline Symbol PreparedbyV.S.Bhati&AkashShukla 40
- 41. Layers : - Layer Properties • Status (Show a green check when a layer is set to current) • Name (Show the name of layer) • On (used to on/off the visibility of a layer. When a layer is turned on, it shows a yellow light bulb. When you turn off a layer, it shows a green light- bulb.) • Freeze (it is used to freeze the objects of a layer so that they cannot be modified. Also, the visibility of the object is turned off.) PreparedbyV.S.Bhati&AkashShukla 41
- 42. Layers : - Layer Properties • Lock/Unlock (It is used to lock the layer so that the object on it cannot be modified.) • Color (It is used to chose the color of the object)• Color (It is used to chose the color of the object) • Line type (It is used to chose the line type of layer) • Line Weight (it is used to set the line weight of the layer) • Description (it is used for add details of the layer) Prepared by V.S. Bhati & Akash Shukla 42
- 43. Layers : - Layer Properties • Create a New Layer • Making a Layer Current • Deleting Layer Prepared by V.S. Bhati & Akash Shukla 43
- 44. Title Block : - Title block size (170 x 80) • Title • Draw by• Draw by • Checked by • Date • Approved by • Scale Prepared by V.S. Bhati & Akash Shukla 44
- 45. Drawing Layouts There are two workspace in AutoCAD • Model Space (Create 2D Drawing) • Paper Space (For Print and Plotting) Prepared by V.S. Bhati & Akash Shukla 45
- 46. Page Setup Manager It is used for Page setup for Printing • Output • Page Setup Manager • Select Layout • Modify • Select parameter Select Printer Paper Size Scale Drawing Orientation (Portrait / Landscape) • ok Prepared by V.S. Bhati & Akash Shukla 46
- 47. How to Print Auto Cad File (Ctrl + P) • Ctrl + P • Then Select Drawing and Paper Size • Make• Make • Print PreparedbyV.S.Bhati&AkashShukla 47
- 48. For any quarry contact us Cipetian - Educational ZoneEducational Zone Virendersingh2993687@gmail.com