
Recommended
More Related Content
What's hot
What's hot (13)
Similar to Evaluation Question 6 Extract: MSP software
Similar to Evaluation Question 6 Extract: MSP software (20)
More from SeyiiO
More from SeyiiO (17)
Recently uploaded
Recently uploaded (20)
Evaluation Question 6 Extract: MSP software
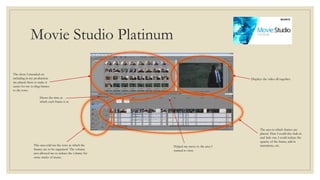
- 1. Movie Studio Platinum This area told me the rows in which the frames are to be organised. The volume area allowed me to reduce the volume for some tracks of music. The area in which frames are placed. Here I could also fade in and fade out, I could reduce the opacity of the frame, add in transitions, etc. Displays the video all together. Shows the time at which each frame is at. The shots I intended on including in my production are placed there to make it easier for me to drag frames to the rows. Helped me move to the area I wanted to view.
- 2. Trimmer – used to trim frames – assistance to delete unwanted areas Before this coursework, I had never used MSP before because I had never really needed to. Initially, When I was introduced to it during my preliminary task, I got very frustrated because I didn’t know what to do and everything required so many instructions, but I got used to it quite quickly. When my school’s IT technicians changed the school’s software from Windows 8 to Windows 7, some computers were unable to use MSP, so I had to wait to get to class to use it. At one point in time, MSP would close and delete my previous work while I was using it, and it also had other problems like being slow, etc. MSP had the tendency to use up a lot of my time Rendering my film took a very long time and was very difficult to do right, so I needed assistance on that front. The first time I rendered it, in order to put it on YouTube, it did not finish rendering, so the full video was not uploaded. The other times I tried the video would refuse to even render, however the last time I tried, it rendered perfectly. Moreover, using MSP was tasking, although it was a very useful way to edit my video. In order to insert special effects and change the brightness, I used Video FX.