
Recommended
Recommended
More Related Content
Similar to Mechatronics Manual.docx
Similar to Mechatronics Manual.docx (20)
More from Ravichandran R
More from Ravichandran R (10)
Recently uploaded
Recently uploaded (20)
Mechatronics Manual.docx
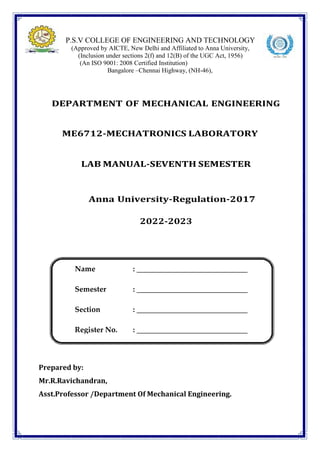
- 1. Name : Semester : Section : Register No. : P.S.V COLLEGE OF ENGINEERING AND TECHNOLOGY (Approved by AICTE, New Delhi and Affiliated to Anna University, (Inclusion under sections 2(f) and 12(B) of the UGC Act, 1956) (An ISO 9001: 2008 Certified Institution) Bangalore –Chennai Highway, (NH-46), DEPARTMENT OF MECHANICAL ENGINEERING ME6712-MECHATRONICS LABORATORY LAB MANUAL-SEVENTH SEMESTER Anna University-Regulation-2017 2022-2023 Prepared by: Mr.R.Ravichandran, Asst.Professor /Department Of Mechanical Engineering.
- 2. ME6712 - MECHATRONICS LABORATORY OBJECTIVES To know the method of programming the microprocessor and also the design, modelling & analysis of basic electrical, hydraulic & pneumatic Systems which enable the students to understand the concept of mechatronics. LIST OF EXPERIMENTS 1. Assembly language programming of 8085 – Addition – Subtraction – Multiplication – Division – Sorting – Code Conversion. 2. Stepper motor interface. 3. Traffic light interface. 4. Speed control of DC motor. 5. Study of various types of transducers. 6. Study of hydraulic, pneumatic and electro-pneumatic circuits. 7. Modelling and analysis of basic hydraulic, pneumatic and electrical circuits using Software. 8. Study of PLC and its applications. 9. Study of image processing technique. OUTCOMES Upon completion of this course, the students can able to design Mechatronics system with the help of Microprocessor, PLC and other electrical and Electronics Circuits. LIST OF EQUIPMENT FOR A BATCH OF 30 STUDENTS S.NO NAME OF THE EQUIPMENT Qty 1. Basic Pneumatic Trainer Kit with manual and electrical controls/ PLC Control. 1 2. Basic Hydraulic Trainer Kit 1 3. Hydraulics and Pneumatics Systems Simulation Software 10 4. 8051 - Microcontroller kit with stepper motor and drive circuit sets 2 5. Image processing system with hardware & software 1
- 3. INTRODUCTION TO MECHATRONICS SYSTEM OBJECTIVE: To study about the important features, applications and components of Mechatronics system. INTRODUCTION TO MECHATRONICS SYSTEM: Mechatronics is one of the new and existing fields on the engineering landscape, subsuming parts of traditional engineering fields and requiring a broader approach to the design of system that we can formally call as Mechatronics system. Many industries improving their works through automation which is based on the inter connection between the electronic control systems and mechanical engineering. Such control systems generally use microprocessors as controllers and have electrical sensors extracting information from mechanical inputs through electrical actuators to mechanical systems. This can be considered to be application of computer based digital control techniques through electronic and electric interfaces to mechanical engineering problems. Successful design of Mechatronics can lead to products that are extremely attractive to customer in quality cost-effectiveness. MECHATRONICS DEFINITION: Mechatronics may be defined as a multi-disciplinary field of study that implies the synergistic integration of electronic engineering, electric engineering, control engineering and computer technology with mechanical engineering for the design, manufacture, analysis and maintenance of a wide range of engineering products and processes. “Mechatronics brings together areas of technology involving sensors and measurement systems, drive and actuation systems, analysis of the behaviour of systems microprocessor systems”. The integration across the traditional boundaries of mechanical engineering, electrical engineering, electronics and control engineering has to occur at the earliest stages of the design process if cheaper, more reliable; more flexible systems are to be developed.
- 4. Large scale application APPLICATIONS OF MECHATRONICS ENGINEERING: Mechatronics engineering finds application in the following fields. Electronic home appliances Electronic entertainment products Engine systems (cars) Schematic Layout of Hydraulic System
- 5. BASIC COMPONENTS OF A HYDRAULIC SYSTEM: Reservoir (or air tank): A reservoir is an oil supply tank. It is provided to hold the hydraulic liquid (usually oil). Pump: The pump is used to force the liquid into the system. Prime mover: A Prime mover, usually an electric motor, is used to drive the pump. Valves: Valves are refitted in the system to control liquid direction, pressure, and flow rate. Actuator: An actuator is provided to convert the liquid energy into mechanical force or torque to do useful work. The actuator is the actual working element of the system. The actuators can be either cylinders (to provide linear motion) or hydro motors (to provide rotary motion). Fluid-transfer piping: The hydraulic Piping is provided to carry the compressed liquid from one place to another. Schematic Layout of Pneumatic System
- 6. BASIC COMPONENTS OF A PNEUMATIC SYSTEM: Reservoir (or air tank): An air tank is provided to store the compressed air required for the operations. Compressor: The compressor is used to compress the atmospheric air so as to increase the pressure of the air. Prime mover: A Prime mover, usually an electric motor, is used to drive the compressor. Valves: Valves are refitted in the system to control air direction, pressure, and flow rate. Actuator: An actuator is provided to convert the air energy into mechanical force or torque to do useful work. Fluid-transfer piping: Piping is provided to carry the compressed air from one place to another.
- 7. BASIC SYMBOLS USED IN HYDRAULIS AND PNEUMATIC SYSTEM:
- 12. RESULT: Thus the important feature of Mechatronics system was studied.
- 13. Ex No: 1 Date : ADDITION OF TWO 8-BIT NUMBERS AIM: To write an assembly language for adding two 8 bit numbers by using micro processor kit. APPARATUS REQUIRED 1. 8085 micro processor kit 8085 (0-5V) 2. DC battery ALGORITHM Step 1: Start the microprocessor. Step 2: Initialize the carry as ‘Zero’. Step 3: Load the first 8 bit data into the accumulator. Step 4: Copy the contents of accumulator into the register ‘B’. Step 5: Load the second 8 bit data into the accumulator. Step 6: Add the 2 - 8 bit data’s and check for carry. Step 7: Jump on if no carry Step 8: Increment carry if there is. Step 9: Store the added request in accumulator. Step 10: More the carry value to accumulator. Step 11: Store the carry value in accumulator. Step 12: Stop the program execution.
- 14. With carry PROGRAM: Address Label Mnemonics Hex Code Comments 4100 MVI C,00 OE, 00 Initialize the carry as zero 4102 LDA 4300 3A, (00, 43) Load the first 8 bit data 4105 MOV, B,A 47 Copy the value of 8 bit data into register B 4106 LDA 4301 3A, (01, 43) Load the second 8 bit data into the accumulator 4109 ADD B 80 Add the two values 410A JNC D2, 0E, 41 Jump on if no carry 410D INR C OC If carry is there increment it by one 410E Loop STA 4302 32 (02, 43) Stone the added value in the accumulator 4111 MOV A,C 79 More the value of carry to the accumulator from register C 4112 STA 4303 32 (03, 43) Store the value of carry in the accumulator 4115 HLT 76 Stop the program INPUT: Without carry Input Address Value 4300 04 4301 02 OUTPUT: Output Address Value 4302 06 4303 00 (carry)
- 15. Input Address Value 4300 FF 4301 FF Output Address Value 4302 FE 4303 01 (carry) Calculation 1111 1111 1111 1111 -------------------- (1) 1111 1110 =========== F E RESULT Thus the assembly language program for 8 bit addition of two numbers was executed successfully by using 8085 micro processing kit.
- 16. Ex No : 2 Date : SUBTRACTION OF TWO 8 BIT NUMBERS AIM: To write an assembly language program for subtracting 2 bit (8) numbers by using-8085 micro processor kit. APPARATUS REQUIRED: 1. 8085 micro processor kit (0-5V) 2. DC battery ALGORITHM: STEP 1: Start the microprocessor. STEP 2: Initialize the carry as ‘Zero’. STEP 3: Load the first 8 bit data into the accumulator. STEP 4: Copy the contents of contents into the register ‘B’. STEP 5: Load the second 8 bit data into the accumulator. STEP 6: Subtract the 2 8 bit data’s and check for borrow. STEP 7: Jump on if no borrow. STEP 8: Increment borrow if there is. STEP 9: 2’s compliment of accumulator is found out. STEP 10: Store the result in the accumulator. STEP 11: More the borrow value from ‘c’ to accumulator. STEP 12: Store the borrow value in the accumulator. STEP 13: Stop program execution.
- 17. OBJECT CODE / PROGRAM: Address Label Mnemonics Hex Code Comments 4100 MVI C,00 OE, 00 Initialize the carry as zero. 4102 LDA 4300 3A, (00, 43) Load the first 8 bit data. 4105 MOV, B,A 47 Copy the value of 8 bit data into register B. 4106 LDA 4301 3A, (01, 43) Load the second 8 bit data into the accumulator. 4109 ADD B 80 Add the hoo values. 410A JNC D2, 0E, 41 Jump on if no carry. 410D INR C OC If carry is there increment it by one. 410E Loop STA 4302 32 (02, 43) Stone the added value in the accumulator. 4111 MOV A,C 79 More the value of carry to the accumulator from register C. 4112 STA 4303 32 (03, 43) Store the value of carry in the accumulator. 4115 HLT 76 Stop the program execution. Input Without borrow Input Address Value 4300 05 4301 07 Output Address Value 4302 02 4303 00 (borrow) With carry borrow Input Address Value 4300 07 4301 05
- 18. Output Address Value 4302 02 Calculation: 05 - 07 07 - 0111 CMA 1000 ADJ 0.1 0001 ---------- 1001 05 - 0101 --------- 1110 (-2) RESULT The assembly language program subtraction of two 8 bit numbers was executed successfully by using 8085 micro processing kit.
- 19. OBJECT CODE / PROGRAM: Ex No : 3 Date : MULTIPLICATION OF TWO 8 – BIT NUMBERS AIM: To write an assembly language for multiplying two 8 bit numbers by using 8085 microprocessor kit. APPARATUS REQUIRED: 1.8085 microprocessor kit (0-5V) 2.DC battery ALGORITHM: Step 1: Start the microprocessor. Step 2: Get the 1st 8 bit numbers. Step 3: Move the 1st 8it number to register ‘B’. Step 4: Get the 2nd 8 bit number. Step 5: Move the 2nd 8 bit number to register ‘C’. Step 6: Initialize the accumulator as zero. Step 7: Initialize the carry as zero. Step 8: Add both register ‘B’ value as accumulator. Step 9: Jump on if no carry. Step 10: Increment carry by 1 if there is. Step 11: Decrement the 2nd value and repeat from step 8, till the 2nd value becomes zero. Step 12: Store the multiplied value in accumulator. Step 13: Move the carry value to accumulator. Step 14: Store the carry value in accumulator. Input Input Address Value 4500 04 4501 02 Output Output Address Value 4502 08 4503 00
- 20. Address Label Mnemonics Hex Code Comments 4100 LDA 4500 3A, 00, 45 Load the first 8 bit number 4103 MOV B,A 47 Move the first 8 bit data to register ‘B’ 4104 LDA 4501 3A, 01, 45 Load the second 16 bit number 4107 MOV C,A 4F Move the second 8 bit data to register ‘C’. 4108 MVI A, 00 3E, 00 Intialise the accumulator as zero 410A MVI D, 00 16, 00 Intialise the carry as zero 410C ADD B 80 Add the contents of ‘B’ and accumulator 410D INC D2 11, 41 Jump if no carry 4110 INR D 14 Increment carry if there is 4111 DCR C OD Decrement the value ‘C’ 4112 JNZ C2 0C, 41 Jump if number zero 4115 STA 4502 32 02, 45 Store the result in accumulator 4118 MOV A,D 7A Move the carry into accumulator 4119 STA 4503 32,03,45 Store the result in accumulator 411C HLT 76 Stop the program execution RESULT: The assembly language program for multiplication of two 8 bit numbers was executed using 8085 micro processing kit.
- 21. Ex No : 4 Date : DIVISION OF TWO 8 – BIT NUMBERS AIM: To write an assembly language for dividing two 8 bit numbers by using 8085 microprocessor kit. APPARATUS REQUIRED: 1.8085 microprocessor kit (0-5V) 2.DC battery. ALGORITHM: Step1: Start the microprocessor. Step2: Initialise the Quotient as zero. Step3: Load the 1st 8 bit data. Step4: Copy the contents of accumulator into register ‘B’. Step5: Load the 2nd 8 bit data. Step6: Compare both the values. Step7: Jump if divisor is greater than dividend. Step8: Subtract the dividend value by divisor value. Step9: Increment Quotient. Step10: Jump to step 7, till the dividend becomes zero. Step11: Store the result (Quotient) value in accumulator. Step12: Move the remainder value to accumulator. Step13: Store the result in accumulator Step14: Stop the program execution
- 22. OBJECT CODE / PROGRAM: Address Label Mnemonics Hex Code Comments 4100 MVI C, 00 0E, 00 Intialise Quotient as zero 4102 LDA, 4500 3A 00, Get the Firstdata 4105 MOV B,A 47 Copy the first data into register ‘B’ 4106 LDA, 4501 3A 01, 45 Get the second data 4109 CMP B B8 Compare the two values 410A JC (LDP) DA Jump if dividend lesser 410D Loop 2 SUB B 90 Subtract the first value by second value 410E INR C 0C Increment Quotient 410F JMP (LDP, C3, 0D, Jump to Loop 1 till the 4112 Loop 1 STA 4502 32 Store the value in 4115 MOV A,C 79 Move the value of 4116 STA 4503 32 03,45 Store the remainder value in accumulator 4119 HLT 76 Stop the program Input: Input Address Value 4500 09 4501 02 Output: Output Address Value 4502 04 (quotient) 4503 01 (reminder) RESULT: The assembly language program for division of two 8 bit numbers was executed using 8085 micro processing kit.
- 23. Ex No : 5(a) Date : DATA SORTING (i) ASCENDING ORDER AIM: To write an assembly language program to sort given ‘n’ numbers in ascending order. APPARATUS REQUIRED: 1.8085 microprocessor kit (0-5V) 2.DC battery ALGORITHM: Step1: Start the microprocessor. Step2: Accumulator is loaded with number of values to sorted and it is saved. Step3: Decrement 8 register (N-1) Repetitions. Step4: Set ‘HL’ register pair as data array. Step5: Set ‘C’ register as counter for (N-1) repetitions. Step6: Load a data of the array in accumulator. Step7: Compare the data pointed in ‘HL’ pair. Step8: If the value of accumulator is smaller than memory, then jump to step 10. Step9: Otherwise exchange the contents of ‘HL’ pair and accumulator Step10: Decrement ‘C’ register, if the of ‘C’ is not zero go to step 6 Step11: Decrement ‘B’ register, if value of ‘B’ is not zero, go step 3 Step12: Stop the program execution. Input: Input Address Value 4500 04 4501 AB 4502 BC 4503 01 4504 0A
- 24. OBJECT CODE / PROGRAM: Address Label Mnemonics Hex Code Comments 4100 LDA 4500 3A, 00,45 Load the number of values 4103 MOV B,A 47 Move it ‘B’ register 4104 DCR B 5 For (N-1) comparisons 4105 Loop LXI H, 4500 21, 00,45 Set the pointer for array 4108 MOV C,M 4E Count for (N-1) comparisons 4109 DCR C 0D For (N-1) comparisons 410A INX H 23 Increment pointer 410B Loop MOV A,M 7E Get one data in array ‘A’ 410C INX H 23 Increment pointer 410D CMP M BE Compare next with 410E JC DA, 16, If content less memory go 4111 MOV D,M 56 If it is greater than 4112 MOV M,A 77 Memory content 4113 DCX H 2B Exchange the content of 4114 MOV M,D 72 One in by ‘HL’ and previous location 4115 INX H 23 Increment pointer 4116 Loop DCR C 0D Decrement ‘C’ register 4117 JNZ Loop 1 C2, 0B, Repeat until ‘C’ is zero 411B JNZ Loop 2 C2, 05, Repeat till ‘B’ is zero 411E HLT 76 Stop the program execution Output Address & Value: Output Address Value 4500 04 4501 01 4502 0A 4503 AB 4504 BC RESULT: The assembly language program for sorting numbers in ascending order was executed by microprocessor kit.
- 25. Ex No : 5(b) Date : DATA SORTING (ii) DESCENDING ORDER AIM: To write an assembly language program to sort given ‘n’ numbers in descending order. APPARATUS REQUIRED: 1. 8085 microprocessor kit (0-5V) 2. DC battery ALGORITHM: Step 1: Start the microprocessor. Step 2: Load the number of values into accumulator and save the number of values in register ‘B’. Step 3: Decrement register ‘B’ for (N-1) Repetitions. Step 4: Set ‘HL’ register pair as data array address pointer and load the data of array in accumulator. Step 5: Set ‘C’ register as counter for (N-1) repetitions. Step 6: Increment ‘HL’ pair (data address pointer). Step 7: Compare the data pointed by ‘HL’ with accumulator. Step 8: If the value of accumulator is larger than memory, then jump to step 10, otherwise next step. Step 9: Exchange the contents of memory pointed by ‘HL’ and accumulator. Step 10: Decrement ‘C’ register, if the of ‘C’ is not zero go to step 6, otherwise next step. Step 11: Decrement ‘B’ register, if ‘B’ is not zero, go step 3, otherwise next step. Step 12: Stop the program execution.
- 26. OBJECT CODE / PROGRAM: Address Label Mnemonics Hex Code Comments 4100 LDA 4500 3A, 00,45 Load the number of values 4103 MOV B,A 47 Move it to ‘B’ register 4104 DCR B 5 For (N-1) comparisons 4105 Loop LXI H, 4500 21, 00,45 Set the pointer for array 4108 MOV C,M 4E Count for (N-1) 4109 DCR C 0D For (N-1) comparisons 410A INX H 23 Increment pointer 410B Loop MOV A,M 7E Get one data from array 410C INX H 23 Increment pointer 410D CMP M BE Compare next with number 410E ICE, Loop 1 D2, 16,41 If content ‘A’ is greater than 4111 MOV D,M 56 If it is greater than 4112 MOV M,A 77 Accumulator to memory 4113 DCX H 2B Decrement memory pointer 4114 MOV M,D 72 Move the old to ‘HL’ and 4115 INX H 23 Increment pointer 4116 Loop DCR C 0D Decrement ‘C’ register 4117 JNZ Loop 2 C2, 0B, Repeat till ‘C’ is zero 411B JNZ Loop 3 C2, 05, Jump to loop till the value of 411E HLT 76 Stop the program execution Input: Input Address Value 4500 04 4501 AB 4502 BC 4503 01 4504 0A
- 27. Output Address & Value: Output Address Value 4500 04 4501 BC 4502 AB 4503 0A 4504 01 RESULT: The assembly language program for sorting ‘4’ numbers in descending order was executed successfully using microprocessor kit.
- 28. Ex No : 6(a) Date : CODE CONVERSION 1. DECIMAL TO HEX AIM: To write an assembly language program to convert a given decimal number to hexadecimal. APPARATUS REQUIRED: 1. 8085 microprocessor kit (0-5V) 2. DC battery ALGORITHM: Step1. Initialize the memory location to the data pointer. Step2. Increment B register. Step3. Increment accumulator by 1 and adjust it to decimal every time. Step4. Compare the given decimal number with accumulator value. Step5. When both matches, the equivalent hexadecimal value is in B register. Step6. Store the resultant in memory location.
- 29. OBJECT CODE / PROGRAM: ADDRESS LABEL MNEMO NICS OPERAN D COMMENTS 8000 LXI H,8100 Initialize HL reg. To 8100H 8001 8002 8003 MVI A,00 Initialize A register. 8004 8005 MVI B,00 Initialize B register.. 8006 8007 LOOP INR B Increment B reg. 8008 ADI 1 Increment A reg 8009 800A DAA Decimal Adjust Accumulator 800B CMP M Compare M & A 800C JNZ LOOP If acc and given number are not equal, then go to LOOP 800D 800E 800F MOV A,B Transfer B reg to acc. 8010 STA 8101 Store the result in a memory location. 8011 8012 8013 HLT Stop the program EXECUTION: S.No INPUT OUTPUT Memory address Value (H) Memory address Value (D) 1. 8100 8101 2. 8100 8101 RESULT: Thus an ALP program for conversion of decimal to hexadecimal was written and executed.
- 30. Ex No : 6(b) Date : CODE CONVERSION 2. HEXADECIMAL TO DECIMAL AIM To write an assembly language program to convert a given to hexadecimal number to Decimal number. APPARATUS REQUIRED 1. 8085 microprocessor kit (0-5V) 2. DC battery ALGORITHM Step1: Initialize the memory location to the data pointer. Step2: Increment B register. Step3: Increment accumulator by 1 and adjust it to decimal every time. Step4: Compare the given hexadecimal number with B register value. Step5: When both match, the equivalent decimal value is in A register. Step6: Store the resultant in memory location.
- 31. PROGRAM: ADDRESS LABEL MNEMO NICS OPERAN D COMMENTS 8000 LXI H 8100 Initialize HL register to 8100H 8001 8002 8003 MVI A,00 Initialize A register. 8004 8005 MVI B,00 Initialize B register. 8006 8007 MVI C,00 Initialize C register for carry. 8008 8009 LOOP INR B Increment B reg. 800A ADI 1 Increment A reg 800C DAA Decimal Adjust Accumulator 800D JNC NEXT If there is no carry go to NEXT 800E 800F 8010 INR C Increment c register. 8011 NEXT MOV D,A Transfer A to D 8012 MOV A,B Transfer B to A 8013 CMP M Compare M & A 8014 MOV A,D Transfer D to A 8015 JNZ LOOP If acc and given number are not equal, then go to LOOP 8016 8017 8018 STA 8101 Store the result in a memory location. 8019 801A 801B MOV A,C Transfer C to A 801C STA 8102 Store the carry in another memory location. 801D 801E 801F HLT Stop the program
- 32. EXECUTION: S.No INPUT OUTPUT Memory address Value (H) Memory address Value (D) 1. 8100 8101 2. 8100 8101 RESULT: Thus an ALP program for conversion of hexadecimal to decimal was written and executed.
- 33. Ex No : 6(C) Date : CODE CONVERSION 3. HEXADECIMAL TO BINARY AIM: To write an assembly language program to convert a given to hexadecimal number to Binary number. APPARATUS REQUIRED: 1. 8085 microprocessor kit (0-5V) ALGORITHM: OBJECT CODE / PROGRAM:
- 34. EXAMPLE Let the data be 5A. 5A(H) = 0101 1010 (B) Result : (4150) = 0 (LSB) (4151) = 1 (4152) = 0 (4153) = 1 (4154) = 1 (4155) = 0 (4156) = 1 (4157) = 0 (MSB) EXECUTION: S.No INPUT Value (H) OUTPUT Memory address Value (B) 1. Value is added in program at memory address 4105 4150 4151 4152 4153 4154 4155 4156 4157 2. Value is added in program at memory address 4105 (change the value) 4150 4151 4152 4153 4154 4155 4156 4157 RESULT: Thus an ALP program for conversion of hexadecimal to binary number was written and executed.
- 35. Ex No :7(a) Date : STEPPER MOTOR INTERFACING WITH 8051 1. STUDY OF 8051 MICROCONTROLLER AND STEPPER MOTOR AIM: The study the fundamentals of 8051 microcontrollers and stepper motor. MICROCONTROLLER: A microcontroller is an integration of a microprocessor with memory and input, output interfaces and other peripherals such as timers on a single chip. A microcontroller may take an input from the device it is controlling and control the device by sending signals to different components in the device. A microcontroller is often small and low cost. The components may be chosen to minimize size and to be as inexperience as possible. Another name for a microcontroller is embedded controller. They can control features or action of the product. Register in microcontroller: A microcontroller contains a group of registers each type of register having a different functions. Accumulator: The accumulator (A) is an 8 bit register where data for an input to the arithmetic and logic unit is temporarily stored. So the accumulator register is a temporary handling register for data to be operated on by the arithmetic and logic unit also after the operation the register for holding the result. B Register: In addition to accumulator an 8 bit B-register is available as a general purpose register when it is not used for the hardware multiply/divide operation. Data pointer (DPTR): The data pointer consists of a high byte (DPH) and a low byte (DPL). Its function is to hold a 16 bit address. It may be manipulated as a 16 bit data register. It serves as a base register in direct jumps, lookup table instructions and external data transfer.
- 36. Stack pointer: The stack refers to an area of internal RAM that is used in conjunction with certain opcode data to store and retrieve data quickly. The stack pointer register is used, by the 8051 to hold as internal RAM that is called top of stock. The stack pointer register is 8 bit wide. It is increased before data is stored during PUSH and CALL instructions and decremented after data is restored during POP and RET instruction. The stack pointer is initialized to 07H after a reset. This causes the stack to begin at location 08H. Program counter: The 8051 has 16 bit program counter. It is used to hold the address of memory location from which the instruction to be fetched. 8051 is a 16 bit hence it can be address up to 216 byte i.e. 64k of memory. The PC is the only register that does not have an internal address. Internal RAM: The 8051 has 128 bytes internal RAM. It is addressed using RAM address register First thirty two bytes from address 00H to 1FH of internal RAM constitute 32 working registers. They organized into four banks of eight registers each. The four register banks are numbered 0 to 3 and consist of eight registers named R0 to R7. Each register can be addressed by name or by its RAM address. Only one register bank is in use at a time. Bits Rs0 and Rs1 in the PSW determine which bank of register is currently in use. Register banks when not selected can be used as general purpose RAM. PIN diagram of microcontroller: The 8051 microcontroller is available in a 40 pin dual in-line (DIL) package arrangement. It is important to note that many pins of 8051 are used for more than one function. The function of each of the pins is as follows. PORT 0 (pins 32-39): Port 0 pins can be used as I/O pins. The output drives and input buffers of port 0 are used to access external memory address, time multiplexed with the data being written or read. Thus port 0 can be used as multiplexed address data bus. PORT 1 (pins 1-8): Port 1 pins can be used only as I/O pins.
- 37. PORT 2 (pins 21-28): The output drives of port 2 are used to access external memory. Port 2 outputs the high order byte of the external memory address when the address is 16 bits wide otherwise port 2 is used as I/O ports. PORT 3 (pins 10-17): All ports pins of port-3 are multifunctional. They have special functions including two external interrupts two counter two special data lines and two timing control strobes. Power supply pins Vcc and ground to pin Vcc with rated power supply current of 125mA. Oscillator Pins XTA2 (pin 18) and XTA1 (pin 19): For generating an internal clock signal the external oscillator is connected at these two pins. ALE (address latch enable) Pin 30: AD0 to AD7 lines are multiplexed. To determine these lines and for obtaining lower half of an address, an external latch and ALE of 8051 is used. RST (Reset pin 9): This pin is used to reset 8051. For proper reset operation, reset signal must be held high at least for two machine cycles, while oscillator is running. PSEN (Program Store Enable pin29): It is the active low output control signal used to activate the enable signal if the external ROM/EPROM. It is activated every six oscillator periods while reading the external memory. Thus this signal acts as the read store to external program memory. STEPPER MOTOR A motor in which the rotor is able to assume only discrete stationary angular position is a stepper motor. The rotary motion occurs in a stepwise manner from one equilibrium position to the next. Construction features: A stepper motor could be either of the reluctance type of or permanent magnet type. A PM motor consists of multiphase stator and two part permanent magnet rotor variable reluctance motor has magnetized rotor. PM stepper motor is the most commonly used type. The basic two phase stepper motor consists of two pairs of stator poles.
- 38. Each of four poles has its own winding. The excitation of any one winding generates a north pole and a South Pole gets attracted and the torque induced at the diametrically opposite side. The rotor magnetic system has two end faces. The left face is permanently magnetized as south and the right face as North Pole faces. The north pole structure is twisted with respect to the south pole structure so that south pole precisely between two north poles. In an arrangement where there are four stator poles and three pairs of rotor poles, there exist 12 possible stable position in which a south pole if the rotor can lock with a north pole of the stator. From this is can be noted that the step size is = 360 (Ns*Nr) Ns number of stator pole Nr number of pairs of rotor poles Generally step size of the stepper motor depends up on rotor poles. There are three different schemes available for stepping a motor. They are 1. Wave scheme 2. 2 phase scheme 3. Half stepping or missed scheme. Wa4 v .e switching scheme: Two phase switching scheme: Anticlock wise Clock wise Step A1 A2 B1 B2 Step A1 A2 B1 B2 1 1 0 0 1 1 1 0 1 0 2 0 1 0 1 2 0 1 1 0 3 0 1 1 0 3 0 1 0 1 4 1 0 1 0 4 1 0 0 1 Anticlock wise Clock wise Step A1 A2 B1 B2 Step A1 A2 B1 B2 1 1 0 0 0 1 1 0 0 0 2 0 0 0 1 2 0 0 1 0 3 0 1 0 0 3 0 1 0 0 4 0 0 1 0 4 0 0 0 0
- 39. REPRESENTATION: Operational features of stepper motor: There are many kinds of stepper motor like unipolar type, bipolar type, single phase type, multiphase type; single phase stepper motor is often used for quartz watch. In PM type stepper motor, a permanent magnet is used for motor and coils are put on stator. The stepper motor model which has 4 poles at top, bottom and at either sides. X coil, X¯ coil, r coil and r¯ coil are put to the upper side and the lower pole. r coil and r¯ coil are rolled up for the direction of the pole becomes opposite when applying an electric current to the r¯ coil. It is similar about X and X¯ too. The turn of the motor is controlled by the electric current which pairs into X, X¯, r, r¯. The rotor rotational speed and the direction of turn can be controlled by this control. Speed control of a stepper motor: The requirement is to use a microcontroller to drive a stepper motor in both forward and reverse directions of shaft rotation and to implement a two speed arrangement switches are to be used to produce the two speeds and a reversal of shaft rotation. Generally a stepper motor has four sets of coils; one end of each coil may be connected together and then connected to DC supply. The remaining four ends may be driven through transistors either separately or in integrated circuit form. A four bit code sequence continuously applied to the drive circuit from the microcontroller port causes the motor shaft to rotate in angular steps. Stepper motor has step angles of 1.8 degree step revolution and turning force may be improved by using a step down gear box. The stepping code sequence may be obtained from the motor manufacturer or distributor. The program in this example was a common four step sequence of A,9,5,6 that it sent continuously would cause the motor shaft to rotate. RESULT: Thus the fundamentals of microcontroller and stepper motor were studied.
- 40. Ex No :7(b) Date : STEPPER MOTOR INTERFACING WITH 8051 2. RUN THE STEPPER MOTOR IN CLOCKWISE AND COUNTER CLOCKWISE DIRECTION AIM: To interface a stepper motor with 8051 microcontroller and operate it in forward and reverse rotations using assembly level language of 8051 microcontroller. APPARATUS REQUIRED: Stepper Motor Interface Board 8051 Microcontroller Keyboard interface Data buses Power chord PROCEDU RE: Step 1 : S witch ON the micro controller Step 2 : Initialize the starting address Step 3 : Enter the mnemonics code in the microcontroller Step 4 : Reset the microcontroller Step 5 : Execute the program RESULT: Thus the program to run the stepper motor at different directions was derived using 8051 assembles language and was verified.
- 41. PROGRAM: TO RUN A STEPPER AT DIFFRENT SPEED IN BOTH PORTS Addr ess Opcodes Label Mnemonics 4100 ORG 4100H 4100 90 45 00 START : MOV DPTR, 4103 78 04 MOV R0, #04H 4105 E0 J0 : MOVX A, @DPTR 4106 FC MOV R4, A 4107 C0 83 PUSH DPH 4109 C0 82 PUSH DPL 410B 90 FF C0 MOV DPTR, 410E F0 MOVX @DPTR, A 410F 12 41 23 LCALL DELAY 4112 90 FF C8 MOV DPTR, 4115 EC MOV A, R4 4116 F0 MOVX @DPTR, A 4117 12 41 23 LCALL DELAY 411A D0 82 POP DPL 411C D0 83 POP DPH 411E A3 INC DPTR 411F D8 E4 DJNZ R0, J0 4121 80 DD SJMP START 4123 DELAY : 4123 7A 04 MOV R2, #04H 4125 L0 : 4125 79 FF MOV R1, #FFH 4127 L1 : 4127 7B FF MOV R3, #FFH 4129 L2 : 4129 DB FE DJNZ R3, L2 412B D9 FA DJNZ R1, L1 412D DA F6 DJNZ R2, L0 412F 22 RET 4130 END INPUT FOR CLOCKWISE ROTATION 4500 09, 05, 06, 0A DB 09, 05, 06, 0A INPUT FOR COUNTER CLOCKWISE ROTATION 4500 0A, 06, 05,09 DB 0A, 06, 05,09
- 42. Ex No :8 Date : TRAFFIC LIGHT CONTROLLERS WITH 8085 AIM: To write an assembly language program to simulate the traffic light at an intersection using a traffic light interface. APPARATUS REQUIRED: SL.NO ITEM SPECIFICATION QUANTITY 1 Microprocessor kit 4185,Vi Microsystems 1 2 Power supply +5 V DC 1 3 Traffic light interface Vi Microsystems 1 ALGORITHM: 1. Initialize the ports. 2. Initialize the memory content, with some address to the data. 3.Read data for each sequence from the memory and display it through the ports. 4. After completing all the sequences, repeat from step2. A SAMPLE SEQUENCE: 1. (a) Vehicles from south can go to straight or left. (b) Vehicles from west can cross the road. (c) Each pedestrian can cross the road. (d) Vehicles from east no movement. (e) Vehicles from north can go only straight. 2.All ambers are ON, indicating the change of sequence. 3. (a) Vehicles from east can go straight and left. (b) Vehicles from south can go only left. (c) North pedestrian can cross the road. (d) Vehicles from north, no movement. (e) Vehicles from west can go only straight. 4.All ambers are ON, indicating the change of sequence. 5. (a) Vehicles from north can go straight and left. (b) Vehicles from east can go only left. (c) West pedestrian can cross the road. (d) Vehicles from west, no movement. (e) Vehicles from south can go only straight.
- 43. 6. All ambers are ON, indicating the change of sequence. 7. (a) Vehicles from west can go straight and left. (b) South pedestrian can cross the road. (c)Vehicles from south, no movement. (d) Vehicles from east can go only straight. 8. All ambers are ON, indicating the change of sequence. 9. (a) All vehicles from all directions no movement. (b) All pedestrian can cross the road. BIT ALLOCATION: BIT LED BIT LED BIT LED PA0 SOUTH LEFT PB0 NORTH LEFT PC0 WEST STRAIGHT PA1 SOUTH RIGHT PB1 NORTH RIGHT PC1 NORTH STRAIGHT PA2 SOUTH AMBER PB2 NORTH AMBER PC2 EAST STRAIGHT PA3 SOUTH RED PB3 NORTH RED PC3 SOUTH STRAIGHT PA4 EAST LEFT PB4 WEST LEFT PC4 NORTH PD PA5 EAST RIGHT PB5 WEST RIGHT PC5 WEST PD PA6 EAST AMBER PB6 WEST AMBER PC6 SOUTH PD PA7 EAST RED PB7 WEST RED PC7 EAST PD PATH REPRESENTATION:
- 44. CONTROL ------0F (FOR 8255 PPI) PORT A------ 0C PORT B------ 0D PORT C------0E Flowchart:
- 45. ADDRESS OPCODE LABEL MNEMONICS OPERAND COMMENT 4100 3E MVI A, 41 Move 41H immediately to accumulator 4102 D3 OUT 0F Output contents of accumulator to OF port 4104 REPEAT LXI H,DATA_SQ Load address 417B to HL register 4107 11 LXI D,DATA_E Load address 4187 to DE 410A CD CALL OUT Call out address 4142 410D EB XCHG Exchange contents of 410E 7E MOV A, M Move M content to accumulator 410F D3 OUT 0D Load port A into output 4111 CD CALL DELAY1 Call delay address 4114 EB XCHG Exchange content of HL 4115 13 INX D Increment the content of 4116 23 INX H Increment the content of 4117 CD CALL OUT Call out the address 411A EB XCHG Exchange content of HL 411B 7E MOV A, M Move M content to 411C D3 OUT 0D Load port B into output 411E CD CALL DELAY1 Call DELAY address 4121 EB XCHG Exchange content of 4122 13 INX D Increment D register 4123 23 INX H Increment H register 4124 CD CALL OUT Call specified address 4127 EB XCHG Exchange content of HL 4128 7E MOV A, M Move M content to accumulator 4129 D3 OUT 0E Load port C into output 412B CD CALL DELAY1 Call DELAY address 412E EB XCHG Exchange content of HL 412F 13 INX D Increment D register 4130 23 INX H Increment H register 4131 CD CALL OUT Call specified address 4134 EB XCHG Exchange content of HL
- 46. 4135 7E MOV A, M Move M content to accumulator 4136 D3 OUT 0E Load port C into output port 4138 23 INX H Increment H register 4139 7E MOV A, M Move M content 413A D3 OUT 0C Load port A into output port 413C CD CALL DELAY1 Call DELAY address 413F C3 JMP REPEAT Jump to specified 4142 7E OUT MOV A, M Move M content to accumulator 4143 D3 OUT 0E Load port C into output port 4145 23 INX H Increment H register 4146 7E MOV A, M Move M content to 4147 D3 OUT 0D Load port B into output port 4149 23 INX H Increment H register 414B D3 OUT 0C Load port A into output 414D CD CALL DELAY Call DELAY address 4150 C9 RET Return to accumulator 4151 E5 DELAY PUSH H Push the register H 4152 21 LXI H,001F Load 00 1F in HL register 4155 1 LXI B,FFFF Load FFFF in DE register 4158 0B DCX B Decrement B register 4159 78 MOV A, B Move B content 415A B1 ORA C OR content of C with 415B C2 JNZ LOOP Jump to LOOP if no zero 415E 2B DCX H Decrement H register 415F 7D MOV A, L Move L content to accumulator RESULT: Thus an assembly language program to simulate the traffic light at an intersection using a traffic light interfaces was written and implemented.
- 47. Ex No :9 Date : SPEED CONTROL OF DC MOTOR AIM: To write an assembly language program to control the speed of DC motor using 8085 or 8051 microcontroller. APPARATUS REQUIRED: DC Motor 8085 Microprocessor (+5V) Interface board Data buses & Wires Power chord Procedure: 1. Start the program. Store the 8-bit data into the accumulator. 2. Initialize the counter. Move the content of accumulator to data pointer. 3. Execute the program. 4. Terminate the program. Program: ADDRESS MNEMONICS OPERAND COMMENTS 4500 74 FF MOV A, #FF Move FF into accumulator 4502 90 FF C0 MOV DPTR,#FF10H Load the value FF 10H into the data pointer 4505 F0 MOVX @DPTR A Move the data content to the accumulator 4506 80 FF SIMPL Instruction is executed. Output: A Register Speed Accumulator FF High 5V 7F Medium 3V 55 Low 2V RESULT Thus the program to control the speed of DC motor was executed and verified successfully.
- 48. Ex No :10 Date : STUDY OF PLC AND ITS APPLICATIONS Objective: At the end of the lab session, students will have the acquaintance of history of PLC, operations, symbols, basic components, and selection and various applications. HISTORY OF PLC: Over time control system engineering has evolved greatly. In the past manual control was the only the form of control. More recently electrical control based on relays were used. These relays allow switching of power without a mechanical switch.PLC or a programmable logic controller is used to check and control a system using digital inputs which can be programmed for automation. The growth of PLC started in 1970s.The PLCs have become a major component of factory mainly because of the advantages they offer like • Cost effective control for complete system • Flexible and reusable • Computational abilities • Analytical power and decision making “The programmable logic controller is defined as a digital electronic device that uses a programmable memory to store instructions and to implement functions such as logic, sequencing, timing, counting and arithmetic words to control machines and processes “ PLCs are available in different designs or formats which vary in the type of their inputs and outputs and the software used for programming. A Programmable Logic Controller, PLC, or Programmable Controller is an electronic device used for Automation of industrial processes, such as control of machinery on factory assembly lines. A programmable controller is a digitally operating electronic apparatus which uses a programmable memory for the internal storage of instructions for implementing specific functions, such as logic, sequencing, timing, counting and arithmetic, to control various machines or processes through digital or analog input/output devices. Unlike general purpose computers, the PLC is designed for multiple inputs and output arrangements, extended temperature ranges, immunity to electrical noise, and resistance to vibrations and impacts. Programs to control machine operation are typically stored in battery backed or non volatile memory.
- 49. A PLC is an example of a real time system since output results are produced in response to input conditions within a bounded time, otherwise unintended operation results. Operation of PLC Checking the Input status PLC takes a look at each input to determine whether it is on or off condition. Execution of the Program Executes a program by one instruction at a time. If the first input is on then it should turn on the first output. Since it is already known, it should be able to decide whether the first output should be turned on based on the state of the first input. It will store the execution results for use later during the next step. Updating the output status In the end PLC updates the status of the outputs based on which inputs are on during the first step and the results of executing your program during the second step.
- 50. PLC Program: Programming Languages • Ladder logic • FBD LOGIC (functional block diagram) • STL LOGIC (statement list) Meanings of symbols used in PLC Program: This instruction is called as “examine on” or “normally opened” as input functions or storage bits. If the corresponding memory bit is a “1” then the respective ‘rung’ will continuously be executed and the corresponding outputs will be energized. Rung is one of the multiple horizontal programming lines in a ladder logic diagram. NOTE: Other factors may also affect rung simultaneously. If the corresponding bit is “0” then the rung will not be executed continuously and outputs will be de-energized. If this instruction is used as input bit, its status should be according to the status of the real world input devices connected to the input table by identical addresses. Addressing Sample: I: 3/1 This indicates address of a sample. I indicates input image table, 3 indicates slot no. 3 of input port and 1 indicates bit three of 3rd slot of input port. This instruction is called “examine off” or “normally closed” as input functions or storage bits. If the corresponding memory bit is a “1” then the respective ‘rung’ will continuously be executed and the corresponding outputs will be energized. NOTE: Other factors may also affect this rung simultaneously. If the corresponding bit is “0” this instruction will not allow rung continuously and outputs will be energized. If used as input bit, its status should correspond to the status of the real world input devices tied to the input table by identical addresses. This is called as ‘output energize’. This instruction sets the specified bit when rung continuity is achieved. Under normal operating conditions, if the set bit corresponds to an output device, output device will be energized when rung goes true. Addressing Example O: 3/1 O -- Output image table 3 -- Slot three 1 -- Bit one of slot three
- 51. OTL : This is called as ‘output latch’. This instruction functions similar to output energize except that once a bit is set with OTL, it is latched on. Once an OTL bit has been set ON (1 on the memory) it will remain ON even if the rung condition goes false. The bit must be reset. (U) This is called as ‘output unlatch’. This is used to unlatch (reset) a latched bit. Its address must be same as latched one. Timer: This is also called as “TON”. It is used to turn an output ON or OFF after the timer has been ON for preset time interval. This output instruction begins timing when rung goes true. It waits the specified amount of time (As specified in Preset), keeps track of accumulated intervals which have occurred (ACCUM), and sets DN (Done) bit when ACCUM time equals preset time. As long as rung condition remains true, Timer adjusts it’s accumulated Value to each evaluation until it reaches the preset value. The accumulated value is reset when rung condition go false, regardless of whether timer has timed out. ” TIME BASE” is an amount of time after which accumulator increases its value by 1. Fig Ladder logic
- 52. Fig FBD Logic (Functional Block Diagram) Fig STL Logic (Statement List)
- 53. PLC Program is a Logic that is executed by the CPU. This logic can be written in the form of Ladder diagram, Instruction List, Sequential Function Charts, Structured text or Functional block diagram. These are the languages used for writing logic as per IEC standard. The program is then downloaded to the PLC. This is usually done by temporarily connecting the PC or HHT to the PLC. Once the program is downloaded to the CPU, it is usually not necessary for the PC to remain connected. Fig PLC used in Industry Basic Components of PLC: CPU and Memory module Power supply Input and output module Programming device
- 54. CPU and Memory Module: This is the device where PLC program is stored and processed. The size and type of CPU determines the programming functions available, size of the application logic available, amount of memory supported, and processing speed. Power Supply: The power supply provides power for the PLC system. It provides internal DC current to operate the processor logic circuitry and input/output assemblies. This can be built into the PLC or an external unit. Common voltage levels required by the PLC are 24Vdc, 120Vac, 220Vac. Input and Output Module: Inputs carry signals from the field (process) to the controller. Various types of inputs can be switches, pressure sensors, transmitters etc. The field devices to whom PLC sends the results of logical operations is the output devices. These are the actuators that adjust or control the process, motors, lights, relays, pumps, etc. Many types of inputs and outputs can be connected to a PLC and they can be categorized mainly as analog and digital. Digital inputs and outputs operate on discrete or binary change i.e. on/off, open/ . Analog inputs and outputs change continuously with reference to time.
- 55. U itary PLC Programming Device: Used to enter the desired program that will determine the sequence of operation and control of process equipment or driven machine. Selecting a PLC Number of logical inputs and outputs. Memory Number of special I/O modules Scan Time Communications Software Classification of PLC Programmable Logic Controllers can be classified in accordance with the number of I/Os which the PLC can handle. The different types of PLCs, thus exists due to this classification are as follows: Unitary PLC Modular PLC Rack Style PLC n
- 56. The Unitary PLC is typically the smallest & least expensive. It contains every feature of a basic system in one box. They are attached to the machine being controlled. It would be used in a small machine or fixed application such as overhead door controls or a standalone parts inspection system. They are not expandable so the application is limited to on-board I/O. There are, however, some very powerful units available with built in GSM, colour screens, & web servers. Most have 1 or 2 analog I/O for motion control as shown in the fig. Modular PLC The Modular PLCs start with a processor with a few or no on-board I/O. These use a range of modules that slot together to build up a system. The basic modules are the power supply, the main module is the CPU, the input module and the output module. Other modules such as A/D converters may be added. The main advantage is that the number of input and output terminals can be expanded to cope with changes to the hardware system. Modular PLCs are used in applications where a higher I/O count is needed or when using specialty modules such as quadrature encoders, thermocouple inputs, etc. They are also useful in small applications that have “upgrades” available to the end user. Systems can be expanded (within certain limits) without adding additional rack space
- 57. Rack Style PLC Rack style PLCs are a larger type of PLC that is a collection of I/O cards that are linked together and stored in a rack. A rack I/O can handle thousands of inputs and outputs. Rack style PLCs is usually more expensive, expandable, and powerful than unitary or modular PLCs. This is a similar concept to the modular design but the modules are on standard cards that slot into a standard rack inside a cabinet. The rack provides a power and communication backplane that greatly increases the communication rate between the processor and the modules as well as allowing some specialty modules to communicate with each other without the processor. In some brands, multiple processors can be in the same rack and share the inputs. Racks also allow for redundant processors for critical systems such as waste water pumps or fire control systems. The types of modules available for rack systems are far more extensive than modular systems. The number of available I/O points is also much higher in the rack systems. Available I/O points are around 1000 for some modular PLCs versus over 100,000 for the same brand of rack system as shown in fig.
- 58. APPLICATIONS PLC can also be used in automated sorting of objects in industries based on the physical properties like weight, shape, color, etc of the objects. Considering weight, for example, the objects to be sorted are sensed by a weight sensor like piezoelectric sensors. They are then diverted to the respective storage area. PLCs are used in a wide range of applications which may range from automation of manufacturing processes in a factory to providing safety solutions. PLCs are used in industrial departments like Chemical industry, Automobile industry, Steel industry and Electricity industry Glass industry. Manufacturing / Machining Food / Beverage Metals Power Mining In making of a float glass, PLC itself cannot finish some controlling tasks because of the complexity of the control system and processing of huge data. For the production of glass, we make use of bus technology to construct the control mode of a PLC with a distributed control system. This control system deals with analog controlling and data recording; The PLC is also used for digital quality control and position control. Applications of PLC in Cement Industry Along with the best quality raw materials, the accurate data regarding process variables, especially during mixing processes within the kiln, ensures that the output provided should be of the best possible quality. Nowadays a DCS with bus technology is used in the production and management industry. By using this existing DCS control system, the PLC is in user mode of SCADA. This mode comprises PLC and configuration software. This SCADA mode comprises the PLC and host computer. The host computer consists of slave and master station. The PLC is used for controlling the ball milling, shaft kiln and Kiln of coal.
- 59. The programmable logic controller is used not only for industrial purpose but also in civil applications such as washing machine, elevators working and traffic signals control. In large process plants PLCs are being increasingly used for automatic startup and shutdown of critical equipments. A PLC ensures that equipment cannot be started unless all the permissive conditions for safe start have been established. It also monitors the conditions necessary for safe running of the equipment and trip the equipment whenever any abnormality in the system is detected. The PLC can be programmed to function as an energy management system for boiler control for maximum efficiency and safety. In the burner management system it can be used to control the process of purging, pilot light off, flame safety checks, main burner light off and valve switching for changeover of fuels. BOOELAN OPERATORS AND OR NAND NOR INPUT OUTPUT INPUT OUTPUT INPUT OUTPUT INPUT OUTPUT A B A B A B A B 0 0 0 0 0 0 0 0 1 0 0 1 1 0 0 1 0 1 1 0 1 1 0 0 0 1 0 0 1 1 0 1 1 0 1 0 1 1 1 1 1 1 1 1 0 1 1 0 XOR NOT INPUT OUTPUT INPUT OUTPUT A B 0 0 0 0 1 1 0 1 1 0 0 1 1 1 1 0
- 60. Ex No :11 Date : DESIGN OF SIMPLE PNEUMATIC CIRCUIT PROBLEM: A double acting cylinder is used for clamping and de-clamping work part in a drilling machine. To actuate the cylinder for clamping and de- clamping, a manually operated valve to be operated. Design a circuit. AIM: To design a simple pneumatic circuit which can clamp and de-clamp the work part in drilling machine when actuated manually. APPARATUS REQUIRED: Double acting cylinder Air supply & FRL unit Manually operated valves Fittings and Hoses CIRCUIT DESCRIPTION: Compressed air supply is given through the FRL unit to the manually operated directional control valve. The output ports of the DC valve are connected to the cylinder ports. In normal condition the cylinder is in the retracted condition (de-clamping). WORKING OF THE CIRCUIT: When the manually operated valve is pressed, the left side configuration of the valve is come into operation and the pressurized air enters into the cover end of the cylinder causing the cylinder to move forward. This clamps the work part and after completing the drilling operation, the operator actuates the valve to the other side. This now gives air to the piston end of the cylinder retracts for de-clamping the work part.
- 61. Simple Pneumatic Circuit RESULT: A circuit for the given problem is designed, constructed using the available components and tested successfully. Ex No :11 Date :
- 62. Ex No :12 Date : CONTROLLING THE SPEED OF THE CYLINDER USING METERING IN AND METERING OUT VALVE CIRCUIT PROBLEM: Design a simple double acting cylinder circuit used for applications like feed a drill bit and boring machine. The speed control of forward and return stroke should be possible to get a positive feed control. The cylinder is actuated by a manually operated valve. AIM: To control the speed of double acting cylinder using Metering In valve circuit in Pneumatic Trainer Kit. APPARATUS REQUIRED: Connecting tubes Double Acting Cylinder Flow Control Valve 4/2 Hand Levered Spring Return DCV FRL Unit PROCEDURE: 1. Draw the Pneumatic circuit and check the connections connection carefully. 2. Connect the FRL unit to the main air supply. 3. The various components are connected as per circuit. 4. Block the valve openings if necessary. 5. Check the leakage of air supply and correct it. 6. Open the valve and operate the cylinder.
- 63. Controlling the Speed of the Cylinder using Metering In valve circuit Controlling the speed of the cylinder using Metering out valve circuit RESULT: Thus the speed of double acting cylinder was controlled using Metering In and Metering Out valve circuit in Pneumatic Trainer Kit.
- 64. Ex No :13 Date : OPERATION OF DOUBLE ACTING CYLINDER WITH LOGIC GATES AIM: To operate a double acting cylinder using AND/OR logic circuit in Pneumatic Trainer Kit. APPARATUS REQUIRED: Connecting tubes Double Acting Cylinder 4/2 Pilot Operated DCV 3/2 Hand Levered DCV Two Pressure Valve FRL Unit PROCEDURE: 1. Draw the Pneumatic circuit and check the connections carefully. 2. Connect the FRL unit to the main air supply. 3. The various components are connected as per circuit. 4. Block the valve openings if necessary. 5. Check the leakage of air supply and correct it. 6. Open the valve and operate the cylinder.
- 65. Operation of double acting cylinder with AND logic circuit Operation of double acting cylinder with OR logic circuit RESULT: Thus the double acting cylinder using AND/OR logic circuit was operated in Pneumatic Trainer Kit.
- 66. Ex No :14 Date : SINGLE CYCLE AUTOMATION OF MULTIPLE CYLINDERS IN SEQUENCE (A+B+B-A-) USING ELECTROPNEUMATIC KIT AIM: To operate single cycle automation of multiple cylinders in sequences (A+B+B-A-) in Electro Pneumatic Trainer Kit. APPARATUS REQUIRED: Automation Studio Software Double Acting Cylinder Input / Output Relay Box 4/2 Solenoid Operated DCV Electrical Switch FRL Unit PROCEDURE 1. Draw the circuit in Automation Studio software and check the connections. 2. Connect the FRL unit to the main air supply. 3. The various components are connected as per circuit. Block the 4. Valve openings if necessary. 5. Check the leakage of air supply and correct it. Open the valve and operate the cylinder.
- 67. Single cycle automation of multiple cylinders in sequences (A+B+B-A-) in Electro Pneumatic Trainer Kit. RESULT: Thus the single cycle automation of multiple cylinders was operated sequence (A+B+B-A-) in Electro Pneumatic Trainer Kit.
- 68. Ex No :15 Date : DESIGN OF SIMPLE HYDRAULIC CIRCUIT PROBLEM: Design a hydraulic circuit for forward and return motion of a cylinder by manually operating a switch. The return stroke speed to be controlled. AIM: To design a hydraulic circuit to create forward and return motion of a cylinder. APPARATUS REQUIRED: Double acting cylinder 4/2 direction control Flow control valve Hydraulic power pack Relief valve & Pressure CIRCUIT DESCRIPTION: The hydraulic circuit is designed with the components available in the hydraulic trainer kit. The double acting cylinder is connected to the direction control valve through hoses. The piston end of the cylinder is connected through the flow control valve to DC valve. The pump is connected to the DC valve through a termination block. Required pressure relief valve and pressure gauge are properly connected in the circuit. WORKING OF THE CYLINDER: Pressurized oil from the pump is given to the DC valve through the relief valve. If the manually operated valve is pressed, the oil flows to one side of the cylinder depending on the connection and the cylinder makes its movement. During return stroke the oil is allowed to come out through the flow control valve and this controls the speed (like meter out valve) of the cylinder in the return stroke.
- 69. Simple Hydraulic Circuit RESULT: The given circuit is designed, constructed with the available components and checked for working.
- 70. Ex No :16 Date : AIM: STUDY OF VARIOUS TYPES OF TRANSDUCERS To study the features and types of transducers. THEORY: Sensor A sensor is a device which is capable of converting any physical quantity to be measured into a signal which can be read, displayed, stored or used to control some other quantity. This signal produced by the sensor is equivalent to the quantity to be measured. Sensors are used to measure a particular characteristic of any object or device. For example a thermocouple, a thermocouple will sense heat energy (temperature) at one of its junction and produce equivalent output voltage which can be measured by a voltmeter. More the temperature rise, higher the voltage read by the voltmeter. All sensors need to be calibrated with respect with some reference value or standard device for accurate measurement. Below is the figure of a thermocouple. Note that a transducer and a sensor are not the same. In the above given example of thermocouple. The thermocouple acts as a transducer but the additional circuits or components needed like the voltmeter, a display etc together from a temperature sensor. Hence the transducer will just convert the energy from one form to another and all the remaining work is done by the additional circuits connected. This whole device forms a sensor. Sensors and transducers are closely related to each other. TYPES OF SENSORS
- 71. Sensors are classified based on the nature of quantity they measure. Following are the types of sensors with few examples. Acoustic and sound sensors e.g.: Microphone, Hydrophone. Automotive sensors e.g.: Speedometer, Radar gun, Speedometer, fuel ratio meter. Chemical Sensors e.g.: Ph sensor, Sensors to detect presences of different gases or liquids. Electric and Magnetic Sensors e.g.: Galvanometer, Hall sensor (measures flux density), Metal detector. Environmental Sensors e.g.: Rain gauge, snow gauge, moisture sensor. Optical Sensors e.g.: Photo diode, Photo transistor, Wave front sensor. Mechanical Sensors e.g.: Strain Gauge, Potential meter (measures displacement). Thermal and Temperature sensors. e.g.: Calorimeter, Thermocouple, Thermistor, Gardon gauge. Proximity and Presences sensors A proximity or presences sensor is the one which is able to detect the presences of nearby objects without any physical contact. They usually emit electromagnetic radiations and detect the changes in reflected signal if any. e.g.: Doppler radar, Motion detector. Further classification can be done based on the principle of operation and nature of output signal (analog or digital).
- 72. TY ES OF TRANS UC R Types of Sensors TRANSDUCER: Instrumentation is the heart of industrial applications. Instrumentation is the art and science of measuring and controlling different variables such as flow, level, temperature, angle, displacement etc. A basic instrumentation system consists of various devices. One of these various devices is a transducer. A transducer plays a very important role in any instrumentation system. An electrical transducer is a device which is capable of converting the physical quantity into a proportional electrical quantity such as voltage or electric current. Hence it converts any quantity to be measured into usable electrical signal. This physical quantity which is to be measured can be pressure, level, temperature, displacement etc. The output which is obtained from the transducer is in the electrical form and is equivalent to the measured quantity. For example, a temperature transducer will convert temperature to an equivalent electrical potential. This output signal can be used to control the physical quantity or display it. Note that any device which is able convert one form of energy into another form is called as a transducer. For example, even a speaker can be called as a transducer as it converts electrical signal to pressure waves (sound).But an electrical transducer will convert a physical quantity to an electrical one. P D E
- 73. There are of many different types of transducer, they can be classified based on various criteria as: Types of Transducer based on Quantity to be Measured Temperature transducers (e.g. a thermocouple) Pressure transducers (e.g. a diaphragm) Displacement transducers (e.g. LVDT) Flow transducers Types of Transducer based on the Principle of Operation Photovoltaic ( e.g. a solar cell ) Piezoelectric Chemical Mutual Induction Electromagnetic Hall effect Photoconductors Types of Transducer based on Whether an External Power Source is required or not. Active Transducer Active transducers are those which do not require any power source for their operation. They work on the energy conversion principle. They produce an electrical signal proportional to the input (physical quantity). For example, a thermocouple is an active transducer. Passive Transducers Transducers which require an external power source for their operation is called as a passive transducer. They produce an output signal in the form of some variation in resistance, capacitance or any other electrical parameter, which than has to be converted to an equivalent current or voltage signal. For example, a photocell (LDR) is a passive transducer which will vary the resistance of the cell when light falls on it. This change in resistance is converted to proportional signal with the help of a bridge circuit. Hence a photocell can be used to measure the intensity of light.
- 74. Above shown is a figure of a bonded strain gauge which is a passive transducer used to measure stress or pressure. As the stress on the strain gauge increases or decreases the strain gauge bends or compresses causing the resistance of the wire bonded on it to increase or decrease. The change in resistance which is equivalent to the change in stress is measured with the help of a bridge. Hence stress is measured. RESULT: Thus the various types of sensors/transducers were studied.
- 75. Ex No :17 Date : STUDY OF IMAGE PROCESSING TECHNIQUE Objective: At the end of the lab session, students will have the information’s on image, digital image, and the processing techniques. Image An image may be defined as a two dimensional function f(x,y), where ‘x’ and ‘y’ are spatial coordinates, and the amplitude of ‘f’ at any pair of coordinates x,y is called intensity or gray level of the image at that point. Digital Image ‘x’, ’y’ and the amplitude ‘f’ are all finite and discrete quantities means then the image is called as digital image. Digital Image Processing The field of digital image processing refers to processing of digital images by a digital computer. Each object has finite number of pixels or pels or image elements or picture elements. Image resolution Image resolution is defined as the number of pixels that can be accommodated in a unit area. Image resolution depends on number of values for N and number of bits used in a gray level (m). If N and ‘m’ is high, then the resolution will be more. Hue Hue is an attribute associated with the dominant wavelength in a mixture of light waves. Thus hue represents dominant color as perceived by an observer eg., red, yellow. Saturation It refers to relative purity or the amount of white light mixed with the hue. The pure spectrum colors are fully saturated (RGB).Color such as pink and lavender are less saturated. ie., The degree of saturation being inversely proportional to the amount of white light added. Hue and saturation taken together are called chromoticity.
- 76. Image Histogram An image histogram is a type of histogram that acts as a graphical representation of the tonal distribution in a digital image. It plots the number of pixels for each tonal value. Horizontal axis tonal variations Vertical axis represents the number of pixels in that particular tone. The left side of the horizontal axis represents the black and dark areas, the middle represents medium grey and the right hand side represents light and pure white areas. The Vertical axis represents the size of the area that is captured in each one of these zones. The histogram for the very dark image will have the majority of its data points on the left side and centre of the graph. The histogram for the very bright image with few dark areas is shadows will have most of its data points on the right side and the centre of the graphs. Histogram of differential excitation differential excitation scaled to [0,255] 300 200 100 0 -2 -1 0 1 2 Fig Shows image histogram FFT Transform Typically, 2-D-Fourier transform (2-D-FT) is used as the representation of complex SAR images. However, the energy of the coefficients of 2-D FT on the complex SAR image distributes in the whole frequency domain. Generally, the frequency signals are divided into real and imaginary parts, and quantized with Lloyd-Max quantizer However, the compression ratios of the frequency domain compression algorithms are almost limited in 10.4:1o r 9.8:1, which are not very high. Wavelet transform can locally analyze time and frequency in multiscale and shows very strong decorrelation ability. As it is particularly suitable for non- stationary signal processing, wavelet transform has been applied to complex SAR image compression currently; most compression algorithms of complex SAR image adopt the traditional wavelet transform.
- 77. However, for the complex SAR images, which are rich in edges and texture, traditional wavelet transform does not show efficient representation. proposed an algorithm which extracted edges of SAR image with wedge let transform and encoded the edges and texture separately. Used 2-D oriented wavelet transform for remote sensing compression. The SAR images used in are not complex SAR images. To the best of our knowledge, directional wavelet transform has not been applied to the compression of complex SAR images. Directional wavelet transform achieves the direction extraction while keeping the property of multiscale analysis of discrete wavelet transform (DWT). Directional wavelet transform can be divided into two classes: frequency-domain transform and spatial-domain transform. The frequency-domain directional wavelet transform, such as contour let which continuously performs directional filter on the high- frequency sub bands of wavelet transform, gives an efficient representation of the edges at the cost of high redundancy. The spatial- domain directional wavelet, such as directional lifting wavelet transform (DLWT), employs direction prediction for wavelet decomposition, which adapts the wavelet transform direction to the image edges. DLWT integrates spatial direction prediction into the wavelet transform lifting framework, provides an efficient representation of edges along multiple directions of images, and thus reduces the energy of high-frequency bands and achieves more energy clustering. As the real parts and imaginary parts of complex SAR image as well as the real image of fast FT (FFT) are rich in edges, two complex SAR image coding schemes using DLWT are proposed. Fourier Transform (FT) with its fast algorithms (FFT) is an important tool for analysis and processing of many natural signals. FT has certain limitations to characterise many natural signals, which are non- stationary (e.g. speech). Wavelet compression system consists of several components:1) filters and algorithms for performing wavelet decomposition and reconstruction, 2) a bit allocation strategy, and 3) quantizers. In order to minimize algorithm complexity and to reduce susceptibility to channel errors, the quantizer output is not encoded with an entropy or arithmetic coder. Side information concerning normalization and bit allocation can be coded in only a few bits for an entire image. The wavelet transform is a relatively new technique for decomposition of a data set with orthogonal (orthogonal) basis functions and is becoming widely used in image compression. The orthogonal wavelet decomposition provides a multi resolution representation of a signal over an ortho normal basis. It offers several advantages for SAR data compression: 1. The decomposition of an image into a representation selective both in frequency and spatial orientation allows allocation of quantization bits to "important" components.
- 78. 2. Algorithms for performing a wavelet decomposition and reconstruction are recursive, computationally efficient, and easily implemented in hardware. The computation of a wavelet transform, as described by Mallat, has a computational burden on the order of &V' . Fast wavelet transform algorithms can reduce the computational burdentolog -4- 3. The decomposition of an image into a pyramid of detail images results in a set of coefficients that have reduced dynamic range compared to the original image. This is particularly important for compression of SAR imagery due to its very large dynamic range. 4. A wavelet multiscale decomposition of an image is convenient for progressive image transmission. A coarse resolution image can be selected from a sensor or database, and then a) browsed at coarse resolution for data quality, data validation, correct location, etc .and or processed by algorithms which require only coarse resolution input data, or b) a subset of the image can be transmitted and displayed at the finest available resolution. Complex SAR Image 1-D FFT Spectrum Moving 1-D IFFT Real part extracting SAR Image Synthetic aperture radar (S microwave imaging system, is in the application field of mi aperture radar (SAR) develo resolution, multi polarization of SAR image data rises steadily way to alleviate the pressure of FFT Program AR), which is an important tool crowave remote ping along the , multiband, an . Data compressio transmission and an all-time, all-weather for achieving information sensing. With synthetic directions of high d multimode, the quantity n technology is a effective storage on SAR system.
- 79. Complex SAR Image The complex SAR image, which consists of amplitude and phase, is the first- level image data of the SAR system. The phase information fidelity in complex SAR image is crucial to some special applications, such as interferometry and moving target detection. Therefore, complex SAR image compression requires not only reasonable amplitude fidelity but also high phase information accuracy, which is different from the ordinary optical image compression. Furthermore, compared with optical images, complex SAR images exhibit significantly higher dynamic range and less spatial correlation. Thus, common optical image compression algorithms are not suitable for the compression of complex SAR images. Efficient representation is important to the compression of complex SAR images. Reconstructions of the compressed detected imagery were of good to excellent quality at data rates as low as 0.25 bpp (compression ratio of 32 : 1 when compared to an uncompressed data rate of 8 bpp). Visual impressions of the imagery were much better than the SNR’s implied. SNR’s for compressed SAR imagery are lower than those reported for optical imagery because the high spatial frequency speckle of SAR imagery does not get accurately reconstructed during the compression process. However, accurate reconstruction of speckle is of virtually no importance to human interpretation of SAR imagery. Complex data rates are expressed as bits per real or imaginary element (bpe), which corresponds to twice the data rate of detected data since each pixel consists of two elements. Even when complex data rates are reported in bits per element, the quality of the reconstructed complex images is poorer than that of the reconstructed detected images; both shadows and objects are less well defined in the complex compressed imagery. Reasonable looking images were obtained at data rates as low as 0.5-1 bpe or 1-2 bpp. On the other hand, since complex imagery is commonly represented with a two- byte integer for each real and imaginary part, a compressed data rate of 1 bpp (0.5 bpe) corresponds to a 32:l compression ratio for complex data. The first scheme directly encodes real parts and imaginary parts of complex SAR images using the CCSDS algorithm which replaces DWT by DLWT. The second scheme first converts a complex image into a real image using FFT, and then encodes the real image in the CCSDS coding algorithm which also replaces DWT by DLWT. Compared with the original CCSDS image coding schemes using DWT, the proposed two coding schemes show significant performance gain not onlyin amplitude peak signal-to-noise ratio (PSNR) but also in mean phase error (MPE). the best in terms of PSNR and structure similarity (SSIM)].
- 80. However, the coding algorithm based on DLWT achieves better rate- distortion performance than that of DWT. It is because the rate- distortion performance of coding algorithm is determined not only by the number of significant coefficients, but also by the position distribution of significant coefficients, i.e., the clustering capability of significant coefficients the coding bits of significant coefficients with CCSDS algorithm with K-term nonlinear approximation gets less PSNR and SSIM than DWT, DLWT coefficients need less actual coding bits for the same number of significant coefficients than DWT. Therefore, at the same bit rate, we can encode more coefficients with DLWT than DWT, and then DLWT may outperform DWT in terms of rate- distortion performance eventually. DLWT consuming less coding bits is due to the better clustering capability. In the first approach the complex image data is converted to a real data format using a FFT scheme without neglecting any phase information. Shifting the frequency spectrum by the half bandwidth to positive frequencies, one obtains a negative spectrum equal to zero. After applying the inverse Fourier transform, the resulting complex signal can be represented by its real part without loss of any information, since real and imaginary part of the signal are mutual Hilbert transforms. The sampling rate are doubled, but because of only using the real part of the converted signal the data amount is not raised. The particular advantage of this transformation is, that the wavelet decomposition and compression schemes can be applied as usual to ordinary intensity data. The reconstructed complex image data is received by undoing the FIT transformation scheme in reverse order. In the second approach the complex image data is divided into magnitude and phase, applying two different compression techniques to both parts. The magnitude of the complex image data has the same properties as intensity SAR data and can be compressed, using the discrete wavelet transform and a compression scheme described below. The phase of the data is uniformly distributed and highly decorrelated, so that a nearly lossless compression technique has to be used. In this paper a vector quantizer was chosen for that. The codebook of the vector quantizer is trained, using a typical image area of a similar image. In both schemes a block adaptive Max quantizer was used with a fixed 5 bit quantization, either for the magnitudes of the image data in our first approach or for the real part of the converted complex image data in our second approach. Additionally, a vector quantizer is used on the Max-quantized data, grouping neighbouring image pixels to specific vectors. The phase of the image data in the second approach is always quantized by a vector quantizer without utilization of a block adaptive Max quantizer.
- 81. The complex SAR data set, we used for both compression methods, was taken in X-Band by the experimental SAR of DLR during a mission in 1996 and shows a part of Mount Etna. For each approach two numerical examples are given with different compression ratios Both proposed schemes lead to good visual image quality as where only one compression example of each approach is depicted. The histograms of the reconstructed image magnitudes are also maintained with respect to their originals. The image quality parameters SNR and PSNR as well as the mean phase error (MPE) and phase standard deviation (PSD) for all the four examples are listed in the first table with their resulting compression ratio. Additionally, the second approach is extended to multi polarization mode. The magnitudes of four polarization channels are separately quantized using a block adaptive Max quantizer with a fixed 5 bit quantization as well. The low-pass component of the final wavelet decomposition was linearly quantized with maximum quantization.