1. The Basics of Photo Editing
What does a properly exposed photo look like?
A properly exposed photo
has good tonal range. This
means that the full range of
tones from pure black to
pure white is present in the
photo.
In digital photography it is
better to mistakenly
underexpose a photo rather
than overexpose, because
the photo can be lightened
in Photoshop. However,
when a photo is
overexposed information in
the light areas cannot be
recovered.
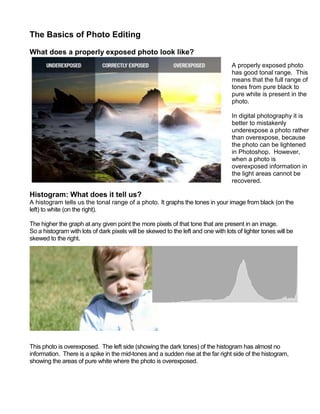
Histogram: What does it tell us?
A histogram tells us the tonal range of a photo. It graphs the tones in your image from black (on the
left) to white (on the right).
The higher the graph at any given point the more pixels of that tone that are present in an image.
So a histogram with lots of dark pixels will be skewed to the left and one with lots of lighter tones will be
skewed to the right.
This photo is overexposed. The left side (showing the dark tones) of the histogram has almost no
information. There is a spike in the mid-tones and a sudden rise at the far right side of the histogram,
showing the areas of pure white where the photo is overexposed.
2. This photo is underexposed. There is a spike on the far left showing
the dark values present in the photo. On the right side of the
histogram that shows the light tones, there is no information.
This photo has a balance of dark tones and light tones, which is
shown by a well-distributed histogram.
Note
The beauty of a histogram is that the small LCD display
on your camera is not really big enough to give you an
great review of a picture and you can often get home to
find that you’ve over or under exposed an image.
Checking the histogram can tell you this while
you’re in a position to be able to adjust your settings
and take another shot.
Photos and information from this section taken from: http://digital-photography-school.com/understanding-histograms
3. Adjusting exposure using the histogram in Photoshop Elements
To adjust exposure, go to “Enhance” > “Adjust Lighting” > “Levels”
To adjust the levels, drag the
arrows underneath the
histogram until your photo has
a balance of light, middle, and
dark tones.
4. Adjusting Colour Curves
Another important step in editing exposure is using Colour Curves. Go to “Enhance” > “Adjust
Colour” > “Adjust Colour Curves”
5. Converting photos to Black and White
You may wish to convert your
colour photos to black and white to
make your images more
expressive. To do so, click
“Enhance” > “Convert to Black and
White”
6. You can adjust the colour levels to change the emphasis of lighting in your black and
white photo.
7. Adjusting colour saturation
To intensify the colours in your photo go to “Enhance” > “Adjust Colour” > “Adjust
Hue/Saturation”
To adjust specific colours in
your photo select the colour
from the drop down menu and
adjust the levels to your liking.
Saving your photos after editing
When you edit photos save them as TIFF files. If you are using JPEG files and edit without
changing to TIFF, each time you save you are losing detail from your image because it
compresses the file.