SlideShare a Scribd company logo
1 of 13
Place the photo you want to edit into Photoshop.
Select the Channel Mixer option, and increase the amount of blue in the image-
slightly increase the red until; you get the colour balanced to the way you want
it.
Select the ‘Selective Colour’ option, and increase the amount of black in
the image. This creates an old, worn out- vintage sort of effect to the
image.
Select the ‘inversion’ option, and then go to the colour range and
click ‘Skin Tones’. This will remove any ounce of skin tone visible,
making it almost invisible, and easier to edit over.
Still on the ‘Invert’ option, click the colour select button to the right,
and on the image in the open tab, click on it to focus the colour in the
area you want for the background. I chose the red to be near the top
of the image. Reduce the fuzziness slightly to maintain the old vintage,
look.
Open up a new presentation the size of a DPS, and open up the second picture
you want to edit. Take exactly the same steps you took with the other image.
Go to the first tab of the original picture, and select the ‘Gradient Map’
option. The colour of the gradient will depend on the negative colours of the
inversion I had applied before, however you can change the colour of the
gradient in the drop arrow button beside the colour in the small tab that’s
open.
Open the tab with two of the photos on, the original photo should have
changed to the gradient image you edited before.
Do the same steps for the second image.
Put the text over the image selection the ‘T’ button. Lower the opacity to (I
lowered it to 39% but you can do it to any amount that suits you) make it more
transparent.
Go to the ‘Colour Picker’ and select the colour you want the text to be.
Select another font (Ming Imperial) and flip the text to make it
vertical, selecting the flip text button beside the font selection box.
Lower the opacity slightly.

More Related Content

What's hot

Contact sheet for cd digipack
Contact sheet for cd digipackContact sheet for cd digipack
Contact sheet for cd digipackgeolaumcl
 
Annatation 3
Annatation 3Annatation 3
Annatation 3Leh98
 
Tutorial photoshop
Tutorial photoshopTutorial photoshop
Tutorial photoshopnova arianty
 
Non Destructive Color Correction
Non Destructive Color CorrectionNon Destructive Color Correction
Non Destructive Color CorrectionAnn Elliott
 
Adobe photoshop lesson by citra
Adobe photoshop lesson by citraAdobe photoshop lesson by citra
Adobe photoshop lesson by citraCitra Yoenita Mhd
 
Marie christine joyce buena
Marie christine joyce buenaMarie christine joyce buena
Marie christine joyce buenaVirgilio Galemba
 
Colored Pencil Sketch Tutorial
Colored Pencil Sketch TutorialColored Pencil Sketch Tutorial
Colored Pencil Sketch TutorialMaryam
 
Photoshop
PhotoshopPhotoshop
Photoshopmopish
 
How to Create Simple Manipulation Using Lighting Effects
How to Create Simple Manipulation Using Lighting EffectsHow to Create Simple Manipulation Using Lighting Effects
How to Create Simple Manipulation Using Lighting EffectsKinga Howard
 
Photoshop Tutorial Displacement Maps
Photoshop Tutorial  Displacement MapsPhotoshop Tutorial  Displacement Maps
Photoshop Tutorial Displacement Mapstvawler
 
Rainbow Lighting Effect
Rainbow Lighting EffectRainbow Lighting Effect
Rainbow Lighting Effectjessmaiava
 
Cut out image with hard hair mask
Cut out image with hard hair maskCut out image with hard hair mask
Cut out image with hard hair masksujon hasan
 
Information Communication Technology
Information Communication TechnologyInformation Communication Technology
Information Communication TechnologyNancyDaro
 
GIMP Tutorial by Juan Rodrigo Badiola
GIMP Tutorial by Juan Rodrigo BadiolaGIMP Tutorial by Juan Rodrigo Badiola
GIMP Tutorial by Juan Rodrigo BadiolaJuanRodrigoBadiola
 
The 8 Basic Steps Elements 6
The 8 Basic Steps  Elements 6The 8 Basic Steps  Elements 6
The 8 Basic Steps Elements 6joelk
 
Black and white tutorial
Black and white tutorialBlack and white tutorial
Black and white tutorialtranpham143
 

What's hot (18)

Contact sheet for cd digipack
Contact sheet for cd digipackContact sheet for cd digipack
Contact sheet for cd digipack
 
Annatation 3
Annatation 3Annatation 3
Annatation 3
 
Tutorial photoshop
Tutorial photoshopTutorial photoshop
Tutorial photoshop
 
Non Destructive Color Correction
Non Destructive Color CorrectionNon Destructive Color Correction
Non Destructive Color Correction
 
Adobe photoshop lesson by citra
Adobe photoshop lesson by citraAdobe photoshop lesson by citra
Adobe photoshop lesson by citra
 
Marie christine joyce buena
Marie christine joyce buenaMarie christine joyce buena
Marie christine joyce buena
 
Colored Pencil Sketch Tutorial
Colored Pencil Sketch TutorialColored Pencil Sketch Tutorial
Colored Pencil Sketch Tutorial
 
Realistic Fog
Realistic FogRealistic Fog
Realistic Fog
 
Photoshop
PhotoshopPhotoshop
Photoshop
 
How to Create Simple Manipulation Using Lighting Effects
How to Create Simple Manipulation Using Lighting EffectsHow to Create Simple Manipulation Using Lighting Effects
How to Create Simple Manipulation Using Lighting Effects
 
Photoshop Tutorial Displacement Maps
Photoshop Tutorial  Displacement MapsPhotoshop Tutorial  Displacement Maps
Photoshop Tutorial Displacement Maps
 
Rainbow Lighting Effect
Rainbow Lighting EffectRainbow Lighting Effect
Rainbow Lighting Effect
 
Cut out image with hard hair mask
Cut out image with hard hair maskCut out image with hard hair mask
Cut out image with hard hair mask
 
Nyssa angela bayos
Nyssa angela bayosNyssa angela bayos
Nyssa angela bayos
 
Information Communication Technology
Information Communication TechnologyInformation Communication Technology
Information Communication Technology
 
GIMP Tutorial by Juan Rodrigo Badiola
GIMP Tutorial by Juan Rodrigo BadiolaGIMP Tutorial by Juan Rodrigo Badiola
GIMP Tutorial by Juan Rodrigo Badiola
 
The 8 Basic Steps Elements 6
The 8 Basic Steps  Elements 6The 8 Basic Steps  Elements 6
The 8 Basic Steps Elements 6
 
Black and white tutorial
Black and white tutorialBlack and white tutorial
Black and white tutorial
 

Viewers also liked (14)

40 stories
40 stories40 stories
40 stories
 
Time management
Time management Time management
Time management
 
Dados de Mercado Abril 2016
Dados de Mercado Abril 2016Dados de Mercado Abril 2016
Dados de Mercado Abril 2016
 
Questionnaire answers
Questionnaire answersQuestionnaire answers
Questionnaire answers
 
Contents Page Screenshot process
Contents Page Screenshot processContents Page Screenshot process
Contents Page Screenshot process
 
Entrega # 3 study habits vocabulary
Entrega # 3 study habits vocabularyEntrega # 3 study habits vocabulary
Entrega # 3 study habits vocabulary
 
Audience Research: Survey Analysis
Audience Research: Survey AnalysisAudience Research: Survey Analysis
Audience Research: Survey Analysis
 
JALALINEZHAD- RESUME - 931020
JALALINEZHAD- RESUME - 931020JALALINEZHAD- RESUME - 931020
JALALINEZHAD- RESUME - 931020
 
Step by step help
Step by step helpStep by step help
Step by step help
 
Front Page Screenshot process
Front Page Screenshot processFront Page Screenshot process
Front Page Screenshot process
 
Q6. What have you learnt about technologies from the process of constructing ...
Q6. What have you learnt about technologies from the process of constructing ...Q6. What have you learnt about technologies from the process of constructing ...
Q6. What have you learnt about technologies from the process of constructing ...
 
video games
video gamesvideo games
video games
 
Dados de Mercado Fevereiro 2016
Dados de Mercado Fevereiro 2016Dados de Mercado Fevereiro 2016
Dados de Mercado Fevereiro 2016
 
Ресторан Старый Город
Ресторан Старый ГородРесторан Старый Город
Ресторан Старый Город
 

Similar to Screenshot analysis

Ms Paint Tutorial
Ms Paint TutorialMs Paint Tutorial
Ms Paint TutorialZ M
 
How to Make a Gradient in Photoshop
How to Make a Gradient in PhotoshopHow to Make a Gradient in Photoshop
How to Make a Gradient in PhotoshopZenith Clipping
 
Create a Photo Collage in Photoshop.pdf
Create a Photo Collage in Photoshop.pdfCreate a Photo Collage in Photoshop.pdf
Create a Photo Collage in Photoshop.pdfPinkverge
 
Photo retouching tips and tricks in photoshop
Photo retouching tips and tricks in photoshopPhoto retouching tips and tricks in photoshop
Photo retouching tips and tricks in photoshopRemon Mia
 
Photoshop booklet 2016
Photoshop booklet 2016Photoshop booklet 2016
Photoshop booklet 2016missfcmay
 
adobephotoshop_frerking
adobephotoshop_frerking adobephotoshop_frerking
adobephotoshop_frerking Agung Yuwono
 
Photoshop editing booklet 2019
Photoshop editing booklet 2019Photoshop editing booklet 2019
Photoshop editing booklet 2019missfcmay
 
Realistic cast shadow effect in photoshop
Realistic cast shadow effect in photoshopRealistic cast shadow effect in photoshop
Realistic cast shadow effect in photoshopmicah20
 
Unit 5 Task 4 Tutorial
Unit 5 Task 4 TutorialUnit 5 Task 4 Tutorial
Unit 5 Task 4 Tutorialilyaboj
 
Unit 5 Task 4 Create an Ad
Unit 5 Task 4 Create an AdUnit 5 Task 4 Create an Ad
Unit 5 Task 4 Create an Adilyaboj
 
Microsoft Paint
Microsoft PaintMicrosoft Paint
Microsoft PaintS C
 
The 8 Basic Steps Elements 6
The 8 Basic Steps  Elements 6The 8 Basic Steps  Elements 6
The 8 Basic Steps Elements 6joelk
 
Photoshop dimensional looking sphere
Photoshop dimensional looking spherePhotoshop dimensional looking sphere
Photoshop dimensional looking sphereJerry Arnold
 
Computer Techniques In Photoshop 1
Computer Techniques In Photoshop 1Computer Techniques In Photoshop 1
Computer Techniques In Photoshop 1moncrief
 
How To Replace Color In Photoshop
How To Replace Color In PhotoshopHow To Replace Color In Photoshop
How To Replace Color In PhotoshopZenith Clipping
 
Photoshop How To
Photoshop How ToPhotoshop How To
Photoshop How Towaltersart1
 

Similar to Screenshot analysis (20)

Ms Paint Tutorial
Ms Paint TutorialMs Paint Tutorial
Ms Paint Tutorial
 
How to Make a Gradient in Photoshop
How to Make a Gradient in PhotoshopHow to Make a Gradient in Photoshop
How to Make a Gradient in Photoshop
 
Create a Photo Collage in Photoshop.pdf
Create a Photo Collage in Photoshop.pdfCreate a Photo Collage in Photoshop.pdf
Create a Photo Collage in Photoshop.pdf
 
Photo retouching tips and tricks in photoshop
Photo retouching tips and tricks in photoshopPhoto retouching tips and tricks in photoshop
Photo retouching tips and tricks in photoshop
 
Photoshop booklet 2016
Photoshop booklet 2016Photoshop booklet 2016
Photoshop booklet 2016
 
adobephotoshop_frerking
adobephotoshop_frerking adobephotoshop_frerking
adobephotoshop_frerking
 
Photoshop editing booklet 2019
Photoshop editing booklet 2019Photoshop editing booklet 2019
Photoshop editing booklet 2019
 
Realistic cast shadow effect in photoshop
Realistic cast shadow effect in photoshopRealistic cast shadow effect in photoshop
Realistic cast shadow effect in photoshop
 
Unit 5 Task 4 Tutorial
Unit 5 Task 4 TutorialUnit 5 Task 4 Tutorial
Unit 5 Task 4 Tutorial
 
Unit 5 Task 4 Create an Ad
Unit 5 Task 4 Create an AdUnit 5 Task 4 Create an Ad
Unit 5 Task 4 Create an Ad
 
Evidence
EvidenceEvidence
Evidence
 
Microsoft Paint
Microsoft PaintMicrosoft Paint
Microsoft Paint
 
The 8 Basic Steps Elements 6
The 8 Basic Steps  Elements 6The 8 Basic Steps  Elements 6
The 8 Basic Steps Elements 6
 
Photoshop dimensional looking sphere
Photoshop dimensional looking spherePhotoshop dimensional looking sphere
Photoshop dimensional looking sphere
 
Writing de materials11
Writing de materials11Writing de materials11
Writing de materials11
 
Computer Techniques In Photoshop 1
Computer Techniques In Photoshop 1Computer Techniques In Photoshop 1
Computer Techniques In Photoshop 1
 
Changing eye colour in photoshop
 Changing eye colour in photoshop Changing eye colour in photoshop
Changing eye colour in photoshop
 
Cours photoshop
Cours photoshopCours photoshop
Cours photoshop
 
How To Replace Color In Photoshop
How To Replace Color In PhotoshopHow To Replace Color In Photoshop
How To Replace Color In Photoshop
 
Photoshop How To
Photoshop How ToPhotoshop How To
Photoshop How To
 

More from JenniferEse

Twobros stepbystep
Twobros stepbystepTwobros stepbystep
Twobros stepbystepJenniferEse
 
Magazine stepbystep
Magazine stepbystepMagazine stepbystep
Magazine stepbystepJenniferEse
 
Titling step by step
Titling step by stepTitling step by step
Titling step by stepJenniferEse
 
Director case study
Director case studyDirector case study
Director case studyJenniferEse
 
Zodiac Film Poster Analysis
Zodiac Film Poster AnalysisZodiac Film Poster Analysis
Zodiac Film Poster AnalysisJenniferEse
 
Q6. What have you learnt about technologies from the process of constructing ...
Q6. What have you learnt about technologies from the process of constructing ...Q6. What have you learnt about technologies from the process of constructing ...
Q6. What have you learnt about technologies from the process of constructing ...JenniferEse
 
DPS Screenshot Process
DPS Screenshot ProcessDPS Screenshot Process
DPS Screenshot ProcessJenniferEse
 
Stepbystepfrontcover
StepbystepfrontcoverStepbystepfrontcover
StepbystepfrontcoverJenniferEse
 
Screenshot analysis
Screenshot analysisScreenshot analysis
Screenshot analysisJenniferEse
 
Record Label Case Study- Rough Trade
Record Label Case Study- Rough TradeRecord Label Case Study- Rough Trade
Record Label Case Study- Rough TradeJenniferEse
 

More from JenniferEse (10)

Twobros stepbystep
Twobros stepbystepTwobros stepbystep
Twobros stepbystep
 
Magazine stepbystep
Magazine stepbystepMagazine stepbystep
Magazine stepbystep
 
Titling step by step
Titling step by stepTitling step by step
Titling step by step
 
Director case study
Director case studyDirector case study
Director case study
 
Zodiac Film Poster Analysis
Zodiac Film Poster AnalysisZodiac Film Poster Analysis
Zodiac Film Poster Analysis
 
Q6. What have you learnt about technologies from the process of constructing ...
Q6. What have you learnt about technologies from the process of constructing ...Q6. What have you learnt about technologies from the process of constructing ...
Q6. What have you learnt about technologies from the process of constructing ...
 
DPS Screenshot Process
DPS Screenshot ProcessDPS Screenshot Process
DPS Screenshot Process
 
Stepbystepfrontcover
StepbystepfrontcoverStepbystepfrontcover
Stepbystepfrontcover
 
Screenshot analysis
Screenshot analysisScreenshot analysis
Screenshot analysis
 
Record Label Case Study- Rough Trade
Record Label Case Study- Rough TradeRecord Label Case Study- Rough Trade
Record Label Case Study- Rough Trade
 

Screenshot analysis

  • 1. Place the photo you want to edit into Photoshop.
  • 2. Select the Channel Mixer option, and increase the amount of blue in the image- slightly increase the red until; you get the colour balanced to the way you want it.
  • 3. Select the ‘Selective Colour’ option, and increase the amount of black in the image. This creates an old, worn out- vintage sort of effect to the image.
  • 4. Select the ‘inversion’ option, and then go to the colour range and click ‘Skin Tones’. This will remove any ounce of skin tone visible, making it almost invisible, and easier to edit over.
  • 5. Still on the ‘Invert’ option, click the colour select button to the right, and on the image in the open tab, click on it to focus the colour in the area you want for the background. I chose the red to be near the top of the image. Reduce the fuzziness slightly to maintain the old vintage, look.
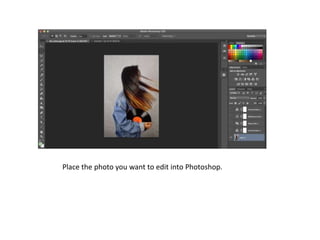
  • 6. Open up a new presentation the size of a DPS, and open up the second picture you want to edit. Take exactly the same steps you took with the other image.
  • 7.
  • 8. Go to the first tab of the original picture, and select the ‘Gradient Map’ option. The colour of the gradient will depend on the negative colours of the inversion I had applied before, however you can change the colour of the gradient in the drop arrow button beside the colour in the small tab that’s open.
  • 9. Open the tab with two of the photos on, the original photo should have changed to the gradient image you edited before.
  • 10. Do the same steps for the second image.
  • 11. Put the text over the image selection the ‘T’ button. Lower the opacity to (I lowered it to 39% but you can do it to any amount that suits you) make it more transparent.
  • 12. Go to the ‘Colour Picker’ and select the colour you want the text to be.
  • 13. Select another font (Ming Imperial) and flip the text to make it vertical, selecting the flip text button beside the font selection box. Lower the opacity slightly.