
Recommended
More Related Content
What's hot
What's hot (19)
Viewers also liked
Viewers also liked (13)
Similar to FPS Server OS Installation Procedures
Similar to FPS Server OS Installation Procedures (20)
FPS Server OS Installation Procedures
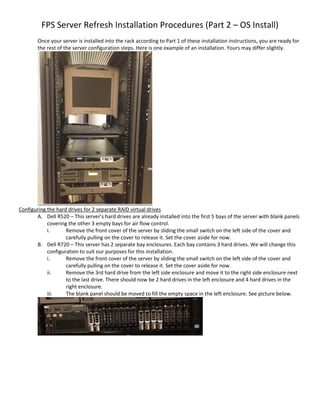
- 1. FPS Server Refresh Installation Procedures (Part 2 – OS Install) Once your server is installed into the rack according to Part 1 of these installation instructions, you are ready for the rest of the server configuration steps. Here is one example of an installation. Yours may differ slightly. Configuring the hard drives for 2 separate RAID virtual drives A. Dell R520 – This server’s hard drives are already installed into the first 5 bays of the server with blank panels covering the other 3 empty bays for air flow control. i. Remove the front cover of the server by sliding the small switch on the left side of the cover and carefully pulling on the cover to release it. Set the cover aside for now. B. Dell R720 – This server has 2 separate bay enclosures. Each bay contains 3 hard drives. We will change this configuration to suit our purposes for this installation. i. Remove the front cover of the server by sliding the small switch on the left side of the cover and carefully pulling on the cover to release it. Set the cover aside for now. ii. Remove the 3rd hard drive from the left side enclosure and move it to the right side enclosure next to the last drive. There should now be 2 hard drives in the left enclosure and 4 hard drives in the right enclosure. iii. The blank panel should be moved to fill the empty space in the left enclosure. See picture below.
- 2. 1. Press the power button on the front of the server that you are working on. You should see “Initializing firmware interfaces…”, “Initialization complete.”, “Configuring Memory…”, “Done”, “Initializing iDRAC…”, “Done”. The Dell logo will appear and then a list of details about the server configuration. 2. When you see the detail that reads “PowerEdge Expandable RAID Controller BIOS, Copyright © 2000-2013 Broadcom Corporation All rights reserved. Press Ctrl-R to enter Configuration Menu”, Press CTRL and R on the keyboard at the same time. 3. If you are in the RAID Configuration Menu, it should look something like this. 4. Press F2 – Operations. 5. Delete the existing disk group and confirm Yes by using the arrow key to highlight Yes and press Enter.
- 3. 6. Now that the drives are un-configured, you can arrow up to the PERC H710 and Press F2. Create new VD, Enter, Enter. To create the first “Disk Group: 0”, choose RAID Level: RAID-1 by arrowing down and choose the first 2 hard drives (Disk ID 00:01:00 and 00:01:01) by pressing the space bar for each disk to be part of the Virtual Drive 0. Tab over to the basic settings and type the VD Name: “OS”. Leave all of the other defaults alone. Tab to OK and press enter to get back to main screen. 7. Arrow up to the PERC H710 Mini again to create the second “Disk Group: 1”. Press F2. Create new VD, Enter. Enter. Choose RAID Level: RAID-5 and choose the remaining hard drives (Disk ID 00:01:02, 00:01:03 and 00:01:04) to be part of the Virtual Drive 1. Tab over to the basic settings and type the VD Name: “Data”. Leave all of the other defaults alone. Tab to OK and press enter to get back to main screen. 8. Hit ESC and arrow over to OK and press enter. Press CTRL- ALT-Del to reboot the server. 9. Now you must wait for the RAID Virtual Disks that you just created to build. This may take several hours depending on the size of the disk. The lights on the front of the drives will be blinking continually during the build process. 10. Once the Virtual Disks have finished building, the drive lights on the front of each drive will have stopped blinking continually. Eject the DVD drive tray and power down the server.
- 4. 11. Insert the DVD image into the DVD drive. 12. Press the power button to turn on the server. 13. Press any key to boot from CD or DVD. 14. The first thing you may see is the Logo as shown below. (Imaged removed) 15. The first screen that you will need to make a choice is shown below. (Imaged removed) 16. Select “Run the Deployment Wizard to install a new Operating System” by clicking on it with the mouse. (Imaged removed) 17. Select the first option to install Windows 2008 R2 for New Server. This task will install the OS after deleting all data from the server. Click Next. (Imaged removed) 18. Enter the correct server name by pressing the Shift key to enter your region’s server’s name. 19. Type WORKGROUP into the workgroup section. Do not attempt to add to the domain during this step since you will do this at a later step. Click Next. 20. Choose the correct time zone for your server location. Click Next. (Imaged removed) 21. Enter the password that is approved for all servers. This is the password and must match exactly with the installation DVD. You will be provided this password by telephone. Please do not send passwords over email or text messaging. (Imaged removed) 22. All qualified IT from other regions should be able to support any servers. In case of emergency, all servers should have the same password. 23. The installation will continue and automatically reboot the server 4 times before completing. 24. You must leave the DVD in the drive during the entire process. (Imaged removed) 25. After the installation has completed, the CTRL-ALT-DEL screen will appear. Login with the approved password that you were provided. 26. You should see the desktop with BGInfo appearing on the right side of the screen. (Imaged removed) 27. The following screens should appear after each login to the server. (Imaged removed) End of Part 2 – OS Install