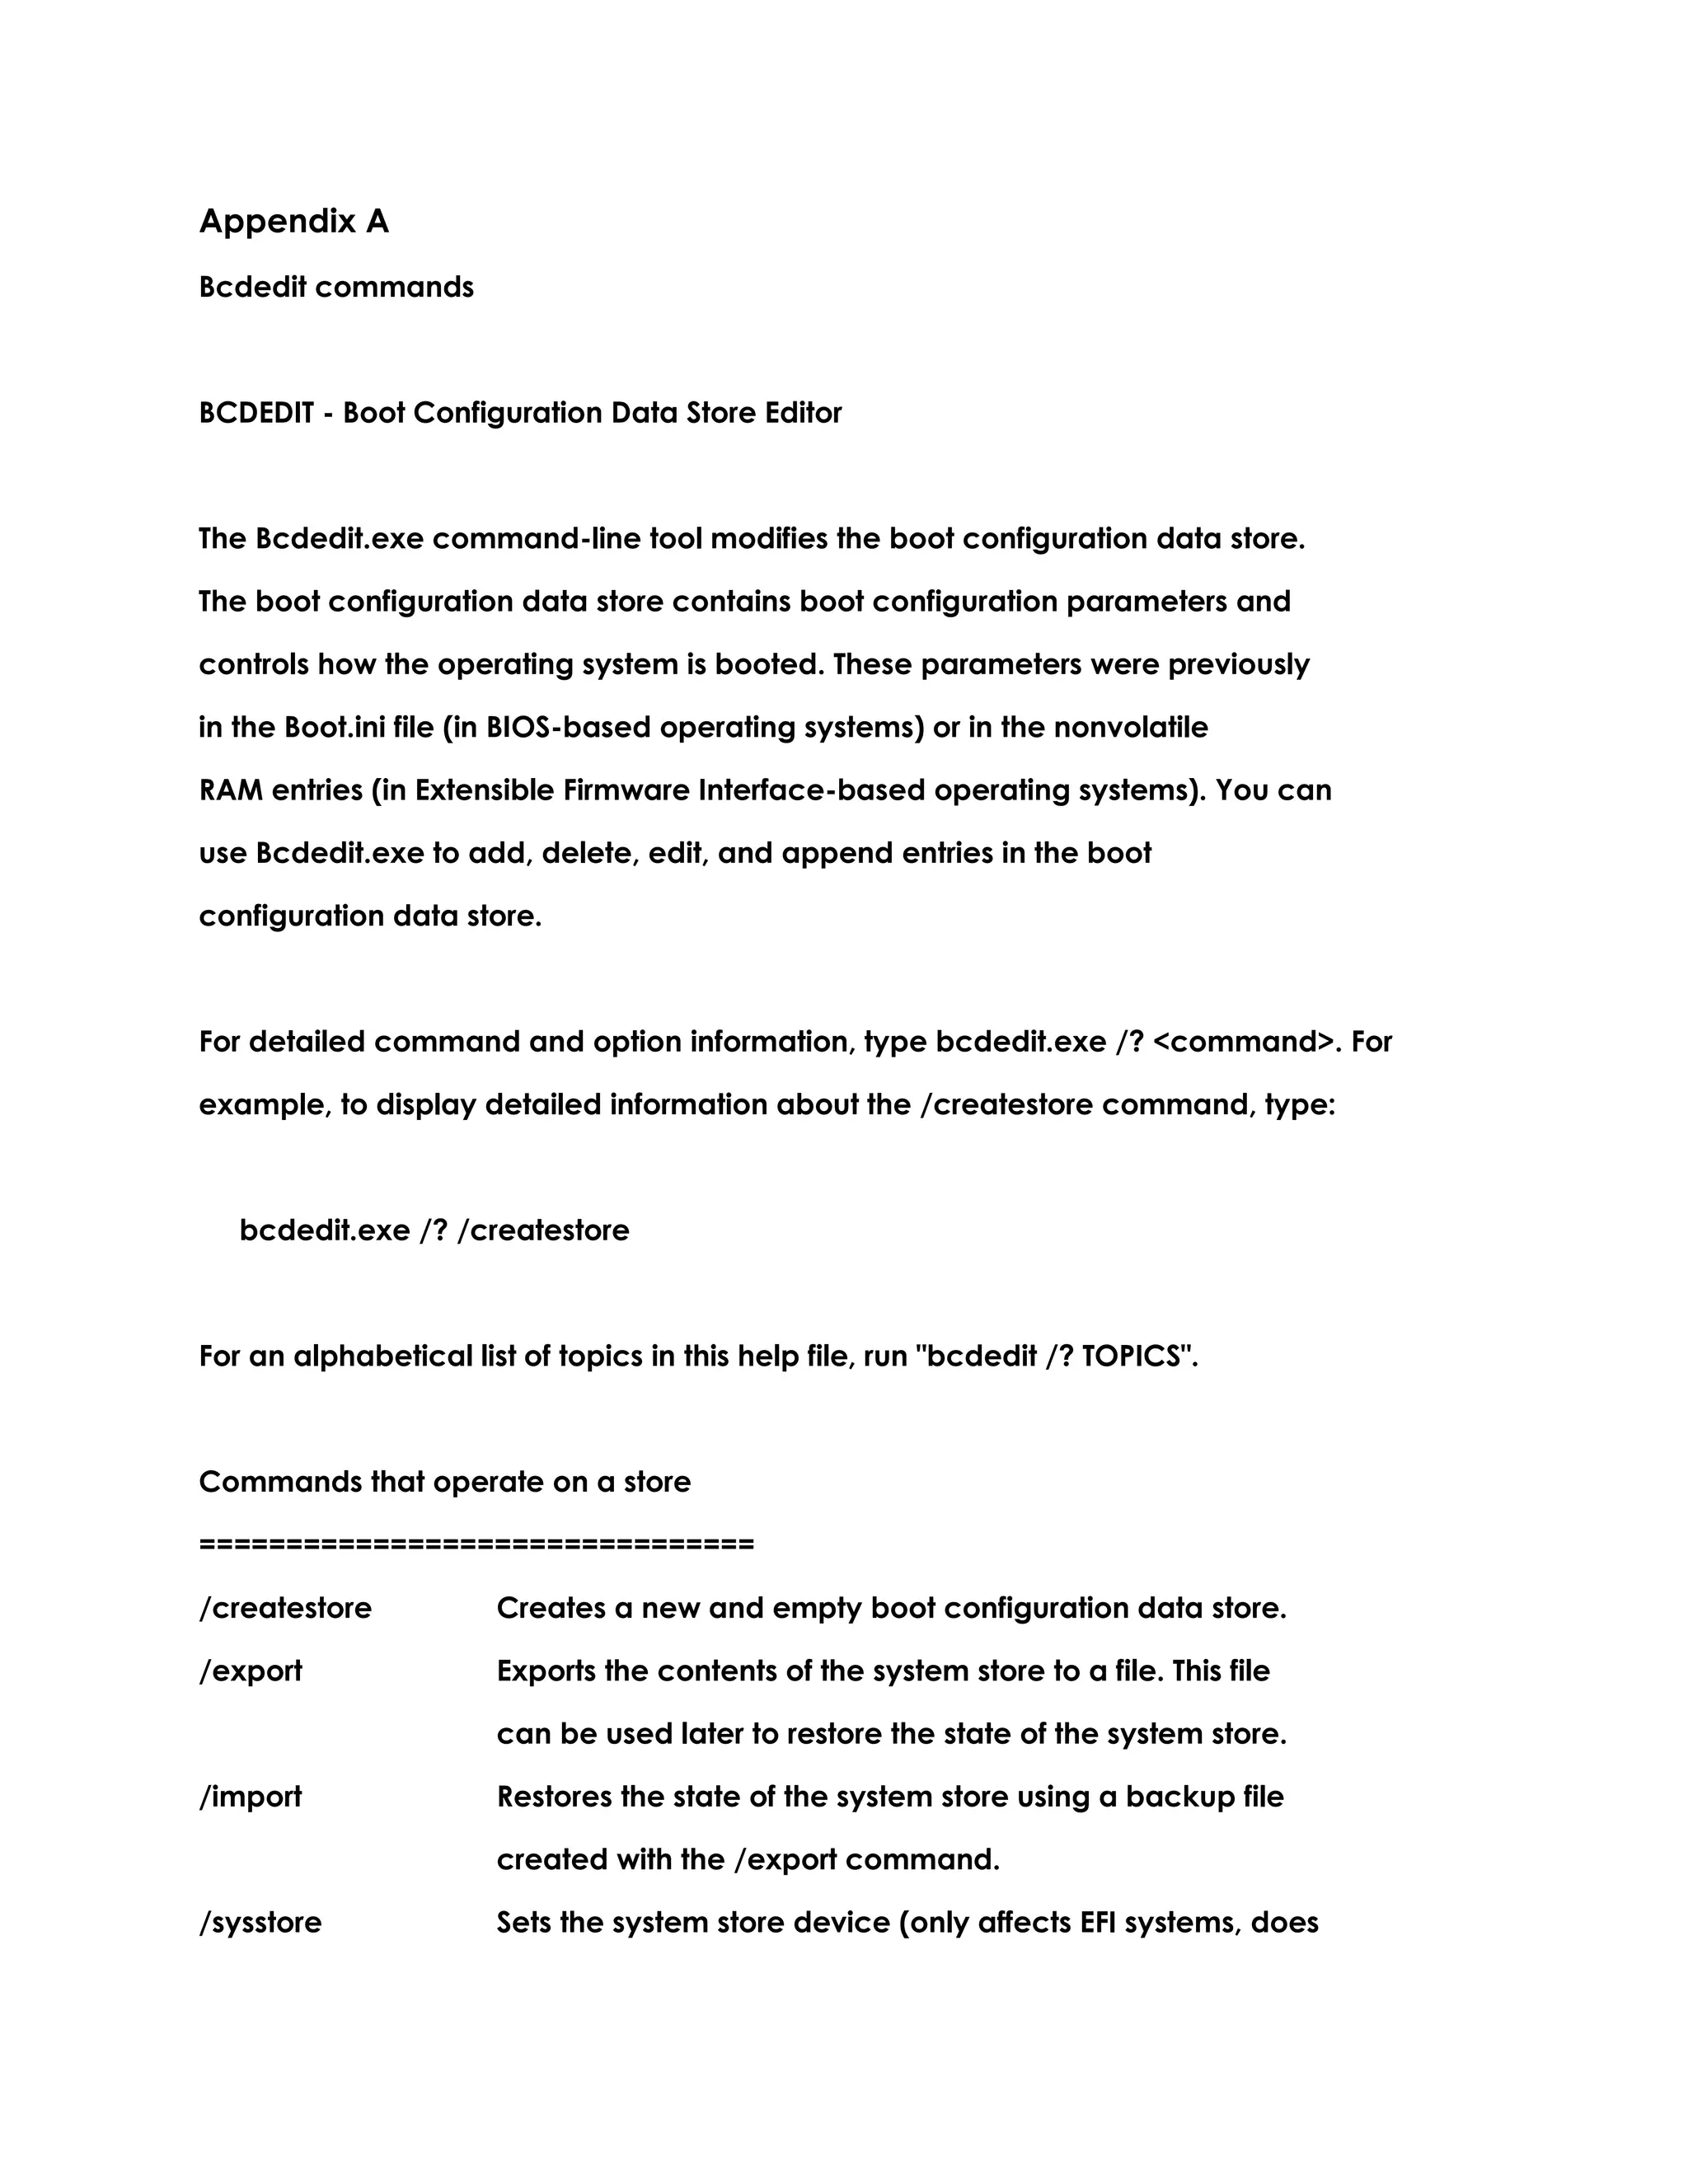
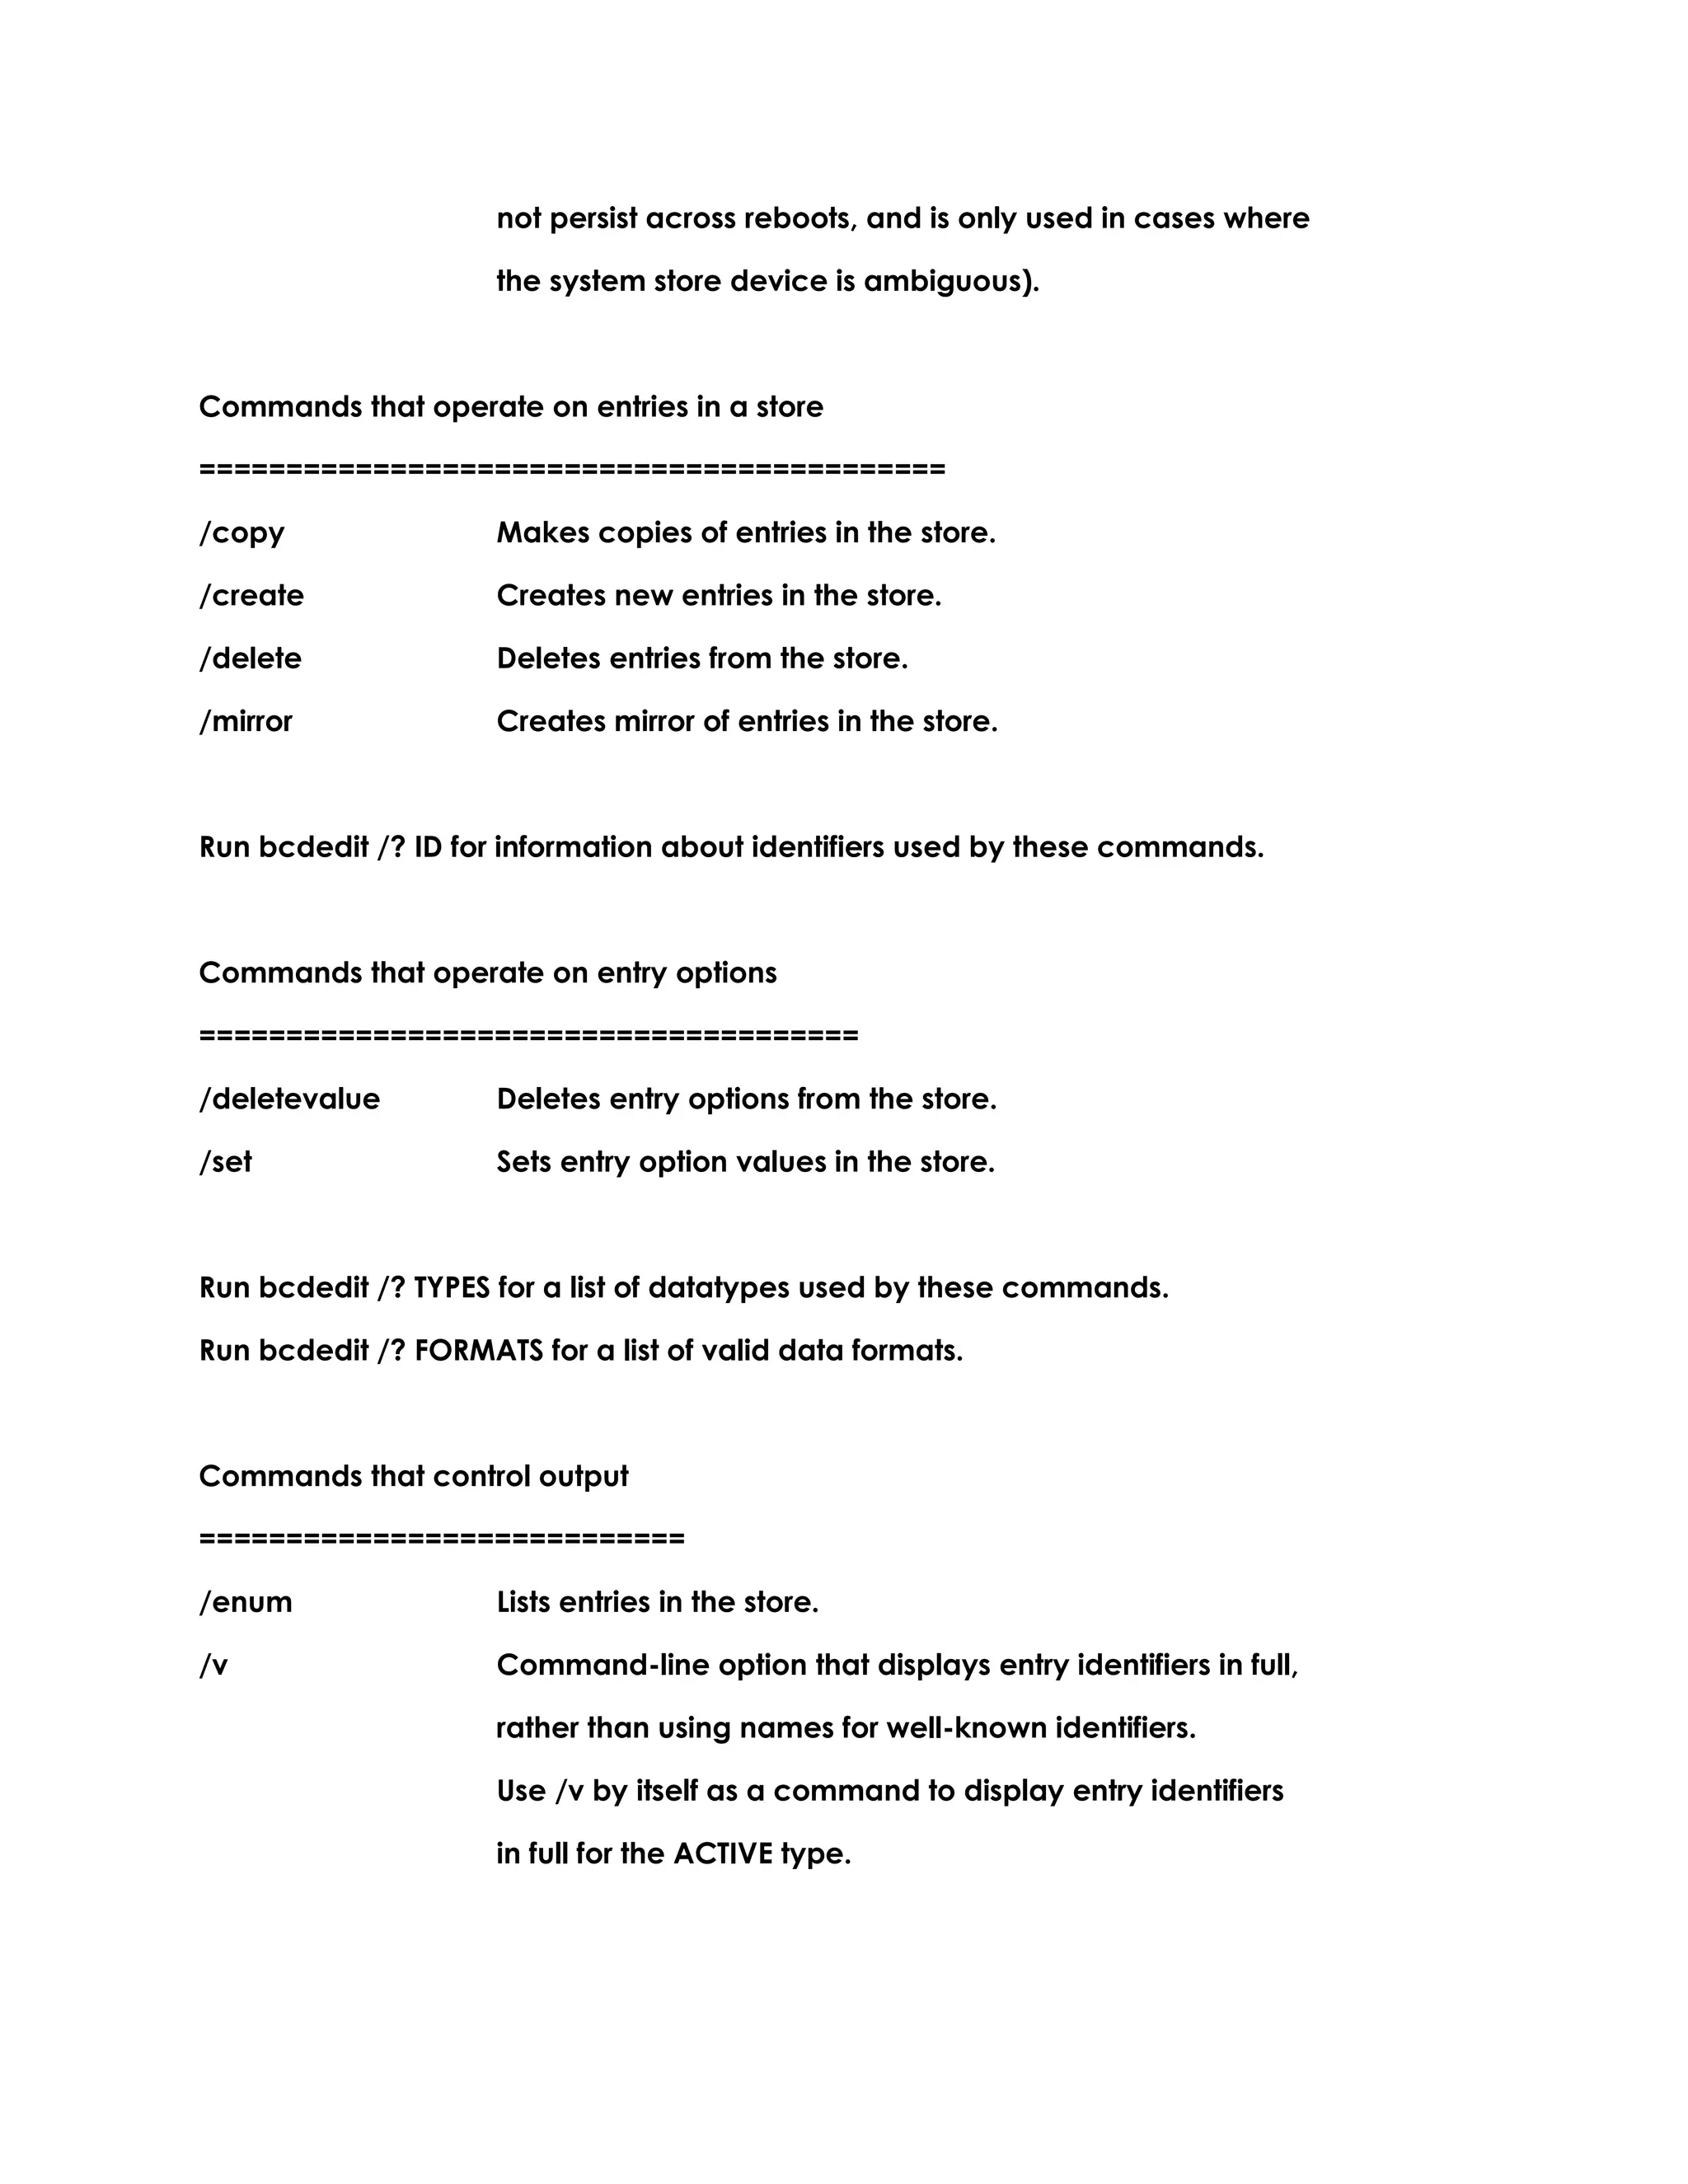
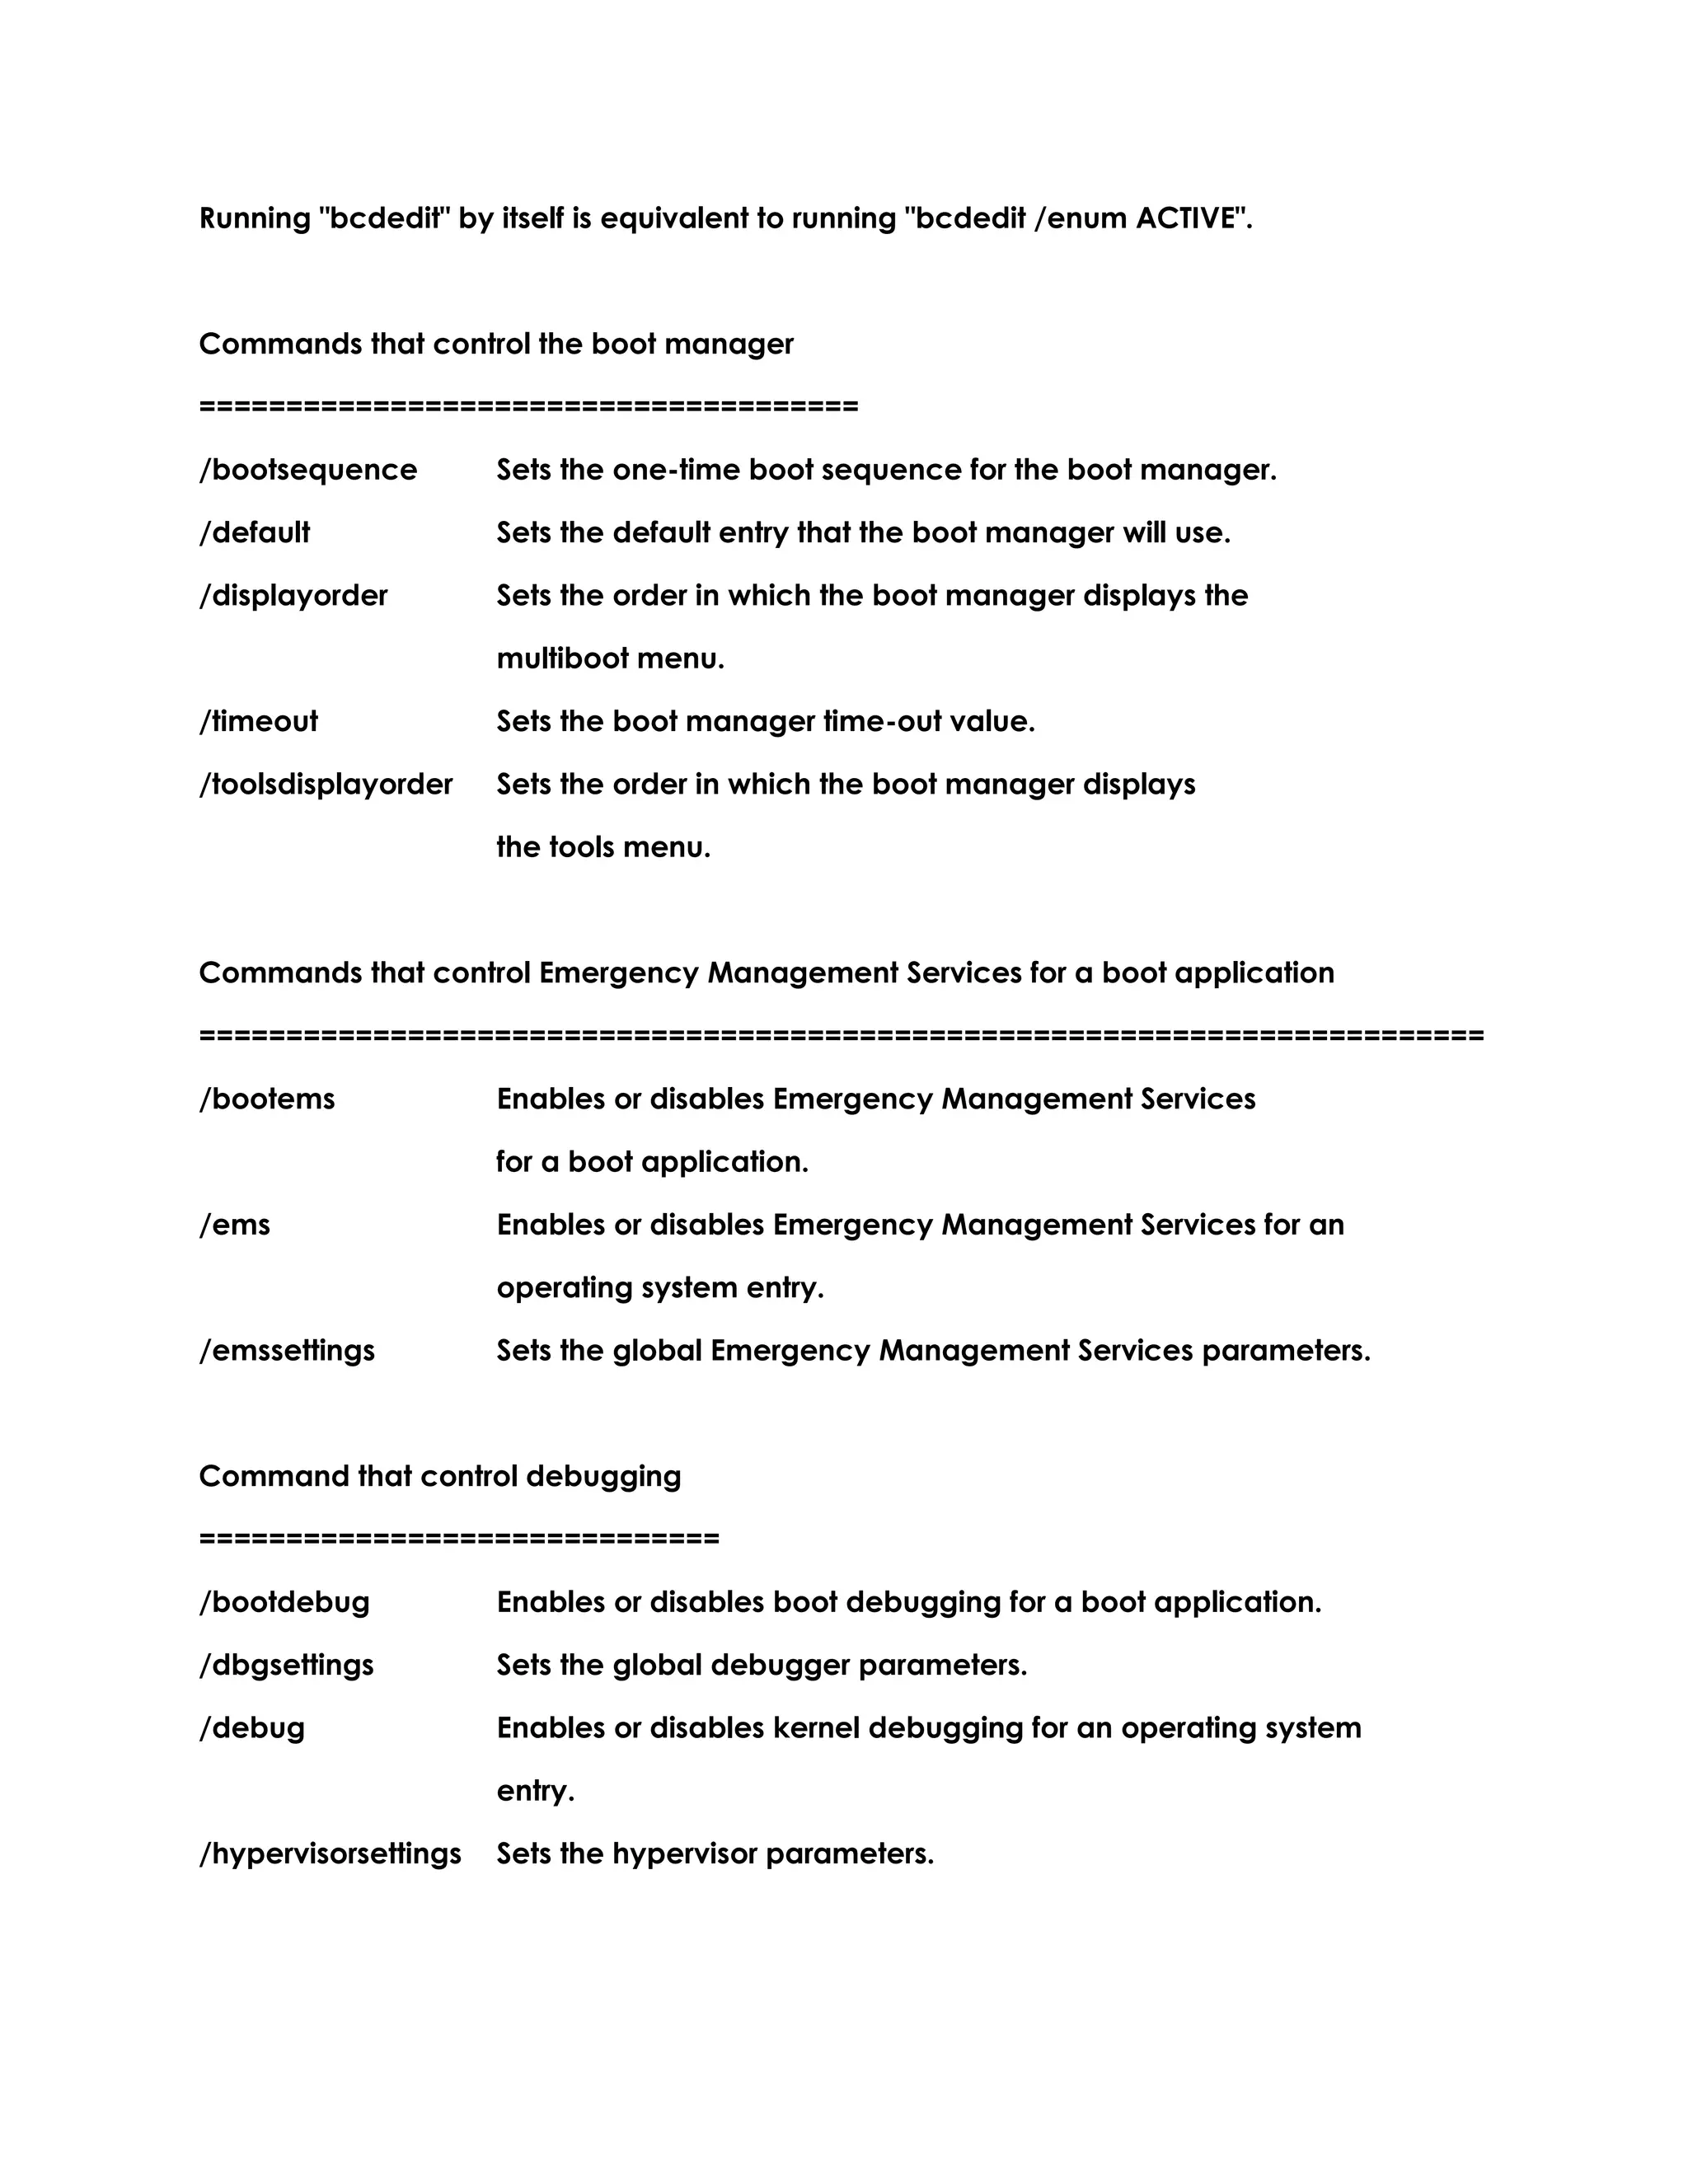
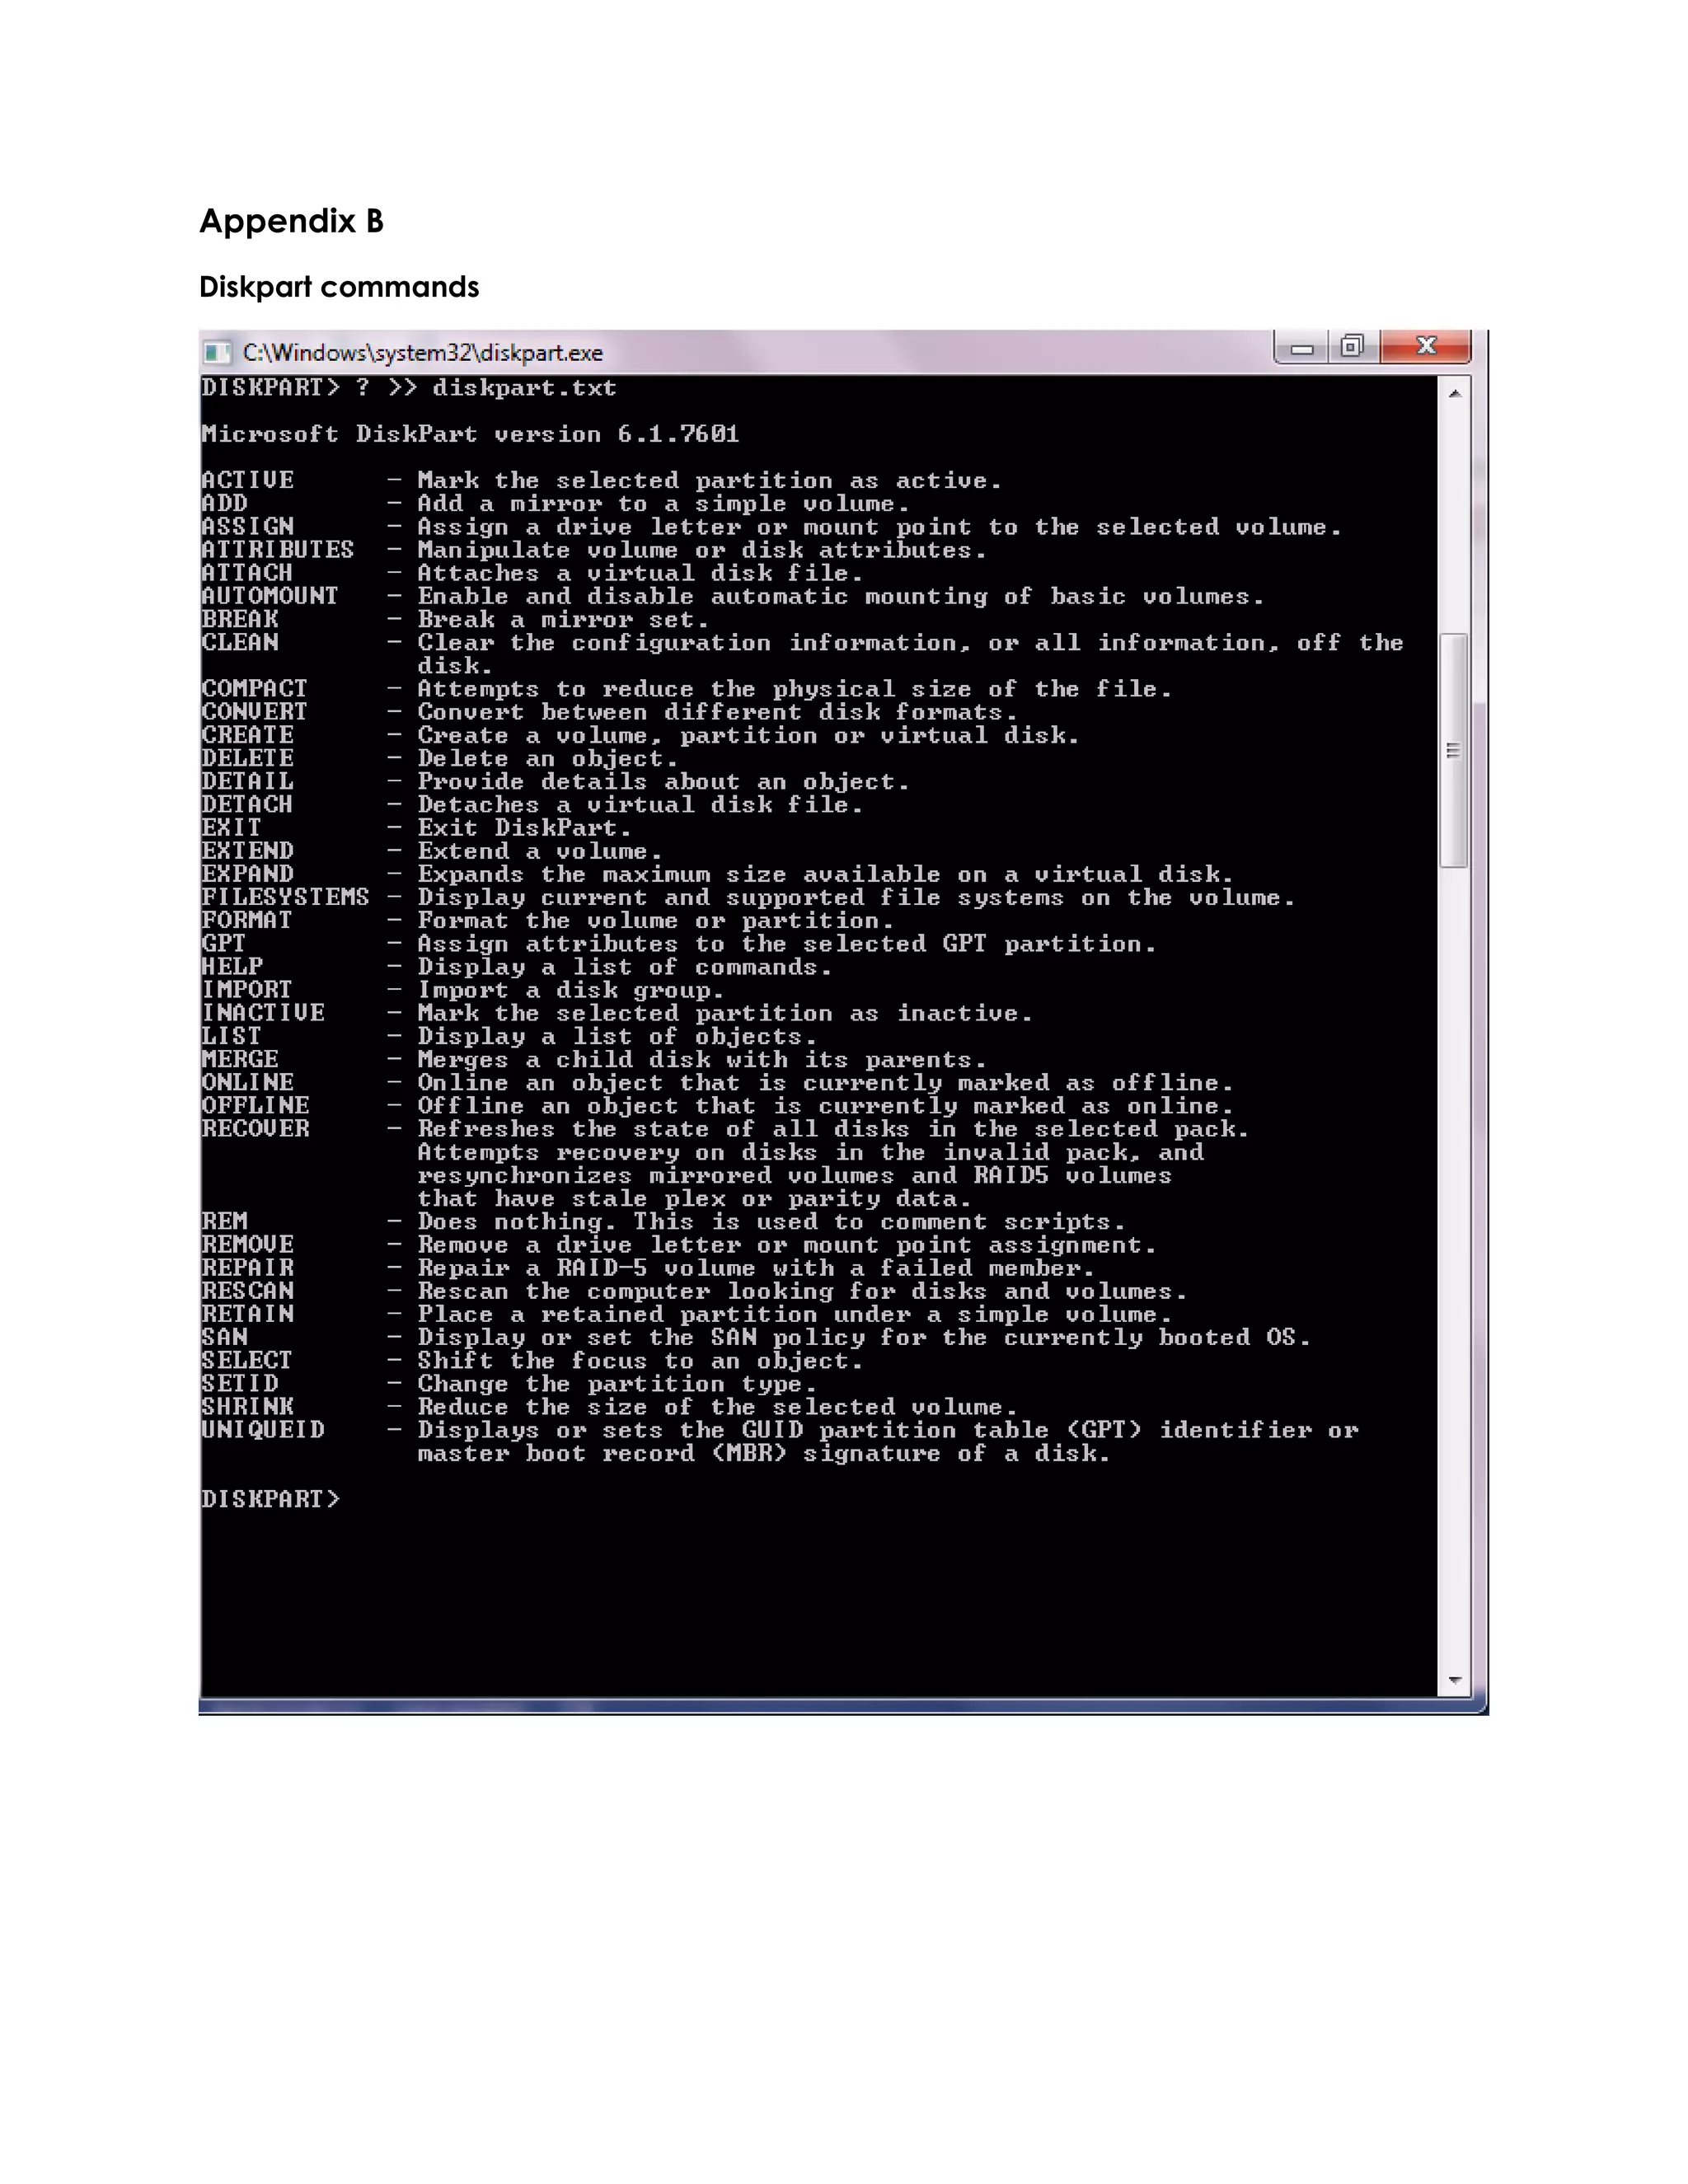
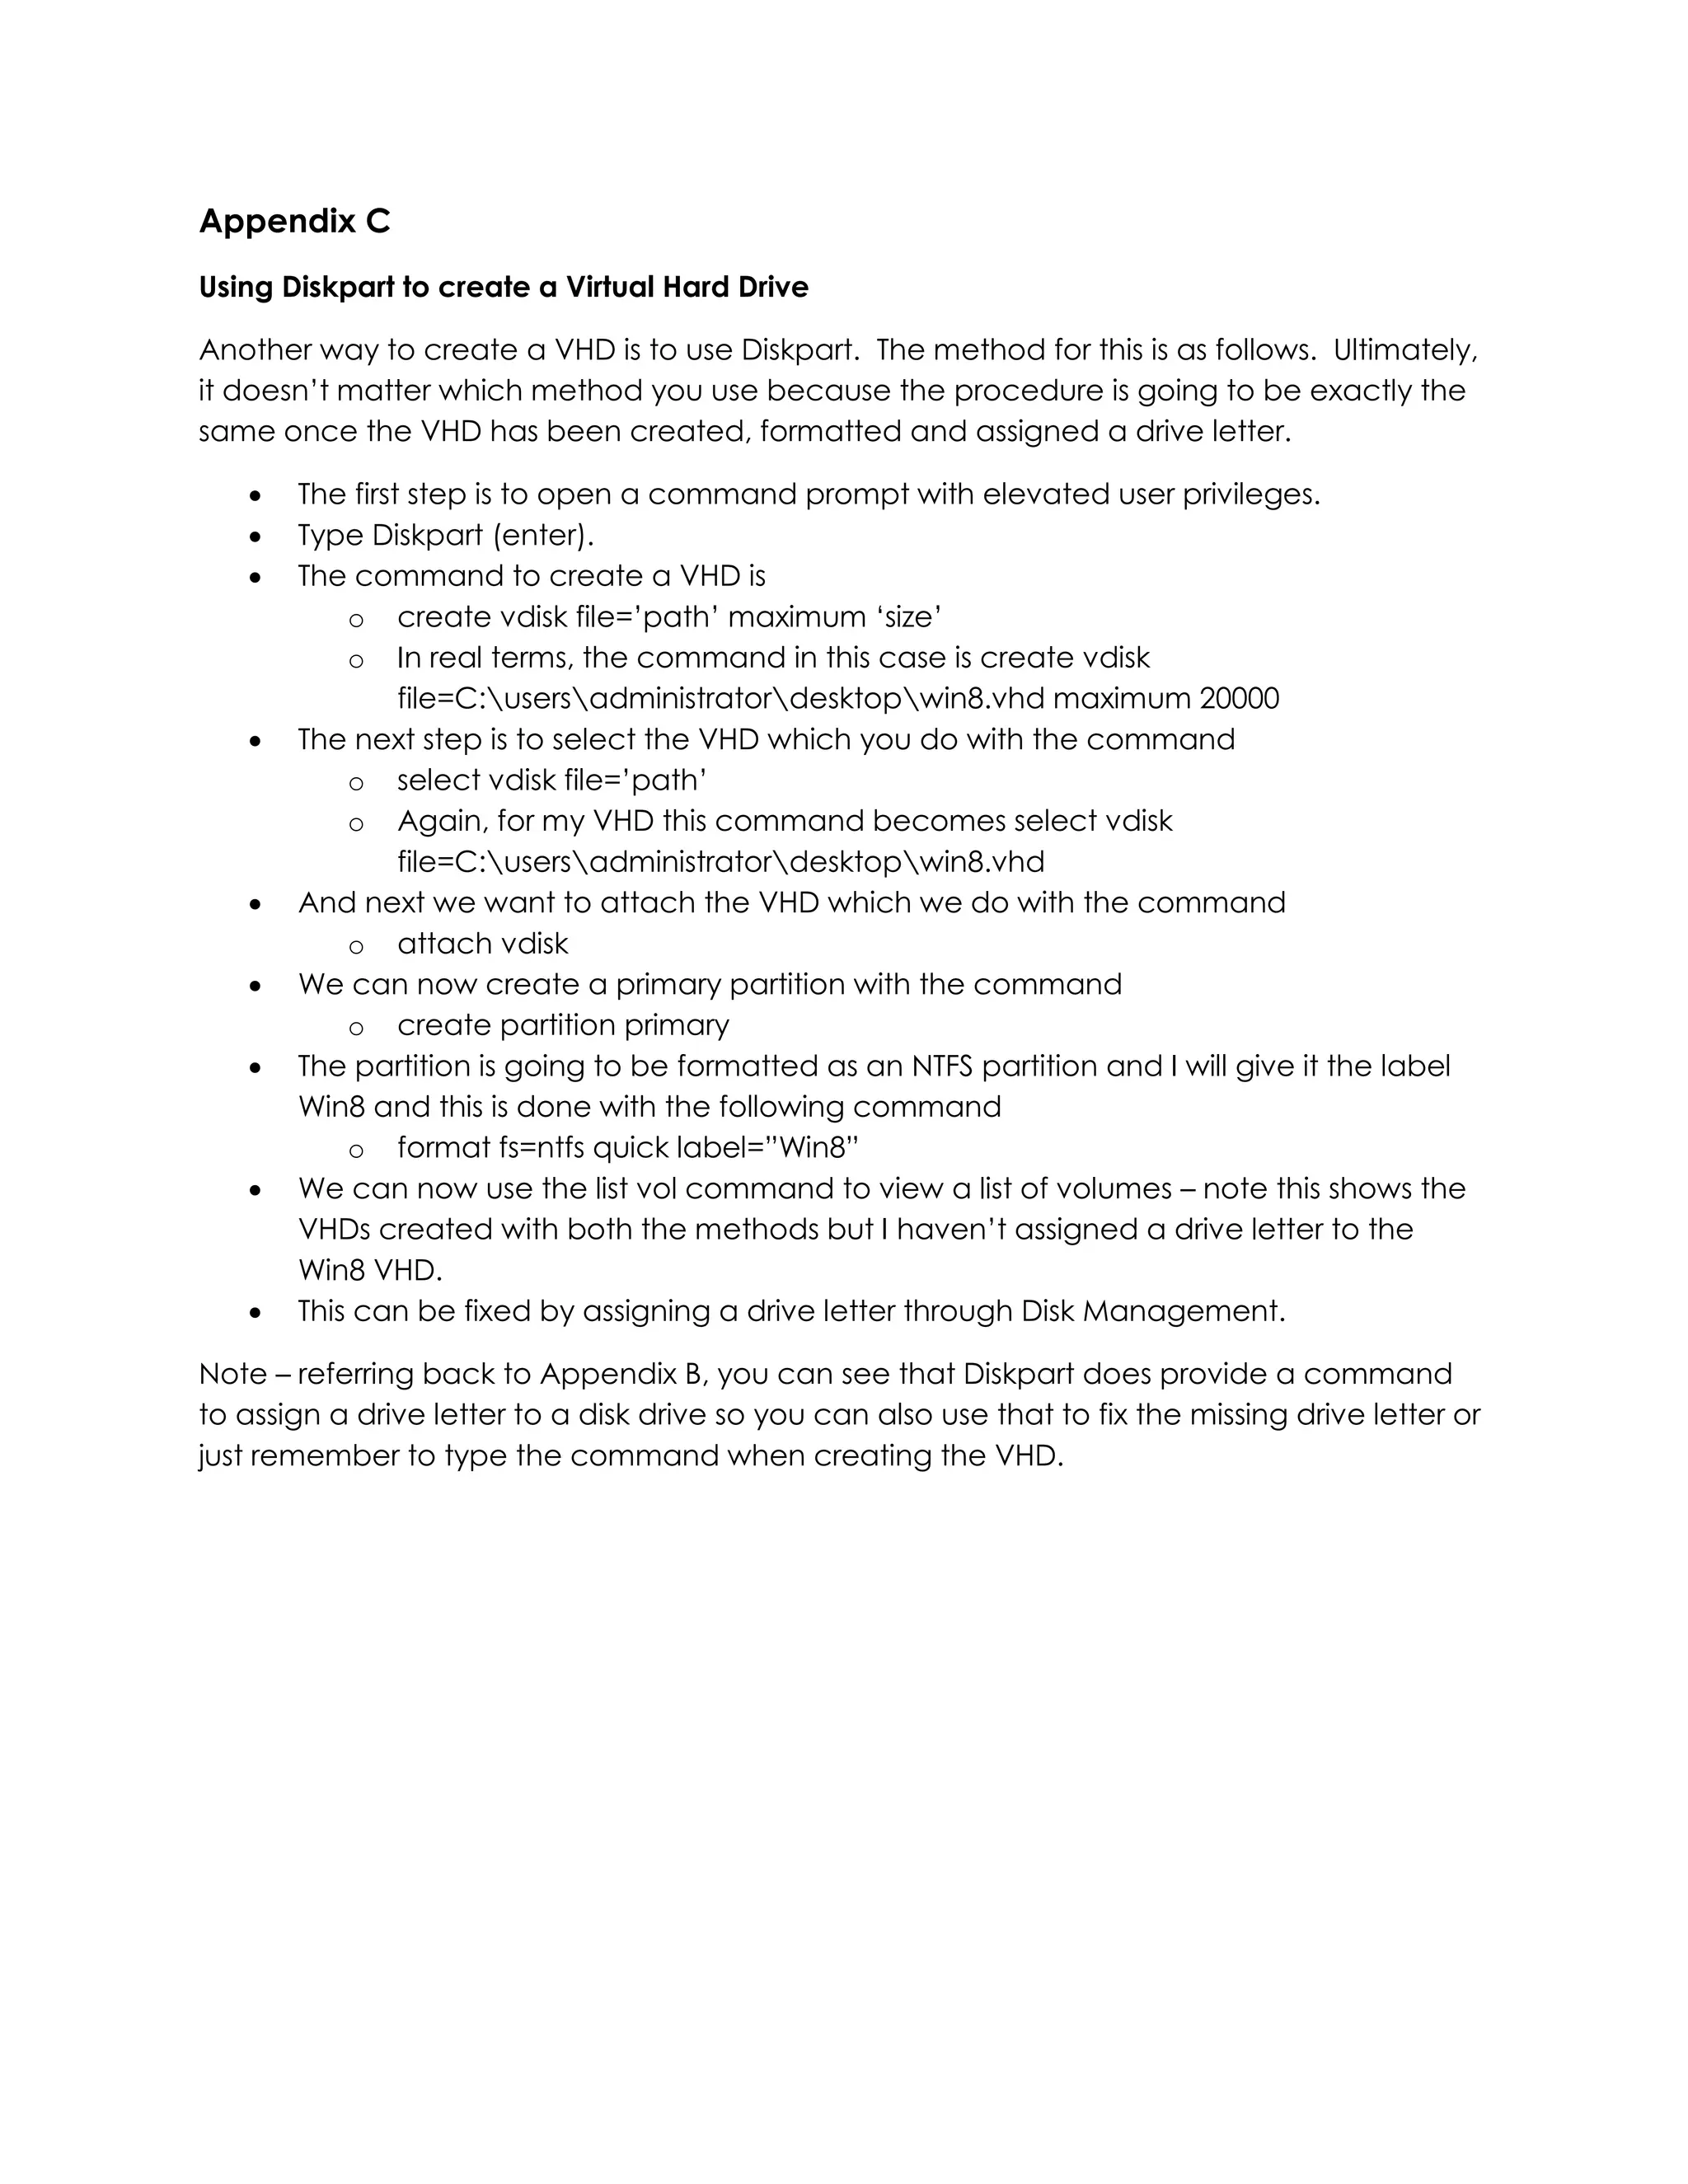
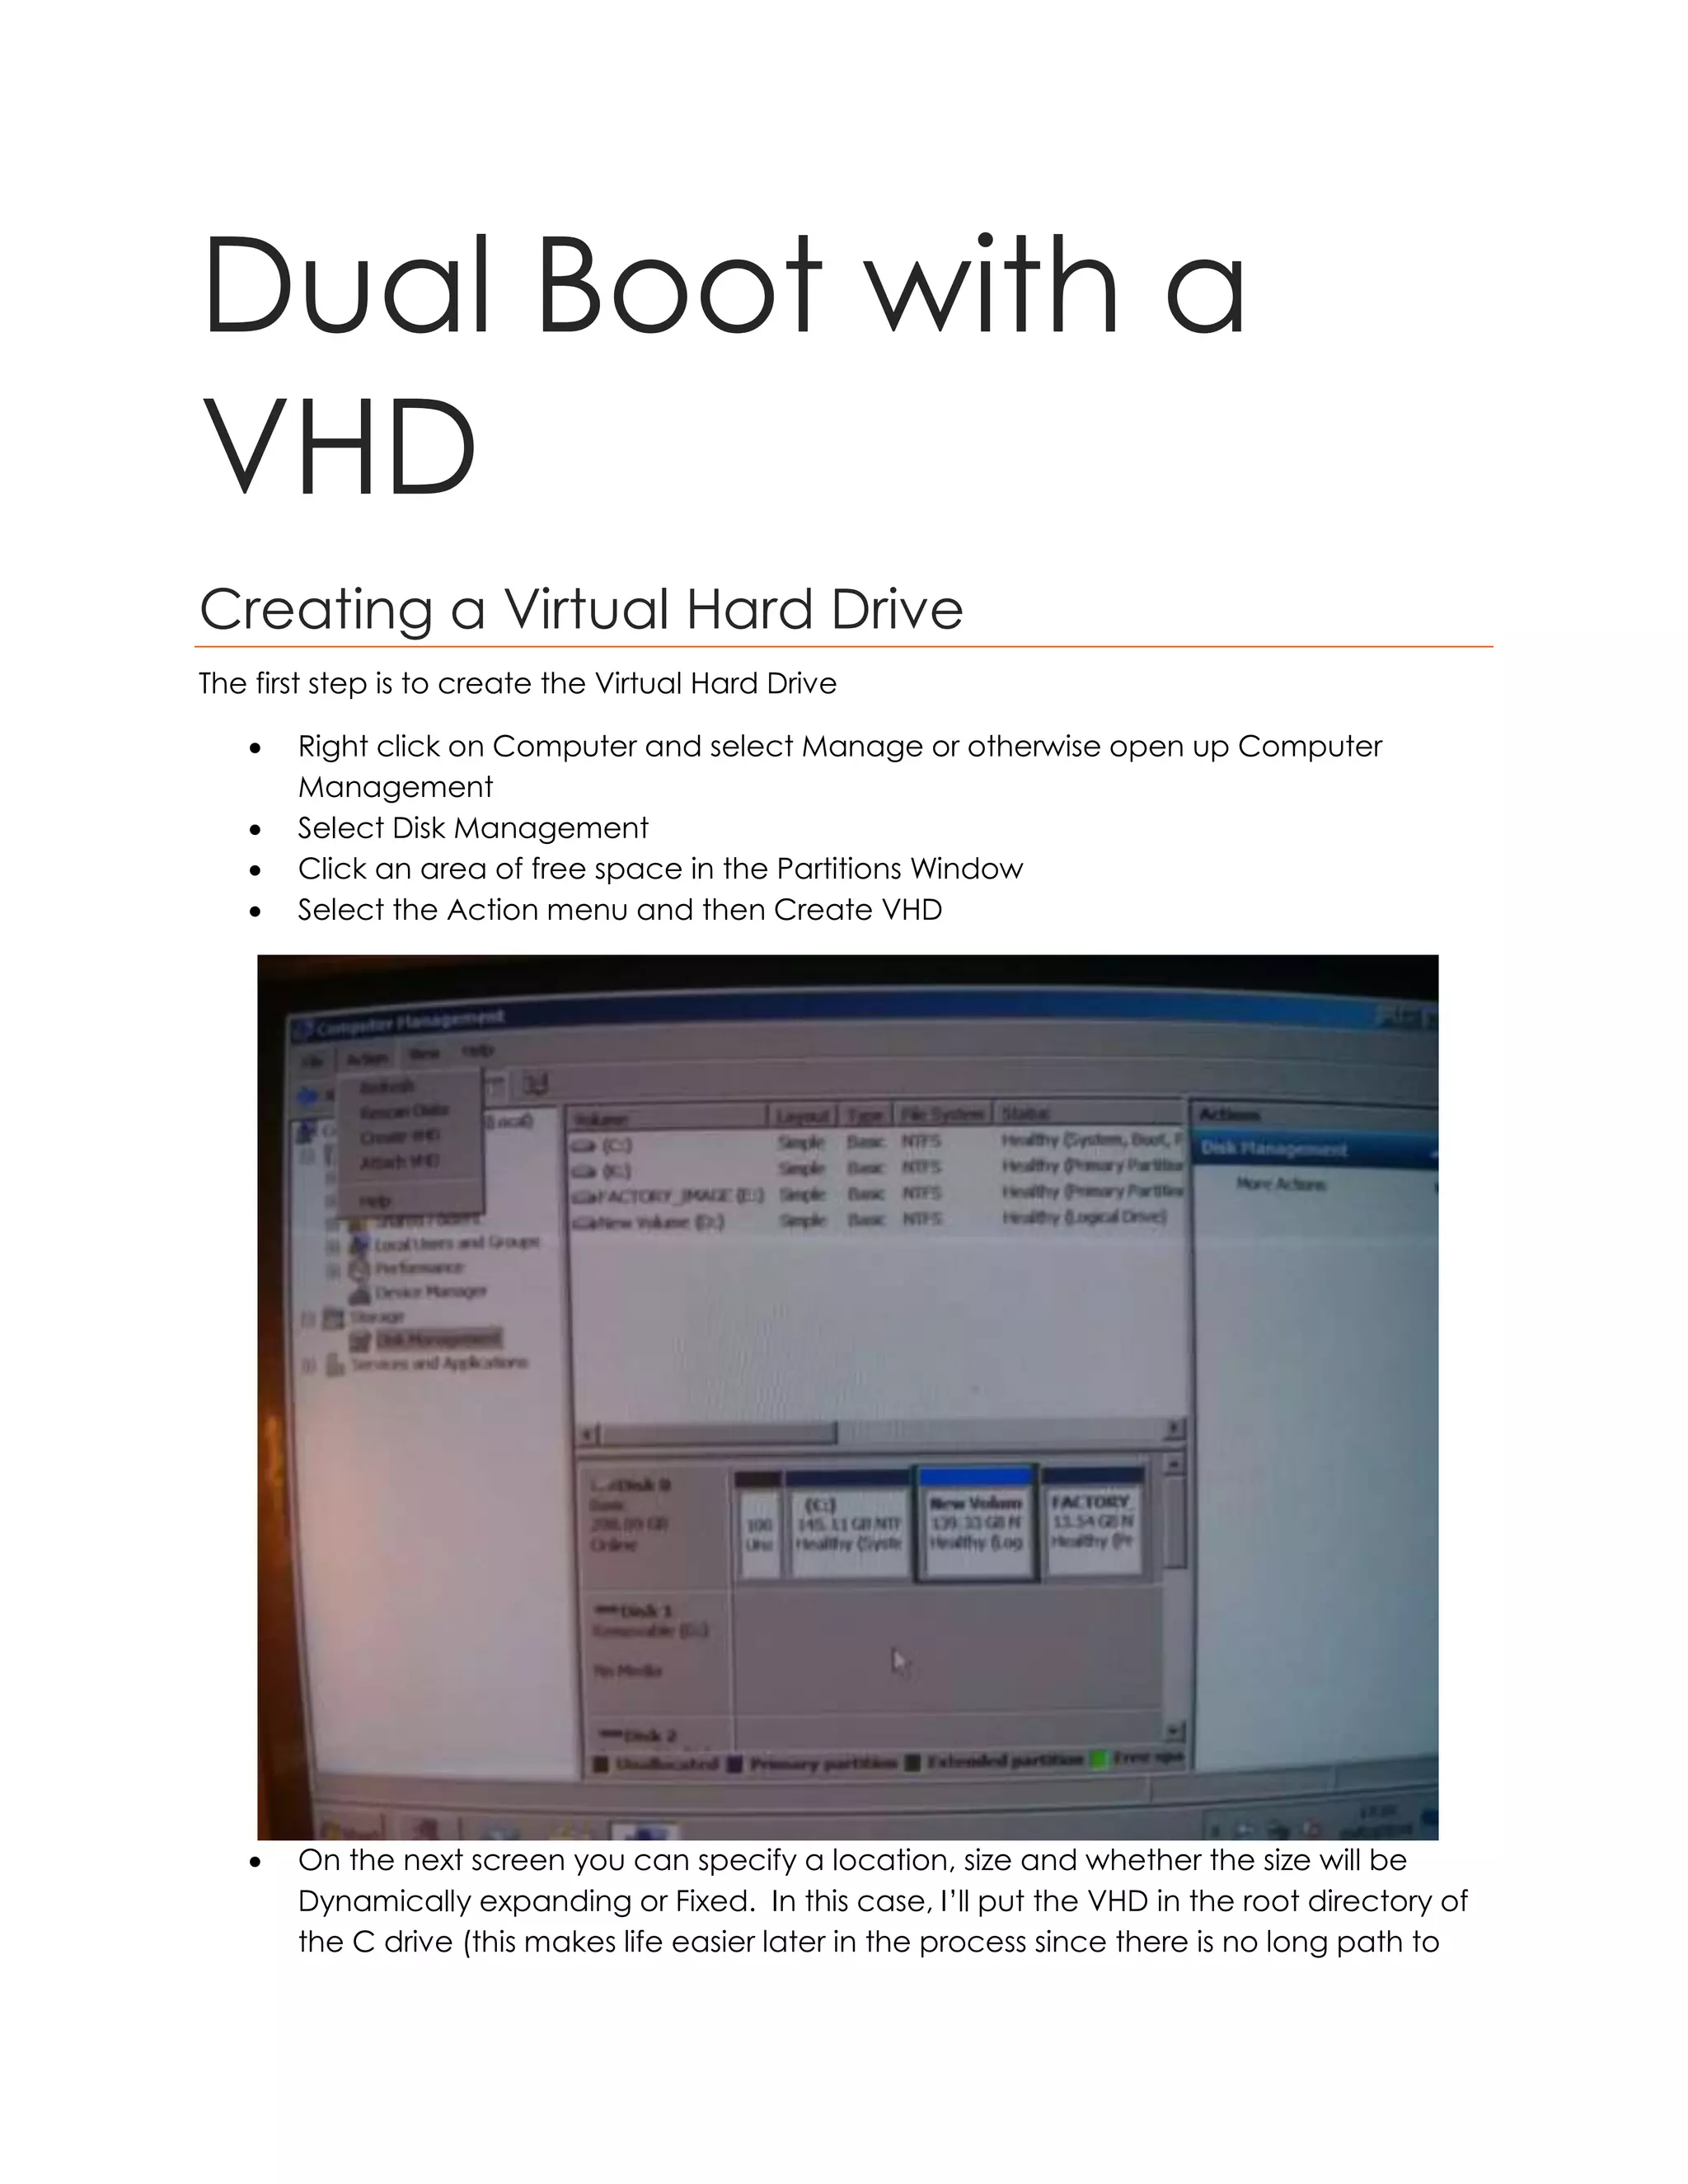
SlideShare a Scribd company logo
1 of 18
Dual Boot With a
VHD
Virtual Hard Drive
Pip 3/20/14 Troubleshooting an OS
Table of Contents
Creating a Virtual Hard Drive .................................................................................................... 3
Installing the Operating System ................................................................................................ 5
Making the Virtual Hard Drive Bootable .................................................................................. 7
Troubleshooting the Process ..................................................................................................... 8
References ........................................................................................................................................12
Appendices
Appendix A - bcdedit commands.................................................................................................13
Appendix B - Diskpart commands .................................................................................................16
Appendix A – Using Diskpart to Create a Virtual Hard Drive ......................................................17
Dual Boot with a
VHD
Creating a Virtual Hard Drive
The first step is to create the Virtual Hard Drive
 Right click on Computer and select Manage or otherwise open up Computer
Management
 Select Disk Management
 Click an area of free space in the Partitions Window
 Select the Action menu and then Create VHD
 On the next screen you can specify a location, size and whether the size will be
Dynamically expanding or Fixed. In this case, I’ll put the VHD in the root directory of
the C drive (this makes life easier later in the process since there is no long path to
type), give it a size of 20 GB and accept the recommended Fixed Size setting. You
will also be prompted for a name for the VHD and I have called this one Win8
because I’ll be using it to install Windows 8.
 Next we need to initialize the disk. In the partition window you will see that the disk is
there and is shown as not initialized. NB – it can take a while for the VHD to be
created (the message Creating Virtual Disk is displayed at the bottom of the Disk
Management console until the process has been completed – there is a progress
bar displayed as well). Right click it and select Initialize Disk
 Leave MBR selected as the partition style and click OK.
 Next, right click on the partition (which will be shown as unallocated) and select
New Simple Volume.
 Leave the default size setting and click Next.
 Select the required drive letter and click Next.
 Format the partition as an NTFS volume and click Next. For my purposes, I don’t
intend to install an operating system which requires a FAT partition.
 Click Finish
Installing the Operating System
To do this, we need a couple of things – we need to have Windows Automated Installation
Kit installed and we need a Windows 8 installation DVD.
We need to copy the installation file from the DVD and put it into the same folder as the
VHD.
The file itself is called install.wim and it is in the sources folder of the installation DVD.
Next, click Start and All Programs and navigate down to the Microsoft Windows AIK folder.
From there click Deployment Tools Command Prompt (right click and run as administrator).
Type the command
o imagex /info c:install.wim
You might recall that with Windows 7 and also Windows 8, the various editions of the
operating system are usually all contained in a single installation DVD and when you run the
installation, the appropriate edition is installed.
What we’ve done with the imagex command above is to list these editions. If you scroll up
to the top of the output in the command window you will see Available Image Choices.
Image Index 1 is the Professional edition, 2 is core N. This DVD only has the two editions.
In this case I will be installing the first version, that is, the Professional edition. You should look
through these and ensure you know the index number for the edition you want to install.
The next step is to copy the image files into the VHD which we do with the command
o imagex /apply c: install.wim 1 l:
NB – l (for Lima) is the letter assigned to the Virtual Drive labelled Win8 so you will need to
change this if you have assigned a different letter. The 1 here is the selected edition so this
may also need to be changed.
Making the Virtual Hard Drive Bootable
The final step is to make sure that we can boot from the Virtual Hard Drive. This is done from
the same Windows AIK console opened earlier.
The first step in doing this is to use bcdedit and we do this with the command
 bcdedit /copy {current} /d “Windows 8.1 Professional VHD”
This provides us with a unique identifier.
 This has to be copied over to the Virtual Hard Drive with the following command:
o bcdedit /set {4ed990b4-639c-11e3-835c-a164008a71da} device
vhd=[c:]Win8.vhd
 The final step to make the vhd bootable is to ensure the entry in the bcdedit file
which we do with the command
o bcdedit /set {4ed990b4-639c-11e3-835c-a164008a71da} osdevice
vhd=[c:]Win8.vhd
 And one final command to allow the vhd to be moved between devices
o bcdedit /set {4ed990b4-639c-11e3-835c-a164008a71da} detecthal on
Troubleshooting the Process
Throughout this process, I did encounter quite a few problems, some of which were easily
fixed and others less so but I thought it might be worth mentioning a few of these whether a
solution was found or not. These might also provide a few pointers for further investigation.
First up, I used two different methods for creating a virtual hard drive. The first was the
method described above and the second was using Diskpart. The Diskpart method is
described in Appendix C.
I found with this method that there was no drive letter assigned to the VHD. I’m not sure if
this was my fault or if the instructions I was following were incorrect, but that was easily fixed
by using Disk Management to assign a letter.
A slightly more serious issue was the operating system. My first attempts were made on a
machine running Windows Server 2008 R2 on which I had tried to install Windows 8 in the
VHD. Everything seemed to work but when I rebooted and select Windows 8 form the
operating system menu, the computer booted into Windows Server 2008 R2.
I decided to ditch Server and install Windows 7 before trying this process again. The second
time, I’ve created two Virtual Drives and installed Windows 8 on one, and Windows Server
2008 R2 on the other. I’m still getting the same thing with Windows 8, but Server worked
perfectly. When I booted into Server, it went through the process of completing the install,
rebooted a couple of times but eventually did boot into Server so this is my first successful
boot of an operating system from a virtual hard drive.
In terms of a cause of the problem, I think there are two possibilities. One is that Windows 8
just can’t be installed in this way. When I tried to find a method for installing Windows 8 onto
a Windows 7 system via a VHD, the solution I found involved creating the VHD and then
installing Windows 8 in the usual way, treating the VHD just like a conventional partition.
Another possibility is that the device wasn’t set correctly. Here is a print out of the BCD file –
this was taken when I had booted into Windows 7 (the current option is the one you have
booted into so viewing this when I have booted into Server doesn’t give me the comparison
I want).
Windows Boot Manager
--------------------
identifier {bootmgr}
device partition=C:
description Windows Boot Manager
locale en-US
inherit {globalsettings}
default {default}
resumeobject {635fd2a9-b169-11e3-9899-ff8f8b007df8}
displayorder {default}
{current}
{635fd2af-b169-11e3-9899-ff8f8b007df8}
toolsdisplayorder {memdiag}
timeout 30
Windows Boot Loader
-------------------
identifier {default}
device partition=C:
path Windowssystem32winload.exe
description Windows 7
locale en-US
inherit {bootloadersettings}
recoverysequence {635fd2ab-b169-11e3-9899-ff8f8b007df8}
recoveryenabled Yes
osdevice partition=C:
systemroot Windows
resumeobject {635fd2a9-b169-11e3-9899-ff8f8b007df8}
nx OptIn
Windows Boot Loader
-------------------
identifier {current}
device partition=C:
path Windowssystem32winload.exe
description Windows Professional 8.1 N VHD
locale en-US
inherit {bootloadersettings}
recoverysequence {635fd2ab-b169-11e3-9899-ff8f8b007df8}
recoveryenabled Yes
osdevice partition=C:
systemroot Windows
resumeobject {635fd2a9-b169-11e3-9899-ff8f8b007df8}
nx OptIn
Windows Boot Loader
-------------------
identifier {635fd2af-b169-11e3-9899-ff8f8b007df8}
device vhd=[C:]Srv2008.vhd
path Windowssystem32winload.exe
description Windows Server 2008 R2
locale en-US
inherit {bootloadersettings}
recoverysequence {635fd2b0-b169-11e3-9899-ff8f8b007df8}
recoveryenabled Yes
osdevice vhd=[C:]Srv2008.vhd
systemroot Windows
resumeobject {635fd2a9-b169-11e3-9899-ff8f8b007df8}
nx OptIn
Actually, you might notice that Windows 8.1 shows as the current OS. This is because when I
booted the system, I did select Windows 8.1.
The first part of the BCD is the loader settings, that is the part of the file that determines
things like the order in which the operating systems appear, which is the default and so on.
The sections labelled Windows Boot Loader represent the operating systems and these are,
in order, Windows 7, Windows 8.1 and Windows Server 2008 R2.
The interesting part is osdevice, which I had set through the appropriate bcdedit command
(similar applied to device). For Server, this is exactly as I had typed it but for Windows 2008,
it simply shows as Partition C: which I would interpret as meaning that the operating system
simply boots from the designated boot partition, hence Windows 7 starts up.
To fix this, it helps that Windows 8.1 is the current operating system on the BCD because it
means I can re-type the commands to set device and osdevice with {current} rather than
the long identifier and it avoids any problems with the wrong entry being updated.
The commands again are
 bcdedit /set {current} device vhd=[C:]Win8.vhd
 bcdedit /set {current} osdevice vhd=[C:]Win8.vhd
 bcdedit /set {current} detecthal on (just for good measure, I still half expect to see
an error message saying ‘I don’t think I can do that, Dave’ but it hasn’t happened
yet!
I’ve typed these in and rerun bcdedit to display the BCD again – just as an aside, I have
rerouted the output to a text file so the command is
 bcdedit >> bcdeditWin8.txt (or any file name you care to provide – bcdedit >>
mytextfile.txt would work just as well and it deposits the text file in the current folder –
since I’m running this from the Windows AIK console that is the PETools folder. The full
path will be displayed on the command line console).
I won’t provide a copy of the full file again but I can see, under the Windows 8.1 entry, that
device is shown as vhd=[C:]Win8.vhd as is osdevice. I’ll now restart the machine and try
to boot up Windows 8 and it boots up correctly.
REFERENCES
https://www.youtube.com/watch?v=S6PEb5mH7-c – YouTube video demonstrating the
creation of a VHD using a command line interface
https://www.youtube.com/watch?v=CIsTGARtFEM – YouTube video demonstrating how to
create a VHD via Disk Management
https://www.youtube.com/watch?v=BV9LlC3Wz5A – YouTube video covering the whole
process including creating the VHD and copying the installation files
https://www.youtube.com/watch?v=_XOwQvPFSwA – YouTube UrbanPenguin video
showing how to make a VHD bootable
Appendix A
Bcdedit commands
BCDEDIT - Boot Configuration Data Store Editor
The Bcdedit.exe command-line tool modifies the boot configuration data store.
The boot configuration data store contains boot configuration parameters and
controls how the operating system is booted. These parameters were previously
in the Boot.ini file (in BIOS-based operating systems) or in the nonvolatile
RAM entries (in Extensible Firmware Interface-based operating systems). You can
use Bcdedit.exe to add, delete, edit, and append entries in the boot
configuration data store.
For detailed command and option information, type bcdedit.exe /? <command>. For
example, to display detailed information about the /createstore command, type:
bcdedit.exe /? /createstore
For an alphabetical list of topics in this help file, run "bcdedit /? TOPICS".
Commands that operate on a store
================================
/createstore Creates a new and empty boot configuration data store.
/export Exports the contents of the system store to a file. This file
can be used later to restore the state of the system store.
/import Restores the state of the system store using a backup file
created with the /export command.
/sysstore Sets the system store device (only affects EFI systems, does
not persist across reboots, and is only used in cases where
the system store device is ambiguous).
Commands that operate on entries in a store
===========================================
/copy Makes copies of entries in the store.
/create Creates new entries in the store.
/delete Deletes entries from the store.
/mirror Creates mirror of entries in the store.
Run bcdedit /? ID for information about identifiers used by these commands.
Commands that operate on entry options
======================================
/deletevalue Deletes entry options from the store.
/set Sets entry option values in the store.
Run bcdedit /? TYPES for a list of datatypes used by these commands.
Run bcdedit /? FORMATS for a list of valid data formats.
Commands that control output
============================
/enum Lists entries in the store.
/v Command-line option that displays entry identifiers in full,
rather than using names for well-known identifiers.
Use /v by itself as a command to display entry identifiers
in full for the ACTIVE type.
Running "bcdedit" by itself is equivalent to running "bcdedit /enum ACTIVE".
Commands that control the boot manager
======================================
/bootsequence Sets the one-time boot sequence for the boot manager.
/default Sets the default entry that the boot manager will use.
/displayorder Sets the order in which the boot manager displays the
multiboot menu.
/timeout Sets the boot manager time-out value.
/toolsdisplayorder Sets the order in which the boot manager displays
the tools menu.
Commands that control Emergency Management Services for a boot application
==========================================================================
/bootems Enables or disables Emergency Management Services
for a boot application.
/ems Enables or disables Emergency Management Services for an
operating system entry.
/emssettings Sets the global Emergency Management Services parameters.
Command that control debugging
==============================
/bootdebug Enables or disables boot debugging for a boot application.
/dbgsettings Sets the global debugger parameters.
/debug Enables or disables kernel debugging for an operating system
entry.
/hypervisorsettings Sets the hypervisor parameters.
Appendix B
Diskpart commands
Appendix C
Using Diskpart to create a Virtual Hard Drive
Another way to create a VHD is to use Diskpart. The method for this is as follows. Ultimately,
it doesn’t matter which method you use because the procedure is going to be exactly the
same once the VHD has been created, formatted and assigned a drive letter.
 The first step is to open a command prompt with elevated user privileges.
 Type Diskpart (enter).
 The command to create a VHD is
o create vdisk file=’path’ maximum ‘size’
o In real terms, the command in this case is create vdisk
file=C:usersadministratordesktopwin8.vhd maximum 20000
 The next step is to select the VHD which you do with the command
o select vdisk file=’path’
o Again, for my VHD this command becomes select vdisk
file=C:usersadministratordesktopwin8.vhd
 And next we want to attach the VHD which we do with the command
o attach vdisk
 We can now create a primary partition with the command
o create partition primary
 The partition is going to be formatted as an NTFS partition and I will give it the label
Win8 and this is done with the following command
o format fs=ntfs quick label=”Win8”
 We can now use the list vol command to view a list of volumes – note this shows the
VHDs created with both the methods but I haven’t assigned a drive letter to the
Win8 VHD.
 This can be fixed by assigning a drive letter through Disk Management.
Note – referring back to Appendix B, you can see that Diskpart does provide a command
to assign a drive letter to a disk drive so you can also use that to fix the missing drive letter or
just remember to type the command when creating the VHD.
 The last thing I need to do under the command prompt is to detach the VDH which
is done with the command
o detach vdisk
o Type exit to come out of Diskpart and close the command prompt

More Related Content

What's hot

Ubuntu alternate ubuntu installation
Ubuntu alternate ubuntu installationUbuntu alternate ubuntu installation
Ubuntu alternate ubuntu installationarunkumar sadhasivam
 
Manual de usuario de virtualbox
Manual de  usuario de virtualboxManual de  usuario de virtualbox
Manual de usuario de virtualboxRuben A Lozada S
 
How to boot a VM form a Forensic Image
How to boot a VM form a Forensic ImageHow to boot a VM form a Forensic Image
How to boot a VM form a Forensic ImageKrešimir Hausknecht
 
How to format a computer windows 7
How to format a computer windows 7How to format a computer windows 7
How to format a computer windows 7Md Aftab
 
setting up v ms
 setting up v ms setting up v ms
setting up v mschigio
 
Fix boot error 0x c0000098
Fix boot error 0x c0000098Fix boot error 0x c0000098
Fix boot error 0x c0000098Trường Tiền
 
Windows 11 storage spaces
Windows 11 storage spacesWindows 11 storage spaces
Windows 11 storage spacesssuser1eca7d
 
Installation of windows xp
Installation of windows xpInstallation of windows xp
Installation of windows xpntsurendhar
 
Vm ware server-tips-tricks
Vm ware server-tips-tricksVm ware server-tips-tricks
Vm ware server-tips-tricksunixadminrasheed
 
Creating a new virtual machine
Creating a new virtual machineCreating a new virtual machine
Creating a new virtual machinejhonmariocasas
 
Windows 10: A Tale of Two Mini-Tablets
Windows 10: A Tale of Two Mini-TabletsWindows 10: A Tale of Two Mini-Tablets
Windows 10: A Tale of Two Mini-Tabletszumfix
 
Building “old” Windows drivers (XP, Vista, 2003 and 2008) with Visual Studio ...
Building “old” Windows drivers (XP, Vista, 2003 and 2008) with Visual Studio ...Building “old” Windows drivers (XP, Vista, 2003 and 2008) with Visual Studio ...
Building “old” Windows drivers (XP, Vista, 2003 and 2008) with Visual Studio ...Yan Vugenfirer
 
Installing Windows 10 in VirtualBox
Installing Windows 10 in VirtualBoxInstalling Windows 10 in VirtualBox
Installing Windows 10 in VirtualBoxMatthew Jericho Sy
 

What's hot (19)

Ubuntu alternate ubuntu installation
Ubuntu alternate ubuntu installationUbuntu alternate ubuntu installation
Ubuntu alternate ubuntu installation
 
Manual de usuario de virtualbox
Manual de  usuario de virtualboxManual de  usuario de virtualbox
Manual de usuario de virtualbox
 
How to boot a VM form a Forensic Image
How to boot a VM form a Forensic ImageHow to boot a VM form a Forensic Image
How to boot a VM form a Forensic Image
 
How to format a computer windows 7
How to format a computer windows 7How to format a computer windows 7
How to format a computer windows 7
 
setting up v ms
 setting up v ms setting up v ms
setting up v ms
 
Windows 7
Windows 7Windows 7
Windows 7
 
Fix boot error 0x c0000098
Fix boot error 0x c0000098Fix boot error 0x c0000098
Fix boot error 0x c0000098
 
Arraque dual "open suse y windows"
Arraque dual "open suse y windows"Arraque dual "open suse y windows"
Arraque dual "open suse y windows"
 
cs506_linux
cs506_linuxcs506_linux
cs506_linux
 
Windows 11 storage spaces
Windows 11 storage spacesWindows 11 storage spaces
Windows 11 storage spaces
 
Installation of windows xp
Installation of windows xpInstallation of windows xp
Installation of windows xp
 
Windows 7 tricks
Windows 7 tricksWindows 7 tricks
Windows 7 tricks
 
Vm ware server-tips-tricks
Vm ware server-tips-tricksVm ware server-tips-tricks
Vm ware server-tips-tricks
 
Creating a new virtual machine
Creating a new virtual machineCreating a new virtual machine
Creating a new virtual machine
 
Windows 10: A Tale of Two Mini-Tablets
Windows 10: A Tale of Two Mini-TabletsWindows 10: A Tale of Two Mini-Tablets
Windows 10: A Tale of Two Mini-Tablets
 
Building “old” Windows drivers (XP, Vista, 2003 and 2008) with Visual Studio ...
Building “old” Windows drivers (XP, Vista, 2003 and 2008) with Visual Studio ...Building “old” Windows drivers (XP, Vista, 2003 and 2008) with Visual Studio ...
Building “old” Windows drivers (XP, Vista, 2003 and 2008) with Visual Studio ...
 
Returnil 2011
Returnil 2011Returnil 2011
Returnil 2011
 
How to install windows xp
How to install windows xpHow to install windows xp
How to install windows xp
 
Installing Windows 10 in VirtualBox
Installing Windows 10 in VirtualBoxInstalling Windows 10 in VirtualBox
Installing Windows 10 in VirtualBox
 

Viewers also liked

Organizational Culture
Organizational CultureOrganizational Culture
Organizational CultureNorhac Kali
 
Endothelial keratoplasty
Endothelial keratoplastyEndothelial keratoplasty
Endothelial keratoplastyOsman Polat
 
Gopika viswanath
Gopika viswanathGopika viswanath
Gopika viswanathgopika v
 
'A Broken Mind' planning presentation
'A Broken Mind' planning presentation'A Broken Mind' planning presentation
'A Broken Mind' planning presentationRebecca Braybrook
 
Penaeid shrimp fishery of india
Penaeid shrimp fishery of indiaPenaeid shrimp fishery of india
Penaeid shrimp fishery of indiagopika v
 
Unit 1 As chemistry
Unit 1 As chemistryUnit 1 As chemistry
Unit 1 As chemistryFatnaBanta
 
Viral diseases in crustaceans
Viral diseases in crustaceansViral diseases in crustaceans
Viral diseases in crustaceansgopika v
 
CSC Laws and Regulations
CSC Laws and RegulationsCSC Laws and Regulations
CSC Laws and RegulationsNorhac Kali
 
Common statistical tools used in research and their uses
Common statistical tools used in research and their usesCommon statistical tools used in research and their uses
Common statistical tools used in research and their usesNorhac Kali
 

Viewers also liked (11)

Organizational Culture
Organizational CultureOrganizational Culture
Organizational Culture
 
Endothelial keratoplasty
Endothelial keratoplastyEndothelial keratoplasty
Endothelial keratoplasty
 
Lets eat together! 1
Lets eat together! 1Lets eat together! 1
Lets eat together! 1
 
Gopika viswanath
Gopika viswanathGopika viswanath
Gopika viswanath
 
Vive.historia,abril14
Vive.historia,abril14Vive.historia,abril14
Vive.historia,abril14
 
'A Broken Mind' planning presentation
'A Broken Mind' planning presentation'A Broken Mind' planning presentation
'A Broken Mind' planning presentation
 
Penaeid shrimp fishery of india
Penaeid shrimp fishery of indiaPenaeid shrimp fishery of india
Penaeid shrimp fishery of india
 
Unit 1 As chemistry
Unit 1 As chemistryUnit 1 As chemistry
Unit 1 As chemistry
 
Viral diseases in crustaceans
Viral diseases in crustaceansViral diseases in crustaceans
Viral diseases in crustaceans
 
CSC Laws and Regulations
CSC Laws and RegulationsCSC Laws and Regulations
CSC Laws and Regulations
 
Common statistical tools used in research and their uses
Common statistical tools used in research and their usesCommon statistical tools used in research and their uses
Common statistical tools used in research and their uses
 

Similar to Dual boot with a vhd final

12849144 how-to-install-a-cccam-server-on-windows
12849144 how-to-install-a-cccam-server-on-windows12849144 how-to-install-a-cccam-server-on-windows
12849144 how-to-install-a-cccam-server-on-windowsrajuy2r
 
Manual 70-410 _Yves
Manual 70-410 _YvesManual 70-410 _Yves
Manual 70-410 _YvesYves Mukusa
 
Booting an image as a forensically sound vm in virtual box
Booting an image as a forensically sound vm in virtual boxBooting an image as a forensically sound vm in virtual box
Booting an image as a forensically sound vm in virtual boxBrent Muir
 
Running virtual box from the linux command line
Running virtual box from the linux command lineRunning virtual box from the linux command line
Running virtual box from the linux command lineEric Javier Espino Man
 
Pc hardware course work
Pc hardware course workPc hardware course work
Pc hardware course workIsmail Mukiibi
 
Building an standard image for windows7
Building an standard image for windows7Building an standard image for windows7
Building an standard image for windows7AMMAR MANZAR
 
Let’s talk virtualization
Let’s talk virtualizationLet’s talk virtualization
Let’s talk virtualizationEtienne Tremblay
 
Create windows 7 recovery usb without dvd
Create windows 7 recovery usb without dvdCreate windows 7 recovery usb without dvd
Create windows 7 recovery usb without dvdssuser1eca7d
 
Benz Star diagnosis transfer from external hdd to internal hdd
Benz Star diagnosis transfer from external hdd to internal hdd Benz Star diagnosis transfer from external hdd to internal hdd
Benz Star diagnosis transfer from external hdd to internal hdd buyobdii
 
Virtual dj 7 getting started
Virtual dj 7   getting startedVirtual dj 7   getting started
Virtual dj 7 getting startedALEXANDER BARBOZA
 
How to fix a required drive partition is missing
How to fix a required drive partition is missingHow to fix a required drive partition is missing
How to fix a required drive partition is missingZoey Chen
 
Vray install quick_1_5
Vray install quick_1_5Vray install quick_1_5
Vray install quick_1_5mynghetoancau
 

Similar to Dual boot with a vhd final (20)

12849144 how-to-install-a-cccam-server-on-windows
12849144 how-to-install-a-cccam-server-on-windows12849144 how-to-install-a-cccam-server-on-windows
12849144 how-to-install-a-cccam-server-on-windows
 
Manual 70-410 _Yves
Manual 70-410 _YvesManual 70-410 _Yves
Manual 70-410 _Yves
 
Virtualization.pdf
Virtualization.pdfVirtualization.pdf
Virtualization.pdf
 
2 Boot To Vhd
2 Boot To Vhd2 Boot To Vhd
2 Boot To Vhd
 
Booting an image as a forensically sound vm in virtual box
Booting an image as a forensically sound vm in virtual boxBooting an image as a forensically sound vm in virtual box
Booting an image as a forensically sound vm in virtual box
 
2. install os
2. install os2. install os
2. install os
 
Midterm
MidtermMidterm
Midterm
 
Running virtual box from the linux command line
Running virtual box from the linux command lineRunning virtual box from the linux command line
Running virtual box from the linux command line
 
Pc hardware course work
Pc hardware course workPc hardware course work
Pc hardware course work
 
Building an standard image for windows7
Building an standard image for windows7Building an standard image for windows7
Building an standard image for windows7
 
Let’s talk virtualization
Let’s talk virtualizationLet’s talk virtualization
Let’s talk virtualization
 
Create windows 7 recovery usb without dvd
Create windows 7 recovery usb without dvdCreate windows 7 recovery usb without dvd
Create windows 7 recovery usb without dvd
 
Windows 7 configuration
Windows 7 configurationWindows 7 configuration
Windows 7 configuration
 
Benz Star diagnosis transfer from external hdd to internal hdd
Benz Star diagnosis transfer from external hdd to internal hdd Benz Star diagnosis transfer from external hdd to internal hdd
Benz Star diagnosis transfer from external hdd to internal hdd
 
Virtual dj 7 getting started
Virtual dj 7   getting startedVirtual dj 7   getting started
Virtual dj 7 getting started
 
How to fix a required drive partition is missing
How to fix a required drive partition is missingHow to fix a required drive partition is missing
How to fix a required drive partition is missing
 
Vray install quick_1_5
Vray install quick_1_5Vray install quick_1_5
Vray install quick_1_5
 
Osr506on esx
Osr506on esxOsr506on esx
Osr506on esx
 
Grcsvm ware
Grcsvm wareGrcsvm ware
Grcsvm ware
 
Virtual dj 7 getting started
Virtual dj 7   getting startedVirtual dj 7   getting started
Virtual dj 7 getting started
 

Recently uploaded

Russian Call Girls In South Delhi Delhi 9711199012 💋✔💕😘 Independent Escorts D...
Russian Call Girls In South Delhi Delhi 9711199012 💋✔💕😘 Independent Escorts D...Russian Call Girls In South Delhi Delhi 9711199012 💋✔💕😘 Independent Escorts D...
Russian Call Girls In South Delhi Delhi 9711199012 💋✔💕😘 Independent Escorts D...nagunakhan
 
Gaya Call Girls #9907093804 Contact Number Escorts Service Gaya
Gaya Call Girls #9907093804 Contact Number Escorts Service GayaGaya Call Girls #9907093804 Contact Number Escorts Service Gaya
Gaya Call Girls #9907093804 Contact Number Escorts Service Gayasrsj9000
 
如何办理(NUS毕业证书)新加坡国立大学毕业证成绩单留信学历认证原版一比一
如何办理(NUS毕业证书)新加坡国立大学毕业证成绩单留信学历认证原版一比一如何办理(NUS毕业证书)新加坡国立大学毕业证成绩单留信学历认证原版一比一
如何办理(NUS毕业证书)新加坡国立大学毕业证成绩单留信学历认证原版一比一ga6c6bdl
 
Call Girls Delhi {Rohini} 9711199012 high profile service
Call Girls Delhi {Rohini} 9711199012 high profile serviceCall Girls Delhi {Rohini} 9711199012 high profile service
Call Girls Delhi {Rohini} 9711199012 high profile servicerehmti665
 
(SANA) Call Girls Landewadi ( 7001035870 ) HI-Fi Pune Escorts Service
(SANA) Call Girls Landewadi ( 7001035870 ) HI-Fi Pune Escorts Service(SANA) Call Girls Landewadi ( 7001035870 ) HI-Fi Pune Escorts Service
(SANA) Call Girls Landewadi ( 7001035870 ) HI-Fi Pune Escorts Serviceranjana rawat
 
Call Girls in Dwarka Sub City 💯Call Us 🔝8264348440🔝
Call Girls in Dwarka Sub City 💯Call Us 🔝8264348440🔝Call Girls in Dwarka Sub City 💯Call Us 🔝8264348440🔝
Call Girls in Dwarka Sub City 💯Call Us 🔝8264348440🔝soniya singh
 
(ANIKA) Wanwadi Call Girls Just Call 7001035870 [ Cash on Delivery ] Pune Esc...
(ANIKA) Wanwadi Call Girls Just Call 7001035870 [ Cash on Delivery ] Pune Esc...(ANIKA) Wanwadi Call Girls Just Call 7001035870 [ Cash on Delivery ] Pune Esc...
(ANIKA) Wanwadi Call Girls Just Call 7001035870 [ Cash on Delivery ] Pune Esc...ranjana rawat
 
《伯明翰城市大学毕业证成绩单购买》学历证书学位证书区别《复刻原版1:1伯明翰城市大学毕业证书|修改BCU成绩单PDF版》Q微信741003700《BCU学...
《伯明翰城市大学毕业证成绩单购买》学历证书学位证书区别《复刻原版1:1伯明翰城市大学毕业证书|修改BCU成绩单PDF版》Q微信741003700《BCU学...《伯明翰城市大学毕业证成绩单购买》学历证书学位证书区别《复刻原版1:1伯明翰城市大学毕业证书|修改BCU成绩单PDF版》Q微信741003700《BCU学...
《伯明翰城市大学毕业证成绩单购买》学历证书学位证书区别《复刻原版1:1伯明翰城市大学毕业证书|修改BCU成绩单PDF版》Q微信741003700《BCU学...ur8mqw8e
 
vip Krishna Nagar Call Girls 9999965857 Call or WhatsApp Now Book
vip Krishna Nagar Call Girls 9999965857 Call or WhatsApp Now Bookvip Krishna Nagar Call Girls 9999965857 Call or WhatsApp Now Book
vip Krishna Nagar Call Girls 9999965857 Call or WhatsApp Now Bookmanojkuma9823
 
WhatsApp 9892124323 ✓Call Girls In Khar ( Mumbai ) secure service - Bandra F...
WhatsApp 9892124323 ✓Call Girls In Khar ( Mumbai ) secure service -  Bandra F...WhatsApp 9892124323 ✓Call Girls In Khar ( Mumbai ) secure service -  Bandra F...
WhatsApp 9892124323 ✓Call Girls In Khar ( Mumbai ) secure service - Bandra F...Pooja Nehwal
 
Presentation.pptxjnfoigneoifnvoeifnvklfnvf
Presentation.pptxjnfoigneoifnvoeifnvklfnvfPresentation.pptxjnfoigneoifnvoeifnvklfnvf
Presentation.pptxjnfoigneoifnvoeifnvklfnvfchapmanellie27
 
Call Girls Delhi {Rs-10000 Laxmi Nagar] 9711199012 Whats Up Number
Call Girls Delhi {Rs-10000 Laxmi Nagar] 9711199012 Whats Up NumberCall Girls Delhi {Rs-10000 Laxmi Nagar] 9711199012 Whats Up Number
Call Girls Delhi {Rs-10000 Laxmi Nagar] 9711199012 Whats Up NumberMs Riya
 
定制加拿大滑铁卢大学毕业证(Waterloo毕业证书)成绩单(文凭)原版一比一
定制加拿大滑铁卢大学毕业证(Waterloo毕业证书)成绩单(文凭)原版一比一定制加拿大滑铁卢大学毕业证(Waterloo毕业证书)成绩单(文凭)原版一比一
定制加拿大滑铁卢大学毕业证(Waterloo毕业证书)成绩单(文凭)原版一比一zul5vf0pq
 
VIP Call Girl Saharanpur Aashi 8250192130 Independent Escort Service Saharanpur
VIP Call Girl Saharanpur Aashi 8250192130 Independent Escort Service SaharanpurVIP Call Girl Saharanpur Aashi 8250192130 Independent Escort Service Saharanpur
VIP Call Girl Saharanpur Aashi 8250192130 Independent Escort Service SaharanpurSuhani Kapoor
 
vip Model Basti Call Girls 9999965857 Call or WhatsApp Now Book
vip Model Basti Call Girls 9999965857 Call or WhatsApp Now Bookvip Model Basti Call Girls 9999965857 Call or WhatsApp Now Book
vip Model Basti Call Girls 9999965857 Call or WhatsApp Now Bookmanojkuma9823
 
定制(UI学位证)爱达荷大学毕业证成绩单原版一比一
定制(UI学位证)爱达荷大学毕业证成绩单原版一比一定制(UI学位证)爱达荷大学毕业证成绩单原版一比一
定制(UI学位证)爱达荷大学毕业证成绩单原版一比一ss ss
 
Call Girls in Nagpur Bhavna Call 7001035870 Meet With Nagpur Escorts
Call Girls in Nagpur Bhavna Call 7001035870 Meet With Nagpur EscortsCall Girls in Nagpur Bhavna Call 7001035870 Meet With Nagpur Escorts
Call Girls in Nagpur Bhavna Call 7001035870 Meet With Nagpur Escortsranjana rawat
 
原版1:1复刻斯坦福大学毕业证Stanford毕业证留信学历认证
原版1:1复刻斯坦福大学毕业证Stanford毕业证留信学历认证原版1:1复刻斯坦福大学毕业证Stanford毕业证留信学历认证
原版1:1复刻斯坦福大学毕业证Stanford毕业证留信学历认证gwhohjj
 

Recently uploaded (20)

Russian Call Girls In South Delhi Delhi 9711199012 💋✔💕😘 Independent Escorts D...
Russian Call Girls In South Delhi Delhi 9711199012 💋✔💕😘 Independent Escorts D...Russian Call Girls In South Delhi Delhi 9711199012 💋✔💕😘 Independent Escorts D...
Russian Call Girls In South Delhi Delhi 9711199012 💋✔💕😘 Independent Escorts D...
 
Gaya Call Girls #9907093804 Contact Number Escorts Service Gaya
Gaya Call Girls #9907093804 Contact Number Escorts Service GayaGaya Call Girls #9907093804 Contact Number Escorts Service Gaya
Gaya Call Girls #9907093804 Contact Number Escorts Service Gaya
 
9953330565 Low Rate Call Girls In Jahangirpuri Delhi NCR
9953330565 Low Rate Call Girls In Jahangirpuri  Delhi NCR9953330565 Low Rate Call Girls In Jahangirpuri  Delhi NCR
9953330565 Low Rate Call Girls In Jahangirpuri Delhi NCR
 
如何办理(NUS毕业证书)新加坡国立大学毕业证成绩单留信学历认证原版一比一
如何办理(NUS毕业证书)新加坡国立大学毕业证成绩单留信学历认证原版一比一如何办理(NUS毕业证书)新加坡国立大学毕业证成绩单留信学历认证原版一比一
如何办理(NUS毕业证书)新加坡国立大学毕业证成绩单留信学历认证原版一比一
 
Call Girls Delhi {Rohini} 9711199012 high profile service
Call Girls Delhi {Rohini} 9711199012 high profile serviceCall Girls Delhi {Rohini} 9711199012 high profile service
Call Girls Delhi {Rohini} 9711199012 high profile service
 
(SANA) Call Girls Landewadi ( 7001035870 ) HI-Fi Pune Escorts Service
(SANA) Call Girls Landewadi ( 7001035870 ) HI-Fi Pune Escorts Service(SANA) Call Girls Landewadi ( 7001035870 ) HI-Fi Pune Escorts Service
(SANA) Call Girls Landewadi ( 7001035870 ) HI-Fi Pune Escorts Service
 
Call Girls in Dwarka Sub City 💯Call Us 🔝8264348440🔝
Call Girls in Dwarka Sub City 💯Call Us 🔝8264348440🔝Call Girls in Dwarka Sub City 💯Call Us 🔝8264348440🔝
Call Girls in Dwarka Sub City 💯Call Us 🔝8264348440🔝
 
young call girls in Gtb Nagar,🔝 9953056974 🔝 escort Service
young call girls in Gtb Nagar,🔝 9953056974 🔝 escort Serviceyoung call girls in Gtb Nagar,🔝 9953056974 🔝 escort Service
young call girls in Gtb Nagar,🔝 9953056974 🔝 escort Service
 
(ANIKA) Wanwadi Call Girls Just Call 7001035870 [ Cash on Delivery ] Pune Esc...
(ANIKA) Wanwadi Call Girls Just Call 7001035870 [ Cash on Delivery ] Pune Esc...(ANIKA) Wanwadi Call Girls Just Call 7001035870 [ Cash on Delivery ] Pune Esc...
(ANIKA) Wanwadi Call Girls Just Call 7001035870 [ Cash on Delivery ] Pune Esc...
 
《伯明翰城市大学毕业证成绩单购买》学历证书学位证书区别《复刻原版1:1伯明翰城市大学毕业证书|修改BCU成绩单PDF版》Q微信741003700《BCU学...
《伯明翰城市大学毕业证成绩单购买》学历证书学位证书区别《复刻原版1:1伯明翰城市大学毕业证书|修改BCU成绩单PDF版》Q微信741003700《BCU学...《伯明翰城市大学毕业证成绩单购买》学历证书学位证书区别《复刻原版1:1伯明翰城市大学毕业证书|修改BCU成绩单PDF版》Q微信741003700《BCU学...
《伯明翰城市大学毕业证成绩单购买》学历证书学位证书区别《复刻原版1:1伯明翰城市大学毕业证书|修改BCU成绩单PDF版》Q微信741003700《BCU学...
 
vip Krishna Nagar Call Girls 9999965857 Call or WhatsApp Now Book
vip Krishna Nagar Call Girls 9999965857 Call or WhatsApp Now Bookvip Krishna Nagar Call Girls 9999965857 Call or WhatsApp Now Book
vip Krishna Nagar Call Girls 9999965857 Call or WhatsApp Now Book
 
WhatsApp 9892124323 ✓Call Girls In Khar ( Mumbai ) secure service - Bandra F...
WhatsApp 9892124323 ✓Call Girls In Khar ( Mumbai ) secure service -  Bandra F...WhatsApp 9892124323 ✓Call Girls In Khar ( Mumbai ) secure service -  Bandra F...
WhatsApp 9892124323 ✓Call Girls In Khar ( Mumbai ) secure service - Bandra F...
 
Presentation.pptxjnfoigneoifnvoeifnvklfnvf
Presentation.pptxjnfoigneoifnvoeifnvklfnvfPresentation.pptxjnfoigneoifnvoeifnvklfnvf
Presentation.pptxjnfoigneoifnvoeifnvklfnvf
 
Call Girls Delhi {Rs-10000 Laxmi Nagar] 9711199012 Whats Up Number
Call Girls Delhi {Rs-10000 Laxmi Nagar] 9711199012 Whats Up NumberCall Girls Delhi {Rs-10000 Laxmi Nagar] 9711199012 Whats Up Number
Call Girls Delhi {Rs-10000 Laxmi Nagar] 9711199012 Whats Up Number
 
定制加拿大滑铁卢大学毕业证(Waterloo毕业证书)成绩单(文凭)原版一比一
定制加拿大滑铁卢大学毕业证(Waterloo毕业证书)成绩单(文凭)原版一比一定制加拿大滑铁卢大学毕业证(Waterloo毕业证书)成绩单(文凭)原版一比一
定制加拿大滑铁卢大学毕业证(Waterloo毕业证书)成绩单(文凭)原版一比一
 
VIP Call Girl Saharanpur Aashi 8250192130 Independent Escort Service Saharanpur
VIP Call Girl Saharanpur Aashi 8250192130 Independent Escort Service SaharanpurVIP Call Girl Saharanpur Aashi 8250192130 Independent Escort Service Saharanpur
VIP Call Girl Saharanpur Aashi 8250192130 Independent Escort Service Saharanpur
 
vip Model Basti Call Girls 9999965857 Call or WhatsApp Now Book
vip Model Basti Call Girls 9999965857 Call or WhatsApp Now Bookvip Model Basti Call Girls 9999965857 Call or WhatsApp Now Book
vip Model Basti Call Girls 9999965857 Call or WhatsApp Now Book
 
定制(UI学位证)爱达荷大学毕业证成绩单原版一比一
定制(UI学位证)爱达荷大学毕业证成绩单原版一比一定制(UI学位证)爱达荷大学毕业证成绩单原版一比一
定制(UI学位证)爱达荷大学毕业证成绩单原版一比一
 
Call Girls in Nagpur Bhavna Call 7001035870 Meet With Nagpur Escorts
Call Girls in Nagpur Bhavna Call 7001035870 Meet With Nagpur EscortsCall Girls in Nagpur Bhavna Call 7001035870 Meet With Nagpur Escorts
Call Girls in Nagpur Bhavna Call 7001035870 Meet With Nagpur Escorts
 
原版1:1复刻斯坦福大学毕业证Stanford毕业证留信学历认证
原版1:1复刻斯坦福大学毕业证Stanford毕业证留信学历认证原版1:1复刻斯坦福大学毕业证Stanford毕业证留信学历认证
原版1:1复刻斯坦福大学毕业证Stanford毕业证留信学历认证
 

Dual boot with a vhd final

  • 1. Dual Boot With a VHD Virtual Hard Drive Pip 3/20/14 Troubleshooting an OS
  • 2. Table of Contents Creating a Virtual Hard Drive .................................................................................................... 3 Installing the Operating System ................................................................................................ 5 Making the Virtual Hard Drive Bootable .................................................................................. 7 Troubleshooting the Process ..................................................................................................... 8 References ........................................................................................................................................12 Appendices Appendix A - bcdedit commands.................................................................................................13 Appendix B - Diskpart commands .................................................................................................16 Appendix A – Using Diskpart to Create a Virtual Hard Drive ......................................................17
  • 3. Dual Boot with a VHD Creating a Virtual Hard Drive The first step is to create the Virtual Hard Drive  Right click on Computer and select Manage or otherwise open up Computer Management  Select Disk Management  Click an area of free space in the Partitions Window  Select the Action menu and then Create VHD  On the next screen you can specify a location, size and whether the size will be Dynamically expanding or Fixed. In this case, I’ll put the VHD in the root directory of the C drive (this makes life easier later in the process since there is no long path to
  • 4. type), give it a size of 20 GB and accept the recommended Fixed Size setting. You will also be prompted for a name for the VHD and I have called this one Win8 because I’ll be using it to install Windows 8.  Next we need to initialize the disk. In the partition window you will see that the disk is there and is shown as not initialized. NB – it can take a while for the VHD to be created (the message Creating Virtual Disk is displayed at the bottom of the Disk Management console until the process has been completed – there is a progress bar displayed as well). Right click it and select Initialize Disk  Leave MBR selected as the partition style and click OK.  Next, right click on the partition (which will be shown as unallocated) and select New Simple Volume.  Leave the default size setting and click Next.  Select the required drive letter and click Next.  Format the partition as an NTFS volume and click Next. For my purposes, I don’t intend to install an operating system which requires a FAT partition.  Click Finish
  • 5. Installing the Operating System To do this, we need a couple of things – we need to have Windows Automated Installation Kit installed and we need a Windows 8 installation DVD. We need to copy the installation file from the DVD and put it into the same folder as the VHD. The file itself is called install.wim and it is in the sources folder of the installation DVD. Next, click Start and All Programs and navigate down to the Microsoft Windows AIK folder. From there click Deployment Tools Command Prompt (right click and run as administrator). Type the command o imagex /info c:install.wim You might recall that with Windows 7 and also Windows 8, the various editions of the operating system are usually all contained in a single installation DVD and when you run the installation, the appropriate edition is installed.
  • 6. What we’ve done with the imagex command above is to list these editions. If you scroll up to the top of the output in the command window you will see Available Image Choices. Image Index 1 is the Professional edition, 2 is core N. This DVD only has the two editions. In this case I will be installing the first version, that is, the Professional edition. You should look through these and ensure you know the index number for the edition you want to install. The next step is to copy the image files into the VHD which we do with the command o imagex /apply c: install.wim 1 l: NB – l (for Lima) is the letter assigned to the Virtual Drive labelled Win8 so you will need to change this if you have assigned a different letter. The 1 here is the selected edition so this may also need to be changed.
  • 7. Making the Virtual Hard Drive Bootable The final step is to make sure that we can boot from the Virtual Hard Drive. This is done from the same Windows AIK console opened earlier. The first step in doing this is to use bcdedit and we do this with the command  bcdedit /copy {current} /d “Windows 8.1 Professional VHD” This provides us with a unique identifier.  This has to be copied over to the Virtual Hard Drive with the following command: o bcdedit /set {4ed990b4-639c-11e3-835c-a164008a71da} device vhd=[c:]Win8.vhd  The final step to make the vhd bootable is to ensure the entry in the bcdedit file which we do with the command o bcdedit /set {4ed990b4-639c-11e3-835c-a164008a71da} osdevice vhd=[c:]Win8.vhd  And one final command to allow the vhd to be moved between devices o bcdedit /set {4ed990b4-639c-11e3-835c-a164008a71da} detecthal on
  • 8. Troubleshooting the Process Throughout this process, I did encounter quite a few problems, some of which were easily fixed and others less so but I thought it might be worth mentioning a few of these whether a solution was found or not. These might also provide a few pointers for further investigation. First up, I used two different methods for creating a virtual hard drive. The first was the method described above and the second was using Diskpart. The Diskpart method is described in Appendix C. I found with this method that there was no drive letter assigned to the VHD. I’m not sure if this was my fault or if the instructions I was following were incorrect, but that was easily fixed by using Disk Management to assign a letter. A slightly more serious issue was the operating system. My first attempts were made on a machine running Windows Server 2008 R2 on which I had tried to install Windows 8 in the VHD. Everything seemed to work but when I rebooted and select Windows 8 form the operating system menu, the computer booted into Windows Server 2008 R2. I decided to ditch Server and install Windows 7 before trying this process again. The second time, I’ve created two Virtual Drives and installed Windows 8 on one, and Windows Server 2008 R2 on the other. I’m still getting the same thing with Windows 8, but Server worked perfectly. When I booted into Server, it went through the process of completing the install, rebooted a couple of times but eventually did boot into Server so this is my first successful boot of an operating system from a virtual hard drive. In terms of a cause of the problem, I think there are two possibilities. One is that Windows 8 just can’t be installed in this way. When I tried to find a method for installing Windows 8 onto a Windows 7 system via a VHD, the solution I found involved creating the VHD and then installing Windows 8 in the usual way, treating the VHD just like a conventional partition. Another possibility is that the device wasn’t set correctly. Here is a print out of the BCD file – this was taken when I had booted into Windows 7 (the current option is the one you have booted into so viewing this when I have booted into Server doesn’t give me the comparison I want). Windows Boot Manager -------------------- identifier {bootmgr} device partition=C:
  • 9. description Windows Boot Manager locale en-US inherit {globalsettings} default {default} resumeobject {635fd2a9-b169-11e3-9899-ff8f8b007df8} displayorder {default} {current} {635fd2af-b169-11e3-9899-ff8f8b007df8} toolsdisplayorder {memdiag} timeout 30 Windows Boot Loader ------------------- identifier {default} device partition=C: path Windowssystem32winload.exe description Windows 7 locale en-US inherit {bootloadersettings} recoverysequence {635fd2ab-b169-11e3-9899-ff8f8b007df8} recoveryenabled Yes osdevice partition=C: systemroot Windows resumeobject {635fd2a9-b169-11e3-9899-ff8f8b007df8} nx OptIn
  • 10. Windows Boot Loader ------------------- identifier {current} device partition=C: path Windowssystem32winload.exe description Windows Professional 8.1 N VHD locale en-US inherit {bootloadersettings} recoverysequence {635fd2ab-b169-11e3-9899-ff8f8b007df8} recoveryenabled Yes osdevice partition=C: systemroot Windows resumeobject {635fd2a9-b169-11e3-9899-ff8f8b007df8} nx OptIn Windows Boot Loader ------------------- identifier {635fd2af-b169-11e3-9899-ff8f8b007df8} device vhd=[C:]Srv2008.vhd path Windowssystem32winload.exe description Windows Server 2008 R2 locale en-US inherit {bootloadersettings} recoverysequence {635fd2b0-b169-11e3-9899-ff8f8b007df8} recoveryenabled Yes osdevice vhd=[C:]Srv2008.vhd
  • 11. systemroot Windows resumeobject {635fd2a9-b169-11e3-9899-ff8f8b007df8} nx OptIn Actually, you might notice that Windows 8.1 shows as the current OS. This is because when I booted the system, I did select Windows 8.1. The first part of the BCD is the loader settings, that is the part of the file that determines things like the order in which the operating systems appear, which is the default and so on. The sections labelled Windows Boot Loader represent the operating systems and these are, in order, Windows 7, Windows 8.1 and Windows Server 2008 R2. The interesting part is osdevice, which I had set through the appropriate bcdedit command (similar applied to device). For Server, this is exactly as I had typed it but for Windows 2008, it simply shows as Partition C: which I would interpret as meaning that the operating system simply boots from the designated boot partition, hence Windows 7 starts up. To fix this, it helps that Windows 8.1 is the current operating system on the BCD because it means I can re-type the commands to set device and osdevice with {current} rather than the long identifier and it avoids any problems with the wrong entry being updated. The commands again are  bcdedit /set {current} device vhd=[C:]Win8.vhd  bcdedit /set {current} osdevice vhd=[C:]Win8.vhd  bcdedit /set {current} detecthal on (just for good measure, I still half expect to see an error message saying ‘I don’t think I can do that, Dave’ but it hasn’t happened yet! I’ve typed these in and rerun bcdedit to display the BCD again – just as an aside, I have rerouted the output to a text file so the command is  bcdedit >> bcdeditWin8.txt (or any file name you care to provide – bcdedit >> mytextfile.txt would work just as well and it deposits the text file in the current folder – since I’m running this from the Windows AIK console that is the PETools folder. The full path will be displayed on the command line console). I won’t provide a copy of the full file again but I can see, under the Windows 8.1 entry, that device is shown as vhd=[C:]Win8.vhd as is osdevice. I’ll now restart the machine and try to boot up Windows 8 and it boots up correctly.
  • 12. REFERENCES https://www.youtube.com/watch?v=S6PEb5mH7-c – YouTube video demonstrating the creation of a VHD using a command line interface https://www.youtube.com/watch?v=CIsTGARtFEM – YouTube video demonstrating how to create a VHD via Disk Management https://www.youtube.com/watch?v=BV9LlC3Wz5A – YouTube video covering the whole process including creating the VHD and copying the installation files https://www.youtube.com/watch?v=_XOwQvPFSwA – YouTube UrbanPenguin video showing how to make a VHD bootable
  • 13. Appendix A Bcdedit commands BCDEDIT - Boot Configuration Data Store Editor The Bcdedit.exe command-line tool modifies the boot configuration data store. The boot configuration data store contains boot configuration parameters and controls how the operating system is booted. These parameters were previously in the Boot.ini file (in BIOS-based operating systems) or in the nonvolatile RAM entries (in Extensible Firmware Interface-based operating systems). You can use Bcdedit.exe to add, delete, edit, and append entries in the boot configuration data store. For detailed command and option information, type bcdedit.exe /? <command>. For example, to display detailed information about the /createstore command, type: bcdedit.exe /? /createstore For an alphabetical list of topics in this help file, run "bcdedit /? TOPICS". Commands that operate on a store ================================ /createstore Creates a new and empty boot configuration data store. /export Exports the contents of the system store to a file. This file can be used later to restore the state of the system store. /import Restores the state of the system store using a backup file created with the /export command. /sysstore Sets the system store device (only affects EFI systems, does
  • 14. not persist across reboots, and is only used in cases where the system store device is ambiguous). Commands that operate on entries in a store =========================================== /copy Makes copies of entries in the store. /create Creates new entries in the store. /delete Deletes entries from the store. /mirror Creates mirror of entries in the store. Run bcdedit /? ID for information about identifiers used by these commands. Commands that operate on entry options ====================================== /deletevalue Deletes entry options from the store. /set Sets entry option values in the store. Run bcdedit /? TYPES for a list of datatypes used by these commands. Run bcdedit /? FORMATS for a list of valid data formats. Commands that control output ============================ /enum Lists entries in the store. /v Command-line option that displays entry identifiers in full, rather than using names for well-known identifiers. Use /v by itself as a command to display entry identifiers in full for the ACTIVE type.
  • 15. Running "bcdedit" by itself is equivalent to running "bcdedit /enum ACTIVE". Commands that control the boot manager ====================================== /bootsequence Sets the one-time boot sequence for the boot manager. /default Sets the default entry that the boot manager will use. /displayorder Sets the order in which the boot manager displays the multiboot menu. /timeout Sets the boot manager time-out value. /toolsdisplayorder Sets the order in which the boot manager displays the tools menu. Commands that control Emergency Management Services for a boot application ========================================================================== /bootems Enables or disables Emergency Management Services for a boot application. /ems Enables or disables Emergency Management Services for an operating system entry. /emssettings Sets the global Emergency Management Services parameters. Command that control debugging ============================== /bootdebug Enables or disables boot debugging for a boot application. /dbgsettings Sets the global debugger parameters. /debug Enables or disables kernel debugging for an operating system entry. /hypervisorsettings Sets the hypervisor parameters.
  • 17. Appendix C Using Diskpart to create a Virtual Hard Drive Another way to create a VHD is to use Diskpart. The method for this is as follows. Ultimately, it doesn’t matter which method you use because the procedure is going to be exactly the same once the VHD has been created, formatted and assigned a drive letter.  The first step is to open a command prompt with elevated user privileges.  Type Diskpart (enter).  The command to create a VHD is o create vdisk file=’path’ maximum ‘size’ o In real terms, the command in this case is create vdisk file=C:usersadministratordesktopwin8.vhd maximum 20000  The next step is to select the VHD which you do with the command o select vdisk file=’path’ o Again, for my VHD this command becomes select vdisk file=C:usersadministratordesktopwin8.vhd  And next we want to attach the VHD which we do with the command o attach vdisk  We can now create a primary partition with the command o create partition primary  The partition is going to be formatted as an NTFS partition and I will give it the label Win8 and this is done with the following command o format fs=ntfs quick label=”Win8”  We can now use the list vol command to view a list of volumes – note this shows the VHDs created with both the methods but I haven’t assigned a drive letter to the Win8 VHD.  This can be fixed by assigning a drive letter through Disk Management. Note – referring back to Appendix B, you can see that Diskpart does provide a command to assign a drive letter to a disk drive so you can also use that to fix the missing drive letter or just remember to type the command when creating the VHD.
  • 18.  The last thing I need to do under the command prompt is to detach the VDH which is done with the command o detach vdisk o Type exit to come out of Diskpart and close the command prompt