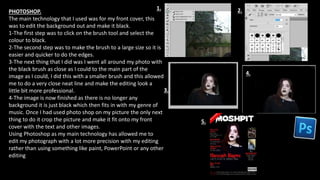
1. PHOTOSHOP.
The main technology that I used was for my front cover, this
was to edit the background out and make it black.
1-The first step was to click on the brush tool and select the
colour to black.
2-The second step was to make the brush to a large size so it is
easier and quicker to do the edges.
3-The next thing that I did was I went all around my photo with
the black brush as close as I could to the main part of the
image as I could, I did this with a smaller brush and this allowed
me to do a very close neat line and make the editing look a
little bit more professional.
4-The image is now finished as there is no longer any
background it is just black which then fits in with my genre of
music. Once I had used photo shop on my picture the only next
thing to do it crop the picture and make it fit onto my front
cover with the text and other images.
Using Photoshop as my main technology has allowed me to
edit my photograph with a lot more precision with my editing
rather than using something like paint, PowerPoint or any other
editing websites.
5.
4.
3.
2.1.
2. INSTAGRAM
I used Instagram to edit my posters on my front cover, the main
image on my front cover and one of my images on my content
page. The main things that I did was to turn up the contrast to
make the image darker to fit in with my target audience and
genre of music. I also turned the sharpness up to make the
image a lot clearer as it will make it look more professional as
images on front covers aren’t blurry blobs in the corner they
are still professional shots like the main image on the front
cover.
Adding all of the darker shadows and contrast etc makes my
original image look better for my target audience and genre of
magazine/music.
Using Instagram allowed me to edit my photographs the way
that Photoshop doesn’t do, or that I know of. Also using
Instagram made it easier for me to edit photos at home
because I can edit them at home without having to use
Photoshop which I don’t have on my laptop.
CAMERA
I used the camera, Canon EOS 50D, this helped me to get a high
quality images for my front cover and 1 of my content page
images. I also used my iPhone camera for my poster images on my
front cover.
3. PowerPoint.
To create my front cover, content page and double page
spread. This allowed me to add my images and fonts that I
need to. Using PowerPoint as my main editing technology has
allowed me to edit my final pieces with a lot more precision as
when I added my fonts. This helped with making my fonts on
my content page look a lot more professional and similar to a
normal magazine you find on a shop shelf. PowerPoint helped
me to line up all of my fonts in a straight line and to make it
look a lot more professional rather than doing it by hand and it
looking really messy.
By using PowerPoint to edit all of my 3 pieces it helped me to
keep all my pieces look the same as I edited it with straight
lines and the sizes were the same when uploaded to my blog. It
also made it a lot easier to add all of the fonts and images I
needed.
FONTSPACE
I used fontspace to find to correct fonts that my target
audience wanted to see and also using PowerPoint helped
me to take away the white background of the
fonts and and make it look more professional.
Also the range of different fonts on font space
helped me to find the right fonts to fit my
target audience.