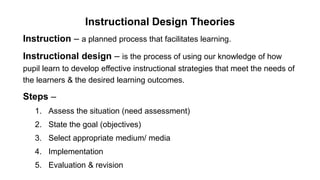
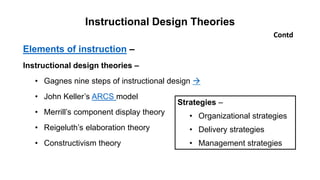
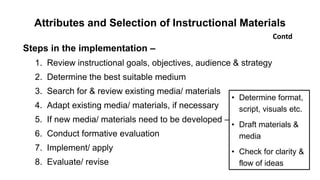
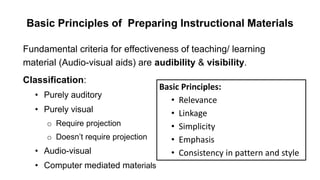
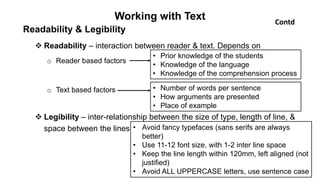
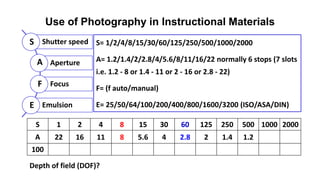
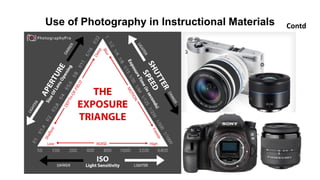
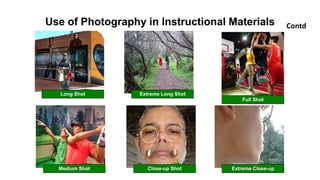
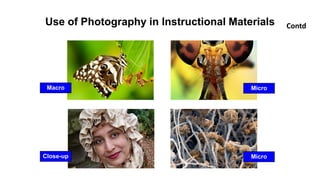
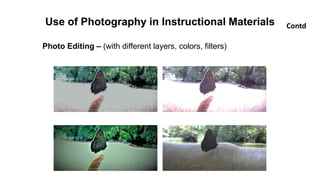
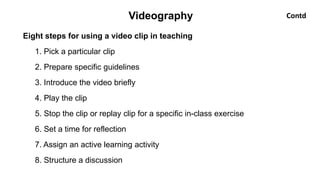
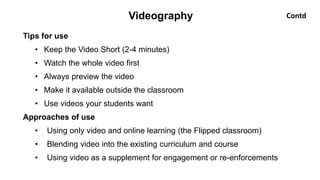
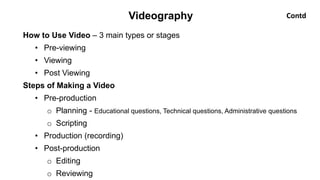
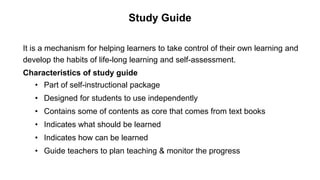
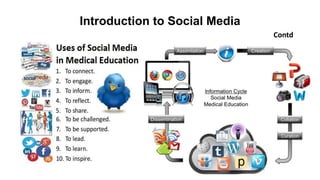
Md Fazlul Kabir
MMEd-15 (2018)
Instructional Materials Development
Part-I (Paper-II)
Md Fazlul Kabir
MMEd-15 (2018)
Student centered approach answers
four questions
Content – what knowledge and skills
will be studied?
Process – what materials and
procedures will be used?
Product – what will students produce
to demonstrate their learning?
Evaluation – how will the learning be
assessed?
Teacher
Student
Parenting
Objectives
• To recapitulate and summarize the concepts of ‘Instructional
Material Development’ in front of learned faculty members
of CME and members of MMEd-15 (2018).
• The session will be evaluated by the respected faculty
members.
Instructional Materials Development
Theoretical –
• Types of Instructional materials
• Their characteristics/ advantages/ disadvantages
• Principles for preparation
Practical –
• Demonstration for preparation
• Hands on training in detail
Instructional Materials Development
Instruction – A deliberately arranged set of external events that are
designed to support internal learning process.
Instructional Materials – Instructional materials are printed or other
media intended to convey events of instruction.
Instructional Media – The physical means by which instructional
message is communicated.
Contd
Instructional Materials Development
Traditional Instructional Media –
• Chalk board (black board)
• White board
• Flannel board
• Flip chart
• Epidiascope
• Real objects (specimen)
• Models
• Simulators
Contd
Instructional Materials Development
Modern Instructional Media –
• Digital presenter
• Visualizer
• Smart Board
• Modern white board
• 3D printed models
• Simulator
• Augmented reality
• Virtual reality
Contd
Instructional Materials Development Contd
Instructional Design Theories
Instruction – a planned process that facilitates learning.
Instructional design – is the process of using our knowledge of how
pupil learn to develop effective instructional strategies that meet the needs of
the learners & the desired learning outcomes.
Steps –
1. Assess the situation (need assessment)
2. State the goal (objectives)
3. Select appropriate medium/ media
4. Implementation
5. Evaluation & revision
Elements of instruction –
Instructional design theories –
• Gagnes nine steps of instructional design 
• John Keller’s ARCS model
• Merrill’s component display theory
• Reigeluth’s elaboration theory
• Constructivism theory
Contd
Instructional Design Theories
Strategies –
• Organizational strategies
• Delivery strategies
• Management strategies
Attributes and Selection of Instructional Materials
Definition – The physical means by which an instructional message is
communicated (printed text, audio with tape, instructor talking etc.)
Elements –
Advantages –
Disadvantages –
Basis of selection –
• Learning objectives
• Instructional method
• Learner characteristics
• Teacher characteristics
• Course characteristics
• Media characteristics
• Practical issues (cost, physical environment, time,
alternative options, qualified staff, electricity,
hardware, software, alternate media, copyright etc.)
Attributes and Selection of Instructional Materials
Steps in the implementation –
1. Review instructional goals, objectives, audience & strategy
2. Determine the best suitable medium
3. Search for & review existing media/ materials
4. Adapt existing media/ materials, if necessary
5. If new media/ materials need to be developed –
6. Conduct formative evaluation
7. Implement/ apply
8. Evaluate/ revise
Contd
• Determine format,
script, visuals etc.
• Draft materials &
media
• Check for clarity &
flow of ideas
Basic Principles of Preparing Instructional Materials
Fundamental criteria for effectiveness of teaching/ learning
material (Audio-visual aids) are audibility & visibility.
Classification:
• Purely auditory
• Purely visual
o Require projection
o Doesn’t require projection
• Audio-visual
• Computer mediated materials
Basic Principles:
• Relevance
• Linkage
• Simplicity
• Emphasis
• Consistency in pattern and style
Basic Principles of Preparing Instructional Materials
• Characteristics:
• Include all necessary information
• Leave out unnecessary information
• Have information in the right order
• Describe all situations in decision-making
• Avoid vague instructions
• Advantages:
• Disadvantages:
contd
Basic Principles of Preparing Instructional Materials
• Importance:
• Aid teaching process
• Aid learning process
• Expose to virtual object
• Conceptualization
• Bridges the experimental gap
• Achievement of instructional goals 
Contd
Factors Affecting Media Selection:
• Students
• Objective
• Environment
• Resources
• Practicability
Preparing Effective Handout
Definition – an instructional tool that complements a teaching session
resulting in improved understanding of information & test performance.
Purpose –
• As a class outline or lesson summary
• As a guide to the student through a lecture
• To relieve students of taking notes
• To prepare students for a discussion
• Guide students to further reading
• Supply additional information not readily available elsewhere
Preparing Effective Handout
Types –
• Incomplete handout 
• Handout as class outline 
• Handout as instruction sheet 
• Thought stimulating handout 
• Handout as a guide to further reading 
Contd
Preparing OHP Transparencies & Overlays
OHP is a small machine designed to project an image onto a small screen or
whiteboard. OHP has been useful tool since 1930s.
Types
• Hand written
o Permanent ink
o Water soluble ink
• Photocopied
• Computer printed
Masking & Overlay 
Storage 
Principles of OHP transparency preparation
Organized
Aesthetically sound
Simple
Interesting
Short
O
A
S
I
S
Preparing OHP Transparencies & Overlays
Disadvantages
• Requires equipment &
electricity
• Must know the operation of the
equipment
• Room & audience size limitations
• Image quality – poor
• May blind the participants
• Group of transparencies may be
out of order, dropped, scratched
etc.
Contd
Advantages
• Simple to prepare, operate & update
• Daylight projection is possible
• Can project written & diagrammatic
information
• Control presentation by masking &
overlaying
• Maintain constant eye contact with
participants
• Suitable for both small & large group
• Materials like X-ray, MRI, CT scan etc.
can be shown
Preparing PowerPoint Presentation
Guidelines
• Be consistent
• Don’t distract
• Don’t overboard
Fonts – simple, legible, common, no variation, avoid ALL UPPERCASE
• Sizes – 40 32 28 24
• Types – Use sans serif fonts like Arial, Verdana, Tahoma, Comic
Avoid serif fonts like courier, Georgia, times new roman
• Styles – Underline, Bold & Italic as necessary
• Rule of 7 (rule of 6)
• Rule of 10/ 20/ 30
• 8 feet rule
Preparing PowerPoint Presentation
Guidelines
Color – Use color to give emphasis a point, to reinforce the logic
• Use black, blue, brown, green (avoid red, orange & yellow)
• Maximum 5 color palette for an entire presentation
• Same color for similar elements
• Dark text on light background in well-lit room
• Light text on dark background in dark room.
Background – consistent throughout, Simple, Attractive, Light
Animation – the way part of a slide appears (line, text, paragraph etc.)
Transition – the way each slide appears
Contd
Preparing PowerPoint Presentation
Guidelines
Tables/ Graphs – use graphs instead of tables as much as possible. Must
have title under each graph and over each table
Spelling/ grammar – proof read slides several times for - spelling mistakes,
use of repeated words, grammatical errors
Get someone else to check it
Conclusions – Use an effective & strong closing – audience remember last
words.
• Summarize main points
• Suggest future avenues of research
• Keep all visuals simple
Contd
Preparing PowerPoint Presentation
• Presenter view
• Screen off/ on
• Pointer options – Laser pointer, Pen, Highlighter
• Zooming
Contd
Working with Text
Points to be considered while preparing text-based instructional
materials –
• Reading comprehension process
• Variables in both reader & text
• Design of the instructional materials
Designing elements –
• Structure & Organization
• Readability & Legibility
• Visual illustration
Working with Text
Structure & Organization
 Verbal cueing
o Linguistic cueing
 Semantic – text
 Syntactic – grammer
o Instructional design in nature
 Typographical cueing
o Font
o Space between lines (1.3/ 1.5), paragraphs (double), more space
between sections than subsections.
• Face (Arial, Verdana, Calibri etc.)
• Styles (Bold, Italic, Underline)
• Size (24201612)
• Color (black, blue, brown etc.)
Contd
Working with Text
Readability & Legibility
 Readability – interaction between reader & text. Depends on
o Reader based factors
o Text based factors
 Legibility – inter-relationship between the size of type, length of line, &
space between the lines • Avoid fancy typefaces (sans serifs are always
better)
• Use 11-12 font size, with 1-2 inter line space
• Keep the line length within 120mm, left aligned (not
justified)
• Avoid ALL UPPERCASE letters, use sentence case
• Prior knowledge of the students
• Knowledge of the language
• Knowledge of the comprehension process
• Number of words per sentence
• How arguments are presented
• Place of example
Contd
Working with Text
Visual Illustrations - Picture & figures with words may enhance
understanding & its retention.
Properties of visual illustrations are –
• The message is not the visual alone – it is the interaction between the
visual stimulus & prior knowledge of the learner.
• They are used for specific affective or cognitive purpose – provide
visual explanation of verbal argument (visual memory > word memory).
• It has cross-reference between the text & visual illustration.
Contd
Reader
Text
Verbal Visual
Use of Photography in Instructional Materials
S= 1/2/4/8/15/30/60/125/250/500/1000/2000
A= 1.2/1.4/2/2.8/4/5.6/8/11/16/22 normally 6 stops (7 slots
i.e. 1.2 - 8 or 1.4 - 11 or 2 - 16 or 2.8 - 22)
F= (f auto/manual)
E= 25/50/64/100/200/400/800/1600/3200 (ISO/ASA/DIN)
Shutter speed
Aperture
Focus
Emulsion
S
A
F
E
S 1 2 4 8 15 30 60 125 250 500 1000 2000
A 22 16 11 8 5.6 4 2.8 2 1.4 1.2
100
Depth of field (DOF)?
Use of Photography in Instructional Materials Contd
Long Shot Extreme Long Shot
Full Shot
Medium Shot Close-up Shot Extreme Close-up
Use of Photography in Instructional Materials Contd
Macro Micro
Close-up Micro
Use of Photography in Instructional Materials Contd
Photo Editing – (with different layers, colors, filters)
Definition – visual multimedia source that combines a sequence of images to
form a moving picture. It usually have audio components that correspond with
the pictures being shown on the screen.
Types –
• Educational videos
• Promotional videos
• Informational videos
• Documentary films
• Entertainment videos
Videography
Benefits
• Facilitating thinking and problem solving
• Assisting with mastery learning
• Inspiring and engaging students
• Authentic learning opportunities
Advantages of Videos as educational medium:
• Concept clarity
• More interesting and engaging
• Learn more efficiently
• Retain and maintain interest for longer periods of time
• Innovative and effective means
• Demonstration-friendly
• Create experiences.
• It acts as a flexible teaching medium
• Whenever required can visualize the video and topic will be revised
and can also make notes
Videography Contd
Eight steps for using a video clip in teaching
1. Pick a particular clip
2. Prepare specific guidelines
3. Introduce the video briefly
4. Play the clip
5. Stop the clip or replay clip for a specific in-class exercise
6. Set a time for reflection
7. Assign an active learning activity
8. Structure a discussion
Videography Contd
Tips for use
• Keep the Video Short (2-4 minutes)
• Watch the whole video first
• Always preview the video
• Make it available outside the classroom
• Use videos your students want
Approaches of use
• Using only video and online learning (the Flipped classroom)
• Blending video into the existing curriculum and course
• Using video as a supplement for engagement or re-enforcements
Videography Contd
How to Use Video – 3 main types or stages
• Pre-viewing
• Viewing
• Post Viewing
Steps of Making a Video
• Pre-production
o Planning - Educational questions, Technical questions, Administrative questions
o Scripting
• Production (recording)
• Post-production
o Editing
o Reviewing
Videography Contd
xx
Videography
Study Guide
It is a mechanism for helping learners to take control of their own learning and
develop the habits of life-long learning and self-assessment.
Characteristics of study guide
• Part of self-instructional package
• Designed for students to use independently
• Contains some of contents as core that comes from text books
• Indicates what should be learned
• Indicates how can be learned
• Guide teachers to plan teaching & monitor the progress
Study Guide
How study guide is used
• Have a quick look at all the pages of the guide
• Read the guide prior to attend any learning session on particular topic
• Read suggested reading list (text books, reference books, journals etc.)
• Select the suitable learning materials
• Make comments about the guide, course, method (feedback)
• Plan the learning process & monitor overall progress by yourself
• Make revision
• Be familiar with the assessment system and get prepared accordingly
• Assess yourself to check your understanding of the subject
Contd
Study Guide
Components of study guide
• Topic
• Objectives
• Course outline
• Teaching methods
• Student’s comment on the guide
• Self-assessment/ clinical problem discussion
• Resources available
• Revision
• Suggested reading
• Glossary
Contd
Study Guide
Advantages of study guide
• Make the teaching-learning session student centered
• More emphasis on students – their needs, interest, expectations
• Student take responsibility for own learning
• Students decide objectives
• Select appropriate learning resources
• Decide sequence & pace
• Assess their own progress
• Active learning
• Teacher acts as a mentor
• Study guide is a media
Contd
Introduction to Social Media
Contd
Introduction to Social Media
Xx
Contd
Distance Learning
• Is a system of instructional learning
• The students & the
teachers are physically
separated
• Learning takes place
with technology
• The system uses
various combination of
telecommunications,
hardware & software
Distance Learning
Contd
Features –
• Teacher is separated geographically from the student
• Learning program is carefully planned & the learner is provided
necessary advice & assistance
• Work done by the student is reviewed by the teacher and
remedial work prescribed if needed (two way communication)
• The learner usually works on his own (occasionally small group
can tackle the program)
Distance Learning
Contd
Types –
• Type-I : Studying the printed material sent to the students
• Type-II : Type-I is supplemented by regular & obligatory teaching-
learning activities
• Type-III : Type-I & Type-II are supplemented by teachers &
demonstrations on radio & televisions
• Type-IV : A programmed computer performs important teaching
functions (tested by USAF)
Distance Learning
Contd
Role of teachers –
• Manager of the student’s learning activity
• Producer of learning resource material
• Producer of assessment exercise
Concerns –
• Attitude of teachers
• Attitude of learners
• Cost
Preparing Posters for Scientific Presentation
Poster
• Any piece of printed paper
• Designed to be attached to a vertical surface
• Typically includes both textual and graphic elements
• Designed to be both eye-catching and informative
Methods
• Approach one (one piece method)
• Approach two (panel method)
Advantages & Disadvantages 
Publishing Software
• Adobe InDesign
• Adobe PageMaker
• InPage
• Corel Draw
• MS Publisher
• MS PowerPoint
• QuarkXPress
Preparing Posters for Scientific Presentation
Stages in poster production
1. Choosing content
2. Making a plan
3. Preparing the final poster
4. Showing the poster
Contd
Types of posters
• Advertising
• Political
• Movie
• Affirmation & motivational posters
• Event
• Travel
• Educational
• Black light
• Research
International standard poster size
• Large – 24” x 36”
• Medium – 18” x 24”
• Small – 11” x 17”
Preparing Posters for Scientific Presentation
Attributes of a good poster
• Important information should be readable from about 10 feet away
• Title is short and draws interest
• Word count of about 300 to 800 words
• Text is clear and to the point
• Use of bullets, numbering, and headlines make it easy to read
• Effective use of graphics, color and fonts
• Consistent and clean layout
• Includes acknowledgments, your name and institutional affiliation
Contd
Preparing Posters for Scientific Presentation
Choosing content (less is often more)
• Purpose –
• Audience –
• What to look
• Place of display
• Guidance
Making a plan
• Structure – grid system
• Developing poster design
Contd
Preparing Posters for Scientific Presentation
Preparing your final poster – five main variables
• Font style - two types
• Type size –
• Leading (line spacing) – 1.5 or 2 space
• Alignment – left
• Case – avoid upper case
An effective poster is –
• Focused – on a single message.
• Graphic – lets graphs and images tell the story; uses text sparingly.
• Ordered – keeps the sequence well-ordered and obvious.
Contd
Other factors
• Color – small range,
• Poster’s background – light
• Diagrams – logical
• Numerical data
Preparing Posters for Scientific Presentation
Showing the poster
• Stand alone
• Stand next to it – talking to
people as they browse and
answering questions about
the poster.
• Handouts (printing A4
paper, bullet points etc.)
• Producing bullet-point
summaries of panel posters
Contd
Summary
Basic Principles of Preparing Instructional Materials
Advantages:
• Make the learning session more interactive
• Helps in necessary note taking by students
• Students find what actually they want to know
• Students can prepare their lesson
• Teacher can disseminate new information
• It serves as record of the teachers’ classes
• Teacher can evaluate himself
• It makes easier for another faculty to conduct the class
• Rare events can be viewed by large number of students
• It facilitates distance learning
contd
Basic Principles of Preparing Instructional Materials
Disadvantages:
• Student can be less dependent on text books, reference materials,
classes & teachers
• Teachers may be more dependent on his own materials than searching
on new texts & reference materials
• Teachers may not be well prepared sometime
contd
Basic Principles of Preparing Instructional Materials
Achievement of instructional goals –
• Attracting & sustaining students’ attention
• Developing students’ interest in the subject
• Adjusting the learning climate
• Promotes acceptance of an idea by the learner
• Works as document
• Helps in the time management
contd
Attributes of Selection of Instructional Materials
Elements of a systematic course of teaching : contd
1. Specify the
aim/ objectives
2. Specify the
content
3. Evaluate the
situation & students’
foreknowledge
4. Determine
strategy
5. Organization
of group
6. Allot time
7. Allot space
8. Choose
teaching aid
9. Evaluate
10. Analyze11. Feedback
Attributes and Selection of Instructional Materials
Advantages –
• Make the teaching sessions more interactive
• Students find what actually they want to know
• Deep learners can proceed based on this materials & references
• Students can prepare their lesson & for examination
• Teacher can disseminate new information
• It serves as a record of the teachers’ classes
• Another faculty can conduct the class if necessary
• Tool for evaluation of a teacher
• Rare events can be viewed to large number of students
• Facilitate distance learning
Contd
Attributes and Selection of Instructional Materials
Disadvantages –
• Students can be less dependent on text books, reference materials &
even classes & teachers
• Teachers are also more dependent on his own materials than
searching on new texts & reference materials
• Sometimes teachers are not well prepared
Contd
Instructional Design Theories
Elements of instruction –
• Learner characteristics
o Academic background
o Personal or social characteristics – age, intelligence, attitude etc.
o Characteristics of the non-conventional learner – cultural diversity,
disability, primary language etc.
o Learning styles
o Motivation
• The objectives
• The methods
o Defining the content
o Sequence the content
o Deliver the instruction – whole group/ small group/ individualized
• The assessment
Contd
Instructional Design Theories
• Gagnes events of instructional design –
1. Gaining attention
2. Informing the learner of the objectives
3. Stimulating recall of pre-requisite learning
4. Presenting the stimulus material
5. Providing learning guidance
6. Eliciting the performance
7. Feedback about performance correctness
8. Assessing the performance
9. Enhancing retention and transfer
Contd
Prepare the learner
(Schema activation)
Actual teaching/ learning
process (Schema construction)
Enhance learning
(Schema refinement)
John Keller’s ARCS model of motivational design –
• Attention – one must gain and keep the attention by different ways
(sensory stimuli, inquiry arousal and variability)
• Relevance – learner must believe that learning is relevant to his
course/ job/ daily life.
• Confidence – learners should feel that they could achieve the learning
goals
• Satisfaction – learners must obtain some type of satisfaction or reward
from the learning experience (performance, score, passing certificate,
praise etc.)
Contd
Instructional Design Theories
Incomplete handout
• To guide the students during a lesson
• Headings and subheadings are listed with adequate space
intervening for note taking by the students
• Encourage the students to listen and process the information instead
of being passive
Preparing Effective Handout
Handout as class outline
• Objectives of the lesson
• Teaching learning methods planned
• Nature of assessment and assignments
• A list of appropriate reading
Handout as instruction sheet
• Clear and easy explanation of procedure
• The most likely problems with possible solutions
Preparing Effective Handout
Thought stimulating handout
• To stimulate thought before a lesson to facilitate discussion
• Contents are in the form of –
o Thought provoking questions
o Issues raised but left unanswered
Guide to further reading
• Comprehensive reference list to guide and stimulate reading
• Important readings to be highlighted
• Level of difficulty and library location – where possible
Preparing Effective Handout
Contd
Preparing OHP Transparencies & Overlays
Storing transparencies
• Avoid dust, scratches and
impressions of moist hands
• Punch holes into the
transparencies and store
them in letter files (index
files).
• Place paper sheets in
between transparencies.
Preparing PowerPoint Presentation
Color codes –
• Dark blue – calming effect
• Red or orange – trigger excitement or emotional response
• Green – make comfortable
• Yellow – quick attention
• Gray – promote quality
– honesty/ sincerity
• Black – not appealing
Contd
Preparing PowerPoint Presentation
Tables/ graphs – use graphs instead of tables as much as possible. Must
have title under each graph and over each table
• Emphasize key parts, so that the points are stronger
• Animate the graph/ table elements
• Use drawing tools to highlight a portion of a table/ graph
• Use strong contrasting color for drawing element
• Use callout box drawing tool, if required
• Minor gridlines not required
Contd
Distance Learning Contd
• Introduction
• Aim
• Course structure
• Course assessment
• Accreditation
• Course team
• Entry requirements
• Course fees
• How to apply
• Address
Components –
What media can be used –
• Television
• Radio
• Audiotape
• Computers
• Interactive video disk
Distribution of materials –
• Post
• By hand
• Radio & television broadcast
• Telephone
• Internet
Points to Ponder
• Don’t silent your phones (switch off)
• No note taking from the screen (you’ll get handout)
• No question during my lecture (you’ll get time after the session)
• No side talking (you’ll get time after the class)

Instructional material development

  • 1.
  • 2.
    Instructional Materials Development Part-I(Paper-II) Md Fazlul Kabir MMEd-15 (2018)
  • 3.
    Student centered approachanswers four questions Content – what knowledge and skills will be studied? Process – what materials and procedures will be used? Product – what will students produce to demonstrate their learning? Evaluation – how will the learning be assessed?
  • 4.
  • 5.
    Objectives • To recapitulateand summarize the concepts of ‘Instructional Material Development’ in front of learned faculty members of CME and members of MMEd-15 (2018). • The session will be evaluated by the respected faculty members.
  • 6.
    Instructional Materials Development Theoretical– • Types of Instructional materials • Their characteristics/ advantages/ disadvantages • Principles for preparation Practical – • Demonstration for preparation • Hands on training in detail
  • 7.
    Instructional Materials Development Instruction– A deliberately arranged set of external events that are designed to support internal learning process. Instructional Materials – Instructional materials are printed or other media intended to convey events of instruction. Instructional Media – The physical means by which instructional message is communicated. Contd
  • 8.
    Instructional Materials Development TraditionalInstructional Media – • Chalk board (black board) • White board • Flannel board • Flip chart • Epidiascope • Real objects (specimen) • Models • Simulators Contd
  • 9.
    Instructional Materials Development ModernInstructional Media – • Digital presenter • Visualizer • Smart Board • Modern white board • 3D printed models • Simulator • Augmented reality • Virtual reality Contd
  • 10.
  • 11.
    Instructional Design Theories Instruction– a planned process that facilitates learning. Instructional design – is the process of using our knowledge of how pupil learn to develop effective instructional strategies that meet the needs of the learners & the desired learning outcomes. Steps – 1. Assess the situation (need assessment) 2. State the goal (objectives) 3. Select appropriate medium/ media 4. Implementation 5. Evaluation & revision
  • 12.
    Elements of instruction– Instructional design theories – • Gagnes nine steps of instructional design  • John Keller’s ARCS model • Merrill’s component display theory • Reigeluth’s elaboration theory • Constructivism theory Contd Instructional Design Theories Strategies – • Organizational strategies • Delivery strategies • Management strategies
  • 13.
    Attributes and Selectionof Instructional Materials Definition – The physical means by which an instructional message is communicated (printed text, audio with tape, instructor talking etc.) Elements – Advantages – Disadvantages – Basis of selection – • Learning objectives • Instructional method • Learner characteristics • Teacher characteristics • Course characteristics • Media characteristics • Practical issues (cost, physical environment, time, alternative options, qualified staff, electricity, hardware, software, alternate media, copyright etc.)
  • 14.
    Attributes and Selectionof Instructional Materials Steps in the implementation – 1. Review instructional goals, objectives, audience & strategy 2. Determine the best suitable medium 3. Search for & review existing media/ materials 4. Adapt existing media/ materials, if necessary 5. If new media/ materials need to be developed – 6. Conduct formative evaluation 7. Implement/ apply 8. Evaluate/ revise Contd • Determine format, script, visuals etc. • Draft materials & media • Check for clarity & flow of ideas
  • 15.
    Basic Principles ofPreparing Instructional Materials Fundamental criteria for effectiveness of teaching/ learning material (Audio-visual aids) are audibility & visibility. Classification: • Purely auditory • Purely visual o Require projection o Doesn’t require projection • Audio-visual • Computer mediated materials Basic Principles: • Relevance • Linkage • Simplicity • Emphasis • Consistency in pattern and style
  • 16.
    Basic Principles ofPreparing Instructional Materials • Characteristics: • Include all necessary information • Leave out unnecessary information • Have information in the right order • Describe all situations in decision-making • Avoid vague instructions • Advantages: • Disadvantages: contd
  • 17.
    Basic Principles ofPreparing Instructional Materials • Importance: • Aid teaching process • Aid learning process • Expose to virtual object • Conceptualization • Bridges the experimental gap • Achievement of instructional goals  Contd Factors Affecting Media Selection: • Students • Objective • Environment • Resources • Practicability
  • 18.
    Preparing Effective Handout Definition– an instructional tool that complements a teaching session resulting in improved understanding of information & test performance. Purpose – • As a class outline or lesson summary • As a guide to the student through a lecture • To relieve students of taking notes • To prepare students for a discussion • Guide students to further reading • Supply additional information not readily available elsewhere
  • 19.
    Preparing Effective Handout Types– • Incomplete handout  • Handout as class outline  • Handout as instruction sheet  • Thought stimulating handout  • Handout as a guide to further reading  Contd
  • 20.
    Preparing OHP Transparencies& Overlays OHP is a small machine designed to project an image onto a small screen or whiteboard. OHP has been useful tool since 1930s. Types • Hand written o Permanent ink o Water soluble ink • Photocopied • Computer printed Masking & Overlay  Storage  Principles of OHP transparency preparation Organized Aesthetically sound Simple Interesting Short O A S I S
  • 21.
    Preparing OHP Transparencies& Overlays Disadvantages • Requires equipment & electricity • Must know the operation of the equipment • Room & audience size limitations • Image quality – poor • May blind the participants • Group of transparencies may be out of order, dropped, scratched etc. Contd Advantages • Simple to prepare, operate & update • Daylight projection is possible • Can project written & diagrammatic information • Control presentation by masking & overlaying • Maintain constant eye contact with participants • Suitable for both small & large group • Materials like X-ray, MRI, CT scan etc. can be shown
  • 22.
    Preparing PowerPoint Presentation Guidelines •Be consistent • Don’t distract • Don’t overboard Fonts – simple, legible, common, no variation, avoid ALL UPPERCASE • Sizes – 40 32 28 24 • Types – Use sans serif fonts like Arial, Verdana, Tahoma, Comic Avoid serif fonts like courier, Georgia, times new roman • Styles – Underline, Bold & Italic as necessary • Rule of 7 (rule of 6) • Rule of 10/ 20/ 30 • 8 feet rule
  • 23.
    Preparing PowerPoint Presentation Guidelines Color– Use color to give emphasis a point, to reinforce the logic • Use black, blue, brown, green (avoid red, orange & yellow) • Maximum 5 color palette for an entire presentation • Same color for similar elements • Dark text on light background in well-lit room • Light text on dark background in dark room. Background – consistent throughout, Simple, Attractive, Light Animation – the way part of a slide appears (line, text, paragraph etc.) Transition – the way each slide appears Contd
  • 24.
    Preparing PowerPoint Presentation Guidelines Tables/Graphs – use graphs instead of tables as much as possible. Must have title under each graph and over each table Spelling/ grammar – proof read slides several times for - spelling mistakes, use of repeated words, grammatical errors Get someone else to check it Conclusions – Use an effective & strong closing – audience remember last words. • Summarize main points • Suggest future avenues of research • Keep all visuals simple Contd
  • 25.
    Preparing PowerPoint Presentation •Presenter view • Screen off/ on • Pointer options – Laser pointer, Pen, Highlighter • Zooming Contd
  • 26.
    Working with Text Pointsto be considered while preparing text-based instructional materials – • Reading comprehension process • Variables in both reader & text • Design of the instructional materials Designing elements – • Structure & Organization • Readability & Legibility • Visual illustration
  • 27.
    Working with Text Structure& Organization  Verbal cueing o Linguistic cueing  Semantic – text  Syntactic – grammer o Instructional design in nature  Typographical cueing o Font o Space between lines (1.3/ 1.5), paragraphs (double), more space between sections than subsections. • Face (Arial, Verdana, Calibri etc.) • Styles (Bold, Italic, Underline) • Size (24201612) • Color (black, blue, brown etc.) Contd
  • 28.
    Working with Text Readability& Legibility  Readability – interaction between reader & text. Depends on o Reader based factors o Text based factors  Legibility – inter-relationship between the size of type, length of line, & space between the lines • Avoid fancy typefaces (sans serifs are always better) • Use 11-12 font size, with 1-2 inter line space • Keep the line length within 120mm, left aligned (not justified) • Avoid ALL UPPERCASE letters, use sentence case • Prior knowledge of the students • Knowledge of the language • Knowledge of the comprehension process • Number of words per sentence • How arguments are presented • Place of example Contd
  • 29.
    Working with Text VisualIllustrations - Picture & figures with words may enhance understanding & its retention. Properties of visual illustrations are – • The message is not the visual alone – it is the interaction between the visual stimulus & prior knowledge of the learner. • They are used for specific affective or cognitive purpose – provide visual explanation of verbal argument (visual memory > word memory). • It has cross-reference between the text & visual illustration. Contd Reader Text Verbal Visual
  • 30.
    Use of Photographyin Instructional Materials S= 1/2/4/8/15/30/60/125/250/500/1000/2000 A= 1.2/1.4/2/2.8/4/5.6/8/11/16/22 normally 6 stops (7 slots i.e. 1.2 - 8 or 1.4 - 11 or 2 - 16 or 2.8 - 22) F= (f auto/manual) E= 25/50/64/100/200/400/800/1600/3200 (ISO/ASA/DIN) Shutter speed Aperture Focus Emulsion S A F E S 1 2 4 8 15 30 60 125 250 500 1000 2000 A 22 16 11 8 5.6 4 2.8 2 1.4 1.2 100 Depth of field (DOF)?
  • 31.
    Use of Photographyin Instructional Materials Contd
  • 32.
    Use of Photographyin Instructional Materials Contd Long Shot Extreme Long Shot Full Shot Medium Shot Close-up Shot Extreme Close-up
  • 33.
    Use of Photographyin Instructional Materials Contd Macro Micro Close-up Micro
  • 34.
    Use of Photographyin Instructional Materials Contd Photo Editing – (with different layers, colors, filters)
  • 35.
    Definition – visualmultimedia source that combines a sequence of images to form a moving picture. It usually have audio components that correspond with the pictures being shown on the screen. Types – • Educational videos • Promotional videos • Informational videos • Documentary films • Entertainment videos Videography Benefits • Facilitating thinking and problem solving • Assisting with mastery learning • Inspiring and engaging students • Authentic learning opportunities
  • 36.
    Advantages of Videosas educational medium: • Concept clarity • More interesting and engaging • Learn more efficiently • Retain and maintain interest for longer periods of time • Innovative and effective means • Demonstration-friendly • Create experiences. • It acts as a flexible teaching medium • Whenever required can visualize the video and topic will be revised and can also make notes Videography Contd
  • 37.
    Eight steps forusing a video clip in teaching 1. Pick a particular clip 2. Prepare specific guidelines 3. Introduce the video briefly 4. Play the clip 5. Stop the clip or replay clip for a specific in-class exercise 6. Set a time for reflection 7. Assign an active learning activity 8. Structure a discussion Videography Contd
  • 38.
    Tips for use •Keep the Video Short (2-4 minutes) • Watch the whole video first • Always preview the video • Make it available outside the classroom • Use videos your students want Approaches of use • Using only video and online learning (the Flipped classroom) • Blending video into the existing curriculum and course • Using video as a supplement for engagement or re-enforcements Videography Contd
  • 39.
    How to UseVideo – 3 main types or stages • Pre-viewing • Viewing • Post Viewing Steps of Making a Video • Pre-production o Planning - Educational questions, Technical questions, Administrative questions o Scripting • Production (recording) • Post-production o Editing o Reviewing Videography Contd
  • 40.
  • 41.
    Study Guide It isa mechanism for helping learners to take control of their own learning and develop the habits of life-long learning and self-assessment. Characteristics of study guide • Part of self-instructional package • Designed for students to use independently • Contains some of contents as core that comes from text books • Indicates what should be learned • Indicates how can be learned • Guide teachers to plan teaching & monitor the progress
  • 42.
    Study Guide How studyguide is used • Have a quick look at all the pages of the guide • Read the guide prior to attend any learning session on particular topic • Read suggested reading list (text books, reference books, journals etc.) • Select the suitable learning materials • Make comments about the guide, course, method (feedback) • Plan the learning process & monitor overall progress by yourself • Make revision • Be familiar with the assessment system and get prepared accordingly • Assess yourself to check your understanding of the subject Contd
  • 43.
    Study Guide Components ofstudy guide • Topic • Objectives • Course outline • Teaching methods • Student’s comment on the guide • Self-assessment/ clinical problem discussion • Resources available • Revision • Suggested reading • Glossary Contd
  • 44.
    Study Guide Advantages ofstudy guide • Make the teaching-learning session student centered • More emphasis on students – their needs, interest, expectations • Student take responsibility for own learning • Students decide objectives • Select appropriate learning resources • Decide sequence & pace • Assess their own progress • Active learning • Teacher acts as a mentor • Study guide is a media Contd
  • 45.
  • 46.
  • 47.
    Introduction to SocialMedia Xx Contd
  • 48.
    Distance Learning • Isa system of instructional learning • The students & the teachers are physically separated • Learning takes place with technology • The system uses various combination of telecommunications, hardware & software
  • 49.
    Distance Learning Contd Features – •Teacher is separated geographically from the student • Learning program is carefully planned & the learner is provided necessary advice & assistance • Work done by the student is reviewed by the teacher and remedial work prescribed if needed (two way communication) • The learner usually works on his own (occasionally small group can tackle the program)
  • 50.
    Distance Learning Contd Types – •Type-I : Studying the printed material sent to the students • Type-II : Type-I is supplemented by regular & obligatory teaching- learning activities • Type-III : Type-I & Type-II are supplemented by teachers & demonstrations on radio & televisions • Type-IV : A programmed computer performs important teaching functions (tested by USAF)
  • 51.
    Distance Learning Contd Role ofteachers – • Manager of the student’s learning activity • Producer of learning resource material • Producer of assessment exercise Concerns – • Attitude of teachers • Attitude of learners • Cost
  • 52.
    Preparing Posters forScientific Presentation Poster • Any piece of printed paper • Designed to be attached to a vertical surface • Typically includes both textual and graphic elements • Designed to be both eye-catching and informative Methods • Approach one (one piece method) • Approach two (panel method) Advantages & Disadvantages  Publishing Software • Adobe InDesign • Adobe PageMaker • InPage • Corel Draw • MS Publisher • MS PowerPoint • QuarkXPress
  • 53.
    Preparing Posters forScientific Presentation Stages in poster production 1. Choosing content 2. Making a plan 3. Preparing the final poster 4. Showing the poster Contd Types of posters • Advertising • Political • Movie • Affirmation & motivational posters • Event • Travel • Educational • Black light • Research International standard poster size • Large – 24” x 36” • Medium – 18” x 24” • Small – 11” x 17”
  • 54.
    Preparing Posters forScientific Presentation Attributes of a good poster • Important information should be readable from about 10 feet away • Title is short and draws interest • Word count of about 300 to 800 words • Text is clear and to the point • Use of bullets, numbering, and headlines make it easy to read • Effective use of graphics, color and fonts • Consistent and clean layout • Includes acknowledgments, your name and institutional affiliation Contd
  • 55.
    Preparing Posters forScientific Presentation Choosing content (less is often more) • Purpose – • Audience – • What to look • Place of display • Guidance Making a plan • Structure – grid system • Developing poster design Contd
  • 56.
    Preparing Posters forScientific Presentation Preparing your final poster – five main variables • Font style - two types • Type size – • Leading (line spacing) – 1.5 or 2 space • Alignment – left • Case – avoid upper case An effective poster is – • Focused – on a single message. • Graphic – lets graphs and images tell the story; uses text sparingly. • Ordered – keeps the sequence well-ordered and obvious. Contd Other factors • Color – small range, • Poster’s background – light • Diagrams – logical • Numerical data
  • 57.
    Preparing Posters forScientific Presentation Showing the poster • Stand alone • Stand next to it – talking to people as they browse and answering questions about the poster. • Handouts (printing A4 paper, bullet points etc.) • Producing bullet-point summaries of panel posters Contd
  • 58.
  • 62.
    Basic Principles ofPreparing Instructional Materials Advantages: • Make the learning session more interactive • Helps in necessary note taking by students • Students find what actually they want to know • Students can prepare their lesson • Teacher can disseminate new information • It serves as record of the teachers’ classes • Teacher can evaluate himself • It makes easier for another faculty to conduct the class • Rare events can be viewed by large number of students • It facilitates distance learning contd
  • 63.
    Basic Principles ofPreparing Instructional Materials Disadvantages: • Student can be less dependent on text books, reference materials, classes & teachers • Teachers may be more dependent on his own materials than searching on new texts & reference materials • Teachers may not be well prepared sometime contd
  • 64.
    Basic Principles ofPreparing Instructional Materials Achievement of instructional goals – • Attracting & sustaining students’ attention • Developing students’ interest in the subject • Adjusting the learning climate • Promotes acceptance of an idea by the learner • Works as document • Helps in the time management contd
  • 65.
    Attributes of Selectionof Instructional Materials Elements of a systematic course of teaching : contd 1. Specify the aim/ objectives 2. Specify the content 3. Evaluate the situation & students’ foreknowledge 4. Determine strategy 5. Organization of group 6. Allot time 7. Allot space 8. Choose teaching aid 9. Evaluate 10. Analyze11. Feedback
  • 66.
    Attributes and Selectionof Instructional Materials Advantages – • Make the teaching sessions more interactive • Students find what actually they want to know • Deep learners can proceed based on this materials & references • Students can prepare their lesson & for examination • Teacher can disseminate new information • It serves as a record of the teachers’ classes • Another faculty can conduct the class if necessary • Tool for evaluation of a teacher • Rare events can be viewed to large number of students • Facilitate distance learning Contd
  • 67.
    Attributes and Selectionof Instructional Materials Disadvantages – • Students can be less dependent on text books, reference materials & even classes & teachers • Teachers are also more dependent on his own materials than searching on new texts & reference materials • Sometimes teachers are not well prepared Contd
  • 68.
    Instructional Design Theories Elementsof instruction – • Learner characteristics o Academic background o Personal or social characteristics – age, intelligence, attitude etc. o Characteristics of the non-conventional learner – cultural diversity, disability, primary language etc. o Learning styles o Motivation • The objectives • The methods o Defining the content o Sequence the content o Deliver the instruction – whole group/ small group/ individualized • The assessment Contd
  • 69.
    Instructional Design Theories •Gagnes events of instructional design – 1. Gaining attention 2. Informing the learner of the objectives 3. Stimulating recall of pre-requisite learning 4. Presenting the stimulus material 5. Providing learning guidance 6. Eliciting the performance 7. Feedback about performance correctness 8. Assessing the performance 9. Enhancing retention and transfer Contd Prepare the learner (Schema activation) Actual teaching/ learning process (Schema construction) Enhance learning (Schema refinement)
  • 70.
    John Keller’s ARCSmodel of motivational design – • Attention – one must gain and keep the attention by different ways (sensory stimuli, inquiry arousal and variability) • Relevance – learner must believe that learning is relevant to his course/ job/ daily life. • Confidence – learners should feel that they could achieve the learning goals • Satisfaction – learners must obtain some type of satisfaction or reward from the learning experience (performance, score, passing certificate, praise etc.) Contd Instructional Design Theories
  • 71.
    Incomplete handout • Toguide the students during a lesson • Headings and subheadings are listed with adequate space intervening for note taking by the students • Encourage the students to listen and process the information instead of being passive Preparing Effective Handout
  • 72.
    Handout as classoutline • Objectives of the lesson • Teaching learning methods planned • Nature of assessment and assignments • A list of appropriate reading Handout as instruction sheet • Clear and easy explanation of procedure • The most likely problems with possible solutions Preparing Effective Handout
  • 73.
    Thought stimulating handout •To stimulate thought before a lesson to facilitate discussion • Contents are in the form of – o Thought provoking questions o Issues raised but left unanswered Guide to further reading • Comprehensive reference list to guide and stimulate reading • Important readings to be highlighted • Level of difficulty and library location – where possible Preparing Effective Handout
  • 74.
    Contd Preparing OHP Transparencies& Overlays Storing transparencies • Avoid dust, scratches and impressions of moist hands • Punch holes into the transparencies and store them in letter files (index files). • Place paper sheets in between transparencies.
  • 75.
    Preparing PowerPoint Presentation Colorcodes – • Dark blue – calming effect • Red or orange – trigger excitement or emotional response • Green – make comfortable • Yellow – quick attention • Gray – promote quality – honesty/ sincerity • Black – not appealing Contd
  • 76.
    Preparing PowerPoint Presentation Tables/graphs – use graphs instead of tables as much as possible. Must have title under each graph and over each table • Emphasize key parts, so that the points are stronger • Animate the graph/ table elements • Use drawing tools to highlight a portion of a table/ graph • Use strong contrasting color for drawing element • Use callout box drawing tool, if required • Minor gridlines not required Contd
  • 77.
    Distance Learning Contd •Introduction • Aim • Course structure • Course assessment • Accreditation • Course team • Entry requirements • Course fees • How to apply • Address Components – What media can be used – • Television • Radio • Audiotape • Computers • Interactive video disk Distribution of materials – • Post • By hand • Radio & television broadcast • Telephone • Internet
  • 78.
    Points to Ponder •Don’t silent your phones (switch off) • No note taking from the screen (you’ll get handout) • No question during my lecture (you’ll get time after the session) • No side talking (you’ll get time after the class)