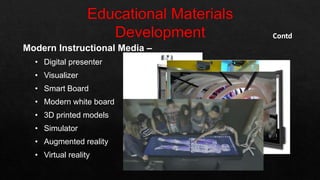
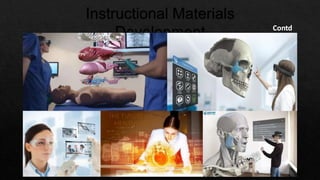
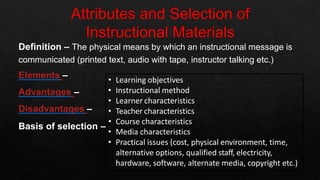
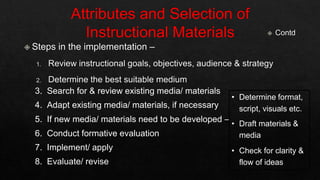
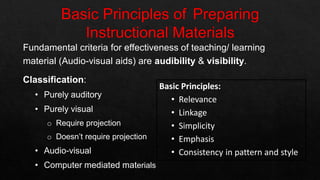
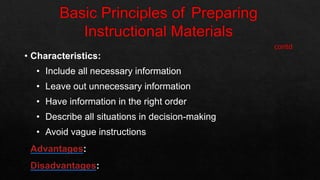
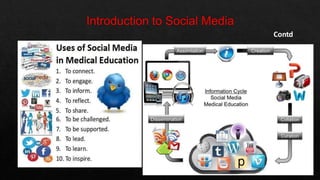
Student
Parenting
Theoretical –
• Types of Instructional materials
• Their characteristics/ advantages/ disadvantages
• Principles for preparation
Practical –
• Demonstration for preparation
• Hands on training in detail
Contd
Instruction – A deliberately arranged set of external events that are
designed to support internal learning process.
Instructional Materials – Instructional materials are printed or other
media intended to convey events of instruction.
Instructional Media – The physical means by which instructional
message is communicated.
Traditional Instructional Media –
• Chalk board (black board)
• White board
• Flannel board
• Flip chart
• Epidiascope
• Real objects (specimen)
• Models
• Simulators
Contd
Modern Instructional Media –
• Digital presenter
• Visualizer
• Smart Board
• Modern white board
• 3D printed models
• Simulator
• Augmented reality
• Virtual reality
Contd
Contd
Instruction – a planned process that facilitates learning.
Instructional design – is the process of using our knowledge of how
pupil learn to develop effective instructional strategies that meet the needs of
the learners & the desired learning outcomes.
Steps –
1. Assess the situation (need assessment)
2. State the goal (objectives)
3. Select appropriate medium/ media
4. Implementation
5. Evaluation & revision
Elements of instruction –
Instructional design theories –
• Gagnes nine steps of instructional design 
• John Keller’s ARCS model
• Merrill’s component display theory
• Reigeluth’s elaboration theory
• Constructivism theory
Contd
Strategies –
• Organizational strategies
• Delivery strategies
• Management strategies
Definition – The physical means by which an instructional message is
communicated (printed text, audio with tape, instructor talking etc.)
Elements –
Advantages –
Disadvantages –
• Learning objectives
• Instructional method
• Learner characteristics
• Teacher characteristics
Basis of selection –
• Course characteristics
• Media characteristics
• Practical issues (cost, physical environment, time,
alternative options, qualified staff, electricity,
hardware, software, alternate media, copyright etc.)
3. Search for & review existing media/ materials
4. Adapt existing media/ materials, if necessary
5. If new media/ materials need to be developed –
6. Conduct formative evaluation
7. Implement/ apply
8. Evaluate/ revise
• Determine format,
script, visuals etc.
• Draft materials &
media
• Check for clarity &
flow of ideas
Fundamental criteria for effectiveness of teaching/ learning
material (Audio-visual aids) are audibility & visibility.
Classification:
• Purely auditory
• Purely visual
o Require projection
o Doesn’t require projection
• Audio-visual
• Computer mediated materials
Basic Principles:
• Relevance
• Linkage
• Simplicity
• Emphasis
• Consistency in pattern and style
• Characteristics:
• Include all necessary information
• Leave out unnecessary information
• Have information in the right order
• Describe all situations in decision-making
• Avoid vague instructions
• Advantages:
• Disadvantages:
• Importance:
• Aid teaching process
• Aid learning process
• Expose to virtual object
• Conceptualization
• Bridges the experimental gap
• Achievement of instructional goals 
Factors Affecting Media Selection:
• Students
• Objective
• Environment
• Resources
• Practicability
Definition – an instructional tool that complements a teaching session
resulting in improved understanding of information & test performance.
Purpose –
• As a class outline or lesson summary
• As a guide to the student through a lecture
• To relieve students of taking notes
• To prepare students for a discussion
• Guide students to further reading
• Supply additional information not readily available elsewhere
Types –
• Incomplete handout 
• Handout as class outline 
• Handout as instruction sheet 
• Thought stimulating handout 
• Handout as a guide to further reading 
Contd
OHP is a small machine designed to project an image onto a small screen or
whiteboard. OHP has been useful tool since 1930s.
Types
• Hand written
o Permanent ink
o Water soluble ink
• Photocopied
• Computer printed
Masking & Overlay 
Storage 
Principles of OHP transparency preparation
Organized
Aesthetically sound
Simple
Interesting
Short
O
A
S
I
S
Disadvantages
• Requires equipment &
electricity
• Must know the operation of the
equipment
• Room & audience size limitations
• Image quality – poor
• May blind the participants
• Group of transparencies may be
out of order, dropped, scratched
etc.
Contd
Advantages
• Simple to prepare, operate & update
• Daylight projection is possible
• Can project written & diagrammatic
information
• Control presentation by masking &
overlaying
• Maintain constant eye contact with
participants
• Suitable for both small & large group
• Materials like X-ray, MRI, CT scan etc.
can be shown
Guidelines
• Be consistent
• Don’t distract
• Don’t overboard
Fonts – simple, legible, common, no variation, avoid ALL UPPERCASE
• Sizes – 40 32 28 24
• Types – Use sans serif fonts like Arial, Verdana, Tahoma, Comic
Avoid serif fonts like courier, Georgia, times new roman
• Styles – Underline, Bold & Italic as necessary
• Rule of 7 (rule of 6)
• Rule of 10/ 20/ 30
• 8 feet rule
Guidelines
Color – Use color to give emphasis a point, to reinforce the logic
• Use black, blue, brown, green (avoid red, orange & yellow)
• Maximum 5 color palette for an entire presentation
• Same color for similar elements
• Dark text on light background in well-lit room
• Light text on dark background in dark room.
Background – consistent throughout, Simple, Attractive, Light
Animation – the way part of a slide appears (line, text, paragraph etc.)
Transition – the way each slide appears
Contd
Guidelines
Tables/ Graphs – use graphs instead of tables as much as possible. Must
have title under each graph and over each table
Spelling/ grammar – proof read slides several times for - spelling mistakes,
use of repeated words, grammatical errors
Get someone else to check it
Conclusions – Use an effective & strong closing – audience remember last
words.
• Summarize main points
• Suggest future avenues of research
• Keep all visuals simple
Contd
• Presenter view
• Screen off/ on
• Pointer options – Laser pointer, Pen, Highlighter
• Zooming
Contd
Points to be considered while preparing text-based instructional
materials –
• Reading comprehension process
• Variables in both reader & text
• Design of the instructional materials
Designing elements –
• Structure & Organization
• Readability & Legibility
• Visual illustration
Structure & Organization
 Verbal cueing
o Linguistic cueing
 Semantic – text
 Syntactic – grammer
o Instructional design in nature
 Typographical cueing
o Font
o Space between lines (1.3/ 1.5), paragraphs (double), more space
between sections than subsections.
• Face (Arial, Verdana, Calibri etc.)
• Styles (Bold, Italic, Underline)
• Size (24201612)
• Color (black, blue, brown etc.)
Contd
Readability & Legibility
 Readability – interaction between reader & text. Depends on
o Reader based factors
o Text based factors
 Legibility – inter-relationship between the size of type, length of line, &
space between the lines • Avoid fancy typefaces (sans serifs are always
better)
• Use 11-12 font size, with 1-2 inter line space
• Keep the line length within 120mm, left aligned (not
justified)
• Avoid ALL UPPERCASE letters, use sentence case
• Prior knowledge of the students
• Knowledge of the language
• Knowledge of the comprehension process
• Number of words per sentence
• How arguments are presented
• Place of example
Contd
Visual Illustrations - Picture & figures with words may enhance
understanding & its retention.
Properties of visual illustrations are –
• The message is not the visual alone – it is the interaction between the
visual stimulus & prior knowledge of the learner.
• They are used for specific affective or cognitive purpose – provide
visual explanation of verbal argument (visual memory > word memory).
• It has cross-reference between the text & visual illustration.
Contd
Reader
Text
Verbal Visual
S= 1/2/4/8/15/30/60/125/250/500/1000/2000
A= 1.2/1.4/2/2.8/4/5.6/8/11/16/22 normally 6 stops (7 slots
i.e. 1.2 - 8 or 1.4 - 11 or 2 - 16 or 2.8 - 22)
F= (f auto/manual)
E= 25/50/64/100/200/400/800/1600/3200 (ISO/ASA/DIN)
Shutter speed
Aperture
Focus
Emulsion
S
A
F
E
S 1 2 4 8 15 30 60 125 250 500 1000 2000
A 22 16 11 8 5.6 4 2.8 2 1.4 1.2
100
Depth of field (DOF)?
Contd
Contd
Long Shot Extreme Long Shot
Full Shot
Medium Shot Close-up Shot Extreme Close-up
Contd
Macro Micro
Close-up Micro
Use of Photography in Instructional Materials Contd
Photo Editing – (with different layers, colors, filters)
Definition – visual multimedia source that combines a sequence of images to
form a moving picture. It usually have audio components that correspond with
the pictures being shown on the screen.
Types –
• Educational videos
• Promotional videos
• Informational videos
• Documentary films
• Entertainment videos
Benefits
• Facilitating thinking and problem solving
• Assisting with mastery learning
• Inspiring and engaging students
• Authentic learning opportunities
Advantages of Videos as educational medium:
• Concept clarity
• More interesting and engaging
• Learn more efficiently
• Retain and maintain interest for longer periods of time
• Innovative and effective means
• Demonstration-friendly
• Create experiences.
• It acts as a flexible teaching medium
• Whenever required can visualize the video and topic will be revised
and can also make notes
Contd
Eight steps for using a video clip in teaching
1. Pick a particular clip
2. Prepare specific guidelines
3. Introduce the video briefly
4. Play the clip
5. Stop the clip or replay clip for a specific in-class exercise
6. Set a time for reflection
7. Assign an active learning activity
8. Structure a discussion
Contd
Tips for use
• Keep the Video Short (2-4 minutes)
• Watch the whole video first
• Always preview the video
• Make it available outside the classroom
• Use videos your students want
Approaches of use
• Using only video and online learning (the Flipped classroom)
• Blending video into the existing curriculum and course
• Using video as a supplement for engagement or re-enforcements
Contd
How to Use Video – 3 main types or stages
• Pre-viewing
• Viewing
• Post Viewing
Steps of Making a Video
• Pre-production
o Planning - Educational questions, Technical questions,Administrative questions
o Scripting
• Production (recording)
• Post-production
o Editing
o Reviewing
Contd
It is a mechanism for helping learners to take control of their own learning and
develop the habits of life-long learning and self-assessment.
Characteristics of study guide
• Part of self-instructional package
• Designed for students to use independently
• Contains some of contents as core that comes from text books
• Indicates what should be learned
• Indicates how can be learned
• Guide teachers to plan teaching & monitor the progress
How study guide is used
• Have a quick look at all the pages of the guide
• Read the guide prior to attend any learning session on particular topic
• Read suggested reading list (text books, reference books, journals etc.)
• Select the suitable learning materials
• Make comments about the guide, course, method (feedback)
• Plan the learning process & monitor overall progress by yourself
• Make revision
• Be familiar with the assessment system and get prepared accordingly
• Assess yourself to check your understanding of the subject
Contd
Components of study guide
• Topic
• Objectives
• Course outline
• Teaching methods
• Student’s comment on the guide
• Self-assessment/ clinical problem discussion
• Resources available
• Revision
• Suggested reading
• Glossary
Contd
Advantages of study guide
• Make the teaching-learning session student centered
• More emphasis on students – their needs, interest, expectations
• Student take responsibility for own learning
• Students decide objectives
• Select appropriate learning resources
• Decide sequence & pace
• Assess their own progress
• Active learning
• Teacher acts as a mentor
• Study guide is a media
Contd
Contd
Xx
Contd
• Is a system of instructional learning
• The students & the
teachers are physically
separated
• Learning takes place
with technology
• The system uses
various combination of
telecommunications,
hardware & software
Contd
Features –
• Teacher is separated geographically from the student
• Learning program is carefully planned & the learner is provided
necessary advice & assistance
• Work done by the student is reviewed by the teacher and
remedial work prescribed if needed (two way communication)
• The learner usually works on his own (occasionally small group
can tackle the program)
Contd
Types –
• Type-I : Studying the printed material sent to the students
• Type-II : Type-I is supplemented by regular & obligatory teaching-
learning activities
• Type-III : Type-I & Type-II are supplemented by teachers &
demonstrations on radio & televisions
• Type-IV : A programmed computer performs important teaching
functions (tested by USAF)
Contd
Role of teachers –
• Manager of the student’s learning activity
• Producer of learning resource material
• Producer of assessment exercise
Concerns –
• Attitude of teachers
• Attitude of learners
• Cost
Poster
• Any piece of printed paper
• Designed to be attached to a vertical surface
• Typically includes both textual and graphic elements
• Designed to be both eye-catching and informative
Methods
• Approach one (one piece method)
• Approach two (panel method)
Advantages & Disadvantages 
Publishing Software
• Adobe InDesign
• Adobe PageMaker
• InPage
• Corel Draw
• MS Publisher
• MS PowerPoint
• QuarkXPress
Stages in poster production
1. Choosing content
2. Making a plan
3. Preparing the final poster
4. Showing the poster
Contd
Types of posters
• Advertising
• Political
• Movie
• Affirmation & motivational posters
• Event
• Travel
• Educational
• Black light
• Research
International standard poster size
• Large – 24” x 36”
• Medium – 18” x 24”
• Small – 11” x 17”
Attributes of a good poster
• Important information should be readable from about 10 feet away
• Title is short and draws interest
• Word count of about 300 to 800 words
• Text is clear and to the point
• Use of bullets, numbering, and headlines make it easy to read
• Effective use of graphics, color and fonts
• Consistent and clean layout
• Includes acknowledgments, your name and institutional affiliation
Contd
Choosing content (less is often more)
• Purpose –
• Audience –
• What to look
• Place of display
• Guidance
Making a plan
• Structure – grid system
• Developing poster design
Preparing your final poster – five main variables
• Font style - two types
• Type size –
• Leading (line spacing) – 1.5 or 2 space
• Alignment – left
• Case – avoid upper case
An effective poster is –
• Focused – on a single message.
• Graphic – lets graphs and images tell the story; uses text sparingly.
• Ordered – keeps the sequence well-ordered and obvious.
Contd
Other factors
• Color – small range,
• Poster’s background – light
• Diagrams – logical
• Numerical data
Contd
Showing the poster
• Stand alone
• Stand next to it – talking to
people as they browse and
answering questions about
the poster.
• Handouts (printing A4
paper, bullet points etc.)
• Producing bullet-point
summaries of panel posters
task13.pptx

task13.pptx

  • 3.
  • 4.
    Theoretical – • Typesof Instructional materials • Their characteristics/ advantages/ disadvantages • Principles for preparation Practical – • Demonstration for preparation • Hands on training in detail
  • 5.
    Contd Instruction – Adeliberately arranged set of external events that are designed to support internal learning process. Instructional Materials – Instructional materials are printed or other media intended to convey events of instruction. Instructional Media – The physical means by which instructional message is communicated.
  • 6.
    Traditional Instructional Media– • Chalk board (black board) • White board • Flannel board • Flip chart • Epidiascope • Real objects (specimen) • Models • Simulators Contd
  • 7.
    Modern Instructional Media– • Digital presenter • Visualizer • Smart Board • Modern white board • 3D printed models • Simulator • Augmented reality • Virtual reality Contd
  • 8.
  • 9.
    Instruction – aplanned process that facilitates learning. Instructional design – is the process of using our knowledge of how pupil learn to develop effective instructional strategies that meet the needs of the learners & the desired learning outcomes. Steps – 1. Assess the situation (need assessment) 2. State the goal (objectives) 3. Select appropriate medium/ media 4. Implementation 5. Evaluation & revision
  • 10.
    Elements of instruction– Instructional design theories – • Gagnes nine steps of instructional design  • John Keller’s ARCS model • Merrill’s component display theory • Reigeluth’s elaboration theory • Constructivism theory Contd Strategies – • Organizational strategies • Delivery strategies • Management strategies
  • 11.
    Definition – Thephysical means by which an instructional message is communicated (printed text, audio with tape, instructor talking etc.) Elements – Advantages – Disadvantages – • Learning objectives • Instructional method • Learner characteristics • Teacher characteristics Basis of selection – • Course characteristics • Media characteristics • Practical issues (cost, physical environment, time, alternative options, qualified staff, electricity, hardware, software, alternate media, copyright etc.)
  • 12.
    3. Search for& review existing media/ materials 4. Adapt existing media/ materials, if necessary 5. If new media/ materials need to be developed – 6. Conduct formative evaluation 7. Implement/ apply 8. Evaluate/ revise • Determine format, script, visuals etc. • Draft materials & media • Check for clarity & flow of ideas
  • 13.
    Fundamental criteria foreffectiveness of teaching/ learning material (Audio-visual aids) are audibility & visibility. Classification: • Purely auditory • Purely visual o Require projection o Doesn’t require projection • Audio-visual • Computer mediated materials Basic Principles: • Relevance • Linkage • Simplicity • Emphasis • Consistency in pattern and style
  • 14.
    • Characteristics: • Includeall necessary information • Leave out unnecessary information • Have information in the right order • Describe all situations in decision-making • Avoid vague instructions • Advantages: • Disadvantages:
  • 15.
    • Importance: • Aidteaching process • Aid learning process • Expose to virtual object • Conceptualization • Bridges the experimental gap • Achievement of instructional goals  Factors Affecting Media Selection: • Students • Objective • Environment • Resources • Practicability
  • 16.
    Definition – aninstructional tool that complements a teaching session resulting in improved understanding of information & test performance. Purpose – • As a class outline or lesson summary • As a guide to the student through a lecture • To relieve students of taking notes • To prepare students for a discussion • Guide students to further reading • Supply additional information not readily available elsewhere
  • 17.
    Types – • Incompletehandout  • Handout as class outline  • Handout as instruction sheet  • Thought stimulating handout  • Handout as a guide to further reading  Contd
  • 18.
    OHP is asmall machine designed to project an image onto a small screen or whiteboard. OHP has been useful tool since 1930s. Types • Hand written o Permanent ink o Water soluble ink • Photocopied • Computer printed Masking & Overlay  Storage  Principles of OHP transparency preparation Organized Aesthetically sound Simple Interesting Short O A S I S
  • 19.
    Disadvantages • Requires equipment& electricity • Must know the operation of the equipment • Room & audience size limitations • Image quality – poor • May blind the participants • Group of transparencies may be out of order, dropped, scratched etc. Contd Advantages • Simple to prepare, operate & update • Daylight projection is possible • Can project written & diagrammatic information • Control presentation by masking & overlaying • Maintain constant eye contact with participants • Suitable for both small & large group • Materials like X-ray, MRI, CT scan etc. can be shown
  • 20.
    Guidelines • Be consistent •Don’t distract • Don’t overboard Fonts – simple, legible, common, no variation, avoid ALL UPPERCASE • Sizes – 40 32 28 24 • Types – Use sans serif fonts like Arial, Verdana, Tahoma, Comic Avoid serif fonts like courier, Georgia, times new roman • Styles – Underline, Bold & Italic as necessary • Rule of 7 (rule of 6) • Rule of 10/ 20/ 30 • 8 feet rule
  • 21.
    Guidelines Color – Usecolor to give emphasis a point, to reinforce the logic • Use black, blue, brown, green (avoid red, orange & yellow) • Maximum 5 color palette for an entire presentation • Same color for similar elements • Dark text on light background in well-lit room • Light text on dark background in dark room. Background – consistent throughout, Simple, Attractive, Light Animation – the way part of a slide appears (line, text, paragraph etc.) Transition – the way each slide appears Contd
  • 22.
    Guidelines Tables/ Graphs –use graphs instead of tables as much as possible. Must have title under each graph and over each table Spelling/ grammar – proof read slides several times for - spelling mistakes, use of repeated words, grammatical errors Get someone else to check it Conclusions – Use an effective & strong closing – audience remember last words. • Summarize main points • Suggest future avenues of research • Keep all visuals simple Contd
  • 23.
    • Presenter view •Screen off/ on • Pointer options – Laser pointer, Pen, Highlighter • Zooming Contd
  • 24.
    Points to beconsidered while preparing text-based instructional materials – • Reading comprehension process • Variables in both reader & text • Design of the instructional materials Designing elements – • Structure & Organization • Readability & Legibility • Visual illustration
  • 25.
    Structure & Organization Verbal cueing o Linguistic cueing  Semantic – text  Syntactic – grammer o Instructional design in nature  Typographical cueing o Font o Space between lines (1.3/ 1.5), paragraphs (double), more space between sections than subsections. • Face (Arial, Verdana, Calibri etc.) • Styles (Bold, Italic, Underline) • Size (24201612) • Color (black, blue, brown etc.) Contd
  • 26.
    Readability & Legibility Readability – interaction between reader & text. Depends on o Reader based factors o Text based factors  Legibility – inter-relationship between the size of type, length of line, & space between the lines • Avoid fancy typefaces (sans serifs are always better) • Use 11-12 font size, with 1-2 inter line space • Keep the line length within 120mm, left aligned (not justified) • Avoid ALL UPPERCASE letters, use sentence case • Prior knowledge of the students • Knowledge of the language • Knowledge of the comprehension process • Number of words per sentence • How arguments are presented • Place of example Contd
  • 27.
    Visual Illustrations -Picture & figures with words may enhance understanding & its retention. Properties of visual illustrations are – • The message is not the visual alone – it is the interaction between the visual stimulus & prior knowledge of the learner. • They are used for specific affective or cognitive purpose – provide visual explanation of verbal argument (visual memory > word memory). • It has cross-reference between the text & visual illustration. Contd Reader Text Verbal Visual
  • 28.
    S= 1/2/4/8/15/30/60/125/250/500/1000/2000 A= 1.2/1.4/2/2.8/4/5.6/8/11/16/22normally 6 stops (7 slots i.e. 1.2 - 8 or 1.4 - 11 or 2 - 16 or 2.8 - 22) F= (f auto/manual) E= 25/50/64/100/200/400/800/1600/3200 (ISO/ASA/DIN) Shutter speed Aperture Focus Emulsion S A F E S 1 2 4 8 15 30 60 125 250 500 1000 2000 A 22 16 11 8 5.6 4 2.8 2 1.4 1.2 100 Depth of field (DOF)?
  • 29.
  • 30.
    Contd Long Shot ExtremeLong Shot Full Shot Medium Shot Close-up Shot Extreme Close-up
  • 31.
  • 32.
    Use of Photographyin Instructional Materials Contd Photo Editing – (with different layers, colors, filters)
  • 33.
    Definition – visualmultimedia source that combines a sequence of images to form a moving picture. It usually have audio components that correspond with the pictures being shown on the screen. Types – • Educational videos • Promotional videos • Informational videos • Documentary films • Entertainment videos Benefits • Facilitating thinking and problem solving • Assisting with mastery learning • Inspiring and engaging students • Authentic learning opportunities
  • 34.
    Advantages of Videosas educational medium: • Concept clarity • More interesting and engaging • Learn more efficiently • Retain and maintain interest for longer periods of time • Innovative and effective means • Demonstration-friendly • Create experiences. • It acts as a flexible teaching medium • Whenever required can visualize the video and topic will be revised and can also make notes Contd
  • 35.
    Eight steps forusing a video clip in teaching 1. Pick a particular clip 2. Prepare specific guidelines 3. Introduce the video briefly 4. Play the clip 5. Stop the clip or replay clip for a specific in-class exercise 6. Set a time for reflection 7. Assign an active learning activity 8. Structure a discussion Contd
  • 36.
    Tips for use •Keep the Video Short (2-4 minutes) • Watch the whole video first • Always preview the video • Make it available outside the classroom • Use videos your students want Approaches of use • Using only video and online learning (the Flipped classroom) • Blending video into the existing curriculum and course • Using video as a supplement for engagement or re-enforcements Contd
  • 37.
    How to UseVideo – 3 main types or stages • Pre-viewing • Viewing • Post Viewing Steps of Making a Video • Pre-production o Planning - Educational questions, Technical questions,Administrative questions o Scripting • Production (recording) • Post-production o Editing o Reviewing Contd
  • 38.
    It is amechanism for helping learners to take control of their own learning and develop the habits of life-long learning and self-assessment. Characteristics of study guide • Part of self-instructional package • Designed for students to use independently • Contains some of contents as core that comes from text books • Indicates what should be learned • Indicates how can be learned • Guide teachers to plan teaching & monitor the progress
  • 39.
    How study guideis used • Have a quick look at all the pages of the guide • Read the guide prior to attend any learning session on particular topic • Read suggested reading list (text books, reference books, journals etc.) • Select the suitable learning materials • Make comments about the guide, course, method (feedback) • Plan the learning process & monitor overall progress by yourself • Make revision • Be familiar with the assessment system and get prepared accordingly • Assess yourself to check your understanding of the subject Contd
  • 40.
    Components of studyguide • Topic • Objectives • Course outline • Teaching methods • Student’s comment on the guide • Self-assessment/ clinical problem discussion • Resources available • Revision • Suggested reading • Glossary Contd
  • 41.
    Advantages of studyguide • Make the teaching-learning session student centered • More emphasis on students – their needs, interest, expectations • Student take responsibility for own learning • Students decide objectives • Select appropriate learning resources • Decide sequence & pace • Assess their own progress • Active learning • Teacher acts as a mentor • Study guide is a media Contd
  • 43.
  • 44.
  • 45.
    • Is asystem of instructional learning • The students & the teachers are physically separated • Learning takes place with technology • The system uses various combination of telecommunications, hardware & software
  • 46.
    Contd Features – • Teacheris separated geographically from the student • Learning program is carefully planned & the learner is provided necessary advice & assistance • Work done by the student is reviewed by the teacher and remedial work prescribed if needed (two way communication) • The learner usually works on his own (occasionally small group can tackle the program)
  • 47.
    Contd Types – • Type-I: Studying the printed material sent to the students • Type-II : Type-I is supplemented by regular & obligatory teaching- learning activities • Type-III : Type-I & Type-II are supplemented by teachers & demonstrations on radio & televisions • Type-IV : A programmed computer performs important teaching functions (tested by USAF)
  • 48.
    Contd Role of teachers– • Manager of the student’s learning activity • Producer of learning resource material • Producer of assessment exercise Concerns – • Attitude of teachers • Attitude of learners • Cost
  • 49.
    Poster • Any pieceof printed paper • Designed to be attached to a vertical surface • Typically includes both textual and graphic elements • Designed to be both eye-catching and informative Methods • Approach one (one piece method) • Approach two (panel method) Advantages & Disadvantages  Publishing Software • Adobe InDesign • Adobe PageMaker • InPage • Corel Draw • MS Publisher • MS PowerPoint • QuarkXPress
  • 50.
    Stages in posterproduction 1. Choosing content 2. Making a plan 3. Preparing the final poster 4. Showing the poster Contd Types of posters • Advertising • Political • Movie • Affirmation & motivational posters • Event • Travel • Educational • Black light • Research International standard poster size • Large – 24” x 36” • Medium – 18” x 24” • Small – 11” x 17”
  • 51.
    Attributes of agood poster • Important information should be readable from about 10 feet away • Title is short and draws interest • Word count of about 300 to 800 words • Text is clear and to the point • Use of bullets, numbering, and headlines make it easy to read • Effective use of graphics, color and fonts • Consistent and clean layout • Includes acknowledgments, your name and institutional affiliation Contd
  • 52.
    Choosing content (lessis often more) • Purpose – • Audience – • What to look • Place of display • Guidance Making a plan • Structure – grid system • Developing poster design
  • 53.
    Preparing your finalposter – five main variables • Font style - two types • Type size – • Leading (line spacing) – 1.5 or 2 space • Alignment – left • Case – avoid upper case An effective poster is – • Focused – on a single message. • Graphic – lets graphs and images tell the story; uses text sparingly. • Ordered – keeps the sequence well-ordered and obvious. Contd Other factors • Color – small range, • Poster’s background – light • Diagrams – logical • Numerical data
  • 54.
    Contd Showing the poster •Stand alone • Stand next to it – talking to people as they browse and answering questions about the poster. • Handouts (printing A4 paper, bullet points etc.) • Producing bullet-point summaries of panel posters