SlideShare a Scribd company logo
1 of 38
1
T A B L E O F C O N T E N T S
Chapter 1: Introduction
1.1 ProjectIntroduction
1.2 Aims and Objectives
1.3 Limitations
1.4 Equipmentand Materials Used
Chapter 2: Truss Selection and PrecedentStudies
2.1 Waddell โ€˜Aโ€™ Truss
2.2 Terminology
2.3 Jointand Member Analysis
Chapter 3: Material Specifications: Testand Analysis
3.1 Material Test and Analysis
3.2 Design Strategy
3.3 Methodology
Chapter 4: Bridge Prototyping and Testing
4.1 Bridge 1
4.2 Bridge 2
4.3 Bridge 3
4.4 Bridge 4
4.5 Bridge 5
4.6 Bridge 6
Chapter 5: Final Bridge Design
5.1 Core Support
5.2 Top and Bottom Chords
5.3 Truss
5.4 Strut
5.5 JointAnalysis
5.6 Construction Process
5.7 Results and Analysis ofBridge Testing
5.8 Calculations
Chapter 6: Conclusion
6.1 Comparison of Load, Weightand Efficiency of Test Bridges and Final
6.2 References
2
Chapter 8: Individual Case Studies (Task 1)
8.1 Case 1
8.2 Case 2
8.3 Case 3
8.4 Case 4
8.5 Case 5
3
C H A P T E R 1: INTRODUCTION
1.1 P R O J E C T I N T R O D U C T I O N
In a group offive, this project requires students to build a perfect truss bridge by using fettuccine pasta as
the material. Students were required to investigate the compression and the tension capabilities of the
bridge with different types ofjoints and designs for the bridge. The students would be able to explore the
different truss members using differentarrangements to achieve the strongest. Throughout the projectthe
students would be able to identify truss system and to be able to identify the beststrength without
exceeding too much weightso that the load would be evenly distributed.
The fettuccine bridge mustbe strong and efficientto achieve high efficiency โ€“ high load-bearing capabilities
and minimal usage ofmaterials โ€“ but within a clear span of350mm. The formula for efficiency is as stated
below:
Efficiency =
๐ฟ๐‘œ๐‘Ž๐‘‘ ๐‘ ๐‘ข๐‘๐‘๐‘œ๐‘Ÿ๐‘ก๐‘’๐‘‘ ๐‘๐‘ฆ ๐‘๐‘Ÿ๐‘–๐‘‘๐‘”๐‘’ (๐‘”)
๐‘Š๐‘’๐‘–๐‘”โ„Ž๐‘ก ๐‘œ๐‘“ ๐‘กโ„Ž๐‘’ ๐‘๐‘Ÿ๐‘–๐‘‘๐‘”๐‘’ (๐‘”)
4
1.2 A I M S A N D O B J E C T I V E S
Aim
The aim of this projectis to develop the studentโ€™s understanding oftension and compressive strength ofthe
construction materials and to understand the force ofdistribution in a truss. Also, to build a truss design
with high aesthetic value whereas could use minimal amount of construction material and withstand a high
amounts of loads.
Objectives
The objectives ofthe projectare:
๏‚ท To develop understanding on force distribution in a truss system;
๏‚ท To develop in-depth understanding on tension and compressive strengths ofthe construction
materials; and
๏‚ท To design and produce a fettuccine bridge ofperfecttruss with high efficiency and minimal
construction materials.
1.3 L I M I T A T I O N S
The mostsignificant limitation in this projectis the requirementthat the overall weightof the fettuccine
bridge cannotexceed 70 g. This encouraged us to approach the construction process and bridge design
carefully, taking into accountthat the main objective is to produce a bridge ofhigh load-bearing qualities
using minimal materials. With that in mind, many bridge designs were explored to determine the most
efficient design which can be constructed within the weight boundary of70 g.
Other forms of limitation include the fact that water, the load used in bridge testing, will escape the pail
when the suspended pail makes contactwith the ground due to gravity. This will cause inaccuracy as the
amount of water spilled cannotbe determined and taken into accountof. This scenario mightnot be fully
preventable, butcan be improved by suspending the pail closer to the ground so that the fall will be less
impactful.
5
1.4 E Q U I P M E N T A N D M A T E R I A L S
1. Fettuccine
Fettuccine is the main material ofthe bridge. Every
componentofthe bridge should be constructed
only using fettuccine. Different fettuccine brands
are explored to selectthe bestfettuccine to
construct the bridge.
2. Glue
Glue is an important factor in constructing the
fettuccine bridge as itconnects and combines the
different fettuccine members, especially atthe
joints. Different types ofglues are experimented to
determine the besttype ofadhesive.
3. Weighing scale
Weighing scale is used to determine the weight
and load imposed on the bridge and individual
fettuccine members.
4. Sandpaper
Sandpaper is used to smoothen rough edges of
the fettuccine, providing more accurate lengths.
5. Cutting blade
Blade is used to cutand trim the fettuccine. It
provides a cleaner and more precise cutas
compared to using scissors.
6. Cutting mat
Cutting mat provides a flat and safe base to cut the
materials.
6
7. Metal ruler
Metal ruler is used to measure the length of
fettuccine needed to be cut. Itis laid flat and side
by side againstthe fettuccine to ensure accurate
markings and preventparallax error.
8. S-hook
S-hook is used to connectthe pail to the fettuccine
bridge during the load test. It is hooked onto a
structural member ofthe bridge on one end,and
the handle of the pail is hooked onto the other end.
9. Pails
Two pails are used to transfer water from one to
another. One pail will be hung onto the S-hook
attached to the bridge, and water will be gradually
transferred into it from another pail on the ground.
10. Plastic cup
Plastic cup is used to transfer water from one pail
to another pail hooked on to the bridge.
11. String
String is used to tie the S-hook on to the bridge
during the final testing, allowing the pail to
hover few inches from ground to preventtoo
much water from splashing out.
7
C H A P T E R 2: TRUSS SELECTION &
PRECEDENTS
2.1 T H E W A D D E L L A T R U S S
Figure 2.1.1: The Waddell โ€˜Aโ€™ Truss Bridge by John Alexander Low Waddell in Missouri, USA.
The Waddell "A" Truss Bridge in Parkville Missouri is also known as Linn 1898. The bridge was designed
by engineer John Alexander Low Waddell and is the subjectofa U.S. patent. The bridge was constructed
and redesigned within 7 years. Hence, the bridge was reassembled using the same high standards as
originally specified by the designers.
The Waddell โ€˜Aโ€™ bridge is a triangular-shaped steel truss bridge, as observed from its overall A-shaped
form. It is supported with four panels, and it is a single span bridge that rests on two supportlinks by
connecting rivetunits. The bridge is capable to supportheavy traffic without excessive vibration.
8
2.2 B R I D G E T E R M I N O L O G Y
2.3 J O I N T A N D M E M B E R A N A L Y S I S
The members ofthe Waddell A bridge along the top chord are in compression as they are supporting a
downward force when load is applied, whereas the members along the bottom chord are in tension.
The trusses and members between the top and bottom chords can be in compression or tensions,
depending on the design,orientation and angle ofthe vertical member.
Members in compression
Members in tension
9
Figure 2.3.1: The form ofthe bridge resembles is โ€˜A-shapeโ€™ and resembles a triangle.
Figure 2.3.2: Joint details ofthe Waddell A Bridge
Figure 2.3.3: Joint and truss details on the top chord ofthe Waddell A bridge
10
C H A P T E R 3 : MATERIAL TEST & ANALYSIS
3.1 M A T E R I A L A N A L Y S I S A N D S E L E C T I O N
To selectthe bestmaterials and design to constructa bridge with high efficiency, many tests were
conducted to determine a few aspects ofthe bridge in terms of:
1. Brand and length of fettuccine span
2. Arrangement offettuccine stack
3. Type of adhesive
The aspects listed above are investigated to determine both compression and tensile strengths.
Compression strength test
Compression strength is the maximum compressive
force a material experiences before sustaining
failure. Compressive strength is crucial and has to
be taken into accountof in bridge design. For the
compressive strength experiment, each subjectwill
be placed upon the weighing scale and secured into
place by a wad of blu-tack. Without applying any
force, its initial weighton the weighing scale is
neglected and computed as zero. Force is then
applied to the subjectby pressing againstthe items
on the weighing scale. The maximum weight
recorded by the weighing scale before the subject
breaks is documented.
11
Tensile strength test
Tensile strength is the maximum tensile force a material can sustain before failure. The bridge mustbe able
to sustain a certain amount of tensile stress before fracturing. Hence, to determine tensile strength, each
aspectofexperimentation will be subjected to a tensile strength test, in which load will placed upon the
subjectand will be subsequently increased. The load will be increased until the subjectexperiences
breakage, and the last recorded load will be documented in the unit of grams (g).
1. Brand and length of fettuccine
Figure 3.1.1: Kimball fettucine Figure 3.1.2: San Remo Figure 3.1.3: Arabella fettuccine
12
This test will determine the mostsuitable brand of fettuccine to use in constructing the bridge with highest
efficiency, and also the suitable length to determine how long should the bridge span be to sustain higher
loads. The brands offettuccine experimented are Arbella, Kimball and San Remo. All the brands will be
tested in lengths of 7, 12, 17 and 22 cm against an increasing load.
Brand Length
(cm)
Number of fettuccine per stack (unit)
1 2 3 4 5
T C T C T C T C T C
SR 7 270 250 900 800 1800 1500 3500 4000 3800 >5000
KI 200 228 500 900 700 1600 2500 3645 2700 >5000
AR 150 235 300 900 900 1500 2000 2356 4000 >5000
SR 12 210 200 300 786 900 1499 1300 3427 2300 >5000
KI 70 218 400 889 600 1430 800 4100 900 >5000
AR 100 167 270 890 420 1267 900 2543 1700 >5000
SR 17 120 78 260 675 715 1298 1200 3216 1950 >5000
KI 135 60 230 688 400 1276 450 2354 1000 >5000
AR 180 76 235 700 400 1208 700 1435 800 >5000
SR 22 147 67 260 567 690 1100 1020 1321 1660 >5000
KI 110 55 213 580 260 1125 679 3423 880 >5000
AR 125 56 170 600 230 1187 543 1231 843 >5000
Key:
SR = San Remo T = Tensile test
KI = Kimball C = Compression test
AR = Arbella
Analysis:
From the tabulated data, we found that San Remo is the strongestfettuccine brand as compared to other
alternatives like Kimball and Arbella.
2. Arrangement of fettuccine stack
Figure 3.1.4: (from right) I-beam, C-beam and triple-stack arrangement
13
Based on the previous analysis on brand and fettuccine length, San Remo fettuccine is then experimented
using 12 cm span, but in different stack arrangement of C-beam, I-beam and horizontal stack.
Arrangement Load sustained before breakage/g
T C
C-beam 2416 4500
I-beam 2268 <5000
Horizontal stack 1300 3850
Key:
T = Tension test C = Compression test
Analysis:
Tension test
Based on the results found, the C-beam and I-beam is the mosteffective arrangement as it can sustain a
load above 2 kg, as compared to the horizontal stack, the weakestarrangement, which can only sustain 1.3
kg. It is also noted that the C-beam tends to crumple internally when load is imposed, hence the I-beam is
the more preferred option.
3. Type of Adhesive
Figure 3.1.5: UHU glue Figure 3.1.6: Super glue Figure 3.1.7: White glue
Besides the type offettuccine, the type ofadhesive used also plays an important role in constructing the
perfectbridge. White glue, UHU glue and superglue is experimented.
Arrangement Type of glue
UHU Super glue White glue
T C T C T C
C-beam 590 1432 1355 3482 530 1435
I-beam 548 1234 1800 3525 547 1745
14
Analysis:
The results are evident: super glue is the bestadhesive. Super glue can sustain almosttwice the load than
other alternatives, whereas UHU glue and white glue is significantly weaker and requires a long time to dry.
I-beam constructed using super glue can sustain a heavier load than the C-beam, making it a better, more
efficient construction material.
3.2 D E S I G N S T R A T E G Y
Based on the tests conducted, we have decided to use the specifications below to create the bridge.
S P E C I F I C A T I O N R E A S O N I N G
Brand
San Remo
Strongestbrand of fettuccine (able to sustain highestloads)
Span
Range of 12-15 cm per span
Ideally, 3 spans should be used instead of2. This is because
Arrangement
I-beam
Strongestand moststable arrangement
Adhesive
Super glue
๏‚ง Bonds fettuccine very strongly (fettuccine does notmove
out of place after application)
๏‚ง Shortest drying time
๏‚ง Easy application
We have also realized that certain fettuccine brands are suitable for compression and certain brands of
fettuccine perform better in tension. Hence, experimenting with materials has helped identify the impact of
different arrangements and orientation on structural integrity ofthe bridge.
Theoretically, members in tension should be more reinforced and strengthened, especially the bottom
chord ofthe bridge due to the downward force the load would impose, calling for the need to utilize I-beam
structure as this is the strongestbeam arrangement. Members in compression, such as the vertical trusses
in between, mightnotrequire such a strong reinforcement, so other more lightweightmaterials and
methods can be considered.
Members in compression
Members in tension
15
3.3 M E T H O D O L O G Y
Methodology is the documentation ofthe construction and testing process, including pre-testpreparations.
Step 1: Preliminary studies
An analysis on bridge typologies is conducted to determine the type ofbridge to construct. The Waddell A
truss is selected.
Step 2: Material selection
Materials used to construct the bridge are experimented by tension and compression tests. Results from
the test are documented, and the best, highestperforming materials are used to constructthe bridge.
Step 3: Improvisations
After determining the specifications we require ofthe bridge, we tried to improvise from the original Waddell
bridge template by sketching outnew modifications which could contribute to a higher efficiency.
Step 4: Pre-making
The template of the bridge is then drawn out on A3 paper. This will ensure that the measuring and cutting
of the fettuccine will be done more accurately, especially atthe joints. The strips of fettuccine are also
checked before the cutting process,and only the flat, straight members are used.
Step 5: Cutting process
The cutting process then commenced. The fettuccine strips are measured precisely using a metal ruler.
Blade is used as opposed to scissors to ensure cleaner, straighter cuts. Joints and edges are carefully
angled. For layers that require 2 or more strips, we ensure that the layers do notline up at the same spotto
preventbreakage.
Step 6: Gluing process
Super glue is used to combine two layers offettuccine strips, making the member stronger and abler to
withstand greater load. As super glue dries very fast, precision is very importantin this step. Therefore, the
fettuccine members should be positioned appropriately and glued carefully, ensuring no gaps in between.
After gluing, the bridge should be leftaside to dry for at least20 minutes before testing.
Step 7: Pre-testing
Before testing the bridge, its weightshould be documented using a weighing scale, as this measurementis
crucial in determining the overall efficiency ofthe bridge. Two tables ofequal heights are placed nextto
each other with a gap of350 mm to fulfil the 35 cm clear span criteria. Both tables are connected by the
fettuccine bridge, which is placed atthe edges ofthe tables. An S hook is also hooked on to the middle
16
beam ofthe bridge, and a pail is then hooked onto the S hook. Prior to that, they should also be weighed,
as their weightwould be taken into account alongside other additional load to be included later.
Step 8: Applying the load
Water is supplied from the nearby washroom, and it is added into the pail carefully and gradually using a
small cup. As the load increases, the bridge is observed for any deformities. The whole process is also
videotaped so thatthe video could be reviewed to analyse the weak points ofthe bridge when it breaks.
Step 9: Determining the load sustained
After sustaining breakage, the amount ofwater in the pail attached to the bridge is weighed using the
weighing scale. The actual load sustained is calculated by dividing the amountfrom the weight of the S
hook and the pail.
Step 10: Post-testing analysis
The video recording the testing process ofthe bridge is reviewed to analyse the failure points of the bridge.
Deformities occurring at any pointof load application is noted and highlighted on the diagram on paper.
After a group discussion, improvisations are made and a new bridge is constructed and tested. Steps 4 to
10 are repeated for each new bridge design.
17
C H A P T E R 4 : BRIDGE TESTING
4.1 B R I D G E 1
Bridge 1 has the simplestdesign, basically keeping to the original template ofthe Waddell A truss, with only
a few modifications to test the original structural integrity ofthe bridge.
S P E C I F I C A T I O N R E A S O N I N G
1 35 cm total length Initially we thought that the total length of the
bridge should only be 35 cm, including clear
span.
2 7 cm height Tall heightas to keep to original A truss
template.
Results
D I M E N S I ON S R E S U L T S
Total height: 7 cm Total weight: 74 g
Load sustained: 2 kg
Efficiency: 27.0 %
Total width: 6 cm
Total length: 35 cm including clear span
18
Analysis
BREAKAGE POINT: core support in which the hook and load is placed
The shape ofthe bridge retains the original Waddell A truss without much modification, and we realize that
the breakage pointofthe bridge lies atthe core, as the rest ofthe bridge was in good condition and did not
collapse internally. The core support has broken from the undistributed force imposed by the pointload
from the S-hook.
Improvements to be made
๏‚ง Strengthen the core support and distribute the load carefully throughout the bridge.
4.2 B R I D G E 2
Learning from Bridge 1, the core supportofthe bridge is modified into an X bracing, so that the load can be
distributed evenly throughoutthe bridge, reducing the stress on the pointin which the S-hook is hung.
However, the overall shape and dimensions ofthe bridge is retained, as we believed thatonly the core
supportis the most fragile member ofthe bridge.
19
S P E C I F I C A T I O N R E A S O N I N G
1 7 cm height Since the overall structure and shape of
Bridge 1 did notcrumble or fracture from the
load, we decided thatthe 7 cm heightcan be
retained as reducing or increasing itwould not
cause any difference.
2 Horizontal X bracing for lateral support Learning from the failure of Bridge 1 โ€“ where
the bottom supporthas broken - we decided
to create an X bracing connecting both bottom
chords in the middle to distribute the force
more evenly throughoutthe bridge. The hook
would be hung on the middle ofthe X.
Results
D I M E N S I O N S R E S U L T S
Total height: 7 cm Total weight: 76 g
Load sustained: 5.2 kg
Efficiency: 68.4 %
Total width: 6 cm
Total length: 35 cm including clear span
20
Analysis
BREAKAGE POINT: Core support in which the load is imposed on
The main reason for failure in Bridge 2 does notlie in the structural integrity ofthe overall design, butrather
the strength of the core support(beam where the hook is placed upon). Placing an Xbracing across the
bottom chords did nothelp as itstill broke under pressure ofthe load, and this might be due to the
weakness ofthe bracing.
Improvements to be made:
๏‚ง Strengthen the X bracing, especially where the S hook is hung on, as this is the pointwhich
receives the moststress.
4.3 B R I D G E 3
In Bridge 3, the horizontal X bracing is retained, butmodified from the last bridge design. I-beams are used
instead of triple-stacked fettuccine beams, in hopes to improve the strength and load-bearing capabilities of
the X-bracing. The heightof the bridge is also reduced to lower the center ofgravity
21
Figure X: Plan view and perspective view of Bridge 3
S P E C I F I C A T I O N R E A S O N I N G
1 5 cm height We attempt to reduce the heightto give ita low center of
gravity, providing more stability. Heightis also reduced to
compensate the high usage offettuccine members.
2 Overlapping horizontal members Due to the fettuccineโ€™s limited length, two strips of
fettuccine is the minimal requirementto create a 35 cm
span bridge. For Bridge 1, to connectboth spans of17.5
cm, an additional shorter I-beam is glued to the sides,
combining and overlapping both spans. Horizontal
22
members are overlapped, assuming that this can make
the horizontal load-bearing components stronger.
3 Diagonal trusses Under the impression that horizontal members will
accommodate mostofthe stress, vertical 4members are
neglected, with only two diagonally placed members to
sustain compressive forces.
4 X-bracing on horizontal members X-bracing is considered to distribute the forces evenly
throughout the bridge instead offocusing on one single
pointin which the load will be placed.
5 Usage ofI-beams instead of stack
arrangement
I-beam is stronger than stacked fettuccine beams.
Results
D I M E N S I O N S R E S U L T S
Total height: 5 cm Total weight: 76 g
Load sustained: 5.5 kg
Efficiency: 72.4 %
Total width: 5 cm
Total length: 35 cm including clear span
Analysis
23
BREAKAGE POINT: I-beam on bottom chord and entire middle portion of the bridge
Bridge 3 is structurally stronger than Bridge 1 and 2, as three layers ofI-beams are overlapped to create
the bottom support. However, due to the lack ofvertical members, the compression forces acting on the
bridge cannotbe dispersed. Also, I-beams required high usage offettuccine (one I-beam required 4-6 strips
of fettuccine), which in turn highly affected the weight ofthe bridge. The weightofBridge 3 is 76 g,
exceeding the weightcriteria by 6 g.
Improvements to be made:
๏‚ง Reduce the weight of the bridge to below 70 g
๏‚ง Increase number of vertical members
๏‚ง Aim to carry heavier load
4.4 B R I D G E 4
From Bridge 3, we realized that the extensive use ofI-beams to improve structural strength of the bridge
has effectively carried a heavier load, butthe weight ofthe bridge has exceeded the requirementby 6 g.
Hence, in Bridge 4, I-beams are only used in parts which are necessary. The reduction ofI-beams is
compensated with extensive reinforcementoftrusses between top and bottom chords.
24
Figure X: Perspective and elevation of Bridge 4
S P E C I F I C A T I O N R E A S O N I N G
1 43 cm total length (35 cm clear span) The length ofthe bridge is elongated, with 4
cm extra length on each side, butthe clear
span remains at 35 cm.
2 Increased number ofvertical members and
trusses
Vertical members are increased to reinforce
the trusses between top and bottom chords.
3 I-beams only used for bottom chord To minimize the weight ofthe bridge, I-beams
are used atonly the mostcritical areas of the
bridge (bottom chord and core support).
25
Results
D I M E N S I O N S R E S U L T S
Total height: 5.5 cm Total weight: 76 g
Load sustained: 7.5 kg
Efficiency: 98.7 %
Total width: 6 cm
Total length: 43 cm (35 cm clear span)
Analysis
BREAKAGE POINT: I-beam on the bottom chord
I-beams are only used for the bottom chords as the bottom chords receive the bulk ofthe load. However,
the breakage pointwas still at the bottom chord, indicating that the bottom chord is still weak even though it
is strong and rigid from the usage ofI-beams. We analyzed the breakage pointand found that the bottom
chord was weakened by the jointconnection between the truss and the bottom chord. This joint is stressed
by the fact that the diagonal truss is not glued to the joint properly, resulting a higher stressed imposed on
the vertical member, pressuring the particular joint, causing it to break.
Improvements to be made:
๏‚ง Workmanship should be improved โ€“ ensure that all angled members are cutand glued precisely
๏‚ง Reduce overall weightofthe bridge
๏‚ง Reduce joints connected to the bottom chord
26
4.5 B R I D G E 5
The overall weightof the bridge is quite an issue throughoutthe many bridge samples we have
constructed. We have successfully reduced the weightto 72 g in Bridge 5, by reducing the number of
vertical units in between the chords.
Figure 4.5.1: Perspective view of Bridge 5
S P E C I F I C A T I O N R E A S O N I N G
1 Reduced number oftrusses To reduce overall weightofthe bridge
2 Reduced number ofjoints To reduce connection points which stresses
the bottom chords ofthe bridge
Results
D I M E N S I O N S R E S U L T S
Total height: 5.5 cm
27
Total width: 4 cm
Total length: 42 cm
Load sustained: 8.4 kg
Efficiency: 116.7 %
Analysis
BREAKAGE POINT: Joint connection of core support to bottom chord
The load sustained by Bridge 5 is by far the highestat 8.4 kg. After a thorough inspection ofthe bridge, the
area of failure seemed to lie atthe connection pointofthe beam to the bottom chord (see highlighted
diagram).
The cross-sectional face ofthe core supportis connected to the web ofthe bottom chord. The I-beam
member was cut too shortly as compared to its equivalent, non-direct load-bearing members.This shortage
created a gap between the beam and the bottom chord, causing the beam to collapse.
Improvements to be made:
๏‚ง Further reduce the overall weightofthe bridge to be under 70 g to heighten efficiency
๏‚ง Improve workmanship on cutting and trimming fettuccine members
28
C H A P T E R 5: THE FINAL BRIDGE
Bridge 6 is the final bridge used in the actual day ofload test. We have made a few modifications based on
the pasttest models we have explored, mainly on the truss direction and number of joints used in the
structure. Each componentofthe fettuccine bridge will be explained extensively in this chapter.
5.1 C O R E S U P P O R T
The core supportis the first and directrecipientofexternal loads from the environment. Hence, ithas to
sustain directstress and distribute it evenly throughoutthe bridge structure, indicating that this component
has to be strengthened and reinforced carefully.
Figure 5.1.1: Elevation and perspective of the core support.
For the final bridge, the core supportis constructed outofoverlapping I-beams, with an extra layer of
fettuccine for extra supportand better form to accommodate the curvature ofthe S-hook. The core support
is very shortin length to minimize the tensile stress imposed on it, and it is layered onto the flange of the
bottom chords instead ofgluing to the web. When load is applied, the core supportwill notdetach from the
bottom chord easily and induce breakage.
5.2 T O P & B O T T O M C H O R D S
The top and bottom chords ofthe final bridge is made outofI-beams extensively. I-beams provide very
high strength and stability which is crucial for sensitive components like the bottom chord, which directly
absorbs the load distribution from the core supportunit.
29
5.3 T R U S S
Instead ofthe previous design in Bridge 4 and 5, the trusses in the final bridge are modified. Diagonal
trusses are inverted to form a triangular unit. This modification is done in consideration ofthe vertical
member, which only comprises ofa single fettuccine layer. By converging the diagonal trusses atone point,
the vertical member, which experiences high compression forces,is now strengthened and supported on
each side.
Figure 5.3.1: Truss design of the final bridge
5.4 S T R U T
The strut is the member which defines the width ofthe bridge and connects the one side ofthe bridge to
another. In previous designs, struts are used extensively. However, in the final bridge, struts are keptto a
minimum. Only 4 struts were used as they provide less load-bearing function as compared to other
counterparts ofthe bridge. However, they are used to provide lateral supportand preventthe top partof the
bridge from collapsing inwardly.
30
Figure 5.4.1: Four struts are used in the final bridge design
5.5 J O I N T A N A L Y S I S
The final bridge design features a variety ofjoints used as connection points between differentcomponents
of the fettuccine bridge.
31
DIAGONAL TRUSS TO CENTRE TRUSS
Diagonal trusses are angled towards the centre truss, forming a three-
way connection pointwhich effectively transfers the load throughout the
bridge.
ANGLED JOINT
The angle between the top chord and bottom chord is 14.9 degrees. An
acute angle calls for an angled jointon the top chord to
TOP CHORD TO CENTRE TRUSS
The top chords, which are made outof I-beams, are cut at an angle.
The cross-section provides ample surface area to connectthe chord to
the centre truss, which is also an I-beam. It is connected to the flange, a
flat surface so that a stable jointcan be formed.
I-BEAM LAYERING
For the core centerpiece which sustains the highestand directload, I-
beam layering is used by stacking I-beams on top ofeach other.
CONVERGING TRUSSES ON THE TOP CHORD
Diagonal trusses converge atthe vertical truss and the top chord,
forming a three-way connection point.
I-BEAM TO I-BEAM JOINT
Beams are double-layered and are positioned between two I-beams to
enhance the directdistribution ofcompressive force. Rather than
putting the beams on top ofthe bottom chord, they are placed between
the I-beams.
32
5.6 C O N S T R U C T IO N P R O C E S S
1. I-beams are constructed to be used for
the bottom chord and top chord for the
final bridge. The bottom chord is
constructed first.
2. The central vertical member is added onto
the bottom chord.
3. The top chords are added to the
structure, forming a triangle.
4. The vertical trusses are added within each
half side ofthe triangle.
5. The diagonal trusses are fitted between
the vertical truss members, forming
small triangles within the triangular
Waddell structure.
6. Four beams are added and positioned
perpendicularly to the web ofthe bottom
chord.
33
7. Another triangular side ofthe bridge is
added to the structure. Both sides are
connected by the perpendicular beams.
8. Struts are added onto the top chord to
secure the alignment ofthe triangular sides.
9. The core supportis inserted carefully into the structure, layered on top the flanges of the bottom
chords.
34
5.7 A R R A N G E M EN T & L O A D D I S T R I B U T I O N I N
F E T T U C C I N E B R I D G E
I-beams are builtusing 6 strands of fettuccine: 1 for the flange on each side and 2 strands to form the
web ofthe I-beam. The 1:2:1 formula is used in constructing the I-beam as it provides more rigidity to the
structure, as the 2-layer web unit provides large surface area for contact with the perpendicular flange.
2-Layer fettuccine strips are used for the beams and struts. They are slotted in vertically to the groove of
the I-beam. If the fettuccine strips are in a horizontal alignment, they will break easily when force is
asserted.
Members in compression
Members in tension
35
1-Layer fettuccine strips are used for the vertical and diagonal trusses between the top and bottom chord.
Force is notasserted severely onto the vertical and diagonal trusses, as the trusses supportthe top and
bottom chord. They are also keptto a single layer as we aim to reduce the overall weightofthe final bridge
to meetthe requirementof 70 g.
5.8 R E S U L T S & A N A L Y S I S O F B R I D G E T E S T I N G
Figure 5.8.1: The final bridge
Results
D I M E N S I O N S R E S U L T S
Total height: 5 cm
Total width: 4 cm
Total length: 42 cm
Total weight: 71 g
Load sustained: 12.1 kg
Efficiency: 169.0 %
Analysis
36
BREAKAGE POINT: I-beam
The final bridge was designed to withstand more weightthan the pasttest bridges. Through multiple test,
we identified the key problem which lies on the use ofcompression and tension. Material wise, fettucine
works well as a tensile member butwhen arranged in an orderly manner; I-beams, could withstand heavy
compression. In our final bridge design, there were surprisingly more tensile members as compared to
compression members.This was realized after calculation was carried outto determine the forces being
withstood by each individual member and its role; whether compressive or tensile in the testing of the
bridge. During the test, the final bridge firstbroke atthe bottom chord which was a 42cm I-beam. This could
be due to the lack of compressive force being transferred to the vertical members (one vertical member
was known to not contribute at all with a reading of0 force) stressing the long span ofI-beam in the
process. However, the final bridge managed to sustain a load of12.1kg while being only 71 g; which was
the lightestweight we have ever achieved resulting in an efficiency of169.0 %. Albeitthe many structural
flaws, workmanship and strategic placementofmembers for force distribution played a significantrole in
the bridge test.
37
C H A P T E R 6 : C O N C L U S I O N
6.1 C O M P A R I S O N B E T W E E N T E S T B R I D G E S A N D F I N A L
As observed from the graph above, there is an upward trend of increasing efficiency as we improvised from
the previous design.
The overall trend of bridge weightfluctuates between the range of70 g to 76 g. Manipulating the overall
weight ofbridge is a very delicate and sensitive task, as adding or removing a strand of fettuccine might
influence it. The overall bridge weightremained at76 g for Bridges 2-4, exceeding the required maximum
weight, but we gradually reduced the amountto a final weight of71 g.
As for the load sustained by the fettuccine bridge, there is an increasing upward trend, indicating that we
have successfully made positive progress with each new design. The first bridge design can only carry a
load of2 kg, butour final bridge managed to carry a load of12.1 kg from the initial load of 2 kg, indicating
that our final fettuccine bridge design is able to sustain a load incrementof83.5 %
Even with an overall flat trend ofbridge weight, the successful incrementin load-bearing ability has
improved the efficiency ofthe bridge in every new design.
0
20
40
60
80
100
120
140
160
180
1 2 3 4 5 final
COMPARISON OF LOAD, WEIGHT AND EFFICIENCY BETWEEN
TEST BRIDGES AND FINAL
sustained load (g/1000) bridge weight (g) efficiency level
38
6.2 R E F E R E N C E S
1. Mystery Bridge Nr. 15: A Wadell A-frame Truss In Texas. (2012). Retrieved May 12, 2016, from
http://thebridgehunter.areavoices.com/2012/11/27/mystery-bridge-nr-15-a-wadell-a-frame-truss-in-
texas/
2. Patent US529220 - Truss-bridge. (n.d.). Retrieved May 12, 2016, from
http://www.google.com/patents/US529220
3. Truss bridge. (n.d.). Retrieved May 7, 2016, from http://dnr.mo.gov/shpo/nps-nr/90002173.pdf

More Related Content

What's hot

Fettucine truss bridge
Fettucine truss bridgeFettucine truss bridge
Fettucine truss bridgelee yiang siang
ย 
Building Structure Project 1 Analysis Report
Building Structure Project 1 Analysis ReportBuilding Structure Project 1 Analysis Report
Building Structure Project 1 Analysis ReportJoyeeLee0131
ย 
Building Structure Project 1 Report
Building Structure Project 1 ReportBuilding Structure Project 1 Report
Building Structure Project 1 Reportkimberleyee95
ย 
Truss Bridge Report
Truss Bridge ReportTruss Bridge Report
Truss Bridge ReportYvonne Chin
ย 
Building structure project 1 report
Building structure project 1 reportBuilding structure project 1 report
Building structure project 1 reportAdelinetingg
ย 
Design and Analysis of Transmission Tower at Allahabad
Design and Analysis of Transmission Tower at AllahabadDesign and Analysis of Transmission Tower at Allahabad
Design and Analysis of Transmission Tower at AllahabadAbhijit Kumar
ย 
Analysis of Prestressed Concrete Girder for Bridges
Analysis of Prestressed Concrete Girder for BridgesAnalysis of Prestressed Concrete Girder for Bridges
Analysis of Prestressed Concrete Girder for Bridgesijtsrd
ย 
Ssb04 detailed design of portal frames
Ssb04 detailed design of portal framesSsb04 detailed design of portal frames
Ssb04 detailed design of portal framesMd. Shahadat Hossain
ย 
project report on truss bridge
project report on truss bridgeproject report on truss bridge
project report on truss bridgerajdutt1111
ย 
Final Report (Steel Bridge Design)
Final Report (Steel Bridge Design)Final Report (Steel Bridge Design)
Final Report (Steel Bridge Design)Josia Tannos, EIT
ย 
Composite deck bridge systems
Composite deck bridge systemsComposite deck bridge systems
Composite deck bridge systemsVenkat Ramana Littu
ย 
Calculation note suez canal cable stayed bridge
Calculation note suez canal cable stayed bridgeCalculation note suez canal cable stayed bridge
Calculation note suez canal cable stayed bridgeMohammed Abdelkawy
ย 
transmission line tower design
transmission line tower designtransmission line tower design
transmission line tower designkunalbhattgecd
ย 
Cfst columns
Cfst columns Cfst columns
Cfst columns amits2280
ย 
Design of portal frame structures
Design of portal frame structuresDesign of portal frame structures
Design of portal frame structuresSiddiq Mohammed
ย 
Experiment 6 MOS LAB
Experiment 6 MOS LABExperiment 6 MOS LAB
Experiment 6 MOS LABRajat Katiyar
ย 
Presentation on construction of cable stay bridge - a modern technique for su...
Presentation on construction of cable stay bridge - a modern technique for su...Presentation on construction of cable stay bridge - a modern technique for su...
Presentation on construction of cable stay bridge - a modern technique for su...Rajesh Prasad
ย 
Ch7 Box Girder Bridges (Steel Bridges ุชุตู…ูŠู… ุงู„ูƒุจุงุฑูŠ ุงู„ู…ุนุฏู†ูŠุฉ & Prof. Dr. Metw...
Ch7 Box Girder Bridges (Steel Bridges ุชุตู…ูŠู… ุงู„ูƒุจุงุฑูŠ ุงู„ู…ุนุฏู†ูŠุฉ & Prof. Dr. Metw...Ch7 Box Girder Bridges (Steel Bridges ุชุตู…ูŠู… ุงู„ูƒุจุงุฑูŠ ุงู„ู…ุนุฏู†ูŠุฉ & Prof. Dr. Metw...
Ch7 Box Girder Bridges (Steel Bridges ุชุตู…ูŠู… ุงู„ูƒุจุงุฑูŠ ุงู„ู…ุนุฏู†ูŠุฉ & Prof. Dr. Metw...Hossam Shafiq II
ย 
Truss bridge final presentation
Truss bridge final presentationTruss bridge final presentation
Truss bridge final presentationkaiumbhai
ย 

What's hot (20)

Fettucine truss bridge
Fettucine truss bridgeFettucine truss bridge
Fettucine truss bridge
ย 
Building Structure Project 1 Analysis Report
Building Structure Project 1 Analysis ReportBuilding Structure Project 1 Analysis Report
Building Structure Project 1 Analysis Report
ย 
Building Structure Project 1 Report
Building Structure Project 1 ReportBuilding Structure Project 1 Report
Building Structure Project 1 Report
ย 
Truss Bridge Report
Truss Bridge ReportTruss Bridge Report
Truss Bridge Report
ย 
Building structure project 1 report
Building structure project 1 reportBuilding structure project 1 report
Building structure project 1 report
ย 
Design and Analysis of Transmission Tower at Allahabad
Design and Analysis of Transmission Tower at AllahabadDesign and Analysis of Transmission Tower at Allahabad
Design and Analysis of Transmission Tower at Allahabad
ย 
Analysis of Prestressed Concrete Girder for Bridges
Analysis of Prestressed Concrete Girder for BridgesAnalysis of Prestressed Concrete Girder for Bridges
Analysis of Prestressed Concrete Girder for Bridges
ย 
Ssb04 detailed design of portal frames
Ssb04 detailed design of portal framesSsb04 detailed design of portal frames
Ssb04 detailed design of portal frames
ย 
project report on truss bridge
project report on truss bridgeproject report on truss bridge
project report on truss bridge
ย 
Final Report (Steel Bridge Design)
Final Report (Steel Bridge Design)Final Report (Steel Bridge Design)
Final Report (Steel Bridge Design)
ย 
Composite deck bridge systems
Composite deck bridge systemsComposite deck bridge systems
Composite deck bridge systems
ย 
Calculation note suez canal cable stayed bridge
Calculation note suez canal cable stayed bridgeCalculation note suez canal cable stayed bridge
Calculation note suez canal cable stayed bridge
ย 
transmission line tower design
transmission line tower designtransmission line tower design
transmission line tower design
ย 
Cfst columns
Cfst columns Cfst columns
Cfst columns
ย 
Design of portal frame structures
Design of portal frame structuresDesign of portal frame structures
Design of portal frame structures
ย 
Experiment 6 MOS LAB
Experiment 6 MOS LABExperiment 6 MOS LAB
Experiment 6 MOS LAB
ย 
Presentation on construction of cable stay bridge - a modern technique for su...
Presentation on construction of cable stay bridge - a modern technique for su...Presentation on construction of cable stay bridge - a modern technique for su...
Presentation on construction of cable stay bridge - a modern technique for su...
ย 
Ch7 Box Girder Bridges (Steel Bridges ุชุตู…ูŠู… ุงู„ูƒุจุงุฑูŠ ุงู„ู…ุนุฏู†ูŠุฉ & Prof. Dr. Metw...
Ch7 Box Girder Bridges (Steel Bridges ุชุตู…ูŠู… ุงู„ูƒุจุงุฑูŠ ุงู„ู…ุนุฏู†ูŠุฉ & Prof. Dr. Metw...Ch7 Box Girder Bridges (Steel Bridges ุชุตู…ูŠู… ุงู„ูƒุจุงุฑูŠ ุงู„ู…ุนุฏู†ูŠุฉ & Prof. Dr. Metw...
Ch7 Box Girder Bridges (Steel Bridges ุชุตู…ูŠู… ุงู„ูƒุจุงุฑูŠ ุงู„ู…ุนุฏู†ูŠุฉ & Prof. Dr. Metw...
ย 
AISC steel manual
AISC steel manualAISC steel manual
AISC steel manual
ย 
Truss bridge final presentation
Truss bridge final presentationTruss bridge final presentation
Truss bridge final presentation
ย 

Viewers also liked

Building Structure Project 1 Fettuccine Bridge
Building Structure Project 1 Fettuccine BridgeBuilding Structure Project 1 Fettuccine Bridge
Building Structure Project 1 Fettuccine BridgeColby Hooi
ย 
How to do your own spaghetti bridge
How to do your own spaghetti bridgeHow to do your own spaghetti bridge
How to do your own spaghetti bridgeAna Carvalho
ย 
Building Structures - Fettucine Bridge
Building Structures - Fettucine BridgeBuilding Structures - Fettucine Bridge
Building Structures - Fettucine Bridgenadiacbass
ย 
Bridge
BridgeBridge
Bridgeillpa
ย 
Spaghetti Bridges 2012
Spaghetti Bridges 2012Spaghetti Bridges 2012
Spaghetti Bridges 2012Stuart Meachem
ย 
Spaghetti bridge project description 1314
Spaghetti bridge project description 1314Spaghetti bridge project description 1314
Spaghetti bridge project description 1314donpata
ย 
Ce 382 l5 truss structures
Ce 382 l5   truss structuresCe 382 l5   truss structures
Ce 382 l5 truss structureshlksd
ย 

Viewers also liked (9)

Building Structure Project 1 Fettuccine Bridge
Building Structure Project 1 Fettuccine BridgeBuilding Structure Project 1 Fettuccine Bridge
Building Structure Project 1 Fettuccine Bridge
ย 
How to do your own spaghetti bridge
How to do your own spaghetti bridgeHow to do your own spaghetti bridge
How to do your own spaghetti bridge
ย 
Building Structures - Fettucine Bridge
Building Structures - Fettucine BridgeBuilding Structures - Fettucine Bridge
Building Structures - Fettucine Bridge
ย 
Bridge
BridgeBridge
Bridge
ย 
Spaghetti Bridges 2012
Spaghetti Bridges 2012Spaghetti Bridges 2012
Spaghetti Bridges 2012
ย 
Spaghetti bridge project description 1314
Spaghetti bridge project description 1314Spaghetti bridge project description 1314
Spaghetti bridge project description 1314
ย 
Tress
TressTress
Tress
ย 
Ce 382 l5 truss structures
Ce 382 l5   truss structuresCe 382 l5   truss structures
Ce 382 l5 truss structures
ย 
Trusses
TrussesTrusses
Trusses
ย 

Similar to Building Structures: Fettuccine Truss Bridge

Building structure report
Building structure reportBuilding structure report
Building structure reportChenyi Teo
ย 
Fettucine recipe
Fettucine recipeFettucine recipe
Fettucine recipelee yiang siang
ย 
Building structuresproject1 fettuccinnefinalm
Building structuresproject1 fettuccinnefinalmBuilding structuresproject1 fettuccinnefinalm
Building structuresproject1 fettuccinnefinalmJ.j. Hayashi
ย 
Bridge report
Bridge reportBridge report
Bridge reportElaine Bong
ย 
Building structure report xoxoxo
Building structure report xoxoxoBuilding structure report xoxoxo
Building structure report xoxoxoJason Juen
ย 
Building structure report xoxoxo
Building structure report xoxoxoBuilding structure report xoxoxo
Building structure report xoxoxoJason Juen
ย 
Building structure report xoxoxo
Building structure report xoxoxoBuilding structure report xoxoxo
Building structure report xoxoxoAnthony Chew
ย 
Bstructure report
Bstructure reportBstructure report
Bstructure reportGarnette Robert
ย 
Bstructure report
Bstructure reportBstructure report
Bstructure reportMegan Chung
ย 
Building structure (project 1:Fettuccine Truss Bridge)
Building structure (project 1:Fettuccine Truss Bridge)Building structure (project 1:Fettuccine Truss Bridge)
Building structure (project 1:Fettuccine Truss Bridge)Baddy Peigun
ย 
BUILDING STRUCTURE FETTUCINE BRIDGE
BUILDING STRUCTURE FETTUCINE BRIDGEBUILDING STRUCTURE FETTUCINE BRIDGE
BUILDING STRUCTURE FETTUCINE BRIDGEChuah Say Yin
ย 
Building Structure Project 1 Fettuccine Bridge
Building Structure Project 1 Fettuccine BridgeBuilding Structure Project 1 Fettuccine Bridge
Building Structure Project 1 Fettuccine BridgeDexter Ng
ย 
bridge report
bridge reportbridge report
bridge reportabc def
ย 
BUILDING STRUCTURE ASSIGNMENT 1
BUILDING STRUCTURE ASSIGNMENT 1BUILDING STRUCTURE ASSIGNMENT 1
BUILDING STRUCTURE ASSIGNMENT 1Nur Zaas
ย 
FETTICCINE BRIDGE
FETTICCINE BRIDGEFETTICCINE BRIDGE
FETTICCINE BRIDGEPengeneee Peng
ย 
Fettuccine bridge Full report
Fettuccine bridge Full reportFettuccine bridge Full report
Fettuccine bridge Full reportTeo Kean Hui
ย 
building Structure
building Structurebuilding Structure
building Structureamee16
ย 
Building Structure Analysis Report
Building Structure Analysis ReportBuilding Structure Analysis Report
Building Structure Analysis ReportEsther Lau
ย 
Building structure analysis report
Building structure analysis report Building structure analysis report
Building structure analysis report Soh Shing
ย 

Similar to Building Structures: Fettuccine Truss Bridge (20)

Building structure report
Building structure reportBuilding structure report
Building structure report
ย 
Fettucine recipe
Fettucine recipeFettucine recipe
Fettucine recipe
ย 
Building structuresproject1 fettuccinnefinalm
Building structuresproject1 fettuccinnefinalmBuilding structuresproject1 fettuccinnefinalm
Building structuresproject1 fettuccinnefinalm
ย 
Bridge report
Bridge reportBridge report
Bridge report
ย 
Building structure report xoxoxo
Building structure report xoxoxoBuilding structure report xoxoxo
Building structure report xoxoxo
ย 
Building structure report xoxoxo
Building structure report xoxoxoBuilding structure report xoxoxo
Building structure report xoxoxo
ย 
Building structure report xoxoxo
Building structure report xoxoxoBuilding structure report xoxoxo
Building structure report xoxoxo
ย 
Bstructure report
Bstructure reportBstructure report
Bstructure report
ย 
Bstructure report
Bstructure reportBstructure report
Bstructure report
ย 
Building structure (project 1:Fettuccine Truss Bridge)
Building structure (project 1:Fettuccine Truss Bridge)Building structure (project 1:Fettuccine Truss Bridge)
Building structure (project 1:Fettuccine Truss Bridge)
ย 
BUILDING STRUCTURE FETTUCINE BRIDGE
BUILDING STRUCTURE FETTUCINE BRIDGEBUILDING STRUCTURE FETTUCINE BRIDGE
BUILDING STRUCTURE FETTUCINE BRIDGE
ย 
Building Structure Project 1 Fettuccine Bridge
Building Structure Project 1 Fettuccine BridgeBuilding Structure Project 1 Fettuccine Bridge
Building Structure Project 1 Fettuccine Bridge
ย 
bridge report
bridge reportbridge report
bridge report
ย 
BUILDING STRUCTURE ASSIGNMENT 1
BUILDING STRUCTURE ASSIGNMENT 1BUILDING STRUCTURE ASSIGNMENT 1
BUILDING STRUCTURE ASSIGNMENT 1
ย 
FETTICCINE BRIDGE
FETTICCINE BRIDGEFETTICCINE BRIDGE
FETTICCINE BRIDGE
ย 
Fettucine
FettucineFettucine
Fettucine
ย 
Fettuccine bridge Full report
Fettuccine bridge Full reportFettuccine bridge Full report
Fettuccine bridge Full report
ย 
building Structure
building Structurebuilding Structure
building Structure
ย 
Building Structure Analysis Report
Building Structure Analysis ReportBuilding Structure Analysis Report
Building Structure Analysis Report
ย 
Building structure analysis report
Building structure analysis report Building structure analysis report
Building structure analysis report
ย 

More from Ee Dong Chen

ADP REPORT
ADP REPORTADP REPORT
ADP REPORTEe Dong Chen
ย 
PROJECT MANAGEMENT REPORT
PROJECT MANAGEMENT REPORTPROJECT MANAGEMENT REPORT
PROJECT MANAGEMENT REPORTEe Dong Chen
ย 
INTERNSHIP REPORT
INTERNSHIP REPORTINTERNSHIP REPORT
INTERNSHIP REPORTEe Dong Chen
ย 
Building Technology
Building Technology Building Technology
Building Technology Ee Dong Chen
ย 
STUDIO V: SITE ANALYSIS
STUDIO V: SITE ANALYSISSTUDIO V: SITE ANALYSIS
STUDIO V: SITE ANALYSISEe Dong Chen
ย 
TAU: SYNOPSIS 4
TAU: SYNOPSIS 4TAU: SYNOPSIS 4
TAU: SYNOPSIS 4Ee Dong Chen
ย 
TAU: SYNOPSIS 3
TAU: SYNOPSIS 3TAU: SYNOPSIS 3
TAU: SYNOPSIS 3Ee Dong Chen
ย 
TAU: SYNOPSIS 2
TAU: SYNOPSIS 2TAU: SYNOPSIS 2
TAU: SYNOPSIS 2Ee Dong Chen
ย 
TAU: SYNOPSIS 1
TAU: SYNOPSIS 1TAU: SYNOPSIS 1
TAU: SYNOPSIS 1Ee Dong Chen
ย 
TAU: Comparative Analysis Essay
TAU: Comparative Analysis EssayTAU: Comparative Analysis Essay
TAU: Comparative Analysis EssayEe Dong Chen
ย 
Building Science II: Lighting Integration Report
Building Science II: Lighting Integration ReportBuilding Science II: Lighting Integration Report
Building Science II: Lighting Integration ReportEe Dong Chen
ย 
Building Science II: Lighting Report
Building Science II: Lighting ReportBuilding Science II: Lighting Report
Building Science II: Lighting ReportEe Dong Chen
ย 
Building Science II: Acoustic Report
Building Science II: Acoustic ReportBuilding Science II: Acoustic Report
Building Science II: Acoustic ReportEe Dong Chen
ย 
Building Structures: Group Report
Building Structures: Group ReportBuilding Structures: Group Report
Building Structures: Group ReportEe Dong Chen
ย 
Asian Architecture: Paper Presentation
Asian Architecture: Paper PresentationAsian Architecture: Paper Presentation
Asian Architecture: Paper PresentationEe Dong Chen
ย 
Asian Architecture: Topic Proposal
Asian Architecture: Topic ProposalAsian Architecture: Topic Proposal
Asian Architecture: Topic ProposalEe Dong Chen
ย 
Asian Architecture: Case Study Paper
Asian Architecture: Case Study PaperAsian Architecture: Case Study Paper
Asian Architecture: Case Study PaperEe Dong Chen
ย 

More from Ee Dong Chen (17)

ADP REPORT
ADP REPORTADP REPORT
ADP REPORT
ย 
PROJECT MANAGEMENT REPORT
PROJECT MANAGEMENT REPORTPROJECT MANAGEMENT REPORT
PROJECT MANAGEMENT REPORT
ย 
INTERNSHIP REPORT
INTERNSHIP REPORTINTERNSHIP REPORT
INTERNSHIP REPORT
ย 
Building Technology
Building Technology Building Technology
Building Technology
ย 
STUDIO V: SITE ANALYSIS
STUDIO V: SITE ANALYSISSTUDIO V: SITE ANALYSIS
STUDIO V: SITE ANALYSIS
ย 
TAU: SYNOPSIS 4
TAU: SYNOPSIS 4TAU: SYNOPSIS 4
TAU: SYNOPSIS 4
ย 
TAU: SYNOPSIS 3
TAU: SYNOPSIS 3TAU: SYNOPSIS 3
TAU: SYNOPSIS 3
ย 
TAU: SYNOPSIS 2
TAU: SYNOPSIS 2TAU: SYNOPSIS 2
TAU: SYNOPSIS 2
ย 
TAU: SYNOPSIS 1
TAU: SYNOPSIS 1TAU: SYNOPSIS 1
TAU: SYNOPSIS 1
ย 
TAU: Comparative Analysis Essay
TAU: Comparative Analysis EssayTAU: Comparative Analysis Essay
TAU: Comparative Analysis Essay
ย 
Building Science II: Lighting Integration Report
Building Science II: Lighting Integration ReportBuilding Science II: Lighting Integration Report
Building Science II: Lighting Integration Report
ย 
Building Science II: Lighting Report
Building Science II: Lighting ReportBuilding Science II: Lighting Report
Building Science II: Lighting Report
ย 
Building Science II: Acoustic Report
Building Science II: Acoustic ReportBuilding Science II: Acoustic Report
Building Science II: Acoustic Report
ย 
Building Structures: Group Report
Building Structures: Group ReportBuilding Structures: Group Report
Building Structures: Group Report
ย 
Asian Architecture: Paper Presentation
Asian Architecture: Paper PresentationAsian Architecture: Paper Presentation
Asian Architecture: Paper Presentation
ย 
Asian Architecture: Topic Proposal
Asian Architecture: Topic ProposalAsian Architecture: Topic Proposal
Asian Architecture: Topic Proposal
ย 
Asian Architecture: Case Study Paper
Asian Architecture: Case Study PaperAsian Architecture: Case Study Paper
Asian Architecture: Case Study Paper
ย 

Recently uploaded

Design Portfolio - 2024 - William Vickery
Design Portfolio - 2024 - William VickeryDesign Portfolio - 2024 - William Vickery
Design Portfolio - 2024 - William VickeryWilliamVickery6
ย 
Call Girls in Okhla Delhi ๐Ÿ’ฏCall Us ๐Ÿ”8264348440๐Ÿ”
Call Girls in Okhla Delhi ๐Ÿ’ฏCall Us ๐Ÿ”8264348440๐Ÿ”Call Girls in Okhla Delhi ๐Ÿ’ฏCall Us ๐Ÿ”8264348440๐Ÿ”
Call Girls in Okhla Delhi ๐Ÿ’ฏCall Us ๐Ÿ”8264348440๐Ÿ”soniya singh
ย 
Chapter 19_DDA_TOD Policy_First Draft 2012.pdf
Chapter 19_DDA_TOD Policy_First Draft 2012.pdfChapter 19_DDA_TOD Policy_First Draft 2012.pdf
Chapter 19_DDA_TOD Policy_First Draft 2012.pdfParomita Roy
ย 
Abu Dhabi Call Girls O58993O4O2 Call Girls in Abu Dhabi`
Abu Dhabi Call Girls O58993O4O2 Call Girls in Abu Dhabi`Abu Dhabi Call Girls O58993O4O2 Call Girls in Abu Dhabi`
Abu Dhabi Call Girls O58993O4O2 Call Girls in Abu Dhabi`dajasot375
ย 
Cosumer Willingness to Pay for Sustainable Bricks
Cosumer Willingness to Pay for Sustainable BricksCosumer Willingness to Pay for Sustainable Bricks
Cosumer Willingness to Pay for Sustainable Bricksabhishekparmar618
ย 
A level Digipak development Presentation
A level Digipak development PresentationA level Digipak development Presentation
A level Digipak development Presentationamedia6
ย 
Kindergarten Assessment Questions Via LessonUp
Kindergarten Assessment Questions Via LessonUpKindergarten Assessment Questions Via LessonUp
Kindergarten Assessment Questions Via LessonUpmainac1
ย 
PORTAFOLIO 2024_ ANASTASIYA KUDINOVA
PORTAFOLIO   2024_  ANASTASIYA  KUDINOVAPORTAFOLIO   2024_  ANASTASIYA  KUDINOVA
PORTAFOLIO 2024_ ANASTASIYA KUDINOVAAnastasiya Kudinova
ย 
VIP Kolkata Call Girl Gariahat ๐Ÿ‘‰ 8250192130 Available With Room
VIP Kolkata Call Girl Gariahat ๐Ÿ‘‰ 8250192130  Available With RoomVIP Kolkata Call Girl Gariahat ๐Ÿ‘‰ 8250192130  Available With Room
VIP Kolkata Call Girl Gariahat ๐Ÿ‘‰ 8250192130 Available With Roomdivyansh0kumar0
ย 
NATA 2024 SYLLABUS, full syllabus explained in detail
NATA 2024 SYLLABUS, full syllabus explained in detailNATA 2024 SYLLABUS, full syllabus explained in detail
NATA 2024 SYLLABUS, full syllabus explained in detailDesigntroIntroducing
ย 
VIP Call Girls Service Kukatpally Hyderabad Call +91-8250192130
VIP Call Girls Service Kukatpally Hyderabad Call +91-8250192130VIP Call Girls Service Kukatpally Hyderabad Call +91-8250192130
VIP Call Girls Service Kukatpally Hyderabad Call +91-8250192130Suhani Kapoor
ย 
3D Printing And Designing Final Report.pdf
3D Printing And Designing Final Report.pdf3D Printing And Designing Final Report.pdf
3D Printing And Designing Final Report.pdfSwaraliBorhade
ย 
Fashion trends before and after covid.pptx
Fashion trends before and after covid.pptxFashion trends before and after covid.pptx
Fashion trends before and after covid.pptxVanshNarang19
ย 
ARt app | UX Case Study
ARt app | UX Case StudyARt app | UX Case Study
ARt app | UX Case StudySophia Viganรฒ
ย 
The history of music videos a level presentation
The history of music videos a level presentationThe history of music videos a level presentation
The history of music videos a level presentationamedia6
ย 
Call Us โœก๏ธ97111โ‡›47426โ‡›Call In girls Vasant Viharเผ’(Delhi)
Call Us โœก๏ธ97111โ‡›47426โ‡›Call In girls Vasant Viharเผ’(Delhi)Call Us โœก๏ธ97111โ‡›47426โ‡›Call In girls Vasant Viharเผ’(Delhi)
Call Us โœก๏ธ97111โ‡›47426โ‡›Call In girls Vasant Viharเผ’(Delhi)jennyeacort
ย 
How to Be Famous in your Field just visit our Site
How to Be Famous in your Field just visit our SiteHow to Be Famous in your Field just visit our Site
How to Be Famous in your Field just visit our Sitegalleryaagency
ย 
ๅฆ‚ไฝ•ๅŠž็†(UVaๆฏ•ไธš่ฏไนฆ๏ผ‰ๅผ—ๅ‰ๅฐผไบšๅคงๅญฆๆฏ•ไธš่ฏๆฏ•ไธš่ฏ๏ผˆๆ–‡ๅ‡ญ๏ผ‰ๆˆ็ปฉๅ•ๅŽŸ็‰ˆไธ€ๆฏ”ไธ€ๅฎšๅˆถ
ๅฆ‚ไฝ•ๅŠž็†(UVaๆฏ•ไธš่ฏไนฆ๏ผ‰ๅผ—ๅ‰ๅฐผไบšๅคงๅญฆๆฏ•ไธš่ฏๆฏ•ไธš่ฏ๏ผˆๆ–‡ๅ‡ญ๏ผ‰ๆˆ็ปฉๅ•ๅŽŸ็‰ˆไธ€ๆฏ”ไธ€ๅฎšๅˆถๅฆ‚ไฝ•ๅŠž็†(UVaๆฏ•ไธš่ฏไนฆ๏ผ‰ๅผ—ๅ‰ๅฐผไบšๅคงๅญฆๆฏ•ไธš่ฏๆฏ•ไธš่ฏ๏ผˆๆ–‡ๅ‡ญ๏ผ‰ๆˆ็ปฉๅ•ๅŽŸ็‰ˆไธ€ๆฏ”ไธ€ๅฎšๅˆถ
ๅฆ‚ไฝ•ๅŠž็†(UVaๆฏ•ไธš่ฏไนฆ๏ผ‰ๅผ—ๅ‰ๅฐผไบšๅคงๅญฆๆฏ•ไธš่ฏๆฏ•ไธš่ฏ๏ผˆๆ–‡ๅ‡ญ๏ผ‰ๆˆ็ปฉๅ•ๅŽŸ็‰ˆไธ€ๆฏ”ไธ€ๅฎšๅˆถdidi bibo
ย 
PORTFOLIO DE ARQUITECTURA CRISTOBAL HERAUD 2024
PORTFOLIO DE ARQUITECTURA CRISTOBAL HERAUD 2024PORTFOLIO DE ARQUITECTURA CRISTOBAL HERAUD 2024
PORTFOLIO DE ARQUITECTURA CRISTOBAL HERAUD 2024CristobalHeraud
ย 

Recently uploaded (20)

Design Portfolio - 2024 - William Vickery
Design Portfolio - 2024 - William VickeryDesign Portfolio - 2024 - William Vickery
Design Portfolio - 2024 - William Vickery
ย 
Call Girls in Okhla Delhi ๐Ÿ’ฏCall Us ๐Ÿ”8264348440๐Ÿ”
Call Girls in Okhla Delhi ๐Ÿ’ฏCall Us ๐Ÿ”8264348440๐Ÿ”Call Girls in Okhla Delhi ๐Ÿ’ฏCall Us ๐Ÿ”8264348440๐Ÿ”
Call Girls in Okhla Delhi ๐Ÿ’ฏCall Us ๐Ÿ”8264348440๐Ÿ”
ย 
Chapter 19_DDA_TOD Policy_First Draft 2012.pdf
Chapter 19_DDA_TOD Policy_First Draft 2012.pdfChapter 19_DDA_TOD Policy_First Draft 2012.pdf
Chapter 19_DDA_TOD Policy_First Draft 2012.pdf
ย 
Abu Dhabi Call Girls O58993O4O2 Call Girls in Abu Dhabi`
Abu Dhabi Call Girls O58993O4O2 Call Girls in Abu Dhabi`Abu Dhabi Call Girls O58993O4O2 Call Girls in Abu Dhabi`
Abu Dhabi Call Girls O58993O4O2 Call Girls in Abu Dhabi`
ย 
Cosumer Willingness to Pay for Sustainable Bricks
Cosumer Willingness to Pay for Sustainable BricksCosumer Willingness to Pay for Sustainable Bricks
Cosumer Willingness to Pay for Sustainable Bricks
ย 
A level Digipak development Presentation
A level Digipak development PresentationA level Digipak development Presentation
A level Digipak development Presentation
ย 
Kindergarten Assessment Questions Via LessonUp
Kindergarten Assessment Questions Via LessonUpKindergarten Assessment Questions Via LessonUp
Kindergarten Assessment Questions Via LessonUp
ย 
PORTAFOLIO 2024_ ANASTASIYA KUDINOVA
PORTAFOLIO   2024_  ANASTASIYA  KUDINOVAPORTAFOLIO   2024_  ANASTASIYA  KUDINOVA
PORTAFOLIO 2024_ ANASTASIYA KUDINOVA
ย 
VIP Kolkata Call Girl Gariahat ๐Ÿ‘‰ 8250192130 Available With Room
VIP Kolkata Call Girl Gariahat ๐Ÿ‘‰ 8250192130  Available With RoomVIP Kolkata Call Girl Gariahat ๐Ÿ‘‰ 8250192130  Available With Room
VIP Kolkata Call Girl Gariahat ๐Ÿ‘‰ 8250192130 Available With Room
ย 
NATA 2024 SYLLABUS, full syllabus explained in detail
NATA 2024 SYLLABUS, full syllabus explained in detailNATA 2024 SYLLABUS, full syllabus explained in detail
NATA 2024 SYLLABUS, full syllabus explained in detail
ย 
VIP Call Girls Service Kukatpally Hyderabad Call +91-8250192130
VIP Call Girls Service Kukatpally Hyderabad Call +91-8250192130VIP Call Girls Service Kukatpally Hyderabad Call +91-8250192130
VIP Call Girls Service Kukatpally Hyderabad Call +91-8250192130
ย 
3D Printing And Designing Final Report.pdf
3D Printing And Designing Final Report.pdf3D Printing And Designing Final Report.pdf
3D Printing And Designing Final Report.pdf
ย 
Fashion trends before and after covid.pptx
Fashion trends before and after covid.pptxFashion trends before and after covid.pptx
Fashion trends before and after covid.pptx
ย 
ARt app | UX Case Study
ARt app | UX Case StudyARt app | UX Case Study
ARt app | UX Case Study
ย 
The history of music videos a level presentation
The history of music videos a level presentationThe history of music videos a level presentation
The history of music videos a level presentation
ย 
Call Us โœก๏ธ97111โ‡›47426โ‡›Call In girls Vasant Viharเผ’(Delhi)
Call Us โœก๏ธ97111โ‡›47426โ‡›Call In girls Vasant Viharเผ’(Delhi)Call Us โœก๏ธ97111โ‡›47426โ‡›Call In girls Vasant Viharเผ’(Delhi)
Call Us โœก๏ธ97111โ‡›47426โ‡›Call In girls Vasant Viharเผ’(Delhi)
ย 
How to Be Famous in your Field just visit our Site
How to Be Famous in your Field just visit our SiteHow to Be Famous in your Field just visit our Site
How to Be Famous in your Field just visit our Site
ย 
ๅฆ‚ไฝ•ๅŠž็†(UVaๆฏ•ไธš่ฏไนฆ๏ผ‰ๅผ—ๅ‰ๅฐผไบšๅคงๅญฆๆฏ•ไธš่ฏๆฏ•ไธš่ฏ๏ผˆๆ–‡ๅ‡ญ๏ผ‰ๆˆ็ปฉๅ•ๅŽŸ็‰ˆไธ€ๆฏ”ไธ€ๅฎšๅˆถ
ๅฆ‚ไฝ•ๅŠž็†(UVaๆฏ•ไธš่ฏไนฆ๏ผ‰ๅผ—ๅ‰ๅฐผไบšๅคงๅญฆๆฏ•ไธš่ฏๆฏ•ไธš่ฏ๏ผˆๆ–‡ๅ‡ญ๏ผ‰ๆˆ็ปฉๅ•ๅŽŸ็‰ˆไธ€ๆฏ”ไธ€ๅฎšๅˆถๅฆ‚ไฝ•ๅŠž็†(UVaๆฏ•ไธš่ฏไนฆ๏ผ‰ๅผ—ๅ‰ๅฐผไบšๅคงๅญฆๆฏ•ไธš่ฏๆฏ•ไธš่ฏ๏ผˆๆ–‡ๅ‡ญ๏ผ‰ๆˆ็ปฉๅ•ๅŽŸ็‰ˆไธ€ๆฏ”ไธ€ๅฎšๅˆถ
ๅฆ‚ไฝ•ๅŠž็†(UVaๆฏ•ไธš่ฏไนฆ๏ผ‰ๅผ—ๅ‰ๅฐผไบšๅคงๅญฆๆฏ•ไธš่ฏๆฏ•ไธš่ฏ๏ผˆๆ–‡ๅ‡ญ๏ผ‰ๆˆ็ปฉๅ•ๅŽŸ็‰ˆไธ€ๆฏ”ไธ€ๅฎšๅˆถ
ย 
PORTFOLIO DE ARQUITECTURA CRISTOBAL HERAUD 2024
PORTFOLIO DE ARQUITECTURA CRISTOBAL HERAUD 2024PORTFOLIO DE ARQUITECTURA CRISTOBAL HERAUD 2024
PORTFOLIO DE ARQUITECTURA CRISTOBAL HERAUD 2024
ย 
Call Girls Service Mukherjee Nagar @9999965857 Delhi ๐Ÿซฆ No Advance VVIP ๐ŸŽ SER...
Call Girls Service Mukherjee Nagar @9999965857 Delhi ๐Ÿซฆ No Advance  VVIP ๐ŸŽ SER...Call Girls Service Mukherjee Nagar @9999965857 Delhi ๐Ÿซฆ No Advance  VVIP ๐ŸŽ SER...
Call Girls Service Mukherjee Nagar @9999965857 Delhi ๐Ÿซฆ No Advance VVIP ๐ŸŽ SER...
ย 

Building Structures: Fettuccine Truss Bridge

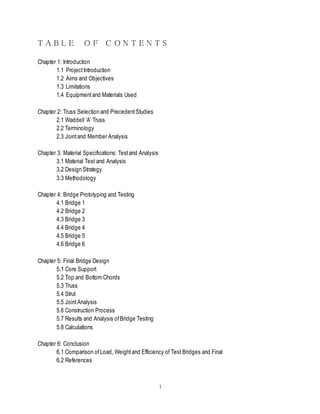
  • 1. 1 T A B L E O F C O N T E N T S Chapter 1: Introduction 1.1 ProjectIntroduction 1.2 Aims and Objectives 1.3 Limitations 1.4 Equipmentand Materials Used Chapter 2: Truss Selection and PrecedentStudies 2.1 Waddell โ€˜Aโ€™ Truss 2.2 Terminology 2.3 Jointand Member Analysis Chapter 3: Material Specifications: Testand Analysis 3.1 Material Test and Analysis 3.2 Design Strategy 3.3 Methodology Chapter 4: Bridge Prototyping and Testing 4.1 Bridge 1 4.2 Bridge 2 4.3 Bridge 3 4.4 Bridge 4 4.5 Bridge 5 4.6 Bridge 6 Chapter 5: Final Bridge Design 5.1 Core Support 5.2 Top and Bottom Chords 5.3 Truss 5.4 Strut 5.5 JointAnalysis 5.6 Construction Process 5.7 Results and Analysis ofBridge Testing 5.8 Calculations Chapter 6: Conclusion 6.1 Comparison of Load, Weightand Efficiency of Test Bridges and Final 6.2 References
  • 2. 2 Chapter 8: Individual Case Studies (Task 1) 8.1 Case 1 8.2 Case 2 8.3 Case 3 8.4 Case 4 8.5 Case 5
  • 3. 3 C H A P T E R 1: INTRODUCTION 1.1 P R O J E C T I N T R O D U C T I O N In a group offive, this project requires students to build a perfect truss bridge by using fettuccine pasta as the material. Students were required to investigate the compression and the tension capabilities of the bridge with different types ofjoints and designs for the bridge. The students would be able to explore the different truss members using differentarrangements to achieve the strongest. Throughout the projectthe students would be able to identify truss system and to be able to identify the beststrength without exceeding too much weightso that the load would be evenly distributed. The fettuccine bridge mustbe strong and efficientto achieve high efficiency โ€“ high load-bearing capabilities and minimal usage ofmaterials โ€“ but within a clear span of350mm. The formula for efficiency is as stated below: Efficiency = ๐ฟ๐‘œ๐‘Ž๐‘‘ ๐‘ ๐‘ข๐‘๐‘๐‘œ๐‘Ÿ๐‘ก๐‘’๐‘‘ ๐‘๐‘ฆ ๐‘๐‘Ÿ๐‘–๐‘‘๐‘”๐‘’ (๐‘”) ๐‘Š๐‘’๐‘–๐‘”โ„Ž๐‘ก ๐‘œ๐‘“ ๐‘กโ„Ž๐‘’ ๐‘๐‘Ÿ๐‘–๐‘‘๐‘”๐‘’ (๐‘”)
  • 4. 4 1.2 A I M S A N D O B J E C T I V E S Aim The aim of this projectis to develop the studentโ€™s understanding oftension and compressive strength ofthe construction materials and to understand the force ofdistribution in a truss. Also, to build a truss design with high aesthetic value whereas could use minimal amount of construction material and withstand a high amounts of loads. Objectives The objectives ofthe projectare: ๏‚ท To develop understanding on force distribution in a truss system; ๏‚ท To develop in-depth understanding on tension and compressive strengths ofthe construction materials; and ๏‚ท To design and produce a fettuccine bridge ofperfecttruss with high efficiency and minimal construction materials. 1.3 L I M I T A T I O N S The mostsignificant limitation in this projectis the requirementthat the overall weightof the fettuccine bridge cannotexceed 70 g. This encouraged us to approach the construction process and bridge design carefully, taking into accountthat the main objective is to produce a bridge ofhigh load-bearing qualities using minimal materials. With that in mind, many bridge designs were explored to determine the most efficient design which can be constructed within the weight boundary of70 g. Other forms of limitation include the fact that water, the load used in bridge testing, will escape the pail when the suspended pail makes contactwith the ground due to gravity. This will cause inaccuracy as the amount of water spilled cannotbe determined and taken into accountof. This scenario mightnot be fully preventable, butcan be improved by suspending the pail closer to the ground so that the fall will be less impactful.
  • 5. 5 1.4 E Q U I P M E N T A N D M A T E R I A L S 1. Fettuccine Fettuccine is the main material ofthe bridge. Every componentofthe bridge should be constructed only using fettuccine. Different fettuccine brands are explored to selectthe bestfettuccine to construct the bridge. 2. Glue Glue is an important factor in constructing the fettuccine bridge as itconnects and combines the different fettuccine members, especially atthe joints. Different types ofglues are experimented to determine the besttype ofadhesive. 3. Weighing scale Weighing scale is used to determine the weight and load imposed on the bridge and individual fettuccine members. 4. Sandpaper Sandpaper is used to smoothen rough edges of the fettuccine, providing more accurate lengths. 5. Cutting blade Blade is used to cutand trim the fettuccine. It provides a cleaner and more precise cutas compared to using scissors. 6. Cutting mat Cutting mat provides a flat and safe base to cut the materials.
  • 6. 6 7. Metal ruler Metal ruler is used to measure the length of fettuccine needed to be cut. Itis laid flat and side by side againstthe fettuccine to ensure accurate markings and preventparallax error. 8. S-hook S-hook is used to connectthe pail to the fettuccine bridge during the load test. It is hooked onto a structural member ofthe bridge on one end,and the handle of the pail is hooked onto the other end. 9. Pails Two pails are used to transfer water from one to another. One pail will be hung onto the S-hook attached to the bridge, and water will be gradually transferred into it from another pail on the ground. 10. Plastic cup Plastic cup is used to transfer water from one pail to another pail hooked on to the bridge. 11. String String is used to tie the S-hook on to the bridge during the final testing, allowing the pail to hover few inches from ground to preventtoo much water from splashing out.
  • 7. 7 C H A P T E R 2: TRUSS SELECTION & PRECEDENTS 2.1 T H E W A D D E L L A T R U S S Figure 2.1.1: The Waddell โ€˜Aโ€™ Truss Bridge by John Alexander Low Waddell in Missouri, USA. The Waddell "A" Truss Bridge in Parkville Missouri is also known as Linn 1898. The bridge was designed by engineer John Alexander Low Waddell and is the subjectofa U.S. patent. The bridge was constructed and redesigned within 7 years. Hence, the bridge was reassembled using the same high standards as originally specified by the designers. The Waddell โ€˜Aโ€™ bridge is a triangular-shaped steel truss bridge, as observed from its overall A-shaped form. It is supported with four panels, and it is a single span bridge that rests on two supportlinks by connecting rivetunits. The bridge is capable to supportheavy traffic without excessive vibration.
  • 8. 8 2.2 B R I D G E T E R M I N O L O G Y 2.3 J O I N T A N D M E M B E R A N A L Y S I S The members ofthe Waddell A bridge along the top chord are in compression as they are supporting a downward force when load is applied, whereas the members along the bottom chord are in tension. The trusses and members between the top and bottom chords can be in compression or tensions, depending on the design,orientation and angle ofthe vertical member. Members in compression Members in tension
  • 9. 9 Figure 2.3.1: The form ofthe bridge resembles is โ€˜A-shapeโ€™ and resembles a triangle. Figure 2.3.2: Joint details ofthe Waddell A Bridge Figure 2.3.3: Joint and truss details on the top chord ofthe Waddell A bridge
  • 10. 10 C H A P T E R 3 : MATERIAL TEST & ANALYSIS 3.1 M A T E R I A L A N A L Y S I S A N D S E L E C T I O N To selectthe bestmaterials and design to constructa bridge with high efficiency, many tests were conducted to determine a few aspects ofthe bridge in terms of: 1. Brand and length of fettuccine span 2. Arrangement offettuccine stack 3. Type of adhesive The aspects listed above are investigated to determine both compression and tensile strengths. Compression strength test Compression strength is the maximum compressive force a material experiences before sustaining failure. Compressive strength is crucial and has to be taken into accountof in bridge design. For the compressive strength experiment, each subjectwill be placed upon the weighing scale and secured into place by a wad of blu-tack. Without applying any force, its initial weighton the weighing scale is neglected and computed as zero. Force is then applied to the subjectby pressing againstthe items on the weighing scale. The maximum weight recorded by the weighing scale before the subject breaks is documented.
  • 11. 11 Tensile strength test Tensile strength is the maximum tensile force a material can sustain before failure. The bridge mustbe able to sustain a certain amount of tensile stress before fracturing. Hence, to determine tensile strength, each aspectofexperimentation will be subjected to a tensile strength test, in which load will placed upon the subjectand will be subsequently increased. The load will be increased until the subjectexperiences breakage, and the last recorded load will be documented in the unit of grams (g). 1. Brand and length of fettuccine Figure 3.1.1: Kimball fettucine Figure 3.1.2: San Remo Figure 3.1.3: Arabella fettuccine
  • 12. 12 This test will determine the mostsuitable brand of fettuccine to use in constructing the bridge with highest efficiency, and also the suitable length to determine how long should the bridge span be to sustain higher loads. The brands offettuccine experimented are Arbella, Kimball and San Remo. All the brands will be tested in lengths of 7, 12, 17 and 22 cm against an increasing load. Brand Length (cm) Number of fettuccine per stack (unit) 1 2 3 4 5 T C T C T C T C T C SR 7 270 250 900 800 1800 1500 3500 4000 3800 >5000 KI 200 228 500 900 700 1600 2500 3645 2700 >5000 AR 150 235 300 900 900 1500 2000 2356 4000 >5000 SR 12 210 200 300 786 900 1499 1300 3427 2300 >5000 KI 70 218 400 889 600 1430 800 4100 900 >5000 AR 100 167 270 890 420 1267 900 2543 1700 >5000 SR 17 120 78 260 675 715 1298 1200 3216 1950 >5000 KI 135 60 230 688 400 1276 450 2354 1000 >5000 AR 180 76 235 700 400 1208 700 1435 800 >5000 SR 22 147 67 260 567 690 1100 1020 1321 1660 >5000 KI 110 55 213 580 260 1125 679 3423 880 >5000 AR 125 56 170 600 230 1187 543 1231 843 >5000 Key: SR = San Remo T = Tensile test KI = Kimball C = Compression test AR = Arbella Analysis: From the tabulated data, we found that San Remo is the strongestfettuccine brand as compared to other alternatives like Kimball and Arbella. 2. Arrangement of fettuccine stack Figure 3.1.4: (from right) I-beam, C-beam and triple-stack arrangement
  • 13. 13 Based on the previous analysis on brand and fettuccine length, San Remo fettuccine is then experimented using 12 cm span, but in different stack arrangement of C-beam, I-beam and horizontal stack. Arrangement Load sustained before breakage/g T C C-beam 2416 4500 I-beam 2268 <5000 Horizontal stack 1300 3850 Key: T = Tension test C = Compression test Analysis: Tension test Based on the results found, the C-beam and I-beam is the mosteffective arrangement as it can sustain a load above 2 kg, as compared to the horizontal stack, the weakestarrangement, which can only sustain 1.3 kg. It is also noted that the C-beam tends to crumple internally when load is imposed, hence the I-beam is the more preferred option. 3. Type of Adhesive Figure 3.1.5: UHU glue Figure 3.1.6: Super glue Figure 3.1.7: White glue Besides the type offettuccine, the type ofadhesive used also plays an important role in constructing the perfectbridge. White glue, UHU glue and superglue is experimented. Arrangement Type of glue UHU Super glue White glue T C T C T C C-beam 590 1432 1355 3482 530 1435 I-beam 548 1234 1800 3525 547 1745
  • 14. 14 Analysis: The results are evident: super glue is the bestadhesive. Super glue can sustain almosttwice the load than other alternatives, whereas UHU glue and white glue is significantly weaker and requires a long time to dry. I-beam constructed using super glue can sustain a heavier load than the C-beam, making it a better, more efficient construction material. 3.2 D E S I G N S T R A T E G Y Based on the tests conducted, we have decided to use the specifications below to create the bridge. S P E C I F I C A T I O N R E A S O N I N G Brand San Remo Strongestbrand of fettuccine (able to sustain highestloads) Span Range of 12-15 cm per span Ideally, 3 spans should be used instead of2. This is because Arrangement I-beam Strongestand moststable arrangement Adhesive Super glue ๏‚ง Bonds fettuccine very strongly (fettuccine does notmove out of place after application) ๏‚ง Shortest drying time ๏‚ง Easy application We have also realized that certain fettuccine brands are suitable for compression and certain brands of fettuccine perform better in tension. Hence, experimenting with materials has helped identify the impact of different arrangements and orientation on structural integrity ofthe bridge. Theoretically, members in tension should be more reinforced and strengthened, especially the bottom chord ofthe bridge due to the downward force the load would impose, calling for the need to utilize I-beam structure as this is the strongestbeam arrangement. Members in compression, such as the vertical trusses in between, mightnotrequire such a strong reinforcement, so other more lightweightmaterials and methods can be considered. Members in compression Members in tension
  • 15. 15 3.3 M E T H O D O L O G Y Methodology is the documentation ofthe construction and testing process, including pre-testpreparations. Step 1: Preliminary studies An analysis on bridge typologies is conducted to determine the type ofbridge to construct. The Waddell A truss is selected. Step 2: Material selection Materials used to construct the bridge are experimented by tension and compression tests. Results from the test are documented, and the best, highestperforming materials are used to constructthe bridge. Step 3: Improvisations After determining the specifications we require ofthe bridge, we tried to improvise from the original Waddell bridge template by sketching outnew modifications which could contribute to a higher efficiency. Step 4: Pre-making The template of the bridge is then drawn out on A3 paper. This will ensure that the measuring and cutting of the fettuccine will be done more accurately, especially atthe joints. The strips of fettuccine are also checked before the cutting process,and only the flat, straight members are used. Step 5: Cutting process The cutting process then commenced. The fettuccine strips are measured precisely using a metal ruler. Blade is used as opposed to scissors to ensure cleaner, straighter cuts. Joints and edges are carefully angled. For layers that require 2 or more strips, we ensure that the layers do notline up at the same spotto preventbreakage. Step 6: Gluing process Super glue is used to combine two layers offettuccine strips, making the member stronger and abler to withstand greater load. As super glue dries very fast, precision is very importantin this step. Therefore, the fettuccine members should be positioned appropriately and glued carefully, ensuring no gaps in between. After gluing, the bridge should be leftaside to dry for at least20 minutes before testing. Step 7: Pre-testing Before testing the bridge, its weightshould be documented using a weighing scale, as this measurementis crucial in determining the overall efficiency ofthe bridge. Two tables ofequal heights are placed nextto each other with a gap of350 mm to fulfil the 35 cm clear span criteria. Both tables are connected by the fettuccine bridge, which is placed atthe edges ofthe tables. An S hook is also hooked on to the middle
  • 16. 16 beam ofthe bridge, and a pail is then hooked onto the S hook. Prior to that, they should also be weighed, as their weightwould be taken into account alongside other additional load to be included later. Step 8: Applying the load Water is supplied from the nearby washroom, and it is added into the pail carefully and gradually using a small cup. As the load increases, the bridge is observed for any deformities. The whole process is also videotaped so thatthe video could be reviewed to analyse the weak points ofthe bridge when it breaks. Step 9: Determining the load sustained After sustaining breakage, the amount ofwater in the pail attached to the bridge is weighed using the weighing scale. The actual load sustained is calculated by dividing the amountfrom the weight of the S hook and the pail. Step 10: Post-testing analysis The video recording the testing process ofthe bridge is reviewed to analyse the failure points of the bridge. Deformities occurring at any pointof load application is noted and highlighted on the diagram on paper. After a group discussion, improvisations are made and a new bridge is constructed and tested. Steps 4 to 10 are repeated for each new bridge design.
  • 17. 17 C H A P T E R 4 : BRIDGE TESTING 4.1 B R I D G E 1 Bridge 1 has the simplestdesign, basically keeping to the original template ofthe Waddell A truss, with only a few modifications to test the original structural integrity ofthe bridge. S P E C I F I C A T I O N R E A S O N I N G 1 35 cm total length Initially we thought that the total length of the bridge should only be 35 cm, including clear span. 2 7 cm height Tall heightas to keep to original A truss template. Results D I M E N S I ON S R E S U L T S Total height: 7 cm Total weight: 74 g Load sustained: 2 kg Efficiency: 27.0 % Total width: 6 cm Total length: 35 cm including clear span
  • 18. 18 Analysis BREAKAGE POINT: core support in which the hook and load is placed The shape ofthe bridge retains the original Waddell A truss without much modification, and we realize that the breakage pointofthe bridge lies atthe core, as the rest ofthe bridge was in good condition and did not collapse internally. The core support has broken from the undistributed force imposed by the pointload from the S-hook. Improvements to be made ๏‚ง Strengthen the core support and distribute the load carefully throughout the bridge. 4.2 B R I D G E 2 Learning from Bridge 1, the core supportofthe bridge is modified into an X bracing, so that the load can be distributed evenly throughoutthe bridge, reducing the stress on the pointin which the S-hook is hung. However, the overall shape and dimensions ofthe bridge is retained, as we believed thatonly the core supportis the most fragile member ofthe bridge.
  • 19. 19 S P E C I F I C A T I O N R E A S O N I N G 1 7 cm height Since the overall structure and shape of Bridge 1 did notcrumble or fracture from the load, we decided thatthe 7 cm heightcan be retained as reducing or increasing itwould not cause any difference. 2 Horizontal X bracing for lateral support Learning from the failure of Bridge 1 โ€“ where the bottom supporthas broken - we decided to create an X bracing connecting both bottom chords in the middle to distribute the force more evenly throughoutthe bridge. The hook would be hung on the middle ofthe X. Results D I M E N S I O N S R E S U L T S Total height: 7 cm Total weight: 76 g Load sustained: 5.2 kg Efficiency: 68.4 % Total width: 6 cm Total length: 35 cm including clear span
  • 20. 20 Analysis BREAKAGE POINT: Core support in which the load is imposed on The main reason for failure in Bridge 2 does notlie in the structural integrity ofthe overall design, butrather the strength of the core support(beam where the hook is placed upon). Placing an Xbracing across the bottom chords did nothelp as itstill broke under pressure ofthe load, and this might be due to the weakness ofthe bracing. Improvements to be made: ๏‚ง Strengthen the X bracing, especially where the S hook is hung on, as this is the pointwhich receives the moststress. 4.3 B R I D G E 3 In Bridge 3, the horizontal X bracing is retained, butmodified from the last bridge design. I-beams are used instead of triple-stacked fettuccine beams, in hopes to improve the strength and load-bearing capabilities of the X-bracing. The heightof the bridge is also reduced to lower the center ofgravity
  • 21. 21 Figure X: Plan view and perspective view of Bridge 3 S P E C I F I C A T I O N R E A S O N I N G 1 5 cm height We attempt to reduce the heightto give ita low center of gravity, providing more stability. Heightis also reduced to compensate the high usage offettuccine members. 2 Overlapping horizontal members Due to the fettuccineโ€™s limited length, two strips of fettuccine is the minimal requirementto create a 35 cm span bridge. For Bridge 1, to connectboth spans of17.5 cm, an additional shorter I-beam is glued to the sides, combining and overlapping both spans. Horizontal
  • 22. 22 members are overlapped, assuming that this can make the horizontal load-bearing components stronger. 3 Diagonal trusses Under the impression that horizontal members will accommodate mostofthe stress, vertical 4members are neglected, with only two diagonally placed members to sustain compressive forces. 4 X-bracing on horizontal members X-bracing is considered to distribute the forces evenly throughout the bridge instead offocusing on one single pointin which the load will be placed. 5 Usage ofI-beams instead of stack arrangement I-beam is stronger than stacked fettuccine beams. Results D I M E N S I O N S R E S U L T S Total height: 5 cm Total weight: 76 g Load sustained: 5.5 kg Efficiency: 72.4 % Total width: 5 cm Total length: 35 cm including clear span Analysis
  • 23. 23 BREAKAGE POINT: I-beam on bottom chord and entire middle portion of the bridge Bridge 3 is structurally stronger than Bridge 1 and 2, as three layers ofI-beams are overlapped to create the bottom support. However, due to the lack ofvertical members, the compression forces acting on the bridge cannotbe dispersed. Also, I-beams required high usage offettuccine (one I-beam required 4-6 strips of fettuccine), which in turn highly affected the weight ofthe bridge. The weightofBridge 3 is 76 g, exceeding the weightcriteria by 6 g. Improvements to be made: ๏‚ง Reduce the weight of the bridge to below 70 g ๏‚ง Increase number of vertical members ๏‚ง Aim to carry heavier load 4.4 B R I D G E 4 From Bridge 3, we realized that the extensive use ofI-beams to improve structural strength of the bridge has effectively carried a heavier load, butthe weight ofthe bridge has exceeded the requirementby 6 g. Hence, in Bridge 4, I-beams are only used in parts which are necessary. The reduction ofI-beams is compensated with extensive reinforcementoftrusses between top and bottom chords.
  • 24. 24 Figure X: Perspective and elevation of Bridge 4 S P E C I F I C A T I O N R E A S O N I N G 1 43 cm total length (35 cm clear span) The length ofthe bridge is elongated, with 4 cm extra length on each side, butthe clear span remains at 35 cm. 2 Increased number ofvertical members and trusses Vertical members are increased to reinforce the trusses between top and bottom chords. 3 I-beams only used for bottom chord To minimize the weight ofthe bridge, I-beams are used atonly the mostcritical areas of the bridge (bottom chord and core support).
  • 25. 25 Results D I M E N S I O N S R E S U L T S Total height: 5.5 cm Total weight: 76 g Load sustained: 7.5 kg Efficiency: 98.7 % Total width: 6 cm Total length: 43 cm (35 cm clear span) Analysis BREAKAGE POINT: I-beam on the bottom chord I-beams are only used for the bottom chords as the bottom chords receive the bulk ofthe load. However, the breakage pointwas still at the bottom chord, indicating that the bottom chord is still weak even though it is strong and rigid from the usage ofI-beams. We analyzed the breakage pointand found that the bottom chord was weakened by the jointconnection between the truss and the bottom chord. This joint is stressed by the fact that the diagonal truss is not glued to the joint properly, resulting a higher stressed imposed on the vertical member, pressuring the particular joint, causing it to break. Improvements to be made: ๏‚ง Workmanship should be improved โ€“ ensure that all angled members are cutand glued precisely ๏‚ง Reduce overall weightofthe bridge ๏‚ง Reduce joints connected to the bottom chord
  • 26. 26 4.5 B R I D G E 5 The overall weightof the bridge is quite an issue throughoutthe many bridge samples we have constructed. We have successfully reduced the weightto 72 g in Bridge 5, by reducing the number of vertical units in between the chords. Figure 4.5.1: Perspective view of Bridge 5 S P E C I F I C A T I O N R E A S O N I N G 1 Reduced number oftrusses To reduce overall weightofthe bridge 2 Reduced number ofjoints To reduce connection points which stresses the bottom chords ofthe bridge Results D I M E N S I O N S R E S U L T S Total height: 5.5 cm
  • 27. 27 Total width: 4 cm Total length: 42 cm Load sustained: 8.4 kg Efficiency: 116.7 % Analysis BREAKAGE POINT: Joint connection of core support to bottom chord The load sustained by Bridge 5 is by far the highestat 8.4 kg. After a thorough inspection ofthe bridge, the area of failure seemed to lie atthe connection pointofthe beam to the bottom chord (see highlighted diagram). The cross-sectional face ofthe core supportis connected to the web ofthe bottom chord. The I-beam member was cut too shortly as compared to its equivalent, non-direct load-bearing members.This shortage created a gap between the beam and the bottom chord, causing the beam to collapse. Improvements to be made: ๏‚ง Further reduce the overall weightofthe bridge to be under 70 g to heighten efficiency ๏‚ง Improve workmanship on cutting and trimming fettuccine members
  • 28. 28 C H A P T E R 5: THE FINAL BRIDGE Bridge 6 is the final bridge used in the actual day ofload test. We have made a few modifications based on the pasttest models we have explored, mainly on the truss direction and number of joints used in the structure. Each componentofthe fettuccine bridge will be explained extensively in this chapter. 5.1 C O R E S U P P O R T The core supportis the first and directrecipientofexternal loads from the environment. Hence, ithas to sustain directstress and distribute it evenly throughoutthe bridge structure, indicating that this component has to be strengthened and reinforced carefully. Figure 5.1.1: Elevation and perspective of the core support. For the final bridge, the core supportis constructed outofoverlapping I-beams, with an extra layer of fettuccine for extra supportand better form to accommodate the curvature ofthe S-hook. The core support is very shortin length to minimize the tensile stress imposed on it, and it is layered onto the flange of the bottom chords instead ofgluing to the web. When load is applied, the core supportwill notdetach from the bottom chord easily and induce breakage. 5.2 T O P & B O T T O M C H O R D S The top and bottom chords ofthe final bridge is made outofI-beams extensively. I-beams provide very high strength and stability which is crucial for sensitive components like the bottom chord, which directly absorbs the load distribution from the core supportunit.
  • 29. 29 5.3 T R U S S Instead ofthe previous design in Bridge 4 and 5, the trusses in the final bridge are modified. Diagonal trusses are inverted to form a triangular unit. This modification is done in consideration ofthe vertical member, which only comprises ofa single fettuccine layer. By converging the diagonal trusses atone point, the vertical member, which experiences high compression forces,is now strengthened and supported on each side. Figure 5.3.1: Truss design of the final bridge 5.4 S T R U T The strut is the member which defines the width ofthe bridge and connects the one side ofthe bridge to another. In previous designs, struts are used extensively. However, in the final bridge, struts are keptto a minimum. Only 4 struts were used as they provide less load-bearing function as compared to other counterparts ofthe bridge. However, they are used to provide lateral supportand preventthe top partof the bridge from collapsing inwardly.
  • 30. 30 Figure 5.4.1: Four struts are used in the final bridge design 5.5 J O I N T A N A L Y S I S The final bridge design features a variety ofjoints used as connection points between differentcomponents of the fettuccine bridge.
  • 31. 31 DIAGONAL TRUSS TO CENTRE TRUSS Diagonal trusses are angled towards the centre truss, forming a three- way connection pointwhich effectively transfers the load throughout the bridge. ANGLED JOINT The angle between the top chord and bottom chord is 14.9 degrees. An acute angle calls for an angled jointon the top chord to TOP CHORD TO CENTRE TRUSS The top chords, which are made outof I-beams, are cut at an angle. The cross-section provides ample surface area to connectthe chord to the centre truss, which is also an I-beam. It is connected to the flange, a flat surface so that a stable jointcan be formed. I-BEAM LAYERING For the core centerpiece which sustains the highestand directload, I- beam layering is used by stacking I-beams on top ofeach other. CONVERGING TRUSSES ON THE TOP CHORD Diagonal trusses converge atthe vertical truss and the top chord, forming a three-way connection point. I-BEAM TO I-BEAM JOINT Beams are double-layered and are positioned between two I-beams to enhance the directdistribution ofcompressive force. Rather than putting the beams on top ofthe bottom chord, they are placed between the I-beams.
  • 32. 32 5.6 C O N S T R U C T IO N P R O C E S S 1. I-beams are constructed to be used for the bottom chord and top chord for the final bridge. The bottom chord is constructed first. 2. The central vertical member is added onto the bottom chord. 3. The top chords are added to the structure, forming a triangle. 4. The vertical trusses are added within each half side ofthe triangle. 5. The diagonal trusses are fitted between the vertical truss members, forming small triangles within the triangular Waddell structure. 6. Four beams are added and positioned perpendicularly to the web ofthe bottom chord.
  • 33. 33 7. Another triangular side ofthe bridge is added to the structure. Both sides are connected by the perpendicular beams. 8. Struts are added onto the top chord to secure the alignment ofthe triangular sides. 9. The core supportis inserted carefully into the structure, layered on top the flanges of the bottom chords.
  • 34. 34 5.7 A R R A N G E M EN T & L O A D D I S T R I B U T I O N I N F E T T U C C I N E B R I D G E I-beams are builtusing 6 strands of fettuccine: 1 for the flange on each side and 2 strands to form the web ofthe I-beam. The 1:2:1 formula is used in constructing the I-beam as it provides more rigidity to the structure, as the 2-layer web unit provides large surface area for contact with the perpendicular flange. 2-Layer fettuccine strips are used for the beams and struts. They are slotted in vertically to the groove of the I-beam. If the fettuccine strips are in a horizontal alignment, they will break easily when force is asserted. Members in compression Members in tension
  • 35. 35 1-Layer fettuccine strips are used for the vertical and diagonal trusses between the top and bottom chord. Force is notasserted severely onto the vertical and diagonal trusses, as the trusses supportthe top and bottom chord. They are also keptto a single layer as we aim to reduce the overall weightofthe final bridge to meetthe requirementof 70 g. 5.8 R E S U L T S & A N A L Y S I S O F B R I D G E T E S T I N G Figure 5.8.1: The final bridge Results D I M E N S I O N S R E S U L T S Total height: 5 cm Total width: 4 cm Total length: 42 cm Total weight: 71 g Load sustained: 12.1 kg Efficiency: 169.0 % Analysis
  • 36. 36 BREAKAGE POINT: I-beam The final bridge was designed to withstand more weightthan the pasttest bridges. Through multiple test, we identified the key problem which lies on the use ofcompression and tension. Material wise, fettucine works well as a tensile member butwhen arranged in an orderly manner; I-beams, could withstand heavy compression. In our final bridge design, there were surprisingly more tensile members as compared to compression members.This was realized after calculation was carried outto determine the forces being withstood by each individual member and its role; whether compressive or tensile in the testing of the bridge. During the test, the final bridge firstbroke atthe bottom chord which was a 42cm I-beam. This could be due to the lack of compressive force being transferred to the vertical members (one vertical member was known to not contribute at all with a reading of0 force) stressing the long span ofI-beam in the process. However, the final bridge managed to sustain a load of12.1kg while being only 71 g; which was the lightestweight we have ever achieved resulting in an efficiency of169.0 %. Albeitthe many structural flaws, workmanship and strategic placementofmembers for force distribution played a significantrole in the bridge test.
  • 37. 37 C H A P T E R 6 : C O N C L U S I O N 6.1 C O M P A R I S O N B E T W E E N T E S T B R I D G E S A N D F I N A L As observed from the graph above, there is an upward trend of increasing efficiency as we improvised from the previous design. The overall trend of bridge weightfluctuates between the range of70 g to 76 g. Manipulating the overall weight ofbridge is a very delicate and sensitive task, as adding or removing a strand of fettuccine might influence it. The overall bridge weightremained at76 g for Bridges 2-4, exceeding the required maximum weight, but we gradually reduced the amountto a final weight of71 g. As for the load sustained by the fettuccine bridge, there is an increasing upward trend, indicating that we have successfully made positive progress with each new design. The first bridge design can only carry a load of2 kg, butour final bridge managed to carry a load of12.1 kg from the initial load of 2 kg, indicating that our final fettuccine bridge design is able to sustain a load incrementof83.5 % Even with an overall flat trend ofbridge weight, the successful incrementin load-bearing ability has improved the efficiency ofthe bridge in every new design. 0 20 40 60 80 100 120 140 160 180 1 2 3 4 5 final COMPARISON OF LOAD, WEIGHT AND EFFICIENCY BETWEEN TEST BRIDGES AND FINAL sustained load (g/1000) bridge weight (g) efficiency level
  • 38. 38 6.2 R E F E R E N C E S 1. Mystery Bridge Nr. 15: A Wadell A-frame Truss In Texas. (2012). Retrieved May 12, 2016, from http://thebridgehunter.areavoices.com/2012/11/27/mystery-bridge-nr-15-a-wadell-a-frame-truss-in- texas/ 2. Patent US529220 - Truss-bridge. (n.d.). Retrieved May 12, 2016, from http://www.google.com/patents/US529220 3. Truss bridge. (n.d.). Retrieved May 7, 2016, from http://dnr.mo.gov/shpo/nps-nr/90002173.pdf