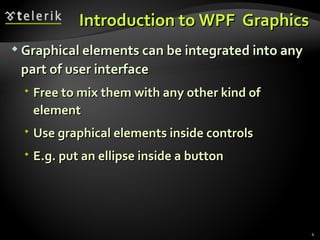
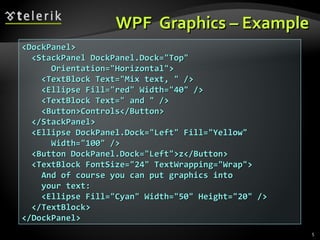
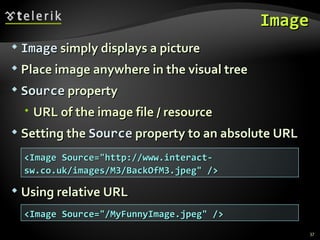
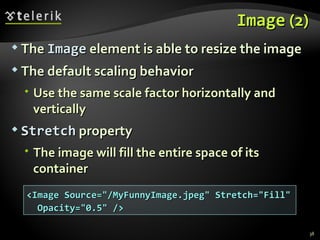
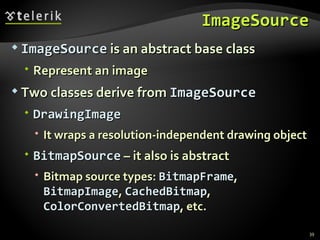
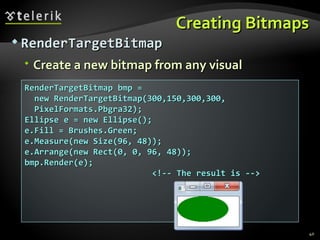
2 D and  3 D Graphics and Animations Doncho Minkov Telerik School Academy schoolacademy.telerik.com   Technical Trainer http://www.minkov.it   WPF  Graphics and Animations
Table of Contents (2) Introduction to WPF Graphics WPF  Drawing Model Resolution Independence Basic Graphics Objects Basic Shapes Bitmaps, Images and Effects Brushes and Pens Transformations Animation
Introduction to WPF  Graphics
Introduction to WPF  Graphics Graphical elements can be integrated into any part of user interface Free to mix them with any other kind of element Use graphical elements inside controls E.g. put an ellipse inside a button
WPF  Graphics – Example <DockPanel> <StackPanel DockPanel.Dock=&quot;Top&quot; Orientation=&quot;Horizontal&quot;> <TextBlock Text=&quot;Mix text, &quot; /> <Ellipse Fill=&quot;red&quot; Width=&quot;40&quot; /> <TextBlock Text=&quot; and &quot; /> <Button>Controls</Button> </StackPanel> <Ellipse DockPanel.Dock=&quot;Left&quot; Fill=&quot;Yellow&quot; Width=&quot;100&quot; /> <Button DockPanel.Dock=&quot;Left&quot;>z</Button> <TextBlock FontSize=&quot;24&quot; TextWrapping=&quot;Wrap&quot;> And of course you can put graphics into your text: <Ellipse Fill=&quot;Cyan&quot; Width=&quot;50&quot; Height=&quot;20&quot; /> </TextBlock> </DockPanel>
Introduction to WPF  Graphics Live Demo
WPF  Drawing Model
WPF  Drawing Model In WPF we don't need to write a C# code to respond to redraw requests\ WPF can keep the screen repainted for us This is because WPF lets us represent drawings as objects that can be represented as XAML Objects are representing graphical shapes in the tree of user interface elements When some property is changed, WPF will automatically update the display
WPF  Drawing Model –Example <Canvas x:Name=&quot;MainCanvas&quot; MouseLeftButtonDown= &quot;mainCanvas_MouseLeftButtonDown&quot;> <Rectangle Canvas.Left=&quot;10&quot; Canvas.Top=&quot;30&quot; Fill=&quot;Indigo&quot; Width=&quot;40&quot; Height=&quot;20&quot; /> <Rectangle Canvas.Left=&quot;20&quot; Canvas.Top=&quot;40&quot; Fill=&quot;Yellow&quot; Width=&quot;40&quot; Height=&quot;20&quot; /> <Rectangle Canvas.Left=&quot;30&quot; Canvas.Top=&quot;50&quot; Fill=&quot;Orange&quot; Width=&quot;40&quot; Height=&quot;20&quot; /> </Canvas> private void MainCanvas_MouseLeftButtonDown (object sender, RoutedEventArgs e) { Rectangle r = e.Source as Rectangle; if (r != null) {  r.Width += 10;  } }
WPF  Drawing Model Live Demo
Resolution Independence, Scaling and Rotation
Resolution Independence What is  resolution independence ? Elements on the screen can be drawn at sizes independent from the pixel grid Resizing do not affect the image quality WPF resolution independence means that If two monitors are set to their native resolution and each of them is accurately reporting its DPI settings to WPF They will display the same WPF window at the exactly the same size
Resolution Independence (2) WPF is resolution independent, but it has logical units to give elements size A WPF window and all the elements inside it are using device-independent units WPF defines a  device-independent pixel  as 1/96th of an inch WPF optimizes its rendering of graphical features for any scale It is ideally placed to take advantage of increasing screen resolutions
Scaling and Rotation WPF supports transformations at a fundamental level Everything in the UI can be transformed Not just the user-drawn graphics E.g. text, images, graphical objects, lines, ellipses, rectangles, controls, etc. The  LayoutTransform  property Available on all user interface elements in WPF Rotation, scaling, effects (e.g. blur), etc.
Scaling and Rotation (2) The details have become crisper G raphic is clearer Because WPF has rendered the button to look as good as it can at the specified size <Button> <Button.LayoutTransform> <ScaleTransform ScaleX=&quot;2&quot; ScaleY=&quot;2&quot; /> </Button.LayoutTransform> ...  <!--The result is--> </Button>  <!--without scaling-->  <!--with scaling-->
Basic Graphical Objects
Shapes, Brushes, and Pens Most of the classes in  WPF’s  drawing toolkit fall into one of these three categories: Shapes – geometrical figures, e.g. rectangle Brushes – mechanisms to fill a shape Pens – draw the shape borders Shapes are objects  that provide the basic building blocks for drawing Rectangle ,  Ellipse ,  Line ,  Polyline ,  Polygon , and  Path
Shapes, Brushes, and Pens (2) The simplest brush is the single-color  SolidColorBrush For more interesting visual effects use LinearGradientBrush RadialGradientBrush Create brushes based on images ImageBrush D rawingBrush VisualBrush  –  take   any visual tree
Shapes, Brushes, and Pens (3) Pens are used to draw the outline of a shape Pen is just an augmented brush When you create a  Pen  object You give it a  Brush  to tell it how it should paint onto the screen The  Pen  class adds more settings L ine thickness (1px, 2px, …) D ash patterns (solid, dotted, dashed, …)
Basic WPF Shapes
Base Shape Class Properties The  Fill  property Specifies the  Brush  that will be used to paint the interior The  Stroke  property Specifies the  Brush  that will be used to paint the outline of the shape The  Stretch  property How the shape is stretched to fill the shape object's layout space
Rectangle It can be drawn either filled in shape, as an outline, or both filled in and outlined Rectangle  doesn’t provide any properties for setting its location The location is determined by the container (e.g.  Canvas ,  StackPanel ,  FlowPanel , …) <Canvas> <Rectangle Fill=&quot;Yellow&quot; Stroke=&quot;Black&quot; Canvas.Left=&quot;30&quot; Canvas.Top=&quot;10&quot; Width=&quot;100&quot; Height=&quot;20&quot; /> </Canvas>
Rectangle (2) A  Rectangle  will usually be aligned with the coordinate system of its parent panel If the parent panel has been rotated,  Rectangle  will of course be also rotated RadiusX  and  RadiusY  properties Draw a rectangle with rounded corners RenderTransform  property Transforms a  Rectangle  relative to its containing panel (rotate, scale, effects, …)
Ellipse Ellipse is similar to  Rectangle Size, location, rotation, fill, and stroke of an  Ellipse  are controlled in exactly the same way as for a  Rectangle <Ellipse Width=&quot;100&quot; Height=&quot;50&quot; Fill=&quot;Yellow&quot; Stroke=&quot;Black&quot; /> <!--The result is-->
Line Draws a straight line between two points C ontrolling the location X1 and Y1 define the start point, and X2 and Y2 deter mine the end point <StackPanel Orientation=&quot;Vertical&quot;> <TextBlock Background=&quot;LightGray&quot;>Foo</TextBlock> <Line Stroke=&quot;Green&quot; X1=&quot;20&quot; Y1=&quot;10&quot; X2=&quot;100&quot; Y2=&quot;40&quot; /> <TextBlock Background=&quot;LightGray&quot;>Bar</TextBlock> <Line Stroke=&quot;Green&quot; X1=&quot;0&quot; Y1=&quot;10&quot; X2=&quot;100&quot; Y2=&quot;0&quot; /> </StackPanel>
Ellipses and Lines Live Demo
Polyline Draw a connected series of line segments Points  property Containing a list of coordinate pairs <Polyline Stroke=&quot;Blue&quot; Points=&quot;0,30 10,30 15,0 18,60 23,30 35,30 40,0 43,60 48,30 160,30&quot; /> <!--The result is-->
Polygon Polygon  is very similar to  Polyline It has a  Points  property that works in exactly the same way as  Polyline ’s Polygon  always draws a closed shape <Polyline Fill=&quot;Orange&quot; Stroke=&quot;Blue&quot; StrokeThickness=&quot;2&quot; Points=&quot;40,10 70,50 10,50&quot;  /> <Polygon Fill=&quot;Orange&quot; Stroke=&quot;Blue&quot; StrokeThickness=&quot;2&quot; Points=&quot;40,10 70,50 10,50&quot;  /> <!--The result is-->
Polygon (2) FillRule  property If this number is odd, the point was inside the shape If it is even, the point is outside the shape The default rule is  EvenOdd <Polygon Fill=&quot;Orange&quot; Stroke=&quot;Blue&quot; StrokeThickness=&quot;2&quot; FillRule=&quot;Nonzero&quot; Points=&quot;10,10 60,10 60,25 20,25 20,40 40,40 40,18 50,18 50,50 10,50&quot; />  <!--The result is-->
Path Path  draws more complex shapes Data  property specifies the  Geometry Three geometry types RectangleGeometry Correspond to the  Rectangle EllipseGeometry Correspond to the  Ellipse LineGeometry Correspond to the  Line
Path (2) GeometryGroup  object Create a shape with multiple geometries <Canvas> <Path Fill=&quot;Cyan&quot; Stroke=&quot;Black&quot;> <Path.Data> <GeometryGroup> <EllipseGeometry Center=&quot;20, 40&quot; RadiusX=&quot;20&quot; RadiusY=&quot;40&quot; /> <EllipseGeometry Center=&quot;20, 40&quot; RadiusX=&quot;10&quot; RadiusY=&quot;30&quot; /> </GeometryGroup> </Path.Data>  <!--The result is-->  </Path> </Canvas>
Path Live Demo
Path (3) The  ArcSegment Add elliptical curves to the edge of a shape P rovides two flags IsLargeArc  – determines whether you get the larger or smaller slice size SweepDirection  – chooses on which side of the line the slice is drawn D raw   Bézier  curves  and c ombining shapes
Arc Segment – Example <Path Fill=&quot;Cyan&quot; Stroke=&quot;Black&quot;> <Path.Data> <PathGeometry> <PathFigure StartPoint=&quot;0,11&quot; IsClosed=&quot;True&quot;> <ArcSegment Point=&quot;50,61&quot; Size=&quot;70,30&quot; SweepDirection=&quot;Counterclockwise&quot; /> </PathFigure> <PathFigure StartPoint=&quot;30,11&quot; IsClosed=&quot;True&quot;> <ArcSegment Point=&quot;80,61&quot; Size=&quot;70,30&quot; SweepDirection=&quot;Clockwise&quot; IsLargeArc=&quot;True&quot; /> </PathFigure> </PathGeometry>  <!--The result is-->  </Path.Data> </Path>
ArcSegment Live Demo
Bitmaps, Images and Effects
Image Image  simply displays a picture Place image anywhere in the visual tree Source  property URL of the image file / resource Setting the  Source  property to an absolute URL Using relative URL <Image Source=&quot;http://www.interact-sw.co.uk/images/M3/BackOfM3.jpeg&quot; /> <Image Source=&quot;/MyFunnyImage.jpeg&quot; />
Image  (2) The  Image  element is able to resize the image The default scaling behavior Use the same scale factor horizontally and vertically Stretch  property The image will fill the entire space of its container <Image Source=&quot;/MyFunnyImage.jpeg&quot; Stretch=&quot;Fill&quot; Opacity=&quot;0.5&quot; />
ImageSource ImageSource  is an abstract base class R epresent an image Two classes derive from  ImageSource DrawingImage It wraps a resolution-independent drawing object BitmapSource  – it also is abstract B itmap source types :  BitmapFram e ,  BitmapImag e ,  CachedBitmap ,  ColorConvertedBitma p , etc.
Creating Bitmaps RenderTargetBitmap Create a new bitmap from any visual RenderTargetBitmap bmp =  new RenderTargetBitmap(300,150,300,300, PixelFormats.Pbgra32); Ellipse e = new Ellipse(); e.Fill = Brushes.Green; e.Measure(new Size(96, 48)); e.Arrange(new Rect(0, 0, 96, 48)); bmp.Render(e);  <!-- The result is -->
Creating Bitmaps  (2) You can choose any resolution you like for the output RenderTargetBitmap  lets you build a bitmap out of any combination of WPF visuals It is great if you want to build or modify a bitmap using WPF elements
Bitmap Effects BitmapEffects  property Apply a visual effect to the element and all of its children All of these effects use bitmap processing algorithms <StackPanel Orientation=&quot;Horizontal&quot;> <StackPanel Orientation=&quot;Vertical&quot;> <TextBlock Text=&quot;Normal Text&quot;  TextAlignment=&quot;Center&quot; FontWeight=&quot;Bold&quot; /> <RadioButton Content=&quot;Better in position 1?&quot; GroupName=&quot;r&quot; /> </StackPanel> <!--The example continues-->
Bitmap Effects (2) T he built-in effects BevelBitmapEffect BitmapEffectGroup BlurBitmapEffect … <StackPanel Orientation=&quot;Vertical&quot; Margin=&quot;10,0&quot;> <StackPanel.BitmapEffect> <BlurBitmapEffect Radius=&quot;3&quot; /> </StackPanel.BitmapEffect> <TextBlock Text=&quot;Blurred Text&quot; TextAlignment=&quot;Center&quot; FontWeight=&quot;Bold&quot; /> <RadioButton Content=&quot;Or position 2?&quot; GroupName=&quot;r&quot; /> </StackPanel> </StackPanel>
Bitmap Effects Live Demo
Brushes and  P ens
SolidColorBrush SolidColorBrush  uses one color across the whole area being painted It has just one property –  Color The XAML compiler will recognize  Yellow  as one of the standard named colors from the  Colors  class Uses a numeric color value Begin with a  #  symbol and contain hexadecimal digits –  Fill=&quot;#8F8&quot;   <Rectangle Fill=&quot;Yellow&quot; Width=&quot;100&quot; Height=&quot;20&quot; />
LinearGradientBrush The painted area transitions from one color to another The  StartPoint  and  EndPoint  properties Indicate where the color transition begins and ends These coordinates are relative to the area being filled
LinearGradientBrush  (2) Each  GradientStop  has an  Offset  property Enables the fill to pass through multiple colors <Rectangle Width=&quot;80&quot; Height=&quot;60&quot;> <Rectangle.Fill> <LinearGradientBrush StartPoint=&quot;0,0&quot; EndPoint=&quot;1,1&quot;> <GradientStop Color=&quot;Blue&quot; Offset=&quot;0&quot; /> <GradientStop Color=&quot;White&quot; Offset=&quot;1&quot; /> </LinearGradientBrush>  <!--The result is-->  </Rectangle.Fill> </Rectangle>
ImageBrush TileBrush Base class for  ImageBrush ,  DrawingBrush , and  VisualBrush Decides how to stretch the source image to fill the available space Stretch  property Specifies how the content of this  TileBrush  stretches to fit its tiles Fill  /  Uniform  /  UniformToFill
ImageBrush  (2) AlignmentX  and  AlignmentY  properties Horizontal and vertical alignment of content in the  TileBrush  base tile Viewbox ,  Viewport ,  ViewboxUnits , and  ViewportUnits  properties Allow you to focus on any part of the image or choose specific scale factors TileMode  property
ImageBrush Live Demo
Pen A  Pen  is always based on a brush Accessed through  Stroke  property Describes how a shape is outlined Important properties Thickness   and  DashArray  propert ies <Rectangle Stroke=&quot;Black&quot; StrokeThickness=&quot;5&quot; StrokeDashArray=&quot;10 1 3 1&quot; /> <Rectangle Stroke=&quot;Black&quot; StrokeThickness=&quot;5&quot; StrokeDashArray=&quot;6 1 6&quot; />
Transformations
Transform Classes TranslateTransform  – displaces the coordinate system by some amount RotateTransform  – rotates coordinate system Angle ,  CenterX ,  CenterY  properties <Button Width=&quot;180&quot; Height=&quot;60&quot; Canvas.Left=&quot;100&quot; Canvas.Top=&quot;100&quot;>I'm rotated 35 degrees <Button.RenderTransform> <RotateTransform Angle=&quot;35&quot;  CenterX=&quot;45&quot; CenterY=&quot;5&quot; /> </Button.RenderTransform> </Button>
Transform Classes ScaleTransform  – scales the coordinate system up or  down ScaleX ,  ScaleY ,  CenterX ,  CenterY  properties SkewTransform  – warps your coordinate system by slanting it a number of degrees AngleX ,  AngleY ,  CenterX ,  CenterX MatrixTransform  – modifies the coordinate system using matrix multiplication Matrix   property
Transformations Live Demo
XAML-Based A nimation
A nimation WPF and Silverlight perform time-based animation with  Storyboard Uses a property-based animation model E.g. modify the value of a property over an interval of time To animate a property you need to have an animation class To modify the color from some value to another, use the  ColorAnimation  class To modify a property, use  DoubleAnimation
Animation – Example <Canvas> <Ellipse Width=&quot;200&quot; Height=&quot;150&quot; Fill=&quot;Orange&quot; x:Name=&quot;AnimatedEllipse&quot;> <Ellipse.Triggers> <EventTrigger RoutedEvent=&quot;Ellipse.Loaded&quot;> <BeginStoryboard><Storyboard> <DoubleAnimation Storyboard.TargetName=&quot;AnimatedEllipse&quot; Storyboard.TargetProperty=&quot;(Canvas.Left)&quot; From=&quot;-50&quot; To=&quot;300&quot; Duration=&quot;00:00:0.88&quot; AutoReverse=&quot;True&quot; RepeatBehavior=&quot;Forever&quot; /> </Storyboard></BeginStoryboard> </EventTrigger> </Ellipse.Triggers> </Ellipse> </Canvas>
A nimation Live Demo
WPF Graphics and Animations Questions?
Exercises Write a program that visualize this figure.  Use only rectangles and  RenderTransform . Draw the rectangles from the previous  exercise with rounded corners. Write a WPF program that visualize the figure below. Use  Polyline  and  Polygon  and  FillRule  property. In the demo &quot; Arc Segment &quot; add rotation of 45 degrees (rotating the ellipses before slicing them). Draw few national flags (e.g. Bulgarian, German, …). Make an animation that transits from one flag to another by changing the opacity of the flags.
Exercises (2) Write a WPF program that visualize a  LinearGradientBrush  with multiple colors (use  Offset  property). Use  TransformGroup  to apply a  ScaleTransform  and a  RotateTransform  to the  RenderTransform  property of a  TextBlock . Implement  Storyboard  animation that moves a large blue rectangle from left to right and back. Add a counterclockwise rotation to the animation. Finally add a color-changing animation from blue to yellow.
Exercises (3) Implement a star field simulation in WPF. The sky should be a  Canvas  panel with black background. The stars should be light blue circles with different size and transparency. All stars should move from top to bottom with different speed. Larger stars move faster and are less transparent. Add a space ship at the  bottom of the screen. Make the ship move left  or right by keyboard keys.
Exercises Create a WPF application that shows   a circle, filled in orange color with black  borders. Create a WPF application that shows the text “Hello world” with font family  Consolas , size  100 , and color  blue . Create a WPF application that shows three nested rectangles with in different colors. Create a WPF application that shows a few rectangles with rounded corners. Create a WPF application that shows all  fonts in &quot; C:\Windows\Fonts &quot;.
Exercises (2) Create a WPF application that shows a  FlowDocument . The document should consist of   header (show in the center of the window, with different font from the other text), a picture (floating at the top left corner) and some other text. Create a WPF application that shows the lists below: Use  List  and  MarkerStyle ,  StartIndex  properties.
Exercises (3) Create a WPF application that shows the table below: Create a WPF application that shows the table below:

WPF Graphics and Animations

  • 1.
    2 D and 3 D Graphics and Animations Doncho Minkov Telerik School Academy schoolacademy.telerik.com Technical Trainer http://www.minkov.it WPF Graphics and Animations
  • 2.
    Table of Contents(2) Introduction to WPF Graphics WPF Drawing Model Resolution Independence Basic Graphics Objects Basic Shapes Bitmaps, Images and Effects Brushes and Pens Transformations Animation
  • 3.
  • 4.
    Introduction to WPF Graphics Graphical elements can be integrated into any part of user interface Free to mix them with any other kind of element Use graphical elements inside controls E.g. put an ellipse inside a button
  • 5.
    WPF Graphics– Example <DockPanel> <StackPanel DockPanel.Dock=&quot;Top&quot; Orientation=&quot;Horizontal&quot;> <TextBlock Text=&quot;Mix text, &quot; /> <Ellipse Fill=&quot;red&quot; Width=&quot;40&quot; /> <TextBlock Text=&quot; and &quot; /> <Button>Controls</Button> </StackPanel> <Ellipse DockPanel.Dock=&quot;Left&quot; Fill=&quot;Yellow&quot; Width=&quot;100&quot; /> <Button DockPanel.Dock=&quot;Left&quot;>z</Button> <TextBlock FontSize=&quot;24&quot; TextWrapping=&quot;Wrap&quot;> And of course you can put graphics into your text: <Ellipse Fill=&quot;Cyan&quot; Width=&quot;50&quot; Height=&quot;20&quot; /> </TextBlock> </DockPanel>
  • 6.
    Introduction to WPF Graphics Live Demo
  • 7.
  • 8.
    WPF DrawingModel In WPF we don't need to write a C# code to respond to redraw requests\ WPF can keep the screen repainted for us This is because WPF lets us represent drawings as objects that can be represented as XAML Objects are representing graphical shapes in the tree of user interface elements When some property is changed, WPF will automatically update the display
  • 9.
    WPF DrawingModel –Example <Canvas x:Name=&quot;MainCanvas&quot; MouseLeftButtonDown= &quot;mainCanvas_MouseLeftButtonDown&quot;> <Rectangle Canvas.Left=&quot;10&quot; Canvas.Top=&quot;30&quot; Fill=&quot;Indigo&quot; Width=&quot;40&quot; Height=&quot;20&quot; /> <Rectangle Canvas.Left=&quot;20&quot; Canvas.Top=&quot;40&quot; Fill=&quot;Yellow&quot; Width=&quot;40&quot; Height=&quot;20&quot; /> <Rectangle Canvas.Left=&quot;30&quot; Canvas.Top=&quot;50&quot; Fill=&quot;Orange&quot; Width=&quot;40&quot; Height=&quot;20&quot; /> </Canvas> private void MainCanvas_MouseLeftButtonDown (object sender, RoutedEventArgs e) { Rectangle r = e.Source as Rectangle; if (r != null) { r.Width += 10; } }
  • 10.
    WPF DrawingModel Live Demo
  • 11.
  • 12.
    Resolution Independence Whatis resolution independence ? Elements on the screen can be drawn at sizes independent from the pixel grid Resizing do not affect the image quality WPF resolution independence means that If two monitors are set to their native resolution and each of them is accurately reporting its DPI settings to WPF They will display the same WPF window at the exactly the same size
  • 13.
    Resolution Independence (2)WPF is resolution independent, but it has logical units to give elements size A WPF window and all the elements inside it are using device-independent units WPF defines a device-independent pixel as 1/96th of an inch WPF optimizes its rendering of graphical features for any scale It is ideally placed to take advantage of increasing screen resolutions
  • 14.
    Scaling and RotationWPF supports transformations at a fundamental level Everything in the UI can be transformed Not just the user-drawn graphics E.g. text, images, graphical objects, lines, ellipses, rectangles, controls, etc. The LayoutTransform property Available on all user interface elements in WPF Rotation, scaling, effects (e.g. blur), etc.
  • 15.
    Scaling and Rotation(2) The details have become crisper G raphic is clearer Because WPF has rendered the button to look as good as it can at the specified size <Button> <Button.LayoutTransform> <ScaleTransform ScaleX=&quot;2&quot; ScaleY=&quot;2&quot; /> </Button.LayoutTransform> ... <!--The result is--> </Button> <!--without scaling--> <!--with scaling-->
  • 16.
  • 17.
    Shapes, Brushes, andPens Most of the classes in WPF’s drawing toolkit fall into one of these three categories: Shapes – geometrical figures, e.g. rectangle Brushes – mechanisms to fill a shape Pens – draw the shape borders Shapes are objects that provide the basic building blocks for drawing Rectangle , Ellipse , Line , Polyline , Polygon , and Path
  • 18.
    Shapes, Brushes, andPens (2) The simplest brush is the single-color SolidColorBrush For more interesting visual effects use LinearGradientBrush RadialGradientBrush Create brushes based on images ImageBrush D rawingBrush VisualBrush – take any visual tree
  • 19.
    Shapes, Brushes, andPens (3) Pens are used to draw the outline of a shape Pen is just an augmented brush When you create a Pen object You give it a Brush to tell it how it should paint onto the screen The Pen class adds more settings L ine thickness (1px, 2px, …) D ash patterns (solid, dotted, dashed, …)
  • 20.
  • 21.
    Base Shape ClassProperties The Fill property Specifies the Brush that will be used to paint the interior The Stroke property Specifies the Brush that will be used to paint the outline of the shape The Stretch property How the shape is stretched to fill the shape object's layout space
  • 22.
    Rectangle It canbe drawn either filled in shape, as an outline, or both filled in and outlined Rectangle doesn’t provide any properties for setting its location The location is determined by the container (e.g. Canvas , StackPanel , FlowPanel , …) <Canvas> <Rectangle Fill=&quot;Yellow&quot; Stroke=&quot;Black&quot; Canvas.Left=&quot;30&quot; Canvas.Top=&quot;10&quot; Width=&quot;100&quot; Height=&quot;20&quot; /> </Canvas>
  • 23.
    Rectangle (2) A Rectangle will usually be aligned with the coordinate system of its parent panel If the parent panel has been rotated, Rectangle will of course be also rotated RadiusX and RadiusY properties Draw a rectangle with rounded corners RenderTransform property Transforms a Rectangle relative to its containing panel (rotate, scale, effects, …)
  • 24.
    Ellipse Ellipse issimilar to Rectangle Size, location, rotation, fill, and stroke of an Ellipse are controlled in exactly the same way as for a Rectangle <Ellipse Width=&quot;100&quot; Height=&quot;50&quot; Fill=&quot;Yellow&quot; Stroke=&quot;Black&quot; /> <!--The result is-->
  • 25.
    Line Draws astraight line between two points C ontrolling the location X1 and Y1 define the start point, and X2 and Y2 deter mine the end point <StackPanel Orientation=&quot;Vertical&quot;> <TextBlock Background=&quot;LightGray&quot;>Foo</TextBlock> <Line Stroke=&quot;Green&quot; X1=&quot;20&quot; Y1=&quot;10&quot; X2=&quot;100&quot; Y2=&quot;40&quot; /> <TextBlock Background=&quot;LightGray&quot;>Bar</TextBlock> <Line Stroke=&quot;Green&quot; X1=&quot;0&quot; Y1=&quot;10&quot; X2=&quot;100&quot; Y2=&quot;0&quot; /> </StackPanel>
  • 26.
  • 27.
    Polyline Draw aconnected series of line segments Points property Containing a list of coordinate pairs <Polyline Stroke=&quot;Blue&quot; Points=&quot;0,30 10,30 15,0 18,60 23,30 35,30 40,0 43,60 48,30 160,30&quot; /> <!--The result is-->
  • 28.
    Polygon Polygon is very similar to Polyline It has a Points property that works in exactly the same way as Polyline ’s Polygon always draws a closed shape <Polyline Fill=&quot;Orange&quot; Stroke=&quot;Blue&quot; StrokeThickness=&quot;2&quot; Points=&quot;40,10 70,50 10,50&quot; /> <Polygon Fill=&quot;Orange&quot; Stroke=&quot;Blue&quot; StrokeThickness=&quot;2&quot; Points=&quot;40,10 70,50 10,50&quot; /> <!--The result is-->
  • 29.
    Polygon (2) FillRule property If this number is odd, the point was inside the shape If it is even, the point is outside the shape The default rule is EvenOdd <Polygon Fill=&quot;Orange&quot; Stroke=&quot;Blue&quot; StrokeThickness=&quot;2&quot; FillRule=&quot;Nonzero&quot; Points=&quot;10,10 60,10 60,25 20,25 20,40 40,40 40,18 50,18 50,50 10,50&quot; /> <!--The result is-->
  • 30.
    Path Path draws more complex shapes Data property specifies the Geometry Three geometry types RectangleGeometry Correspond to the Rectangle EllipseGeometry Correspond to the Ellipse LineGeometry Correspond to the Line
  • 31.
    Path (2) GeometryGroup object Create a shape with multiple geometries <Canvas> <Path Fill=&quot;Cyan&quot; Stroke=&quot;Black&quot;> <Path.Data> <GeometryGroup> <EllipseGeometry Center=&quot;20, 40&quot; RadiusX=&quot;20&quot; RadiusY=&quot;40&quot; /> <EllipseGeometry Center=&quot;20, 40&quot; RadiusX=&quot;10&quot; RadiusY=&quot;30&quot; /> </GeometryGroup> </Path.Data> <!--The result is--> </Path> </Canvas>
  • 32.
  • 33.
    Path (3) The ArcSegment Add elliptical curves to the edge of a shape P rovides two flags IsLargeArc – determines whether you get the larger or smaller slice size SweepDirection – chooses on which side of the line the slice is drawn D raw Bézier curves and c ombining shapes
  • 34.
    Arc Segment –Example <Path Fill=&quot;Cyan&quot; Stroke=&quot;Black&quot;> <Path.Data> <PathGeometry> <PathFigure StartPoint=&quot;0,11&quot; IsClosed=&quot;True&quot;> <ArcSegment Point=&quot;50,61&quot; Size=&quot;70,30&quot; SweepDirection=&quot;Counterclockwise&quot; /> </PathFigure> <PathFigure StartPoint=&quot;30,11&quot; IsClosed=&quot;True&quot;> <ArcSegment Point=&quot;80,61&quot; Size=&quot;70,30&quot; SweepDirection=&quot;Clockwise&quot; IsLargeArc=&quot;True&quot; /> </PathFigure> </PathGeometry> <!--The result is--> </Path.Data> </Path>
  • 35.
  • 36.
  • 37.
    Image Image simply displays a picture Place image anywhere in the visual tree Source property URL of the image file / resource Setting the Source property to an absolute URL Using relative URL <Image Source=&quot;http://www.interact-sw.co.uk/images/M3/BackOfM3.jpeg&quot; /> <Image Source=&quot;/MyFunnyImage.jpeg&quot; />
  • 38.
    Image (2)The Image element is able to resize the image The default scaling behavior Use the same scale factor horizontally and vertically Stretch property The image will fill the entire space of its container <Image Source=&quot;/MyFunnyImage.jpeg&quot; Stretch=&quot;Fill&quot; Opacity=&quot;0.5&quot; />
  • 39.
    ImageSource ImageSource is an abstract base class R epresent an image Two classes derive from ImageSource DrawingImage It wraps a resolution-independent drawing object BitmapSource – it also is abstract B itmap source types : BitmapFram e , BitmapImag e , CachedBitmap , ColorConvertedBitma p , etc.
  • 40.
    Creating Bitmaps RenderTargetBitmapCreate a new bitmap from any visual RenderTargetBitmap bmp = new RenderTargetBitmap(300,150,300,300, PixelFormats.Pbgra32); Ellipse e = new Ellipse(); e.Fill = Brushes.Green; e.Measure(new Size(96, 48)); e.Arrange(new Rect(0, 0, 96, 48)); bmp.Render(e); <!-- The result is -->
  • 41.
    Creating Bitmaps (2) You can choose any resolution you like for the output RenderTargetBitmap lets you build a bitmap out of any combination of WPF visuals It is great if you want to build or modify a bitmap using WPF elements
  • 42.
    Bitmap Effects BitmapEffects property Apply a visual effect to the element and all of its children All of these effects use bitmap processing algorithms <StackPanel Orientation=&quot;Horizontal&quot;> <StackPanel Orientation=&quot;Vertical&quot;> <TextBlock Text=&quot;Normal Text&quot; TextAlignment=&quot;Center&quot; FontWeight=&quot;Bold&quot; /> <RadioButton Content=&quot;Better in position 1?&quot; GroupName=&quot;r&quot; /> </StackPanel> <!--The example continues-->
  • 43.
    Bitmap Effects (2)T he built-in effects BevelBitmapEffect BitmapEffectGroup BlurBitmapEffect … <StackPanel Orientation=&quot;Vertical&quot; Margin=&quot;10,0&quot;> <StackPanel.BitmapEffect> <BlurBitmapEffect Radius=&quot;3&quot; /> </StackPanel.BitmapEffect> <TextBlock Text=&quot;Blurred Text&quot; TextAlignment=&quot;Center&quot; FontWeight=&quot;Bold&quot; /> <RadioButton Content=&quot;Or position 2?&quot; GroupName=&quot;r&quot; /> </StackPanel> </StackPanel>
  • 44.
  • 45.
  • 46.
    SolidColorBrush SolidColorBrush uses one color across the whole area being painted It has just one property – Color The XAML compiler will recognize Yellow as one of the standard named colors from the Colors class Uses a numeric color value Begin with a # symbol and contain hexadecimal digits – Fill=&quot;#8F8&quot; <Rectangle Fill=&quot;Yellow&quot; Width=&quot;100&quot; Height=&quot;20&quot; />
  • 47.
    LinearGradientBrush The paintedarea transitions from one color to another The StartPoint and EndPoint properties Indicate where the color transition begins and ends These coordinates are relative to the area being filled
  • 48.
    LinearGradientBrush (2)Each GradientStop has an Offset property Enables the fill to pass through multiple colors <Rectangle Width=&quot;80&quot; Height=&quot;60&quot;> <Rectangle.Fill> <LinearGradientBrush StartPoint=&quot;0,0&quot; EndPoint=&quot;1,1&quot;> <GradientStop Color=&quot;Blue&quot; Offset=&quot;0&quot; /> <GradientStop Color=&quot;White&quot; Offset=&quot;1&quot; /> </LinearGradientBrush> <!--The result is--> </Rectangle.Fill> </Rectangle>
  • 49.
    ImageBrush TileBrush Baseclass for ImageBrush , DrawingBrush , and VisualBrush Decides how to stretch the source image to fill the available space Stretch property Specifies how the content of this TileBrush stretches to fit its tiles Fill / Uniform / UniformToFill
  • 50.
    ImageBrush (2)AlignmentX and AlignmentY properties Horizontal and vertical alignment of content in the TileBrush base tile Viewbox , Viewport , ViewboxUnits , and ViewportUnits properties Allow you to focus on any part of the image or choose specific scale factors TileMode property
  • 51.
  • 52.
    Pen A Pen is always based on a brush Accessed through Stroke property Describes how a shape is outlined Important properties Thickness and DashArray propert ies <Rectangle Stroke=&quot;Black&quot; StrokeThickness=&quot;5&quot; StrokeDashArray=&quot;10 1 3 1&quot; /> <Rectangle Stroke=&quot;Black&quot; StrokeThickness=&quot;5&quot; StrokeDashArray=&quot;6 1 6&quot; />
  • 53.
  • 54.
    Transform Classes TranslateTransform – displaces the coordinate system by some amount RotateTransform – rotates coordinate system Angle , CenterX , CenterY properties <Button Width=&quot;180&quot; Height=&quot;60&quot; Canvas.Left=&quot;100&quot; Canvas.Top=&quot;100&quot;>I'm rotated 35 degrees <Button.RenderTransform> <RotateTransform Angle=&quot;35&quot; CenterX=&quot;45&quot; CenterY=&quot;5&quot; /> </Button.RenderTransform> </Button>
  • 55.
    Transform Classes ScaleTransform – scales the coordinate system up or down ScaleX , ScaleY , CenterX , CenterY properties SkewTransform – warps your coordinate system by slanting it a number of degrees AngleX , AngleY , CenterX , CenterX MatrixTransform – modifies the coordinate system using matrix multiplication Matrix property
  • 56.
  • 57.
  • 58.
    A nimation WPFand Silverlight perform time-based animation with Storyboard Uses a property-based animation model E.g. modify the value of a property over an interval of time To animate a property you need to have an animation class To modify the color from some value to another, use the ColorAnimation class To modify a property, use DoubleAnimation
  • 59.
    Animation – Example<Canvas> <Ellipse Width=&quot;200&quot; Height=&quot;150&quot; Fill=&quot;Orange&quot; x:Name=&quot;AnimatedEllipse&quot;> <Ellipse.Triggers> <EventTrigger RoutedEvent=&quot;Ellipse.Loaded&quot;> <BeginStoryboard><Storyboard> <DoubleAnimation Storyboard.TargetName=&quot;AnimatedEllipse&quot; Storyboard.TargetProperty=&quot;(Canvas.Left)&quot; From=&quot;-50&quot; To=&quot;300&quot; Duration=&quot;00:00:0.88&quot; AutoReverse=&quot;True&quot; RepeatBehavior=&quot;Forever&quot; /> </Storyboard></BeginStoryboard> </EventTrigger> </Ellipse.Triggers> </Ellipse> </Canvas>
  • 60.
  • 61.
    WPF Graphics andAnimations Questions?
  • 62.
    Exercises Write aprogram that visualize this figure. Use only rectangles and RenderTransform . Draw the rectangles from the previous exercise with rounded corners. Write a WPF program that visualize the figure below. Use Polyline and Polygon and FillRule property. In the demo &quot; Arc Segment &quot; add rotation of 45 degrees (rotating the ellipses before slicing them). Draw few national flags (e.g. Bulgarian, German, …). Make an animation that transits from one flag to another by changing the opacity of the flags.
  • 63.
    Exercises (2) Writea WPF program that visualize a LinearGradientBrush with multiple colors (use Offset property). Use TransformGroup to apply a ScaleTransform and a RotateTransform to the RenderTransform property of a TextBlock . Implement Storyboard animation that moves a large blue rectangle from left to right and back. Add a counterclockwise rotation to the animation. Finally add a color-changing animation from blue to yellow.
  • 64.
    Exercises (3) Implementa star field simulation in WPF. The sky should be a Canvas panel with black background. The stars should be light blue circles with different size and transparency. All stars should move from top to bottom with different speed. Larger stars move faster and are less transparent. Add a space ship at the bottom of the screen. Make the ship move left or right by keyboard keys.
  • 65.
    Exercises Create aWPF application that shows a circle, filled in orange color with black borders. Create a WPF application that shows the text “Hello world” with font family Consolas , size 100 , and color blue . Create a WPF application that shows three nested rectangles with in different colors. Create a WPF application that shows a few rectangles with rounded corners. Create a WPF application that shows all fonts in &quot; C:\Windows\Fonts &quot;.
  • 66.
    Exercises (2) Createa WPF application that shows a FlowDocument . The document should consist of header (show in the center of the window, with different font from the other text), a picture (floating at the top left corner) and some other text. Create a WPF application that shows the lists below: Use List and MarkerStyle , StartIndex properties.
  • 67.
    Exercises (3) Createa WPF application that shows the table below: Create a WPF application that shows the table below:

Editor's Notes

  • #2 * 02/25/12 07/16/96 (c) 2005 National Academy for Software Development - http://academy.devbg.org. All rights reserved. Unauthorized copying or re-distribution is strictly prohibited.* ##
  • #4 * 02/25/12 07/16/96 (c) 2005 National Academy for Software Development - http://academy.devbg.org. All rights reserved. Unauthorized copying or re-distribution is strictly prohibited.* ##
  • #7 * 02/25/12 07/16/96 (c) 2005 National Academy for Software Development - http://academy.devbg.org. All rights reserved. Unauthorized copying or re-distribution is strictly prohibited.* ##
  • #8 * 02/25/12 07/16/96 (c) 2005 National Academy for Software Development - http://academy.devbg.org. All rights reserved. Unauthorized copying or re-distribution is strictly prohibited.* ##
  • #11 * 02/25/12 07/16/96 (c) 2005 National Academy for Software Development - http://academy.devbg.org. All rights reserved. Unauthorized copying or re-distribution is strictly prohibited.* ##
  • #12 * 02/25/12 07/16/96 (c) 2005 National Academy for Software Development - http://academy.devbg.org. All rights reserved. Unauthorized copying or re-distribution is strictly prohibited.* ##
  • #17 * 02/25/12 07/16/96 (c) 2005 National Academy for Software Development - http://academy.devbg.org. All rights reserved. Unauthorized copying or re-distribution is strictly prohibited.* ##
  • #21 * 02/25/12 07/16/96 (c) 2005 National Academy for Software Development - http://academy.devbg.org. All rights reserved. Unauthorized copying or re-distribution is strictly prohibited.* ##
  • #27 * 02/25/12 07/16/96 (c) 2005 National Academy for Software Development - http://academy.devbg.org. All rights reserved. Unauthorized copying or re-distribution is strictly prohibited.* ##
  • #33 * 02/25/12 07/16/96 (c) 2005 National Academy for Software Development - http://academy.devbg.org. All rights reserved. Unauthorized copying or re-distribution is strictly prohibited.* ##
  • #36 * 02/25/12 07/16/96 (c) 2005 National Academy for Software Development - http://academy.devbg.org. All rights reserved. Unauthorized copying or re-distribution is strictly prohibited.* ##
  • #37 * 02/25/12 07/16/96 (c) 2005 National Academy for Software Development - http://academy.devbg.org. All rights reserved. Unauthorized copying or re-distribution is strictly prohibited.* ##
  • #45 * 02/25/12 07/16/96 (c) 2005 National Academy for Software Development - http://academy.devbg.org. All rights reserved. Unauthorized copying or re-distribution is strictly prohibited.* ##
  • #46 * 02/25/12 07/16/96 (c) 2005 National Academy for Software Development - http://academy.devbg.org. All rights reserved. Unauthorized copying or re-distribution is strictly prohibited.* ##
  • #52 * 02/25/12 07/16/96 (c) 2005 National Academy for Software Development - http://academy.devbg.org. All rights reserved. Unauthorized copying or re-distribution is strictly prohibited.* ##
  • #54 * 02/25/12 07/16/96 (c) 2005 National Academy for Software Development - http://academy.devbg.org. All rights reserved. Unauthorized copying or re-distribution is strictly prohibited.* ##
  • #57 * 02/25/12 07/16/96 (c) 2005 National Academy for Software Development - http://academy.devbg.org. All rights reserved. Unauthorized copying or re-distribution is strictly prohibited.* ##
  • #58 * (c) 2008 National Academy for Software Development - http://academy.devbg.org. All rights reserved. Unauthorized copying or re-distribution is strictly prohibited.* ##
  • #61 * (c) 2008 National Academy for Software Development - http://academy.devbg.org. All rights reserved. Unauthorized copying or re-distribution is strictly prohibited.* ##
  • #63 * 02/25/12 07/16/96 (c) 2005 National Academy for Software Development - http://academy.devbg.org. All rights reserved. Unauthorized copying or re-distribution is strictly prohibited.* ##
  • #64 * 02/25/12 07/16/96 (c) 2005 National Academy for Software Development - http://academy.devbg.org. All rights reserved. Unauthorized copying or re-distribution is strictly prohibited.* ##
  • #66 * (c) 2008 National Academy for Software Development - http://academy.devbg.org. All rights reserved. Unauthorized copying or re-distribution is strictly prohibited.* ##
  • #67 * 02/25/12 07/16/96 (c) 2005 National Academy for Software Development - http://academy.devbg.org. All rights reserved. Unauthorized copying or re-distribution is strictly prohibited.* ##
  • #68 * 02/25/12 07/16/96 (c) 2005 National Academy for Software Development - http://academy.devbg.org. All rights reserved. Unauthorized copying or re-distribution is strictly prohibited.* ##