1. VLSI DESIGN
INTRODUCTION TO IC TECHNOLOGY
Over the last two decades electronics industry has achieved remarkable growth, mainly
due to the advent of Very-large-scale integration (VLSI).VLSI is the process of creating an
integrated circuit( IC) by combining thousands of transistors into a single chip. The number of
applications of IC’s is in high performance computing, telecommunications, consumer
electronics etc. The required computational power (or the intelligence) of these applications is
the driving force the fast development of this field.
As more and more complex functions are required in various data processing and
telecommunications devices, the need to integrate these functions in a small system/package is
also increasing. The levels of integration are measured by the no. of logic gates in a monolithic
chip. Table 1.1 shows evaluation of logic complexity in integrated circuits.
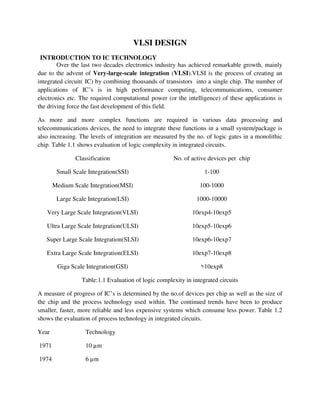
Classification No. of active devices per chip
Small Scale Integration(SSI) 1-100
Medium Scale Integration(MSI) 100-1000
Large Scale Integration(LSI) 1000-10000
Very Large Scale Integration(VLSI) 10exp4-10exp5
Ultra Large Scale Integration(ULSI) 10exp5-10exp6
Super Large Scale Integration(SLSI) 10exp6-10exp7
Extra Large Scale Integration(ELSI) 10exp7-10exp8
Giga Scale Integration(GSI) >10exp8
Table:1.1 Evaluation of logic complexity in integrated circuits
A measure of progress of IC’s is determined by the no.of devices per chip as well as the size of
the chip and the process technology used within. The continued trends have been to produce
smaller, faster, more reliable and less expensive systems which consume less power. Table 1.2
shows the evaluation of process technology in integrated circuits.
Year Technology
1971 10 µm
1974 6 µm
2. Next technology nodes are 36A0
,25A0
,18A0
, 13A0
, 9A0
(1A0
= nm)
The Integrated Circuit (IC) era:
Such has been the potential of the silicon integrated circuit that there has been an
extremely rapid growth in the number of transistors (as a measure of complexity) being
integrated into circuits on a single silicon chip. The relationship between the no. of transistors
per chip versus the year has become known as ‘Moor’s first law’ after declaration made by
Gordon moor in the 1960s.
1977 3 µm
1982 1.5 µm
1985 1µm
1989 800 nm
1994 600 nm
1995 350 nm
1997 250 nm
1999 180 nm
2001 130 nm
2004 90 nm
2006 65 nm
2008 45 nm
2010 32 nm
2012 22 nm
2014 14 nm
2017 10 nm
2018 7 nm
2020 5 nm
3. Moore's law is the observation that over the history of computing hardware, the number
of transistors on integrated circuits doubles approximately every two years. The period often
quoted as "18 months" is due to Intel executive David House, who predicted that period for a
doubling in chip performance.
Although over the past several years, Silicon CMOS technology has become the
dominant fabrication process for relatively high performance and cost effective VLSI circuits,
the revolutionary nature of new systems such as the wired and wireless communication
technologies, high performance imaging systems, smart appliances and the like are constantly
challenging the boundaries of various technological fronts including silicon CMOS. The
processing requirements for the image capture, conversion, compression, decompression,
enhancement and display of increasingly higher quality multimedia content and future generation
multimedia, together with the emergence of new and complex optical and photonics technologies
being driven by microelectronics, place heavy demands on current standard CMOS technology
integrated systems, particularly when low power and high performance solutions are required.
Although technology is continuously evolving to produce smaller systems with
minimized power dissipation, the IC industry is facing major challenges due to constraints on
4. power density (W/cm2) and high dynamic (operating) and static (standby) power dissipation.
The key to overcome these challenges lies in improvements in design, material and
manufacturing processes. The significant issues that relate to successful designs include (a)
approach to system design cycle (b) workable transistors models.
System Design Cycle:
The VLSI design cycle starts with a formal specification of a VLSI chip, follows a series of
steps, and eventually produces a packaged chip.
VLSI design Flow
1.System Specification:
The first step of any design process is to set the specifications of the system. System
specification is a high level representation of the system. The factors to be considered in this
process are performance, functionality, and physical dimensions (size of the die (chip)). The
fabrication technology and design techniques are also considered. The specification of a system
is a compromise between market requirements, technology and economical viability.
5. 2.Architectural Design:
The basic architecture of the system is designed in this step. The architectural design of a
VLSI circuit begins with the development of the idea of the main module that will be followed
by the definition of the module in terms of inputs, outputs, and a description of the specific
function. This also includes number of ALUs, Floating Point units, number and structure of
pipelines, and size of caches among others.
3. Functional Design:
In this step, main functional units of the system are identified. This also identifies the
interconnect requirements between the units. The area, power, and other parameters of each unit
are estimated and functional aspects of the system are considered here.
For example, it may specify that a multiplication is required, but exactly in which mode
such multiplication may be executed is not specified. We may use a variety of multiplication
hardware depending on the speed and word size requirements. The key idea is to specify
behavior, in terms of input, output and timing of each unit, without specifying its internal
structure.
The outcome of functional design is usually a timing diagram. This information leads to
improvement of the overall design process and reduction of the complexity of subsequent phases.
4. Logic Design:
In this step the control flow, word widths, register allocation, arithmetic operations, and
logic operations of the design that represent the functional design are derived and tested.
This description is called Register Transfer Level (RTL) description. RTL is expressed in
a Hardware Description Language (HDL), such as VHDL or Verilog. This description can be
used in simulation and verification. This description consists of Boolean expressions and timing
information. The Boolean expressions are minimized to achieve the smallest logic design which
conforms to the functional design. This logic design of the system is simulated and tested to
verify its correctness. In some special cases, logic design can be automated using high level
synthesis tools. These tools produce a RTL description from a behavioral description of the
design.
5. Circuit Design:
The purpose of circuit design is to develop a circuit representation based on the logic
design. The Boolean expressions are converted into a circuit representation by taking into
consideration the speed and power requirements of the original design. Circuit Simulation is used
to verify the correctness and timing of each component.
The circuit design is usually expressed in a detailed circuit diagram. This diagram shows
the circuit elements (cells, macros, gates, transistors) and interconnection between these
elements. This representation is also called a netlist. Tools used to manually enter such
description are called schematic capture tools. In many cases, a netlist can be created
automatically from logic (RTL) description by using logic synthesis tools.
6. Physical Design:
In this step the netlist converted into a geometric representation. This geometric
representation of a circuit is called a layout. Layout is created by converting each logic
component (cells, macros, gates, transistors) into a geometric representation which performs the
intended logic function of the corresponding component. Connections between different
components are also expressed as geometric patterns typically lines in multiple layers.
The exact details of the layout also depend on design rules, which are guidelines based on
the limitations of the fabrication process and the electrical properties of the fabrication materials.
Physical design is a very complex process and therefore it is usually broken down into various
sub-steps. In many cases, physical design can be completely or partially automated and layout
can be generated directly from netlist by Layout Synthesis tools. Various verification and
validation checks are performed on the layout during physical design.
7. Fabrication:
After layout and verification, the design is ready for fabrication. Since layout data is
typically sent to fabrication on a tape, the event of release of data is called Tape Out. Layout data
is converted into photo-lithographic masks, one for each layer. Masks identify spaces on the
wafer, where certain materials need to be deposited, diffused or even removed. Silicon crystals
are grown and sliced to produce wafers. The fabrication process consists of several steps
involving deposition, and diffusion of various materials on the wafer. During each step one mask
is used. Several dozen masks may be used to complete the fabrication process.
8. Packaging, Testing and Debugging:
Finally, the wafer is fabricated and cut into individual chips in a fabrication process. Each
chip is then packaged and tested to ensure that it meets all the design specifications and that it
functions properly. Chips used in Printed Circuit Boards (PCBs) are packaged in Dual In-line
Package (DIP), Pin Grid Array (PGA), Ball Grid Array (BGA), and Quad Flat Package (QFP).
Transistors modeling:
The transistor models are characterized by a figure of merit that depends on (a) performance, (b)
level of integration and (c) cost. These are further influenced by a number of other factors
including:
Minimum feature size;
Number of gates;
Power dissipation;
Die size;
Gate delay;
Testing;
Reliability, and
Production cost.
7. Therefore there are many issues that the designer needs to comprehend for a successful
design.
METAL-OXIDE-SEMICONDUCTOR (MOS) AND RELATED VLSI TECHNOLOGY
Within the bounds of MOS technology, the possible circuit realizations may be based on pMOS,
nMOS, CMOS (which includes nMOS and pMOS transistors) and BiCMOS devices. Although
CMOS is the dominant technology, some of the examples used to illustrate the design processes
will be presented in nMOS form. The reasons for this are as follows:
For nMOS technology, the design methodology and the design rules are easily learned,
thus providing a simple but excellent introduction to structured design for VLSI.
nMOS technology and design processes provide an excellent background for other
technologies. In particular, some familiarity with nMOS allows a relatively easy
transition to CMOS technology design.
Not only is VLSI technology providing the user with a new and more complex range of
'off the self' circuits, but VLSI design processes are such that system designers can readily design
their own special circuit of considerable complexity. This provides a new degree of freedom for
designers and it is probable that some very significant advances will results.
BASIC MOS TRANSISTORS
N-CHANNEL ENHANCEMENT TRANSISTOR: nMOS devices are formed in a p-type
substrate of moderate doping level. Two heavily doped n-type regions are created in substrate
using doping process. They are called source and drain. A layer of SiO2 is grown on the top
surface of the substrate. The SiO2 layer acts as an insulator. Next metal (poly silicon) is
deposited on top of the SiO2 and it works as gate electrode of the device. Next metal layer is
grown at the top of source, drain, gate and substrate regions to provide different ohmic contacts.
So it has four terminals.
8. From the device structure the p-type substrate forms pn-junction with the source(S) and
drain(D) regions. Therefore the S and D are isolated from one another by these diodes. In normal
operation these diodes are kept reverse biased at all times, since the drain will be at +ve voltage
related to the source. The two pn-junctions can be effectively cut-off by simply connecting the
substrate terminal to the source.
For an enhancement-mode, n-channel MOSFET, the four operational modes are:
1. Cut-off , sub threshold or weak-inversion mode:
When Vgs < Vt:
When Vgs< Vt, the transistor is turned off because two back to back diodes exits in series
between D and S. These diodes prevent current conduction from D to S. So no current flows
between D and S.
A more accurate model considers the effect of thermal energy on the Boltzmann
distribution of electron energies which allow some of the more energetic electrons at the source
to enter the channel and flow to the drain. This results in a subthreshold current that is an
exponential function of gate to source voltage. While the current between drain and source
should ideally be zero when the transistor is being used as a turned-off switch, there is a weak-
inversion current, sometimes called subthreshold leakage.
2. Vgs > Vt and Vds 0:
A small +ve Vgs is applied on the gate terminal. Due to Vgs, holes in the P type layer
close to the silicon dioxide layer under the gate to be repelled down into the P type substrate, and
at the same time this positive potential on the gate attracts free electrons from the surrounding
substrate material. These free electrons form a thin layer of charge carriers beneath the gate
electrode (they can’t reach the gate because of the insulating silicon dioxide layer) bridging the
gap between the heavily doped source and drain areas. This layer is called channel and also
sometimes called an “inversion layer” because applying the gate voltage has caused the P type
material immediately under the gate to firstly become “intrinsic” and then an N type layer within
the P type substrate.
Any further increase in the gate voltage attracts more charge carriers into the inversion layer, so
reducing its resistance, and increasing current flow between source and drain. Reducing the gate
source voltage reduces current flow. When the power is switched off, the area beneath the gate
reverts to P type once more. This method of operation is called “ENHANCEMENT MODE” as
the application of gate source voltage makes a conducting channel “grow”, therefore it enhances
the channel. This MOSFET is called n-channel because the channel is populated with n-type
carriers.
9. Threshold voltage : The gate voltage at which a sufficient no.of electrons accumulate under the
gate region, to form a channel and start conduction between S and D is called the threshold
voltage(Vt).For n-channel Vt should be +ve and for p-channel Vt will be –ve. Its value depends
on the process of device fabrication.
The gate and substrate form a parallel plate capacitor where SiO2 acts as a
dielectric.
When we apply a positive voltage on its gate, the top plate of the capacitor will accumulate a
positive charge. Similarly the bottom plate of the capacitor will accumulate a negative charge.
Due to this charge formation, it will develop an electrical field in vertical direction across the
channel. It is the field which controls the amount of accumulated charge in the channel. So this
voltage Vgs is called controlling voltage which determines the channel conductivity.
Triode mode or linear region (also known as the ohmic mode
when Vgs > Vt and Vds < ( Vgs – Vt )
When we apply a small amount of Vds on its drain, then the current will start
flowing through the induced channel. The direction of current(ID) will be from D to S and the
magnitude of ID depends on the density of electrons in the channel again which depends on
Vgs.
As Vds is increased, then current flows in the channel .There must be a corresponding IR
drop = Vds along the channel. This develops a voltage between gate and channel varying with
distance along the channel with the voltage being a maximum of Vgs at the source end. Due to
this voltage variance across the channel, the channel is no longer uniform depth and its depth
depends on the voltage across it. Therefore due to Vds, the channel shape will be tapered . The
channel being deepst at the source end and shallowest at the drain end.
10. Since the effective gate voltage is Vg= Vgs - Vt (no current flows when Vgs < Vt), there
will be voltage available to invert the channel at the drain end so long as Vds ≤ (Vgs - Vt )· The
limiting condition comes when Vds= Vgs - Vt. For all voltages Vds < Vgs - Vt, the device
operated in the non-saturated region.
Saturation region when Vgs > Vt and Vds > ( Vgs – Vt ):
Let us now consider the situation when Vds is increased to a level greater than Vgs - Vt.
In this case, an IR drop equal to Vgs – Vt occurs over less than the whole length of the channel
such that, near the drain, there is insufficient electric field available to give rise to an inversion
layer to create the channel. The channel is, therefore, 'pinched off .Diffusion current completes
the path from source to drain in this case, causing the channel to exhibit a high resistance and
behave as a constant current source. This region, known as saturation, is characterized by almost
constant current for increase of Vds above Vds = Vgs - Vt. In all cases, the channel will cease to
exist and no current will flow when Vgs < Vt. Typically, for enhancement mode devices, Vt = 1
volt for VDD = 5 V or, in general terms, Vt = 0.2 VDD.
11. ID-VDS Characteristics of MOS Transistor :
The graph below shows the ID Vs VDS characteristics of an n- MOS transistor for several
values of Vgs .It is clear that there are two conduction states when the device is ON, they
saturated state and the non-saturated state. The saturated curve is the flat portion and defines the
saturation region. For Vgs < VDS + Vt, the nMOS device is conducting and ID is independent of
VDS.
For Vgs > VDS + Vth, the transistor is in the non-saturation region and the curve is a half
parabola.
When the transistor is OFF (Vgs < Vt), then ID is zero for any VDS value.
The boundary of the saturation/non-saturation bias states is a point seen for each curve in
the graph as the intersection of the straight line of the saturated region with the quadratic curve
of the non-saturated region. This intersection point occurs at the channel pinch off voltage called
VDSAT. VDSAT is defined as the minimum drain-source voltage that is required to keep the
transistor in saturation for a given Vgs .
In the non-saturated state, the drain current initially increases almost linearly from the
origin before bending in a parabolic response. Thus the name, ohmic or triode or linear for the
non- saturated region. The drain current in saturation is virtually independent of VDS and the
transistor acts as a current source. This is because there is no carrier inversion at the drain region
of the channel. Carriers are pulled into the high electric field of the drain/substrate pn junction
and ejected out of the drain terminal.
N-CHANNEL DEPLETION MODE TRANSISTOR (DE-MOSFET):
Construction of a DEMOSFET: Figure shows the construction of an N-channel depletion
MOSFET. It consists of a highly doped P-type substrate into which two blocks of heavily doped
N-type material are diffused forming the source and drain. An N-channel is formed by diffusion
12. between the source and drain. The type of impurity for the channel is the same as for the source
and drain. Now a thin layer of SiO2 dielectric is grown over the entire surface and holes are cut
through the SiO2(silicon-dioxide) layer to make contact with the N-type blocks (Source and
Drain). Metal is deposited through the holes to provide drain and source terminals, and on the
surface area between drain and source, a metal plate is deposited. This layer constitutes the
gate. Si02 layer results in an extremely high input impedance of the order of 1010
to 1015
Q for
this area. A P-channel DE-MOSFET is constructed like an N-channel DE-MOSFET, starting
with an N-type substrate and diffusing P-type drain and source blocks and connecting them
internally by a P-doped channel region.
Operation of DEMOSFET:
when the gate is made negative with respect to the substrate, the gate repels some of the
negative charge carriers out of the N-channel. This creates a depletion region in the channel, aill
and therefore, increases the channel resistance and reduces the drain urrent. The more negative
the gate, the less the drain current. In this mode of operation the device is referred to as
a depletion-mode MOSFET. Here too much negative gate voltage can pinch-off the channel.
On the other hand When the drain is made positive with respect to source, a drain current
will flow, even with zero gate potential and the MOSFET is said to be operating in Enhancement
mode. In this mode of operation gate attracts the negative charge carriers from the P-substrate to
the N-channel and thus reduces the channel resistance and increases the drain-current. The more
positive the gate is made, the more drain current flows.
13. So DE-MOSFET can be operated with either a positive or a negative gate. When gate is
positive with respect to the source it operates in the enhancement mode and when the gate is
negative with respect to the source, it operates in depletion-mode.
IC PRODUCTION PROCESSES
Integrated Circuit (IC)
An Integrated Circuit (IC) is also called as chip or microchip. It is a semiconductor wafer
in which millions of components are fabricated. The active and passive components such as
resistors, diodes, transistors etc and external connections are usually fabricated in on extremely
tiny single chip of silicon. All circuit components and interconnections are formed on single thin
wafer (substrate) is called monolithic IC. IC is very small in size. It require microscope to see
connections between components. The steps to fabricate IC chips is similar to the steps required
to fabricate transistors, diodes etc. In IC chips, the fabrication of circuit elements such as
transistors, diodes, capacitors etc. and their interconnections are done at same time. It has so
many advantages such as extremely small size, small weight, low cost, low power consumption,
high processing speed, easy replacement, etc. IC is the principal component in all electronic
systems n. IC can function as amplifier, oscillator, timer, counter, computer memory etc.
The manufacturing of Integrated Circuits (IC) consists of following steps. The steps includes 8-
20 patterned layers created into the substrate to form the complete integrated circuit.
IC production process steps:
Step1: Wafer preparation
14. Step2: Oxidation
Step3: Masking and lithography
Step4: Etching
Step5: Doping
Step6: Metallization
Step7: Testing
Step8: Packaging
1. Wafer Preparation:
The first step is wafer production. The wafer is a round slice of semiconductor material such as
silicon. Silicon is preferred due to its characteristics. It is more suitable for manufacturing IC. It
is the base or substrate for entire chip.
Wafer preparation requires three general processes which are SILICON REFINEMENT,
CRYSTAL GROWTH and WAFER FORMATION.
SILICON REFINEMENT: Silicon is the most important semiconductor for the
microelectronics industry. When compared to germanium, silicon excels for the following
reasons:
(1) Si has a larger bandgap (1.1 eV for Si versus 0.66 eV for Ge).
(2) Si devices can operate at a higher temperature (150
o
C vs 100
o
C).
(3) Intrinsic resistivity is higher (2.3 x 10
5
Ω-cm vs 47 Ω-cm).
(4) SiO
2
is more stable than GeO
2
which is also water soluble.
(5) Si is less costly.
Electronic-grade silicon (EGS), a polycrystalline material of high purity, is the starting
material for the preparation of single crystal silicon. EGS is made from metallurgical-grade
silicon (MGS) which in turn is made from quartzite, which is a relatively pure form of sand.
MGS is purified by the following reaction:
Si (solid) + 3HCl (gas) → SiHCl
3
(gas) + H
2
(gas) + heat
The boiling point of trichlorosilane (SiHCl
3
) is 32
o
C and can be readily purified using fractional
distillation. EGS is formed by reacting trichlorosilane with hydrogen:
2SiHCl
3
(gas) + 2H
2
(gas) → 2Si (solid) + 6HCl (gas)
Electronic-grade silicon is the raw material used to prepare device. This is called single
crystal silicon.
CRYSTAL GROWTH: There are two main techniques for converting polycrystalline EGS into
a single crystal ingot, which are used to obtain the final wafers.
1. Czochralski technique (CZ) - this is the dominant technique for manufacturing single
crystals. It is especially suited for the large wafers that are currently used in IC fabrication.
2. Float zone technique - this is mainly used for small sized wafers. The float zone
technique is used for producing specialty wafers that have low oxygen impurity concentration.
15. Czochralski technique(CZ):
A schematic of this growth process is shown in figure. The various components of the process
are
1. Furnace
2. Crystal pulling mechanism
3. Ambient control - atmosphere
4. Control system
The starting material for the CZ process is electronic grade silicon, which is melted in the
furnace. To minimize contamination, the crucible is made of quartz .
The furnace is heated above 1500o
C, since Si melting point is 1412o
C. A precisely
oriented rod-mounted seed crystal is dipped into the molten Silicon. The seed crystal’s rod is
slowly pulled upwards and rotated simultaneously. The furnace is rotated in the direction
opposite to the crystal puller. The molten Si sticks to the seed crystal and starts to solidify with
the same orientation as the seed crystal is withdrawn. Thus, a single crystal ingot is obtained.
To create doped crystals, the dopant material is added to the Si melt so that it can be
incorporated in the growing crystal. By precisely controlling the temperature gradients, speed of
pulling and speed of rotation of the crystal puller, it is possible to extract a large, single-crystal
cylindrical ingot from the melt. This ingot is further processed to get the wafers that are used for
fabrication.
Fig: Single crystal Si ingot
16. Float zone technique:
The float zone technique is suited for small wafer production, with low oxygen impurity.
The schematic of the process is shown in figure . A polycrystalline EGS rod is fused with the
single crystal seed of desired orientation. This is taken in an inert gas furnace and then melted
along the length of the rod by a traveling radio frequency (RF) coil. The RF coil starts from the
fused region, containing the seed, and travels up, as shown in figure . When the molten region
solidifies, it has the same orientation as the seed. The furnace is filled with an inert gas like argon
to reduce gaseous impurities.
Also, since no crucible is needed it can be used to produce oxygen 'free' Si wafers. The
difficulty is to extend this technique for large wafers, since the process produces large number of
dislocations. It is used for small specialty applications requiring low oxygen content wafers.
WAFER FORMATION:
After the single crystal is obtained, this needs to be further processed to produce the wafers. For
this, the wafers need to be shaped and cut. Usually, industrial grade diamond tipped saws are
used for this process. The shaping operations consist of two steps
1. The seed and tang ends of the ingot are removed.
2. The surface of the ingot is ground to get a uniform diameter across the length
of the ingot.
Before further processing, the ingots are checked for resistivity and orientation. Resistivity is
checked by a four point probe technique and can be used to confirm the dopant concentration.
This is usually done along the length of the ingot to ensure uniformity. Orientation is measured
by x-ray diffraction at the ends (after grinding).
After the orientation and resistivity checks, one or more flats are ground along the length of the
ingot. After making the flats, the individual wafers are sliced per the required thickness. After
cutting, the wafers are chemically etched to remove any damaged and contaminated regions.
This is usually done in an acid bath with a mixture of hydrofluoric acid, nitric acid, and acetic
acid. After etching, the surfaces are polished, first a rough abrasive polish, followed by a
17. chemical mechanical polishing (CMP) procedure. In CMP, a slurry of fine SiO2 particles
suspended in aqueous NaOH solution is used. The pad is usually a polyester material. Polishing
happens both due to mechanical abrasion and also reaction of the silicon with the NaOH
solution.
Wafers are typically single side or double side polished. Large wafers are usually double
side polished so that the backside of the wafers can be used for patterning. But wafer handling
for double side polished wafers should be carefully controlled to avoid scratches on the backside.
Typical 300 mm wafers used for IC manufacture are handled by robot arms and these are made
of ceramics to minimize scratches. Smaller wafers (3" and 4" wafers) used in labs are usually
single side polished. After polishing, the wafers are subjected to a final inspection before they
are packed and shipped to the fab.
2.Oxidation:
Oxidation is the process in which oxygen (dry oxidation) or H2O(wet oxidation) molecules
convert silicon layers on top of the wafer to silicon dioxide. The chemical reaction of silicon and
oxygen already starts at room temperature but stops after a very thin native oxide film. For an
effective oxidation rate the wafer must be settled to a furnace with oxygen or water vapor at
elevated temperatures.
Purpose of oxide layers: They can be
Part of the active device
Used as masks to protect against diffusion or ion implantation
Used as protecting layer at the end of device fabrication
Silicon dioxide layers are used as high-quality insulators or masks for ion implantation. The
ability of silicon to form high quality silicon dioxide is an important reason, why silicon is still
the dominating material in IC fabrication.
Thermal oxidation is a way to produce a thin layer of SiO2on the surface of a substrate. The
thermal oxidation of SiO2 consists of exposing the Si substrate to an oxidation environment of O2
or H2O at elevated temperature. Thermal oxidation is accomplished by using an oxidation
furnace which provides the heat needed to elevate the oxidizing ambient temperature.
The heating system usually consists of several heating coils that control temperature
around the furnace tube. The wafers are placed in quartz glass ware called boat. The boat can
contain many wafers typically 50 or more. The oxidizing agent(oxygen or steam) then enters the
process tube through its source end, subsequently diffusing to the wafers where oxidation occurs.
18. Oxidation methods: Two types of oxidation methods are there
1. Wet oxidation 2. Dry oxidation
1.Wet oxidation : During wet oxidation, the silicon wafer is placed into an atmosphere of water
vapor (H2O) and the ensuing chemical reaction is between the water vapor molecules and the
solid silicon atoms (Si) on the surface of the wafer, with hydrogen gas (H ) released as a
byproduct.
Si(s)+ 2H2O(l) SiO2(s)+2H2(gas)
These oxidation reactions occur at the Si – SiO2 interface. As the oxide grows, the Si –
SiO2 interface will always be below the original Si wafer surface. The SiO2 surface on the other
hand, is always above the original Si surface. so oxide layer grows in both directions from the
original substrate surface (approx. 50/50)
It is evident that wet oxidation operates with much higher oxidation rates than dry
oxidation, up to approximately 600nm/h. The reason is the ability of hydroxide (OH-
) to diffuse
through the already-grown oxide much quicker than O2, effectively widening the oxidation rate
bottleneck when growing thick oxides, which is the diffusion of species. Due to the fast growth
rate, wet oxidation is generally used where thick oxides are required, such as insulation and
passivation layers, masking layers, and for blanket field oxides.
19. 2.Dry oxidation: During dry oxidation, the Si wafer react with the ambient oxygen, forming a
layer of SiO2 on its surface.
Si(s) + O2(vapor) SiO2(s)
The oxide films resulting from a dry oxidation process have a better quality than those
grown in a wet environment, which makes them more desirable when high quality oxides are
needed. Dry oxidation is generally used to grow films not thicker than 100nm or as a second
step in the growth of thicker films, after wet oxidation has already been used to obtain a desired
thickness. The application of a second step is only meant to improve the quality of the thick
oxide.
3. Masking and lithography:
Lithography: An IC consists of many microscopic regions(implantation regions and contact
windows)on the wafer surface that make up the devices and interconnections as per the circuit. In
the planner process, the regions are fabricated by steps that add, alter or remove in selected areas
of the wafer surface. Each layer is determined by geometric pattern representing circuit design
information.
Lithography is a process of drawing patterns on a silicon wafer. Different lithographic
techniques are available which are photolithography, Electron lithography, X-ray
lithography and Ion lithography.
Photolithography:
To protect some area of wafer when working on another area, a process called
photolithography is used. The process of photolithography includes masking with a
photographic mask and photo etching.
Photolithography is the transfer of an image using photographic techniques. It Uses light
radiation to expose a coating of photoresist on the surface of the wafer. Common light source
used in wafer processing is UV light due to its short wave length.
Photolithography transfers designer generated information (device placement and
interconnections) to an actual IC structure using masks which contain the geometrical
information. The process of photolithography is repeated many times in manufacture of an
IC to build up device structures and interconnections.
Photo mask:
It is important component in photolithography. It contains blue print of the designed
circuit. Using the photo mask, specific images of detailed devices are transferred on to the
surface of the silicon wafer. A single photo mask plate produces identical images on 1000’s of
wafers. The quality of the photo mask determines the quality of semiconductor chips. The
material used for building photo masks is quartz plate upon which detailed images or patterns are
formed. The patterns are then transferred on to the wafer surface by exposing light through the
quartz plate.
Each mask contains only layer of the circuit. A set of masks, each defining one
pattern layer, is fed into a photolithography machine and individually selected for exposure to
form the desired pattern on the wafer. Circuit elements such as transistors, capacitors and
resistors are created by those patterns of many layers.
20. Photolithography process: First step in photolithography is to coat the surface with
approx 1 μm of photoresist(PR). Photoresist is an organic polymer i.e sensitive to light radiation
in a certain wavelength range. The sensitivity causes either an increase or decrease in solubility
of the polymer to certain chemicals. The PR is then exposed to UV (ultraviolet) radiation through
a mask. The masks generated from information about device placement and connection. The UV
radiation causes a chemical change in the PR. The PR is then developed using a chemical
developer.
There are two types of PR. 1. Negative PR 2. Positive PR
Negative PR:A negative PR is hardened against the developer by the UV radiation, and hence
remains on the surface where UV shone through the mask.
Positive PR: A positive PR is the opposite, it is removed where the UV shone through the mask
21. EXAMPLE: Negative PR
Assume a negative PR for this example, so the PR on the sides will be weakened and removed
by the developer. Once the developer has been washed off, the result is PR in the region
corresponding to the transparent part of the mask. Subsequent processing steps will use this
structure to form device areas, interconnects, etc.
4. Etching:
Etching is the process of using strong acid or etchant to cut into the unprotected parts of a metal
surface to create a design. It removes material selectively from the surface of wafer to create
patterns. The pattern is defined by etching mask. The parts of material are protected by this
etching mask. Etching is after lithography.
Etching is of two types:
1. wet etching 2.Dry etching
wet etching:
Wet etching uses an acid, to remove a target material. Etchant is selected to
chemically attack the specific material to be removed and not the protective layer. For silicon,
the most commonly used etchants are mixtures of nitric acid and hydrofluoric acid in water or
acetic acid. Wet etching is good and fairly cheap and capable of processing many wafers quickly.
The disadvantage is that wet etching does not allow the smaller critical geometries that are
needed for today chips.
Dry etching:
Dry etching uses gas instead of chemical etchants. It is capable of producing critical
geometries that are very small. Example: Plasma etching
Plasma etching: Plasma etching uses a gas that is subjected to an intense electric field to generate
the plasma state( Plasma is an ionized gas composed of equal no.of positive and negative
charges and a different no.of un ionizes molecules). The electric field is produced with coils that
are wrapped around the chamber and exposed to a high level RF source.
22. There are two different versions of this type of etching based on the shape of the chamber
used.
1. One consists of a barrel type chamber where the wafers are placed sitting up while the gas is
flowed over the wafers and out through an exhaust pipe.
2. The second type uses a parallel plate reactor . Here there are two plates that are used
to give the gas the electric field rather than the coil that is wrapped around the barrel
chamber.
In plasma form, the gases used are very reactive, providing effective etching of the
exposed surface. Plasma etching provides good critical geometry but the wafer can be damaged
from the RF radiation.
23. Types of etching profiles: The shape of the feature that is etched is called the etch profile. There
are two types of etch profiles.
1. Isotropic 2. Anisotropic
To perform etching in all directions at same time, isotropic etching will be used.
Anisotropic etching is faster in one direction.
1. Isotropic etch profile: Etched equally in all directions. Wet etches gives the isotropic
etch profile. Some dry etches also give the isotropic etch profile. A perfectly isotropic
etch produces round side walls.
Isotropic
1. 2.Anisotropic etch profile: Etched in a preferred direction only. Dry etches gives the
anisotropic etch profile. Anisotropic profiles are needed to transfer lithographic patterns
for small features. A perfectly anisotropic etch produces vertical sidewalls.
Anisotropic
24. 5.Doping:
Inorder to fabricate semiconductor devices, a controlled amount of impurities are added
selectively into the single crystal wafers. Three methods are used for controlled doping of a
semiconductor. They are
1. Epitaxy 2. Diffusion 3. Ion implantation
1. Epitaxy :
In this process a thin layer of single crystal semiconductor (nm to um) is grown on an
already existing crystalline substrate such that the grown film has same lattice as the substrate.
There are two types of epitaxy. a. Homo epitaxy b. Hetero epitaxy
a. Homo epitaxy: In which same layer is grown over the substrate.
Example: Si is growing on Si substrate.
b. Hetero epitaxy: In which different layer is grown over the substrate.
Example: AlGaAs is growing on GaAs.
2. Diffusion:
By using epitaxy we can grow a layer with controlled doping but we can’t control the
doping of selective regions of the semiconductor surface. It means that epitaxial growth takes
place throughout the surface i.e it is non-selective. Inorder to get selective doping, the most
commonly used technique is diffusion.
In this method p and n regions are created by adding dopants into the wafer. The wafers
are placed in an oven which is made up of quartz and it is surrounded with heating elements.
Then the wafers are heated at a temperature of about 1500-2200°F. The inert gas carries the
dopant chemical. The dopant and gas is passed through the wafers and finally the dopant will get
deposited on the wafer. This method can only be used for large areas. For small areas it will be
difficult and it may not be accurate.
m
2.Ion implantation:
This is also a method used for adding dopants. In this method, dopant gas such as phosphine or
boron trichloride will be ionized first. Then it provides a beam of high energy dopant ions to the
specified regions of wafer. It will penetrate the wafer. The depth of the penetration depends on
the energy of the beam. By altering the beam energy, it is possible to control the depth of
penetration of dopants into the wafer. The beam current and time of exposure is used to control
the amount of dopant. This method is slower than atomic diffusion process. First it points the
wafer that where it is needed and shoot the dopants to the place where it is required.
25. 6. Metallization:
Metallization is a process of adding a layer of metal on the surface of wafer.
Functions of conductive materials on wafer surface:
used to create contact with silicon
form certain components(e.g gates) of IC devices
provide interconnecting conduction paths between devices on chip
connect the chip to external circuits
Metallization materials:
Aluminium: A thin layer of aluminum is deposited over the whole wafer. Aluminium is selected
because it is a good conductor, has good mechanical bond with silicon, forms low resistance
contact and it can be applied and patterned with single deposition and etching process.
Other materials: poly silicon, gold, silicides and nitrides.
7. Testing:
After the wafer has been processed and the final metallization pattern defined, it is placed
in a holder under a microscope and is aligned for testing by a multiple-point probe .The probe
contacts the various pads on an individual circuit and a series of tests are made of the electrical
properties of the device. The various tests are conducted automatically in a very short time
ranging from a few milliseconds for a simple circuit to 30 seconds or more for a complex chip.
The test results are fed into a computer, and a decision is made regarding the acceptability of the
circuit. If the chip is defective or the circuit falls below specifications, the computer instructs the
test probe to mark the circuit with a dot of ink. The probe automatically steps the prescribed
distance to the next chip on the wafer and repeats the process. After all of the circuits have been
tested and substandard ones marked, the wafer is removed from the testing machine, scribed
between the circuits, and broken apart .In the testing process, information from tests on each
circuit can be printed out to facilitate analysis of the rejected ones or to evaluate the fabrication
process for possible modification.
8.Packaging:
Packaging is used to connect the IC to the outside world.
Functions of packaging:
Packages protect the IC from damaging external influences like Moisture, Dust,
Vibration, Shock, Lightning, Magnets, etc.
26. The chip is attached to a lead frame and encapsulated inside a package. Lead frame
allows electrical signals to be sent and received to and from semiconductor devices.
Packages effectively release the heat generated by the chip during its operation.
Packages allow for enlargement of terminals size that makes the chips much easier to
handle.
IC packages are classified according to the way they are mounted on the PCB as either pin
through hole mounted or surface mounted.
Pin- through-hole package: Pin through hole packages have pins(leads) that are inserted
through holes in the PCB and can be soldered to conductors on the opposite side.
Surface mount technology(SMT):pins of surface mounted packages are soldered directly to
conductors on one side of the board, leaving other side free for additional circuits.
IC packages can be further grouped into three general categories; Dual In-line Packages,
Chip Carriers and Grid Arrays. All the packages, regardless of the category has a body style that
scales with pin count. That is the name of the package does not determine the physical size of the
package, the number of pins do.
1. Dual In-line Packages [DIP], or Dual In-Line [DIL] packages are packages with two rows of
leads on two sides of the package. DIP ICs may be through-hole [PDIP or CERDIP] or SMT
package [SOJ or SOIC].
2. Quad Flat Packs or Chip Carriers are square packages [or nearly square], with leads on all four
sides . Chip Carriers, as in PLCCs and other variants are strictly Surface Mount Technology
(SMT).
3. Grid Arrays are those type packages that have their pins arranged in a grid.
The pin grid may consist of Leads, pads, or solder balls on an area array. The through hole
variant is called a PGA, while the SMT variant might be called LGA or BGA.
MOS AND CMOS FABRICATION PROCESS
nMOS fabrication process:
nMOS FABRICATION: Using the basic processes mentioned in the previous section, typical
processing steps of the poly-silicon gate self-aligning nMOS technology are given below. The
fabrication of nMOS can be considered a standard process. The advantages of this process over
the other processes are that it is conceptually and physically simpler than other processes because
it requires less photolithography steps. It has high functional density, good speed.
The major drawback of nMOS process is its high absolute power consumption and its electrical
asymmetry.CMOS is replacing nMOS as the standard process because it minimizes both of the
above disadvantages. But fabrication process used for nMOS is relevant to CMOS and BiCMOS,
This may be viewed as involving additional fabrication steps.
Figure shows the step-by-step production of the transistor.
27. 1.Processing is carried out on a thin wafer cut from a single crystal of silicon of high purity
into which the required p-impurities are introduced as the crystal is grown. Such wafers are
typically 75 to 150 mm in diameter and 0.4 mm thick and are doped with, say, boron to
impurity concentrations of 1015
/cm3
to 1016
/cm3
, giving resistivity in the approximate range
25 ohm cm to 2 ohm cm.
2.The next step is to grow a thick silicon dioxide (SiO2) layer, typically of 1 µm thickness all
over the wafer surface to protect the surface. This oxide layer will act as a barrier to dopant
during subsequent processing and provide an insulting layer on which other patterned layers
can be formed.
3. The surface is now covered with a photoresist which is deposited onto the wafer and
to achieve an even distribution of the required thickness.
4.The photoresist layer is then exposed to ultraviolet light through a mask which defines
those regions into which diffusion is to take place together with transistor channels. Assume,
for example, that those areas exposed to ultraviolet radiation are polymerized (hardened), but
that the areas required for diffusion are shielded by the mask and remain unaffected.
5. These areas are subsequently readily etched away together with the underlying silicon
dioxide so that the wafer surface is exposed in the window defined by the mask.
28. 6. The remaining photoresist is removed and a thin layer of SiO2 (0.1 m
typical) is grown over
the entire chip surface and then polysilicon is deposited on top of this to form the gate
structure. The polysilicon layer consists of heavily doped polysilicon deposited by
chemical vapor deposition (CVD). In the fabrication of fine pattern devices, precise
control of thickness, impurity concentration, and resistivity is necessary.
7. Further photoresist coating and masking allows the polysilicon to be patterned (as shown in
Step 6), and then the thin oxide is removed to expose areas into which n-type impurities
are to be diffused to form the source and drain as shown. Diffusion is achieved by heating
the wafer to a high temperature and passing a gas containing the desired n-type impurity
(for example, phosphorus) over the surface as indicated .
8. Thick oxide (SiO2) is grown over all again and is then masked with photoresist and etched to
expose selected areas of the polysilicon gate and the drain and source areas where
connections (i.e. contact cuts) are to be made.
9. The whole chip then has metal (aluminum) deposited over its surface to a thickness typically
of 1µm.This metal layer is then masked and etched to form the required interconnection pattern.
It will be seen that the process revolves around the formation or deposition and patterning
of three layers, separated by silicon dioxide insulation. The layers are diffused within the
substrate, polysilicon on oxide on the substrate, and metal insulated again by oxide.
To form depletion mode devices it is only necessary to introduce a masked ion
implantation step between Steps 5 and 6 in Figure. Again, the thick oxide acts as a mask and this
process stage is also self-aligning.
29. CMOS FABRICATION PROCESS:
CMOS fabrication can be accomplished using either of the three technologies:
• N-well/P-well technologies
• Twin well technology
• Silicon On Insulator (SOI)
Among these methods the p-well process is widely used in practice and the n-well process is
also popular, particularly as it is an easy retrofit to existing nMOS lines
The P-well Process
The basic processing steps used for P-Well Process are of the same as those used for nMOS
fabrication.
The P-Well structure consists of an n-type substrate in which p-devices may be formed
by suitable masking and diffusion and, in order to accommodate n-type devices, a deep p-well is
diffused into the n-type substrate as shown in the figure below
.
This diffusion must be carried out with special care since the p-well doping concentration
and depth will affect the threshold voltages as well as the breakdown voltages of the n-
transistors. To achieve low threshold voltages (0.6 to 1.0 V), we need either deep well diffusion
or high well resistivity. However, deep wells require larger spacing between the n- and p-type
transistors and wires because of lateral diffusion and therefore a larger chip area. The p-wells act
as substrates for the n-devices within the parent n-substrate, and, provided that voltage polarity
restrictions are observed, the two areas are electrically isolated.
In all other respects- like masking, patterning, and diffusion-the process is similar to
nMOS fabrication.
30. However, since there are now in effect two substrates, two substrate connections (VDD
and Vss) are required. The diagram below shows the CMOS p-well inverter showing VDD and
Vss substrate connections
.
In summary, typical processing steps are:
Mask 1-defines the areas in which the deep p-well diffusions are to take place.
Mask 2-defines the thinox regions, namely those areas where the thick oxide is to be
stripped and thin oxide grown to accommodate p- and n-transistors and diffusion Wires.
Mask 3-used to pattern the polysilicon layer which is deposited after the thin oxide.
Mask 4-A p-plus mask is now used (to be in effect 'Anded' with Mask 2) to define all
areas where p-diffusion is to take place.
Mask 5- This is usually performed using the negative form of the p-plus mask and, with
Mask 2, defines those areas where n-type diffusion is to take place.
31. Mask 6-Contact cuts are now defined.
Mask 7- The metal layer pattern is defined by this mask.
Mask 8-An overall passivation (overglass) layer is now applied and Mask 8 is needed to
define the openings for access to bonding pads.
The N-well Process:
N-Well CMOS fabrication requires that both n-channel and p-channel transistors be built on the
same chip substrate. To accommodate this, special regions are created with a semiconductor type
opposite to the substrate type. The regions thus formed are called wells or tubs. In an n-type
substrate, we can create a p-well or alternatively, an n-well is created in a p-type substrate. We
present here a simple n-well CMOS fabrication process, in which the NMOS transistor is created
in the p-type substrate, and the PMOS in the n-well, which is built-in into the p-type substrate.
Historically, fabrication started with p-well technology but now it has been completely
shifted to n-well technology. The main reason for this is that, "n-well sheet resistance can be
made lower than p-well sheet resistance" (electrons are more mobile than holes), lower substrate
bias effects on transistor threshold voltage and inherently lower parasitic capacitances associated
with source and drain regions.
The simplified process sequence for the fabrication of CMOS integrated circuits on a p-
type silicon substrate is as follows:
Fig.n-well fabrication steps
32. The first mask defines the n-well regions. This is followed by a low dose phosphorus implant
driven in by a high temperature diffusion step to form the n-wells. The well depth is optimized to
ensure against p-substrate to p+
diffusion breakdown without compromising the n-well to n+
mask separation. The next steps are to define the devices and diffusion paths, grow field oxide,
deposit and pattern the polysilicon, carry out the diffusions, make contact cuts, and finally
metalize as before.
It will be seen that an n+ mask and its complement may be used to define the n- and p-
diffusion regions respectively. These same masks also include the VDD and Vss contacts
(respectively). It should be noted that, alternatively, we could have used a p+
mask and its
complement, since the n+
and p+
masks are generally complementary.
The below Figure will shows an inverter circuit fabricated by the n-well process.
Due to differences in charge carrier motilities, the n-well process creates non-optimum p-channel
characteristics. However, in many CMOS designs (such as domino-logic and dynamic logic
structures), this is relatively unimportant since they contain a preponderance of n-channel
devices. Thus the n-channel transistors are mainly those used to form logic elements, providing
speed and high density of elements.
Latch-up problems can be considerably reduced by using a low-resistivity epitaxial p-
type substrate as the starting material, which can subsequently act as a very low resistance
ground-plane to collect substrate currents.
However, a factor of the n-well process is that the performance of the already poorly
performing p-transistor is even further degraded. Modem process lines have come to grips with
these problems, and good device performance may be achieved for both p-well and n-well
fabrication.
33. The Twin-Tub Process:
A logical extension of the p-well and n-well approaches is the twin-tub fabrication process.
Using twin tub technology, we can optimize NMOS and PMOS transistors separately. This
means that transistor parameters such as threshold voltage, body effect and the channel
transconductance of both types of transistors can be tuned independently.
A high resistivity n-type substrate, with a lightly doped epitaxial layer on top, forms the starting
material for this technology. The n-well and p-well are formed on this epitaxial layer which
forms the actual substrate. Through this process it is possible to preserve the performance of n-
transistors without compromising the p-transistors. The dopant concentrations can be carefully
optimized to produce the desired device characteristics because two independent doping steps are
performed to create the well regions. This is particularly important as far as latch-up is
concerned.
The conventional n-well CMOS process suffers from, among other effects, the problem
of unbalanced drain parasitic since the doping density of the well region typically being about
one order of magnitude higher than the substrate. This problem is absent in the twin-tub process.
The below Figure will shows an inverter circuit fabricated by the Twin well process.
Silicon on Insulator (SOI)
To improve process characteristics such as speed and latch-up susceptibility, technologists have
sought to use an insulating substrate instead of silicon as the substrate material. Completely
isolated NMOS and PMOS transistors can be created virtually side by side on an insulating
substrate (eg. sapphire) by using the SOI CMOS technology.
This technology offers advantages in the form of higher integration density (because of
the absence of well regions), complete avoidance of the latch-up problem, and lower parasitic
capacitances compared to the conventional n-well or twin-tub CMOS processes. But this
technology comes with the disadvantage of higher cost than the standard n-well CMOS process.
Yet the improvements of device performance and the absence of latch-up problems can justify its
use, especially in deep submicron devices.
34. BI-CMOS TECHNOLOGY:
A BiCMOS circuit consists of both bipolar junction transistors and MOS transistors on a
single substrate. The deficiency of MOS technology is the limited load driving capabilities of
MOS transistors. This is due to the limited current sourcing and current sinking abilities
associated with both p- and n-transistors and although it is possible, to design so-called super
buffers using MOS transistors alone, such arrangements do not always compare well with the
capabilities of bipolar transistors. Bipolar transistors also provide higher gain and have better
noise and high frequency characteristics than MOS transistors.
To drive large capacitive loads Bi-CMOS technology is used. As this technology
combines Bipolar and CMOS transistors in a single integrated circuit, it has the advantages of
both bipolar and CMOS transistors. BiCMOS is able to achieve VLSI circuits with speed-power-
density performance previously not possible with either technology individually.
Using BiCMOS gates may be an effective way of speeding up VLSI circuits. However, the
application of BiCMOS in subsystems such as ALU, ROM, a register-file, a barrel shifter is not
always an effective way of improving speed. This is because most gates in such structures do not
have to drive large capacitive loads so that the BiCMOS arrangements give no speed advantage.
To take advantage of BiCMOS, the whole functional entity, not just the logic gates, must be
considered. A comparison between the characteristics of CMOS and bipolar circuits is set out in
Table shown below.
Comparison between CMOS and Bipolar Technologies
MOS Technology Bipolar Technology
Low static power dissipation
High input impedance
(low drive current)
Scalable threshold voltage
High nose margin
High packing density
High delay sensitivity to load
( fan-out limitations)
Low output drive current
Low gm
Bidirectional capability
(drain and source are interchangeable)
A near ideal switching device
High power dissipation
Low input impedance
(high drive current)
-----
Low voltage swing logic
Low packing density
Low delay sensitivity to load
High output drive current
High gm
High fT at low currents
Essentially unidirectional
35. Theoretically there should be little difficulty in extending CMOS fabrication processes to
include bipolar as well as MOS transistors. In fact, a problem of p-well and n-well CMOS
processing is that parasitic bipolar transistors are inadvertently formed as part of the outcome of
fabrication. The production of npn bipolar transistors with good performance characteristics can
be achieved, for example, by extending the standard n-well CMOS processing to include further
masks to add two additional layers- the n+ subcollector and p+ base layers. The npn transistor is
formed in an n-well and the additional p+
base region is located in the well to form the p-base
region of the transistor. The second additional layer, the buried n+
subcollector (BCCD), is added
to reduce the n-well (collector) resistance and thus improve the quality of the bipolar transistor.
The simplified general arrangement of such a bipolar npn transistor is shown in below figure.
BiCMOS Fabrication in an N-well Process
The basic process steps used are those already outlined for CMOS but with additional process
steps and additional masks defining (i) the p+
base region; (ii) n+
collector area; and (iii) the
buried subcollector (BCCD).
Below Table sets out the process steps for a single poly, single metal CMOS n-well
process, showing the additional process steps for the bipolar devices.
36. N-Well BiCMOS fabrication Process Steps
Single poly, Single Metal CMOS Additional steps for Bipolar Devices
Form n-well
Define active area
Channel stop
Threshold Vt adjustment
Define poly gate areas
Form n+ active area
Form p+ active area
Define contacts
Define the metal areas
Form buried n+ layer(BCCD)
Form deep n+ collector
Form p+ base for bipolar
Some Aspects of Bipolar and CMOS Devices
There are several advantages if the properties of CMOS and bipolar technologies could
be combined. This is achieved to a significant extent in the BiCMOS technology. As in all
things, there is a penalty which, arises from the additional process steps, some loss of packing
density and thus higher cost.
37. A further advantage which arises from BiCMOS technology is that analog amplifier
design is facilitated and improved. High impedance CMOS transistors may be used for the input
circuitry while the remaining stages and output drivers are realized using bipolar transistors.
To take maximum advantage of available silicon technologies one might envisage the following
mix of technologies in a silicon system:
CMOS for logic
BiCMOS for I/O and driver circuits
ECL for critical high speed parts of the system
BASIC ELECTRICAL PROPERTIES OF MOS ANA BiCMOS CIRCUITS
Drain-to-Source Current Ids Versus Voltage Vds Relationships:
The working of a MOS transistor is based on the principle that the use of a voltage on the
gate to induce a charge in the channel between source and drain, which may then be caused to
move from source to drain under the influence of an electric field created by voltage Vds applied
between drain and source. Since the charge induced is dependent on the gate to source voltage
Vgs then Ids is dependent on both Vgs and Vds. Let us consider the diagram below in which
electrons will flow source to drain .So, the drain current is given by
Charge induced in channel (Qc)
Ids =-Isd = __________________________
Electron transit time(τ)
Length of the channel
Where the transit time is given by τsd = ------------------------------
Velocity (v)
Where
μ =electron or hole mobility and Eds = Electric field
38. also , Eds = Vds/L
so, v = μ.Vds/L
and τds = L2
/ μ.Vds
The typical values of μ at room temperature are given below.
The Non-saturated Region :
Let us consider the Id vs Vd relationships in the non-saturated region .The charge
induced in the channel due to gate voltage is duo to the voltage difference between the gate and
the channel, Vgs (assuming substrate connected to source). The voltage along the channel varies
linearly with distance X from the source due to the IR drop in the channel. In the non-saturated
state the average value is Vds/2. Also the effective gate voltage Vg = Vgs – Vt where Vt, is the
threshold voltage needed to invert the charge under the gate and establish the channel.
Note: the charge/unit area = Eg εinsεo.
Hence the induced charge is Qc = Eg εins εoW. L
Where EG= average electric field gate to channel
εins= relative permittivity of insulation between gate and channel (≈ 4.0
for silicon dioxide)
ε0 = permittivity of free space (8.85 * 10-14
Fcm-1
)
Eg = [(Vgs- Vt) – Vds/2] / D
where D= oxide thickness
Threshold Voltage
The voltage at which the surface of the semiconductor gets inverted to the opposite polarity is
known as threshold voltage. At the threshold voltage condition, the concentration of electrons /
holes accumulated near the surface in an n MOS / p MOS is equal to the doping concentration of
the bulk doping concentration.
Vt for n MOS +vei.eVgs>Vtn
Vt for p MOS -vei.eVgs<Vtp
The threshold voltage of a MOSFET is defined as the value of the gate to source voltage which is
sufficient to produce a surface inversion layer when VDS= 0.
39. (or)
The voltage at which the surface of the semiconductor gets inverted to opposite polarity is
known as Threshold Voltage (Vt).
QC = WL εinsε0[(Vgs- Vt) – Vds/2]
D
So, by combining the above two equations ,we get
Ids = QC / τds
= WL εinsε0[Vgs- Vt) – Vds/2] /L2
D µVDS
Ids= εinsε0µW[Vgs- Vt) – Vds
2
/2]
D L
Ids= K W [Vgs- Vt) – Vds
2
/2]
L
In the non-saturated or resistive region where
Vds<Vgs- Vtand
K= εinsε0µ
D
The factor W/L is geometric factor = K W/L
Ids= [Vgs- Vt) – Vds
2
/2]
Gate / channel capacitance Cg= WL εinsε0
D
K= Cgµ
WL
Ids= Cg µ [Vgs- Vt) – Vds
2
/2]
L2
Cg= C0WL
Ids= C0 µW [Vgs- Vt) – Vds
2
/2]
L
The Saturated Region:
Saturation begins when Vds= Vgs-Vt, the IRdrop in the channel equals the effective gate to
channel voltage at the drain and assume that the current remains fairly constant as Vds increases
further.
Ids = K W (Vgs- Vt)2
/2
L
40. Ids= /2 (Vgs- Vt)2
Ids= Cgµ(Vgs- Vt)2
2L2
Ids= C0µ W (Vgs- Vt)2
2L
Ids for both enhancement and depletion mode devices, the threshold voltage for the n MOS
depletion mode device (denoted Vtdis -ve).
Aspects of MOS Transistor Threshold Voltage Vt :
The gate structure of a MOS transistor consists, of charges stored in the dielectric layers
and in the surface to surface interfaces as well as in the substrate itself. Switching an
enhancement mode MOS transistor from the off to the on state consists in applying sufficient
gate voltage to neutralize these charges and enable the underlying silicon to undergo an inversion
due to the electric field from the gate. Switching a depletion mode nMOS transistor from the on
to the off state consists in applying enough voltage to the gate to add to the stored charge and
invert the 'n' implant region to 'p'. The threshold voltage Vt may be expressed as:
where QB = the charge per unit area in the depletion layer below the oxide
Qss = charge density at Si: SiO2 interface
Co =Capacitance per unit area.
Φms = work function difference between gate and Si
ΦfN = Fermi level potential between inverted surface and bulk Si
For polynomial gate and silicon substrate, the value of Φms is negative but negligible and the
magnitude and sign of Vt are thus determined by balancing the other terms in the equation.
To evaluate the Vt the other terms are determined as below.
Body Effect :
Generally while studying the MOS transistors it is treated as a three terminal device. But
,the body of the transistor is also an implicit terminal which helps to understand the
characteristics of the transistor. Considering the body of the MOS transistor as a terminal is
known as the body effect. The potential difference between the source and the body (Vsb) affects
the threshold voltage of the transistor. In many situations, this Body Effect is relatively
insignificant, so we can (unless otherwise stated) ignore the Body Effect. But it is not always
insignificant, in some cases it can have a tremendous impact on MOSFET circuit performance.
41. Body effect - nMOS device
Increasing Vsb causes the channel to be depleted of charge carriers and thus the threshold
voltage is raised. Change in Vt is given by ΔVt = .(Vsb)1/2 where is a constant which depends
on substrate doping so that the more lightly doped the substrate, the smaller will be the body
effect
The threshold voltage can be written as
Where Vt(0) is the threshold voltage for Vsd = 0
For n-MOS depletion mode transistors ,the body voltage values at different VDD voltages are
given below.
VSB = 0 V ; Vsd = -0.7VDD (= - 3.5 V for VDD =+5V )
VSB = 5 V ; Vsd = -0.6VDD (= - 3.0 V for VDD =+5V )
The nMOS INVERTER : For any IC technology used in digital circuit design, the basic circuit
element is the logic inverter. Once the operation and characterization of an inverter circuits are
thoroughly understood, the results can be extended to the design of the logic gates and other
more complex circuits.
An inverter circuit is a very important circuit for producing a complete range of logic
circuits. This is needed for restoring logic levels, for Nand and Nor gates, and for sequential and
memory circuits of various forms.
nMOS INVERTER with Resistive Load:
A simple inverter circuit can be constructed using a transistor with source connected to
ground and a load resistor of connected from the drain to the positive supply rail VDD· The
output is taken from the drain and the input applied between gate and ground. The basic structure
of a resistive load inverter is shown in the figure given below.
42. Circuit Operation :Here, enhancement type nMOS acts as the driver transistor. The load
consists of a simple linear resistor RL. When the input of the driver transistor is less than
threshold voltage Vtn (Vin < Vtn), driver transistor is in the cut – off region and does not conduct
any current. So, the voltage drop across the load resistor is ZERO and output voltage is equal to
the VDD.
Now, when the input voltage increases slightly above Vtn, driver transistor will start conducting
the non-zero current and goes in saturation region since Vds > (Vgs – Vtn) .
Vout = VDD - iRRL
IR = Ids = [ (Vgs - Vtn)2
]/2
Increasing the input voltage further, driver transistor will enter into the linear region since Vds <
(Vgs – Vtn) and output of the driver transistor decreases.
Ids = [(Vgs - Vtn)Vds – {(Vds)2
/2}]
VTC of the resistive load inverter, shown below.
43. But, during the fabrication resistors are not conveniently produced on the silicon
substrate and even small values of resistors occupy excessively large areas .Hence some other
form of load resistance is used. A more convenient way to solve this problem is to use a MOS
transistor as the load.
Enhancement Load NMOS:
An n-channel enhancement-mode MOSFET with the gate connected to the drain can be
used as load device in an NMOS inverter. Since the gate and drain of the transistor are
connected, we have Vgs = Vds. When Vgs=Vds >Vtn, a non zero drain current is induced in the
transistor and thus the transistor operates in saturation only. And following condition is satisfied
Vds > (Vds - Vt). The inverter with enhancement-type load device is shown in the figure.
When Vin < VtnD , the driver is cut off and the drain currents are zero. It means
IdsL = 0 = [ L(VdsL - VtnL)2
]/2
So VdsL – VtnL = 0
But VdsL = VDD –Vout
VDD –Vout – VtnL = 0
Vout = VDD –VtnL
When Vin > VtnD , the driver turns on and is biased in saturation region.
So IdsL = IdsD
[ D(VgsD – VtnD)2
]/2 = [ L(VdsL - VtnL)2
]/2
[ D(Vin – VtnD)2
]/2 = [ L(VDD –Vout - VtnL)2
]/2
Vout = VDD - VtnL - {√ L / D}(Vin – VtnD)
As the Vin increases , the Vout decreases linearly with vin.
Increasing the input voltage further, driver transistor will enter into the linear region since VdsD
< (VgsD – VtnD) and output of the driver transistor decreases.
The main drawback of this inverter is Vout limited to VDD –VtnL.
44. NMOS Inverter with Depletion Load: This is an alternate form of the NMOS inverter
that uses an depletion-mode MOSFET load device with gate and source terminal connected.
This inverter has the advantage of Vout = VDD.
The salient features of the n-MOS depletion mode transistor are:
In n- channel depletion mode MOSFET, an n-channel region or inversion layer
exists under the gate oxide layer even at zero gate voltage and hence term
depletion mode.
A negative voltage must be applied to the gate to turn the device off.
The threshold voltage is always negative for this kind of device.
The salient features of the n-MOS inverter are
For the depletion mode transistor, the gate is connected to the source(Vgs = 0) so
it is always on .
In this configuration the depletion mode device is called the pull-up (P.U) and the
enhancement mode device the pull-down (P.D) transistor.
With no current drawn from the output, the currents Ids for both transistors
must be equal.
When Vin < VtnD , the driver is cut off and no drain current conduct in either transistor.
That means the load transistor must be in the linear region of the operation and the output current
can be expressed as fellows
IdsL = 0 = L[(VgsL - VtnL)VdsL –{ VdsL
2
/2}]
But VgsL = 0
IdsL = 0 = - L VdsL [ VtnL+ {VdsL/2}] which gives VdsL = 0
But VdsL = VDD –Vout
VDD –Vout = 0
Vout = VDD
45. When Vin > VtnD , the driver turns on and is biased in saturation region. However load
is in non saturation region.so that
IdsL = L[(VgsL - VtnL)VdsL –{ VdsL
2
/2}]
= L[(0 - VtnL) (VDD –Vout) –{ (VDD –Vout) 2
/2}]
IdsD = [ D(VgsD – VtnD)2
]/2
= [ D(Vin – VtnD)2
]/2
By euqting above two equations we have a non linear relation between Vout and Vin.
Increasing the input voltage further, both the transistors will enter into the saturation
region. Then the relation between Vout and Vin is linear.
As Increasing the input voltage further and further, driver transistor biased in the non-saturation
region while the load is in the saturation. This implies that input and output voltages are not
linear in this region.
nMOS Inverter transfer characteristic.
The transfer characteristic is drawn by taking Vds on x-axis and Ids on Y-axis for both
enhancement and depletion mode transistors. So,to obtain the inverter transfer characteristic for
Vgs = 0 depletion mode characteristic curve is superimposed on the family of curves for the
enhancement mode device and from the graph it can be seen that , maximum voltage across the
enhancement mode device corresponds to minimum voltage across the depletion mode transistor.
From the graph it is clear that as Vin(=Vgs p.d. transistor) exceeds the Pull down
threshold voltage current begins to flow. The output voltage Vout thus decreases and the
subsequent increases in Vin will cause the Pull down transistor to come out of saturation and
become resistive.
46. Inverter voltage transfer characteristic:
Determination of Pull-up to Pull –Down Ratio (Zp.u}Zp.d.)for an nMOS Inverter driven
by another nMOS Inverter :
Let us consider the arrangement shown in Fig.(a). in which an inverter is driven from the
output of another similar inverter. Consider the depletion mode transistor for which Vgs = 0
under all conditions, and also assume that in order to cascade inverters without degradation the
condition
Fig.(a).Inverter driven by another inverter.
For equal margins around the inverter threshold, we set Vinv = 0.5VDD · At this point both
transistors are in saturation and we can write that
47. where Wp.d , Lp.d , Wp.u. and Lp.u are the widths and lengths of the pull-down and pull-up
transistors respectively.
So,we can write that
The typical, values for Vt ,Vinv and Vtd are
Substituting these values in the above equation ,we get
Here
So,we get
48. This is the ratio for pull-up to pull down ratio for an inverter directly driven by another inverter.
Pull -Up to Pull-Down ratio for an nMOS Inverter driven through one or more Pass
Transistors
Let us consider an arrangement in which the input to inverter 2 comes from the output of
inverter 1 but passes through one or more nMOS transistors as shown in Fig. below (These
transistors are called pass transistors).
The connection of pass transistors in series will degrade the logic 1 level / into inverter 2
so that the output will not be a proper logic 0 level. The critical condition is , when point A is at
0 volts and B is thus at VDD. but the voltage into inverter 2at point C is now reduced from VDD
by the threshold voltage of the series pass transistor. With all pass transistor gates connected to
VDD there is a loss of Vtp, however many are connected in series, since no static current flows
through them and there can be no voltage drop in the channels. Therefore, the input voltage to
inverter 2 is
Vin2 = VDD- Vtp
where Vtp = threshold voltage for a pass transistor.
Let us consider the inverter 1 shown in Fig.(a) with input = VDD· If the input is at VDD ,
then the pull-down transistor T2 is conducting but with a low voltage across it; therefore, it is in
its resistive region represented by R1 in Fig.(a) below. Meanwhile, the pull up transistor T1 is in
saturation and is represented as a current source.
For the pull down transistor
49. Since Vds is small, Vds/2 can be neglected in the above expression.
Now, for depletion mode pull-up transistor in saturation with Vgs = 0
The product I1R1 = Vout1
Let us now consider the inverter 2 Fig.b .when input = VDD- Vtp.
50. Whence,
If inverter 2 is to have the same output voltage under these conditions then Vout1 = Vout2. That is
I1R1=I2R2 , therefore
Considering the typical values
Therefore
From the above theory it is clear that, for an n-MOS transistor
(i). An inverter driven directly from the output of another should have a Zp.u/ Zpd. ratio
of ≥ 4/1.
51. (ii).An inverter driven through one or more pass transistors should have a Zp.u./Zp.d ratio of
≥8/1
ALTERMTIVE FORMS OF PULL –UP
Generally the inverter circuit will have a depletion mode pull-up transistor as its load. But
there are also other configurations .Let us consider four such arrangements.
(i).Load resistance RL : This arrangement consists of a load resistor as a pull-up as shown in
the diagram below. But it is not widely used because of the large space requirements of
resistors produced in a silicon substrate.
2. nMOS depletion mode transistor pull-up : This arrangement consists of a depletion mode
transistor as pull-up. The arrangement and the transfer characteristic are shown below.In this
type of arrangement we observe
(a) Dissipation is high , since rail to rail current flows when Vin = logical 1.
(b) Switching of output from 1 to 0 begins when Vin exceeds Vt, of pull-down device
nMOS depletion mode transistor pull-up and transfer characteristic
(c) When switching the output from 1 to 0, the pull-up device is non-saturated initially and this
52. presents lower resistance through which to charge capacitive loads .
3. nMOS enhancement mode pull-up :This arrangement consists of a n-MOS enhancement
mode transistor as pull-up. The arrangement and the transfer characteristic are shown below.
nMOS enhancement mode pull-up and transfer characteristic
The important features of this arrangement are
(a) Dissipation is high since current flows when Vin =logical 1 (VGG is returned to VDD) .
(b) Vout can never reach VDD (logical I) if VGG = VDD as is normally the case.
(c) VGG may be derived from a switching source, for example, one phase of a clock, so that
dissipation can be greatly reduced.
(d) If VGG is higher than VDD then an extra supply rail is required.
4. Complementary transistor pull-up (CMOS) : This arrangement consists of a C-MOS
arrangement as pull-up. The arrangement and the transfer characteristic are shown below
The salient features of this arrangement are
(a) No current flows either for logical 0 or for logical 1 inputs.
(b) Full logical 1 and 0 levels are presented at the output.
(c) For devices of similar dimensions the p-channel is slower than the n-channel device.
53. CMOS Inverter :
The inverter is the very important part of all digital designs. Once its operation and
properties are clearly understood, Complex structures like NAND gates, adders, multipliers, and
microprocessors can also be easily done. The electrical behavior of these complex circuits can be
almost completely derived by extrapolating the results obtained for inverters. As shown in the
diagram below the CMOS transistor is designed using p-MOS and n-MOS transistors
In the inverter circuit ,if the input is high .the lower n-MOS device closes to discharge
the capacitive load .Similarly ,if the input is low,the top p-MOS device is turned on to charge the
capacitive load .At no time both the devices are on ,which prevents the DC current flowing from
positive power supply to ground. Qualitatively this circuit acts like the switching circuit, since
the p-channel transistor has exactly the opposite characteristics of the n-channel transistor. In the
transition region both transistors are saturated and the circuit operates with a large voltage gain.
Circuit operation:
The operation of CMOS inverter can be divided into five regions .The behavior of n- and p-
devices in each of region is explained below.
Region 1 : This region is defined by 0 =< Vin < Vtn in which the n-device is cut off (Idsn =0),
and the p-device is in the linear region. Since Idsn = –Idsp, the drain-tosource current Idsp for
the p-device is also zero.
Idsp = 0 = p[(Vgsp - |Vtp|)Vdsp –{ Vdsp2
/2}]
= p Vdsp [(Vgsp - |Vtp|) –{ Vdsp /2}]
But Vgsp = Vs – Vg = VDD – Vin (By considering all positive voltages)
Vdsp = Vs – Vd = VDD – Vout
Inorder to get Idsp = 0,Vdsp should be zero
Vdsp = 0 = VDD – Vout
Vout = VDD
54. Region 2 : This region is defined by Vtn = < Vin < {VDD /2} in which the n-device is biased in
saturation (Vgsn > Vtn and Vdsn = Vout = VDD), while the p-device is in the linear region(Vdsp
= small ).
Idsp = p[(Vgsp - |Vtp|)Vdsp –{ Vdsp2
/2}]
Idsn = n[(Vgsn - Vtn)2
]/2
Vgsn = Vin
Idsn = n[(Vin - Vtn)2
/2
By euqting above two equations we have a non linear relation between Vout and Vin.
Region 3 : This region is defined by Vin = VDD /2 in which Vin ) - |Vtp|]biased in saturation.
To find the point at which pMOS enter into saturation:
The transition point for pMOS at which it enter into saturation is given by
Vdsp = (Vgsp - |Vtp|) =[(VDD - Vin ) - |Vtp|]
But Vdsp = VDD – Vout
By equating above two equations we get
Vout = Vin + |Vtp|
At this point of Vdsp pMOS transistor enter into saturation.
So Idsn = Idsp
n[(Vin - Vtn)2
]/2 = -- [(VDD - Vin ) - |Vtp|]2
/2
if n = p and Vtn = |Vtp|
Vin – Vtn = VDD - Vin - |Vtp|
2Vin = VDD
Vin = VDD/2
Therefore Vin = VDD/2 is the point at which both the transistors enter into saturation.
Which implies that region 3 exists only for one value of Vin. We have assumed that a
MOS device in saturation behaves like an ideal current soured with drain-to-source current being
independent of Vds. In reality, as Vds increases, Ids also increases slightly; thus region 3 has a
finite slope. The significant factor to be noted is that in region 3, we have two current sources in
series, which is an “unstable” condition. Thus a small input voltage as a large effect at the output.
This makes the output transition very steep, which contrasts with the equivalent nMOS inverter
characteristics. The above expression of Vin is particularly useful since it provides the basis for
defining the gate threshold Vinv which corresponds to the state where Vout=Vin .This region
also defines the “gain” of the CMOS inverter when used as a small signal amplifier.
Region 4 : This region is described by VDD/2 < Vin = < VDD - | Vtp|.
The p-device is in saturation while the n-device is operation in its nonsaturated region. In this region
The relation between Vin and Vout is non linear.
Region 5 : This region is described by Vin > VDD - | Vtp| in which the p device is cut off (Idsp =0),
and the n-device is in the linear mode. Here, Vgsp= Vin - VDD Which is more positive than Vtp.
The output in this region is Vout=0 From the transfer curve , it may be seen that the transition
between the two states is very step. This characteristic is very desirable because the noise
immunity is maximized. The gate-threshold voltage, Vinv, where Vin =Vout is dependent on
n/ p. Thus, for given proc kess, if we want to change n/ p we need to change the channel
55. dimensions, i.e.,channel-length L and channel-width W. Therefore it can be seen that as the ratio
n/ p is decreased, the transition region shifts from left to right; however, the output voltage
transition remains sharp.
The CMOS transfer characteristic is shown in the below graph.
CMOS inverter Transfer characteristics
CMOS inverter current versus Vin plot
The BiCMOS Inverter
Two bipolar transistors (T3 and T4), one nMOS and one pMOS transistor (both enhancement-
type devices, OFF at Vin=0V)
The MOS switches perform the logic function & bipolar transistors drive output loads
With Vin = 0, T1 is off therefore T3 is non-conducting T2 ON - supplies current to base of T4
T4 base voltage set to Vdd.T4 conducts & acts as current source to charge load CL towards Vdd.
Vout rises to Vdd - Vbe (of T4)/
With Vin = Vdd T2 is off therefore T4 is non-conducting.T1 is on and supplies current to the
base of T3 thenT3 conducts & acts as a current sink to discharge load CL towards 0V.
56. Vout falls to 0V+ VCEsat (of T3)
BiCMOS Inverter
• T3 & T4 present low impedances when turned on into saturation & load CL will be
charged or discharged rapidly.
• Output logic levels will be good & will be close to rail voltages since VCEsat is quite
small & VBE 0.7V. Therefore, inverter has high noise margins
• Inverter has high input impedance, i.e., MOS gate input
• Inverter has high drive capability but occupies a relatively small area
However, this is not a good arrangement to implement since no discharge path exists for
current from the base of either bipolar transistor when it is being turned off, i.e. when
Vin=Vdd, T2 is off and no conducting path to the base of T4 exists when Vin=0, T1 is off
and no conducting path to the base of T3 exists
Latch-up in CMOS circuits
A byproduct of the Bulk CMOS structure is a pair of parasitic bipolar transistors. The collector
of each BJT is connected to the base of the other transistor in a positive feedback structure. A
phenomenon called latch up can occur when (1) both BJT's conduct, creating a low resistance
path between Vdd and GND and (2) the product of the gains of the two transistors in the
feedback loop, b1 x b2, is greater than one. The result of latch up is at the minimum a circuit
malfunction, and in the worst case, the destruction of the device.
Cross section of parasitic transistors in Bulk CMOS
57. Equivalent Circuit
Latchup may begin when Vout drops below GND due to a noise spike or an improper circuit
hookup (Vout is the base of the lateral NPN Q2). If sufficient current flows through Rsub to turn
on Q2 (I Rsub > 0.7 V ), this will draw current through Rwell. If the voltage drop across Rwell is
high enough, Q1 will also turn on, and a self-sustaining low resistance path between the power
rails is formed. If the gains are such that b1 x b2 > 1, latchup may occur. Once latchup has
begun, the only way to stop it is to reduce the current below a critical level, usually by removing
power from the circuit.
The most likely place for latch up to occur is in pad drivers, where large voltage transients and
large currents are present.
Preventing latch up
Fab/Design Approaches
1. Reduce the gain product b1 x b1
• move n-well and n+ source/drain farther apart increases width of the base of Q2
and reduces gain beta2 > also reduces circuit density
• buried n+ layer in well reduces gain of Q1
2. Reduce the well and substrate resistances, producing lower voltage drops
• higher substrate doping level reduces Rsub
• reduce Rwell by making low resistance contact to GND
• guard rings around p- and/or n-well, with frequent contacts to the rings, reduces
the parasitic resistances.
58. Surrounding PMOS and NMOS transistors with an insulating oxide layer (trench). This
breaks parasitic SCR structure.
Latch up Protection Technology circuitry which shuts off the device when latchup is
detected.
Prepared By Faculty
IV ECE1---- Mrs M.Manikumari
IV ECE2---- Mrs B. Lakshmi