
Recommended
Recommended
More Related Content
Similar to Module 019 introduction to bone setup, rigging character_e_text
Similar to Module 019 introduction to bone setup, rigging character_e_text (8)
More from Dr. Abhishek K (Ryan)
More from Dr. Abhishek K (Ryan) (14)
Recently uploaded
Recently uploaded (20)
Module 019 introduction to bone setup, rigging character_e_text
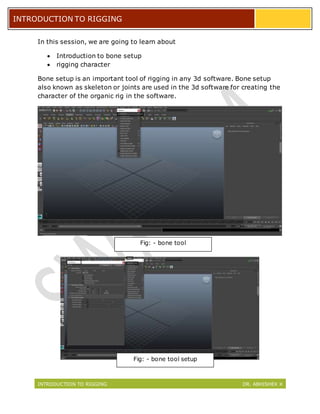
- 1. INTRODUCTION TO RIGGING DR. ABHISHEK K INTRODUCTION TO RIGGING In this session, we are going to learn about Introduction to bone setup rigging character Bone setup is an important tool of rigging in any 3d software. Bone setup also known as skeleton or joints are used in the 3d software for creating the character of the organic rig in the software. Fig: - bone tool Fig: - bone tool setup
- 2. INTRODUCTION TO RIGGING DR. ABHISHEK K INTRODUCTION TO RIGGING With the bone tool setup, we can easily adjust the size of the bones and joints according to the mesh. Fig: - bone size Fig: - creating bone setup
- 3. INTRODUCTION TO RIGGING DR. ABHISHEK K INTRODUCTION TO RIGGING Other than just creating the joint setup we skeleton tool also provide us with several other useful tools. They are:- Insert joint tool Reroot joint tool Remove joint tool Disconnect joint tool Mirror joint tool Orient joint tool Insert joint tool: - with the help of this tool, we can insert an extra joint in between of pre created joints. Reroot joint tool: - this tool helps us in changing the root or the origin of the joint. Fig: - insert joint tool
- 4. INTRODUCTION TO RIGGING DR. ABHISHEK K INTRODUCTION TO RIGGING Remove joint tool: - this tool helps in removing the joint from the hierarchy yet maintaining the hierarchy. Fig: - reroot joint tool Fig: - before removing joint
- 5. INTRODUCTION TO RIGGING DR. ABHISHEK K INTRODUCTION TO RIGGING Disconnect joint tool:- this tool helps in the discontinuation of the hierarchy. Connect joint tool:- as the name suggests this tool helps us in connecting the two different joint setups. Fig: -after removing joint Fig: -disconnect joint
- 6. INTRODUCTION TO RIGGING DR. ABHISHEK K INTRODUCTION TO RIGGING Mirror joint tool: - this tool helps in creating exactly mirror replica of the joint created. Orient joint tool: - this tool helps us in setting the orientation of the joint by setting the LRA or the local rotation axis of the joint. Fig: -connect joint Fig: -mirror joint
- 7. INTRODUCTION TO RIGGING DR. ABHISHEK K INTRODUCTION TO RIGGING Creating a rig for the character is another helpful and easy tool that can be used for better character animation. The very first thing one does is create the complete rig setup for the body mesh We have to create following setups for the complete body rig. Leg setup Fig: -orient joint joint Fig: -creating bone joint
- 8. INTRODUCTION TO RIGGING DR. ABHISHEK K INTRODUCTION TO RIGGING Parenting(fk:-forward kinematics) Orient constrain(fk) Ik(inverse kinematics) handle Reverse foot Hand setup Parenting(fk) Orient constrain(fk) Ik handle Spine setup Parenting(fk) Orient constrain(fk) Spine Ik handle Finger rigging Head neck jaw As we are done with creating bones next we have to start creating attribute or controllers. Fig: -creating setup joint
- 9. INTRODUCTION TO RIGGING DR. ABHISHEK K INTRODUCTION TO RIGGING As we are done with the rig and the controller setting the last thing we have to do is we do skinning. Skinning is the process with the help of which we attach bones with the mesh and divide the weight of the vertices on the rigged bones or joint. First, we select mesh then bones and then apply bind skin>smooth bind for applying smooth bind skin on the mesh. Fig: -creating controller joint Fig: -applying bind skin joint
- 10. INTRODUCTION TO RIGGING DR. ABHISHEK K INTRODUCTION TO RIGGING As we ago to smooth bind we can find an attribute drop down menu beside it. In this menu, we have to apply certain changes as shown in the figure. Soon after applying the smooth bind we can see that mesh starts working with the bones. Fig: - bind skin setting joint Fig: - skin bind joint
- 11. INTRODUCTION TO RIGGING DR. ABHISHEK K INTRODUCTION TO RIGGING But the flexibility is not proper for achieving proper flexible skin we have to paint weight manually that means we have to divide an equal amount of weight on the bone for the result. Painting weight is the final process for achieving the complete rigged character. The painting into the polygons with the help of a brush can be achieved through the color property. If the paint color will be white then it is more effective and if the color is being got feded off then it is least effective. Fig: - painting weight joint