
Recommended
More Related Content
What's hot
What's hot (14)
Similar to Technical Writing Example
Similar to Technical Writing Example (20)
Technical Writing Example
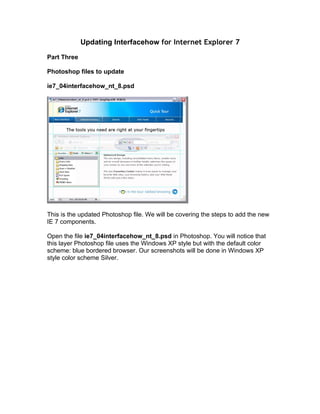
- 1. Updating Interfacehow for Internet Explorer 7 Part Three Photoshop files to update ie7_04interfacehow_nt_8.psd This is the updated Photoshop file. We will be covering the steps to add the new IE 7 components. Open the file ie7_04interfacehow_nt_8.psd in Photoshop. You will notice that this layer Photoshop file uses the Windows XP style but with the default color scheme: blue bordered browser. Our screenshots will be done in Windows XP style color scheme Silver.
- 2. Here is the same Photoshop file updated with added layers (orange arrow pointing to the layers with orange color) and some layers turned off (the eye icon, left side of the layer itself, has been turned off) You will notice the browser border of the image is now Silver, and the icons, tools, address bar, search box have been updated to the latest Internet Explorer 7 design. Let’s begin.
- 3. In the open file ie7_04interfacehow_nt_8.psd in Photoshop. Press Control 0 (zero) to enlarge to fit your psd file in your Photoshop screen. Turn off the layer called: Frame. Click its eye icon off and on. You will see the blue browser frame turn off and on as well. You have now located the important layer we are going to update with the new browser design. Turn off layer 31, this will turn of the ellipse with the highlighted tools. Also trun off Layers: Selected Tab, Tab, Search Box, and Address Bar.
- 4. Press Control O (the letter O) to open the favorites.bmp screenshot that shows the rss feed window on the left side of the browser. Using the Marquee tool select the top left portion of the browser excluding the top of the favorites menu. Press Control C to copy. Toggle back to your psd file and with the Frame layer selected Press Control V to paste your selection into a new layer. Name this layer topLeftBrow and color code it code orange. Toggle to your Photoshop file and with the Frame layer selected press Control V. This will paste this selection from your screenshot into a new layer in the Photoshop file just above the layer you had selected. Position the selection and align it over the blue browser top left corner. Right click the new layer, choose Layer Properties and give it an appropriate name, such as topLeftBrow, you want to color code it as well, such as making the layer eye icon orange in color. Using the Move tool, arrow this selection into place on top of the old left part of the browser graphic. Toggle back to your screenshot. Using the Marquee tool select the top right portion of the browser. Press Control C to copy. Toggle back to your psd file and with the Frame layer selected Press Control V to paste your selection into a new
- 5. layer. Right click the new layer, choose Layer Properties and give it an appropriate name, such as topRightBrow, you want to color code it as well, such as making the layer eye icon orange in color. Using the Move tool, arrow this selection into place on top of the old right part of the browser graphic. Turn off the topRightBrow layer and select the topLeftBrow With the Marquee tool select from the topLeftBrow the new tab and a portion the the tab next to it. Press Control C to copy and Control V to paste this selection into a new layer. Name this layer New Tab and color code it orange. Arrow this new tab layer to the left shortening the tab button. Set the opacity level to 30% for these layers: topRightBrow, topLeftBrow, and New Tab. Select and turn topRightBrow layer back on and with the Marquee tool select a rectangle area around the tools and tabs area. Press Delete to clear out any piece of graphic covering this area to reveal the new tab in its new position.
- 6. Next we will trim portions of the browser where the graphics are seen to overlap. Select the topLeftBrow layer and using the marquee tool select the last part of the url in the address bar to trim out.
- 7. Select topRightBrow layer and Control click it to create a dashed Marquee line. Then select topLeftBrow and Press Delete to clear out the extra Silver layer on top of the browser. Press Control D to deselect Marquee selection. Toggle back to your screenshot and with the Marquee tool select the Windows Internet Explorer text at the top of the browser. Press Control C to copy. Toggle back to the psd file and with the topRightBrow layer selected, Press Control V to paste this selection into a new layer. Name this new layer IE Text and color code it orange. Using the Move tool (V) Arrow this selection into place; top left part of the browser to cover the current text. Set the IE Text layer’s opacity to 30%. Control click this layer. Select the topRightBrow layer and Press Delete. Selct the topLeftBrow layer and Press Delete. This will clear out the overlapping pieces of the browser. Select the layer topRightBrow and at the bottom of the Layers Palette click the Add Vector Mask button. This will add a vector mask to the layer. Press G (Gradient tool), holding the shift key carefully draw a short horizontal line to help blend the sharp color change at the seam between the 2 browser half’s.
- 8. Then select the topLeftBrow and at the bottom of the Layers Palette click the Add Vector Mask button. This will add a vector mask to the layer. Press G (Gradient tool), holding the shift key carefully draw another short horizontal line to help blend the sharp color change at the seam between the 2 browser half’s. For best results draw your gradient fill from the vertical point where the two colors meet to the end of your Marquee selection.
- 9. Toggle back to your screenshot and using the Marquee tool select the Favorites menu. Press Control C to copy. Toggle back to your psd file and with the Menu layer selected Press Control V to paste this New Favorites Menu into a new layer. Name this layer New Menu and color code it orange. With Move Tool Arrow this selection into place above the previous Favorites Menu. Toggle back to the screenshot and let’s grab the bottom of the Menu frame. Press Control C to copy. Toggle back to your psd file and with the New Menu layer selected Press Control V to paste this New Favorites Menu Bottom Border into a new layer. Name this layer New Bottom and color code it orange.
- 10. With Move Tool Arrow this selection into place at the bottom of the Favorites Menu. Now let’s re-position the text to the right of the Favorites Menu. Selct the Text layer called: Optimized Design The new design. Double click its eye icon to select the text itself. Grab the left border re-size handle and drag it right until it is well past the Favorites Menu border.
- 11. Press K to choose your Slice Selection tool. Click on each slice and check move their borders so they allow for the new size of the Favorites Menu. The slice over the Favorites Menu will have to have its right border pulled wider to the right as well as its bottom border pulled down farther so it does not cut off the graphic part of this border. Check the other slice on the left part of the browser and pull its left handle to match the right handle of the previous slice as well as the bottom needs to be pulled up to allow for the text re-position and to line up with the slice bottom border to its left. The top left slice needs to have its handle moved to the right to line up with the slice border on the left slice. The text below is not part of the graphic. HTML will replace this text graphic on the webpage. Return the topRightBrow layer to 100% opacity. With the topRightBrow layer selected choose the Marquee tool and select an area with the refresh button to the search box, Press Control C then Control V to copy and paste this selection into a new layer. Add a layer style, Stroke, size 1 pixel and color dark gray. Click OK.
- 12. Make sure the Frame layer is turned off and that all your opacity levels for the following orange icon layers to 30%: IE Text, topRightBrow, New Tab, and topLeftBrow.
- 13. Your psd file is now ready to export the updated graphics: Press Control, Alt, Shift, S (or File>Save For Web). Use default setting, JPEG, High, Optimized checked, Quality 70%, Press Save. In your images folder you will find the graphics: toolbar_left.jpg Dimensions: 299 px by 85 px Size: 7 K search_highlight.jpg Dimensions: 364 px by 84 px Size: 8 K favorites_menu.jpg Dimensions: 299 px by 249 px Size: 18 K You have completed this portion of the update. Save and close your psd file and close the screenshot without saving.