

Recommended
More Related Content
What's hot
What's hot (20)
Similar to Seattle Tilth Worm Composting Bin
Similar to Seattle Tilth Worm Composting Bin (20)
More from x3G9
More from x3G9 (20)
Recently uploaded
Recently uploaded (20)
Seattle Tilth Worm Composting Bin
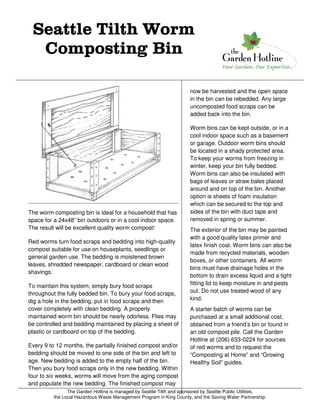
- 1. The Garden Hotline is managed by Seattle Tilth and sponsored by Seattle Public Utilities, the Local Hazardous Waste Management Program in King County, and the Saving Water Partnership. Seattle Tilth WormSeattle Tilth WormSeattle Tilth WormSeattle Tilth Worm Composting BinComposting BinComposting BinComposting Bin The worm composting bin is ideal for a household that has space for a 24x48” bin outdoors or in a cool indoor space. The result will be excellent quality worm compost! Red worms turn food scraps and bedding into high-quality compost suitable for use on houseplants, seedlings or general garden use. The bedding is moistened brown leaves, shredded newspaper, cardboard or clean wood shavings. To maintain this system, simply bury food scraps throughout the fully bedded bin. To bury your food scraps, dig a hole in the bedding, put in food scraps and then cover completely with clean bedding. A properly maintained worm bin should be nearly odorless. Flies may be controlled and bedding maintained by placing a sheet of plastic or cardboard on top of the bedding. Every 9 to 12 months, the partially finished compost and/or bedding should be moved to one side of the bin and left to age. New bedding is added to the empty half of the bin. Then you bury food scraps only in the new bedding. Within four to six weeks, worms will move from the aging compost and populate the new bedding. The finished compost may now be harvested and the open space in the bin can be rebedded. Any large uncomposted food scraps can be added back into the bin. Worm bins can be kept outside, or in a cool indoor space such as a basement or garage. Outdoor worm bins should be located in a shady protected area. To keep your worms from freezing in winter, keep your bin fully bedded. Worm bins can also be insulated with bags of leaves or straw bales placed around and on top of the bin. Another option is sheets of foam insulation which can be secured to the top and sides of the bin with duct tape and removed in spring or summer. The exterior of the bin may be painted with a good quality latex primer and latex finish coat. Worm bins can also be made from recycled materials, wooden boxes, or other containers. All worm bins must have drainage holes in the bottom to drain excess liquid and a tight fitting lid to keep moisture in and pests out. Do not use treated wood of any kind. A starter batch of worms can be purchased at a small additional cost, obtained from a friend’s bin or found in an old compost pile. Call the Garden Hotline at (206) 633-0224 for sources of red worms and to request the “Composting at Home” and “Growing Healthy Soil” guides.
- 2. Seattle Tilth Worm Composting Bin rev 11/2012 Page 2 The Garden Hotline is managed by Seattle Tilth and sponsored by Seattle Public Utilities, the Local Hazardous Waste Management Program in King County, and the Saving Water Partnership. Materials 1 Sheet of ½” exterior plywood Note: CDX grade is least expensive, ACX is most expensive. Do not use composite or chip boards, they will not withstand the moisture generated in a worm bin. 2 8’ 2x4s, stud grade will probably be the straightest 2 8’ 2x2s 80 1 1 ⁄8” x #8 coated deck screws 1 Pair of zinc plated 3”x2” butt hinges without screws if possible (use the deck screws). For additional strength, 3 butt hinges can be installed instead of 2. 1 48” length of 3 ⁄8” polypropylene rope Tools Tape measure, portable electric saw or hand crosscut saw, electric drill with variable speed, #2 Philips driver bit, 3 ⁄8” drill bit, hammer, pencil, 4’ straight edge, pair of saw horses (for cutting plywood and assembling the bin) and eye and ear protection. Note: Drills and saws can be rented if you have no real need to own power tools. Additional Notes. To extend the life of the bin, caulk the lid at each join. Attach hardware cloth to the bottom of the bin and put the bin up on bricks or risers.
- 3. Seattle Tilth Worm Composting Bin rev 11/2012 Page 3 Learn More About Natural Yard Care Contact the Garden Hotline with your garden questions! We can send you booklets “Composting at Home” or “Building Healthy Soil.” help@gardenhotline.org (206) 633-0224 gardenhotline.org Construction DetailsConstruction DetailsConstruction DetailsConstruction Details Look over the cutting sequence and expanded view on page 2. Use a pencil and straight edge to mark all measurements before cutting. Step 1: Cut the sheet of plywood in half. When making this first cut (#1), just barely leave the 48" pencil line. Step 2: Take the full 48x48" piece and divide it into three equal pieces (cuts #2 and #3). This time, split the pencil line with the cut, otherwise the pieces will end up being too small because the saw blade takes 1 ⁄8" every time a cut is made. Step 3: Split the pencil line again. Divide one of the three pieces just cut in half (cut #4). These four pieces will become the front side, back side and two ends. Step 4: Cut the other half of the sheet as per the drawing (cut #5). Split the pencil line on the 23" cut. This will be part of the bottom. The remaining piece will be part of the lid. Constructing the Bottom. Cut one of the 2’x2’s into two 48" sections. From the other 2x2’, cut two pieces 20" long. Attach these pieces to the edges of the bottom. Cut one more piece of 2x2’, 20" long for the middle support on the bottom. Use only a few deck screws per side. Next, drill 3 ⁄8" drainage holes in the bottom. See expanded view for one pattern for these holes. Need 12 to 16 holes. Constructing the Sides. Cut from one of the 2x4’s two pieces 14¼". Cut from one of the 2x2’s two pieces 14¼". These four pieces are the corner blocks. Next, place the 2x2’s under each end of what will become the front. Look for the best plywood surface to be up as that will show on the final bin. Make sure the ends of the 2x2’’s are flush with the top edge of this front side. fasten using the deck screws. Follow the spacing pattern shown on the expanded view. Do the same with the other side using the previously cut 2x4’s. This side will be the back of the bin. Attach the ends to the just completed front and back sides. Turn the completed unit so the bottom-end is facing up. Slide the bottom—plywood face down—into place so that it rests on the ends of the corner blocks. The bottom 2x2’ framing will extend beyond the bottom edge of the box. This is done to keep the plywood edges from direct contact with the ground. Fasten the sides and ends to the bottom using the screw pattern from the expanded view. Screws are used to assemble the bin because they are easier than nailing and mistakes can be corrected more easily. Constructing the Lid. Cut two pieces of 2x4’ 51" long and two 18½” long. Lay the pieces out to form a rectangle. Center the plywood (best surface up) on this rectangle of 2x4’s and fasten as per expanded view, the 2x4’s will extend beyond the plywood. Next, attach the hinges to the back edge of the bin centered on the 2x4’ corner blocks. Once this is done, place the lid on the bin, center it from side to side, and attach the hinges to the back edge of the top. Then, drill a 3 ⁄8" hole in one end 4” from the front edge of the bin and down 3” from the top edge of the bin. Mark the lid directly above this hole and drill a 3 ⁄8” hole through just the 2x4 edge of the top. Knot one end of the polypropylene rope; thread it through the hole in the bin leaving the knot on the inside of the bin. Then thread the rope up through the hole in the rim of the lid. Open the lid to just past vertical and tie another knot in the rope. This rope prevents the top from falling back and possibly breaking off the hinges. This completes the building of the worm bin.