SlideShare a Scribd company logo
1 of 24
Download to read offline
FINAL PROJECT EVALUATION
OLIVIA SINGLETON
This is my final major project evaluation, in this evaluation I evaluate my own images, I talk about my production
skills that I have newly acquired and existing skills that I have further developed, I talk about how my final prod-
uct matches my original intentions, I discuss with you my time management and problem solving, I talk about
how I came to reach my target audience and finally my conclusion of how I would respond to my project brief if I
were to do it again.
THEME - ADHD
ADHD got voted twice for the theme the audience most liked and once for the most they didn’t like.
IMAGE ONE – DIFFICULTY IN PAYING ATTENTION
This image is in the category ‘ADHD’ and the person is my little brother, he has ADD therefore this
role was suitable for him and it was easy to get him to act in front of the camera. It’s an entire
different story when you’re taking the image compared to when you sit back and look at the final
image you have completed. When I look at this image I see a lot of character on my brother’s face, I
see the little details like the mark below his eye, the freckle on his collar bone, then I see the
complexity of his facial expressions. He’s doing an exceptional poker face and you can tell because
his eyes are the only thing that is screaming out at you, if I didn’t know him personally I’d think he
was looking into my soul. Then we look at the replica of him and we see he’s looking down which
explains in itself ‘difficulty in paying attention’ I think this is powerful because he looks like he’s
listening to you at first, absorbed, but then he can so easily lose his focus which his replica to the left
portraits. The lighting could be improved, I used a simple plug in light which was at an angle in front
of him to cast shadows and while it worked, it was increasingly hard to edit the picture because of
the dark shadowing on his face and body. This photo like the other images in the ‘ADHD’ category
was shot in my bedroom at my dad’s house, it was the only place we could shoot where there was
enough room to get long shot pictures and not just close-ups.
When editing this image in Photoshop I made a lot of changes such as using the dodge tool to lighten
my brothers eyes and to emphasis the lighting on his face, I used the burn tool to darken the pupils
of his eyes and to also darken his lips, I also used small touch ups with the spot healing brush
because he had a few marks on his face. I changed the lighting in this image using the brightness tool
and I also increased the contrast so certain shadows would stand out and then I changed the picture
to black and white using the black and white effect in Photoshop, then I overlaid IMG_2778 to create
a more creative effect and to add to the ‘ADHD’ theme feel.
Before: After:
FINAL PROJECT EVALUATION
OLIVIA SINGLETON
IMAGE TWO – RESTLESSNESS
This image is in the category ‘ADHD’ and the person is my little brother, he has ADD therefore this
role was suitable for him and it was easy to get him to act in front of camera. I think this image is
really thought-provoking, I later gave it the title ‘restlessness’ because I thought it was appropriate,
you see him settled with his mouth open a little and then you see him going wild, screaming. This
image could fit into more than one category as it doesn’t just scream ‘ADHD’ but ‘Mental Health’
too, you see a lot of internal struggle. I also took this image in my bedroom because it has a lot of
room to do close-ups and far away shots.
When editing this image I straightaway edited the colour to black and white because of how well the
black and white effect turned out in the first image and then adjusted the contrast so it was
increased and by doing this I made a lot more stand out, I also used the ‘smart sharpen’ tool and did
that twice so that the image was sharper. I’m glad I went with this editing technique because it
made the image appear into two images and I had to sit and think about the changes I had made to
this image because I was persuaded I had overlaid two images when in fact I hadn’t, I had just made
it sharper and when I did that the second face stood out which I’m proud of.
Before: After:
FINAL PROJECT EVALUATION
OLIVIA SINGLETON
IMAGE THREE – IMPATIENT
This image is in the category ‘ADHD’ and the person is my little brother, he has ADD therefore this
role was appropriate for him and it was easy to get him to act in front of the camera. Out of all the
images I took for ‘ADHD’ I thought this one would be my favourite because the lighting and the
background out of all is the best so it made it easier to edit in photo shop, but I was wrong, while I
love this image because of his innocence portrayed, it’s not as creative as the others. Furthermore
what I do like about this image is that it shows some character, he doesn’t actually look impatient
like the title given says, he looks frightened which is underlining the theme mental health and not
ADHD. I really like the way his eyes are glistening, they show a lot of emotion because of the size and
energy and that’s a good thing to have in a picture, I always aim to have some sort of emotion in my
pictures and have succeeded in doing so in this image. I like the way you can see every detail of his
face; his freckles, the cracks in his lips, the wrinkles in his fingers, the bone structure of his nose,
detail is a very strong point for me. While this picture is very sharp, his skin still looks softly edited so
that’s a positive.
When editing this image I knew straight away what I had planned for it, because of how good the
lighting was and the fact that there were no shadows on his face made it so much easier for me to
edit it, so I went ahead and started touching up the brightness, contrast and saturation, I then went
and made the image a lot sharper so that every detail of his face was enhanced, I then used the burn
tool to make his lips look like they have more colour and I used the dodging tool to make the whites
of his eyes whiter also I used the burn tool on his pupils to make them a little larger.
Before: After:
FINAL PROJECT EVALUATION
OLIVIA SINGLETON
IMAGE FOUR – OVERACTIVE BEHAVOUR
You can’t really see the boy in this image so the composition isn’t great, although you can see where
he would be stood. This image was took with the light covered with a blanket so minimal lighting
came out, I did this so that you would be able to see the boy but in the end when it came to editing I
thought it would be best to hide any lighting with the clone tool and brightening tool so that all you
could see was the glow sticks. This image fits the title ‘overactive behaviour’ because of the amount
of activity going on with the glow sticks, the glow sticks could almost represent a soul, the soul is
different colours, the soul is going in many different directions, just like a boy with ADHD would.
There are colours of red which is a very emotionally intense colour, and is associated with anger,
strength and power, there are colours of blue which is often associated with depth and stability,
there are colours of orange which represents enthusiasm and happiness, and then there are little
glimpses of the colour purple which represents magic. These colours are all very powerful and are all
beneficial to the meaning of my picture and it is very easy for me to tell a story with them. Red – if
you find a child with ADHD you will see they cannot control their emotions and are quick to explode
over little things. Orange – you will find that if you watch a child with ADHD for long enough, you will
see them switch into a very enthusiastic character who is filled with excitement and happiness. Blue
– stability is a strong manufacture of ADHD because no matter what stage you’re at with your ADHD
there is always a way you can be helped, you can become stable in a healthy way. Purple – purple
mainly represents magic, magic is all around children with ADHD, they have more character than an
author does when creating his stories. Magic is an occurring thing that children with ADHD surprise
you with.
When editing this image I didn’t really know what to do with it, I thought well I could lighten the
whole picture up with the brightening tool so that you could see the boy’s face and then it would be
a proper portrait but it didn’t work out and that’s probably for the best as I much prefer this edit.
First off I overlaid another image on top of this one ‘IMG_2771’ so that there would be an idea of
where the boys’ face would be, then I continued to make the image darker by decreasing the
brightness and increasing the contrast, I then went over both layers with the dodge tool so to make
the colours a lot brighter, and I also used the sharpening tool to make things more detailed.
Before: After:
FINAL PROJECT EVALUATION
OLIVIA SINGLETON
ANGEL & DEVIL
Angel and devil got one vote for being the audience’s favourite theme and two votes for being their
least favourite.
IMAGE ONE – AN ATTENDANT SPIRIT
The theme angel and devil was the first theme I thought of doing and was the one I was most certain
about. In this image you can tell she’s pure because of the colour; the colour that stands out. I got
my friend who is a makeup artist to do her face up to look like an angel and as you can see she did a
very good job. You can see a lot of characteristics of an angel in this picture, she looks patient,
modest, powerful, obedient, visible and heavenly. While the colour white stands out, so do the
brown in her eyes also angels are known to have powerful eyes like fire. Her eyes are really
important in this picture, eyes are always the strongest giveaway but her eyes tell you nothing but
innocence and serenity. Overall, I really like this image, while it isn’t one of my strongest because of
the lighting, it holds other strong points like how I have made it so her lips stand out because an
angels lips are untouchable and how her face looks soft but her hair is so sharp and her eyes are so
in depth.
When editing I first of all made some ‘auto’ corrections such as ‘auto brightness’ and ‘auto contrast’
I did indeed try the ‘auto tone’ correction but I didn’t like the tone it changed my picture to so I left
that out. Then I went forward with highlighting the white paint on her face with the dodging tool as I
did also with her lips and the whites of her eyes, then I used the burn tool to make her pupil’s a
touch darker and also the roots of her hair. I then went and enlarged her lips a little by using the
selection tool on her lips and then using the feather tool and putting it to 5% I then pressed and held
ctrl + J so that the selection I made around the lips created another layer and when that was done I
went onto the lips layer and used the free transform tool and changed the size of her lips. After
completing this I used the paint tool with the colour white to go over her lips so they were whiter
than before. Once finished with highlighting all the white parts of her face I used the clone tool to
erase stray hairs in the background so that it looks neater and while this worked, I doubt my skills
when I look at her shoulder’s and see that I may have gone too far from the background and into her
skin.
Before:
After:
FINAL PROJECT EVALUATION
OLIVIA SINGLETON
IMAGE TWO - A PERSON OF EXAMPLARY CONDUCT OR VIRTUE
The theme angel and devil was the first theme I thought of doing and was the one I was most certain
about. This image is a lot softer than the others, it was sharp to begin with but I put a blurry effect
on parts of the image in photo shop, I think this was a good move because an angel is known to be
soft and all you see in this image is softness like she’s a feather, whereas her eyes are still sharp and
they become the main focus. She is smiling a little in this image which makes her friendlier and gives
the image a serene effect. Her eyes aren’t as dark as they were in the previous image, even her hair
isn’t as dark as it was. Overall I like this image, it gives the other images a middle because the others
are sharper.
When editing this image I first off selected ‘auto brightness’ and ‘auto contrast’ like in the first image
because of how well it worked out, once the image was clear enough for me to edit I then moved
onto trying to enlarge the lips as I did in the last image following the same process with selection
tool, feather, ctrl+J, free transform and while this worked, I didn’t make her lips look as big as I did
before because this is from a different angle and wouldn’t work as well. I then highlighted all the
white paint on her face including her lips and the whites of her eyes so that they stood out, after
doing that I used the burn tool to make her eyebrows a little darker and to darken the bronzer on
her cheekbones so it would be more prominent. I also used the clone tool to clone some of the
white stripe son her face so that there would be more and so that it would look more like a mask to
the audience.
Before: After:
FINAL PROJECT EVALUATION
OLIVIA SINGLETON
IMAGE THREE – A SUPERNATURAL BEING
The theme angel and devil was the first theme I thought of doing and was the one I was most certain
about. This image is more or less the same as ‘an attendant spirit’ except I have adjusted it in
different ways. The lighting is stronger so it highlights her face better, her lips stand out a lot more
and the white of her eyelashes. I don’t think this image is the best because of the editing, I made a
fault adjustment to her lips and now they look unreal whereas I wanted them to look more plump
and the whites of her eyes look a little too white to be real, but what can you expect an angel isn’t
meant to be on earth so who knows what an angel looks like face to face? I like the background most
because there is more space and even though the composition is original; having her focused in the
middle, it fits. Overall I like this image a lot more than it’s almost replica ‘an attendant spirit’ because
of the ease of editing with the lighting.
When editing this image I followed the same protocol as the first image except I made the brightness
lighter instead of relying on auto brightness, I did that on this image because I wanted to try
something different with an image that is basically the twin of the first. I followed the same pattern
by enlarging the lips with the selection tool, feather, ctrl+J, and free transform. In this image I used
the clone tool to clone the stripes on her face like image two, and I also used the clone tool to
remove the lines off the wall in the background so that it looked like all that was behind her was
emptiness; heaven. Furthermore I used the clone tool lastly to delete the stray hairs in the
background so that again this image would look tidy.
Before: After:
FINAL PROJECT EVALUATION
OLIVIA SINGLETON
IMAGE FOUR – INNOCENT
The theme angel and devil was the first theme I thought of doing and was the one I was most certain
about. I’m not 100% certain on this picture, it wasn’t one I wanted to keep, but I thought it would be
good to show I used a different style in my composition, I took this at an angle so you could see her
hair and see her looking ahead from a different angle. I think this image looks more urban than it
does angelic because of the shades of her hair and the tiled wall in the background but I like that her
eyes are still a little focused while the rest of her face is blurred and you can still see the white of her
eyebrows and lips. Overall this image is good but in future I would like to go at a different angle if I’m
thinking of changing my composition and I’d also leave her hair up. Although it’s a coincidence that I
put this picture before ‘a supreme of evil; Satan’ where she has her hair down so she could be losing
her innocence mentally and it shows in her characteristics.
When editing this image I made a lot of improvements to her hair instead of her face, to begin with I
used ‘auto contrast’ and adjusted the lighting myself, I tried to adjust the saturation, but areas of her
face would warm up when I didn’t want them to so I left that tool alone, then I moved on to
enhancing the white paint on her face once more with the dodging tool but that is mostly all I did
with her face, moving on to her hair I highlighted all of her light strands in her hair where the brown
has faded and just enhanced that, I also used the burning tool to make the dark strands a lot darker.
I went with this idea because in the first 3 images her hair is up and is out of the way so it doesn’t
add to her character, but here she is becoming a devil and her hair becomes the main feature so I
wanted it to look as characterised as possible (as much as hair can be).
Before: After:
FINAL PROJECT EVALUATION
OLIVIA SINGLETON
IMAGE FIVE – THE SUPREME OF EVIL; SATAN
The theme angel and devil was the first theme I thought of doing and was the one I was most certain
about. I really like this image, it screams so many words at you, if you weren’t to know she was a
devil you would be certain that she’d been abused because of the marks of the dark contouring but
also because of the darkness her eyes hold in them. I’m really proud of this image, not just because
of how powerful her face looks but because of the editing, everything is so bold and sharp, you can
see her bone structure in her cheeks and her nose which is a bonus when producing a portrait
picture, you want every detail to be sharp and in focus. I like how you can’t see any of the colour in
her eyes just like you can’t in the actual devils, there is no soul hiding in them. I’m glad I chose to
have her hair down for this shot because it adds to the sexual character that the devil is, according
to Buddhism ‘Mara’ a devil tempted Gautama Buddha by trying to seduce him with the vision of a
beautiful woman. I shot this portrait in the drama studio in college because of their black
background and I used a flash which I wouldn’t normally use but I think there it created a nice effect
and also highlighted a lot of beauty in this girl. Overall I don’t think there is anything to be improved
on in this image, I like the red tones to her face, they create a dark aura around her and I like the
sharpness of her eyes and eyebrows, her lips look amazing and everything is as perfect as can be
without overdoing it in Photoshop so I am certain there need be no improvements in this image.
When editing this image I immediately increased the brightness and contrast myself as I knew this
image would be far better with bright lighting, I adjusted it so it wasn’t too bright or too dark and
until I was happy with my image. I then edited her lips using the same process as I did the first time
with the selection tool, feather, ctrl+J, and free transform, I then did this with her left and right eye
and making them a touch bigger. When I was happy with the enlargement of the eyes and lips I then
proceeded to darken her eye pupils and her lips so that they were both ghastly dark, I used the burn
tool on her eyes, and the paint tool (black) on her lips with 50% opacity. I then used the burn tool on
all the angles of her face where we had put the red paint, I was really happy with how the burn tool
effected the paint as it made it stand out more on her forehead and defined her cheekbones and
collarbones more than it did in the beginning. At the very end I used the sharpening tool to finish my
image off, I didn’t use too much like I did in the angel pictures but just enough so that the features
that I wanted to stand out stood out.
Before: After:
FINAL PROJECT EVALUATION
OLIVIA SINGLETON
IMAGE SIX – AN EVIL SPIRIT; A DEMON
The theme angel and devil was the first theme I thought of doing and was the one I was most certain
about. ‘An evil spirit; a demon’ is one of my favourites in this theme because she isn’t looking into
the camera, she looks confident from this angle which is an important characteristic in a devil and
I’m glad I went with this composition. This image is different to the first for many reasons, her lips
here are a shade of purple instead of black and the tones aren’t as harsh as before. Here she looks
more flattering instead of scary and her eyes have a nice sparkle to them which is not artificial but
natural; coincidence, I think this is very fitting because a devil is like I said previously an alluring
creature, so it’s almost as if she is luring her predators to her with her beautiful appearance and
glistening eyes. I do think this image could have benefited from much softer tones because of the
imperfections on her face, but I think there is a reason why I didn’t soften them out, every person
has a few imperfections and everybody is so used to the media hiding these imperfections when it
comes to celebrity’s, I don’t want to do that as blemishes are natural and to change this would make
my image another piece of material for the world that every girl envies. Furthermore, I think I could
improve on this image by going by the same composition, but making it so you can’t see any further
then her right cheekbone because as I am looking at this image it doesn’t look as good with her ear
and hair showing to the right, it’s only a small thing but I reckon it could’ve made a difference to my
image if I would’ve thought of this before.
While editing this image I came to realise there would be no point in trying to clone out the
blemishes as you’d be able to notice, and this is the first encounter I have had with these blemishes,
when I did the survey for what the audience wants they said they don’t agree with how much the
media photo shops women and men so I decided to leave the blemishes, I think I could’ve held off
sharpening this image but I did so anyway. In this image I didn’t enlarge the lips with the selection
tool but I did with the clone tool and found it was pretty easy, I then used the black paint with the
opacity still at 50% and then used the burn tool to darken the shades on her lips and ended up with a
colour close to dark but a shade of purple too. Instead of darkening her eyes like in the other images,
I made them lighter instead with the dodging tool and found that it gave them a bigger sparkle
which I didn’t know I was wanting to achieve at the time, I also went over the eyelashes with the
burn tool so to make the eyelashes stand out then continued to use the burn tool on the red shades
on her cheekbones and forehead.
Before: After:
FINAL PROJECT EVALUATION
OLIVIA SINGLETON
IMAGE SEVEN – PRINCESS OF DARKNESS
The theme angel and devil was the first theme I thought of doing and was the one I was most certain
about. This image is different to the other two devil images and is the last, there are a lot of positives
about this image including the much softer tones, her lip shape and shade, her eye size, everything
looks soft and unreal and her hair is now up in a bun no longer down it is almost like she’s
transitioning back into the angel she was previously, as we all know heaven is above and not below
and above is the direction she is looking in, while she’s looking in that direction you can see now that
there are highlights of white under her eyes and across her nose, as if the rays of heaven are shining
down on her and accepting her once more, although she still has fierce dark eyes and poisoned lips
she is slowly transforming into softer shades and virtue, also coincidentally she is stood in front of
the background where she was previously stood as an angel, while this makes up for the good
lighting it is all accidentally put together to tell a story about an angel who switches to a devil and
wants redemption so she can live as an angel again, it’s a good message sent to the audience if they
were to look close enough to tell this is a story and not just a few pictures clumsily put together.
Overall the only thing I would change about this image is where I went wrong with the cloning tool
near her neck because of the opacity of the brush.
When editing this image I was very specific about how I went about it because of how each image
tells a story and this is the devil returning back to the heavens as you can tell by the soft tones, I did
this by highlighting parts of the face I wanted softened with the red pen and afterwards pressed J
making the pen turn into a selection on the parts I chose, I then created a new layer and used the
‘smart blur’ effect till I was happy with it. Beforehand I adjusted the lighting so the highlights on her
face stood out more and increased the contrast, then went over the red shadows and eyebrows with
the burn tool. I also made a selection on her lips to enlarge them following the previous cycles with
feather, ctrl + J, and free transform, I then went over the lips with black paint and afterwards
darkened them even more with the burn tool. I also used the clone tool on the background to erase
the lines so that I would have a more heavenly effect and accidentally went into her shoulders which
is a bad mistake that I’ve noticed.
Before:
After:
FINAL PROJECT EVALUATION
OLIVIA SINGLETON
Mental Health
Mental health got mentioned on the question ‘do you like the composition in these photos’ and a
person commented some, ‘the mental health ones especially’. Mental health got voted twice for
being the theme the audience likes best and one vote for being their least liked theme.
Schizophrenia
IMAGE ONE – AKATHISIA; RESTLESSNESS
It was fairly hard to do schizophrenia in relation to mental health because of the emotions and with
help I chose to take this pictures in the mirror in my auntie’s bedroom where her lighting was
adjustable. At first this image was just one and then I decided to overlay a similar image, I think it
looks powerful because in the mirror you can see how she’s struggling, and then in person she’s
going crazy. I chose to edit this photo with a black and white effect because the colours looked too
saturated and weak, I think black and white makes this image look more powerful. We decided at
first to take pictures where she was acting normal and happy with her makeup intact, and then
afterwards we smudged her makeup with water to show she’d been crying. I’m not too fond of this
image, I do like the overlaying on her person but I think it could be improved on by her face in the
mirror being more in focus instead of her person.
I found it very difficult to edit this photo as there were so many shadows on the models face to the
point it did not look good in black and white, so I began by using auto contrast and brightness and
then going over where the mascara had run under her eyes to make it stand out, I then used the
dodging tool to go over her teeth in a low opacity and then moved to the whites of her eyes to make
them stand out more. After doing this I got IMG_3002 and used it to overlay her person, I used the
rubber to rub out the bits I didn’t want, that’s why you can see the overlay out of the mirror and not
in the mirror. After finishing the overlay I used the black and white effect and altered it so that it
wasn’t too grainy as it first had that effect on my image, after doing this I finished off with
sharpening my image with smart sharpen like I do all my images.
Before: After:
FINAL PROJECT EVALUATION
OLIVIA SINGLETON
IMAGE TWO – EXASPERATION
I really like this image for the reason that her face is more in focus and you can see all the details, I
wasn’t too fond of the lighting in my auntie’s room so it was difficult to edit her face in Photoshop
that is why her face has a lot of shadowing but I think this image like the other looks better in black
5and white than in colour as the colours were too strong and saturated. I really like the detail of her
hair at the back of her head because of the sharpness, it makes all the strands stand out. She looks a
lot crazier than she did in ‘akathisia – restlessness’ not that she’s not meant to, but her face holds a
lot of emotion which like I say is important in photography, she’s very good at acting. I think if I were
to take this picture again I would get her to wear different coloured clothes such as black and white
so I wouldn’t have to edit the colours, also I would take these pictures in a different room with
better lighting so that there wouldn’t be as much shadowing on her face in the mirror, I’d also have
her wearing no accessories like she’s wearing in this image. Overall I think this image is the most
powerful but it could have been more powerful had it not been in a mirror making it hard to edit.
When editing this image I carried out the same routine I did before-hand with the first image in
‘Mental Health’ except I feel this image turned out a lot better quality wise. I again used auto
contrast and auto brightness to level out the light and dark in my image and came to the conclusion
that I would have to also do this image black and white because the shadowing on her face wasn’t
that great in colour, after doing this I went over where her mascara had leaked and her lipstick had
smudged with the burn tool to once again make it stand out, and then finished the image off by
using the filter smart sharpen, repeating until I was happy with my image.
Before: After:
FINAL PROJECT EVALUATION
OLIVIA SINGLETON
IMAGE THREE - MANIC
Before doing this image I got some inspiration from Annie Lebovitz and her image was called manic
too except it wasn’t anything to do with mental health it was four images of a model in a bathroom
going crazy in a shower. I really like this because I think it describes mental health ‘to a T’ because of
her actions and facial expressions, I don’t think I could’ve put this together any better if I tried and
I’m very proud of it. Again I think it could’ve benefited from her wearing a different set of clothing
but I planned for this to be in black and white to begin with so it wouldn’t have made a massive
difference. I don’t think the lighting really matters here as it weren’t very good but if it would’ve
been a touch brighter near the mirror it could have made a difference to the shadowing on her face.
When editing this image I used all four images I had edited in photo shop using the same process as
before with my other two images in ‘Mental Health’, when doing this I had to do a contact sheet as
that is the only option I’m familiar with when it comes to collaging, as I did this I tried different
settings out within the contact sheet, using different lengths and spaces and eventually ended up
deciding that it wasn’t going to work out so I then went on to paint and lay the images out how I
wanted them and saved the image to my folders, it worked out very well and is in good quality so
I’m not that bothered that I couldn’t master this technique in Photoshop. With these four images I
each edited them in Photoshop by using auto contrast and auto brightness to level out the darkness
and brightness, with a one or more of these images I had to use the clone tool on the back of her
hair because when she was pulling at her hair she revealed a few bald patches so I had to cover
them up with her hair which was pretty tricky as it would often end up looking like a blur of hair,
when I finished touching them all up I went forward with using the black and white effect on them
so they would be like the other two, and like each other so that it would work in the collage, also I
had the image that inspired me in mind and consisted with trying to get them all to look the same
editing wise.
After:
Before:
FINAL PROJECT EVALUATION
OLIVIA SINGLETON
Constellation
Constellation got 3 votes for being the audience’s favourite theme and one vote for being their least
favourite.
IMAGE ONE – NEWBORN STAR
‘Newborn star’ is one of my best images, the name fits as she’s a replica of a new star exploding in
the sky, also I took a picture of her mother and called her image ‘mother star’ so the two are
connected. I took this image in a living room and I got my cousin Ebony to lie on the sofa while I used
a tri-pod to get the best composition possible. With Photoshop I made the glitter and paint on
ebony’s face brighter with the touch up tool and also made her neck and collar bones brighter so
they stand out, at first when I edited this picture I took an image from Google of stars to overlay but
found I weren’t allowed to do this as I may be crossing a copyright boundary, so I went on to
devianart which I’m familiar with and got another image of stars and overlaid it on top instead and
I’m certain that it gives this photo a more imaginary effect. I think I could’ve improved this in the
process of editing because I have badly erased some of the stars and you can see at the bottom right
where I have done this. Furthermore I like this image because of how amazing her face looks due to
the paint and glitter, it adds to the newborn star effect.
When editing this image I knew exactly what I was wanting to achieve and I knew what tools to use
so it was very easy for me. To begin with, I decreased the lighting a little so that the background
wasn’t so noticeable and then increased the contrast so that the background would be darker but I
didn’t increase it too much just in case the shadows on the girl’s face went too dark. Then I began
using the dodging tool to highlight over the glitter on her face and increasing the saturation to make
the colours stand out on her lips, face and neck, as I was going over her face with the dodging tool I
had the opacity high, but when I went lower to her collar bones I had the opacity low so that I wasn’t
highlighting too much of her neck. I then proceeded to use the burn tool to go over her dark features
such as her eyebrows, hairline and pupils, as I didn’t want these features to be too dark I had the
opacity on low. I then used the clone tool on the glitter to add more of it to her face, just so that she
looked more like a star, I then got an image from ‘deviantart’ of stars to overlay over her which I
thought would be a really nice effect considering she’s a newborn star, I decreased the opacity and
began rubbing out bits I didn’t want, and I also used the rubber on a low opacity to neutralize the
intensity of the stars so that it worked better around her. I realise now afterwards as I look at my
image on a different computer with different lighting the mistakes I made with the rubber and the
stars layer, I didn’t notice how deeply I’d rubbed into the stars on the right hand corner and next
time will make sure I’m using a very bright screen where I can see my work as I’m editing as this is
very important. Afterwards, I used the sharpening tool once again to make all the little details stand
out.
Before: After:
FINAL PROJECT EVALUATION
OLIVIA SINGLETON
IMAGE TWO – ELEMENT
I really like this image because of the contrast compared to ‘newborn star’ it’s a lot darker so you
can only see the light that’s reflecting off her face and the glitter paint, it’s not as colourful but it’s
almost as if she’s a sleeping star because of her closed eyes and settled tones. I love how the only
thing that stands out in this image is the glitter near her eyes and nose it’s very arty. It is almost as if
she is actually in her element because of her facial expressions and her calm state. I think if I were to
do this image again I wouldn’t have it included at all because it’s not the same as ‘newborn star’ or
‘Orion nebula’ and while I like it in this collection I wouldn’t like it if I were to put it in another. I’m
impressed with how the lighting only bounces off certain places of her face such as her nose, the
glitter paint, her forehead and a little on her lips but nowhere else.
When editing this image I was careful to keep the tones quiet and leave them as they were, I didn’t
want this image to be like ‘newborn star’ as she looks like she’s sleeping and therefore deserves
softer darker tones. With this in mind I altered the brightness so that the only light was coming from
the light that was shone on her face when capturing her, I also adjusted the contrast so that the
shadows underneath her were darker and therefore making the sofa she was lay on unnoticeable. I
then used the same process as before regarding highlighted the glitter and paint on her face but
after doing that I didn’t increase the saturation like I did before, I left it alone so that it wasn’t too
eye capturing regarding colours. After I’d done this I sharpened the image a little and then left it
alone as I was happy with it.
Before: After:
FINAL PROJECT EVALUATION
OLIVIA SINGLETON
IMAGE THREE – ORION NEBULA
Orion nebula is a place where new stars are born which is what my first image was, in this image she
is a replica of the Orion nebula in space because of the amount of activity that is going on with her
face. I think it is amazing how well the glitter and paint work together here, you can now tell the
colours apart and like I said in my theme ‘ADHD’ where colours represent something, purple is the
primary colour here which represents ‘magic’ and magic is all around stars so I’m glad I went with
this colour scheme. For this image I changed my composition, I went from a different angle near her
feet and zoomed in, I instructed her to look anywhere except the lens and told her because her eyes
were growing tired to close and then open them and this is how her eyes turned out so wide and
awake.
With this image I went with the same routine as the first image, I started off by decreasing the
lighting and increasing the contrast and then went over the glitter and paint on her face with the
dodging tool, after making sure I’d highlighted everything that I wanted highlighting, I used the
sharpen more tool so to make the image sharp, and to make the glitter stand out more than before.
I used the clone tool on this image too as I wanted more of the glitter down her face, I did this with
ease as I’d done it before in the first image, but I had to be careful I didn’t go overboard and have my
image end up looking too fake. After this process I used the burn tool to darken the purple on her
lips to make them stand out, and I finished off the colour by increasing the saturation so that her
face looked a lot more colourful, when I did this I also noticed that the grey on her neck and collar
bones also stood out a lot more which was a bonus as I feel it looks very good.
Before: After:
FINAL PROJECT EVALUATION
OLIVIA SINGLETON
IMAGE FOUR – MOTHER STAR
For this image I found some inspiration off the web and the photographer was not named but it was
of a young girl my age with lights around her, and so I thought I could paint my aunties face a whitish
colour, I tried to get the colours of an old star in this image but it didn’t turn out that way, I did the
composition all wrong so it didn’t turn out how I had expected and when it came to editing it in
Photoshop I had no idea with what to do with it, so I got the same image and overlaid to create
more lights to represent stars and this is how it turned out. If I were to do this image again I would
go with a different colour of lights and I would have my auntie huddled on a bed, but whatever
colour scheme I would go with the fairy lights I would have a separate light to fill the room with the
same light but I would have the light be dim so it would still be dark but not as dark as this image.
This isn’t my best image and I’m very disappointed with how it turned out and I am glad I can
recognise my mistakes.
When editing this image I really didn’t know what to do with it, as I tried different ways of making it
look good including adjusting the brightness, adjusting the contrast, changing the colours of the
lights with colour balance, making her face lighter with the dodge tool (even though it doesn’t work
that way) nothing would work because of the lighting – this proved to me just how important
lighting is when it comes down to capturing images because absolutely nothing would work to make
this look like the portrait I had hoped for. In the end I went with overlaying the same image over the
top so that there would be more emphasis on the lights and therefore look a lot more like stars,
after erasing the parts I didn’t want in low opacity, I changed the colour balance of the image so that
the image was no longer warm but cold and would therefore revolve around one colour, after
finishing this process I put the cherry on the cake by using the sharpening more tool to emphasis the
lights.
Before: After:
FINAL PROJECT EVALUATION
OLIVIA SINGLETON
MISC
IMAGE ONE - ‘?’
This image or theme was not planned or thought out and it was in fact taken on the way home from
the hospital I was meant to be shooting at. My original shoot was meant to be in the hospital of
patients coming and going, but as I went in with my tri-pod and camera they said I would need
permission from such a person to carry out this shoot. While this shoot wasn’t expected and in no
way relates to any of my other images I am quiet fond of how I captured it with the van blurred in
the background because of the shutter speed and having the biker in such sharp focus, I also like the
lights that surround this picture, it’s very much like it was planned, I suppose you have to have 1 or 2
odd or imbalanced images to make the rest of your work stand out.
I didn’t edit this image much because it wasn’t one I was particularly fond of, what I did do to this
image was auto brighten it, auto contrast it, and auto tone it, by doing this I created a very cool
toned image. As I was looking for things to touch up on I noticed that the sky was not one which I
wanted to mess with as it already looked a pretty shade, so I moved onto the cars’ rear-lights and
used the dodging tool on them so that they’d be brighter, I also did this on the lights in front of the
bike and the light at the top back of the car, I wanted all the lights to stand out. After doing that I
also went over the man’s top with the dodge and burn tool, I used the burn on the black and the
dodge on the white so to make him stand out more. I then finished it off with the ‘sharpen more’
effect, while this image wasn’t expected, I’m not too disappointed in it either.
Before: After:
Production skills I have newly acquired or progressed on
FINAL PROJECT EVALUATION
OLIVIA SINGLETON
Throughout the project my mind has expanded with many skills along the way which have helped
me not only in my project but in other units in Media. I have learned a lot about project
management, this is highly important I have come to realise because it is the whole structure and
plan of what you intend to do and when you intend to do it, it doesn’t just help you with managing
time with your coursework but could help you further on in life too as it’s always important to be
able to manage time. It is a key part in keeping the project running smooth. I have learnt new ways
to manage my project and I’m proud of myself that I kept to the rules of my project throughout so
there were little mistakes to be made and I got everything done smoothly.
I have also developed many skills in research which I had some knowledge of but have never used it
to the extent in which was needed for this project. I’ve almost always stuck to the internet for
research and answers but never thought to go to a magazine or a book for answers, although I didn’t
use other ways of research like books I did come familiar with the aspect and know to next time do
further more thorough research including photography magazines and books, also I learnt a lot by
doing survey’s on survey monkey to get answers for what the audience most want to see in
photography and also in my images that I was going to produce so that was a massive help and it
made me more aware for what to aim for. I believe that the biggest production skill that I further
developed in this process is my camera techniques and the way I use the camera during production,
this shows in the way I have composed my images.
The production of my image helped me develop my skills immensely and I've gathered lots of new
skills along the way in Photoshop which include using the clone tool professionally – making sure you
use the right amount of opacity and the correct size of the brush so to make your image look mature
and not immature, the highlighting tool to make certain points on the face stands out, at first I
struggled with this and would make things look unrealistic but I soon got the knack of it, due to
having to use it every day, also I have never been so familiar with layers than I am today because of
how many times I had to enlarge certain things on my images I would have to make new layers just
in case I went wrong and could delete that layer to go back to my image and be able to do it a
different way. Furthermore something I would really like to progress on in Photoshop is being able
to professional adjust lighting as I really struggled with shadowing on my portrait’s and would really
benefit from learning how to do this.
Managing my time
As part of my project I had to take consideration of time management. When working on a project of
this nature it’s vital that I manage my time well and have a contingency if there was anything to go
wrong potentially endangering my project. There are a few methods which help with time
management the main being a chart in excel, this chart will represent each day of my project and
what I was going to do on each day stated in a clear colour format. Another use of time management
I used was my production diary, this helped me keep in check all the things that I have done and any
progress I had made so I can look back and see what I have to aim for next. Throughout my project I
have not fallen behind or gone off schedule, each day while carrying out my project I have endlessly
checked my project schedule to be certain I was on target and while there were a few problems with
production when taking images I followed my contingency plan and worked through the problems
such as facing a lighting problem I would then use the back-up light I had prepared.
Final Major Project Original Intentions Proposal VS. Final Major Project Final Product
FINAL PROJECT EVALUATION
OLIVIA SINGLETON
Overall I’m very happy with the way my product has taken shape although at some points I made
some jumps over set out plans I’m extremely happy with it and I believe that is effective in what I
intended it to do.
However there are some differences which changed from my original design. In my final major
project proposal I intended to have more than the five themes that I have presented in my
evaluation ‘ADHD, mental health, constellation, ?, angel and devil’ I also meant to have a theme
‘hospital’ where I would capture life events such as a person being wheeled past me, nurses grieving,
a theme ‘life swap’, a theme ‘youth’ I was also meant to capture women and men working together
so to get the feel of femininity but my images took a different course. In terms of production
techniques I stayed on board, I followed through with editing using Photoshop and succeeded in
making my images look more creative than others and I stated that I would only retouch to make my
images clearer and where others will be overly edited to look more imaginary and creative which I
succeeded in.
The difference in my final piece from my idea isn’t as bad as expected, I kept to all my instructions
on my FMP time management and whenever I needed more time for I would add it on and instruct
that I had done so, so nothing changed within those boundaries. The only difference is that I have
less work than I hoped, I did image I could have done greater things with Photoshop but I have only
been using it for two years and haven’t had many lessons using it so I’m proud of how it planned out
and I’m not at all bothered that I didn’t 100% stick with my FMP project plan.
Reaching my target audience
My target audience was mainly women because of the femininity I was hoping to get across, also
targeted at people who suffer abuse (not relevant now) and also mental illnesses, lovers of creativity
and the youth social group. I am proud to say that I indeed did reach lovers of creativity and people
who have mental illnesses, the feedback I got on survey money clarified this for me and also friends
of mine who suffer with such mental illnesses said that felt the power in my theme ‘mental health’
but also ADHD which was not targeted at them, I suppose this is because of the titles. Regarding
audiences in survey monkey I think I did a very good job, these are the responses to the images and
my reactions to positive and negative criticism –
‘difficulty in paying attention’ did not get any votes for ‘which two pictures do you like the most’
and 1 vote for ‘which did you like the least on terms of editing’ while I’m disappointed I’m not
surprised because it’s not edited as best as it could have been, you can see the white next to the
overlay where it has been erased in a rush but that’s all I can think of with my faults with this image.
‘restlessness’ got voted 3 times for the image the audience most liked out of all of my images and
also best edited with 1 vote, coming to a draw with ‘newborn star’ which I’m not surprised as both
of these images are amazing, I’m glad my audience agrees with this image because I think it’s very
powerful and well edited.
‘Impatient’ got 1 vote for being the audience’s favourite image and 1 vote for being their least
favourite, I think this is because it is the least creative out of all of them but is the main one that is
most like a portrait, I think if I were to make a change to this I would leave it for a different theme.
‘Overactive behaviour’ didn’t get any votes for ‘most favourite’ but did get a vote for ‘least
favourite’ while they didn’t say why I can probably guess that it’s because it’s different from the rest,
you can’t see the boy’s face so it isn’t much of a portrait but, it does explain the emotion very well
and I think if they understood that then they would be able to see that it speaks more than a portrait
does. Overactive behaviour got a vote for best edited which I’m proud of as I didn’t think it was that
FINAL PROJECT EVALUATION
OLIVIA SINGLETON
great, so my confidence in my image has been boosted and I will make sure I edit a photo similar to
this like that again. This image got a vote for space for improvement which I understand and will
take into consideration for next time.
‘An attendant spirit’ got 2 votes for pictures they like the least and while I like the image myself, I
think the audience aren’t too certain on it because of the comment about approval of lighting in the
photos, they put ‘some of the angel and devil ones appear a bit too sharp and bright and would
possibly benefit from being softer muted’ I agree with this because after all this image is of an angel
and angels are supposed to be soft and angelic so I understand my mistakes with this, as for the
brightness maybe it could be toned down a little, I was confident with it because an angel’s home is
heaven and is known to be bright and white so I went with my knowledge of that.
‘a person of exemplary conduct or virtue’ got a single vote for being the audience’s favourite edited
photo and nothing more, while I wanted feedback on all of my photo’s all I have is this single
feedback, I personally think this image could have been improved on, but I think the audience likes
this because soft tones are being used on an angel and that is what they wanted as their comment
said so in approval of lighting.
‘A supernatural being’ didn’t get any feedback from the audience and I’m not surprised because it is
basically a replica of ‘an attendant spirit’ I know that if I were to do this shoot again I would cancel
this image out because it serves no purpose acting as a clone.
‘innocent’ did not get any feedback either which I’m quite surprised, but I’ve commented how I
would choose to go different about this image if I were to do it again, by going at a different angle if
I’m thinking of changing my composition or that I’d leave her hair up.
‘the supreme of evil; Satan’ got two points for being the audience’s least favourite image and one
vote for an image I could improve on, I honestly love this photo and can only see one major way I
could go about changing this, because of the unoriginality of it, she looks like she’s been beaten up
or dressed to go trick or treating and I think that’s all down to the flash used so I will definitely not
be using the flash again for any of my images in the future.
‘an evil spirit; a demon’ got one vote for being the audience’s least favourite image and two votes
for being an image I could improve on, while the audience haven’t been able to specifically tell me
what it is I could improve on I can guess that it’s because of the sharpness of this photo while there
are blemishes on her face and while I mentioned earlier that the audience expects a perfect soft
touch-upped face, I did not want to follow the media society and do this to my images but if it is to
please my audience then next time I will go different about this image or I will make sure the lighting
is not too harsh on the face.
‘Princess of darkness’ got a single vote and that was for being the audience’s least favourite image.
I’m really surprised with the voting on this image because I thought it would meet up to the
audience’s expectations of a soft touched up image with nice colouring and large eyes.
‘akathisia - restlessness’ got one vote for being the audience’s most liked image and one vote for
being the audience’s favourite image on terms of editing, I am very proud of this result because I
myself didn’t think this image spoke much out to you yet the audience feels differently and agrees
with the way I have chosen my composition, the way I have edited my photo and they overall like
this image. This has helped my confidence but has also given me inspiration to use this idea again in
other pictures in the future.
‘Exasperation’ didn’t get a vote for anything which is disappointing because I thought the audience
would have enjoyed this image more than the first as you can see her struggle but they haven’t, as
my audience haven’t voted for this image being their worst nor favourite in terms of editing,
FINAL PROJECT EVALUATION
OLIVIA SINGLETON
composition, or overall one of the ones they like I will know for next time to do things differently in
order to get a good reaction and good feedback.
‘manic’ got one vote for being the audience’s favourite image and one vote for being the audience’s
favourite on terms of editing, I am really happy with this outcome because I myself think I edited this
image very well, how I managed to put the four together on photo shop and make them all fit nicely
I will definitely go with this idea again, but most importantly with this image I wanted my audience
to feel something, so I asked them ‘what do you think of when you look at image ‘manic’ theme –
mental health?’ and I got responses like ‘internal battle with oneself’ ‘it’s breath taking!’ ‘Someone’s
internal struggles’ ‘cry for help’ ‘I feel as if that’s my inner self screaming inside of me to come out’ I
am beyond happy with these responses! It was exactly the reaction I was looking for and I’m pleased
that an image I produced could make my audience think and feel such things.
‘Newborn star’ got 3 votes for being the audience’s favourite image, 1 vote for being the audience’s
favourite image on terms of editing, I’m really happy with this feedback because I knew just how
much my audience would love this image, it’s creative and meets the needs of every socialite who
reviewed my images, while I know what I can improve on this image I am glad I didn’t get any
negative feedback because of immature mistakes.
‘element’ got two single votes and that was for being the audience’s favourite image, I’m glad my
audience like this picture as there isn’t much to like or dislike about it, the colours are more muted
but the audience must be able to feel a certain calmness from it.
‘Orion Nebula’ got a single vote and that was for the photo they thought was best edited, while I’m
not surprised because of all the colourful features on her face I did expect more feedback as this is
the image I put a lot of work into to make sure the colours were bright enough but I suppose the
composition could have been better so it’s just a simple mix of right and wrong.
‘Mother star’ got 1 vote for being the audience’s favourite image, 3 votes for being the audience’s
least favourite image, 3 votes for being the image the audience least liked on terms of editing and 1
vote for being an image I could improve on also one vote for being an image they don’t approve on
due to lighting which is all totally understandable because it is a badly editing, produced image
which I expected to come out better, next time I will make sure I don’t only have fairy lights as my
source of lighting but also a dimmed light to match the colour of the fairy lights so there will be more
lighting in the room and I would also go for a different composition as well as getting my person to
sit in a different way.
‘?’ got 1 vote for being the audience's most liked Image, 2 votes for being the audience's least liked
image, 2 votes for being the audience's least favourite image on terms of editing and 1 vote for
being an image I could improve on, while I agree because this image stands out like a sore thumb for
being so out of character and not being able to mingle in, it wasn't meant to be to begin with and
next time I will straight away cancel out any images that do not fit in with my work.
Overall, I think I reached my target audience exceptionally because of the amount of good honest
and bad feedback that I got, I know where to improve and what techniques to develop on in the
future, I’m very thankful for so many responses on my survey so that I can progress further.
Summary – how I would respond to my project brief if I were to do it again
If I were to do my project brief again I would make sure I keep in the reasonable boundaries because
I was meant to be basing my FMP around feminism like I proposed in my brief, as I explored
FINAL PROJECT EVALUATION
OLIVIA SINGLETON
feminism in some ways with my work I didn’t overall which isn’t very professional and if I want
people to take me as a professional student I would have to have stuck to my exact words. Also I
imagined I could produce images that were way beyond my ability like the ‘abuse’ idea where I
would have a man playing the role as a ‘puppet master’ where I would have to Photoshop him in the
background of a family at a table, while this is reasonably ideal it isn’t in the way of finding a family
to do this. I’m content with the work I have produced and would in the future carry out such work
like this again because I’m proud of it and happy with the outcome, I made a few mistakes which
were due to pure laziness towards the end because of lack of time so next time I would definitely
give myself more time in my project management to edit my images in Photoshop so to avoid these
mistakes. Next time I come to do a project like this I would like my target audience to be children as
I’m highly interested in creating magical and creative portraits in photography, and I would like to
see how children respond to these images, after showing my younger brother my images of him and
the others, he was really interested in one theme in particular; my angel & devil images, I know
that’s because of how creative they look, also most importantly they’re not real and children enjoy
things that aren’t real, beyond imagination, just like in fairy tales and story books.

More Related Content

Viewers also liked

Evaluation for photography
Evaluation for photography Evaluation for photography
Evaluation for photography traynorw
 
Final major project evaluation
Final major project evaluationFinal major project evaluation
Final major project evaluationdanhops888
 
Evaluation of final major project
Evaluation of final major projectEvaluation of final major project
Evaluation of final major projectLydiaCharlotteCooke
 
Evaluation For Final Major Project
Evaluation For Final Major ProjectEvaluation For Final Major Project
Evaluation For Final Major ProjectDenniHepburn
 
Final Major Project Evaluation
Final Major Project Evaluation Final Major Project Evaluation
Final Major Project Evaluation ryansharman
 
Final major project evaluation full
Final major project evaluation fullFinal major project evaluation full
Final major project evaluation fullJack Dixon
 
Final Major Project Evaluation
Final Major Project EvaluationFinal Major Project Evaluation
Final Major Project EvaluationAlexNesbit
 
Final evaluation of the project
Final evaluation of the projectFinal evaluation of the project
Final evaluation of the projectIsabellucas59
 
Final Major Project Evaluation
Final Major Project EvaluationFinal Major Project Evaluation
Final Major Project Evaluationemilyaldredd
 
Iain fmp evaluation
Iain fmp evaluationIain fmp evaluation
Iain fmp evaluationJoe Hayes
 
Photography & Digital Manipulation
Photography & Digital ManipulationPhotography & Digital Manipulation
Photography & Digital ManipulationChris Bailey
 
Extended Project Evaluation AO4 (Evaluating the project)
Extended Project Evaluation AO4 (Evaluating the project)Extended Project Evaluation AO4 (Evaluating the project)
Extended Project Evaluation AO4 (Evaluating the project)jake
 

Viewers also liked (13)

Evaluation for photography
Evaluation for photography Evaluation for photography
Evaluation for photography
 
Final major project evaluation
Final major project evaluationFinal major project evaluation
Final major project evaluation
 
Evaluation of final major project
Evaluation of final major projectEvaluation of final major project
Evaluation of final major project
 
Evaluation For Final Major Project
Evaluation For Final Major ProjectEvaluation For Final Major Project
Evaluation For Final Major Project
 
The final evaluation
The final evaluationThe final evaluation
The final evaluation
 
Final Major Project Evaluation
Final Major Project Evaluation Final Major Project Evaluation
Final Major Project Evaluation
 
Final major project evaluation full
Final major project evaluation fullFinal major project evaluation full
Final major project evaluation full
 
Final Major Project Evaluation
Final Major Project EvaluationFinal Major Project Evaluation
Final Major Project Evaluation
 
Final evaluation of the project
Final evaluation of the projectFinal evaluation of the project
Final evaluation of the project
 
Final Major Project Evaluation
Final Major Project EvaluationFinal Major Project Evaluation
Final Major Project Evaluation
 
Iain fmp evaluation
Iain fmp evaluationIain fmp evaluation
Iain fmp evaluation
 
Photography & Digital Manipulation
Photography & Digital ManipulationPhotography & Digital Manipulation
Photography & Digital Manipulation
 
Extended Project Evaluation AO4 (Evaluating the project)
Extended Project Evaluation AO4 (Evaluating the project)Extended Project Evaluation AO4 (Evaluating the project)
Extended Project Evaluation AO4 (Evaluating the project)
 

Similar to ADHD themes portrayed through photography

Experiments%20evidence%20template[1]
Experiments%20evidence%20template[1]Experiments%20evidence%20template[1]
Experiments%20evidence%20template[1]shannoncloee
 
Experiments%20evidence%20template[1]
Experiments%20evidence%20template[1]Experiments%20evidence%20template[1]
Experiments%20evidence%20template[1]shannoncloee
 
Annotation for cage marta
Annotation for cage martaAnnotation for cage marta
Annotation for cage martaeilisbell
 
Fashion spread fave 5 - bedroom
Fashion spread fave 5 - bedroomFashion spread fave 5 - bedroom
Fashion spread fave 5 - bedroomtcrowley96
 
Fashion spread fave 5
Fashion spread fave 5Fashion spread fave 5
Fashion spread fave 5tcrowley96
 
Cover 3 fave 5.
Cover 3 fave 5.Cover 3 fave 5.
Cover 3 fave 5.crowleyt96
 
Photography powerpoint final edit
Photography powerpoint final editPhotography powerpoint final edit
Photography powerpoint final editdemibromfield
 
Film poster info
Film poster infoFilm poster info
Film poster infoa2mn
 
Edited photgraphy
Edited photgraphyEdited photgraphy
Edited photgraphylstafford97
 
Photos for unison
Photos for unisonPhotos for unison
Photos for unisonguest5a2837
 
On going evaluations
On going evaluationsOn going evaluations
On going evaluationsem-monsey
 

Similar to ADHD themes portrayed through photography (20)

Experiments%20evidence%20template[1]
Experiments%20evidence%20template[1]Experiments%20evidence%20template[1]
Experiments%20evidence%20template[1]
 
Experiments%20evidence%20template[1]
Experiments%20evidence%20template[1]Experiments%20evidence%20template[1]
Experiments%20evidence%20template[1]
 
Photographs
PhotographsPhotographs
Photographs
 
Photographs
PhotographsPhotographs
Photographs
 
Photographs
PhotographsPhotographs
Photographs
 
Image manipulation
Image manipulationImage manipulation
Image manipulation
 
Annotation for cage marta
Annotation for cage martaAnnotation for cage marta
Annotation for cage marta
 
Fashion spread fave 5 - bedroom
Fashion spread fave 5 - bedroomFashion spread fave 5 - bedroom
Fashion spread fave 5 - bedroom
 
Fashion spread fave 5
Fashion spread fave 5Fashion spread fave 5
Fashion spread fave 5
 
Cover 3 fave 5.
Cover 3 fave 5.Cover 3 fave 5.
Cover 3 fave 5.
 
Cv
CvCv
Cv
 
Cv
CvCv
Cv
 
Photoshoot for poster
Photoshoot for posterPhotoshoot for poster
Photoshoot for poster
 
Photography powerpoint final edit
Photography powerpoint final editPhotography powerpoint final edit
Photography powerpoint final edit
 
Film poster info
Film poster infoFilm poster info
Film poster info
 
Edited photgraphy
Edited photgraphyEdited photgraphy
Edited photgraphy
 
Photos for unison
Photos for unisonPhotos for unison
Photos for unison
 
Artist
ArtistArtist
Artist
 
On going evaluations
On going evaluationsOn going evaluations
On going evaluations
 
Portrait shoot pp
Portrait shoot ppPortrait shoot pp
Portrait shoot pp
 

More from wolllfie

Production comentary
Production comentaryProduction comentary
Production comentarywolllfie
 
Task 4 final images landscape
Task 4 final images landscapeTask 4 final images landscape
Task 4 final images landscapewolllfie
 
Pr9 – sourcing images
Pr9 – sourcing imagesPr9 – sourcing images
Pr9 – sourcing imageswolllfie
 
Task 4 final images landscape
Task 4 final images landscapeTask 4 final images landscape
Task 4 final images landscapewolllfie
 
Olivia singleton fmp diary main
Olivia singleton fmp diary mainOlivia singleton fmp diary main
Olivia singleton fmp diary mainwolllfie
 
Magazine research
Magazine researchMagazine research
Magazine researchwolllfie
 
Task 1 part 2
Task 1 part 2Task 1 part 2
Task 1 part 2wolllfie
 
Task 1 part 1
Task 1 part 1Task 1 part 1
Task 1 part 1wolllfie
 
Review on dan's work
Review on dan's workReview on dan's work
Review on dan's workwolllfie
 
Task 7 previous work
Task 7 previous workTask 7 previous work
Task 7 previous workwolllfie
 
Task 6 research magazine covers
Task 6 research magazine coversTask 6 research magazine covers
Task 6 research magazine coverswolllfie
 
Task 5 research styles of makeup and hair
Task 5 research styles of makeup and hairTask 5 research styles of makeup and hair
Task 5 research styles of makeup and hairwolllfie
 
Task 4 photography theme ideas
Task 4 photography theme ideasTask 4 photography theme ideas
Task 4 photography theme ideaswolllfie
 
Task 3 mind map ideas
Task 3 mind map ideasTask 3 mind map ideas
Task 3 mind map ideaswolllfie
 
Task 2 research different settings
Task 2 research different settingsTask 2 research different settings
Task 2 research different settingswolllfie
 
Task 1 research famous portrait photographers
Task 1 research famous portrait photographersTask 1 research famous portrait photographers
Task 1 research famous portrait photographerswolllfie
 
Unit 51 page layout & design task 2
Unit 51 page layout & design task 2Unit 51 page layout & design task 2
Unit 51 page layout & design task 2wolllfie
 

More from wolllfie (20)

Production comentary
Production comentaryProduction comentary
Production comentary
 
Task 4 final images landscape
Task 4 final images landscapeTask 4 final images landscape
Task 4 final images landscape
 
Pr10
Pr10Pr10
Pr10
 
Pr9 – sourcing images
Pr9 – sourcing imagesPr9 – sourcing images
Pr9 – sourcing images
 
Task 4 final images landscape
Task 4 final images landscapeTask 4 final images landscape
Task 4 final images landscape
 
Olivia singleton fmp diary main
Olivia singleton fmp diary mainOlivia singleton fmp diary main
Olivia singleton fmp diary main
 
Magazine research
Magazine researchMagazine research
Magazine research
 
Task 1 part 2
Task 1 part 2Task 1 part 2
Task 1 part 2
 
Task 1 part 1
Task 1 part 1Task 1 part 1
Task 1 part 1
 
Review on dan's work
Review on dan's workReview on dan's work
Review on dan's work
 
Task 7 previous work
Task 7 previous workTask 7 previous work
Task 7 previous work
 
Task 6 research magazine covers
Task 6 research magazine coversTask 6 research magazine covers
Task 6 research magazine covers
 
Task 5 research styles of makeup and hair
Task 5 research styles of makeup and hairTask 5 research styles of makeup and hair
Task 5 research styles of makeup and hair
 
Task 4 photography theme ideas
Task 4 photography theme ideasTask 4 photography theme ideas
Task 4 photography theme ideas
 
Task 3 mind map ideas
Task 3 mind map ideasTask 3 mind map ideas
Task 3 mind map ideas
 
Task 2 research different settings
Task 2 research different settingsTask 2 research different settings
Task 2 research different settings
 
Task 1 research famous portrait photographers
Task 1 research famous portrait photographersTask 1 research famous portrait photographers
Task 1 research famous portrait photographers
 
Unit 51 page layout & design task 2
Unit 51 page layout & design task 2Unit 51 page layout & design task 2
Unit 51 page layout & design task 2
 
Db17 new
Db17 newDb17 new
Db17 new
 
Db17
Db17Db17
Db17
 

ADHD themes portrayed through photography

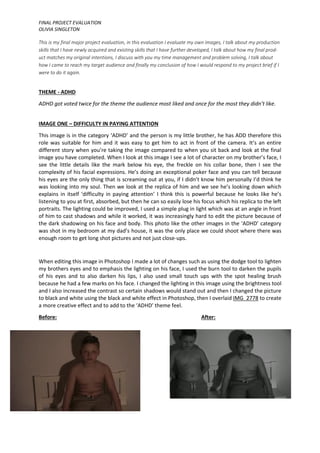
  • 1. FINAL PROJECT EVALUATION OLIVIA SINGLETON This is my final major project evaluation, in this evaluation I evaluate my own images, I talk about my production skills that I have newly acquired and existing skills that I have further developed, I talk about how my final prod- uct matches my original intentions, I discuss with you my time management and problem solving, I talk about how I came to reach my target audience and finally my conclusion of how I would respond to my project brief if I were to do it again. THEME - ADHD ADHD got voted twice for the theme the audience most liked and once for the most they didn’t like. IMAGE ONE – DIFFICULTY IN PAYING ATTENTION This image is in the category ‘ADHD’ and the person is my little brother, he has ADD therefore this role was suitable for him and it was easy to get him to act in front of the camera. It’s an entire different story when you’re taking the image compared to when you sit back and look at the final image you have completed. When I look at this image I see a lot of character on my brother’s face, I see the little details like the mark below his eye, the freckle on his collar bone, then I see the complexity of his facial expressions. He’s doing an exceptional poker face and you can tell because his eyes are the only thing that is screaming out at you, if I didn’t know him personally I’d think he was looking into my soul. Then we look at the replica of him and we see he’s looking down which explains in itself ‘difficulty in paying attention’ I think this is powerful because he looks like he’s listening to you at first, absorbed, but then he can so easily lose his focus which his replica to the left portraits. The lighting could be improved, I used a simple plug in light which was at an angle in front of him to cast shadows and while it worked, it was increasingly hard to edit the picture because of the dark shadowing on his face and body. This photo like the other images in the ‘ADHD’ category was shot in my bedroom at my dad’s house, it was the only place we could shoot where there was enough room to get long shot pictures and not just close-ups. When editing this image in Photoshop I made a lot of changes such as using the dodge tool to lighten my brothers eyes and to emphasis the lighting on his face, I used the burn tool to darken the pupils of his eyes and to also darken his lips, I also used small touch ups with the spot healing brush because he had a few marks on his face. I changed the lighting in this image using the brightness tool and I also increased the contrast so certain shadows would stand out and then I changed the picture to black and white using the black and white effect in Photoshop, then I overlaid IMG_2778 to create a more creative effect and to add to the ‘ADHD’ theme feel. Before: After:
  • 2. FINAL PROJECT EVALUATION OLIVIA SINGLETON IMAGE TWO – RESTLESSNESS This image is in the category ‘ADHD’ and the person is my little brother, he has ADD therefore this role was suitable for him and it was easy to get him to act in front of camera. I think this image is really thought-provoking, I later gave it the title ‘restlessness’ because I thought it was appropriate, you see him settled with his mouth open a little and then you see him going wild, screaming. This image could fit into more than one category as it doesn’t just scream ‘ADHD’ but ‘Mental Health’ too, you see a lot of internal struggle. I also took this image in my bedroom because it has a lot of room to do close-ups and far away shots. When editing this image I straightaway edited the colour to black and white because of how well the black and white effect turned out in the first image and then adjusted the contrast so it was increased and by doing this I made a lot more stand out, I also used the ‘smart sharpen’ tool and did that twice so that the image was sharper. I’m glad I went with this editing technique because it made the image appear into two images and I had to sit and think about the changes I had made to this image because I was persuaded I had overlaid two images when in fact I hadn’t, I had just made it sharper and when I did that the second face stood out which I’m proud of. Before: After:
  • 3. FINAL PROJECT EVALUATION OLIVIA SINGLETON IMAGE THREE – IMPATIENT This image is in the category ‘ADHD’ and the person is my little brother, he has ADD therefore this role was appropriate for him and it was easy to get him to act in front of the camera. Out of all the images I took for ‘ADHD’ I thought this one would be my favourite because the lighting and the background out of all is the best so it made it easier to edit in photo shop, but I was wrong, while I love this image because of his innocence portrayed, it’s not as creative as the others. Furthermore what I do like about this image is that it shows some character, he doesn’t actually look impatient like the title given says, he looks frightened which is underlining the theme mental health and not ADHD. I really like the way his eyes are glistening, they show a lot of emotion because of the size and energy and that’s a good thing to have in a picture, I always aim to have some sort of emotion in my pictures and have succeeded in doing so in this image. I like the way you can see every detail of his face; his freckles, the cracks in his lips, the wrinkles in his fingers, the bone structure of his nose, detail is a very strong point for me. While this picture is very sharp, his skin still looks softly edited so that’s a positive. When editing this image I knew straight away what I had planned for it, because of how good the lighting was and the fact that there were no shadows on his face made it so much easier for me to edit it, so I went ahead and started touching up the brightness, contrast and saturation, I then went and made the image a lot sharper so that every detail of his face was enhanced, I then used the burn tool to make his lips look like they have more colour and I used the dodging tool to make the whites of his eyes whiter also I used the burn tool on his pupils to make them a little larger. Before: After:
  • 4. FINAL PROJECT EVALUATION OLIVIA SINGLETON IMAGE FOUR – OVERACTIVE BEHAVOUR You can’t really see the boy in this image so the composition isn’t great, although you can see where he would be stood. This image was took with the light covered with a blanket so minimal lighting came out, I did this so that you would be able to see the boy but in the end when it came to editing I thought it would be best to hide any lighting with the clone tool and brightening tool so that all you could see was the glow sticks. This image fits the title ‘overactive behaviour’ because of the amount of activity going on with the glow sticks, the glow sticks could almost represent a soul, the soul is different colours, the soul is going in many different directions, just like a boy with ADHD would. There are colours of red which is a very emotionally intense colour, and is associated with anger, strength and power, there are colours of blue which is often associated with depth and stability, there are colours of orange which represents enthusiasm and happiness, and then there are little glimpses of the colour purple which represents magic. These colours are all very powerful and are all beneficial to the meaning of my picture and it is very easy for me to tell a story with them. Red – if you find a child with ADHD you will see they cannot control their emotions and are quick to explode over little things. Orange – you will find that if you watch a child with ADHD for long enough, you will see them switch into a very enthusiastic character who is filled with excitement and happiness. Blue – stability is a strong manufacture of ADHD because no matter what stage you’re at with your ADHD there is always a way you can be helped, you can become stable in a healthy way. Purple – purple mainly represents magic, magic is all around children with ADHD, they have more character than an author does when creating his stories. Magic is an occurring thing that children with ADHD surprise you with. When editing this image I didn’t really know what to do with it, I thought well I could lighten the whole picture up with the brightening tool so that you could see the boy’s face and then it would be a proper portrait but it didn’t work out and that’s probably for the best as I much prefer this edit. First off I overlaid another image on top of this one ‘IMG_2771’ so that there would be an idea of where the boys’ face would be, then I continued to make the image darker by decreasing the brightness and increasing the contrast, I then went over both layers with the dodge tool so to make the colours a lot brighter, and I also used the sharpening tool to make things more detailed. Before: After:
  • 5. FINAL PROJECT EVALUATION OLIVIA SINGLETON ANGEL & DEVIL Angel and devil got one vote for being the audience’s favourite theme and two votes for being their least favourite. IMAGE ONE – AN ATTENDANT SPIRIT The theme angel and devil was the first theme I thought of doing and was the one I was most certain about. In this image you can tell she’s pure because of the colour; the colour that stands out. I got my friend who is a makeup artist to do her face up to look like an angel and as you can see she did a very good job. You can see a lot of characteristics of an angel in this picture, she looks patient, modest, powerful, obedient, visible and heavenly. While the colour white stands out, so do the brown in her eyes also angels are known to have powerful eyes like fire. Her eyes are really important in this picture, eyes are always the strongest giveaway but her eyes tell you nothing but innocence and serenity. Overall, I really like this image, while it isn’t one of my strongest because of the lighting, it holds other strong points like how I have made it so her lips stand out because an angels lips are untouchable and how her face looks soft but her hair is so sharp and her eyes are so in depth. When editing I first of all made some ‘auto’ corrections such as ‘auto brightness’ and ‘auto contrast’ I did indeed try the ‘auto tone’ correction but I didn’t like the tone it changed my picture to so I left that out. Then I went forward with highlighting the white paint on her face with the dodging tool as I did also with her lips and the whites of her eyes, then I used the burn tool to make her pupil’s a touch darker and also the roots of her hair. I then went and enlarged her lips a little by using the selection tool on her lips and then using the feather tool and putting it to 5% I then pressed and held ctrl + J so that the selection I made around the lips created another layer and when that was done I went onto the lips layer and used the free transform tool and changed the size of her lips. After completing this I used the paint tool with the colour white to go over her lips so they were whiter than before. Once finished with highlighting all the white parts of her face I used the clone tool to erase stray hairs in the background so that it looks neater and while this worked, I doubt my skills when I look at her shoulder’s and see that I may have gone too far from the background and into her skin. Before: After:
  • 6. FINAL PROJECT EVALUATION OLIVIA SINGLETON IMAGE TWO - A PERSON OF EXAMPLARY CONDUCT OR VIRTUE The theme angel and devil was the first theme I thought of doing and was the one I was most certain about. This image is a lot softer than the others, it was sharp to begin with but I put a blurry effect on parts of the image in photo shop, I think this was a good move because an angel is known to be soft and all you see in this image is softness like she’s a feather, whereas her eyes are still sharp and they become the main focus. She is smiling a little in this image which makes her friendlier and gives the image a serene effect. Her eyes aren’t as dark as they were in the previous image, even her hair isn’t as dark as it was. Overall I like this image, it gives the other images a middle because the others are sharper. When editing this image I first off selected ‘auto brightness’ and ‘auto contrast’ like in the first image because of how well it worked out, once the image was clear enough for me to edit I then moved onto trying to enlarge the lips as I did in the last image following the same process with selection tool, feather, ctrl+J, free transform and while this worked, I didn’t make her lips look as big as I did before because this is from a different angle and wouldn’t work as well. I then highlighted all the white paint on her face including her lips and the whites of her eyes so that they stood out, after doing that I used the burn tool to make her eyebrows a little darker and to darken the bronzer on her cheekbones so it would be more prominent. I also used the clone tool to clone some of the white stripe son her face so that there would be more and so that it would look more like a mask to the audience. Before: After:
  • 7. FINAL PROJECT EVALUATION OLIVIA SINGLETON IMAGE THREE – A SUPERNATURAL BEING The theme angel and devil was the first theme I thought of doing and was the one I was most certain about. This image is more or less the same as ‘an attendant spirit’ except I have adjusted it in different ways. The lighting is stronger so it highlights her face better, her lips stand out a lot more and the white of her eyelashes. I don’t think this image is the best because of the editing, I made a fault adjustment to her lips and now they look unreal whereas I wanted them to look more plump and the whites of her eyes look a little too white to be real, but what can you expect an angel isn’t meant to be on earth so who knows what an angel looks like face to face? I like the background most because there is more space and even though the composition is original; having her focused in the middle, it fits. Overall I like this image a lot more than it’s almost replica ‘an attendant spirit’ because of the ease of editing with the lighting. When editing this image I followed the same protocol as the first image except I made the brightness lighter instead of relying on auto brightness, I did that on this image because I wanted to try something different with an image that is basically the twin of the first. I followed the same pattern by enlarging the lips with the selection tool, feather, ctrl+J, and free transform. In this image I used the clone tool to clone the stripes on her face like image two, and I also used the clone tool to remove the lines off the wall in the background so that it looked like all that was behind her was emptiness; heaven. Furthermore I used the clone tool lastly to delete the stray hairs in the background so that again this image would look tidy. Before: After:
  • 8. FINAL PROJECT EVALUATION OLIVIA SINGLETON IMAGE FOUR – INNOCENT The theme angel and devil was the first theme I thought of doing and was the one I was most certain about. I’m not 100% certain on this picture, it wasn’t one I wanted to keep, but I thought it would be good to show I used a different style in my composition, I took this at an angle so you could see her hair and see her looking ahead from a different angle. I think this image looks more urban than it does angelic because of the shades of her hair and the tiled wall in the background but I like that her eyes are still a little focused while the rest of her face is blurred and you can still see the white of her eyebrows and lips. Overall this image is good but in future I would like to go at a different angle if I’m thinking of changing my composition and I’d also leave her hair up. Although it’s a coincidence that I put this picture before ‘a supreme of evil; Satan’ where she has her hair down so she could be losing her innocence mentally and it shows in her characteristics. When editing this image I made a lot of improvements to her hair instead of her face, to begin with I used ‘auto contrast’ and adjusted the lighting myself, I tried to adjust the saturation, but areas of her face would warm up when I didn’t want them to so I left that tool alone, then I moved on to enhancing the white paint on her face once more with the dodging tool but that is mostly all I did with her face, moving on to her hair I highlighted all of her light strands in her hair where the brown has faded and just enhanced that, I also used the burning tool to make the dark strands a lot darker. I went with this idea because in the first 3 images her hair is up and is out of the way so it doesn’t add to her character, but here she is becoming a devil and her hair becomes the main feature so I wanted it to look as characterised as possible (as much as hair can be). Before: After:
  • 9. FINAL PROJECT EVALUATION OLIVIA SINGLETON IMAGE FIVE – THE SUPREME OF EVIL; SATAN The theme angel and devil was the first theme I thought of doing and was the one I was most certain about. I really like this image, it screams so many words at you, if you weren’t to know she was a devil you would be certain that she’d been abused because of the marks of the dark contouring but also because of the darkness her eyes hold in them. I’m really proud of this image, not just because of how powerful her face looks but because of the editing, everything is so bold and sharp, you can see her bone structure in her cheeks and her nose which is a bonus when producing a portrait picture, you want every detail to be sharp and in focus. I like how you can’t see any of the colour in her eyes just like you can’t in the actual devils, there is no soul hiding in them. I’m glad I chose to have her hair down for this shot because it adds to the sexual character that the devil is, according to Buddhism ‘Mara’ a devil tempted Gautama Buddha by trying to seduce him with the vision of a beautiful woman. I shot this portrait in the drama studio in college because of their black background and I used a flash which I wouldn’t normally use but I think there it created a nice effect and also highlighted a lot of beauty in this girl. Overall I don’t think there is anything to be improved on in this image, I like the red tones to her face, they create a dark aura around her and I like the sharpness of her eyes and eyebrows, her lips look amazing and everything is as perfect as can be without overdoing it in Photoshop so I am certain there need be no improvements in this image. When editing this image I immediately increased the brightness and contrast myself as I knew this image would be far better with bright lighting, I adjusted it so it wasn’t too bright or too dark and until I was happy with my image. I then edited her lips using the same process as I did the first time with the selection tool, feather, ctrl+J, and free transform, I then did this with her left and right eye and making them a touch bigger. When I was happy with the enlargement of the eyes and lips I then proceeded to darken her eye pupils and her lips so that they were both ghastly dark, I used the burn tool on her eyes, and the paint tool (black) on her lips with 50% opacity. I then used the burn tool on all the angles of her face where we had put the red paint, I was really happy with how the burn tool effected the paint as it made it stand out more on her forehead and defined her cheekbones and collarbones more than it did in the beginning. At the very end I used the sharpening tool to finish my image off, I didn’t use too much like I did in the angel pictures but just enough so that the features that I wanted to stand out stood out. Before: After:
  • 10. FINAL PROJECT EVALUATION OLIVIA SINGLETON IMAGE SIX – AN EVIL SPIRIT; A DEMON The theme angel and devil was the first theme I thought of doing and was the one I was most certain about. ‘An evil spirit; a demon’ is one of my favourites in this theme because she isn’t looking into the camera, she looks confident from this angle which is an important characteristic in a devil and I’m glad I went with this composition. This image is different to the first for many reasons, her lips here are a shade of purple instead of black and the tones aren’t as harsh as before. Here she looks more flattering instead of scary and her eyes have a nice sparkle to them which is not artificial but natural; coincidence, I think this is very fitting because a devil is like I said previously an alluring creature, so it’s almost as if she is luring her predators to her with her beautiful appearance and glistening eyes. I do think this image could have benefited from much softer tones because of the imperfections on her face, but I think there is a reason why I didn’t soften them out, every person has a few imperfections and everybody is so used to the media hiding these imperfections when it comes to celebrity’s, I don’t want to do that as blemishes are natural and to change this would make my image another piece of material for the world that every girl envies. Furthermore, I think I could improve on this image by going by the same composition, but making it so you can’t see any further then her right cheekbone because as I am looking at this image it doesn’t look as good with her ear and hair showing to the right, it’s only a small thing but I reckon it could’ve made a difference to my image if I would’ve thought of this before. While editing this image I came to realise there would be no point in trying to clone out the blemishes as you’d be able to notice, and this is the first encounter I have had with these blemishes, when I did the survey for what the audience wants they said they don’t agree with how much the media photo shops women and men so I decided to leave the blemishes, I think I could’ve held off sharpening this image but I did so anyway. In this image I didn’t enlarge the lips with the selection tool but I did with the clone tool and found it was pretty easy, I then used the black paint with the opacity still at 50% and then used the burn tool to darken the shades on her lips and ended up with a colour close to dark but a shade of purple too. Instead of darkening her eyes like in the other images, I made them lighter instead with the dodging tool and found that it gave them a bigger sparkle which I didn’t know I was wanting to achieve at the time, I also went over the eyelashes with the burn tool so to make the eyelashes stand out then continued to use the burn tool on the red shades on her cheekbones and forehead. Before: After:
  • 11. FINAL PROJECT EVALUATION OLIVIA SINGLETON IMAGE SEVEN – PRINCESS OF DARKNESS The theme angel and devil was the first theme I thought of doing and was the one I was most certain about. This image is different to the other two devil images and is the last, there are a lot of positives about this image including the much softer tones, her lip shape and shade, her eye size, everything looks soft and unreal and her hair is now up in a bun no longer down it is almost like she’s transitioning back into the angel she was previously, as we all know heaven is above and not below and above is the direction she is looking in, while she’s looking in that direction you can see now that there are highlights of white under her eyes and across her nose, as if the rays of heaven are shining down on her and accepting her once more, although she still has fierce dark eyes and poisoned lips she is slowly transforming into softer shades and virtue, also coincidentally she is stood in front of the background where she was previously stood as an angel, while this makes up for the good lighting it is all accidentally put together to tell a story about an angel who switches to a devil and wants redemption so she can live as an angel again, it’s a good message sent to the audience if they were to look close enough to tell this is a story and not just a few pictures clumsily put together. Overall the only thing I would change about this image is where I went wrong with the cloning tool near her neck because of the opacity of the brush. When editing this image I was very specific about how I went about it because of how each image tells a story and this is the devil returning back to the heavens as you can tell by the soft tones, I did this by highlighting parts of the face I wanted softened with the red pen and afterwards pressed J making the pen turn into a selection on the parts I chose, I then created a new layer and used the ‘smart blur’ effect till I was happy with it. Beforehand I adjusted the lighting so the highlights on her face stood out more and increased the contrast, then went over the red shadows and eyebrows with the burn tool. I also made a selection on her lips to enlarge them following the previous cycles with feather, ctrl + J, and free transform, I then went over the lips with black paint and afterwards darkened them even more with the burn tool. I also used the clone tool on the background to erase the lines so that I would have a more heavenly effect and accidentally went into her shoulders which is a bad mistake that I’ve noticed. Before: After:
  • 12. FINAL PROJECT EVALUATION OLIVIA SINGLETON Mental Health Mental health got mentioned on the question ‘do you like the composition in these photos’ and a person commented some, ‘the mental health ones especially’. Mental health got voted twice for being the theme the audience likes best and one vote for being their least liked theme. Schizophrenia IMAGE ONE – AKATHISIA; RESTLESSNESS It was fairly hard to do schizophrenia in relation to mental health because of the emotions and with help I chose to take this pictures in the mirror in my auntie’s bedroom where her lighting was adjustable. At first this image was just one and then I decided to overlay a similar image, I think it looks powerful because in the mirror you can see how she’s struggling, and then in person she’s going crazy. I chose to edit this photo with a black and white effect because the colours looked too saturated and weak, I think black and white makes this image look more powerful. We decided at first to take pictures where she was acting normal and happy with her makeup intact, and then afterwards we smudged her makeup with water to show she’d been crying. I’m not too fond of this image, I do like the overlaying on her person but I think it could be improved on by her face in the mirror being more in focus instead of her person. I found it very difficult to edit this photo as there were so many shadows on the models face to the point it did not look good in black and white, so I began by using auto contrast and brightness and then going over where the mascara had run under her eyes to make it stand out, I then used the dodging tool to go over her teeth in a low opacity and then moved to the whites of her eyes to make them stand out more. After doing this I got IMG_3002 and used it to overlay her person, I used the rubber to rub out the bits I didn’t want, that’s why you can see the overlay out of the mirror and not in the mirror. After finishing the overlay I used the black and white effect and altered it so that it wasn’t too grainy as it first had that effect on my image, after doing this I finished off with sharpening my image with smart sharpen like I do all my images. Before: After:
  • 13. FINAL PROJECT EVALUATION OLIVIA SINGLETON IMAGE TWO – EXASPERATION I really like this image for the reason that her face is more in focus and you can see all the details, I wasn’t too fond of the lighting in my auntie’s room so it was difficult to edit her face in Photoshop that is why her face has a lot of shadowing but I think this image like the other looks better in black 5and white than in colour as the colours were too strong and saturated. I really like the detail of her hair at the back of her head because of the sharpness, it makes all the strands stand out. She looks a lot crazier than she did in ‘akathisia – restlessness’ not that she’s not meant to, but her face holds a lot of emotion which like I say is important in photography, she’s very good at acting. I think if I were to take this picture again I would get her to wear different coloured clothes such as black and white so I wouldn’t have to edit the colours, also I would take these pictures in a different room with better lighting so that there wouldn’t be as much shadowing on her face in the mirror, I’d also have her wearing no accessories like she’s wearing in this image. Overall I think this image is the most powerful but it could have been more powerful had it not been in a mirror making it hard to edit. When editing this image I carried out the same routine I did before-hand with the first image in ‘Mental Health’ except I feel this image turned out a lot better quality wise. I again used auto contrast and auto brightness to level out the light and dark in my image and came to the conclusion that I would have to also do this image black and white because the shadowing on her face wasn’t that great in colour, after doing this I went over where her mascara had leaked and her lipstick had smudged with the burn tool to once again make it stand out, and then finished the image off by using the filter smart sharpen, repeating until I was happy with my image. Before: After:
  • 14. FINAL PROJECT EVALUATION OLIVIA SINGLETON IMAGE THREE - MANIC Before doing this image I got some inspiration from Annie Lebovitz and her image was called manic too except it wasn’t anything to do with mental health it was four images of a model in a bathroom going crazy in a shower. I really like this because I think it describes mental health ‘to a T’ because of her actions and facial expressions, I don’t think I could’ve put this together any better if I tried and I’m very proud of it. Again I think it could’ve benefited from her wearing a different set of clothing but I planned for this to be in black and white to begin with so it wouldn’t have made a massive difference. I don’t think the lighting really matters here as it weren’t very good but if it would’ve been a touch brighter near the mirror it could have made a difference to the shadowing on her face. When editing this image I used all four images I had edited in photo shop using the same process as before with my other two images in ‘Mental Health’, when doing this I had to do a contact sheet as that is the only option I’m familiar with when it comes to collaging, as I did this I tried different settings out within the contact sheet, using different lengths and spaces and eventually ended up deciding that it wasn’t going to work out so I then went on to paint and lay the images out how I wanted them and saved the image to my folders, it worked out very well and is in good quality so I’m not that bothered that I couldn’t master this technique in Photoshop. With these four images I each edited them in Photoshop by using auto contrast and auto brightness to level out the darkness and brightness, with a one or more of these images I had to use the clone tool on the back of her hair because when she was pulling at her hair she revealed a few bald patches so I had to cover them up with her hair which was pretty tricky as it would often end up looking like a blur of hair, when I finished touching them all up I went forward with using the black and white effect on them so they would be like the other two, and like each other so that it would work in the collage, also I had the image that inspired me in mind and consisted with trying to get them all to look the same editing wise. After: Before:
  • 15. FINAL PROJECT EVALUATION OLIVIA SINGLETON Constellation Constellation got 3 votes for being the audience’s favourite theme and one vote for being their least favourite. IMAGE ONE – NEWBORN STAR ‘Newborn star’ is one of my best images, the name fits as she’s a replica of a new star exploding in the sky, also I took a picture of her mother and called her image ‘mother star’ so the two are connected. I took this image in a living room and I got my cousin Ebony to lie on the sofa while I used a tri-pod to get the best composition possible. With Photoshop I made the glitter and paint on ebony’s face brighter with the touch up tool and also made her neck and collar bones brighter so they stand out, at first when I edited this picture I took an image from Google of stars to overlay but found I weren’t allowed to do this as I may be crossing a copyright boundary, so I went on to devianart which I’m familiar with and got another image of stars and overlaid it on top instead and I’m certain that it gives this photo a more imaginary effect. I think I could’ve improved this in the process of editing because I have badly erased some of the stars and you can see at the bottom right where I have done this. Furthermore I like this image because of how amazing her face looks due to the paint and glitter, it adds to the newborn star effect. When editing this image I knew exactly what I was wanting to achieve and I knew what tools to use so it was very easy for me. To begin with, I decreased the lighting a little so that the background wasn’t so noticeable and then increased the contrast so that the background would be darker but I didn’t increase it too much just in case the shadows on the girl’s face went too dark. Then I began using the dodging tool to highlight over the glitter on her face and increasing the saturation to make the colours stand out on her lips, face and neck, as I was going over her face with the dodging tool I had the opacity high, but when I went lower to her collar bones I had the opacity low so that I wasn’t highlighting too much of her neck. I then proceeded to use the burn tool to go over her dark features such as her eyebrows, hairline and pupils, as I didn’t want these features to be too dark I had the opacity on low. I then used the clone tool on the glitter to add more of it to her face, just so that she looked more like a star, I then got an image from ‘deviantart’ of stars to overlay over her which I thought would be a really nice effect considering she’s a newborn star, I decreased the opacity and began rubbing out bits I didn’t want, and I also used the rubber on a low opacity to neutralize the intensity of the stars so that it worked better around her. I realise now afterwards as I look at my image on a different computer with different lighting the mistakes I made with the rubber and the stars layer, I didn’t notice how deeply I’d rubbed into the stars on the right hand corner and next time will make sure I’m using a very bright screen where I can see my work as I’m editing as this is very important. Afterwards, I used the sharpening tool once again to make all the little details stand out. Before: After:
  • 16. FINAL PROJECT EVALUATION OLIVIA SINGLETON IMAGE TWO – ELEMENT I really like this image because of the contrast compared to ‘newborn star’ it’s a lot darker so you can only see the light that’s reflecting off her face and the glitter paint, it’s not as colourful but it’s almost as if she’s a sleeping star because of her closed eyes and settled tones. I love how the only thing that stands out in this image is the glitter near her eyes and nose it’s very arty. It is almost as if she is actually in her element because of her facial expressions and her calm state. I think if I were to do this image again I wouldn’t have it included at all because it’s not the same as ‘newborn star’ or ‘Orion nebula’ and while I like it in this collection I wouldn’t like it if I were to put it in another. I’m impressed with how the lighting only bounces off certain places of her face such as her nose, the glitter paint, her forehead and a little on her lips but nowhere else. When editing this image I was careful to keep the tones quiet and leave them as they were, I didn’t want this image to be like ‘newborn star’ as she looks like she’s sleeping and therefore deserves softer darker tones. With this in mind I altered the brightness so that the only light was coming from the light that was shone on her face when capturing her, I also adjusted the contrast so that the shadows underneath her were darker and therefore making the sofa she was lay on unnoticeable. I then used the same process as before regarding highlighted the glitter and paint on her face but after doing that I didn’t increase the saturation like I did before, I left it alone so that it wasn’t too eye capturing regarding colours. After I’d done this I sharpened the image a little and then left it alone as I was happy with it. Before: After:
  • 17. FINAL PROJECT EVALUATION OLIVIA SINGLETON IMAGE THREE – ORION NEBULA Orion nebula is a place where new stars are born which is what my first image was, in this image she is a replica of the Orion nebula in space because of the amount of activity that is going on with her face. I think it is amazing how well the glitter and paint work together here, you can now tell the colours apart and like I said in my theme ‘ADHD’ where colours represent something, purple is the primary colour here which represents ‘magic’ and magic is all around stars so I’m glad I went with this colour scheme. For this image I changed my composition, I went from a different angle near her feet and zoomed in, I instructed her to look anywhere except the lens and told her because her eyes were growing tired to close and then open them and this is how her eyes turned out so wide and awake. With this image I went with the same routine as the first image, I started off by decreasing the lighting and increasing the contrast and then went over the glitter and paint on her face with the dodging tool, after making sure I’d highlighted everything that I wanted highlighting, I used the sharpen more tool so to make the image sharp, and to make the glitter stand out more than before. I used the clone tool on this image too as I wanted more of the glitter down her face, I did this with ease as I’d done it before in the first image, but I had to be careful I didn’t go overboard and have my image end up looking too fake. After this process I used the burn tool to darken the purple on her lips to make them stand out, and I finished off the colour by increasing the saturation so that her face looked a lot more colourful, when I did this I also noticed that the grey on her neck and collar bones also stood out a lot more which was a bonus as I feel it looks very good. Before: After:
  • 18. FINAL PROJECT EVALUATION OLIVIA SINGLETON IMAGE FOUR – MOTHER STAR For this image I found some inspiration off the web and the photographer was not named but it was of a young girl my age with lights around her, and so I thought I could paint my aunties face a whitish colour, I tried to get the colours of an old star in this image but it didn’t turn out that way, I did the composition all wrong so it didn’t turn out how I had expected and when it came to editing it in Photoshop I had no idea with what to do with it, so I got the same image and overlaid to create more lights to represent stars and this is how it turned out. If I were to do this image again I would go with a different colour of lights and I would have my auntie huddled on a bed, but whatever colour scheme I would go with the fairy lights I would have a separate light to fill the room with the same light but I would have the light be dim so it would still be dark but not as dark as this image. This isn’t my best image and I’m very disappointed with how it turned out and I am glad I can recognise my mistakes. When editing this image I really didn’t know what to do with it, as I tried different ways of making it look good including adjusting the brightness, adjusting the contrast, changing the colours of the lights with colour balance, making her face lighter with the dodge tool (even though it doesn’t work that way) nothing would work because of the lighting – this proved to me just how important lighting is when it comes down to capturing images because absolutely nothing would work to make this look like the portrait I had hoped for. In the end I went with overlaying the same image over the top so that there would be more emphasis on the lights and therefore look a lot more like stars, after erasing the parts I didn’t want in low opacity, I changed the colour balance of the image so that the image was no longer warm but cold and would therefore revolve around one colour, after finishing this process I put the cherry on the cake by using the sharpening more tool to emphasis the lights. Before: After:
  • 19. FINAL PROJECT EVALUATION OLIVIA SINGLETON MISC IMAGE ONE - ‘?’ This image or theme was not planned or thought out and it was in fact taken on the way home from the hospital I was meant to be shooting at. My original shoot was meant to be in the hospital of patients coming and going, but as I went in with my tri-pod and camera they said I would need permission from such a person to carry out this shoot. While this shoot wasn’t expected and in no way relates to any of my other images I am quiet fond of how I captured it with the van blurred in the background because of the shutter speed and having the biker in such sharp focus, I also like the lights that surround this picture, it’s very much like it was planned, I suppose you have to have 1 or 2 odd or imbalanced images to make the rest of your work stand out. I didn’t edit this image much because it wasn’t one I was particularly fond of, what I did do to this image was auto brighten it, auto contrast it, and auto tone it, by doing this I created a very cool toned image. As I was looking for things to touch up on I noticed that the sky was not one which I wanted to mess with as it already looked a pretty shade, so I moved onto the cars’ rear-lights and used the dodging tool on them so that they’d be brighter, I also did this on the lights in front of the bike and the light at the top back of the car, I wanted all the lights to stand out. After doing that I also went over the man’s top with the dodge and burn tool, I used the burn on the black and the dodge on the white so to make him stand out more. I then finished it off with the ‘sharpen more’ effect, while this image wasn’t expected, I’m not too disappointed in it either. Before: After: Production skills I have newly acquired or progressed on
  • 20. FINAL PROJECT EVALUATION OLIVIA SINGLETON Throughout the project my mind has expanded with many skills along the way which have helped me not only in my project but in other units in Media. I have learned a lot about project management, this is highly important I have come to realise because it is the whole structure and plan of what you intend to do and when you intend to do it, it doesn’t just help you with managing time with your coursework but could help you further on in life too as it’s always important to be able to manage time. It is a key part in keeping the project running smooth. I have learnt new ways to manage my project and I’m proud of myself that I kept to the rules of my project throughout so there were little mistakes to be made and I got everything done smoothly. I have also developed many skills in research which I had some knowledge of but have never used it to the extent in which was needed for this project. I’ve almost always stuck to the internet for research and answers but never thought to go to a magazine or a book for answers, although I didn’t use other ways of research like books I did come familiar with the aspect and know to next time do further more thorough research including photography magazines and books, also I learnt a lot by doing survey’s on survey monkey to get answers for what the audience most want to see in photography and also in my images that I was going to produce so that was a massive help and it made me more aware for what to aim for. I believe that the biggest production skill that I further developed in this process is my camera techniques and the way I use the camera during production, this shows in the way I have composed my images. The production of my image helped me develop my skills immensely and I've gathered lots of new skills along the way in Photoshop which include using the clone tool professionally – making sure you use the right amount of opacity and the correct size of the brush so to make your image look mature and not immature, the highlighting tool to make certain points on the face stands out, at first I struggled with this and would make things look unrealistic but I soon got the knack of it, due to having to use it every day, also I have never been so familiar with layers than I am today because of how many times I had to enlarge certain things on my images I would have to make new layers just in case I went wrong and could delete that layer to go back to my image and be able to do it a different way. Furthermore something I would really like to progress on in Photoshop is being able to professional adjust lighting as I really struggled with shadowing on my portrait’s and would really benefit from learning how to do this. Managing my time As part of my project I had to take consideration of time management. When working on a project of this nature it’s vital that I manage my time well and have a contingency if there was anything to go wrong potentially endangering my project. There are a few methods which help with time management the main being a chart in excel, this chart will represent each day of my project and what I was going to do on each day stated in a clear colour format. Another use of time management I used was my production diary, this helped me keep in check all the things that I have done and any progress I had made so I can look back and see what I have to aim for next. Throughout my project I have not fallen behind or gone off schedule, each day while carrying out my project I have endlessly checked my project schedule to be certain I was on target and while there were a few problems with production when taking images I followed my contingency plan and worked through the problems such as facing a lighting problem I would then use the back-up light I had prepared. Final Major Project Original Intentions Proposal VS. Final Major Project Final Product
  • 21. FINAL PROJECT EVALUATION OLIVIA SINGLETON Overall I’m very happy with the way my product has taken shape although at some points I made some jumps over set out plans I’m extremely happy with it and I believe that is effective in what I intended it to do. However there are some differences which changed from my original design. In my final major project proposal I intended to have more than the five themes that I have presented in my evaluation ‘ADHD, mental health, constellation, ?, angel and devil’ I also meant to have a theme ‘hospital’ where I would capture life events such as a person being wheeled past me, nurses grieving, a theme ‘life swap’, a theme ‘youth’ I was also meant to capture women and men working together so to get the feel of femininity but my images took a different course. In terms of production techniques I stayed on board, I followed through with editing using Photoshop and succeeded in making my images look more creative than others and I stated that I would only retouch to make my images clearer and where others will be overly edited to look more imaginary and creative which I succeeded in. The difference in my final piece from my idea isn’t as bad as expected, I kept to all my instructions on my FMP time management and whenever I needed more time for I would add it on and instruct that I had done so, so nothing changed within those boundaries. The only difference is that I have less work than I hoped, I did image I could have done greater things with Photoshop but I have only been using it for two years and haven’t had many lessons using it so I’m proud of how it planned out and I’m not at all bothered that I didn’t 100% stick with my FMP project plan. Reaching my target audience My target audience was mainly women because of the femininity I was hoping to get across, also targeted at people who suffer abuse (not relevant now) and also mental illnesses, lovers of creativity and the youth social group. I am proud to say that I indeed did reach lovers of creativity and people who have mental illnesses, the feedback I got on survey money clarified this for me and also friends of mine who suffer with such mental illnesses said that felt the power in my theme ‘mental health’ but also ADHD which was not targeted at them, I suppose this is because of the titles. Regarding audiences in survey monkey I think I did a very good job, these are the responses to the images and my reactions to positive and negative criticism – ‘difficulty in paying attention’ did not get any votes for ‘which two pictures do you like the most’ and 1 vote for ‘which did you like the least on terms of editing’ while I’m disappointed I’m not surprised because it’s not edited as best as it could have been, you can see the white next to the overlay where it has been erased in a rush but that’s all I can think of with my faults with this image. ‘restlessness’ got voted 3 times for the image the audience most liked out of all of my images and also best edited with 1 vote, coming to a draw with ‘newborn star’ which I’m not surprised as both of these images are amazing, I’m glad my audience agrees with this image because I think it’s very powerful and well edited. ‘Impatient’ got 1 vote for being the audience’s favourite image and 1 vote for being their least favourite, I think this is because it is the least creative out of all of them but is the main one that is most like a portrait, I think if I were to make a change to this I would leave it for a different theme. ‘Overactive behaviour’ didn’t get any votes for ‘most favourite’ but did get a vote for ‘least favourite’ while they didn’t say why I can probably guess that it’s because it’s different from the rest, you can’t see the boy’s face so it isn’t much of a portrait but, it does explain the emotion very well and I think if they understood that then they would be able to see that it speaks more than a portrait does. Overactive behaviour got a vote for best edited which I’m proud of as I didn’t think it was that
  • 22. FINAL PROJECT EVALUATION OLIVIA SINGLETON great, so my confidence in my image has been boosted and I will make sure I edit a photo similar to this like that again. This image got a vote for space for improvement which I understand and will take into consideration for next time. ‘An attendant spirit’ got 2 votes for pictures they like the least and while I like the image myself, I think the audience aren’t too certain on it because of the comment about approval of lighting in the photos, they put ‘some of the angel and devil ones appear a bit too sharp and bright and would possibly benefit from being softer muted’ I agree with this because after all this image is of an angel and angels are supposed to be soft and angelic so I understand my mistakes with this, as for the brightness maybe it could be toned down a little, I was confident with it because an angel’s home is heaven and is known to be bright and white so I went with my knowledge of that. ‘a person of exemplary conduct or virtue’ got a single vote for being the audience’s favourite edited photo and nothing more, while I wanted feedback on all of my photo’s all I have is this single feedback, I personally think this image could have been improved on, but I think the audience likes this because soft tones are being used on an angel and that is what they wanted as their comment said so in approval of lighting. ‘A supernatural being’ didn’t get any feedback from the audience and I’m not surprised because it is basically a replica of ‘an attendant spirit’ I know that if I were to do this shoot again I would cancel this image out because it serves no purpose acting as a clone. ‘innocent’ did not get any feedback either which I’m quite surprised, but I’ve commented how I would choose to go different about this image if I were to do it again, by going at a different angle if I’m thinking of changing my composition or that I’d leave her hair up. ‘the supreme of evil; Satan’ got two points for being the audience’s least favourite image and one vote for an image I could improve on, I honestly love this photo and can only see one major way I could go about changing this, because of the unoriginality of it, she looks like she’s been beaten up or dressed to go trick or treating and I think that’s all down to the flash used so I will definitely not be using the flash again for any of my images in the future. ‘an evil spirit; a demon’ got one vote for being the audience’s least favourite image and two votes for being an image I could improve on, while the audience haven’t been able to specifically tell me what it is I could improve on I can guess that it’s because of the sharpness of this photo while there are blemishes on her face and while I mentioned earlier that the audience expects a perfect soft touch-upped face, I did not want to follow the media society and do this to my images but if it is to please my audience then next time I will go different about this image or I will make sure the lighting is not too harsh on the face. ‘Princess of darkness’ got a single vote and that was for being the audience’s least favourite image. I’m really surprised with the voting on this image because I thought it would meet up to the audience’s expectations of a soft touched up image with nice colouring and large eyes. ‘akathisia - restlessness’ got one vote for being the audience’s most liked image and one vote for being the audience’s favourite image on terms of editing, I am very proud of this result because I myself didn’t think this image spoke much out to you yet the audience feels differently and agrees with the way I have chosen my composition, the way I have edited my photo and they overall like this image. This has helped my confidence but has also given me inspiration to use this idea again in other pictures in the future. ‘Exasperation’ didn’t get a vote for anything which is disappointing because I thought the audience would have enjoyed this image more than the first as you can see her struggle but they haven’t, as my audience haven’t voted for this image being their worst nor favourite in terms of editing,
  • 23. FINAL PROJECT EVALUATION OLIVIA SINGLETON composition, or overall one of the ones they like I will know for next time to do things differently in order to get a good reaction and good feedback. ‘manic’ got one vote for being the audience’s favourite image and one vote for being the audience’s favourite on terms of editing, I am really happy with this outcome because I myself think I edited this image very well, how I managed to put the four together on photo shop and make them all fit nicely I will definitely go with this idea again, but most importantly with this image I wanted my audience to feel something, so I asked them ‘what do you think of when you look at image ‘manic’ theme – mental health?’ and I got responses like ‘internal battle with oneself’ ‘it’s breath taking!’ ‘Someone’s internal struggles’ ‘cry for help’ ‘I feel as if that’s my inner self screaming inside of me to come out’ I am beyond happy with these responses! It was exactly the reaction I was looking for and I’m pleased that an image I produced could make my audience think and feel such things. ‘Newborn star’ got 3 votes for being the audience’s favourite image, 1 vote for being the audience’s favourite image on terms of editing, I’m really happy with this feedback because I knew just how much my audience would love this image, it’s creative and meets the needs of every socialite who reviewed my images, while I know what I can improve on this image I am glad I didn’t get any negative feedback because of immature mistakes. ‘element’ got two single votes and that was for being the audience’s favourite image, I’m glad my audience like this picture as there isn’t much to like or dislike about it, the colours are more muted but the audience must be able to feel a certain calmness from it. ‘Orion Nebula’ got a single vote and that was for the photo they thought was best edited, while I’m not surprised because of all the colourful features on her face I did expect more feedback as this is the image I put a lot of work into to make sure the colours were bright enough but I suppose the composition could have been better so it’s just a simple mix of right and wrong. ‘Mother star’ got 1 vote for being the audience’s favourite image, 3 votes for being the audience’s least favourite image, 3 votes for being the image the audience least liked on terms of editing and 1 vote for being an image I could improve on also one vote for being an image they don’t approve on due to lighting which is all totally understandable because it is a badly editing, produced image which I expected to come out better, next time I will make sure I don’t only have fairy lights as my source of lighting but also a dimmed light to match the colour of the fairy lights so there will be more lighting in the room and I would also go for a different composition as well as getting my person to sit in a different way. ‘?’ got 1 vote for being the audience's most liked Image, 2 votes for being the audience's least liked image, 2 votes for being the audience's least favourite image on terms of editing and 1 vote for being an image I could improve on, while I agree because this image stands out like a sore thumb for being so out of character and not being able to mingle in, it wasn't meant to be to begin with and next time I will straight away cancel out any images that do not fit in with my work. Overall, I think I reached my target audience exceptionally because of the amount of good honest and bad feedback that I got, I know where to improve and what techniques to develop on in the future, I’m very thankful for so many responses on my survey so that I can progress further. Summary – how I would respond to my project brief if I were to do it again If I were to do my project brief again I would make sure I keep in the reasonable boundaries because I was meant to be basing my FMP around feminism like I proposed in my brief, as I explored
  • 24. FINAL PROJECT EVALUATION OLIVIA SINGLETON feminism in some ways with my work I didn’t overall which isn’t very professional and if I want people to take me as a professional student I would have to have stuck to my exact words. Also I imagined I could produce images that were way beyond my ability like the ‘abuse’ idea where I would have a man playing the role as a ‘puppet master’ where I would have to Photoshop him in the background of a family at a table, while this is reasonably ideal it isn’t in the way of finding a family to do this. I’m content with the work I have produced and would in the future carry out such work like this again because I’m proud of it and happy with the outcome, I made a few mistakes which were due to pure laziness towards the end because of lack of time so next time I would definitely give myself more time in my project management to edit my images in Photoshop so to avoid these mistakes. Next time I come to do a project like this I would like my target audience to be children as I’m highly interested in creating magical and creative portraits in photography, and I would like to see how children respond to these images, after showing my younger brother my images of him and the others, he was really interested in one theme in particular; my angel & devil images, I know that’s because of how creative they look, also most importantly they’re not real and children enjoy things that aren’t real, beyond imagination, just like in fairy tales and story books.