Call Girls in Barasat | 7001035870 At Low Cost Cash Payment Booking
Development Diary Music Video
1. Development Diary: The music video for ‘First Love- The Maccabees’
After coming up with our initial ideas following typical conventions of music videos
of the indie rock genre and getting permission to use the ‘First Love – The
Maccabees’ song we wished to base our music around; We wrote up our script, drew
up the storyboards and gained permissions from actors and owners of the locations we
wish to shoot. We was then ready to film/ We used the ‘Capture and Transfer’ method
to upload our footage onto Final Cut Pro after selecting the exact shots we wished to
include in the video after filling out our edit decision list. We scripted that our music
video would be in normal weather conditions, although later in the day when filming
it began to rain meaning certain shots filmed could not be included as it affected the
continuity in the video and some shots even involved droplets on the camera which
caused the filming to look very
unprofessional, as a result of this,
these shots could not be used.
Firstly we imported the ‘First
Love-The Maccabees.mp3’ and
locked this layer so it couldn’t be
moved (this would affect syncing).
After looking through our footage in the ‘browser’ that we added from our edit
decision list we finalized our decisions of what clips we wanted to use, by dragging
each individual clip we wanted to use onto the timeline. We then used the keyboard
shortcuts ‘B’ and ‘A’, which stand for ‘Blade’ and ‘Arrow’ to cut down the unneeded
parts of the clips and deleting, by using the backspace button. Following this, we used
the snap tool (keyboard shortcut: N) to cut together the video clips if we didn’t feel
they needed any more editing, the snap tool allows for no clips to overlap so nothing
is cut.
2. When editing the music video, we had to ensure that we cut to the beat. This
creates pace within the music video and makes our target audience engaged
with the music video. By keeping the levels below the red dot at the top
means that the sound from the music video isn't distorted. We had to always
watch the sound levels when putting in a cut, because if cuts aren’t edited to
the beat won’t flow and look like they are synchronized.
After adding each shot to the timeline in the order we want and so that all of
the video footage we want to include lasts for the duration of the song. During
this stage we colour corrected the clips so they look less raw and amateur. We did this
by using the colour correct tool and made the colour in each clip stand out a lot more.
We did this by increasing the reds and greens of the footage. This also made the clips
fit the up beat peace of the music video causing some of the negative clips to look
slightly more positive and drawing the viewers eye a lot more. Instead of doing this
colour correction for each individual clip, we saved the filter as a ‘favourite’ effect,
and simply dragged and dropped it onto all
the clips. We then decided to add a slight
sepia effect on each of the flashbacks from
the point that the protagonists relationship
falls apart, we did this to show the gradual
separation between the couple as later in
the video each flashback is displayed in
black and white to suggest that protagonist
Abbie had moved on and had got over her
ex boyfriend Harry. We added the sepia
tone by selecting the ‘Effects’ tab at the top
of the page and choosing ‘Video
filters’>>’Image control’ >> ‘Sepia’ this made each shot an extremely noticeable
sepia style, causing a very warm orange look on the clip, we felt that we did not want
this look and altered the tint colour by selecting a lighter sepia tone and then altered
the amount so that there is only a light tone on the image. We chose to do it this way
so that it suggests to the audience that the characters are unaware that their
relationship is falling apart. As it is clear that Harry is
very hurt by the events, he may feel they still have a
chance of getting back together. To cause the black and
white effect on the image we selected
‘effects’>>’image control’>>’desaturate’ we did this
for each clip we needed to make black and white.
We then added text to the beginning of the video in
order to introduce the audience to
the video. We stuck to the typical
conventions of music videos
here, by including the title of the
song, the artist, album name and record company. We also used
a conventional typeface in order to make it seem more
professional. We decided to fade
the text in and out in
correspondence to the music after
watching several music videos,
3. which followed the same conventions. We did this boy dragging the pen tool in a
diagonal line across the section we wished for the text to fade in and out.
We then added a transition to the end of the music video in order to show a transition
into new things and the future as Abbie meets someone else. We did this by right
clicking on the timeline at the point that
we want the transition to take place and
selecting ‘cross dissolve’. We then
altered the line to cause the transition to
start and fade into the next shot. We also caused the video to fade out at the end and
added text again so if people did not catch the artist or song title at the beginning of
the song they could be reminded at the end. To add the fade out at the end of the
video we used the pen tool as seen earlier in the video.
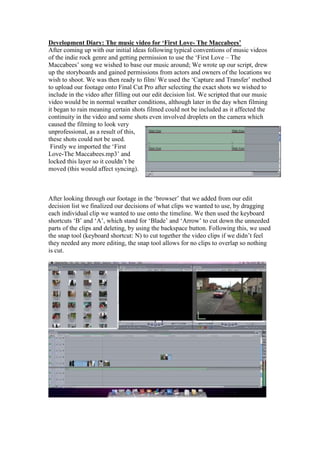
Above is the completed timeline for the music video. This displays all transitions and
shots used. When our music video was complete we exported the music video to a
QuickTime file so that we are able to upload it on YouTube so that it could be viewed
by the public and receive response from different audiences. The video can also be
played in a normal .Mp4 format.