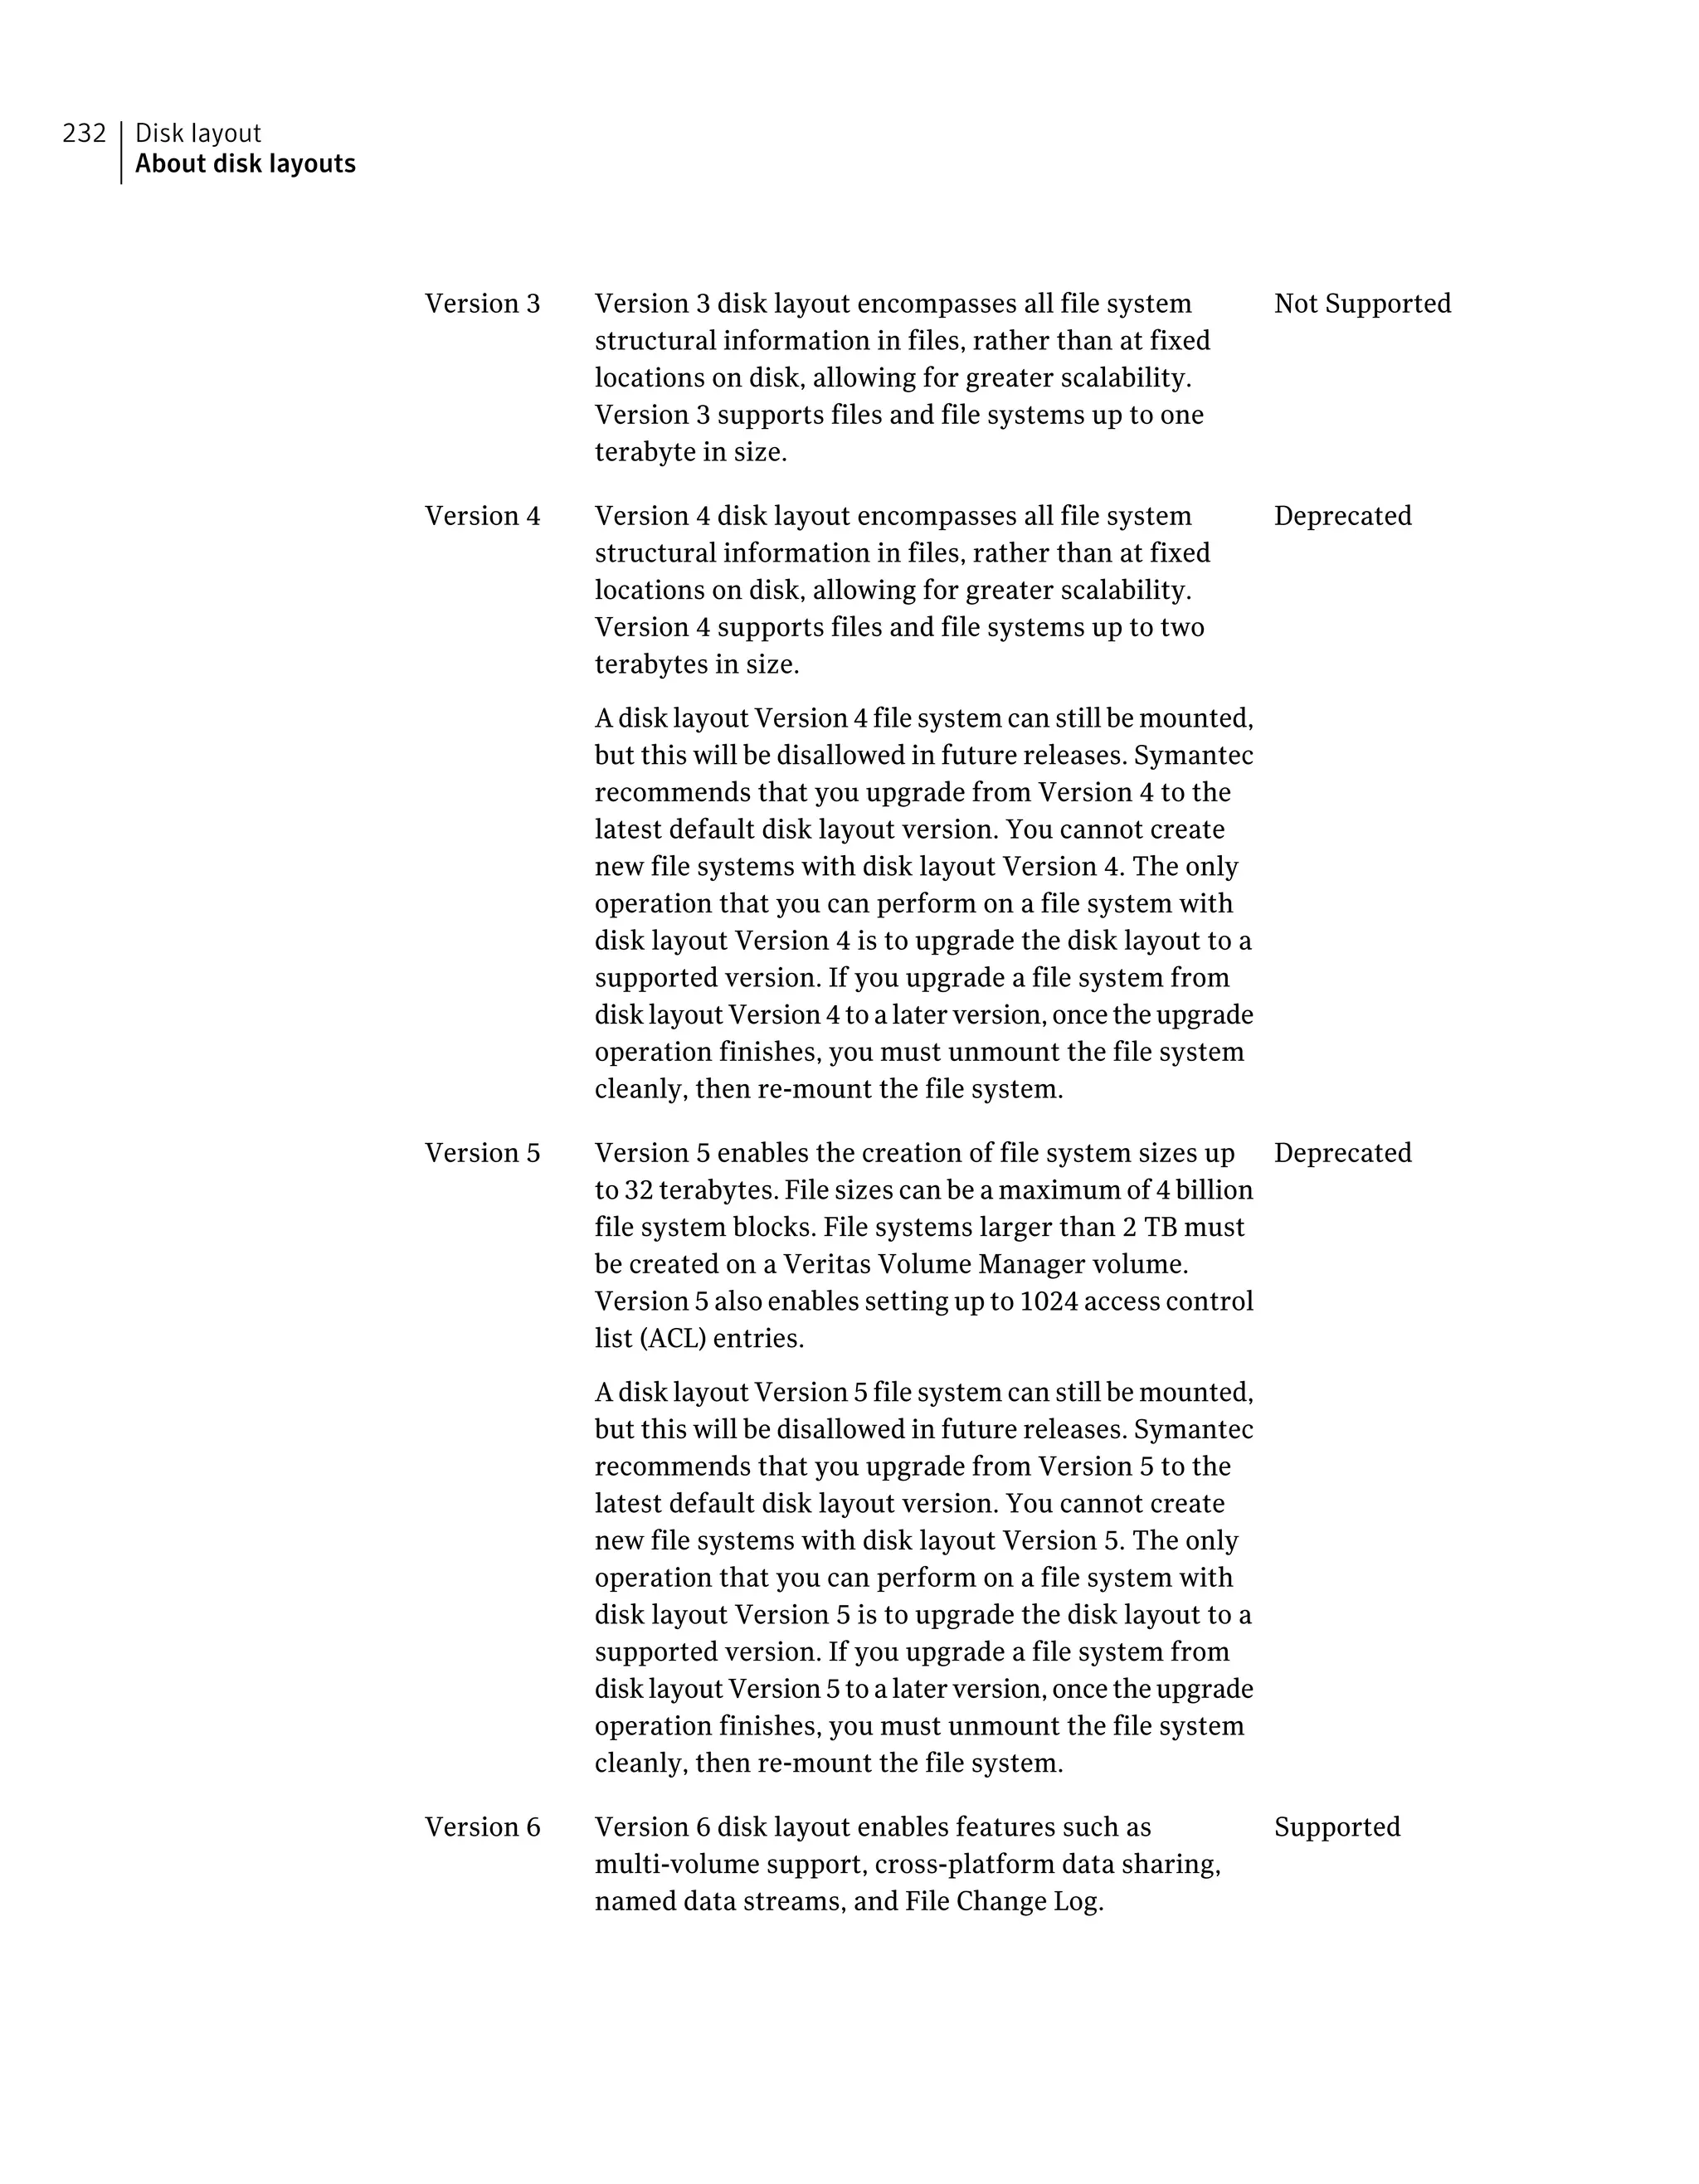
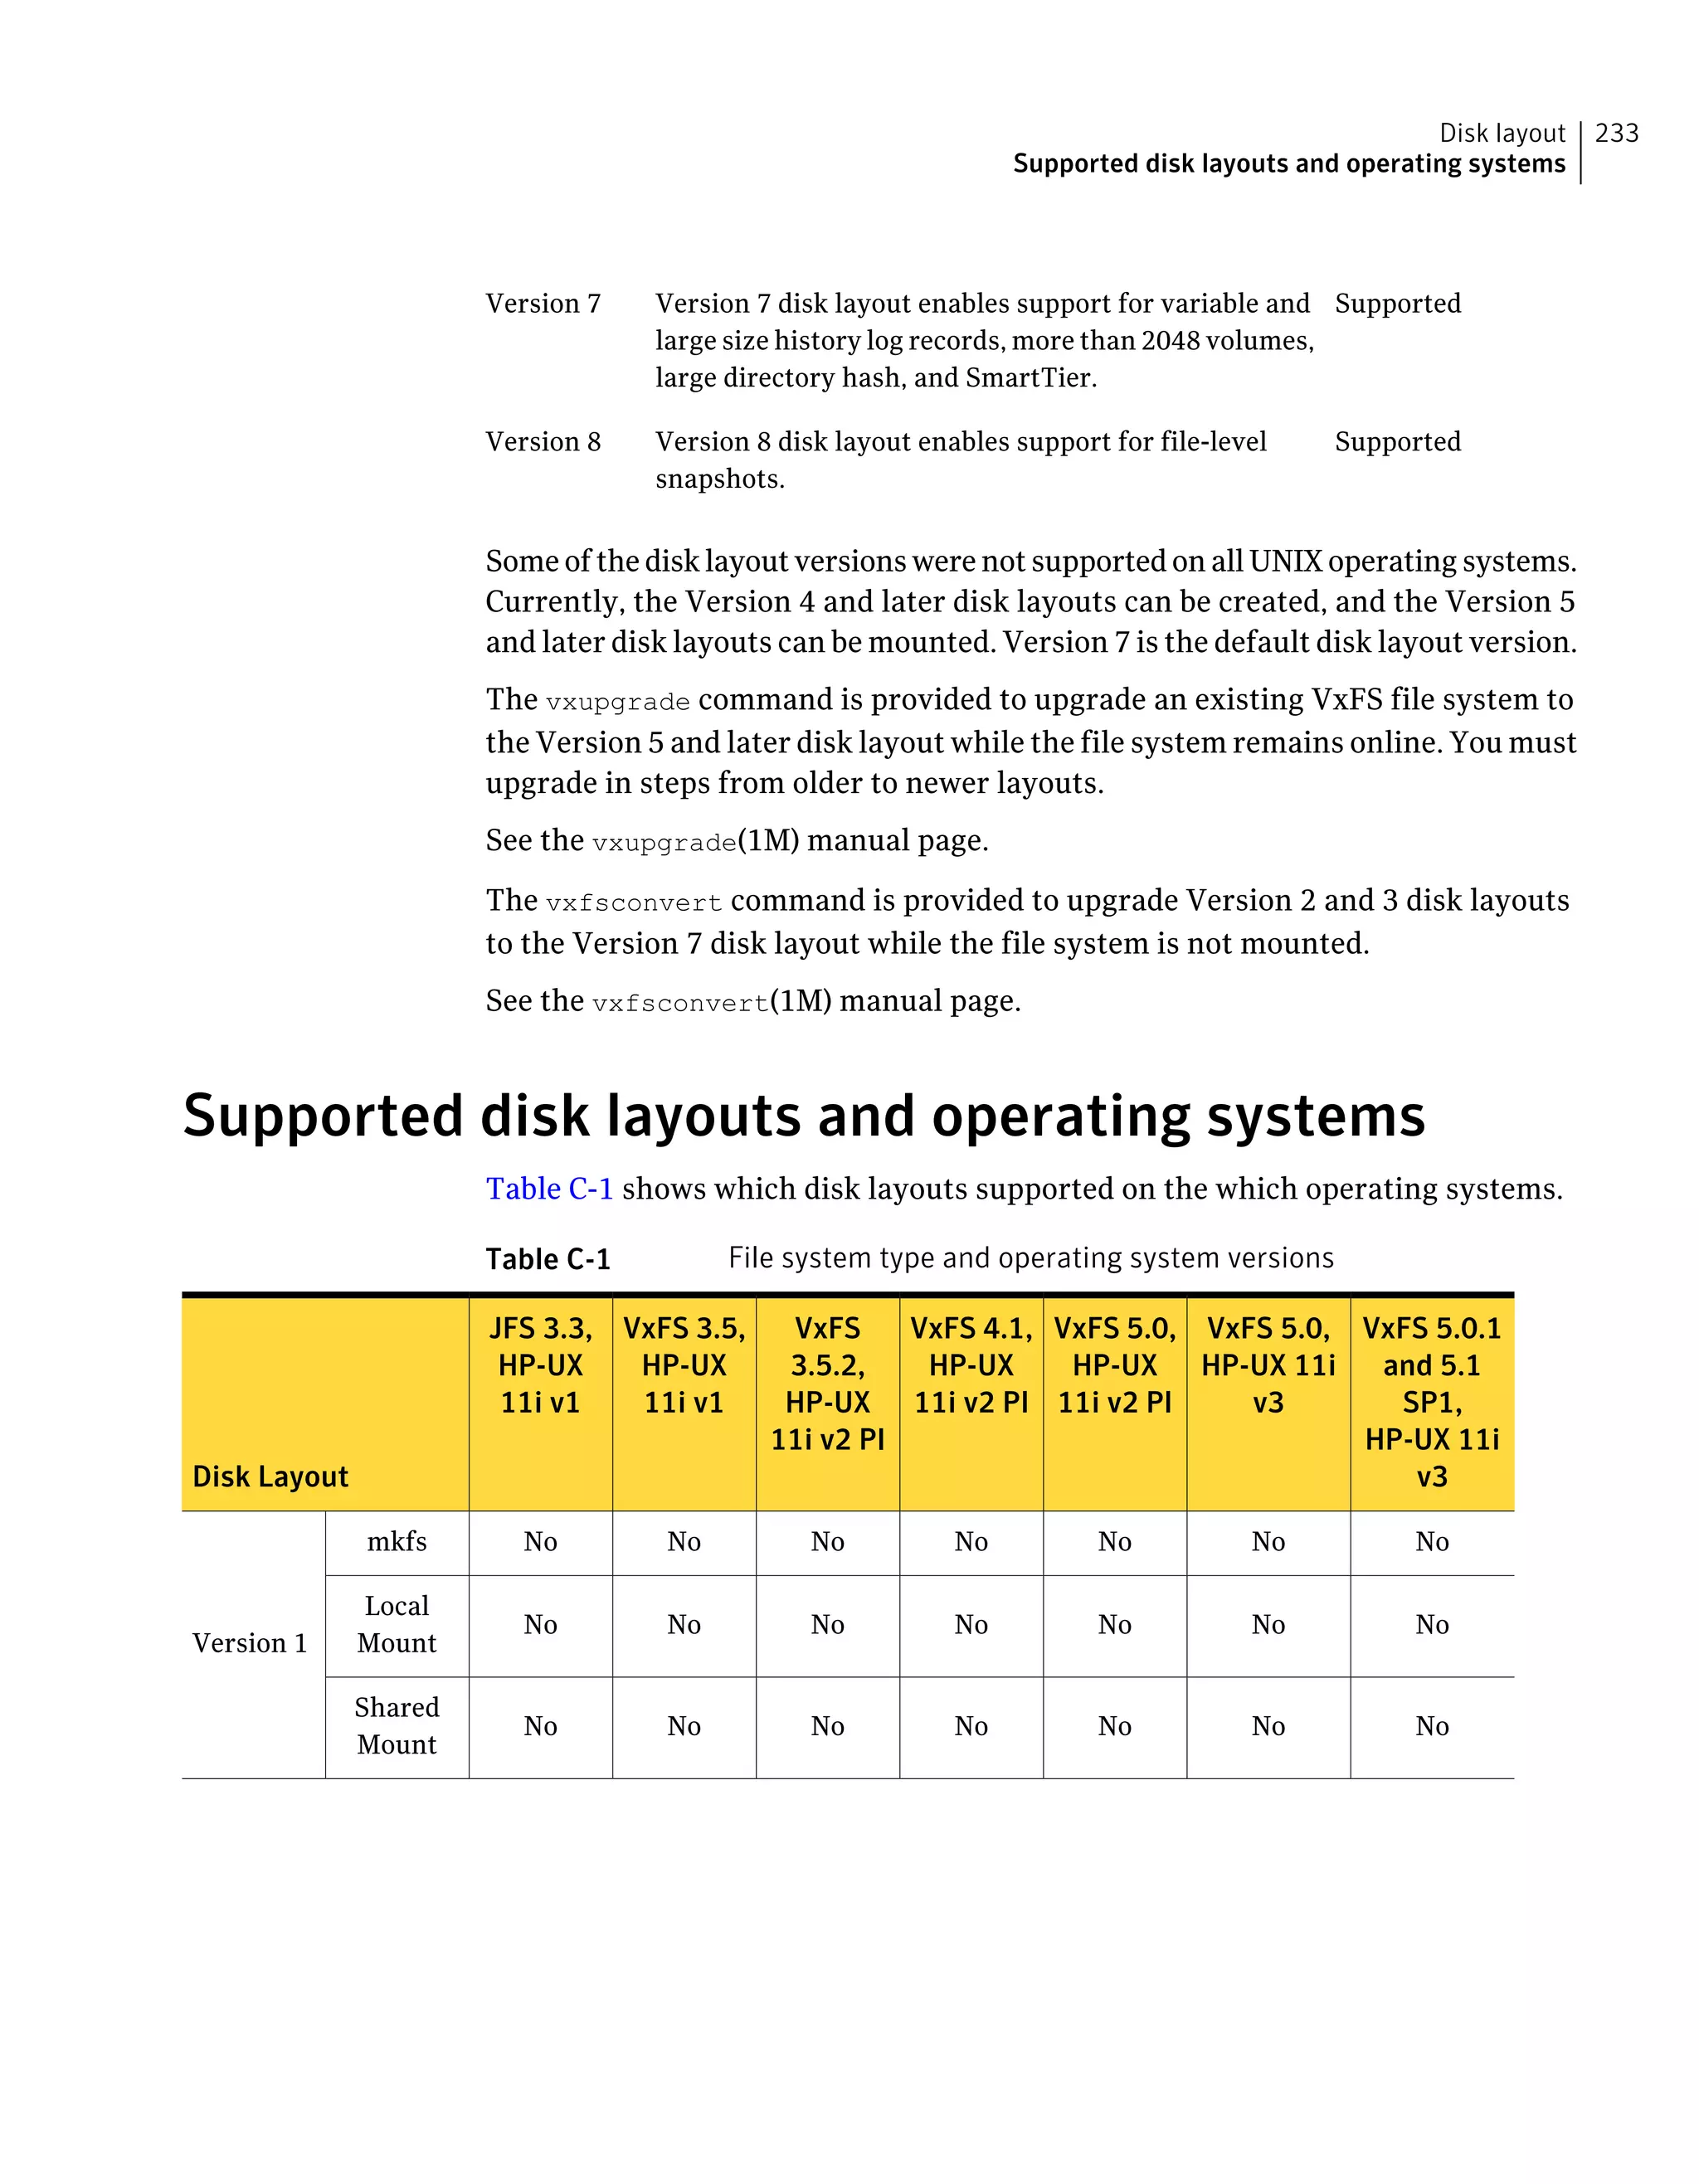
This document provides an administrator's guide for using Veritas File System (VxFS) with HP-UX 11i v3. It describes features of VxFS including extent-based allocation, fast file system recovery, quotas, Storage Checkpoints, and file change logging. It also provides instructions for tasks like creating and mounting VxFS file systems, setting file system attributes, tuning performance, and using Veritas extensions for database optimization. The document contains several chapters and appendixes that describe VxFS commands, diagnostic messages, and a quick reference guide.


![Mounting a file system with large files
If a mount succeeds and nolargefiles is specified, the file system cannot contain
or create any large files. If a mount succeeds and largefiles is specified, the file
system may contain and create large files.
The mount command fails if the specified largefiles|nolargefiles option does
not match the on-disk flag.
Because the mount command defaults to match the current setting of the on-disk
flag if specified without the largefiles or nolargefiles option, the best practice
is not to specify either option. After a file system is mounted, you can use the
fsadm utility to change the large files option.
Managing a file system with large files
Managing a file system with large files includes the following tasks:
■ Determining the current status of the large files flag
■ Switching capabilities on a mounted file system
■ Switching capabilities on an unmounted file system
To determine the current status of the largefiles flag, type either of the following
commands:
# mkfs -F vxfs -m special_device
# fsadm -F vxfs mount_point | special_device
To switch capabilities on a mounted file system:
# fsadm -F vxfs -o [no]largefiles mount_point
To switch capabilities on an unmounted file system:
# fsadm -F vxfs -o [no]largefiles special_device
You cannot change a file system to nolargefiles if it contains large files.
See the mount_vxfs(1M), fsadm_vxfs(1M), and mkfs_vxfs(1M) manual pages.
The cio option
The cio (Concurrent I/O) option specifies the file system to be mounted for
concurrent readers and writers. Concurrent I/O is a separately licensed feature
of VxFS. If cio is specified, but the feature is not licensed, the mount command
prints an error message and terminates the operation without mounting the file
system. The cio option cannot be disabled through a remount. To disable the cio
43VxFS performance: creating, mounting, and tuning file systems
Mounting a VxFS file system](https://image.slidesharecdn.com/c26c5c8f-a512-479d-9247-560686ddd018-160310211410/75/vxfs_admin_51sp1_hpux-43-2048.jpg)


![Providing API access for the FCL feature allows backward
compatibility for applications. The API allows applications to
parse the FCL file independent of the FCL layout changes. Even if
the hidden disk layout of the FCL changes, the API automatically
translates the returned data to match the expected output record.
As a result, the user does not need to modify or recompile the
application due to changes in the on-disk FCL layout.
Backward
compatibility
The following sample code fragment reads the FCL superblock, checks that the
state of the FCL is VX_FCLS_ON, issues a call to vxfs_fcl_sync to obtain a finishing
offset to read to, determines the first valid offset in the FCL file, then reads the
entries in 8K chunks from this offset. The section process fcl entries is what an
application developer must supply to process the entries in the FCL file.
#include <stdint.h>
#include <stdio.h>
#include <stdlib.h>
#include <sys/types.h>
#include <sys/fcntl.h>
#include <errno.h>
#include <fcl.h>
#include <vxfsutil.h>
#define FCL_READSZ 8192
char* fclname = "/mnt/lost+found/changelog";
int read_fcl(fclname) char* fclname;
{
struct fcl_sb fclsb;
uint64_t off, lastoff;
size_t size;
char buf[FCL_READSZ], *bufp = buf;
int fd;
int err = 0;
if ((fd = open(fclname, O_RDONLY)) < 0) {
return ENOENT;
}
if ((off = lseek(fd, 0, SEEK_SET)) != 0) {
close(fd);
return EIO;
}
size = read(fd, &fclsb, sizeof (struct fcl_sb));
if (size < 0) {
close(fd);
return EIO;
File Change Log
File Change Log programmatic interface
86](https://image.slidesharecdn.com/c26c5c8f-a512-479d-9247-560686ddd018-160310211410/75/vxfs_admin_51sp1_hpux-86-2048.jpg)


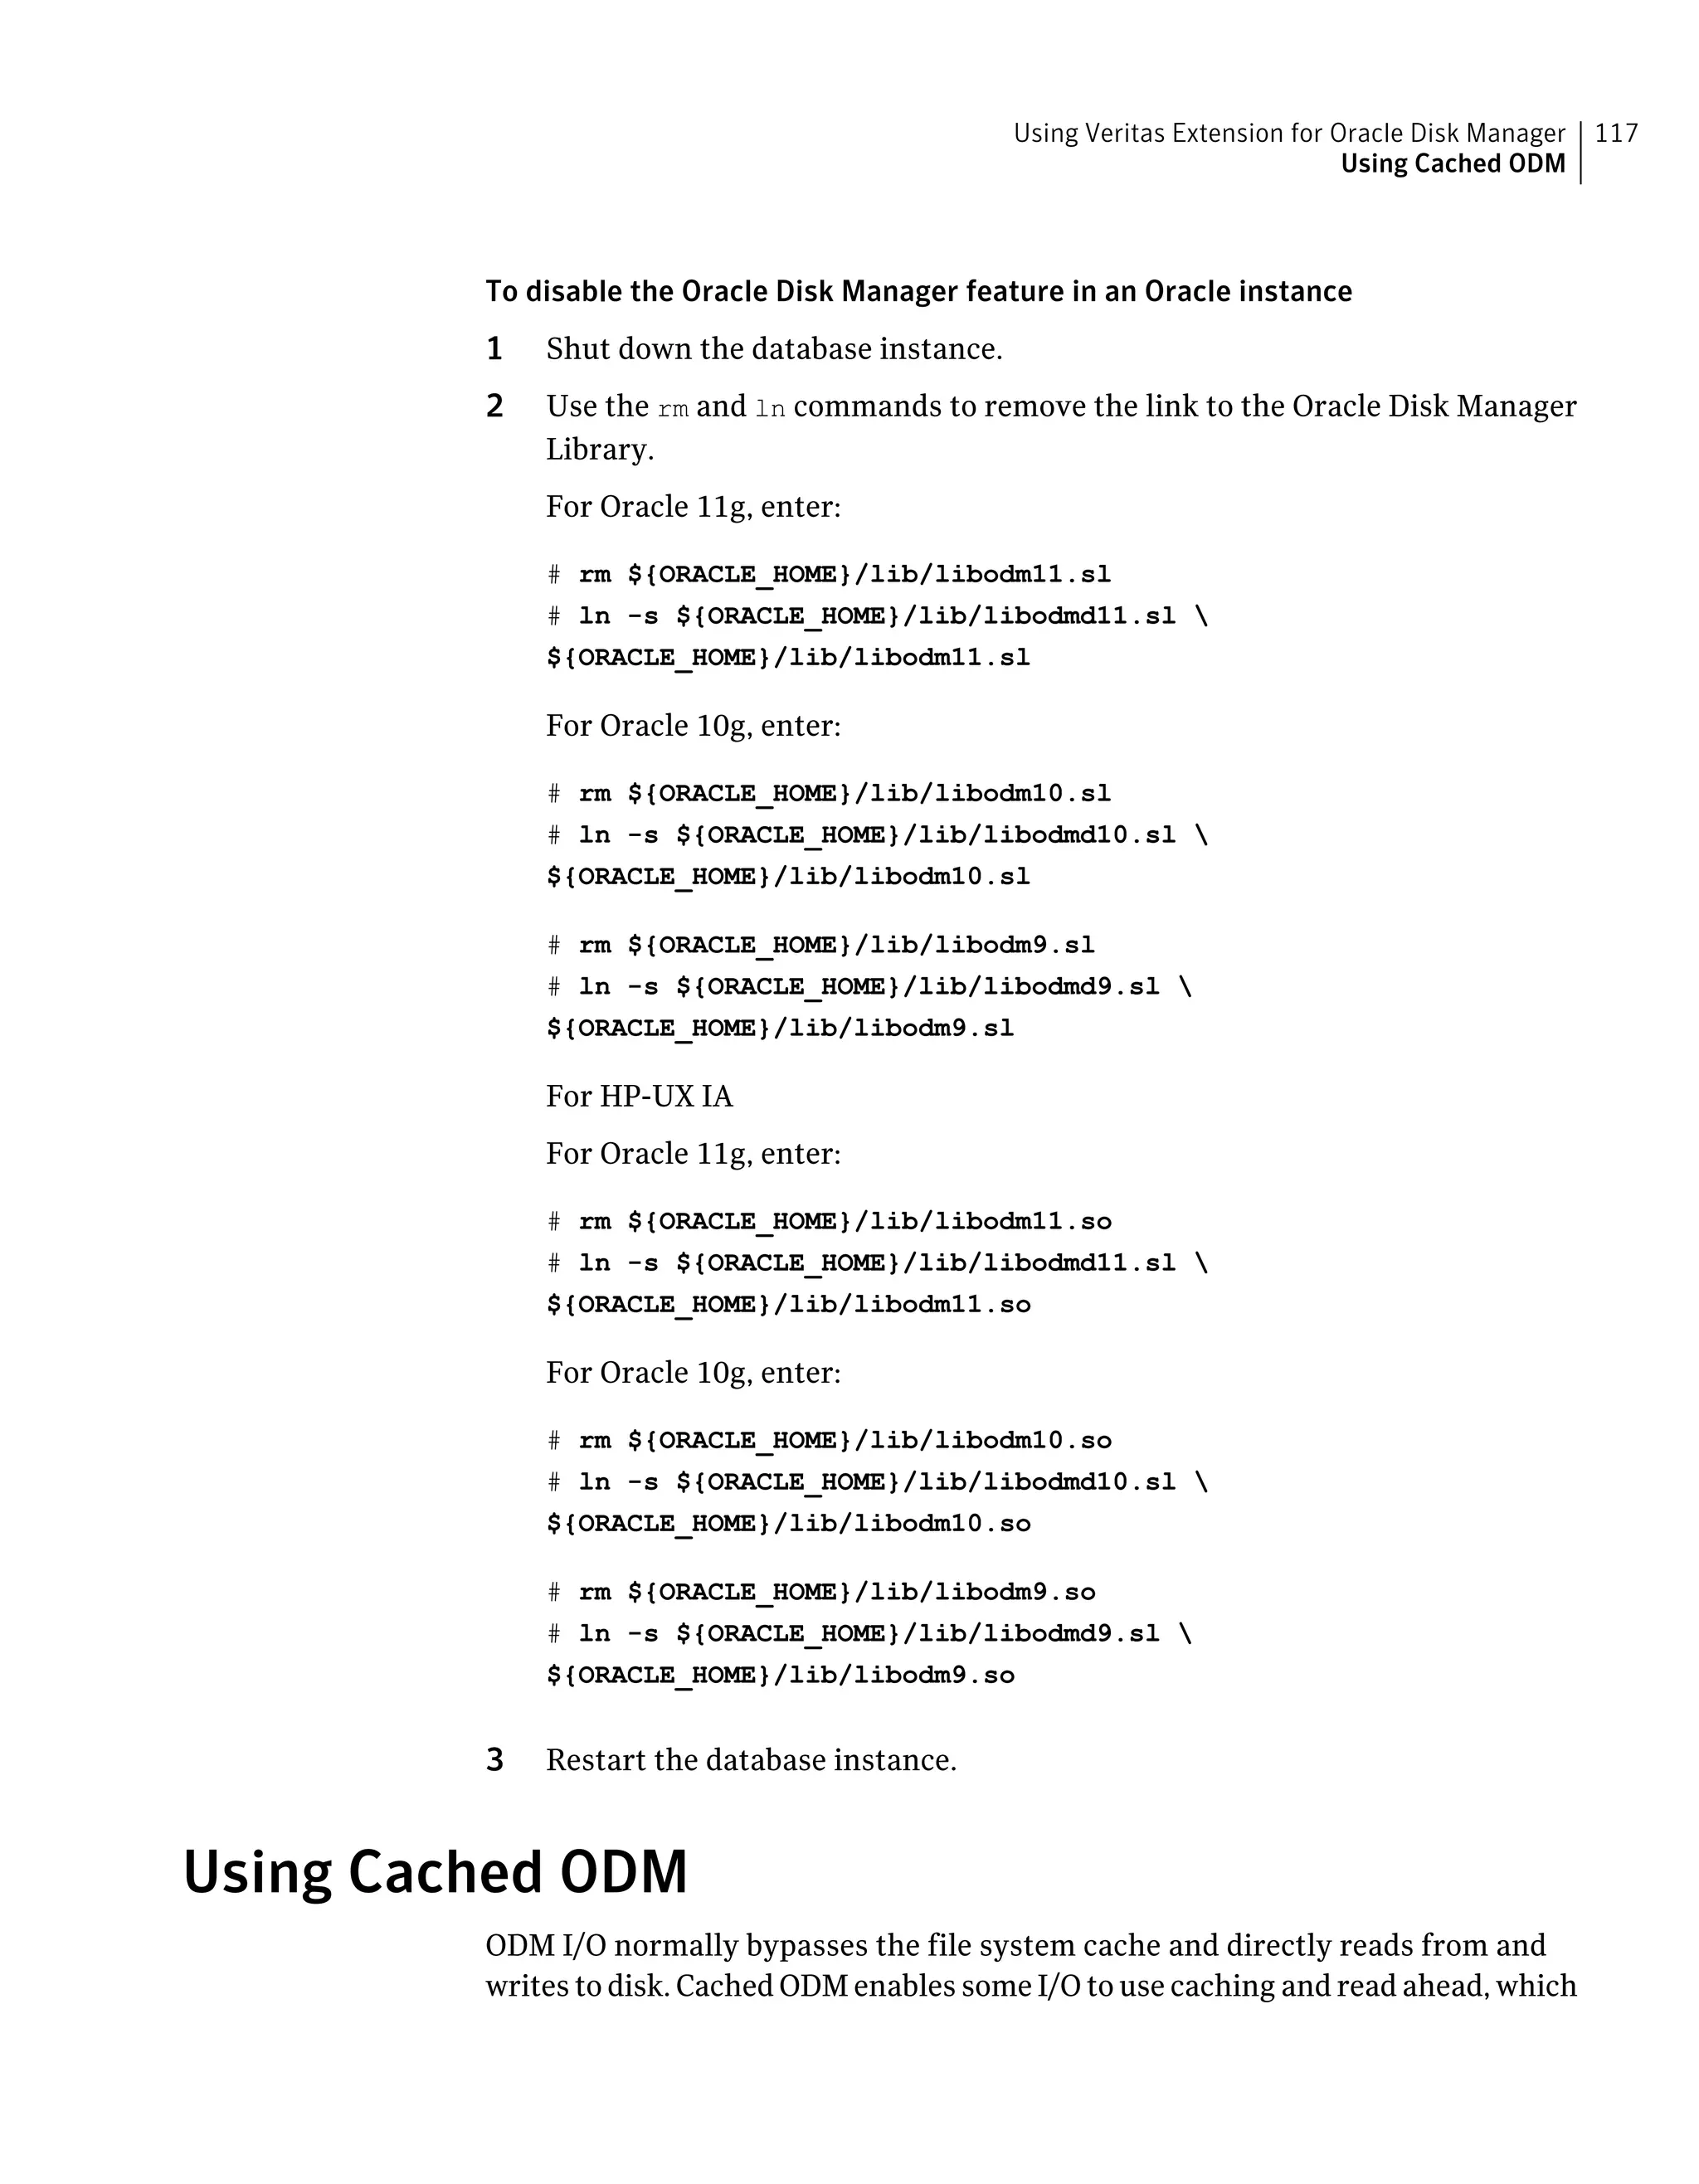
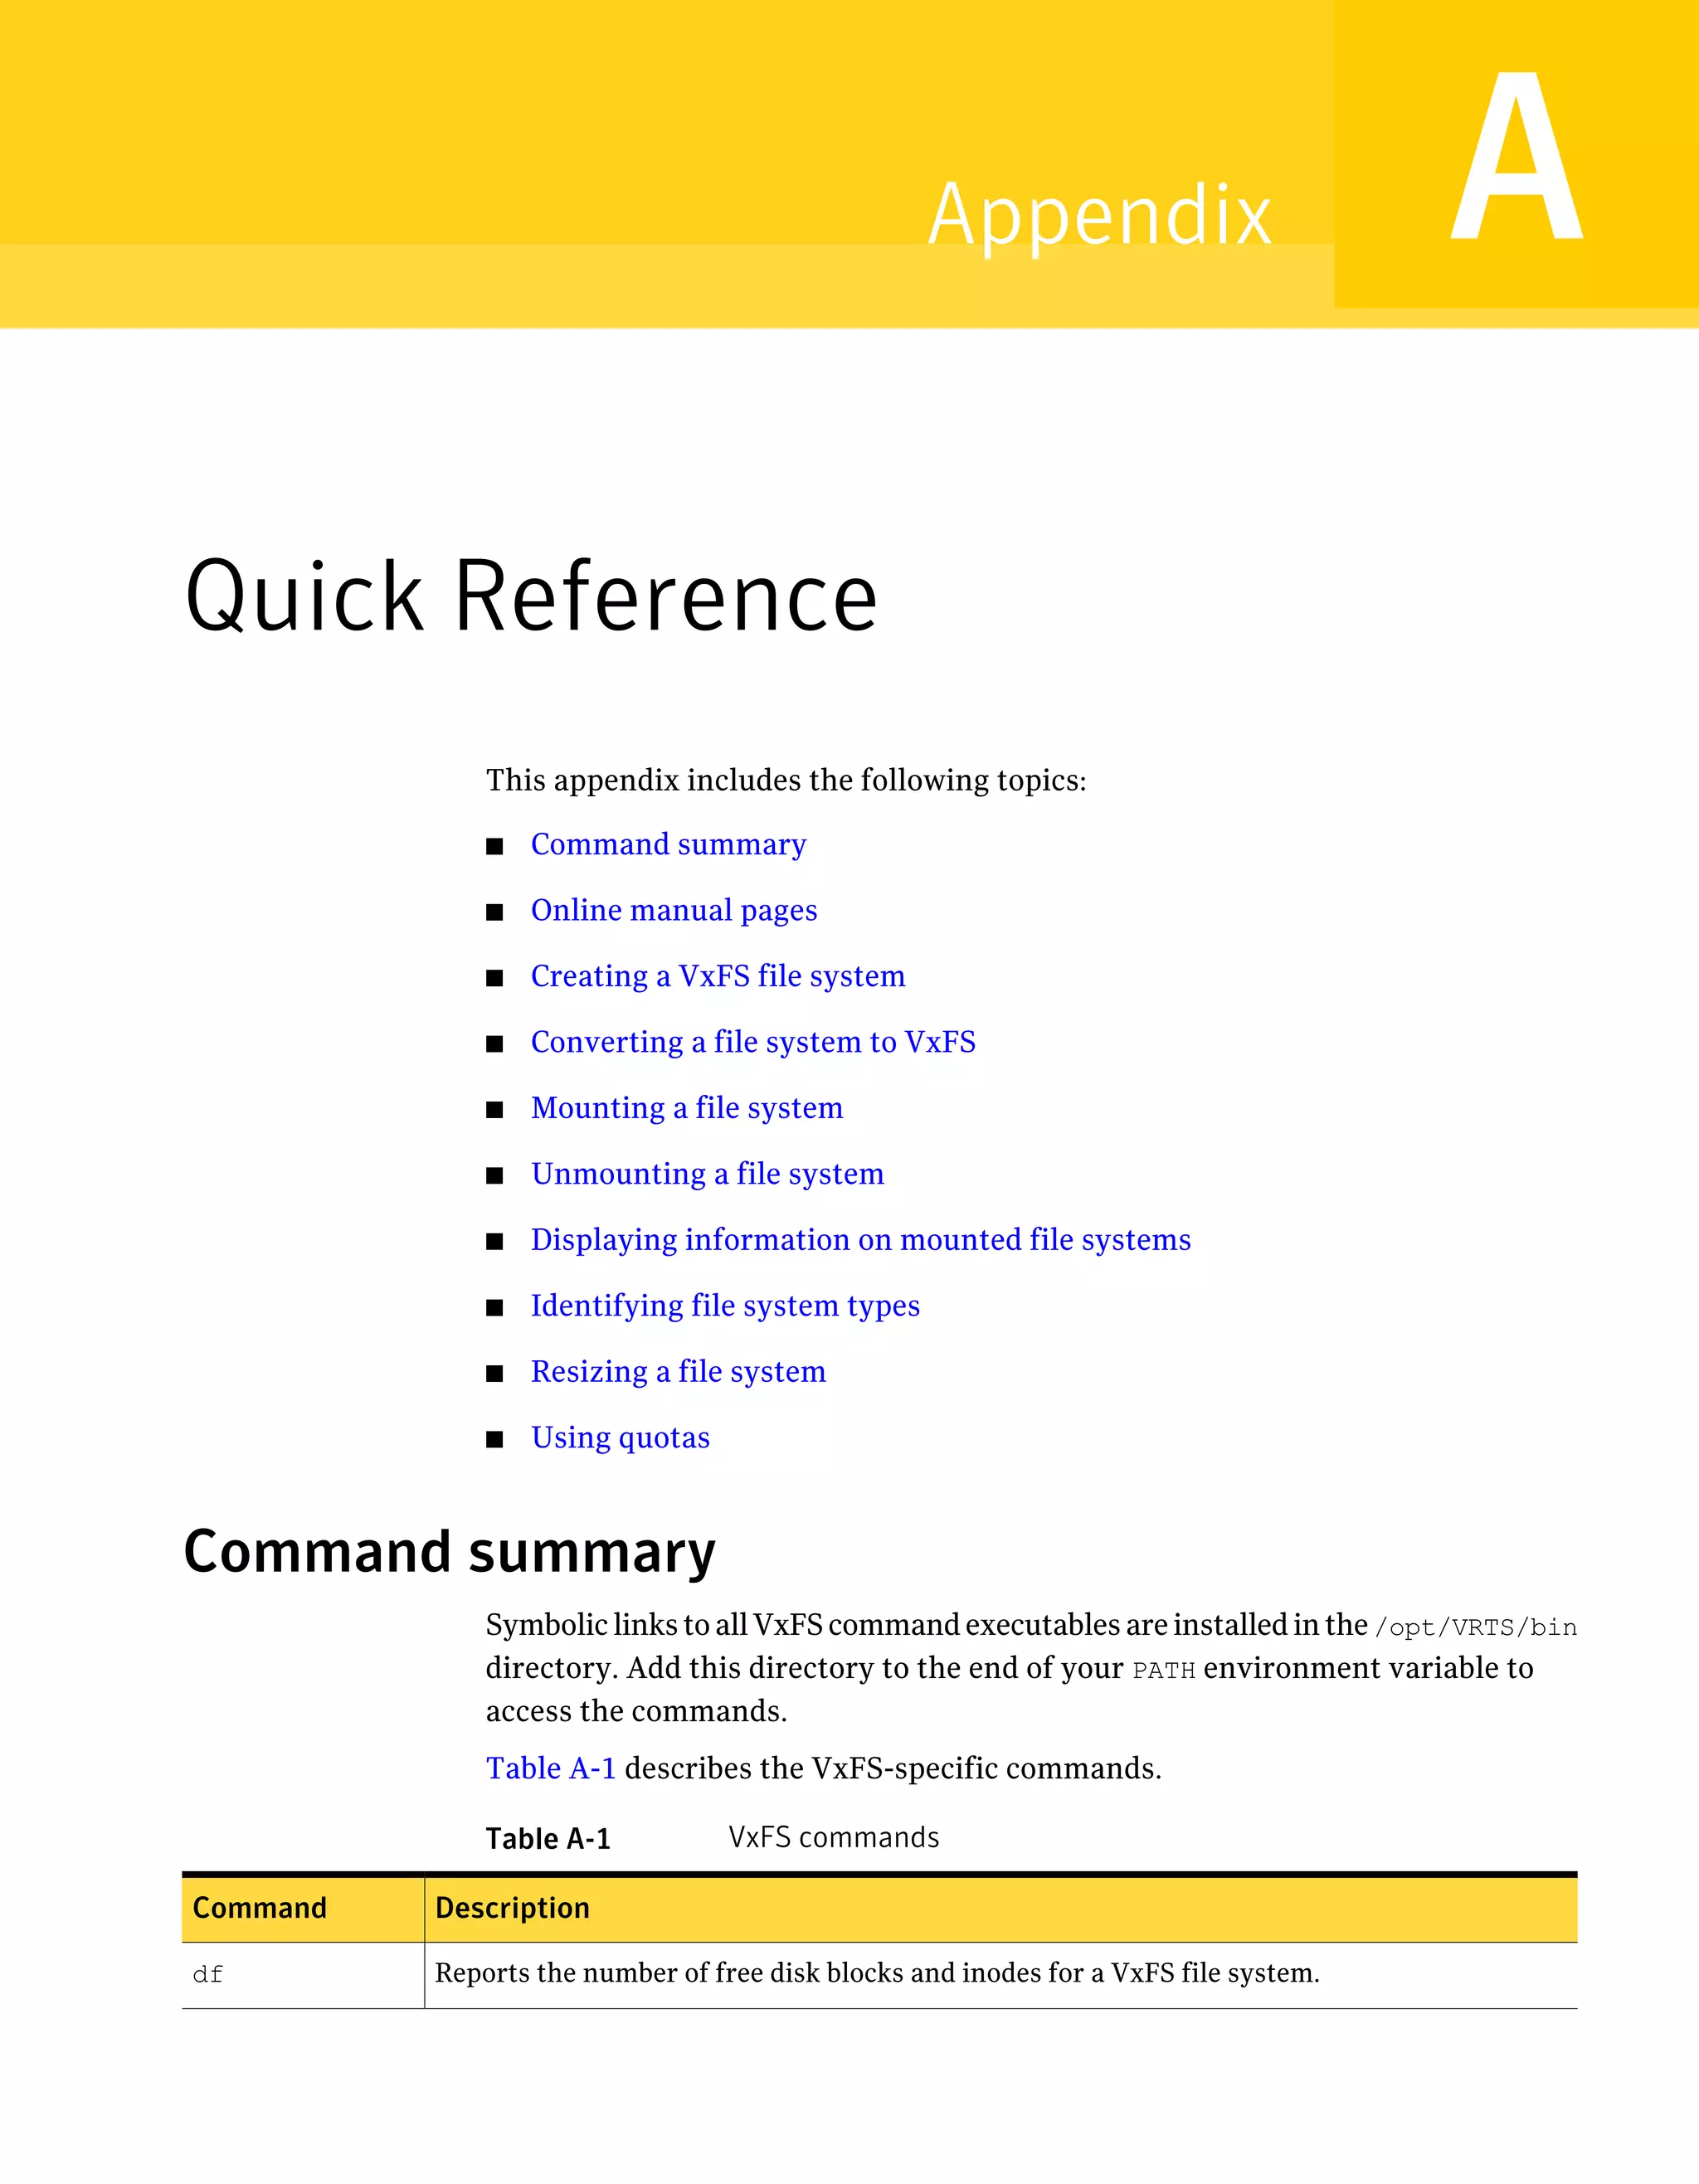
![To verify that Oracle Disk Manager is configured
1 Verify that the ODM feature is included in the license:
# /opt/VRTS/bin/vxlicrep | grep ODM
The output verifies that ODM is enabled.
Note: Verify that the license key containing the ODM feature is not expired.
If the license key has expired, you will not be able to use the ODM feature.
2 Check that the VRTSodm package is installed:
(root@slias19)[/] swlist VRTSodm
# Initializing...
# Contacting target "slias19"...
#
# Target: slias19:/
#
# VRTSodm 5.0.31.5.%20090322 Veritas Oracle Disk Manager
VRTSodm.ODM-KRN 5.0.31.5.%20090322 Veritas ODM kernel files
VRTSodm.ODM-MAN 5.0.31.5.%20090322 Veritas ODM manual pages
VRTSodm.ODM-RUN 5.0.31.5.%20090322 Veritas ODM commands
3 Check that libodm.sl is present.
# ls -lL /opt/VRTSodm/lib/libodm.sl
-rw-r--r-- 1 root sys 14336 Apr 25 18:42
/opt/VRTSodm/lib/libodm.sl
To verify that Oracle Disk Manager is running
1 Start the Oracle database.
2 Check that the instance is using the Oracle Disk Manager function:
# cat /dev/odm/stats
# echo $?
0
115Using Veritas Extension for Oracle Disk Manager
Verifying that Oracle Disk Manager is configured](https://image.slidesharecdn.com/c26c5c8f-a512-479d-9247-560686ddd018-160310211410/75/vxfs_admin_51sp1_hpux-115-2048.jpg)

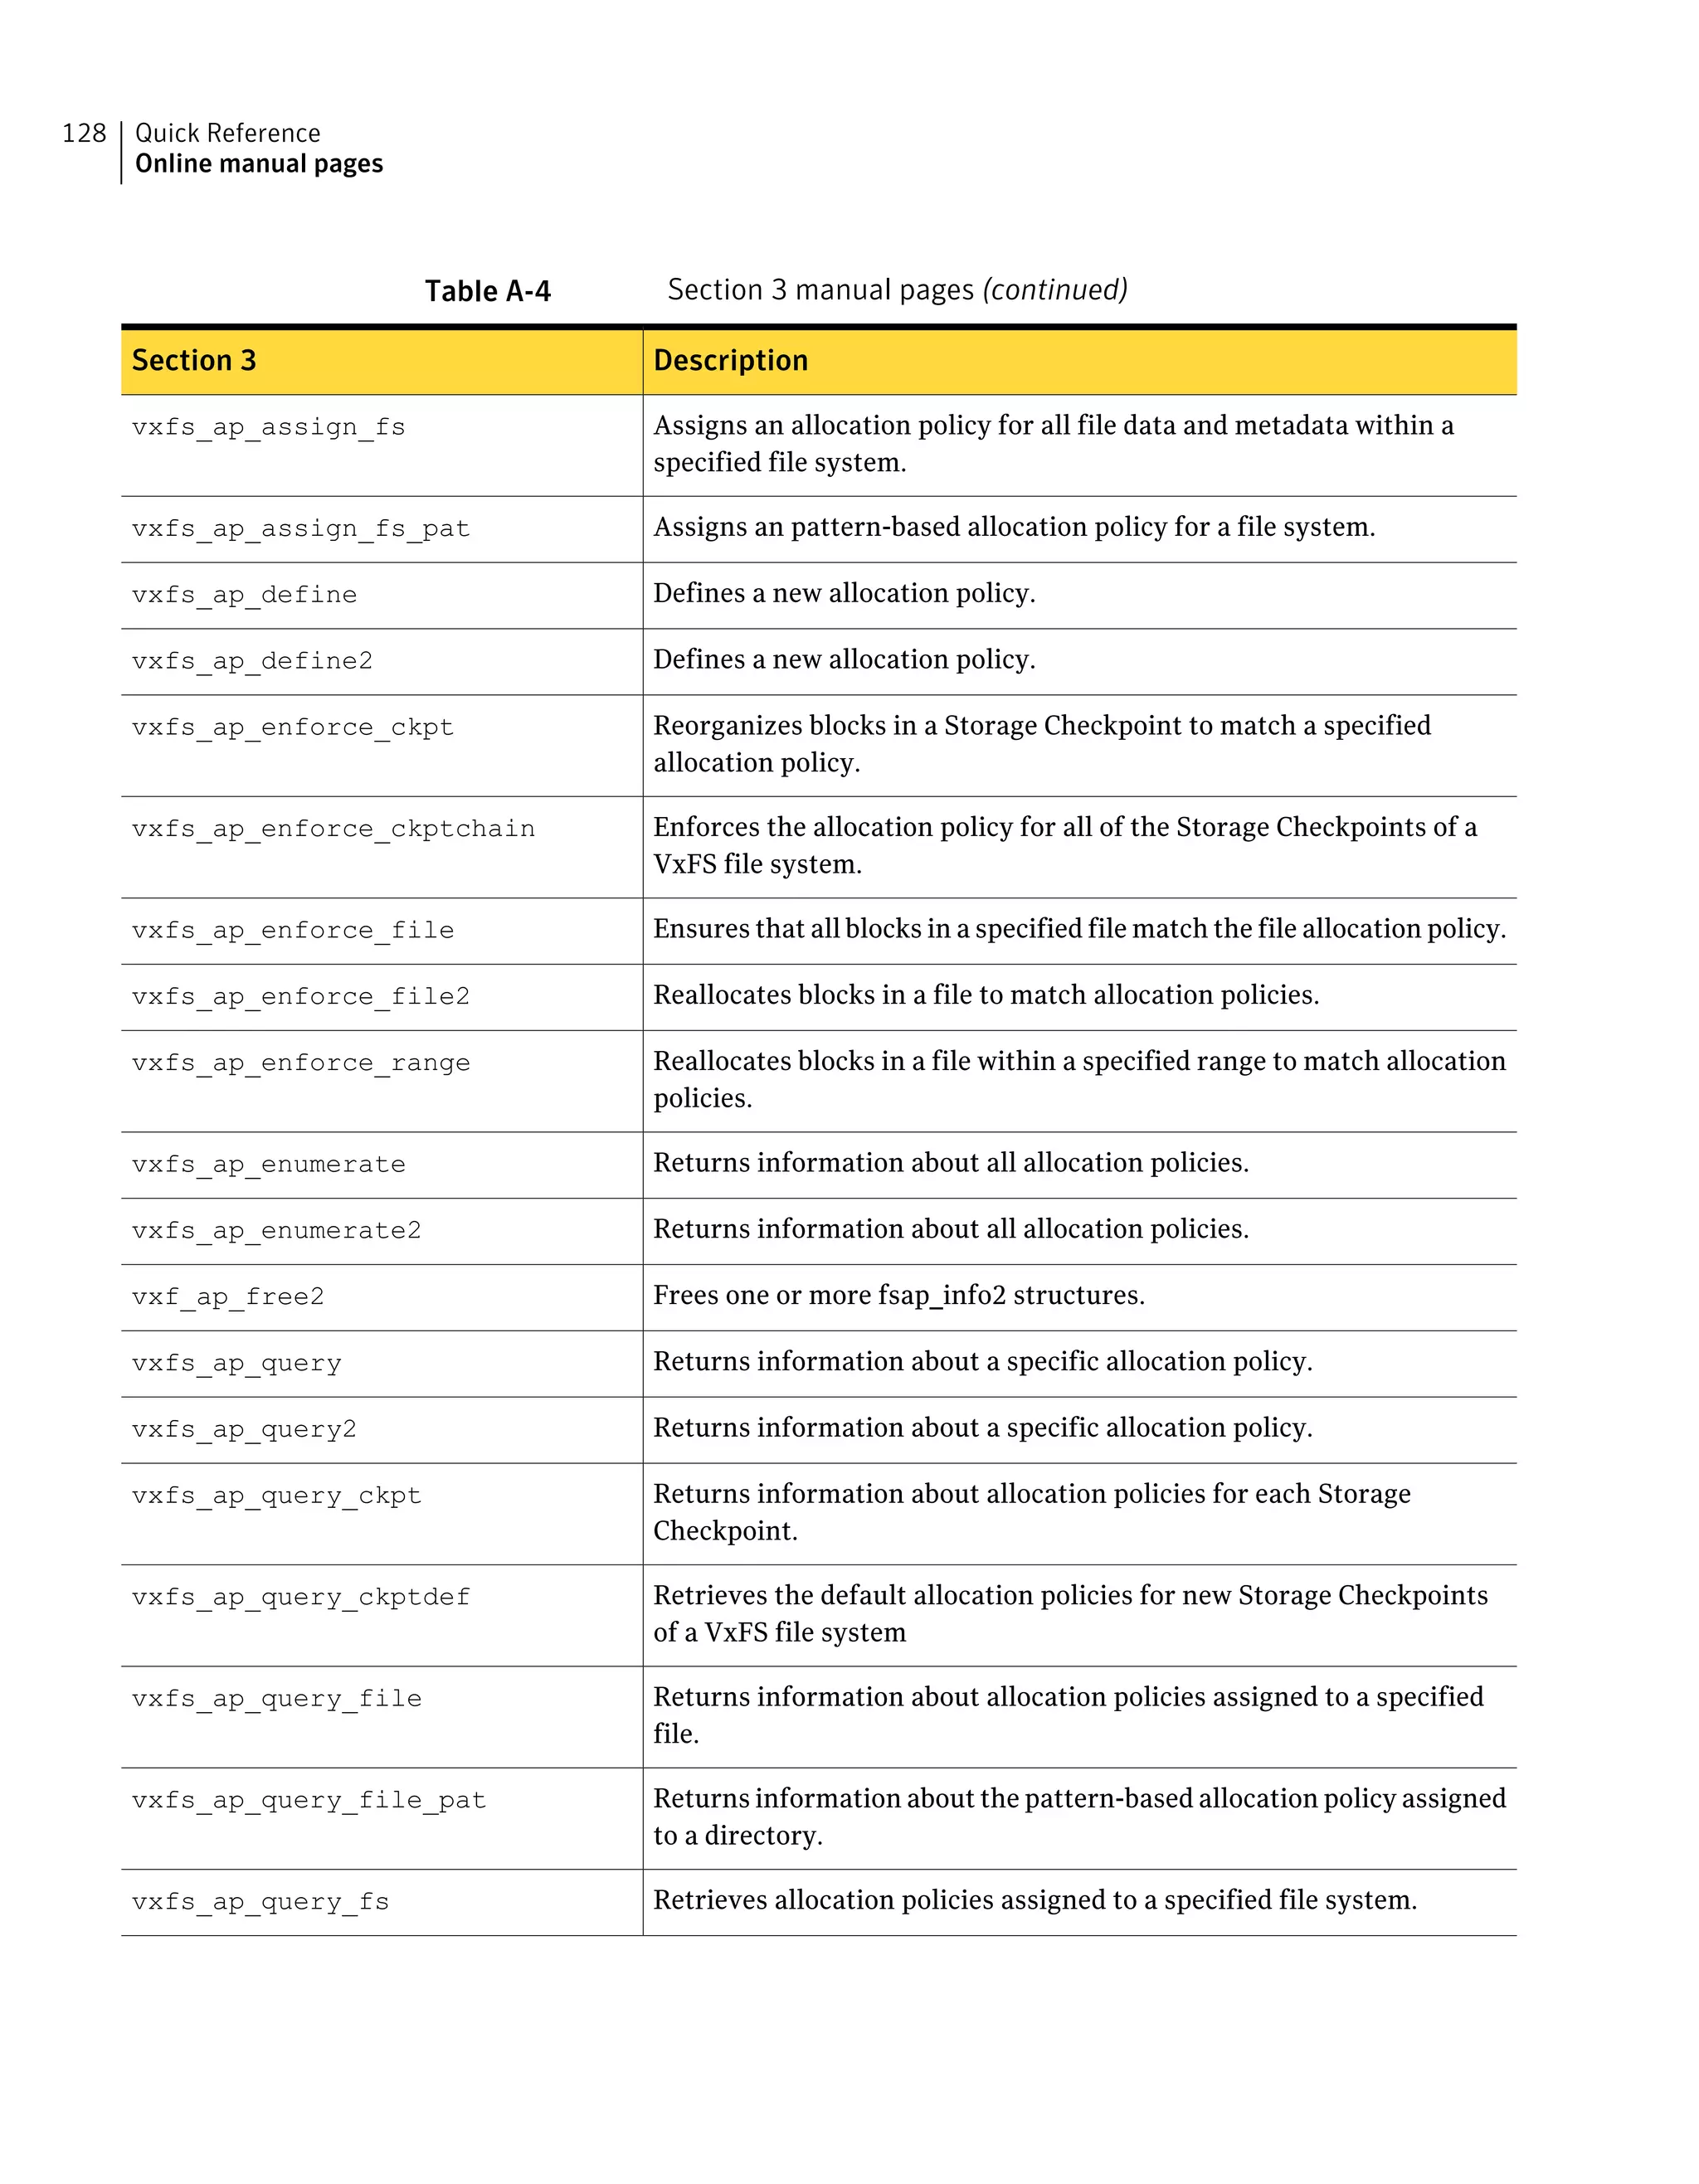

![To create a file system
◆ Use the mkfs command to create a file system:
mkfs [-F vxfs] [-m] [generic_options] [-o specific_options]
special [size]
Specifies the VxFS file system type.-F vxfs
Displays the command line that was used to create the file
system. The file system must already exist. This option
enables you to determine the parameters used to construct
the file system.
-m
Options common to most other file system types.generic_options
Options specific to VxFS.-o specific_options
Displays the geometry of the file system and does not write
to the device.
-o N
Allows users to create files larger than two gigabytes. The
default option is largefiles.
-o largefiles
Specifies the special device file location or character device
node of a particular storage device.
special
Specifies the number of 1024-byte sectors in the file system.
If size is not specified, mkfs determines the size of the special
device.
size
Example of creating a file system
The following example creates a VxFS file system of 12288 sectors in size on a
VxVM volume.
To create a VxFS file system
1 Create the file system:
# mkfs -F vxfs /dev/vx/rdsk/diskgroup/volume 12288
version 7 layout
262144 sectors, 262144 blocks of size 1024, log size 1024 blocks
largefiles supported
2 Mount the newly created file system.
# mount -F vxfs /dev/vx/rdsk/diskgroup/volume /mnt1
131Quick Reference
Creating a VxFS file system](https://image.slidesharecdn.com/c26c5c8f-a512-479d-9247-560686ddd018-160310211410/75/vxfs_admin_51sp1_hpux-131-2048.jpg)
![Converting a file system to VxFS
The vxfsconvert command can be used to convert a HFS file system to a VxFS
file system.
See the vxfsconvert(1M) manual page.
To convert a HFS file system to a VxFS file system
◆ Use the vxfsconvert command to convert a HFS file system to VxFS:
vxfsconvert [-l logsize] [-s size] [-efnNvyY] special
Estimates the amount of space required to complete the conversion.-e
Displays the list of supported file system types.-f
Specifies the size of the file system intent log.-l logsize
Assumes a no response to all questions asked by vxfsconvert.-n|N
Directs vxfsconvert to use free disk space past the current end of the
file system to store VxFS metadata.
-s siz
Specifies verbose mode.-v
Assumes a yes response to all questions asked by vxfsconvert.-y|Y
Specifies the name of the character (raw) device that contains the file
system to convert.
special
Example of converting a file system
The following example converts a HFS file system to a VxFS file system with an
intent log size of 4096 blocks.
To convert a HFS file system to a VxFS file system
◆ Convert the file system:
# vxfsconvert -l 4096 /dev/vx/rdsk/diskgroup/volume
Mounting a file system
You can mount a VxFS file system by using the mount command. If you enter this
command, the generic mount command parses the arguments and the -F fstype
option executes the mount command specific to that file system type. For VxFS
Quick Reference
Converting a file system to VxFS
132](https://image.slidesharecdn.com/c26c5c8f-a512-479d-9247-560686ddd018-160310211410/75/vxfs_admin_51sp1_hpux-132-2048.jpg)
![and Veritas-installed products, the generic mount command executes the VxFS
mount command from the directory /sbin/fs/vxfs. If the -F option is not
supplied, the command searches the file /etc/fstab for a file system and an
fstype matching the special file or mount point provided. If no file system type is
specified, mount uses the default file system type (VxFS).
The mount command automatically runs the VxFS fsck command to clean up the
intent log if the mount command detects a dirty log in the file system. This
functionality is only supported on file systems mounted on a Veritas Volume
Manager (VxVM) volume.
To mount a file system
◆ Use the mount command to mount a file system:
mount [-F vxfs] [generic_options] [-r] [-o specific_options]
special mount_point
File system type.vxfs
Options common to most other file system types.generic_options
Options specific to VxFS.specific_options
Mounts a Storage Checkpoint.-o ckpt=ckpt_name
Mounts a file system in shared mode. Available only with the VxFS
cluster file system feature.
-o cluster
A VxFS block special device.special
Directory on which to mount the file system.mount_point
Mounts the file system as read-only.-r
Mount options
The mount command has numerous options to tailor a file system for various
functions and environments.
The following table lists some of the specific_options:
If security is important, use blkclear to ensure that deleted files
are completely erased before the space is reused.
Security feature
133Quick Reference
Mounting a file system](https://image.slidesharecdn.com/c26c5c8f-a512-479d-9247-560686ddd018-160310211410/75/vxfs_admin_51sp1_hpux-133-2048.jpg)
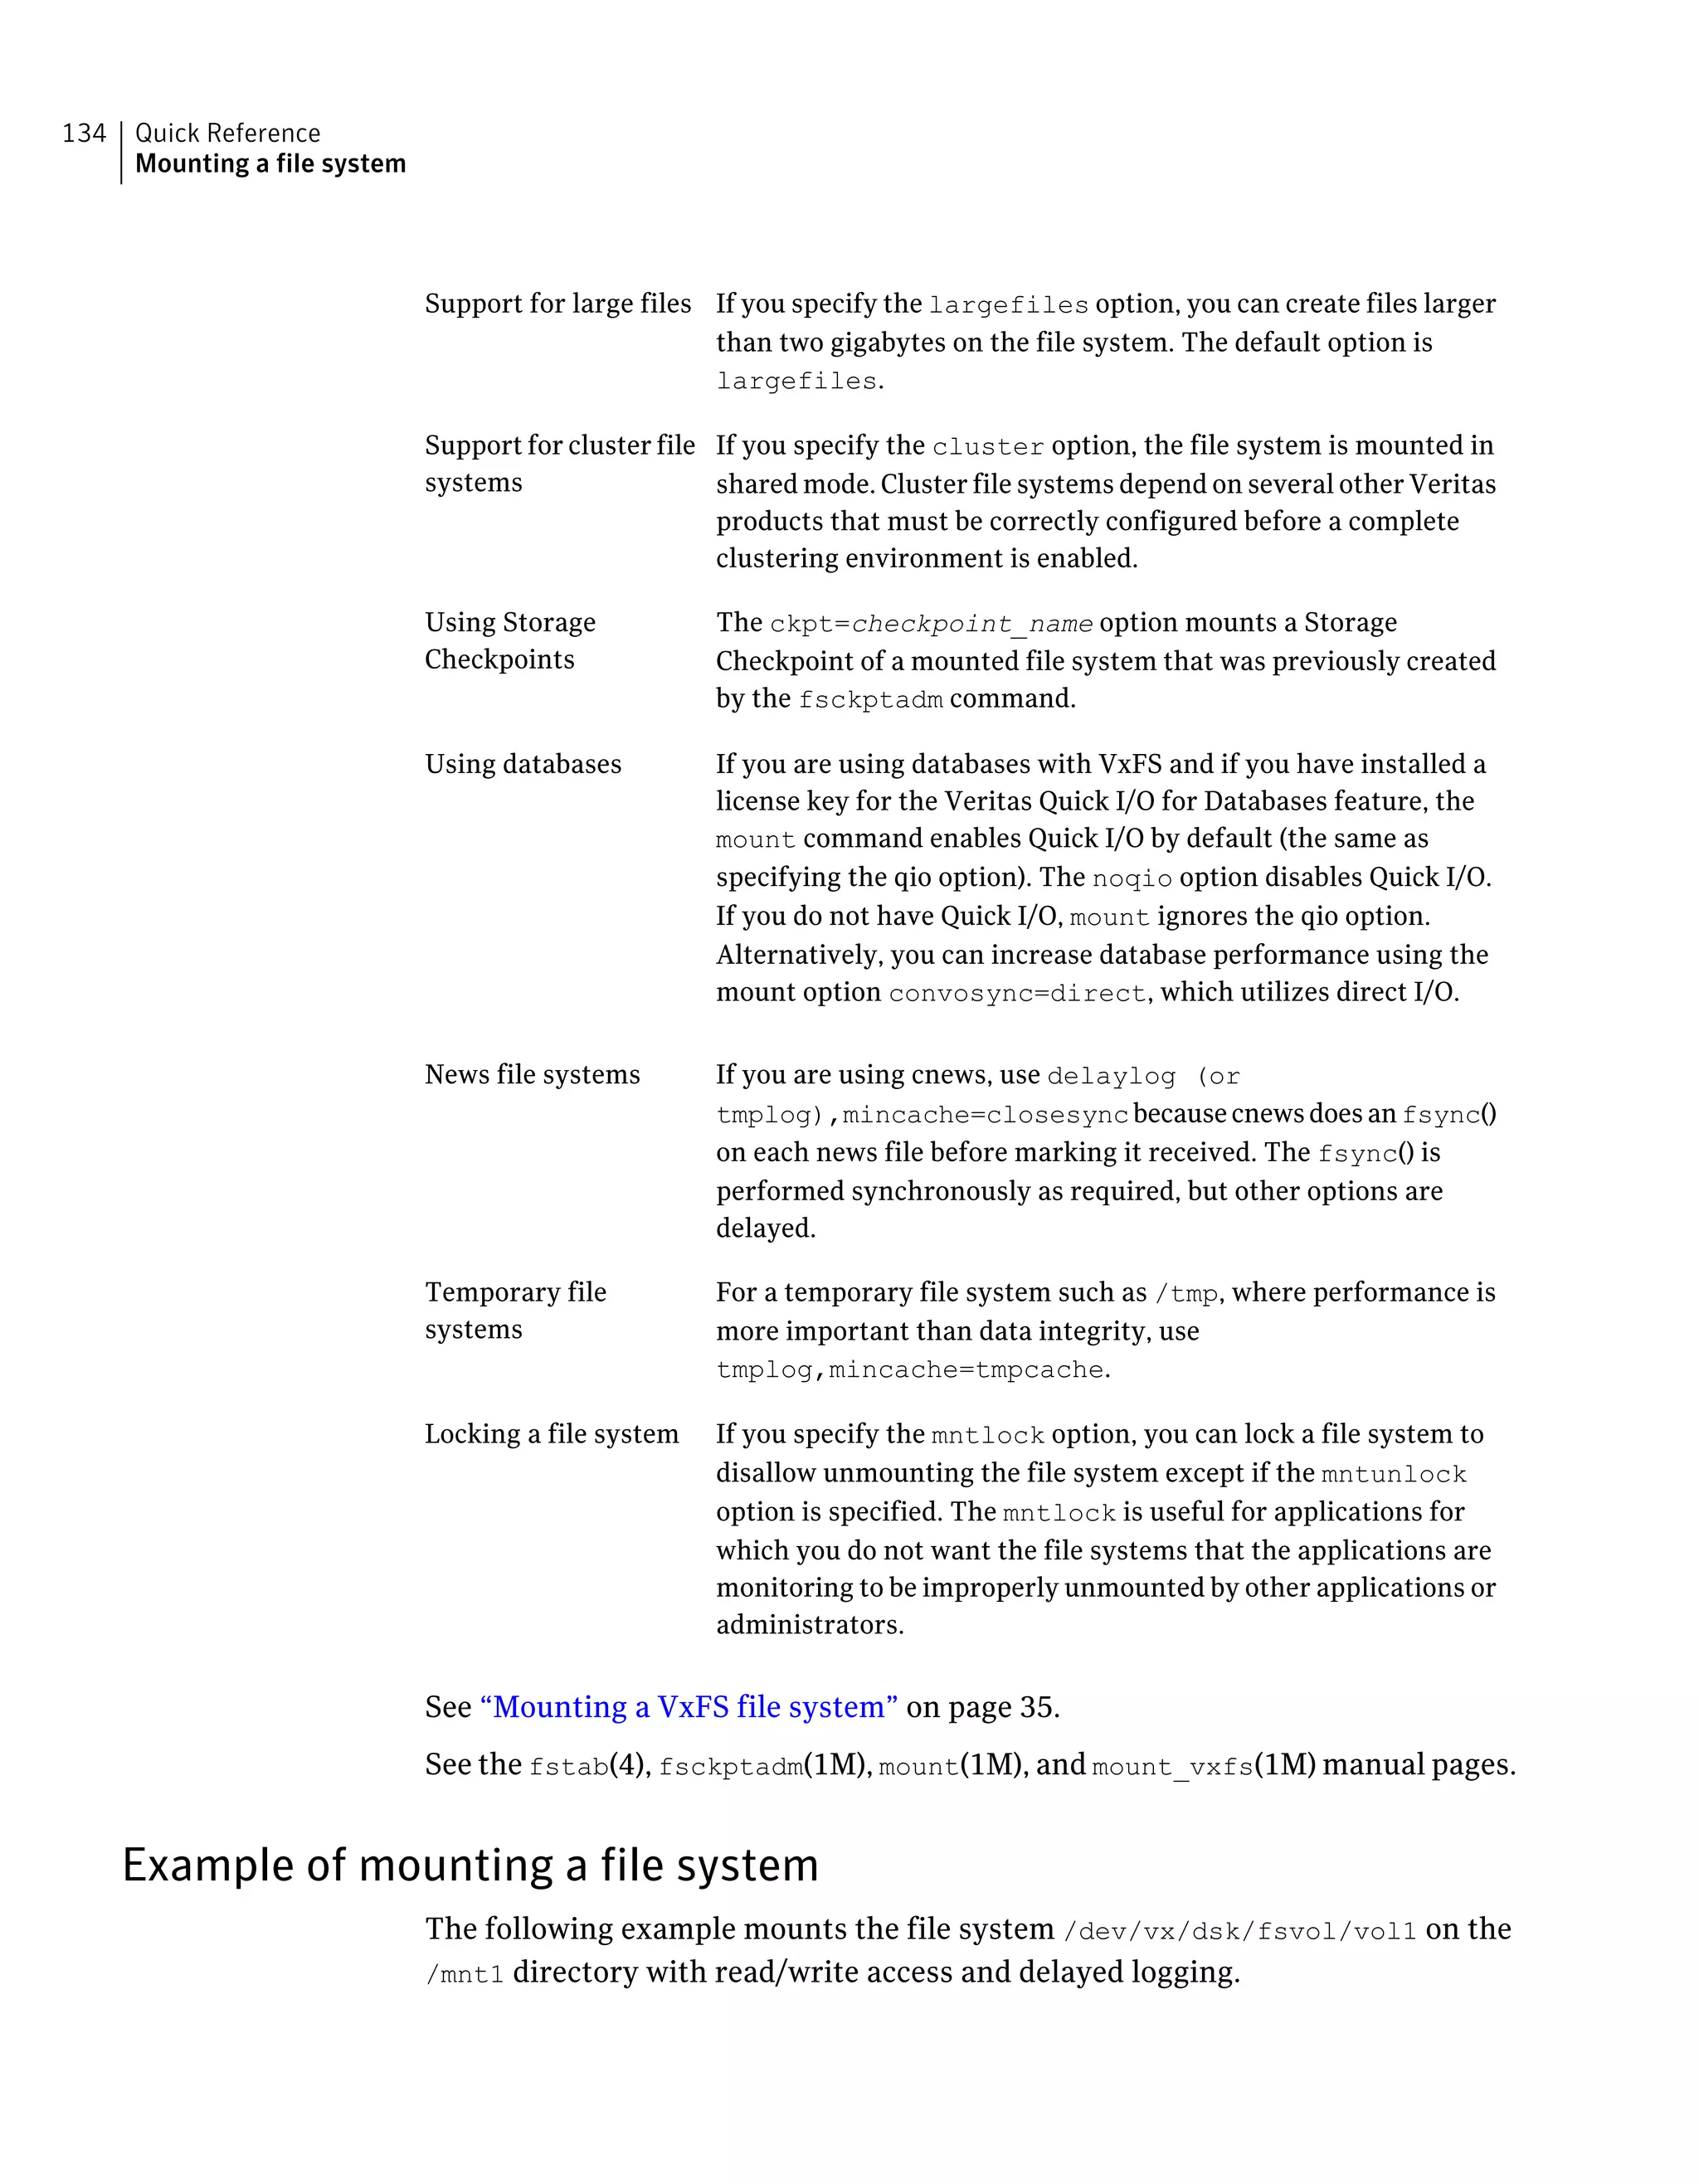
![To unmount a file system
◆ Use the umount command to unmount a file system:
vxumount [-o [force]] mount_point
vxumount [-f] mount_point
vxumount [-o [force]] {special|mount_point}
Specify the file system to be unmounted as a mount_point or special. special
is the VxFS block special device on which the file system resides.
Example of unmounting a file system
The following are examples of unmounting file systems.
To unmount the file system /dev/vx/dsk/fsvol/vol1
◆ Unmount the file system:
# umount /dev/vx/dsk/fsvol/vol1
To unmount all file systems not required by the system
◆ Unmount the file system mounted at /mnt1:
# vxumount /mnt1
Displaying information on mounted file systems
Use the mount command to display a list of currently mounted file systems.
See the mount(1M) and mount_vxfs(1M) manual pages.
To view the status of mounted file systems
◆ Use the mount command to view the status of mounted file systems:
mount -v
This shows the file system type and mount options for all mounted file systems.
The -v option specifies verbose mode.
Example of displaying information on mounted file systems
The following example shows the result of invoking the mount command without
options.
Quick Reference
Displaying information on mounted file systems
136](https://image.slidesharecdn.com/c26c5c8f-a512-479d-9247-560686ddd018-160310211410/75/vxfs_admin_51sp1_hpux-136-2048.jpg)

![To extend a VxFS file system
◆ Use the fsadm command to extend a VxFS file system:
fsadm [-F vxfs] [-b newsize] [-r rawdev]
mount_point
The file system type.vxfs
The size to which the file system will increase. The default units
is sectors, but you can specify k or K for kilobytes, m or M for
megabytes, or g or G for gigabytes.
newsize
The file system's mount point.mount_point
Specifies the path name of the raw device if there is no entry in
/etc/fstab and fsadm cannot determine the raw device.
-r rawdev
Examples of extending a file system
The following example extends a file system mounted at /mnt1 to 22528 sectors.
To extend a file system to 22528 sectors
◆ Extend the VxFS file system mounted on /mnt1 to 22528 sectors:
# fsadm -F vxfs -b 22528 /mnt1
The following example extends a file system mounted at /mnt1 to 500 gigabytes.
To extend a file system to 500 gigabytes
◆ Extend the VxFS file system mounted on /mnt1 to 500 gigabytes:
# fsadm -F vxfs -b 500g /mnt1
Shrinking a file system
You can decrease the size of the file system using fsadm, even while the file system
is mounted.
Warning: After this operation, there is unused space at the end of the device. You
can then resize the device, but be careful not to make the device smaller than the
new size of the file system.
139Quick Reference
Resizing a file system](https://image.slidesharecdn.com/c26c5c8f-a512-479d-9247-560686ddd018-160310211410/75/vxfs_admin_51sp1_hpux-139-2048.jpg)
![To decrease the size of a VxFS file system
◆ Use the fsadm command to decrease the size of a VxFS file system:
fsadm [-F vxfs] [-b newsize] [-r rawdev] mount_point
The file system type.vxfs
The size to which the file system will shrink. The default units is
sectors, but you can specify k or K for kilobytes, m or M for
megabytes, or g or G for gigabytes.
newsize
The file system's mount point.mount_point
Specifies the path name of the raw device if there is no entry in
/etc/fstab and fsadm cannot determine the raw device.
-r rawdev
Examples of shrinking a file system
The following example shrinks a VxFS file system mounted at /mnt1 to 20480
sectors.
To shrink a file system to 20480 sectors
◆ Shrink a VxFS file system mounted at /mnt1 to 20480 sectors:
# fsadm -F vxfs -b 20480 /mnt1
The following example shrinks a file system mounted at /mnt1 to 450 gigabytes.
To shrink a file system to 450 gigabytes
◆ Shrink the VxFS file system mounted on /mnt1 to 450 gigabytes:
# fsadm -F vxfs -b 450g /mnt1
Reorganizing a file system
You can reorganize or compact a fragmented file system using fsadm, even while
the file system is mounted. This may help shrink a file system that could not
previously be decreased.
To reorganize a VxFS file system
◆ Use the fsadm command to reorganize a VxFS file system:
fsadm [-F vxfs] [-e] [-d] [-E] [-D] [-r rawdev] mount_point
Quick Reference
Resizing a file system
140](https://image.slidesharecdn.com/c26c5c8f-a512-479d-9247-560686ddd018-160310211410/75/vxfs_admin_51sp1_hpux-140-2048.jpg)
![The file system type.vxfs
Reorders directory entries to put subdirectory entries first, then
all other entries in decreasing order of time of last access. Also
compacts directories to remove free space.
-d
Reports on directory fragmentation.-D
Minimizes file system fragmentation. Files are reorganized to
have the minimum number of extents.
-e
Reports on extent fragmentation.-E
The file system's mount point.mount_point
Specifies the path name of the raw device if there is no entry in
/etc/fstab and fsadm cannot determine the raw device.
-r rawdev
Example of reorganizing a file system
The following example reorganizes the file system mounted at /mnt1.
To reorganize a VxFS file system
◆ Reorganize the VxFS file system mounted at /mnt1:
# fsadm -F vxfs -EeDd /mnt1
Extending a file system using extendfs
If a VxFS file system is not mounted, you can use the extendfs command to
increase the size of the file system.
To extend a VxFS file system
◆ Use the extendfs command to extend a VxFS file system:
extendfs [-F vxfs] [-q] [-v] [-s size] special
The file system typevxfs
Displays the size of special without resizing it-q
Specifies verbose mode-v
Specifies the number of blocks to add to the file system (maximum if
not specified)
-s size
141Quick Reference
Resizing a file system](https://image.slidesharecdn.com/c26c5c8f-a512-479d-9247-560686ddd018-160310211410/75/vxfs_admin_51sp1_hpux-141-2048.jpg)


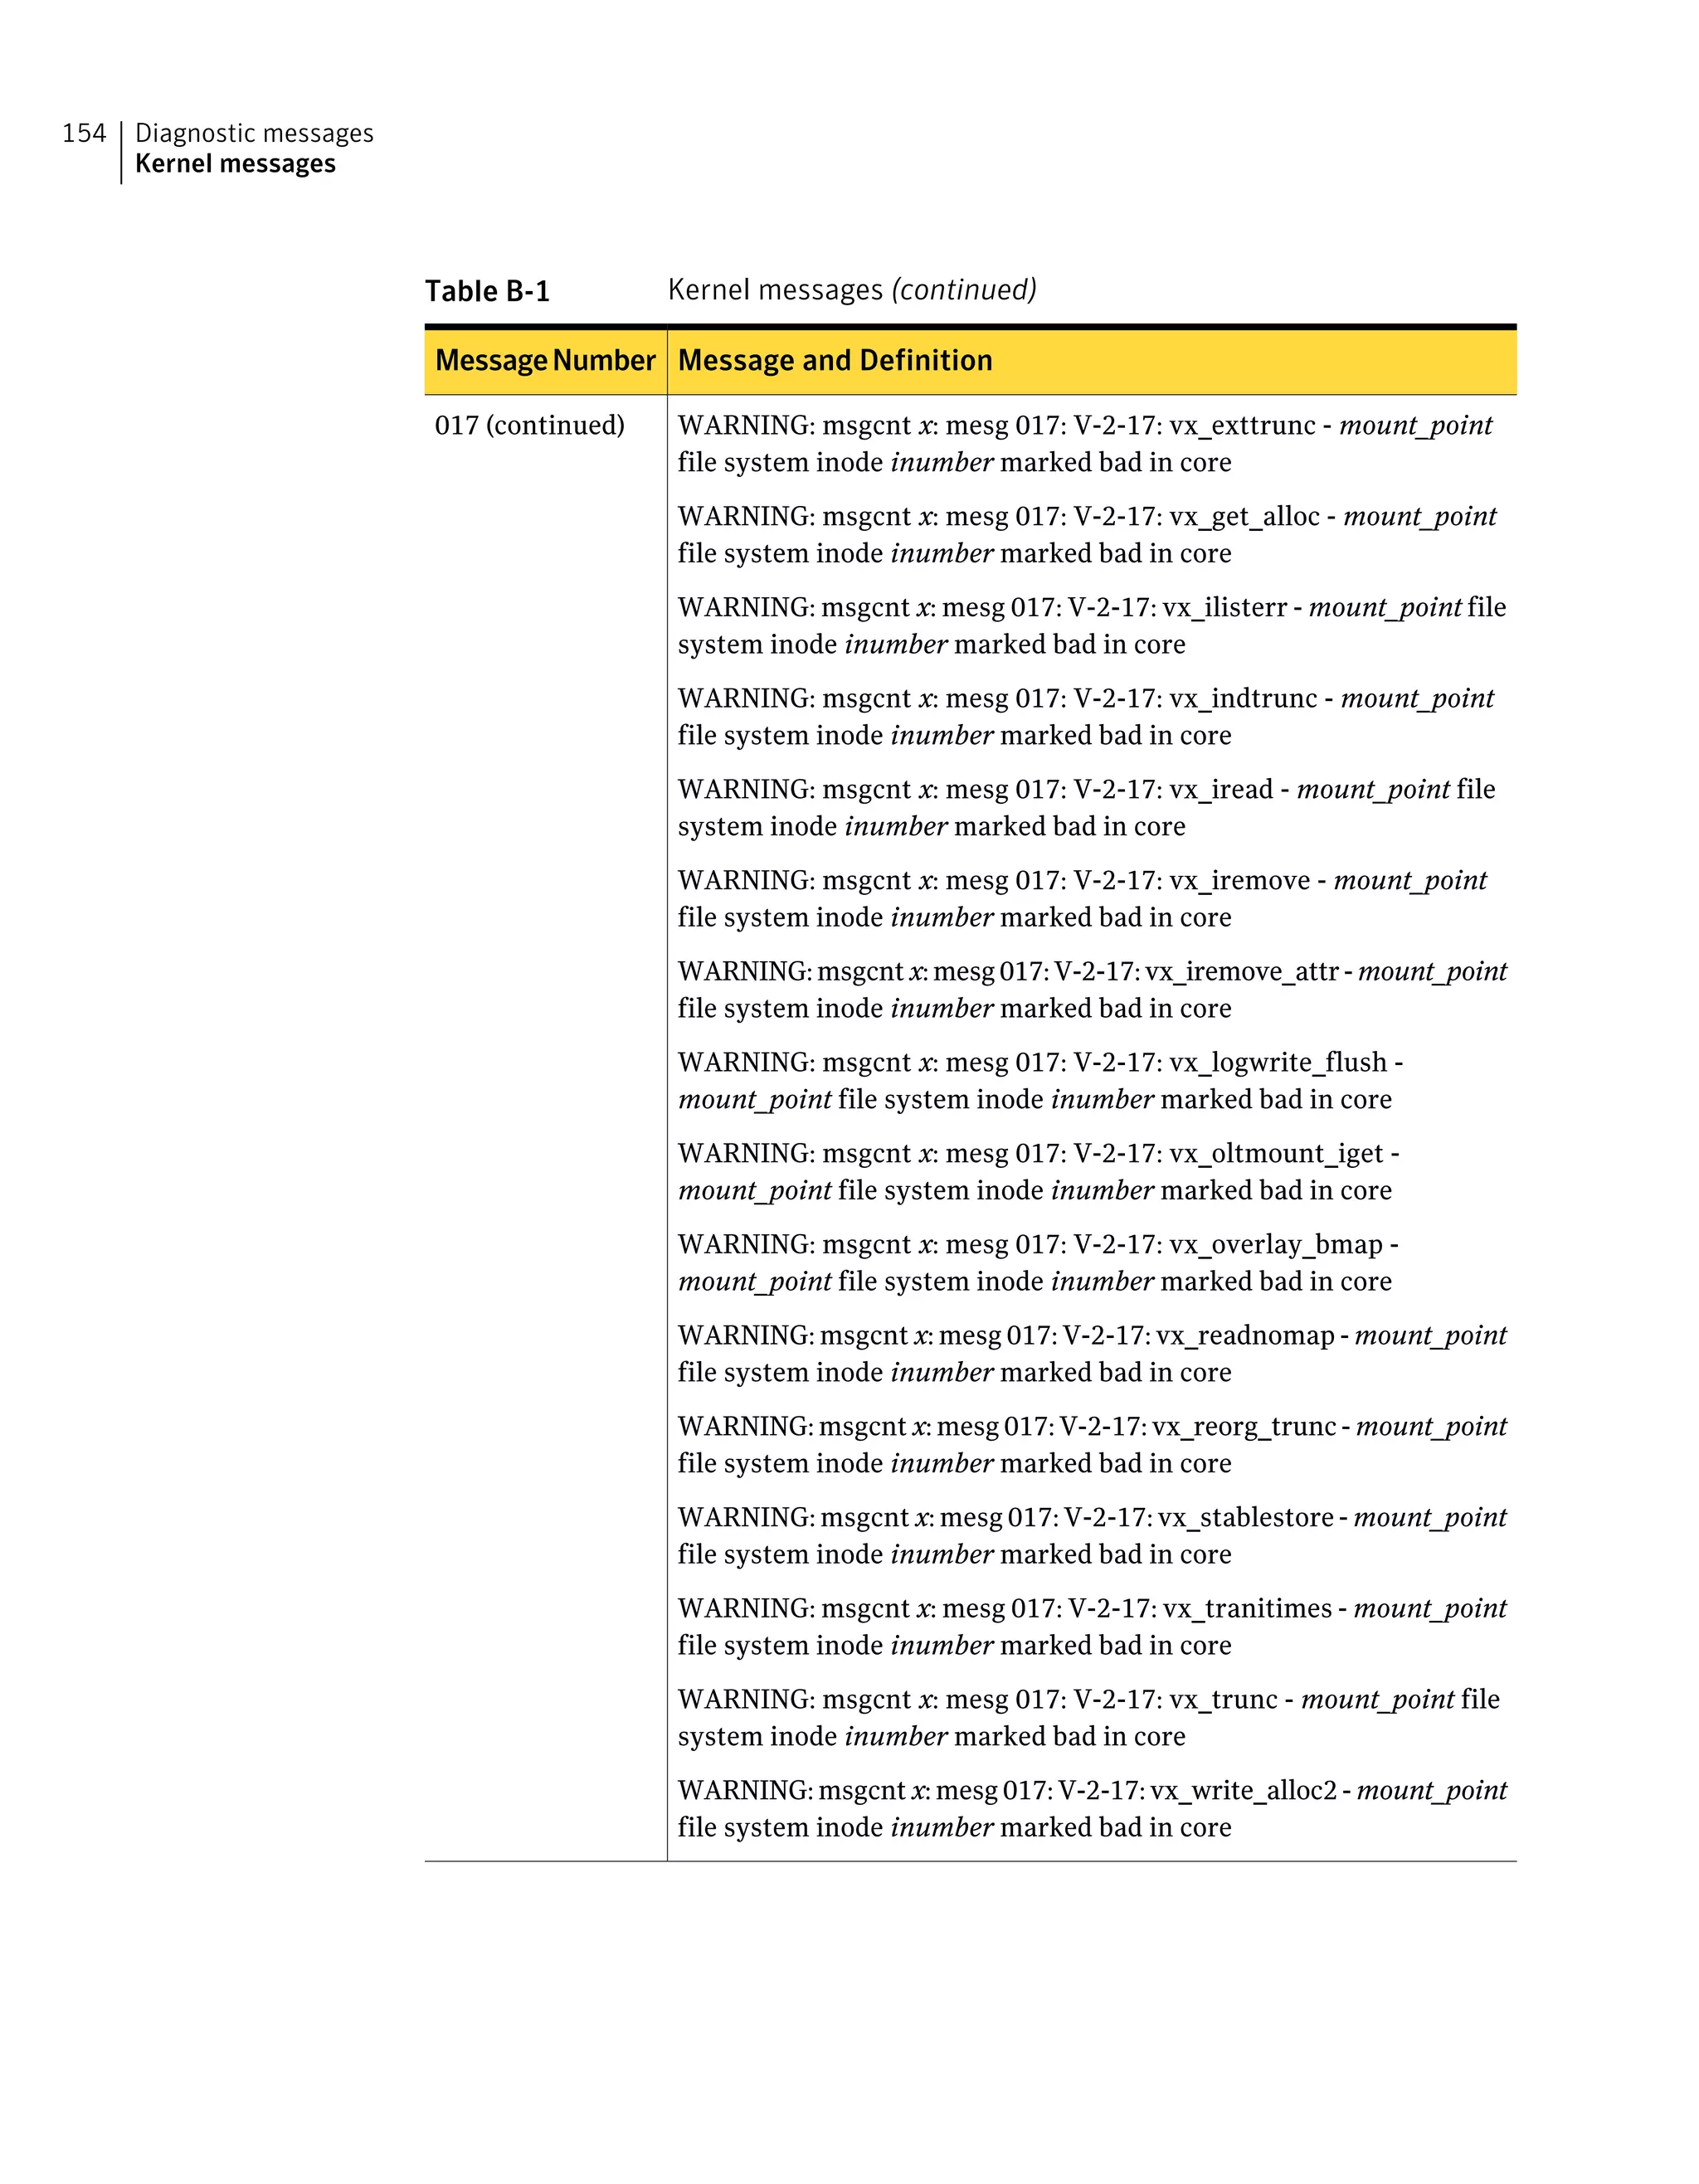

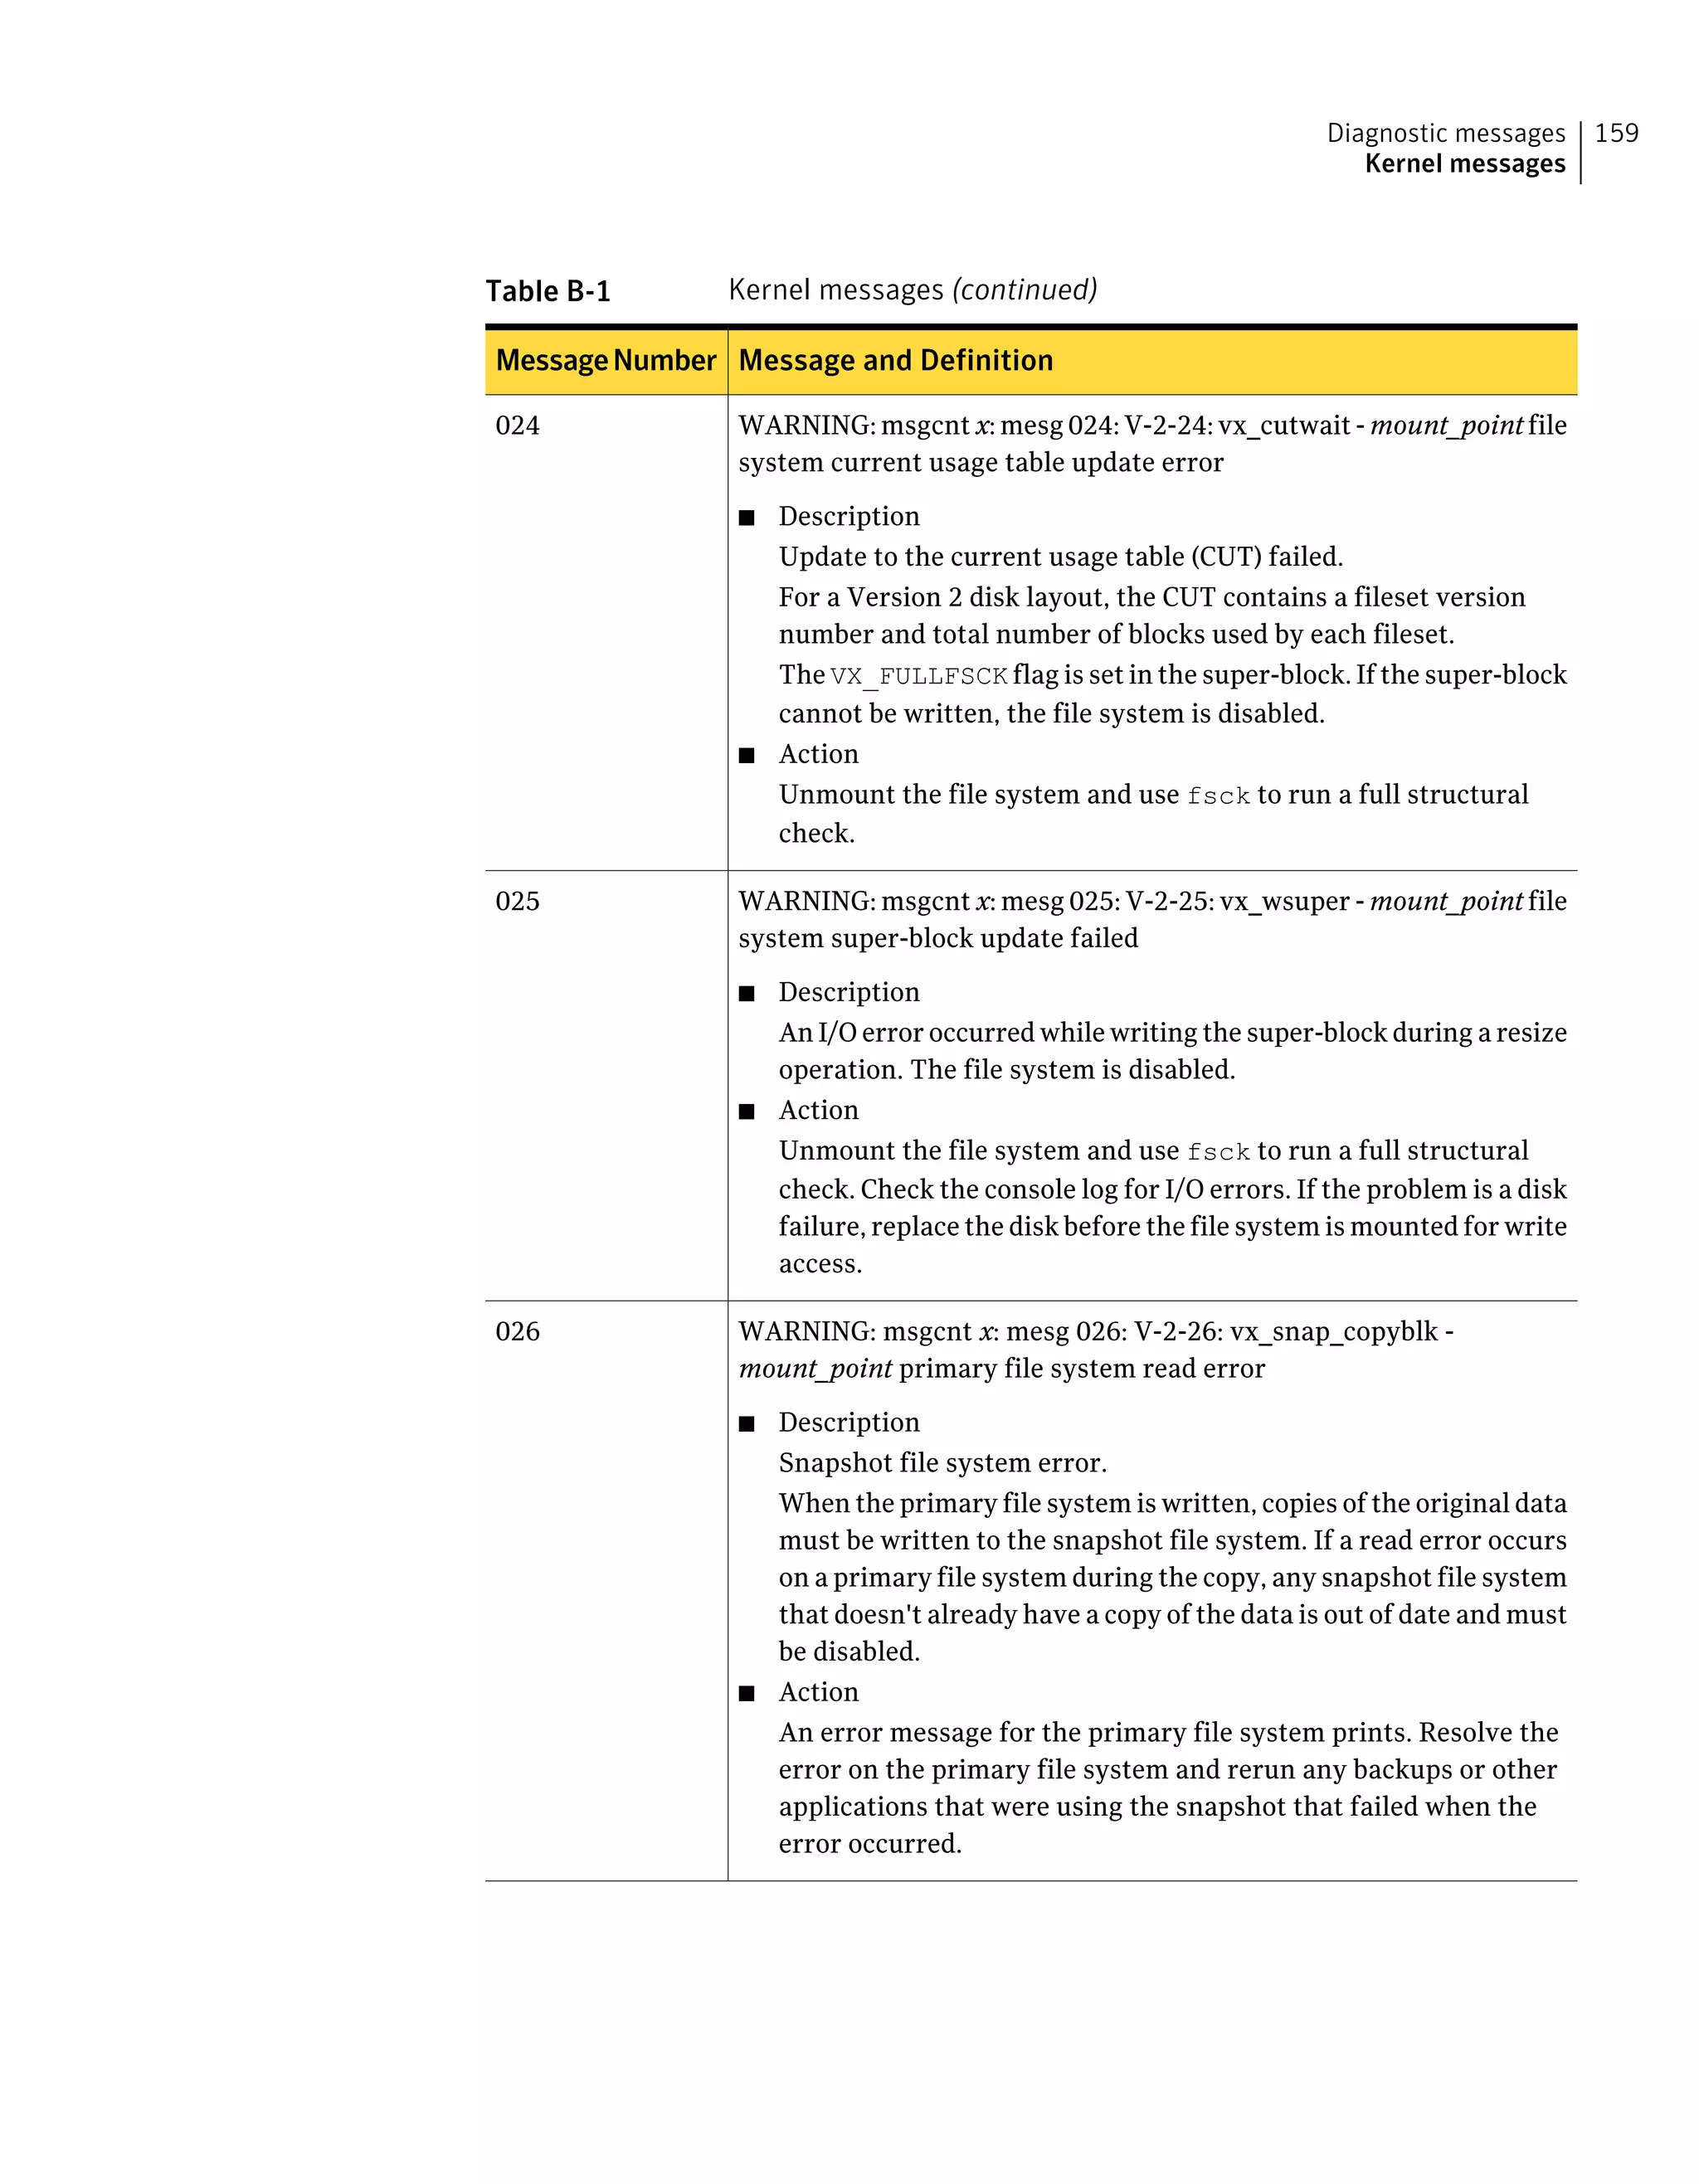

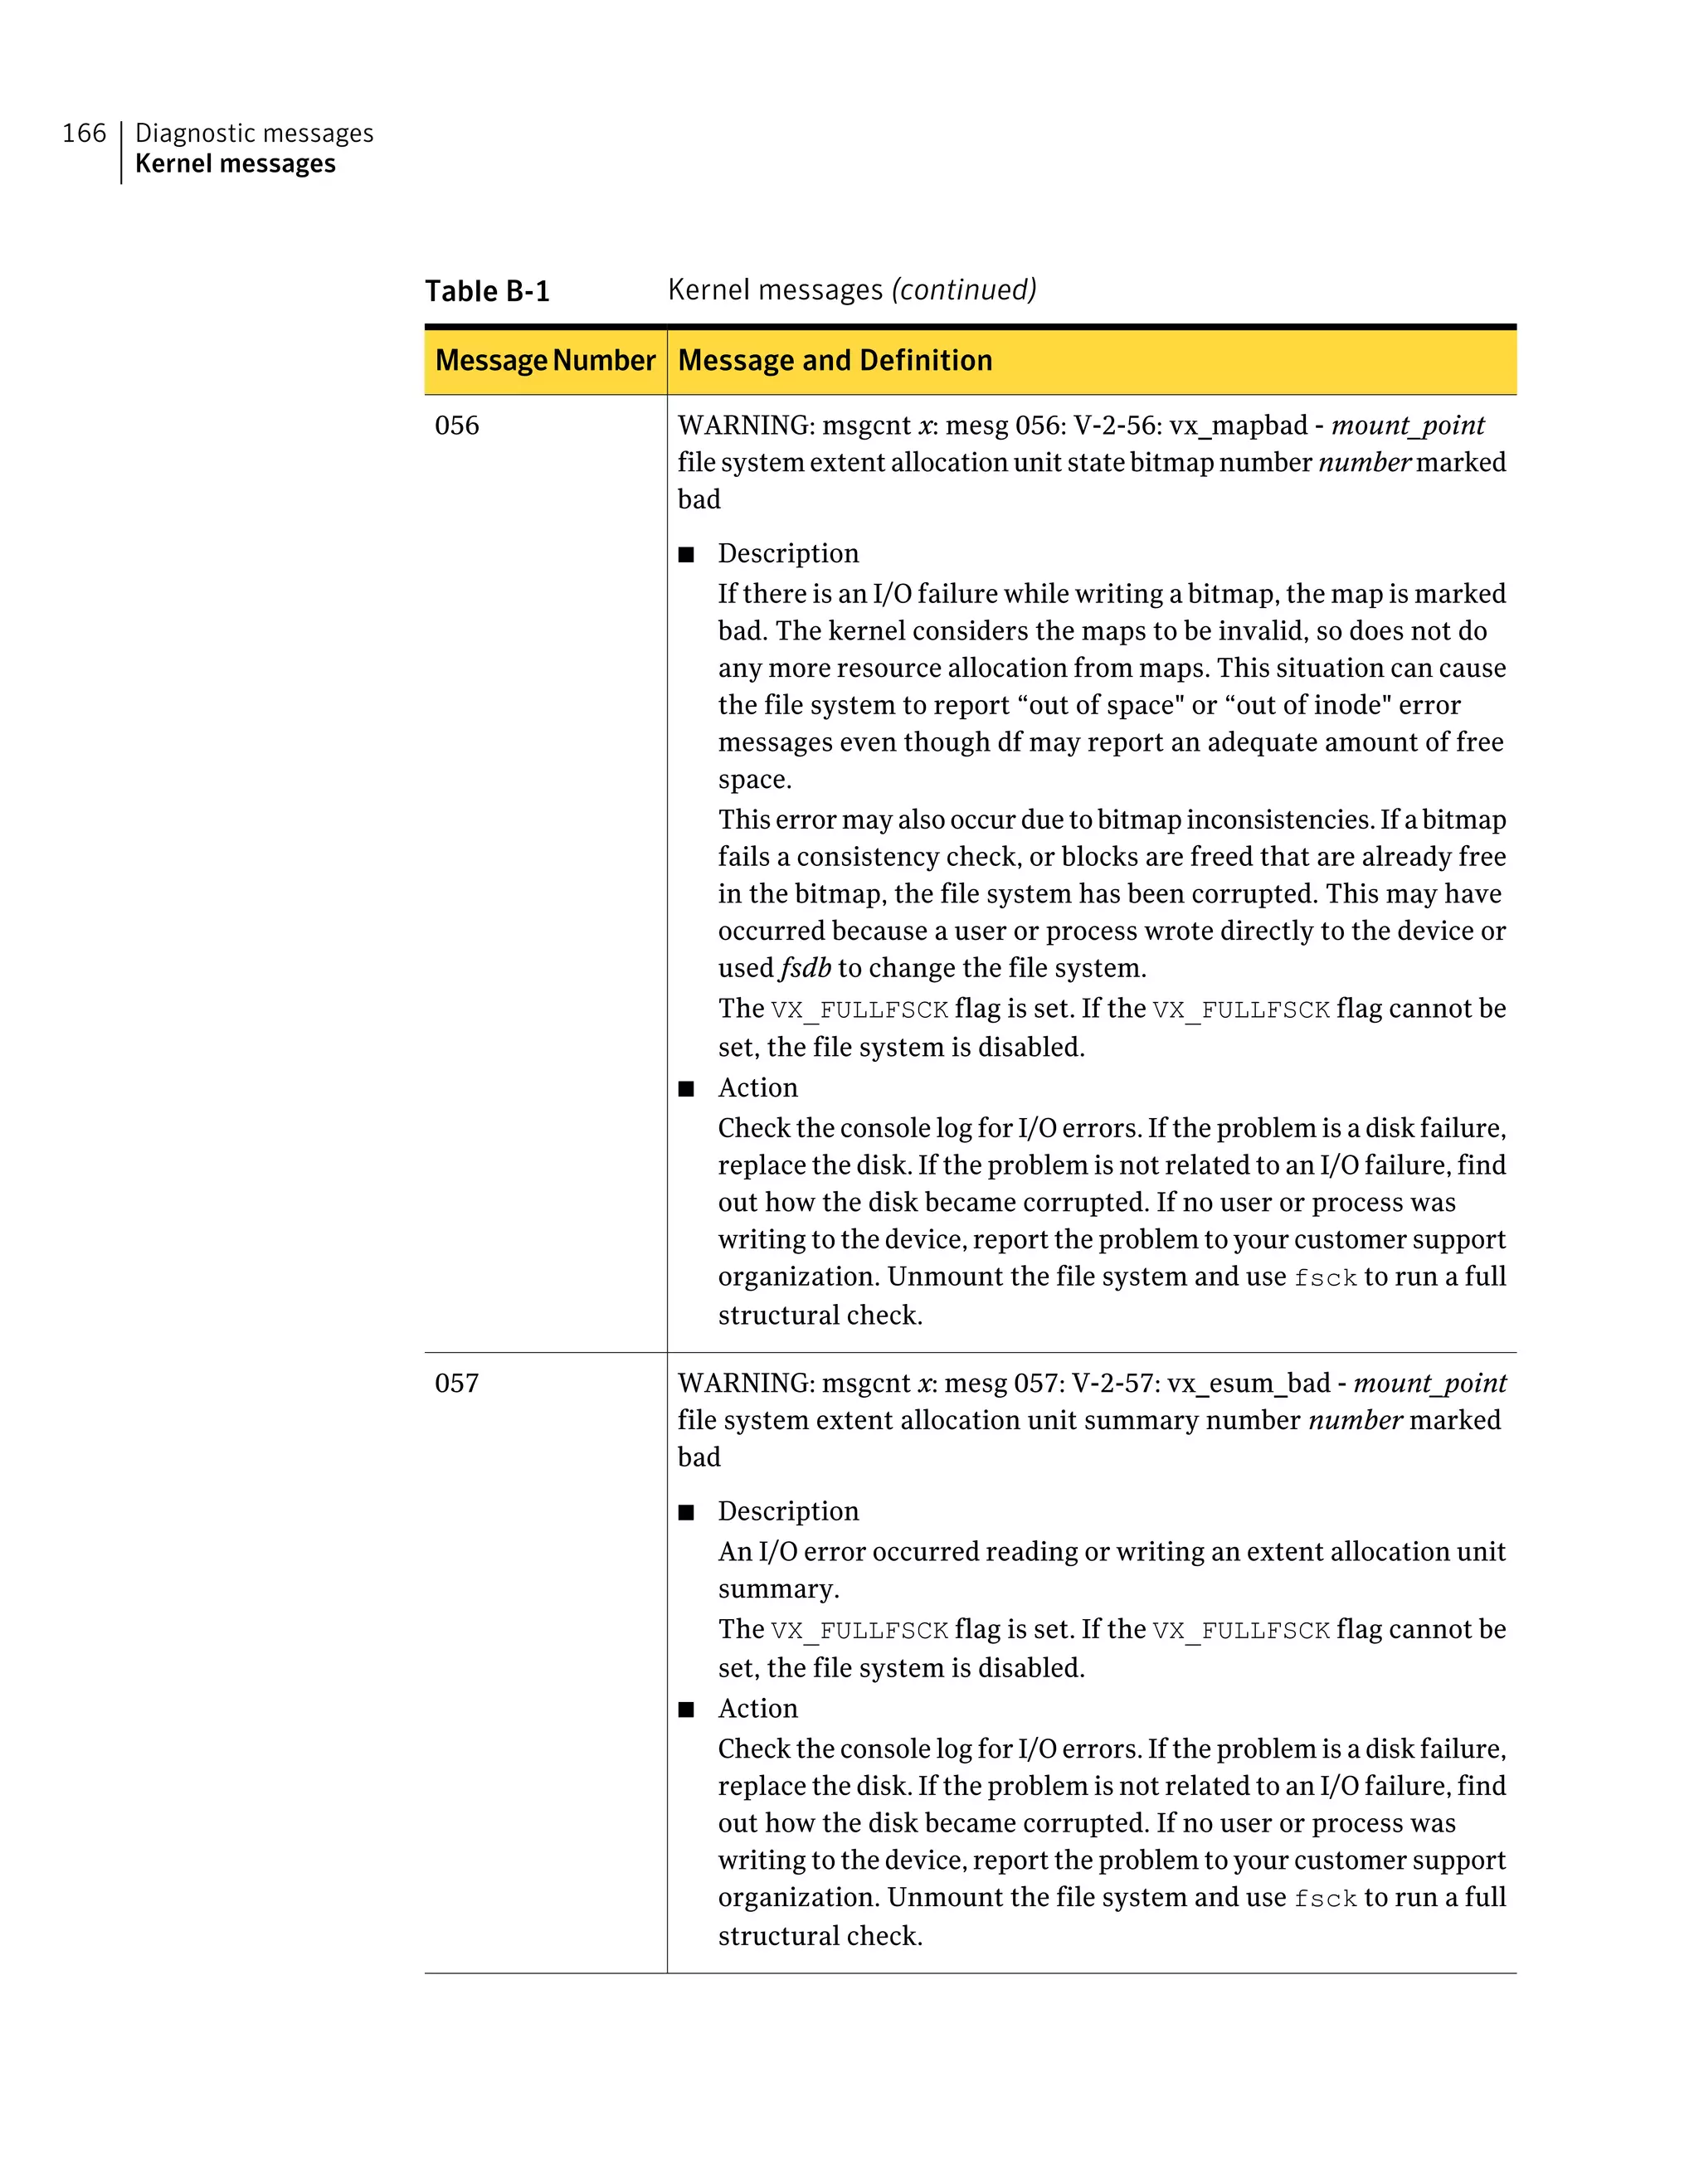
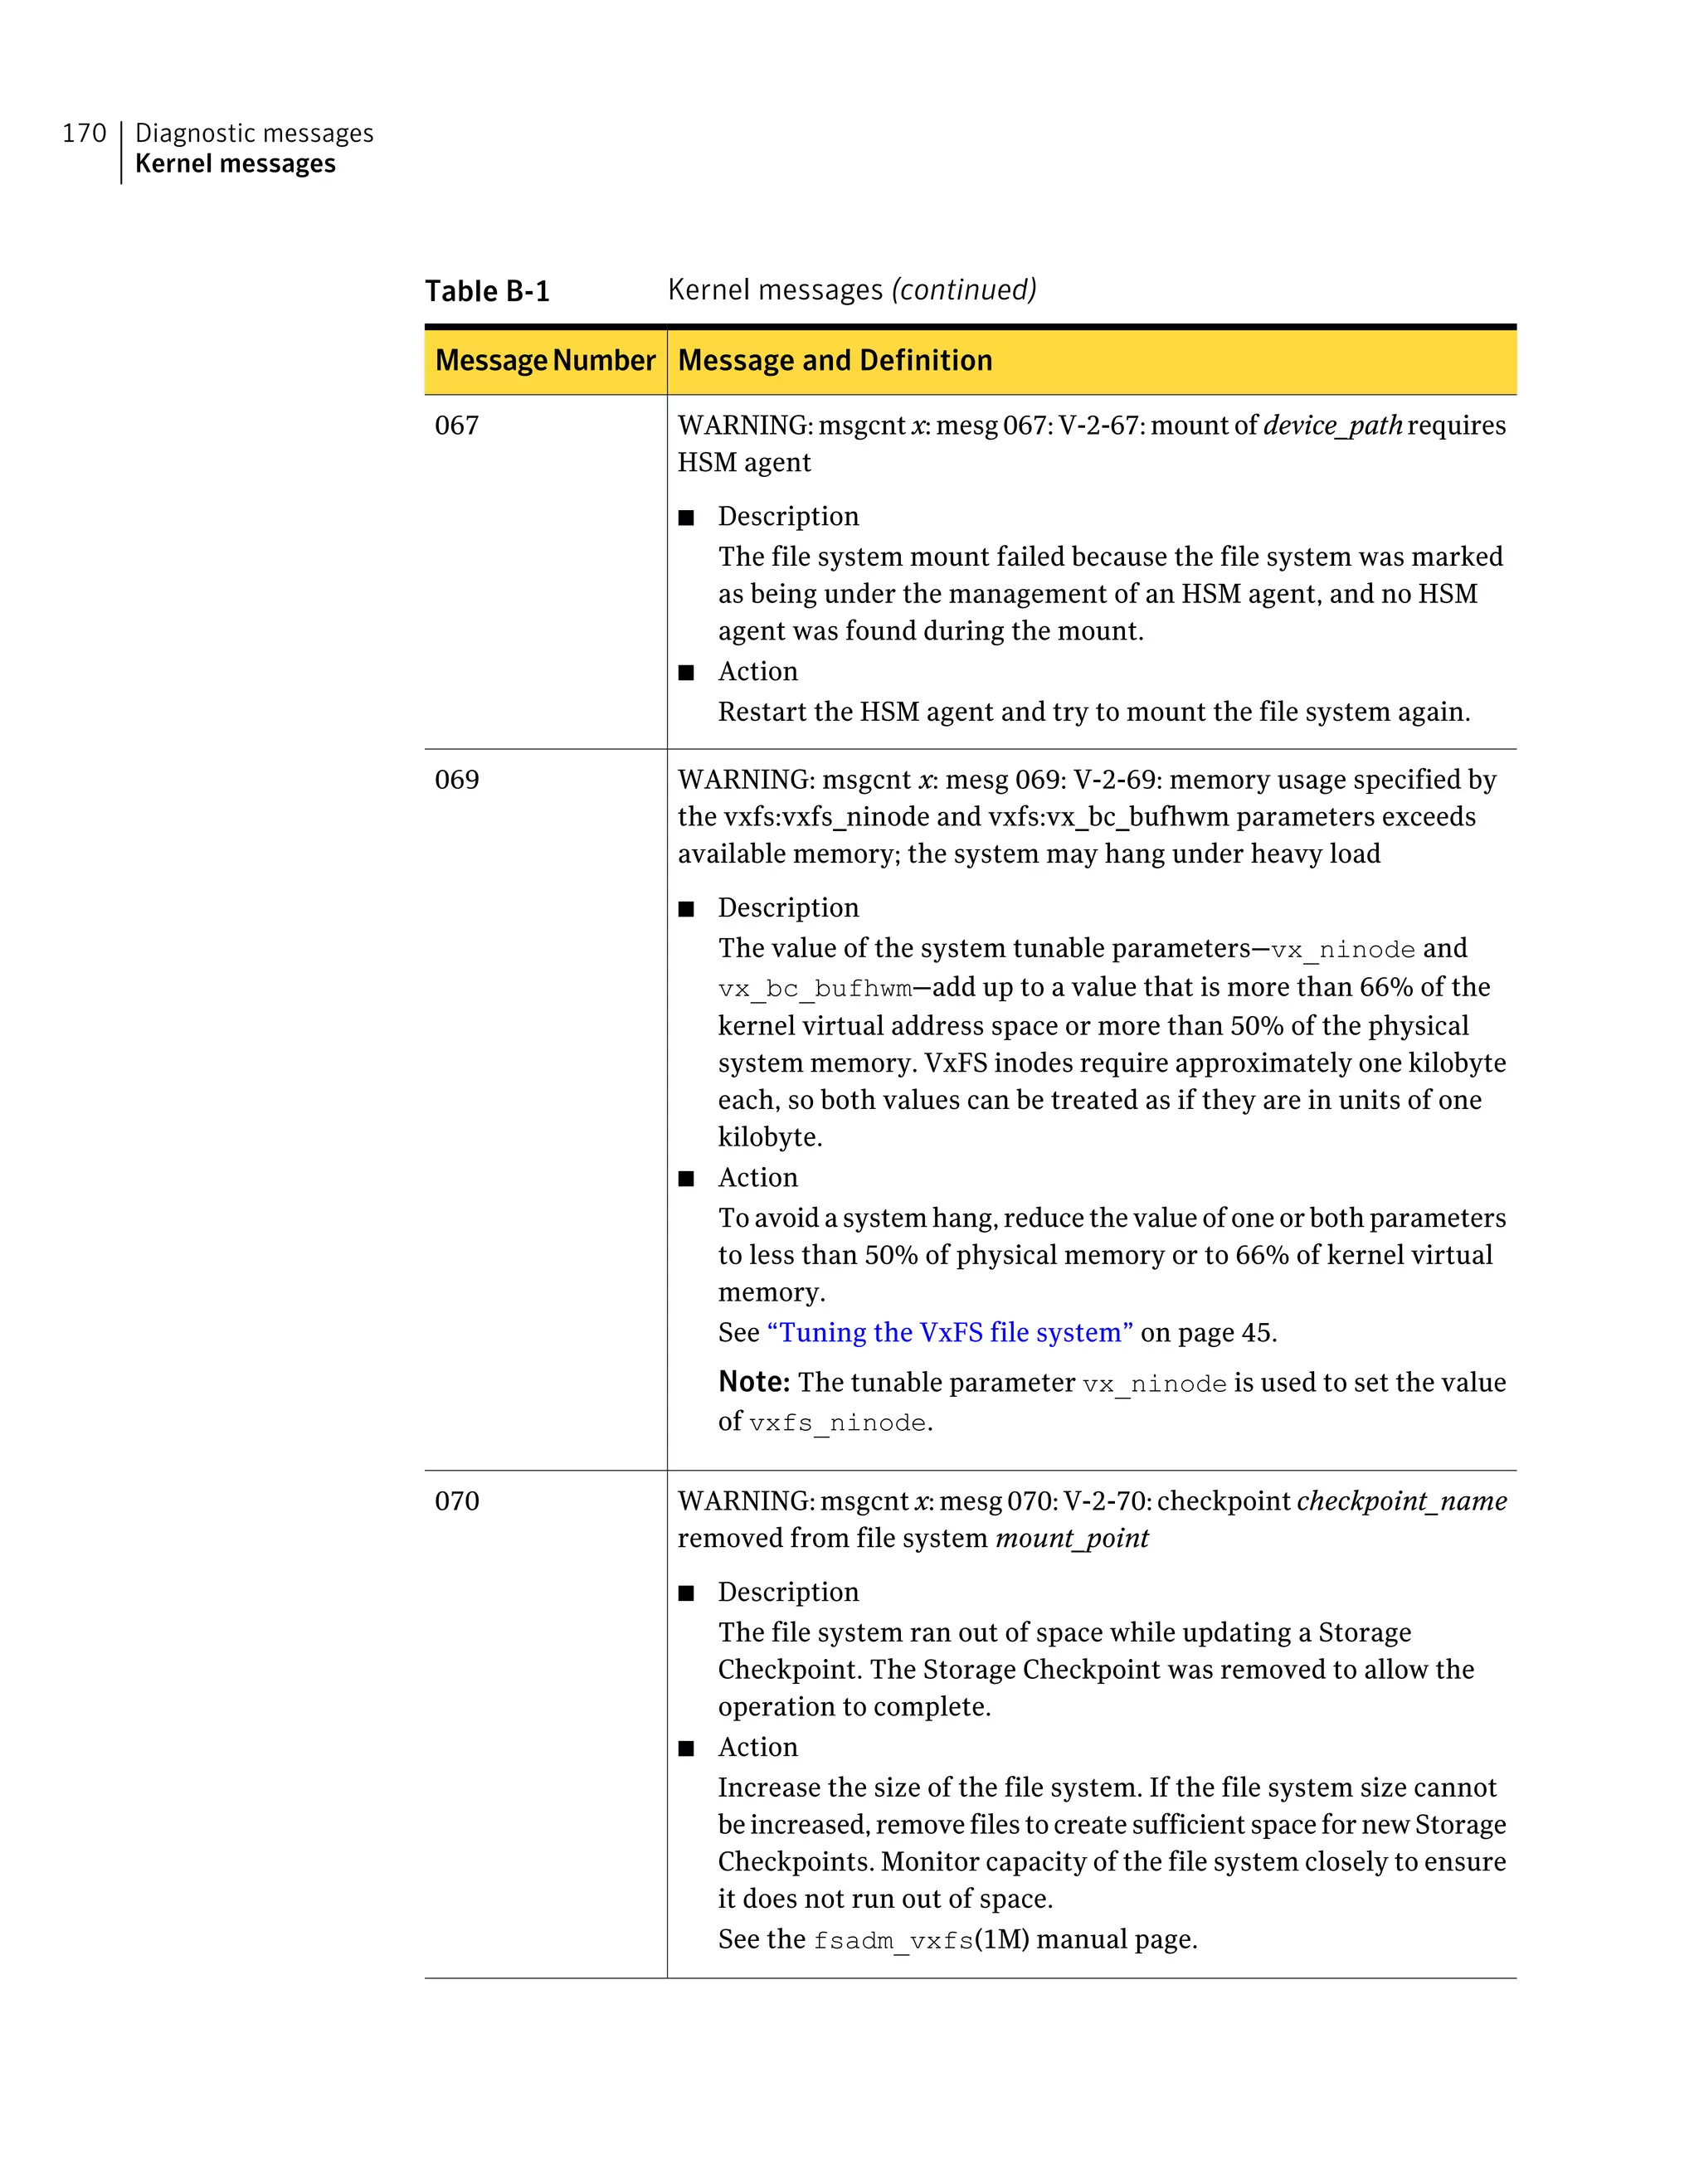
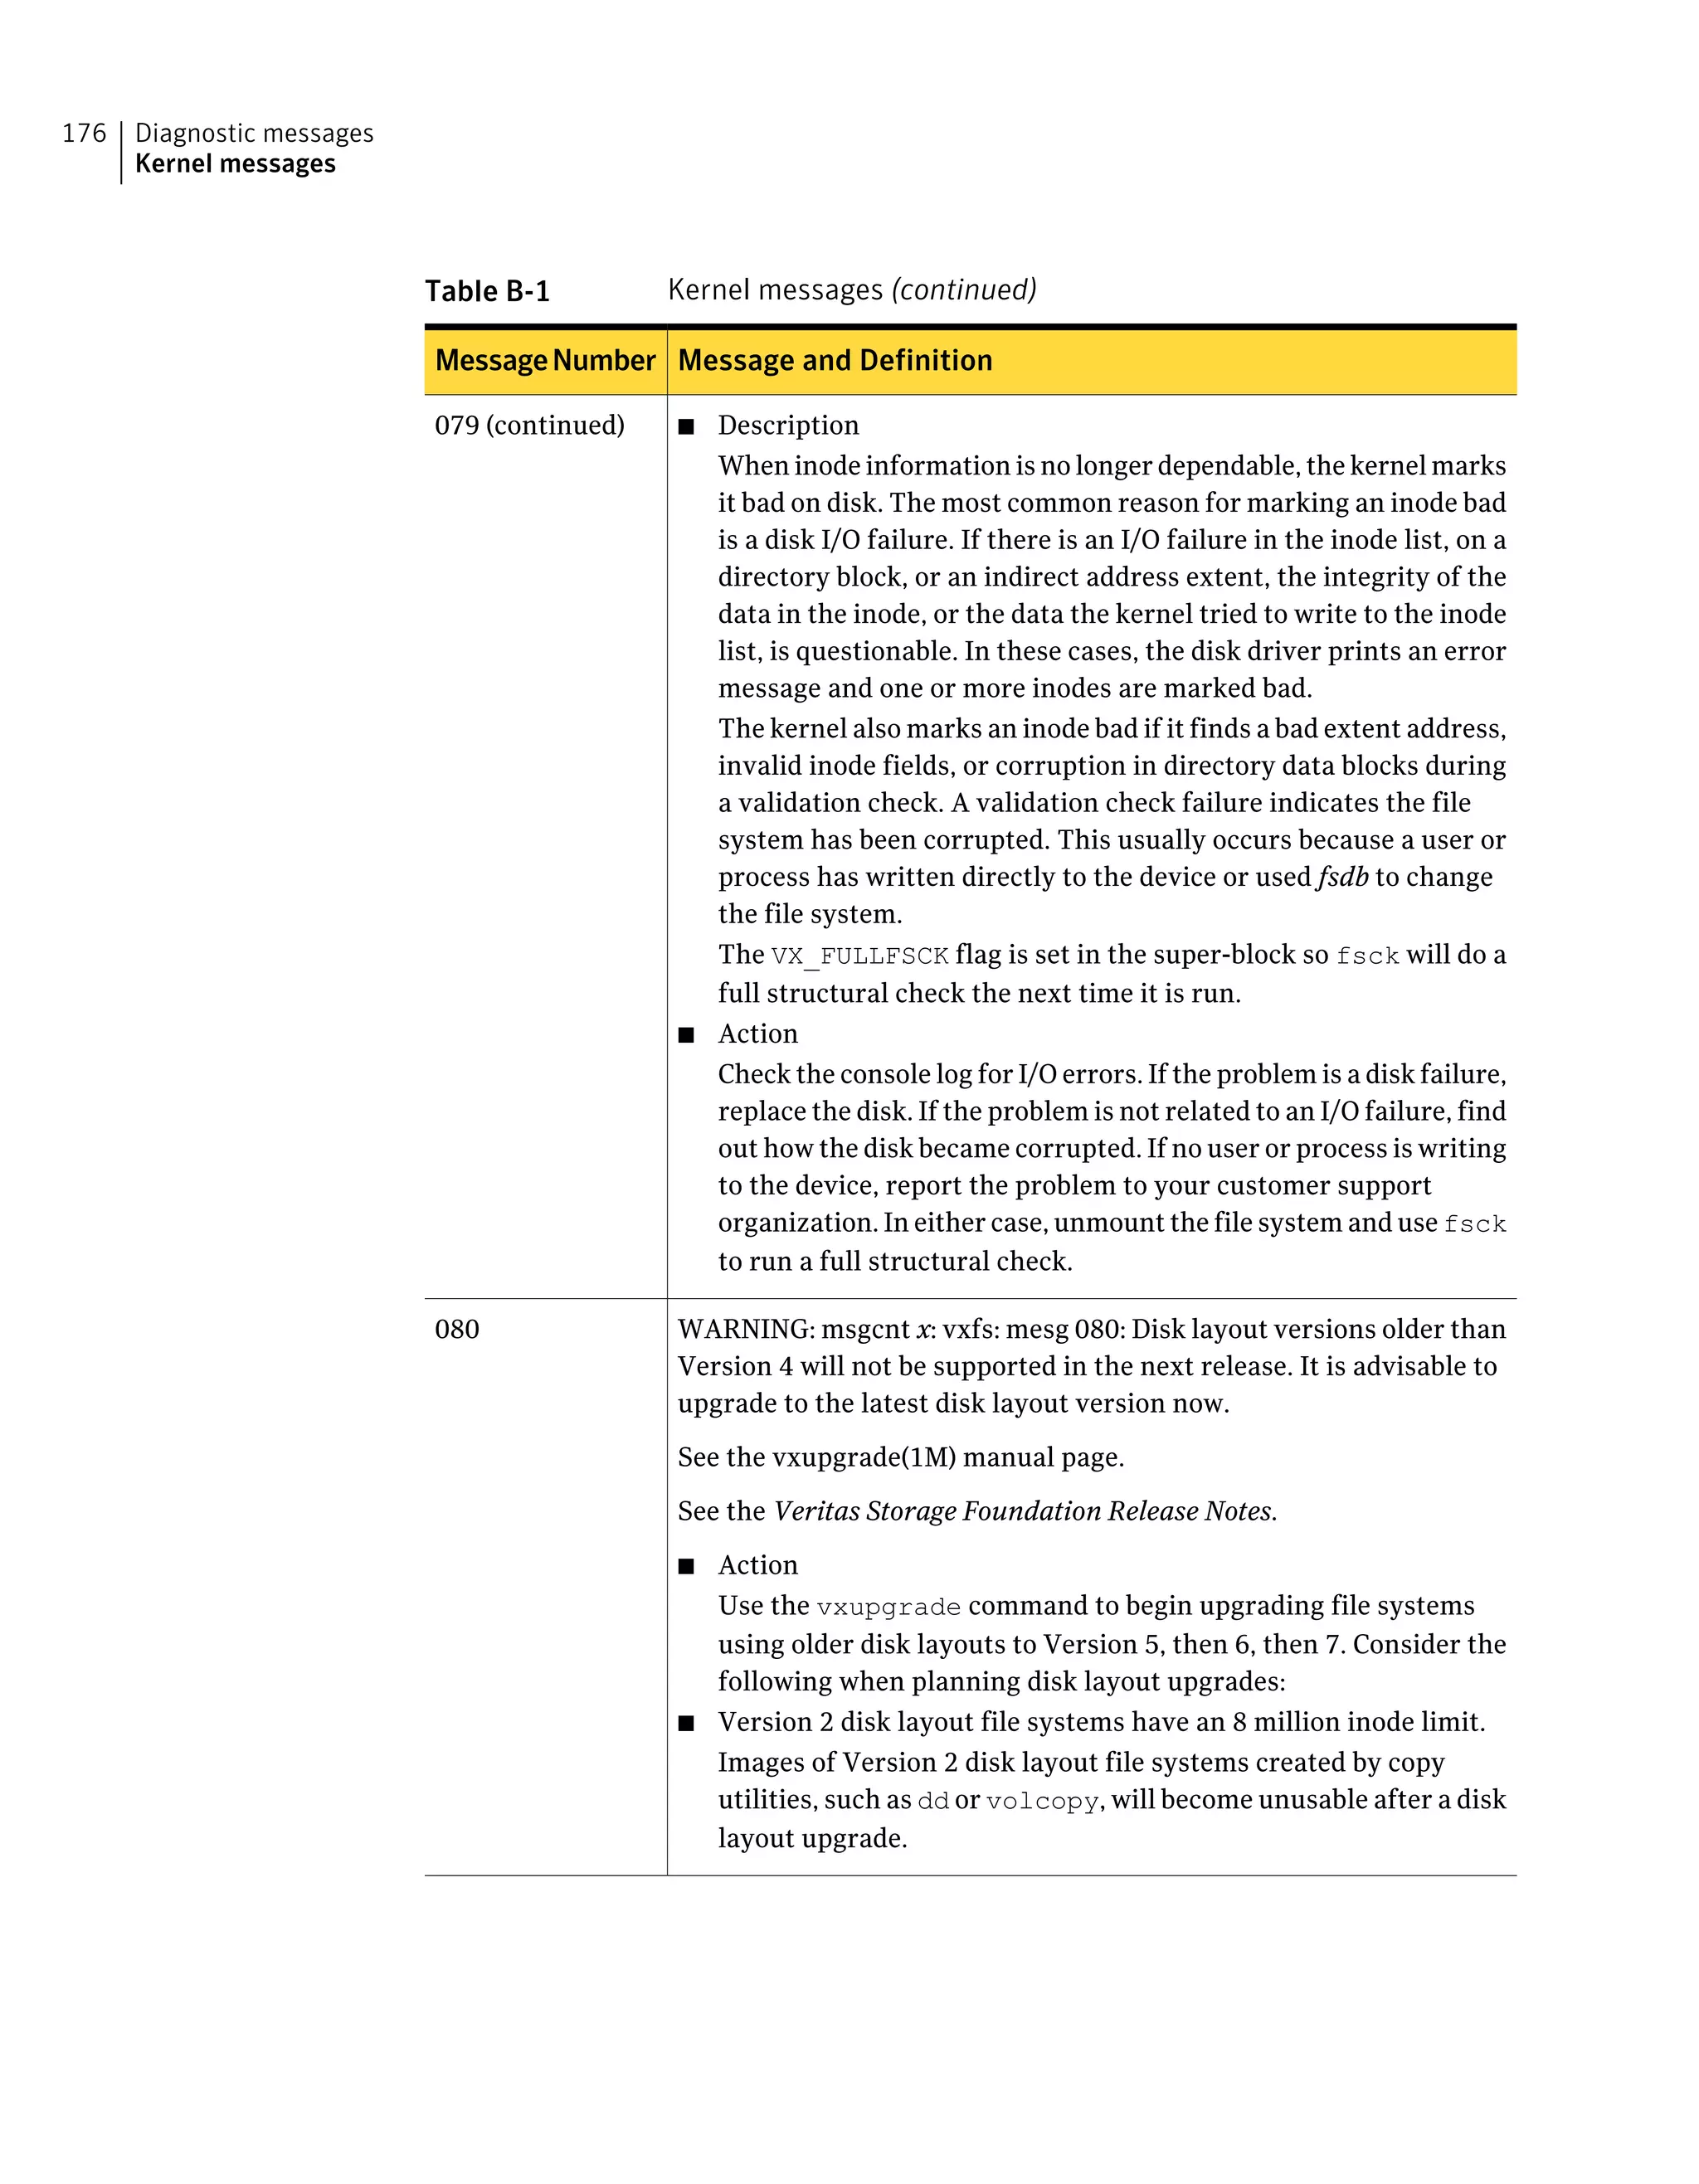
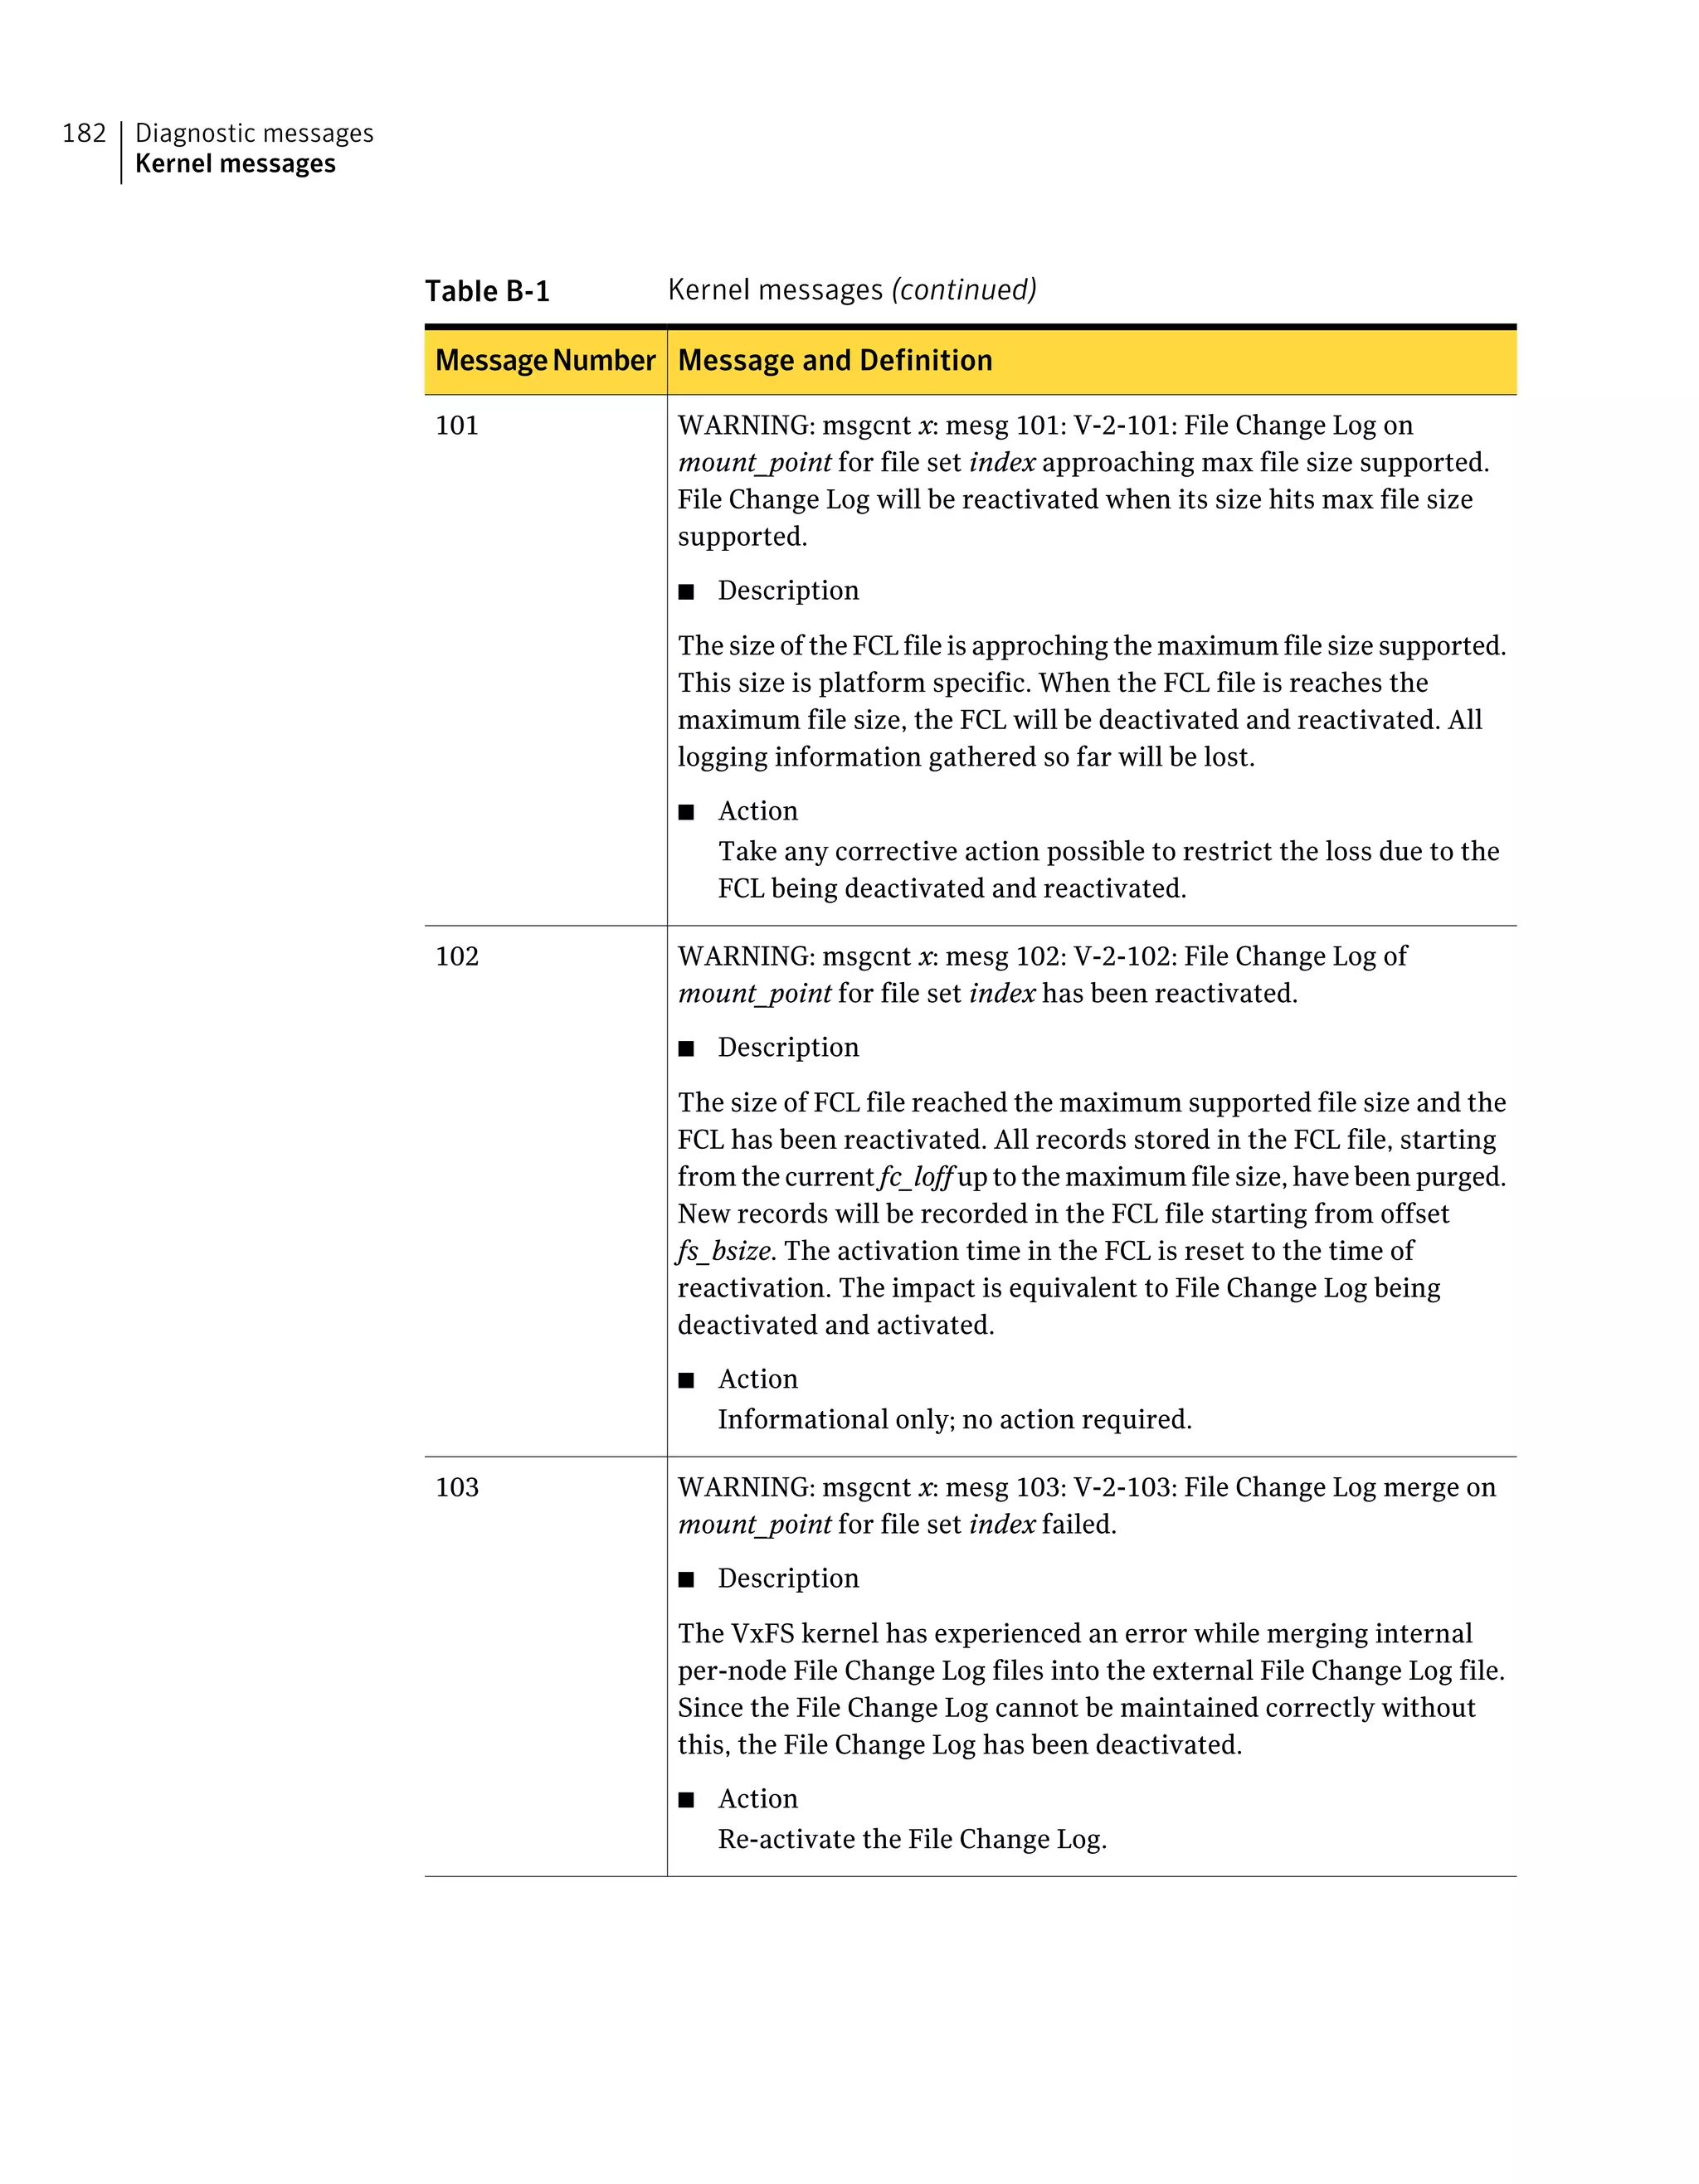
![Table B-1 Kernel messages (continued)
Message and DefinitionMessageNumber
WARNING: msgcnt x: mesg 036: V-2-36: vx_lctbad - mount_point file
system link count table lctnumber bad
■ Description
Update to the link count table (LCT) failed.
For a Version 2 and above disk layout, the LCT contains the link
count for all the structural inodes. The VX_FULLFSCK flag is set
in the super-block. If the super-block cannot be written, the file
system is disabled.
■ Action
Unmount the file system and use fsck to run a full structural
check.
036
WARNING: msgcnt x: mesg 037: V-2-37: vx_metaioerr - function -
volume_name file system meta data [read|write] error in dev/block
device_ID/block
■ Description
A read or a write error occurred while accessing file system
metadata. The full fsck flag on the file system was set. The
message specifies whether the disk I/O that failed was a read or a
write.
File system metadata includes inodes, directory blocks, and the
file system log. If the error was a write error, it is likely that some
data was lost. This message should be accompanied by another file
system message describing the particular file system metadata
affected, as well as a message from the disk driver containing
information about the disk I/O error.
■ Action
Resolve the condition causing the disk error. If the error was the
result of a temporary condition (such as accidentally turning off
a disk or a loose cable), correct the condition. Check for loose cables,
etc. Unmount the file system and use fsck to run a full structural
check (possibly with loss of data).
In case of an actual disk error, if it was a read error and the disk
driver remaps bad sectors on write, it may be fixed when fsck is
run since fsck is likely to rewrite the sector with the read error.
In other cases, you replace or reformat the disk drive and restore
the file system from backups. Consult the documentation specific
to your system for information on how to recover from disk errors.
The disk driver should have printed a message that may provide
more information.
037
163Diagnostic messages
Kernel messages](https://image.slidesharecdn.com/c26c5c8f-a512-479d-9247-560686ddd018-160310211410/75/vxfs_admin_51sp1_hpux-163-2048.jpg)
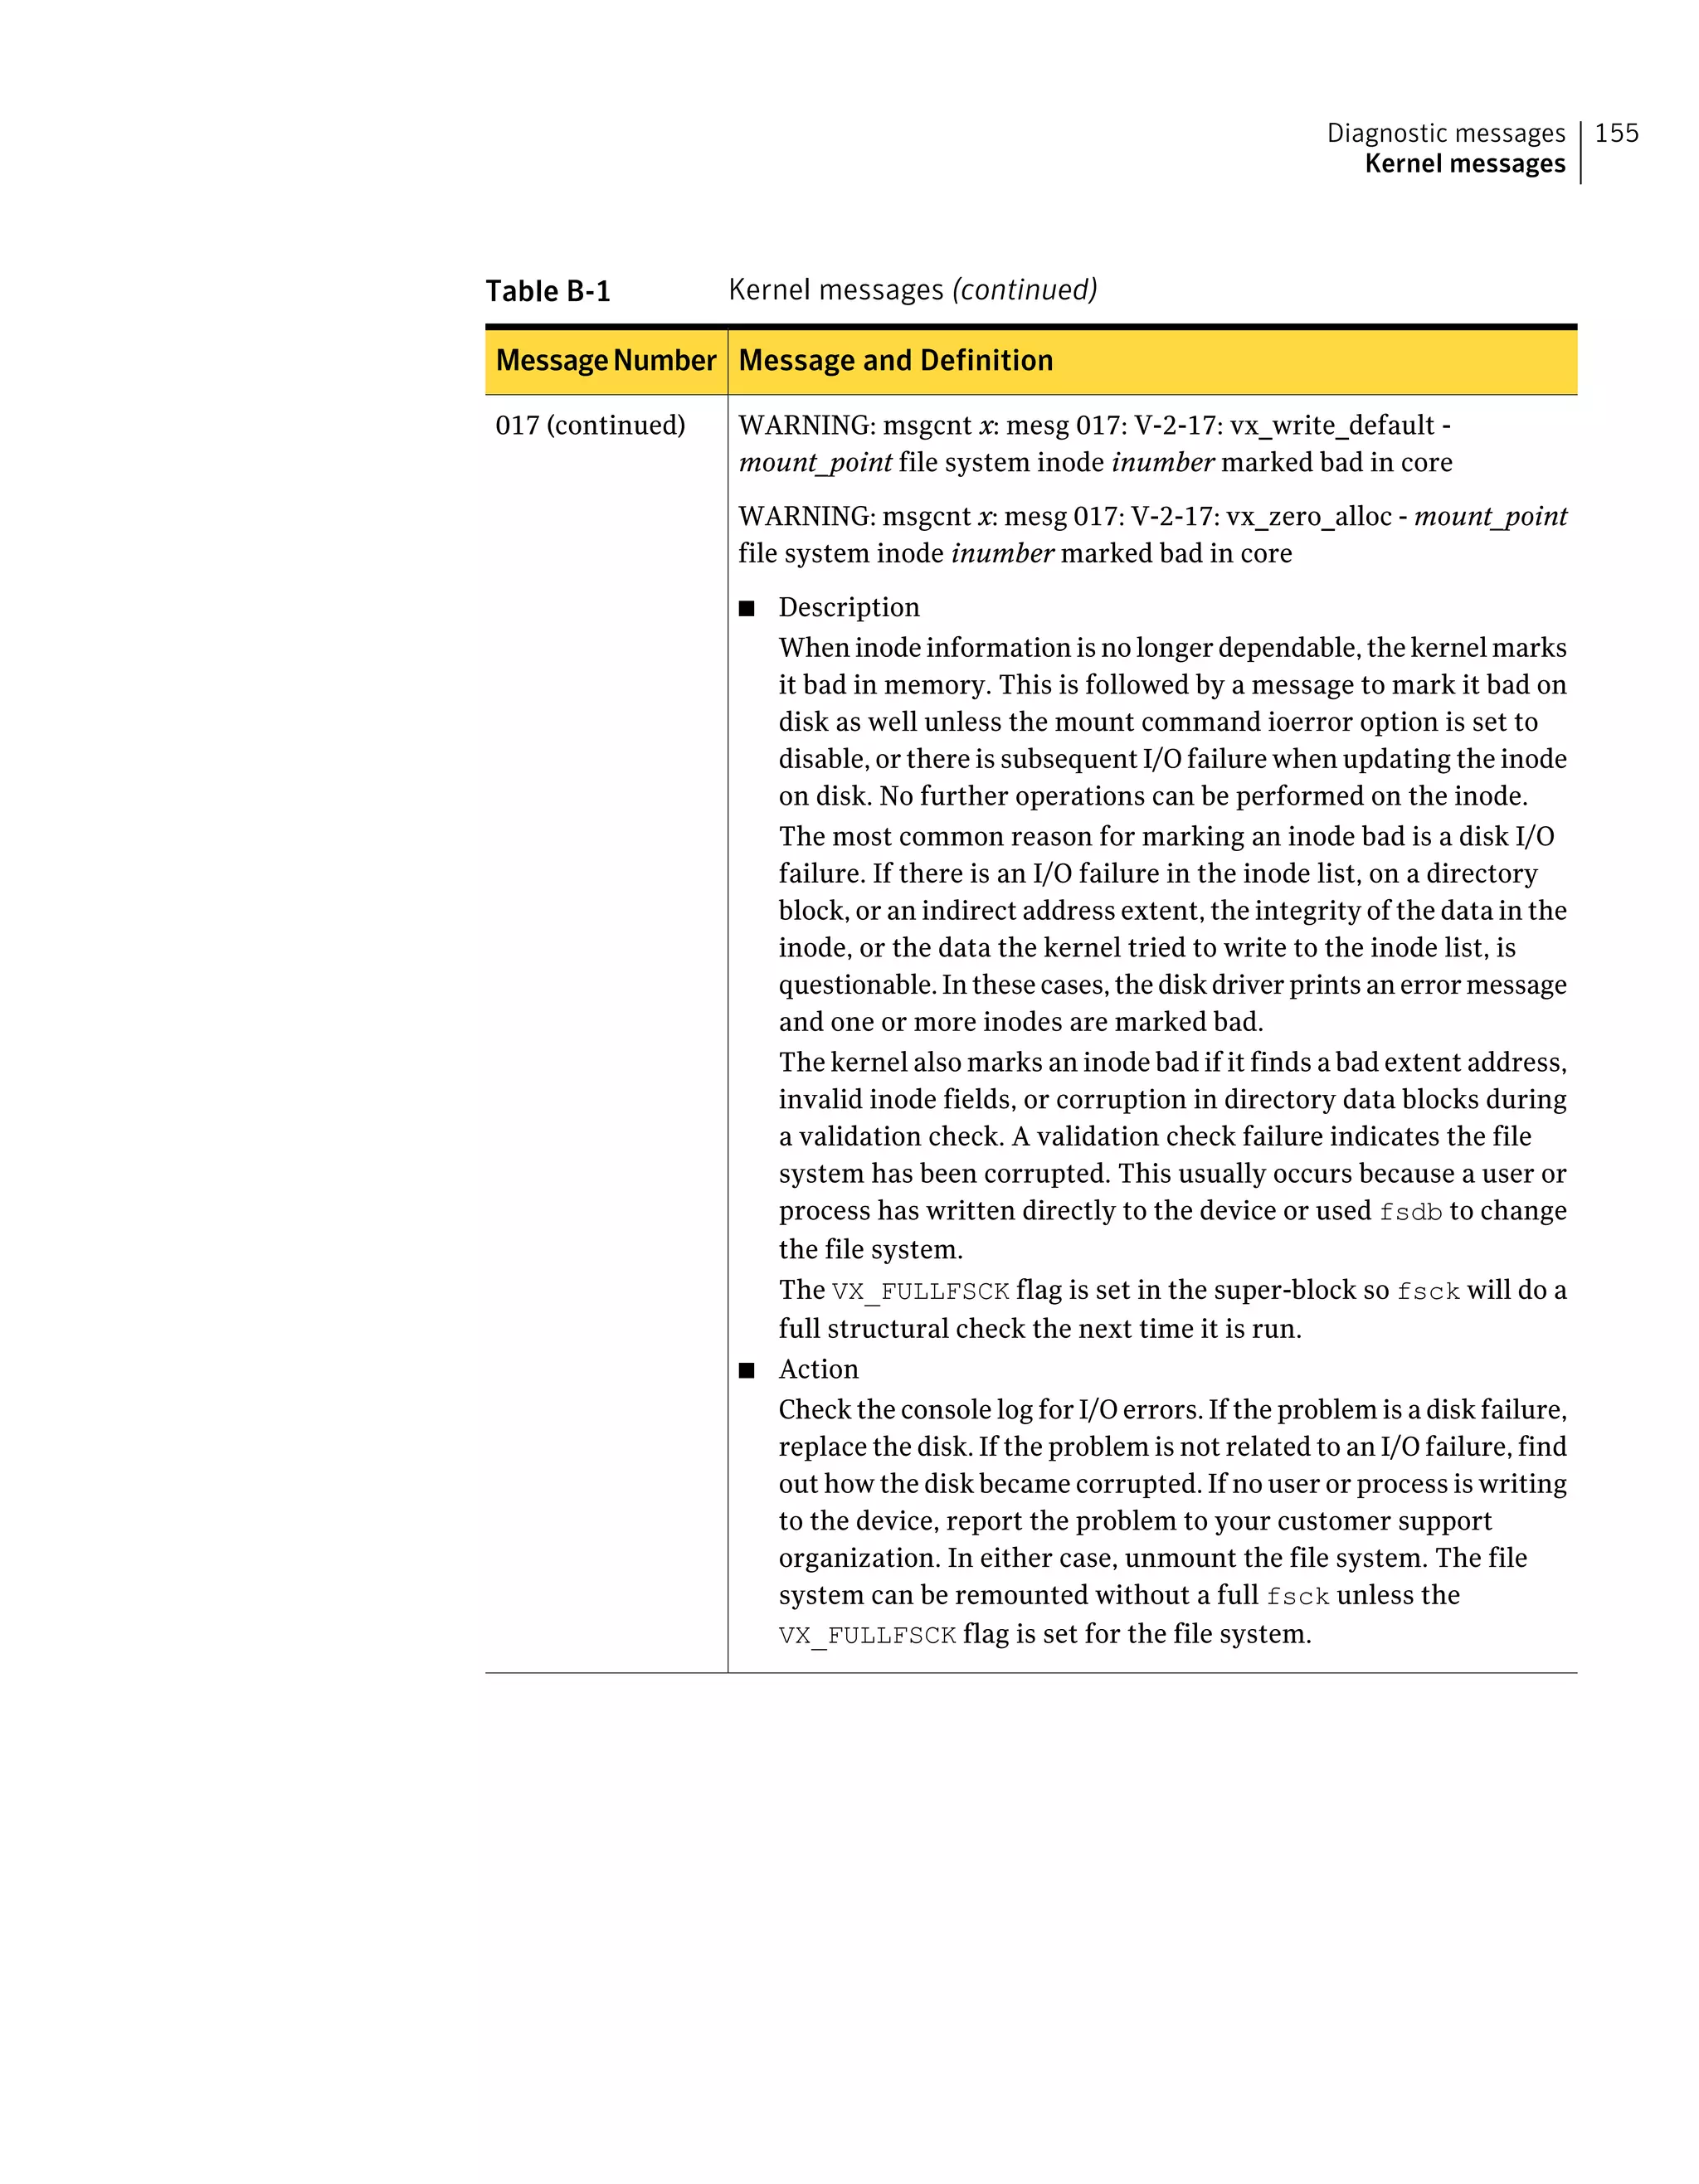
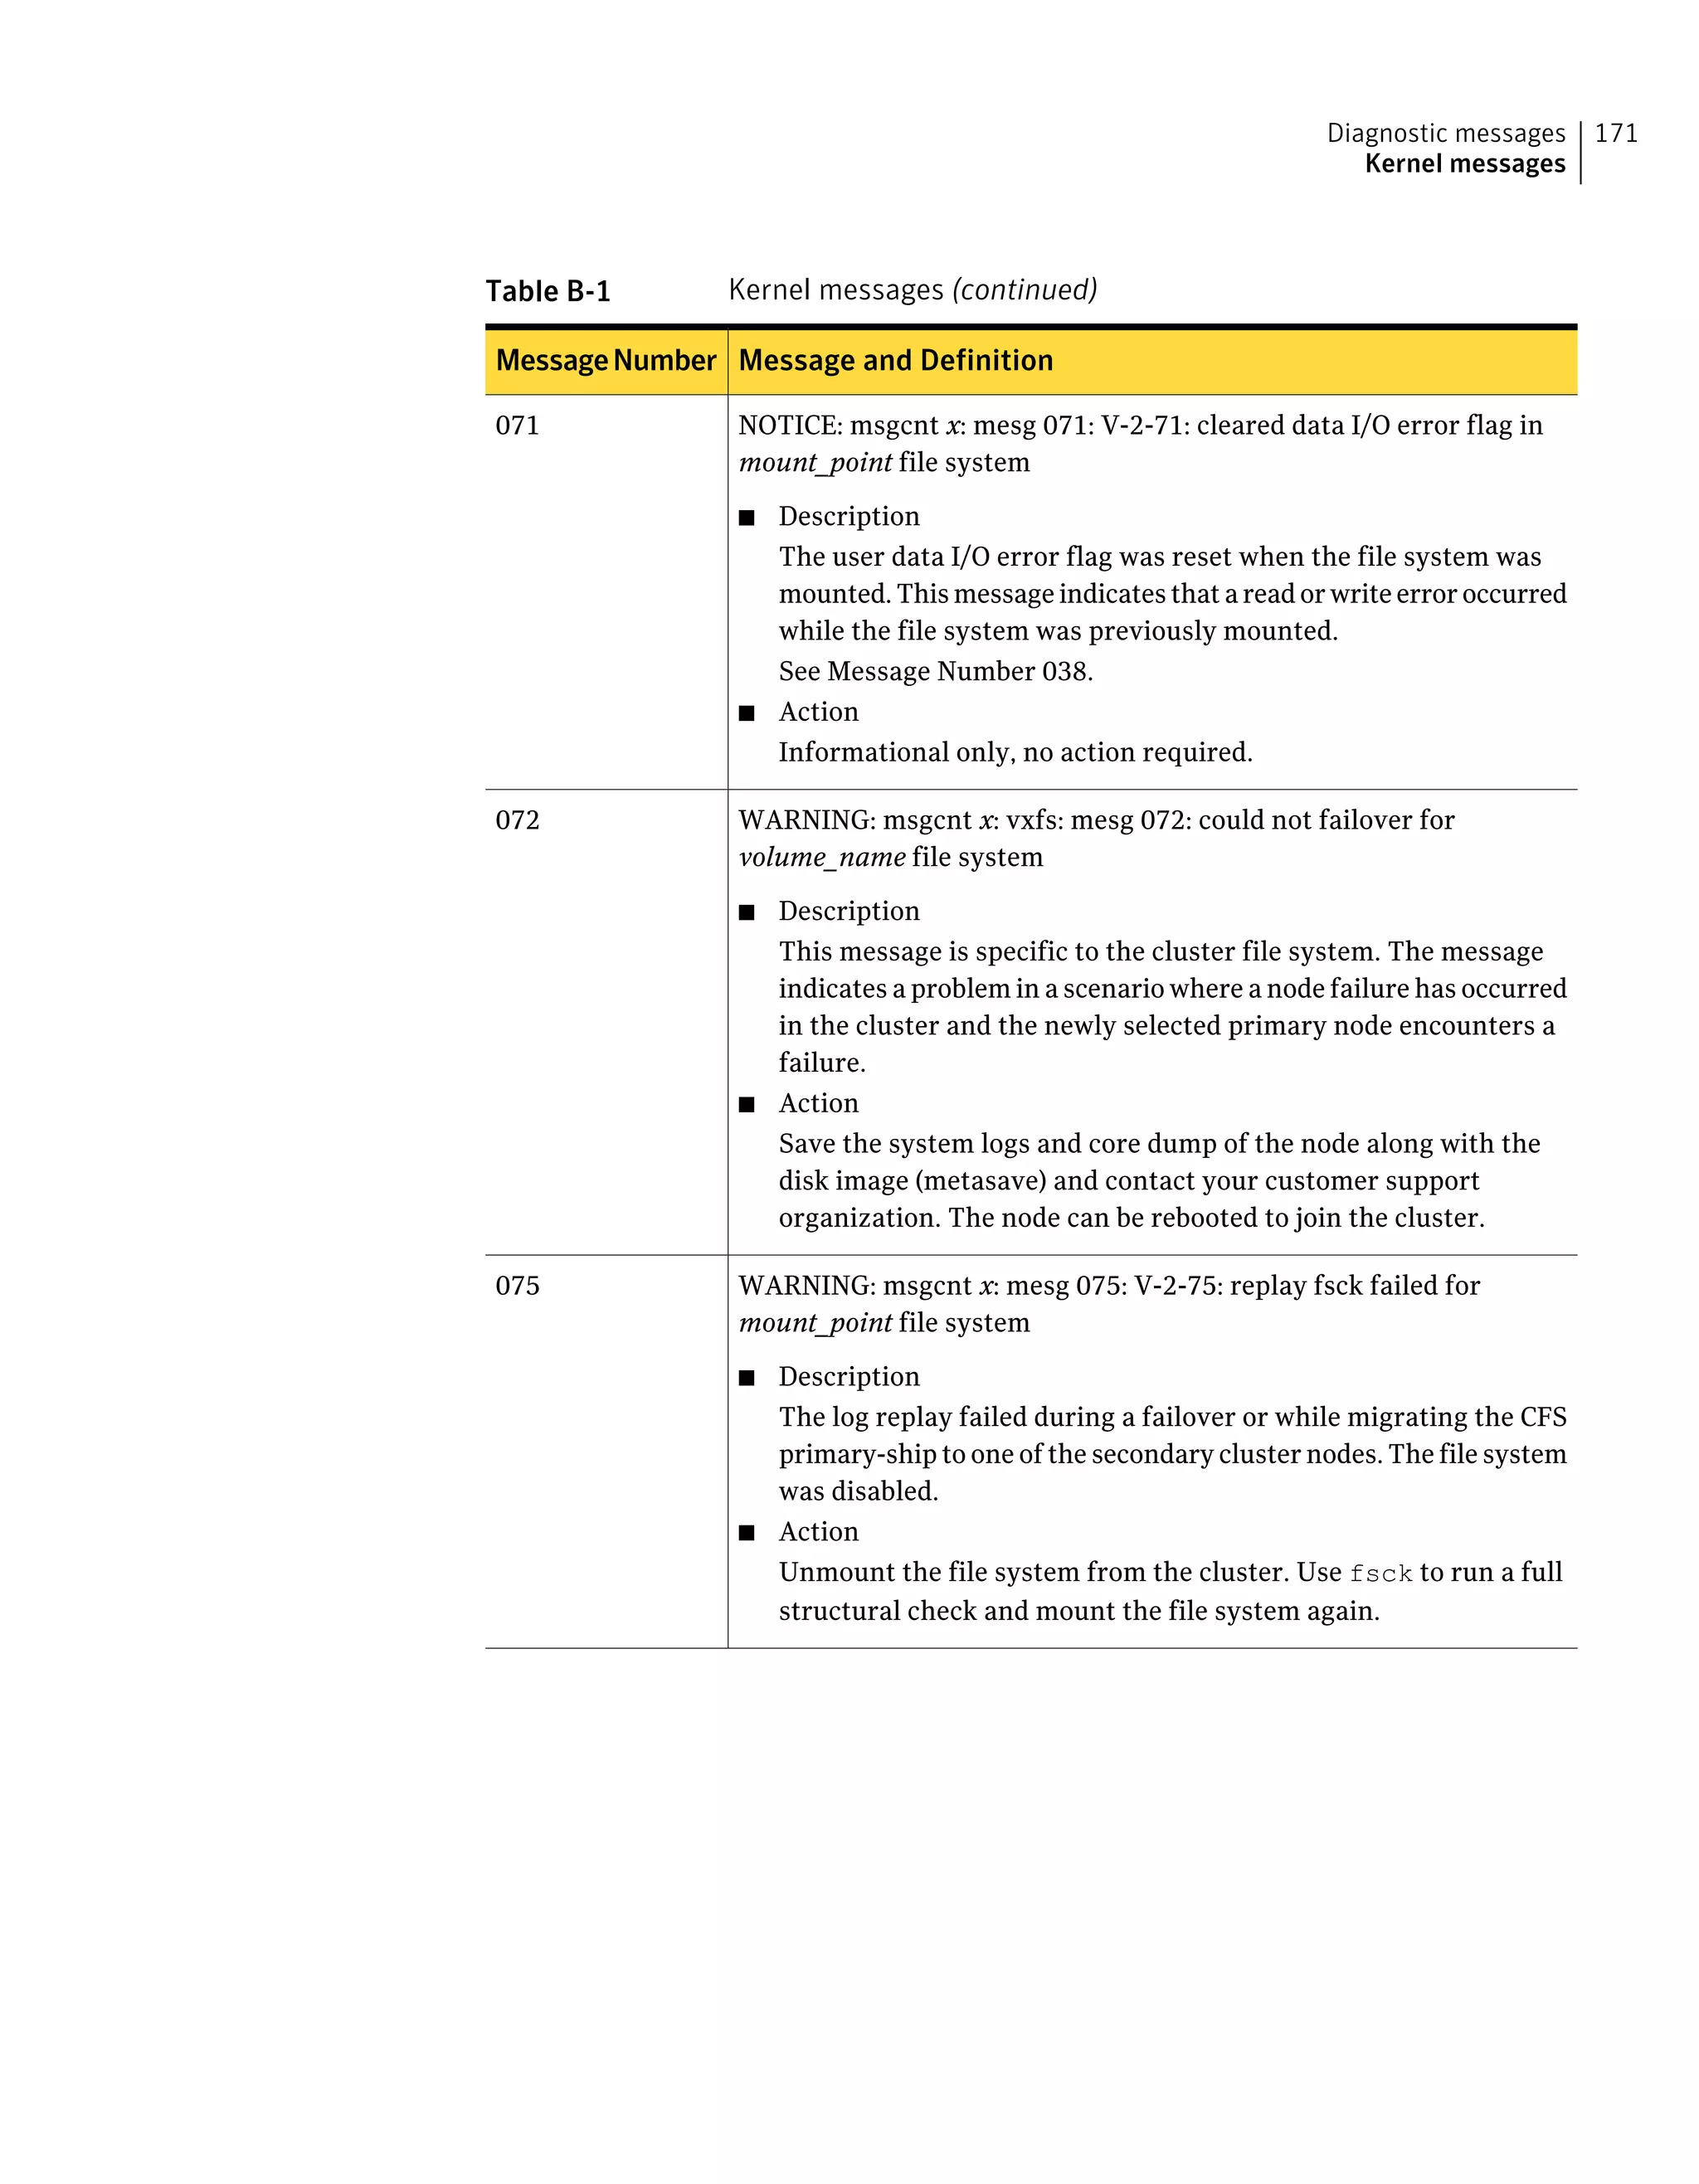
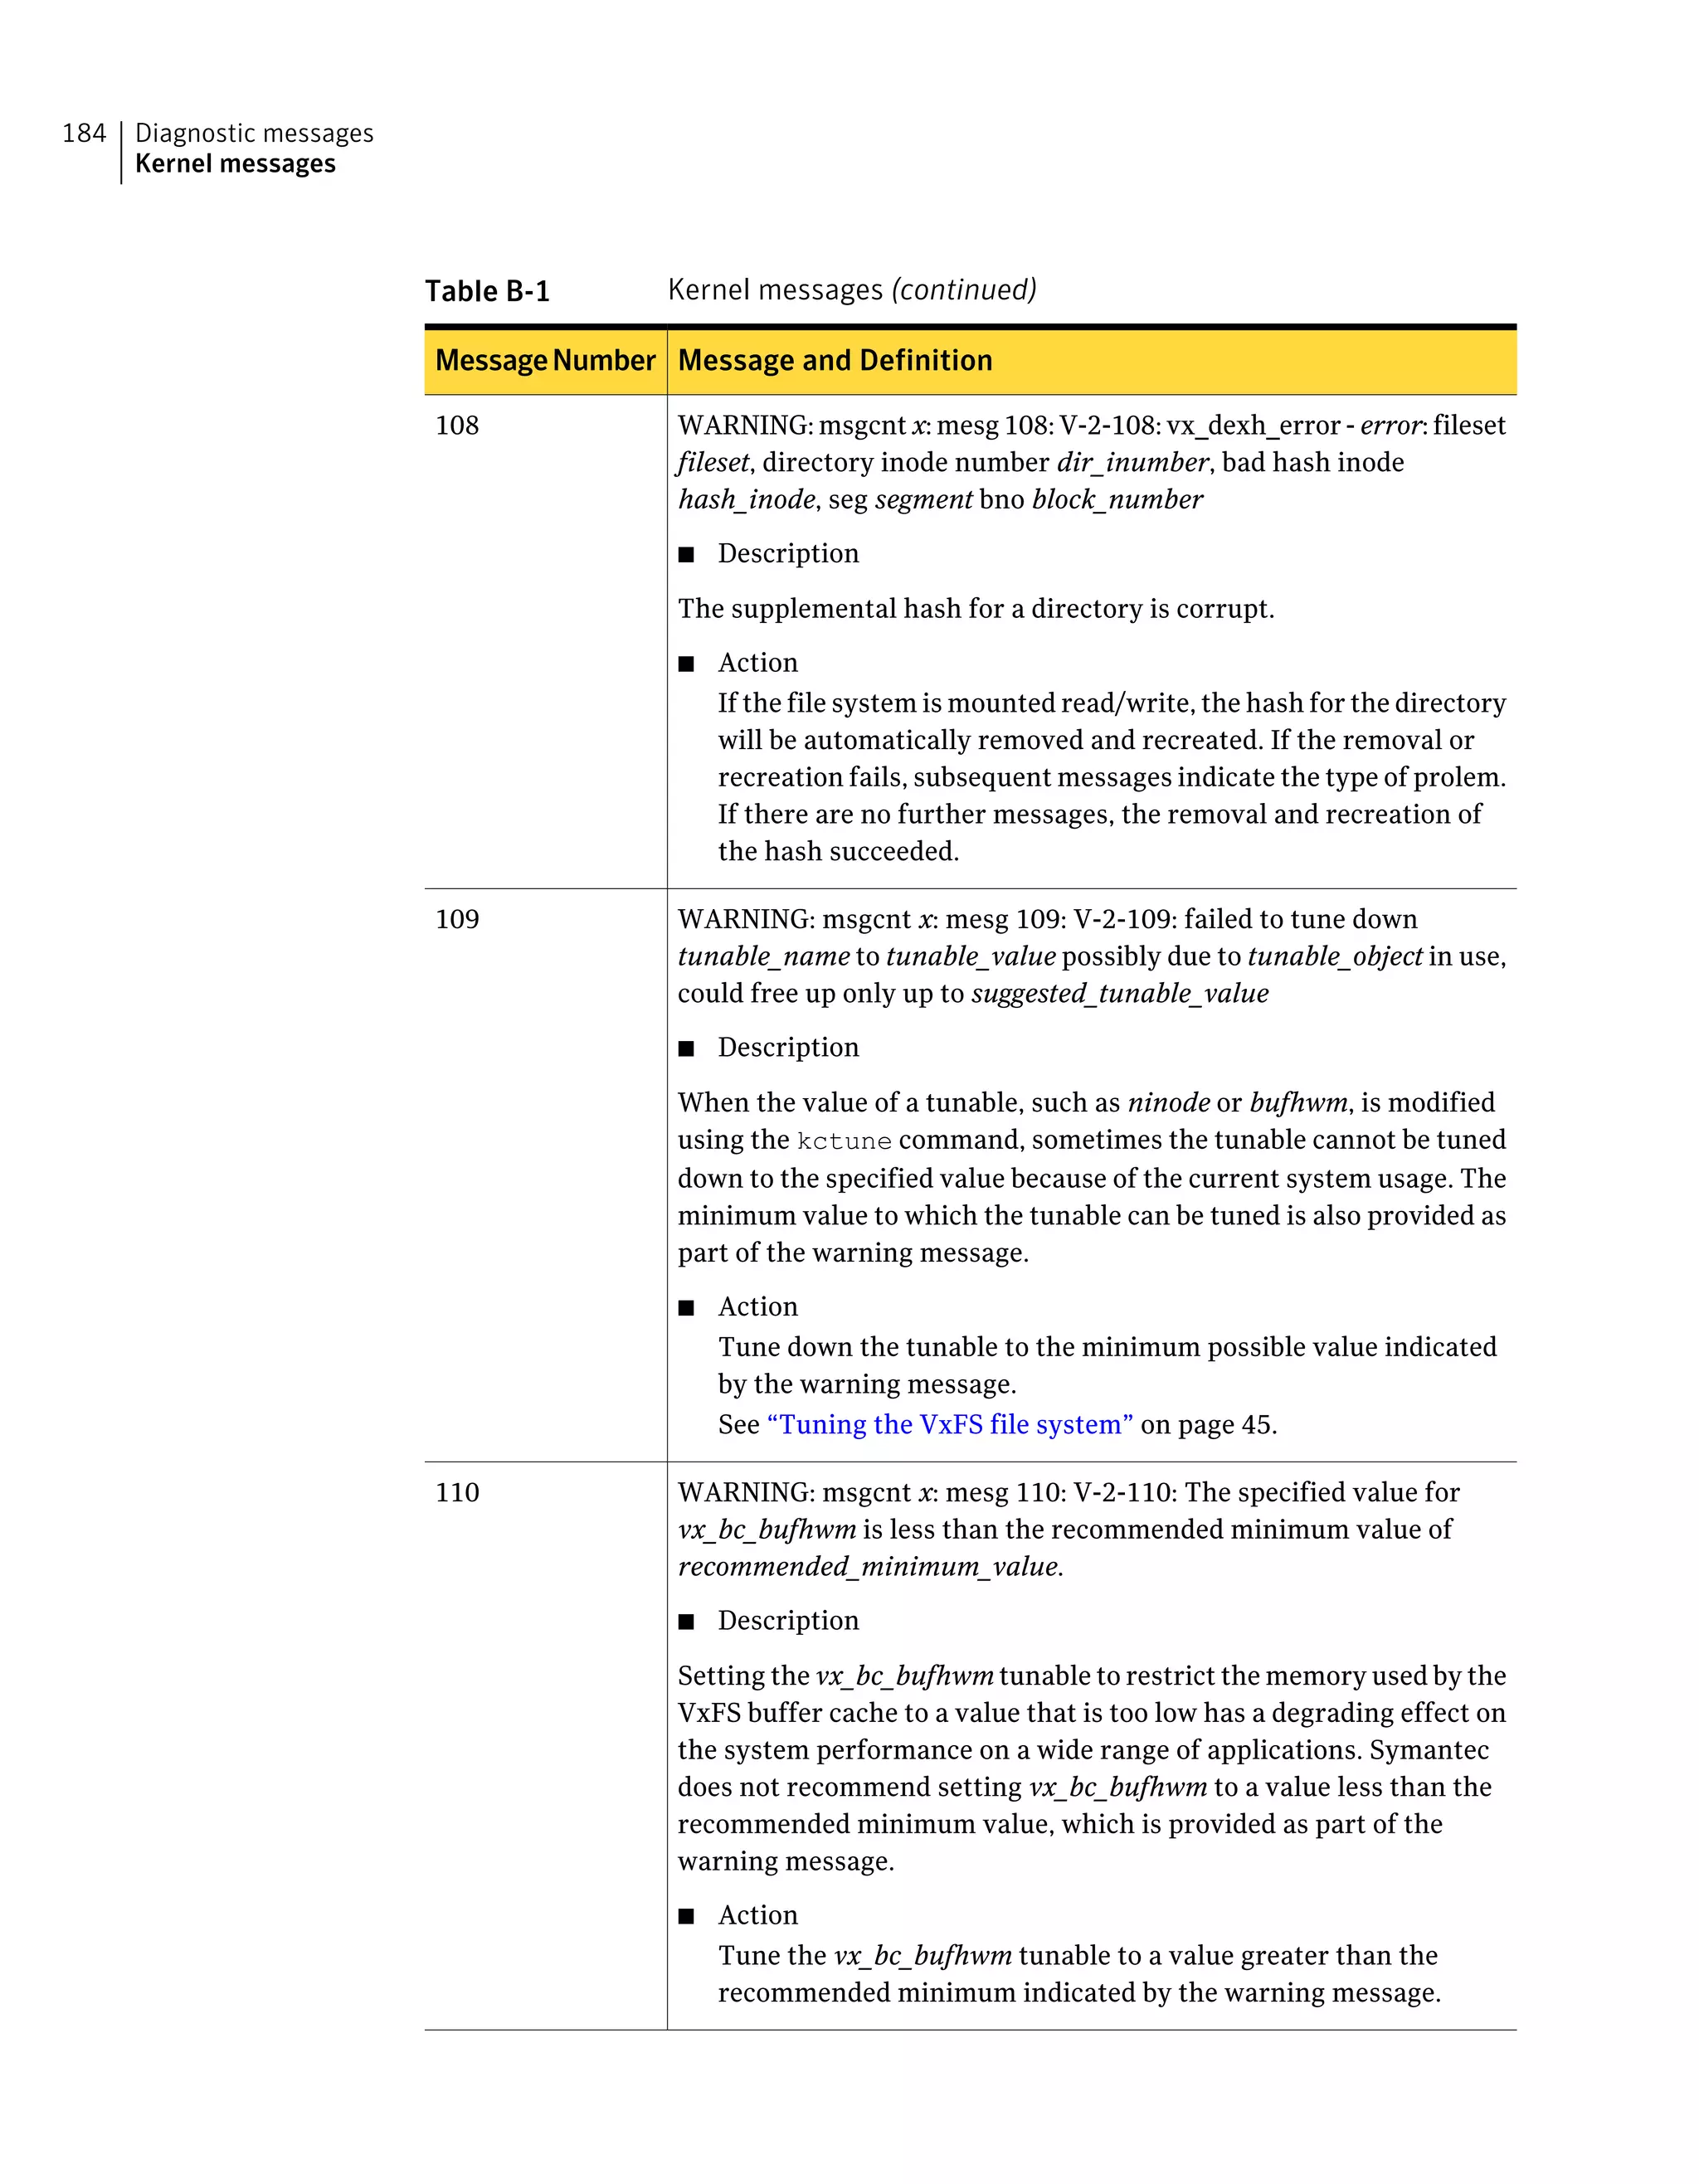
![Table B-1 Kernel messages (continued)
Message and DefinitionMessageNumber
WARNING: msgcnt x: mesg 038: V-2-38: vx_dataioerr - volume_name
file system file data [read|write] error in dev/block device_ID/block
■ Description
A read or a write error occurred while accessing file data. The
message specifies whether the disk I/O that failed was a read or a
write. File data includes data currently in files and free blocks. If
the message is printed because of a read or write error to a file,
another message that includes the inode number of the file will
print. The message may be printed as the result of a read or write
error to a free block, since some operations allocate an extent and
immediately perform I/O to it. If the I/O fails, the extent is freed
and the operation fails. The message is accompanied by a message
from the disk driver regarding the disk I/O error.
■ Action
Resolve the condition causing the disk error. If the error was the
result of a temporary condition (such as accidentally turning off
a disk or a loose cable), correct the condition. Check for loose cables,
etc. If any file data was lost, restore the files from backups.
Determine the file names from the inode number.
See the ncheck(1M) manual page.
If an actual disk error occurred, make a backup of the file system,
replace or reformat the disk drive, and restore the file system from
the backup. Consult the documentation specific to your system for
information on how to recover from disk errors. The disk driver
should have printed a message that may provide more information.
038
Diagnostic messages
Kernel messages
164](https://image.slidesharecdn.com/c26c5c8f-a512-479d-9247-560686ddd018-160310211410/75/vxfs_admin_51sp1_hpux-164-2048.jpg)
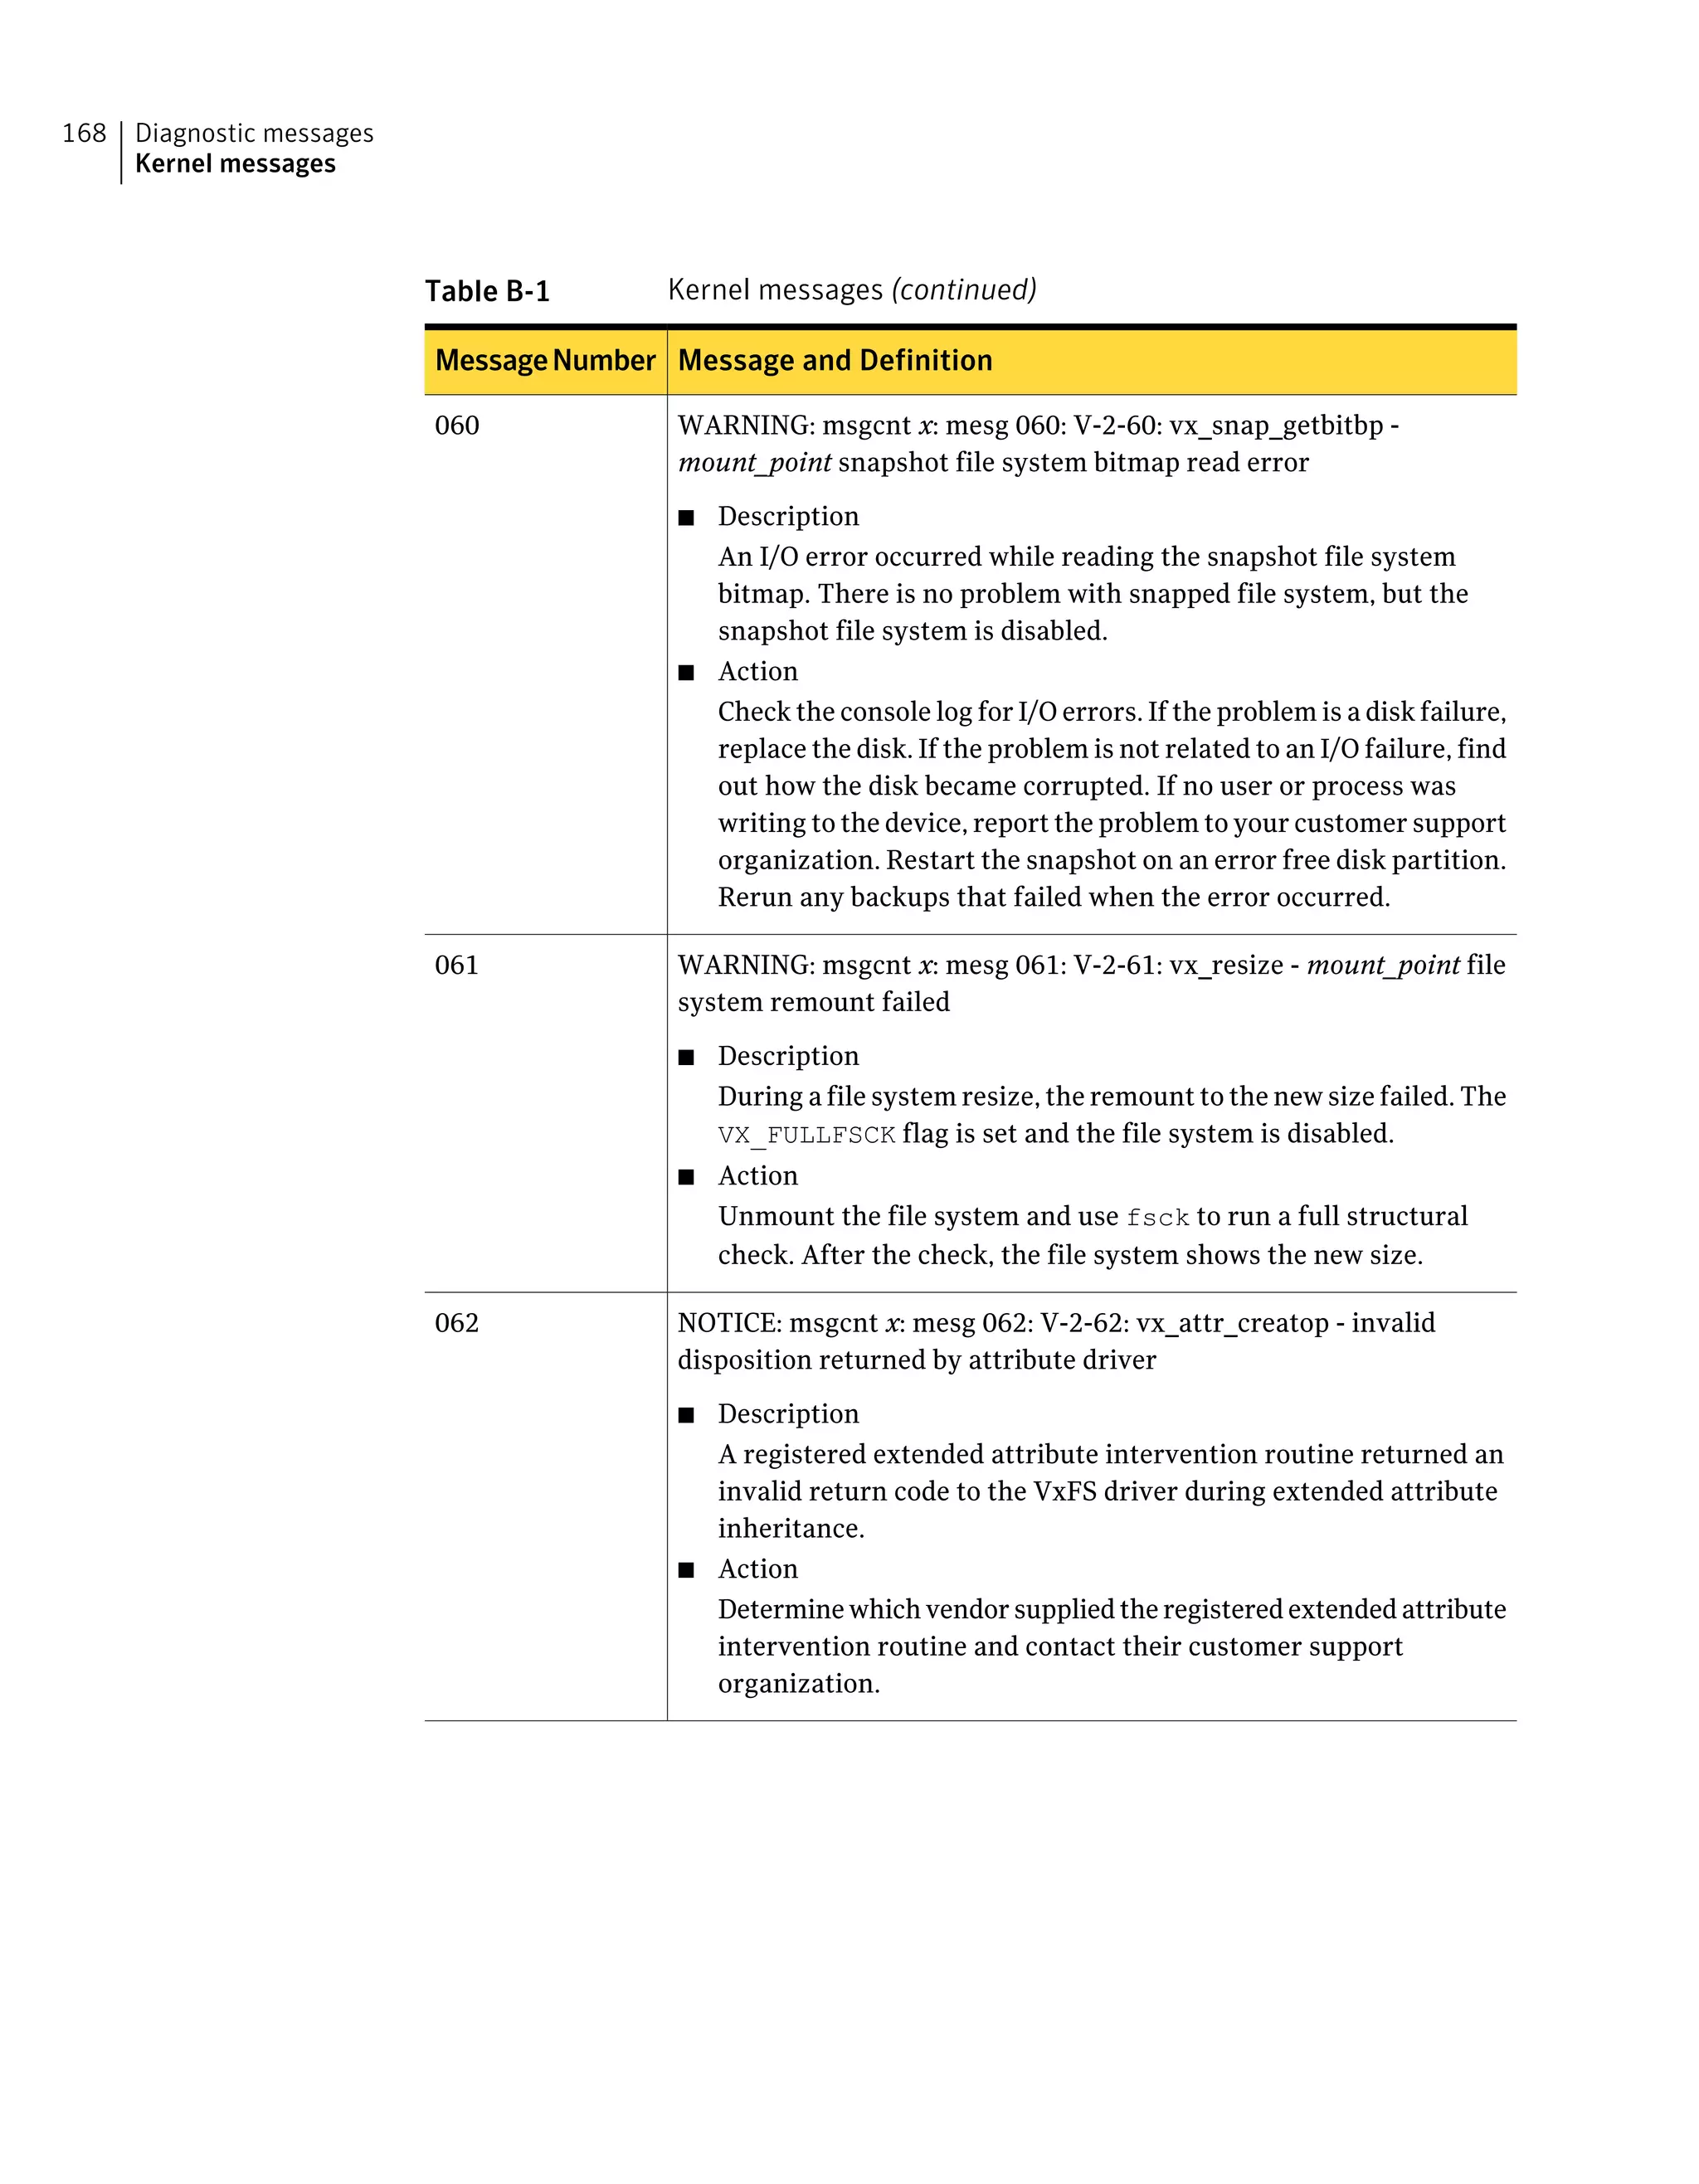
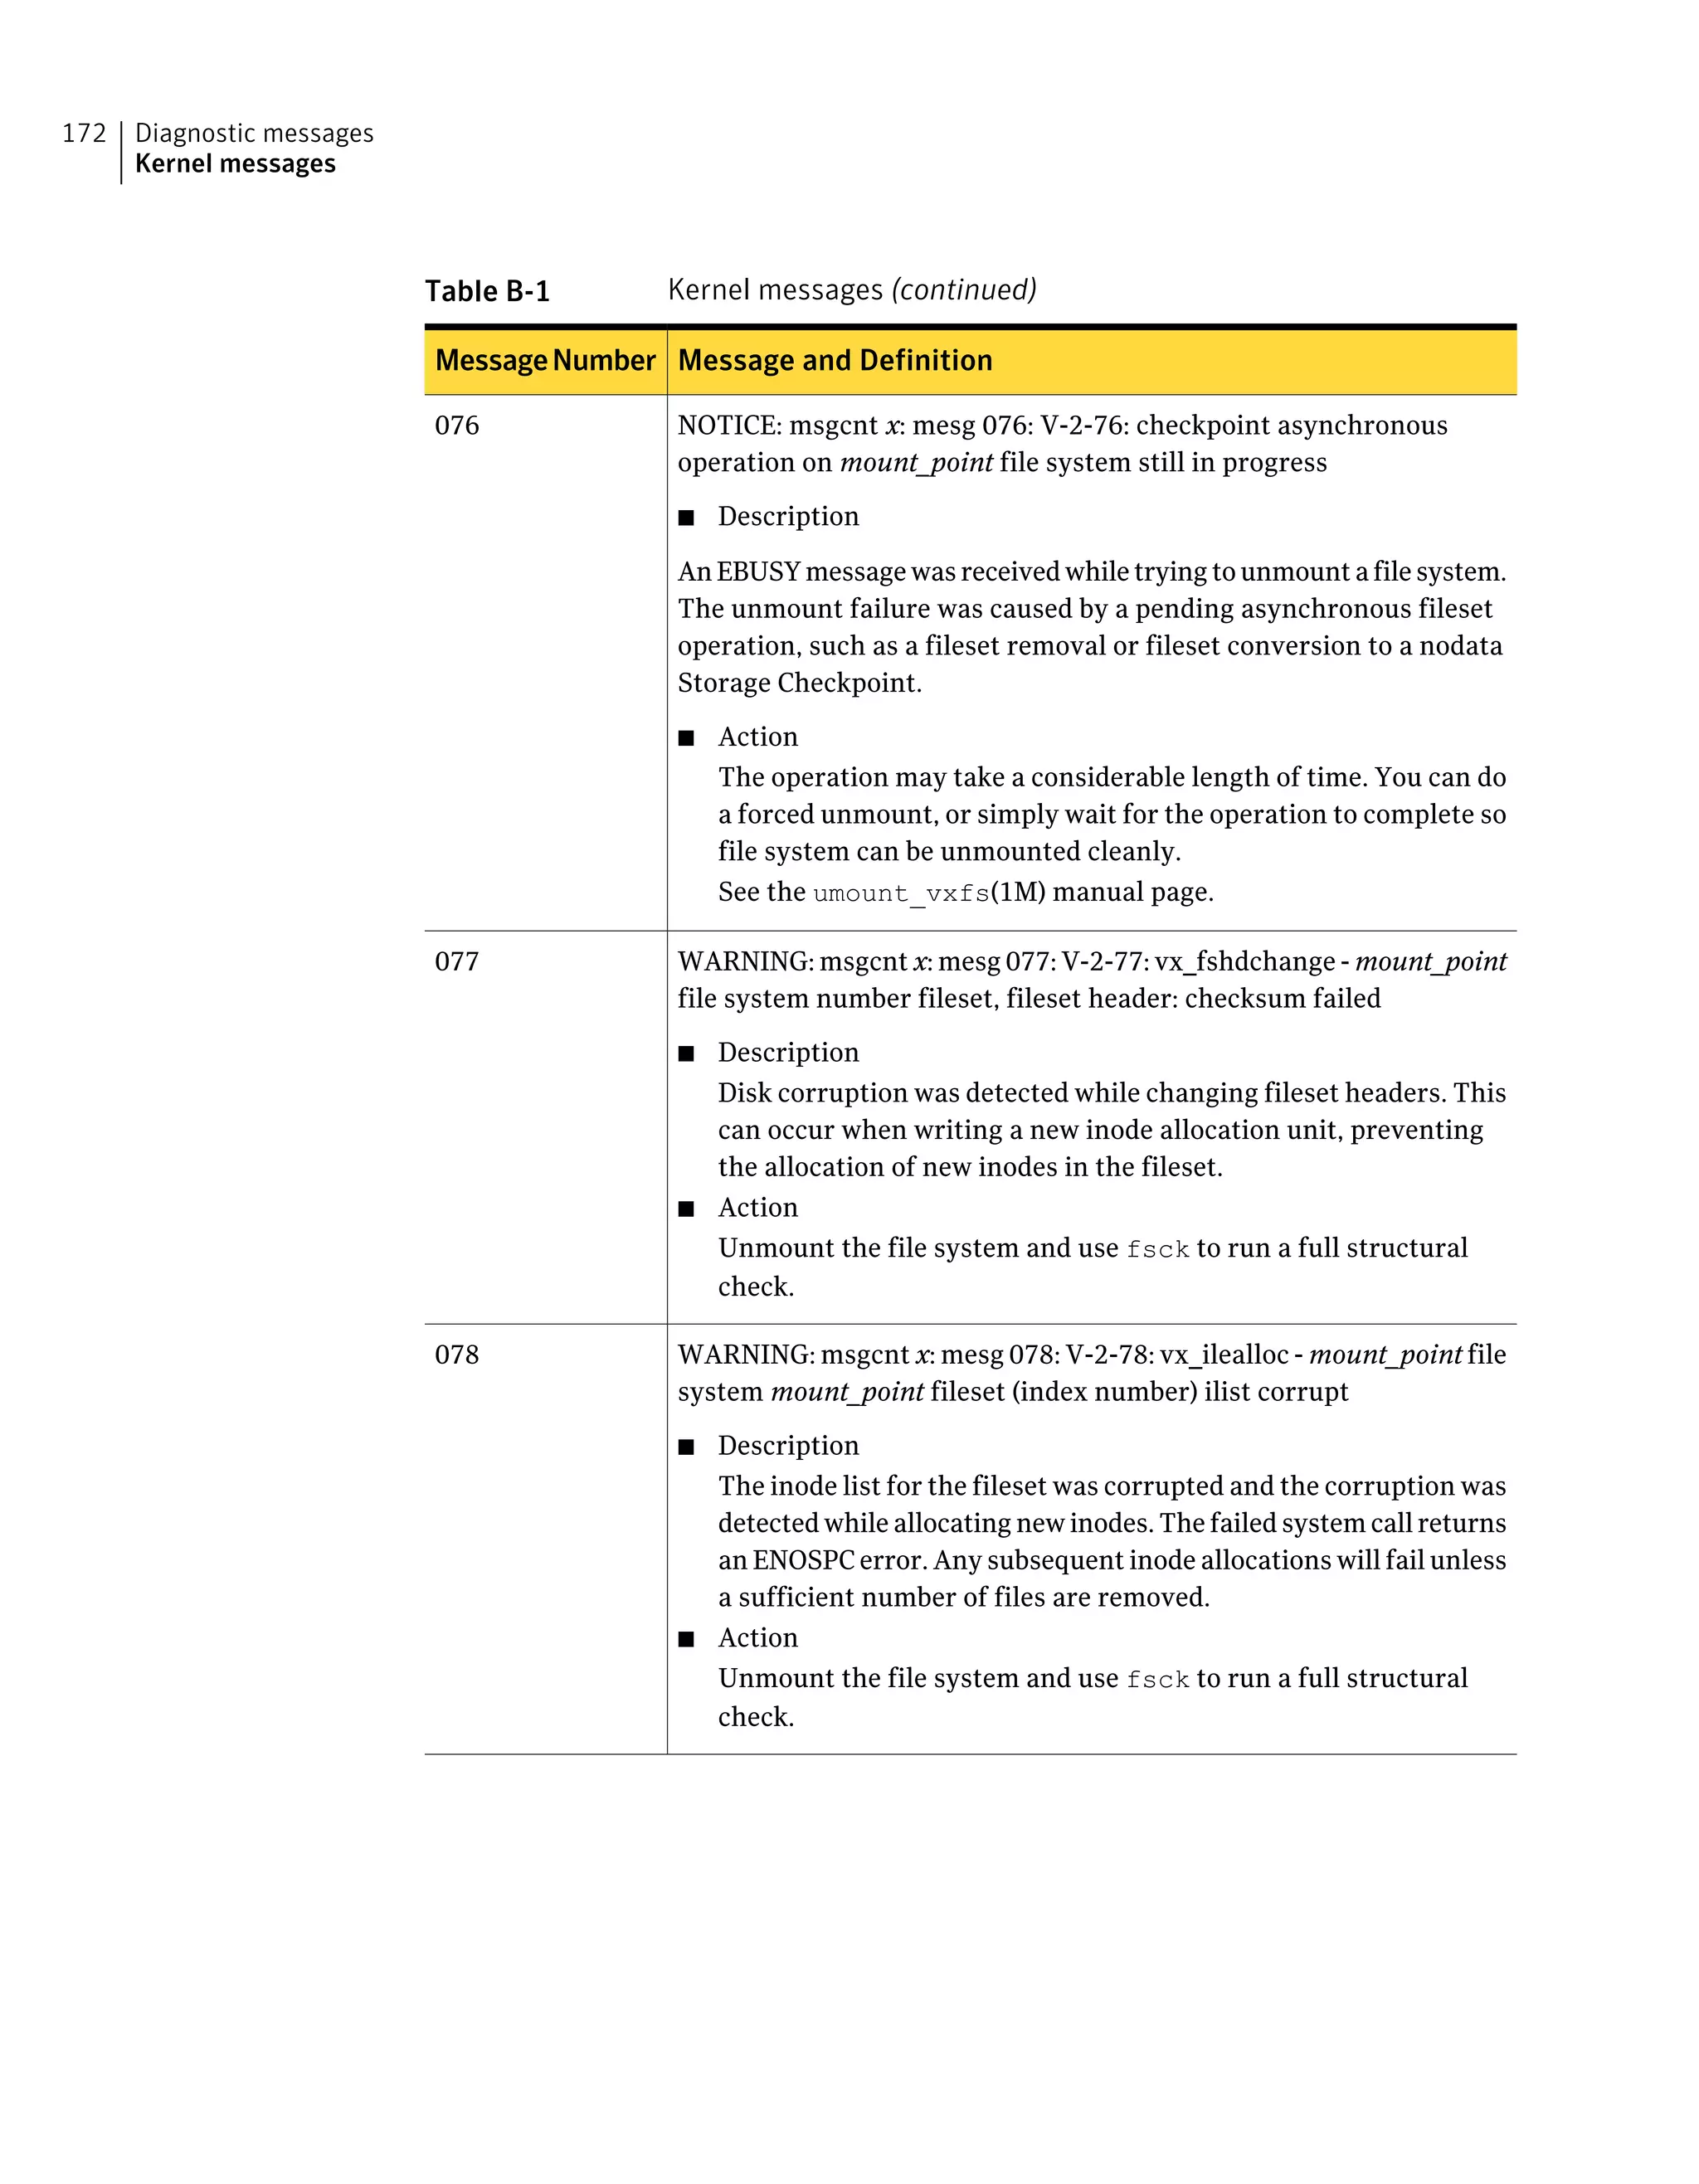


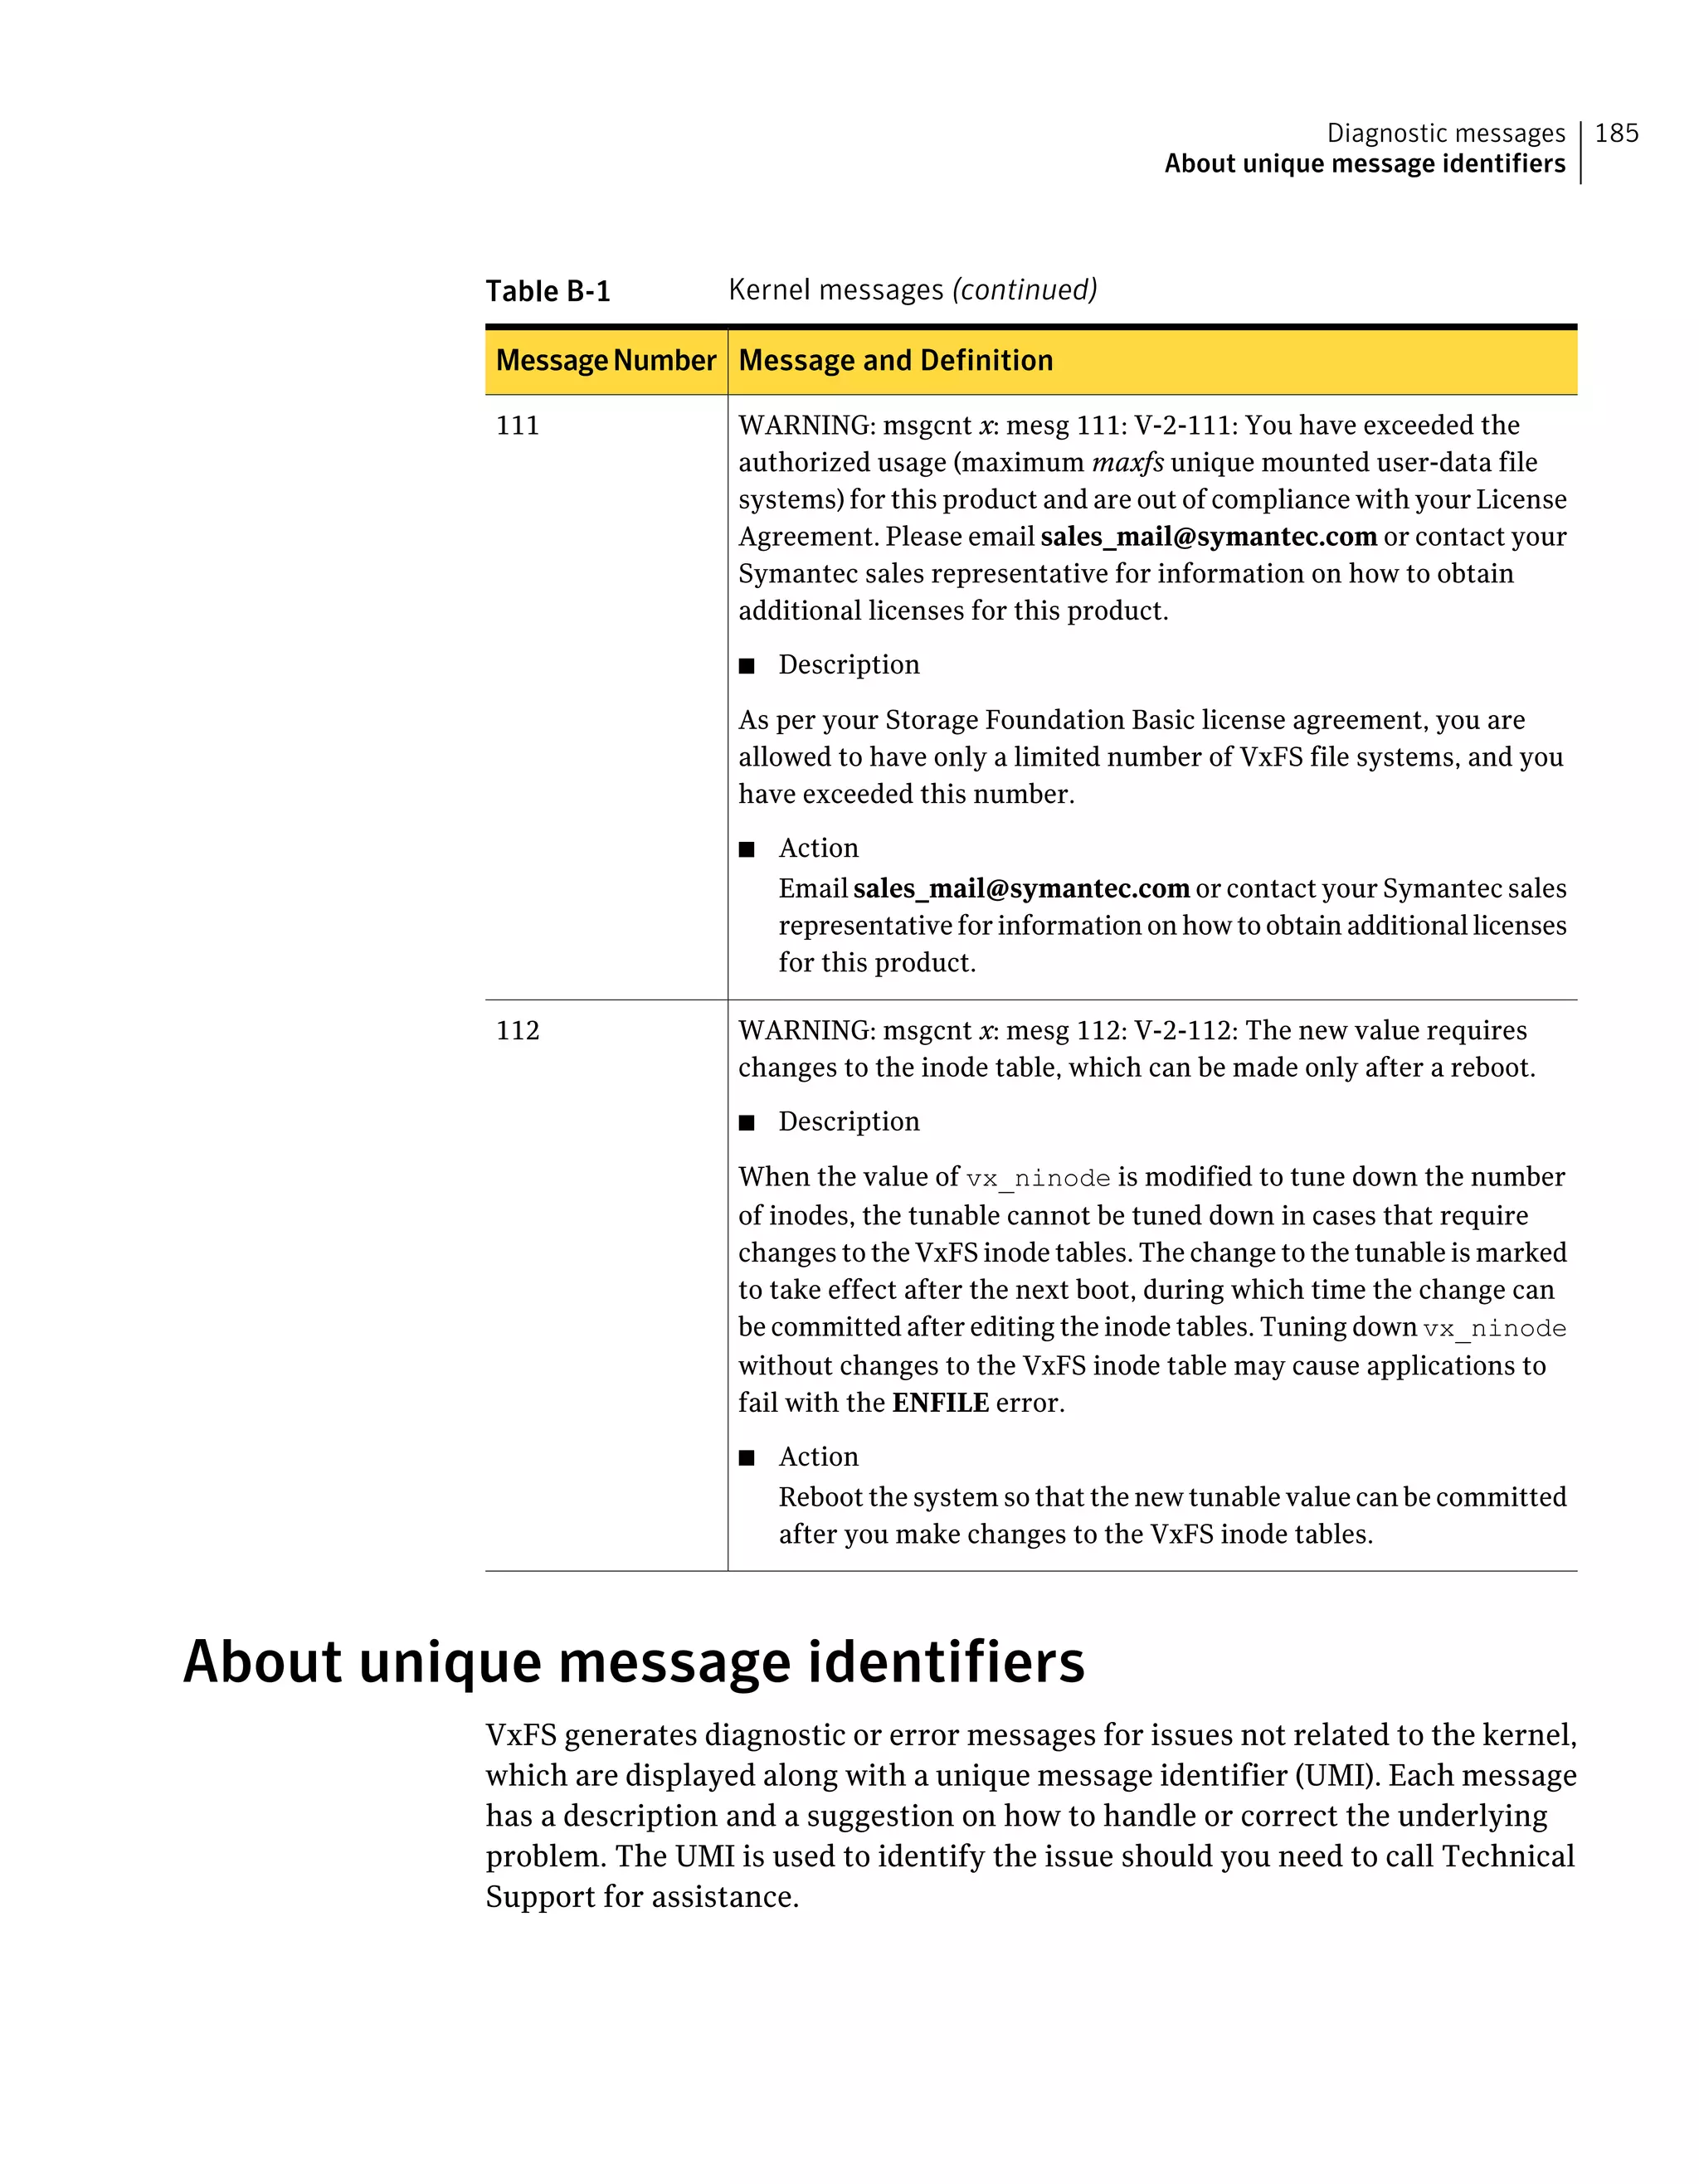


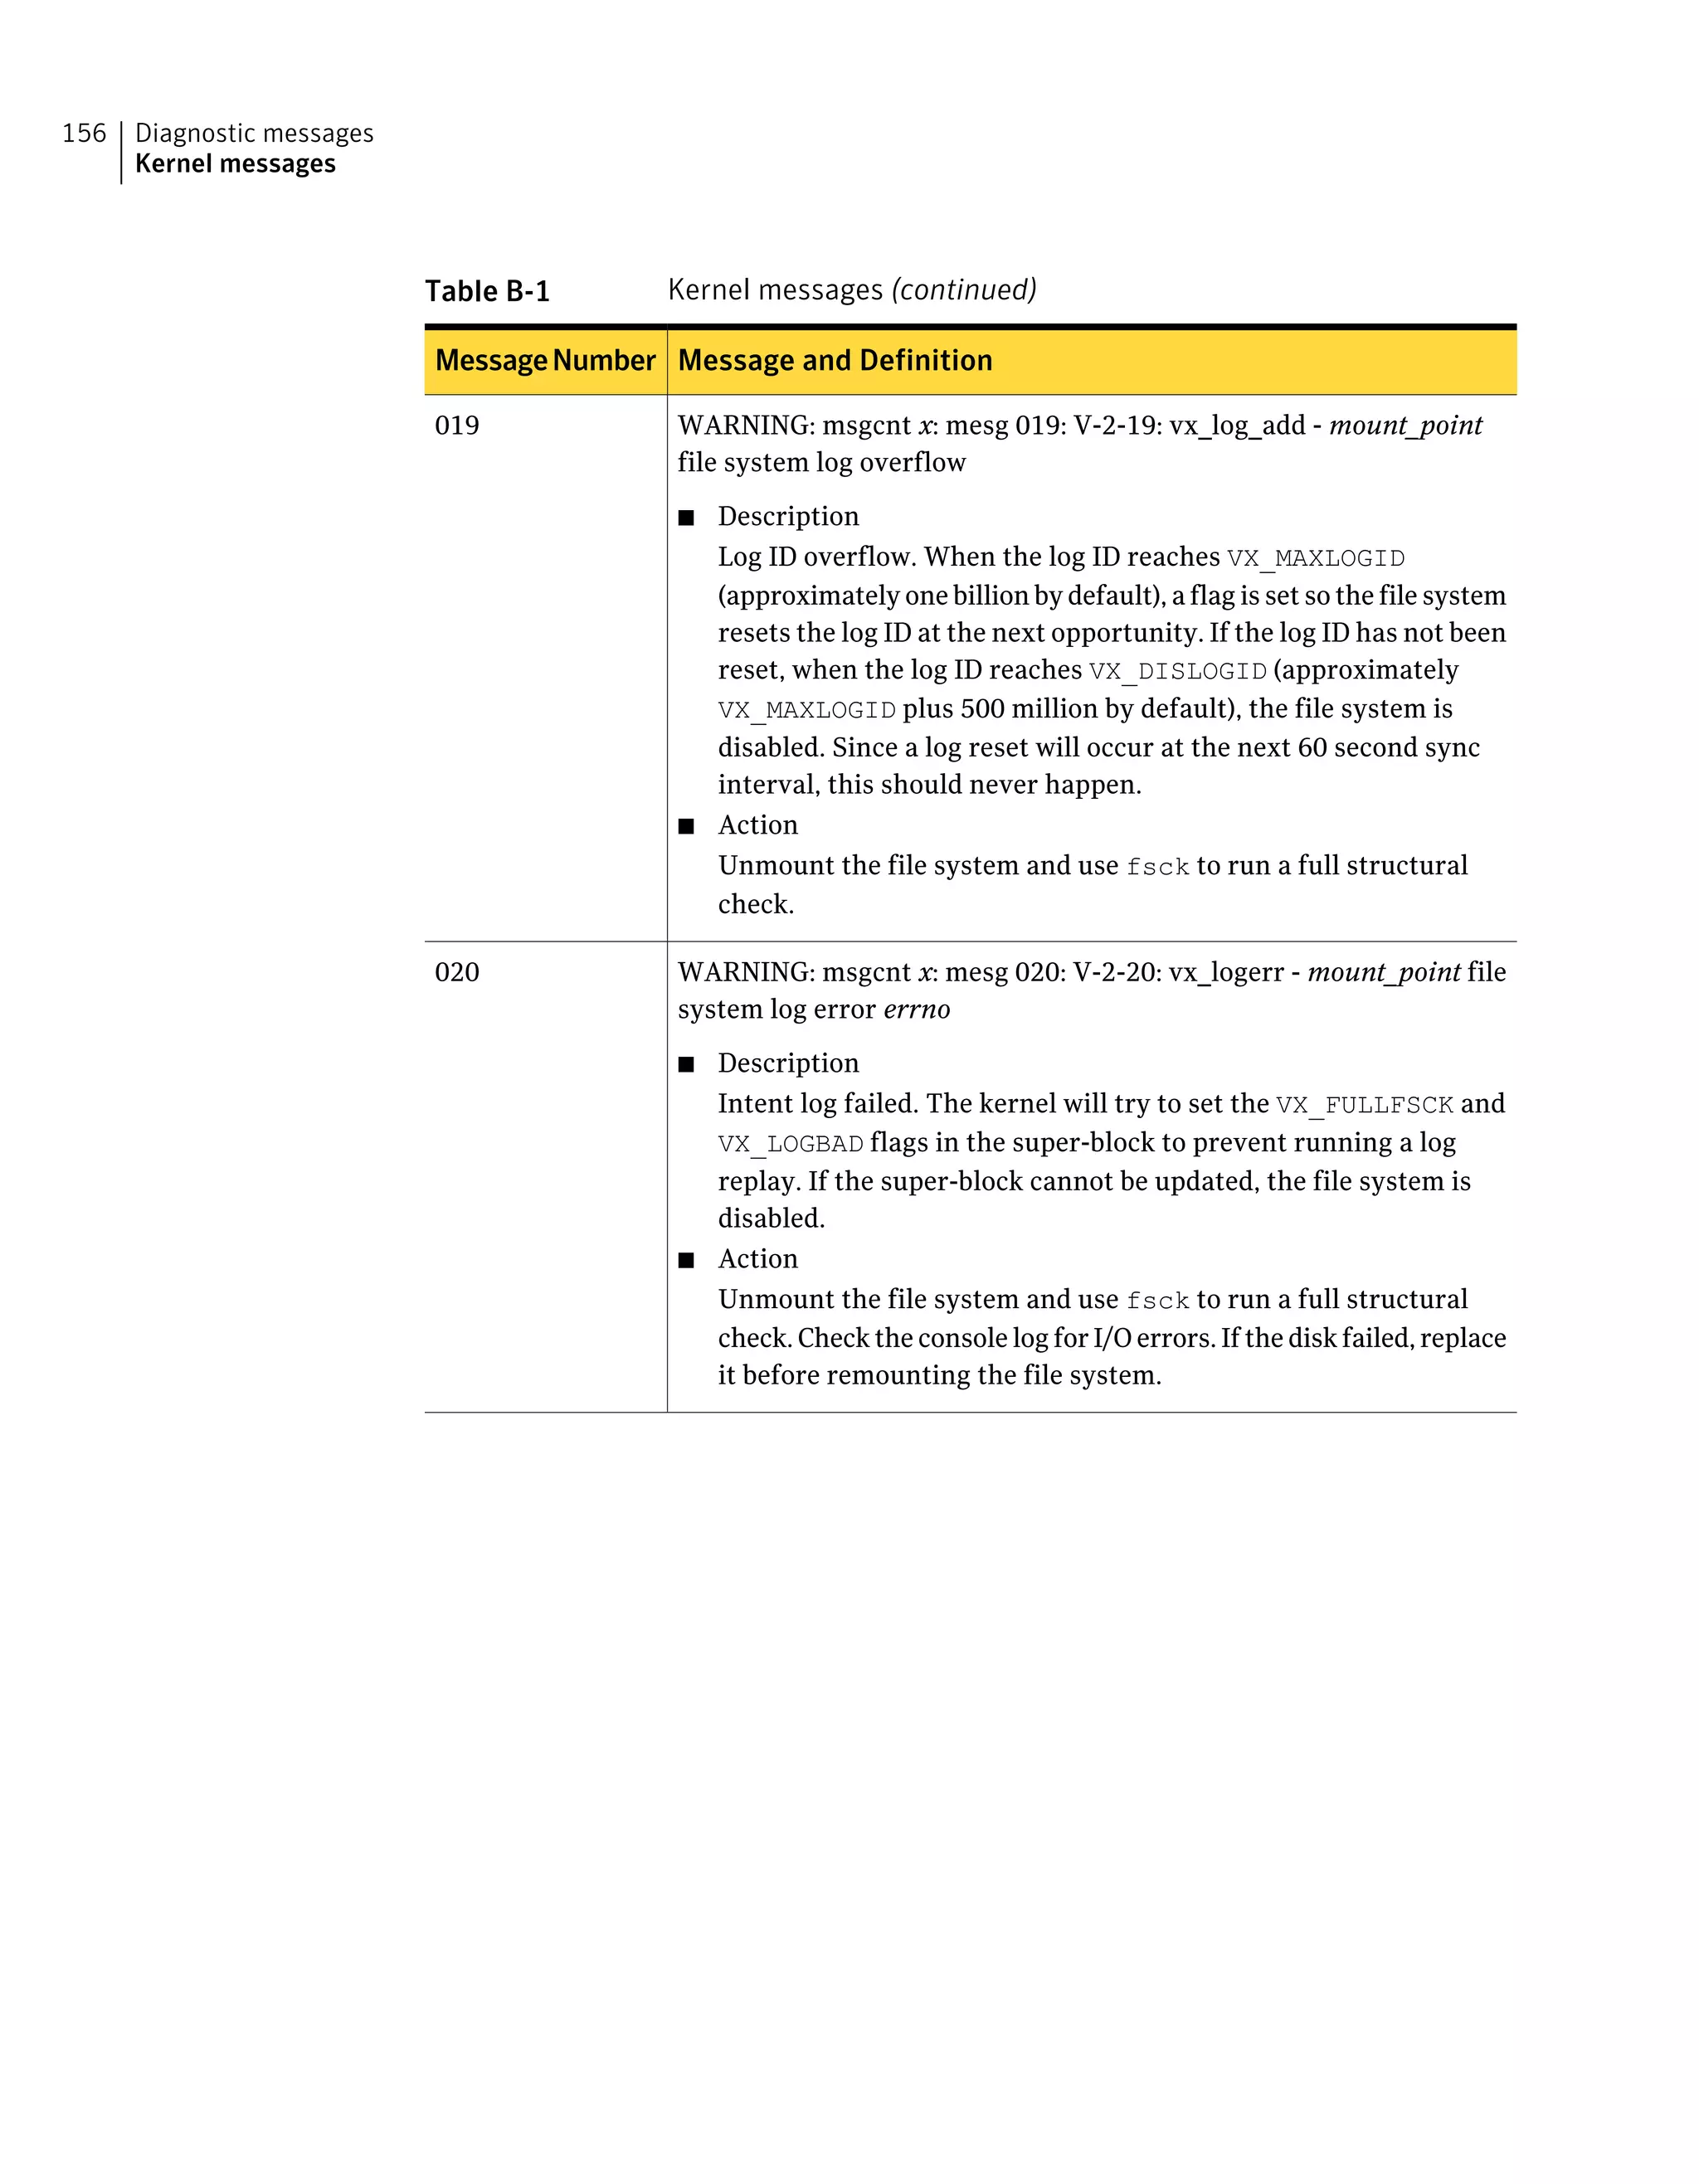
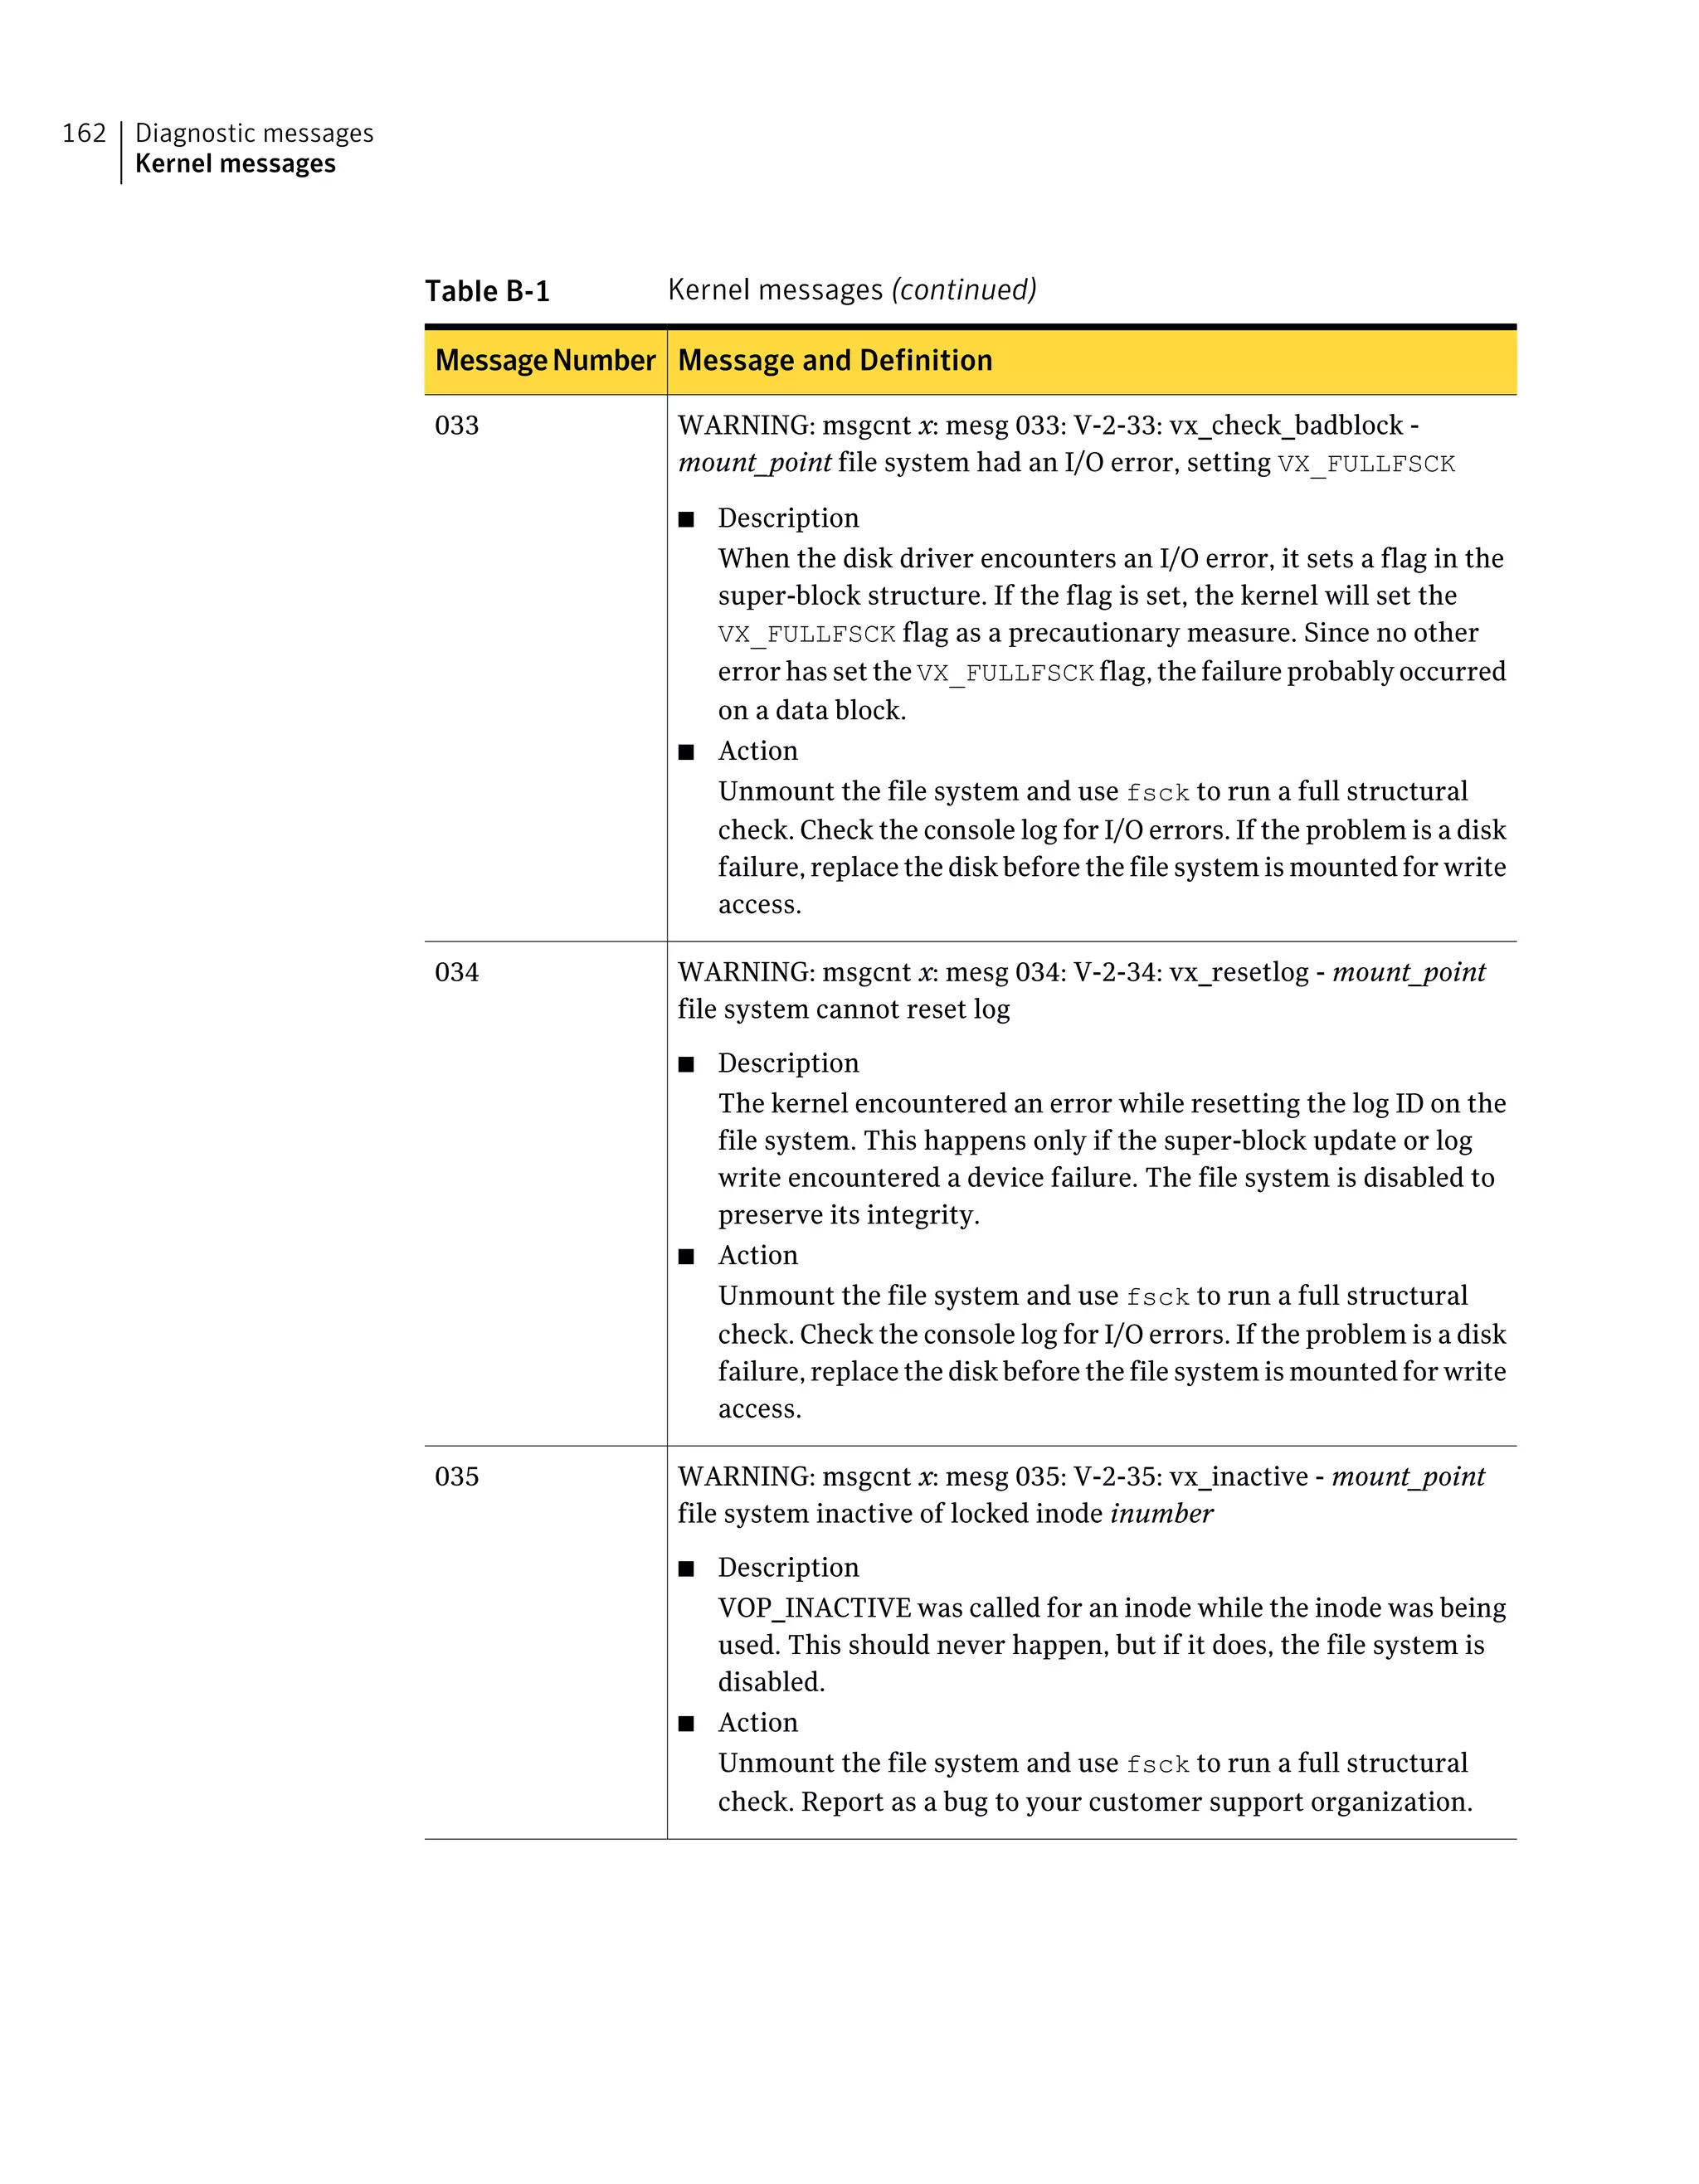
![V-2-35
WARNING: msgcnt x: mesg 035: V-2-35: vx_inactive - mount_point file system
inactive of locked inode inumber
Description:
VOP_INACTIVE was called for an inode while the inode was being used. This
should never happen, but if it does, the file system is disabled.
Recommended action:
Unmount the file system and use fsck to run a full structural check. Report as a
bug to your customer support organization.
V-2-36
WARNING: msgcnt x: mesg 036: V-2-36: vx_lctbad - mount_point file system link
count table lctnumber bad
Description:
Update to the link count table (LCT) failed.
For a Version 2 and above disk layout, the LCT contains the link count for all the
structural inodes. The VX_FULLFSCK flag is set in the super-block. If the super-block
cannot be written, the file system is disabled.
Recommended action:
Unmount the file system and use fsck to run a full structural check.
V-2-37
WARNING: msgcnt x: mesg 037: V-2-37: vx_metaioerr - function - volume_name
file system meta data [read|write] error in dev/block device_ID/block
Description:
A read or a write error occurred while accessing file system metadata. The full
fsck flag on the file system was set. The message specifies whether the disk I/O
that failed was a read or a write.
File system metadata includes inodes, directory blocks, and the file system log.
If the error was a write error, it is likely that some data was lost. This message
should be accompanied by another file system message describing the particular
file system metadata affected, as well as a message from the disk driver containing
information about the disk I/O error.
Recommended action:
205Diagnostic messages
Dewey kernel messages](https://image.slidesharecdn.com/c26c5c8f-a512-479d-9247-560686ddd018-160310211410/75/vxfs_admin_51sp1_hpux-205-2048.jpg)
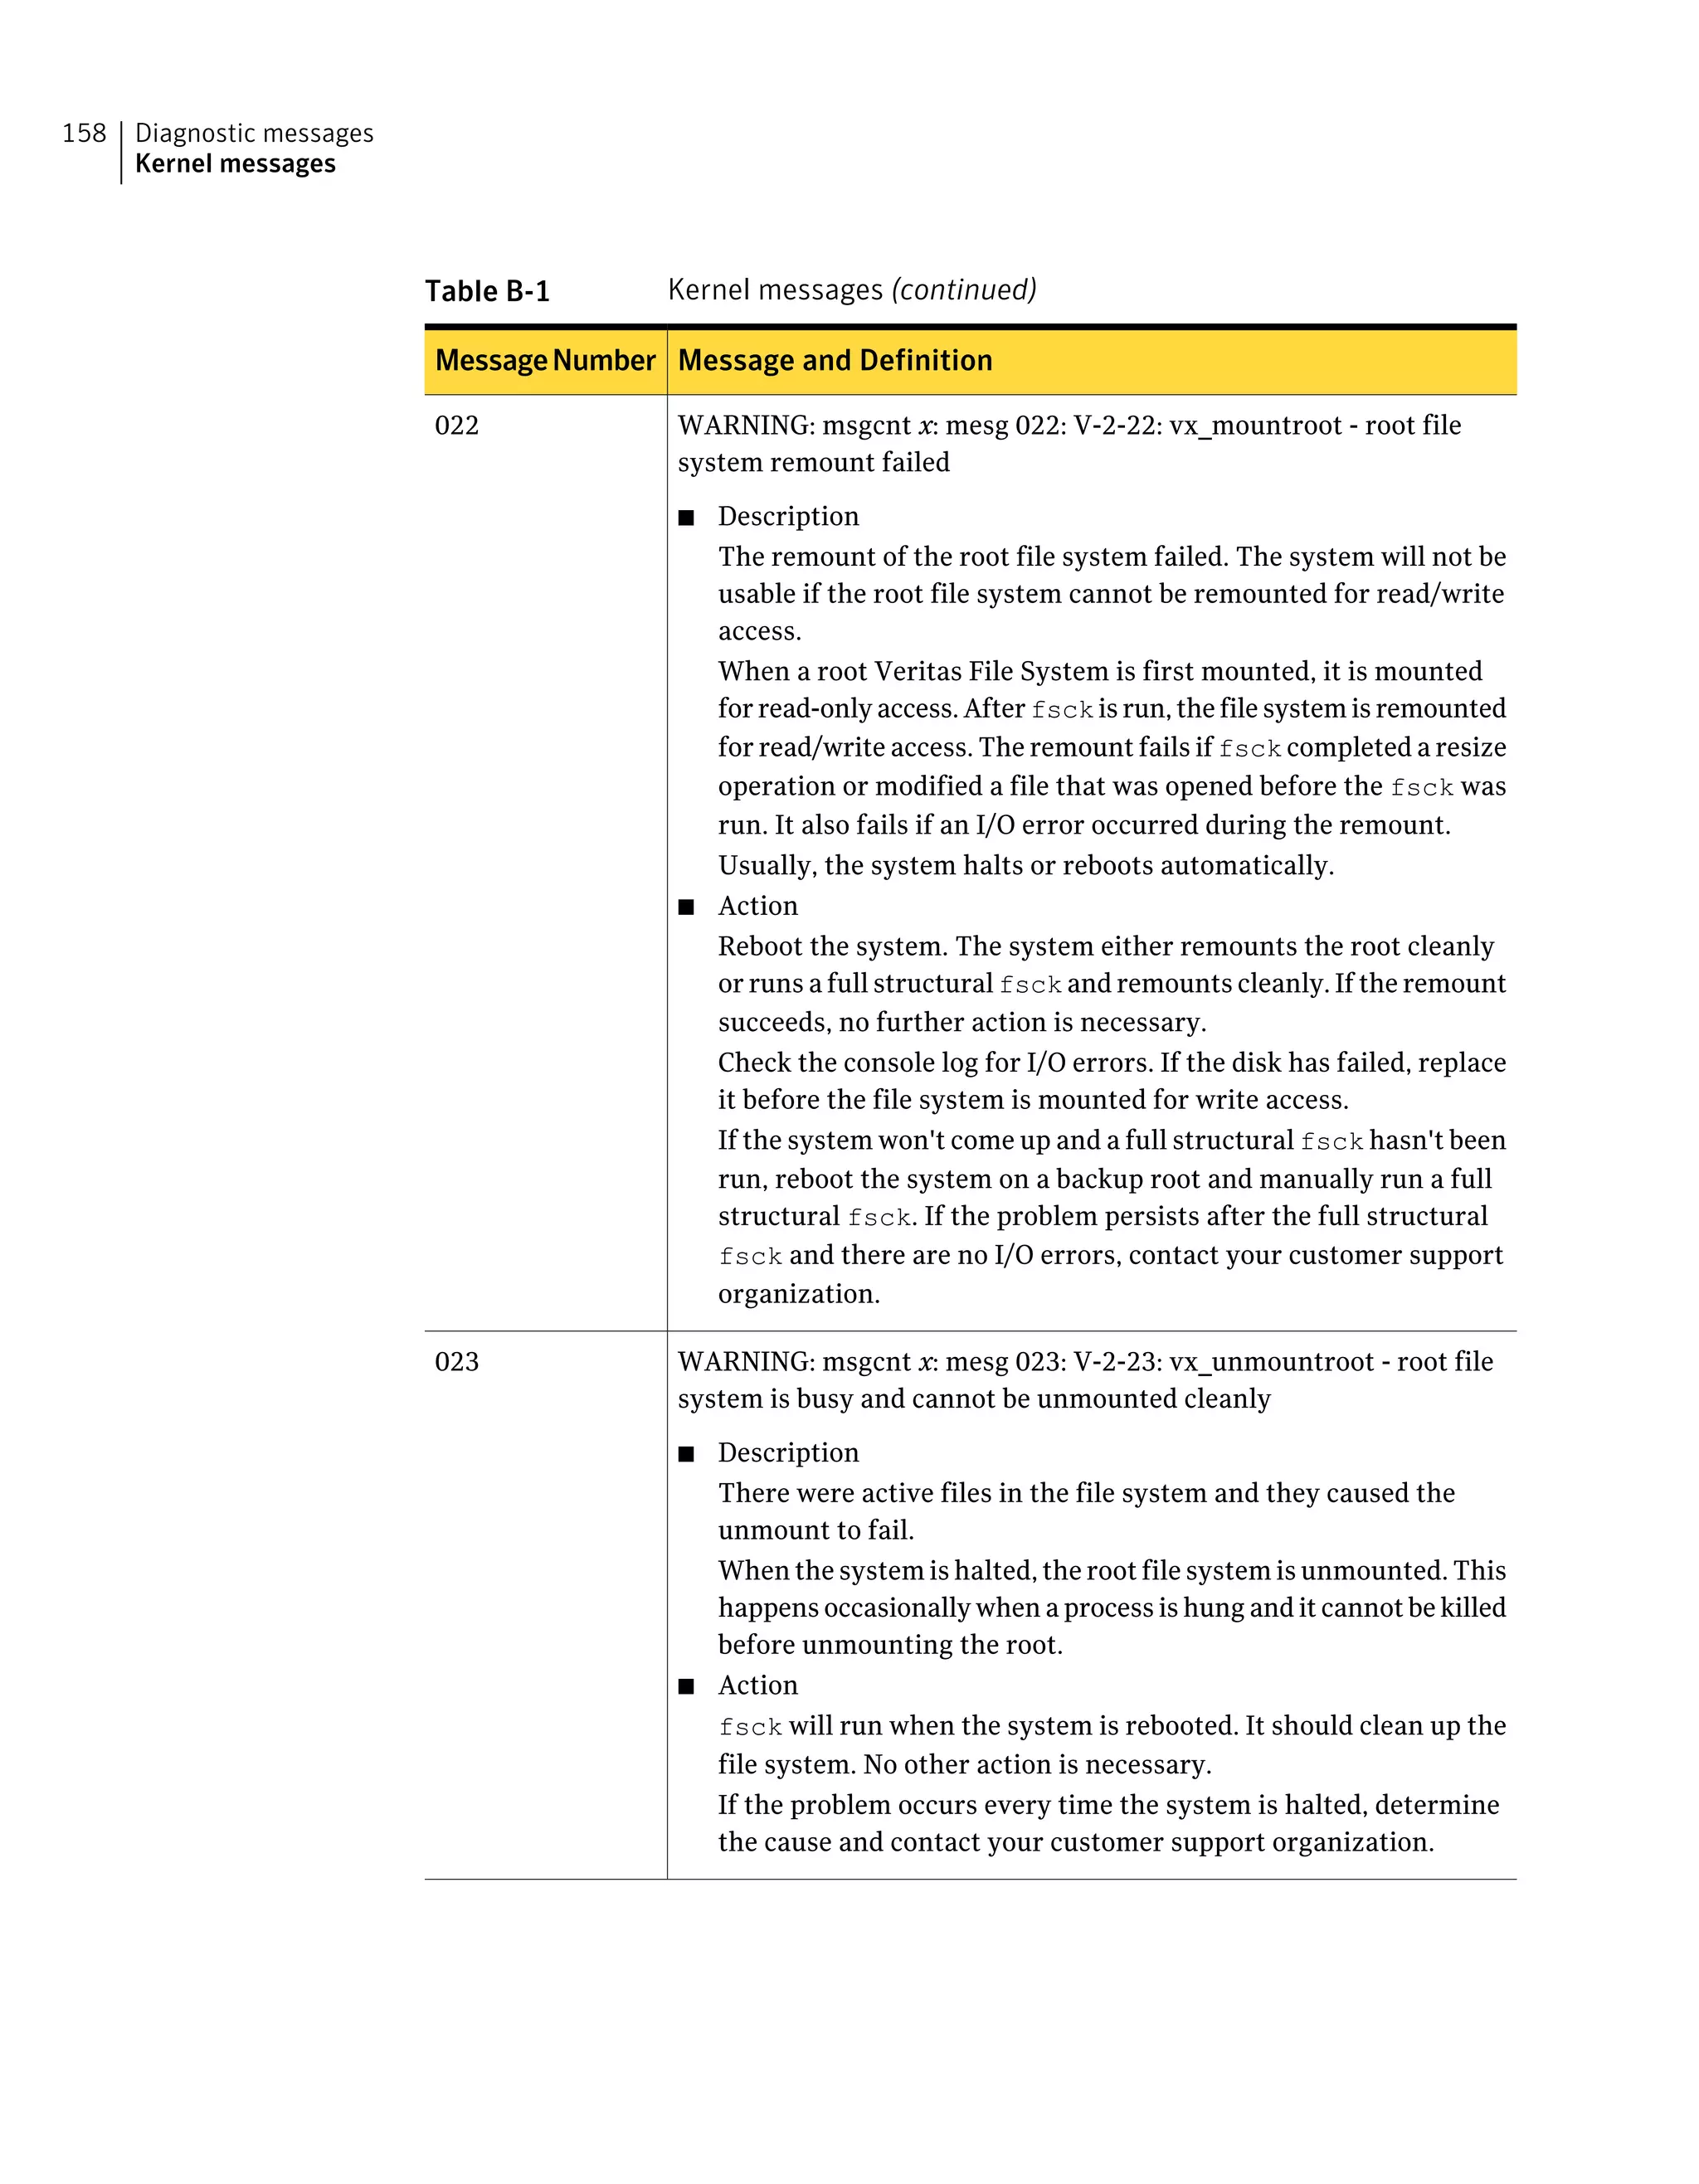
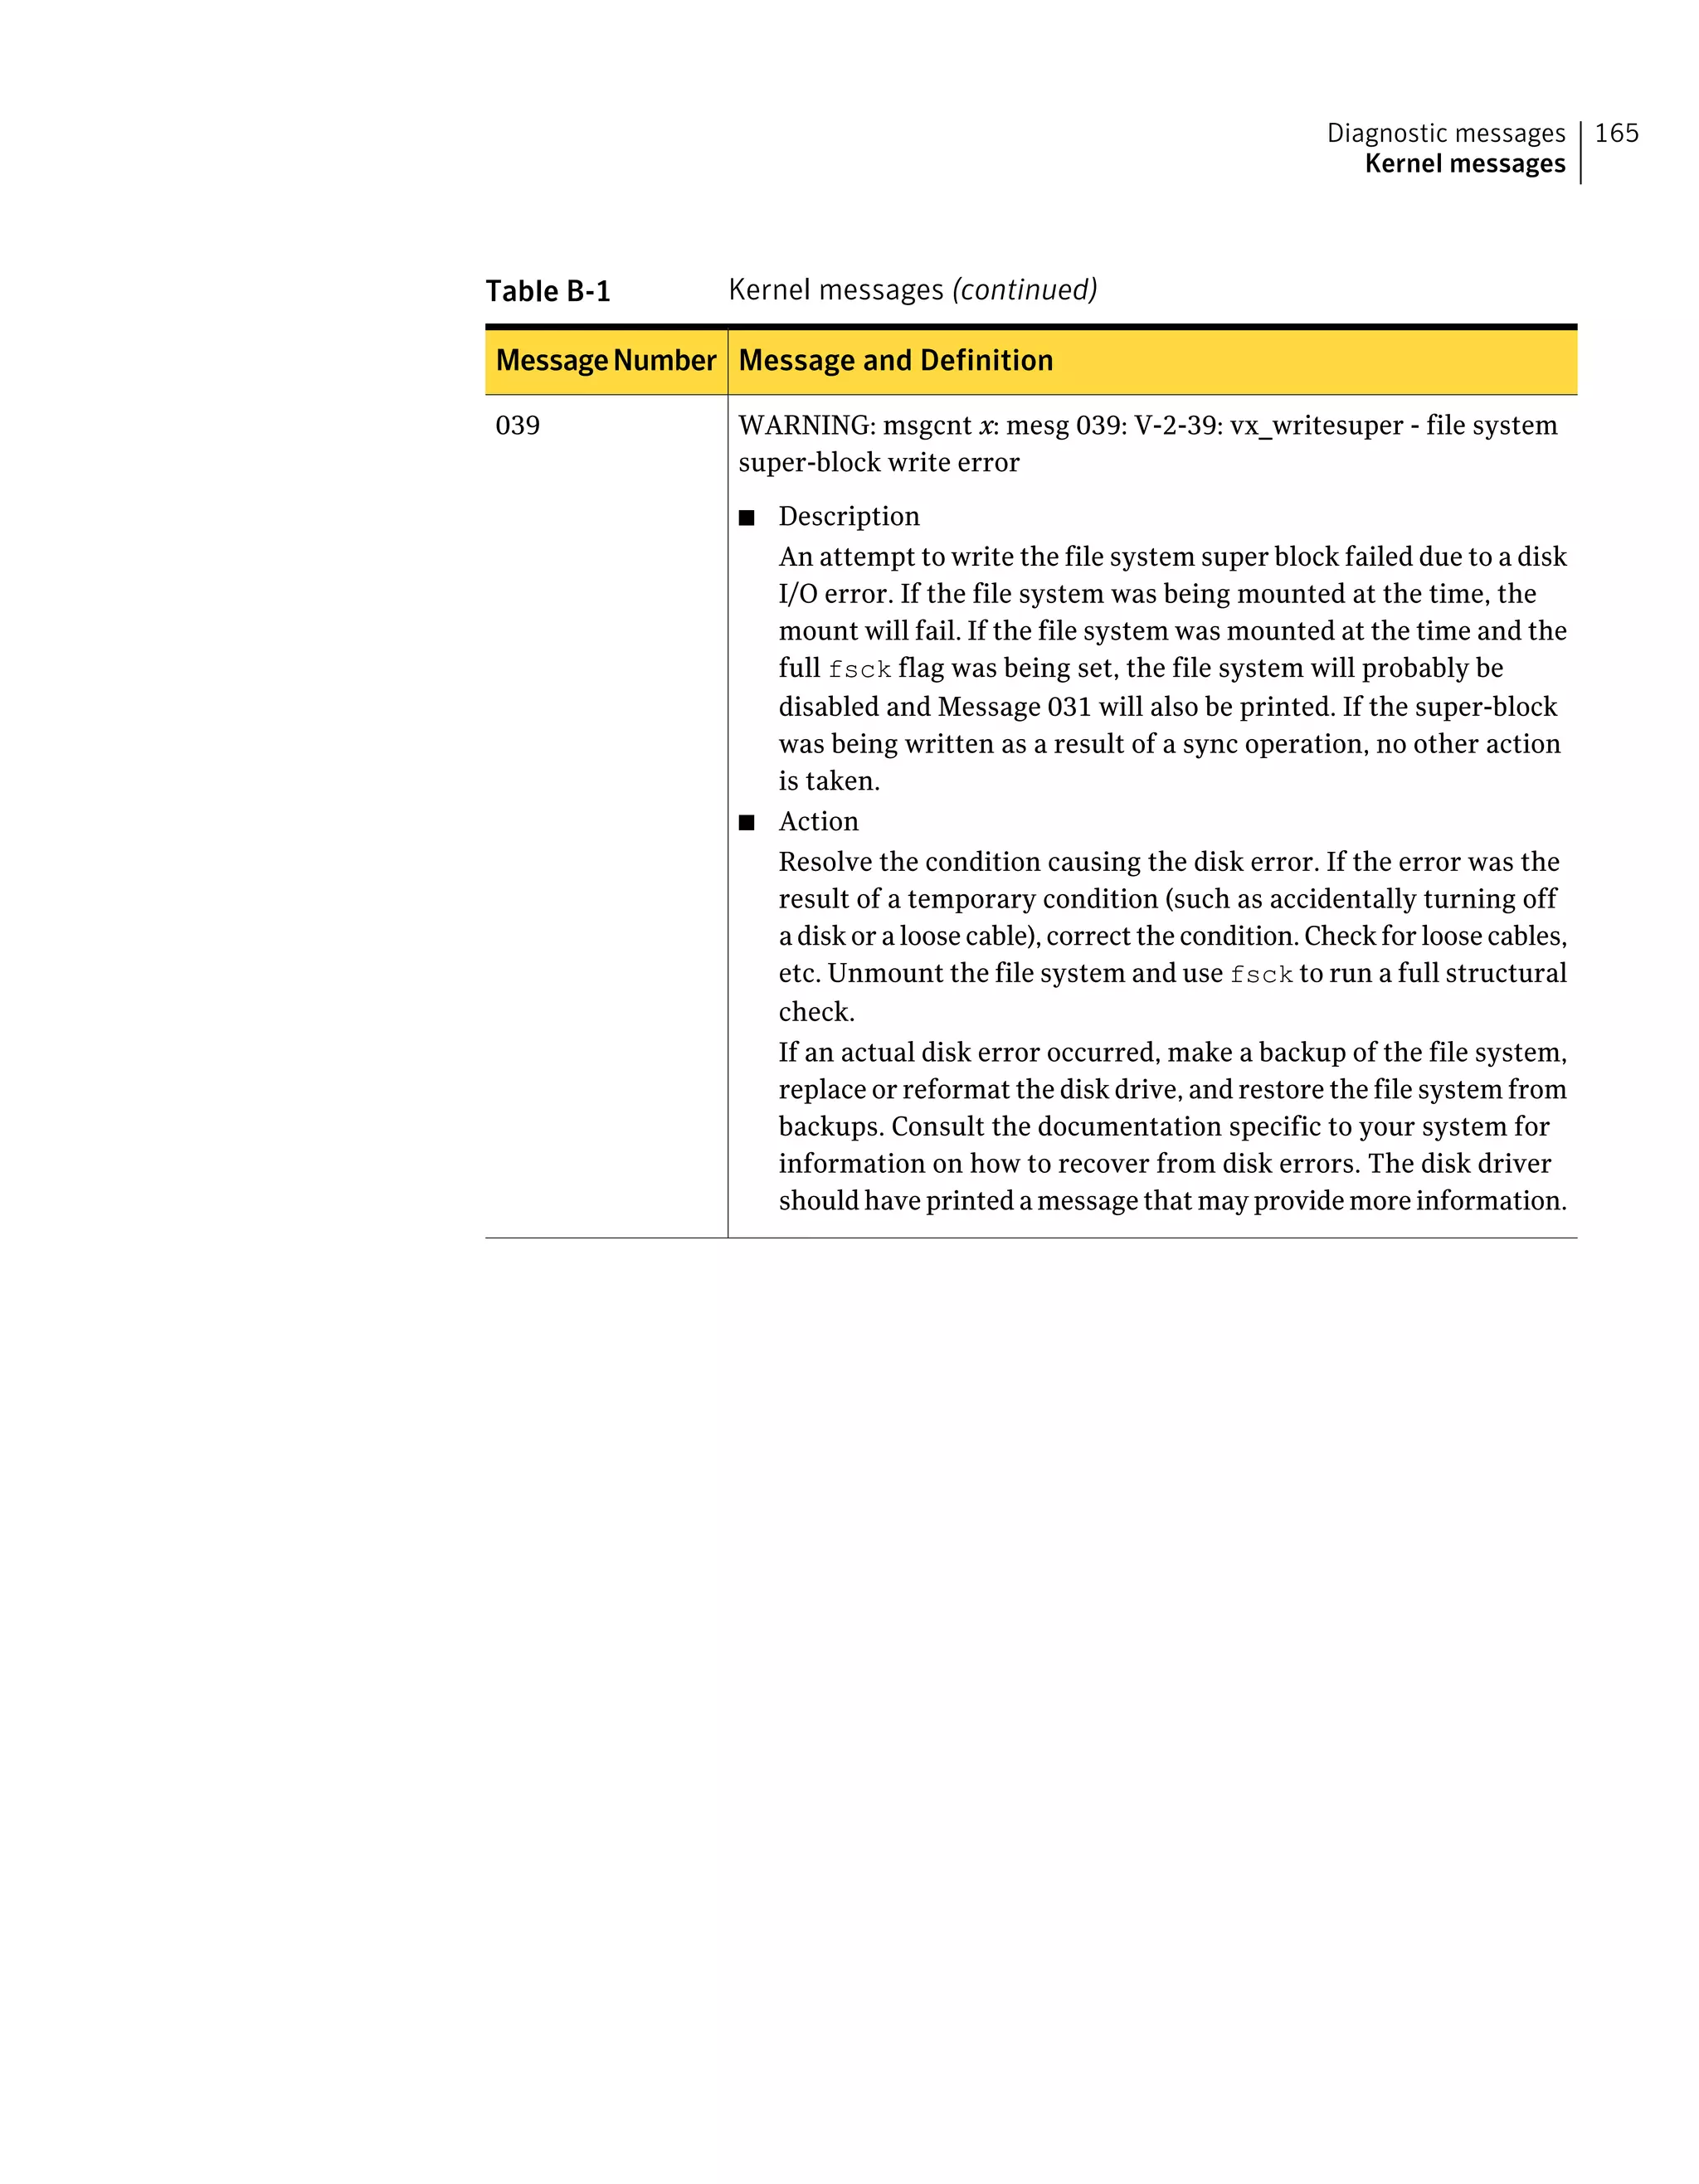
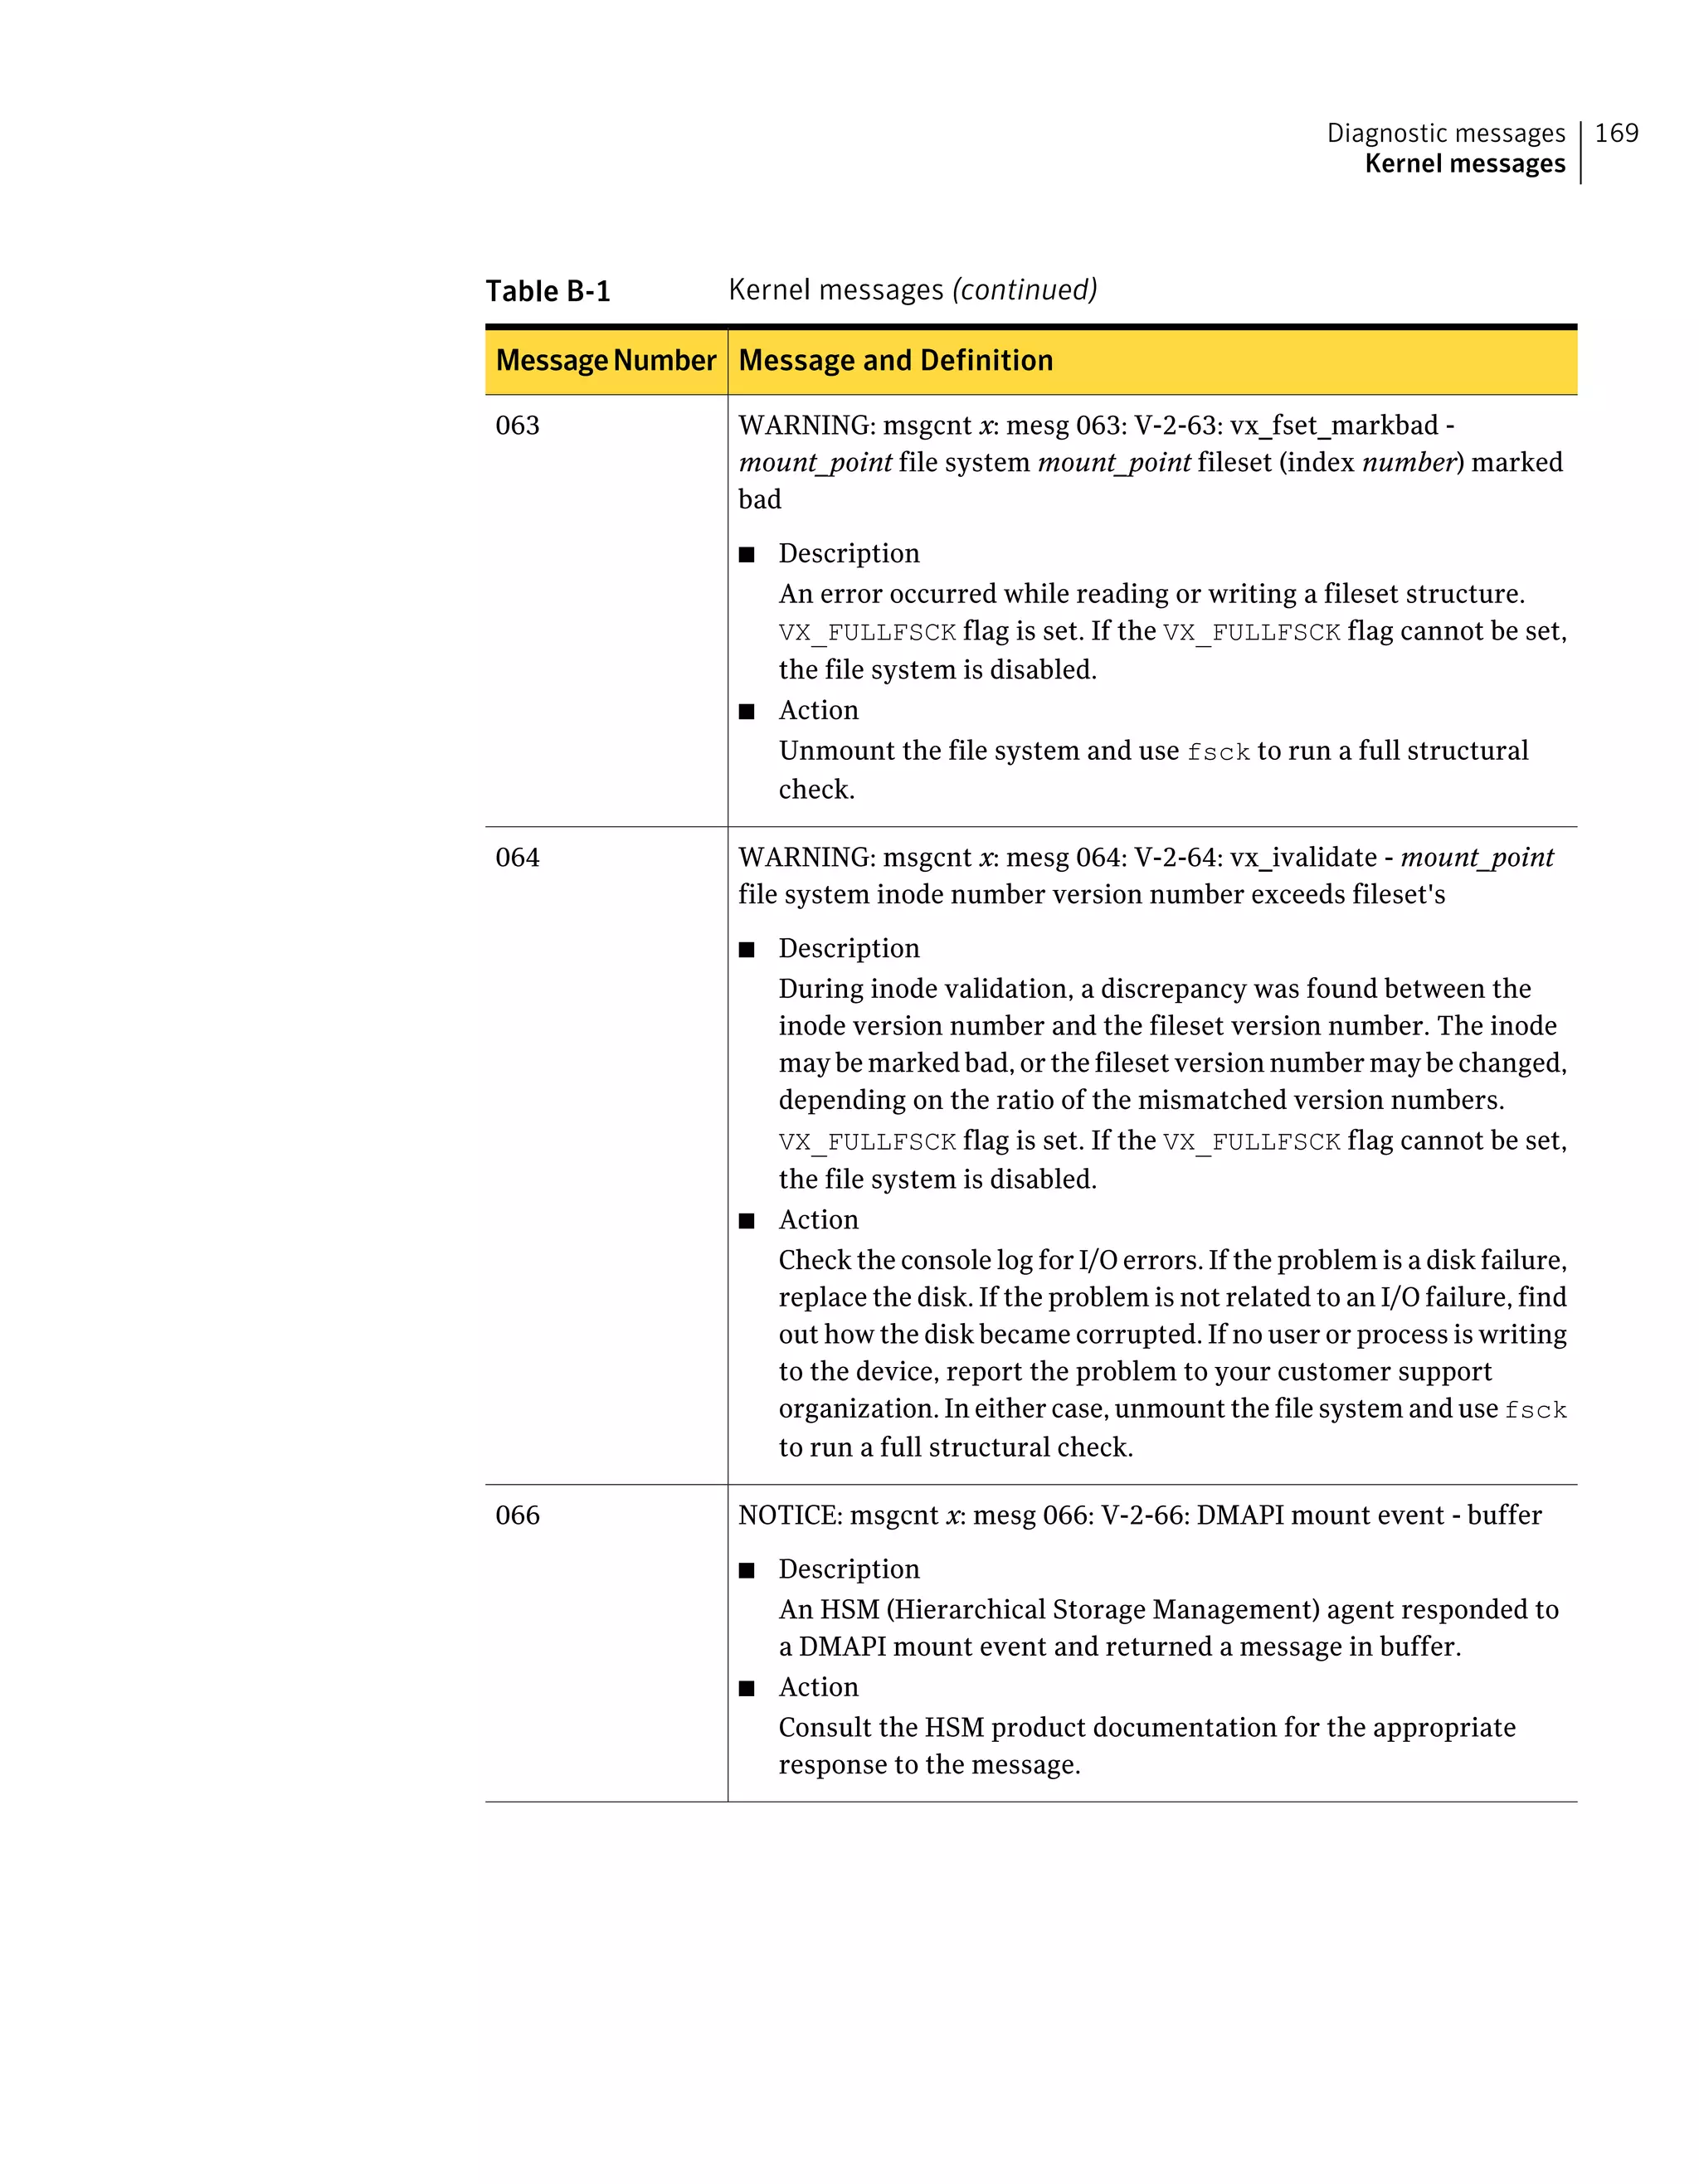
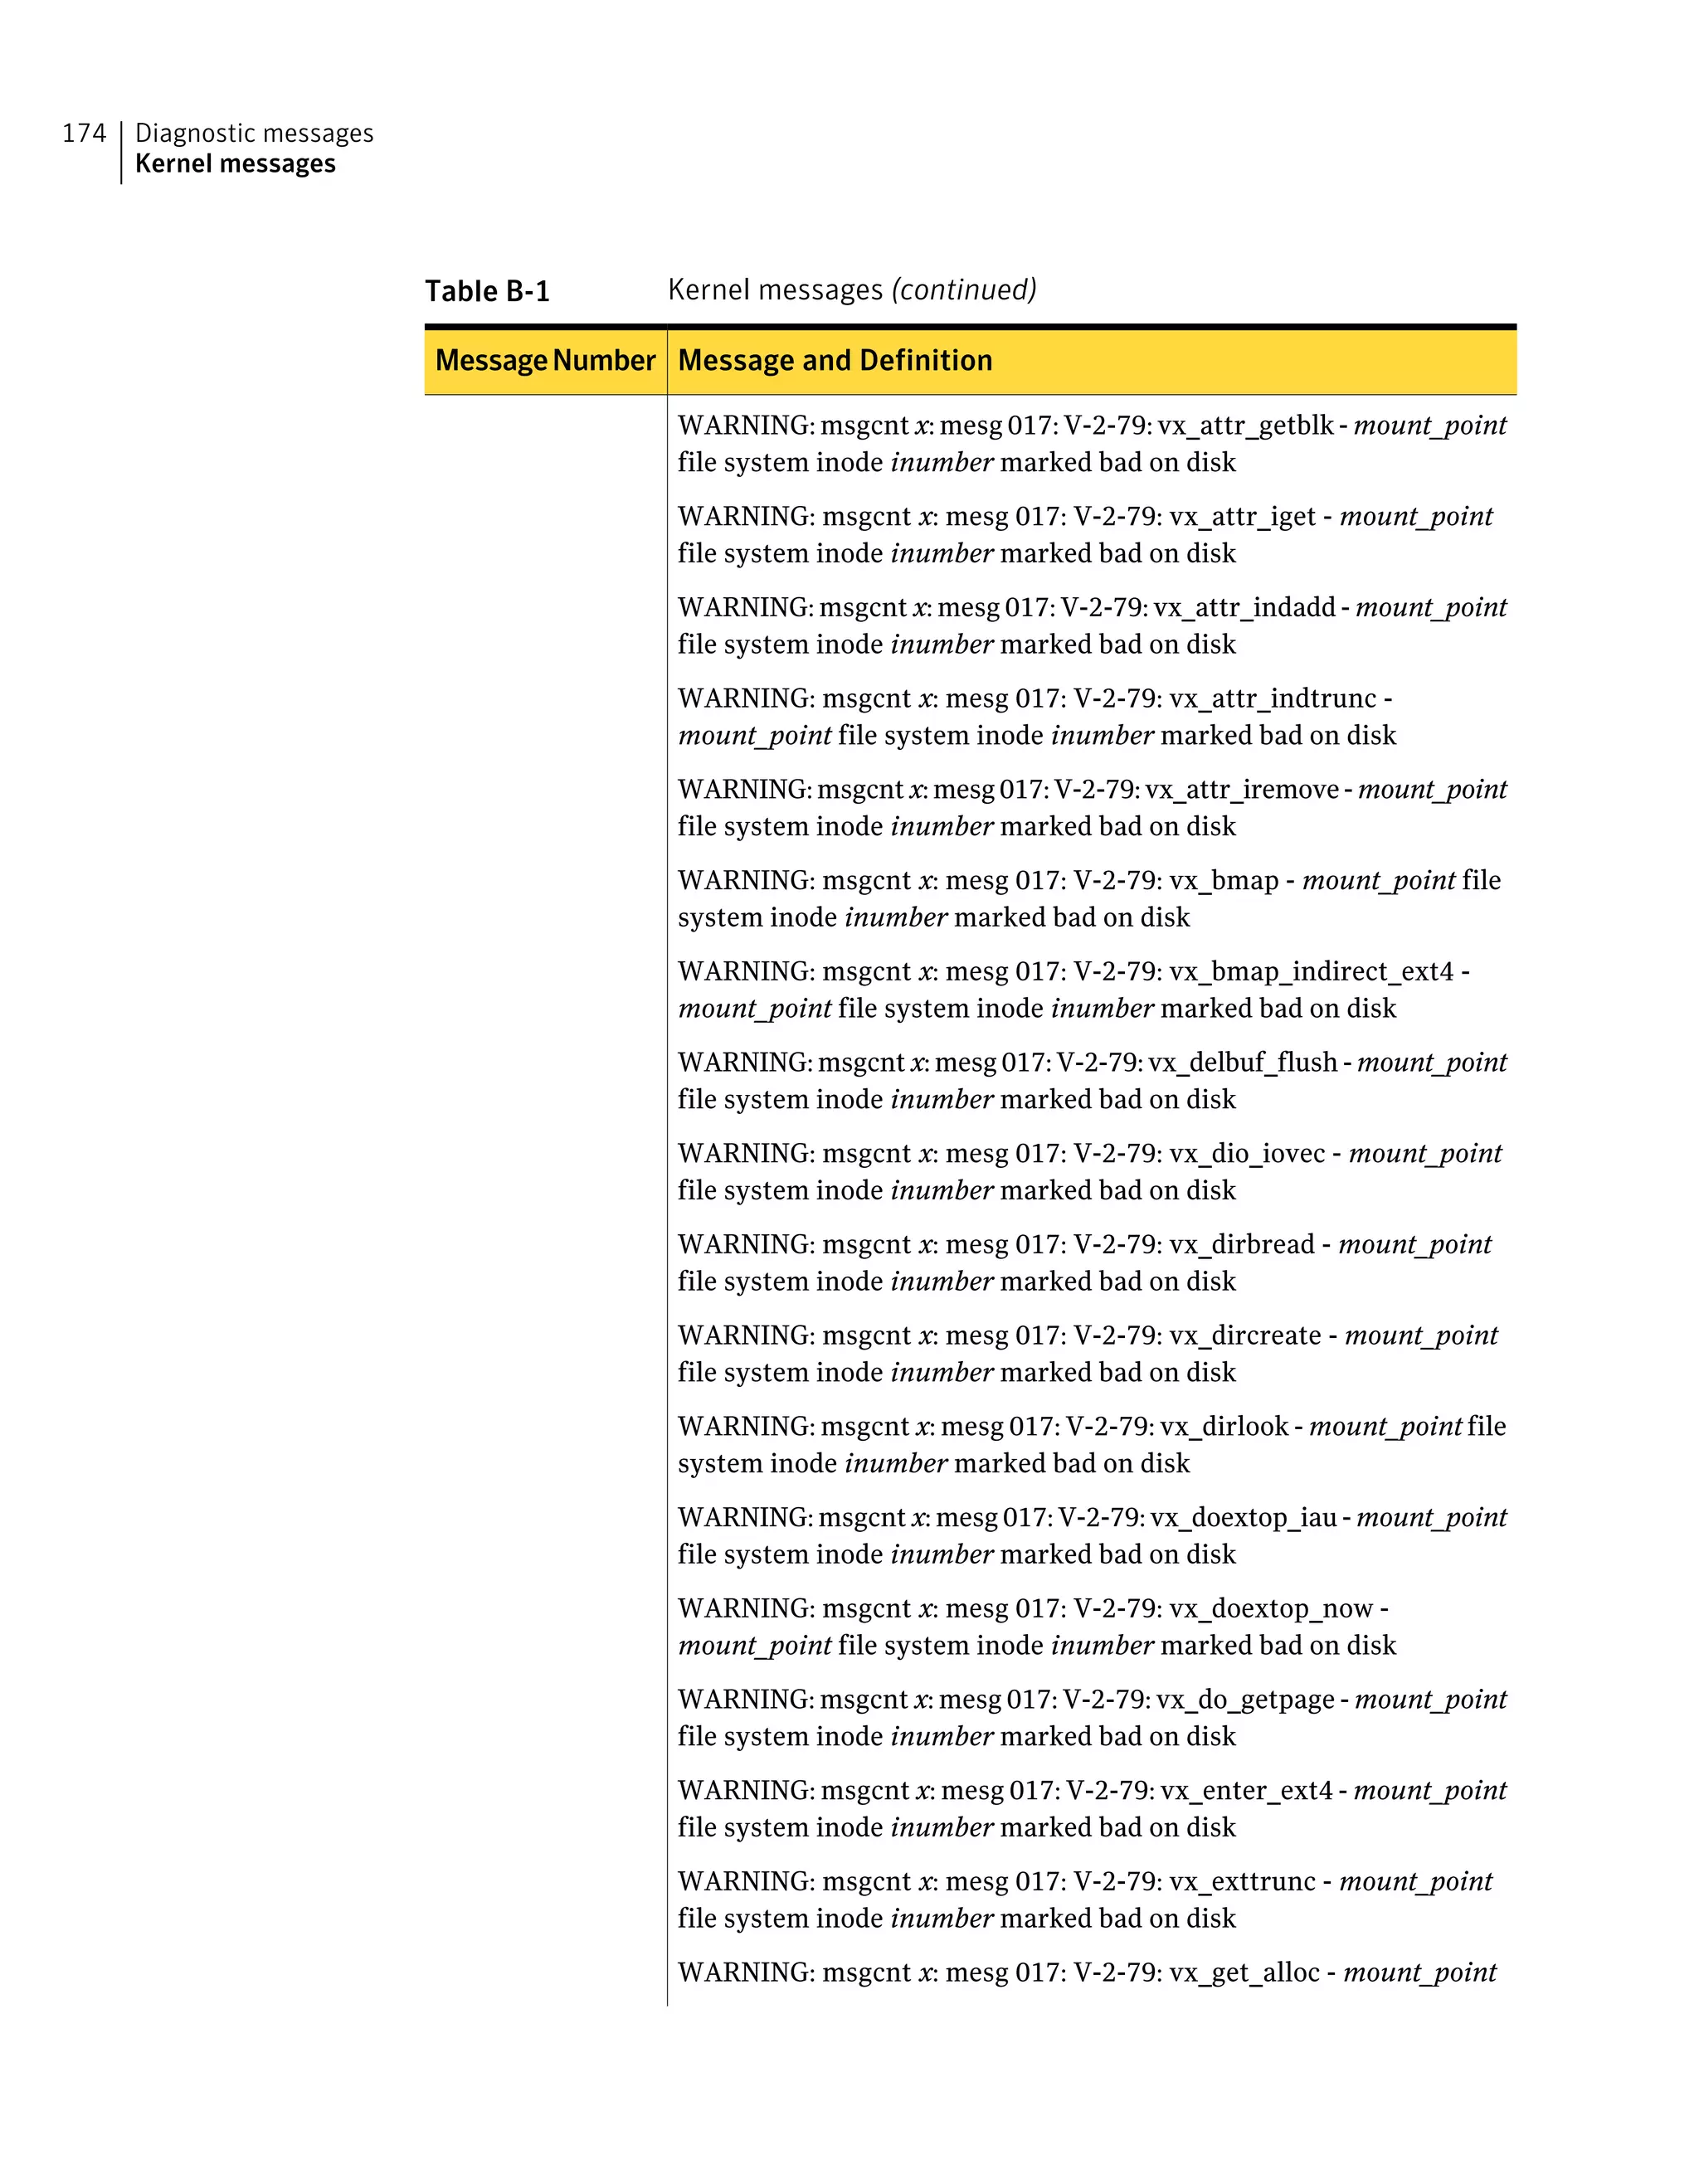
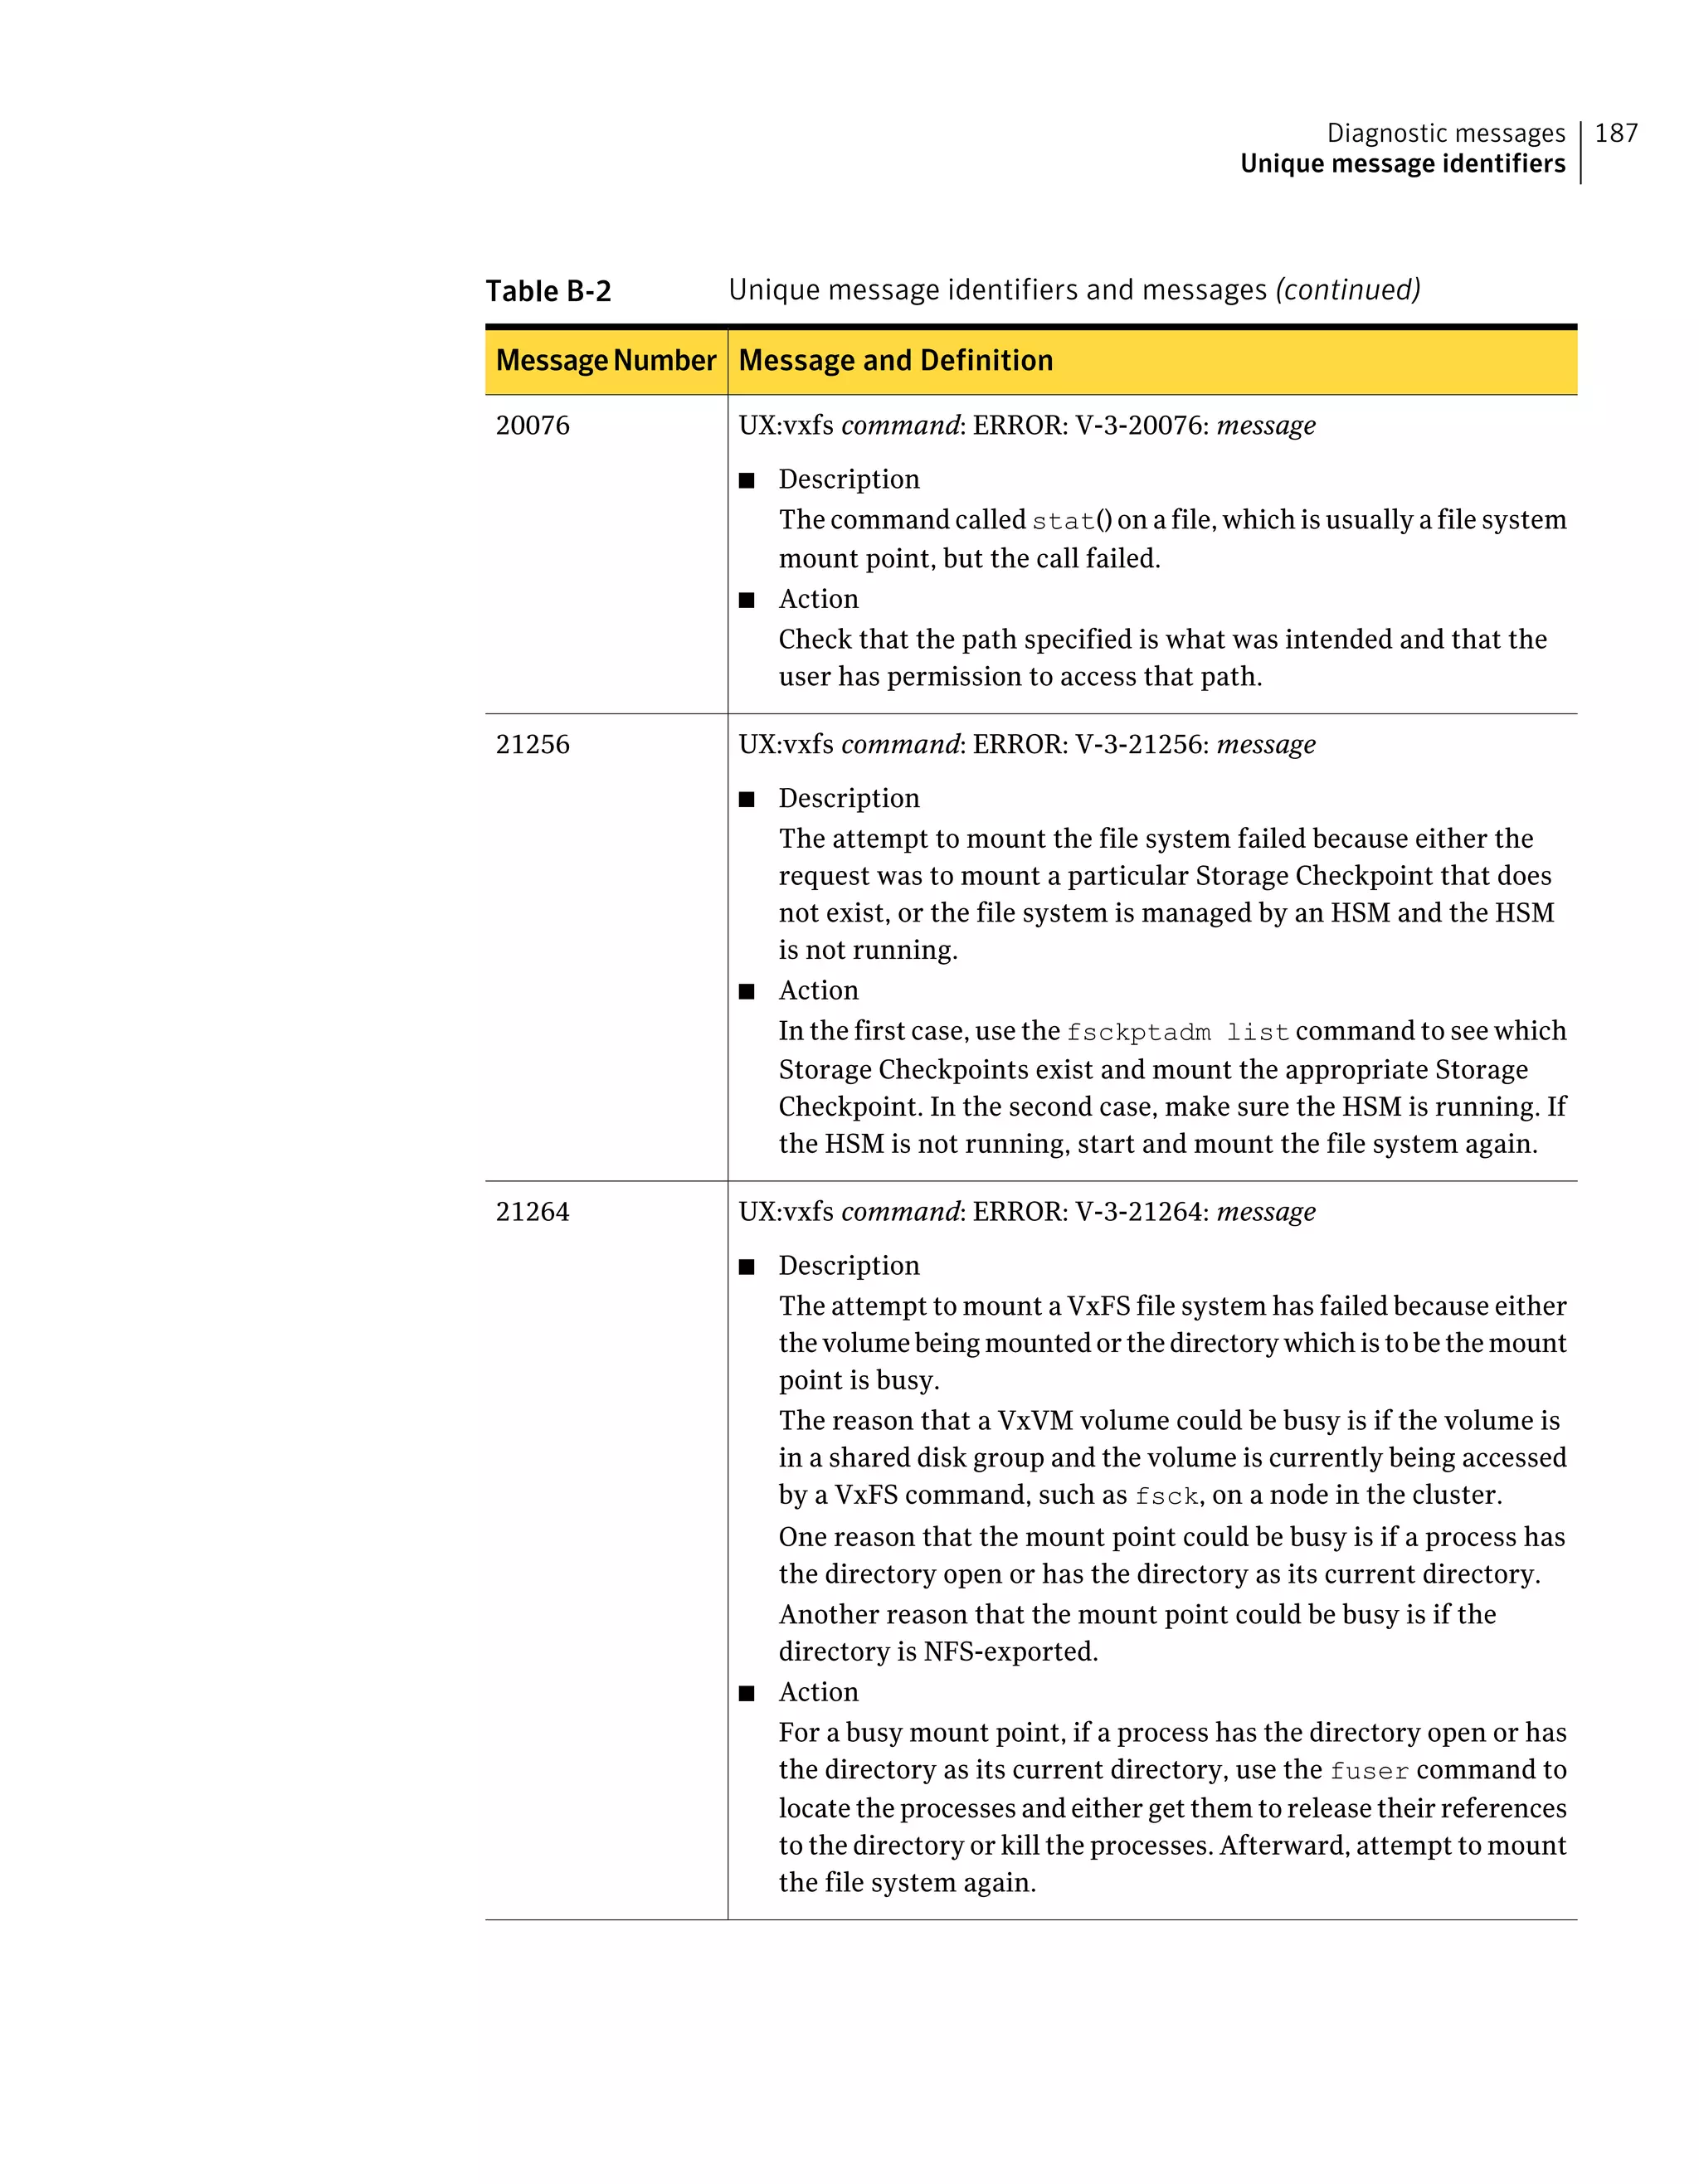
![Resolve the condition causing the disk error. If the error was the result of a
temporary condition (such as accidentally turning off a disk or a loose cable),
correct the condition. Check for loose cables, etc. Unmount the file system and
use fsck to run a full structural check (possibly with loss of data).
In case of an actual disk error, if it was a read error and the disk driver remaps
bad sectors on write, it may be fixed when fsck is run since fsck is likely to rewrite
the sector with the read error. In other cases, you replace or reformat the disk
drive and restore the file system from backups. Consult the documentation specific
to your system for information on how to recover from disk errors. The disk driver
should have printed a message that may provide more information.
V-2-38
WARNING: msgcnt x: mesg 038: V-2-38: vx_dataioerr - volume_name file system
file data [read|write] error in dev/block device_ID/block
Description:
A read or a write error occurred while accessing file data. The message specifies
whether the disk I/O that failed was a read or a write. File data includes data
currently in files and free blocks. If the message is printed because of a read or
write error to a file, another message that includes the inode number of the file
will print. The message may be printed as the result of a read or write error to a
free block, since some operations allocate an extent and immediately perform I/O
to it. If the I/O fails, the extent is freed and the operation fails. The message is
accompanied by a message from the disk driver regarding the disk I/O error.
Recommended action:
Resolve the condition causing the disk error. If the error was the result of a
temporary condition (such as accidentally turning off a disk or a loose cable),
correct the condition. Check for loose cables, etc. If any file data was lost, restore
the files from backups. Determine the file names from the inode number.
See the ncheck(1M) manual page.
If an actual disk error occurred, make a backup of the file system, replace or
reformat the disk drive, and restore the file system from the backup. Consult the
documentation specific to your system for information on how to recover from
disk errors. The disk driver should have printed a message that may provide more
information.
V-2-39
WARNING: msgcnt x: mesg 039: V-2-39: vx_writesuper - file system super-block
write error
Diagnostic messages
Dewey kernel messages
206](https://image.slidesharecdn.com/c26c5c8f-a512-479d-9247-560686ddd018-160310211410/75/vxfs_admin_51sp1_hpux-206-2048.jpg)