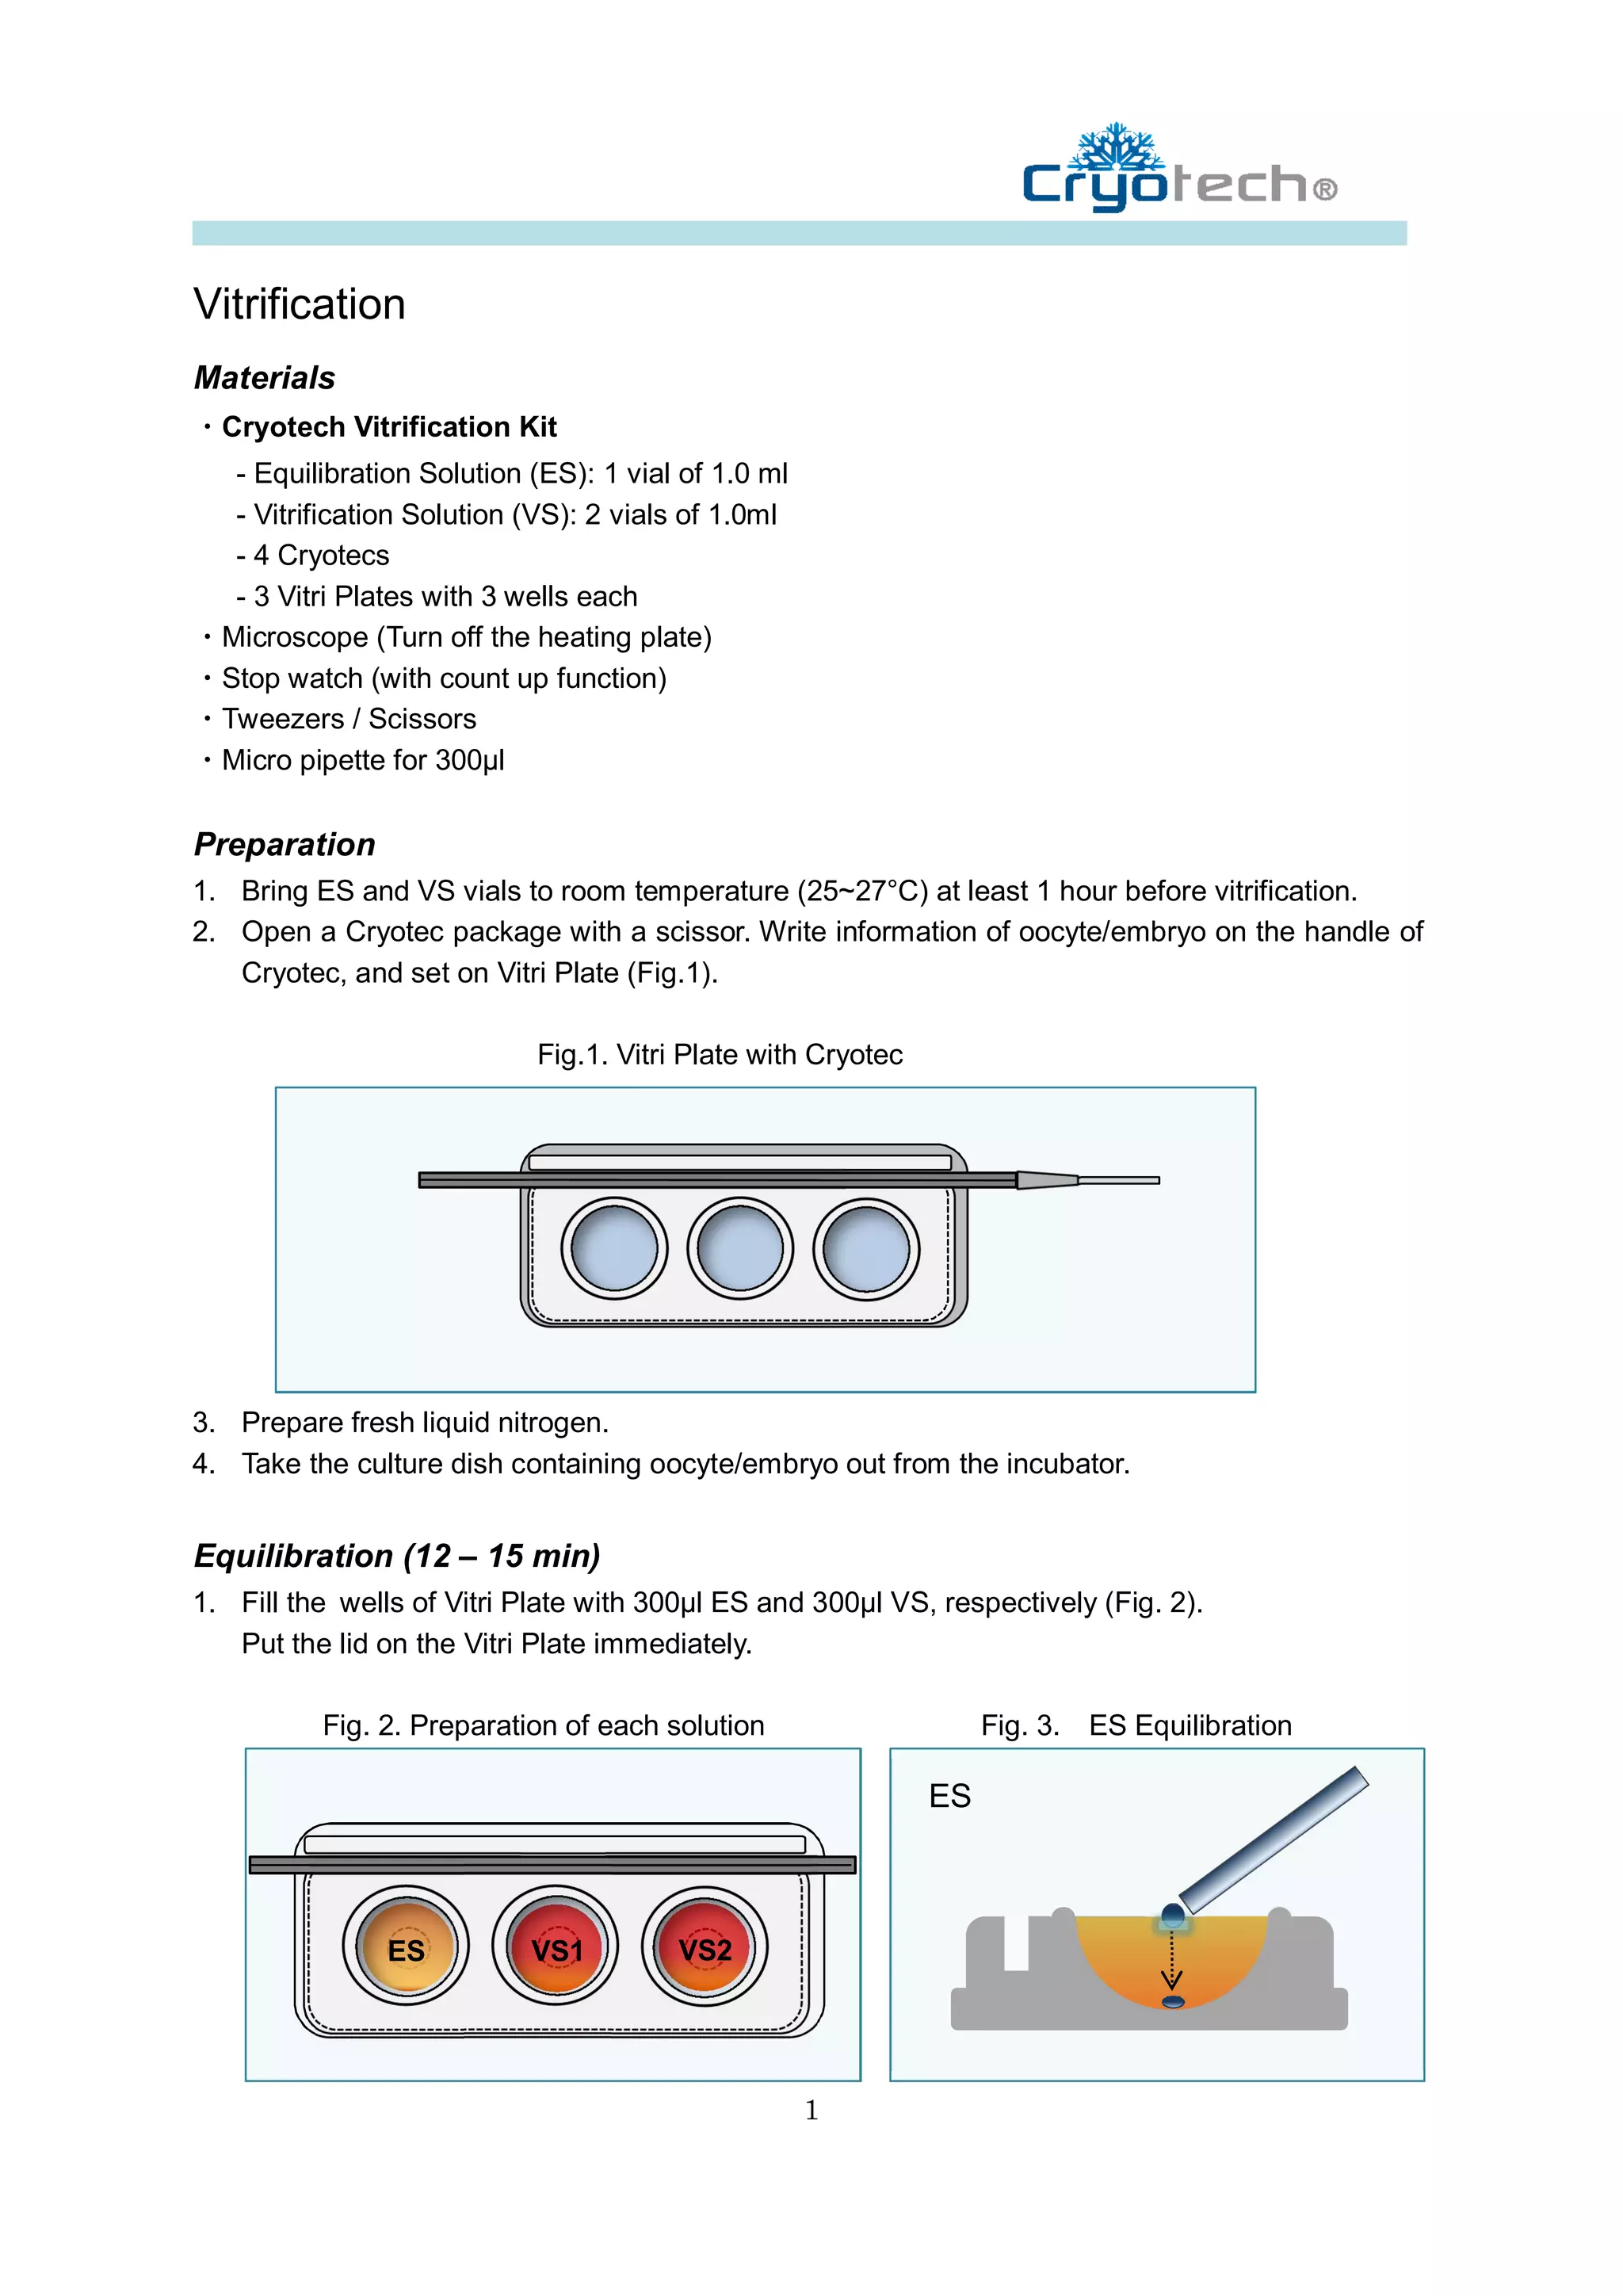
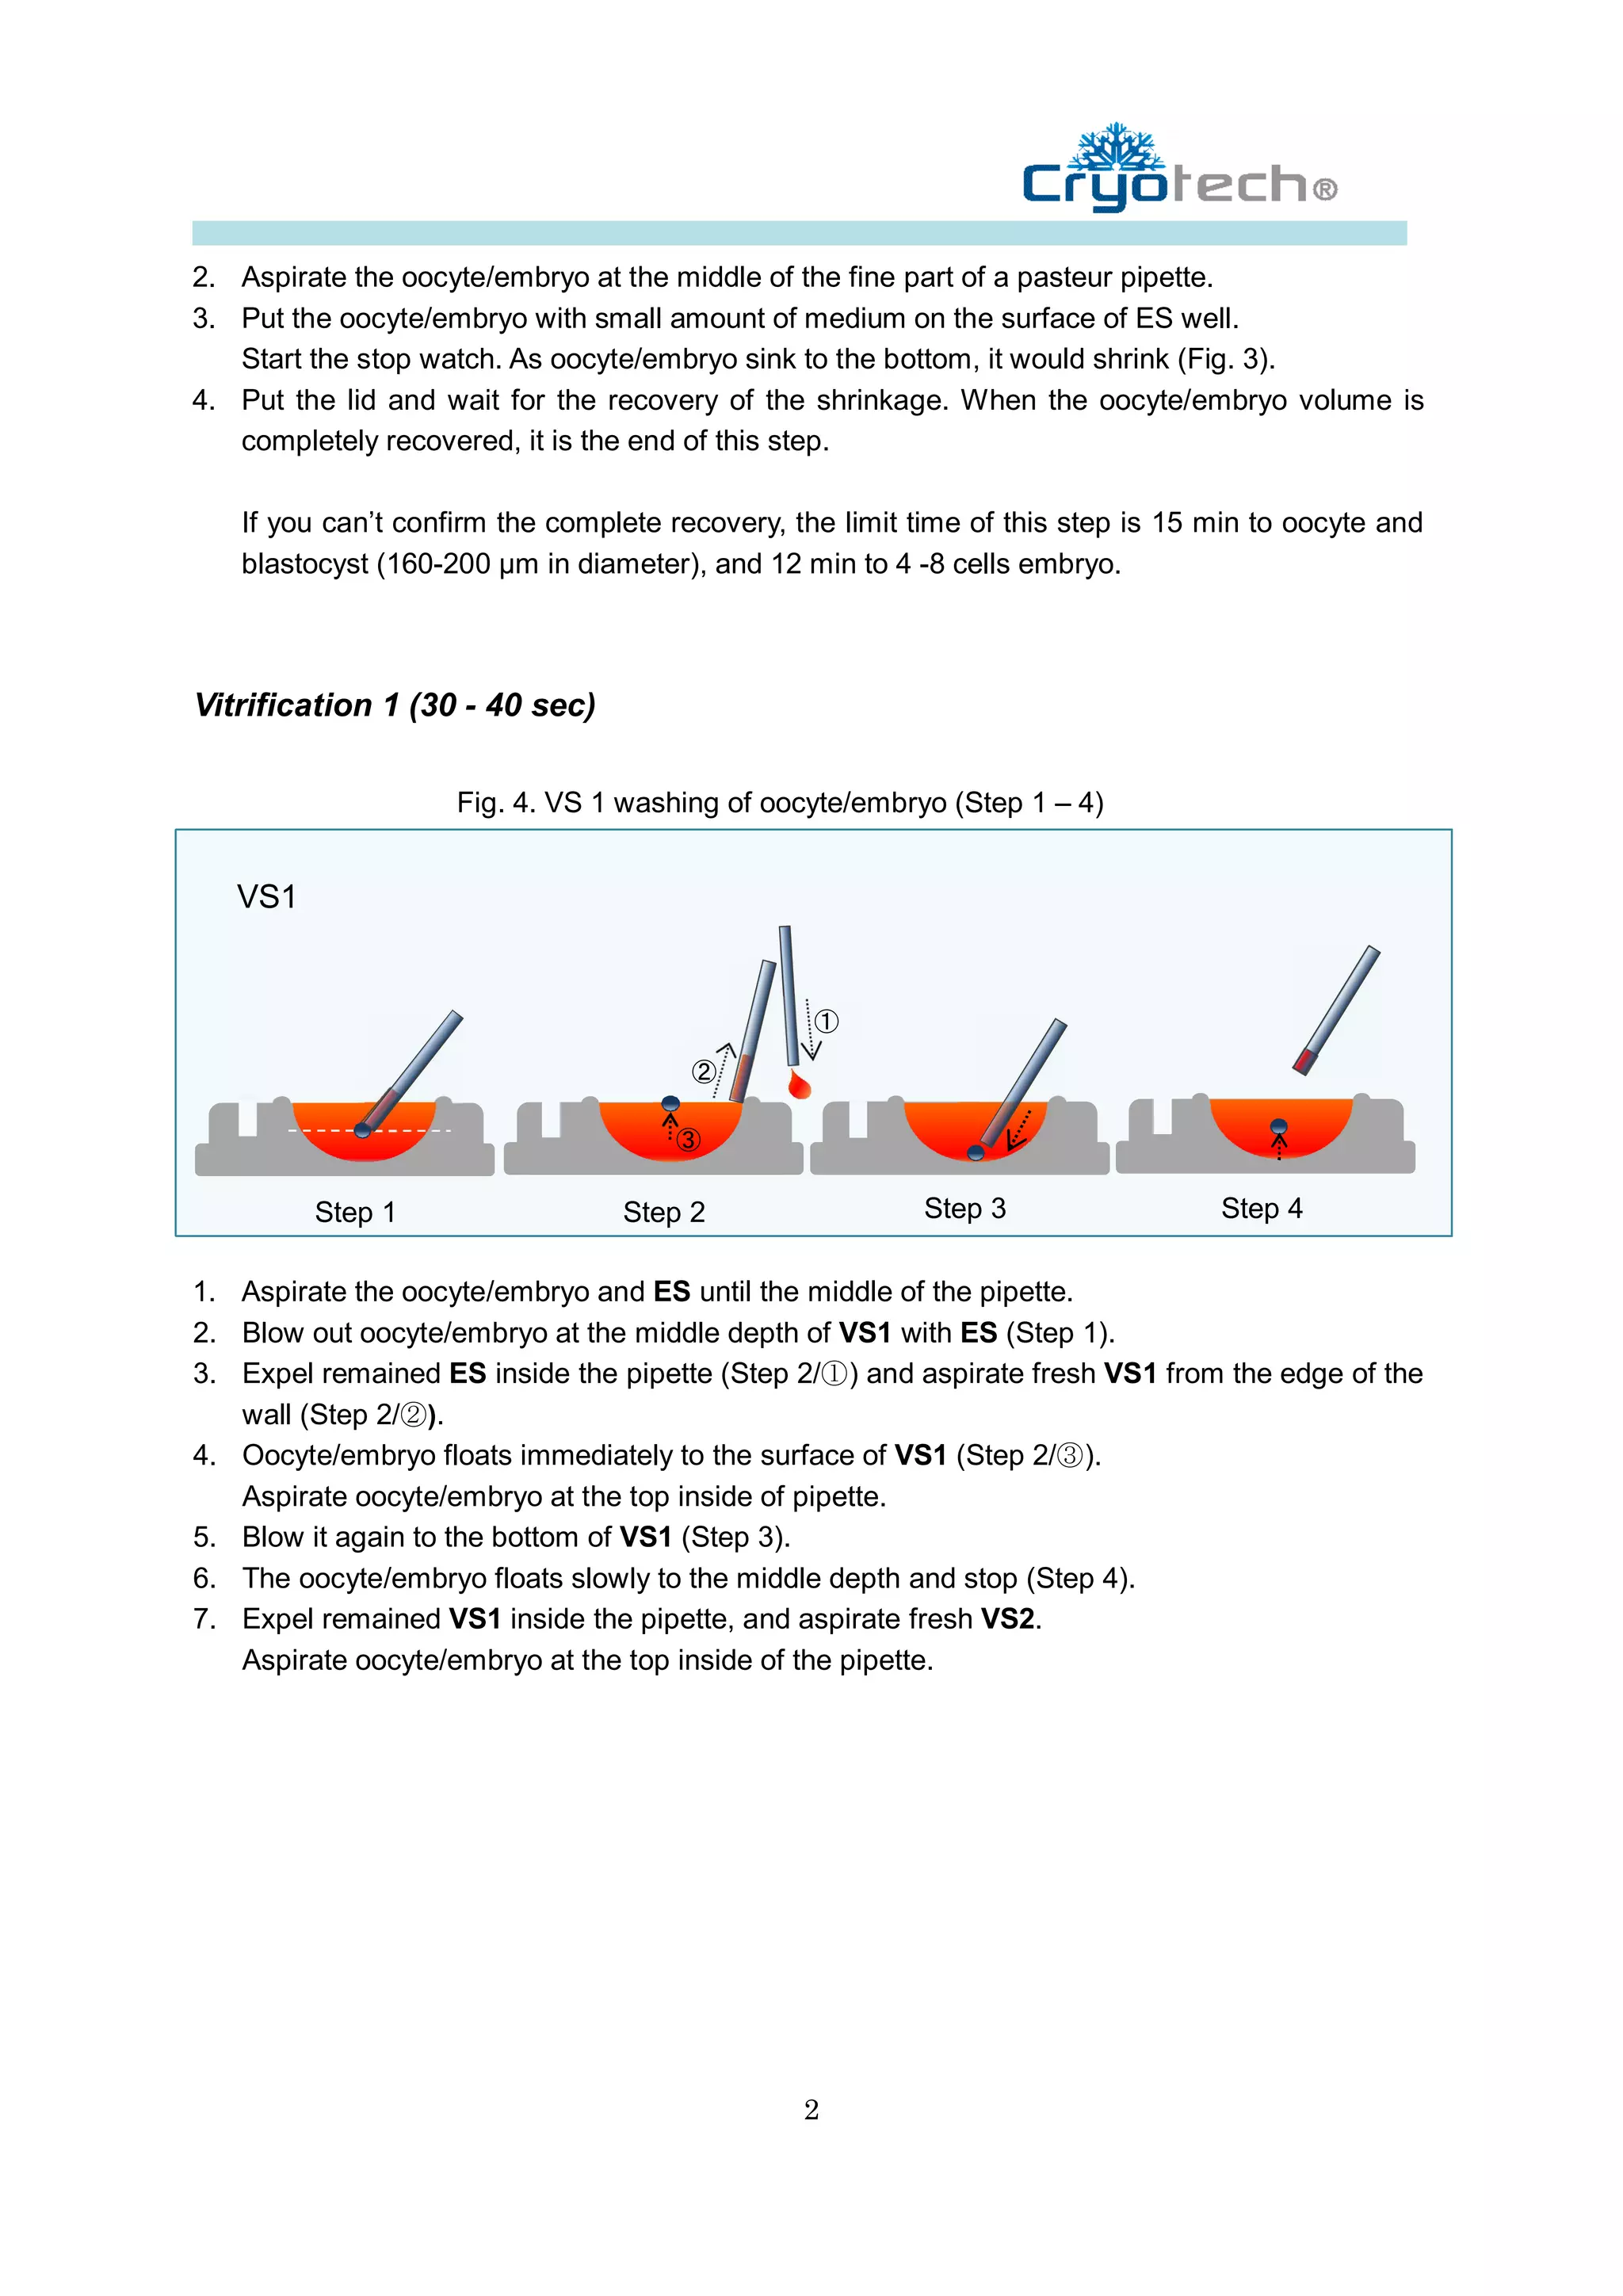
THE CRYOTEC METHOD
     Manual Book

 “For Oocyte and Embryo”
Vitrification
Materials
・Cryotech Vitrification Kit
  - Equilibration Solution (ES): 1 vial of 1.0 ml
  - Vitrification Solution (VS): 2 vials of 1.0ml
  - 4 Cryotecs
  - 3 Vitri Plates with 3 wells each
・Microscope (Turn off the heating plate)
・Stop watch (with count up function)
・Tweezers / Scissors
・Micro pipette for 300μl

Preparation
1. Bring ES and VS vials to room temperature (25~27°C) at least 1 hour before vitrification.
2. Open a Cryotec package with a scissor. Write information of oocyte/embryo on the handle of
   Cryotec, and set on Vitri Plate (Fig.1).

                            Fig.1. Vitri Plate with Cryotec


3. Prepare fresh liquid nitrogen.
4. Take the culture dish containing oocyte/embryo out from the incubator.


Equilibration (12 – 15 min)
1. Fill the wells of Vitri Plate with 300μl ES and 300μl VS, respectively (Fig. 2).
   Put the lid on the Vitri Plate immediately.

          Fig. 2. Preparation of each solution                     Fig. 3. ES Equilibration

                                                              ES


                ES         VS1         VS2


                                                    1
2. Aspirate the oocyte/embryo at the middle of the fine part of a pasteur pipette.
3. Put the oocyte/embryo with small amount of medium on the surface of ES well.
   Start the stop watch. As oocyte/embryo sink to the bottom, it would shrink (Fig. 3).
4. Put the lid and wait for the recovery of the shrinkage. When the oocyte/embryo volume is
   completely recovered, it is the end of this step.

   If you can’t confirm the complete recovery, the limit time of this step is 15 min to oocyte and
   blastocyst (160-200 μm in diameter), and 12 min to 4 -8 cells embryo.


Vitrification 1 (30 - 40 sec)

                    Fig. 4. VS 1 washing of oocyte/embryo (Step 1 – 4)


   VS1


                                                 ①

                                       ②

                                     ③

         Step 1                  Step 2                  Step 3                  Step 4

1. Aspirate the oocyte/embryo and ES until the middle of the pipette.
2. Blow out oocyte/embryo at the middle depth of VS1 with ES (Step 1).
3. Expel remained ES inside the pipette (Step 2/①) and aspirate fresh VS1 from the edge of the
   wall (Step 2/②).
4. Oocyte/embryo floats immediately to the surface of VS1 (Step 2/③).
   Aspirate oocyte/embryo at the top inside of pipette.
5. Blow it again to the bottom of VS1 (Step 3).
6. The oocyte/embryo floats slowly to the middle depth and stop (Step 4).
7. Expel remained VS1 inside the pipette, and aspirate fresh VS2.
   Aspirate oocyte/embryo at the top inside of the pipette.


                                                2
Vitrification 2 (10 – 20 sec)
                         Fig. 5. VS2 washing of oocyte/embryo (Step 5 – 8)


  VS2
                                                    ①

                                         ②


          Step 5                    Step 6                    Step 7                  Step 8


8. Blow the oocyte/embryo to the middle depth of VS2 (Step 5).
9. Expel remained VS inside the pipette (Step 6/①) and aspirate fresh VS2 from the edge of the
    wall (Step 6/②).
10. Blow VS2 and mix the solution around oocyte/embryo to exchange the remaining previous
    solution (Step 7).
11. Expel and wash inside of the pipette with fresh VS2.
12. Take oocyte/embryo at the top inside of pipette (Step 8).
13. Place the oocyte/embryo near the end of Cryotec sheet with minimal volume of VS2.
    (1 oocyte/embryo per droplet is recommended) (Fig. 6).
14. Immediately submerge the Cryotec into fresh liquid nitrogen.
15. Put the straw cap on Cryotec in the liquid nitrogen.

                       Fig. 6. Oocyte/embryo on the Cryotec


Note 1
 Use a right size pasteur pipette.
 ・140-150 μm for oocyte and cleavage stage embryo.
 ・160~200 μm for blastocyst.
Note 2
 Best timing of vitrification of blastocyst: the size(diameter) should be between160~220 μm for perfect
 survival after vitirfication.
Note 3
 All the solutions only allowed to be used within 30 days after uncorking, and on the condition that
 dropping method is aseptic.


                                                   3

Vitri book

  • 1.
    THE CRYOTEC METHOD Manual Book “For Oocyte and Embryo”
  • 2.
    Vitrification Materials ・Cryotech Vitrification Kit - Equilibration Solution (ES): 1 vial of 1.0 ml - Vitrification Solution (VS): 2 vials of 1.0ml - 4 Cryotecs - 3 Vitri Plates with 3 wells each ・Microscope (Turn off the heating plate) ・Stop watch (with count up function) ・Tweezers / Scissors ・Micro pipette for 300μl Preparation 1. Bring ES and VS vials to room temperature (25~27°C) at least 1 hour before vitrification. 2. Open a Cryotec package with a scissor. Write information of oocyte/embryo on the handle of Cryotec, and set on Vitri Plate (Fig.1). Fig.1. Vitri Plate with Cryotec 3. Prepare fresh liquid nitrogen. 4. Take the culture dish containing oocyte/embryo out from the incubator. Equilibration (12 – 15 min) 1. Fill the wells of Vitri Plate with 300μl ES and 300μl VS, respectively (Fig. 2). Put the lid on the Vitri Plate immediately. Fig. 2. Preparation of each solution Fig. 3. ES Equilibration ES ES VS1 VS2 1
  • 3.
    2. Aspirate theoocyte/embryo at the middle of the fine part of a pasteur pipette. 3. Put the oocyte/embryo with small amount of medium on the surface of ES well. Start the stop watch. As oocyte/embryo sink to the bottom, it would shrink (Fig. 3). 4. Put the lid and wait for the recovery of the shrinkage. When the oocyte/embryo volume is completely recovered, it is the end of this step. If you can’t confirm the complete recovery, the limit time of this step is 15 min to oocyte and blastocyst (160-200 μm in diameter), and 12 min to 4 -8 cells embryo. Vitrification 1 (30 - 40 sec) Fig. 4. VS 1 washing of oocyte/embryo (Step 1 – 4) VS1 ① ② ③ Step 1 Step 2 Step 3 Step 4 1. Aspirate the oocyte/embryo and ES until the middle of the pipette. 2. Blow out oocyte/embryo at the middle depth of VS1 with ES (Step 1). 3. Expel remained ES inside the pipette (Step 2/①) and aspirate fresh VS1 from the edge of the wall (Step 2/②). 4. Oocyte/embryo floats immediately to the surface of VS1 (Step 2/③). Aspirate oocyte/embryo at the top inside of pipette. 5. Blow it again to the bottom of VS1 (Step 3). 6. The oocyte/embryo floats slowly to the middle depth and stop (Step 4). 7. Expel remained VS1 inside the pipette, and aspirate fresh VS2. Aspirate oocyte/embryo at the top inside of the pipette. 2
  • 4.
    Vitrification 2 (10– 20 sec) Fig. 5. VS2 washing of oocyte/embryo (Step 5 – 8) VS2 ① ② Step 5 Step 6 Step 7 Step 8 8. Blow the oocyte/embryo to the middle depth of VS2 (Step 5). 9. Expel remained VS inside the pipette (Step 6/①) and aspirate fresh VS2 from the edge of the wall (Step 6/②). 10. Blow VS2 and mix the solution around oocyte/embryo to exchange the remaining previous solution (Step 7). 11. Expel and wash inside of the pipette with fresh VS2. 12. Take oocyte/embryo at the top inside of pipette (Step 8). 13. Place the oocyte/embryo near the end of Cryotec sheet with minimal volume of VS2. (1 oocyte/embryo per droplet is recommended) (Fig. 6). 14. Immediately submerge the Cryotec into fresh liquid nitrogen. 15. Put the straw cap on Cryotec in the liquid nitrogen. Fig. 6. Oocyte/embryo on the Cryotec Note 1 Use a right size pasteur pipette. ・140-150 μm for oocyte and cleavage stage embryo. ・160~200 μm for blastocyst. Note 2 Best timing of vitrification of blastocyst: the size(diameter) should be between160~220 μm for perfect survival after vitirfication. Note 3 All the solutions only allowed to be used within 30 days after uncorking, and on the condition that dropping method is aseptic. 3