vi and vim editor Traversing and training on LINUX basic Editor
1.
1
vi and vimEditor Traversing and command
available list
- Guhan
LINUX Enthusiast and likely to contribute for Money
making projects
Reach me @guhansenthil – LinkedIn
Blogs: https://venerable-forever.blogspot.com
FOSS contribution:
https://bit.ly/VOIPAPPS-FOR-YOUR-CHOICE
2.
2
Introduction
• Vim isa widely used, open-source Unix text editor. Learning
to use Vim commands is a matter of practice and
experience. That is why it is handy to have a helpful
reference sheet while mastering them.
3.
3
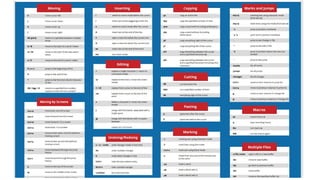
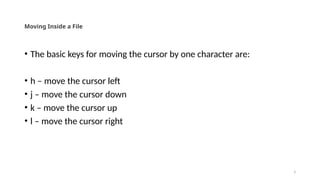
Moving Inside aFile
• The basic keys for moving the cursor by one character are:
• h – move the cursor left
• j – move the cursor down
• k – move the cursor up
• l – move the cursor right
4.
4
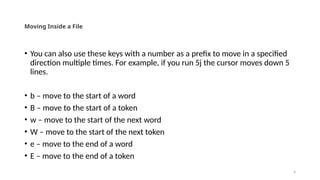
Moving Inside aFile
• You can also use these keys with a number as a prefix to move in a specified
direction multiple times. For example, if you run 5j the cursor moves down 5
lines.
• b – move to the start of a word
• B – move to the start of a token
• w – move to the start of the next word
• W – move to the start of the next token
• e – move to the end of a word
• E – move to the end of a token
5.
5
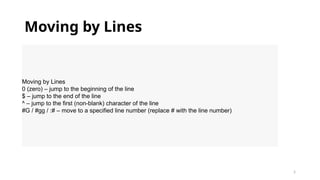
Moving by Lines
Movingby Lines
0 (zero) – jump to the beginning of the line
$ – jump to the end of the line
^ – jump to the first (non-blank) character of the line
#G / #gg / :# – move to a specified line number (replace # with the line number)
6.
6
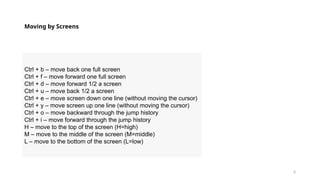
Moving by Screens
Ctrl+ b – move back one full screen
Ctrl + f – move forward one full screen
Ctrl + d – move forward 1/2 a screen
Ctrl + u – move back 1/2 a screen
Ctrl + e – move screen down one line (without moving the cursor)
Ctrl + y – move screen up one line (without moving the cursor)
Ctrl + o – move backward through the jump history
Ctrl + i – move forward through the jump history
H – move to the top of the screen (H=high)
M – move to the middle of the screen (M=middle)
L – move to the bottom of the screen (L=low)
7.
7
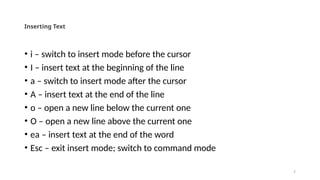
Inserting Text
• i– switch to insert mode before the cursor
• I – insert text at the beginning of the line
• a – switch to insert mode after the cursor
• A – insert text at the end of the line
• o – open a new line below the current one
• O – open a new line above the current one
• ea – insert text at the end of the word
• Esc – exit insert mode; switch to command mode
8.
8
Editing Text
• r– replace a single character (and return to command mode)
• cc – replace an entire line (deletes the line and moves into insert mode)
• C / c$ – replace from the cursor to the end of a line
• cw – replace from the cursor to the end of a word
• s – delete a character (and move into insert mode)
• J – merge the line below to the current one with a space in between them
• gJ – merge the line below to the current one with no space in between them
• u – undo
• Ctrl + r – redo
• . – repeat last command
9.
9
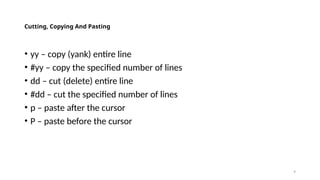
Cutting, Copying AndPasting
• yy – copy (yank) entire line
• #yy – copy the specified number of lines
• dd – cut (delete) entire line
• #dd – cut the specified number of lines
• p – paste after the cursor
• P – paste before the cursor
10.
10
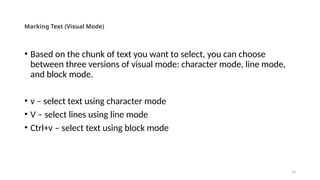
Marking Text (VisualMode)
• Based on the chunk of text you want to select, you can choose
between three versions of visual mode: character mode, line mode,
and block mode.
• v – select text using character mode
• V – select lines using line mode
• Ctrl+v – select text using block mode
11.
11
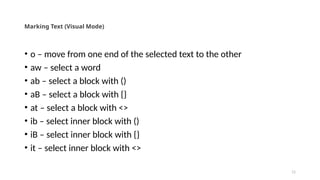
Marking Text (VisualMode)
• o – move from one end of the selected text to the other
• aw – select a word
• ab – select a block with ()
• aB – select a block with {}
• at – select a block with <>
• ib – select inner block with ()
• iB – select inner block with {}
• it – select inner block with <>
12.
12
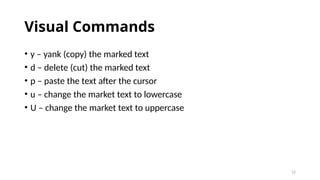
Visual Commands
• y– yank (copy) the marked text
• d – delete (cut) the marked text
• p – paste the text after the cursor
• u – change the market text to lowercase
• U – change the market text to uppercase
13.
13
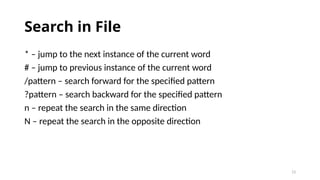
Search in File
*– jump to the next instance of the current word
# – jump to previous instance of the current word
/pattern – search forward for the specified pattern
?pattern – search backward for the specified pattern
n – repeat the search in the same direction
N – repeat the search in the opposite direction
14.
14
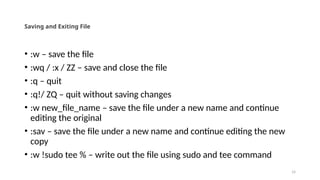
Saving and ExitingFile
• :w – save the file
• :wq / :x / ZZ – save and close the file
• :q – quit
• :q!/ ZQ – quit without saving changes
• :w new_file_name – save the file under a new name and continue
editing the original
• :sav – save the file under a new name and continue editing the new
copy
• :w !sudo tee % – write out the file using sudo and tee command
15.
15
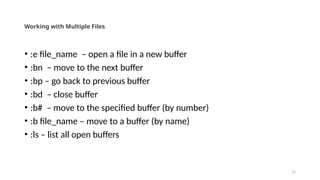
Working with MultipleFiles
• :e file_name – open a file in a new buffer
• :bn – move to the next buffer
• :bp – go back to previous buffer
• :bd – close buffer
• :b# – move to the specified buffer (by number)
• :b file_name – move to a buffer (by name)
• :ls – list all open buffers
16.
16
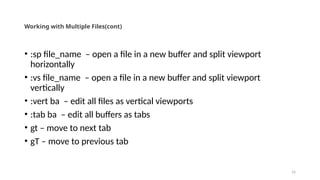
Working with MultipleFiles(cont)
• :sp file_name – open a file in a new buffer and split viewport
horizontally
• :vs file_name – open a file in a new buffer and split viewport
vertically
• :vert ba – edit all files as vertical viewports
• :tab ba – edit all buffers as tabs
• gt – move to next tab
• gT – move to previous tab
17.
17
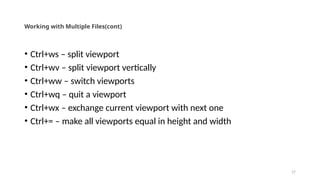
Working with MultipleFiles(cont)
• Ctrl+ws – split viewport
• Ctrl+wv – split viewport vertically
• Ctrl+ww – switch viewports
• Ctrl+wq – quit a viewport
• Ctrl+wx – exchange current viewport with next one
• Ctrl+= – make all viewports equal in height and width
18.
18
Marks and Jumps
•m[a-z] – mark text using character mode (from a to z)
• M[a-z] – mark lines using line mode (from a to z)
• `a - jump to position marked a
• `y`a – yank text to position marked >a>
• `. – jump to last change in file
• `0 – jump to position where Vim was last exited
• `` – jump to last jump
• :marks – list all marks
• :jumps – list all jumps
• :changes – list all changes
• Ctrl+i – move to next instance in jump list
• Ctrl+o – move to previous instance in jump list
• g, – move to next instance in change list
• g; – move to previous instance in change list
19.
19
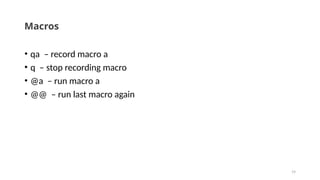
Macros
• qa –record macro a
• q – stop recording macro
• @a – run macro a
• @@ – run last macro again
20.
20
Enabling Vim ColorSchemes
:colorscheme [colorscheme_name] – change to specified scheme
:colorscheme [space]+Ctrl+d – list available Vim color scheme
21.
21
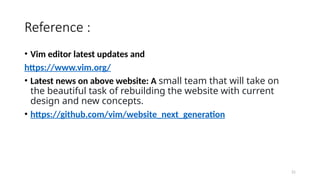
Reference :
• Vimeditor latest updates and
https://www.vim.org/
• Latest news on above website: A small team that will take on
the beautiful task of rebuilding the website with current
design and new concepts.
• https://github.com/vim/website_next_generation
22.
22
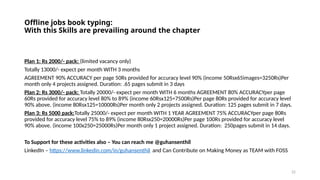
Offline jobs booktyping:
With this Skills are prevailing around the chapter
Plan 1: Rs 2000/- pack: (limited vacancy only)
Totally 13000/- expect per month WITH 3 months
AGREEMENT 90% ACCURACY per page 50Rs provided for accuracy level 90% (income 50Rsx65images=3250Rs)Per
month only 4 projects assigned. Duration: .65 pages submit in 3 days
Plan 2: Rs 3000/- pack: Totally 20000/- expect per month WITH 6 months AGREEMENT 80% ACCURACYper page
60Rs provided for accuracy level 80% to 89% (income 60Rsx125=7500Rs)Per page 80Rs provided for accuracy level
90% above. (income 80Rsx125=10000Rs)Per month only 2 projects assigned. Duration: 125 pages submit in 7 days.
Plan 3: Rs 5000 pack:Totally 25000/- expect per month WITH 1 YEAR AGREEMENT 75% ACCURACYper page 80Rs
provided for accuracy level 75% to 89% (income 80Rsx250=20000Rs)Per page 100Rs provided for accuracy level
90% above. (income 100x250=25000Rs)Per month only 1 project assigned. Duration: 250pages submit in 14 days.
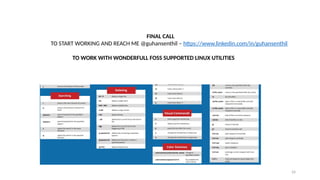
To Support for these activities also – You can reach me @guhansenthil
LinkedIn – https://www.linkedin.com/in/guhansenthil and Can Contribute on Making Money as TEAM with FOSS
24
FINAL CALL
TO STARTWORKING AND REACH ME @guhansenthil – https://www.linkedin.com/in/guhansenthil
TO WORK WITH WONDERFULL FOSS SUPPORTED LINUX UTILITIES

![18
Marks and Jumps
• m[a-z] – mark text using character mode (from a to z)
• M[a-z] – mark lines using line mode (from a to z)
• `a - jump to position marked a
• `y`a – yank text to position marked >a>
• `. – jump to last change in file
• `0 – jump to position where Vim was last exited
• `` – jump to last jump
• :marks – list all marks
• :jumps – list all jumps
• :changes – list all changes
• Ctrl+i – move to next instance in jump list
• Ctrl+o – move to previous instance in jump list
• g, – move to next instance in change list
• g; – move to previous instance in change list](https://image.slidesharecdn.com/viandvimeditortraversing-250911130548-9109d41f/85/vi-and-vim-editor-Traversing-and-training-on-LINUX-basic-Editor-18-320.jpg)
![20
Enabling Vim Color Schemes
:colorscheme [colorscheme_name] – change to specified scheme
:colorscheme [space]+Ctrl+d – list available Vim color scheme](https://image.slidesharecdn.com/viandvimeditortraversing-250911130548-9109d41f/85/vi-and-vim-editor-Traversing-and-training-on-LINUX-basic-Editor-20-320.jpg)