Session 1
Introduction tomanicure
Many practical skills are required in order to perform manicure services. During
your course you will also learn about the tools, cosmetic preparations used,
hygiene, sterilisation, health and safety, client consultation, nail types, nail
shapes, contra-indications, contra-actions, aftercare and home care advice and
the anatomy and physiology that relates to the hands and nails.
These treatments are very popular, cost effective and require little space so are
ideal in hairdressing salons, nail and beauty salons, tanning salons, mobile,
large retail stores etc. These treatments are the best way for people to care for
their natural nails. Our hands are constantly on show and well-groomed nails
can finish an outfit off.
3.
Session 1
Standards andreputation
• Standards are high in the industry so you must remain professional and
courteous at all times. The nail technician can chat with the client during
these treatments but remember to keep the conversation appropriate and
not too personal. The nail technician should put any personal problems
they may have aside. Make sure you are also concentrating on the
treatment and work methodically; never cut corners. If a client is happy
with a treatment they will tell one or two people but if a client is
dissatisfied with a treatment they will tell on average ten people. A bad
reputation is difficult to shake off!
• Sometimes clients may confide in the nail technician. It is vital that you do
not offer an opinion or advice as this may backfire on you. You must try to
remain neutral and be as tactful as possible..
4.
Session 1
Punctuality andincreasing revenue
• Punctuality is important and you must try to make sure that you don’t cancel
clients’ appointments, for example through illness, if possible.
• Nail art can also be applied to the natural nails, which can help to bring in
extra revenue. Retailing products and courses of treatments is also another
way of raising your income.
• At the moment this can all seems like a daunting task but with time and
practice it will become second nature.
5.
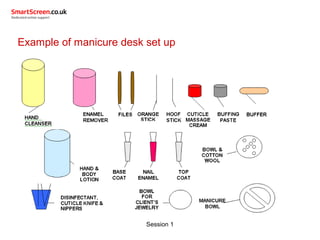
Session 1
Manicure equipment
•Two bowls: one for clean cotton wool and one for jewellery
• Manicure bowl
• Bin: this should have a bin liner and a lid
• Nail clippers
• Nail files
• Towel
• Disposable covering
• Cotton wool
• Orange sticks
• Cuticle knife
• Cuticle nippers
• Nail buffer
• Nail brush
6.
Session 1
Manicure products
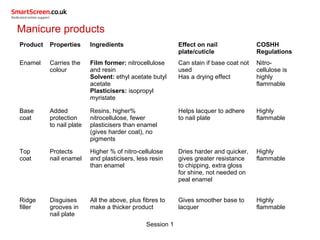
ProductProperties Ingredients Effect on nail
plate/cuticle
COSHH
Regulations
Enamel Carries the
colour
Film former: nitrocellulose
and resin
Solvent: ethyl acetate butyl
acetate
Plasticisers: isopropyl
myristate
Can stain if base coat not
used
Has a drying effect
Nitro-
cellulose is
highly
flammable
Base
coat
Added
protection
to nail plate
Resins, higher%
nitrocellulose, fewer
plasticisers than enamel
(gives harder coat), no
pigments
Helps lacquer to adhere
to nail plate
Highly
flammable
Top
coat
Protects
nail enamel
Higher % of nitro-cellulose
and plasticisers, less resin
than enamel
Dries harder and quicker,
gives greater resistance
to chipping, extra gloss
for shine, not needed on
peal enamel
Highly
flammable
Ridge
filler
Disguises
grooves in
nail plate
All the above, plus fibres to
make a thicker product
Gives smoother base to
lacquer
Highly
flammable
7.
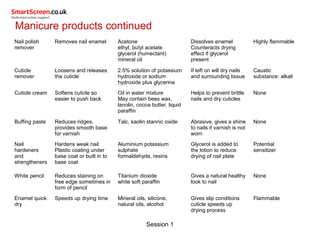
Session 1
Manicure productscontinued
Nail polish
remover
Removes nail enamel Acetone
ethyl, butyl acetate
glycerol (humectant)
mineral oil
Dissolves enamel
Counteracts drying
effect if glycerol
present
Highly flammable
Cuticle
remover
Loosens and releases
the cuticle
2.5% solution of potassium
hydroxide or sodium
hydroxide plus glycerine
If left on will dry nails
and surrounding tissue
Caustic
substance: alkali
Cuticle cream Softens cuticle so
easier to push back
Oil in water mixture
May contain bees wax,
lanolin, cocoa butter, liquid
paraffin
Helps to prevent brittle
nails and dry cuticles
None
Buffing paste Reduces ridges,
provides smooth base
for varnish
Talc, kaolin stannic oxide Abrasive, gives a shine
to nails if varnish is not
worn
None
Nail
hardeners
and
strengtheners
Hardens weak nail
Plastic coating under
base coat or built in to
base coat
Aluminium potassium
sulphate
formaldehyde, resins
Glycerol is added to
the lotion to reduce
drying of nail plate
Potential
sensitizer
White pencil Reduces staining on
free edge sometimes in
form of pencil
Titanium dioxide
white soft paraffin
Gives a natural healthy
look to nail
None
Enamel quick
dry
Speeds up drying time Mineral oils, silicone,
natural oils, alcohol
Gives slip conditions
cuticle speeds up
drying process
Flammable
8.
Session 1
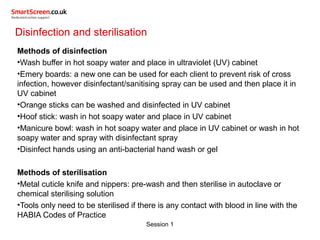
Disinfection andsterilisation
Methods of disinfection
•Wash buffer in hot soapy water and place in ultraviolet (UV) cabinet
•Emery boards: a new one can be used for each client to prevent risk of cross
infection, however disinfectant/sanitising spray can be used and then place it in
UV cabinet
•Orange sticks can be washed and disinfected in UV cabinet
•Hoof stick: wash in hot soapy water and place in UV cabinet
•Manicure bowl: wash in hot soapy water and place in UV cabinet or wash in hot
soapy water and spray with disinfectant spray
•Disinfect hands using an anti-bacterial hand wash or gel
Methods of sterilisation
•Metal cuticle knife and nippers: pre-wash and then sterilise in autoclave or
chemical sterilising solution
•Tools only need to be sterilised if there is any contact with blood in line with the
HABIA Codes of Practice
Session 1
Manicure procedure
1)Check the tools have been correctly disinfected
2) Check personal appearance and hygiene
3) Check workstation is set up neatly and correctly
4) Client consultation, assess the hands and check for contra-indications and
record the findings along with client’s details on the record card
5) Wash your hands
6) Remove client’s jewellery
7) Cleanse client’s hands with sanitiser
8) Remove any traces of old nail enamel by using a cotton wool pad soaked in
remover. Begin on the thumb, then onto the little finger and work along to the
index finger. Hold the pad against the client’s enamel for a few seconds, this
helps to dissolve the enamel and makes it easier to remove. Use the ‘squeak’
method to complete the removal. If there are any signs of stubborn enamel
perhaps around the cuticle area this can be removed by using a cotton wool
tipped orange stick, dipped in remover and gently worked around the area.
11.
Session 1
Manicure procedurecontinued
If you are trying to remove a darkly coloured enamel remove the bulk of the
colour and then use a fresh pad to clean off any residue.
Even if the client has no enamel on, still wipe the nails over with the remover to
further cleanse the nails.
9) Assess the hands and nails and check for any contra-indications. Touch the
nails along the surface by running your finger down the nail and check strength
and flexibility by very gently squeezing them along the sidewalls and free edge.
This will help you determine the nail type. Ask the client how they care for the
nails and make a note of any extra information you may have gained.
10) Start working on the ‘working hand’, file nails from the thumb, then to little
finger and working to index finger. Hold the emery board or shaping file at one
end and file at a 30° angle to the nail plate by gently stroking the file across the
nail plate in one direction. Finish the filling by beveling down the free edge to
smooth the nail using either the smooth side of the emery board or finishing file.
Never file the corners of the nail away as helps provide the nails with strength.
12.
Session 1
Manicure procedurecontinued
11) Use an orange stick to take a small amount of cuticle massage cream out of
the tub and replace the lid. Apply a small amount of cuticle massage cream to
each finger and massage into cuticles using your thumbs in a circular motion.
This will help to soften the cuticles and prepare them for further treatment. It will
also increase the blood supply to the nail plate and bed thus bringing nutrients
and oxygen to the area.
12) Soak working hand in the manicure bowl filled with warm soapy water. Do
not overfill the manicure bowl otherwise the water will spill out, and check the
water is not too hot.
13) Repeat steps 9-12 on non-working hand.
14) Remove first hand from soak, dry it thoroughly. As you do this gently push
back cuticles using the towel and your thumbs in a circular motion. Soak non-
working hand.
13.
Session 1
Manicure procedurecontinued
15) Check the free edge of working hand by carefully running the orange stick
under it. This will bring any loose bits of free edge to the surface and clean
away any debris. Re-file to neaten the edge by using the smooth side of the
emery board or finishing file.
16) Apply cuticle remover to the base of the nail plate by using the cotton wool
tipped orange stick dipped into the bottle. If you need more product after you
have touched the nail plate change the cotton wool so as not to cross-infect
or contaminate the product.
This product will loosen any excess cuticle that has overgrown onto the nail
plate, which can inhibit the growth of the nail. Be careful you don’t get any
product onto the surrounding skin as it could burn it. Also check if your client
has sensitive skin as this product can be an irritant. Once the product has
been applied to all the nail plates on the hand, again starting at the thumb,
use small gentle circles with the cotton wool tipped orange stick on the
rounded end or hoof stick to push back the cuticles. This will help to ease
and remove excess cuticle and dead skin from the nail plate.
14.
Session 1
Manicure procedurecontinued
17) Very carefully use cuticle knife to remove excess skin adhering to the nail
plate. Ensure the knife is damp at all times and it should be used flat to the
nail plate working inwards with light pressure so as not to damage the nail
plate.
18) Use cuticle nippers to remove any excess skin around the nail plate but NOT
the eponychium. Only remove any excess on the nail plate. Work carefully
using small movements. If the eponychium was completely clipped away the
matrix could be left open to infection and it can encourage the cuticle to grow
back thicker.
Rinse the hands to remove excess cuticle remover from the nail plate.
19) Apply a small amount of buffing paste by dipping the cotton wool tipped
orange stick into the paste and apply to the nail plate. Gently buff the nails to
shine using a gentle downward stroking action using about three strokes per
nail. Incorrect or over-buffing can lead to separation of the layers of the nail
plate.
15.
Session 1
Manicure procedurecontinued
20) Repeat steps 14-19 on non-working hand.
21) Apply massage cream to the working hand and arm, remembering to warm
the cream in your hands first. Commence with hand massage procedure on
first hand. This should be slow and rhythmical. Ensure the client’s elbow is
resting on the manicure station and the forearm is supported on the hand rest.
22) De-grease the nail plate by using the enamel remover and cotton wool. This is
very important, as the nail enamel may not adhere to the nail plate.
23) Next base coat is used. Check the top is securely on the bottle and turn it
upside down and roll it between your hands to mix it up. Open the product and
wipe the back of the brush to remove excess product. Apply the base coat to
the nail plate by starting in the center and allowing the product to spread a little.
Push the product down towards the cuticle, being careful no to flood it then
gently drag the brush towards the free edge using 4-5 strokes of the brush on
the thumb then moving on to the little finger where 3-4 strokes can be used.
Apply the product to the edge of the free edge using the side of the brush.
16.
Session 1
Manicure procedurecontinued
24) Repeat steps 21 and 23.
25) The client may replace jewellery at this point. This is also a good time for the
client to pay for the treatment and purchase any retail products.
26) Apply two coats of nail enamel and one topcoat in the same manner as
described in step 23 (some product ranges use a separate fast finisher to dry the
nails at this point).
27) ASK THE CLIENT TO SIT DOWN AND ALLOW THE NAILS TO DRY FOR
AT LEAST 10 MINUTES BEFORE LEAVING.
28) Give aftercare and home care advice.
29) Rebook appointment if appropriate.
30) ALWAYS check that the nails are dry before the client leaves (some products
may only be ‘touch dry’ after 10 mins, but not dent proof).
17.
Session 1
Example ofa hand and arm massage
1) Effleurage from finger tips to elbow. (3 times)
2) Zig zags on back of hand (gently). (3 times)
3) Thumb kneading on wrist. (3 times)
4) Thumb kneading from wrist to elbow. (3 times)
5) Finger twists. (3 times)
6) Finger rotation (make sure the joint is supported as the rotations are
completed). (3 times)
7) Thumb kneading to palm. (3 times)
8) Wrist rotation (left and right circles making sure the joint is supported
throughout). (3 times)
9) Effleurage (as in step 1) (3 times)