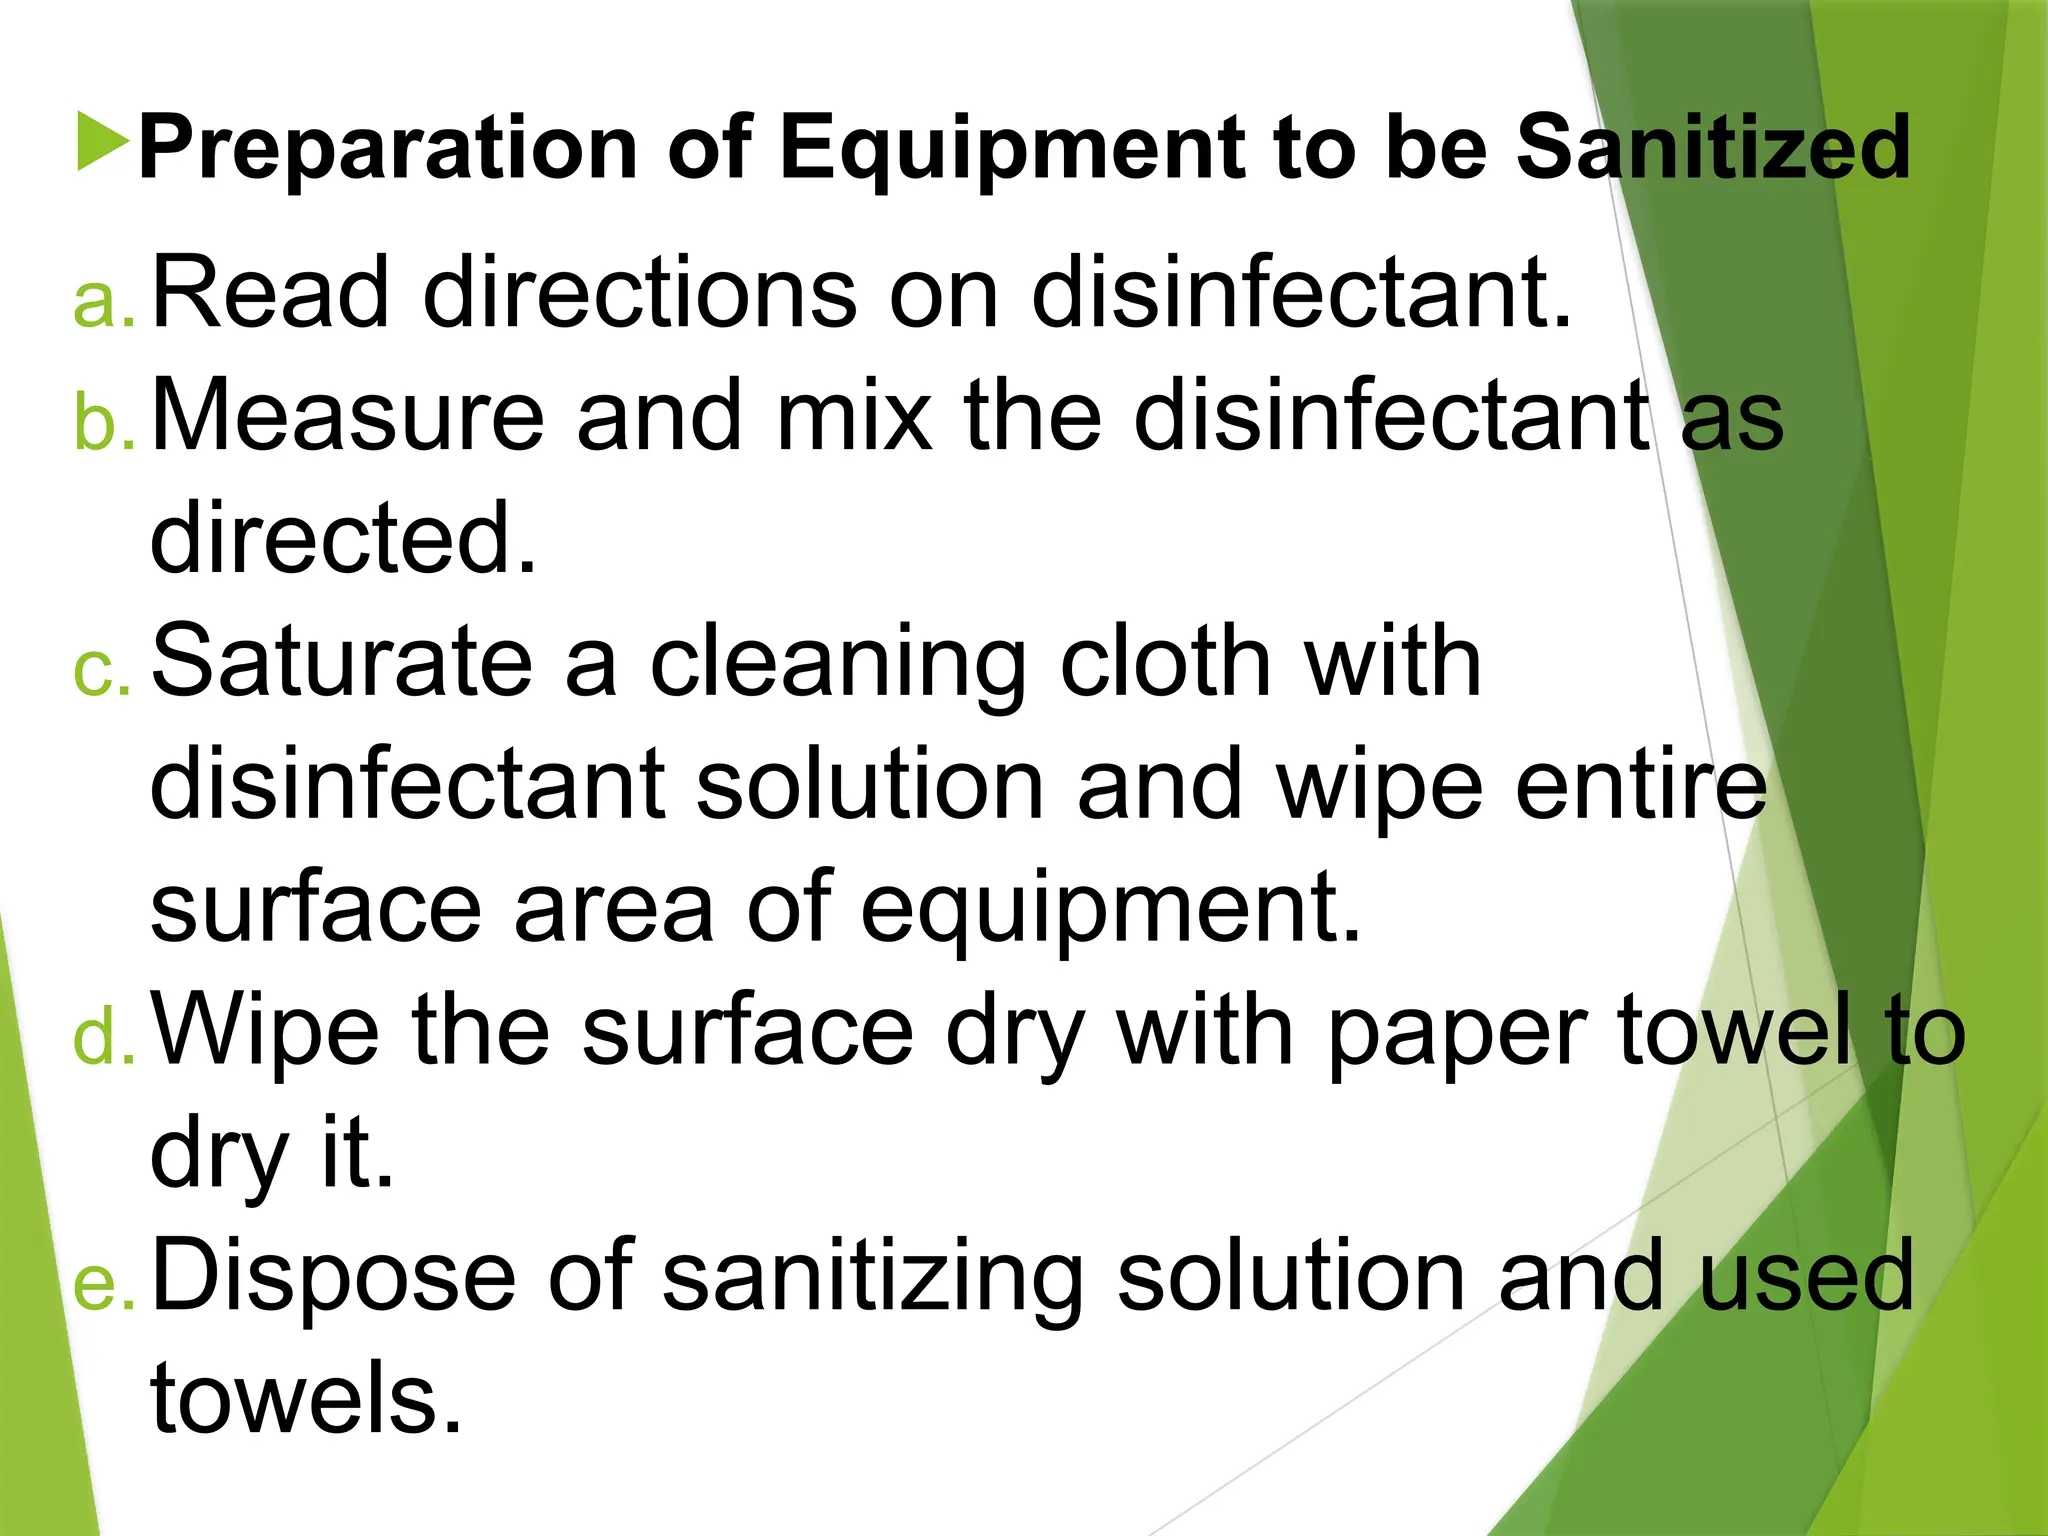
FIRST QUARTER
BEAUTY CARE/NAIL CARE
SERVICES
.
Nail care service - is a cosmetic
beauty treatment for the fingernails
and toenails performed at home or
in a nail salon. This involves
preparing the client, cleaning of
fingernails and toenails, applying
nail polish, and applying final
retouch. These are given to both
male and female customers.
Lesson 1
Use of Nail Care
Equipment,
Implements,
Cosmetics, and
Materials
EQUIPMENT
Equipment- are permanent
items used in manicure that are
durable and do not have to be
replaced until they wear out.
The following are the equipment
used in manicure.
1. ManicureTable is a
furniture especially
designed for giving
manicure. Usually it has a
laminated plastic surface
and a drawer for storing
materials. It is often fitted
with ball casters for easy
mobility.
1. Manicurist's
Chair or stool-
is the adjustable
upholstered
seat fitted over
a metal chrome.
2. Finger bowl- is
a plastic or glass
bowl specially
shaped for soaking
the clients' fingers in
warm water and
anti-bacterial soap.
3. Disinfectant
container is a
receptacle large
enough to hold the
disinfectant solution in
which objects to be
sanitized is immersed.
4. Manicure pillow -is
a hand cushion that
helps a client to keep
her hands steady and
relaxed.
5. Sanitized wipe
container-This
container will hold
clean absorbent
cotton or lint-free
wipes.
6. Supply Tray-The
tray holds cosmetics
such as polishes,
polish removers, and
creams.
7. Electric Nail dryer-
A nail dryer is an
optional item used to
shorten the length of
time necessary for the
client’s nails to dry.
IMPLEMENTS
Implements are handheld
tools used in manicure which
are durable and must be
sanitized (or disposed) of after
each use with each client.
1. Orangewood
stick-An instrument
with pointed and
rounded ends used
to remove excess
nail polish.
Disposable in nature.
2. Steel
Pusher-It is
used to push
back and
loosen cuticle.
3. Metal nail
file-It is used to
shape the free
edge of hard or
sculptured nails.
4. Emery board-It is
used for filing soft and
fragile nails. It is a
wooden, sand paper-
like stick with a fine
texture on one side and
a coarse texture on the
other side.
5. Cuticle Nipper-It is
used to trim excess
cuticle at the base of the
nail.
6. Tweezers-It is used
to lift small bits of
cuticle from the nail.
7. Nail Brush-It
is used to clean
fingernails and
remove bits of
cuticle with warm
soapy water.
8. Nail Buffer-An
implement used for
smoothening and
polishing the nails.
9. Fingernail
Clippers/nail cutter-It is
used to trim the nails.
MATERIALS
Materials are supplies
that are used during a
manicure and need to be
replaced for each client.
1. Disposable towelsIt is
used to cover the clients’
cushion before each
manicure. It is also used to
dry a client’s hands after
soaking in the fingerbowl.
2. Cotton or cotton balls-
Cotton is a soft white
downy fiber for dubbing or
cleaning the nails and
removing nail polish.
3. Plastic Spatula-It is
used to remove nail
cosmetics from their
containers.
4. Garbage bins/bags -
are plastic disposable
bags or trash receptacles
used to contain rubbish
to keep the place clean.
5. First Aid Kit-A
collection of supplies for
use in giving first aid.
NAIL
COSMETICS
Antibacterial soap-It is
mixed with warm water and
used in the fingerbowl. An
antibacterial agent used to
sanitize the client’s hands.
Nail Polish
Remover(aceton
e)-An organic
solvent used to
dissolve and
remove old nail
polish.
Cuticle remover-
It is a liquid used to
soften nail cuticles
and prepare them
to be cut.
Cuticle oil-It keeps
the cuticle soft and
helps to prevent
hangnails. It gives
added touch to the
finish of manicure.
Solvent-Solvent
is a substance
used to thin out
the nail polish
when it has
thickened.
Nail bleach-
It is used to
remove yellow
stains.
Nail whitener-Nail
whiteners are applied
under the free edge of the
nail to make the nail
appear white. It is a
paste, cream or coated
string that consist mainly
of white pigment.
Hand cream or
hand lotion- It
helps the skin retain
its moisture, so
hands are not dry,
cracked, and
wrinkled.
Assorted colored Nail
Polish-These are lacquers
applied on fingernails and
toenails to decorate and/or
protect the nail plate.
Base Coat-A
primer application
that serves to
prepare nail surface
for enamel
application.
Nail strengthener/
Hardener-It is
applied to the natural
nail before the base
coat to prevent
splitting and peeling
of the nail.(Optional)
Top coat or sealer-
It is a colorless polish
applied over colored
polish to prevent
enamel chipping and
promotes longer
wearing of nail polish.
Liquid nail
dry(Quick dry)-It
is used to prevent
smudging of the
nail polish.
ITEM
EQUIPMENT IMPLEMENTS COSMETICS MATERIALS
1. Nail Cutter/Clipper/Trimmer
2. Orange Wood Stick
3. Nail File
4. Antiseptic Solution
5. Alcohol
6. Nail Buffer
7. Mixing Bowl
8. Pedicure Nail Brush
9. Pumice stone
10. Callous Remover
11. Disinfectant
12. Manicurist’s Stool
13. Timer
14. Manicure Table
15. Cuticle Remover
16. Hand Towel
17. Cotton
18. Nail Polish
19. Cuticle Scissors
20. Chairs
LESSON 2
MAINTAIN TOOLS AND
EQUIPMENT
Sterilization and Sanitation
of Nail Care Equipment and
Implements
Sterilization- is
the process of
destroying all living
micro-organisms.
Sanitization -is the
process of
destroying some,
not all
microorganisms.
Disinfectant-is a
substance used to control
micro-organisms on non-
living surfaces such as
tools, equipment, and
furniture/ fixtures.
Antiseptic-is an
agent that
prevents the
multiplication of
microorganisms.
Preparation of Equipment to be Sanitized
a.Read directions on disinfectant.
b.Measure and mix the disinfectant as
directed.
c. Saturate a cleaning cloth with
disinfectant solution and wipe entire
surface area of equipment.
d.Wipe the surface dry with paper towel to
dry it.
e.Dispose of sanitizing solution and used
towels.
Preparation of Metal Implements for
Sterilization
a.Soak the implements in hot, soapy water
solution to remove any debris and oil
residue. Rinse them thoroughly.
b.Place the implements in a 70% to 90%
alcohol solution for 20 minutes.
c.Remove the implements from solution,
wipe them dry, and place them into a dry
sterilizer.

Preparation of the Sanitizing Jar
a. Cleanse the sanitizing jar with disinfectant and
wipe it dry.
b. Place thin layer of sterile cotton at the bottom
of jar.
c. Remove implements from wet or dry sanitizer
and place them into the jar, handles up,
except for metal nail files.
d. Fill the jar with 70% to 90% alcohol solution to
cover cutting edges and tips of orangewood
sticks.
Keeping the Workplace Clean and Safe
1.All beauty salons must be well-
lighted and well-ventilated and must
be in good sanitary condition.
2.The salon premises must be free
from rodents, vermin, flies or other
similar insects.
3.All salon establishments must be
provided with continuous running hot
and cold water.
4. The curtains and floor coverings
in the salon must be washable
and kept clean.
5. All hair, used cotton or other
waste materials must be removed
from the floor immediately, and
deposited in a closed container.
Get rid of them from the salon
premises at frequent intervals.
6.The rest rooms must be well-sanitized
and be provided with individual towels.
7.Each beautician must wear a
washable uniform while working on
clients.
8.Each client must be provided with a
freshly laundered towel.
9.All waste materials should be
disposed of in an enclosed waste bin
fitted with polythene bin liner, durable
enough to resist tearing.
Do the following measures after every
manicure service:
1.Tools which are made of plastic
should be kept clean and sanitized
properly in preparation for the next use.
2.Empty bottles and containers are
discarded in a separate trash bin.
3.Used cosmetic products and other
chemicals are stored, arranged and
properly labeled.
4.Finger bowls must be cleansed and sanitized
before use for the next patron.
5.Metal tools and instruments must be sterilized
following proper sterilization techniques. After
the process, store it in a dry cabinet until
needed.
6.Tools/Implements which are made of porous
materials such as nail files, buffers, nail
brushes and orangewood sticks can harbor
bacteria easily. Since they are wood products
which cannot be sterilized, these tools are
disposables.
7. Waste materials should be disposed of
properly in an enclosed waste container
fitted with polythene bag and should be
sanitized with disinfectant regularly in a
well-ventilated area. Remember to wear
protective gloves while doing this.
8. Contaminated wastes should be
disposed of, following the right procedures
prescribed by local authorities.
9.Any tool or equipment
in poor condition must
be repaired immediately
or disposed of properly
for the safety of both
client and manicurist.
LESSON 3
Practice Occupational
Health and Safety
Procedures
Occupational Health and
Safety (OHS)
-is a planned system of
working to prevent illness
and injury at work by
recognizing and identifying
hazards and risks.
Harm- is an adverse
health effects on
something or someone
under certain conditions
at work.
Risk - the chance or
probability that a person
will be harmed or
experience an adverse
health effect if exposed
to a hazard.
Identifying workplace
hazards means looking
for those things at your
workplace that have the
potential to cause harm.
Common
hazards in a
beauty salon
1)Electrical Hazard-Many of the
electrical appliances used in the
beauty salons can create serious
health and safety risks,
particularly in wet conditions.

2.Chemical Hazard -These
are substances used and/or
produced at work that have the
potential to harm the health
and safety of people at work.
3.Fire Hazard-you must
be aware of and trained
in fire and emergency
evacuation procedures
in the workplace
4.Biological Hazards
Biohazards- also refer to
biological substances that pose
a threat to the health of living
organisms, primarily that of
humans.
5). Ergonomics
-Manicurist/pedicurist use forceful
repetitive movements such as filing
and buffing nails and holding
uncomfortable positions for long
period of time, thereby increasing risk
for musculoskeletal injuries.
Personal Protective
Equipment (PPE) at Work
Personal protective
equipment -is clothing
equipment designed to be
worn by a manicurist or salon
workers to protect them from
risks of injury or illness
The following are personal protective
clothing of a salon worker
Gloves Splash proof apron
Protective
mask
Eyewear

Advantages of
wearing PPE at
work:
a. Prevents damage to
workers’ nails and skin.
b. To prevent skin from
absorbing potentially
harmful chemicals which
may cause skin allergies,
irritation, or other related
problems.
c. So as not to generate a
lot of dust, it may be
necessary to wear a dust
mask to minimize
breathing in particles while
filing or buffing nails.
d. Protects the
wearer's face and
prevents the breathing
of air contaminated
with chemical and/or
biological agents
Lesson 4:
Manicure and
Pedicure Services
Structure of Nails
Nails are a part of the skin and
are made up of the same
protein, keratin (KER-a-tin), as
skin and hair. It is composed
of then hardest keratin.
The technical term for nail in
onyx ( ON-iks).
The purpose of nails
is to protect the ends
of fingers and toes
and to help the
fingers grasp small
objects.
Adult fingernails
grow at an average
rate of 1/8 inch a
month; toenails
grow more easily.
The characteristics
of healthy nails are
smooth, shiny, and
translucent pink.
Nails replace
themselves every
four months and
grow more quickly in
summer than in
winter.
The nail grows
fastest on the
middle finger and
slowest on the
thumb.
The Diagram of the Nail and
its Structure
Nail body or Plate -
is the main part or
plate of nail that is
attached to the skin at
the tip of the finger.
Nail root - is where
the nail growth begins.
It is embedded
underneath the skin at
the base of the nail.
Free edge
- is the end of the
nail that extends
beyond the fingertip.
Structure Beneath the
Nail
The structures
beneath the nail include
the nail bed, matrix,
and lunula.
Nail Bed
-is the portion of skin
beneath the nail body that
the nail plates rest upon. It is
supplied with blood vessels
that provide the nourishment
necessary for nail growth.
Matrix (May-triks)
- contains nerves together
with lymph and blood
vessels that produce the
nail cells and control the
rate of growth of the nails.
Lunula
- is the light-colored half-
moon shape at the base of
the nail. This is where
the matrix connects with
the nail bed.
Skin Surrounding the Nail
Cuticle( KYOO-ti-kel)
-is the overlapping skin
around the nail. A normal
cuticle should be loose and
pliable.
Nail Fold Or Mantle
(MAN-tel) is the deep
fold or skin at the base
of the nail where the
nail root is embedded.
Nail Grooves
- are slits or tracks in
the nail bed at the
sides of the nail on
which the nail grows.
Nail Wall
-is the skin on the
sides of the nail
above the grooves
Eponychium (ep-o-NIK-ee-um)
-is the thin line of skin
at the base of the nail
that extends from the
nail wall to the nail
plate.
Perionychium
(PER-i-o-nikee-um)
- is the part of the
skin that surrounds
the entire nail area.
Hyponychium
(heye-poh-NIK-ee-
um) is the part of the
skin under the free
edge of the nail.
Shapes of Nail
1. Oval Nail
It is common among people
with long, perfect nail beds. It
may be styled slightly
rounded at the base and
slightly pointed at the
fingertips.
2. Square nail
It is created by allowing
the nail to grow out straight
and then filing the tip straight
across at right angles with
the rest of the nail plate.
3. Round Nail
This is ideal for shorter
nails. The nail is ideal to
grow out at the sides for
approximately 1.5 mm and
then the tip is filed into a
rounded shape.
4. Squoval Nail
 The squoval nail is
a square nail but the
softer edges of an
oval.
5. Pointed Nail
A pointed nail is filed away
at the sides to a point at the
tip; this shape is very weak as
the sides of the nail (which
provide the strength) are
totally lost.
1
2
3
4
5
6
7
8
9
10
11
12
13
14
15
16
17
18
19
20
Nail Diseases and Disorders

Nail diseases are conditions of both
the nail, and the surrounding skin which
result from bacterial, fungal, and viral
infections
Nail disorder, on the other hand is a
condition caused by injury to the nail or
disease or imbalance in the body.
An inflammation is red and sore. An
infection will have evidence of pus.
Broken skin or nail tissue is a cut or
tear that exposes deeper layers of these
structures. Raised or swollen skin
appears fatter than normal skin and rise
above the normal level.
Onychosis is a technical term applied
to nail disease.
The following are the nail disorders that can be serviced by a nail technician.
Nail
Disorders
Appearance Characteristics
1. Bruised
Nail
A condition in
which a clot of
blood forms
under the nail
plate caused by
injury to the nail
bed. Give gentle manicure.
May need to refer to a
medical practitioner
2.Dis
colored
nails
A condition in which
the nails turn a
variety of colors
including yellow,
blue, blue-grey,
green, red & purple.
It is caused by poor
blood circulation,.
heart condition, or topical or
oral medication. Application of
colored nail polish can hide
this condition
3.
Eggshell
Nail
Nail plate is thin,
white, and curved
over the free
edge. The
condition is
caused by
improper diet,
internal disease,
medication, or nervous disorders. Give gentle manicure; do
not use pressure with a metal pusher at the base of the nail
4.Hang-
nails
A condition which
the cuticle around
the nails splits. It
is caused by dry
cuticles or
cuticles that have
been cut too
close to the nail. This condition can be improved by softening the cuticles with oil and trimming the cuticles with nippers. Hangnails are also called agnail. Give
gentle manicure with emphasis on cuticle work.
5.Leu-
konychia
A condition in
which spots
appear on the
nails. It is caused
by air bubbles, a
bruise, or other
injury to the nail.
6. Ony-
cha-
trophia or
atrophy
of the nail
The wasting away
of the nail,
causing it to lose
its lustre and
become smaller.
The nail can also
shed completely.
This condition is
mainly caused by
injury or disease.
7. Ony-
chauxis or
Hy-
pertrophy
An overgrowth of
the nail caused
by internal
imbalance, local
infection, or
heredity.
8.Ony-
cho-
crypto-
sis
(Ingrown
Nails)
The nail grows
into the sides of
the flesh and
may cause
infection.
Incorrect
trimming and
shaping of nails
are often
responsible for
ingrown nails. Do not manicure or pedicure, if infection is present. Refer to
medical practitioner.
9. Ony-
chor-
rexis
It is a split or
brittle nails,
caused by injury
to the finger or
exposure to harsh
chemicals. You
may give oil
manicures to improve the
condition.
10. Nevus
A brown or black
stain on the nail
caused by a
pigmented mole
that occurs in the
nail. Application
of colored polish
can hide this
disorder.
11.Ony-
cho-
pagy
( Bitten
Nails)
A medical term
for nails that
have been bitten
enough to
become
deformed.
Regular
manicure may
help to stop nail
biting.
12. Pte-
rygium
Common
condition of the
forward growth of
the cuticle. The
cuticle sticks to
the nail and, if
not treated, will
grow over the
nail to the free
edge.
13. Ony-
cholysis
A condition in
which the nail
loosens from the
nail bed,
beginning usually
at the free edge
and continuing to
the lunula, but
does not come
off.
1 2
3 4
5 6
7
The following are nail diseases that
cannot be serviced by a nail technician
or manicurist
NAIL DISEASES APPEARANCE CHARACTERISTICS
1.
Mold
A fungus infection
of the nail that is
usually caused
when moisture
seeps between an
artificial nail and
the free edge.
Molds starts with a yellow -
green color and darkens to
black if not treated by a
doctor.
2.
Onychia
An inflammation in
the nail where the
tissue at the base
of the nail may be
red and swollen
and pus may form.
3.
Onychog
ryposis
A condition in
which the nail
curvature is
increased and
enlarged. The
nail becomes
thicker and
curves,
sometimes
extending over
the tip of the finger and toe.
This condition results in
inflammation and pain if the
nail grows into the skin.
4.
Onycho-
mycosis
( tinea
unguium)
An infectious
disease caused
by a fungus
(vegetable
parasite). A
common form is
whitish patches
that can be scraped off the
surfaces.
5.Ony-
chop-
tosis
It is the periodic
shedding of one
or more nails
either in the
whole or in part. It
can occur during
or after certain
diseases of the
body, such as
syphilis, as a result of a fever
and system upsets, as a
reaction to prescription drugs,
or a result of trauma.
6. Parony-
chia
A bacterial
inflammation of
the tissue around
the nail. The
symptoms are
redness, swelling
and tenderness of
the tissue surrounding the
nail.
7.Pyoge-
nic
Granu-
loma
Severe
inflammation of
the nail in which
a lump of red
tissue grows up
from the nail bed
to the nail plate.
Lesson 5
HAND MASSAGE
Hand massage- is the manipulation
of the hands to relax the client and
ease the discomfort prior to the
application of nail polish
Benefits of Hand Massage:

1. It moisturizes the skin with hand
cream.
2. It helps remove any dead skin
cells.
3. It relaxes the client.
4. It stimulates blood flow
Steps in giving hand massage
1.Spread the lotion or cream over the
arms and hands
2.Effleurage to the whole hand and
forearm. Use long sweeping strokes
from the hand to the elbow moving on
both the outer and the inner sides of the
forearm. Repeat step 1 for the final result.
Effleurage is a stroking movement in
massage
3.Knead thumb to the back of the hand
and the forearm. Use the thumbs, one
in front of the other, and move backwards
or forwards in a gentle sawing action.
Move from the hands to the elbow, and
then slide the thumbs back down to the
hands. Repeat step 2 twice.
4.Knead thumb to the palm and the inner forearm. Use the same movements as
in step 2.
5.Finger circulations, supporting
the joints. Support the knuckles with
one hand, hold the fingers individually
and gently taking each through in full
range of movements, first clockwise
and then counter-clockwise. Move
from the little finger to the thumb.
Repeat step 4 or further 2 times.
6.Wrist circulations, supporting
the joints. Support the wrist with
one hand and put your fingers
between the client’s gently grasping
her hand. Move the wrist through its
full range of movement, first
clockwise and then, anticlockwise.
Repeat step 5 or further 2 times
7.Effleurage to the whole hand and
forearm. Use the same movement as
in step 1. Repeat step 6 for 5 times.
8.Squeeze clients hand between
your own gently, and slide off to
finish.
LESSON 6
BASIC
MANICURING/PEDICURI
NG PROCEDURES
Procedure for a Basic
Manicure/Pedicure
1.Remove old polish. Gently remove old
polish on the nails with nail polish
remover (acetone) in a piece of cotton
without smearing the old polish into the
cuticle or surrounding tissue
2.Shape the nails. Using your emery
board, shape the nails as you and your
client have agreed. Discuss with the client
the nail shape suited for him or her. File
the nails of the left hand, starting with the
little finger and working towards the
thumb.
3.Soften cuticle. After filing left hand, put
it in your soap bath to soak and soften
cuticles while you file the right hand
4.Dry fingertips. Holding a towel with
both hands, carefully dry the left hand,
including the area between the fingers. As
you dry, gently push back the cuticle.
5.Apply cuticle remover. Wind a thin
layer of cotton around the blunt edge of
an orangewood stick for use as an
applicator. Apply cuticle solvent around
the cuticle of the left hand
6.Loosen Cuticle. Use the spoon end of
the cuticle pusher to gently push back
and lift cuticle off the nails of the left
hand. Use a circular movement to left the
cuticles that cling to the nail plate
7.Trim Cuticle. Use your cuticle nipper to
remove dead cuticles, uneven cuticle or
hangnails. In cutting the cuticle, be
careful to remove it as a single segment.
8.Clean under free edge. Use a cotton-
tipped orangewood stick, dipped in soapy
water to clean under free edge, working
from the center toward each side,
employing gentle pressure. Note:
Remove right hand over soap bath and
brush a last time to remove bits of cuticle
traces of solvent. Then let the client rest
the left hand on the sanitized towel
9.Buff the nail (optional). Starting with
the roughest grit side of the buffer, begin
to buff your nails with a gentle, side-to-
side motion. At first, just aim to smooth
out major ridges
10.Re-examine nails and cuticles.
Carefully examine the nails for defects.
Use the fine side of an emery board to
give the nails a smooth beveled edge.
Remove remaining pieces of cuticle
11.Apply hand and arm massage. Apply
hand lotion all over the hand and arm up to
the elbow. Gently massage the hands and
fingers as this procedure can help increase
blood circulation and make the hand softer.
12.Remove traces of oil. Remove
traces of oil from the nail so the polish will
adhere better. Use small piece of cotton
saturated with alcohol or polish remover
and wipe off the nail
13.Apply base coat. Apply base coat to
the left hand with long strokes, starting
with the little finger and working toward
the thumb. Let it dry for a few seconds
14.Apply colored polish. Apply two
coats of colored polish with the same
technique used for the base coat.
Complete your first color coat on both
hands before starting the second coat. If
you get polish on the cuticle, use a
cotton-tipped orangewood stick saturated
with nail polish remover to clean it off.
15.Apply top coat. Apply one coat of
sealer or top coat to prevent chipping and
to give nails a glossy look
16.Apply instant nail dry-optional.
Apply instant nail dry on each nail to
prevent smudging and dulling
NAIL TRIMMING
LESSON 7
THE FUNDAMENTALS IN
NAIL DESIGNS
 Nail design -adds beauty, color, elegance,
fun, inspiration, glamour, and style. It has
become a popular trend nowadays because
most of the beauty salons available in town
offer this kind of service. Beautiful nail
designs not only adorn nails but is also a great
way of showing off your beautiful fingernails
What makes your nails attractive?
 Nail polish is used to coat the nail
plate for a number of reasons:
 To adorn the nail;
 To disguise stained nails;
 To add temporary strength to weak nails;
and
 To coordinate with the clothes or make-
up.
HOW TO APPLY THE DIFFERENT BASIC NAIL
DESIGNS
 A. Plain manicure
It is the traditional application of nail polish
to the entire nail plate.
Steps in Plain manicure
1. Apply base coat
· Begin with little finger of one hand.
Repeat polish application on the other
hand.
2. Apply two coats of polish
· Use light long strokes from nail base
to free edge
· Apply polish to the middle of the nail
first and then to the sides
• Repeat second coat of polish to both hands
· Remove excess polish around nail with a cotton
tipped orangewood stick
3. Apply top coat
B. Half-Moon
Half moon is a style that involves
applying of nail polish over the whole nail
plate except the area of lunula.
Steps in giving Half-Moon nail design
1. Apply base coat.
2. Apply white or platinum nail polish and leave for
a few minutes to dry.
3. Apply colored polish from one side to the other
side of the nail following the shape of lunula.
Repeat the application of the nail polish if
necessary.
4. Remove excess polish from the skin.
5. Apply top coat.
C. Half- Moon with Tip

It involves the application of colored
polish over the whole nail plate except
the area of lunula and tip of the nail
Steps in Giving Half-Moon with Tip
1. Apply base coat.
2. Apply white or platinum nail
polish and leave for a few minutes
to dry.
3. Apply colored nail polish from
one side to the other side of the
nail to form a half-moon, leaving
the lunula of the nail.
4. Leave the part of the free edge.
The free edge should be seen.
5. Repeat the application of nail
polish if necessary
D. French Manicure or Tip design:

Steps in giving French Manicure-
Variation no. 1
1. Apply base coat and leave for a few
minutes to dry.
2. Apply white or platinum nail polish and
leave for a few minutes to dry.
3. With the use of white or colored nail
polish, draw a thin line over the tip of the
nail
following the shape of the free edge of
the nail. Apply second coating, if
necessary
.4. Remove excess polish.
5. Apply top coat.
 French Manicure or Tip design - Variation
no. 2
 It involves the application of white nail polish
or colored polish on the tips and coating the
rest of the nail with a sheer polish. It’s
suitable for short nails and those with
moderate length of nail
 Steps in giving French Manicure-Variation
no. 2
 Apply base coat and leave for a few minutes
 2. Apply a coat of translucent pink polish over your entire nail.
 3. With the use of white or colored nail polish, draw a thin line over the
tip of the nail following the shape of the free edge of the nail. Apply second
coating, if necessary.
4. Remove excess polish.
5. Apply top coat.
E. Elephant Tusk
Elephant tusk is a style that involves
the application of nail polish to create
S -curve, leaving a slightly larger gap
along the nail walls.
Steps in making an Elephant Tusk:
1. Apply white or platinum nail polish and
leave for a few minutes to dry.
2. Apply colored nail polish creating a
half- circle design at the inner side of the
nail as you continue it to form S-like.]=
3. Fill up the other side to complete the
design.
4. Remove excess polish.
5. Seal with a top coat

BEAUTY CARE - T L E 8 TOPIC FOR FIRST QUARTER

  • 1.
  • 2.
    Nail care service- is a cosmetic beauty treatment for the fingernails and toenails performed at home or in a nail salon. This involves preparing the client, cleaning of fingernails and toenails, applying nail polish, and applying final retouch. These are given to both male and female customers.
  • 3.
    Lesson 1 Use ofNail Care Equipment, Implements, Cosmetics, and Materials
  • 4.
    EQUIPMENT Equipment- are permanent itemsused in manicure that are durable and do not have to be replaced until they wear out. The following are the equipment used in manicure.
  • 5.
    1. ManicureTable isa furniture especially designed for giving manicure. Usually it has a laminated plastic surface and a drawer for storing materials. It is often fitted with ball casters for easy mobility.
  • 6.
    1. Manicurist's Chair orstool- is the adjustable upholstered seat fitted over a metal chrome.
  • 7.
    2. Finger bowl-is a plastic or glass bowl specially shaped for soaking the clients' fingers in warm water and anti-bacterial soap.
  • 8.
    3. Disinfectant container isa receptacle large enough to hold the disinfectant solution in which objects to be sanitized is immersed.
  • 9.
    4. Manicure pillow-is a hand cushion that helps a client to keep her hands steady and relaxed.
  • 10.
    5. Sanitized wipe container-This containerwill hold clean absorbent cotton or lint-free wipes.
  • 11.
    6. Supply Tray-The trayholds cosmetics such as polishes, polish removers, and creams.
  • 12.
    7. Electric Naildryer- A nail dryer is an optional item used to shorten the length of time necessary for the client’s nails to dry.
  • 13.
    IMPLEMENTS Implements are handheld toolsused in manicure which are durable and must be sanitized (or disposed) of after each use with each client.
  • 14.
    1. Orangewood stick-An instrument withpointed and rounded ends used to remove excess nail polish. Disposable in nature.
  • 15.
    2. Steel Pusher-It is usedto push back and loosen cuticle.
  • 16.
    3. Metal nail file-Itis used to shape the free edge of hard or sculptured nails.
  • 17.
    4. Emery board-Itis used for filing soft and fragile nails. It is a wooden, sand paper- like stick with a fine texture on one side and a coarse texture on the other side.
  • 18.
    5. Cuticle Nipper-Itis used to trim excess cuticle at the base of the nail.
  • 19.
    6. Tweezers-It isused to lift small bits of cuticle from the nail.
  • 20.
    7. Nail Brush-It isused to clean fingernails and remove bits of cuticle with warm soapy water.
  • 21.
    8. Nail Buffer-An implementused for smoothening and polishing the nails.
  • 22.
    9. Fingernail Clippers/nail cutter-Itis used to trim the nails.
  • 23.
    MATERIALS Materials are supplies thatare used during a manicure and need to be replaced for each client.
  • 24.
    1. Disposable towelsItis used to cover the clients’ cushion before each manicure. It is also used to dry a client’s hands after soaking in the fingerbowl.
  • 25.
    2. Cotton orcotton balls- Cotton is a soft white downy fiber for dubbing or cleaning the nails and removing nail polish.
  • 26.
    3. Plastic Spatula-Itis used to remove nail cosmetics from their containers.
  • 27.
    4. Garbage bins/bags- are plastic disposable bags or trash receptacles used to contain rubbish to keep the place clean.
  • 28.
    5. First AidKit-A collection of supplies for use in giving first aid.
  • 29.
  • 30.
    Antibacterial soap-It is mixedwith warm water and used in the fingerbowl. An antibacterial agent used to sanitize the client’s hands.
  • 31.
    Nail Polish Remover(aceton e)-An organic solventused to dissolve and remove old nail polish.
  • 32.
    Cuticle remover- It isa liquid used to soften nail cuticles and prepare them to be cut.
  • 33.
    Cuticle oil-It keeps thecuticle soft and helps to prevent hangnails. It gives added touch to the finish of manicure.
  • 34.
    Solvent-Solvent is a substance usedto thin out the nail polish when it has thickened.
  • 35.
    Nail bleach- It isused to remove yellow stains.
  • 36.
    Nail whitener-Nail whiteners areapplied under the free edge of the nail to make the nail appear white. It is a paste, cream or coated string that consist mainly of white pigment.
  • 37.
    Hand cream or handlotion- It helps the skin retain its moisture, so hands are not dry, cracked, and wrinkled.
  • 38.
    Assorted colored Nail Polish-Theseare lacquers applied on fingernails and toenails to decorate and/or protect the nail plate.
  • 39.
    Base Coat-A primer application thatserves to prepare nail surface for enamel application.
  • 40.
    Nail strengthener/ Hardener-It is appliedto the natural nail before the base coat to prevent splitting and peeling of the nail.(Optional)
  • 41.
    Top coat orsealer- It is a colorless polish applied over colored polish to prevent enamel chipping and promotes longer wearing of nail polish.
  • 42.
    Liquid nail dry(Quick dry)-It isused to prevent smudging of the nail polish.
  • 43.
    ITEM EQUIPMENT IMPLEMENTS COSMETICSMATERIALS 1. Nail Cutter/Clipper/Trimmer 2. Orange Wood Stick 3. Nail File 4. Antiseptic Solution 5. Alcohol 6. Nail Buffer 7. Mixing Bowl 8. Pedicure Nail Brush 9. Pumice stone 10. Callous Remover 11. Disinfectant 12. Manicurist’s Stool 13. Timer 14. Manicure Table 15. Cuticle Remover 16. Hand Towel 17. Cotton 18. Nail Polish 19. Cuticle Scissors 20. Chairs
  • 44.
    LESSON 2 MAINTAIN TOOLSAND EQUIPMENT Sterilization and Sanitation of Nail Care Equipment and Implements
  • 45.
    Sterilization- is the processof destroying all living micro-organisms.
  • 46.
    Sanitization -is the processof destroying some, not all microorganisms.
  • 47.
    Disinfectant-is a substance usedto control micro-organisms on non- living surfaces such as tools, equipment, and furniture/ fixtures.
  • 48.
    Antiseptic-is an agent that preventsthe multiplication of microorganisms.
  • 49.
    Preparation of Equipmentto be Sanitized a.Read directions on disinfectant. b.Measure and mix the disinfectant as directed. c. Saturate a cleaning cloth with disinfectant solution and wipe entire surface area of equipment. d.Wipe the surface dry with paper towel to dry it. e.Dispose of sanitizing solution and used towels.
  • 50.
    Preparation of MetalImplements for Sterilization a.Soak the implements in hot, soapy water solution to remove any debris and oil residue. Rinse them thoroughly. b.Place the implements in a 70% to 90% alcohol solution for 20 minutes. c.Remove the implements from solution, wipe them dry, and place them into a dry sterilizer.
  • 51.
     Preparation of theSanitizing Jar a. Cleanse the sanitizing jar with disinfectant and wipe it dry. b. Place thin layer of sterile cotton at the bottom of jar. c. Remove implements from wet or dry sanitizer and place them into the jar, handles up, except for metal nail files. d. Fill the jar with 70% to 90% alcohol solution to cover cutting edges and tips of orangewood sticks.
  • 52.
    Keeping the WorkplaceClean and Safe 1.All beauty salons must be well- lighted and well-ventilated and must be in good sanitary condition. 2.The salon premises must be free from rodents, vermin, flies or other similar insects. 3.All salon establishments must be provided with continuous running hot and cold water.
  • 53.
    4. The curtainsand floor coverings in the salon must be washable and kept clean. 5. All hair, used cotton or other waste materials must be removed from the floor immediately, and deposited in a closed container. Get rid of them from the salon premises at frequent intervals.
  • 54.
    6.The rest roomsmust be well-sanitized and be provided with individual towels. 7.Each beautician must wear a washable uniform while working on clients. 8.Each client must be provided with a freshly laundered towel. 9.All waste materials should be disposed of in an enclosed waste bin fitted with polythene bin liner, durable enough to resist tearing.
  • 55.
    Do the followingmeasures after every manicure service: 1.Tools which are made of plastic should be kept clean and sanitized properly in preparation for the next use. 2.Empty bottles and containers are discarded in a separate trash bin. 3.Used cosmetic products and other chemicals are stored, arranged and properly labeled.
  • 56.
    4.Finger bowls mustbe cleansed and sanitized before use for the next patron. 5.Metal tools and instruments must be sterilized following proper sterilization techniques. After the process, store it in a dry cabinet until needed. 6.Tools/Implements which are made of porous materials such as nail files, buffers, nail brushes and orangewood sticks can harbor bacteria easily. Since they are wood products which cannot be sterilized, these tools are disposables.
  • 57.
    7. Waste materialsshould be disposed of properly in an enclosed waste container fitted with polythene bag and should be sanitized with disinfectant regularly in a well-ventilated area. Remember to wear protective gloves while doing this. 8. Contaminated wastes should be disposed of, following the right procedures prescribed by local authorities.
  • 58.
    9.Any tool orequipment in poor condition must be repaired immediately or disposed of properly for the safety of both client and manicurist.
  • 59.
  • 60.
    Occupational Health and Safety(OHS) -is a planned system of working to prevent illness and injury at work by recognizing and identifying hazards and risks.
  • 61.
    Harm- is anadverse health effects on something or someone under certain conditions at work.
  • 62.
    Risk - thechance or probability that a person will be harmed or experience an adverse health effect if exposed to a hazard.
  • 63.
    Identifying workplace hazards meanslooking for those things at your workplace that have the potential to cause harm.
  • 64.
  • 65.
    1)Electrical Hazard-Many ofthe electrical appliances used in the beauty salons can create serious health and safety risks, particularly in wet conditions. 
  • 66.
    2.Chemical Hazard -These aresubstances used and/or produced at work that have the potential to harm the health and safety of people at work.
  • 67.
    3.Fire Hazard-you must beaware of and trained in fire and emergency evacuation procedures in the workplace
  • 68.
    4.Biological Hazards Biohazards- alsorefer to biological substances that pose a threat to the health of living organisms, primarily that of humans.
  • 69.
    5). Ergonomics -Manicurist/pedicurist useforceful repetitive movements such as filing and buffing nails and holding uncomfortable positions for long period of time, thereby increasing risk for musculoskeletal injuries.
  • 70.
    Personal Protective Equipment (PPE)at Work Personal protective equipment -is clothing equipment designed to be worn by a manicurist or salon workers to protect them from risks of injury or illness
  • 71.
    The following arepersonal protective clothing of a salon worker Gloves Splash proof apron
  • 72.
  • 73.
     Advantages of wearing PPEat work: a. Prevents damage to workers’ nails and skin.
  • 74.
    b. To preventskin from absorbing potentially harmful chemicals which may cause skin allergies, irritation, or other related problems.
  • 75.
    c. So asnot to generate a lot of dust, it may be necessary to wear a dust mask to minimize breathing in particles while filing or buffing nails.
  • 76.
    d. Protects the wearer'sface and prevents the breathing of air contaminated with chemical and/or biological agents
  • 77.
  • 78.
    Structure of Nails Nailsare a part of the skin and are made up of the same protein, keratin (KER-a-tin), as skin and hair. It is composed of then hardest keratin. The technical term for nail in onyx ( ON-iks).
  • 79.
    The purpose ofnails is to protect the ends of fingers and toes and to help the fingers grasp small objects.
  • 80.
    Adult fingernails grow atan average rate of 1/8 inch a month; toenails grow more easily.
  • 81.
    The characteristics of healthynails are smooth, shiny, and translucent pink.
  • 82.
    Nails replace themselves every fourmonths and grow more quickly in summer than in winter.
  • 83.
    The nail grows fasteston the middle finger and slowest on the thumb.
  • 84.
    The Diagram ofthe Nail and its Structure
  • 88.
    Nail body orPlate - is the main part or plate of nail that is attached to the skin at the tip of the finger.
  • 89.
    Nail root -is where the nail growth begins. It is embedded underneath the skin at the base of the nail.
  • 90.
    Free edge - isthe end of the nail that extends beyond the fingertip.
  • 91.
    Structure Beneath the Nail Thestructures beneath the nail include the nail bed, matrix, and lunula.
  • 92.
    Nail Bed -is theportion of skin beneath the nail body that the nail plates rest upon. It is supplied with blood vessels that provide the nourishment necessary for nail growth.
  • 93.
    Matrix (May-triks) - containsnerves together with lymph and blood vessels that produce the nail cells and control the rate of growth of the nails.
  • 94.
    Lunula - is thelight-colored half- moon shape at the base of the nail. This is where the matrix connects with the nail bed.
  • 95.
    Skin Surrounding theNail Cuticle( KYOO-ti-kel) -is the overlapping skin around the nail. A normal cuticle should be loose and pliable.
  • 96.
    Nail Fold OrMantle (MAN-tel) is the deep fold or skin at the base of the nail where the nail root is embedded.
  • 97.
    Nail Grooves - areslits or tracks in the nail bed at the sides of the nail on which the nail grows.
  • 98.
    Nail Wall -is theskin on the sides of the nail above the grooves
  • 99.
    Eponychium (ep-o-NIK-ee-um) -is thethin line of skin at the base of the nail that extends from the nail wall to the nail plate.
  • 100.
    Perionychium (PER-i-o-nikee-um) - is thepart of the skin that surrounds the entire nail area.
  • 101.
    Hyponychium (heye-poh-NIK-ee- um) is thepart of the skin under the free edge of the nail.
  • 102.
  • 103.
    1. Oval Nail Itis common among people with long, perfect nail beds. It may be styled slightly rounded at the base and slightly pointed at the fingertips.
  • 104.
    2. Square nail Itis created by allowing the nail to grow out straight and then filing the tip straight across at right angles with the rest of the nail plate.
  • 105.
    3. Round Nail Thisis ideal for shorter nails. The nail is ideal to grow out at the sides for approximately 1.5 mm and then the tip is filed into a rounded shape.
  • 106.
    4. Squoval Nail The squoval nail is a square nail but the softer edges of an oval.
  • 107.
    5. Pointed Nail Apointed nail is filed away at the sides to a point at the tip; this shape is very weak as the sides of the nail (which provide the strength) are totally lost.
  • 108.
  • 109.
  • 110.
  • 111.
  • 112.
  • 113.
  • 114.
  • 115.
  • 116.
  • 117.
  • 118.
  • 119.
  • 120.
  • 121.
  • 122.
  • 123.
  • 124.
  • 125.
  • 126.
  • 127.
  • 128.
    Nail Diseases andDisorders  Nail diseases are conditions of both the nail, and the surrounding skin which result from bacterial, fungal, and viral infections Nail disorder, on the other hand is a condition caused by injury to the nail or disease or imbalance in the body.
  • 129.
    An inflammation isred and sore. An infection will have evidence of pus. Broken skin or nail tissue is a cut or tear that exposes deeper layers of these structures. Raised or swollen skin appears fatter than normal skin and rise above the normal level. Onychosis is a technical term applied to nail disease.
  • 130.
    The following arethe nail disorders that can be serviced by a nail technician. Nail Disorders Appearance Characteristics 1. Bruised Nail A condition in which a clot of blood forms under the nail plate caused by injury to the nail
  • 131.
    bed. Give gentlemanicure. May need to refer to a medical practitioner 2.Dis colored nails A condition in which the nails turn a variety of colors including yellow, blue, blue-grey, green, red & purple. It is caused by poor blood circulation,.
  • 132.
    heart condition, ortopical or oral medication. Application of colored nail polish can hide this condition 3. Eggshell Nail Nail plate is thin, white, and curved over the free edge. The condition is caused by improper diet, internal disease,
  • 133.
    medication, or nervousdisorders. Give gentle manicure; do not use pressure with a metal pusher at the base of the nail 4.Hang- nails A condition which the cuticle around the nails splits. It is caused by dry cuticles or cuticles that have been cut too
  • 134.
    close to thenail. This condition can be improved by softening the cuticles with oil and trimming the cuticles with nippers. Hangnails are also called agnail. Give gentle manicure with emphasis on cuticle work.
  • 135.
    5.Leu- konychia A condition in whichspots appear on the nails. It is caused by air bubbles, a bruise, or other injury to the nail.
  • 136.
    6. Ony- cha- trophia or atrophy ofthe nail The wasting away of the nail, causing it to lose its lustre and become smaller. The nail can also shed completely. This condition is mainly caused by injury or disease.
  • 137.
    7. Ony- chauxis or Hy- pertrophy Anovergrowth of the nail caused by internal imbalance, local infection, or heredity.
  • 138.
    8.Ony- cho- crypto- sis (Ingrown Nails) The nail grows intothe sides of the flesh and may cause infection. Incorrect trimming and shaping of nails are often responsible for
  • 139.
    ingrown nails. Donot manicure or pedicure, if infection is present. Refer to medical practitioner. 9. Ony- chor- rexis It is a split or brittle nails, caused by injury to the finger or exposure to harsh chemicals. You may give oil
  • 140.
    manicures to improvethe condition. 10. Nevus A brown or black stain on the nail caused by a pigmented mole that occurs in the nail. Application of colored polish can hide this disorder.
  • 141.
    11.Ony- cho- pagy ( Bitten Nails) A medicalterm for nails that have been bitten enough to become deformed. Regular manicure may help to stop nail biting.
  • 142.
    12. Pte- rygium Common condition ofthe forward growth of the cuticle. The cuticle sticks to the nail and, if not treated, will grow over the nail to the free edge.
  • 143.
    13. Ony- cholysis A conditionin which the nail loosens from the nail bed, beginning usually at the free edge and continuing to the lunula, but does not come off.
  • 144.
  • 145.
  • 146.
  • 147.
  • 148.
    The following arenail diseases that cannot be serviced by a nail technician or manicurist NAIL DISEASES APPEARANCE CHARACTERISTICS 1. Mold A fungus infection of the nail that is usually caused when moisture seeps between an artificial nail and the free edge.
  • 149.
    Molds starts witha yellow - green color and darkens to black if not treated by a doctor. 2. Onychia An inflammation in the nail where the tissue at the base of the nail may be red and swollen and pus may form.
  • 150.
    3. Onychog ryposis A condition in whichthe nail curvature is increased and enlarged. The nail becomes thicker and curves, sometimes extending over
  • 151.
    the tip ofthe finger and toe. This condition results in inflammation and pain if the nail grows into the skin. 4. Onycho- mycosis ( tinea unguium) An infectious disease caused by a fungus (vegetable parasite). A common form is whitish patches
  • 152.
    that can bescraped off the surfaces. 5.Ony- chop- tosis It is the periodic shedding of one or more nails either in the whole or in part. It can occur during or after certain diseases of the body, such as
  • 153.
    syphilis, as aresult of a fever and system upsets, as a reaction to prescription drugs, or a result of trauma. 6. Parony- chia A bacterial inflammation of the tissue around the nail. The symptoms are redness, swelling and tenderness of
  • 154.
    the tissue surroundingthe nail. 7.Pyoge- nic Granu- loma Severe inflammation of the nail in which a lump of red tissue grows up from the nail bed to the nail plate.
  • 155.
    Lesson 5 HAND MASSAGE Handmassage- is the manipulation of the hands to relax the client and ease the discomfort prior to the application of nail polish
  • 156.
    Benefits of HandMassage:  1. It moisturizes the skin with hand cream. 2. It helps remove any dead skin cells. 3. It relaxes the client. 4. It stimulates blood flow
  • 157.
    Steps in givinghand massage
  • 158.
    1.Spread the lotionor cream over the arms and hands 2.Effleurage to the whole hand and forearm. Use long sweeping strokes from the hand to the elbow moving on both the outer and the inner sides of the forearm. Repeat step 1 for the final result. Effleurage is a stroking movement in massage
  • 160.
    3.Knead thumb tothe back of the hand and the forearm. Use the thumbs, one in front of the other, and move backwards or forwards in a gentle sawing action. Move from the hands to the elbow, and then slide the thumbs back down to the hands. Repeat step 2 twice.
  • 162.
    4.Knead thumb tothe palm and the inner forearm. Use the same movements as in step 2.
  • 163.
    5.Finger circulations, supporting thejoints. Support the knuckles with one hand, hold the fingers individually and gently taking each through in full range of movements, first clockwise and then counter-clockwise. Move from the little finger to the thumb. Repeat step 4 or further 2 times.
  • 165.
    6.Wrist circulations, supporting thejoints. Support the wrist with one hand and put your fingers between the client’s gently grasping her hand. Move the wrist through its full range of movement, first clockwise and then, anticlockwise. Repeat step 5 or further 2 times
  • 167.
    7.Effleurage to thewhole hand and forearm. Use the same movement as in step 1. Repeat step 6 for 5 times. 8.Squeeze clients hand between your own gently, and slide off to finish.
  • 175.
    LESSON 6 BASIC MANICURING/PEDICURI NG PROCEDURES Procedurefor a Basic Manicure/Pedicure 1.Remove old polish. Gently remove old polish on the nails with nail polish remover (acetone) in a piece of cotton without smearing the old polish into the cuticle or surrounding tissue
  • 177.
    2.Shape the nails.Using your emery board, shape the nails as you and your client have agreed. Discuss with the client the nail shape suited for him or her. File the nails of the left hand, starting with the little finger and working towards the thumb.
  • 178.
    3.Soften cuticle. Afterfiling left hand, put it in your soap bath to soak and soften cuticles while you file the right hand
  • 179.
    4.Dry fingertips. Holdinga towel with both hands, carefully dry the left hand, including the area between the fingers. As you dry, gently push back the cuticle.
  • 180.
    5.Apply cuticle remover.Wind a thin layer of cotton around the blunt edge of an orangewood stick for use as an applicator. Apply cuticle solvent around the cuticle of the left hand 6.Loosen Cuticle. Use the spoon end of the cuticle pusher to gently push back and lift cuticle off the nails of the left hand. Use a circular movement to left the cuticles that cling to the nail plate
  • 181.
    7.Trim Cuticle. Useyour cuticle nipper to remove dead cuticles, uneven cuticle or hangnails. In cutting the cuticle, be careful to remove it as a single segment.
  • 182.
    8.Clean under freeedge. Use a cotton- tipped orangewood stick, dipped in soapy water to clean under free edge, working from the center toward each side, employing gentle pressure. Note: Remove right hand over soap bath and brush a last time to remove bits of cuticle traces of solvent. Then let the client rest the left hand on the sanitized towel
  • 183.
    9.Buff the nail(optional). Starting with the roughest grit side of the buffer, begin to buff your nails with a gentle, side-to- side motion. At first, just aim to smooth out major ridges
  • 184.
    10.Re-examine nails andcuticles. Carefully examine the nails for defects. Use the fine side of an emery board to give the nails a smooth beveled edge. Remove remaining pieces of cuticle
  • 185.
    11.Apply hand andarm massage. Apply hand lotion all over the hand and arm up to the elbow. Gently massage the hands and fingers as this procedure can help increase blood circulation and make the hand softer.
  • 186.
    12.Remove traces ofoil. Remove traces of oil from the nail so the polish will adhere better. Use small piece of cotton saturated with alcohol or polish remover and wipe off the nail
  • 187.
    13.Apply base coat.Apply base coat to the left hand with long strokes, starting with the little finger and working toward the thumb. Let it dry for a few seconds
  • 188.
    14.Apply colored polish.Apply two coats of colored polish with the same technique used for the base coat. Complete your first color coat on both hands before starting the second coat. If you get polish on the cuticle, use a cotton-tipped orangewood stick saturated with nail polish remover to clean it off.
  • 189.
    15.Apply top coat.Apply one coat of sealer or top coat to prevent chipping and to give nails a glossy look
  • 190.
    16.Apply instant naildry-optional. Apply instant nail dry on each nail to prevent smudging and dulling
  • 202.
  • 203.
    LESSON 7 THE FUNDAMENTALSIN NAIL DESIGNS  Nail design -adds beauty, color, elegance, fun, inspiration, glamour, and style. It has become a popular trend nowadays because most of the beauty salons available in town offer this kind of service. Beautiful nail designs not only adorn nails but is also a great way of showing off your beautiful fingernails
  • 204.
    What makes yournails attractive?  Nail polish is used to coat the nail plate for a number of reasons:  To adorn the nail;  To disguise stained nails;  To add temporary strength to weak nails; and  To coordinate with the clothes or make- up.
  • 205.
    HOW TO APPLYTHE DIFFERENT BASIC NAIL DESIGNS  A. Plain manicure It is the traditional application of nail polish to the entire nail plate.
  • 206.
    Steps in Plainmanicure 1. Apply base coat · Begin with little finger of one hand. Repeat polish application on the other hand. 2. Apply two coats of polish · Use light long strokes from nail base to free edge · Apply polish to the middle of the nail
  • 207.
    first and thento the sides • Repeat second coat of polish to both hands · Remove excess polish around nail with a cotton tipped orangewood stick 3. Apply top coat
  • 208.
    B. Half-Moon Half moonis a style that involves applying of nail polish over the whole nail plate except the area of lunula.
  • 209.
    Steps in givingHalf-Moon nail design 1. Apply base coat. 2. Apply white or platinum nail polish and leave for a few minutes to dry. 3. Apply colored polish from one side to the other side of the nail following the shape of lunula. Repeat the application of the nail polish if necessary. 4. Remove excess polish from the skin. 5. Apply top coat.
  • 210.
    C. Half- Moonwith Tip  It involves the application of colored polish over the whole nail plate except the area of lunula and tip of the nail
  • 211.
    Steps in GivingHalf-Moon with Tip 1. Apply base coat. 2. Apply white or platinum nail polish and leave for a few minutes to dry. 3. Apply colored nail polish from one side to the other side of the nail to form a half-moon, leaving the lunula of the nail.
  • 212.
    4. Leave thepart of the free edge. The free edge should be seen. 5. Repeat the application of nail polish if necessary
  • 213.
    D. French Manicureor Tip design: 
  • 214.
    Steps in givingFrench Manicure- Variation no. 1 1. Apply base coat and leave for a few minutes to dry. 2. Apply white or platinum nail polish and leave for a few minutes to dry. 3. With the use of white or colored nail polish, draw a thin line over the tip of the nail
  • 215.
    following the shapeof the free edge of the nail. Apply second coating, if necessary .4. Remove excess polish. 5. Apply top coat.
  • 216.
     French Manicureor Tip design - Variation no. 2  It involves the application of white nail polish or colored polish on the tips and coating the rest of the nail with a sheer polish. It’s suitable for short nails and those with moderate length of nail  Steps in giving French Manicure-Variation no. 2  Apply base coat and leave for a few minutes
  • 217.
     2. Applya coat of translucent pink polish over your entire nail.  3. With the use of white or colored nail polish, draw a thin line over the tip of the nail following the shape of the free edge of the nail. Apply second coating, if necessary.
  • 218.
    4. Remove excesspolish. 5. Apply top coat. E. Elephant Tusk Elephant tusk is a style that involves the application of nail polish to create S -curve, leaving a slightly larger gap along the nail walls.
  • 219.
    Steps in makingan Elephant Tusk: 1. Apply white or platinum nail polish and leave for a few minutes to dry. 2. Apply colored nail polish creating a half- circle design at the inner side of the nail as you continue it to form S-like.]= 3. Fill up the other side to complete the design.
  • 220.
    4. Remove excesspolish. 5. Seal with a top coat