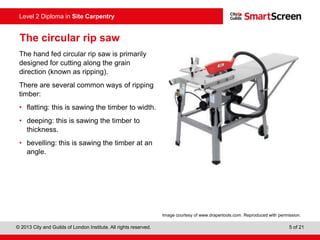
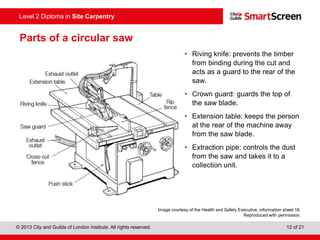
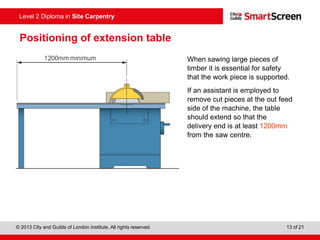
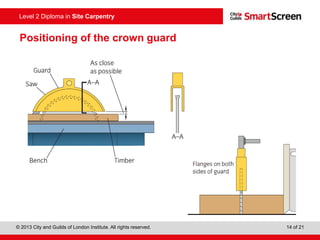
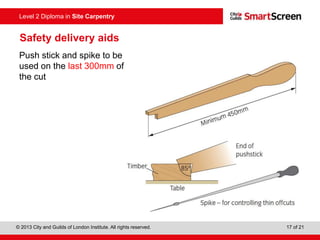
Š 2013 City and Guilds of London Institute. All rights reserved. 1 of 21
Level 2 Diploma in Site Carpentry
PowerPointpresentation
Parts of a machine
Unit 211: Set up and operate a circular saw
Š 2013 City and Guilds of London Institute. All rights reserved. 2 of 21
Level 2 Diploma in Site Carpentry
Identify the components of a circular saw
Enable learners to:
• know the regulations and guidance covering circular saw
• identify components of a circular rip saw
• state the potential faults in relation to a circular rip saw
• describe the procedure to follow on identification of faults.
Š 2013 City and Guilds of London Institute. All rights reserved. 3 of 21
Level 2 Diploma in Site Carpentry
Safe use of woodworking
Circular saws are governed by the following regulations and guidance:
• Provision and Use of Work Equipment Regulations 1998 as applied to woodworking
machinery
• Approved Code of Practice and guidance.
For full details go to www.hse.gov.uk/pubns/priced/l114.pdf
Š 2013 City and Guilds of London Institute. All rights reserved. 4 of 21
Level 2 Diploma in Site Carpentry
Accident statistics for circular saw benches
Accidents at circular saw benches account for around 35% of the total accidents
recorded at woodworking machines.
Help prevent accidents by:
• carrying out risk assessments and ensuring control measures are followed
• ensuring that all operators are trained, competent and authorised
• ensuring that all guarding is available and correctly positioned
• carrying out regular maintenance on machines
• ensuring that operators follow current safe working practices at all times.
Š 2013 City and Guilds of London Institute. All rights reserved. 5 of 21
Level 2 Diploma in Site Carpentry
The circular rip saw
The hand fed circular rip saw is primarily
designed for cutting along the grain
direction (known as ripping).
There are several common ways of ripping
timber:
• flatting: this is sawing the timber to width.
• deeping: this is sawing the timber to
thickness.
• bevelling: this is sawing the timber at an
angle.
Image courtesy of www.drapertools.com. Reproduced with permission.
Š 2013 City and Guilds of London Institute. All rights reserved. 6 of 21
Level 2 Diploma in Site Carpentry
Example of flat cutting
• Flat cutting timber to the required size.
• The saw blade cuts through the thinnest section of the timber.
• Do not stand directly in line with the saw cut but slightly to the left.
Image courtesy of the Health and Safety Executive, information sheet 16.
Reproduced with permission.
Š 2013 City and Guilds of London Institute. All rights reserved. 7 of 21
Level 2 Diploma in Site Carpentry
Example of deep cutting
Deep cutting timber to the required size.
The saw blade cuts through the thickest section of the timber.
Image courtesy of the Health and Safety Executive, information sheet 16.
Reproduced with permission.
Š 2013 City and Guilds of London Institute. All rights reserved. 8 of 21
Level 2 Diploma in Site Carpentry
Correctly positioning timber
After cutting, the two halves of the timber will fall away from the saw blade, thus
reducing the risk of kickback.
Š 2013 City and Guilds of London Institute. All rights reserved. 9 of 21
Level 2 Diploma in Site Carpentry
Correct positioning of timber
Š 2013 City and Guilds of London Institute. All rights reserved. 10 of 21
Level 2 Diploma in Site Carpentry
Example of bevel cutting with a saddle
• The timber sits on to a saddle which holds the timber safely in place and at the
required angle while cutting.
• Provides a constant cutting angle for repeat jobs.
Images courtesy of the Health and Safety Executive, information sheet 16. Reproduced with permission.
Š 2013 City and Guilds of London Institute. All rights reserved. 11 of 21
Level 2 Diploma in Site Carpentry
Guarding a circular saw
All hand fed circular saws must be guarded in three ways:
• Guards fitted to the top and front of the saw above the table known as the crown
guard.
• Riving knife fitted at the correct distance to the rear of the saw blade and the correct
height above the machine table.
• Guards fitted below the machine table (usually formed by the main frame of the
machine table).
Š 2013 City and Guilds of London Institute. All rights reserved. 12 of 21
Level 2 Diploma in Site Carpentry
Parts of a circular saw
• Riving knife: prevents the timber
from binding during the cut and
acts as a guard to the rear of the
saw.
• Crown guard: guards the top of
the saw blade.
• Extension table: keeps the person
at the rear of the machine away
from the saw blade.
• Extraction pipe: controls the dust
from the saw and takes it to a
collection unit.
Image courtesy of the Health and Safety Executive, information sheet 16.
Reproduced with permission.
Š 2013 City and Guilds of London Institute. All rights reserved. 13 of 21
Level 2 Diploma in Site Carpentry
Positioning of extension table
When sawing large pieces of
timber it is essential for safety
that the work piece is supported.
If an assistant is employed to
remove cut pieces at the out feed
side of the machine, the table
should extend so that the
delivery end is at least 1200mm
from the saw centre.
Š 2013 City and Guilds of London Institute. All rights reserved. 14 of 21
Level 2 Diploma in Site Carpentry
Positioning of the crown guard
Š 2013 City and Guilds of London Institute. All rights reserved. 15 of 21
Level 2 Diploma in Site Carpentry
Positioning for blades less than 600mm in diameter
The riving knife should go to within 25mm of the top of the saw blade on saw blades less
than 600 mm diameter.
Š 2013 City and Guilds of London Institute. All rights reserved. 16 of 21
Level 2 Diploma in Site Carpentry
Positioning for blades more than 600mm in diameter
• The riving knife must match the saw blade at the rear of the saw.
• It must be curved to match the profile of the saw blade in use.
• The riving knife should be large enough to extend at least 225mm above the table for
saw.
Š 2013 City and Guilds of London Institute. All rights reserved. 17 of 21
Level 2 Diploma in Site Carpentry
Safety delivery aids
Push stick and spike to be
used on the last 300mm of
the cut
Š 2013 City and Guilds of London Institute. All rights reserved. 18 of 21
Level 2 Diploma in Site Carpentry
Video on safe working practice
Video on using a circular rip saw: www.hse.gov.uk/woodworking/ripsaw.htm
Video on using a crosscut saw: www.hse.gov.uk/woodworking/crosscut.htm
Š 2013 City and Guilds of London Institute. All rights reserved. 19 of 21
Level 2 Diploma in Site Carpentry
Faults found with circular saws
Action required when identifying a fault with any circular saw:
• Stop and isolate machine immediately.
• Put a warning sign on the machine warning ‘Do not use. Faulty and dangerous
machine’.
• Report faulty machine to your supervisor straightaway.
Š 2013 City and Guilds of London Institute. All rights reserved. 20 of 21
Level 2 Diploma in Site Carpentry
Examples of faults found with circular saws
Fault
• Missing or damaged guards.
• Unable to correctly position guards.
• Incorrectly positioned riving knife.
• Missing out feed table when long lengths
are to be cut or when a out feed worker
is used.
• Damaged or blunt tooling.
Action required
• Repair and position correctly.
• Do not operate saw until guard can be
positioned – maintenance could be
required to free movement.
• Select suitable size and correctly position.
• Fit correct size out feed table.
• Remove and fit correct size tooling.
Š 2013 City and Guilds of London Institute. All rights reserved. 21 of 21
Level 2 Diploma in Site Carpentry
Any questions?

unit 211 PPT 1

  • 1.
    Š 2013 Cityand Guilds of London Institute. All rights reserved. 1 of 21 Level 2 Diploma in Site Carpentry PowerPointpresentation Parts of a machine Unit 211: Set up and operate a circular saw
  • 2.
    © 2013 Cityand Guilds of London Institute. All rights reserved. 2 of 21 Level 2 Diploma in Site Carpentry Identify the components of a circular saw Enable learners to: • know the regulations and guidance covering circular saw • identify components of a circular rip saw • state the potential faults in relation to a circular rip saw • describe the procedure to follow on identification of faults.
  • 3.
    © 2013 Cityand Guilds of London Institute. All rights reserved. 3 of 21 Level 2 Diploma in Site Carpentry Safe use of woodworking Circular saws are governed by the following regulations and guidance: • Provision and Use of Work Equipment Regulations 1998 as applied to woodworking machinery • Approved Code of Practice and guidance. For full details go to www.hse.gov.uk/pubns/priced/l114.pdf
  • 4.
    © 2013 Cityand Guilds of London Institute. All rights reserved. 4 of 21 Level 2 Diploma in Site Carpentry Accident statistics for circular saw benches Accidents at circular saw benches account for around 35% of the total accidents recorded at woodworking machines. Help prevent accidents by: • carrying out risk assessments and ensuring control measures are followed • ensuring that all operators are trained, competent and authorised • ensuring that all guarding is available and correctly positioned • carrying out regular maintenance on machines • ensuring that operators follow current safe working practices at all times.
  • 5.
    © 2013 Cityand Guilds of London Institute. All rights reserved. 5 of 21 Level 2 Diploma in Site Carpentry The circular rip saw The hand fed circular rip saw is primarily designed for cutting along the grain direction (known as ripping). There are several common ways of ripping timber: • flatting: this is sawing the timber to width. • deeping: this is sawing the timber to thickness. • bevelling: this is sawing the timber at an angle. Image courtesy of www.drapertools.com. Reproduced with permission.
  • 6.
    © 2013 Cityand Guilds of London Institute. All rights reserved. 6 of 21 Level 2 Diploma in Site Carpentry Example of flat cutting • Flat cutting timber to the required size. • The saw blade cuts through the thinnest section of the timber. • Do not stand directly in line with the saw cut but slightly to the left. Image courtesy of the Health and Safety Executive, information sheet 16. Reproduced with permission.
  • 7.
    Š 2013 Cityand Guilds of London Institute. All rights reserved. 7 of 21 Level 2 Diploma in Site Carpentry Example of deep cutting Deep cutting timber to the required size. The saw blade cuts through the thickest section of the timber. Image courtesy of the Health and Safety Executive, information sheet 16. Reproduced with permission.
  • 8.
    Š 2013 Cityand Guilds of London Institute. All rights reserved. 8 of 21 Level 2 Diploma in Site Carpentry Correctly positioning timber After cutting, the two halves of the timber will fall away from the saw blade, thus reducing the risk of kickback.
  • 9.
    Š 2013 Cityand Guilds of London Institute. All rights reserved. 9 of 21 Level 2 Diploma in Site Carpentry Correct positioning of timber
  • 10.
    © 2013 Cityand Guilds of London Institute. All rights reserved. 10 of 21 Level 2 Diploma in Site Carpentry Example of bevel cutting with a saddle • The timber sits on to a saddle which holds the timber safely in place and at the required angle while cutting. • Provides a constant cutting angle for repeat jobs. Images courtesy of the Health and Safety Executive, information sheet 16. Reproduced with permission.
  • 11.
    © 2013 Cityand Guilds of London Institute. All rights reserved. 11 of 21 Level 2 Diploma in Site Carpentry Guarding a circular saw All hand fed circular saws must be guarded in three ways: • Guards fitted to the top and front of the saw above the table known as the crown guard. • Riving knife fitted at the correct distance to the rear of the saw blade and the correct height above the machine table. • Guards fitted below the machine table (usually formed by the main frame of the machine table).
  • 12.
    © 2013 Cityand Guilds of London Institute. All rights reserved. 12 of 21 Level 2 Diploma in Site Carpentry Parts of a circular saw • Riving knife: prevents the timber from binding during the cut and acts as a guard to the rear of the saw. • Crown guard: guards the top of the saw blade. • Extension table: keeps the person at the rear of the machine away from the saw blade. • Extraction pipe: controls the dust from the saw and takes it to a collection unit. Image courtesy of the Health and Safety Executive, information sheet 16. Reproduced with permission.
  • 13.
    Š 2013 Cityand Guilds of London Institute. All rights reserved. 13 of 21 Level 2 Diploma in Site Carpentry Positioning of extension table When sawing large pieces of timber it is essential for safety that the work piece is supported. If an assistant is employed to remove cut pieces at the out feed side of the machine, the table should extend so that the delivery end is at least 1200mm from the saw centre.
  • 14.
    Š 2013 Cityand Guilds of London Institute. All rights reserved. 14 of 21 Level 2 Diploma in Site Carpentry Positioning of the crown guard
  • 15.
    Š 2013 Cityand Guilds of London Institute. All rights reserved. 15 of 21 Level 2 Diploma in Site Carpentry Positioning for blades less than 600mm in diameter The riving knife should go to within 25mm of the top of the saw blade on saw blades less than 600 mm diameter.
  • 16.
    © 2013 Cityand Guilds of London Institute. All rights reserved. 16 of 21 Level 2 Diploma in Site Carpentry Positioning for blades more than 600mm in diameter • The riving knife must match the saw blade at the rear of the saw. • It must be curved to match the profile of the saw blade in use. • The riving knife should be large enough to extend at least 225mm above the table for saw.
  • 17.
    Š 2013 Cityand Guilds of London Institute. All rights reserved. 17 of 21 Level 2 Diploma in Site Carpentry Safety delivery aids Push stick and spike to be used on the last 300mm of the cut
  • 18.
    Š 2013 Cityand Guilds of London Institute. All rights reserved. 18 of 21 Level 2 Diploma in Site Carpentry Video on safe working practice Video on using a circular rip saw: www.hse.gov.uk/woodworking/ripsaw.htm Video on using a crosscut saw: www.hse.gov.uk/woodworking/crosscut.htm
  • 19.
    © 2013 Cityand Guilds of London Institute. All rights reserved. 19 of 21 Level 2 Diploma in Site Carpentry Faults found with circular saws Action required when identifying a fault with any circular saw: • Stop and isolate machine immediately. • Put a warning sign on the machine warning ‘Do not use. Faulty and dangerous machine’. • Report faulty machine to your supervisor straightaway.
  • 20.
    © 2013 Cityand Guilds of London Institute. All rights reserved. 20 of 21 Level 2 Diploma in Site Carpentry Examples of faults found with circular saws Fault • Missing or damaged guards. • Unable to correctly position guards. • Incorrectly positioned riving knife. • Missing out feed table when long lengths are to be cut or when a out feed worker is used. • Damaged or blunt tooling. Action required • Repair and position correctly. • Do not operate saw until guard can be positioned – maintenance could be required to free movement. • Select suitable size and correctly position. • Fit correct size out feed table. • Remove and fit correct size tooling.
  • 21.
    Š 2013 Cityand Guilds of London Institute. All rights reserved. 21 of 21 Level 2 Diploma in Site Carpentry Any questions?