This document provides instructions for three video editing techniques in Adobe Premiere:
1) Highlighting part of an image by creating a blue shape over the video and darkening the rest with a black rectangle.
2) Creating a ghost effect by overlaying the same shot with and without an actor at 30% opacity.
3) Blurring part of an image by applying a blur effect to a copy of the clip, and using a crop filter to blur only the desired area.
Clipping Path Eu is a well reputed photo editing service company ,
Here you can find any type of photo editing service with affordable price and also high professional work
This Presentation was built for Speakers and Technically Directors to have a medium of understanding and to make sure everyone presenting their content in the right Aspect Ratio for that big moment on the stage. whether that be 16:9 or 4:3 this quick page turner will help you get your content in the right format for the big screen.
Adobe Premiere Pro How to Use Ultra Key Effect.
The Ultra Key Effect in Adobe Premiere Pro is a powerful tool that allows you to remove the background from a video clip and replace it with a different background. This is a useful technique for creating green screen videos or for replacing the background in a shot with a more suitable one.
In this presentation, we will discuss how to use the Ultra Key Effect in Adobe Premiere Pro.
Step 1: Import your footage. The first step is to import the footage that you want to use in your video. Make sure that the footage has a green or blue screen background, as this will make it easier to remove the background using the Ultra Key Effect.
Step 2: Drag the footage to the timeline. Drag the footage to the timeline and place it on the track that you want to use. Make sure that the footage is selected.
Step 3: Apply the Ultra Key Effect. To apply the Ultra Key Effect, go to the Effects panel and search for Ultra Key. Drag the effect onto the footage in the timeline. This will open the Ultra Key panel in the Effects Controls panel.
Step 4: Choose the Key Color. The Key Color setting in the Ultra Key panel allows you to select the color that you want to remove from the footage. By default, the color is set to green, but you can change it to blue or any other color that you want to remove.
Step 5: Adjust the Matte Generation Settings. The Matte Generation Settings in the Ultra Key panel control how the background is removed from the footage. You can adjust the settings to make the background removal more accurate or less accurate. The Matte Generation Settings include Matte Cleanup, Matte Generation, and Matte Edges.
Step 6: Adjust the Output Settings. The Output Settings in the Ultra Key panel control how the removed background is replaced with a new background. You can choose to replace the background with a solid color, an image, or another video clip. You can also adjust the opacity and blend mode of the new background to make it blend more seamlessly with the footage.
Step 7: Fine-tune the settings After applying the Ultra Key Effect, you may need to fine-tune the settings to achieve the desired effect. You can adjust the Matte Generation and Output Settings to make the background removal and replacement more accurate. You can also adjust the opacity and blend mode of the new background to make it blend more seamlessly with the footage.
Step 8: Save your settings as a preset If you want to save your Ultra Key settings as a preset, you can do so by clicking on the menu icon in the Ultra Key panel and selecting Save Preset. Give your preset a name and click OK. You can then apply the preset to other clips in your project.
In conclusion, the Ultra Key Effect in Adobe Premiere Pro is a powerful tool that allows you to remove the background from a video clip and replace it with a different background. By following these steps, you can create professional-quality green screen videos or replace the background in
Adobe Premiere Pro: How to Use Drop Shadow Effect?
The Drop Shadow Effect in Adobe Premiere Pro is a useful tool that can add depth and dimension to your video clips. With this effect, you can create the illusion of a shadow behind an object or text, giving it a more realistic and three-dimensional appearance.
Mastering Premiere Pro: Tips and Tricks for Beginners (Youtube Channel)
In this article, we will discuss how to use the Drop Shadow Effect in Adobe Premiere Pro.
Step 1: Import your footage The first step is to import the footage that you want to use in your video. Make sure that the footage is selected.
Step 2: Create a new adjustment layer To apply the Drop Shadow Effect, you will need to create a new adjustment layer. To do this, go to the Project panel and click on the New Item icon. From the drop-down menu, select Adjustment Layer. This will create a new adjustment layer in your project.
Step 3: Apply the Drop Shadow Effect To apply the Drop Shadow Effect, drag the adjustment layer onto the timeline above the clip that you want to add the effect to. Then, go to the Effects panel and search for Drop Shadow. Drag the effect onto the adjustment layer.
Step 4: Adjust the settings After applying the Drop Shadow Effect, you can adjust the settings to achieve the desired effect. The settings that you can adjust include Distance, Angle, Opacity, Softness, and Color.
Distance: This setting controls how far the shadow is cast from the object. Increase the distance to make the shadow appear further away from the object.
Angle: This setting controls the angle of the shadow. You can adjust the angle to make the shadow appear to come from a different direction.
Opacity: This setting controls the opacity of the shadow. Increase the opacity to make the shadow more visible.
Softness: This setting controls the softness of the shadow. Increase the softness to make the shadow appear more diffuse and less defined.
Color: This setting controls the color of the shadow. You can choose a different color for the shadow, depending on the look that you want to achieve.
Step 5: Fine-tune the settings After adjusting the settings, you may need to fine-tune them to achieve the desired effect. You can preview the effect in the Program Monitor to see how it looks.
Step 6: Save your settings as a preset If you want to save your Drop Shadow settings as a preset, you can do so by clicking on the menu icon in the Effects Controls panel and selecting Save Preset. Give your preset a name and click OK. You can then apply the preset to other clips in your project.
In conclusion, the Drop Shadow Effect in Adobe Premiere Pro is a powerful tool that can add depth and dimension to your video clips. By following these steps, you can create realistic shadows behind objects or text, giving your videos a more professional look.
The Art of the Pitch: WordPress Relationships and SalesLaura Byrne
Clients don’t know what they don’t know. What web solutions are right for them? How does WordPress come into the picture? How do you make sure you understand scope and timeline? What do you do if sometime changes?
All these questions and more will be explored as we talk about matching clients’ needs with what your agency offers without pulling teeth or pulling your hair out. Practical tips, and strategies for successful relationship building that leads to closing the deal.
Neuro-symbolic is not enough, we need neuro-*semantic*Frank van Harmelen
Neuro-symbolic (NeSy) AI is on the rise. However, simply machine learning on just any symbolic structure is not sufficient to really harvest the gains of NeSy. These will only be gained when the symbolic structures have an actual semantics. I give an operational definition of semantics as “predictable inference”.
All of this illustrated with link prediction over knowledge graphs, but the argument is general.
GraphRAG is All You need? LLM & Knowledge GraphGuy Korland
Guy Korland, CEO and Co-founder of FalkorDB, will review two articles on the integration of language models with knowledge graphs.
1. Unifying Large Language Models and Knowledge Graphs: A Roadmap.
https://arxiv.org/abs/2306.08302
2. Microsoft Research's GraphRAG paper and a review paper on various uses of knowledge graphs:
https://www.microsoft.com/en-us/research/blog/graphrag-unlocking-llm-discovery-on-narrative-private-data/
UiPath Test Automation using UiPath Test Suite series, part 3DianaGray10
Welcome to UiPath Test Automation using UiPath Test Suite series part 3. In this session, we will cover desktop automation along with UI automation.
Topics covered:
UI automation Introduction,
UI automation Sample
Desktop automation flow
Pradeep Chinnala, Senior Consultant Automation Developer @WonderBotz and UiPath MVP
Deepak Rai, Automation Practice Lead, Boundaryless Group and UiPath MVP
Software Delivery At the Speed of AI: Inflectra Invests In AI-Powered QualityInflectra
In this insightful webinar, Inflectra explores how artificial intelligence (AI) is transforming software development and testing. Discover how AI-powered tools are revolutionizing every stage of the software development lifecycle (SDLC), from design and prototyping to testing, deployment, and monitoring.
Learn about:
• The Future of Testing: How AI is shifting testing towards verification, analysis, and higher-level skills, while reducing repetitive tasks.
• Test Automation: How AI-powered test case generation, optimization, and self-healing tests are making testing more efficient and effective.
• Visual Testing: Explore the emerging capabilities of AI in visual testing and how it's set to revolutionize UI verification.
• Inflectra's AI Solutions: See demonstrations of Inflectra's cutting-edge AI tools like the ChatGPT plugin and Azure Open AI platform, designed to streamline your testing process.
Whether you're a developer, tester, or QA professional, this webinar will give you valuable insights into how AI is shaping the future of software delivery.
UiPath Test Automation using UiPath Test Suite series, part 4DianaGray10
Welcome to UiPath Test Automation using UiPath Test Suite series part 4. In this session, we will cover Test Manager overview along with SAP heatmap.
The UiPath Test Manager overview with SAP heatmap webinar offers a concise yet comprehensive exploration of the role of a Test Manager within SAP environments, coupled with the utilization of heatmaps for effective testing strategies.
Participants will gain insights into the responsibilities, challenges, and best practices associated with test management in SAP projects. Additionally, the webinar delves into the significance of heatmaps as a visual aid for identifying testing priorities, areas of risk, and resource allocation within SAP landscapes. Through this session, attendees can expect to enhance their understanding of test management principles while learning practical approaches to optimize testing processes in SAP environments using heatmap visualization techniques
What will you get from this session?
1. Insights into SAP testing best practices
2. Heatmap utilization for testing
3. Optimization of testing processes
4. Demo
Topics covered:
Execution from the test manager
Orchestrator execution result
Defect reporting
SAP heatmap example with demo
Speaker:
Deepak Rai, Automation Practice Lead, Boundaryless Group and UiPath MVP
Transcript: Selling digital books in 2024: Insights from industry leaders - T...BookNet Canada
The publishing industry has been selling digital audiobooks and ebooks for over a decade and has found its groove. What’s changed? What has stayed the same? Where do we go from here? Join a group of leading sales peers from across the industry for a conversation about the lessons learned since the popularization of digital books, best practices, digital book supply chain management, and more.
Link to video recording: https://bnctechforum.ca/sessions/selling-digital-books-in-2024-insights-from-industry-leaders/
Presented by BookNet Canada on May 28, 2024, with support from the Department of Canadian Heritage.
Generating a custom Ruby SDK for your web service or Rails API using Smithyg2nightmarescribd
Have you ever wanted a Ruby client API to communicate with your web service? Smithy is a protocol-agnostic language for defining services and SDKs. Smithy Ruby is an implementation of Smithy that generates a Ruby SDK using a Smithy model. In this talk, we will explore Smithy and Smithy Ruby to learn how to generate custom feature-rich SDKs that can communicate with any web service, such as a Rails JSON API.
State of ICS and IoT Cyber Threat Landscape Report 2024 previewPrayukth K V
The IoT and OT threat landscape report has been prepared by the Threat Research Team at Sectrio using data from Sectrio, cyber threat intelligence farming facilities spread across over 85 cities around the world. In addition, Sectrio also runs AI-based advanced threat and payload engagement facilities that serve as sinks to attract and engage sophisticated threat actors, and newer malware including new variants and latent threats that are at an earlier stage of development.
The latest edition of the OT/ICS and IoT security Threat Landscape Report 2024 also covers:
State of global ICS asset and network exposure
Sectoral targets and attacks as well as the cost of ransom
Global APT activity, AI usage, actor and tactic profiles, and implications
Rise in volumes of AI-powered cyberattacks
Major cyber events in 2024
Malware and malicious payload trends
Cyberattack types and targets
Vulnerability exploit attempts on CVEs
Attacks on counties – USA
Expansion of bot farms – how, where, and why
In-depth analysis of the cyber threat landscape across North America, South America, Europe, APAC, and the Middle East
Why are attacks on smart factories rising?
Cyber risk predictions
Axis of attacks – Europe
Systemic attacks in the Middle East
Download the full report from here:
https://sectrio.com/resources/ot-threat-landscape-reports/sectrio-releases-ot-ics-and-iot-security-threat-landscape-report-2024/
Slack (or Teams) Automation for Bonterra Impact Management (fka Social Soluti...Jeffrey Haguewood
Sidekick Solutions uses Bonterra Impact Management (fka Social Solutions Apricot) and automation solutions to integrate data for business workflows.
We believe integration and automation are essential to user experience and the promise of efficient work through technology. Automation is the critical ingredient to realizing that full vision. We develop integration products and services for Bonterra Case Management software to support the deployment of automations for a variety of use cases.
This video focuses on the notifications, alerts, and approval requests using Slack for Bonterra Impact Management. The solutions covered in this webinar can also be deployed for Microsoft Teams.
Interested in deploying notification automations for Bonterra Impact Management? Contact us at sales@sidekicksolutionsllc.com to discuss next steps.
Slack (or Teams) Automation for Bonterra Impact Management (fka Social Soluti...
Tutorial 3 adobe premier pro
1. SEGI University College – Kota Damansara 1
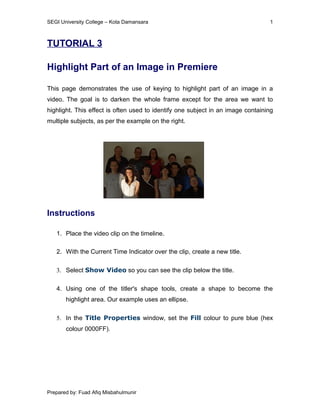
TUTORIAL 3
Highlight Part of an Image in Premiere
This page demonstrates the use of keying to highlight part of an image in a
video. The goal is to darken the whole frame except for the area we want to
highlight. This effect is often used to identify one subject in an image containing
multiple subjects, as per the example on the right.
Instructions
1. Place the video clip on the timeline.
2. With the Current Time Indicator over the clip, create a new title.
3. Select Show Video so you can see the clip below the title.
4. Using one of the titler's shape tools, create a shape to become the
highlight area. Our example uses an ellipse.
5. In the Title Properties window, set the Fill colour to pure blue (hex
colour 0000FF).
Prepared by: Fuad Afiq Misbahulmunir
2. SEGI University College – Kota Damansara 2
6. When you are happy with the size and position of the shape, create a new
black rectangle shape that covers the entire frame. This will become the
darkened area.
7. Right-click the shape and select Arrange > Send to Back. This
places the rectangle behind the highlight shape.
Prepared by: Fuad Afiq Misbahulmunir
3. SEGI University College – Kota Damansara 3
8. Place the title in the timeline on a track above the video clip. Adjust the
opacity of the title until the dark area has the right amount of transparency
(about 50% should be okay — you can tweak it later).
9. Apply the Color Key effect to the title (Effects > Video Effects >
Keying).
10. Select pure blue (0000FF) as the key colour.
11. Adjust the Color Tolerance, Edge Thin and Edge Feather until
the highlight looks right. The example settings shown here should work in
most situations.
12. If necessary, fine-tune the shape and opacity of the highlight.
Prepared by: Fuad Afiq Misbahulmunir
4. SEGI University College – Kota Damansara 4
Ghost Effect
Creating a ghost effect for video is quite simple, as long as you have an editing
package capable of using layers and setting layer opacity.
First of all, set the camera up on a tripod and frame the shot. Shoot the scene
empty (without the ghost), then shoot the scene again with the ghost actor. It's
very important that both versions (takes) of the shot are framed identically, so
don't move the camera at all. The background also needs to be still.
Import both takes of the shot into your Adobe Premiere. Place the empty shot on
the first video track and the ghost shot on the next track.
Set the opacity of the ghost shot to around 30%, or whatever setting achieves the
best result.
Prepared by: Fuad Afiq Misbahulmunir
5. SEGI University College – Kota Damansara 5
Note: You might like to add a spooky sound effect for added impact.
Prepared by: Fuad Afiq Misbahulmunir
6. SEGI University College – Kota Damansara 6
How to Blur Part of an Image
This page shows you how to blur or pixelate part of a video image. This
technique is commonly used to blur a face in order to protect the subject's
identity.
This technique uses two video tracks, and can be used with any editing
application which supports multiple tracks/layers.
To begin, place the video clip on the timeline. Make an exact copy of the clip and
place it on a video track directly above the original clip like so:
From the effects palette, add a blur or pixelate effect to the top track. Set the
amount of blur as desired. The example above uses a gaussian blur (Video
Effects > Blur & Sharpen > Gaussian Blur) set to 27.
At this stage the entire image on the top track is blurred (or pixelated). To blur
only the face, add a crop filter (Video Effects > Transform > Crop) to the
Prepared by: Fuad Afiq Misbahulmunir
7. SEGI University College – Kota Damansara 7
top track. Adjust the crop parameters (left, top, right, bottom) until only the
blurred face remains.
The screenshot on the right shows the effects we have added: Gaussian Blur
and Crop.
Note: If the face (or whatever you are blurring) moves around a lot, there are
two options:
1. Make the blurred area big enough to accommodate the movement.
2. Use keyframes to animate the crop effect.
Prepared by: Fuad Afiq Misbahulmunir