The document discusses various features of the Visual Basic Editor in Microsoft Office, including:
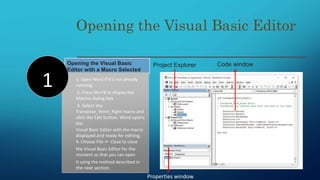
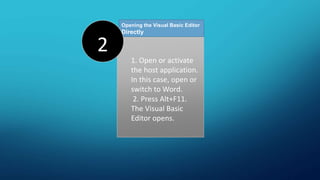
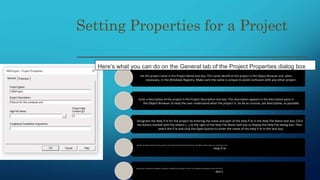
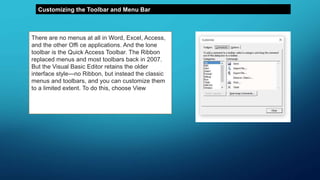
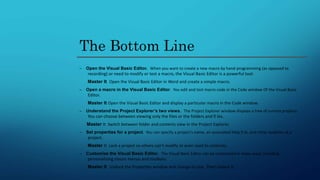
1. It describes how to open the Visual Basic Editor from within Word or other Office applications using keyboard shortcuts or menu options.
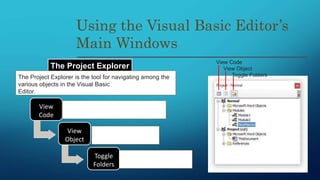
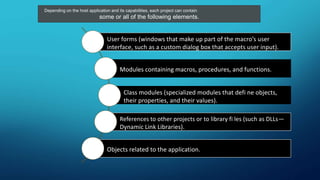
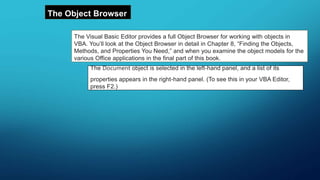
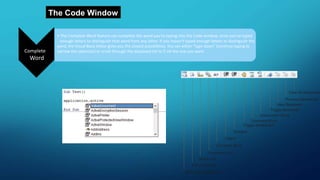
2. It outlines the main windows of the Visual Basic Editor, including the Project Explorer, Code window, and Object Browser.
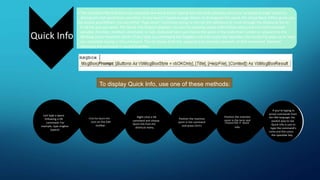
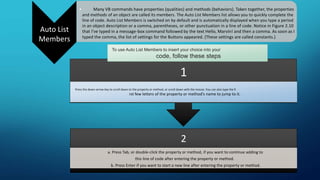
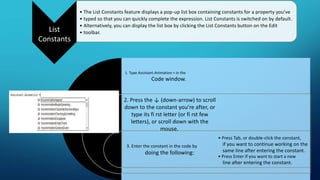
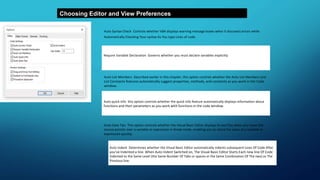
3. It provides details on features like Auto List Members, Quick Info, and List Constants that help provide information about code as you work.
Getting started with the visual basic editorputiadetiara
berikut adalah penjelasan tentang bagaimana memulai visual basic application.
oleh :
Ade Tiara Putri
Program Studi S1 Sistem Informasi
Fakultas Sains dan Teknologi
Universitas Islam Negeri Sultan Syarif Kasim Riau
please visit
http://sif.uin-suska.ac.id/
http://fst.uin-suska.ac.id/
http://www.uin-suska.ac.id/
Word Processor with a multiple question answer presentation
If you liked it don't forget to follow me-
SlideShare-www.slideshare.net/gauravyadav65
Instagram-yadavgaurav251
Facebook-www.facebook.com/yadavgaurav251
This really motivates me too help you guys more :D
This presentation will give you a brief introduction to Excel Macros. Also it covers step by step instructions on how to record a Macro in Excel 2007 & execute the same.
The French Revolution, which began in 1789, was a period of radical social and political upheaval in France. It marked the decline of absolute monarchies, the rise of secular and democratic republics, and the eventual rise of Napoleon Bonaparte. This revolutionary period is crucial in understanding the transition from feudalism to modernity in Europe.
For more information, visit-www.vavaclasses.com
Read| The latest issue of The Challenger is here! We are thrilled to announce that our school paper has qualified for the NATIONAL SCHOOLS PRESS CONFERENCE (NSPC) 2024. Thank you for your unwavering support and trust. Dive into the stories that made us stand out!
Instructions for Submissions thorugh G- Classroom.pptxJheel Barad
This presentation provides a briefing on how to upload submissions and documents in Google Classroom. It was prepared as part of an orientation for new Sainik School in-service teacher trainees. As a training officer, my goal is to ensure that you are comfortable and proficient with this essential tool for managing assignments and fostering student engagement.
2024.06.01 Introducing a competency framework for languag learning materials ...Sandy Millin
http://sandymillin.wordpress.com/iateflwebinar2024
Published classroom materials form the basis of syllabuses, drive teacher professional development, and have a potentially huge influence on learners, teachers and education systems. All teachers also create their own materials, whether a few sentences on a blackboard, a highly-structured fully-realised online course, or anything in between. Despite this, the knowledge and skills needed to create effective language learning materials are rarely part of teacher training, and are mostly learnt by trial and error.
Knowledge and skills frameworks, generally called competency frameworks, for ELT teachers, trainers and managers have existed for a few years now. However, until I created one for my MA dissertation, there wasn’t one drawing together what we need to know and do to be able to effectively produce language learning materials.
This webinar will introduce you to my framework, highlighting the key competencies I identified from my research. It will also show how anybody involved in language teaching (any language, not just English!), teacher training, managing schools or developing language learning materials can benefit from using the framework.
The Indian economy is classified into different sectors to simplify the analysis and understanding of economic activities. For Class 10, it's essential to grasp the sectors of the Indian economy, understand their characteristics, and recognize their importance. This guide will provide detailed notes on the Sectors of the Indian Economy Class 10, using specific long-tail keywords to enhance comprehension.
For more information, visit-www.vavaclasses.com
Model Attribute Check Company Auto PropertyCeline George
In Odoo, the multi-company feature allows you to manage multiple companies within a single Odoo database instance. Each company can have its own configurations while still sharing common resources such as products, customers, and suppliers.
How to Create Map Views in the Odoo 17 ERPCeline George
The map views are useful for providing a geographical representation of data. They allow users to visualize and analyze the data in a more intuitive manner.
The Roman Empire A Historical Colossus.pdfkaushalkr1407
The Roman Empire, a vast and enduring power, stands as one of history's most remarkable civilizations, leaving an indelible imprint on the world. It emerged from the Roman Republic, transitioning into an imperial powerhouse under the leadership of Augustus Caesar in 27 BCE. This transformation marked the beginning of an era defined by unprecedented territorial expansion, architectural marvels, and profound cultural influence.
The empire's roots lie in the city of Rome, founded, according to legend, by Romulus in 753 BCE. Over centuries, Rome evolved from a small settlement to a formidable republic, characterized by a complex political system with elected officials and checks on power. However, internal strife, class conflicts, and military ambitions paved the way for the end of the Republic. Julius Caesar’s dictatorship and subsequent assassination in 44 BCE created a power vacuum, leading to a civil war. Octavian, later Augustus, emerged victorious, heralding the Roman Empire’s birth.
Under Augustus, the empire experienced the Pax Romana, a 200-year period of relative peace and stability. Augustus reformed the military, established efficient administrative systems, and initiated grand construction projects. The empire's borders expanded, encompassing territories from Britain to Egypt and from Spain to the Euphrates. Roman legions, renowned for their discipline and engineering prowess, secured and maintained these vast territories, building roads, fortifications, and cities that facilitated control and integration.
The Roman Empire’s society was hierarchical, with a rigid class system. At the top were the patricians, wealthy elites who held significant political power. Below them were the plebeians, free citizens with limited political influence, and the vast numbers of slaves who formed the backbone of the economy. The family unit was central, governed by the paterfamilias, the male head who held absolute authority.
Culturally, the Romans were eclectic, absorbing and adapting elements from the civilizations they encountered, particularly the Greeks. Roman art, literature, and philosophy reflected this synthesis, creating a rich cultural tapestry. Latin, the Roman language, became the lingua franca of the Western world, influencing numerous modern languages.
Roman architecture and engineering achievements were monumental. They perfected the arch, vault, and dome, constructing enduring structures like the Colosseum, Pantheon, and aqueducts. These engineering marvels not only showcased Roman ingenuity but also served practical purposes, from public entertainment to water supply.
We all have good and bad thoughts from time to time and situation to situation. We are bombarded daily with spiraling thoughts(both negative and positive) creating all-consuming feel , making us difficult to manage with associated suffering. Good thoughts are like our Mob Signal (Positive thought) amidst noise(negative thought) in the atmosphere. Negative thoughts like noise outweigh positive thoughts. These thoughts often create unwanted confusion, trouble, stress and frustration in our mind as well as chaos in our physical world. Negative thoughts are also known as “distorted thinking”.
Welcome to TechSoup New Member Orientation and Q&A (May 2024).pdfTechSoup
In this webinar you will learn how your organization can access TechSoup's wide variety of product discount and donation programs. From hardware to software, we'll give you a tour of the tools available to help your nonprofit with productivity, collaboration, financial management, donor tracking, security, and more.
This is a presentation by Dada Robert in a Your Skill Boost masterclass organised by the Excellence Foundation for South Sudan (EFSS) on Saturday, the 25th and Sunday, the 26th of May 2024.
He discussed the concept of quality improvement, emphasizing its applicability to various aspects of life, including personal, project, and program improvements. He defined quality as doing the right thing at the right time in the right way to achieve the best possible results and discussed the concept of the "gap" between what we know and what we do, and how this gap represents the areas we need to improve. He explained the scientific approach to quality improvement, which involves systematic performance analysis, testing and learning, and implementing change ideas. He also highlighted the importance of client focus and a team approach to quality improvement.
1. Astrid Yolanda
Program Studi S1 Sistem
Informasi
Fakultas Sains dan Teknologi
Universitas Islam Negeri Sultan Syarif Kasim Riau
2. Opening the Visual Basic
Editor with a Macro Selected
Opening the Visual Basic Editor
1. Open Word if it’s not already
running.
2. Press Alt+F8 to display the
Macros dialog box.
3. Select the
Transpose_Word_Right macro and
click the Edit button. Word opens
the
Visual Basic Editor with the macro
displayed and ready for editing,
4. Choose File ➢ Close to close
the Visual Basic Editor for the
moment so that you can open
it using the method described in
the next section.
1
Code window
Properties window
Project Explorer
3. Opening the Visual Basic Editor
Directly
1. Open or activate
the host application.
In this case, open or
switch to Word.
2. Press Alt+F11.
The Visual Basic
Editor opens.
2
4. Using the Visual Basic Editor’s
Main Windows
The Project Explorer
View Code
View Object
Toggle FoldersThe Project Explorer is the tool for navigating among the
various objects in the Visual Basic
Editor.
View
Code
• Displays the Code window for the selected
objec
View
Object
• Displays a window containing
the selected object. T
Toggle
Folders
• Toggles the view of the objects in the
Project Explorer between folder view
and contents view
5. Depending on the host application and its capabilities, each project can contain
some or all of the following elements.
User forms (windows that make up part of the macro’s user
interface, such as a custom dialog box that accepts user input).
Modules containing macros, procedures, and functions.
Class modules (specialized modules that defi ne objects,
their properties, and their values).
References to other projects or to library fi les (such as DLLs—
Dynamic Link Libraries).
Objects related to the application.
6. The Object Browser
The Visual Basic Editor provides a full Object Browser for working with objects in
VBA. You’ll look at the Object Browser in detail in Chapter 8, “Finding the Objects,
Methods, and Properties You Need,” and when you examine the object models for the
various Office applications in the final part of this book.
The Document object is selected in the left-hand panel, and a list of its
properties appears in the right-hand panel. (To see this in your VBA Editor,
press F2.)
7. The Code Window
Complete
Word
• The Complete Word feature can complete the word you’re typing into the Code window, once you’ve typed
enough letters to distinguish that word from any other. If you haven’t typed enough letters to distinguish the
word, the Visual Basic Editor gives you the closest possibilities. You can either “type down” (continue typing to
narrow the selection) or scroll through the displayed list to fi nd the one you want.
Clear All Bookmarks
Previous Bookmark
Next Bookmark
Toggle Bookmark
Uncomment Block
Comment Block
Toggle Breakpoint
Outdent
Indent
Complete Word
Parameter Info
Quick Info
List Constants
List Properties/Methods
8. Quick Info
• The Complete Word feature can complete the word you’re typing into the Code window, once you’ve typed enough letters to
distinguish that word from any other. If you haven’t typed enough letters to distinguish the word, the Visual Basic Editor gives you
the closest possibilities. You can either “type down” (continue typing to narrow the selection) or scroll through the displayed list to
fi nd the one you want. The Quick Info feature displays a ScreenTip showing syntax information about the currently selected
variable, function, method, command, or sub. (Selected here just means the word in the code that’s under or adjacent to the
blinking cursor insertion point.) If you type in a command like MsgBox and then press the spacebar, the ScreenTip pops up to help
you complete typing in the command. The tip shows both the required and optional elements of that command. Optional
elements are enclosed in square brackets.
If you’re typing in
actual commands from
the VBA language, the
easiest way to see
Quick Info is just to
type the command’s
name and then press
the spacebar key
Position the insertion
point in the term and
choose Edit ➢ Quick
Info.
Position the insertion
point in the command
and press Ctrl+I.
Right-click a VB
command and choose
Quick Info from the
shortcut menu.
Click the Quick Info
icon on the Edit
toolbar.
Just type a space
following a VB
command. For
example, type msgbox
(space).
To display Quick Info, use one of these methods:
9. Auto List
Members
• Many VB commands have properties (qualities) and methods (behaviors). Taken together, the properties
and methods of an object are called its members. The Auto List Members list allows you to quickly complete the
line of code. Auto List Members is switched on by default and is automatically displayed when you type a period
in an object description or a comma, parentheses, or other punctuation in a line of code. Notice in Figure 2.10
that I’ve typed in a message-box command followed by the text Hello, Marvin! and then a comma. As soon as I
typed the comma, the list of settings for the Buttons appeared. (These settings are called constants.)
2
a. Press Tab, or double-click the property or method, if you want to continue adding to
this line of code after entering the property or method.
b. Press Enter if you want to start a new line after entering the property or method.
1
Press the down-arrow key to scroll down to the property or method, or scroll down with the mouse. You can also type the fi
rst few letters of the property or method’s name to jump to it.
To use Auto List Members to insert your choice into your
code, follow these steps
10. List
Constants
• The List Constants feature displays a pop-up list box containing constants for a property you’ve
• typed so that you can quickly complete the expression. List Constants is switched on by default.
• Alternatively, you can display the list box by clicking the List Constants button on the Edit
• toolbar.
1. Type Assistant.Animation = in the
Code window.
2. Press the ↓ (down-arrow) to scroll
down to the constant you’re after, or
type its fi rst letter (or fi rst few
letters), or scroll down with the
mouse.
3. Enter the constant in the code by
doing the following:
• Press Tab, or double-click the constant,
if you want to continue working on the
same line after entering the constant.
• Press Enter if you want to start a new
line after entering the constant.
11. Setting Properties for a Project
Set the project name in the Project Name text box. This name identifi es the project in the Object Browser and, when
necessary, in the Windows Registry. Make sure the name is unique to avoid confusion with any other project.
Enter a description of the project in the Project Description text box. This description appears in the Description pane in
the Object Browser to help the user understand what the project is. So be as concise, yet descriptive, as possible.
Designate the Help fi le for the project by entering the name and path of the Help fi le in the Help File Name text box. Click
the button marked with the ellipsis (…) to the right of the Help File Name text box to display the Help File dialog box. Then
select the fi le and click the Open button to enter the name of the Help fi le in the text box.
Specify the Help context for the project in the Project Help Context ID text box. The Help context refers to a location in th e
Help fi le
Specify any conditional compilation arguments needed for the project. Some fi nd conditional compilation useful, but most
don’t.
Here’s what you can do on the General tab of the Project Properties dialog box
12. Customizing the Visual Basic
Editor
Choose Editor and
View preference
settings in the
Visual Basic Editor
to control how it
interacts with you.
Choose which
windows to display
in the Visual Basic
Editor, and
organize their
layout so you can
use your
workspace as
effectively as
possible.
Customize the
toolbar and menus
in the Visual Basic
Editor so the
commands you
need are at hand
(without cluttering
up your
workspace).
Customize the
Toolbox so it
contains the tools
you need to build
your user forms.
Given how much time you’re likely to spend in the Visual Basic Editor, you ought to customize it
so you can work as efficiently and comfortably as possible. You can customize it as follows:
13. Choosing Editor and View Preferences
Auto Syntax Check Controls whether VBA displays warning message boxes when it discovers errors while
Automatically Checking Your syntax As You type Lines of code.
Require Variable Declaration Governs whether you must declare variables explicitly
Auto List Members Described earlier in this chapter, this option controls whether the Auto List Members and
List Constants features automatically suggest properties, methods, and constants as you work in the Code
window.
Auto quick info this option controls whether the quick info feature automatically displays information about
functions and their parameters as you work with functions in the code window.
Auto Data Tips This option controls whether the Visual Basic Editor displays ScreenTips when you hover the
mouse pointer over a variable or expression in Break mode, enabling you to check the value of a variable or
expression quickly.
Auto Indent Determines whether the Visual Basic Editor automatically indents subsequent Lines Of Code After
you’ve Indented a line. When Auto Indent Switched on, The Visual Basic Editor Starts Each new line Of Code
Indented to the Same Level (the Same Number Of Tabs or spaces or the Same Combination Of The two) as The
Previous line.
14. Tab Width Sets the number of spaces in a tab.
Drag-And-Drop Text Editing Controls whether the Visual Basic Editor supports dragand-drop.
Default To Full Module View Controls whether the Visual Basic Editor displays all the procedures
in a module in one list (Full Module view) or displays them one at a time (Procedure view).
Procedure Separator Controls whether the Visual Basic Editor displays horizontal lines to separate
the procedures within a module shown in Full Module view in the Code window.
15. Editor Format Page Options
Normal Text Takes care of much of the text in a typical procedure. You’ll
probably want to make this a conventional color (such as black, the
default).
Selection Text Affects the color of selected (highlighted) text.
Syntax Error Text Affects the color VBA uses for offending lines. The
default color is red.
Execution Point Text Affects the color VBA uses for the line currently
being executed in Break mode.
Breakpoint Text Affects the color in which VBA displays breakpoints
(points where code execution is forced to stop).
Comment Text Affects the color of comment lines. The default color is
dark green.
Keyword Text Affects the color of keywords (words recognized as part of
the VBA language).
Identifi er Text Affects the color VBA uses for identifiers. Identifiers
include the names of variables, constants, and procedures you define.
Bookmark Text Affects the color VBA uses for the bookmarks in your
code.
Call Return Text Affects the color VBA uses for calls to other procedures.
By default, the Visual Basic Editor uses lime green for call return text.
16. General Page Options
Form Grid
Settings
Group Box
Edit and
Continue
Group Box
Error
Trapping
Group Box
• Break On All Errors
• Break In Class
Module
• Break On
Unhandled Errors
Compile
Group Box
Show
ToolTips and
Collapse Proj.
Hides
Windows
17. Docking Page Options
The Docking page of the Options dialog box, controls
whether the various windows in the Visual Basic Editor
are dockable—that is, whether they snap automatically
and magnetically to a side of the window when you
move them there. Keeping windows dockable usually
makes for a more organized interface. However, you
may want to make the windows undockable so you can
drag them outside the Visual Basic Editor if necessary
and arrange them as you like on the screen.
Contemporary monitors are becoming quite large, so
you might have plenty of room to display various
windows outside the primary Editor window.
18. Choosing and Laying Out the Editor Windows
Always make the Code window large—maximize it within
the Editor. If you write long lines of code, you’ll want to
have as much space in the Visual Basic Editor window as
possible. That way your lines won’t wrap and the code will
be easier to read.
Some people fi nd that much of the time they’re actively
writing code, they can dispense with the Project Explorer,
displaying it only when needed. As a handy way of restoring
it, you can put the Project Explorer display command on the
Code window, Code window break, Watch window,
Immediate window, and Locals window context menus.
(You’ll learn how to customize the Editor’s menus in the
next section.) You can also quickly display the Project
Explorer by pressing its shortcut key, Ctrl+R.
19. Customizing the Toolbar and Menu Bar
There are no menus at all in Word, Excel, Access,
and the other Offi ce applications. And the lone
toolbar is the Quick Access Toolbar. The Ribbon
replaced menus and most toolbars back in 2007.
But the Visual Basic Editor retains the older
interface style—no Ribbon, but instead the classic
menus and toolbars, and you can customize them
to a limited extent. To do this, choose View ➢
Toolbars ➢ Customize (or right-click a toolbar or
the menu bar and choose Customize from the
context menu).
20. Customizing the Toolbox
Adding Controls to the Toolbox
• Right-click in the Toolbox page (not the tab
itself) where you want to add controls. (You’ll
learn how to add new pages to the Toolbox in
the section “Adding Pages to the Toolbox” a
little later in this chapter.)
• Choose Additional Controls from the context
menu to display the Additional Controls
dialog box.
• In the Available Controls list box, click the
check boxes for the controls you want to add
to the Toolbox, and then click the OK button.
21. The Bottom Line
– Open the Visual Basic Editor. When you want to create a new macro by hand-programming (as opposed to
recording) or need to modify or test a macro, the Visual Basic Editor is a powerful tool.
Master It Open the Visual Basic Editor in Word and create a simple macro.
– Open a macro in the Visual Basic Editor. You edit and test macro code in the Code window Of the Visual Basic
Editor.
Master It Open the Visual Basic Editor and display a particular macro in the Code window.
– Understand the Project Explorer’s two views. The Project Explorer window displays a tree of current projects.
You can choose between viewing only the files or the folders and fi les.
Master It Switch between folder and contents view in the Project Explorer.
– Set properties for a project. You can specify a project’s name, an associated Help fi le, and other qualities of a
project.
Master It Lock a project so others can’t modify or even read its contents.
– Customize the Visual Basic Editor. The Visual Basic Editor can be customized in many ways, including
personalizing classic menus and toolbars.
Master It Undock the Properties window and change its size. Then redock it.