INTRODUCTION TO TRACHEOSTOMIES
•What is a Tracheostomy? An opening made through the
neck into the trachea to help a person breathe.This opening is
called a stoma, and a tube is placed in it to keep the hole open.
• Why is it needed? Indications include facilitating weaning from
ventilation, providing long-term ventilation, securing an airway, or
removing bronchial secretions.
• Normal vs. Trach Breathing: In normal breathing, air is
warmed, cleansed, and moistened by the nose and mouth.With a
tracheostomy tube, air goes directly into the windpipe, bypassing
these functions.
3.
TRACHEOSTOMY TUBE TYPESAND
PARTS
Cuffed vs. CufflessTubes:
• Cuffed: Have a balloon that inflates to create a seal against the
tracheal wall, preventing air from passing around the tube. Used
for patients who require ventilators or have severe swallowing
issues.
• Cuffless: Do not have a cuff and are used for patients who
don't need a ventilator and can manage their own secretions.
5.
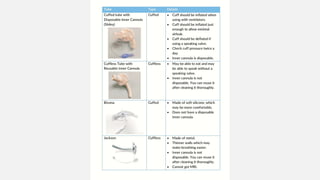
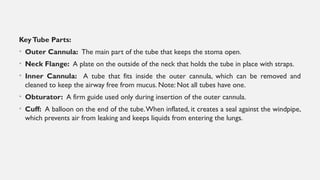
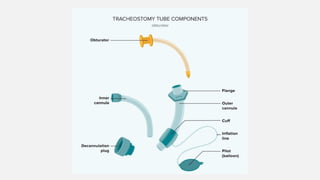
KeyTube Parts:
• OuterCannula: The main part of the tube that keeps the stoma open.
• Neck Flange: A plate on the outside of the neck that holds the tube in place with straps.
• Inner Cannula: A tube that fits inside the outer cannula, which can be removed and
cleaned to keep the airway free from mucus. Note: Not all tubes have one.
• Obturator: A firm guide used only during insertion of the outer cannula.
• Cuff: A balloon on the end of the tube.When inflated, it creates a seal against the windpipe,
which prevents air from leaking and keeps liquids from entering the lungs.
7.
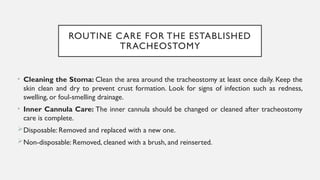
ROUTINE CARE FORTHE ESTABLISHED
TRACHEOSTOMY
• Cleaning the Stoma: Clean the area around the tracheostomy at least once daily. Keep the
skin clean and dry to prevent crust formation. Look for signs of infection such as redness,
swelling, or foul-smelling drainage.
• Inner Cannula Care: The inner cannula should be changed or cleaned after tracheostomy
care is complete.
Disposable: Removed and replaced with a new one.
Non-disposable: Removed, cleaned with a brush, and reinserted.
8.
• Tracheostomy Ties:Change the ties, ensuring a two-finger gap between the tie and the
neck for a proper fit. It's crucial to hold the tracheostomy tube in place with one hand
while changing ties to prevent it from coming out.
• Humidification: Since air bypasses the nose, additional humidity is needed to prevent
thick and crusty secretions. This can be achieved with a personal humidifier or a room
humidifier.
• Suctioning: Suctioning is necessary when the patient cannot clear secretions, has
difficulty breathing, or is coughing excessively.
Insert the suction catheter into the trach without suction.
Apply suction as you slowly withdraw the catheter to remove secretions.
9.
TRACHEOSTOMY CARE CHECKLIST
(INCLUDINGSUCTIONING)
I. Preparation:
1. Wash hands thoroughly with soap and water or use an alcohol-based hand sanitizer.
2. Collect all necessary items: suction machine, suction catheters (various sizes), sterile gloves, sterile saline
solution, sterile container, lubricant (if needed), oxygen source (if required), clean trach dressing, trach ties,
and a towel.
3. Turn on the suction machine and adjust the pressure to the appropriate level for the patient (typically
between 80-120 mmHg for adults).
4. If using sterile suctioning, open the sterile catheter package and pour sterile saline into a sterile container,
maintaining sterility.
5. Position the patient comfortably, ensuring their head and neck are supported. If they are on a ventilator,
maintain the head of the bed at 30-45 degrees to prevent ventilator-associated pneumonia.
10.
• II. Suctioning:
1.Pre-oxygenation (if applicable): If the patient can tolerate it, pre-oxygenate with 100% oxygen using a
manual resuscitation bag (Ambu bag) or encourage them to take several deep breaths.
2. Put on sterile gloves (if using sterile technique) or clean gloves (if not using sterile technique).
3. Dip the tip of the suction catheter into sterile saline to lubricate it.
4. Gently insert the suction catheter into the tracheostomy tube, without applying suction, to the pre-
measured depth (generally, slightly past the length of the tube).
5. Cover the thumb port on the catheter to initiate suctioning and gently rotate the catheter as you slowly
withdraw it.
6. Each suctioning pass should be short, typically 5-10 seconds, to minimize discomfort and oxygen
deprivation.
7. After each suction pass, rinse the catheter with sterile saline to clear secretions.
8. Repeat the suctioning process until the patient's airway is clear and respirations sound clear.
9. Post-oxygenation: Allow the patient to rest and recover their breathing after suctioning. Provide oxygen
if needed.
11.
• III.Tracheostomy Care:
1.If the tracheostomy tube has an inner cannula, carefully remove, clean, and reinsert it according to facility
protocol.
2. Change the trach ties as needed, using a two-person technique to prevent dislodgement (one person
holds the tube while the other changes the ties).
3. Apply a clean tracheostomy dressing around the stoma to absorb any drainage.
4. Provide oral care to prevent infection and promote comfort.
5. Document the procedure, including the amount and type of secretions, the patient's response, and any
complications encountered.
6. Continuously monitor the patient's respiratory status, including oxygen saturation, heart rate, and
respiratory rate.
7. Discard used supplies and clean reusable equipment according to facility policy.
8. Perform hand hygiene after completing the procedure.
12.
Important Considerations:
Sterile Technique:When indicated, maintaining a sterile field and using sterile gloves is crucial
to prevent infection.
Patient Comfort: Minimize discomfort during suctioning and allow for rest periods.
Individualized Care: Tailor the suctioning technique and frequency to the specific needs of the
patient.