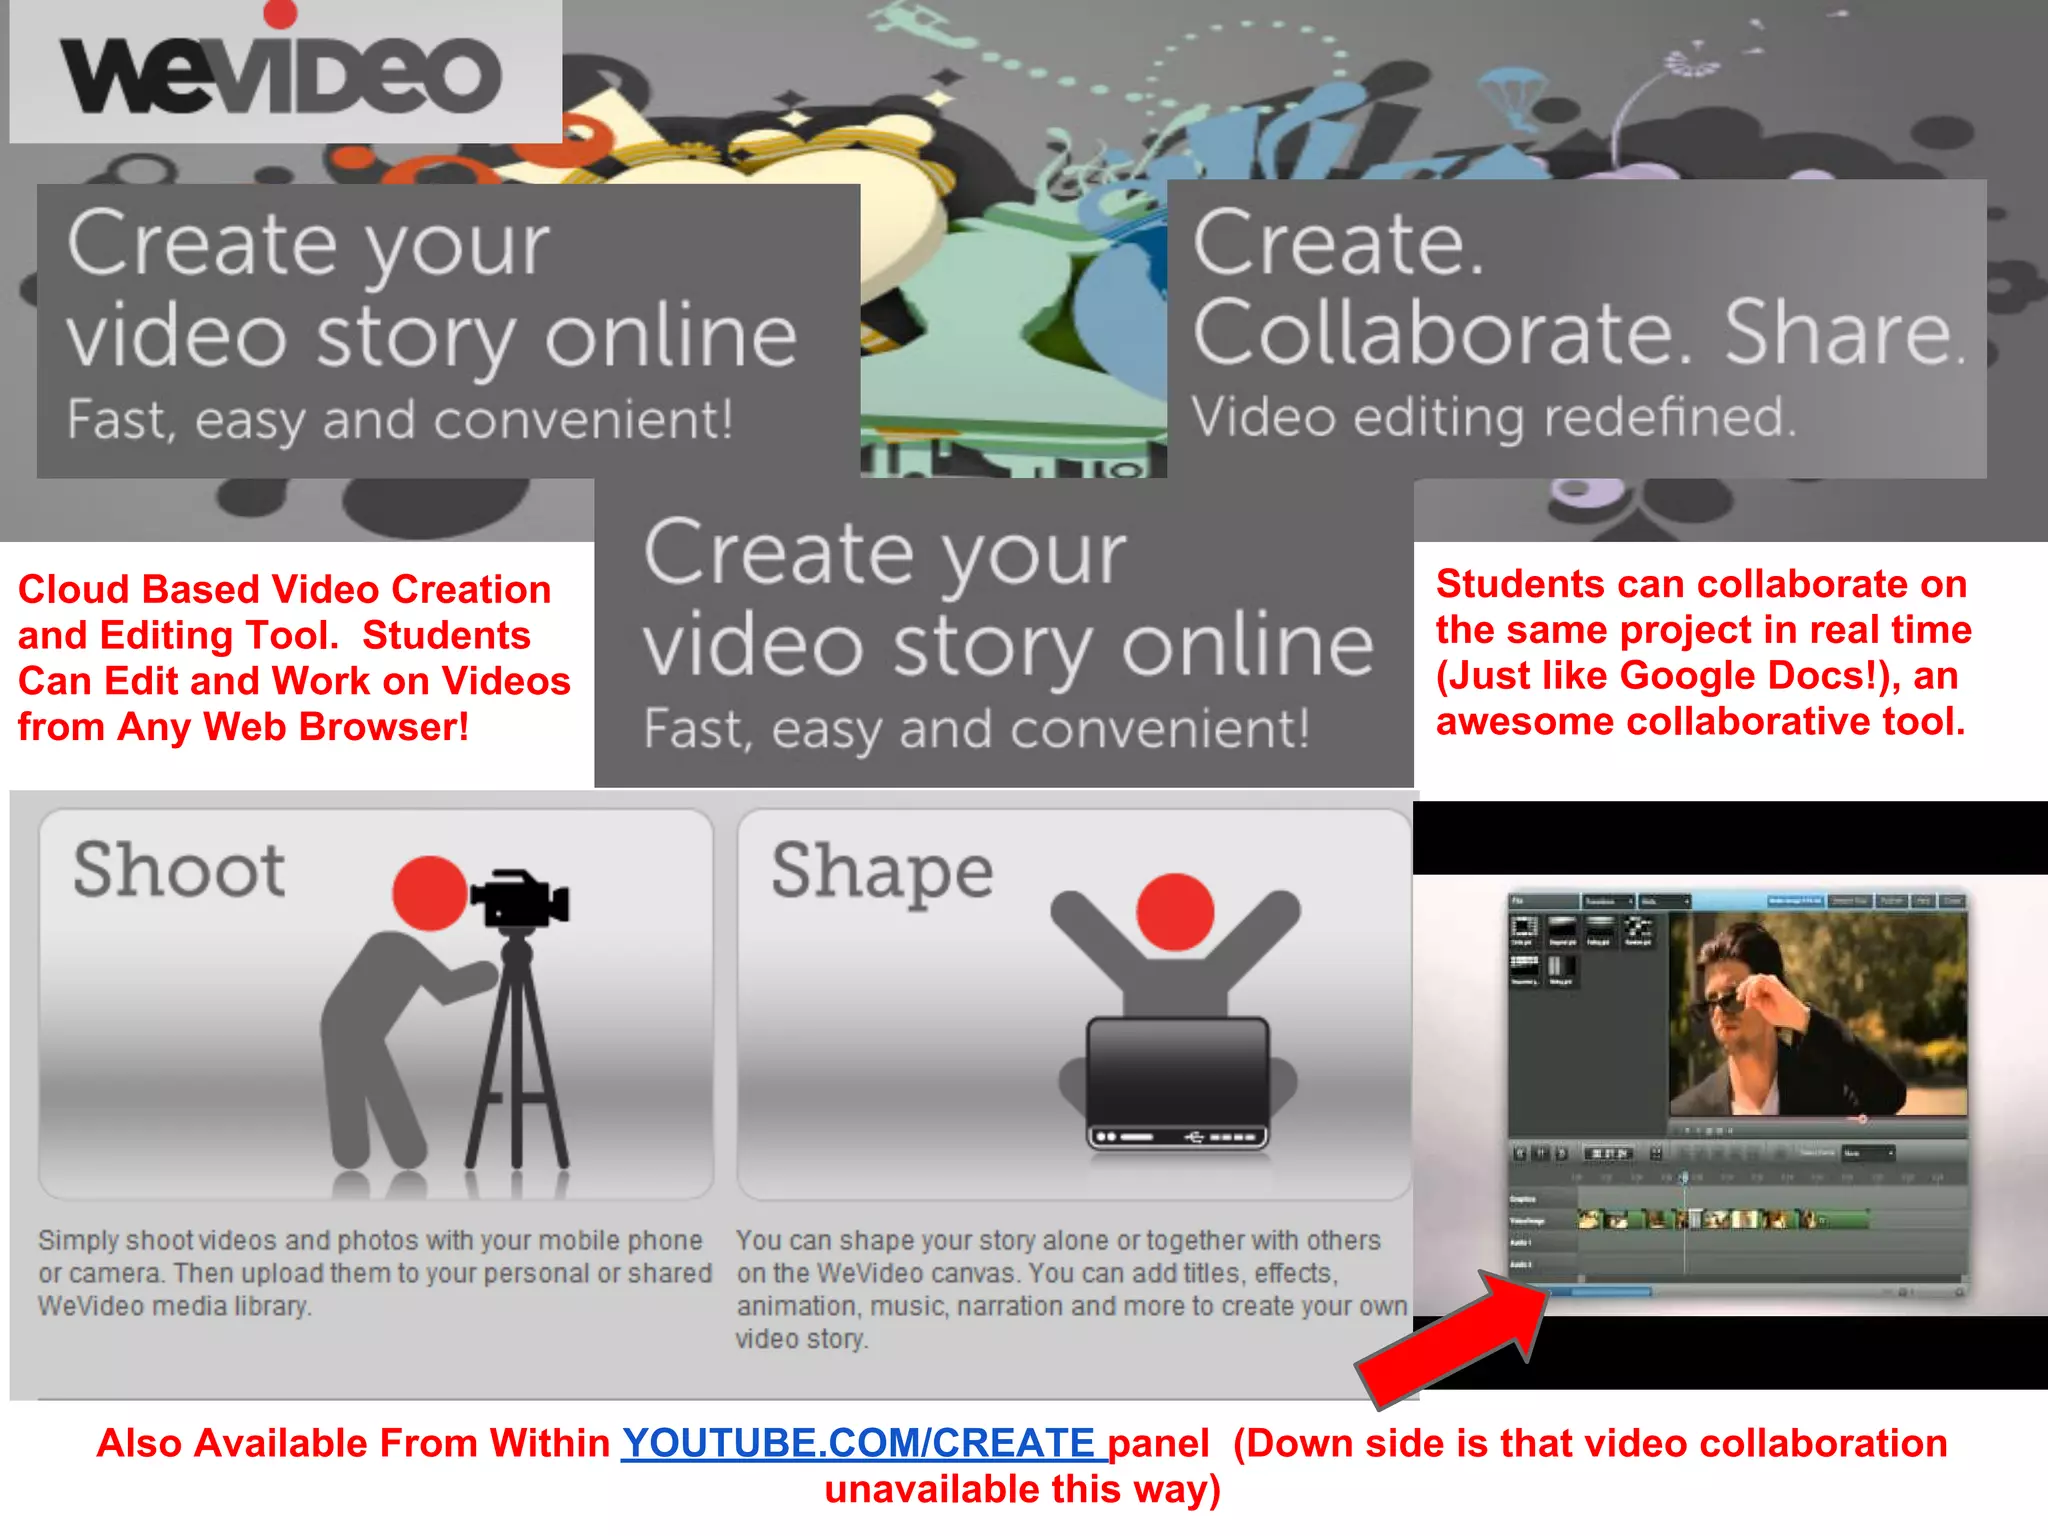
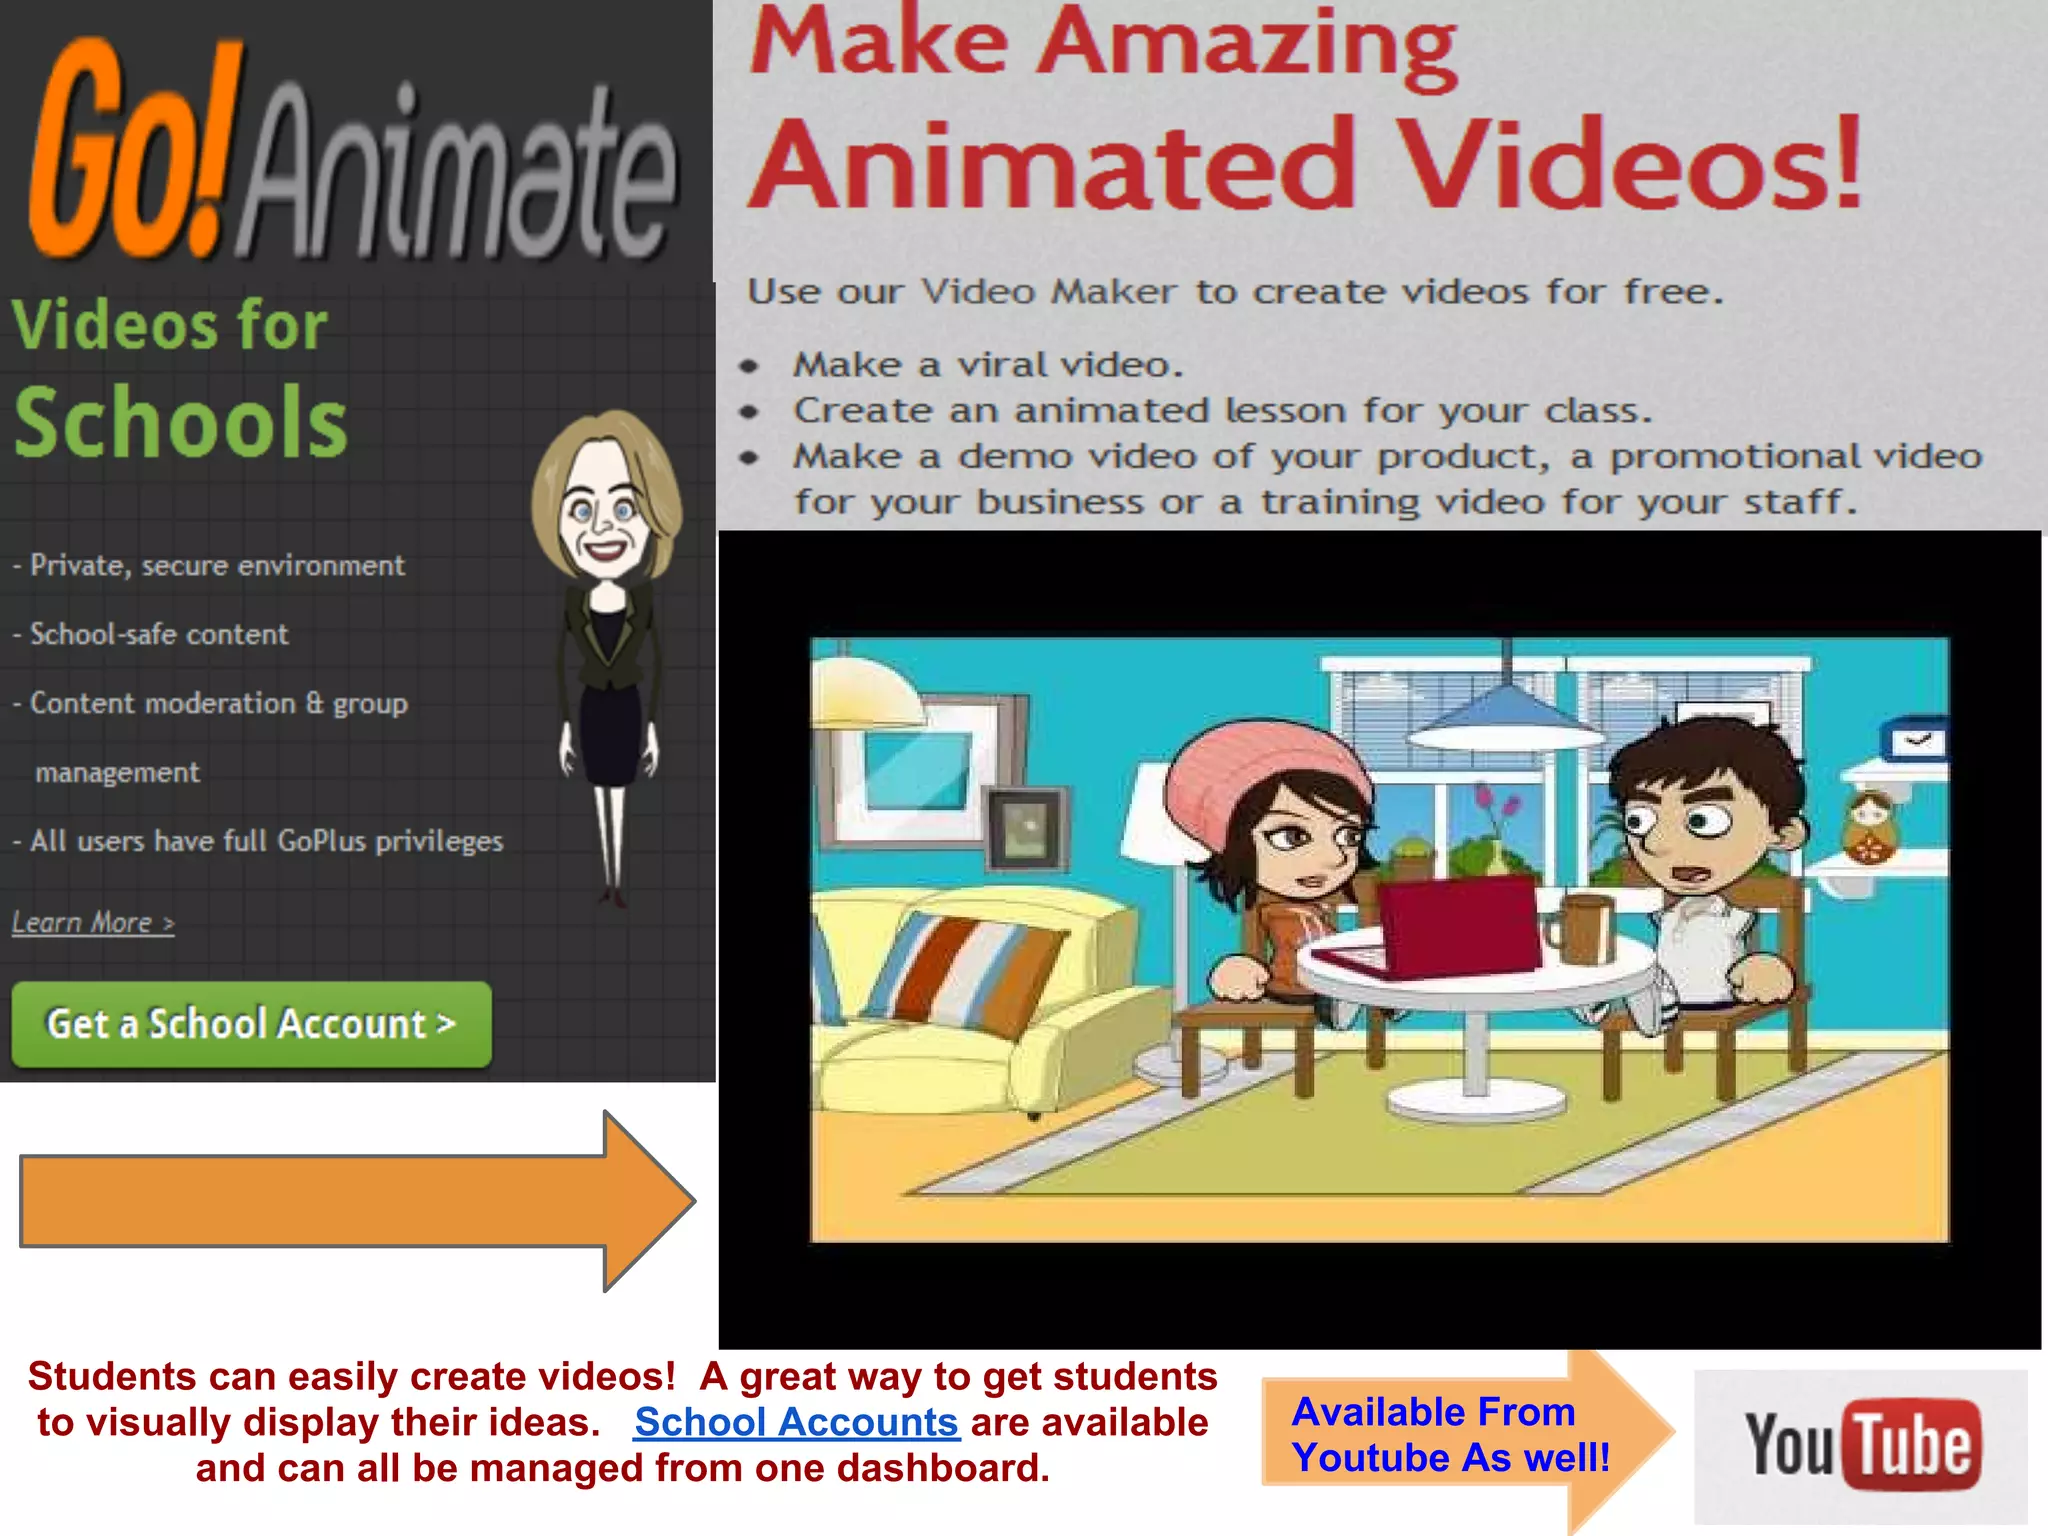
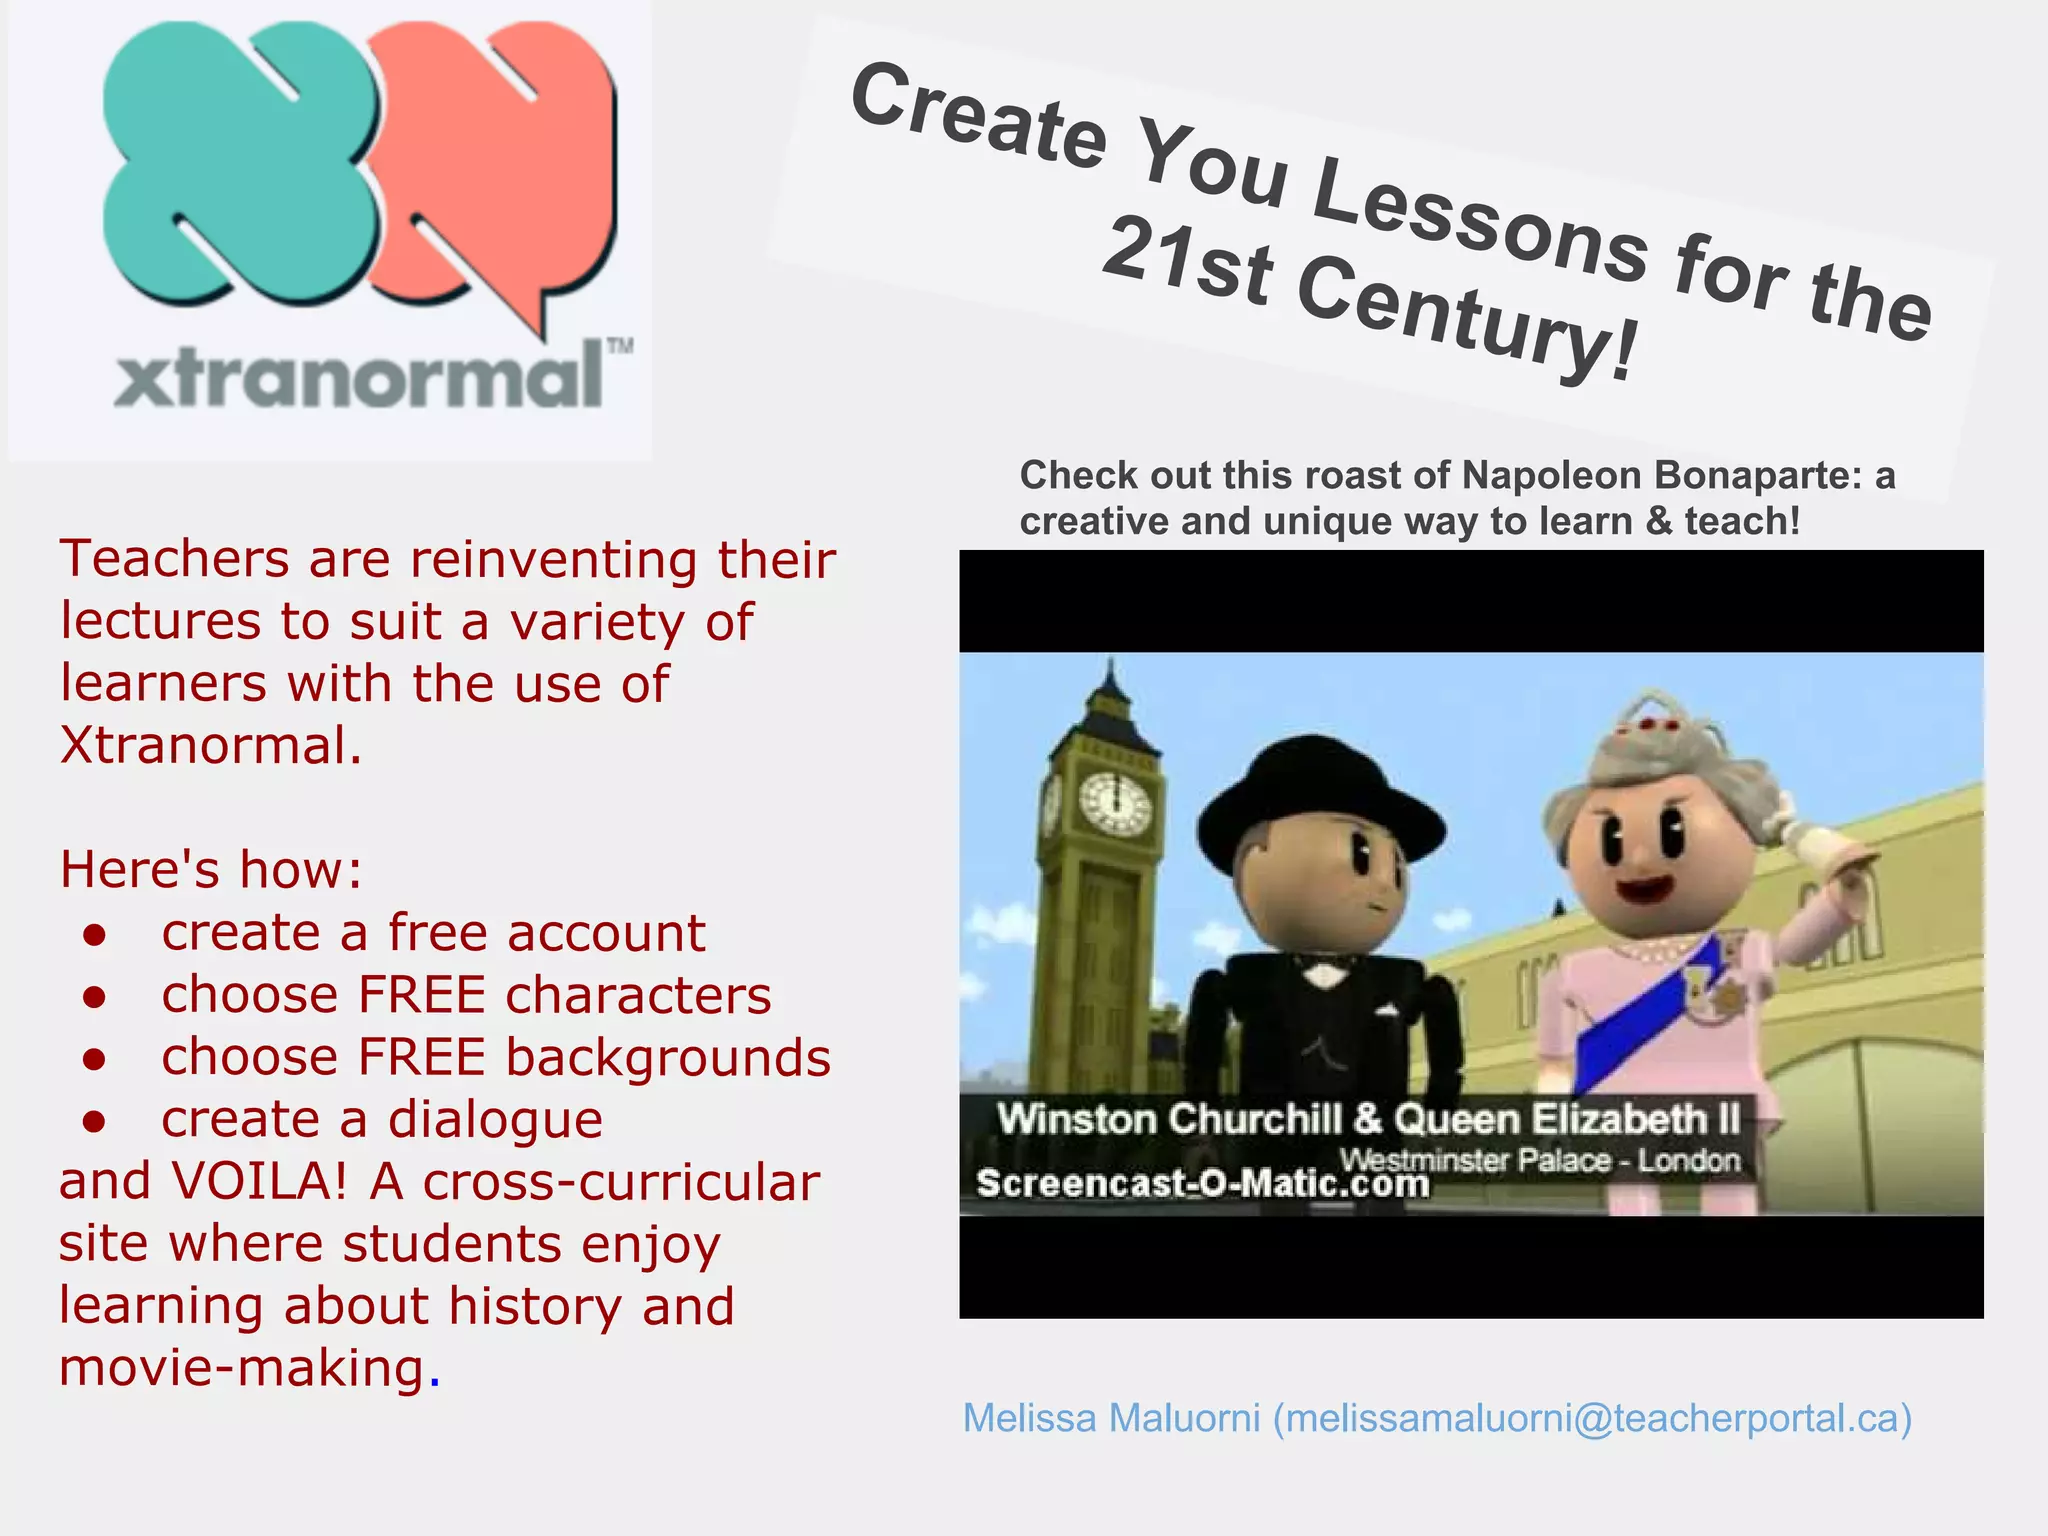
Find more slides at our blog, edtechvoice.com. The goal of this slide is to provide some simple advice to teachers/students/beginners on how to use cloud based video tools,
The document discusses various technologies the author learned about and used during the process of constructing a media product. The author gained experience using Apple iMacs and software like Mac OS X, Adobe Creative Suite applications (Photoshop, Premiere Pro, After Effects), iMovie, Blogger, Twitter, Facebook, Canon 550D camera, Slideshare, Scoop.it!, and Celtx. Overall, the author found many of the modern technologies to be simplistic yet powerful tools for filmmaking, image editing, publishing work online, and planning pre-production.
This document introduces free online tools that can be used to improve student achievement, including wikis, Animoto, Voki, Blabberize, Glogster, Audacity, Jing, and SlideShare. The schedule provides an overview of the workshops, which will demonstrate how to create and use wikis, make videos with Animoto, make avatars with Voki, add sound to images with Blabberize, make interactive posters with Glogster, record and edit audio with Audacity, take screenshots with Jing, and share slideshows with SlideShare. Participants will learn how to incorporate these tools into their teaching and have students collaborate online through a wiki.
PowerPoint allows users to add video, audio, and other multimedia to enhance presentations. Video and audio can be inserted from files or embedded from websites. Users can adjust properties like size and playback settings. Recording a narrated presentation is also possible. The library has equipment for checking out like cameras and microphones. Animations, transitions, motion paths can be used to draw attention to different elements. Knowing software limitations and troubleshooting is advised to ensure smooth presentations.
Austen Nuttall learned several new technologies through constructing this project. They learned how to embed videos, text, and PowerPoint slides into blog posts using HTML code. They also explored using outside HTML code to add soundtracks and hidden content reveals. Through using a Canon camera, Austen learned how to operate the interface and settings to capture higher quality footage using techniques like the rule of thirds. They also learned how to edit videos in Adobe Premiere Elements, including converting file formats, adding color adjustments and effects, and creating title animations through overlapping images. Austen explored new camera techniques as well, such as the dolly zoom, to strengthen emotional impact.
Professor Davis held a seminar on October 2nd, 2012 about using various media formats and tools for presentations. The seminar covered how to incorporate images, video, music and podcasts into presentations. It provided guidance on copyright and fair use of media, and recommended sources for media including taking one's own photos and videos or finding creative commons content. The seminar demonstrated how to create slideshows, movies and podcasts using tools like iPhoto, iMovie and GarageBand, and how to combine media using PowerPoint, Dipity, Voicethread and Prezi. Tips were provided on recording audio, editing presentations and preparing for the presentation.
Q6: What have you learnt about technologies from the process of constructing ...Ruby Dixon
The document discusses several technologies used in the process of constructing a film project. It describes learning to use:
- Digital cameras which enabled high-definition filming and an understanding of different shots.
- Apple iMac computers and software like Final Cut Pro X which facilitated easy editing.
- Websites like Blogger, YouTube, SoundCloud, Prezi and Moovly to document and evaluate the project.
- Gmail to share files and communicate with group members. The learner gained skills in attaching various file types.
Conor Willis used various media technologies throughout the construction, research, planning, and evaluation stages of his project. He used a Canon camera with 41x zoom and image stabilization to film footage. He edited the footage using Final Cut Express 4 on an upgraded iMac. During editing, he worked to perfectly sync lip movements with vocals, and added effects like blurs, color balances, and fragmented frames. He researched online using sites like Scribd, Slideshare, and Prezi, and distributed drafts on YouTube and social media for feedback. Throughout the process, his skills with technologies like editing software improved.
What have you learned about the technologies from the process of constructing...Abbeyfield
The document discusses the technologies learned during the construction of an opening for a film. They experimented with different camera techniques before finding the best shot required the camera to be further away from the actors. They also learned how to keep the camera steady without a squeaky tripod. While the video editing software Adobe Premier initially seemed complex, seeking help from teachers made it easier to edit and add effects to the opening. Adding voiceovers required learning how to incorporate audio on the timeline. Uploading files to Tumblr was initially difficult for some, and the school internet not always cooperating made uploads challenging but working from home helped overcome this.
This document provides an overview of how to use Camtasia screencast software to record and edit tutorial videos. It discusses preparing for recording by writing a script and customizing screen settings. For recording, it describes selecting audio and screen options and using built-in or external microphones. Editing in Camtasia involves using tracks, trimming clips, adding effects like callouts and transitions. SmartFocus helps automatically zoom and pan recorded areas. Finally, projects are exported as shareable file formats like MP4. The document aims to help users make high-quality tutorial videos using Camtasia's recording and editing tools.
This document provides an overview of advanced audio and visual features in iMovie '11, including right-click menu options, the inspector button, clip drop-down menu, and advanced tools. It discusses visual effects like splitting clips, adding comment markers, and freeze frames. It also covers adjusting clip speed/direction and color levels in the inspector. For audio, it discusses using raw video clip audio, recording voiceovers, and adding music and sound effects from iTunes or GarageBand. Resources for additional help with iMovie features are also listed.
Technical Training provides an overview of using Apple software such as iMovie, iDVD, and Garageband. It discusses prerequisites and file organization. It then provides 57 tips over 17 pages on how to create graphics, video, and audio; use iMovie to edit projects; add titles, transitions, and effects; publish projects to DVD, YouTube, and iTunes; and create music in Garageband. The document aims to help users master Apple software for video and audio editing.
Austen Nuttall learned several new technologies through constructing this project. They learned how to embed videos, text, and PowerPoint slides into blog posts using HTML code. They also explored using outside HTML code to add soundtracks and hidden content to blog posts. Through using a Canon camera, Austen learned how to operate the interface and settings to capture higher quality footage using techniques like the rule of thirds. They also learned how to edit video files in Adobe Premiere Elements, including converting file formats, adding grayscale effects, and creating title animations by overlapping images.
The document summarizes skills learned across camera work, music editing, and video editing. It describes learning how to change camera focus, use a tripod, and vary camera angles. It also covers recording and editing music, including adding effects and cutting recordings to length. For video editing, it discusses uploading, exporting, adding transitions, audio, and trimming clips, as well as changing video color, speed, and effects.
This document provides an overview of screencasting and cloud-based screencasting applications. It defines screencasting as the digital recording of computer screen output along with audio narration. Cloud computing is defined as using internet-based applications instead of locally installed software. The document discusses benefits of screencasts such as ease of use, sharing, and viewing. It also reviews features of the screencasting applications Screenr and Screencast-O-Matic which allow creating and storing screencasts in the cloud. Best practices for recording screencasts are also presented.
The document discusses the use of new media technologies in the various stages of creating a music video. In the research and planning stage, blogging sites and slideshare were used to document the process. A digital camera was used to manually focus photos during shoots. YouTube was used to gather audience feedback on the produced video. Adobe Premiere was used to edit basic video clips for a vox pops video early on, and later for advanced editing, effects, and audio/video integration. A video camera and lighting were used to film the music video. Adobe Photoshop was used to manipulate images and create ancillary tasks.
New media technologies used included YouTube for analyzing films, tutorials, and uploading the finished film. Social media platforms like Twitter and Facebook were used to promote the film and communicate. Blogger was used for group and individual blogs to upload work and evaluations. Other technologies included a HD video camera and DSLR camera for filming, a MacBook Pro for work, Final Cut Pro for editing, USBs for file storage, Photoshop for ancillary tasks, and PowerPoint for presentations.
This document provides information about streaming video resources available through HPU Libraries. It discusses two main video subscriptions: Films for Humanities and Swank Digital Campus. Films for Humanities allows users to search, create custom video segments and playlists, and embed videos. Swank Digital Campus allows instructors to provide streaming URLs for feature-length films for students to watch outside of class. The document also provides instructions for embedding streaming videos into the university's content management system, Blackboard.
Question 6: What have you learnt about technologies from the process of const...Austen Nuttall
Austen Nuttall learned several new technologies through creating this project. He learned how to use digital cameras more effectively, including settings like the rule of thirds. He also learned how to edit video footage in Adobe Premiere Elements, including converting file formats, adding effects like grayscale, and creating an animatic title sequence. Additionally, he learned how to film with techniques like the dolly zoom and distribute project videos online through YouTube and embed links and information from IMDb.
Microsoft Movie Maker is a free video editing software that can be downloaded from Microsoft's website. It allows users to import photos, video, and music clips and arrange them on a timeline. Users can edit video and add titles, captions, and effects. When the project is complete, it can be exported in common formats like WMV or published directly to YouTube. Help and tutorials are available on Microsoft's website or through the campus media services department.
The document discusses various media technologies used in the evaluation of a media project. It describes how iMacs were used for their internet access and editing software. Google resources like YouTube and Google Images were used for initial research. Prezi, Slideshare and Haiku Deck were used to present research findings. Facebook was used for group communication. A Blue Snowball microphone and SoundCloud were used to record podcasts for evaluations. Equipment like a Nikon DSLR camera, studio lights, tripod and dolly were used to film a music video. Software like Final Cut Express, Adobe After Effects, Photoshop and Wix were used to edit videos, add visual effects, design graphics and build a website.
The document provides an overview of the iMovie 09 interface and features. It describes the main interface windows including the Project Library, Edit Project, Viewer, Event Library, and Event Browser. It also covers preferences, acquiring video from cameras, importing footage, and using features like titles, transitions, effects, maps and more. The author aims to demonstrate the full capabilities of iMovie 09, which they find surprisingly robust for a consumer-level video editing application.
Screencasting involves recording computer screen actions and audio to create instructional videos for students to watch later, and there are many free and low-cost screencasting tools like CamStudio, Jing, and Screencast-O-Matic that allow teachers to easily create and share videos by uploading them to YouTube or SchoolTube for students to access. Teachers should experiment with different screencasting tools to find the best fit and start small by creating some basic videos before building a large video library.
This document provides guidance on creating presentations using Prezi. It discusses the key elements of a good Prezi, including structure, pacing, smooth transitions, consistent design, and telling a story. It then outlines the different ways to create a Prezi using either the online editor or desktop software. The rest of the document offers step-by-step instructions on adding various media types like images, videos, documents and shaping the presentation path within Prezi.
This document provides tips and instructions for adding video, sound, recordings, and animations to Microsoft PowerPoint 2010 presentations. It discusses how to insert video and audio files, embed videos from websites, record narrations and slideshows, add transitions and animations. It also covers formatting options for media elements, troubleshooting playback issues, and includes references for additional support resources.
This document provides guidance on creating mobile videos for educational purposes. It discusses planning videos, including scripting and storyboarding. Tips are provided for shooting quality video on mobile devices, such as using landscape orientation, stabilizing the camera, managing lighting and audio. The document reviews tools for editing videos on iOS and Android devices. It emphasizes the importance of testing videos and getting feedback. Guidelines are given for sharing videos, including using appropriate Creative Commons licenses and adding captions for accessibility. The overall message is that educational videos should add value to the learning process and be integrated into course assignments.
Multimedia & Software Programs as a Recent Teaching ToolsSameh Abdel-ghany
This document discusses various multimedia and software programs that can serve as teaching tools. It begins by introducing different categories of multimedia, including painting/drawing tools, 3D modeling tools, image editing tools, sound editing tools, and animation/video editing tools. Examples of software for each category are provided. The document then discusses programs for creating graphics and multimedia, as well as web-based learning sites that allow creating online presentations, accessing self-paced resources, and engaging diverse learning styles. Specific software and tools are provided as examples for each category.
Learn how to use free web tools to create instructional videos for your classroom. Whether you'd like to create a video to flip a lesson, provide homework help for students or improve communication with parents, this workshop will give you the hands-on practice you need to get started.
This document provides an A to Z list of Web 2.0 technology tools that can be used in the classroom to enhance student learning. It describes tools for communication, organization, bookmarking, social networking, and digital storytelling. Each entry lists the website, provides a brief description of the tool's functions, and examples of how it could be used educationally. The document encourages teachers to explore these free resources and contact the author with any questions.
This document discusses various free Web 2.0 tools that can be used to increase student engagement, including video tools (Animoto, PowToon), audio tools (Audiopal, Voki), image editing tools, and QR code generators. It provides examples of classroom projects where these tools could be incorporated, such as creating a video of student work or recording themselves reading an assignment aloud. Pros and cons of each tool are outlined. Additional resources for finding images and citing sources are also included.
The document describes the technologies and software the author learned to use while constructing a film project. They learned how to operate a digital camera, transfer footage to a computer, edit using Adobe Premiere Pro and After Effects, author DVD menus in Encore, find free audio online, upload videos and presentations, and create a blog to share their work. Overall, the author found the practical experience taught them about many technologies and resources for filmmaking that were previously unknown to them.
The document discusses several Web 2.0 tools that can be used by both students and educators, including Kerpoof, VCASMO, Prezi, Blinkweb, and Nirvana. Kerpoof, VCASMO and Prezi allow students to create animated movies, presentations, and stories in an engaging format. Blinkweb and Nirvana are aimed more at educators for creating websites and organizing to-do lists. While some tools require internet access or have limited free versions, these applications can be beneficial in classrooms for teaching and student projects when utilized effectively.
The document summarizes several Web 2.0 tools that can be used in education:
- Kerpoof allows students to create animated movies, stories, and art. It has a simple interface and large library of characters.
- VCASMO is an online presentation tool that allows multimedia presentations. It has features like blogging, slideshows, and uploading PowerPoints.
- Blinkweb allows users to easily create websites with templates and design elements. It can be used to create personal or business sites for free.
- Prezi is a web-based presentation tool that uses a zooming layout instead of slides. It has an interactive canvas and allows embedding of videos.
The document summarizes several Web 2.0 tools that can be used in education:
- Kerpoof allows students to create animated movies, stories, and art in a simple interface. It was acquired by Disney.
- VCASMO is an online presentation tool that allows multimedia presentations. It has features like blogging, slideshows, and uploading PowerPoints.
- Blinkweb allows users to easily create websites with templates and features like opt-in forms. It can be used to create personal or business sites.
- Prezi is a web-based presentation tool that uses a zooming layout instead of slides. It has benefits like being visually appealing and allowing embedding of videos.
The document summarizes several Web 2.0 tools that can be used in education:
- Kerpoof allows students to create animated movies, stories, and art. It has a simple interface and large library of characters.
- VCASMO is an online presentation tool that allows multimedia presentations. It has features like blogging, slideshows, and uploading PowerPoints.
- Blinkweb allows users to easily create websites using templates and widgets. It can be used to create personal or business sites for free.
- Prezi is a web-based presentation tool that uses a zooming interface rather than slides. It has benefits like being visually appealing and allowing embedding of videos.
- Nirvana is an
Camtasia Studio is a screen recording and video editing software that allows users to capture activities on their computer screen and create instructional videos. It can record the entire screen, a single window, or a selected portion. Users can edit recordings by adding video, images, audio, captions and more. Camtasia also allows users to share finished videos online through services like YouTube or on web pages. Popular uses of Camtasia include creating tutorials, presentations, remote lectures and more for business and education purposes.
Camtasia Studio is a screen recording and video editing software that allows users to capture activities on their computer screen and create instructional videos. It can record the entire screen, a single window, or a selected portion. Users can edit recordings by adding video, images, audio, pan and zoom functions. Finished videos can be exported in various formats and shared on websites or platforms like YouTube. Camtasia is useful for creating tutorials, presentations, and videos for business or education purposes like webinars and online lectures.
Camtasia Studio is a screen recording and video editing software that allows users to capture activities on their computer screen and create instructional videos. It can record the entire screen, a single window, or a selected portion. Users can edit recordings by adding video, images, audio, captions and more. Camtasia also allows users to share finished videos online through services like YouTube or on web pages. Popular uses of Camtasia include creating tutorials, presentations, remote lectures and more for business and education purposes.
This document discusses various software programs and websites that can be used for video production. It provides information on iMovie, Keynote, PowerPoint, Windows Movie Maker, YouTube Video Editor, Animoto, Vimeo, VoiceThread, Xtranormal, Stupeflix Studio, Pixorial, and Stroome. Each option is summarized in one or two sentences describing its purpose and key features.
Follett Discover, MERLOT, NBC Learn, OER Commons, PBS Learning Media, and Wisc-Online are resources for finding open educational materials that can be accessed through the CSUN Moodle site. They contain course materials, videos, images, and other educational objects that can be used by instructors and students.
This document provides a summary of various Web 2.0 tools that can be useful for education. It describes tools for creating slide shows, multimedia presentations online, drawing and editing graphics, sharing documents online, and enabling collaboration. Some of the key tools mentioned include Animoto, Flickr, Flixtime, Google+, Prezi, SlideShare, and Google Sites.
Create, Communicate, and Captivate with Tech ToolsElizabeth Romero
The document discusses and provides links to 10 innovative tech tools for creating, communicating and engaging content. It describes GarageBand as a software that allows users to create music and podcasts, export songs to iTunes, and share content. It also outlines Prezi as an online presentation tool that employs a digital canvas for placing images, text and videos in frames that can be zoomed in and out of. Finally, it characterizes YouTube as a free video sharing website where users can upload, view and share videos on the site and beyond.
The document discusses podcasting and its uses for education. It defines podcasting as a combination of iPod and broadcasting, allowing users to subscribe and listen to audio or video content. It describes the different types of podcasts and software that can be used to create podcasts. Benefits highlighted include engaging students, enhancing the learning process, and generating creative expression. Examples of student and teacher podcasts are provided.
Similar to Tips and ideas to create video and animation for student and teachers (20)
How to Build a Module in Odoo 17 Using the Scaffold MethodCeline George
Odoo provides an option for creating a module by using a single line command. By using this command the user can make a whole structure of a module. It is very easy for a beginner to make a module. There is no need to make each file manually. This slide will show how to create a module using the scaffold method.
Main Java[All of the Base Concepts}.docxadhitya5119
This is part 1 of my Java Learning Journey. This Contains Custom methods, classes, constructors, packages, multithreading , try- catch block, finally block and more.
Exploiting Artificial Intelligence for Empowering Researchers and Faculty, In...Dr. Vinod Kumar Kanvaria
Exploiting Artificial Intelligence for Empowering Researchers and Faculty,
International FDP on Fundamentals of Research in Social Sciences
at Integral University, Lucknow, 06.06.2024
By Dr. Vinod Kumar Kanvaria
MATATAG CURRICULUM: ASSESSING THE READINESS OF ELEM. PUBLIC SCHOOL TEACHERS I...NelTorrente
In this research, it concludes that while the readiness of teachers in Caloocan City to implement the MATATAG Curriculum is generally positive, targeted efforts in professional development, resource distribution, support networks, and comprehensive preparation can address the existing gaps and ensure successful curriculum implementation.
How to Manage Your Lost Opportunities in Odoo 17 CRMCeline George
Odoo 17 CRM allows us to track why we lose sales opportunities with "Lost Reasons." This helps analyze our sales process and identify areas for improvement. Here's how to configure lost reasons in Odoo 17 CRM
This presentation includes basic of PCOS their pathology and treatment and also Ayurveda correlation of PCOS and Ayurvedic line of treatment mentioned in classics.
Biological screening of herbal drugs: Introduction and Need for
Phyto-Pharmacological Screening, New Strategies for evaluating
Natural Products, In vitro evaluation techniques for Antioxidants, Antimicrobial and Anticancer drugs. In vivo evaluation techniques
for Anti-inflammatory, Antiulcer, Anticancer, Wound healing, Antidiabetic, Hepatoprotective, Cardio protective, Diuretics and
Antifertility, Toxicity studies as per OECD guidelines
This slide is special for master students (MIBS & MIFB) in UUM. Also useful for readers who are interested in the topic of contemporary Islamic banking.
How to Fix the Import Error in the Odoo 17Celine George
An import error occurs when a program fails to import a module or library, disrupting its execution. In languages like Python, this issue arises when the specified module cannot be found or accessed, hindering the program's functionality. Resolving import errors is crucial for maintaining smooth software operation and uninterrupted development processes.
বাংলাদেশের অর্থনৈতিক সমীক্ষা ২০২৪ [Bangladesh Economic Review 2024 Bangla.pdf] কম্পিউটার , ট্যাব ও স্মার্ট ফোন ভার্সন সহ সম্পূর্ণ বাংলা ই-বুক বা pdf বই " সুচিপত্র ...বুকমার্ক মেনু 🔖 ও হাইপার লিংক মেনু 📝👆 যুক্ত ..
আমাদের সবার জন্য খুব খুব গুরুত্বপূর্ণ একটি বই ..বিসিএস, ব্যাংক, ইউনিভার্সিটি ভর্তি ও যে কোন প্রতিযোগিতা মূলক পরীক্ষার জন্য এর খুব ইম্পরট্যান্ট একটি বিষয় ...তাছাড়া বাংলাদেশের সাম্প্রতিক যে কোন ডাটা বা তথ্য এই বইতে পাবেন ...
তাই একজন নাগরিক হিসাবে এই তথ্য গুলো আপনার জানা প্রয়োজন ...।
বিসিএস ও ব্যাংক এর লিখিত পরীক্ষা ...+এছাড়া মাধ্যমিক ও উচ্চমাধ্যমিকের স্টুডেন্টদের জন্য অনেক কাজে আসবে ...
Macroeconomics- Movie Location
This will be used as part of your Personal Professional Portfolio once graded.
Objective:
Prepare a presentation or a paper using research, basic comparative analysis, data organization and application of economic information. You will make an informed assessment of an economic climate outside of the United States to accomplish an entertainment industry objective.
Tips and ideas to create video and animation for student and teachers
1. Your Source For Educational Technology Information
Tips and Ideas to Create Video and
Animation For Student and Teachers
This slide show is a shared slide show. Find the original or republish with respect to CC
license. To open click the link below and you will be able to edit and keep up with all the
improvments we add to this slideshow. Follow us on Twitter @marcdubeau
This work is licensed under Creative Commons Attribution
Noncommercial Share Alike 3.0 license.
2. Cloud Based Video Creation Students can collaborate on
and Editing Tool. Students the same project in real time
Can Edit and Work on Videos (Just like Google Docs!), an
from Any Web Browser! awesome collaborative tool.
Also Available From Within YOUTUBE.COM/CREATE panel (Down side is that video collaboration
unavailable this way)
3. Students can easily create videos! A great way to get students
to visually display their ideas. School Accounts are available Available From
and can all be managed from one dashboard. Youtube As well!
4. Creat
e You
Lesso
21st C ns for
entur the
y!
Check out this roast of Napoleon Bonaparte: a
creative and unique way to learn & teach!
Teachers are reinventing their
lectures to suit a variety of
learners with the use of
Xtranormal.
Here's how:
● create a free account
● choose FREE characters
● choose FREE backgrounds
● create a dialogue
and VOILA! A cross-curricular
site where students enjoy
learning about history and
movie-making.
Melissa Maluorni (melissamaluorni@teacherportal.ca)
5. Download online videos using these great programs
Copy, paste and click! Webvideofetcher.com is a free internet
It's never been so easy to get your video download application which allows
online videos. Choose from a you to convert nearly any audio or video
varitety of formats and you're done! URL from Youtube, Myspace, Google,
Just save the file once it has finished Vimeo, Facebook and 100 more. NO
converting. WAITING. Can be installed as a Chrome
Extension.
Copy the URL from the video you
want, select the format you would
like then click the start button!
Could it be any easier?
Formats to chose from include: MP3,
AAC, WMA, M4A, OGG and many
more!
6. Create a Simple Video with Pictures,
Music and Text!
Upload your videos
3 neat services you can try!
to your favourite
social networking
site.
-Choose from a
Create a video in 3 easy steps: wide variety of
1-Upload videos, pictures and text songs and themes.
2-Chose a song -Create your video
3-Share your video anywhere in 360p, 480p or
720p HD!
Features text to speech capabilities
and original theme! It's easy to add
your own pictures and music from
your computer or social networking
sites. You can even add maps!
7. Engaging Digital Natives Beyond the
Classroom
Invoke learners to use their
visual and auditory senses to
enhance learning
Camtasia Studio is a screen
recorder and video editor
that lets you easily render
compelling instructional
videos, screencasts, and
presentations for the Web,
portable media players, and
iPods.
Record a live presentation or
lecture and give students a
rewind button for class. Help
them learn at their own
pace…or catch up from an
absence. Calida Seifert
Calida Seifert
8. Help us! Add your ideas/Tips/Tricks to our slide show.
Please make sure to share it with your friends on
Twitter, Facebook, Google + . Please follow us
@marcdubeau (twitter).
To find all our original Slide Shows on Ed
Technology, Please Visit our Website www.
edtechvoice.com.